Instrukcja obsługi EtiamPro ECAMIP801
EtiamPro
Kamera monitorująca
ECAMIP801
Przeczytaj poniżej 📖 instrukcję obsługi w języku polskim dla EtiamPro ECAMIP801 (127 stron) w kategorii Kamera monitorująca. Ta instrukcja była pomocna dla 17 osób i została oceniona przez 2 użytkowników na średnio 4.5 gwiazdek
Strona 1/127


Network Camera User Manual
2
ECAMIP101(B)/ECAMIP601(B)/ECAMIP801
User Manual
About this Manual
This Manual is applicable to Network Camera.
The Manual includes instructions for using and managing the product. Pictures, charts,
images and all other information hereinafter are for description and explanation only.
The information contained in the Manual is subject to change, without notice, due to
firmware updates or other reasons. Please find the latest version in the company
website.
Please use this user manual under the guidance of professionals.
Legal Disclaimer
TO THE MAXIMUM EXTENT PERMITTED BY APPLICABLE LAW, THE
PRODUCT DESCRIBED, WITH ITS HARDWARE, SOFTWARE AND
FIRMWARE, IS PROVIDED "AS IS", WITH ALL FAULTS AND ERRORS, AND
OUR COMPANY MAKES NO WARRANTIES, EXPRESS OR IMPLIED,
INCLUDING WITHOUT LIMITATION, MERCHANTABILITY,
SATISFACTORY QUALITY, FITNESS FOR A PARTICULAR PURPOSE, AND
NON-INFRINGEMENT OF THIRD PARTY. IN NO EVENT WILL OUR
COMPANY, ITS DIRECTORS, OFFICERS, EMPLOYEES, OR AGENTS BE
LIABLE TO YOU FOR ANY SPECIAL, CONSEQUENTIAL, INCIDENTAL, OR
INDIRECT DAMAGES, INCLUDING, AMONG OTHERS, DAMAGES FOR
LOSS OF BUSINESS PROFITS, BUSINESS INTERRUPTION, OR LOSS OF
DATA OR DOCUMENTATION, IN CONNECTION WITH THE USE OF THIS
PRODUCT, EVEN IF OUR COMPANY HAS BEEN ADVISED OF THE
POSSIBILITY OF SUCH DAMAGES.
REGARDING TO THE PRODUCT WITH INTERNET ACCESS, THE USE OF
PRODUCT SHALL BE WHOLLY AT YOUR OWN RISKS. OUR COMPANY
SHALL NOT TAKE ANY RESPONSIBILITIES FOR ABNORMAL OPERATION,
PRIVACY LEAKAGE OR OTHER DAMAGES RESULTING FROM CYBER
ATTACK, HACKER ATTACK, VIRUS INSPECTION, OR OTHER INTERNET

Network Camera User Manual
3
ECAMIP101(B)/ECAMIP601(B)/ECAMIP801
SECURITY RISKS; HOWEVER, OUR COMPANY WILL PROVIDE TIMELY
TECHNICAL SUPPORT IF REQUIRED.
SURVEILLANCE LAWS VARY BY JURISDICTION. PLEASE CHECK ALL
RELEVANT LAWS IN YOUR JURISDICTION BEFORE USING THIS PRODUCT
IN ORDER TO ENSURE THAT YOUR USE CONFORMS THE APPLICABLE
LAW. OUR COMPANY SHALL NOT BE LIABLE IN THE EVENT THAT THIS
PRODUCT IS USED WITH ILLEGITIMATE PURPOSES.
IN THE EVENT OF ANY CONFLICTS BETWEEN THIS MANUAL AND THE
APPLICABLE LAW, THE LATER PREVAILS.
Regulatory Information
FCC Information
FCC compliance: This equipment has been tested and found to comply with the
limits for a digital device, pursuant to part 15 of the FCC Rules. These limits are
designed to provide reasonable protection against harmful interference when the
equipment is operated in a commercial environment. This equipment generates, uses,
and can radiate radio frequency energy and, if not installed and used in accordance
with the instruction manual, may cause harmful interference to radio communications.
Operation of this equipment in a residential area is likely to cause harmful
interference in which case the user will be required to correct the interference at his
own expense.
FCC Conditions
This device complies with part 15 of the FCC Rules. Operation is subject to the
following two conditions:
1. This device may not cause harmful interference.
2. This device must accept any interference received, including interference that may
cause undesired operation.

Network Camera User Manual
4
ECAMIP101(B)/ECAMIP601(B)/ECAMIP801
EU Conformity Statement
This product and - if applicable - the supplied accessories too are
marked with "CE" and comply therefore with the applicable
harmonized European standards listed under the EMC Directive
2014/30/EU, the RoHS Directive 2011/65/EU.
2012/19/EU (WEEE directive): Products marked with this symbol
cannot be disposed of as unsorted municipal waste in the European
Union. For proper recycling, return this product to your local
supplier upon the purchase of equivalent new equipment, or dispose
of it at designated collection points. For more information see: www.recyclethis.info.
2006/66/EC (battery directive): This product contains a battery that
cannot be disposed of as unsorted municipal waste in the European
Union. See the product documentation for specific battery
information. The battery is marked with this symbol, which may
include lettering to indicate cadmium (Cd), lead (Pb), or mercury (Hg). For proper
recycling, return the battery to your supplier or to a designated collection point. For
more information, see: www.recyclethis.info.
Industry Canada ICES-003 Compliance
This device meets the CAN ICES-3 (A)/NMB-3(A) standards requirements.
Safety Instruction
These instructions are intended to ensure that the user can use the product correctly to
avoid danger or property loss.
The precaution measure is divided into 'Warnings' and 'Cautions':
Warnings: Serious injury or death may be caused if any of these warnings are
neglected.
Cautions: Injury or equipment damage may be caused if any of these cautions are
neglected.

Network Camera User Manual
5
ECAMIP101(B)/ECAMIP601(B)/ECAMIP801
Warnings Follow these safeguards to
prevent serious injury or death.
Cautions Follow these precautions to
prevent potential injury or material
damage.
Warnings:
⚫ Please adopt the power adapter which can meet the safety extra low voltage
(SELV) standard. And source with 12 VDC or 24 VAC (depending on models)
according to the IEC60950-1 and Limited Power Source standard.
⚫ To reduce the risk of fire or electrical shock, do not expose this product to rain or
moisture.
⚫ This installation should be made by a qualified service person and should conform
to all the local codes.
⚫ Please install blackouts equipment into the power supply circuit for convenient
supply interruption.
⚫ Please make sure that the ceiling can support more than 50(N) Newton gravities if
the camera is fixed to the ceiling.
⚫ If the product does not work properly, please contact your dealer or the nearest
service center. Never attempt to disassemble the camera yourself. (We shall not
assume any responsibility for problems caused by unauthorized repair or
maintenance.)
Cautions:
⚫ Make sure the power supply voltage is correct before using the camera.
⚫ Do not drop the camera or subject it to physical shock.
⚫ Do not touch sensor modules with fingers. If cleaning is necessary, use a clean
cloth with a bit of ethanol and wipe it gently. If the camera will not be used for an

Network Camera User Manual
6
ECAMIP101(B)/ECAMIP601(B)/ECAMIP801
extended period of time, put on the lens cap to protect the sensor from dirt.
⚫ Do not aim the camera lens at the strong light such as sun or incandescent lamp.
The strong light can cause fatal damage to the camera.
⚫ The sensor may be burned out by a laser beam, so when any laser equipment is
being used, make sure that the surface of the sensor not be exposed to the laser
beam.
⚫ Do not place the camera in extremely hot, cold temperatures (the operating
temperature should be between -30°C to +60°C, or -40°C +60°C if the camera to
model has an "H" in its suffix), dusty or damp environment, and do not expose it
to high electromagnetic radiation.
⚫ To avoid heat accumulation, ensure there is good ventilation to the device.
⚫ Keep the camera away from water and any liquids.
⚫ While shipping, pack the camera in its original, or equivalent, packing materials.
Or packing the same texture.
⚫ Improper use or replacement of the battery may result in hazard of explosion.
Please use the manufacturer recommended battery type.
Notes:
For the camera supports IR, you are required to pay attention to the following
precautions to prevent IR reflection:
⚫ Dust or grease on the dome cover will cause IR reflection. Please do not remove
the dome cover film until the installation is finished. If there is dust or grease on
the dome cover, clean the dome cover with clean soft cloth and isopropyl alcohol.
⚫ Make certain the installation location does not have reflective surfaces of objects
too close to the camera. The IR light from the camera may reflect back into the
lens causing reflection.
⚫ The foam ring around the lens must be seated flush against the inner surface of
the bubble to isolate the lens from the IR LEDS. Fasten the dome cover to camera
body so that the foam ring and the dome cover are attached seamlessly.

Network Camera User Manual
7
ECAMIP101(B)/ECAMIP601(B)/ECAMIP801
Table of Contents
Chapter 1 System Requirement .......................................................................... 10
Chapter 2 Network Connection ........................................................................... 2
2.1 Setting the Network Camera over the LAN ........................................................ 2
2.1.1 Wiring over the LAN 2 ..........................................................................................................
2.1.2 Activating the Camera 3 ......................................................................................................
2.2 Setting the Network Camera over the WAN 9 ......................................................
2.2.1 Static IP Connection .......................................................................................................... 9
2.2.2 Dynamic IP Connection ................................................................................................... 10
Chapter 3 Access to the Network Camera ........................................................... 13
3.1 Accessing by Web Browsers ............................................................................ 13
3.2 Accessing by Client Software .......................................................................... 14
Chapter 4 -Fi Settings Wi .................................................................................... 16
4.1 Configuring Wi-Fi Connection in Manage and Ad-hoc Modes ........................... 16
4.2 Easy Wi-Fi Connection with WPS function ....................................................... 21
4.3 IP Property Settings for Wireless Network Connection .................................... 23
Chapter 5 Live View ........................................................................................... 25
5.1 Live View Page ............................................................................................... 25
5.2 Starting Live View .......................................................................................... 26
5.3 Recording and Capturing Pictures Manually .................................................... 27
5.4 Operating PTZ Control .................................................................................... 27
5.4.1 PTZ Control Panel ............................................................................................................ 27
5.4.2 Setting/Calling a Preset ..................................................................................................28
5.4.3 Setting/Calling a Patrol ................................................................................................... 29
Chapter 6 Network Camera Configuration ......................................................... 31
6.1 Configuring Local Parameters ......................................................................... 31
6.2 Configure System Settings .............................................................................. 33
6.2.1 Configuring Basic Information ........................................................................................33
6.2.2 Configuring Time Settings ............................................................................................... 34
6.2.3 Configuring DST Settings ................................................................................................. 36
6.2.4 Configuring RS232 Settings ............................................................................................. 37
6.2.5 Viewing License ..............................................................................................................38
6.3 Maintenance . ................................................................................................ 39

Network Camera User Manual
8
ECAMIP101(B)/ECAMIP601(B)/ECAMIP801
6.3.1 Upgrade & Maintenance ................................................................................................ 39
6.3.2 Log ..................................................................................................................................40
6.3.3 System Service ................................................................................................................ 41
6.4 Security Settings ............................................................................................ 41
6.4.1 Authentication ................................................................................................................ 42
6.4.2 IP Address Filter .............................................................................................................. 42
6.4.3 Security Service ...............................................................................................................44
6.5 User Management ......................................................................................... 44
6.5.1 User Management .......................................................................................................... 44
6.5.2 Online Users .................................................................................................................... 47
Chapter 7 Network Settings ............................................................................... 49
7.1 Configuring Basic Settings .............................................................................. 49
7.1.1 Configuring TCP/IP Settings ............................................................................................49
7.1.2 Configuring DDNS Settings .............................................................................................. 51
7.1.3 Configuring PPPoE Settings ............................................................................................. 53
7.1.4 Configuring Port Settings ................................................................................................ 54
7.1.5 Configure NAT (Network Address Translation) Settings .................................................. 55
7.2 Configure Advanced Settings .......................................................................... 55
7.2.1 Configuring SNMP Settings ............................................................................................. 56
7.2.2 Configuring FTP Settings ................................................................................................. 58
7.2.3 Configuring Email Settings .............................................................................................. 60
7.2.4 Platform Access ..............................................................................................................62
7.2.5 HTTPS Settings ................................................................................................................ 62
7.2.6 Configuring QoS Settings ................................................................................................65
7.2.7 Configuring 802.1X Settings ............................................................................................ 66
7.2.8 Integration Protocol ........................................................................................................ 67
Chapter 8 Video/Audio Settings ......................................................................... 69
8.1 Configuring Video Settings ............................................................................. 69
8.2 Configuring Audio Settings ............................................................................. 72
8.3 Configuring ROI Encoding ............................................................................... 73
8.4 Display Info. on Stream .................................................................................. 75
Chapter 9 Image Settings ..................................................................................76
9.1 Configuring Display Settings ........................................................................... 76
9.1.1 Day/Night Auto-Switch ................................................................................................... 76
9.1.2 Day/Night Scheduled-Switch .......................................................................................... 80
9.2 Configuring OSD Settings ................................................................................ 81
9.3 Configuring Privacy Ma sk ............................................................................... 83

Network Camera User Manual
10
ECAMIP101(B)/ECAMIP601(B)/ECAMIP801
Chapter 1 System Requirement
Operating System: Microsoft Windows XP and above version
CPU: 3.0 GHz or higher
RAM: 1G or higher
Display: 1024×768 resolution or higher
Web Browser: Internet Explorer 8.0 and above version, Apple Safari 8.0 and above
version, Mozilla Firefox 30.0-51, and Google Chrome 31.0-44.

2
Chapter 2 Network Connection
Note:
⚫ You shall acknowledge that the use of the product with Internet access might be
under network security risks. For avoidance of any network attacks and
information leakage, please strengthen your own protection. If the product does
not work properly, please contact with your dealer or the nearest service center.
⚫ To ensure the network security of the network camera, we recommend you to
have the network camera assessed and maintained termly. You can contact us if
you need such service.
Before you start:
⚫ If you want to set the network camera via LAN (Local Area Network), please a
refer to Section 2.1 . Setting the Network Camera over the LAN
⚫ If you want to set the network camera via WAN (Wide Area Network), please a
refer to Section 2.2 Setting the Network Camera over the WAN.
2.1 Setting the Network Camera over the LAN
Purpose:
To view and configure the camera via LAN, you need to connect the network a
camera in the same subnet with your computer, and install the SADP or Guarding
Vision software to search and change the IP of the network camera.
Note: For the detailed introduction of SADP, please refer to Appendix 1.
2.1.1 Wiring over the LAN
The following figures show the two ways of cable connection of network camera a
and computer: a
Purpose:
⚫ To test the network camera, you can directly connect the network camera to the

Network Camera User Manual
3
ECAMIP101(B)/ECAMIP601(B)/ECAMIP801
computer with a network cable as shown in Figure 2-1.
⚫ Refer to the Figure 2-2 to set network camera over the LAN via a switch or a
router.
Network Cable
or
Network Camera
Computer
Figure 2-1 Connecting Directly
Network Cable
Network Cable
or
or
Network Camera Computer
Figure 2-2 Connecting via a Switch or Router a
2.1.2 Activating the Camera
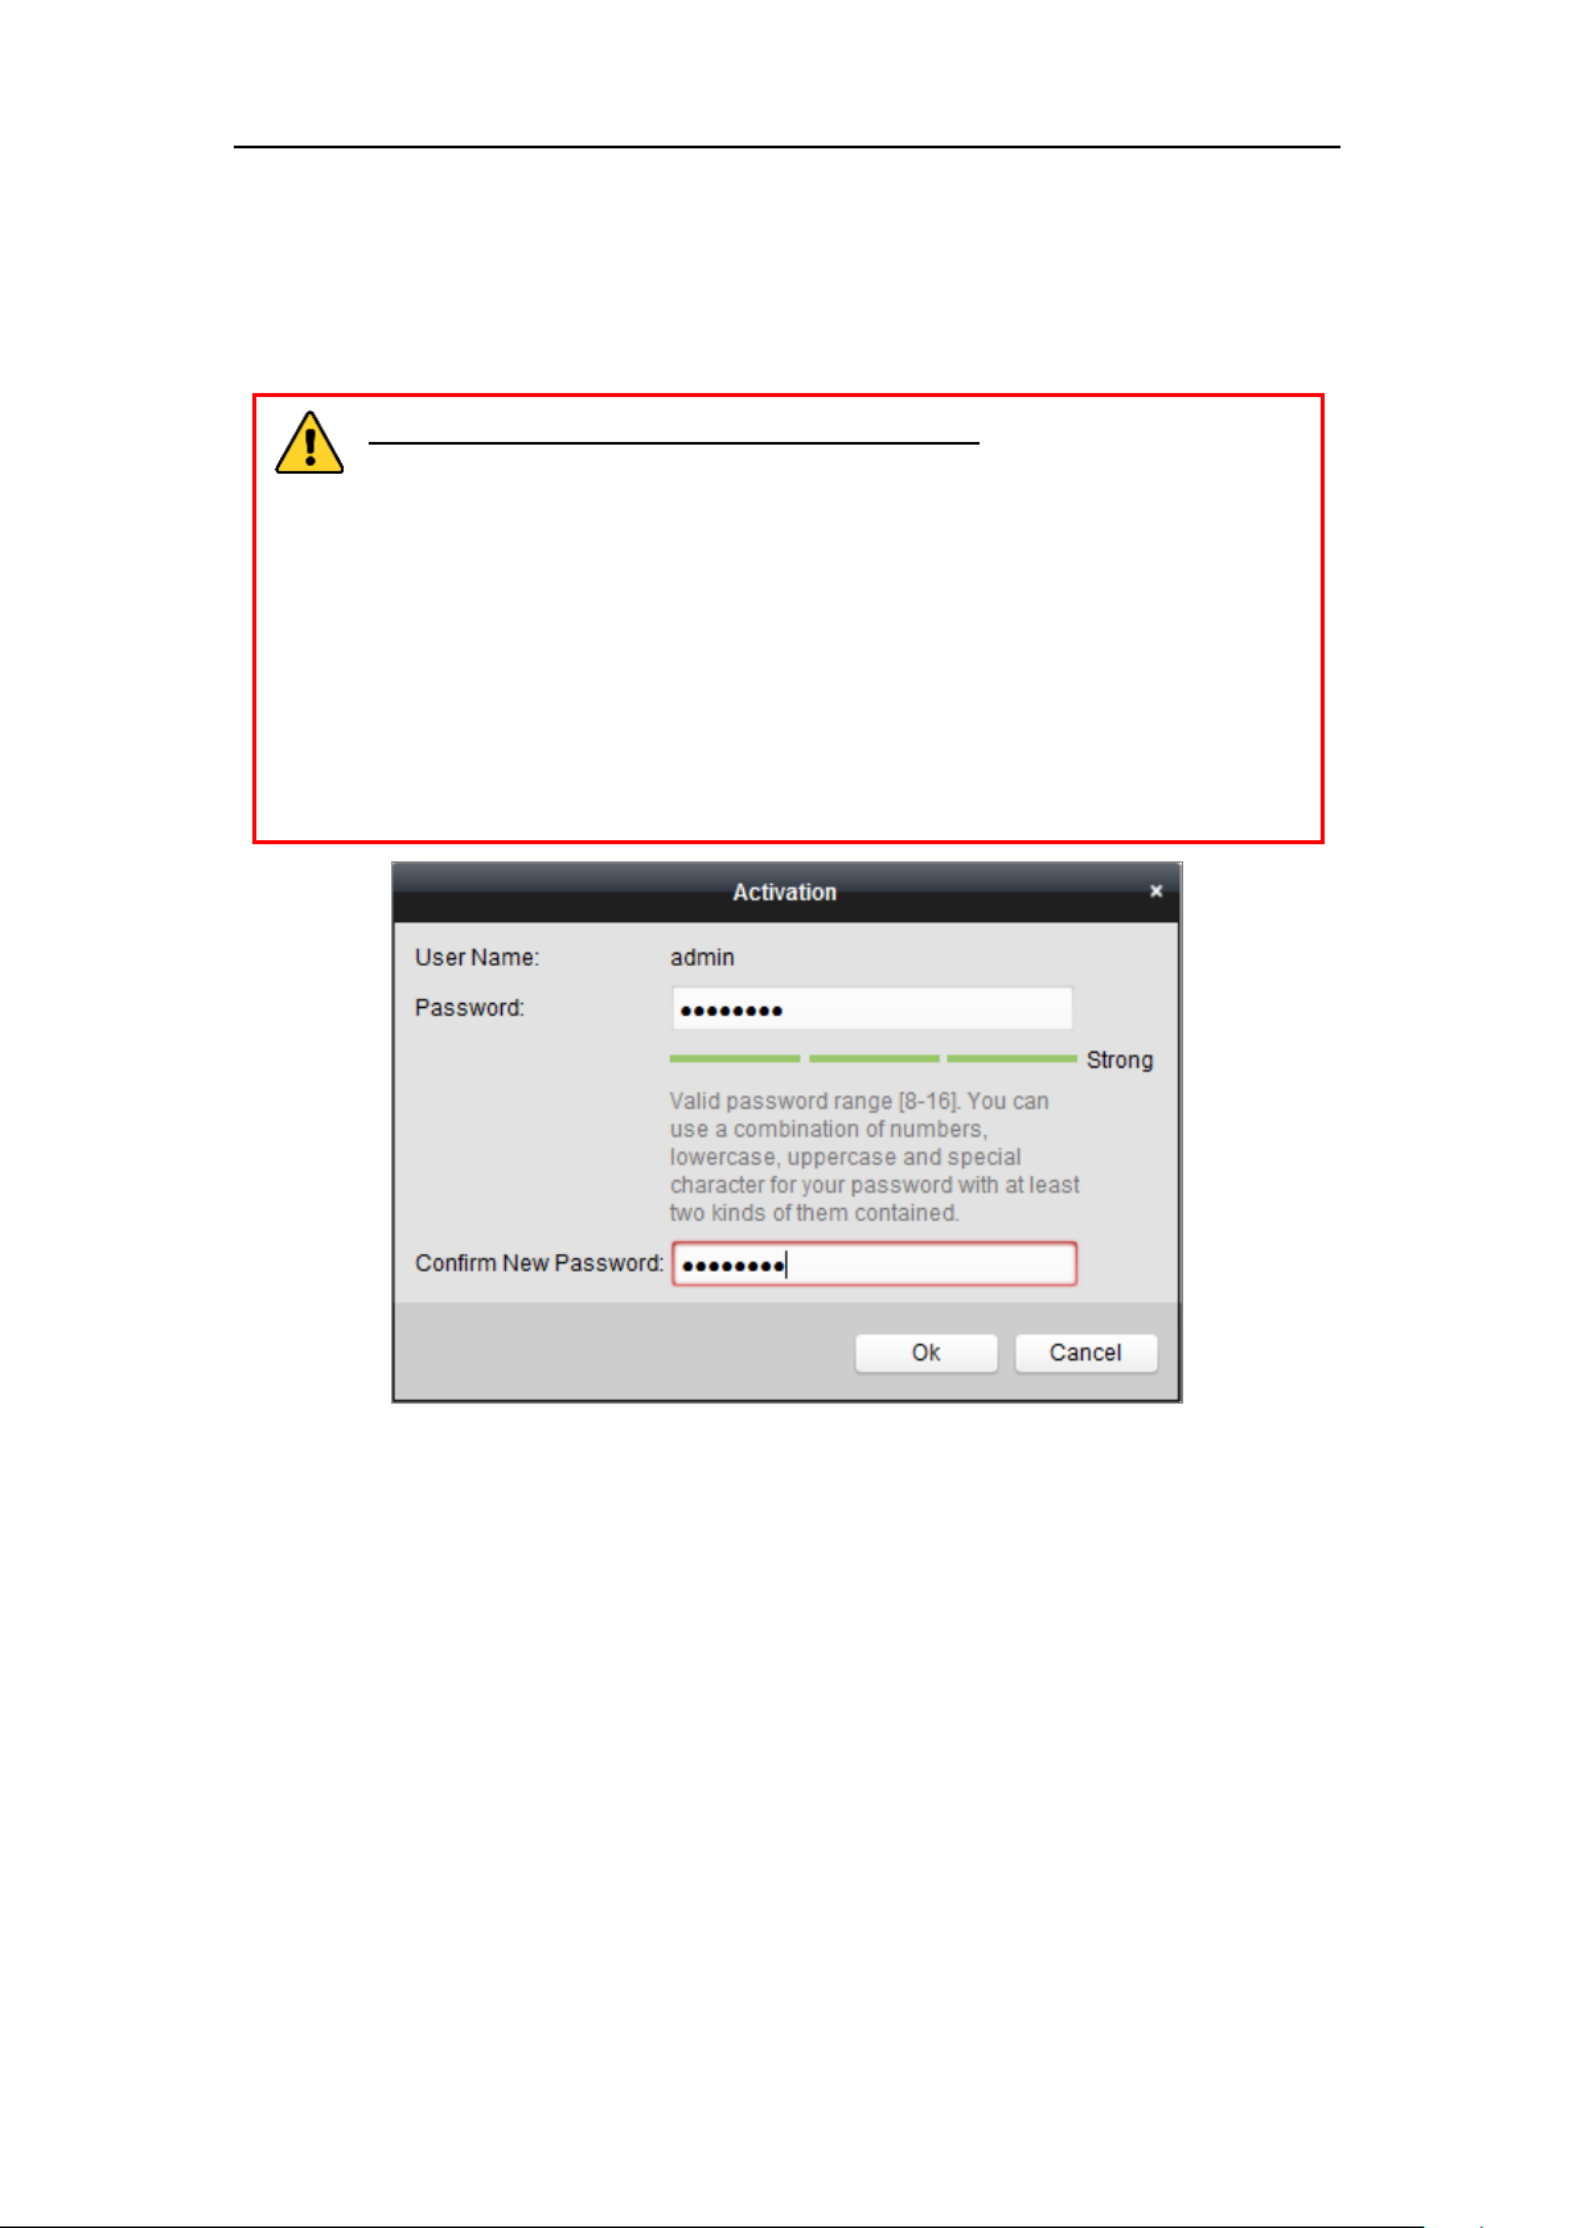
You are required to activate the camera first by setting a strong password for it before
you can use the camera.
Activation via Web Browser, Activation via SADP, and Activation via Client Software
are all supported.
❖ Activation via Web Browser
Steps:
1. Power on the camera, and connect the camera to the network.
2. Input the IP address into the address bar of the web browser, and click Enter to
enter the activation interface.
Notes:
⚫ The default IP address of the camera is 192.168.1.64.
⚫ For the camera enables the DHCP by default, the IP address is allocated
automatically. And you need to activate the camera via SADP software. Please refer to

Network Camera User Manual
4
ECAMIP101(B)/ECAMIP601(B)/ECAMIP801
the following chapter for Activation via SADP.
Figure 2-3 Activation via Web Browser
3. Create a password and input the password into the password field.
STRONG PASSWORD RECOMMENDED–We highly recommend you
create a strong password of your own choosing (using a minimum of 8
characters, including at least three of the following categories: upper case letters,
lower case letters, numbers, and special characters) in order to increase the
security of your product. And we recommend you reset your password regularly,
especially in the high security system, resetting the password monthly or weekly
can better protect your product.
4. Confirm the password.
5. Click to save the password and enter the live view interface. OK
❖ Activation via SADP Software
SADP software is used for detecting the online device, activating the camera, and
resetting the password.
Get the SADP software from the supplied disk or the official website, and install the
SADP according to the prompts. Follow the steps to activate the camera.

Network Camera User Manual
6
ECAMIP101(B)/ECAMIP601(B)/ECAMIP801
Figure 2-5 Modify the IP Address
6. Input the password and click the button to activate your IP address Modify
modification.
❖ Activation via Client Software
The client software is versatile video management software for multiple kinds of
devices.
Get the client software from the supplied disk or the official website, and install the
software according to the prompts. Follow the steps to activate the camera.
Steps:
1. Run the client software and the control panel of the software pops up, as shown in
the figure below.

Network Camera User Manual
7
ECAMIP101(B)/ECAMIP601(B)/ECAMIP801
Figure 2-6 Control Panel
2. Click the icon to enter the Device Management interface, as Device Management
shown in the figure below.
Figure 2-7 Device Management Interface
3. Check the device status from the device list, and select an inactive device.
Network Camera User Manual
8
ECAMIP101(B)/ECAMIP601(B)/ECAMIP801
4. Click the button to pop up the Activation interface. Activate
5. Create a password and input the password in the password field, and confirm the
password.
STRONG PASSWORD RECOMMENDED–We highly recommend
you create a strong password of your own choosing (using a minimum of
8 characters, including at least three of the following categories: upper
case letters, lower case letters, numbers, and special characters) in order
to increase the security of your product. We recommend you reset your
password regularly, especially in the high security system, resetting the
password monthly or weekly can better protect your product.
Figure 2-8 Activation Interface (Client Software)
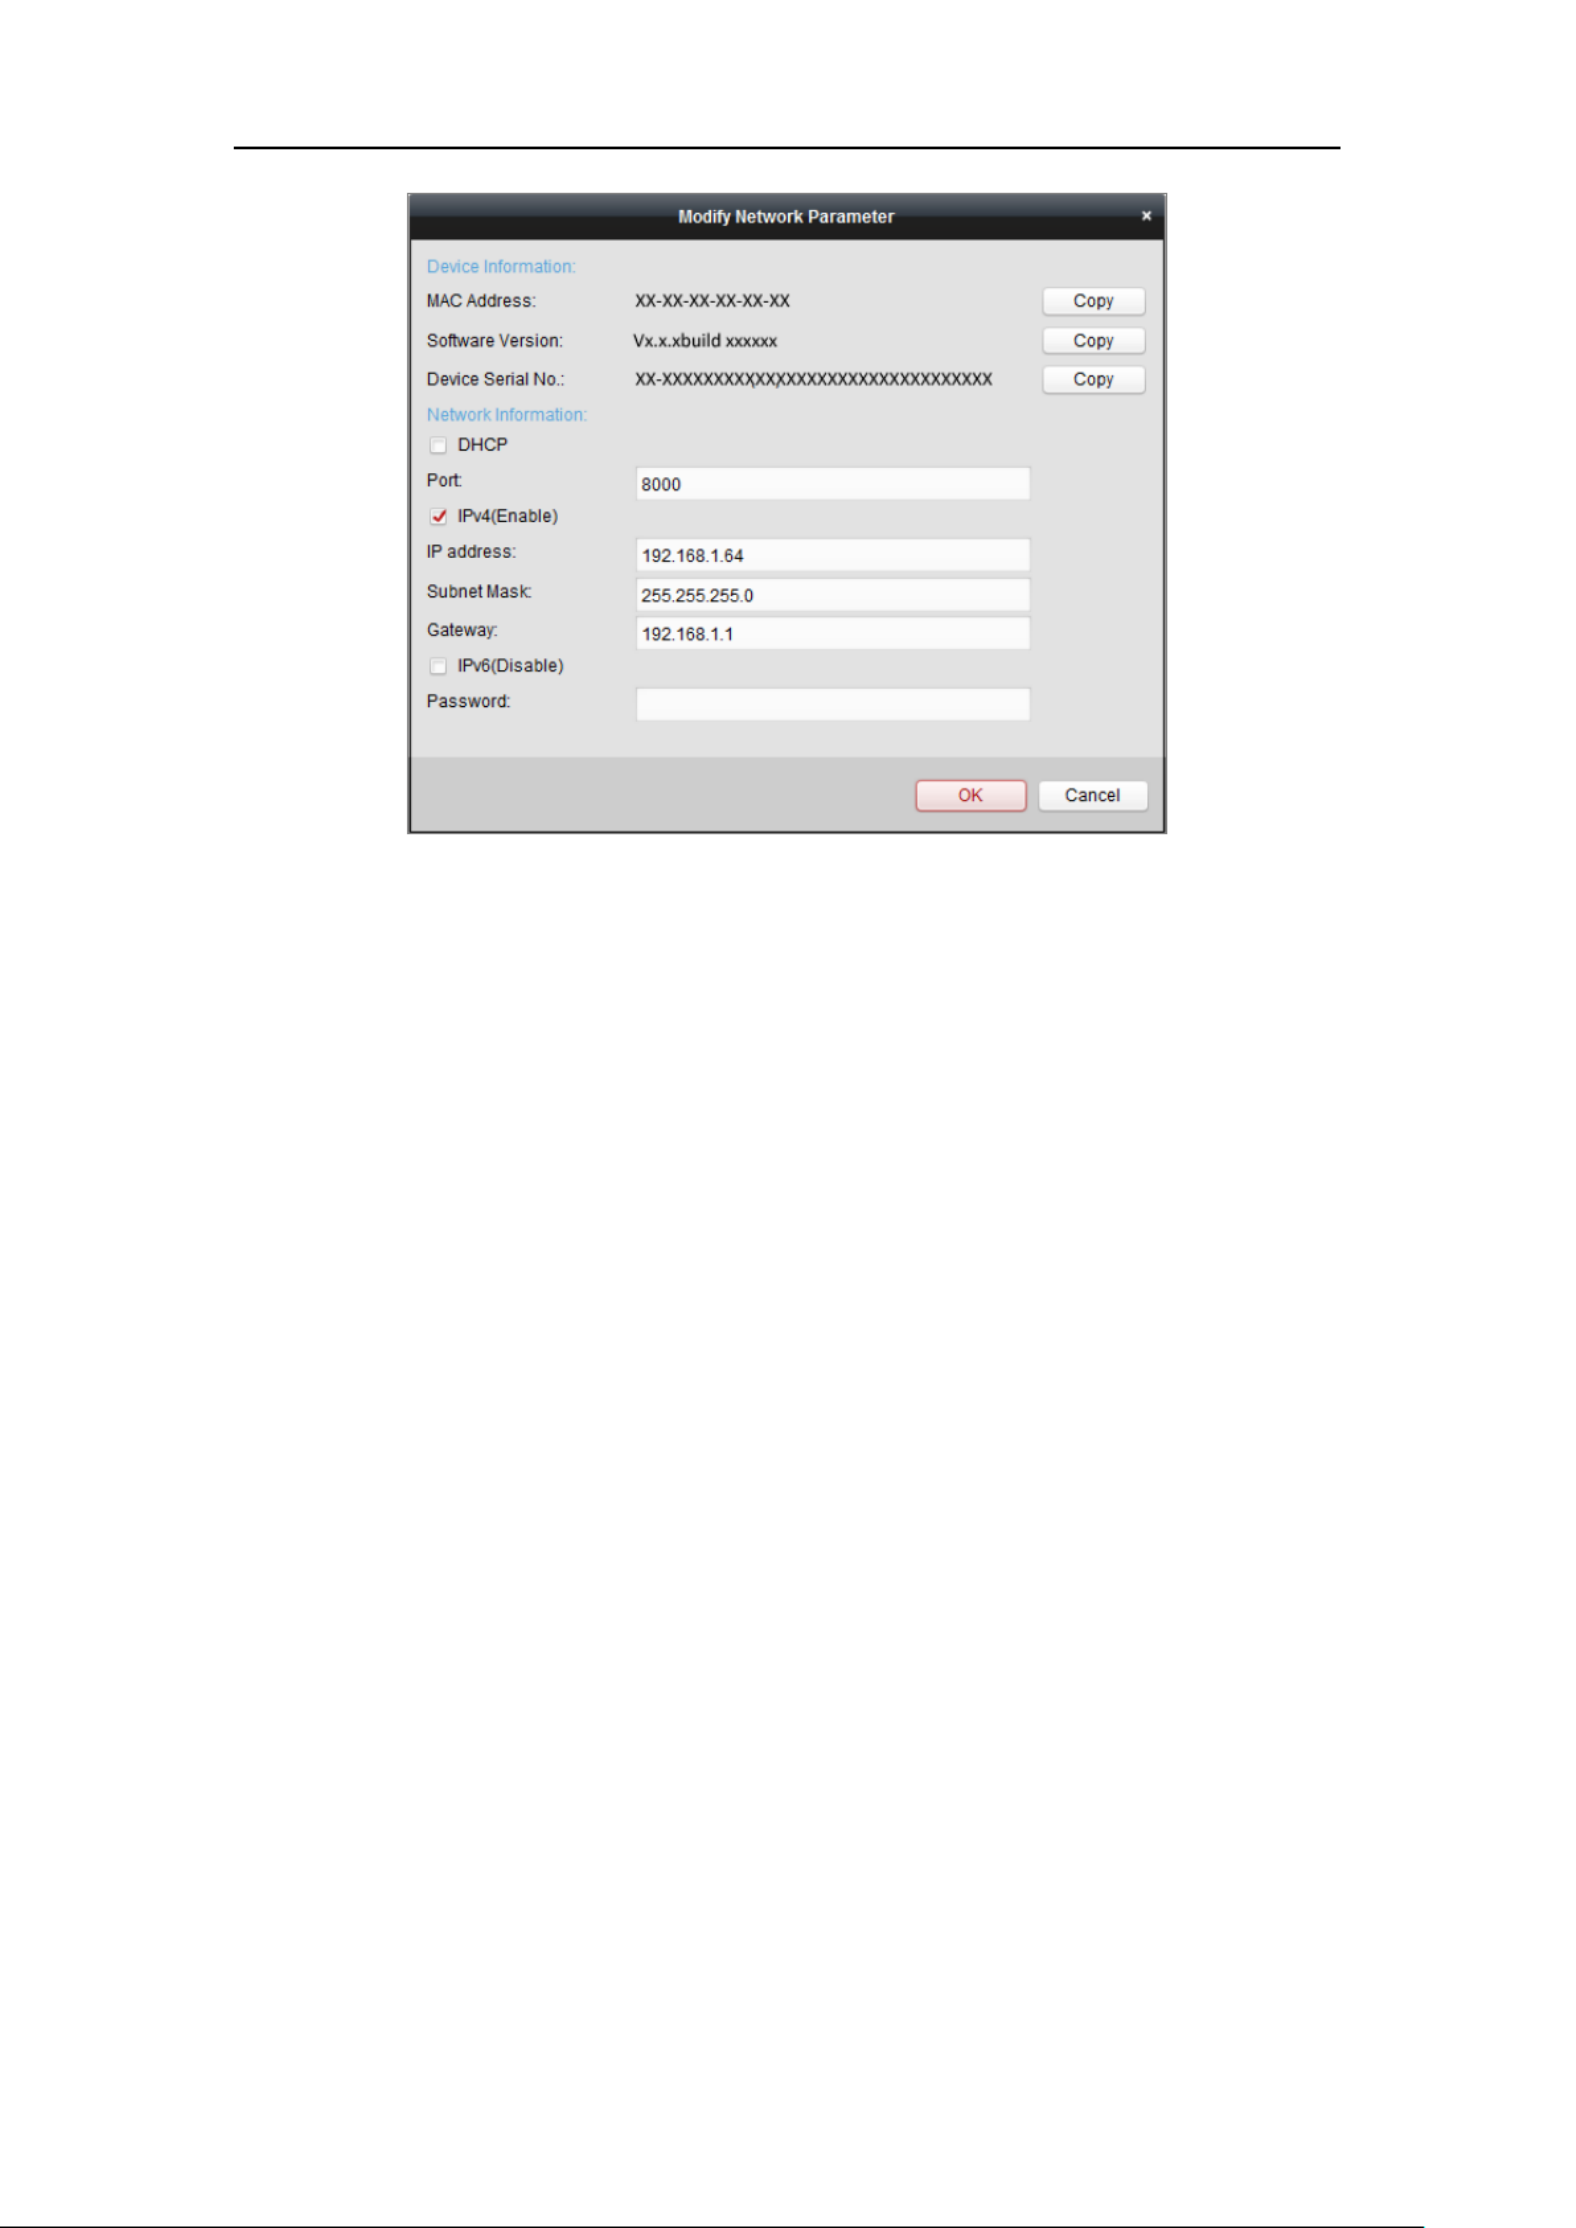
6. Click button to start activation. OK
7. Click the Modify Netinfo button to pop up the Network Parameter Modification
interface, as shown in the figure below.
Network Camera User Manual
9
ECAMIP101(B)/ECAMIP601(B)/ECAMIP801
Figure 2-9 Modifying the Network Parameters
8. Change the device IP address to the same subnet with your computer by either
modifying the IP address manually or checking the checkbox of Enable DHCP.
9. Input the password to activate your IP address modification.
2.2 Setting the Network Camera over the WAN
Purpose:
This section explains how to connect the network camera to the WAN with a static IP
or a dynamic IP.
2.2.1 Static IP Connection
Before you start:
Please apply a static IP from an ISP (Internet Service Provider). With the static IP
address, you can connect the network camera via a router or connect it to the WAN
directly.
⚫ Connecting the network camera via a router
Steps:

13
Chapter 3 Access to the Network
Camera
3.1 Accessing by Web Browsers
Steps:
1. Open the web browser.
2. In the browser address bar, input the IP address of the network camera, and press
the key to enter the login interface. Enter
3. Activate the network camera for the first time using, refer to the Section 2.1.2 for
details.
Note:
⚫ The default IP address is 192.168.1.64.
⚫ If the camera is not activated, please activate the camera first according to
Chapter 2.1.2.
4. Select English as the interface language on the top-right of login interface.
5. Input the user name and password and click . Login
The admin user should configure the device accounts and user/operator permissions
properly. Delete the unnecessary accounts and user/operator permissions.
Note:
The IP address gets locked if the admin user performs 7 failed password attempts
(5 attempts for the user/operator).
Figure 3-1 Login Interface
Specyfikacje produktu
| Marka: | EtiamPro |
| Kategoria: | Kamera monitorująca |
| Model: | ECAMIP801 |
Potrzebujesz pomocy?
Jeśli potrzebujesz pomocy z EtiamPro ECAMIP801, zadaj pytanie poniżej, a inni użytkownicy Ci odpowiedzą
Instrukcje Kamera monitorująca EtiamPro

28 Grudnia 2024
28 Grudnia 2024
22 Września 2024
21 Września 2024
21 Września 2024
20 Września 2024
20 Września 2024
20 Września 2024
20 Września 2024
20 Września 2024
Instrukcje Kamera monitorująca
- Kamera monitorująca Sony
- Kamera monitorująca Samsung
- Kamera monitorująca Tenda
- Kamera monitorująca Motorola
- Kamera monitorująca Stabo
- Kamera monitorująca Logitech
- Kamera monitorująca Xiaomi
- Kamera monitorująca Braun
- Kamera monitorująca Pioneer
- Kamera monitorująca TP-Link
- Kamera monitorująca Philips
- Kamera monitorująca Bosch
- Kamera monitorująca Gigaset
- Kamera monitorująca Hikvision
- Kamera monitorująca EZVIZ
- Kamera monitorująca Conceptronic
- Kamera monitorująca Panasonic
- Kamera monitorująca Canon
- Kamera monitorująca Crestron
- Kamera monitorująca Withings
- Kamera monitorująca Asus
- Kamera monitorująca Nedis
- Kamera monitorująca AG Neovo
- Kamera monitorująca Reolink
- Kamera monitorująca Boss
- Kamera monitorująca TRENDnet
- Kamera monitorująca Marquant
- Kamera monitorująca Toshiba
- Kamera monitorująca D-Link
- Kamera monitorująca August
- Kamera monitorująca Niceboy
- Kamera monitorująca Ring
- Kamera monitorująca Garmin
- Kamera monitorująca Imou
- Kamera monitorująca Blaupunkt
- Kamera monitorująca Grundig
- Kamera monitorująca APC
- Kamera monitorująca Honeywell
- Kamera monitorująca BLOW
- Kamera monitorująca Manhattan
- Kamera monitorująca Strong
- Kamera monitorująca Swann
- Kamera monitorująca Kwikset
- Kamera monitorująca Kodak
- Kamera monitorująca Cisco
- Kamera monitorująca ORNO
- Kamera monitorująca Broan
- Kamera monitorująca Moxa
- Kamera monitorująca Synology
- Kamera monitorująca Gembird
- Kamera monitorująca ZTE
- Kamera monitorująca Turing
- Kamera monitorująca Lindy
- Kamera monitorująca Minox
- Kamera monitorująca Zebra
- Kamera monitorująca DSC
- Kamera monitorująca JVC
- Kamera monitorująca ZyXEL
- Kamera monitorująca Trust
- Kamera monitorująca LogiLink
- Kamera monitorująca Furrion
- Kamera monitorująca Linksys
- Kamera monitorująca Google
- Kamera monitorująca Digitus
- Kamera monitorująca Vimar
- Kamera monitorująca V-TAC
- Kamera monitorująca Dahua Technology
- Kamera monitorująca Schneider
- Kamera monitorująca Eufy
- Kamera monitorująca Ricoh
- Kamera monitorująca Emos
- Kamera monitorująca AVMATRIX
- Kamera monitorująca Renkforce
- Kamera monitorująca Rollei
- Kamera monitorująca Marshall
- Kamera monitorująca Perel
- Kamera monitorująca Somfy
- Kamera monitorująca Uniden
- Kamera monitorująca Netgear
- Kamera monitorująca Thomson
- Kamera monitorująca DiO
- Kamera monitorująca Velleman
- Kamera monitorująca Ferguson
- Kamera monitorująca DataVideo
- Kamera monitorująca Delta Dore
- Kamera monitorująca Pyle
- Kamera monitorująca Intellinet
- Kamera monitorująca CRUX
- Kamera monitorująca Setti+
- Kamera monitorująca Waeco
- Kamera monitorująca Vivotek
- Kamera monitorująca Vtech
- Kamera monitorująca Speco Technologies
- Kamera monitorująca Edimax
- Kamera monitorująca Petcube
- Kamera monitorująca ION
- Kamera monitorująca First Alert
- Kamera monitorująca AirLive
- Kamera monitorująca Maginon
- Kamera monitorująca EnGenius
- Kamera monitorująca SPC
- Kamera monitorująca Planet
- Kamera monitorująca Brilliant
- Kamera monitorująca Genie
- Kamera monitorująca LevelOne
- Kamera monitorująca Axis
- Kamera monitorująca Sanyo
- Kamera monitorująca Lorex
- Kamera monitorująca Control4
- Kamera monitorująca Milesight
- Kamera monitorująca Aluratek
- Kamera monitorująca Abus
- Kamera monitorująca Elro
- Kamera monitorująca Olympia
- Kamera monitorująca Hama
- Kamera monitorująca Marmitek
- Kamera monitorująca Ubiquiti Networks
- Kamera monitorująca Western Digital
- Kamera monitorująca Netatmo
- Kamera monitorująca Schwaiger
- Kamera monitorująca Promise Technology
- Kamera monitorująca GVI Security
- Kamera monitorująca AVer
- Kamera monitorująca ZKTeco
- Kamera monitorująca Netis
- Kamera monitorująca Extech
- Kamera monitorująca Denver
- Kamera monitorująca Anker
- Kamera monitorująca Allnet
- Kamera monitorująca Marshall Electronics
- Kamera monitorująca Orion
- Kamera monitorująca Yale
- Kamera monitorująca SereneLife
- Kamera monitorująca Ernitec
- Kamera monitorująca AVerMedia
- Kamera monitorująca MEE Audio
- Kamera monitorująca Genius
- Kamera monitorująca Trevi
- Kamera monitorująca Technaxx
- Kamera monitorująca Atlona
- Kamera monitorująca Hanwha
- Kamera monitorująca Overmax
- Kamera monitorująca Quantum
- Kamera monitorująca Y-cam
- Kamera monitorująca Grandstream
- Kamera monitorująca Raymarine
- Kamera monitorująca Powerfix
- Kamera monitorująca Avanti
- Kamera monitorująca Ikan
- Kamera monitorująca Alecto
- Kamera monitorująca Avidsen
- Kamera monitorująca JUNG
- Kamera monitorująca Burg Wächter
- Kamera monitorująca Foscam
- Kamera monitorująca Lumens
- Kamera monitorująca Monacor
- Kamera monitorująca Dörr
- Kamera monitorująca M-e
- Kamera monitorująca EVE
- Kamera monitorująca Smartwares
- Kamera monitorująca Adj
- Kamera monitorująca Qian
- Kamera monitorująca Arenti
- Kamera monitorująca Elmo
- Kamera monitorująca Vitek
- Kamera monitorująca Alfatron
- Kamera monitorująca UniView
- Kamera monitorująca Clas Ohlson
- Kamera monitorująca Laserliner
- Kamera monitorująca Megasat
- Kamera monitorująca REVO
- Kamera monitorująca BZBGear
- Kamera monitorująca BirdDog
- Kamera monitorująca KJB Security Products
- Kamera monitorująca HiLook
- Kamera monitorująca Profile
- Kamera monitorująca Aldi
- Kamera monitorująca Aritech
- Kamera monitorująca Acti
- Kamera monitorująca ACME
- Kamera monitorująca Flamingo
- Kamera monitorująca Caliber
- Kamera monitorująca Eminent
- Kamera monitorująca Sitecom
- Kamera monitorująca Exibel
- Kamera monitorująca Fortinet
- Kamera monitorująca KlikaanKlikuit
- Kamera monitorująca Trebs
- Kamera monitorująca Ednet
- Kamera monitorująca Steren
- Kamera monitorująca Flir
- Kamera monitorująca Buffalo
- Kamera monitorująca Arlo
- Kamera monitorująca Nest
- Kamera monitorująca Siedle
- Kamera monitorująca Hive
- Kamera monitorująca Switel
- Kamera monitorująca Chacon
- Kamera monitorująca InFocus
- Kamera monitorująca Hombli
- Kamera monitorująca Naxa
- Kamera monitorująca Konig
- Kamera monitorująca Valueline
- Kamera monitorująca BRK
- Kamera monitorująca QSC
- Kamera monitorująca Xavax
- Kamera monitorująca Vaddio
- Kamera monitorująca Gira
- Kamera monitorująca Interlogix
- Kamera monitorująca Boyo
- Kamera monitorująca IC Intracom
- Kamera monitorująca Iget
- Kamera monitorująca EverFocus
- Kamera monitorująca Adesso
- Kamera monitorująca Satel
- Kamera monitorująca POSline
- Kamera monitorująca Notifier
- Kamera monitorująca Hawking Technologies
- Kamera monitorująca Friedland
- Kamera monitorująca Nexxt
- Kamera monitorująca Monoprice
- Kamera monitorująca Watec
- Kamera monitorująca Beafon
- Kamera monitorująca Chuango
- Kamera monitorująca ETiger
- Kamera monitorująca Videcon
- Kamera monitorująca INSTAR
- Kamera monitorująca Provision ISR
- Kamera monitorująca Aqara
- Kamera monitorująca Advantech
- Kamera monitorująca Digital Watchdog
- Kamera monitorująca Ganz
- Kamera monitorująca AViPAS
- Kamera monitorująca ClearOne
- Kamera monitorująca Ebode
- Kamera monitorująca Oplink
- Kamera monitorująca Sonic Alert
- Kamera monitorująca Linear PRO Access
- Kamera monitorująca Summer Infant
- Kamera monitorująca SMC
- Kamera monitorująca Topica
- Kamera monitorująca Kogan
- Kamera monitorująca Iiquu
- Kamera monitorująca Verint
- Kamera monitorująca Brinno
- Kamera monitorująca Rostra
- Kamera monitorująca Caddx
- Kamera monitorująca Spyclops
- Kamera monitorująca EKO
- Kamera monitorująca Kguard
- Kamera monitorująca Woonveilig
- Kamera monitorująca Mobi
- Kamera monitorująca Surveon
- Kamera monitorująca Hollyland
- Kamera monitorująca Epcom
- Kamera monitorująca Indexa
- Kamera monitorująca Lutec
- Kamera monitorująca Whistler
- Kamera monitorująca ClearView
- Kamera monitorująca VideoComm
- Kamera monitorująca IMILAB
- Kamera monitorująca 3xLOGIC
- Kamera monitorująca Pelco
- Kamera monitorująca Leviton
- Kamera monitorująca Inkovideo
- Kamera monitorująca Pentatech
- Kamera monitorująca Weldex
- Kamera monitorująca SecurityMan
- Kamera monitorująca Canyon
- Kamera monitorująca CNB Technology
- Kamera monitorująca Tapo
- Kamera monitorująca Aigis
- Kamera monitorująca Exacq
- Kamera monitorująca Brickcom
- Kamera monitorująca Laxihub
- Kamera monitorująca Securetech
- Kamera monitorująca EFB Elektronik
- Kamera monitorująca NetMedia
- Kamera monitorująca Videotec
- Kamera monitorująca Illustra
- Kamera monitorująca Nivian
- Kamera monitorująca E-bench
- Kamera monitorująca Syscom
- Kamera monitorująca Tecno
- Kamera monitorująca Night Owl
- Kamera monitorująca Guardzilla
- Kamera monitorująca Astak
- Kamera monitorująca Blink
- Kamera monitorująca Milestone Systems
- Kamera monitorująca Zavio
- Kamera monitorująca Campark
- Kamera monitorująca IPX
- Kamera monitorująca Dedicated Micros
- Kamera monitorująca Hamlet
- Kamera monitorująca Annke
- Kamera monitorująca AVTech
- Kamera monitorująca Qoltec
- Kamera monitorująca Approx
- Kamera monitorująca Digimerge
- Kamera monitorująca Wisenet
- Kamera monitorująca Infortrend
- Kamera monitorująca Epiphan
- Kamera monitorująca Mach Power
- Kamera monitorująca Compro
- Kamera monitorująca Aida
- Kamera monitorująca Ikegami
- Kamera monitorująca Accsoon
- Kamera monitorująca Vimtag
- Kamera monitorująca Gewiss
- Kamera monitorująca Alula
- Kamera monitorująca Insteon
- Kamera monitorująca Costar
- Kamera monitorująca ALC
- Kamera monitorująca Security Labs
- Kamera monitorująca Comtrend
- Kamera monitorująca Seneca
- Kamera monitorująca Avigilon
- Kamera monitorująca American Dynamics
- Kamera monitorująca Vosker
- Kamera monitorująca Sentry360
- Kamera monitorująca Bea-fon
- Kamera monitorująca Owltron
- Kamera monitorująca Enabot
- Kamera monitorująca Luis Energy
- Kamera monitorująca Sir Gawain
- Kamera monitorująca VisorTech
- Kamera monitorująca Atlantis Land
- Kamera monitorująca B & S Technology
- Kamera monitorująca I3International
- Kamera monitorująca IDIS
- Kamera monitorująca Ecobee
- Kamera monitorująca Conbrov
- Kamera monitorująca HuddleCamHD
- Kamera monitorująca Mobotix
- Kamera monitorująca IOIO
- Kamera monitorująca BIRDFY
- Kamera monitorująca I-PRO
- Kamera monitorująca DVDO
- Kamera monitorująca TCP
- Kamera monitorująca Bolin Technology
- Kamera monitorująca Nextech
Najnowsze instrukcje dla Kamera monitorująca
28 Stycznia 2025
25 Stycznia 2025
17 Stycznia 2025
17 Stycznia 2025
15 Stycznia 2025

13 Stycznia 2025

13 Stycznia 2025
13 Stycznia 2025

12 Stycznia 2025
12 Stycznia 2025