Instrukcja obsługi Elro C903IP
Elro
Kamera monitorująca
C903IP
Przeczytaj poniżej 📖 instrukcję obsługi w języku polskim dla Elro C903IP (1 stron) w kategorii Kamera monitorująca. Ta instrukcja była pomocna dla 6 osób i została oceniona przez 2 użytkowników na średnio 4.5 gwiazdek
Strona 1/1
SPECIFICATIONSSAFETY AND MAINTENANCE INSTRUCTIONS
INSTRUCTIONS DE SECURITE ET D'ENTRETIENSICHERHEITS- UND WARTUNGSHINWEISE
GB
TR
D
GR
PL
CZ
NL
H
F
RO
E
HR
* Camera sensor : ¼” CMOS
* Pixels : 320x240 , 640x480 (QVGA) (VGA)
* Lens : f:6mm, F:2.0
* Min. Ilumination : 0.5Lux
* Nightview : 24x IR LEDs
* Compression : MJPEG
* Frame rate : 30fps@QVGA, 15fps@VGA
* Ports : LAN
* Power supply : 230VAC/5VDC, 2.0A
* Power consumption : <5W
* Operating temperature : -10° ~ + 40°
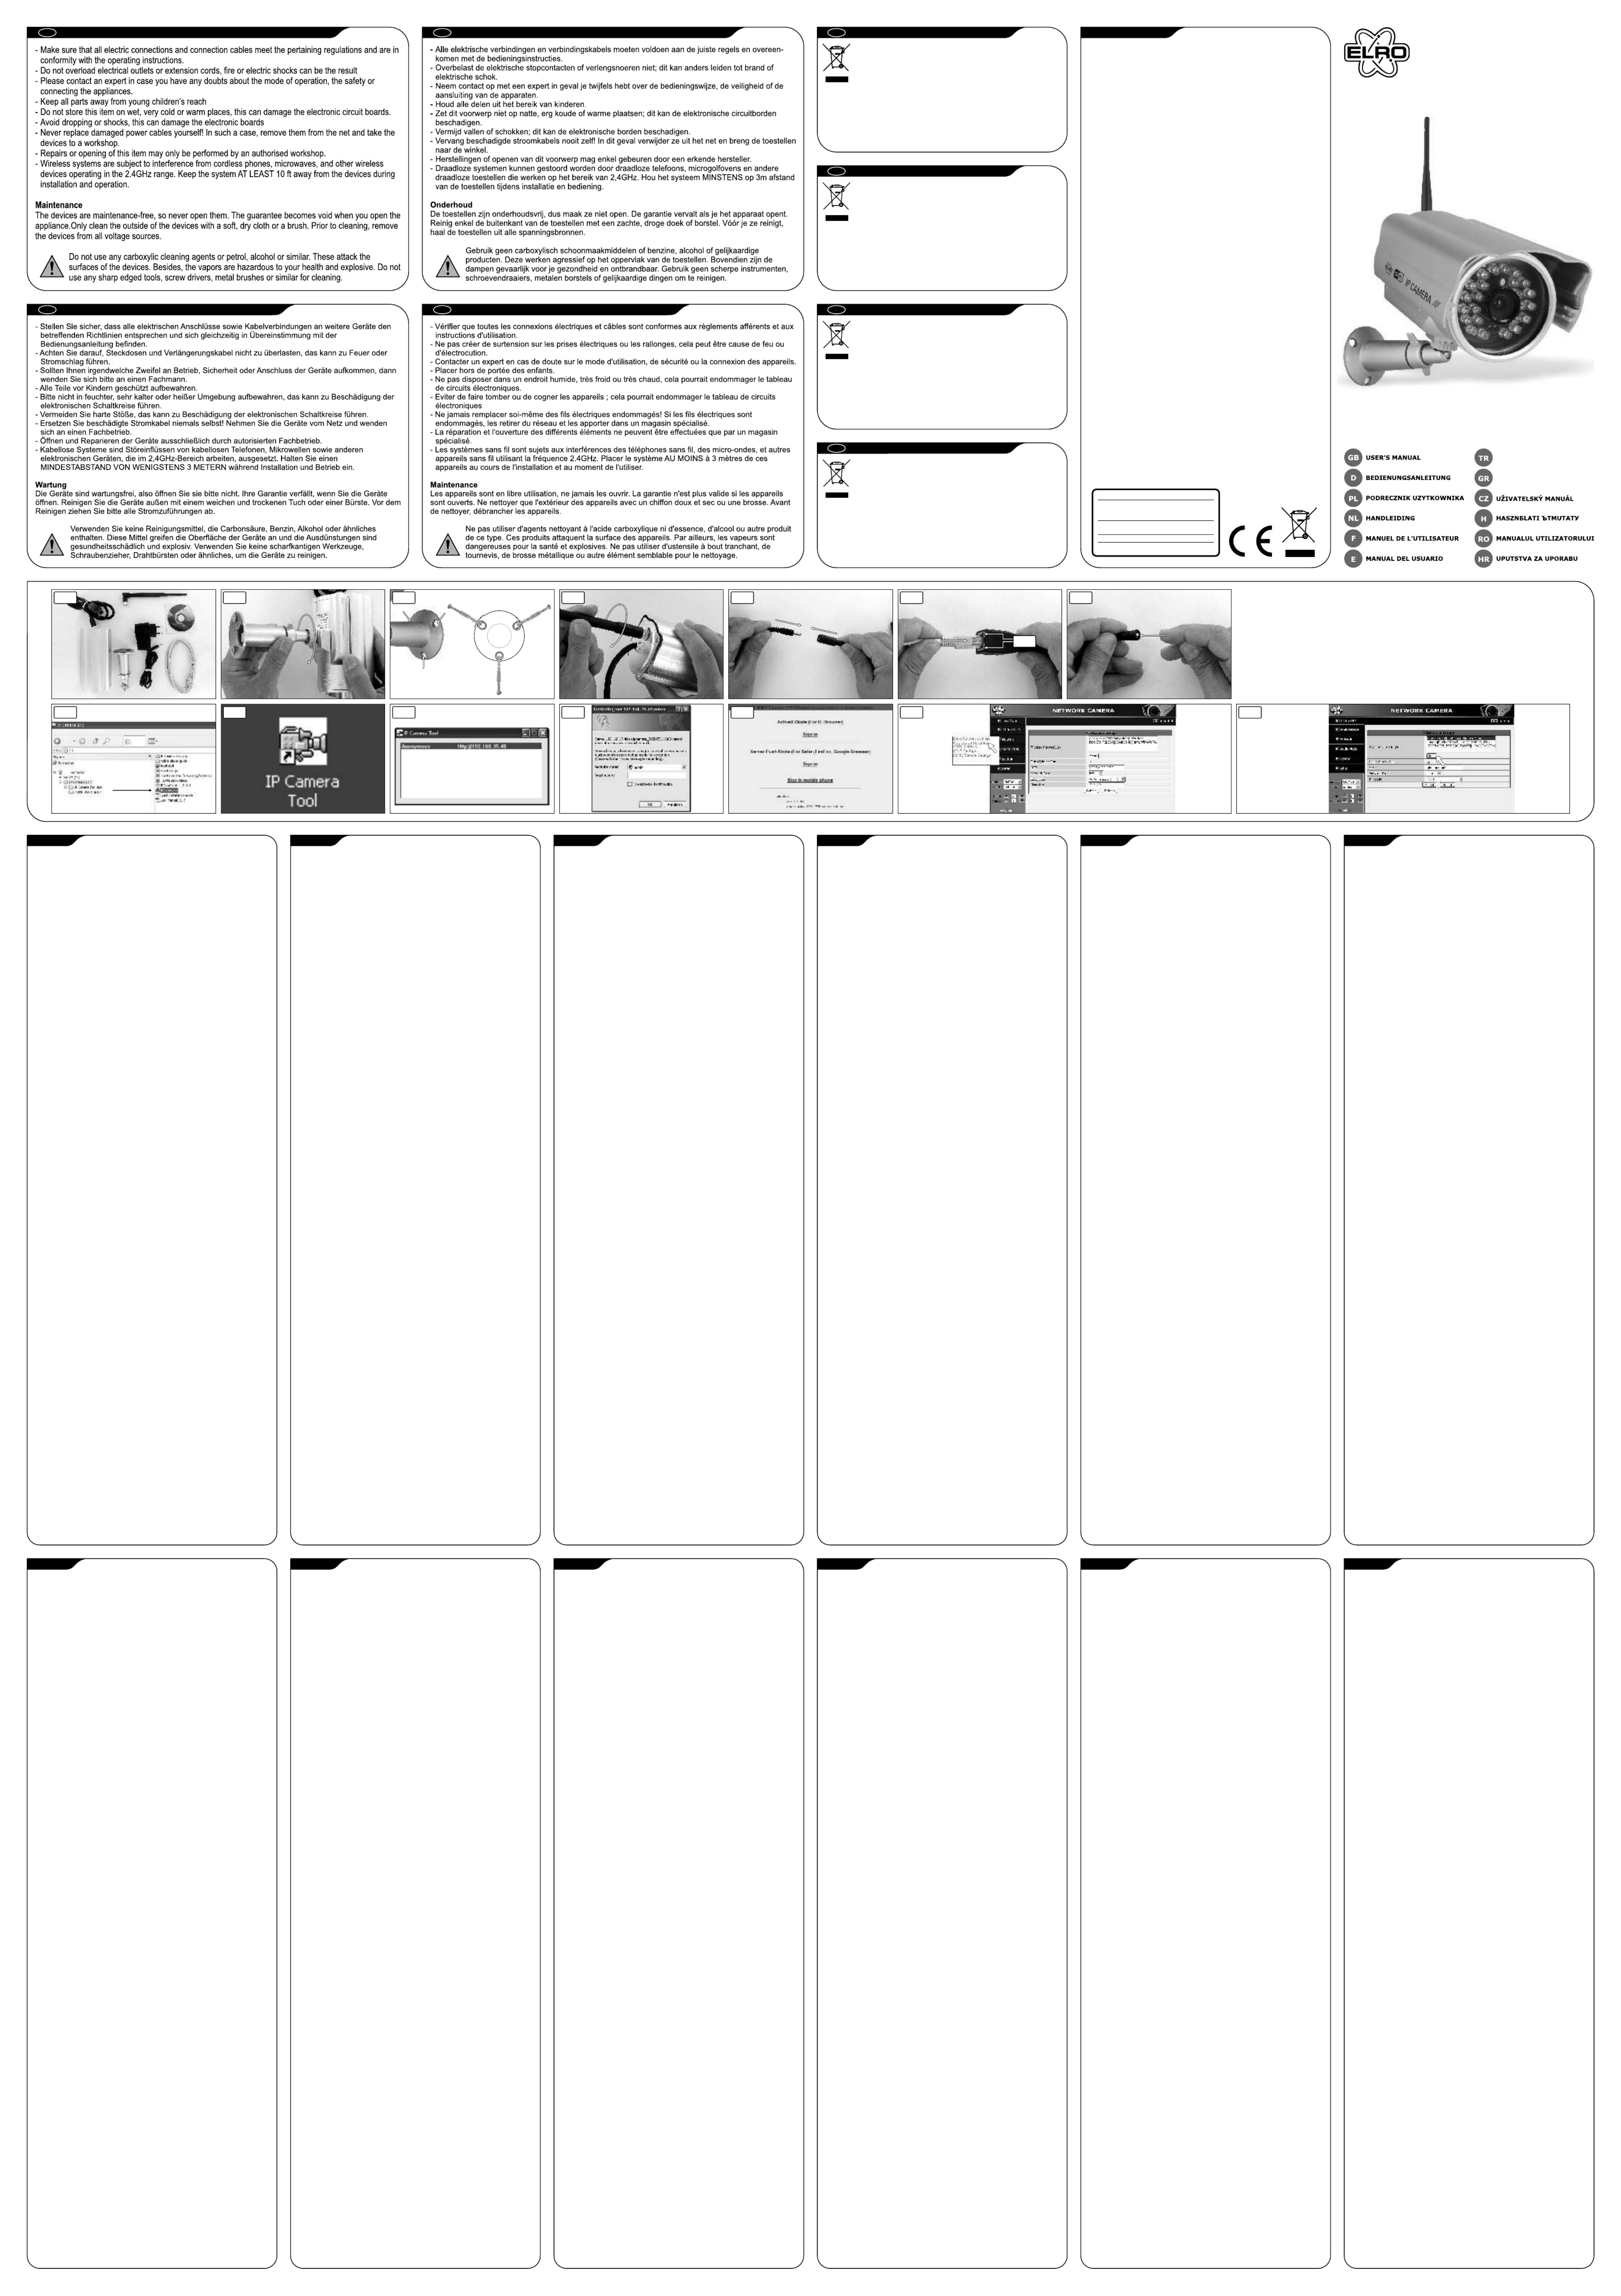
C903IP PLUG & PLAY WIFI NETWORK CAMERA
The IP camera provides a quick and easy way for viewing the
desired image on any PC in your intranet or over the internet
via a web browser. The camera provides night vision through
built-in IR LEDs. Please read this manual carefully and if
necessary read the full manual on the provided CD.
PACKAGE CONTENT (1)
a. Wireless IP camera with stand
b. DC power supply
c. Network Cable
d. Antenna
e. Software
CAMERA INSTALLATION
- Connect the screw hole located on the bottom of the IP camera (2a)
to the stand. There are three holes located in the base of the camera
stand (1a) allowing the camera to be mounted on the ceiling or any
wall securely (2b)
- From the rear panel of the IP camera, screw the external antenna
(1d) that came with the camera into the antenna connector (3)
- Attach the external DC power supply (1b) to the DC input located on
the on the end of connection cable (4) and then connect it to your
local power supply
- Connect the network cable (1c) to the network input located on
the end of connection cable (5) and then attach it to the router/
switch. The yellow LED will light up when connected to the power,
the green LED will blink when data transferred (5a)
- Reset the camera by pressing the reset button continuously for 15
seconds, then the camera will be reset back to the factory default
settings (6).
SOFTWARE INSTALLATION
- Insert the provided CD into your computer´s disk drive
- Run “IPCamSetup.exe” file (7) and click “Next” button two times.
Software is now installed.
SOFTWARE OPERATION
- Double click the icon “IP Camera Tool” icon on your desktop. The
software automatically searches the network for camera (8a)
- Double-click on the camera in the list (8b). The IP address will
automatically be opened in your default browser. The default user
name is ´admin´ and no password (9)
- Choose the appropriate login. ActiveX for Internet Explorer, Server
Push Mode for other browsers or Mobile phone for mobile devices
(10) (requires manual connection).
Note: you will only have full functionality when running in Internet
Explorer.
WIRELESS CONFIGURATION
- Click “Network” in the browser program and select “Wireless Lan
Settings” (11)
- Make sure the router is a wireless router. Make sure that you know
the password if there is any
- Click “Scan” button two times. The program will show all available
WLAN networks. Choose your own network (12)
- If there is no encryption click Submit. If there is encryption please
input the share key then click Submit
- Wait about 30 seconds. The camera will reboot. Then unplug the
network cable.
TIPS
- Connection must be made indoor
- The camera cannot see through glass during night because of
reflection of the IR LEDs.
- You can extend the range of your wireless network by using a range
extender.
FOR MORE INFORMATION SEE FULL USERS GUIDE ON CD
C903IP
PLUG & PLAY WIFI
NETWORK CAMERA
?G? ??? ?? ??
HIZLI KLAVUZ
NL
GB
D
F
D
VEILIGHEIDS- EN ONDERHOUDSINSTRUCTIES
NL
F
Roos Electronics bv,
Postbus 117, 5126 ZJ Gilze, Holland
WWW.ELRO-NL.COM - WWW.ELRO-BE.COM
WWW.ELRO.EU
Roos Electronics GmbH Arnsberg-Germany
WWW.ROOSELECTRONICS.DE
C H Byron Corporation, Bromsgrove, U.K.
WWW.CHBYRON.COM
EDEN, Vallauris, France WWW.EDEN.FR
Correct Disposal of This Product (Waste Electrical & Electronic
Equipment) (Applicable in the European Union and other European
countries with separate collection systems)
This marking shown on the product or its literature, indicates that it should not
be disposed with other household wastes at the end of its working life. To
prevent possible harm to the environment or human health from uncontrolled
waste disposal, please separate this from other types of wastes and recycle it
responsibly to promote the sustainable reuse of material resources.Household users should
contact either the retailer where they purchased this product, or their local government
office, for details of where and how they can take this item for environmentally safe
recycling. Business users should contact their supplier and check the terms and conditions of
the purchase contract. This product should not be mixed with other commercial wastes for
disposal.
Korrekte Entsorgung dieses Produkts (Elektromüll) (Anzuwenden in
den Ländern der Europäischen Union und anderen euroäischen
Ländern mit einem separaten Sammelsystem)
Die Kennzeichnung auf dem Produkt bzw. auf der dazugehörigen Literatur gibt
an, dass es nach seiner Lebensdauer nicht zusammen mit dem normalen
Haushaltsmüll entsorgt werden darf. Entsorgen Sie dieses Gerät bitte getrennt
von anderen Abfällen, um der Umwelt bzw. Der menschlichen Gesundheit nicht
durch unkontrollierte Müllbeseitigung zu schaden. Recyceln Sie das Gerät, um die
nachhaltige Wiederverwertung von stofflichen Ressourcen zu fördern.Private Nutzer sollten
den Händler, bei dem das Produkt gekauft wurde, oder die zuständigen Behörden
kontaktieren, um in Erfahrung zu bringen, wie sie das Gerät auf umweltfreundliche Weise
recyceln können.Gewerbliche Nutzer sollten sich an Ihren Lieferanten wenden und die
Bedingungen des Verkaufsvertrags konsultieren. Dieses Produkt darf nicht zusammen mit
anderem Gewerbemüll entsorgt werden.
Correcte verwijdering van dit product (elektrische & elektronische
afvalapparatuur)
Dit merkteken op het product of het bijbehorende informatiemateriaal duidt
erop dat het niet met ander huishoudelijk afval verwijderd moet worden aan het
einde van zijn gebruiksduur. Om mogelijke schade aan het milieu of de
menselijke gezondheid door ongecontroleerde afvalverwijdering te
voorkomen, moet u dit product van andere soorten afval scheiden en op een
verantwoorde manier recyclen, zodat het duurzame hergebruik van materiaalbronnen
wordt bevorderd. Huishoudelijke gebruikers moeten contact opnemen met de winkel waar
ze dit product hebben gekocht of met de gemeente waar ze wonen om te vernemen waar en
hoe ze dit product milieuvriendelijk kunnen laten recyclen. Zakelijke gebruikers moeten
contact opnemen met hun leverancier en de algemene voorwaarden van de
koopovereenkomsten nalezen. Dit product moet niet worden gemengd met ander
bedrijfsafval voor verwijdering.
Comment éliminer ce produit (déchets d’équipements électriques et
électroniques) (Applicable dans les pays de l’Union Européen et aux
autres pays européens disposant de systémes de collecte sélective)
Ce symbole sur le produit ou sa documentation indique qu’il ne doit pas être
éliminé en fin de vie avec les autres déchets ménagers. L’élimination
incontrôlée des déchets pouvant porter préjudice à l’environnement ou à la
santé humaine, veuillez le séparer des autres types de déchets et le recycler de
façon responsable. Vous favoriserez ainsi la réutilisation durable des ressources matérielles.
Les particuliers sont invités à contacter le distributeur leur ayant vendu le produit ou à se
renseigner auprès de leur mairie pour savoir où et comment ils peuvent se débarrasser de ce
produit afin qu’il soit recyclé en respectant l’environnement. Les entreprises sont invitées à
contacter leurs fournisseurs et à consulter les conditions de leur contrat de vente. Ce produit
ne doit pas être éliminé avec les autres déchets commerciaux.
GB
(1) (2a) (2b) (3) (4) (6)(5a)
(7) (8b) (9) (10) (11) (12)
a
b
c
d
e
(5b)
15 sec
15 sec
15 sec
15 sec15 sec
(8a)
1
1
1
112
2
2
22
3
3
3
33
C903IP PLUG & PLAY WIFI NETZWERK-KAMERA
Mit der IP Kamera können Sie das gewünschte Bild schnell und
einfach auf jedem beliebigen PC in Ihrem internen Netzwerk
oder via Webbrowser über das Internet betrachten. Die
Kamera bietet Nachtsicht durch die integrierten IR LEDs. Bitte
lesen Sie sorgfältig diese Anleitung und erforderlichenfalls
lesen Sie das vollständige Handbuch auf der mitgelieferten CD.
VERPACKUNGSINHALT (1)
a. Drahtlose IP Kamera mit Ständer
b. DC Stromversorgung
c. Netzwerkkabel
d. Antenne
e. Software
KAMERA INSTALLATION
- Das Schraubenloch an der Unterseite der IP Kamera mit (2a)
dem Ständer verbinden. An der Basis des Kameraständers (1a)
befinden sich drei Löcher, mit denen die Kamera sicher an die
Decke oder jede beliebige Wand montiert werden kann . (2b)
- An der Rückplatte der IP Kamera die mitgelieferte externe
Antenne (1d) in den Antennenanschluss schrauben . (3)
- Die externe DC Stromversorgung (1b) am DC Eingang am einen
Ende des Anschlusskabels anschließen und dann mit der (4)
örtlichen Stromversorgung verbinden.
- Das Netzwerkkabel (1c) am Netzwerkeingang am Ende des
Anschlusskabels anschließen und dann mit dem Router/ (5)
Schalter verbinden. Die gelbe LED leuchtet beim Anschluss an
der Stromversorgung, die grüne LED blinkt bei der
Datenübertragung .(5a)
- Die Kamera durch durchgehendes Drücken der Rückstelltaste für
15 Sekunden zurückstellen, dann wird die Kamera auf
Werkseinstellungen zurückgestellt .(6)
SOFTWARE INSTALLATION
- Die mitgelieferte CD in das CD-Laufwerk des Computers
einlegen.
- Die “IPCamSetup.exe” Datei starten und zweimal die (7)
“Nächste” Schaltfläche anklicken. Jetzt ist die Software installiert.
SOFTWARE FUNKTION
- Auf das “IP Kamera Tool” Symbol auf dem Desktop doppelklicken.
Die Software sucht die Kamera automatisch im Netzwerk (8a)
- Auf die Kamera in der Liste doppelklicken . Die IP Adresse (8b)
wird im Standardbrowser automatisch geöffnet. Der Standard
Benutzername ist ´admin´ ohne Passwort .(9)
- Die passende Anmeldung wählen. ActiveX für Internet Explorer,
Server Push-Modus für andere Browser oder Mobiltelefon für
Mobilgeräte (Manuelle Verbindung erforderlich).(10)
Hinweis: die volle Funktionalität ist nur mit Internet Explorer
verfügbar.
DRAHTLOSE KONFIGURATION
- Im Browserprogramm auf “Netzwerk” klicken und “Drahtlose LAN
Einstellungen” wählen .(11)
- Der Router muss ein drahtloser Router sein. Stellen Sie sicher,
dass Sie das Passwort kennen, falls eines vorhanden ist.
- Die “Scan” Schaltfläche zweimal anklicken. Das Programm zeigt
alle verfügbaren WLAN Netzwerke an. Wählen Sie Ihr eigenes
Netzwerk .(12)
- Falls keine Verschlüsselung eingerichtet ist, auf Abschicken
klicken. Mit Verschlüsselung bitte den vergebenen Schlüssel
eingeben und auf Abschicken klicken.
- Warten Sie ca. 30 Sekunden. Die Kamera wird neu gestartet.
Dann das Netzwerkkabel abstecken.
TIPPS
- Der Anschluss muss im Innenbereich vorgenommen werden.
- Die Kamera kann wegen der Reflektion der IR LEDs nachts nicht
durch Glas sehen.
- Der Bereich des drahtlosen Netzwerks kann mit einem Range
Extender erweitert werden.
FÜR WEITERE INFORMATIONEN SIEHE VOLLSTÄNDIGES
HANDBUCH AUF CD
KAMERA SIECIOWA WIFI TYPU PODLACZ I ODTWARZAJ
C903IP
Kamera IP zapewnia szybki latwy sposób na przegladanie
wybranego obrazu na PC w sieci intranet lub poprzez Internet
za pomoca przegladarki. Wbudowane w kamerze diody IR-LED
umozliwiaja funkcje widzenia w nocy. Prosimy o dokladne
przeczytanie niniejszych instrukcji i w razie koniecznosci
przeczytanie calego podrecznika na dolaczonej plycie CD.
ZAWARTOSC OPAKOWANIA (1)
a. Bezprzewodowa kamera IP ze statywem
b. Zasilanie DC
c. Kabel sieciowy
d. Antena
e. Oprogramowanie
INSTALACJA KAMERY
- Podlaczyc otwór na srubke umieszczony w dolnej czesci kamery
IP ze statywem. Na podstawie statywu kamery znajduja sie (2a)
trzy otwory (1a) pozwalajace na montaz kamery na suficie lub
jakiejkolwiek scianie w bezpieczny sposób .(2b)
- Z tylnego panelu kamery IP odkrecic zewnetrzna antene (1d),
która wraz z kamera wchodzi do zlacza anteny .(3)
- Zamocowac zewnetrzne zasilanie DC (1b) na wejsciu DC
umieszczonym na koncu kabla polaczeniowego i nastepnie (4)
podlaczyc do miejscowego zasilania.
- Podlaczyc kabel sieciowy (1c) z wejsciem sieciowym
umieszczonym na koncu kabla polaczeniowego a nastepnie (5)
zamocowac go do routera/ przelacznika. Zólta dioda LED zapali
sie przy podlaczaniu do sieci, natomiast zielona dioda LED bedzie
migac podczas transferu danych .(5a)
- Zresetowac kamere mozna za pomoca przycisku resetowania
ciagle przez 15 sekund, a nastepnie kamera zostanie z powrotem
zresetowana do fabrycznych ustawien domyslnych .(6)
INSTALACJA OPROGRAMOWANIA
- Wstawic plyte CD do napedu dysku w komputerze
- Uruchomic plik “IPCamSetup.exe” i kliknac dwukrotnie (7)
przycisk “Nastepny”. Oprogramowanie jest juz zainstalowane.
PRACA OPROGRAMOWANIA
- Dwukrotnie kliknac ikone “Narzedzie kamery IP” na komputerze.
Oprogramowanie automatycznie wyszukuje sieci dla kamery
(8a).
- Dwukrotnie kliknac kamere na liscie . Adres IP (8b)
automatycznie otworzy sie w domyslnej przegladarce. Nazwa
domyslnego uzytkownika to ´admin´ i nie ma hasla .(9)
- Wybrac odpowiedni login ActiveX dla Internet Explorer, Tryb
serwera (Server Push Mode) dla innych przegladarek lub telefonu
komórkowego dla urzadzen telefonii komórkowej (To (10)
wymaga recznego polaczenia).
Uwaga: pelna funkcjonalnosc wystepuje tylko dla przegladarki
Internet Explorer.
KONFIGURACJA BEZPRZEWODOWA
- Kliknac “Siec” w programie przegladarki i wybrac
“bezprzewodowe ustawienia Lan” .(11)
- Sprawdzic, czy router jest routerem bezprzewodowym.
Sprawdzic, czy znamy haslo, o ile wystepuje
- Nacisnac dwukrotnie przycisk “Skanuj” Program pokaze dostepne
sieci WLAN. Wybrac wlasna siec .(12)
- Jesli nie ma kodowania nalezy kliknac Wyslij Jesli pojawia sie
kodowanie nalezy wprowadzic klucz i nastepnie kliknac Wyslij
- Poczekac ok. 30 sekund. Kamera zaladuje sie ponownie.
Nastepnie odlaczyc kabel sieciowy.
WSKAZÓWKI
- Polaczenie musi zostac wykonane w budynku
- Kamera nie widzi przez szybe w nocy z powodu odbijania diod IR
LED.
- Mozna poszerzyc zasieg sieci bezprzewodowej poprzez uzycie z
urzadzenia poszerzajacego zasieg.
WIECEJ INFORMACJI ZNALEZC MOZNA W PELNYM
PODRECZNIKU UZYTKOWANIA NA PLYCIE CD
C903IP PLUG & PLAY WIFI NETWERK CAMERA
De IP camera maakt het eenvoudig om beelden op iedere PC in
uw intranet of over het internet via een web browser te
bekijken. De camera ondersteunt nachtzicht middels
ingebouwde IR LEDs. Lees a.u.b. deze handleiding aandachtig
door en indien nodig de volledige handleiding op de
meegeleverde CD.
INHOUD VAN HET PAKKET (1)
a. Draadloze IP camera met standaard
b. DC voeding
c. Netwerkkabel
d. Antenne
e. Software
CAMERA INSTALLATIE
- Verbind het schroefgat aan de onderkant van de IP-camera (2a)
op de standaard. Er zijn drie gaten te vinden in de voet van de
camerastandaard (1a) waardoor de camera veilig tegen het
plafond of een muur kan worden gemonteerd (2b)
- Schroef de externe antenne (1d) die met de camera is
meegeleverd in de antenne aansluiting aan de achterzijde (3)
- Sluit de externe DC voeding (1b) aan op de DC aansluiting aan
op het eind van de verbindingskabel en steek de stekker in (4)
het stopcontact
- Verbind de netwerkkabel (1c) met de netwerk aansluiting aan het
eind van de verbindingskabel en steek deze dan in de router/ (5)
switch. De gele LED licht op als er stroom is, de groene LED gaat
knipperen als er gegevens worden verstuurd .(5a)
- Reset de camera door de reset button 15 seconden in te
drukken, de camera wordt dan teruggezet in de
fabrieksinstellingen . (6)
SOFTWARE INSTALLATIE
- Steek de meegeleverde CD in de drive in de computer
- Start “IPCamSetup.exe” en klik tweemaal op de “Volgende” (7)
toets. De software is nu geïnstalleerd.
SOFTWARE GEBRUIKEN
- Dubbelklik op het icoon “IP Camera Tool” op uw bureaublad. De
software zoekt automatisch het netwerk af naar de camera (8a)
- Dubbelklik op de camera in de lijst . Het IP adres wordt (8b)
automatisch in uw browser geopend. De standaard
gebruikersnaam is ´admin´ zonder wachtwoord . (9)
- Kies de gewenste login. ActiveX voor Internet Explorer, Server
Push Mode voor andere browsers of Mobiele telefoon voor
mobiele apparatuur (deze verbinding moet handmatig (10)
gemaakt worden).
Opmerking:u beschikt alleen over de volledige functionaliteit als u
Internet Explorer gebruikt.
DRAADLOZE CONFIGURATIE
- Klik op “Netwerk” in de browser en kies “Draadloze Lan
Instellingen” .(11)
- Let erop dat de router een draadloze router is. Let erop dat u het
wachtwoord weet, als deze nodig is
- Klik tweemaal op de “Scan” toets. Het programma toont alle
beschikbare WLAN netwerken. Selecteer uw eigen netwerk .(12)
- Als er geen encryptie is klikt u op Submit. Als er wel encryptie is,
geef dan de sleutel in en klik dan op Submit
- Wacht ongeveer 30 seconden. De camera start opnieuw op. Trek
dan de netwerk kabel eruit.
TIPS
- De verbinding moet binnenshuis gemaakt worden
- De camera kan 's nachts niet door glas heenkijken door de
reflectie van de IR LEDs.
- U kunt het bereik van uw draadloze netwerk vergroten door een
range extender te gebruiken.
VOOR MEER INFORMATIE ZIE
DE VOLLEDIGE HANDLEIDING OP DE CD
C903IP CAMÉRA DE RÉSEAU SANS FIL (WIFI) PLUG & PLAY
La caméra à adresse IP fournit un moyen rapide et facile de
regarder l'image voulue de tout PC de votre intranet ou à
travers internet à l'aide d'un navigateur web. La caméra est
d o t é e d ' u n e v i s i o n n o c t u r n e p a r d e s d i o d e s
électroluminescentes intégrées. Veuillez lire attentivement ce
manuel et si nécessaire, le manuel complet fourni sur le CD.
CONTENU DE LA CONFECTION (1)
a. Caméra à adresse IP de réseau sans fil avec son support
b. Alimentation électrique DC
c. Câble réseau
d. Antenne
e. Logiciel
INSTALLATION DE LA CAMÉRA
- Placez les trous de vis situés sur le fond de la Caméra IP au (2a)
support. Il y a trois trous situés à la base du support de caméra
(1a) qui permettent à la caméra d'être fixée au plafond ou sur le
mur fermement .(2b)
- Sur le panneau arrière de la caméra à adresse IP, vissez
l'antenne externe (1d) fournie avec la caméra dans le connecteur
d'antenne .(3)
- Branchez l'alimentation électrique DC externe (1b) à l'entrée DC
située à l'extrémité du câble de connexion et ensuite (4)
connectez-la à votre prise de courant local.
- Connectez le câble réseau (1c) à l'entrée réseau située à
l'extrémité du câble de connexion et ensuite attachez-le à (5)
votre routeur à votre commutateur. Le voyant DEL jaune
s'allumera quand l'alimentation est mise, le voyant DEL vert
clignotera lors du transfert de données .(5a)
- Réinitialisez la caméra en appuyant sur le bouton reset de façon
continue pendant 15 secondes, la caméra reviendra ensuite aux
réglages par défaut d'usine .(6)
INSTALLATION DU LOGICIEL
- Insérez le CD fourni dans le lecteur de disque de votre ordinateur
- Exécutez le fichier “IPCamSetup.exe” et cliquez sur le bouton (7)
“Suivant” deux fois. Le logiciel est à présent installé.
PRISE EN MAIN DU LOGICIEL
- Double-cliquez sur l'icône “Outil caméra IP” sur votre bureau. Le
logiciel recherche automatiquement la caméra sur le réseau
(8a).
- Double-cliquez sur la caméra de la liste . L'adresse IP sera (8b)
automatiquement ouverte dans votre navigateur web par défaut.
Le nom de l'utilisateur par défaut est 'admin' et le mot de passe
n'est pas configuré .(9)
- Choisissez l'identifiant correct. ActiveX pour Internet Explorer,
Mode Server Push pour les autres navigateurs ou Téléphonie
mobile pour les appareils mobiles (Une connexion manuelle (10)
est requise).
Remarque: Toutes les fonctionnalités sont assurées uniquement
avec l'utilisation d'Internet Explorer.
CONFIGURATION DE RÉSEAU SANS FIL
- Cliquez “Réseau” dans le programme de navigation et
sélectionnez “Configuration de réseau local sans fil” .(11)
- Assurez-vous que le router est un routeur de réseau sans fil.
Assurez-vous de connaître le mot de passe s'il est configuré
- Cliquez sur le bouton “Recherche” deux fois. Le programme
indiquera tous les réseaux sans fil (WLAN) disponibles. Choisissez
votre propre réseau .(12)
- S'il n'y a pas de chiffrement, cliquez sur Soumettre. S'il y a un
chiffrement, veuillez saisir la clé partagée et ensuite cliquez sur
Soumettre
- Patientez environ 30 secondes. La caméra redémarrera. Ensuite,
débranchez le câble réseau.
CONSEILS
- La connexion doit être réalisée en interne
- La caméra ne permet pas de regarder à travers les vitres
pendant la nuit en raison de la réflexion des diodes
électroluminescentes à infrarouge.
- Vous pouvez étendre la portée de votre réseau sans fil en
utilisant un répétiteur.
POUR PLUS D'INFORMATIONS, VOIR LE GUIDE DE
L'UTILISATEUR COMPLET SUR CD
CAMÁRA DE RED WIFI C903IP CONECTAR Y USAR
La cámara IP ofrece una manera rápida y fácil de visualizar la
imagen deseada en cualquier PC de intranet o por Internet a
través de un navegador de web. La cámara proporciona una
vision nocturna a través de los IR LED integrados. Por favor,
lea atentamente este manual y si fuera necesario, lea el
manual completo en el CD suministrado.
CONTENIDO DEL PAQUETE (1)
a. Cámara IP inalámbrica con soporte
b. Fuente de alimentación DC
c. Cable de red
d. Antena
e. Software
INSTALACIÓN DE LA CÁMARA
- Conecte el orificio del tornillo situado en la parte inferior de la
cámara IP al soporte. Hay tres orificios situados en la base (2a)
del soporte de la cámara (1a) que permiten montarla en el techo
o en cualquier pared de manera segura . (2b)
- En el panel posterior de la cámara IP, atornille la antena externa
(1d) que viene con la cámara en el conector de la antena (3)
- Conecte la fuente de alimentación DC externa (1b) a la entrada
DC situada en el extremo del cable de conexión después (4)
conéctela a la fuente de alimentación local.
- Conecte el cabe de red (1c) a la entrada de red situada en el
extremo del cable de conexión y después conéctelo al (5)
router/interruptor. El LED amarillo se encenderá cuando se
conecte a la alimentación, el LED verde parpadeará cuando se
transfieran los datos .(5a)
- Reinicie la cámara pulsando el botón de reinicio de manera
continua durante 15 segundos, después la cámara se reiniciará
de nuevo a la configuración predeterminada de fábrica (6).
INSTALACIÓN DEL SOFTWARE
- Inserte el CD suministrado en la unidad de disco de su
ordenador.
- Ejecute el archivo “IPCamSetup.exe” (7) y haga clic dos veces
en el botón “Siguiente”. El Software p1-ya se p1-ha instalado.
FUNCIONAMIENTO DEL SOFTWARE
- Haga doble clic en el icono “Herramienta de cámara IP” de su
escritorio. El software busca automáticamente la cámara en la
red .(8a)
- Haga doble clic en la cámara en la lista . La dirección IP (8b)
abrirá automáticamente el navegador predeterminado. El nombre
de usuario predeterminado es ´admin´ y no hay contraseña (9).
- Elija los datos adecuados para iniciar sesión. ActiveX para
Internet Explorer, Modo Server Push para otros navegadores o
teléfono móvil para dispositivos móviles (Esto require una (10)
conexión manual).
Nota: solo tendrá una funcionalidad completa cuando se ejecute
en Internet Explorer.
CONFIGURACIÓN INALÁMBRICA
- Haga clic en “Red” en el programa navegador y seleccione
“Configuración inalámbrica LAN" .(11)
- Asegúrese de que el router sea inalámbrico. Asegúrese de que
conoce la contraseña si hubiera alguna.
- Haga clic dos veces en el botón “Scan”. El programa mostrará
todas las redes WLAN disponibles. Elija su propia red . (12)
- Si no hay codificación, haga clic en Enviar. Si hay codificación,
por favor, introduzca la clave común, y a continuación haga clic
en Enviar.
- Espere unos 30 segundos. La cámara se reiniciará. Después
desconecte el cable de red.
CONSEJOS
- La conexión se debe realizar en el interior.
- La cámara no puede ver a través del cristal por la noche, debido
al reflejo de los IR LED.
- Puede ampliar el alcance de su red inalámbrica utilizando un
extensor de rango.
PARA MÁS INFORMACIÓN VEA LA GUÍA COMPLETA
DEL USUARIO EN CD
C903IP TAK-ÇALISTIR KABLOSUZ KAMERA
IP kamera herhangi yerel agdan veya internet üzerinden bir
tarayiciyla bir bilgisayarda hizli ve kolay görüntü incelemeye
olanak saglar. Kamera dahili kizilötesi LED lambalar sayesinde
gece görüsü saglar. Lütfen bu kilavuzu dikkatlice okuyunuz ve
gerekirse ürünle birlikte verilen CD’deki tam kapsamli
kilavuzu okuyunuz.
PAKET IÇERIGI (1)
a. Ayakli kablosuz IP kamera
b. DC güç kaynagi
c. Ag kablosu
d. Anten
e. Yazilim
KAMERA KURULUMU
- Ayagi IP kameranin altindaki vida deligine baglayiniz. (2a)
Kamerayi tavana veya duvara monte etmek için kamera ayaginin
altinda (1a) üç adet delik bulunmaktadir .(2b)
- Kamera ile birlikte verilen harici anteni (1d) IP kameranin arka
panelindeki anten konnektörünü baglayiniz .(3)
- Harici DC güç kaynagini (1b) baglanti kablosunun ucundaki DC
girisine baglayiniz ve ardindan elektrik sebekesine baglayiniz. (4)
- Ag kablosunu (1c) baglanti kablosunun ucundaki ag girisine (5)
baglayiniz ve ardindan yönlendiriciye/anahtara baglayiniz. Güç
baglantisi yapildiginda sari LED yanacaktir. Veri aktarimi
basladiginda yesil LED yanip sönecektir .(5a)
- Sifirlama dügmesini 15 saniye basili tutarak kamerayi
sifirlayabilirsiniz. Kamera fabrika ayarlarina dönecektir .(6)
YAZILIMIN KURULUMU
- Ürünle birlikte verilen CD’yi bilgisayarinizin disk sürücüsüne
yerlestiriniz
- “IPCamSetup.exe” dosyasini çalistiriniz ve iki defa “Next” (7)
(Ileri) dügmesine basiniz. Yazilim kurulumu tamamlanmistir.
YAZILIMIN KULLANIMI
- Bilgisayarinizin masaüstündeki “IP Camera Tool” simgesine çift
tiklayiniz. Yazilim otomatik olarak agda kamerayi arayacaktir
(8a).
- Listedeki kameraya çift tiklayiniz . IP adresi otomatik olarak (8b)
varsayilan tarayicinizda açilacaktir. Varsayilan kullanici adi
‘admin’dir ve parola yoktur .(9)
- Uygun oturum açma seçenegini seçiniz: Internet Explorer için
ActiveX, diger tarayicilar için Server Push Mode veya mobil
cihazlar için Mobile phone (Bu elle baglanti gerektirir).(10)
Not: Yalnizca Internet Explorer ile tüm islevler kullanilabilir.
KABLOSUZ BAGLANTI YAPILANDIRMASI
- Tarayicida “Network” (Ag) seçenegine tiklayiniz ve “Wireless Lan
Settings” (Kablosuz Ag Ayarlari) sekmesini seçiniz .(11)
- Yönlendiricinin kablosuz oldugundan emin olun. Varsa parola
girmeniz gerekecektir.
- “Scan” (Tara) dügmesine iki defa basiniz. Program kullanilabilir
tüm kablosuz aglari gösterecektir. Kendi aginizi seçiniz .(12)
- Sifreleme yoksa “Submit”e (Gönder) tiklayiniz. Sifreleme varsa
lütfen paylasim anahtarini giriniz ve “Submit”e (Gönder)
tiklayiniz.
- Yaklasik 30 saniye bekleyiniz. Kamera yeniden baslatilacaktir.
Ardindan ag kablosunu çikariniz.
IPUÇLARI
- Baglanti iç mekanda yapilmalidir.
- Kizilötesi LED isik yansiyacagindan kamera geceleri camin
arkasini göremez.
- Bir menzil artirici kullanarak kablosuz aginizin menzilini
artirabilirsiniz.
DAHA FAZLA BILGI IÇIN CD’DEKI TAM KAPSAMLI KULLANIM
KILAVUZUNA BAKINIZ
C903IP ? ?? ??? ? ? ? ? ? ?? ? WIFI PLUG & PLAY
? ??µe?a IP sa? e?as f a???e? ??a ??????? ?a? e????? t??p? ?a
de?te t?? e????a p?? ep???µe?te s e ?p???d?p?te ?p?????s t?
t?? e?d? d??t??? s a? ? s t ? d?ad??t?? µ?s ? ??p????
p?????µµat?? pe?????s ?? ?s t??. ? ??µe?a d?a??te? ???te????
? ? as ? ?? ? ? s t ?? e?s ? µat ? µ??e? ? p?? ? ? ? e? LEDs.
? a?a?a???µe d?aß?s te t? pa??? e??e???d?? p??s e?t??? ?a? e??
??e?as te?, d?aß?s te p??s e?t??? t? p???e? e??e???d?? p??
?p???e? s t? pa?e??µe?? CD.
? ?? ??? ? ? ?? ? S?S???? S?? S (1)
a. ? s??µat? ??µe?a IP µe ß?s?
b. ???f ?d?t??? DC
c. ?a?? d?? ? ??t ???
d. ? e?a?a
e. ? ???sµ???
?G? ? ?? S?? S? ? ? ? ?? ? S
- S??d?ste t?? ?p? t ?? ß?da? p?? ß??s?eta? st ? ??t? µ???? t??
??µe?a? IP µe t? ß?s ?. ?p?????? t?e?? ?p?? s t? ß?s? t?? (2a)
??µe?a? (1a) p?? ep?t??p??? t?? asf a?? t?p???t?s ? t?? se
taß??? ? ?p???d?p?te t???? .(2b)
- St? p?s ? µ???? t?? ??µe?a? IP, ß?d? st e t ?? e?? te???? ?e?a?a
p?? pe???aµß??et a? st? s?s ?e?as ?a (1d) st ?? ?p?d??? t??
?e?a?a? . (3)
- S??d?ste t? e?? te???? t??f ?d?t ??? DC (1b) st?? e?s?d? DC p??
ß??s?eta? st?? ???? t?? ?a?? d??? s??des?? ?a? st? (4)
s????e?a s??d?st e t? µe t?? t?p??? sa? pa????.
- S??d?ste t? ?a?? d?? d??t??? (1c) s t?? e?s ?d? d??t??? p??
ß??s?eta? st?? ???? t?? ?a?? d??? s??des?? ?a? st? (5)
s????e?a s??d?st e t? µe t? router/ d?a??pt?. ? ??t???? LED ?a
e?e???p????e? ?at? t ? s??des? µe t? ?e?µa, ?a? ? p??s??? LED
?a a?aß?sß??e? ?at? t? µetaf ??? ded?µ??? ? .(5a)
- ?pa?af ??et e t?? ??µe?a st ?? a????? t?? ?at?stas? pat? ?ta?
s??e??µe?a t ? p???t?? reset ??a 15 de?te???ept a, ?p?te ?
??µe?a ?a epa????e? s t?? e???stas?a??? t?? ???µ?s e?? .(6)
?G? ? ?? S?? S? ? ? G?S? ?? ? ?
- ??s??ete t? pa?e??µe?? CD s t?? ?p?????st? s a?
- ?p????te e?t ??es? t?? a??e??? “IPCamSetup.exe” ?a? ???ete (7)
???? st? p???t?? «?p?µe??» d?? f ????. ?? ????sµ??? ??e? p????
e??atasta?e?.
? ???? ? ?G?? ? ? G?S? ?? ? ?
- ? ??ete d?p?? ???? st? e?????d?? “IP Camera Tool” st?? ep?f ??e?a
e??as?a? sa?. ?? ????sµ??? a?a??t ? a?t?µ?t? ? t?? ??µe?a st?
d??t?? .(8a)
- ? ??ete d?p?? ???? st?? ??µe?a ap? t? ??s ta . ? d?e????s? (8b)
IP ?a a????e? a?t?µ?t ? ? st? p??ep??e?µ??? p????aµµ? sa?
pe?????s?? ?st??. ?? p??ep??e?µ??? ???µa ???st ? e??a? admin / /
?a? de? ?p???e? ?? d???? .(9)
- ?p????te t ?? ?at ?????? s ??des?. ActiveX ??a t?? Internet
Explorer, Server Push Mode ??a ???a p?????µµata pe?????s ??
?st?? ? ? ???t ? t??ef ? ??a ??a ????t ?? s?s ?e??? (? ?t? (10)
apa?te? ?e???????t? s??des?).
S?µe?? s?: p????? ?e?t ???????t ?ta e?asf a???eta? µ??? ?at ? t??
e?t??es? t ?? Internet Explorer.
? S??? ? ?? ? ?? ? ? ? F OS?
- ? ??ete ???? s t? «? ??t??» st ? p????aµµa pe?????s ?? ?st?? ?a?
ep????te «? s??µate? ???µ?se?? Lan» .(11)
- ? eßa?? ?e?te ?t? t? router e??a? as??µat?. ? eßa?? ?e?t e ?t?
??? ???ete t?? ?? d??? se pe??pt ? s? p?? ?p???e?.
- ? ??ete ???? s t? p???t?? «S??? s?» d?? f ????. ?? p????aµµa ?a
eµf a??se? ??a ta d?a??s?µa d??t?a WLAN. ?p????te t? d??? sa?
d??t?? .(12)
- ??? de? ?p???e? ???pt ????f ?s ?, ???ete ???? st?? ?p?ß???. ???
?p???e? ???pt????f ?s?, pa?a?a???µe e?s??ete t? ??e?d? ?a?
???ete ???? st?? ?p?ß???.
- ? e??µ??ete pe??p?? 30 de?te???ept a. ? ??µe?a ?a
p?a?µat?p???se? epa?e?????s?. St? s????e?a ap?s ??d?ste t?
?a?? d?? d??t???.
S?? ? ? ?? ?S
- ? s??des? p??pe? ?a ???e? s e es? te???? ?? ??
- ? ??µe?a de? µp??e? ?a de? µ?sa ap? ??a?? ?at ? t? d????e?a t??
???ta? ???? t?? a?ta????as?? t? ? ?p?????? ? LEDs.
- ? p??e?t e ?a epe?te??ete t?? eµß??e?a t?? as??µat ?? d??t??? s a?
???s ?µ?p??? ?ta? µ?a s ?s?e?? ep??tas ?? eµß??e?a?.
G?? ? ?? ?SS? ????S ? ? ? ? ? F ? ? ??S S?? ? ? ? ? ?? T ???? ??
? ? ? ? ?S ?G? ????? ?? ? ? ? ?? ? ? ??? S?? CD
C903IP PLUG & PLAY WIFI SÍTOVÁ KAMERA
IP kamera predstavuje snadný a rychlý zpusob k zobrazení
požadovaného obrazu na jakémkoliv PC ve Vašem intranetu
nebo pres internet prostrednictvím webového prohlížece. Tato
kamera umožnuje nocní videní skrz zabudované infracervené
LED. Prectete si, prosím, dukladne tento návod a podle potreby
se podívejte do úplného návodu na CD.
OBSAH BALENÍ (1)
a. Bezdrátová IP kamera se stojanem
b. Stejnosmerný zdroj napájení
c. Sítový kabel
d. Anténa
e. Software
INSTALACE KAMERY
- Napojte otvor pro šroub umístený na spodku IP kamery ke (2a)
stojanu. Ve spodku stojanu (1a) kamery jsou tri otvory, které
umožnují bezpecnou montáž kamery na strop nebo stenu .(2b)
- Ze zadního panelu IP kamery namontujte vnejší anténu (1d),
která byla dodána s kamerou, do konektoru pro anténu .(3)
- Pripojte vnejší stejnosmerný napájecí zdroj (1b) do príslušného
konektoru kamery a pak ho zapojte do elektrické síte.(4)
- Zapojte sítový kabel (1c) do sítového konektoru na konci
propojovacího kabelu a pak ho zapojte do routeru/ switche. (5)
Žlutá LED kontrolka se rozsvítí pri zapojení do síte, zelená LED
bude blikat pri prenosu dat .(5a)
- Kameru lze resetovat pridržením tlacítka reset po dobu
15 sekund, kamera se pak nastaví na výchozí tovární nastavení
(6).
INSTALACE SOFTWARU
- Vložte dodané CD do mechaniky svého pocítace
- Spustte soubor “IPCamSetup.exe” a kliknete dvakrát na (7)
tlacítko “Další”. Software je nyní nainstalován.
OVLÁDÁNÍ SOFTWARU
- Kliknete dvakrát na ikonu “IP Camera Tool” na Vaší pracovní
ploše. Software automaticky vyhledá kameru v síti .(8a)
- Kliknete dvakrát na kameru v seznamu . IP adresa se (8b)
automaticky otevre ve Vašem výchozím prohlížeci. Výchozí
uživatelské jméno je ´admin´ a bez hesla .(9)
- Zvolte správné prihlášení. ActiveX pro Internet Explorer, Server
Push Mode pro ostatní prohlížece nebo Mobile phone pro mobilní
zarízení (vyžaduje manuální zapojení).(10)
Poznámka: plné funkcnosti dosáhnete pouze pri použití Internet
Exploreru.
BEZDRÁTOVÁ KONFIGURACE
- Kliknete na “Network (sít)” v programu prohlížece a zvolte
“Wireless Lan Settings (nastavení bezdrátové síte)” (11).
- Ujistete se, že router je bezdrátový. Ujistete se, že znáte heslo,
je-li potreba
- Kliknete dvakrát na tlacítko “Scan”. Program zobrazí všechny
dostupné WLAN síte. Zvolte svou sít .(12)
- Není-li sít zabezpecená, kliknete na "Submit (pripojit)". Je-li
zabezpecená, zadejte sdílený klíc a pak kliknete na "Submit
(pripojit)".
- Pockejte približne 30 sekund. Kamera se restartuje. Pak odpojte
sítový kabel.
TIPY
- Pripojení musí být provedeno pod strechou
- Kamera neuvidí v noci pres sklo kvuli odrazu infracervených LED.
- Dosah bezdrátové síte lze zvetšit prostrednictvím prodlužovace
dosahu.
VÍCE INFORMACÍ VIZ PLNÝ NÁVOD NA CD
C903IP PLUG & PLAY WIFI HÁLÓZATI KAMERA
Az IP kamera gyors és könnyed lehetoséget biztosít a kívánt
képtartalom intranetre csatlakozó személyi számítógépen
való megjelenítésére, illetve az interneten keresztül egy
webböngészo segítségével való megtekintésére. A kamera
éjszakai üzemmódját beépített LED-ek teszik lehetové.
Kérjük, alaposan tekintse át ezt a kézikönyvet és – szükség
esetén – olvassa el a CD-n található teljes kézikönyvet.
A CSOMAG TARTALMA (1)
a. vezeték nélküli IP-kamera talppal
b. egyenáramú tápegység
c. hálózati kábel
d. antenna
e. szoftver
KAMERA ÜZEMBE HELYEZÉSE
- Tekerje be a talpat az IP-kamera alján található menetes furatba
(2a). A kameratalp (1a) alján három furat található, ami
lehetové teszi a készülék biztonságos rögzítését a plafonra,
illetve bármilyen falra .(2b)
- Az IP-kamera hátoldalán tekerje be a készülékhez melléklet külso
antennát (1d) az antenna csatlakozó aljzatába .(3)
- Helyezze be a külso egyenáramú tápegység (1b) dugaszát a
csatlakoztató kábel végén található aljzatba , majd (4)
csatlakoztassa a tápegységet a hálózati áramellátásra.
- Helyezze be a hálózati kábelt (1c) a csatlakoztató kábel végén
található hálózati aljzatba , majd csatlakoztassa a (5)
routerhez/kapcsolóhoz. Az áramellátás meglétét a sárga LED-izzó
felgyulladása jelzi, a villogó zöld LED-izzó pedig az adatátvitelt
mutatja .(5a)
- A készülék gyári alapértelmezett beállításait a RESET
(visszaállítás) gomb 15 mp-ig tartó folyamatos lenyomásával
állíthatja vissza .(6)
SZOFTVER TELEPÍTÉSE
- Helyezze be a mellékelt CD-t a számítógép lemezmeghajtójába.
- Futassa az „IPCamSetup.exe” fájlt , majd kattintson kétszer a (7)
„Tovább” gombra. A szoftver telepítése befejezodött.
A SZOFTVER HASZNÁLATA
- Kattintson kétszer az Asztalon megjelent „IP kamera eszköz”
ikonra. A szoftver automatikusan megkeresi a kamerát a
hálózaton . (8a)
- Kattintson kétszer a listán található kamerára . Ekkor az IP-(8b)
cím automatikusan megjelenik az alapértelmezett
webböngészoben. Az alapértelmezett felhasználónév „admin”,
jelszó nincs .(9)
- Válassza ki a megfelelo belépési módot. ActiveX Internet
Explorerhez. Server Push Mode (kiszolgáló leküldési üzemmód)
egyéb webböngészok esetében, illetve Mobile phone
(mobiltelefon) mobilkészülékek esetében . (Ehhez kézi (10)
csatlakoztatás szükséges.)
Megjegyzés: teljes funkcionalitás Internet Explorer alatti futtatás
esetén érheto el.
VEZETÉK NÉLKÜLI KONFIGURÁCIÓ
- Kattintson a „Hálózat” lehetoségre a webböngészojében és
válassza ki a „Vezeték nélküli hálózati beállítások” opció (11)
- Gyozodjön meg róla, hogy a router vezeték nélküli router.
Gondoskodjon róla, hogy adott esetben rendelkezzen a
csatlakozáshoz szükséges jelszóval.
- Kattintson a „Keresés” gombra kétszer A program az összes
elérheto vezeték nélküli (WLAN) hálózatot megmutatja. Válassza
ki saját hálózatát .(12)
- Amennyiben nincs titkosítás, kattintson a „Küldés” lehetoségre.
Titkosítás esetén adja meg a megosztási azonosítót, majd
kattintson a „Küldés” lehetoségre.
- Várjon 30 másodpercet. A kamera újraindul. Ezt követoen húzza
ki a hálózati kábelt.
JÓ TANÁCSOK
- A csatlakoztatást beltérben végezze.
- A kamera éjszaka nem lát át az üvegen az infravörös LED-ek
visszatükrözodése miatt.
- A vezeték nélküli hálózat hatótávolsága kiterjesztheto
hatótávolság-növelo készülékkel.
TOVÁBBI RÉSZLETEKÉRT LÁSD A CD-N TALÁLHATÓ TELJES
FELHASZNÁLÓI ÚTMUTATÓT.
CAMERA VIDEO DE RETEA C903IP PLUG & PLAY WIFI
Camera video IP ofera un mod usor si rapid de a viziona
imaginea dorita pe orice PC din reteaua de intranet sau pe
internet prin intermediul unui browser web. Camera video
asigura vedere de noapte prin LED-uri IR incorporate. Va
rugam sa cititi cu atentie acest manual, iar daca este cazul,
cititi întregul manual de pe CD-ul oferit.
CONTINUTUL PACHETULUI (1)
a. Camera video IP fara fir cu suport
b. Sursa de alimentare curent continuu
c. Cablu retea
d. Antena
e. Software
INSTALAREA CAMEREI
- Fixati orificiul aflat la baza camerei video IP pe suport. (2a)
Sunt trei orificii la baza suportului camerei (1a) care permit
montarea în siguranta a camerei video pe tavan sau pe perete
(2b).
- Din spatele panoului camerei video IP, însurubati antena externa
(1d) la conectorul de antena . (3)
- Atasati sursa de alimentare de curent continuu (1b) la borna de
intrare a sursei amplasata la capatul cablului de conectare si (4)
apoi conectati-o la sursa dumneavoastra de alimentare.
- Conectati cablul de retea (1c) la borna de retea amplasata la
capatul cablului de conectare si apoi conectati-l la (5)
router/întrerupator. LED-ul galben se aprinde atunci când este
conectat la sursa de curent, LED-ul verde se aprinde intermitent
atunci când sunt transferate datele .(5a)
- Resetati camera video prin apasarea continua timp de
15 secunde a butonului de resetare, apoi camera video este
resetata la setarile initiale .(6)
INSTALARE SOFTWARE
- Introduceti CD-ul în unitatea de disc a calculatorului
dumneavostra.
- Executati fisierul “IPCamSetup.exe” si dati clic pe butonul (7)
“Next” de doua ori. Software-ul este acum instalat.
OPERARE SOFTWARE
- Dati dublu clic pe pictograma “IP Camera Tool” de pe desktop.
Software-ul cauta automat reteaua pentru camera video .(8a)
- Executati dublu clic pe camera video din lista (8b). Adresa IP se
va deschide automat în browser-ul dumneavoastra implicit.
Numele implicit de utilizator este ´admin´ si nu exista parola
(9).
- Alegeti modul de conectare corespunzator. ActiveX pentru
Internet Explorer, Server Push Mode pentru alte browsere sau
Mobile phone pentru aparate mobile (Acesta necesita (10)
conectare manuala).
Observatie: aparatul functioneaza la capacitate maxima atunci când
este utilizat în Internet Explorer.
CONFIGURARE WIRELESS
- Dati clic pe “Network” în programul browser-ului si selectati
“Wireless Lan Settings” .(11)
- Asigurati-va ca router-ul este un router wireless/fara fir.
Asigurati-va ca stiti parola daca aceasta exista.
- Dati clic pe butonul “Scan” de doua ori. Programul va afisa toate
retelele WLAN disponibile.Alegeti reteaua .(12)
- Daca nu exista criptare, dati click pe Submit. Daca exista
criptare, introduceti cheia de conectare apoi dati clic pe Submit.
- Asteptati aproximativ 30 de secunde. Camera video reporneste.
Apoi deconectati cablul de retea.
RECOMANDARI
- Conectarea trebuie efectuata în interior.
- Camera video nu poate înregistra prin sticla în tipul noptii din
cauza reflectiei LED-urilor IR.
- Puteti prelungi raza retelei wireless prin folosirea unui prelungitor
de distanta.
PENTRU MAI MULTE INFORMATII VA RUGAM
SA CONSULTATI GHIDUL COMPLET
AL UTILIZATORULUI DE PE CD
C903IP PLUG & PLAY WIFI MREŽNA KAMERA
IP kamera pruža brz i jednostavan nacin za pregled željene
slike na bilo kojem racunalu u vašem intranetu ili preko
interneta putem web preglednika. Kamera osigurava nocno
gledanje putem ugradenih IC LED svjetala. Molimo pažljivo
procitajte ovaj prirucnik i ako je potrebno procitajte kompletni
prirucnik na isporucenom CD-u.
SADRŽAJ PAKETA (1)
a. Bežicna IP kamera sa stalkom
b. DC izvor napajanja
c. Mrežni kabel
d. Antena
e. Softver
POSTAVLJANJE KAMERE
- Spojite rupu za vijak s donje strane IP kamere na stalak. (2a)
Na podnožju stalka za kameru (1a) nalaze se tri rupe koje
omogucuju cvrsto montiranje kamere na strop ili bilo koji zid
(2b).
- Na stražnjoj ploci bežicne IP kamere, pritegnite vanjsku antenu
(1d) koju ste dobili s kamerom na prikljucak za antenu .(3)
- Prikljucite vanjsko DC napajanje (1b) na DC ulaz koji se nalazi na
kraju spojnog kabela , a zatim na zidnu uticnicu.(4)
- Spojite mrežni kabel (1c) na mrežni ulaz koji se nalazi na kraju
spojnog kabela , a zatim ga spojite na usmjerivac / (5)
preklopnik. Žuto LED svjetlo ce zasvijetliti kad je ostvarena veza
s napajanjem, zeleno LED svjetlo ce treptati kad se podaci
prebace .(5a)
- Resetirajte kameru tako da pritisnete gumb reset neprekidno na
15 sekundi, kamera ce se resetirati na tvornicki zadane postavke
(6).
INSTALACIJA SOFTVERA
- Umetnite priloženi instalacijski CD u pogon optickog diska
racunala.
- Pokrenite datoteku „IPCamSetup.exe“ i kliknite gumb „Dalje“ (7)
dva puta. Softver je sada instaliran.
SOFTVERSKI RAD
- Dvostruko kliknite ikonu „IP Camera Tool“ na radnoj površini.
Softver automatski traži mrežu za kameru .(8a)
- Dvostruko kliknite na kameru na popisu . IP adresa ce se (8b)
automatski otvoriti u vašem zadanom pregledniku. Zadano
korisnicko ime je „admin“ i nema lozinke (9).
- Odaberite odgovarajucu prijavu. ActiveX za Internet Explorer,
režim Server Push za ostale preglednike ili Mobile phone za
mobilne uredaje (Za ovo je potrebno rucno povezivanje).(10)
Zapamtite: punu funkcionalnost cete imati samo kad je pokrenut
Internet Explorer.
KONFIGURACIJA BEŽICNE MREŽE
- Kliknite „Mreža“ u pregledniku i odaberite „Postavke bežicne LAN
mreže“ .(11)
- Pobrinite se da imate bežicni usmjerivac. Pobrinite se da znate
lozinku ako je postavljena.
- Kliknite gumb „Skeniraj“ dva puta. Program ce prikazati sve
dostupne WLAN mreže. Odaberite vlastitu mrežu .(12)
- Ako nema enkripcije kliknite „Podnesi“. Ako postoji enkripcija
molimo unesite kljuc i zatim kliknite „Podnesi“.
- Pricekajte oko 30 sekundi. Kamera ce se ponovno pokrenuti.
Zatim iskopcajte mrežni kabel.
SAVJETI
- Kamera se mora postaviti u zatvorenom prostoru.
- Kamera ne može vidjeti kroz staklo po noci zbog refleksije IC LED
svjetala.
- Možete proširiti domet vaše bežicne mreže korištenjem
proširivaca dometa.
ZA VIŠE INFORMACIJA POGLEDAJTE KOMPLETNI
KORISNICKI PRIRUCNIK NA CD-U
Specyfikacje produktu
| Marka: | Elro |
| Kategoria: | Kamera monitorująca |
| Model: | C903IP |
Potrzebujesz pomocy?
Jeśli potrzebujesz pomocy z Elro C903IP, zadaj pytanie poniżej, a inni użytkownicy Ci odpowiedzą
Instrukcje Kamera monitorująca Elro

10 Października 2024
9 Października 2024
29 Września 2024
20 Września 2024
19 Września 2024
16 Września 2024
15 Września 2024
14 Września 2024
13 Września 2024
7 Września 2024
Instrukcje Kamera monitorująca
- Kamera monitorująca Sony
- Kamera monitorująca Samsung
- Kamera monitorująca Tenda
- Kamera monitorująca Motorola
- Kamera monitorująca Stabo
- Kamera monitorująca Logitech
- Kamera monitorująca Xiaomi
- Kamera monitorująca Braun
- Kamera monitorująca Pioneer
- Kamera monitorująca TP-Link
- Kamera monitorująca Philips
- Kamera monitorująca Bosch
- Kamera monitorująca Gigaset
- Kamera monitorująca Hikvision
- Kamera monitorująca EZVIZ
- Kamera monitorująca Conceptronic
- Kamera monitorująca Panasonic
- Kamera monitorująca Canon
- Kamera monitorująca Crestron
- Kamera monitorująca Withings
- Kamera monitorująca Asus
- Kamera monitorująca Nedis
- Kamera monitorująca AG Neovo
- Kamera monitorująca Reolink
- Kamera monitorująca Boss
- Kamera monitorująca TRENDnet
- Kamera monitorująca Marquant
- Kamera monitorująca Toshiba
- Kamera monitorująca D-Link
- Kamera monitorująca August
- Kamera monitorująca Niceboy
- Kamera monitorująca Ring
- Kamera monitorująca Garmin
- Kamera monitorująca Imou
- Kamera monitorująca Blaupunkt
- Kamera monitorująca Grundig
- Kamera monitorująca APC
- Kamera monitorująca Honeywell
- Kamera monitorująca BLOW
- Kamera monitorująca Manhattan
- Kamera monitorująca Strong
- Kamera monitorująca Swann
- Kamera monitorująca Kwikset
- Kamera monitorująca Kodak
- Kamera monitorująca Cisco
- Kamera monitorująca ORNO
- Kamera monitorująca Broan
- Kamera monitorująca Moxa
- Kamera monitorująca Synology
- Kamera monitorująca Gembird
- Kamera monitorująca ZTE
- Kamera monitorująca Turing
- Kamera monitorująca Lindy
- Kamera monitorująca Minox
- Kamera monitorująca Zebra
- Kamera monitorująca DSC
- Kamera monitorująca JVC
- Kamera monitorująca ZyXEL
- Kamera monitorująca Trust
- Kamera monitorująca LogiLink
- Kamera monitorująca Furrion
- Kamera monitorująca Linksys
- Kamera monitorująca Google
- Kamera monitorująca Digitus
- Kamera monitorująca Vimar
- Kamera monitorująca V-TAC
- Kamera monitorująca Dahua Technology
- Kamera monitorująca Schneider
- Kamera monitorująca Eufy
- Kamera monitorująca Ricoh
- Kamera monitorująca Emos
- Kamera monitorująca AVMATRIX
- Kamera monitorująca Renkforce
- Kamera monitorująca Rollei
- Kamera monitorująca Marshall
- Kamera monitorująca Perel
- Kamera monitorująca Somfy
- Kamera monitorująca Uniden
- Kamera monitorująca Netgear
- Kamera monitorująca Thomson
- Kamera monitorująca DiO
- Kamera monitorująca Velleman
- Kamera monitorująca Ferguson
- Kamera monitorująca DataVideo
- Kamera monitorująca Delta Dore
- Kamera monitorująca Pyle
- Kamera monitorująca Intellinet
- Kamera monitorująca CRUX
- Kamera monitorująca Setti+
- Kamera monitorująca Waeco
- Kamera monitorująca Vivotek
- Kamera monitorująca Vtech
- Kamera monitorująca Speco Technologies
- Kamera monitorująca EtiamPro
- Kamera monitorująca Edimax
- Kamera monitorująca Petcube
- Kamera monitorująca ION
- Kamera monitorująca First Alert
- Kamera monitorująca AirLive
- Kamera monitorująca Maginon
- Kamera monitorująca EnGenius
- Kamera monitorująca SPC
- Kamera monitorująca Planet
- Kamera monitorująca Brilliant
- Kamera monitorująca Genie
- Kamera monitorująca LevelOne
- Kamera monitorująca Axis
- Kamera monitorująca Sanyo
- Kamera monitorująca Lorex
- Kamera monitorująca Control4
- Kamera monitorująca Milesight
- Kamera monitorująca Aluratek
- Kamera monitorująca Abus
- Kamera monitorująca Olympia
- Kamera monitorująca Hama
- Kamera monitorująca Marmitek
- Kamera monitorująca Ubiquiti Networks
- Kamera monitorująca Western Digital
- Kamera monitorująca Netatmo
- Kamera monitorująca Schwaiger
- Kamera monitorująca Promise Technology
- Kamera monitorująca GVI Security
- Kamera monitorująca AVer
- Kamera monitorująca ZKTeco
- Kamera monitorująca Netis
- Kamera monitorująca Extech
- Kamera monitorująca Denver
- Kamera monitorująca Anker
- Kamera monitorująca Allnet
- Kamera monitorująca Marshall Electronics
- Kamera monitorująca Orion
- Kamera monitorująca Yale
- Kamera monitorująca SereneLife
- Kamera monitorująca Ernitec
- Kamera monitorująca AVerMedia
- Kamera monitorująca MEE Audio
- Kamera monitorująca Genius
- Kamera monitorująca Trevi
- Kamera monitorująca Technaxx
- Kamera monitorująca Atlona
- Kamera monitorująca Hanwha
- Kamera monitorująca Overmax
- Kamera monitorująca Quantum
- Kamera monitorująca Y-cam
- Kamera monitorująca Grandstream
- Kamera monitorująca Raymarine
- Kamera monitorująca Powerfix
- Kamera monitorująca Avanti
- Kamera monitorująca Ikan
- Kamera monitorująca Alecto
- Kamera monitorująca Avidsen
- Kamera monitorująca JUNG
- Kamera monitorująca Burg Wächter
- Kamera monitorująca Foscam
- Kamera monitorująca Lumens
- Kamera monitorująca Monacor
- Kamera monitorująca Dörr
- Kamera monitorująca M-e
- Kamera monitorująca EVE
- Kamera monitorująca Smartwares
- Kamera monitorująca Adj
- Kamera monitorująca Qian
- Kamera monitorująca Arenti
- Kamera monitorująca Elmo
- Kamera monitorująca Vitek
- Kamera monitorująca Alfatron
- Kamera monitorująca UniView
- Kamera monitorująca Clas Ohlson
- Kamera monitorująca Laserliner
- Kamera monitorująca Megasat
- Kamera monitorująca REVO
- Kamera monitorująca BZBGear
- Kamera monitorująca BirdDog
- Kamera monitorująca KJB Security Products
- Kamera monitorująca HiLook
- Kamera monitorująca Profile
- Kamera monitorująca Aldi
- Kamera monitorująca Aritech
- Kamera monitorująca Acti
- Kamera monitorująca ACME
- Kamera monitorująca Flamingo
- Kamera monitorująca Caliber
- Kamera monitorująca Eminent
- Kamera monitorująca Sitecom
- Kamera monitorująca Exibel
- Kamera monitorująca Fortinet
- Kamera monitorująca KlikaanKlikuit
- Kamera monitorująca Trebs
- Kamera monitorująca Ednet
- Kamera monitorująca Steren
- Kamera monitorująca Flir
- Kamera monitorująca Buffalo
- Kamera monitorująca Arlo
- Kamera monitorująca Nest
- Kamera monitorująca Siedle
- Kamera monitorująca Hive
- Kamera monitorująca Switel
- Kamera monitorująca Chacon
- Kamera monitorująca InFocus
- Kamera monitorująca Hombli
- Kamera monitorująca Naxa
- Kamera monitorująca Konig
- Kamera monitorująca Valueline
- Kamera monitorująca BRK
- Kamera monitorująca QSC
- Kamera monitorująca Xavax
- Kamera monitorująca Vaddio
- Kamera monitorująca Gira
- Kamera monitorująca Interlogix
- Kamera monitorująca Boyo
- Kamera monitorująca IC Intracom
- Kamera monitorująca Iget
- Kamera monitorująca EverFocus
- Kamera monitorująca Adesso
- Kamera monitorująca Satel
- Kamera monitorująca POSline
- Kamera monitorująca Notifier
- Kamera monitorująca Hawking Technologies
- Kamera monitorująca Friedland
- Kamera monitorująca Nexxt
- Kamera monitorująca Monoprice
- Kamera monitorująca Watec
- Kamera monitorująca Beafon
- Kamera monitorująca Chuango
- Kamera monitorująca ETiger
- Kamera monitorująca Videcon
- Kamera monitorująca INSTAR
- Kamera monitorująca Provision ISR
- Kamera monitorująca Aqara
- Kamera monitorująca Advantech
- Kamera monitorująca Digital Watchdog
- Kamera monitorująca Ganz
- Kamera monitorująca AViPAS
- Kamera monitorująca ClearOne
- Kamera monitorująca Ebode
- Kamera monitorująca Oplink
- Kamera monitorująca Sonic Alert
- Kamera monitorująca Linear PRO Access
- Kamera monitorująca Summer Infant
- Kamera monitorująca SMC
- Kamera monitorująca Topica
- Kamera monitorująca Kogan
- Kamera monitorująca Iiquu
- Kamera monitorująca Verint
- Kamera monitorująca Brinno
- Kamera monitorująca Rostra
- Kamera monitorująca Caddx
- Kamera monitorująca Spyclops
- Kamera monitorująca EKO
- Kamera monitorująca Kguard
- Kamera monitorująca Woonveilig
- Kamera monitorująca Mobi
- Kamera monitorująca Surveon
- Kamera monitorująca Hollyland
- Kamera monitorująca Epcom
- Kamera monitorująca Indexa
- Kamera monitorująca Lutec
- Kamera monitorująca Whistler
- Kamera monitorująca ClearView
- Kamera monitorująca VideoComm
- Kamera monitorująca IMILAB
- Kamera monitorująca 3xLOGIC
- Kamera monitorująca Pelco
- Kamera monitorująca Leviton
- Kamera monitorująca Inkovideo
- Kamera monitorująca Pentatech
- Kamera monitorująca Weldex
- Kamera monitorująca SecurityMan
- Kamera monitorująca Canyon
- Kamera monitorująca CNB Technology
- Kamera monitorująca Tapo
- Kamera monitorująca Aigis
- Kamera monitorująca Exacq
- Kamera monitorująca Brickcom
- Kamera monitorująca Laxihub
- Kamera monitorująca Securetech
- Kamera monitorująca EFB Elektronik
- Kamera monitorująca NetMedia
- Kamera monitorująca Videotec
- Kamera monitorująca Illustra
- Kamera monitorująca Nivian
- Kamera monitorująca E-bench
- Kamera monitorująca Syscom
- Kamera monitorująca Tecno
- Kamera monitorująca Night Owl
- Kamera monitorująca Guardzilla
- Kamera monitorująca Astak
- Kamera monitorująca Blink
- Kamera monitorująca Milestone Systems
- Kamera monitorująca Zavio
- Kamera monitorująca Campark
- Kamera monitorująca IPX
- Kamera monitorująca Dedicated Micros
- Kamera monitorująca Hamlet
- Kamera monitorująca Annke
- Kamera monitorująca AVTech
- Kamera monitorująca Qoltec
- Kamera monitorująca Approx
- Kamera monitorująca Digimerge
- Kamera monitorująca Wisenet
- Kamera monitorująca Infortrend
- Kamera monitorująca Epiphan
- Kamera monitorująca Mach Power
- Kamera monitorująca Compro
- Kamera monitorująca Aida
- Kamera monitorująca Ikegami
- Kamera monitorująca Accsoon
- Kamera monitorująca Vimtag
- Kamera monitorująca Gewiss
- Kamera monitorująca Alula
- Kamera monitorująca Insteon
- Kamera monitorująca Costar
- Kamera monitorująca ALC
- Kamera monitorująca Security Labs
- Kamera monitorująca Comtrend
- Kamera monitorująca Seneca
- Kamera monitorująca Avigilon
- Kamera monitorująca American Dynamics
- Kamera monitorująca Vosker
- Kamera monitorująca Sentry360
- Kamera monitorująca Bea-fon
- Kamera monitorująca Owltron
- Kamera monitorująca Enabot
- Kamera monitorująca Luis Energy
- Kamera monitorująca Sir Gawain
- Kamera monitorująca VisorTech
- Kamera monitorująca Atlantis Land
- Kamera monitorująca B & S Technology
- Kamera monitorująca I3International
- Kamera monitorująca IDIS
- Kamera monitorująca Ecobee
- Kamera monitorująca Conbrov
- Kamera monitorująca HuddleCamHD
- Kamera monitorująca Mobotix
- Kamera monitorująca IOIO
- Kamera monitorująca BIRDFY
- Kamera monitorująca I-PRO
- Kamera monitorująca DVDO
- Kamera monitorująca TCP
- Kamera monitorująca Bolin Technology
- Kamera monitorująca Nextech
Najnowsze instrukcje dla Kamera monitorująca
28 Stycznia 2025
25 Stycznia 2025
17 Stycznia 2025
17 Stycznia 2025
15 Stycznia 2025

13 Stycznia 2025

13 Stycznia 2025
13 Stycznia 2025

12 Stycznia 2025
12 Stycznia 2025