Instrukcja obsługi Eizo FS2331
Przeczytaj poniżej 📖 instrukcję obsługi w języku polskim dla Eizo FS2331 (62 stron) w kategorii monitor. Ta instrukcja była pomocna dla 12 osób i została oceniona przez 2 użytkowników na średnio 4.5 gwiazdek
Strona 1/62

Important
Please read PRECAUTIONS, this User’s Manual, and the Setup Guide
(separate volume) carefully to familiarize yourself with safe and
effective usage.
•Please refer to the Setup Guide for basic information ranging from
connection of the monitor to a PC or external device to using the
monitor.
•The latest User’s Manual is available for download from our web site:
http://www.eizo.com
2
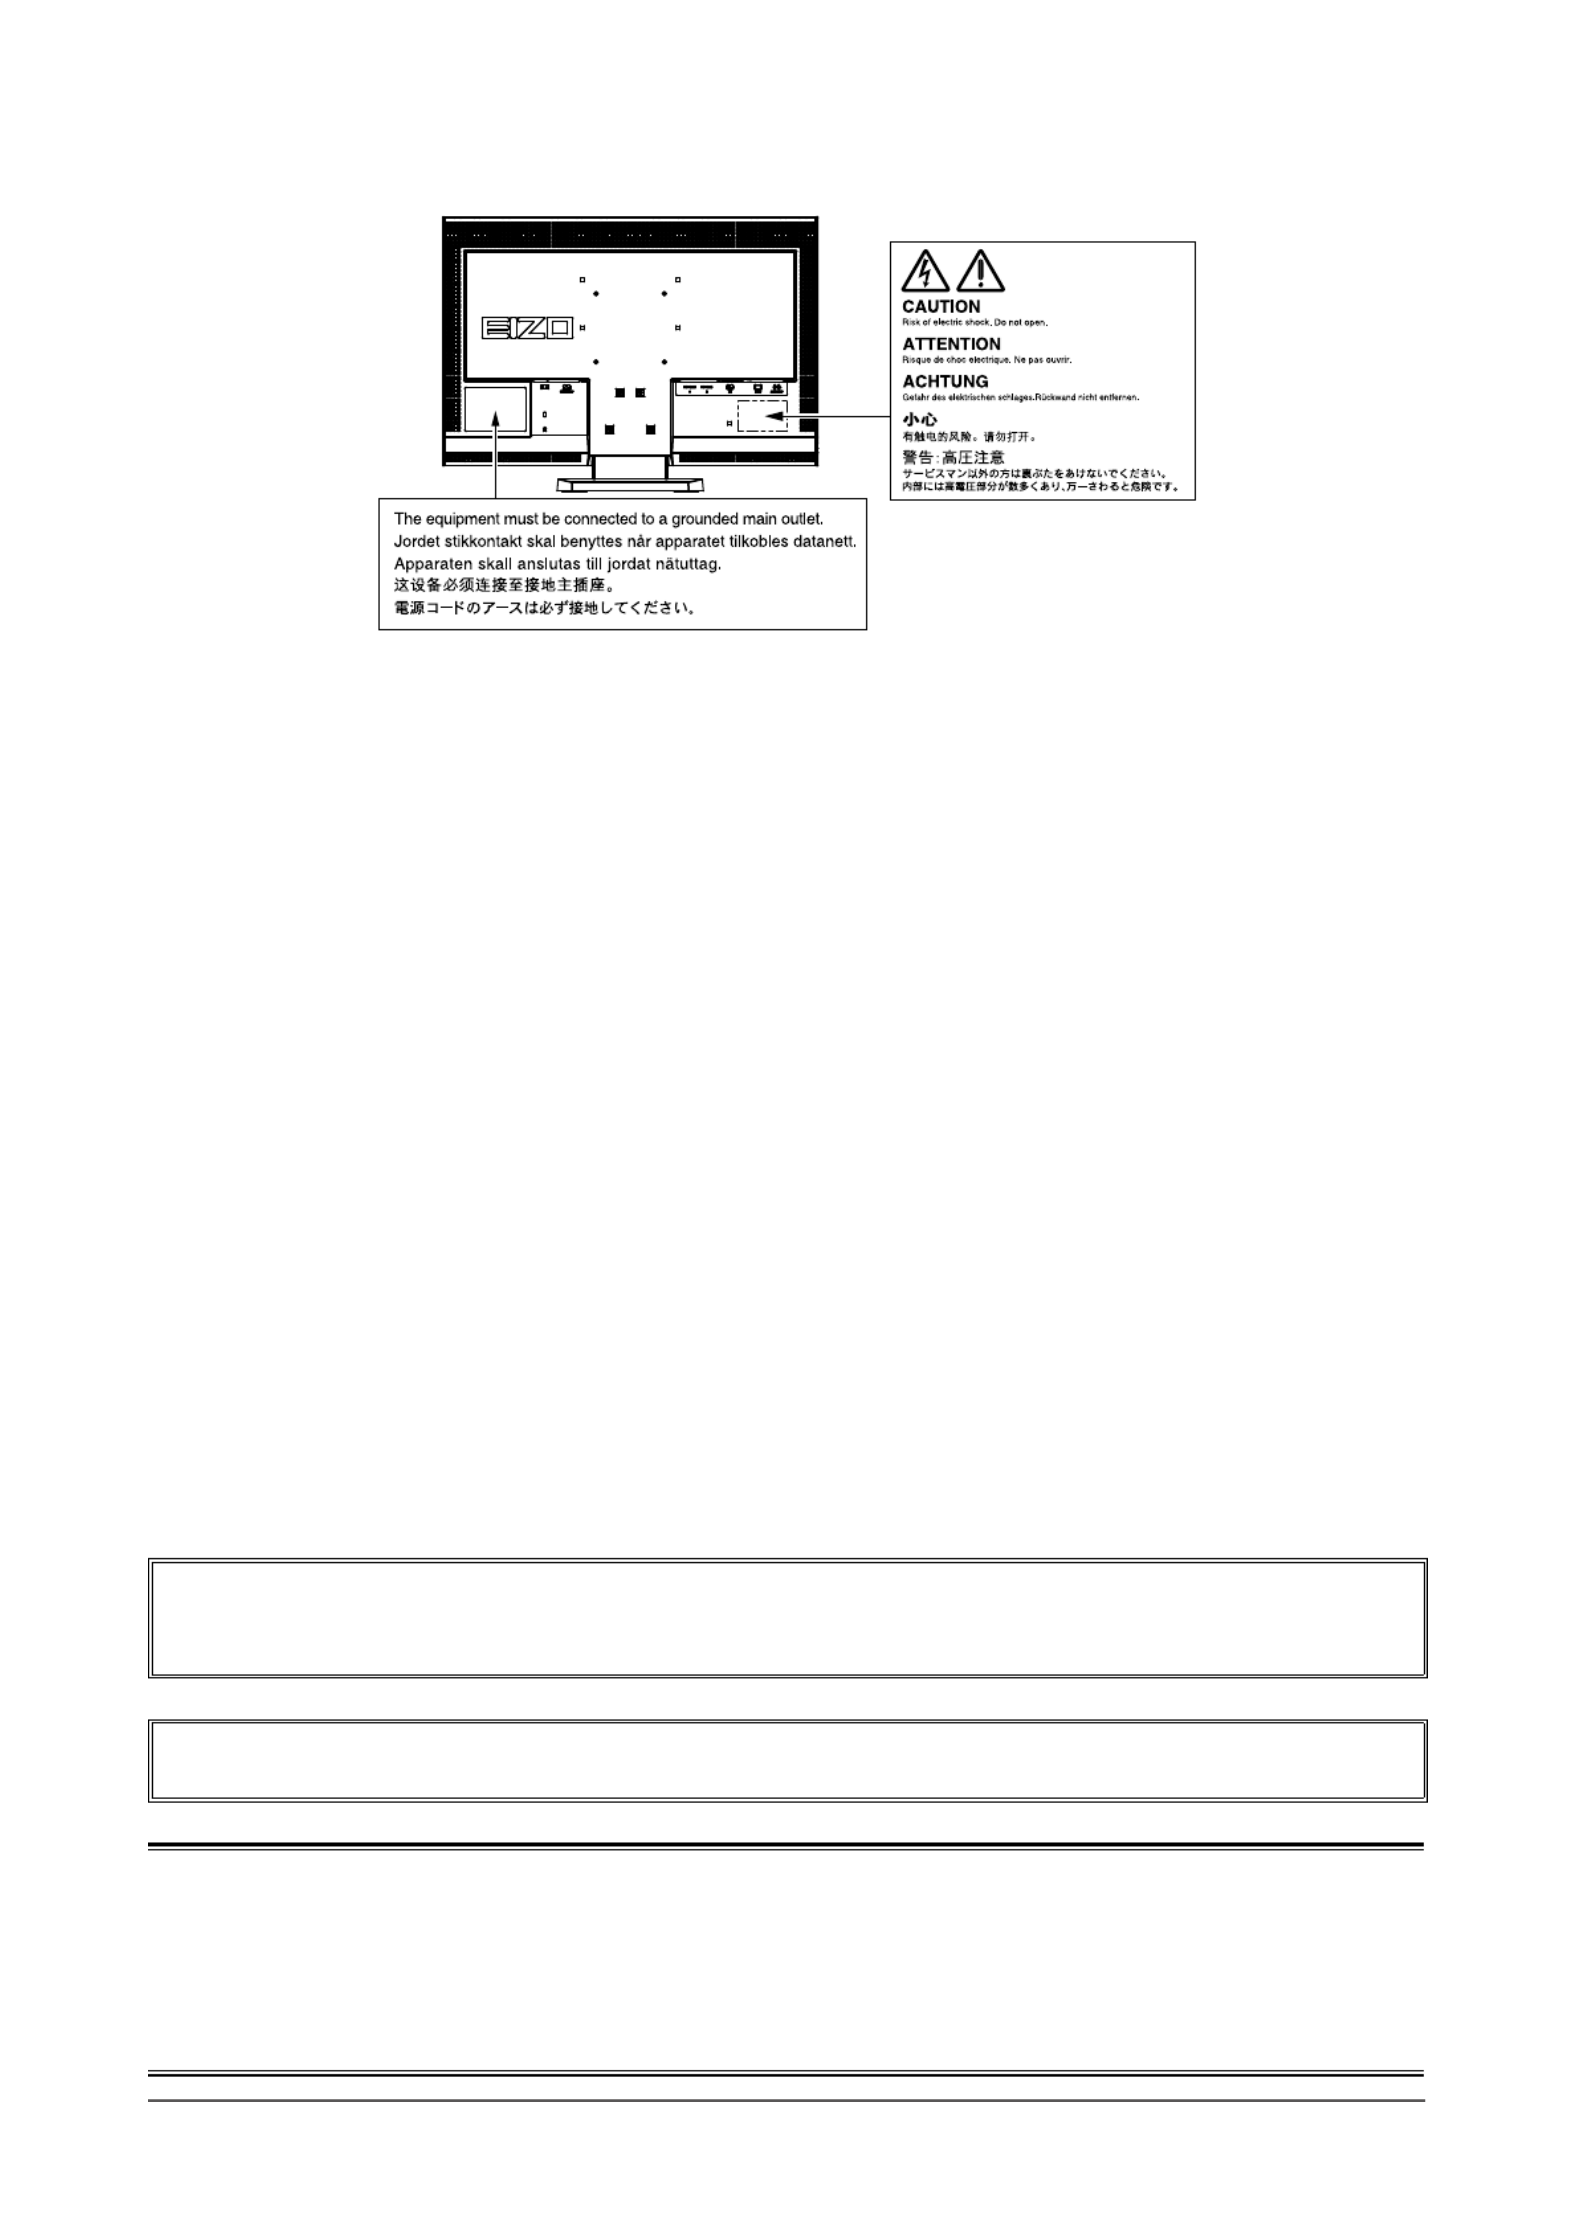
Location of Caution Statement
<For USA-California Only>
CR Coin Lithium Battery contains Perchlorate Material - special handling may apply.
See www.dtsc.ca.gov/hazardouswaste/perchlorate.
This product has been adjusted specically for use in the region to which it was originally shipped. If operated
outside this region, the product may not perform as stated in the specications.
No part of this manual may be reproduced, stored in a retrieval system, or transmitted, in any form or by any means,
electronic, mechanical, or otherwise, without the prior written permission of EIZO NANAO CORPORATION.
EIZO NANAO CORPORATION is under no obligation to hold any submitted material or information condential
unless prior arrangements are made pursuant to EIZO NANAO CORPORATION’s receipt of said information.
Although every effort has been made to ensure that this manual provides up-to-date information, please note that
EIZO monitor specications are subject to change without notice.

3
Notice for this monitor
This product is suited to general purposes like creating documents, viewing multimedia content.
This product has been adjusted specically for use in the region to which it was originally shipped. If the product is
used outside the region, it may not operate as specied in the specications.
This product may not be covered by warranty for uses other than those described in this manual.
The specications noted in this manual are only applicable when the following are used:
· Power cords provided with the product
· Signal cables specied by us
Only use optional products manufactured or specied by us with this product.
As it takes about 30 minutes for the performance of electrical parts to stabilize, adjust the monitor 30 minutes or more
after the monitor power has been turned on.
Monitors should be set to a lower brightness to reduce changes in luminosity caused by long-term use and maintain a
stable display.
When the screen image is changed after displaying the same image for extended periods of time, an afterimage may
appear. Use the screen saver or power save function to avoid displaying the same image for extended periods of time.
Periodic cleaning is recommended to keep the monitor looking new and to prolong its operation lifetime (refer to
“Cleaning” (page 4)).
The LCD panel is manufactured using high-precision technology. Although, missing pixels or lit pixels may appear on
the LCD panel, this is not a malfunction. Percentage of effective dots: 99.9994% or higher.
The backlight of the LCD panel has a xed lifetime. When the screen becomes dark or begins to icker, please contact
your dealer.
Do not press on the panel or edge of the frame strongly, as this may result in display malfunctions, such as interference
patterns, etc. If pressure is continually applied to the panel, it may deteriorate or damage your panel. (If the pressure
marks remain on the panel, leave the monitor with a black or white screen. The symptom may disappear.)
Do not scratch or press on the panel with any sharp objects, as this may result in damage to the panel. Do not attempt
to brush with tissues as this may scratch the panel.
When the monitor is cold and brought into a room or the room temperature goes up quickly, dew condensation may
occur on the interior and exterior surfaces of the monitor. In that case, do not turn the monitor on. Instead wait until
the dew condensation disappears, otherwise it may cause some damage to the monitor.

4
Cleaning
Attention
• Chemicals such as alcohol and antiseptic solution may cause gloss variation, tarnishing, and fading of the cabinet or
panel, and also quality deterioration of the image.
• Never use any thinner, benzene, wax, and abrasive cleaner, which may damage the cabinet or panel.
Note
• The optional ScreenCleaner is recommended for cleaning the cabinet and panel surface.
If necessary, the stains on the cabinet and panel surface can be removed by moistening part of a soft cloth with
water.
To use the monitor comfortably
• An excessively dark or bright screen may affect your eyes. Adjust the brightness of the monitor according
to the environmental conditions.
• Staring at the monitor for a long time tires your eyes. Take a 10-minute rest every hour.

5
CONTENTS
CONTENTS
Cover ...................................................................... 1
Notice for this monitor ............................................ 3
CONTENTS ............................................................. 5
Chapter 1 Introduction ....................................... 7
1-1. Features ......................................................... 7
1-2. Controls and Functions ............................... 8
●BeforeUsingRemoteControl......................... 9
Howtoinstallbattery................................... 9
ReceivableRangeofRemoteControl......... 9
1-3. EIZO LCD Utility Disk...................................10
●Diskcontentsandsoftwareoverview............10
●Touse“ScreenManagerProfor
LCD(DDC/CI)/EIZOScreenSlicer”.................10
1-4. Basic Operations and Functions ...............11
●BasicoperationoftheSettingmenu..............11
●Functions........................................................12
Chapter 2 Adjusting Screens .......................... 13
2-1. Compatible Resolutions/Formats ..............13
AnalogInput(D-Sub)..................................13
DigitalInput(DVI-D,HDMI:PCsignal).......13
DigitalInput(HDMI:videosignal)...............13
2-2. Setting the Resolution ................................14
Windows7..................................................14
WindowsVista............................................14
WindowsXP................................................14
MacOSX....................................................14
2-3. Adjusting Color ............................................15
●Toselectthedisplaymode(ColorMode).......15
●Toperformadvancedadjustments................16
●Adjustablesettingsineachmode..................16
●Toadjustbrightness“Brightness”..................17
●Toadjustblacklevel“BlackLevel”.................17
●Toadjustcontrast“Contrast”..........................18
●Toadjustthecolorsaturation“Saturation”.....18
●Toadjusthue“Hue”........................................19
●Toadjustcolortemperature“Temperature”...19
●TosetContrastEnhancer
“ContrastEnhancer”....................................... 20
●Toreduceimageblur“PowerResolution”..... 20
●Toadjustgamma“Gamma”...........................21
●Toadjustgain“Gain”......................................21
●Tosetoverdriveintensity“Overdrive”........... 22
2-4. Screen Adjustment ..................................... 22
●DigitalSignalInput........................................ 22
●AnalogSignalInput....................................... 22
2-5. Screen Size Changing ................................ 26
●AnalogInput(D-Sub)/DigitalInput
(DVI-D,HDMI:PCsignal)............................. 26
●DigitalInput(HDMI:videosignal)................. 27
Tosetthescreenratio“Overscan”............ 27
Chapter 3 Setting Monitor ............................... 28
3-1. Adjusting Volume........................................ 28
●Toturnthevolumeup/down.......................... 28
●Tomutethesoundtemporarily...................... 28
3-2. Switching sound source for HDMI signal
input “Source” ............................................. 28
3-3. To adjust the sound level “Sound Level” .. 29
3-4. Enabling/Disabling DDC/CI
communication “DDC/CI” .......................... 29
3-5. Locking Buttons “Key Lock” ..................... 29
3-6. Setting the EIZO Logo Display “Logo” .... 30
3-7. Setting Language “Language” .................. 30
3-8. Changing the HDCP authentication
setting for HDMI signal input ..................... 30
3-9. Resetting the Monitor to the Default
Settings .........................................................31
●Toresetthecoloradjustments“ColorReset”31
●Toresetalladjustmentstothedefault
settings“Reset”..............................................31
Chapter 4 Power Saving Functions ................ 32
4-1. Setting Power Saving “Power Save” ........ 32
●Monitor.......................................................... 32
●AudioOutput................................................. 33
4-2. Setting Power Indicator “Power
Indicator” ..................................................... 33
4-3. Enabling/Disabling Automatic
Brightness Adjustment “Auto EcoView” . 34
4-4. Checking the power saving level .............. 34
4-5. Enabling/Disabling Auto Power-OFF
“Off Timer (min)” ......................................... 34
Chapter 5 Connecting Cables ......................... 36
5-1. Connecting Multiple External Devices ..... 36
●Toswitchamonginputsignals...................... 36
Chapter 6 Troubleshooting .............................. 37
Chapter 7 Reference ........................................ 41
7-1. How to Attach the Optional Arm ................41
7-2. Attaching the Stand base .......................... 42
7-3. Displaying Monitor Information
“Information” ............................................... 42
7-4. Specications ............................................. 43
7-5. Glossary ....................................................... 46
7-6. Preset Timing .............................................. 48

7
Chapter1Introduction
Chapter 1 Introduction
Thank you very much for choosing an EIZO color LCD monitor.
1-1. Features
• 23″ wide format LCD
• Applicable to the resolution of 1920 × 1080.
• Panel with a wide eld of view adopted
VA panel with 178º horizontal and vertical viewing angles.
• HDMI connector × 2
-Applicable to the PC input signal using HDMI input, allowing three different digital signal inputs from a PC.
• The Color Mode function allows the user to select the display mode optimum to the displayed image.
-The Paper mode reproduces an easy-on-the-eyes display that looks just like printed paper.
See “To select the display mode (Color Mode)” (page 15).
• ContrastEnhancer function
Automatically adjusts the contrast according to the image, enabling the display of high contrast and sharp animated
images.
See “To set ContrastEnhancer “ContrastEnhancer”” (page 20).
• Power Resolution function
You can reduce image blur by enhancing its outline.
See “To reduce image blur “Power Resolution”” (page 20).
• Two dedicated gamma modes (“Power1”/“Power2”) suitable for game images implemented
The images will be sharpened by increasing the halftone (Power1) and low-tone (Power2) contrasts.
See “To adjust gamma “Gamma”” (page 21).
• A variety of Screen Size can be selected, such as dot by dot (image is displayed without scaling the input
signals), Letterbox, Overscan (change of the display area of the input image)
See “2-5. Screen Size Changing” (page 26).
• The software “ScreenManager Pro for LCD (DDC/CI)” to adjust the screen using the mouse and keyboard
is included.
See “1-3. EIZO LCD Utility Disk” (page 10).
• Remote control enables easy operation, setting and adjustment of the monitor.
See “1-2. Controls and Functions” (page 8).
• Color sheets (in three colors) to be pasted at the bottom of the monitor included
Select your desired color to add an accent to the monitor.
See “Setup Guide”.
• HDCP (High-bandwidth Digital Content Protection)
• Built-in stereo speakers and headphone jack
See “1-2. Controls and Functions” (page 8).

8Chapter1Introduction
1-2. Controls and Functions
Monitor
PowerManager
Menu
Color
Sound
Screen
Monitor Settings
Information
14 12
13
1 2 3 4 5 6 107 8 9 11
1. Auto EcoView sensor Detectsambientbrightness.AutoEcoViewfunction( ).page34
2. Remote control
detector Receivesthesignalfromtheremotecontrol.
3. button Switchesinputsignalsfordisplay( ).page36
PC1(DVI)→PC2(D-SUB)→HDMI1→HDMI2
4. / button Displaysthevolumeadjustmentmenutovolumeupordown.
5. button Turnsthepoweronoroff.
6. Power indicator
Indicatesthemonitor’soperationstatus.
Blue: Operating
Orange: Powersavingmode
Red Poweroff
OFF: Mainpoweroff
7. Main power switch Turnsthemainpoweronoroff.
8. Power connector Connectsthepowercord.
9. Input signal connector Left:HDMIconnector×2(HDMI1,HDMI2)/Center:DVI-Dconnector/
Right:D-Submini15-pinconnector
10. Stereo mini jack Connectsthestereominijackcable.
11. Headphone jack Connectstheheadphones.
12. Security lock slot ComplieswithKensington’sMicroSaversecuritysystem.
13. Stand*2 Usedtoadjusttheangleofthemonitorscreen.
14. Speaker Outputsaudiosource.
*1Seepage11forhowtouse.
*2Anoptionalarm(oranoptionalstand)canbeattachedbyremovingthestand(see“7-1.HowtoAttachtheOptional
Arm”(page41)).
Settingmenu*1

9
Chapter1Introduction
Remote Control
4
6
7
32
12
13
8
5
1
10
9
11
1. OFF TIMER Setsthetimeuntilthemonitorpower-off.
2. DISPLAY Displaysthecurrentinputport.
3. SCREEN SIZE Changesthescreensize.
4. POWER Turnsthepoweronoroff.
5. INPUT SELECT Switchesinputsignalsfordisplay.
PC PC1(DVI)→PC2(D-SUB)
HDMI HDMI1→HDMI2
6. MUTE Mutessoundtemporarily.
7. VOLUME +/- Adjuststhevolume.
8. MENU Displays/ExitstheSettingmenu.
9. RETURN Returnstothepreviousmenuinmenuoperation.
10. / / /
• Choosesandincreases/decreasesadjustmentsettings
foradvancedadjustmentusingtheSettingmenu.
• / :Displaysthebrightnessadjustmentmenu(page
17).
11. ENTER Determinesanitemonthemenuscreen,andsaves
valuesadjusted.
12. MODE Changesthecolormode.
13. EcoView Displays/ExitstheEcoViewmenu.
● Before Using Remote Control
How to install battery
1. While pushing the tab toward the arrow (1), pull out the
battery case (2). (1)
(2)
2. Insert a battery with the positive side up. (Battery model
number: CR2032)
3. Insert the battery case until it clicks.
Receivable Range of Remote Control
Use the remote control inside of the range as below.
5m
5m
20°
20°
7m
5m
30°
30°
7m
5m

10 Chapter1Introduction
1-3. EIZO LCD Utility Disk
An “EIZO LCD Utility Disk” (CD-ROM) is supplied with this product. The following table shows the disk
contents and the overview of the software programs.
● Disk contents and software overview
The disk includes software programs for adjustment, and User’s Manual. Refer to Readme.txt le on the disk
for software startup procedures or le access procedures.
Item Overview Windows
Macintosh
AReadme.txtle √ √
Screenadjustmentpatternles Usedwhenadjustingtheimageofanalog
signalinputmanually.
√ √
ScreenManagerProforLCD(DDC/
CI)
Softwareforadjustingthescreenusingthe
mouseandkeyboard
ThissoftwaredoesnotrunonaPC
connectedviatheHDMIinput.
√ -
EIZOScreenSlicer Softwarethatdividesascreenandlaysout
multiplewindowsefciently.
√ -
User’sManualofthismonitor(PDFle) √ √
● To use “ScreenManager Pro for LCD(DDC/CI)/EIZO ScreenSlicer”
For the installation and use of “ScreenManager Pro for LCD(DDC/CI)/EIZO SceenSlicer”, refer to the
respective User’s Manual on the disk.

11
Chapter1Introduction
1-4. Basic Operations and Functions
● Basic operation of the Setting menu
1.
Displaying the Setting menu
1. Press on the remote control. The Setting menu appears.
PowerManager
Menu
Color
Sound
Screen
Monitor Settings
Information
2.
Adjusting/Setting
1. Choose a menu to adjust/set with , , and then press . The Sub menu appears.
Color
Color Mode
Black Level
Hue
Saturation
Contrast
Return
Color Reset
Advanced Settings
Brightness
Temperature
[ ]
[ ]
[ ]
[ ]
[ ]
[ ]
[ ]
80
50
75
0
0
Off
User1
2. Choose an item to adjust/set with , , and then press . The adjustment/ setting menu appears.
60
Brightness
3. Adjust/set the selected item with , , , , and then press .
3.
Exiting
1. Press .
Note
• To go back to the previous menu, press .
12 Chapter1Introduction
●
Functions
The following table shows all the Setting menu’s adjustment and setting menus.
Main menu Setting Reference
Color*1 ColorMode “2-3.AdjustingColor”(page15)
Brightness
BlackLevel
Contrast
Saturation
Hue
Temperature
AdvancedSettings ContrastEnhancer
PowerResolution
Gamma
Gain
Overdrive
ColorReset
Screen AutoScreenAdjust*2 “2-4.ScreenAdjustment”(page22)
AutoRangeAdjust*2
Clock*2
Phase*2
Position*2
ColorSpace*3
Smoothing
Sound Source*3 “3-2.Switchingsoundsourcefor
HDMIsignalinput“Source””(page28)
SoundLevel “3-3.Toadjustthesoundlevel
“SoundLevel””(page29)
PowerSave “4-1.SettingPowerSaving“Power
Save””(page32)
PowerManager PowerSave
MonitorSettings DDC/CI “3-4.Enabling/DisablingDDC/CI
communication
“DDC/CI””(page29)
KeyLock “3-5. Locking Buttons “Key Lock””
(page29)
Logo “3-6.SettingtheEIZOLogoDisplay
“Logo””(page30)
PowerIndicator “4-2.SettingPowerIndicator“Power
Indicator””(page33)
Language “3-7.SettingLanguage“Language””
(page30)
Reset “3-9.ResettingtheMonitortothe
DefaultSettings”(page31)
Information “7-3.DisplayingMonitorInformation
“Information””(page42)
*1Theadjustment/settingsavailableonthe“Color”menudependontheselectedColormode.Theabove
tableshowsthesubmenuswhentheUser1orUser2modeisselected.
*2Thesefunctionscanbeadjustedwithanaloginput.
*3ThisfunctionisavailablewithHDMIsignalinput.

13
Chapter2AdjustingScreens
Chapter 2 Adjusting Screens
2-1. Compatible Resolutions/Formats
The monitor supports the following resolutions and signal format.
Analog Input (D-Sub)
Resolution Applicable Signals Vertical Scan
Frequency Dot Clock
640×480 VGA,VESA,CEA-861 upto75Hz
148.5MHz
(Max.)
720×400 VGATEXT 70Hz
800×600 VESA upto75Hz
1024×768 VESA upto75Hz
1280×720 CEA-861 60Hz
1280×960 VESA 60Hz
1280×1024 VESA upto75Hz
1680×1050 VESACVT,VESACVTRB 60Hz
1920×1080* CEA-861 60Hz
Digital Input (DVI-D, HDMI: PC signal)
Resolution Applicable Signals Vertical Scan
Frequency Dot Clock
640×480 VGA,CEA-861 60Hz
148.5MHz
(Max.)
720×400 VGATEXT 70Hz
800×600 VESA 60Hz
1024×768 VESA 60Hz
1280×720 CEA-861 60Hz
1280×960 VESA 60Hz
1280×1024 VESA 60Hz
1680×1050 VESACVT,VESACVTRB 60Hz
1920×1080* CEA-861 60Hz
A graphics board in conformance with the VESA and CEA-861 standards is required.
*Recommended resolution
Digital Input (HDMI: video signal)
• Video signal
-VGA / 525i (480i)/525p (480p)/1125i (1080i)/750p (720p)/1125p (1080p): 60 Hz
-625i (576i)/625p (576p)/1125i (1080i)/750p (720p)/1125p (1080p): 50 Hz
• Audio signal
-2ch linear PCM (32 kHz / 44.1 kHz / 48 kHz)

14 Chapter2AdjustingScreens
2-2. Setting the Resolution
When you connect the monitor to the PC and nd that the resolution is improper, or when you want to change
the resolution, follow the procedure below.
Windows 7
1. Right-click the mouse anywhere on the desktop except for icons.
2. From the displayed menu, click “Screen resolution”.
3. On the “Screen Resolution” dialog box, select the monitor.
4. Click “Resolution” to select the desired resolution.
5. Click the [OK] button.
6. When a conrmation dialog box is displayed, click [Keep changes].
Windows Vista
1. Right-click the mouse anywhere on the desktop except for icons.
2. From the displayed menu, click “Personalize”.
3. On the “Personalization” window, click “Display Settings”.
4. On the “Display Settings” dialog box, select the “Monitor” tab and select desired resolution in the
“Resolution” eld.
5. Click the [OK] button.
6. When a conrmation dialog box is displayed, click [Yes].
Windows XP
1. Right-click the mouse anywhere on the desktop except for icons.
2. From the displayed menu, click “Properties”.
3. When the “Display Properties” dialog box is displayed, click the “Settings” tab and select desired
resolution for “Screen resolution” under “Display”.
4. Click the [OK] button to close the dialog box.
Mac OS X
1. Select “System Preferences” from the Apple menu.
2. When the “System Preferences” dialog box is displayed, click “Displays” for “Hardware”.
3. On the displayed dialog box, select the “Display” tab and select desired resolution in the “Resolutions”
eld.
4. Your selection will be reected immediately. When you are satised with the selected resolution, close
the window.

15
Chapter2AdjustingScreens
2-3. Adjusting Color
● To select the display mode (Color Mode)
This function allows easy selection of a desired mode according to monitor application.
Display Modes
Mode Purpose
User1 Selectoneoftheseusermodestodeneadesiredsetofparametersettings.
User2
sRGB SuitableforcolormatchingwithsRGBcompatibleperipherals.
Paper Producesaprintedpapereffectbydecreasingcontrastandcolortemperature.
Game Suitablefordisplayinggameimages.
Cinema Suitablefordisplayingmovie-likeimages.
Color Mode
User1
Displaysthecurrentmode.
Procedure
1. Press on the remote control.
The mode name appears at the center of the screen.
2. The mode among the list is highlighted in turn each time is pressed.
You can switch the current mode with or while the mode menu is being displayed.
→User1←→User2←→sRGB←→Paper←→Game←→Cinema←
Note
• The Setting menu and the Mode menu cannot be displayed at the same time.
• “ScreenManager Pro for LCD (DDC/CI)” allows you to select the Color mode automatically according to the
application used (see “Chapter 3 Auto Fine-Contrast” in the “ScreenManager Pro for LCD (DDC/CI)” User’s
Manual).

16 Chapter2AdjustingScreens
●
To perform advanced adjustments
The “Color” menu of the Setting menu allows you to set and save the independent color adjustment for each
mode.
Attention
• The monitor will take about 30 minutes before its internal electric components stabilize. Wait 30 minutes or more
after turning the monitor power on before starting adjustment.
• Perform the range adjustment rst when adjusting color for analog signals (see “To adjust color gradation
automatically “Auto Range Adjust”” (page 25)).
• The same image may be seen in different colors on multiple monitors due to their monitor-specic characteristics.
Make ne color adjustment visually when matching colors on multiple monitors.
Note
• The value shown in “K” is available only as reference.
• Using the “ScreenManager Pro for LCD (DDC/CI)” allows you to perform the color adjustment by using the mouse
and keyboard of your PC. (Refer to “Chapter 4 Color Adjustment” in the User’s Manual for “ScreenManager Pro for
LCD (DDC/CI)”.)
● Adjustable settings in each mode
The adjustable settings depend on the mode. (You cannot select any non-adjustable or non-settable function.)
For instructions on how to adjust or set each function, refer to subsequent pages.
√: Adjustable -: Not adjustable
Function
Color Mode
User1
User2 sRGB Paper Game Cinema
Brightness √ √ √ √ √
BlackLevel √ - - √ √
Contrast √ - - √ √
Saturation √ - - √ √
Hue √ - - √ √
Temperature √ - √ √ √
AdvancedSettings ContrastEnhancer √ - - √ √
PowerResolution √ - - √ √
Gamma √ - - √ -
Gain √ - - - -
Overdrive √ - - √ -
ColorReset √ √ √ √ √
Specyfikacje produktu
| Marka: | Eizo |
| Kategoria: | monitor |
| Model: | FS2331 |
| Kolor produktu: | Czarny |
| Podręcznik użytkownika: | Tak |
| Bluetooth: | Nie |
| Moc wyjściowa (RMS): | 1 W |
| Certyfikaty: | TCO Displays 5.1, EPEAT Silver (US), TÜV, TÜV/GS, TÜV/NRTL, c-Tick, CE, CB, cTÜVus, FCC-B, ICES-003-B, TÜV/S, VCCI-B, EPA Energy Star, RoHS, WEEE |
| Typ HD: | Full HD |
| Obsługiwane systemy operacyjne Mac: | Nie |
| Długość przekątnej ekranu: | 23 " |
| Rozdzielczość: | 1920 x 1080 px |
| Natywne proporcje obrazu: | 16:9 |
| Ekran dotykowy: | Nie |
| Pobór mocy w trybie czuwania: | 1 W |
| Pobór mocy: | 24 W |
| Diody LED: | Stand-by |
| Ilość portów DVI-D: | 1 |
| Ilość portów HDMI: | 2 |
| Zasilanie: | 100 - 240 V |
| Jasność wyświetlacza (typowa): | 300 cd/m² |
| Współczynik kontrastu (dynamiczny): | 3000:1 |
| Kąt widzenia (poziomy): | 178 ° |
| Kąt widzenia (pionowy): | 178 ° |
| Czas odpowiedzi (typowy): | 7 ms |
| Częstotliwość odświeżania poziomego: | 31 - 68 kHz |
| Częstotliwość odświeżania pionowego: | 59 - 61 Hz |
| Wbudowana kamera/aparat: | Nie |
| Interfejs do montażu panelu: | 100 x 100 mm |
| Kensington Lock: | Nie |
| Liczba portów VGA (D-Sub): | 1 |
| HDMI: | Tak |
| Wejście audio: | Tak |
| HDCP: | Tak |
| Wyście mocy ac: | Tak |
| Szerokość urządzenia (z podstawą): | 549 mm |
| Głębokość urządzenia (z podstawą): | 212 mm |
| Wysokość urządzenia (z podstawą): | 403 mm |
| Waga (z podstawą): | 6900 g |
| Szerokość (bez podstawy): | 549 mm |
| Głębokość (bez podstawy): | 58 mm |
| Wysokość (bez podstawy): | 393 mm |
| Waga (bez podstawy): | 6100 g |
| System dźwięku: | 2.0 |
| Wbudowany tuner tv: | Nie |
| Obsługa funkcji Plug & Play: | Tak |
| Format obrazu: | 16:9 |
| Minimalne wymagania systemowe: | DVI\nD-Sub mini |
| Wyjście audio: | Tak |
| PC Audio out: | Tak |
Potrzebujesz pomocy?
Jeśli potrzebujesz pomocy z Eizo FS2331, zadaj pytanie poniżej, a inni użytkownicy Ci odpowiedzą
Instrukcje monitor Eizo

7 Października 2024
7 Października 2024
7 Października 2024
7 Października 2024
7 Października 2024
2 Października 2024
2 Października 2024
2 Października 2024
25 Września 2024
25 Września 2024
Instrukcje monitor
- monitor Sony
- monitor Yamaha
- monitor Samsung
- monitor PeakTech
- monitor UPERFECT
- monitor LG
- monitor Xiaomi
- monitor Joy-It
- monitor Sharp
- monitor Huawei
- monitor TCL
- monitor Pioneer
- monitor Lenovo
- monitor Philips
- monitor Plantronics
- monitor SilverCrest
- monitor Gigabyte
- monitor Acer
- monitor Bosch
- monitor Epson
- monitor JBL
- monitor Hikvision
- monitor Fujitsu
- monitor HyperX
- monitor LC-Power
- monitor Hisense
- monitor Panasonic
- monitor Promethean
- monitor Canon
- monitor Crestron
- monitor Viewsonic
- monitor Behringer
- monitor Asus
- monitor AG Neovo
- monitor Allen & Heath
- monitor IK Multimedia
- monitor Medion
- monitor Boss
- monitor Marquant
- monitor MSI
- monitor Toshiba
- monitor Tesla
- monitor Westinghouse
- monitor Jensen
- monitor Yealink
- monitor Ring
- monitor Garmin
- monitor Blaupunkt
- monitor Salora
- monitor Iiyama
- monitor Citizen
- monitor APC
- monitor Haier
- monitor HP
- monitor Hyundai
- monitor Honeywell
- monitor Chauvet
- monitor Tripp Lite
- monitor Shure
- monitor Cisco
- monitor Xerox
- monitor Smart
- monitor Cooler Master
- monitor Alpine
- monitor Godox
- monitor Dynaudio
- monitor Deltaco
- monitor JVC
- monitor V7
- monitor Dell
- monitor IFM
- monitor Corsair
- monitor Alesis
- monitor Vimar
- monitor Dahua Technology
- monitor Schneider
- monitor Eurolite
- monitor Ricoh
- monitor SMART Technologies
- monitor NZXT
- monitor Emos
- monitor Renkforce
- monitor Marshall
- monitor Viessmann
- monitor Omron
- monitor Thomson
- monitor Velleman
- monitor Neumann
- monitor DataVideo
- monitor Danfoss
- monitor Pyle
- monitor Apple
- monitor Newline
- monitor Waeco
- monitor AOC
- monitor Peerless-AV
- monitor Speco Technologies
- monitor Samson
- monitor PreSonus
- monitor ARRI
- monitor Kindermann
- monitor Olympus
- monitor Mitsubishi
- monitor Fluid
- monitor Razer
- monitor ART
- monitor Continental Edison
- monitor RCF
- monitor NEC
- monitor Brandson
- monitor Prestigio
- monitor OSEE
- monitor Sanyo
- monitor Elvid
- monitor Optoma
- monitor Focal
- monitor Asrock
- monitor Monkey Banana
- monitor Abus
- monitor AMCV
- monitor Jay-Tech
- monitor Mackie
- monitor Palmer
- monitor Barco
- monitor Insignia
- monitor AVer
- monitor Akuvox
- monitor 3M
- monitor Element
- monitor Denver
- monitor Marshall Electronics
- monitor Orion
- monitor Hitachi
- monitor Postium
- monitor Kali Audio
- monitor IStarUSA
- monitor Seiki
- monitor Ernitec
- monitor Wohler
- monitor SmallHD
- monitor AJA
- monitor KRK
- monitor BenQ
- monitor Atlona
- monitor Thermaltake
- monitor Simrad
- monitor Hanwha
- monitor Odys
- monitor Elo
- monitor Ikan
- monitor BOOX
- monitor JUNG
- monitor Burg Wächter
- monitor Monacor
- monitor Aputure
- monitor Daewoo
- monitor Tannoy
- monitor GVision
- monitor Positivo
- monitor Adj
- monitor Freedom Scientific
- monitor SPL
- monitor Qian
- monitor I3-Technologies
- monitor Stairville
- monitor Vitek
- monitor Planar
- monitor Mobile Pixels
- monitor REVO
- monitor Atomos
- monitor Newstar
- monitor SWIT
- monitor Kramer
- monitor RGBlink
- monitor AMX
- monitor Midas
- monitor Alienware
- monitor Archos
- monitor Acti
- monitor Emachines
- monitor Caliber
- monitor Maxdata
- monitor Sunstech
- monitor GlobalTronics
- monitor Sunny
- monitor BlueBuilt
- monitor Da-Lite
- monitor ProXtend
- monitor Kubo
- monitor GeoVision
- monitor LaCie
- monitor InFocus
- monitor Festo
- monitor Konig
- monitor Swissonic
- monitor IHealth
- monitor Peaq
- monitor QSC
- monitor Hannspree
- monitor ESI
- monitor Avocor
- monitor Vivitek
- monitor Genelec
- monitor Interlogix
- monitor Vorago
- monitor EverFocus
- monitor POSline
- monitor Peerless
- monitor M-Audio
- monitor Mad Catz
- monitor Krom
- monitor Monoprice
- monitor Eve Audio
- monitor Yorkville
- monitor HoverCam
- monitor Voxicon
- monitor Sonifex
- monitor TV One
- monitor Fostex
- monitor Prowise
- monitor Terra
- monitor Neets
- monitor Soundstream
- monitor Xoro
- monitor HKC
- monitor CTOUCH
- monitor Ozone
- monitor Ibm
- monitor Maxell
- monitor Packard Bell
- monitor Provision ISR
- monitor Mybeo
- monitor CSL
- monitor Bearware
- monitor Drawmer
- monitor Blue Sky
- monitor Zalman
- monitor Iadea
- monitor Advantech
- monitor Hercules
- monitor Avantone Pro
- monitor Ganz
- monitor TVLogic
- monitor Gamber-Johnson
- monitor Extron
- monitor Neat
- monitor Legamaster
- monitor Belinea
- monitor Adam
- monitor Triton
- monitor ITek
- monitor Kogan
- monitor Posiflex
- monitor Antelope Audio
- monitor MicroTouch
- monitor X-Rite
- monitor EKO
- monitor ONYX
- monitor IBoardTouch
- monitor Mirai
- monitor Elite Screens
- monitor Hollyland
- monitor Mitsai
- monitor Christie
- monitor Skytronic
- monitor Enttec
- monitor Feelworld
- monitor Phoenix Contact
- monitor COMMBOX
- monitor Yiynova
- monitor Alogic
- monitor Pelco
- monitor Lilliput
- monitor LightZone
- monitor AOpen
- monitor Planet Audio
- monitor EC Line
- monitor Datacolor
- monitor HELGI
- monitor Desview
- monitor Syscom
- monitor Allsee
- monitor Night Owl
- monitor ProDVX
- monitor Varad
- monitor PureTools
- monitor DoubleSight
- monitor CTL
- monitor Game Factor
- monitor Nixeus
- monitor Chimei
- monitor Blue Sea
- monitor Faytech
- monitor Hamlet
- monitor Wyse - Dell
- monitor Approx
- monitor Bauhn
- monitor GeChic
- monitor Oecolux
- monitor ADS-TEC
- monitor Satco
- monitor Casalux
- monitor Jupiter
- monitor Transvideo
- monitor Innocn
- monitor KeepOut
- monitor Shimbol
- monitor Raysgem
- monitor Motrona
- monitor Ikegami
- monitor AORUS
- monitor Portkeys
- monitor Mimo Monitors
- monitor American Dynamics
- monitor AIS
- monitor Wortmann AG
- monitor Viotek
- monitor Vidi-Touch
- monitor KTC
- monitor CoolerMaster
- monitor Atlantis Land
- monitor HEDD
- monitor Colormetrics
- monitor IOIO
- monitor DTEN
- monitor Cocopar
- monitor Titan Army
- monitor Xenarc
- monitor Delvcam
- monitor Wimaxit
- monitor BookIT
- monitor SideTrak
- monitor TRIUMPH BOARD
- monitor Japannext
Najnowsze instrukcje dla monitor

8 Kwietnia 2025

8 Kwietnia 2025

8 Kwietnia 2025
7 Kwietnia 2025

5 Kwietnia 2025

4 Kwietnia 2025

4 Kwietnia 2025
3 Kwietnia 2025
2 Kwietnia 2025

2 Kwietnia 2025