Instrukcja obsługi Dell Wyse 5030
Dell Wyse cienki klient 5030
Przeczytaj poniżej 📖 instrukcję obsługi w języku polskim dla Dell Wyse 5030 (2 stron) w kategorii cienki klient. Ta instrukcja była pomocna dla 42 osób i została oceniona przez 5 użytkowników na średnio 4.4 gwiazdek
Strona 1/2
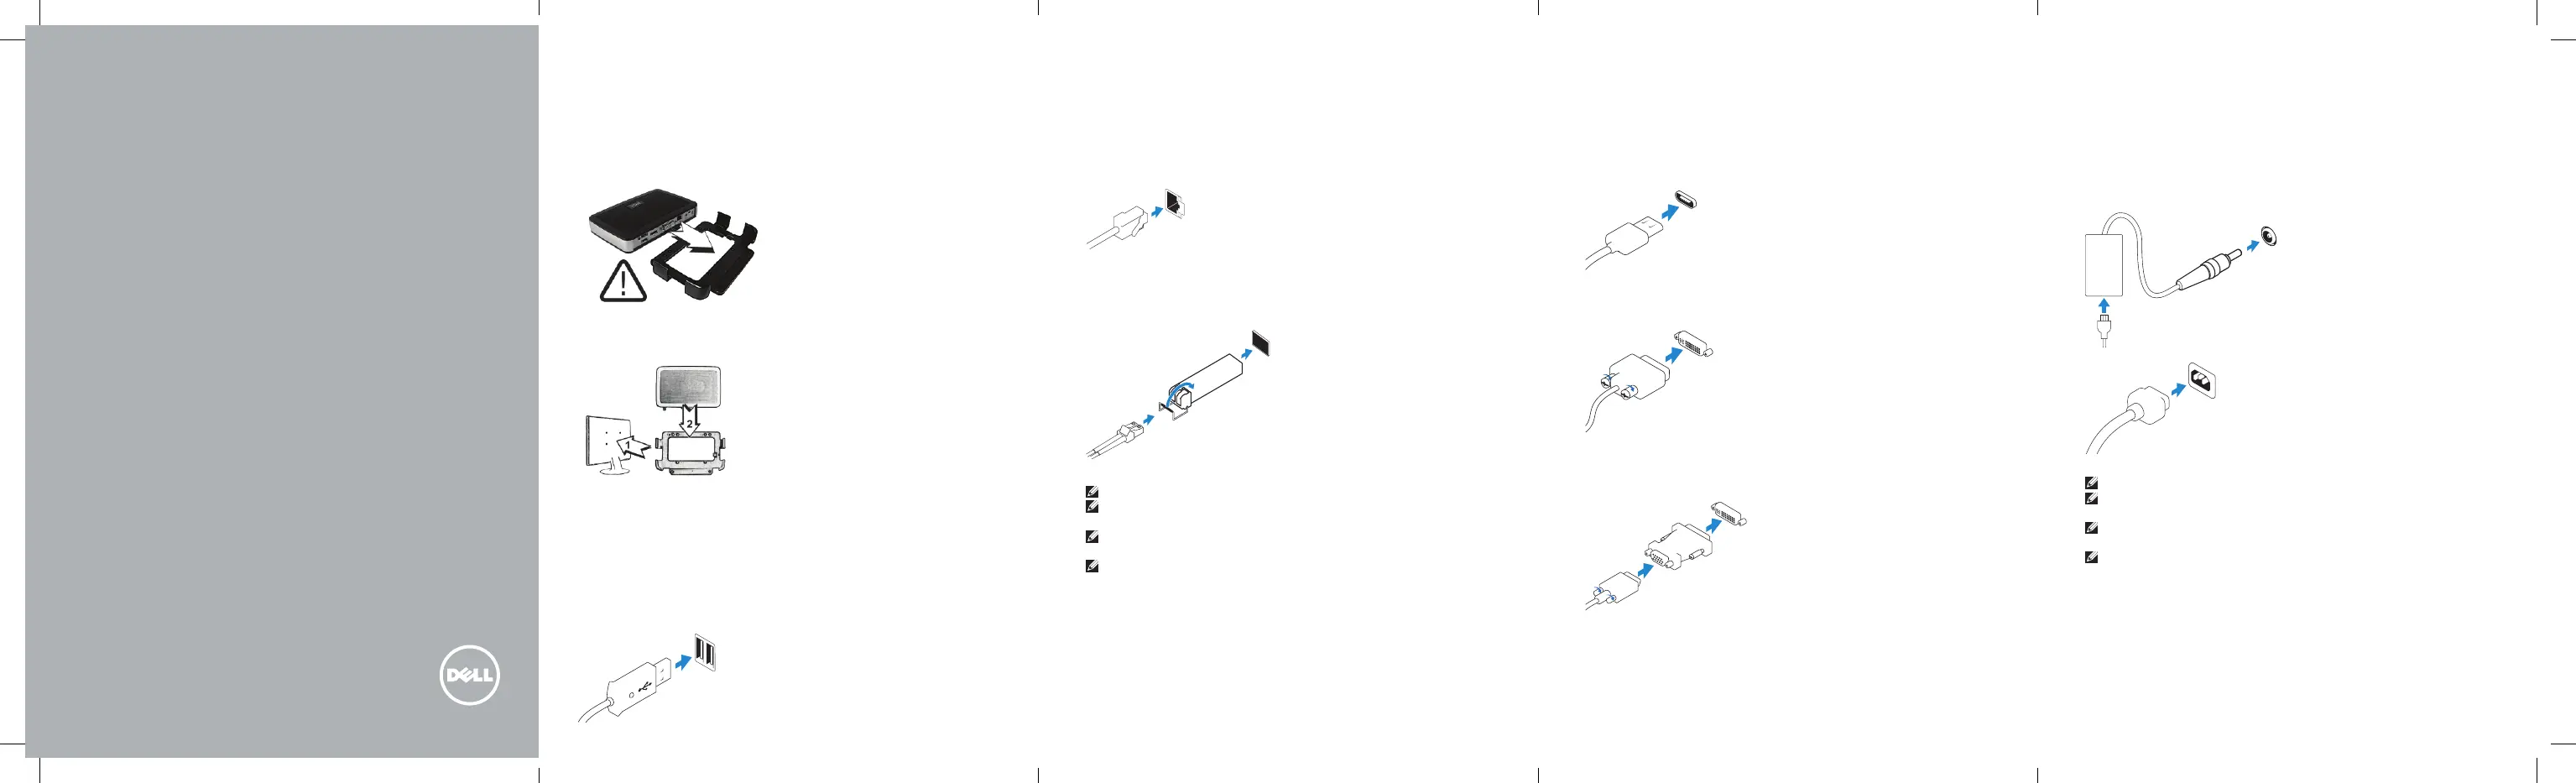
Install the horizontal stand or the VESA mount
Installeer de horizontale standaard of de VESA-montagebeugel
Installez le socle horizontal ou le montage VESA
Installieren Sie den horizontalen Standrahmen oder die VESA-Halterung
1
Dell Wyse Cloud Client
Wyse 5030
Quick Start Guide
Snelstartgids
Guide de démarrage rapide
Schnellstart-Handbuch
5
Connect the power cable on your client
device and display
Sluit de stroomkabel aan op uw clientapparaat en uw display
Connectez le câble d’alimentation à votre périphérique client et à
votre écran
Verbinden Sie das Stromkabel mit Ihrem Client-Gerät und dem Bildschirm
Display power connector
Stroomaansluiting display
Connecteur d’alimentation de l’écran
Bildschirm-Stromversorgungsanschluss
Client device power connector
Stroomaansluiting clientapparaat
Connecteur d’alimentation du
périphérique client
Stromversorgungsanschluss des
Client-Geräts
6Turn on your client device and display
Zet uw clientapparaat en display aan
Mettez sous tension votre périphérique client et votre écran
Schalten Sie Ihr Client-Gerät und den Bildschirm an
NOTE: Your client device is ready to use when the client device activity light goes off.
N.B. Uw clientapparaat is klaar voor gebruik zodra het activiteitslampje van het
clientapparaat uit gaan.
REMARQUE :Votre périphérique client est prêt à l’emploi lorsque le voyant d’activité du
périphérique client s’éteint.
ANMERKUNG: Ihr Client-Gerät ist zur Verwendung bereit, wenn die Aktivitätsleuchte des
Client-Geräts aus geht.
3Connect the network
Sluit het netwerk aan
Connectez le réseau
Stellen Sie eine Netzwerkverbindung her
NOTE: To remove the Fibre SFP module, rotate the latch and unplug it from its slot.
N.B. Als u de SFP-module wilt verwijderen, dient u de vergrendeling omhoog te draaien en
de module uit de aansluiting te verwijderen.
REMARQUE : Pour retirer le module Fibre SFP, tournez le loquet, puis détachez le module
de son logement.
ANMERKUNG: Drehen Sie zum Entfernen des Fibre-SFP-Moduls den Riegel und trennen
Sie die Verbindung zum Anschluss.
Network connector
Netwerkaansluiting
Connecteur réseau
Netzwerkanschluss
Or | OF | Ou | oder
Fiber SFP module
Glasvezel-SFP-module
Module SFP Fibre
Fiber SFP-Modul
Horizontal stand
Horizontale standaard
Socle horizontal
Horizontaler Standrahmen
VESA mount
VESA-montagebeugel
Montage VESA
VESA-Halterung
Or | OF | Ou | oder
2
USB connector
USB-aansluiting
Connecteur USB
USB-Anschluss
Connect the keyboard and mouse
Sluit het toetsenbord en de muis aan
Connectez le clavier et la souris
Verbinden der Tastatur und Maus
4Connect the display
Sluit de display aan
Connectez l’écran
Schließen Sie den Bildschirm an
Display Port connector
Aansluiting displaypoort
Connecteur de port de l’écran
Bildschirmanschluss
Or | OF | Ou | oder
DVI-I connector
DVI-I-aansluiting
Connecteur DVI-I
DVI-I Anschluss
Or | OF | Ou | oder
VGA adapter
VGA-adapter
Adaptateur VGA
VGA-Adapter
Specyfikacje produktu
| Marka: | Dell Wyse |
| Kategoria: | cienki klient |
| Model: | 5030 |
Potrzebujesz pomocy?
Jeśli potrzebujesz pomocy z Dell Wyse 5030, zadaj pytanie poniżej, a inni użytkownicy Ci odpowiedzą
Instrukcje cienki klient Dell Wyse

23 Września 2024
22 Września 2024
22 Września 2024
22 Września 2024
22 Września 2024
22 Września 2024
21 Września 2024
20 Września 2024
18 Września 2024
18 Września 2024
Instrukcje cienki klient
Najnowsze instrukcje dla cienki klient
2 Marca 2025
27 Grudnia 2024
25 Grudnia 2024
25 Grudnia 2024
25 Grudnia 2024
7 Października 2024
7 Października 2024
7 Października 2024
4 Października 2024
4 Października 2024