Instrukcja obsługi Cool Head 712025
Przeczytaj poniżej 📖 instrukcję obsługi w języku polskim dla Cool Head 712025 (42 stron) w kategorii lodówka. Ta instrukcja była pomocna dla 10 osób i została oceniona przez 2 użytkowników na średnio 4.5 gwiazdek
Strona 1/42

OPZETKOELVITRINE
REFRIGERATED COUNTER
VITRINE RÉFRIGERÉE
KÜHL AUFSATZVITRINE
model: *712.010 - *712.012 - *712.021 - *712.022
MET RVS KLAPDEKSEL/WIH STAINLESS STEEL LIFT-UP LID/AVEC COUVERCLE INOX/MIT DECKEL AUS CNS
model: *712.015 - *712.017 - *712.025 - *712.027
Gebruiksaanwijzing
Users manual
Mode d’ emploi
Bedienungsanleitung
712010-027 G23M 1/42

Beste klant,
Gefeliciteerd met uw aankoop van dit product. Zoals alle VRX-modellen is ook dit product ontwikkeld op basis van
de nieuwste technologie en geproduceerd met behulp van betrouwbare en moderne elektrische componenten.
Neem een paar minuten de tijd voordat u het apparaat in gebruik neemt en lees de volgende gebruiksaanwijzing.
INHOUDSOPGAVE
Veiligheidstips,.................................................................................................................................................................................... 2~4
Installatie.............................................................................................................................................................................................4~6
Bediening............................................................................................................................................................................................ 6~8
Reiniging, verzorging en onderhoud.......................................................................................................................................................9
Schakelschema.......................................................................................................................................................................................9
Technische gegevens............................................................................................................................................................................10
Probleemoplossen.................................................................................................................................................................................11
Garantie.................................................................................................................................................................................................11
VEILIGHEIDSTIPS
Plaatsing op een vlakke, stabiele ondergrond.
Een gekwalificeerde technicus moet de installatie en eventuele reparaties
uitvoeren, indien nodig.
Verwijder geen componenten of onderhoudspanelen van dit product.
Belangrijk: Lees voor uw veiligheid de handleiding
zorgvuldig door voordat u dit product installeert of gebruikt.
Bewaar deze handleiding voor toekomstig gebruik.
NL
712010-027 G23M 2/42

VEILIGHEIDSTIPS
Raadpleeg de lokale en nationale normen om aan het volgende te voldoen:
1. Wetgeving inzake gezondheid en veiligheid op het werk.
2. Brandvoorzorgsmaatregelen.
3. IEE-bedradingsvoorschriften.
4. Bouwvoorschriften.
5. Het apparaat is bedoeld voor commercieel gebruik.
6. Gebruik het apparaat NIET buiten.
7. Probeer NIET zelf het artikel te repareren.
8. Gebruik GEEN beschadigde apparaten. Als u twijfelt, raadpleeg dan een
serviceagent.
9. Gebruik GEEN elektrische apparaten in het apparaat (bijvoorbeeld
verwarmingstoestellen, ijsmachines enz.), tenzij ze van het type zijn dat
door de fabrikant wordt aanbevolen.
10.Houd ventilatieopeningen in de behuizing van het apparaat of in de
ingebouwde structuur vrij van obstakels.
11.Gebruik GEEN mechanische apparaten of andere middelen om het
ontdooiproces te versnellen, behalve die aanbevolen door de fabrikant.
12.Beschadig het koelcircuit NIET.
13.Ga NIET op het apparaat of het glaspaneel staan of steunen.
14.Zorg ervoor dat olie of vet NIET in contact komt met de plastic onderdelen.
Bij contact onmiddellijk reinigen.
15.Plaats GEEN brandbare, explosieve of vluchtige artikelen, bijtende zuren of
alkaliën, of vloeistoffen in het apparaat.
16.Gebruik dit apparaat NIET om medische benodigdheden op te slaan.
17.Gebruik GEEN straal-/hogedrukreinigers om het apparaat schoon te maken.
18.Laat kinderen NIET met de verpakking spelen en vernietig het plastic
verpakkingsmateriaal veilig.
19.Draag, bewaar en hanteer het apparaat altijd in verticale positie en
verplaats het apparaat door het aan de onderkant vast te houden..
20.Schakel het apparaat altijd uit en ontkoppel de voeding voordat u het reinigt.
21.Als het netsnoer beschadigd is, moet het worden vervangen door de een
vergelijkbaar gekwalificeerde technicus om gevaar te voorkomen.
NL
712010- 027 G23M 3/42

INSTALLATIE
• Pak de houten/kartonnen doos zorgvuldig uit; het is aan te raden dit werk met twee personen te doen.
• Schroef de kragen op de rand van het apparaat.
• Steek het achterpaneel in de kragen, met de gaten in het glas naar boven.
• Schroef een stelschroef in elke kraag om het paneel vast te zetten.
• Steek de twee zijpanelen in de kragen, met de gaten in het glas naar boven.
• Schroef een stelschroef in elke kraag om de panelen vast te zetten.
• Steek de plastic bussen in elk van de gaten.
• Schroef de beugels aan de binnenkant van elk paneel met behulp van de verbindingsbouten.
• Plaats het bovenpaneel op de beugels en zorg ervoor dat alle gaten op één lijn liggen.
• Plaats de plastic bussen en bevestig het bovenpaneel met de verbindingsbouten aan de beugels.
Montagehandleiding voor glazen panelen
NL
712010- 027 G23M 5/42

INSTALLATIE
Voedsel bewaren
Volg deze instructies om de beste resultaten met dit apparaat te halen:
•Bewaar levensmiddelen pas in het apparaat als het de juiste bedrijfstemperatuur heeft bereikt.
•Zorg ervoor dat de GN-bak vakken altijd gevuld zijn, ook als de GN-bakken ongebruikt of leeg zijn.
Lege vakken zullen de efficiëntie van het apparaat aanzienlijk verminderen.
•Sluit altijd de deur, de deksel of lade wanneer deze niet in gebruik is.
•Plaats geen onafgedekt heet voedsel of vloeistof in het apparaat.
•Verpak of bedek voedsel indien mogelijk.
•Zorg ervoor dat de ventilatoren in het apparaat niet geblokkeerd worden.
•Vermijd het langdurig openen van de deuren/laden.
•De maximale belasting voor een plank/lade is 20 kg.
•Het voedsel moet in de container worden gedaan voordat het in de kast of op de plank wordt geplaatst. Voedsel mag niet
rechtstreeks in de kast worden geplaatst.
•Wanneer er voedsel/groente in de Saladette wordt gedaan, is het normaal dat er ijs (sneeuw) op het oppervlak verschijnt.
Aanzetten
• Sluit de deur/deksel/lade van het apparaat.
• Zorg ervoor dat de aan/uit-schakelaar op [O] staat en dat deze is aangesloten op het stoomnet.
• Schakel de stroom in [I]. De huidige temperatuur in het apparaat wordt weergegeven.
• Het op het bedieningspaneel knippert gedurende 3 minuten om aan te geven dat er een vertraging is tussen het stoppen
en opnieuw opstarten van de motorcompressor
Het deksel of de lade openen/sluiten
WAARSCHUWING: De schuifdeksel heeft geen vergrendelingsmechanisme. Zorg er altijd voor dat het deksel in de ‘half-
open’ positie staat voordat u het opent..
WAARSCHUWING: Trek de lade niet uit de volledig geopende positie om letsel te voorkomen.
De deksel van de koelvitrine is meervoudig verstelbaar:
•Terwijl de deksel gesloten is, schuift u het paneel terug in de halfopen positie. Hierdoor is een gedeeltelijke toegang tot
de GN-bak vakken mogelijk.
•Til de deksel omhoog en naar achteren, zodat het scharnier in de steunsleuf valt.
•Til de deksel omhoog en helemaal naar achteren, zodat de GN-bak vakken volledig vrij komen.
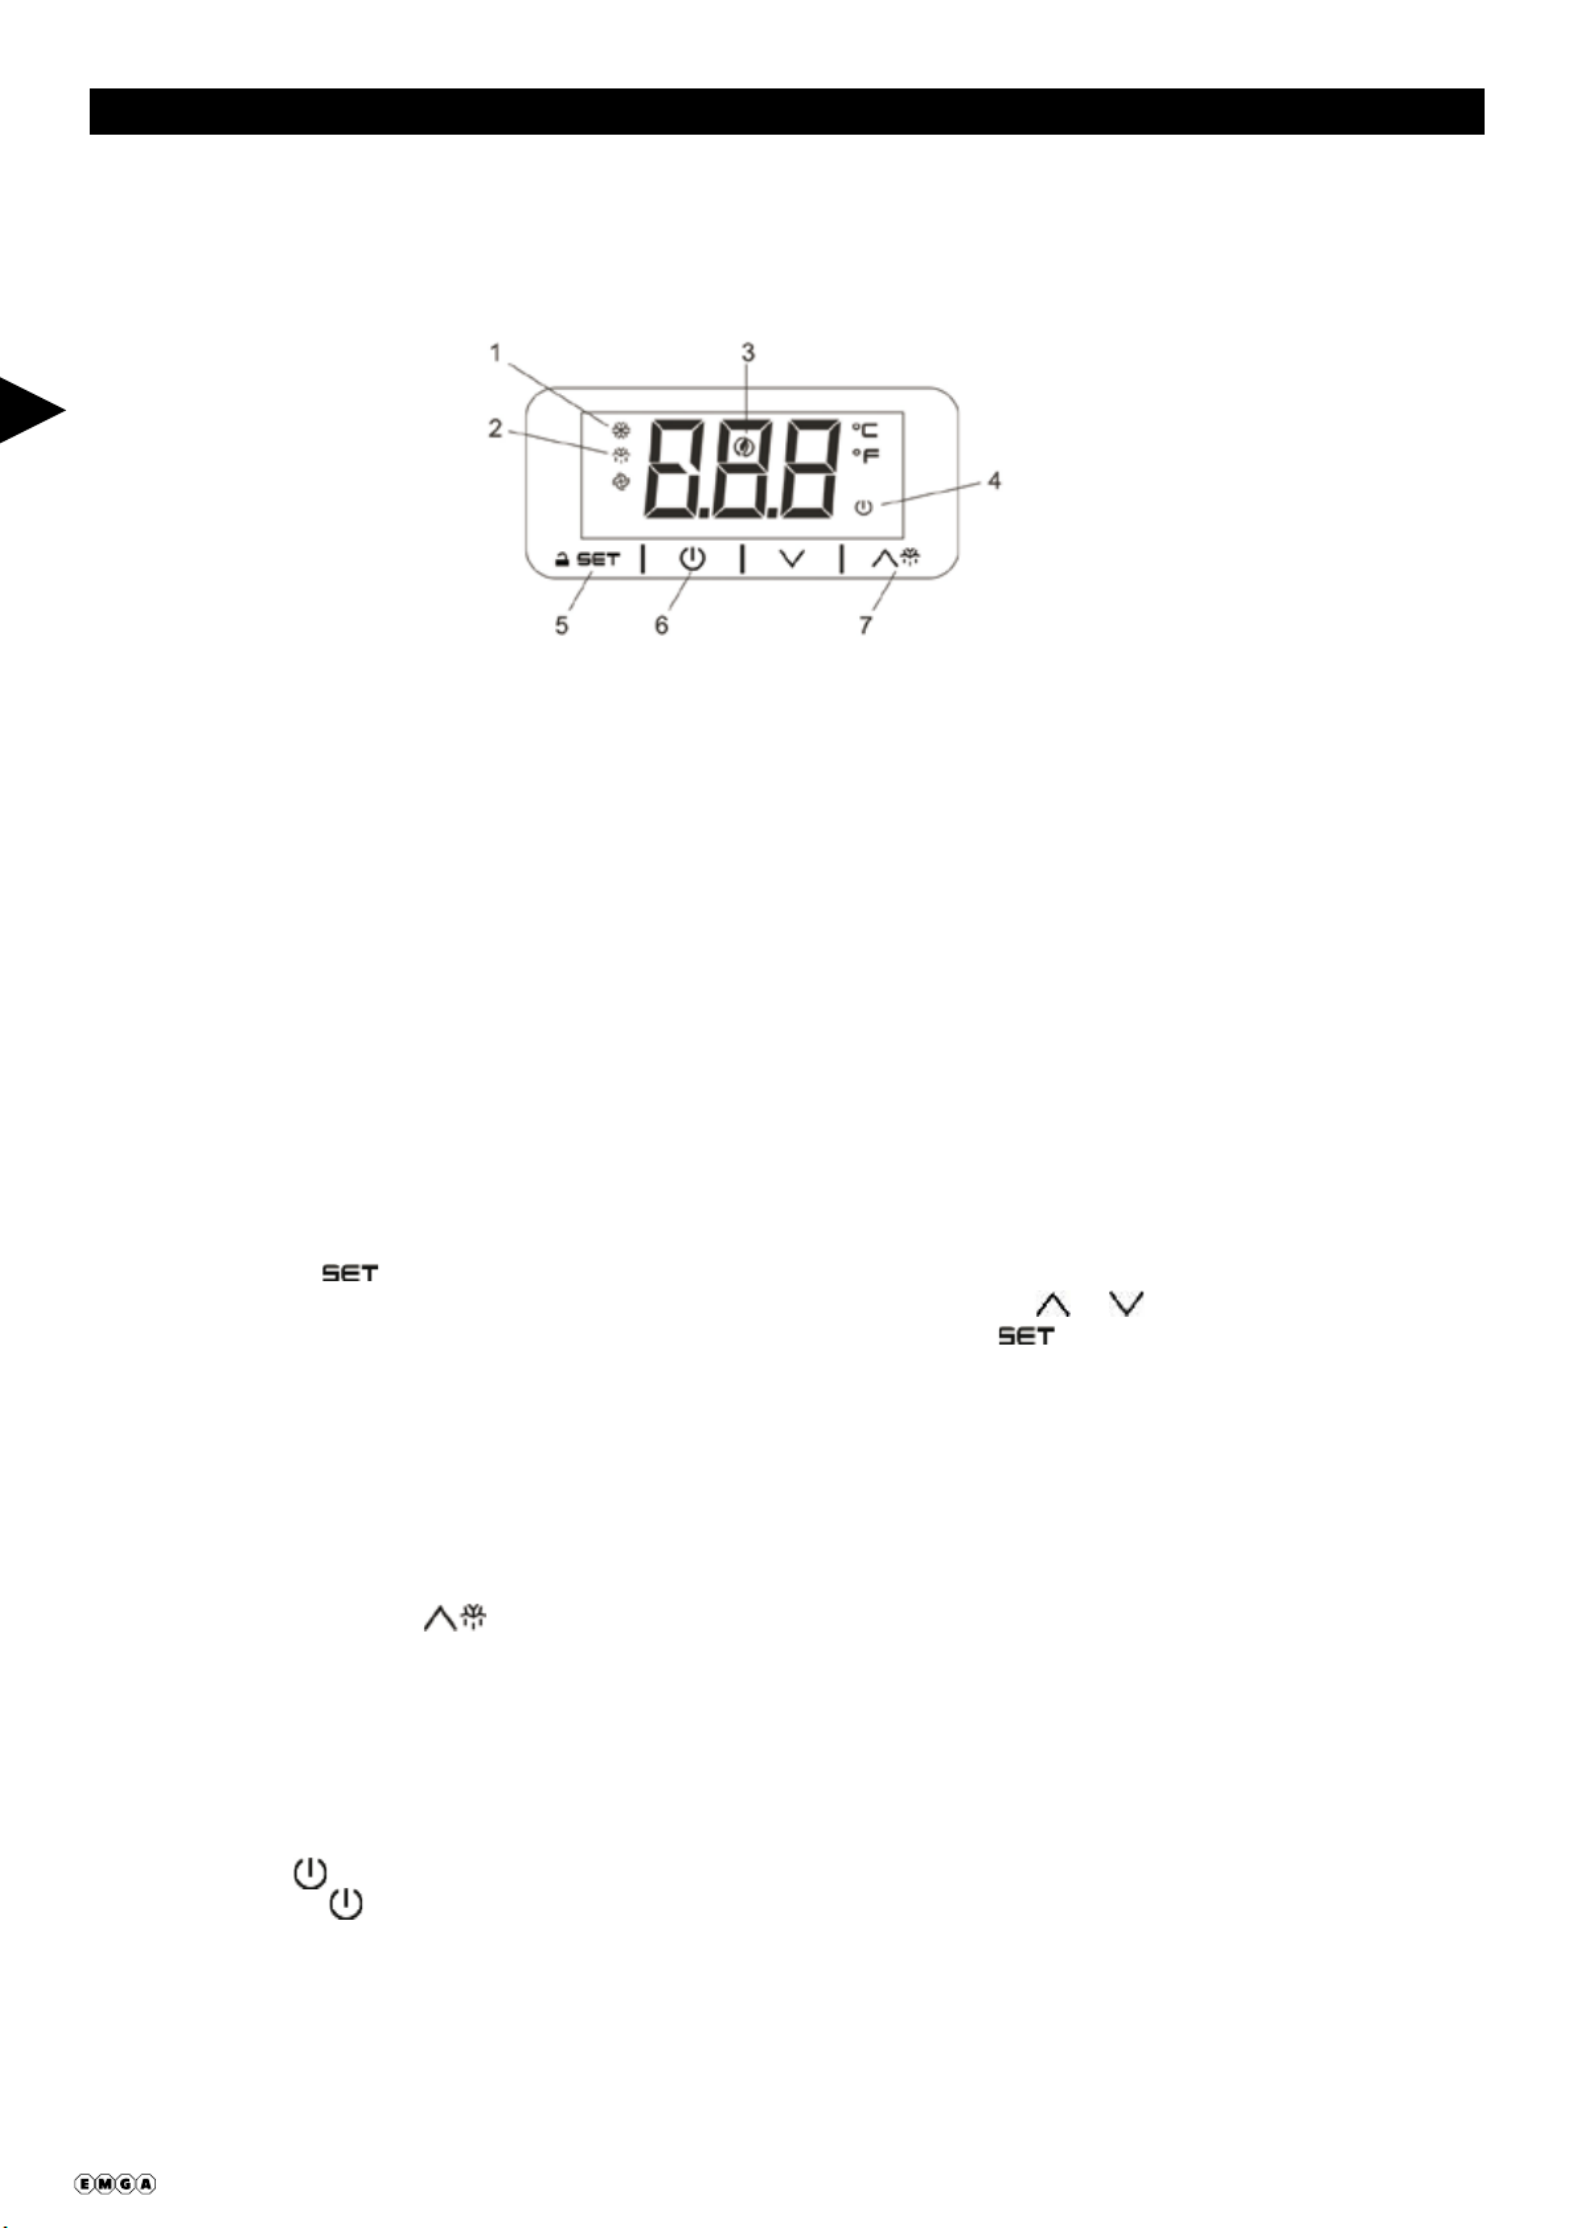
BEDIENING
Beugel
Glazen paneel
Montage bout
Plastic bus
Montage schroef
NL
712010- 027 G23M 6/42

BEDIENING
Temperatuurinstelling en -controle
Het voorpaneel van de thermostaat
1. Ontdooilampje
2. Bedrijfslampje compressor
3. Digitale thermostaat
4. Programmeer toets (alleen servicemonteur)
5. Toetsen voor temperatuurwijziging
6. Handmatig ontdooien
De ingestelde temperatuur uitlezen
•Druk op de -toets en laat deze onmiddellijk los; de temperatuur wordt weergegeven;SET
•Druk de -toets in en laat deze onmiddellijk los of wacht ongeveer 15 seconden om terug te keren naar de normale weergave.SET
De temperatuur wijzigen
•Druk de -toets langer dan 2 seconden in om een nieuwe temperatuur in te stellenSET ;
•De temperatuurwaarde wordt weergegeven en de "°C" begint te knipperen;
•Om de temperatuurwaarde te wijzigen, drukt u binnen 10 seconden op de pijlen “ ” (omhoog) of “ ” (omlaag).
•Om de nieuwe temperatuurwaarde op te slaan, drukt u op de SET-knop of wacht u 10 seconden.
Handmatig ontdooien
Het apparaat voert automatisch elke 12 uur een ontdooicyclus uit.
Opmerking: De cyclus begint vanaf het moment dat het apparaat voor het eerst wordt ingeschakeld..
Om het apparaat handmatig te ontdooien:
•Houd de knop 5 seconden ingedrukt.DEFROST
•De ontdooicyclus start onmiddellijk en de defrost LED gaat branden. Het ontdooien duurt 20 minuten.
Opmerking: Als u handmatig ontdooit, wordt ook de automatische ontdooitimer gereset.
De volgende automatische ontdooiing start 12 uur nadat de handmatige ontdooiing is voltooid.
NL
712010- 027 G23M 7/42
toets en laat onmiddellijk los het instelpunt wordt weergegeven en begint te knipperen, ;
BEDIENING
Het voorpaneel van de thermostaat
1. Compressor licht
2. Ontdooien licht
3. Energiebesparend licht
4. Stand-by licht
5. Programmeer toets (alleen servicemonteur)
6. Machine aan/stand-by (ingedrukt houden)
7. Handmatig ontdooien (ingedrukt houden)
Hoe het toetsenbord te ontgrendelen bericht(»Loc» )
- , «UnL» Houd een willekeurige knop langer dan 2 seconden ingedrukt bericht verschijnt en het toetsenbord
wordt ontgrendeld.
Opmerking: om veiligheidsredenen wordt het toetsenbord automatisch vergrendeld na 30 seconden inactiviteit.
Om een bewerking uit te voeren, moet u eerst het toetsenbord ontgrendelen.
How to see and modify the set point
-Druk op de
-Om de ingestelde waarde te wijzigen, drukt u binnen 20 seconden op de of pijlen.
- 20 s . Om de nieuwe instelwaarde op te slaan, drukt u opnieuw op de knop of wacht econde
Handmatig ontdooien
Het apparaat voert automatisch elke 12 uur een ontdooicyclus uit.
Opmerking: de cyclus begint vanaf het moment dat het apparaat voor het eerst wordt ingeschakeld.
Om het apparaat handmatig te ontdooien :
- Houd de DEFROST knop 5 seconden ingedrukt.
- De ontdooicyclus start onmiddellijk en de LED gaat branden. Het ontdooien duurt 20 minuten.
Let op: het starten van een handmatige ontdooiing reset ook de automatische ontdooitimer.
De volgende automatische ontdooiing start 12 uur nadat de handmatige ontdooiing is voltooid.
Hoe u de machine in de AAN/STAND-BY-status kunt zetten
- 4 s , Houd de knop econde ingedrukt de machine schakelt van AAN naar STAND-BY-status en omgekeerd.
Terwijl u de knop ingedrukt houdt, knippert de LED om aan te geven dat de status verandert.
NL
712010- 027 G23M 8/42

REINIGING, VERZORGING & ONDERHOUD
SCHAKELSCHEMA
Routine onderhoud
Schakel het apparaat uit en haal de stekker uit het stopcontact voordat u gaat schoonmaken.
•Reinig de behuizing en de binnenkant van het apparaat zo vaak mogelijk.
•Veeg het apparaat af met een vochtige doek. Laat de schakelaar, het bedieningspaneel, de kabel of de stekker nooit nat worden.
•Gebruik geen schurende schoonmaakmiddelen. Deze kunnen schadelijke resten achterlaten. Gebruik alleen mild zeepsop.
•Zorg ervoor dat er geen reinigingswater in de elektrische componenten binnendringt.
•Er mag niet met een waterstraal worden gereinigd.
•Veeg het apparaat na het reinigen altijd droog met een zachte doek.
•Wees voorzichtig bij het schoonmaken van de achterkant van het apparaat.
•Alleen een gekwalificeerde technicus mag indien nodig reparaties uitvoeren.
•Als het apparaat langere tijd niet wordt gebruikt, haal dan de stekker uit het stopcontact nadat u de schakelaar in de UIT-stand hebt
gezet, maak het koelgedeelte leeg en maak het grondig schoon.
Speciaal onderhoud
De instructies in de volgende paragraaf zijn bedoeld voor een GEKWALIFICEERDE PERSOON.
Periodieke werkzaamheden
•Reinig de condensor regelmatig met geschikt gereedschap (stofzuiger of zachte borstels)
•Controleer of de elektrische aansluitingen niet los zitten.
•Controleer of de thermostaat en de sensor goed werken.
•Laat indien nodig een gespecialiseerde technicus de condensor reinigen.
P1
S1
TH1
C1
QF1
R1
F1
SQ1
STEKKER
HOOFDSCHAKELAAR
VERWARMINGSSCHAKELAAR
COMPRESSOR
OVERBELASTINGEN
RELAIS
CONDENSORVENTILATOR
TEMPERATUURSONDE
NL
712010- 027 G23M 9/42

TECHNISCHE DATA
NL
LET OP: GEVAAR VOOR BRAND EN EXPLOSIE MET ONTVLAMBAAR KOELMIDDEL R600a.
Milieubescherming.
Discarded electric appliances are recyclable and should not be discarded in the domestic waste! Please actively support
us in conserving resources and protecting the environment by returning this appliance to the collection centres( if available).
VRX1000/330
VRX1000/380
VRX1200/330
VRX1200/380
VRX1400/330
VRX1400/380
VRX1500/330
VRX1500/380
VRX1600/330
VRX1600/380
VRX1800/330
VRX1800/380
VRX1900/330
VRX1900/380
VRX2000/330
VRX2000/380
VRX2200/330
VRX2200/380
220-240/50
220-240/50
220-240/50
220-240/50
220-240/50
220-240/50
220-240/50
220-240/50
220-240/50
220-240/50
220-240/50
220-240/50
220-240/50
220-240/50
220-240/50
220-240/50
220-240/50
220-240/50
4
4
4
4
4
4
4
4
4
4
4
4
4
4
4
4
4
4
+2~+8
+2~+8
+2~+8
+2~+8
+2~+8
+2~+8
+2~+8
+2~+8
+2~+8
+2~+8
+2~+8
+2~+8
+2~+8
+2~+8
+2~+8
+2~+8
+2~+8
+2~+8
R134a/R600a
R134a/R600a
R134a/R600a
R134a/R600a
R134a/R600a
R134a/R600a
R134a/R600a
R134a/R600a
R134a/R600a
R134a/R600a
R134a/R600a
R134a/R600a
R134a/R600a
R134a/R600a
R134a/R600a
R134a/R600a
R134a/R600a
R134a/R600a
65/30
65/30
75/35
75/35
80/40
80/40
80/40
80/40
80/40
80/40
90/40
90/40
90/45
90/45
95/45
95/45
110/50
110/50
160
160
160
160
160
160
160
160
160
160
160
160
160
160
160
160
160
160
1.2
1.2
1.2
1.2
1.3
1.3
1.3
1.3
1.3
1.3
1.3
1.3
1.3
1.3
1.3
1.3
1.3
1.3
3xGN1/4
2xGN1/3+1xGN1/2
5xGN1/4
3xGN1/3+1xGN1/2
6xGN1/4
6xGN1/3
7xGN1/4
5xGN1/3+1xGN1/2
7xGN1/4
5xGN1/3+1xGN1/2
8xGN1/4
8xGN1/3
9xGN1/4
7xGN1/3+1xGN1/2
10xGN1/4
9xGN1/3
11xGN1/4
10xGN1/3
955x335x225
955x395x225
1200x335x225
1200x395x225
1400x335x225
1400x395x225
1500x335x225
1500x395x225
1600x335x225
1600x395x225
1800x335x225
1800x395x225
1900x335x225
1900x395x225
2000x335x225
2000x395x225
2200x335x225
2200x395x225
34
37
39
43
VRX1300/330 220-240/50 4 +2~+8 R134a/R600a 75/35 160 1.2 5xGN1/4 1300x335x225 41
VRX1300/380 220-240/50 4 +2~+8 R134a/R600a 75/35 160 1.2 5xGN1/3 1300x395x225 45
42
46.5
47
48
47
51
48
51
51.5
55.5
53.5
57.5
55
59
VRX2500/330 220-240/50 4 +2~+8 R134a/R600a 110/50 160 1.3 12xGN1/4 2500x395x225 59
VRX2500/380 220-240/50 4 +2~+8 R134a/R600a 110/50 160 1.3 11xGN1/3 2500x395x225 62
VRX1000/330 LID
VRX1000/380 LID
VRX1200/330 LID
VRX1200/380 LID
VRX1400/330 LID
VRX1400/380 LID
VRX1500/330 LID
VRX1500/380 LID
VRX1600/330 LID
VRX1600/380 LID
VRX1800/330 LID
VRX1800/380 LID
VRX1900/330 LID
VRX1900/380 LID
VRX2000/330 LID
VRX2000/380 LID
VRX2200/330 LID
VRX2200/380 LID
220-240/50
220-240/50
220-240/50
220-240/50
220-240/50
220-240/50
220-240/50
220-240/50
220-240/50
220-240/50
220-240/50
220-240/50
220-240/50
220-240/50
220-240/50
220-240/50
220-240/50
220-240/50
4
4
4
4
4
4
4
4
4
4
4
4
4
4
4
4
4
4
+2~+8
+2~+8
+2~+8
+2~+8
+2~+8
+2~+8
+2~+8
+2~+8
+2~+8
+2~+8
+2~+8
+2~+8
+2~+8
+2~+8
+2~+8
+2~+8
+2~+8
+2~+8
R134a/R600a
R134a/R600a
R134a/R600a
R134a/R600a
R134a/R600a
R134a/R600a
R134a/R600a
R134a/R600a
R134a/R600a
R134a/R600a
R134a/R600a
R134a/R600a
R134a/R600a
R134a/R600a
R134a/R600a
R134a/R600a
R134a/R600a
R134a/R600a
65/30
65/30
75/35
75/35
80/40
80/40
80/40
80/40
80/40
80/40
90/40
90/40
90/45
90/45
95/45
95/45
110/50
110/50
160
160
160
160
160
160
160
160
160
160
160
160
160
160
160
160
160
160
1.2
1.2
1.2
1.2
1.3
1.3
1.3
1.3
1.3
1.3
1.3
1.3
1.3
1.3
1.3
1.3
1.3
1.3
3xGN1/4
2xGN1/3+1xGN1/2
5xGN1/4
3xGN1/3+1xGN1/2
6xGN1/4
6xGN1/3
7xGN1/4
5xGN1/3+1xGN1/2
7xGN1/4
5xGN1/3+1xGN1/2
8xGN1/4
8xGN1/3
9xGN1/4
7xGN1/3+1xGN1/2
10xGN1/4
9xGN1/3
11xGN1/4
10xGN1/3
955x335x225
955x395x225
1200x335x225
1200x395x225
1400x335x225
1400x395x225
1500x335x225
1500x395x225
1600x335x225
1600x395x225
1800x335x225
1800x395x225
1900x335x225
1900x395x225
2000x335x225
2000x395x225
2200x335x225
2200x395x225
26
29
30
34
31.5
36.5
31.5
37
36
39
34
41
38
42.5
40
43
40.5
41
VRX2500/330 LID
VRX2500/380 LID
220-240/50
220-240/50
4
4
+2~+8
+2~+8
R134a/R600a
R134a/R600a
110/50
110/50
160
160
1.3
1.3
12xGN1/4
11xGN1/3
2500x335x225
2500x395x225
45
47
MODEL VOLTAGE KLIMAAT
K S ELA S
TEMP.
BERIJK oC
KOELMIDDEL KOELMIDDEL
CHARGE g
POWER STROOM AFMETINGEN GEWICHTCAPACITEIT
VRX1300/330 LID
VRX1300/380 LID
220-240/50
220-240/50
4
4
+2~+8
+2~+8
R134a/R600a
R134a/R600a
75/35
75/35
160
160
1.2
1.2
5xGN1/4
5xGN1/3
1300x335x225
1300x395x225
31
34
V/Hz W mm (WxDxH) KgA
712010-027 G23M 10/42

Op dit product is een wettelijke garantie van toepassing.
Schade veroorzaakt door verkeerde behandeling of bediening, door onjuiste plaatsing of opslag,
onjuiste aansluiting of installatie, evenals geweld of andere invloeden van buitenaf, valt niet onder
deze garantie. Wij raden u aan de gebruiksaanwijzing aandachtig te lezen, omdat deze belangrijke
informatie bevat.
Let op:
Indien dit product niet correct functioneert, controleer dan eerst of er andere redenen zijn, b.v.
bij elektrische apparaten is een onderbreking van de stroomvoorziening of een algemene
onjuiste behandeling de oorzaak.
Houd er rekening mee dat u, indien mogelijk, de volgende documenten of informatie bij uw
defecte product moet voegen of gereed moet hebben:
-Aankoopbon
-Modelbeschrijving/Type/Merk
-Beschrijf de storing en het probleem zo gedetailleerd mogelijk
Bij aanspraak op garantie of bij gebreken kunt u contact opnemen met de verkoper.
1.
2.
PROBLEEMOPLOSSEN
Als uw apparaat een storing vertoont, controleer dan de volgende tabel.
Storing Waarschijnlijke oorzaak eActi
Het apparaat werkt niet Het apparaat is niet ingeschakeld
Het apparaat maakt ongebruikelijk veel
lawaai
Losse moer/schroef Controleer alle moeren en schroeven en
draai ze vast
Controleer of het apparaat correct is
aangesloten en is ingeschakeld
Stekkers en kabels zijn beschadigd Bel een gekwalificeerde technicus
Zekering in de stekker is doorgebrand Vervang de zekering
Voedingen Controleer de voeding
Interne bedradingsfout Bel een gekwalificeerde technicus
Het apparaat gaat aan, maar
de temperatuur is te hoog/laag
Te veel ijs in de verdamper Ontdooi het apparaat
Condensor verstopt door stof Bel een gekwalificeerde technicus
Apparaat bevindt zich in de buurt van een
warmtebron of de luchtstroom naar de
condensor wordt onderbroken
Verplaats het apparaat naar een
geschiktere locatie
Omgevingstemperatuur is te hoog Zorg voor betere ventilatie of kies een
koelere plek voor het apparaat
Ongeschikt voedsel opgeslagen in het
apparaat
Verwijder voedsel dat te heet is; de
ventilator mag niet geblokkeerd zijn
Apparaat is te vol Verminder de hoeveelheid opgeslagen
voedsel
Het apparaat is niet op een vlakke of
stabiele plaats geïnstalleerd
Controleer de locatie en wijzig
dit indien nodig
GARANTIE
NL
712010- 027 G23M 11/42

Original instruction
Dear Customer,
Congratulations on your purchase of this product. Like all VRX models, this product has also been developed on the basis the
latest technology and produced using reliable and modern electrical components.
Please take a few minutes before starting operation of the appliance and read the following operating instructions.
Many thanks.
TABLE OF CONTENTS
Safety tips........................................................................................................................................................................................... 2~4
Installation...........................................................................................................................................................................................4~6
Operation............................................................................................................................................................................................ 6~8
Cleaning, care & maintenance................................................................................................................................................................9
Circuit diagram........................................................................................................................................................................................9
Technical data.......................................................................................................................................................................................10
Troubleshooting.....................................................................................................................................................................................11
Warranty................................................................................................................................................................................................11
SAFETY TIPS
Position on a fl at, stable surface.
A service agent/qualifi ed technician should carry out installation and any
repairs if required. Do not remove any components or service panels on this
product.
Important: For your safety read the manual carefully before
installing or using this product.
Save this manual for future reference.
GB
712010-027 G23M 12/42

SAFETY TIPS
Consult Local and National Standards to comply with the following:
1. Health and Safety at Work Legislation.
2. Fire Precautions.
3. IEE Wiring Regulations.
4. Building Regulations.
5. The appliance is intended for commercial use.
6. DO NOT use the appliance outside.
7. DO NOT attempt to service the item yourself.
8. DO NOT use damaged appliances. If you are in any doubt, consult service
agent.
9. s,DO NOT use electrical appliances inside the appliance (e.g. heater
ice-cream makers etc.), unless they are of the type recommended by the
manufacturer.
10. Keep ventilation openings, in the appliance enclosure or in the built-in
structure, clear of obstruction.
11. DO NOT use mechanical device or other means to accelerate the
defrosting process, other than those recommended by the manufacturer.
12. DO NOT damage the refrigerant circuit.
13. DO NOT stand or support yourself on the appliance or glass panel.
14. DO NOT allow oil or fat to come into contact with the plastic components.
Clean immediately if contact occurs.
15. DO NOT place combustible, explosive or volatile articles, corrosive acid
or alkali, or liquids into the unit.
16. DO NOT use this appliance to store medical supplies.
17. DO NOT use jet/pressure washers to clean the appliance.
18. DO NOT allow children to play with the packaging, and destroy plastic
bags safely.
19. Always carry, store and handle the appliance in a vertical position and
move by holding the base of the appliance.
20. Always switch off and disconnect the power supply to the unit before
cleaning.
21. If the supply cord is damaged, it must be replaced by the manufacturer,
its service agent or similarly qualifi ed persons in order to avoid a hazard.
GB
712010-027 G23M 13/42

SAFETY TIPS
22. This appliance is not intended for use by persons (including children) with
reduced iencephysical, sensory or mental capabilities, or lack of exper
and uctionknowledge, unless they have been given supervision or instr
concerning use of the appliance by a person responsible for their safety.
23. Children should be supervised to ensure that they do not play with the
appliance.
24. For indoor use only. Not suitable for installation in an area where a water
jet could be used. Must not be cleaned by a water jet.
25. To guarantee safe operation, ensure that the appliance is set up and
connected as described in the instruction manual.
26. theAny repairs and work on the appliance should only be carried out by
customer service department.
27. Do not store explosive substances such as aerosol cans with a fl ammable
propellant in this appliance.
INSTALLATION
Fit Glass Panels
Note: Ensure the hole in the collar for the grub screw faces inwards.
Note: Ensure the screw hole furthest from the edge of the panel goes to the back of the appliance.
Note: Ensure the soft end of the grub screw is the end making contact with the glass.
Note: Ensure the short end of the bolt assembly is on the outside of the panels.
Note: The glass panel must not be used as shelf.
ATTENTION: RISK OF BREAKAGE OF THE GLASS PANEL.
• Remove the appliance from the packaging. Make sure that all protective plastic fi lm and coatings are thoroughly removed from all
surfaces. To prevent injury or damage to the unit, the appliance should be unpacked and set up by two people.
• Maintain a distance of 20cm (7 inches) between the unit and walls or other objects for ventilation. Increase this distance if the
obstacle is a heat source.
• Level the appliance by adjusting the screw feet. It should be placed on a level solid fl oor or base to reduce the vibration and noise.
• t be between 10 and 32°C (Climatic Class 4).The temperature in the place where the showcase is located mus Avoid locating it in
direct sunlight or near heat source such as an oven or a radiator.
• Please make sure the appliance is properly ventilated.
• Power supply and voltage at the operating point must comply with the details on the rating label. The plug must be accessible after
installation.
• Correctly connect and disconnect the plug. When inserting the plug ensure it is fully inserted. When pulling out the plug grip the
plug body. Never pull the supply cord directly.
• If the showcase is to be shut down for long period, switch it off and disconnect the plug from socket outlet. Clean the appliance and
leave the lid open to prevent odor.
•Important! For your personal safety, this appliance must be properly grounded. This appliance is equipped with a cord
having a grounding (earthing) wire with a grounding (earthed) plug. The plug must be inserted into an outlet that is properly
grounded and installed. Consult a qualifi ed electrician or service center if you do not completely understand the grounding
instructions. If doubt exits as to whether the appliance is properly grounded, have a qualifi ed electrician check the circuit to make
sure the outlet is properly grounded.
• If the cable does not reach the nearest socket, either rearrange your store layout or ask a qualifi ed electrician to fi x a new socket.
• If power is cut off, wait for at least 3 minutes before restart the unit to avoid damaging the compressor.
GB
712010-027 G23M 14/42

INSTALLATION
•Unpack the wooden/carton box carefully; it’s recommended to do this work with two people.
•Screw the collars to the rim of the appliance.
•Slot the two side panels into the collars, with the holes in the glass at the top.
•Screw a grub screw into each collar to secure the panels.
•Slot the rear panel into the collars, with the holes in the glass at the top.
•Screw a grub screw into each collar to secure the panel.
•Slot the plastic bushes into each of the holes.
•Screw the brackets to the inside of each panel using the bolt assemblies.
•Place the top panel onto the brackets, ensuring all holes line up.
•Insert the bush and attach the top panel to the brackets with the bolt assemblies.
Glass Panel Assembly Guide
GB
712010-027 G23M 15/42

INSTALLATION
Storing food
To get the best results from your appliance, follow these instructions:
• Only store foodstuffs in the appliance when it has reached the correct operating temperature.
• Ensure GN container bays are full at all times, even if the GN containers are unused or empty. Empty bays will greatly reduce effi
ciency of the appliance.
• Always close the door,lid or drawer when not in use.
• Do not place uncovered hot food or liquid inside the appliance.
• Wrap or cover food where possible.
• Do not obstruct the fans inside the appliance.
• Avoid opening the doors/drawers for prolonged periods of time.
• The maximum load for a shelf/drawer is 20 kg.
• The food must be put into container before placed into cabinet or on the shelf. Food must not be placed into food cabinet directly.
• When wet food/vegetable is put in the Saladette, it’s normal that ice (snow) appears on the surface.
Turn on
• Close the door/lid/drawer of the appliance.
• Ensure the power switch is set to [O] and turn on at the socket.
• Switch on the Power [I]. The current temperature within the appliance is displayed.
• The on the control panel will fl ash for 3-min to indicate a delay between the motor compressor being stopped and then
restarted.
Open/close the lid or drawer
WARNING: The sliding lid does not have a locking mechanism. Always make sure that the lid is in the ‘half-open’ position
before opening.
WARNING: Do not pull the drawer out of its full open position to avoid any hurt.
The lid of the GSA is multi-positional:
• With the lid closed, slide the panel back into the half open position. This allows partial access to the GN container trays.
• Lift the lid up and back so the hinge settles into the support slot.
• Lift the lid up and completely back so the GN container trays are completely exposed.
OPERATION
Brac etk
Glass Panel
Bolt Assembly
Bush
Bolt Assembly
GB
712010- 027 G23M 16/42

OPERATION
Temperature setting and control
The front panel of the t rmostathe
1. Defrosting light
2. Compressor operation light
3. Digital thermostat
4. Programming key (Service agent only)
5. Temperature modifi cation keys
6. Manual defrost
How to see the set point
•Push and immediately release the key, the set point will be showed;SET
•Push and immediately release the key or wait about 15s to return to normal visuallsation.SET
How to change the set point
•Push the key for more than 2 second to change the set point value;SET s
•The value of the set point will be displayed and the “°C“ starts blinking;
•To change the set value push the „ ” (up) or „ ” (down) arrows within 10s.
•To memorise the new set point value push the SE key again or wait 10s.T
Manual defrost
The appliance will automatically run a defrost cycle every 12 hours.
Note: The cycle starts from the time the appliance is initially powered up.
To manually defrost the appliance:
•Press and hold the DEFROST button for 5 seconds.
•The defrost cycle will start immediately and the Defrost LED illuminates. The defrost will last 20 minutes.
Note: Starting a manual defrost also resets the automatic defrost timer. The next automatic defrost will
start 12 hours after the manual defrost has finished.
GB
712010-027 G23M 17/42
Specyfikacje produktu
| Marka: | Cool Head |
| Kategoria: | lodówka |
| Model: | 712025 |
Potrzebujesz pomocy?
Jeśli potrzebujesz pomocy z Cool Head 712025, zadaj pytanie poniżej, a inni użytkownicy Ci odpowiedzą
Instrukcje lodówka Cool Head

3 Stycznia 2025
3 Stycznia 2025
30 Września 2024
30 Września 2024
30 Września 2024
30 Września 2024
30 Września 2024
30 Września 2024
Instrukcje lodówka
- lodówka Bauknecht
- lodówka Yamaha
- lodówka Ikea
- lodówka Hoshizaki
- lodówka Samsung
- lodówka Bertazzoni
- lodówka Electrolux
- lodówka DeLonghi
- lodówka AEG
- lodówka Balay
- lodówka Beko
- lodówka Teka
- lodówka LG
- lodówka Worx
- lodówka Küppersbusch
- lodówka Smeg
- lodówka Götze & Jensen
- lodówka Gram
- lodówka Caso
- lodówka Amica
- lodówka Gorenje
- lodówka Etna
- lodówka LERAN
- lodówka Sharp
- lodówka TCL
- lodówka Cookology
- lodówka Russell Hobbs
- lodówka Philips
- lodówka Livoo
- lodówka SilverCrest
- lodówka Dometic
- lodówka Bosch
- lodówka Candy
- lodówka Whirlpool
- lodówka Miele
- lodówka Midea
- lodówka Lamona
- lodówka Severin
- lodówka Hisense
- lodówka Berg
- lodówka Infiniton
- lodówka Panasonic
- lodówka Liebherr
- lodówka Nedis
- lodówka Medion
- lodówka Baumatic
- lodówka OK
- lodówka Polar
- lodówka Adler
- lodówka Hoover
- lodówka Toshiba
- lodówka Westinghouse
- lodówka Quigg
- lodówka Romo
- lodówka Maytag
- lodówka Domo
- lodówka GE
- lodówka Ardes
- lodówka Orbegozo
- lodówka Garmin
- lodówka Blaupunkt
- lodówka Brandt
- lodówka Vivax
- lodówka Salora
- lodówka Siemens
- lodówka Danby
- lodówka Grundig
- lodówka Haier
- lodówka FrigeluX
- lodówka Cylinda
- lodówka Jocel
- lodówka Hyundai
- lodówka Silverline
- lodówka Blomberg
- lodówka Husqvarna
- lodówka Honeywell
- lodówka Concept
- lodówka Fisher & Paykel
- lodówka ECG
- lodówka Indesit
- lodówka Matsui
- lodówka Ilve
- lodówka Unold
- lodówka Mercury
- lodówka Viking
- lodówka Nodor
- lodówka CATA
- lodówka Hotpoint
- lodówka Kenwood
- lodówka V-Zug
- lodówka Vintec
- lodówka Trisa
- lodówka Ariston Thermo
- lodówka Mestic
- lodówka PKM
- lodówka Cuisinart
- lodówka Culinair
- lodówka Thor
- lodówka Amana
- lodówka Dacor
- lodówka Hotpoint Ariston
- lodówka Furrion
- lodówka Bomann
- lodówka U-Line
- lodówka Moulinex
- lodówka Emerio
- lodówka Create
- lodówka H.Koenig
- lodówka InAlto
- lodówka Meireles
- lodówka Melissa
- lodówka Schneider
- lodówka Daikin
- lodówka Thetford
- lodówka Stirling
- lodówka MPM
- lodówka CDA
- lodówka Sam Cook
- lodówka Philco
- lodówka Neff
- lodówka CHiQ
- lodówka Corbero
- lodówka Zanussi
- lodówka Ravanson
- lodówka Crivit
- lodówka Marshall
- lodówka Perel
- lodówka Fagor
- lodówka Koenic
- lodówka Thomson
- lodówka Ardo
- lodówka ProfiCook
- lodówka Klarstein
- lodówka Coyote
- lodówka Manta
- lodówka Pyle
- lodówka Wolkenstein
- lodówka Cecotec
- lodówka Artusi
- lodówka KitchenAid
- lodówka Waeco
- lodówka Icecool
- lodówka Eta
- lodówka Camry
- lodówka NewAir
- lodówka Germanica
- lodówka Sôlt
- lodówka Nevir
- lodówka Fridgemaster
- lodówka TriStar
- lodówka Exquisit
- lodówka Bartscher
- lodówka Hestan
- lodówka GYS
- lodówka Mitsubishi
- lodówka Privileg
- lodówka Dimplex
- lodówka Arçelik
- lodówka Hanseatic
- lodówka Continental Edison
- lodówka Bifinett
- lodówka Linarie
- lodówka Lavorwash
- lodówka Atag
- lodówka Rosieres
- lodówka Franke
- lodówka DCG
- lodówka Rocktrail
- lodówka G3 Ferrari
- lodówka AKAI
- lodówka Mobicool
- lodówka Sanyo
- lodówka Gourmetmaxx
- lodówka Novy
- lodówka Telefunken
- lodówka NEO Tools
- lodówka Rommer
- lodówka Inventum
- lodówka SVAN
- lodówka IFB
- lodówka Cooluli
- lodówka Napoleon
- lodówka Princess
- lodówka Thorens
- lodówka Heller
- lodówka Euro Appliances
- lodówka Mora
- lodówka Caple
- lodówka AEG-Electrolux
- lodówka Omega
- lodówka Comfee
- lodówka BeefEater
- lodówka Wisberg
- lodówka Airflo
- lodówka Bush
- lodówka New Pol
- lodówka Kenmore
- lodówka Kaiser
- lodówka Zephyr
- lodówka LeCavist
- lodówka VOX
- lodówka Insignia
- lodówka Hiberg
- lodówka AYA
- lodówka Pelgrim
- lodówka Veripart
- lodówka Chefman
- lodówka Frilec
- lodówka Benavent
- lodówka True
- lodówka Element
- lodówka Orima
- lodówka Rex
- lodówka Denver
- lodówka Kernau
- lodówka Aspes
- lodówka DCS
- lodówka Hitachi
- lodówka Zerowatt
- lodówka Salton
- lodówka Respekta
- lodówka Vedette
- lodówka Seiki
- lodówka JennAir
- lodówka Frigidaire
- lodówka Galanz
- lodówka Matrix
- lodówka RCA
- lodówka MBM
- lodówka Climadiff
- lodówka Marvel
- lodówka Summit
- lodówka Whynter
- lodówka Foster
- lodówka Electra
- lodówka Gardenline
- lodówka Fulgor Milano
- lodówka Electroline
- lodówka Kelvinator
- lodówka Gaggenau
- lodówka Elica
- lodówka Nabo
- lodówka Avanti
- lodówka Asko
- lodówka Kalorik
- lodówka Zenith
- lodówka Flavel
- lodówka Esatto
- lodówka Signature
- lodówka Daewoo
- lodówka BlueStar
- lodówka Consul
- lodówka Kunft
- lodówka Robinhood
- lodówka Sub-Zero
- lodówka Becken
- lodówka Haeger
- lodówka Scandomestic
- lodówka Ignis
- lodówka Guzzanti
- lodówka Brass Monkey
- lodówka Belling
- lodówka De Dietrich
- lodówka SanGiorgio
- lodówka Magic Chef
- lodówka Sauber
- lodówka Smith&Brown
- lodówka Sogo
- lodówka Crosley
- lodówka Constructa
- lodówka Proline
- lodówka Euromaid
- lodówka Schaub Lorenz
- lodówka Fhiaba
- lodówka Lemair
- lodówka Ideal
- lodówka Arktic
- lodówka Scancool
- lodówka Thermador
- lodówka Finlux
- lodówka Yolco
- lodówka Optimum
- lodówka Atosa
- lodówka Kuhla
- lodówka Swan
- lodówka Zanker
- lodówka Kluge
- lodówka Airlux
- lodówka Aldi
- lodówka Ariston
- lodówka Techwood
- lodówka Tricity Bendix
- lodówka Palsonic
- lodówka Arthur Martin
- lodówka Nordland
- lodówka Progress
- lodówka Tomado
- lodówka Bellini
- lodówka Vestel
- lodówka John Lewis
- lodówka Prima
- lodówka Junker
- lodówka Mabe
- lodówka Monogram
- lodówka Iberna
- lodówka Logik
- lodówka Valberg
- lodówka Accucold
- lodówka Scholtes
- lodówka Profilo
- lodówka Castor
- lodówka Heinner
- lodówka Eldom
- lodówka Jocca
- lodówka Juno
- lodówka Defy
- lodówka Igloo
- lodówka Premium
- lodówka White Knight
- lodówka Sunny
- lodówka Luxor
- lodówka Nordmende
- lodówka CaterCool
- lodówka Rangemaster
- lodówka Friac
- lodówka Boretti
- lodówka GOTIE
- lodówka Hansa
- lodówka Kubo
- lodówka Costway
- lodówka Elba
- lodówka WLA
- lodówka Everglades
- lodówka Steel Cucine
- lodówka Jenn-Air
- lodówka Limit
- lodówka Freggia
- lodówka Carpigiani
- lodówka Listo
- lodówka Edesa
- lodówka Milectric
- lodówka Leonard
- lodówka Osprey
- lodówka New World
- lodówka Leisure
- lodówka WhiteLine
- lodówka Bompani
- lodówka Blaze
- lodówka Glem Gas
- lodówka Viva
- lodówka M-System
- lodówka Changhong
- lodówka Primo
- lodówka Goddess
- lodówka Saro
- lodówka Godrej
- lodówka Juno-electrolux
- lodówka Essentiel B
- lodówka Stoves
- lodówka Edy
- lodówka Edgestar
- lodówka Parmco
- lodówka Eurotech
- lodówka Avintage
- lodówka Carrefour Home
- lodówka Equator
- lodówka Vestfrost
- lodówka Electrolux-Rex
- lodówka Upo
- lodówka SIBIR
- lodówka Brandy Best
- lodówka Café
- lodówka Aconatic
- lodówka Lynx
- lodówka AVEA
- lodówka Bluesky
- lodówka Khind
- lodówka Tecnolux
- lodówka Tisira
- lodówka Cobal
- lodówka Marynen
- lodówka La Germania
- lodówka Premium Levella
- lodówka Lec
- lodówka Oranier
- lodówka Turbo Air
- lodówka Orava
- lodówka United
- lodówka CombiSteel
- lodówka Kalamazoo
- lodówka Husky
- lodówka Unic Line
- lodówka Gastro-Cool
- lodówka Maxx Cold
- lodówka Wells
- lodówka Paulmann
- lodówka Kucht
- lodówka Avantco
- lodówka Kogan
- lodówka Norlake
- lodówka Arctic Air
- lodówka Gamko
- lodówka Snaigė
- lodówka Merax
- lodówka Blucher
- lodówka Silhouette
- lodówka ColdTech
- lodówka ONYX
- lodówka Magic Cool
- lodówka Rhino
- lodówka Le Chai
- lodówka IOMABE
- lodówka APW Wyott
- lodówka General Electric
- lodówka SPT
- lodówka Kolpak
- lodówka Hatco
- lodówka High One
- lodówka Les Petits Champs
- lodówka Moa
- lodówka Bushman
- lodówka Master-Bilt
- lodówka Hydra Kool
- lodówka XO
- lodówka Dunavox
- lodówka Curtiss
- lodówka Nemco
- lodówka Beverage-Air
- lodówka Winia
- lodówka Delfield
- lodówka Traulsen
- lodówka Alto-Shaam
- lodówka Simfer
- lodówka Federal
- lodówka Structural Concepts
- lodówka Vinata
- lodówka Avallon
- lodówka Emperor's Select
- lodówka Engel
- lodówka Fisher Paykel
- lodówka DAYA
- lodówka Wine Klima
- lodówka Marbor
- lodówka Americana
- lodówka Koolatron
- lodówka Cosmo
- lodówka Adventure Kings
- lodówka Bromic
- lodówka Schmick
- lodówka EvaKool
- lodówka Dellware
- lodówka FAURE
- lodówka Coldtainer
- lodówka Orien
- lodówka Enofrigo
- lodówka BSK
- lodówka Techfrost
- lodówka Irinox
- lodówka Azure
- lodówka Gecko
- lodówka Adora
- lodówka Newpol
- lodówka Brastemp
- lodówka Royal Catering
- lodówka Haden
- lodówka Perlick
- lodówka Sedona
- lodówka Gladiator
- lodówka Vinotemp
- lodówka Norpole
- lodówka Gasmate
- lodówka Arthur Martin-Electrolux
- lodówka Triomph
- lodówka Elektra Bregenz
- lodówka HABAU
- lodówka Tuscany
- lodówka TESLA Electronics
- lodówka Pando
- lodówka Smart Brand
- lodówka Waltham
- lodówka Lec Medical
- lodówka Hoover-Grepa
- lodówka Coca-Cola
- lodówka Acros
- lodówka HomeCraft
- lodówka Koldfront
- lodówka Eqtemp
- lodówka Uniprodo
- lodówka Corona
- lodówka Coors Light
- lodówka Miller Lite
- lodówka Lanbo
- lodówka Helkama
- lodówka Pitsos
- lodówka Landmark
- lodówka Momcube
- lodówka Sheffield
- lodówka Richome
- lodówka Sevenstars
Najnowsze instrukcje dla lodówka

9 Kwietnia 2025

9 Kwietnia 2025
9 Kwietnia 2025

9 Kwietnia 2025

9 Kwietnia 2025
9 Kwietnia 2025

9 Kwietnia 2025

9 Kwietnia 2025

8 Kwietnia 2025
8 Kwietnia 2025