Instrukcja obsługi Canon LEGRIA MD235
Przeczytaj poniżej 📖 instrukcję obsługi w języku polskim dla Canon LEGRIA MD235 (77 stron) w kategorii kamera. Ta instrukcja była pomocna dla 4 osób i została oceniona przez 2 użytkowników na średnio 4.5 gwiazdek
Strona 1/77

PUB. DIE-295
Digital Video Camcorder
Instruction Manual
PAL

2
In t ro d uc t io n
Cleaning the Video Heads
Digital video camcorders record video signals onto the tape in very thin lines (as thin
as 1/8 the width of a hair). The following anomalies may appear if the video heads
become dirty even a little.
• Mosaic or other blocky video artifacts (Fig. 1) or banding
(Fig. 2) appear on the picture during playback.
• Sound becomes distorted, or there is no sound during
playback.
• The message “HEADS DIRTY, USE CLEANING CASSETTE”
appears.
If such symptoms appear, clean the video heads with the
Canon DVM-CL Digital Video Head Cleaning Cassette* or a
commercially available dry cleaning cassette.
If the symptoms reappear shortly after the cleaning, the
videocassette may be defective. Stop using it.
* Availability differs from area to area.
Video heads may become dirty under the following conditions:
• When using the camcorder in humid or hot places.
• When using cassettes with damaged or dirty tapes.
• When using the camcorder in dusty places.
• When using the video heads for a long time without cleaning them.
NOTES
• Before you make important recordings, clean the video heads and make a test recording
first. We also recommend cleaning the video heads after use, before storing the
camcorder.
• Do not use wet type cleaning cassettes as this may damage the camcorder.
• Even after cleaning the video heads you may not be able to play back correctly tapes
that were recorded with dirty video heads.
Fig. 1
Fig. 2
3
Important Usage Instructions
WARNING!
TO REDUCE THE RISK OF ELECTRIC SHOCK, DO NOT REMOVE COVER (OR
BACK). NO USER SERVICEABLE PARTS INSIDE. REFER SERVICING TO
QUALIFIED SERVICE PERSONNEL.
WARNING!
TO REDUCE THE RISK OF FIRE OR ELECTRIC SHOCK, DO NOT EXPOSE THIS
PRODUCT TO RAIN OR MOISTURE.
CAUTION:
TO REDUCE THE RISK OF ELECTRIC SHOCK AND TO REDUCE ANNOYING
INTERFERENCE, USE THE RECOMMENDED ACCESSORIES ONLY.
CAUTION:
DISCONNECT THE MAINS PLUG FROM THE SUPPLY SOCKET WHEN NOT IN USE.
The Mains plug is used as the disconnect device. The Mains plug shall remain readily operable to disconnect
the plug in case of an accident.
While using the compact power adapter, do not wrap it or cover it with a piece of cloth, and do not place it in
confined narrow spaces. Heat may build up, the plastic case may deform and it could result in electric shock
or fire.
CA-590E identification plate is located on the bottom.
Using any device other than the Compact Power Adapter CA-590E may damage the camcorder.
European Union (and EEA) only.
This symbol indicates that this product is not to be disposed of with your household waste, according to
the WEEE Directive (2002/96/EC) and your national law. This product should be handed over to a
designated collection point, e.g., on an authorized one-for-one basis when you buy a new similar product
or to an authorized collection site for recycling waste electrical and electronic equipment (EEE). Improper
handling of this type of waste could have a possible negative impact on the environment and human
health due to potentially hazardous substances that are generally associated with EEE. At the same time, your
cooperation in the correct disposal of this product will contribute to the effective usage of natural resources. For
more information about where you can drop off your waste equipment for recycling, please contact your local city
office, waste authority, approved WEEE scheme or your household waste disposal service. For more information
regarding return and recycling of WEEE products, please visit
www.canon-europe.com/environment.
(EEA: Norway, Iceland and Liechtenstein)

4
Table of contents
Introduction ______________________________
8 About this Manual
9 Getting to Know the Camcorder
9 Supplied Accessories
10 Components Guide
13 Screen Displays
Preparations _____________________________
15 Getting Started
15 Charging the Battery Pack
17 Installing the Backup Battery
17 Preparing the Wireless Controller ( only)
and Accessories
19 Basic Operation of the Camcorder
19 Operating Modes
19 Joystick and Joystick Guide
20 Using the Menus
22 First Time Settings
22 Changing the Language
22 Changing the Time Zone
23 Setting the Date and Time
23 Getting Ready to Start Recording
23 Opening the Lens Cover and Adjusting the LCD Screen
25 Inserting and Removing a Tape
5
Table of contents
Video ____________________________________
26 Basic Recording
26 Shooting Video
28 Zooming: Optical, Advanced and Digital Zoom
30 Quick Start Function
31 Reviewing the Last Scene Recorded
31 Basic Playback
31 Playing Back Video
33 Returning to a Pre-marked Position
33 Locating the Beginning of a Recording Date
34 Locating the End of the Last Scene
34 On-Screen Displays (Data Code)
35 Advanced Function
35 : Special Scene Recording Programs
37 Flexible Recording: Changing the Shutter Speed
38 LCD Video Light
38 Self Timer
39 Audio Recording Mode
40 Audio Playback Modes
41 Manual Focus Adjustment
42 Manual Exposure Adjustment
42 White Balance
43 Image Effects
44 Digital Effects

6
External Connections _______________________
46 Connecting to a TV or VCR
47 Connection Diagrams
48 Playback on a TV Screen
48 Copying your Recordings to an External Video Recorder
49 Audio Dubbing
51 Connecting to a Computer
51 PC Connection Diagram
52 Transferring Video Recordings

7
Table of contents
Additional Information ______________________
53 Appendix: Menu Options Lists
53 FUNC. Menu
54 Setup Menus
54 Camera Setup (Advanced Zoom, Image Stabilizer, etc.)
55 VCR Setup (Recording Mode, TV Type, etc.)
55 Audio Setup (Audio Mode, Wind Screen, etc.)
56 Display Setup (LCD Brightness, Language, etc.)
57 System Setup (Beep, Power Save, etc.)
58 Date/Time Setup
59 Trouble?
59 Troubleshooting
61 List of Messages
63 Do’s and Don’ts
63 Handling Precautions
65 Maintenance/Others
67 Using the Camcorder Abroad
68 General Information
68 System Diagram
69 Optional Accessories
72 Specifications
75 Index

Introduction
8
Thank you for purchasing the Canon MD235/MD216/MD215/MD205. Please read
this manual carefully before you use the camcorder and retain it for future reference.
Should your camcorder fail to operate correctly, refer to Troubleshooting ( 59).
Conventions Used in this Manual
• IMPORTANT: Precautions related to the camcorder’s operation.
• NOTES: Additional topics that complement the basic operating procedures.
• POINTS TO CHECK: Restrictions or requirements regarding the function
described.
• : Reference page number.
• : Text that applies only to the model(s) shown in the icon.
• “Screen” refers to the LCD and the viewfinder screen.
• The photos included in the manual are simulated pictures taken with a still camera.
Note that unless indicated otherwise, illustrations in this manual refer to the
model.
About this Manual
Setting the Date and Time
1Open the date and time setup
screen.
[ MENU]
[ DAT E/TIME SET UP]
[DATE/TIME]
Blinking arrows will be displayed
around the first field of the date.
2Change each field of the date and
time with the joystick ( ) and
move ( ) to the next field.
3Press ( ) to start the clock.
4Press to close the menu.
NOTES
You can also change the date format
( 93).
FUNC.
( 30)
FUNC.
FUNC.
Brackets [ ] and capital letters are used to refer to menu
options as they are displayed on screen. In tables in this
manual the default value is shown in boldface.
For example [ON], [OFF].
Buttons and switches to be operated
Names of buttons and switches other than the joystick
are indicated within a “button” frame.
For example .
FUNC.

9
Get t ing t o Know t he Camcord er
Supplied Accessories
CA-590E Compact Power
Adapter
(incl. power cord)
BP-2L5 Battery Pack
Lithium Button Battery
(CR1616)
STV-250N Stereo Video
Cable
(
incl. ferrite core
)
WL-D85
Wireless Controller
Lithium Button
Battery (CR2025) for
Wireless Controller

Introduction
10
Names of buttons and switches other than the
joystick are indicated within a
“ ”button frame
(for example ).
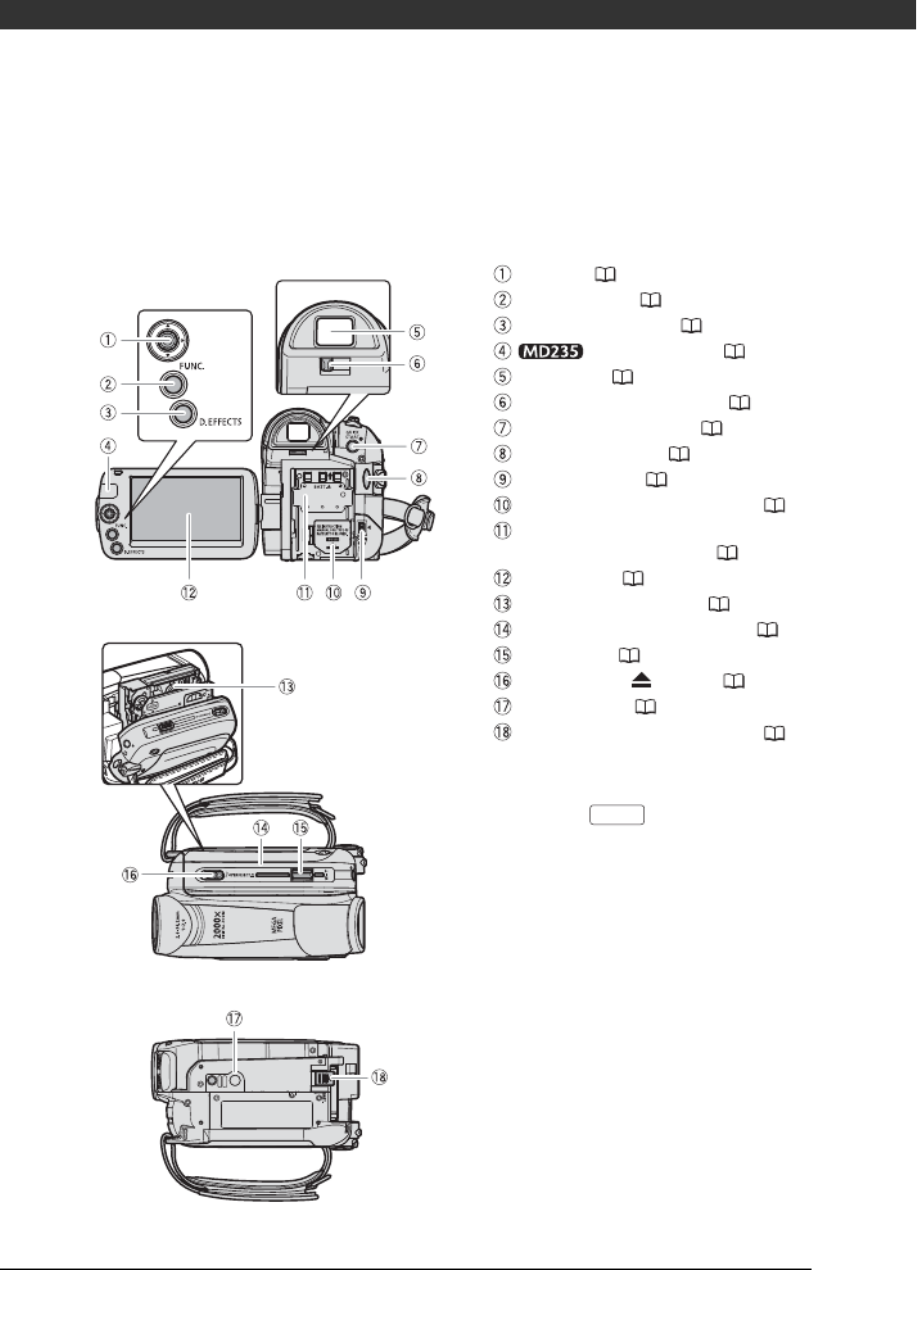
Components Guide
Left side view
Front view
Right side view
Lens cover switch ( 26)
( open, closed)
DV terminal ( 47, 51)
MIC (microphone) terminal ( 39)
AV terminal ( 47)
CHARGE indicator ( 15)
Speaker
Mode switch ( 27)
Easy recording
Recording programs
Grip belt ( 18)
Strap mount
( 71)
Lock button
switch ( 19)
Stereo microphone
FUNC.
11
Names of buttons and switches other than the
joystick are indicated within a
“ ”button frame
(for example ).
Back view
Top view
Bottom view
Joystick ( 19)
FUNC. button ( 20, 53)
D.EFFECTS button ( 44)
Remote sensor ( 18)
Viewfinder ( 28)
Dioptric adjustment lever ( 28)
QUICK START button ( 30)
Start/Stop button ( 26)
DC IN terminal ( 15)
Backup battery compartment ( 17)
Serial number/
Battery attachment unit ( 15)
LCD screen ( 23)
Cassette compartment
( 25)
Cassette compartment cover
( 25)
Zoom lever ( 28)
OPEN/EJECT switch
( 25)
Tripod socket
( 18)
BATT. (battery release) switch ( 15)
FUNC.
Introduction
12
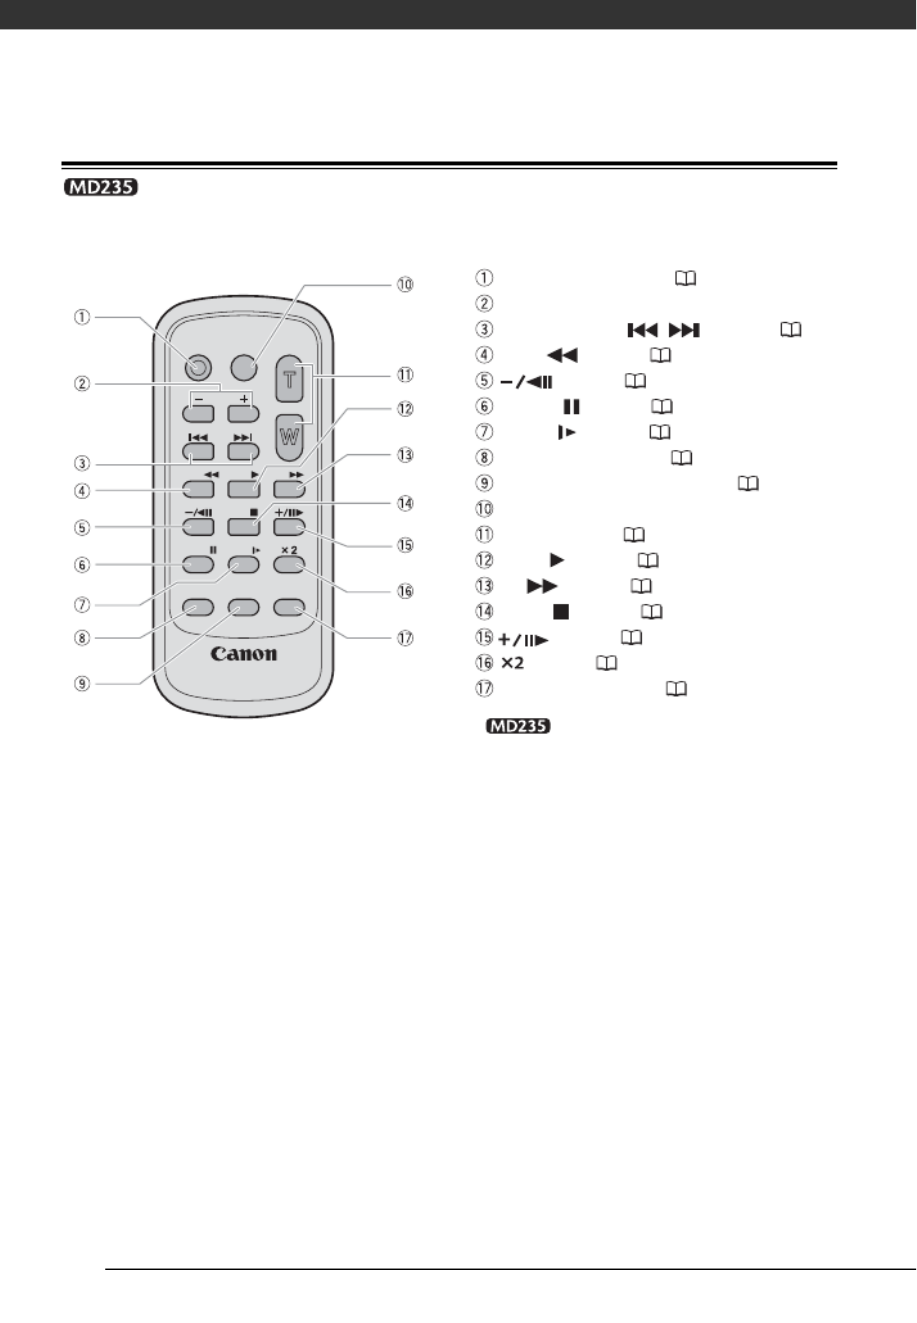
Wireless Controller WL-D85
* Still images cannot be recorded or
played back using this model. Please
disregard these buttons.
WIRELESS CONTROLLER WL-D85
START/
STOP PHOTO ZOOM
CARD
DATE SEARCH
REW PLAY FF
STOP
PAUSE SLOW
AUDIO DUB. ZERO SET
MEMORY TV SCREEN
START/STOP button ( 26)
CARD –/+ buttons*
DATE SEARCH / buttons ( 33)
REW button ( 31)
button ( 31)
PAUSE button ( 31)
SLOW button ( 31)
AUDIO DUB. button ( 49)
ZERO SET MEMORY button ( 33)
PHOTO button*
Zoom buttons ( 28)
PLAY button ( 31)
FF button ( 31)
STOP button ( 31)
button ( 31)
button ( 31)
TV SCREEN button ( 57)

13
Screen Displays
Recording Movies
Zoom ( 28), Exposure ( 42)
Recording program ( 35)
White balance ( 42)
Image effect ( 43)
LCD video light ( 38)
Digital effects ( 44)
Condensation warning ( 66)
Shutter speed ( 37)
Self timer ( 38)
Playing Movies Exposure adjustment ( 42)
Manual focus ( 41)
Image stabilizer ( 54)
Recording mode ( 55)
Tape operation ( 14)
Time code (hours : minutes : seconds)
Remaining tape ( 14)
Remaining battery charge ( 14)
Wind screen off ( 56)
Audio recording mode ( 39)
Remote sensor off ( 57)
Backup battery warning ( 17)
Level marker ( 57)
Recording reminder ( 14)
Operating mode ( 19)
Audio playback mode ( 40)
Speaker volume ( 32)
Search function display
END SEARCH ( 34)/
DATE SEARCH ( 33)
Playback time
(hours : minutes : seconds : frames)
Joystick guide ( 19)
Data code ( 34)

Introduction
14
Tape operation
Note that some playback and search modes are
only available when using the wireless controller
(not included with all models).
Record, Record pause,
Stop, Eject,
Fast forward, Rewind,
Playback, Playback pause,
Reverse playback pause,
x1 Playback (normal speed),
x1 Reverse playback (normal speed),
x2 Playback (double speed),
x2 Reverse playback (double speed),
Fast forward playback,
Rewind playback,
Slow playback,
Slow reverse playback,
Frame advance,
Frame reverse,
/ Date search ( 33),
/ Zero set memory ( 33)
Remaining tape
Indicates the remaining time of the tape in minutes.
moves during recording. When the tape
reaches its end, the display changes to “ END”.
• When the time left is less than 15 seconds, the
remaining tape time may not appear.
• Depending on the type of tape, the remaining
time displayed may not be correct. In any case,
you will be able to record on the tape the number
of minutes that appears on the cassette’s label
(for example, 85 minutes).
Remaining battery charge
• When starts flashing in red replace the
battery pack with a fully charged one.
• When you attach an empty battery pack, the
power may turn off without displaying the icon.
• Depending on the conditions under which the
camcorder and the battery pack are used, the
actual battery charge may not be indicated
accurately.
Recording reminder
The camcorder counts from 1 to 10 seconds when
you start recording. This is helpful to avoid scenes
that are too short.
15
Preparations
This chapter describes basic operations, such as navigating the
menus, and first time settings to help you learn more about your
camcorder.
Get t ing St arted
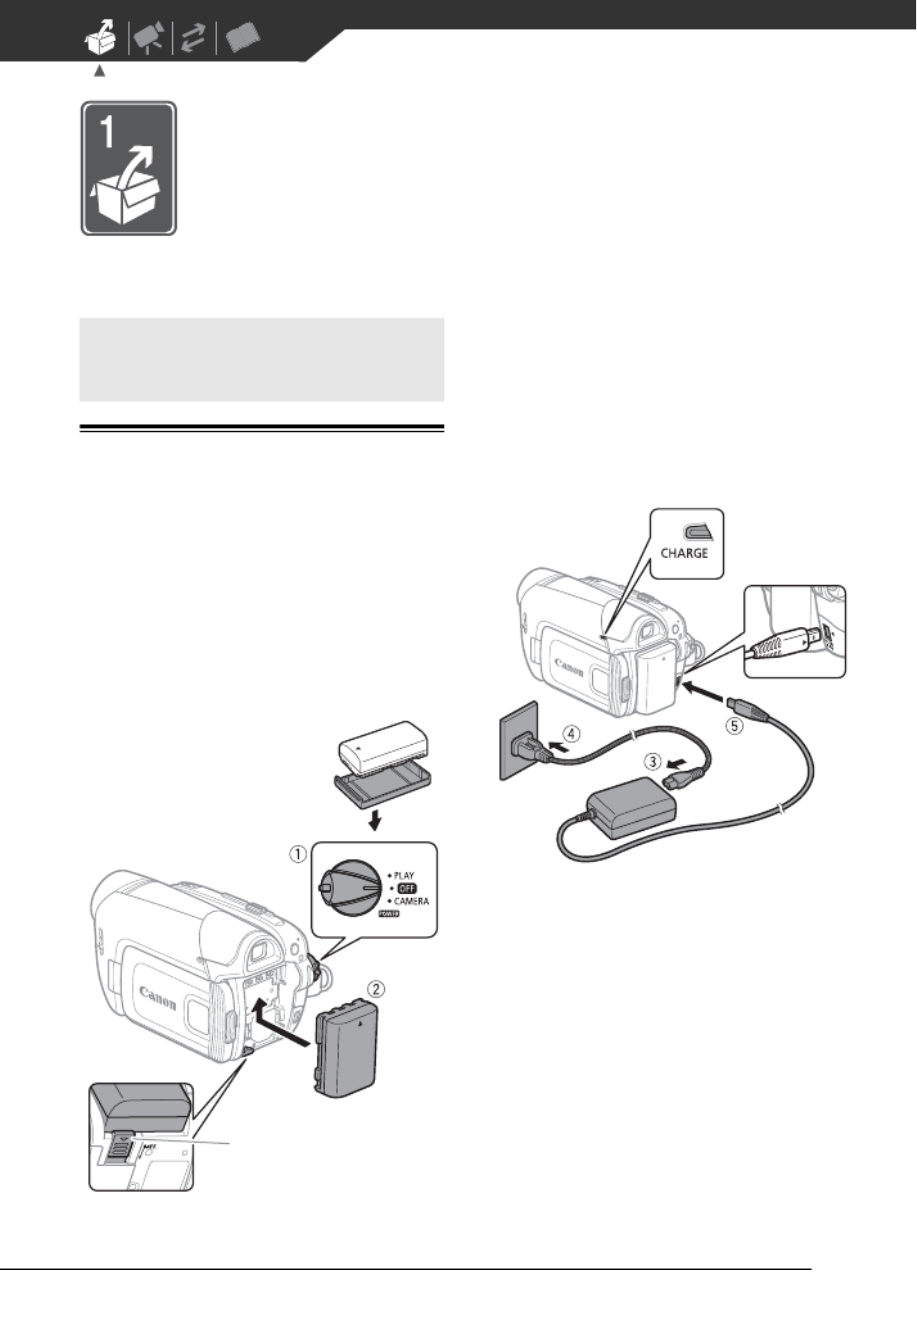
Charging the Battery Pack
The camcorder can be powered with a
battery pack or directly using the
compact power adapter. Charge the
battery pack before use.
For approximate charging times and
recording/playback times with a full
battery pack, refer to the tables on
page 70.
1Turn off the camcorder.
2Attach the battery pack to the
camcorder.
Press the battery pack lightly and
slide it up until it clicks.
3Connect the power cord to the
compact power adapter.
4Plug the power cord into a power
outlet.
5Connect the compact power
adapter to the camcorder’s DC IN
terminal.
• The CHARGE indicator starts
flashing. The indicator will stay on
when the charging is completed.
Getting Started
Remove the battery
terminal cover before
attaching the battery
BATT. switch
CHARGE
indicator
DC IN
terminal

17
Installing the Backup Battery
The backup battery (lithium button battery
CR1616) allows the camcorder to retain
the date, time ( 23) and other
camcorder settings while the power
source is disconnected. Connect a power
source to the camcorder when replacing
the backup battery to retain the settings.
1If a battery pack is attached,
remove it first.
2Open the backup battery cover.
3Insert the backup battery with the
+ side facing out.
4Close the cover.
NOTES
The battery life of the backup battery is
about one year. flashes in red when
the lithium button battery is not installed,
or when it needs to be replaced.
Preparing the Wireless Controller
( only) and Accessories
First, insert the supplied lithium button
battery (CR2025) into the wireless
controller.
1Press the tab in the direction of
the arrow and pull out the battery
holder.
2Place the lithium button battery
with the + side facing up.
3Insert the battery holder.
Tab

Preparations
18
Point the controller at the
camcorder’s remote sensor when
you press the buttons.
You can rotate the LCD panel 180
degrees to use the wireless controller
from the front of the camcorder.
NOTES
• The wireless controller may not work
properly when the remote sensor is
situated under strong light sources or
direct sunlight.
• If the wireless controller does not work,
check that [WL.REMOTE] is not set to
[OFF ] ( 57). Otherwise, replace
the battery.
Accessories
Fasten the grip belt.
Adjust the grip belt so that you can
reach the zoom lever with your index
finger, and the button with
your thumb.
Do not leave the viewfinder
exposed to direct sunlight
as it may melt (due to
concentration of the light by
the lens). Do not use tripods
with fastening screws
longer than 5.5 mm. Doing
so may damage the camcorder.
T O USE THE WIRELESS CONTROLLER
W HEN YOU MOUNT THE CAMCORDER ON A
TRIPOD
Start/Stop
Preparations
20
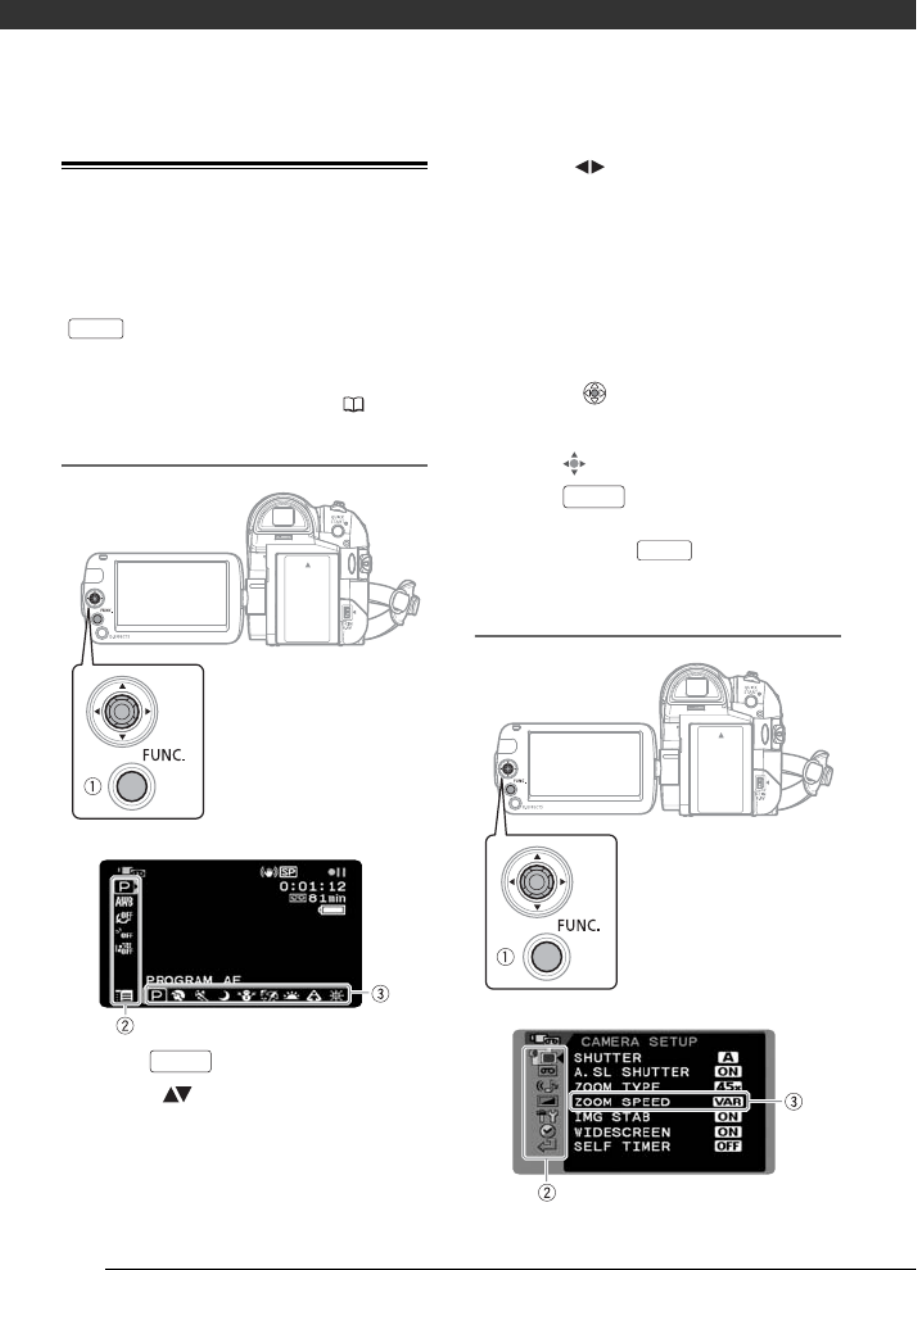
Using the Menus
Many of the camcorder’s functions can
be adjusted from the menus that open
after pressing the FUNC. button
( ).
For details about the available menu
options and settings, refer to the
appendix Menu Options Lists ( 53).
Selecting a FUNC. Menu Option
1Press .
2Select ( ) the icon of the
function you want to change from
the left side column.
Menu items not available will appear
grayed out.
3Select ( ) the desired setting
from the available options at the
bottom bar.
• The selected option will be
highlighted in light blue. Menu
items not available will appear
grayed out.
• With some settings you will need to
make further selections and/or
press ( ). Follow the additional
operation guides that will appear
on the screen (such as the joystick
icon , small arrows, etc.).
4Press to save the settings
and close the menu.
You can press to close the
menu at any time.
Selecting an Option from the Setup Menus
FUNC.
FUNC.
FUNC.
FUNC.

21
1Press .
2Select ( ) the icon and press
( ) to open the setup menus.
3Select ( ) the desired menu from
the left side column and press
( ).
The title of the selected menu
appears on top of the screen and
under it the list of settings.
4Select ( ) the setting you want
to change and press ( ).
• An orange frame will indicate the
menu item currently selected.
Menu items not available will
appear grayed out.
• To return to the menu selection
screen, select ( ) [ RETURN]
and press ().
5Select ( ) the desired option and
press ( ) to save the setting.
6Press .
You can press to close the
menu at any time.
NOTES
Instead of steps 1 and 2, you can also
keep pressed down for more than
1 second to open the setup menus screen
directly.
Abbreviation of Menu Selections in this
Manual
In this manual, the arrow is used to
abbreviate menu selections. Below is
an example of changing a setting using
the setup menus.
[ MENU]
[ DISPLAY SETUP/ ]
[LANGUAGE]
Desired language
For selections in the FUNC. menu, the
abbreviated form will always show the
initial default value. In recording mode,
its icon will appear on the left side
column when you first open the menu.
If the setting was changed, the icon of
the currently selected option will appear
instead.
[ IMAGE EFFECT OFF]
Desired image effect
FUNC.
FUNC.
FUNC.
FUNC.
FUNC.
FUNC.
FUNC.
FUNC.

Preparations
22
First Time Set t ings
Changing the Language
The language for on-screen and menu
displays can be changed. The list of
available languages depends on the
region where you purchased the
camcorder.
Default value
[ MENU]
[ DISPLAY SETUP/ ]
[LANGUAGE]
Desired language
NOTES
• If you changed the language by mistake,
follow the mark next to the menu
item to change the setting.
• The display that appears in some
menu screens refers to the name of the
button on the camcorder and will not
change, regardless of the language
selected.
Changing the Time Zone
Change the time zone to match your
location. The default setting is Paris or
Singapore, depending on the region of
purchase.
[ MENU]
[ DATE/TIME SETUP]
[T.ZONE/DST]
Desired time zone*
* To adjust for daylight saving time, select the
time zone with the mark next to the
area.
World Time Zones
Once you have set the time zone, date
and time, you do not need to reset the
clock every time you travel to another
time zone. Select the time zone to
match the local time at your
destination, referring to the date and
time displayed on the screen.
First Time Settings
FUNC.
( 20)
Language Set A
Czech, German, Greek, English, Spanish,
French, Italian, Hungarian, Polish, Romanian,
Turkish, Russian, Ukrainian, Arabic and
Persian.
Language Set B
English, Malay, Simplified Chinese, Traditional
Chinese and Thai.
FUNC.
FUNC.
FUNC.
( 20)
FUNC.
FUNC.
Specyfikacje produktu
| Marka: | Canon |
| Kategoria: | kamera |
| Model: | LEGRIA MD235 |
| Kolor produktu: | Czarny, Srebrny |
| Wbudowany wyświetlacz: | Tak |
| Wysokość produktu: | 127 mm |
| Szerokość produktu: | 68 mm |
| Głębokość produktu: | 82 mm |
| Waga produktu: | 380 g |
| Gniazdko wyjścia DC: | Tak |
| Pojemność baterii: | - mAh |
| Technologia baterii: | Litowo-jonowa (Li-Ion) |
| Typ ekranu: | LCD |
| Długość przekątnej ekranu: | 2.7 " |
| Obsługiwane typy kart pamięci: | Nieobsługiwany |
| Pojemność pamięci wewnętrznej: | 0 GB |
| Kompatybilność 3D: | Nie |
| Rodzaj baterii: | BP-2L5 |
| Mikrofon: | Tak |
| HDMI: | Nie |
| Długość ogniskowa: | 2.6 - 96.2 mm |
| Pictbridge: | Nie |
| Obsługa typów dysków: | Nie |
| Cyfrowe zbliżenie: | 2000 x |
| Czas pracy na zasilaniu akumulatorowym: | 4.5 h |
| Wbudowany mikrofon: | Tak |
| Sport: | Tak |
| Typ przetwornika obrazu: | CCD |
| Stabilizator obrazu: | Tak |
| Suma megapikseli: | 1.07 MP |
| Zoom optyczny: | 37 x |
| Regulator ostrości: | Automatyczne/Ręczne |
| Opóżnienie samowyzwalacza: | 10 s |
| Wizjer: | Elektroniczny |
| Rozdzielczość wizjera: | 114000 px |
| Wbudowany flesz: | Tak |
| Wbudowane światło: | Tak |
| Wielkość czujnika CCD: | 1/6 " |
| Odpowiednik soczewki optycznej 35 mm: | 41.7 - 1877 mm |
| Rodzaj kamery: | Ręczna |
| Rodzaj taśmy kamery wideo: | Mini-DV |
| Typ nośnika kamery: | Kaseta wideo |
| Wejście DV: | Tak |
| Wyjście S-Video: | Nie |
| Sztuka: | Tak |
Potrzebujesz pomocy?
Jeśli potrzebujesz pomocy z Canon LEGRIA MD235, zadaj pytanie poniżej, a inni użytkownicy Ci odpowiedzą
Instrukcje kamera Canon

28 Lutego 2025
13 Stycznia 2025
14 Grudnia 2024
5 Października 2024
3 Października 2024
29 Września 2024
29 Września 2024
29 Września 2024
29 Września 2024
28 Września 2024
Instrukcje kamera
- kamera Sony
- kamera Samsung
- kamera Leica
- kamera Logitech
- kamera Xiaomi
- kamera Joy-It
- kamera Braun
- kamera Lenovo
- kamera TP-Link
- kamera Philips
- kamera SilverCrest
- kamera Acer
- kamera Epson
- kamera Hikvision
- kamera EZVIZ
- kamera Panasonic
- kamera Mio
- kamera Viewsonic
- kamera Nedis
- kamera Reolink
- kamera Medion
- kamera Lenco
- kamera Fujifilm
- kamera D-Link
- kamera GE
- kamera Ring
- kamera Garmin
- kamera Imou
- kamera Blaupunkt
- kamera IOptron
- kamera Casio
- kamera Sigma
- kamera HP
- kamera Prixton
- kamera SJCAM
- kamera Creative
- kamera Swann
- kamera Nikon
- kamera Ozito
- kamera Kodak
- kamera Cisco
- kamera Scosche
- kamera DJI
- kamera Zenit
- kamera Gembird
- kamera Minox
- kamera Cobra
- kamera JVC
- kamera Trust
- kamera Fimi
- kamera AgfaPhoto
- kamera Vimar
- kamera Dahua Technology
- kamera Kyocera
- kamera Eufy
- kamera Ricoh
- kamera Rollei
- kamera Netgear
- kamera Velleman
- kamera Bolex
- kamera Pyle
- kamera Vtech
- kamera Speco Technologies
- kamera ARRI
- kamera Fluke
- kamera Olympus
- kamera Avaya
- kamera National Geographic
- kamera Maginon
- kamera SPC
- kamera Polaroid
- kamera Konica Minolta
- kamera Sanyo
- kamera Red Digital Cinema
- kamera Oregon Scientific
- kamera Lorex
- kamera Optoma
- kamera Bresser
- kamera Hama
- kamera GoPro
- kamera TomTom
- kamera Denver
- kamera Anker
- kamera Pentax
- kamera Bushnell
- kamera Berger & Schröter
- kamera Marshall Electronics
- kamera Hitachi
- kamera Emerson
- kamera SereneLife
- kamera Vemer
- kamera Azden
- kamera AVerMedia
- kamera RCA
- kamera Genius
- kamera Levenhuk
- kamera BenQ
- kamera Trevi
- kamera Technaxx
- kamera Lexibook
- kamera Hanwha
- kamera Sencor
- kamera Powerfix
- kamera Blackmagic Design
- kamera Foscam
- kamera Lumens
- kamera Daewoo
- kamera Dörr
- kamera Best Buy
- kamera EVE
- kamera POV
- kamera Elmo
- kamera UniView
- kamera Laserliner
- kamera Vivitar
- kamera PTZ Optics
- kamera Agfa
- kamera Argus
- kamera Easypix
- kamera Celestron
- kamera Yashica
- kamera Flir
- kamera Daitsu
- kamera Arlo
- kamera Nest
- kamera Ansco
- kamera Intel
- kamera Mamiya
- kamera Konig
- kamera Fuji
- kamera Minolta
- kamera Zorki
- kamera EverFocus
- kamera RunCam
- kamera SeaLife
- kamera Burris
- kamera Liiv360
- kamera Watec
- kamera Meade
- kamera Contax
- kamera Sinji
- kamera Traveler
- kamera Exakta
- kamera Digital Watchdog
- kamera MuxLab
- kamera AViPAS
- kamera ZeissIkon
- kamera Silvergear
- kamera Spypoint
- kamera HOLGA
- kamera Praktica
- kamera Hasselblad
- kamera Moto Mods (Motorola)
- kamera Fantasea Line
- kamera Kogan
- kamera Getac
- kamera Brinno
- kamera Z CAM
- kamera General
- kamera Ergoguys
- kamera Strex
- kamera General Electric
- kamera Leotec
- kamera Leitz Focomat IIc
- kamera Syrp
- kamera Cosina
- kamera Videology
- kamera InfiRay
- kamera Pelco
- kamera Videotec
- kamera Cambo
- kamera Kobian
- kamera Kyocera Yashica
- kamera Bauhn
- kamera Konica
- kamera Akaso
- kamera Seek Thermal
- kamera Aida
- kamera Ikegami
- kamera Ikelite
- kamera Adeunis
- kamera Hoppstar
- kamera Moultrie
- kamera PatrolEyes
- kamera Camouflage
- kamera HuddleCamHD
- kamera Aplic
- kamera Linhof
- kamera GoXtreme
- kamera KanDao
- kamera Aquapix
- kamera Kraken Sports
- kamera Voigtlander
Najnowsze instrukcje dla kamera

9 Kwietnia 2025

9 Kwietnia 2025

3 Kwietnia 2025
2 Kwietnia 2025
1 Kwietnia 2025
29 Marca 2025
29 Marca 2025
27 Marca 2025
27 Marca 2025
27 Marca 2025