Instrukcja obsługi Canon Legria HF G30
Przeczytaj poniżej 📖 instrukcję obsługi w języku polskim dla Canon Legria HF G30 (4 stron) w kategorii kamera. Ta instrukcja była pomocna dla 16 osób i została oceniona przez 2 użytkowników na średnio 4.5 gwiazdek
Strona 1/4

1
XXXXXXXX © CANON INC. 2012
5
1
3
4
2
6
1
2
3
series
Retire las hojas protectoras y la cinta.
Compruebe que se le han suministrado los siguientes elementos.
Conexión de red:
Prepare los dispositivos de
red, como el router o el punto
de acceso, según convenga.
La bandeja de salida del papel se abre automáticamente al comenzar la impresión. Mantenga la parte frontal de la impresora libre
de obstáculos.
No conecte aún el cable USB.
Conecte el cable de alimentación.
44
Pulse el botón ACTIVADO (ON).
55
ESPAÑOL
Compruebe que la luz de
ENCENDIDO (POWER) se ilumina
en blanco.
66
Si la luz de Alarma
(Alarm) parpadea en
naranja, pulse el botón
ACTIVADO (ON) para
apagar la impresora y
repita desde .
Pulse el botón Abrir.
La bandeja de salida del papel y la
extensión de la bandeja de salida se
abren automáticamente.
11
Cierre la tapa superior.
33
Preparativos
Elementos
suministrados
Abra la tapa superior. Retire la cinta naranja y el material de protección.
22
¡Léame en primer lugar!
Consérvelo a mano para utilizarlo
como referencia en el futuro.
Windows es una marca comercial o una marca comercial registrada de Microsoft
Corporation en EE. UU. y/u otros países.
Windows Vista es una marca comercial o una marca comercial registrada de Microsoft
Corporation en EE. UU. y/u otros países.
Mac, Mac OS, AirPort y Bonjour son marcas comerciales de Apple Inc., registradas en
EE. UU. y en otros países.
•
•
•
Número de modelo: K10383
Para llevar a cabo la instalación, coloque la impresora cerca del punto de acceso*
y del ordenador.
(* necesario para LAN inalámbrica)
Guía de inicio
Impresora fotográca Canon Inkjet
Ayuda de Canon
Asistencia técnica por correo electrónico:
www.usa.canon.com/support
Asistencia técnica gratuita: 1-800-OK-CANON
Esta opción proporciona asistencia telefónica técnica personal, sin
cargo por servicio, de lunes a viernes (excepto festivos), durante
el periodo de garantía.
Se dispone de un dispositivo telefónico auxiliar para sordos (TDD) en
1-866-251-3752.
Remove the protective sheets and tape.
Check the included items.
Network connection:
Prepare network devices
such as a router or an access
point as necessary.
The Paper Output Tray opens automatically as printing starts. Keep the front of the printer clear of any obstacles.
Do not connect the USB cable yet.
Connect the power cord.
44
Press the button.ON
55
ENGLISH
Check that the POWER lamp lights
white.
66
If the Alarm lamp ashes
orange, press the ON
button to turn OFF the
printer, then redo from .
Press the Open Button.
The Paper Output Tray and the Output
Tray Extension open automatically.
11
Close the Top Cover.
33
Preparation
Included Items
Open the Top Cover. Remove the orange tape and protective material.
22
Getting Started Read me rst!
Keep me handy for future reference.
Windows is a trademark or registered trademark of Microsoft Corporation in the U.S.
and/or other countries.
Windows Vista is a trademark or registered trademark of Microsoft Corporation in the
U.S. and/or other countries.
Mac, Mac OS, AirPort and Bonjour are trademarks of Apple Inc., registered in the U.S.
and other countries.
•
•
•
Model Number: K10383
To perform setup, place the printer near the access point* and computer.
(* Required for wireless LAN)
Canon Inkjet Photo Printer
Getting Help from Canon
Email Tech Support — www.usa.canon.com/support
Toll-Free Tech Support— 1-800-OK-CANON
This option provides live telephone technical support, free of
service charges, Monday-Friday (excluding holidays), during the
warranty period.
Telephone Device for the Deaf (TDD) support is available at
1-866-251-3752.
QT5-5673-V01 PRINTED IN XXXXXXXX
2
1
2
1
2
5
6
1
2
2
4
(B)(A)
1
2
3
8
7
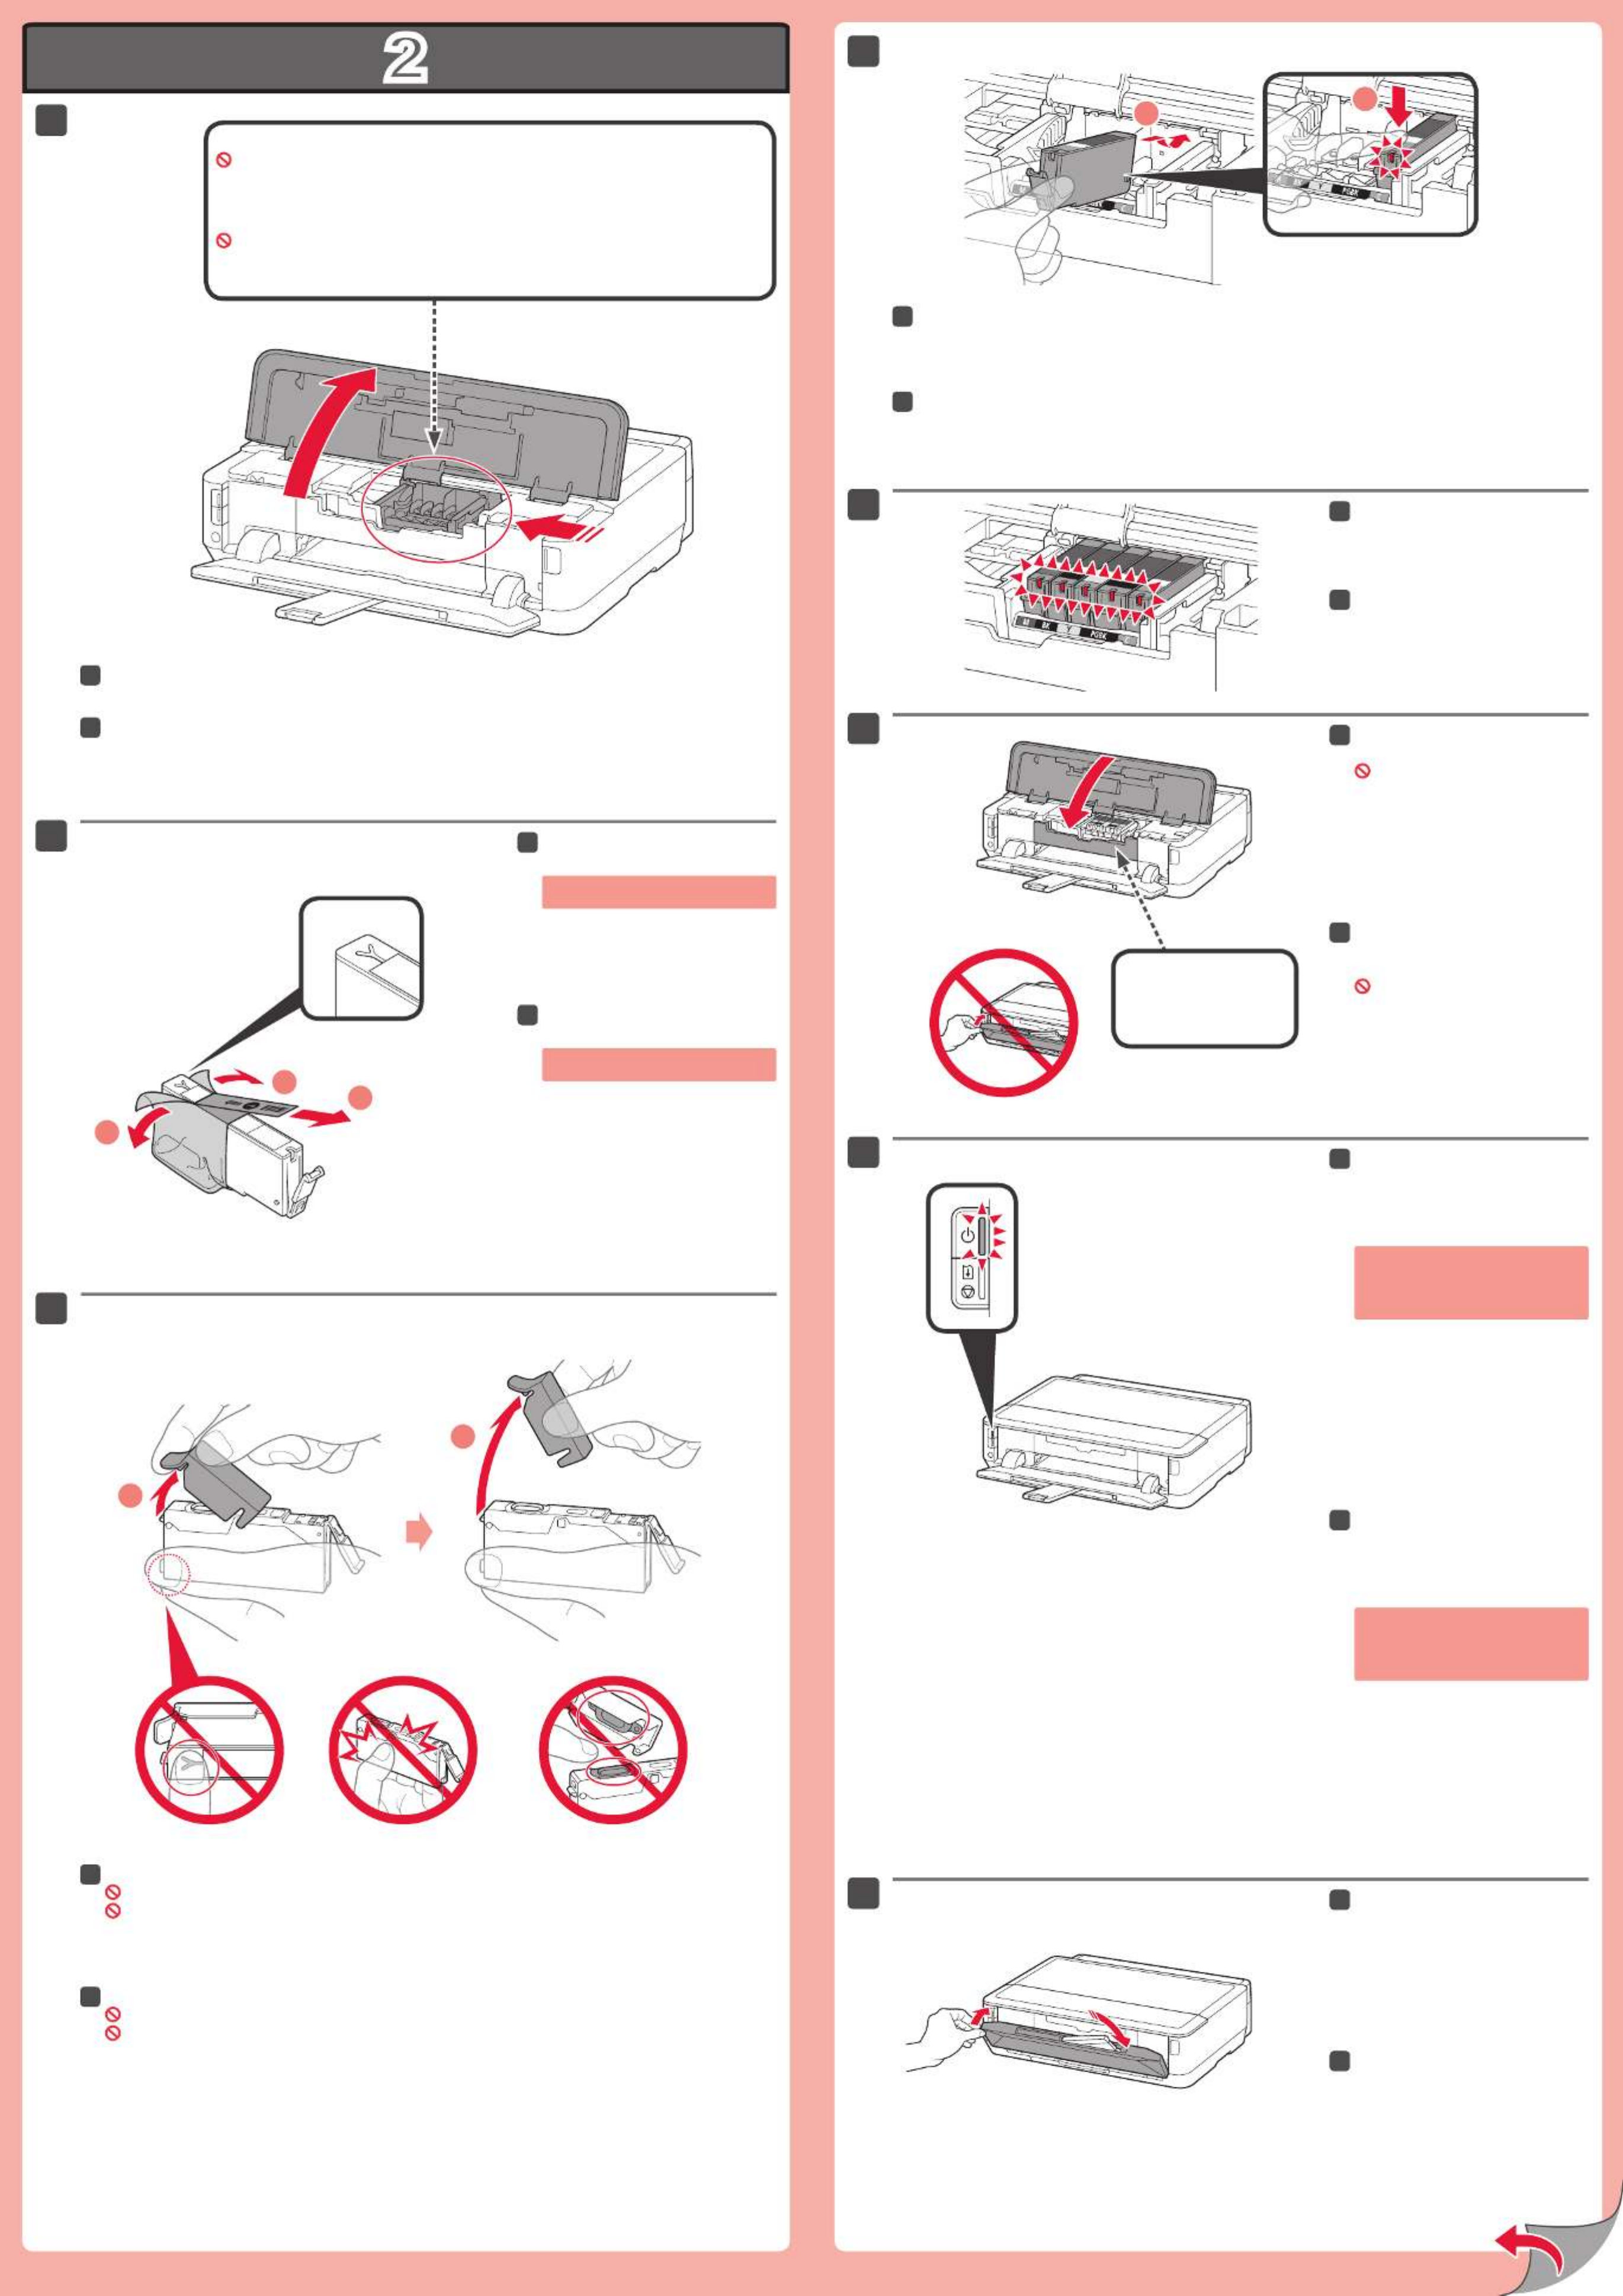
Abra la tapa superior.
11
Sujete la tapa naranja con los dedos y tire de ella suavemente.
(A) No presione los laterales si la ranura en forma de Y está bloqueada.
(B) ¡No tocar!
33
Introduzca y empuje hacia abajo el depósito de tinta en la ranura del color correspondiente.
Compruebe que la lámpara de tinta está encendida y coloque el siguiente depósito de tinta.
44
Compruebe que todas las
lámparas están encendidas.
55
Si la luz de parpadea Alarma (Alarm)
en naranja, compruebe que los
depósitos de tinta estén instalados
correctamente.
Compruebe que la cubierta interior
está cerrada y cierre la tapa
superior.
¡No cierre aún la bandeja de salida
del papel!
66
Los depósitos de tinta deberán instalarse en este soporte.
No toque el interior hasta que cese el movimiento.
Retire totalmente la cinta naranja.
Retire el envoltorio protector.
22
Cubierta interior
Cierre la bandeja de salida del
papel.
La extensión de la bandeja de salida se
cierra automáticamente.
88
Al cabo de aproximadamente 3 o
4 minutos, compruebe que luz de
ENCENDIDO (POWER) pasa de
parpadear a iluminarse en blanco.
77
Open the Top Cover.
11
Hook your ngers under the orange cap and slowly pull it out.
(A) Do not press the sides when the Y-shaped groove is blocked.
(B) Do not touch!
33
Insert and push down the ink tank into the matching color slot.
Check that the ink lamp is lit, then install the next ink tank.
44
Check that all lamps are lit.
55
If the Alarm lamp ashes orange,
check that the ink tanks are installed
correctly.
Check that the Inner Cover is
closed, then close the Top Cover.
Don't close the Paper Output Tray yet!
66
Remove the orange tape completely.
Remove the protective wrap.
22
The ink tanks will be installed into this holder.
Do not touch inside until the movement stops.
Inner Cover
Close the Paper Output Tray.
The Output Tray Extension closes
automatically.
88
After about 3 to 4 minutes, check
that the lamp changes POWER
from ashing to lit white.
77

3
4
5
2
1
4
3
1
2
1
2
1
2
5
6
8
2
1
7
Realice la Alineación de los cabezales de impresión (Print Head Alignment).
Pulse el botón REANUDAR/
CANCELAR (RESUME/CANCEL).
77
Cierre el soporte de la salida del
papel.
11
Cargue papel en el cassette como se describe en
- hasta - .
Ajuste las guías del papel al tamaño del papel.
22
Cargue el papel MP-101
suministrado en el cassette.
33
Decida qué cassette utilizar en función del tamaño de papel.
Coloque el papel con la cara imprimible hacia abajo.
Antes de imprimir, cambie la conguración de la impresora para el tipo y el tamaño del soporte. Para
obtener más detalles, consulte el que se instalará posteriormente.Manual en pantalla
Tamaño de
papel y cara
impri mible
Extraiga el cassette (inferior).
11
Si la luz de Alarma
(Alarm) parpadea en
naranja, pulse el botón
REANUDAR/CANCELAR
(RESUME/CANCEL) y
continúe con . Cuando
nalice la instalación,
consulte el Manual en
pantalla para repetir
la Alineación de los
cabezales de impresión
(Print Head Alignment).
Al cabo de 6 minutos, se imprime
un patrón en negro y azul. La
Alineación de los cabezales de
impresión (Print Head Alignment)
naliza.
88
Ajuste la guía del papel derecha al
tamaño del papel.
Deslice el papel contra la guía
frontal.
44
Para obtener más información sobre el papel, consulte el que se instalará posteriormente.Manual en pantalla
Ajuste la guía del papel frontal al tamaño A4.
Deslice la guía del papel derecha hacia el lado.
Las guías del papel izquierda y derecha se mueven al mismo tiempo.
22
Deslice el cassette (inferior) hacia
atrás.
55
Pulse el botón Abrir.
Extraiga el soporte de la salida del
papel.
66
Si el punto de acceso que está utilizando dispone de un botón WPS, utilice ese botón para conectar la
impresora a la LAN inalámbrica.
Perform the Print Head Alignment.
Pull out the Cassette (Lower).
11
Press the RESUME/CANCEL
button.
77
In about 6 minutes, a blue-black
pattern is printed. Print Head
Alignment is complete.
88
Close the Paper Output Support.
11
Load paper into the Cassette as described in
- through - .
Adjust the Paper Guides to t the paper size.
22
Load the supplied MP-101 paper
into the Cassette.
33
Adjust the right guide to t the
paper size.
Slide the paper against the front
guide.
44
For information about paper, refer to the which will be installed later.On-screen Manual
Decide which Cassette to use according to the paper size.
Set the paper with the printable side down.
Before printing, change the printer settings for media type and size.
For details, refer to the which will be installed On-screen Manual
later.
Paper Size
and Printing
Side
If the lamp Alarm
ashes orange, press
the RESUME/CANCEL
button, then proceed to
. After installation is
complete, refer to the On-
screen Manual to redo
Print Head Alignment.
Adjust the front Paper Guide to A4 size.
Slide the right Paper Guide to the side.
The left and right Paper Guide move together.
22
Slide the Cassette (Lower) back.
55
Press the Open Button.
Pull out the Paper Output Support.
66
If the access point that you are using has a WPS button, use that button to connect the printer to the wireless
LAN.
Specyfikacje produktu
| Marka: | Canon |
| Kategoria: | kamera |
| Model: | Legria HF G30 |
| Kolor produktu: | Czarny |
| Wbudowany wyświetlacz: | Tak |
| Wysokość produktu: | 84 mm |
| Szerokość produktu: | 115 mm |
| Głębokość produktu: | 231 mm |
| Waga produktu: | 900 g |
| Wyjścia słuchawkowe: | 1 |
| Typ HD: | Full HD |
| GPS: | Nie |
| Pojemność baterii: | 1780 mAh |
| Technologia baterii: | Litowo-jonowa (Li-Ion) |
| Typ ekranu: | OLED |
| Długość przekątnej ekranu: | 3.5 " |
| Obsługiwane typy kart pamięci: | SD, SDHC, SDXC |
| Maksymalny rozmiar karty pamięci: | 64 GB |
| Pojemność pamięci wewnętrznej: | - GB |
| Ekran dotykowy: | Tak |
| Wi-Fi: | Tak |
| Obsługiwane formaty plików wideo: | AVCHD, MP4 |
| Liczba portów USB 2.0: | 1 |
| Kompatybilność 3D: | Nie |
| Mikrofon: | Tak |
| HDMI: | Tak |
| System dźwięku: | Dolby Digital 2.0 |
| Długość ogniskowa: | 3.67 - 73.4 mm |
| Funkcja wykrywania twarzy: | Tak |
| Obsługa typów dysków: | Nie |
| Cyfrowe zbliżenie: | 400 x |
| Wyjście komponentu wideo: | 1 |
| Napięcie baterii: | 7.4 V |
| Czas pracy na zasilaniu akumulatorowym: | - h |
| Wbudowany mikrofon: | Tak |
| Typ przetwornika obrazu: | CMOS |
| Maksymalna rozdzielczość obrazu: | 1920 x 1080 px |
| Stabilizator obrazu: | Tak |
| Suma megapikseli: | 3.09 MP |
| Rozdzielczości wideo: | 640 x 360,1280 x 720,1440 x 1080,1920 x 1080 px |
| Maksymalna rozdzielczość filmu: | 1920 x 1080 px |
| Zoom optyczny: | 20 x |
| Wielkość filtra: | 58 mm |
| Regulator ostrości: | Automatyczne/Ręczne |
| Procesor zdjęć: | DIGIC DV IV |
| Balans bieli: | Automatyczna |
| Tryby scenerii: | Beach, Fireworks, Night, Portrait, Snow, Sports, Spotlight, Sunset |
| Histogram: | Nie |
| Tryby naświetlania: | Ręczny |
| Wyświetlacz LCD o zmiennym kącie: | Tak |
| Rozmiar ekranu wizjera: | 0.24 " |
| Min. Oświetlenie: | 1 lx |
| Gniazda pamięci: | 2 |
| Wielkość czujnika CCD: | 1/2.84 " |
| Szybkość migawki: | 1/2000 s |
| Kompensacja oświetlenia tylnego: | Tak |
| Odpowiednik soczewki optycznej 35 mm: | 26.8 - 576 mm |
| Megapiksele efektywne (film): | 2.91 MP |
| Typ stabilizatora obrazu: | Optical Image Stabilization (OIS) |
| Rodzaj kamery: | Ręczna |
| Rodzaj taśmy kamery wideo: | Nie |
| Typ nośnika kamery: | Karta pamięci |
| Wejście DV: | Nie |
| Wyjście S-Video: | Nie |
| Megapiksele efektywne (zdjęcie): | 2.07 MP |
| Zapis wstępny: | Tak |
| Czas ciągłego nagrywania video: | 4.92 h |
| Wymienny obiektyw: | Nie |
| Tryb zdjęć seryjnych: | Nie |
| Podwójne ujęcie (film &zdjęcie): | Nie |
| Czułość przy słabym oświetleniu: | Tak |
Potrzebujesz pomocy?
Jeśli potrzebujesz pomocy z Canon Legria HF G30, zadaj pytanie poniżej, a inni użytkownicy Ci odpowiedzą
Instrukcje kamera Canon

28 Lutego 2025
13 Stycznia 2025
14 Grudnia 2024
5 Października 2024
3 Października 2024
29 Września 2024
29 Września 2024
29 Września 2024
29 Września 2024
28 Września 2024
Instrukcje kamera
- kamera Sony
- kamera Samsung
- kamera Leica
- kamera Logitech
- kamera Xiaomi
- kamera Joy-It
- kamera Braun
- kamera Lenovo
- kamera TP-Link
- kamera Philips
- kamera SilverCrest
- kamera Acer
- kamera Epson
- kamera Hikvision
- kamera EZVIZ
- kamera Panasonic
- kamera Mio
- kamera Viewsonic
- kamera Nedis
- kamera Reolink
- kamera Medion
- kamera Lenco
- kamera Fujifilm
- kamera D-Link
- kamera GE
- kamera Ring
- kamera Garmin
- kamera Imou
- kamera Blaupunkt
- kamera IOptron
- kamera Casio
- kamera Sigma
- kamera HP
- kamera Prixton
- kamera SJCAM
- kamera Creative
- kamera Swann
- kamera Nikon
- kamera Ozito
- kamera Kodak
- kamera Cisco
- kamera Scosche
- kamera DJI
- kamera Zenit
- kamera Gembird
- kamera Minox
- kamera Cobra
- kamera JVC
- kamera Trust
- kamera Fimi
- kamera AgfaPhoto
- kamera Vimar
- kamera Dahua Technology
- kamera Kyocera
- kamera Eufy
- kamera Ricoh
- kamera Rollei
- kamera Netgear
- kamera Velleman
- kamera Bolex
- kamera Pyle
- kamera Vtech
- kamera Speco Technologies
- kamera ARRI
- kamera Fluke
- kamera Olympus
- kamera Avaya
- kamera National Geographic
- kamera Maginon
- kamera SPC
- kamera Polaroid
- kamera Konica Minolta
- kamera Sanyo
- kamera Red Digital Cinema
- kamera Oregon Scientific
- kamera Lorex
- kamera Optoma
- kamera Bresser
- kamera Hama
- kamera GoPro
- kamera TomTom
- kamera Denver
- kamera Anker
- kamera Pentax
- kamera Bushnell
- kamera Berger & Schröter
- kamera Marshall Electronics
- kamera Hitachi
- kamera Emerson
- kamera SereneLife
- kamera Vemer
- kamera Azden
- kamera AVerMedia
- kamera RCA
- kamera Genius
- kamera Levenhuk
- kamera BenQ
- kamera Trevi
- kamera Technaxx
- kamera Lexibook
- kamera Hanwha
- kamera Sencor
- kamera Powerfix
- kamera Blackmagic Design
- kamera Foscam
- kamera Lumens
- kamera Daewoo
- kamera Dörr
- kamera Best Buy
- kamera EVE
- kamera POV
- kamera Elmo
- kamera UniView
- kamera Laserliner
- kamera Vivitar
- kamera PTZ Optics
- kamera Agfa
- kamera Argus
- kamera Easypix
- kamera Celestron
- kamera Yashica
- kamera Flir
- kamera Daitsu
- kamera Arlo
- kamera Nest
- kamera Ansco
- kamera Intel
- kamera Mamiya
- kamera Konig
- kamera Fuji
- kamera Minolta
- kamera Zorki
- kamera EverFocus
- kamera RunCam
- kamera SeaLife
- kamera Burris
- kamera Liiv360
- kamera Watec
- kamera Meade
- kamera Contax
- kamera Sinji
- kamera Traveler
- kamera Exakta
- kamera Digital Watchdog
- kamera MuxLab
- kamera AViPAS
- kamera ZeissIkon
- kamera Silvergear
- kamera Spypoint
- kamera HOLGA
- kamera Praktica
- kamera Hasselblad
- kamera Moto Mods (Motorola)
- kamera Fantasea Line
- kamera Kogan
- kamera Getac
- kamera Brinno
- kamera Z CAM
- kamera General
- kamera Ergoguys
- kamera Strex
- kamera General Electric
- kamera Leotec
- kamera Leitz Focomat IIc
- kamera Syrp
- kamera Cosina
- kamera Videology
- kamera InfiRay
- kamera Pelco
- kamera Videotec
- kamera Cambo
- kamera Kobian
- kamera Kyocera Yashica
- kamera Bauhn
- kamera Konica
- kamera Akaso
- kamera Seek Thermal
- kamera Aida
- kamera Ikegami
- kamera Ikelite
- kamera Adeunis
- kamera Hoppstar
- kamera Moultrie
- kamera PatrolEyes
- kamera Camouflage
- kamera HuddleCamHD
- kamera Aplic
- kamera Linhof
- kamera GoXtreme
- kamera KanDao
- kamera Aquapix
- kamera Kraken Sports
- kamera Voigtlander
Najnowsze instrukcje dla kamera

9 Kwietnia 2025

9 Kwietnia 2025

3 Kwietnia 2025
2 Kwietnia 2025
1 Kwietnia 2025
29 Marca 2025
29 Marca 2025
27 Marca 2025
27 Marca 2025
27 Marca 2025