Instrukcja obsługi Canon IXUS 117 HS
Przeczytaj poniżej 📖 instrukcję obsługi w języku polskim dla Canon IXUS 117 HS (105 stron) w kategorii kamera. Ta instrukcja była pomocna dla 5 osób i została oceniona przez 2 użytkowników na średnio 4.5 gwiazdek
Strona 1/105

CEL-SQ6SA2M1
Getting Started ENGLISH
Guía de inicio ESPAÑOL
Guia de Iniciação
PORTUGUÊS

Getting Started
ENGLISH
• Make sure you read this guide, including the “Safety
Precautions” section, before using the camera.
• Store this guide safely so that you can use it in the future.
Please refer to the complete user guide included
on the DIGITAL CAMERA Manuals Disk for more
detailed information.

2
Check if the following items are included in your camera package.
If anything is missing, contact the retailer where you purchased the camera.
Using the Manuals
Also refer to the manuals on the DIGITAL CAMERA Manuals Disk.
•Camera User Guide
Once you have mastered the basics, use the camera’s many
features to shoot more challenging photos.
•Software Guide
Read when you want to use the included software.
•A memory card is not included.
•Adobe Reader is required to view the PDF manuals. Microsoft Word/
Word Viewer can be installed to view the Word manuals (required only for
manuals for the Middle East).
Checking the Package Contents
Battery Charger
CB-2LV/CB-2LVE
Camera Battery Pack NB-4L
(with Terminal Cover)
AV Cable
AVC-DC400
Interface Cable
IFC-400PCU
Wrist Strap
WS-DC11
Getting Started
(This Guide)
DIGITAL CAMERA
Solution Disk
Warranty System
Booklet

4
•Before using the product, please ensure that you read the safety precautions described
below. Always ensure that the product is used correctly.
•The safety precautions noted on the following pages are intended to prevent injuries to
yourself and other persons, or damage to the equipment.
•Be sure to also check the guides included with any separately sold accessories you
use.
Warning Denotes the possibility of serious injury or death.
•Do not trigger the flash in close proximity to people’s eyes.
Exposure to the intense light produced by the flash could damage eyesight. In particular,
remain at least one meter (39 inches) away from infants when using the flash.
•Store this equipment out of the reach of children and infants.
Strap: Putting the strap around a child’s neck could result in asphyxiation.
•Use only recommended power sources.
•Do not attempt to disassemble, alter or apply heat to the product.
•Avoid dropping or subjecting the product to severe impacts.
•To avoid the risk of injury, do not touch the interior of the product if it has been
dropped or otherwise damaged.
•Stop using the product immediately if it emits smoke, a strange smell, or
otherwise behaves abnormally.
•Do not use organic solvents such as alcohol, benzine, or thinner to clean the
equipment.
•Do not let the product come into contact with water (e.g. sea water) or other
liquids.
•Do not allow liquids or foreign objects to enter the camera.
This could result in electrical shock or fire.
If liquids or foreign objects come into contact with the camera interior, immediately turn
the camera power off and remove the battery.
If the battery charger becomes wet, unplug it from the outlet and consult your camera
distributor or a Canon Customer Support Help Desk.
•Use only the recommended battery.
•Do not place the battery near or in direct flame.
•Unplug the power cord periodically, and using a dry cloth, wipe away any dust
and dirt that has collected on the plug, the exterior of the power outlet, and the
surrounding area.
•Do not handle the power cord with wet hands.
•Do not use the equipment in a manner that exceeds the rated capacity of the
electrical outlet or wiring accessories. Do not use if the power cord or plug are
damaged, or not fully plugged into the outlet.
•Do not allow dirt or metal objects (such as pins or keys) to contact the terminals
or plug.
The battery may explode or leak, resulting in electrical shock or fire. This could cause
injury and damage the surroundings. In the event that a battery leaks and the battery acid
contacts eyes, mouth, skin or clothing, immediately flush with water.
Safety Precautions

Safety Precautions
5
•Turn the camera off in places where camera use is prohibited.
The electromagnetic waves emitted by the camera may interfere with the operation of
electronic instruments and other devices. Exercise adequate caution when using the
camera in places where use of electronic devices is restricted, such as inside airplanes
and medical facilities.
•Do not play the supplied CD-ROM(s) in any CD player that does not support data
CD-ROMs.
It is possible to suffer hearing loss from listening with headphones to the loud sounds of
a CD-ROM played on a music CD player. Additionally, playing the CD-ROM(s) in an audio
CD player (music player) could damage the speakers.
Caution Denotes the possibility of injury.
•Be careful not to bang the camera or subject it to strong impacts or shocks when
hanging it by the strap.
•Be careful not to bump or push strongly on the lens.
This could lead to injury or damage the camera.
•Be careful not to subject the screen to strong impacts.
If the screen cracks, injury may result from the broken fragments.
•When using the flash, be careful not to cover it with your fingers or clothing.
This could result in burns or damage to the flash.
•Avoid using, placing or storing the product in the following places:
- Places subject to strong sunlight
- Places subject to temperatures above 40 °C (104 °F)
- Humid or dusty areas
These could cause leakage, overheating or an explosion of the battery, resulting in
electrical shock, fire, burns or other injuries.
High temperatures may cause deformation of the camera or battery charger casing.
•The slideshow transition effects may cause discomfort when viewed for
prolonged periods.
Caution Denotes the possibility of damage to the equipment.
•Do not aim the camera at bright light sources (such as the sun on a clear day).
Doing so may damage the image sensor.
•When using the camera on a beach or at a windy location, be careful not to allow
dust or sand to enter the camera.
This may cause the product to malfunction.

Safety Precautions
6
•In regular use, small amounts of smoke may be emitted from the flash.
This is due to the high intensity of the flash burning dust and foreign materials stuck to the
front of the unit. Please use a cotton swab to remove dirt, dust or other foreign matter from
the flash to prevent heat build-up and damage to the unit.
•Remove and store the battery when you are not using the camera.
If the battery is left inside the camera, damage caused by leakage may occur.
•Before you discard the battery, cover the terminals with tape or other insulators.
Contacting other metal materials may lead to fire or explosions.
•Unplug the battery charger from the power outlet after charging is complete, or
when you are not using it.
•Do not place anything, such as cloth on top of the battery charger while it is
charging.
Leaving the unit plugged in for a long period of time may cause it to overheat and distort,
resulting in fire.
•Do not place the battery near pets.
Pets biting the battery could cause leakage, overheating or explosion, resulting in fire or
damage.
•Do not sit down with the camera in your pocket.
Doing so may cause malfunctions or damage the screen.
•When putting the camera in your bag, ensure that hard objects do not come into
contact with the screen.
•Do not attach any hard objects to the camera.
Doing so may cause malfunctions or damage the screen.

8
Use the included charger to charge the battery. Be sure to charge the battery
as it is not charged at the time of purchase.
Remove the cover.
Insert the battery.
zAlign the o marks on the battery and
charger, then insert the battery by sliding it
in ( ) and down ( ).
Charge the battery.
zFor CB-2LV: Flip out the plug ( ) and
plug the charger into a power outlet ( ).
zFor CB-2LVE: Plug the power cord into
the charger, then plug the other end into a
power outlet.
XThe charge lamp lights orange and
charging starts.
XThe charge lamp will light green when
charging has finished. Charging takes
approx. 1 hour and 30 minutes.
Remove the battery.
zUnplug the battery charger from the power
outlet, then remove the battery by sliding it
in ( ) and up ( ).
Charging the Battery
CB-2LV
CB-2LVE
To protect the battery and prolong its life, do not charge it for longer than
24 hours continuously.

Charging the Battery
9
Number of Possible Shots
• The number of shots that can be taken is based on the Camera & Imaging Products
Association (CIPA) measurement standard.
• Under some shooting conditions, the number of shots that can be taken may be less
than mentioned above.
Battery Charge Indicator
An icon or message will appear on the screen indicating the battery’s charge
state.
Number of Shots Approx. 230
Playback Time Approx. 5 hours
Display Summary
Sufficient charge.
Slightly depleted, but sufficient.
(Blinking red) Nearly depleted. Charge the battery.
“Change the battery pack.” Depleted. Recharge the battery.
Using the battery and charger effectively
•Charge the battery on the day, or the day before, it will be used.
Charged batteries continue to discharge naturally even if they are not used.
•How to store the battery for long periods:
Deplete and remove the battery from the camera. Attach the terminal cover and
store the battery. Storing a battery for long periods of time (about a year) without
depleting it may shorten its life span or affect its performance.
•The battery charger can also be used when abroad.
The charger can be used in regions that have 100 – 240 V (50/60 Hz) AC power.
If the plug does not fit the outlet, use a commercially available plug adapter. Do
not use electrical transformers for foreign travel as they will cause damage.
•The battery may develop a bulge.
This is a normal characteristic of the battery and does not indicate a problem.
However, if the battery bulges to the point where it will no longer fit into the
camera, please contact a Canon Customer Support Help Desk.
•If the battery is quickly depleted even after charging, it has reached the end of
its life span. Purchase a new battery.
Attach the cover to a charged battery so that
the o mark is visible.

10
The cards below can be used without restrictions on their capacities.
•SD memory cards*
•SDHC memory cards*
•SDXC memory cards *
•MultiMediaCards
•MMCplus memory cards
•HC MMCplus memory cards
•Eye-Fi Cards
* This memory card complies with the SD standards. Some cards may not operate
properly depending on the brand of card used.
About Eye-Fi Cards
This product is not guaranteed to support Eye-Fi card functions (including
wireless transfer). In case of an issue with an Eye-Fi card, please check with
the card manufacturer.
Also note that an approval is required to use Eye-Fi cards in many countries
or regions. Without approval, use of the card is not permitted. If it is unclear
whether the card has been approved for use in the area, please check with
the card manufacturer.
Insert the included battery and a memory card (sold separately).
Check the card’s write-protect tab.
zIf the memory card has a write-protect tab,
you will not be able to record images if the
tab is in the locked position. Slide the tab
up until you hear a click.
Open the cover.
zSlide the cover ( ) and open it ( ).
Depending on your computer’s OS version, SDXC memory cards may not
be recognized even when using a commercially available card reader.
Check to make sure that your OS supports SDXC memory cards
beforehand.
Compatible Memory Cards (Sold Separately)
Inserting the Battery and Memory Card
Inserting the Battery and Memory Card
11
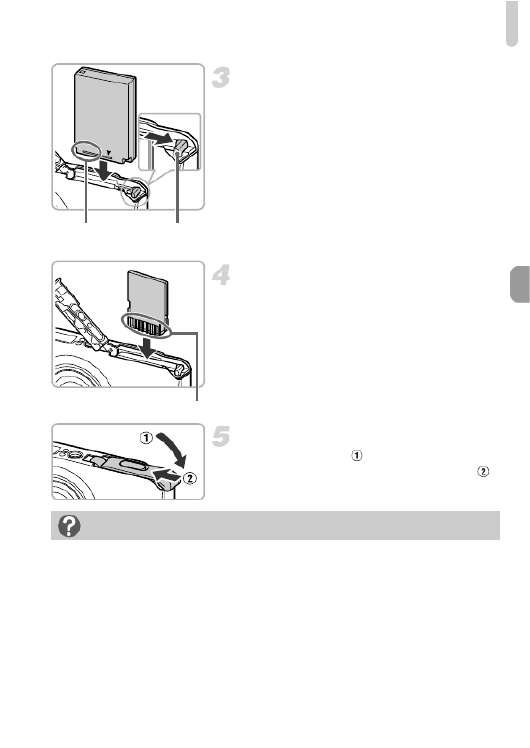
Insert the battery.
zPress the battery lock in the direction of the
arrow, then insert the battery as shown
until it locks into place with a click.
zBe sure to insert the battery in the correct
direction or it will not properly lock into
place.
Insert the memory card.
zInsert the memory card as shown until it
locks into place with a click.
zBe sure the memory card is oriented
correctly. Inserting the memory card in the
wrong direction could damage the camera.
Close the cover.
zClose the cover ( ), and press downward
as you slide it until it clicks into place ( ).
Terminals Battery
lock
Terminals
What if [Memory card locked] appears on the screen?
SD, SDHC, SDXC memory cards, and Eye-Fi cards have a write-protect tab. If
this tab is in the locked position, [Memory card locked] will appear on the screen
and you will not be able to take or erase images.

Inserting the Battery and Memory Card
12
Removing the Battery and Memory Card
Remove the battery.
zOpen the cover and press the battery lock
in the direction of the arrow.
XThe battery will pop up.
Remove the memory card.
zPush the memory card in until you hear a
click, then slowly release it.
XThe memory card will pop up.
Number of Shots per Memory Card
• Values are based on the default settings.
• The number of shots that can be taken will vary depending on camera settings, the
subject and the memory card used.
Memory Card 4 GB 16 GB
Number of Shots Approx. 1231 Approx. 5042
Can you check the number of shots that can be taken?
You can check the number of shots that can be taken when the camera is in a
Shooting mode (p. 18).
Number of shots that can be taken

13
The Date/Time settings screen will appear the first time the camera is turned
on. Since the dates and times recorded into your images are based on these
settings, be sure to set them.
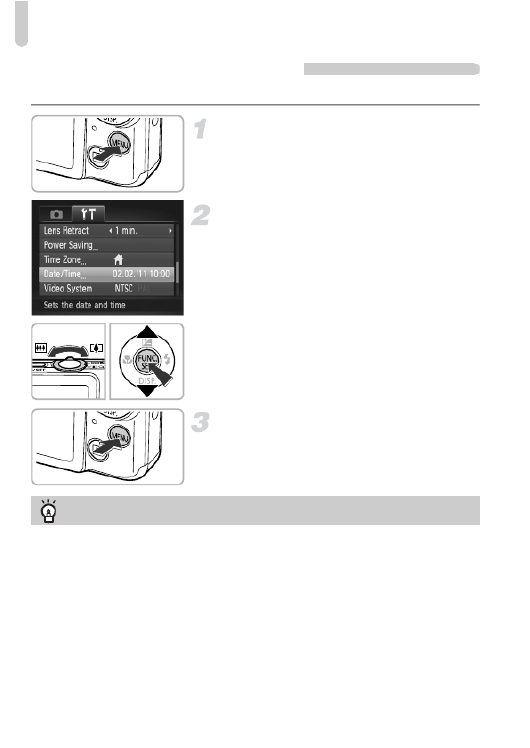
Turn on the camera.
zPress the ON/OFF button.
XThe Date/Time screen will appear.
Set the date and time.
zPress the qr buttons to choose an option.
zPress the op buttons to set a value.
Complete the setting.
zPress the m button.
XOnce the date and time have been set, the
Date/Time screen will close.
zPressing the ON/OFF button will turn off
the camera.
Setting the Date and Time
Reappearing Date/Time screen
Set the correct date and time. If you have not set the date and time, the Date/Time
screen will appear each time you turn on the camera.
Daylight saving time settings
If you choose in Step 2 and press the op buttons to choose , you will set
the time to daylight saving (1 hour ahead).
Setting the Date and Time
14
Changing the Date and Time
You can change the current date and time settings.
Display the menu.
zPress the n button.
Choose [Date/Time].
zMove the zoom lever to choose the 3 tab.
zPress the op buttons to choose [Date/
Time], then press the m button.
Change the date and time.
zFollow Steps 2 and 3 on p. 13 to adjust the
setting.
zPress the n button to close the menu.
Date/Time battery
•The camera has a built-in date/time battery (backup battery) that allows the
date/time settings to be retained for about three weeks after the battery pack
has been removed.
•By inserting a charged battery or connecting an AC adapter kit (sold separately,
p. 32) the date/time battery can be charged in about 4 hours even if the camera
is not turned on.
•If the date/time battery is depleted, the Date/Time screen will appear when you
turn the camera on. Follow the steps on p. 13 to set the date and time.
15
You can change the language that displays on the screen.
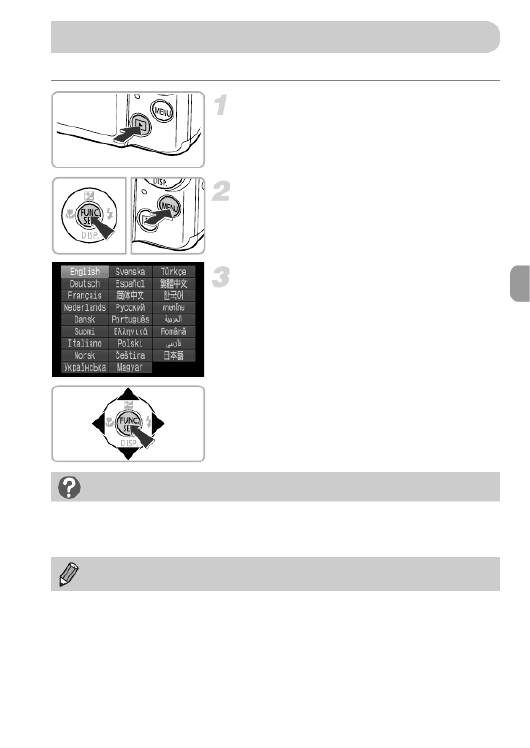
Enter Playback mode.
zPress the 1 button.
Display the settings screen.
zPress and hold the m button, then
immediately press the n button.
Set the display language.
zPress the opqr buttons to choose a
language, then press the m button.
XOnce the display language has been set,
the settings screen will close.
Setting the Display Language
What if the clock appears when the m button is pressed?
The clock will appear if too much time passes between pressing the m button
and the n button in Step 2. If the clock appears, press the m button to
remove the clock and repeat Step 2.
You can also change the display language by pressing the n button
to choose [Language] from the 3 tab.

16
Before you use a new memory card or one that has been formatted in other
devices, you should format the card with this camera. Formatting (initializing) a
memory card erases all data on the memory card. As you cannot retrieve the
erased data, exercise adequate caution before formatting the memory card.
Before formatting an Eye-Fi card (see Camera User Guide), be sure to install
the software contained on the card to a computer.
Display the menu.
zPress the n button.
Choose [Format].
zMove the zoom lever to choose the 3 tab.
zPress the op buttons to choose [Format],
then press the m button.
Choose [OK].
zPress the qr buttons to choose [OK], then
press the m button.
Format the memory card.
zPress the op buttons to choose [OK],
then press the m button.
XThe memory card will be formatted.
Formatting Memory Cards

Pressing the Shutter Button
17
Complete formatting.
XWhen formatting ends, [Memory card
formatting complete] will appear on the
screen.
zPress the m button.
To take images that are in focus, be sure to first press the shutter button
lightly (halfway) to focus, then press fully to shoot.
Press halfway (Press lightly to focus).
zPress lightly until the camera beeps twice
and AF frames appear where the camera
focused.
Press fully (Press fully to shoot).
XThe camera plays the shutter sound and
takes the shot.
zSince the shot is being taken while the
shutter sound plays, be careful not to move
the camera.
Formatting or erasing data on a memory card merely changes the file
management information on the card and does not ensure its contents are
completely erased. Be careful when transferring or disposing of a memory
card. When disposing of a memory card, take precautions such as
physically destroying the card to prevent personal information leaks.
•The total capacity of the memory card displayed in the formatting screen
may be less than indicated on the memory card.
•Perform a low-level format (see Camera User Guide) of the memory card
when the camera does not operate properly, the recording/reading speed
of a memory card has dropped, when continuous shooting speed slows
down, or when movie recording stops suddenly.
Pressing the Shutter Button
Taking Pictures (Smart Auto)
18
Since the camera can determine the subject and shooting conditions, you can
let it automatically select the best settings for the scene and just shoot. The
camera can also detect and focus on faces, setting the color and brightness
to optimal levels.
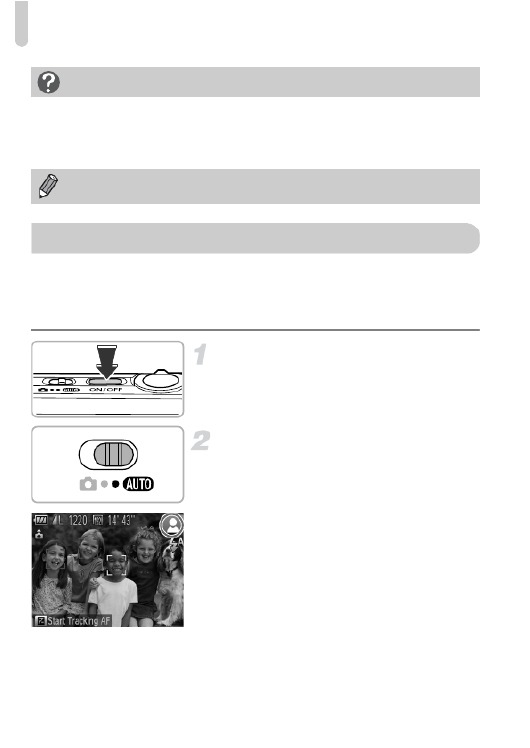
Turn on the camera.
zPress the ON/OFF button.
XThe start-up screen will appear.
Enter A mode.
zSet the mode switch to A.
zWhen you point the camera toward the
subject, the camera will make a slight
noise as it determines the scene.
XThe icon for the determined scene will
appear in the upper right of the screen.
XThe camera will focus on detected
subjects and display frames on them.
Does the length of the shutter sound change?
•Since the time required to shoot differs depending on the scene you want to
take, the length of the shutter sound may change.
•If the camera or subject moves while the shutter sound is playing, the recorded
image may be blurry.
If you shoot without pressing the shutter button halfway, the image may not
be in focus.
Taking Pictures (Smart Auto)

Taking Pictures (Smart Auto)
19
Compose the shot.
zMoving the zoom lever toward i
(telephoto) will zoom in on your subject,
making it appear larger. Moving the lever
toward j (wide angle) will zoom out from
your subject, making it appear smaller.
(The zoom bar showing the zoom position
appears on the screen.)
Focus.
zPress the shutter button halfway to focus.
XWhen the camera focuses, it will beep
twice and AF frames will appear where the
camera focused.
Several AF frames will appear when the
camera focuses on more than one point.
Shoot.
zPress the shutter button fully to shoot.
XThe camera will play the shutter sound and
shoot. The flash will automatically fire in
low light conditions.
XThe image will appear on the screen for
approximately two seconds.
zYou can take a second picture even while
an image is displayed by pressing the
shutter button again.
Zoom bar
AF Frame

Taking Pictures (Smart Auto)
20
What if...
•What if the color and brightness of the images do not turn out as
expected?
The scene icon (see Camera User Guide) that appears on the screen may not
match the actual scene. If this happens, try shooting in G mode (see Camera
User Guide).
•What if white and gray frames appear when you point the camera toward
a subject?
A white frame appears on the face or subject that the camera detected as the
main subject, while gray frames appear on other detected faces. The frames will
follow the subjects within a certain range.
If the subject moves, however, the gray frames will disappear, leaving only the
white frame.
•What if a frame does not appear on the subject you want to shoot?
The subject may not be detected, and frames may appear on the background.
If this happens, try shooting in G mode (see Camera User Guide).
•What if a blue frame appears when you press the shutter button halfway?
A blue frame appears when a moving subject is detected; the focus and
exposure will continuously adjust (Servo AF).
•What if a flashing appears?
Attach the camera to a tripod so that the camera does not move and blur the image.
•What if the camera does not play any sounds?
Pressing the p button while turning on the camera power will turn off all sounds.
To turn the sounds on, press the n button to choose [Mute] from the 3
tab, then press the qr buttons to choose [Off].
•What if the image comes out dark even if the flash fired when shooting?
The subject is too far away for the flash to reach. The effective flash range is
approximately 30 cm – 4.0 m (12 in. – 13 ft.) from the end of the lens at
maximum wide angle (j), and approximately 50 cm – 2.0 m (1.6 – 6.6 ft.) from
the end of the lens at maximum telephoto (i).
•What if the camera beeps once when the shutter button is pressed
halfway?
Your subject may be too close. When the camera is at maximum wide angle (
j
),
move about 3 cm (1.2 in.) or more away from your subject and shoot. Move about
50 cm (1.6 ft.) or more away when the camera is at maximum telephoto (
i
).
•What if the lamp lights when the shutter button is pressed halfway?
To reduce red-eye and to assist in focusing, the lamp may light when shooting
in dark areas.
•What if the h icon blinks when you try to shoot?
The flash is charging. You can shoot when recharging ends.

Viewing Images
21
You can view the images you have taken on the screen.
Enter Playback mode.
zPress the 1 button.
XThe last image you took will appear.
Choose an image.
zPressing the q button will cycle through
the images from newest to oldest.
zPressing the r button will cycle through
the images from oldest to newest.
zPressing and holding the qr buttons will
display images in a line letting you quickly
search them. Pressing the m button
restores single image playback (see
Camera User Guide).
zThe lens will retract after approximately 1
minute elapses.
zPressing the 1 button again while the
lens is retracted will turn off the power.
What if an icon appears in the upper right of the screen?
The icon for the determined scene will appear in the upper right of the screen. For
details on the icons that appear, see “Scene Icons” (see Camera User Guide).
Choosing the subject to focus on (Tracking AF)
After pressing the o button and displaying , point the camera so that is
on the subject you want to focus on. Press and hold the shutter button halfway to
display a blue frame where focus and exposure will be maintained (Servo AF).
Press the shutter button fully to shoot.
Viewing Images
Switching to Shooting mode
Pressing the shutter button halfway while in Playback mode switches the camera
to Shooting mode.

22
You can choose and erase images one at a time. Please note that erased
images cannot be recovered. Exercise adequate caution before erasing an
image.
Enter Playback mode.
zPress the 1 button.
XThe last image you took will appear.
Choose an image to erase.
zPress the qr buttons to display an image
to erase.
Erase the image.
zAfter pressing the m button, press the
op buttons to choose a, then press the
m button again.
X[Erase?] appears on the screen.
zPress the qr buttons to choose [Erase],
then press the m button.
XThe displayed image will be erased.
zTo exit instead of erasing, press the qr
buttons to choose [Cancel], then press the
m button.
Erasing Images

23
The camera can automatically select all settings so that you can shoot movies
just by pressing the movie button.
If you continue shooting for a long time, the camera may become warm. This
is not a malfunction.
Choose A mode.
zSet the mode switch to A.
Compose the shot.
zMoving the zoom lever toward i will
zoom in on your subject, making it appear
larger. Moving the lever toward j will
zoom out from your subject, making it
appear smaller.
Shoot.
zPress the movie button.
z
Black bars appear at the top and bottom of
the screen. These areas cannot be recorded.
XThe camera will beep once, recording will
start, and [ Rec] and the elapsed time will
appear on the screen.
zOnce shooting begins, take your finger off
the movie button.
Shooting Movies
Remaining Time
Elapsed Time

Transferring Images to a Computer for Viewing
26
You can use the included software to transfer images you have shot with the
camera to a computer for viewing. If you are already using software included
with another Canon-brand compact digital camera, install the software from
the included CD-ROM, overwriting your current installation.
System Requirements
Windows
* For Windows XP, Microsoft .NET Framework 3.0 or later (max. 500 MB) must be
installed. Installation may take some time depending on your computer’s capabilities.
How can I play back movies on a computer?
Install the included software (p. 27).
•When watching a movie on a computer, frames may drop, it may not play
smoothly, and the audio may stop suddenly depending on the computer’s
capabilities.
•If you use the supplied software to copy the movie back onto the memory card,
you can play back the movie smoothly with the camera. For enhanced playback
you can also connect the camera to a TV.
OS Windows 7
Windows Vista Service Pack 1 and 2
Windows XP Service Pack 3
Computer model The above OS should be pre-installed on computers with built-in
USB ports.
CPU Pentium 1.3 GHz or higher (still images), Core2 Duo 2.6 GHz or
higher (movies)
RAM Windows 7 (64 bit): 2 GB or more
Windows 7 (32 bit), Windows Vista (64 bit, 32 bit): 1 GB or more
(still images), 2 GB or more (movies)
Windows XP: 512 MB or more (still images), 2 GB or more (movies)
Interface USB
Free Hard Disk
Space
ZoomBrowser EX: 200 MB or more
CameraWindow: 150 MB or more*
Movie Uploader for YouTube: 30 MB or more
PhotoStitch: 40 MB or more
Display 1,024 x 768 pixels or higher
Transferring Images to a Computer for Viewing

Transferring Images to a Computer for Viewing
28
When the installation finishes, click
[Restart] or [Finish].
Remove the CD-ROM.
zRemove the CD-ROM when your desktop
screen appears.
Macintosh
Place the CD in the computer’s CD-
ROM drive.
zPlace the supplied CD-ROM (DIGITAL
CAMERA Solution Disk) (p. 2) into the
computer’s CD-ROM drive.
Begin installation.
zDouble-click the on the CD.
zClick [Install], and follow the on-screen
instructions to proceed with the
installation.
Connect the camera to the
computer.
zTurn off the camera.
zOpen the cover and insert the included
interface cable’s smaller plug (p. 2) firmly
into the camera terminal in the direction
shown.
zInsert the interface cable’s larger plug into
the computer. For connection details, refer
to the user guide provided with the
computer.
Turn on the camera.
zPress the 1 button to turn on the camera.
Specyfikacje produktu
| Marka: | Canon |
| Kategoria: | kamera |
| Model: | IXUS 117 HS |
Potrzebujesz pomocy?
Jeśli potrzebujesz pomocy z Canon IXUS 117 HS, zadaj pytanie poniżej, a inni użytkownicy Ci odpowiedzą
Instrukcje kamera Canon

28 Lutego 2025
13 Stycznia 2025
14 Grudnia 2024
5 Października 2024
3 Października 2024
29 Września 2024
29 Września 2024
29 Września 2024
29 Września 2024
28 Września 2024
Instrukcje kamera
- kamera Sony
- kamera Samsung
- kamera Leica
- kamera Logitech
- kamera Xiaomi
- kamera Joy-It
- kamera Braun
- kamera Lenovo
- kamera TP-Link
- kamera Philips
- kamera SilverCrest
- kamera Acer
- kamera Epson
- kamera Hikvision
- kamera EZVIZ
- kamera Panasonic
- kamera Mio
- kamera Viewsonic
- kamera Nedis
- kamera Reolink
- kamera Medion
- kamera Lenco
- kamera Fujifilm
- kamera D-Link
- kamera GE
- kamera Ring
- kamera Garmin
- kamera Imou
- kamera Blaupunkt
- kamera IOptron
- kamera Casio
- kamera Sigma
- kamera HP
- kamera Prixton
- kamera SJCAM
- kamera Creative
- kamera Swann
- kamera Nikon
- kamera Ozito
- kamera Kodak
- kamera Cisco
- kamera Scosche
- kamera DJI
- kamera Zenit
- kamera Gembird
- kamera Minox
- kamera Cobra
- kamera JVC
- kamera Trust
- kamera Fimi
- kamera AgfaPhoto
- kamera Vimar
- kamera Dahua Technology
- kamera Kyocera
- kamera Eufy
- kamera Ricoh
- kamera Rollei
- kamera Netgear
- kamera Velleman
- kamera Bolex
- kamera Pyle
- kamera Vtech
- kamera Speco Technologies
- kamera ARRI
- kamera Fluke
- kamera Olympus
- kamera Avaya
- kamera National Geographic
- kamera Maginon
- kamera SPC
- kamera Polaroid
- kamera Konica Minolta
- kamera Sanyo
- kamera Red Digital Cinema
- kamera Oregon Scientific
- kamera Lorex
- kamera Optoma
- kamera Bresser
- kamera Hama
- kamera GoPro
- kamera TomTom
- kamera Denver
- kamera Anker
- kamera Pentax
- kamera Bushnell
- kamera Berger & Schröter
- kamera Marshall Electronics
- kamera Hitachi
- kamera Emerson
- kamera SereneLife
- kamera Vemer
- kamera Azden
- kamera AVerMedia
- kamera RCA
- kamera Genius
- kamera Levenhuk
- kamera BenQ
- kamera Trevi
- kamera Technaxx
- kamera Lexibook
- kamera Hanwha
- kamera Sencor
- kamera Powerfix
- kamera Blackmagic Design
- kamera Foscam
- kamera Lumens
- kamera Daewoo
- kamera Dörr
- kamera Best Buy
- kamera EVE
- kamera POV
- kamera Elmo
- kamera UniView
- kamera Laserliner
- kamera Vivitar
- kamera PTZ Optics
- kamera Agfa
- kamera Argus
- kamera Easypix
- kamera Celestron
- kamera Yashica
- kamera Flir
- kamera Daitsu
- kamera Arlo
- kamera Nest
- kamera Ansco
- kamera Intel
- kamera Mamiya
- kamera Konig
- kamera Fuji
- kamera Minolta
- kamera Zorki
- kamera EverFocus
- kamera RunCam
- kamera SeaLife
- kamera Burris
- kamera Liiv360
- kamera Watec
- kamera Meade
- kamera Contax
- kamera Sinji
- kamera Traveler
- kamera Exakta
- kamera Digital Watchdog
- kamera MuxLab
- kamera AViPAS
- kamera ZeissIkon
- kamera Silvergear
- kamera Spypoint
- kamera HOLGA
- kamera Praktica
- kamera Hasselblad
- kamera Moto Mods (Motorola)
- kamera Fantasea Line
- kamera Kogan
- kamera Getac
- kamera Brinno
- kamera Z CAM
- kamera General
- kamera Ergoguys
- kamera Strex
- kamera General Electric
- kamera Leotec
- kamera Leitz Focomat IIc
- kamera Syrp
- kamera Cosina
- kamera Videology
- kamera InfiRay
- kamera Pelco
- kamera Videotec
- kamera Cambo
- kamera Kobian
- kamera Kyocera Yashica
- kamera Bauhn
- kamera Konica
- kamera Akaso
- kamera Seek Thermal
- kamera Aida
- kamera Ikegami
- kamera Ikelite
- kamera Adeunis
- kamera Hoppstar
- kamera Moultrie
- kamera PatrolEyes
- kamera Camouflage
- kamera HuddleCamHD
- kamera Aplic
- kamera Linhof
- kamera GoXtreme
- kamera KanDao
- kamera Aquapix
- kamera Kraken Sports
- kamera Voigtlander
Najnowsze instrukcje dla kamera

9 Kwietnia 2025

9 Kwietnia 2025

3 Kwietnia 2025
2 Kwietnia 2025
1 Kwietnia 2025
29 Marca 2025
29 Marca 2025
27 Marca 2025
27 Marca 2025
27 Marca 2025