Instrukcja obsługi Canon imageFORMULA DR-G2140
Przeczytaj poniżej 📖 instrukcję obsługi w języku polskim dla Canon imageFORMULA DR-G2140 (182 stron) w kategorii skaner. Ta instrukcja była pomocna dla 2 osób i została oceniona przez 2 użytkowników na średnio 4.5 gwiazdek
Strona 1/182

• Please read this manual before operating this scanner.
• After you finish reading this manual, store it in a safe place
for future reference.
User Manual

2
FCC REGULATIONS (For 120 V model)
Document Scanner, Model 6130020/6130030/6130040/6130130/
6130140
This device complies with Part 15 of the FCC Rules. Operation is
subject to the following two conditions: (1) This device may not cause
harmful interference, and (2) this device must accept any interference
received, including interference that may cause undesired operation.
Note: This equipment has been tested and found to comply with the
limits for a Class B digital device, pursuant to Part 15 of the FCC
Rules. These limits are designed to provide reasonable protection
against harmful interference in a residential installation. This
equipment generates, uses, and can radiate radio frequency energy
and, if not installed and used in accordance with the instructions, may
cause harmful interference to radio communications. However, there
is no guarantee that interference will not occur in a particular
installation. If this equipment does cause harmful interference to radio
or television reception, which can be determined by turning the
equipment OFF and ON, the user is encouraged to try to correct the
interference by one or more of the following measures:
– Reorient or relocate the receiving antenna.
– Increase the separation between the equipment and receiver.
– Connect the equipment into an outlet on a circuit different from that
to which the receiver is connected.
– Consult the dealer or an experienced radio/TV technician for help.
Use of shielded cable is required to comply with Class B limits in
Subpart B of Part 15 of FCC Rules.
Do not make any changes or modifications to the equipment unless
otherwise specified in the manual. If such changes or modifications
should be made, you could be required to stop operation of the
equipment.
Canon U.S.A. Inc.
ONE CANON PARK, MELVILLE, NY 11747, U.S.A.
Tel. No. (800)652-2666
RADIO INTERFERENCE REGULATIONS (For 120 V
models)
This digital apparatus does not exceed the Class B limits for radio
noise emissions from digital apparatus as set out in the interference-
causing equipment standard entitled “Digital Apparatus”, ICES-003 of
the Industry Canada.
RÈGLEMENT SUR LE BROUILLAGE RADIOÉLECTRIQUE
(For 120 V models)
Cet appareil numérique respecte les limites de bruits radioélectriques
applicables aux appareils numériques de Classe B prescrites dans la
norme sur le matériel brouilleur: “Appareils Numériques”, NMB-003
édictée par l’Industrie Canada.
International ENERGY STAR® Office Equipment Program
As an ENERGY STAR® Partner, CANON
ELECTRONICS INC. has determined that this
machine meets the ENERGY STAR® Program
guidelines for energy efficiency.
The International ENERGY STAR® Office Equipment
Program is an international program that promotes
energy saving through the use of computers and other office
equipment. The program backs the development and dissemination of
products with functions that effectively reduce energy consumption. It
is an open system in which business proprietors can participate
voluntarily. The targeted products are office equipment, such as
computers, monitors, printers, fax, machine, copiers, and scanners.
The standards and logos are uniform among participating nations.
This model doesn’t provide setting options for power management.

3
European Union (and EEA) only.
This symbol indicates that this product is not to be disposed
of with your household waste, according to the WEEE
Directive (2002/96/EC) and your national law. This product
should be handed over to a designated collection point,
e.g., on an authorized one-for-one basis when you buy a
new similar product or to an authorized collection site for recycling
waste electrical and electronic equipment (EEE). Improper handling of
this type of waste could have a possible negative impact on the
environment and human health due to potentially hazardous
substances that are generally associated with EEE. At the same time,
your cooperation in the correct disposal of this product will contribute
to the effective usage of natural resources. For more information
about where you can drop off your waste equipment for recycling,
please contact your local city office, waste authority, approved WEEE
scheme or your household waste disposal service. For more
information regarding return and recycling of WEEE products, please
visit www.canon-europe.com/environment.
(EEA: Norway, Iceland and Liechtenstein)
Für EMVG
Dieses Produkt ist zum Gebrauch im Wohnbereich, Geschäfts-und
Gewerbebereich sowie in Kleinbetrieben vorgesehen.
Model Names
The following name may be provided for the safety regulations in each
sales region of the Document Scanner.
DR-G2140: Model 6130020/6130130
DR-G2110: Model 6130030/6130140
DR-G2090: Model 6130040
Reproduction Warning
This device is designed to be used in a legal manner, in accordance
with all applicable laws, including, but not limited to, counterfeit and
copyright laws, as well as laws pertaining to national security.
Any person(s) found to have reproduced any of the following materials
(regardless of whether such reproduction was intentional or not) for
the purpose of misrepresenting such material as the original may be
prosecuted in accordance with the applicable laws and regulations.
• Paper money or bank notes (domestic and foreign)
• Postage stamps, revenue stamps, or other similar stamps
• Stock certificates, bond certificates, promissory notes, cheques, or
other valuable certificates
• Passports, licenses, or other certificates or documents issued by
government officials or agencies
This is not an exhaustive list.
Canon is not responsible for how this scanner is used by an individual.
Please note that certain intellectual property is protected by copyright
law, and copyrighted items may not be reproduced without the
express permission of the copyright holder except for personal or
household use under limited circumstances.

4
Trademarks
• Canon and the Canon logo are registered trademarks, of Canon Inc.
in the United States and may also be trademarks or registered
trademarks in other countries.
• imageFORMULA is a trademark of CANON ELECTRONICS INC.
• Microsoft, Windows, PowerPoint, and SharePoint are registered
trademarks or trademarks of Microsoft Corporation in the United
States and other countries.
• Microsoft product screen shot(s) reprinted with permission from
Microsoft Corporation.
• ENERGY STAR® is a registered trademark of the United States
Environmental Protection Agency.
• ISIS is a registered trademark of Open Text in the United States.
• Other product and company names herein may be the trademarks
of their respective owners. However, the TM and ® symbols are not
used in this document.
Copyright
Copyright 2018 by CANON ELECTRONICS INC. All rights reserved.
No part of this publication may be reproduced or transmitted in any
form or by any means, electronic or mechanical, including
photocopying and recording, or by any information storage or retrieval
system without the prior written permission of CANON
ELECTRONICS INC.
Disclaimers
The information in this document is subject to change without notice.
CANON ELECTRONICS INC. MAKES NO WARRANTY OF ANY
KIND WITH REGARD TO THIS MATERIAL, EITHER EXPRESS OR
IMPLIED, EXPECT AS PROVIDED HEREIN, INCLUDING WITHOUT
LIMITATION, THEREOF, WARRANTIES AS TO MARKETABILITY,
MERCHANTABILITY, FITNESS FOR A PARTICULAR PURPOSE
OF USE OR NON-INFRINGEMENT. CANON ELECTRONICS INC.
SHALL NOT BE LIABLE FOR ANY DIRECT, INCIDENTAL, OR
CONSEQUENTIAL DAMAGES OF ANY NATURE, OR LOSSES OR
EXPENSES RESULTING FROM THE USE OF THIS MATERIAL.
CANON ELECTRONICS INC. IS NOT LIABLE FOR THE STORAGE
AND HANDLING OF DOCUMENTS SCANNED WITH THIS
PRODUCT, OR THE STORAGE AND HANDLING OF RESULTING
SCANNED IMAGE DATA.
IF YOU INTEND TO DISCARD THE ORIGINALS OF SCANNED
DOCUMENTS, YOU THE CUSTOMER ARE RESPONSIBLE FOR
INSPECTING THE SCANNED IMAGES AND VERIFYING THAT
DATA IS INTACT.
THE MAXIMUM LIABILITY OF CANON ELECTRONICS INC.
UNDER THIS WARRANTY IS LIMITED TO THE PURCHASE PRICE
OF THE PRODUCT COVERED BY THE WARRANTY.

5
Setup Guide
STEP 1 Checking Your Purchased Model
Scanner Models
Scanner models include those with USB connector only, and those
with both USB and wired LAN connectors. This manual describes both
USB and wired LAN connection functions. Check your model before
reading this manual.
*The serial number is alphanumeric characters printed on a label on
the bottom/back of the product.
Model Serial No.* USB
Connection
Wired LAN
Connection
DR-G2140
(with LAN connector) JF Yes Yes
DR-G2140
(without LAN
connector)
JS Yes No
DR-G2110
(with LAN connector) JG Yes Yes
DR-G2110
(without LAN
connector)
JT Yes No
DR-G2090 JH Yes No
Please read first.

6
STEP 2 Checking the Accessories
If any of the items listed below are missing or damaged, contact your local authorized Canon dealer or service representative.
Main Unit
USB Cable Warranty Card
(U.S.A. and Canada only)
Cleaning Cloth
(x1)
Setup Guide
Power Cord
Setup Disc
• The cleaning cloth is for cleaning the interior of the scanner.
• Items included in this manual are subject to change without notice.
• You must keep the machine’s packaging and packing materials for storing or transporting the machine.
• The shape of the power plug varies by country and region.

7
Setup Disc Contents
Install the following software necessary for using the scanner from the
supplied Setup Disc.
●CaptureOnTouch
This is a dedicated scanning application for DR Series scanners.
●Scanner driver
This is the scanner driver for this product.
●Barcode Module
●2D code module
Module to recognize barcodes printed on documents during
scanning,

8
STEP 3 Installing the Software
System requirements
To use the scanner, your computer must satisfy the following system
requirements.
Computer
CPU: Intel Core i3 2.13GHz or faster
Memory: 4GB or more
Hard disk: 3 GB or more available space required for
installation of all software
USB interface: USB3.1 Gen1/USB2.0
Monitor: Resolution of 1024 × 768 (XGA) or better
recommended.
Optical drive: Drive capable of reading CDs/DVDs.
Operating system
• Microsoft Windows 7 Service Pack 1 or later (32-bit and 64-bit
editions)
• Microsoft Windows 8.1 (32-bit and 64-bit editions)
• Microsoft Windows 10 (32-bit and 64-bit editions)
• Microsoft Windows Server 2008 R2 Service Pack 1 or later
• Microsoft Windows Server 2012 R2
• Microsoft Windows Server 2016
This is the environment as of August 2018.
For the latest software support information, go to the Products page
on the Canon website.
Other requirements
• An ISIS-compatible application (Windows only) or a TWAIN-compatible
application that is compatible with the above operating systems.
• .NET Framework 4.5 or later
IMPORTANT
• If you connect this scanner to a USB3.1 Gen1 enabled USB port,
some computers may not recognize the scanner. If unrecognized,
connect it to a USB2.0 port.
• Use the USB interface provided as standard with your computer.
However, normal operation is not guaranteed with all USB
interfaces, even if present as standard equipment on the computer.
For details, consult your local authorized Canon dealer.
• Scanning speeds are lower if your computer’s standard USB
interface is USB Full-Speed (equal to USB 1.1.)
• The USB cable you are using should be the one originally included
with the scanner.
• If the CPU, memory, interface card, and other specifications do not
satisfy the installation requirements, the scanning speed may be
greatly reduced and transmission may take a long time.
• Even if the computer satisfies the system requirements, the
scanning speed may vary, depending on the specification of the
computer and the environment.
• The scanner drivers provided with the scanner do not necessarily
operate on all ISIS or TWAIN-compatible applications. For details,
contact your application software retailer.
• In Windows 10 tablet mode, the software may disrupt the display.
• The Desktop Experience feature must be enabled for Windows
Server 2008 R2 and Windows Server 2012 R2.
9
Installation
IMPORTANT
• Install the software before connecting the scanner to the computer
with the USB cable.
• Log on to Windows as an Administrator.
• Close all other applications before installing the software.
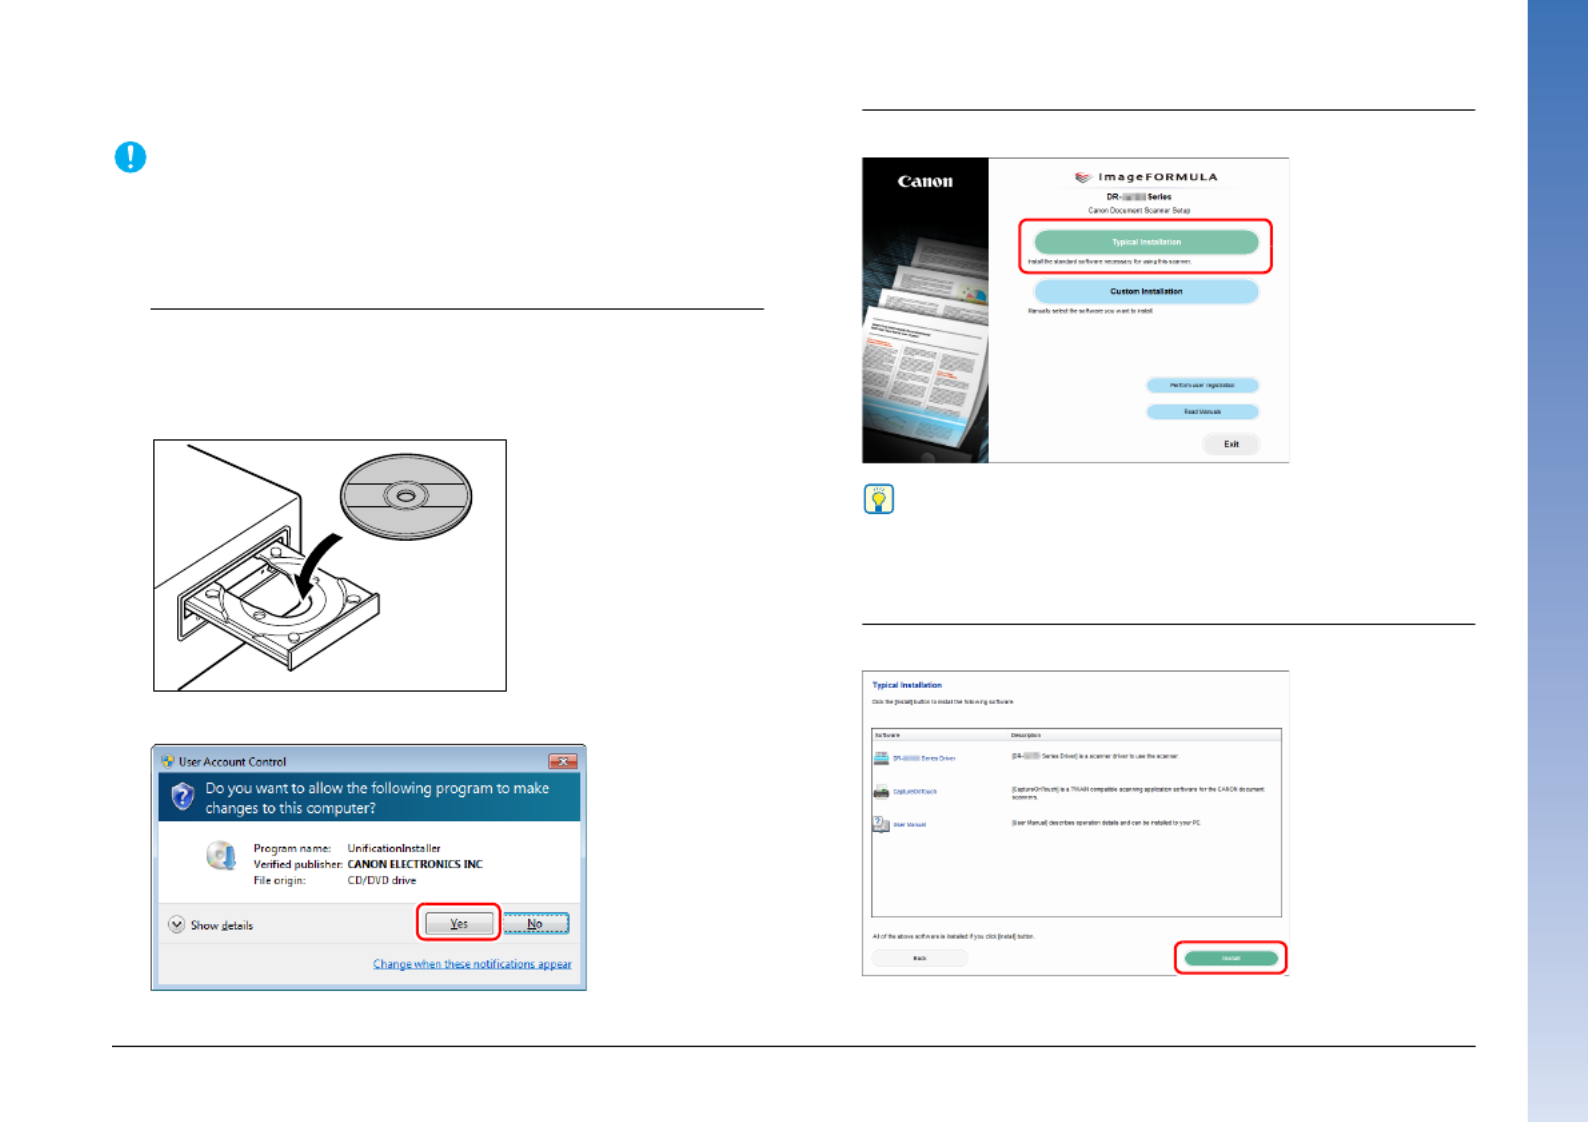
1
Insert the Setup Disc into the disk drive of the computer.
The setup menu automatically starts up when you insert the disc
into the drive. (If the menu does not start up, execute setup.exe
from the disc.)
If the following screen appears, click [Yes] or [Permissions].
2
Click [Typical Installation].
Hint
If you want to reinstall only specific software that you have
previously uninstalled, select [Custom Installation] and specify
the software.
3
Click [Install].
10
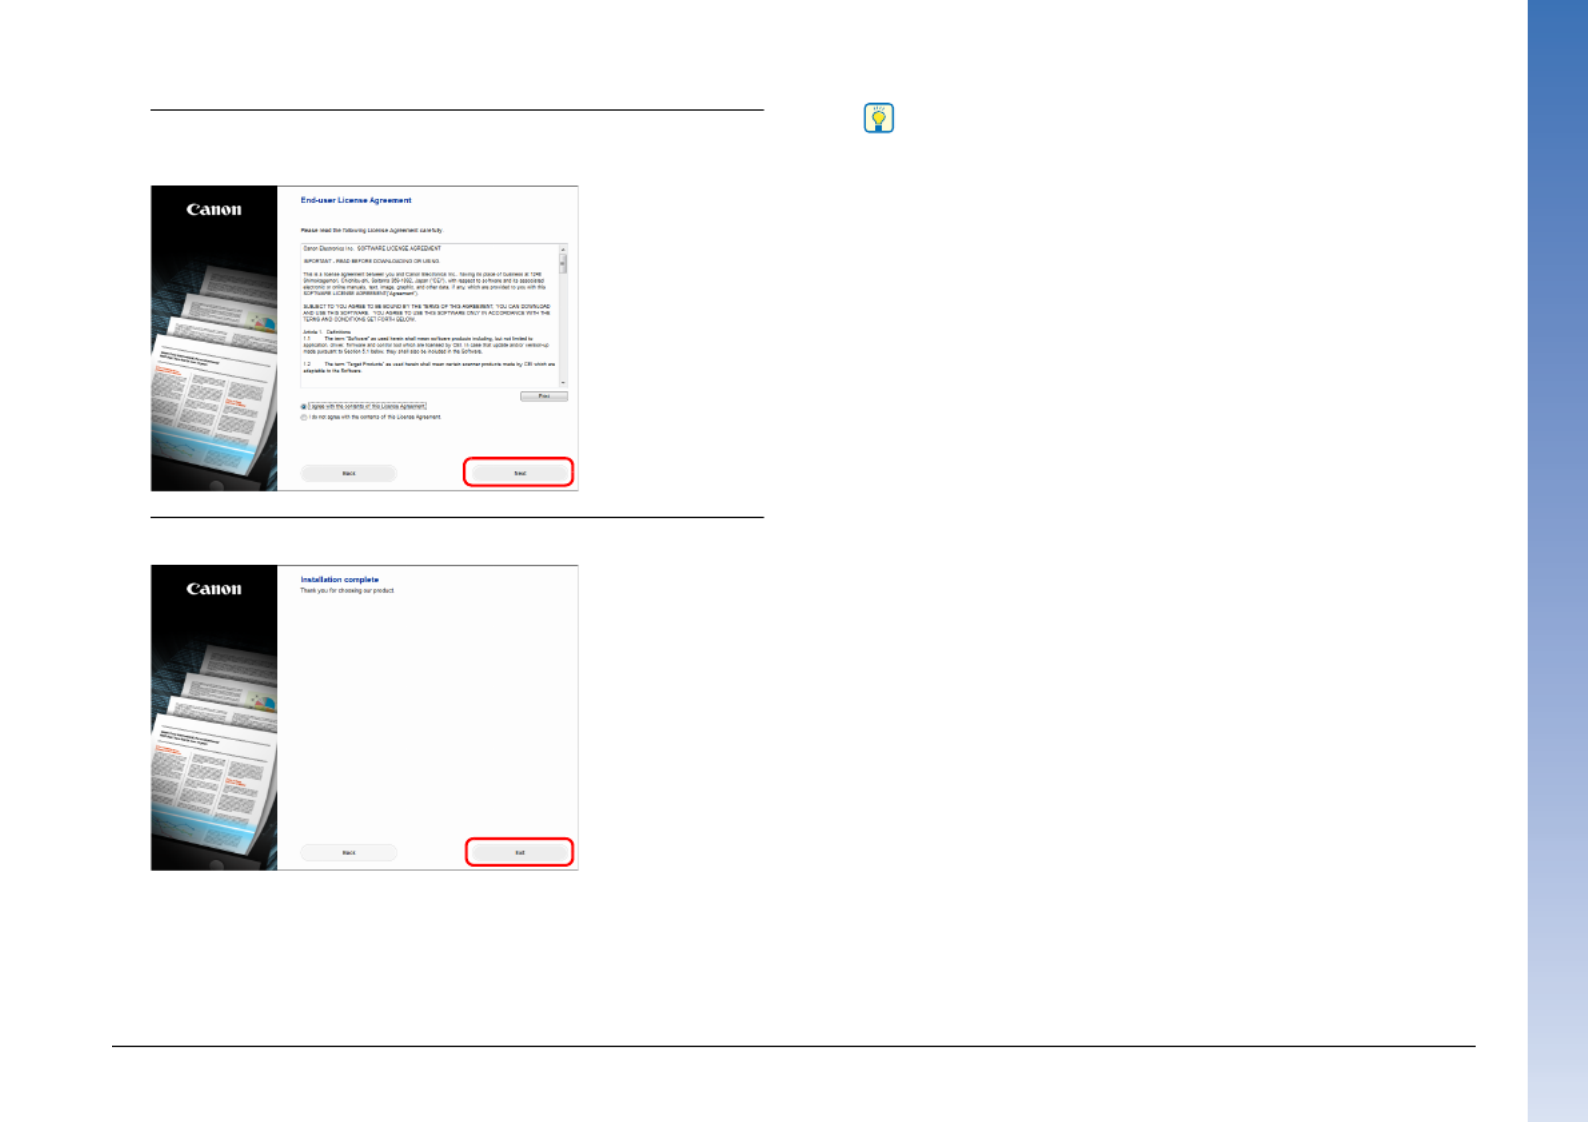
4
Follow the instructions on the screen to complete
installation.
5
Click [Exit] to finish installing the software.
* Download the latest software from the Canon website.
Hint
Depending on your system environment, your web browser may
start up full screen during installation. In that case, return to the
desktop after processing in the browser is completed, and
continue the installation process.

11
STEP 4 Connecting to a Computer and the Power
Connect the scanner to the computer and the power supply. The
scanner can be connected to a USB port or LAN port on the computer.
IMPORTANT
Before connecting the scanner to the computer, verify that the power
of the scanner is OFF. If the power is ON, turn it OFF.
Interface Connector Locations
The USB connector is located on the scanner as shown below.
IMPORTANT
Use only the supplied power cord.
Power Supply Connection
1
Connect the supplied power cord into the power
connector on the back of the scanner. (1)
2
Connect the power cord into an AC outlet. (2)
USB connector
LAN Connector
Power Connector
120 V Type
220 - 240 V Type

12
Connecting to a Computer
The scanner supports either USB connection or wired LAN connection.
The scanner automatically recognizes the connection method when
the USB cable or the LAN cable is connected.
IMPORTANT
• This connection method remains effective until the power to the
scanner is turned off. To change the connection method, disconnect
the cable, restart the scanner, and connect the other cable.
• When the scanner starts up, if both the USB cable and the LAN
cable are connected, the USB connection takes precedence.
Connecting via USB
Use the included USB cable to connect to the computer.
IMPORTANT
Do not connect the scanner to the computer before installing the
software.
The end of the USB cable with the square plug (Type B) connects to
the scanner. The other end with the flat plug (Type A) connects to a
USB port on the computer.
Connecting via wired LAN
Use a LAN cable to connect the scanner to a wired LAN router.
IMPORTANT
• The computer needs to be connected to the router via wired or
wireless LAN.
• The router and LAN cable are not included, and must be provided
separately.
Hint
• The scanner supports DHCP (Dynamic Host Configuration
Protocol). A DHCP server in the network environment provides IP
addresses that can be automatically acquired, eliminating the need
to specify an IP address for the scanner.
• If you must specify a fixed IP address for the scanner, such as when
using it on a network without a DHCP server, you can specify a
static IP address on the operation panel or from the Web Menu.
"Network" (See p. 72), "Web Menu" (See p. 129)
• When connecting via wired LAN, the optional flatbed scanner
cannot be used.
Type B
Type A

14
Turning Off the Power
Press and hold the power switch to turn it off.
IMPORTANT
• After turning the scanner off, wait at least 10 seconds before turning
it back on.
• If you will not be using the scanner for an extended period, you
should disconnect the power cord from the AC outlet for safety.
Hint
The scanner’s auto power off setting is enabled by default, and the
scanner will turn off automatically if it is not operated for 4 hours.
To override this setting, please see "About the Canon
imageFORMULA Driver Setting Tool" on p. 127.
This completes setup.

17
Table of Contents
Setup Guide ......................................................................... 5
Interface Connector Locations .............................................. 11
Power Supply Connection..................................................... 11
Connecting to a Computer .................................................... 12
Turning Off the Power ........................................................... 14
Introduction ....................................................................... 15
Symbols Used in This Manual.................................................... 16
Before Using the Scanner.......................... 20
Important Safety Instructions ..................................... 20
Installation Location .............................................................. 20
Power Supply........................................................................ 21
Moving the Scanner .............................................................. 21
Handling ................................................................................ 21
Disposal ................................................................................ 23
Features of the Scanner.............................................. 24
Names and Functions of Parts ................................... 29
Basic Operation ......................................... 35
Documents ................................................................... 35
Document Feed and Eject Tray Preparation ............. 37
Preparing the Document Feed Tray...................................... 37
Adjusting the Document Guides............................................ 40
Preparing the Document Eject Tray ...................................... 43
Document Feeding Methods....................................... 45
Selecting the Document Feeding Method ............................. 45
Scanning Documents Larger than A3 ................................... 48
Scanning with Carrier Sheets................................................ 50
Long Document Scanning..................................................... 51
Detecting a Document Double Feed..................................... 54
Count the Number of Document Sheets ............................... 57
Assigning a Function to the Function Key ................ 59
User Mode Operations ............................... 61
About User Mode.......................................................... 61
User Mode Operating Procedure .......................................... 61
Configuring Scanner Driver Settings ..................................... 63
User Mode Functions................................................... 66
Separation Off ....................................................................... 66
New File ................................................................................ 66
Scanner Setting..................................................................... 66
Scan Setting.......................................................................... 67
Count Only ............................................................................ 69
Count Clear ........................................................................... 70
Imprint Test ........................................................................... 70
Maintenance.......................................................................... 71
Network ................................................................................. 72
Scanning Methods ..................................... 74
Selecting a Scan Job ................................................... 74
About the Job Function ......................................................... 74
Scanning with CaptureOnTouch................................. 76
What is CaptureOnTouch?.................................................... 76
Starting and Exiting CaptureOnTouch................................... 78
Selecting a Scanner .............................................................. 79
Screen Descriptions .............................................................. 80
Standard Scanning................................................................ 80
Scanning Shortcut................................................................. 83
Select Document Settings ..................................................... 95
Setting the Batch Separation................................................. 97
Setting the Output ................................................................. 98
Setting the Index ................................................................. 100

18
Scanning Shortcut Setting................................................... 101
About File Formats.............................................................. 102
Environmental Settings ....................................................... 104
Setting the Scanner Driver........................................ 107
Configuration and Functions of the Scanner Driver ............ 107
Setting Basic Scanning Conditions ..................................... 110
More Advanced Scanning Methods (Batch
Separation) ................................................................. 123
Batch Separation (Insert blank page).................................. 123
Batch Separation Using Patch Code Sheets ...................... 124
About the Canon imageFORMULA Driver
Setting Tool ................................................................ 127
What is Canon imageFORMULA Driver Setting Tool? ....... 127
Start-up of the Canon imageFORMULA Driver Setting
Tool ..................................................................................... 128
Web Menu................................................. 129
Using the Web Menu.................................................. 129
Displaying the Scanner's Web Menu .................................. 129
Web Menu Pages................................................................ 131
Web Menu Settings.................................................... 132
Scanner Name Setting ........................................................ 132
Network Setting................................................................... 132
mDNS Setting ..................................................................... 133
Password Setting ................................................................ 134
Maintenance Setting ........................................................... 134
Maintenance............................................. 136
Daily Maintenance...................................................... 136
Cleaning the Scanner.......................................................... 136
Cleaning the Sensors.......................................................... 137
Opening and Closing the Upper Unit .................................. 137
Cleaning the Scanning Glass, Roller, and Pad ................... 138
Adjusting the Compression ................................................. 140
Auto Power OFF Function................................................... 140
Power Plug.......................................................................... 140
Replacing the Feed Roller ......................................... 141
Roller Replacement Cycle................................................... 141
Checking and Resetting the Page Counter ......................... 142
Removing and Reinstalling the Rollers ............................... 144
Detaching and attaching the separation pad
(retard roller cover) .................................................... 151
When to Replace the Separation Pad (Retard Roller
Cover).................................................................................. 151
Detaching the Separation Pad (Retard Roller Cover) ......... 151
Attaching the Separation Pad (Retard Roller Cover) .......... 152
Imprinter Ink Cartridge Replacement and
Cleaning ...................................................................... 153
About the Imprinter.............................................................. 153
Replacing Ink Cartridges ..................................................... 153
Specifying the Printing Position........................................... 156
Cleaning the Imprinter ......................................................... 157
Imprinter Testing ................................................................. 158
Head Cleaning..................................................................... 159
Troubleshooting ....................................... 160
Common Problems and Solutions............................ 160
Software Troubleshooting......................................... 165
Useful tips................................................................... 166
Paper Jam, Skew and Staple Detection
Processing .................................................................. 168
Error Message ............................................................ 169
Uninstalling the Software .......................................... 170

19
Appendix .................................................. 171
Specifications............................................................. 171
Options................................................................................ 172
Consumables ...................................................................... 173
Dimensions ......................................................................... 173
Other Specifications.................................................. 174
Barcode Specifications........................................................ 174
Imprinter Specifications....................................................... 176
Index............................................................................. 177

23
●For safety when the scanner will not be used for a long time, be sure
to unplug the power cord from the scanner and unplug the power
plug from the wall outlet.
●Do not wear loose clothing or jewelry that may get caught in the
scanner while you are using it, as this may result in personal injury.
Be extra careful of neckties and long hair. If anything becomes
caught in the scanner, immediately disconnect the power cord to
stop the scanner.
●Be careful when loading paper into the scanner and when removing
jammed paper, as it is possible to cut your hand on the edge of a
sheet of paper.
注意
注意
注意
注意注意
CAUTION: Hot Surface
●The part where the seal is attached can become hot, and handling
it carelessly can result in burns. To ensure safe handling, be sure to
observe all safety precautions.
Disposal
When disposing of the scanner, be sure to follow all local ordinances
and laws, or consult with your local authorized Canon dealer or
service representative.

24
Features of the Scanner
The main features of the scanner are described below.
Scanner Features
●Variety of Scanning Modes
The scanner is equipped with the following scanning modes.
Black and White, Error Diffusion, Advanced Text Enhancement,
Advanced Text Enhancement II, Active Threshold, 256-level
Grayscale, and 24-bit Color
* Advanced Text Enhancement and Active Threshold can clarify
scanned text by processing background or foreground colors.
●Fast Document Feeding
The scanner can scan up to 140 document sheets per minute of
LTR/A4-size paper in black and white, grayscale, and color
scanning modes (for the DR-G2140).
* Scanning conditions: LTR/A4 landscape, duplex, 300 dpi
●Large Capacity Feeder
Up to 500 plain paper document sheets (up to 300 in the DR-
G2090) can be loaded in the Document Feed Tray.
●Count-Only Mode
When operating the scanner as a stand-alone device, this mode
counts the number of loaded document sheets. "Count-Only Mode"
(See p. 57)
●Adjustable Document Feed Tray
The position of the Document Feed Tray can be adjusted according
to the number of document sheets to be loaded. "Preparing the
Document Feed Tray" (See p. 37)
●Long Document Mode
Depending on User Mode settings, it is possible to scan documents
up to 5,588 mm long (220") (or up to 3,000 mm (118.11") with the
DR-G2090). Also, the feeding speed can be changed in Long
Document Mode. "Long Document Scanning" (See p. 51)
●Freely Adjustable Document Guides
The left and right document guides can be adjusted for either left-
or right-side scanning. "Adjusting the Document Guides" (See
p. 40)
●User Mode
User Mode functions can be employed to set the scanner for
practically any condition. "User Mode Operations" (See p. 61)
26
●Color Unevenness Reduction Function
You can control or reduce the color irregularity at the time of the
scan.
●Document orientation
The text orientation on each fed page is detected, and the scanned
image is rotated in 90-degree increments as necessary to match.
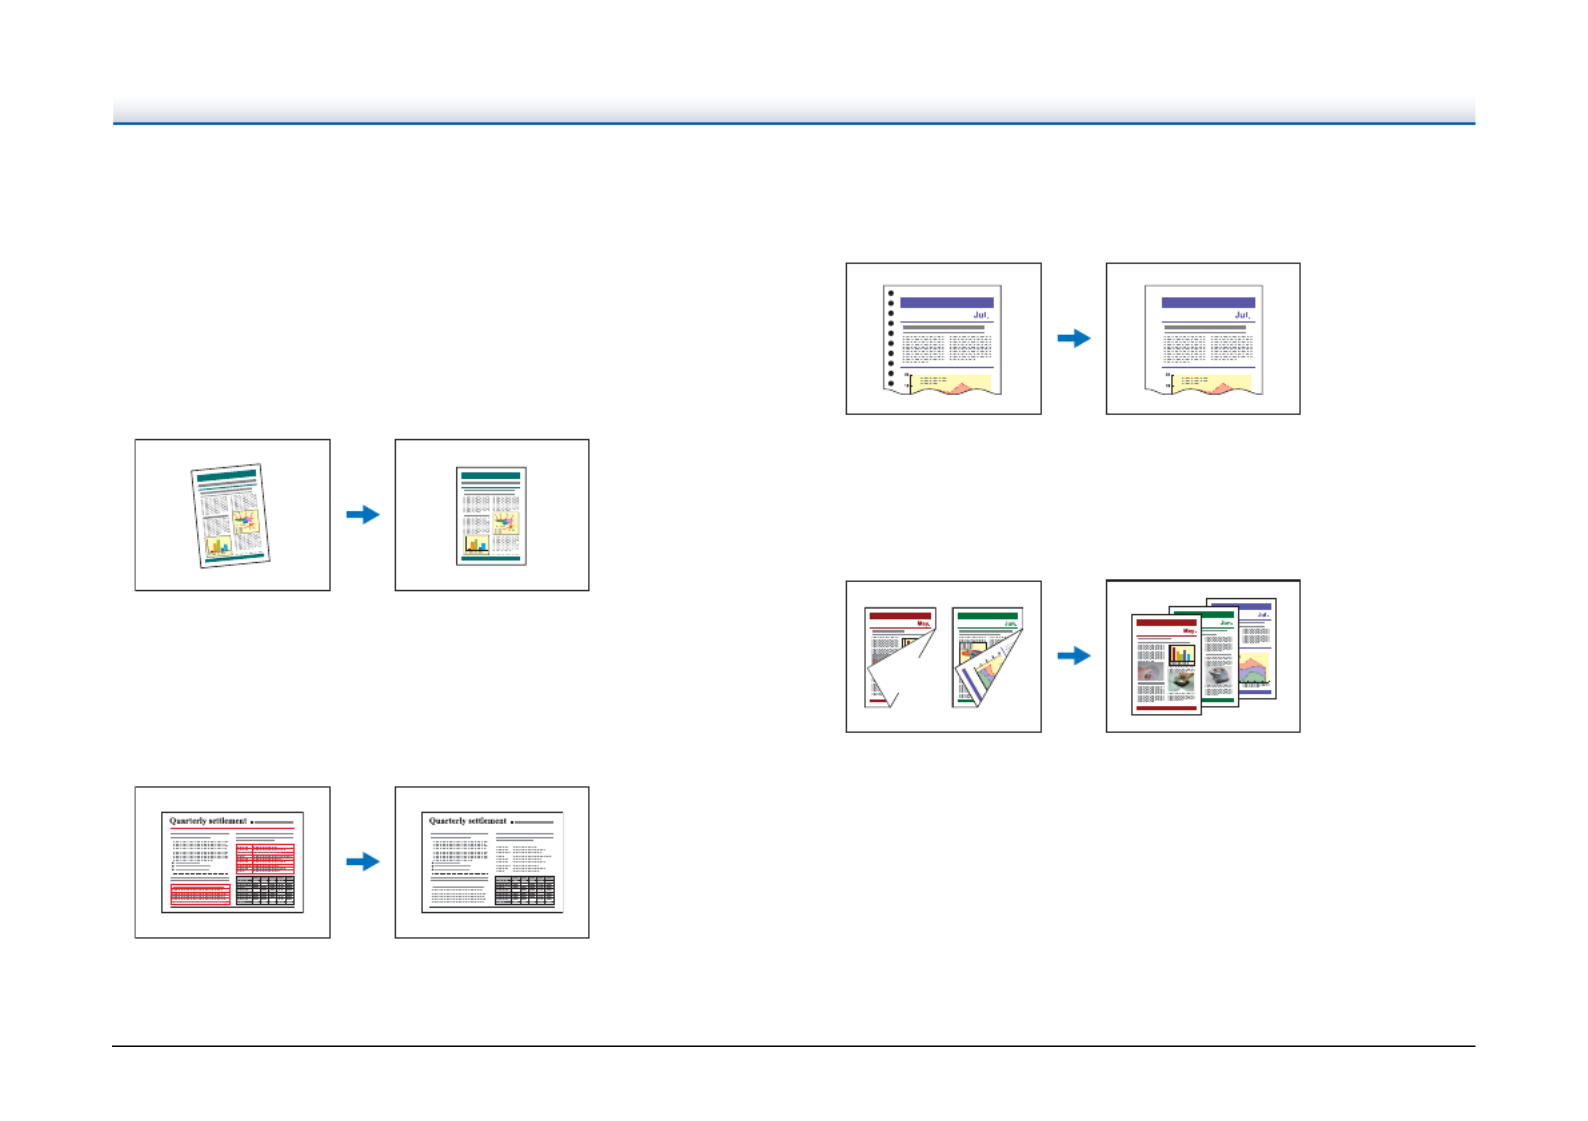
●Deskew
If a scanned image is detected to be skewed, the skewed image is
straightened.
●Drop-Out and Color Enhancement
The scanner is equipped with color drop-out and enhancement
functions that enable you to specify one color (red, blue, or green)
or intermediate color range to be omitted (dropped out) or
enhanced when scanning.
●Binding Hole Removal
Erases shadows that appear on scanned images from binding
holes on the document.
●Skip Blank Page
The scanner scans both sides of each page and skips saving
images of pages detected to be blank.
Skewed image Deskewed image
Multicolor original Red dropped out
Image with binder
holes
Image with binder
holes removed
Monthly Report
Monthly Report
Two-sided
documents with blank
page
Skipped blank page
Mont hly Report
Mont hly Report
Mont hly Report
Mont hly Report
Mont hly Report
Blank
Page

28
Option
●Imprinter
Use to print on scanned documents.

30
Front View (with Document Feed and Eject Trays extended)
FDocument Eject Tray Extension
Open the Document Eject Tray Extension to prevent documents
from falling off of the Document Eject Tray. (See p. 43)
GDocument Eject Stopper
Adjust to fit the length of documents, to avoid document spillage.
(See p. 44)
HDocument Eject Guides
Adjust to fit the width of documents, so that ejected documents
stack neatly. (See p. 43)
IDocument Feed Guides
Adjust to fit the width of documents. (See p. 39, p. 40)
JDocument Guide Lock Levers
Locks the Document Guides. (See p. 40)
KDocument Feed Tray
Load documents to be scanned here. (See p. 37)
LDocument Feed Tray Extension / Wire
Extend as needed to fit the length of the documents. (See p. 40)
F
GH
I
J
J
K
L

32
E Function Key
Executes the assigned function. (See p. 59)
F OK Key
Selects the user mode, and accepts settings.
G Stop Key
Stops a scan in progress.
H Start Key
Starts scanning.
I Back Key
Returns to the previous display panel screen.
J Job Key
Selects jobs. (See p. 74)
Display panel examples
The information displayed on the display panel changes depending on
the status of the scanner.
The following are representative examples.
● Information displayed on the screen
ATitle area
Shows the scanner's connection mode.
When USB is connected, "(USB)" is displayed after the title. When
the scanner and computer are connected via a network, "(LAN)" is
displayed. However, neither "(USB)" nor "(LAN)" is displayed on
USB-only models.
BComments area
Displays available menu and job items, error messages, etc.
COperation buttons area
Icons that control scanning operations and indicate setting states
are displayed.
The icons displayed are as follows.
: Separation Mode setting
: New File setting
Keys
Keys
(OK) Key
(Start) Key
5HDG\86%
͍$%&'(
DEFGH
ձ
ղ
ճ մ
Specyfikacje produktu
| Marka: | Canon |
| Kategoria: | skaner |
| Model: | imageFORMULA DR-G2140 |
Potrzebujesz pomocy?
Jeśli potrzebujesz pomocy z Canon imageFORMULA DR-G2140, zadaj pytanie poniżej, a inni użytkownicy Ci odpowiedzą
Instrukcje skaner Canon

4 Października 2024
22 Września 2024
21 Września 2024
20 Września 2024
13 Września 2024
8 Września 2024
7 Września 2024
4 Września 2024
4 Września 2024
3 Września 2024
Instrukcje skaner
- skaner Braun
- skaner Voltcraft
- skaner SilverCrest
- skaner Epson
- skaner Fujitsu
- skaner Panasonic
- skaner Nedis
- skaner Medion
- skaner Lenco
- skaner HP
- skaner Brother
- skaner Honeywell
- skaner Nikon
- skaner Kodak
- skaner Xerox
- skaner Zebra
- skaner Cobra
- skaner Trust
- skaner AgfaPhoto
- skaner Eurolite
- skaner Ricoh
- skaner Renkforce
- skaner Rollei
- skaner Uniden
- skaner Dymo
- skaner Panduit
- skaner Visioneer
- skaner ION
- skaner Maginon
- skaner Antec
- skaner Konica Minolta
- skaner Jay-Tech
- skaner Creality
- skaner Albrecht
- skaner AVerMedia
- skaner Genius
- skaner Technaxx
- skaner Martin
- skaner Blackmagic Design
- skaner Newland
- skaner Elmo
- skaner Avision
- skaner Lexmark
- skaner Agfa
- skaner Reflecta
- skaner Tevion
- skaner Targus
- skaner Sagem
- skaner Easypix
- skaner Kensington
- skaner GlobalTronics
- skaner Steren
- skaner Konig
- skaner Minolta
- skaner Veho
- skaner Dnt
- skaner Hella
- skaner Ipevo
- skaner Rittz
- skaner Jobo
- skaner Plustek
- skaner Zolid
- skaner Traveler
- skaner Mustek
- skaner Neat
- skaner RadioShack
- skaner ICarsoft
- skaner Kenko
- skaner Kogan
- skaner Yupiteru
- skaner Vupoint Solutions
- skaner DTRONIC
- skaner Ross-Tech
- skaner DENSO
- skaner Perfect Choice
- skaner IRIS
- skaner Soundsation
- skaner CDVI
- skaner Scan Dimension
- skaner Dyka
- skaner Matter And Form
- skaner Pacific Image
- skaner Doxie
- skaner CZUR
- skaner Cartrend
- skaner 3DMAKERPRO
- skaner Ambir
- skaner Microtek
Najnowsze instrukcje dla skaner

29 Marca 2025

22 Lutego 2025

19 Lutego 2025
28 Stycznia 2025
16 Stycznia 2025
12 Stycznia 2025
11 Stycznia 2025
11 Stycznia 2025
29 Grudnia 2024
22 Grudnia 2024