Instrukcja obsługi Cactus RF60x
Przeczytaj poniżej 📖 instrukcję obsługi w języku polskim dla Cactus RF60x (63 stron) w kategorii Błysk. Ta instrukcja była pomocna dla 17 osób i została oceniona przez 2 użytkowników na średnio 4.5 gwiazdek
Strona 1/63

User Manual
Wireless
Flash
RF60X

2
Table of Contents
1. Getting to Know your RF60X 03
2. Caution and Warnings 04
3. Major Specif ications 05
4. Package Contents 06
5. Nomenclature 07
6. LCD Panel 08
7. Getting Started 08
8. On-camera Operation: 19
Local Mode
9. Wireless Flash: 21
Master and Slave Modes
10. Group Aliases 26
11. Advanced Operation 28
12. Personalizing the RF60X 44
13. Working with Cactus 50
Triggers
14. External Power 53
15. Forming the Capacitor 54
16. USB Connection 54
17. Optional Accessories 55
18. Troubleshooting 55
19. Notices 59
20. Warranty 62

3
1. Getting to Know your
RF60X
Thank you for purchasing the Cactus
Wireless Flash RF60X. The RF60X is
unique among other ashes
available in the market. With a built-
in transmitter and receiver, it not
only receives wireless signals, but
also functions as a commander to
control other RF60X or RF60. The
possibilities are endless!
This new RF60X features outstanding
improvement from its predecessor:
–Exclusive! Cooling mode to prevent
RF60X from overheat cut-off;
–Quick full-power recharge time at
1.9s;
–Auto-focus assist light in sync
with other Cactus devices;
–Automatic wireless HSS support in
Slave mode for Canon, Fujif ilm,
Nikon, Olympus, Panasonic, Pentax
when working with V6 II; and Sony
with V6 IIs transceiver.
Other features include:
–Built-in wireless commander and
receiver
–Remote control of power and zoom
levels
–Group control of up to four groups
wi th conf igurabl e Group Alias
–Optical slave with delay feature
–High power up to Guide Number of
56 meters

4
–Compatible with Cactus V6 IIs,
V6 II and V6 Wireless Flash
Transceivers
–Multi-ash feature
2. Caution and Warnings
Before using the product, read the
following instructions to ensure
correct and safe use and to help
prevent damage of the Cactus RF60X.
1. Turn OFF all your equipment
(Cactus units, cameras, etc.)
before changing batteries or
making a connection.
2. Remove batteries and switch off
the ash when it is not in use.
3. Use only the batteries specif ied
in this instruction manual.
4. Do not permanently store the
product in a high temperature
environment (i.e., under strong
direct sunlight, near cooking
stoves or oven).
5. The ash should not be submerged
in liquid or exposed to heavy
rain unless it is properly
protected.
6. Do not operate the device in the
presence of ammable gases or
fumes.
7. Do not f ire the ash directly
into the eyes of someone at close
range.
8. Do not f ire the ash directly at
the driver of a moving car.

5
3. Major Specifications
–Guide Number (ISO 100):
Zoom (mm) 24 28 10535 50 70 80
GN (meter) 33 34 38 45 51 54 56
GN (feet) 108 112 124 147 168 183177
–Motor zooms: 24 mm – 28 mm – 35 mm
– 50 mm – 70 mm – 80 mm – 105 mm
–Power levels (22 in total):
1/1 1/2 1/8 1/16 1/32 1/1281/4 1/64
1/2+0.3 1/4 +0.3 1/8 +0.3 1/16 +0.3 1/32 +0.3 1/64 +0.3 1/128 +0.3
1/2 +0.7 1/4 +0.7 1/8 +0.7 1/16 +0.7 1/32 +0.7 1/64 +0.7 1/128 +0.7
–Flash durations (t.5):
1/1,000 – 1/45,000 sec
–Modes: Local (L), Master (M), and
Slave (S)
–Working radio frequency: 2.4 GHz
–Number of channels: 16
–Number of groups: 4
–Maximum wireless effective
distance: 100 meters (328 feet)
–Built-in optical slave
–AF-assist light: 1W LED
–Power input: 4 AA-sized batteries
Battery Type Primary LR6
Alkaline 1.5V
Rechargeable
HR6 Ni-MH 1.2V
Flash Count
at Full Power 110 170
Recycle Time
at Full Power 2.5 sec 1.9 sec
–Color temperature at full power:
5600k +/- 200k
–Operating temperature:
-20°C to +50°C
–Dimensions: 205 x 83 x 61 mm
–Net weight: 395 g

6
4. Package Contents
X
Flash RF60X Carrying Case FC-3
User ManualFlash Stand FS-2

7
5. Nomenclature
x
WIDE ANGLE DIFFUSER
AND BOUNCE CARD FRESNEL LENS
OPTICAL SENSOR
TRIPOD MOUNT
EXTERNAL POWER
CONNECTOR
CONNECTOR COVER
MOUNTING FOOT
CONNECTOR COVER
3.5 mm CONNECTOR
HOT SHOE CONTACT
BOUNCE ANGLE
INDICATOR
LCD PANEL
MODE BUTTON
MENU BUTTON
- BUTTON
NEXT BUTTON + BUTTON
ON/OFF SWITCH
TEST BUTTON/
FLASH-READy INDICATOR
BATTERy COMPARTMENT
DOOR
MULTI/HSS BUTTON
GROUP BUTTON
USB PORT
HOT SHOE
LOCKING WHEEL
AF-ASSIST
LIGHT

8
6. LCD Panel
7. Getting Started
Inserting Batteries
1. Using your thumb, press on the
battery compartment door and
slide it open in the direction
shown by the arrow.
7.1
GROUP PANEL
OPERATING
MODES CHANNEL
BEEP INDICATOR
OPTICAL SLAVE DELAY INDICATOR
BATTERY LEVEL
HIGH TEMPERATURE
WARNING
POWER LEVEL POWER LEVEL
INCREMENT
HSS SYMPATHY
MODE
TEXT AREA SELECTION
INDICATORS
ZOOM
LEVEL
STATUS
BAR

9
2. Install the batteries.
Make sure the positive (+) and
negative (-) battery contacts are
properly oriented as shown in the
compartment.
3. Slide the battery compartment
door in the direction shown by
the arrow to close it.
Caution:
1. Use a new set of AA batteries of
the same brand and type. When
replacing batteries, replace all
four at the same time.
2. AA-sized alkaline, Ni-MH, or
lithium batteries can be used.
Use only one type of batteries at
a time. Do not mix battery types.
3. If you change batteries after
f iring many ashes continuously,
be aware that the batteries may
be hot.
4. For alkaline or lithium
batteries, the battery level
indicator on the LCD will show

10
7.2
when around 50% of the battery
power has been consumed, and
the indicator will blink when
the ash does not have enough
power to f ire. Replace batteries
immediately when you see the
blinking signal. The
indicator is not applicable to
Ni-MH battery.
5. When the ash is not in use,
remove the batteries to prevent
possible damage from battery
corrosion.
Attaching the Flash to and detaching it
from the Camera
1. To attach the ash, slide the
ash’s hot shoe mounting foot
all the way into the camera’s hot
shoe.
2. To secure the ash, rotate the
locking wheel on the mounting
foot to the left until it locks.

11
7.3
3. To detach the ash, rotate the
locking wheel on the mounting
foot to the right until it is
loosened.
Turning the Flash On
1. Switch the On/Off Switch to ON.
The ash starts charging.
2. Check that the ash is ready.
- The ash-ready indicator blinks
in red, indicating that the ash
is ready for quick ash (see
Section 12.4).
- Once fully charged, the ash-
ready indicator stays red and the
ash is ready to give full power
output.

12
7.4
- Press the button to f ire a
test ash.
Caution:
1. When the ash is switched ON but
not used, after a certain period
of time, the ash’s power turns
off automatically. However, the
ash still consumes power and
batteries discharge over a long
period of time, which may damage
the battery contacts of the ash.
Therefore, shut off the ash
power if the ash is not in use.
2. The overheating protection of the
RF60X may stop the ash from
f iring after a number of full
power ashes have been f ired in
short intervals. The temperature
warning signal will appear in
the status bar of the LCD
display. If this occur, allow a
rest time of about 15 minutes
and the ash will then return to
normal.
3. To prevent the ash from over-
heating, turn on the Cooling Mode
(see Section 12.1).
Adjusting the Flash Head
By pointing the ash toward a wall or
ceiling, the ash will bounce off
the surface before illuminating the
subject. This will soften the shadows
behind the subject for a more

13
natural-looking shot. This is called
a bounce ash.
Tip: When using bounce ash, try to
avoid hitting the subject with
direct ash light. Make sure the
ash head is suff iciently angled
away from the subject.
The ash head of the RF60X can be
tilted up to a vertical angle of 90˚,
with click stops at 30˚, 60˚, 75˚, and
down at 15˚. Horizontally, it can be
rotated up to 180˚ to the right and
90˚ to the left, with click stops at
30˚, 60˚, 90˚, 120˚, 150˚ (right) and
30˚, 60˚ (left).
270˚
90˚
15˚
X

14
7.5 Bounce Card and Wide Angle Diffuser
There is a bounce card and wide angle
diffuser set built in the RF60X. The
bounce card and wide angle diffuser
can be used separately or at the same
time.
Tip: The bounce card is useful in
bounce ash applications to direct
some of the light toward the
subject in order to create catch
lights and/or soften strong shadows
from the bounced light.
Using the Bounce Card
1. Point the ash head upward by 90°.
2. Pull out the wide angle diffuser.
The bounce card will come out at
the same time.
3. Push the wide angle diffuser back
in. The bounce card will be ready
for use.

15
7.6
Using the Wide Angle Diffuser
1. Pull out the wide angle diffuser
and place it over the ash head as
shown. The bounce card will come
out at the same time.
2. Push the bounce card back in.
The ash will illuminate at 18 mm
coverage.
Choosing the Operating Mode
There are three operating modes in
the RF60X, namely Local, Master, and
Slave. Upon switching on the RF60X,
press the button to choose the
appropriate mode. The mode indicator
turns in the following sequence:
Local Master Slave
Modes Where to place
the RF60X?
With wireless
control?
on camera X
on camera √
off camera √
16
7.7
7.8
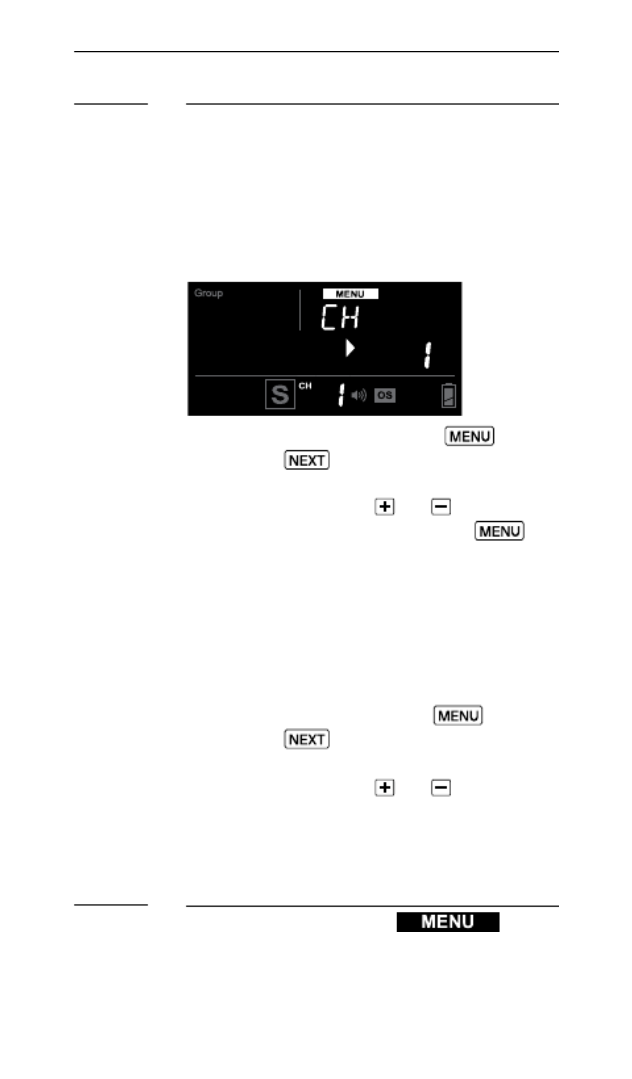
Setting the Channel and the Radio ID
When the RF60X units are in the
Master or Slave mode, they need to
communicate in the same RF wireless
channel with each other.
To set the channel, press . Then
press the button until <CH>
(short form for channel) is
displayed. Use the or button to
select the RF channel. Press
to go back to the main screen. The
selected channel will be shown on the
LCD panel.
To protect your setup from
interferences by other Cactus
devices, assign all your RF60X to a
specif ic radio ID. Press , then
press the button until <RAD ID>
(short form for radio ID) is
displayed. Use the or button to
set the radio ID from 1 to 999. Set
the same radio ID in all Cactus
devices in your setup.
Navigating the Menu
There are a number of conf igurable
menu options on the RF60X.

17
To change a menu option:
1. Press the button to access
the f irst menu item.
2. Press the button to change
the menu subject in the sequence.
3. Press the button to see or
each option of a menu item. The
conf iguration of the menu item
will change immediately.
4. Press the button to leave
and go back to the main screen, or
press the button to change
the menu to the next item in the
sequence.
Menu item and
corresponding options
Text shown
on LCD
Applicable
modes
L M S
AF-assist Continuous
Mode
- Off
- On
AF CON
- OFF
- ON
√√√
AF-assist Power
- 0-9
AF PWR
- 0-9
√√√
Optical Slave
- Off
- S1: Straight
Triggering
- S2: Pre-ash Ignored
OPT SL
- OFF
- S1 (FIRST)
- S2 (MAIN)
√√√
Delay Timer
- 0-999 ms
- 1-99 sec
DELAY
- 0-999 ms
- 1-99 sec
√√√
Auto HSS
- Off
- On
AU HSS
- OFF
- ON
√
Cooling Mode
- Off
- On
COOL
- OFF
- ON
√√√
Quick Flash
- Off
- On
QCK FL
- OFF
- ON
√√√

18
Menu item and
corresponding options
Text shown
on LCD
Applicable
modes
L M S
Beep Feedback
- Off
- Fn1: Quick Flash
- Fn2: Full Charge
- Fn3: Insuff icient
Power Warning
BEEP
- OFF
- Fn1 (QCK FL)
- Fn2 (READy)
- Fn3 (WARN)
√√√
LCD Backlight
- 15 sec
- 1 min
- 5 min
- Continuous
BK LGT
- 15 sec
- 1 min
- 5 min
- ON
√√√
Sleep Timer
- Off
- 3 min
- 5 min
- 15 min
- 30 min
- 60 min
SLEEP
- OFF
- 3 min
- 5 min
- 15 min
- 30 min
- 60 min
√√√
RF Channel
- 1-16
CH
- 1-16
√ √
Radio ID
- 0-999
RAD ID
- 0-999
√ √

19
8.1
8. On-camera Operation:
Local Mode
Set up the RF60X in Local mode
when you work with one ash on the
camera’s hot shoe.
In the main screen, the power level
is shown on the left while the zoom
level is shown on the right. The
selection indicator ► will be shown
at either the power level or zoom
level. Press the button to
switch the selection indicator in
order to adjust a setting of an item.
Adjusting the Power Level
To adjust the power level, press
until the selection indicator ► is
pointing to the power ratio value
(i.e., the left f igure in the center
row). Press to increase or to
decrease the power level.

21
9.1
9. Wireless Flash: Master
and Slave Modes
With a built-in Radio Frequency (RF)
module, the RF60X has the ability to
communicate with other RF60/RF60X
units wirelessly. To control and f ire
the RF60/RF60X wirelessly, set up one
RF60X in Master mode and the other
RF60/RF60X units in Slave mode.
Setting up the RF60X Slave
1. Make sure that the RF60X units
that you want to control through
the Master ash are set to mode
(see Section 7.6).
2. Set the units to the same RF
channel (see Section 7.7).
3. Assign RF60X Slave units to either
group A, B, C, or D. Press
to select the group for each
RF60X. Each press of the Group
button in Slave mode will change
the group in the sequence of
A-B-C-D. The selected group will
be shown on the group panel.

22
9.2 Commanding with the RF60X Master
1. Set the on-camera RF60X to
mode by pressing (see
Section 7.6).
2. Set the RF60X Master to the same
channel as the RF60X Slave units
(see Section 7.7).
3. Check the group statuses on
the group panel. Only activated
group(s) will be shown as A, B, C,
or D boxes.
Changing Parameters of the Master
Flash
4. On the RF60X Master, you can
change the power level and zoom
level of the Master ash itself,
and the RF60X Slave ashes in
groups A, B, C, and D.
5. The default group is the Master
RF60X. In the display, the text
area will show <MASTER>. No group
is selected in the group panel,
though it still shows the group
activation status.
23
Changing Parameters of a particular
Slave Group
6. To select a particular group for
remote control, press and
the group selection indicator
will go to group A.
7. Press again to select the
next group, i.e., group B. Each
press of the Group button will
select the next group in the
following sequence:
Master A B C D
8. Adjust the power level of the
Master ash or of a particular
group using the or button.
Press to adjust the zoom
level. You can also adjust the
zoom level with the or
button.
Note: The power and zoom level will
only apply to the group being
selected.

25
Turning on and off a Slave Group
13. If you wish to stop f iring a
particular group, turn the group
off by selecting the group (see
steps 6 and 7) and press and hold
the button. The screen will
show <OFF> in the center row.
Note: The RF60X Master can also be
turned off by pressing and holding
the button in the Master group.
Once turned off, the RF60X Master
will not f ire, but it will still
command the RF60X Slaves, changing
their settings and f iring them
accordingly.
14. To turn on a group again, select
the group (see steps 6 and 7) and
press and hold the button.
The power level and zoom level
last used for the group will be
shown in the center row again.
15. Press the shutter release button
on the camera and the RF60X
Master and Slave units in groups
A, B, C, or D will f ire at the
power level and zoom level you
have set in the RF60X Master.
26
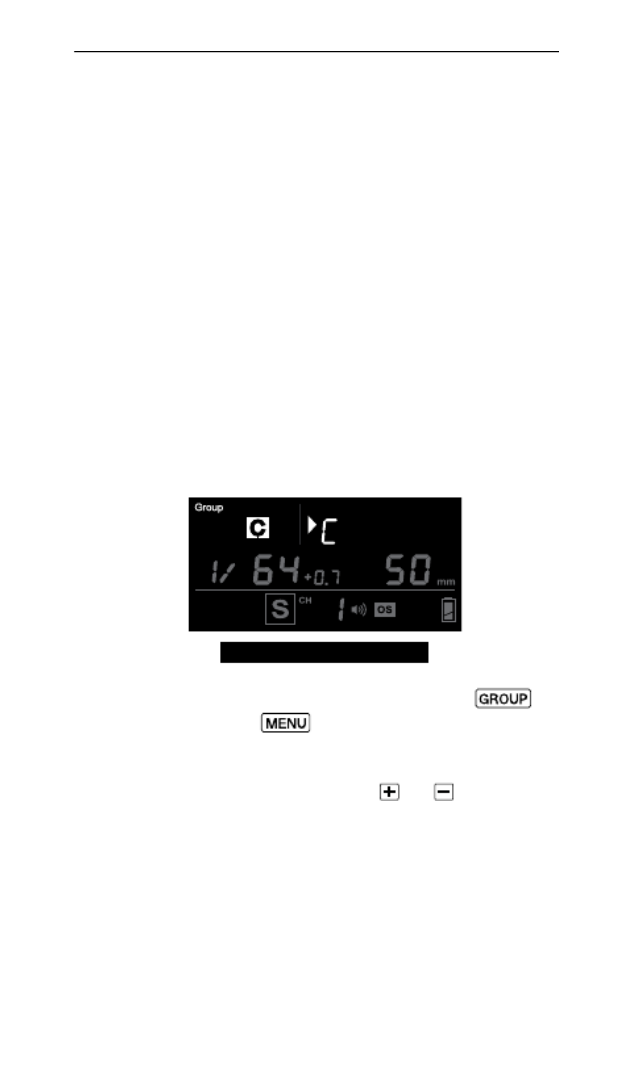
10. Group Aliases
The RF60X comes with a list of
pre-set group aliases to choose from
for the particular slave groups
according to the purpose of each.
The chosen group alias will be shown
in the text area next to the group
panel. The group alias will display
whenever the group is selected.
The group aliases available for
selection are:
KEY – FILL – SPOT – RIM – HAIR – LEFT
– RIGHT – BACK – FRONT
1. To set a group alias, select the
group you would like to set an
alias for, then press the
and buttons simultaneously.
2. The selection indicator and group
letter will be shown in the text
area. Press the or button
to scroll through the available
group aliases.

27
3. Press or to conf irm
the alias and exit.
4. Repeat steps 1-3 to set aliases
in all the Cactus RF60X units.
To prevent confusion, make sure
that you have set the same alias
for the same group in all RF60X
units.
5. The alias of each group will
appear in Slave mode or Master
mode whenever the group is
selected.
Specyfikacje produktu
| Marka: | Cactus |
| Kategoria: | Błysk |
| Model: | RF60x |
Potrzebujesz pomocy?
Jeśli potrzebujesz pomocy z Cactus RF60x, zadaj pytanie poniżej, a inni użytkownicy Ci odpowiedzą
Instrukcje Błysk Cactus

27 Września 2024
Instrukcje Błysk
- Błysk Sony
- Błysk Leica
- Błysk Braun
- Błysk Panasonic
- Błysk Canon
- Błysk Asus
- Błysk Fujifilm
- Błysk Sigma
- Błysk Nikon
- Błysk Godox
- Błysk Minox
- Błysk LogiLink
- Błysk Vimar
- Błysk Ricoh
- Błysk Rollei
- Błysk Lastolite
- Błysk Olympus
- Błysk Pulsar
- Błysk Audio-Technica
- Błysk Konica Minolta
- Błysk Bresser
- Błysk COLBOR
- Błysk GVM
- Błysk Pentax
- Błysk Quantum
- Błysk EasyMaxx
- Błysk Ikan
- Błysk Impact
- Błysk Aputure
- Błysk Dörr
- Błysk Metz
- Błysk Bolt
- Błysk Nissin
- Błysk Profoto
- Błysk SmallRig
- Błysk Hähnel
- Błysk Pelican
- Błysk Vello
- Błysk Goodram
- Błysk Yongnuo
- Błysk Konig
- Błysk Xit
- Błysk Genaray
- Błysk Sunpak
- Błysk SeaLife
- Błysk Neewer
- Błysk Xantech
- Błysk Kenko
- Błysk Elinchrom
- Błysk Dracast
- Błysk Cullmann
- Błysk Rotolight
- Błysk PolarPro
- Błysk ANDYCINE
- Błysk Westcott
- Błysk Ikelite
- Błysk Kaiser Fototechnik
- Błysk Triopo
- Błysk Smith-Victor
- Błysk Luxli
- Błysk Geekoto
Najnowsze instrukcje dla Błysk
1 Kwietnia 2025
29 Marca 2025
29 Marca 2025
27 Marca 2025
9 Marca 2025
3 Marca 2025
26 Lutego 2025
25 Lutego 2025
6 Lutego 2025
5 Lutego 2025