Instrukcja obsługi Bushnell Trophy Cam 119678
Przeczytaj poniżej 📖 instrukcję obsługi w języku polskim dla Bushnell Trophy Cam 119678 (216 stron) w kategorii kamera. Ta instrukcja była pomocna dla 4 osób i została oceniona przez 2 użytkowników na średnio 4.5 gwiazdek
Strona 1/216

Model#s: 119676 / 119677 / 119678
I N S T R U C T I O N M A N U A L
05-14

FrançaisEspañolDeutschItaliano
Rejoignez la communauté Trophy Cam HD sur www.trophycam.fr pour :
• Trouver des informations sur l’utilisation et les capacités de votre Trophy Cam HD
• Partager vos expériences, vos conseils et astuces avec les autres utilisateurs de la
communauté mondiale Trophy Cam HD
• Découvrir des animaux du monde entier
• Accéder à un service internet gratuit pour gérer et publier les photos et vidéos prises avec
votre Trophy Cam HD (vidéos hébergées sur YouTube)
Visita la web-site de la comunidad Trophy Cam HD donde quieras y cuando quieras:
• Más información sobre las capacidades y aplicaciones de las Trophy Cam HD
• Comenta tus experiencias Trophy Cam HD con otros usuarios, forma parte de esta nueva
comunidad
• Descubre animales de todos los rincones del mundo
• Accede a un servicio gratuito para gestionar tus fotos y videos on-line y sube tus fotos (los
videos se suben a través de YouTube)
Visita oggi la Trophy Cam HD Community del tuo paese, e se possibile:
• Cerca ulteriori informazioni sulle funzionalità e sulle applicazioni delle Bushnell Trophy Cam
HD
• Discuti le tue esperienze con le Trophy Cam HD con altri utenti, condividi suggerimenti, entra
in questa nuova comunità mondiale
• Scopri gli animali di tutto il mondo
• Accedi al un servizio gratuito per gestire online le foto/ video ottenute con le Trophy Cam HD
e carica le vostre foto (i video sono caricati su YouTube)
www.trophycam.fr
www.trophycam.es
www.trophycam.de
www.trophycam.it
Besuchen Sie noch heute die deutsche Trophy Cam HD Community Internetseite, dort:
• Finden Sie weitere Informationen zu den Funktionen und Anwendungen der Bushnell Trophy
Cam HDs
• Können Sie mit anderen Nutzern der TrophyCam Ihre Erfahrungen austauschen und Tipps
von Anwendern aus der ganzen Welt erhalten
• Entdecken Sie Tiere aus der ganzen Welt
• Haben Sie Zugri auf einen freien Service, um Ihre Trophy Cam HD Bilder/Videos online zu
verwalten und Ihre Bilder zu speichern (Videos werden bei YouTube gespeichert)

3
TABLE OF CONTENTS PAGE
ENGLISH
FrANçAIS
ESPAñOL
DEuTSCH
ITALIANO
4-39
40-81
82-125
126-169
170-214
Visit the Trophy Cam HD community website for your country today, where you can:
• See more information about the capabilities and applications of the Bushnell Trophy Cam
HDs
• Discuss your Trophy Cam HD experiences with other users, share tips, belong to this new
worldwide community
• Discover animals from all over the world
• Access a free service to manage your Trophy Cam HD photos/videos online and host your
photos (videos are hosted on YouTube)
www.trophycam.eu
www.trophycam.co.uk

4
IMPORTANT NOTE
Congratulations on your purchase of one of the best trail cameras
on the market! Bushnell is very proud of this little unit and we
are sure you will be pleased with it as well. We appreciate your
business and want to earn your trust. Please refer to the notes
below and the instructions in this manual to ensure that you are
completely satisfied with this product.
If your Bushnell Trophy Cam HD does not seem to be
functioning properly or if you are having photo/video quality
issues, please check the Troubleshooting/FAQ section
on pages 32-36 .
Problems are often due to something simple that was
overlooked, or require only changing one setting to solve.
If your problem continues after trying the solutions in
the Troubleshooting/FAQ section, please call Bushnell
Customer Service at (800) 423-3537. In Canada, call (800)
361-5702.
Bushnell recommends using a full set of Energizer
® Lithium AA
batteries (8 or 12, depending on the model) in these Trophy Cam
HD models to obtain maximum battery life
Do not mix old and new batteries
Do not mix battery types-use ALL lithium or ALL alkaline
Bushnell recommends using SanDisk
® SD and SDHC Cards
(up to 32GB capacity, Ultra
® or Extreme® series for HD video)
in these Trophy Cam HD models

5
INTRODUCTION
About the Trophy Cam HD
The Bushnell Trophy Cam HD is a digital scouting camera. It can be
triggered by any movement of game in a location, detected by a highly
sensitive Passive Infra-Red (PIR) motion sensor, and then take high quality
pictures (up to 8MP still photos), or video clips.
The Trophy Cam HD consumes very little power (less than 0.25 mA) in
a stand-by (surveillance) state. This means it can deliver up to six months
stand-by operation time when the device is powered by the full capacity of
AA alkaline batteries, and up to twelve months utilizing lithium AA batteries.
Once motion in the monitored area is detected, the digital camera unit will be
triggered at once (typically within one second) and then automatically take
photos or videos according to previously programmed settings. The Trophy
Cam HD is equipped with built-in infrared LEDs that function as a flash, so
that it delivers clear photos or videos (in black & white) even in the dark, and
it can take color photos or videos under sufficient daylight. The Trophy Cam
HD HD is designed for outdoor use and is resistant against water and snow.
Your trail camera is one of the latest generation of Bushnell Trophy Cam HD
HDs, and includes many new or improved features, including:
• Auto PIR Sensitivity-the camera monitors ambient temperature
conditions and automatically adjusts the sensor/trigger signal to be
more sensitive to slight variations in temperature on hot days, less
sensitive on cold days.
• Hyper NightVision-The IR LED Flash array now has increased range,
brighter output and better coverage for improved nighttime images.
• Field Scan 2x with Live Trigger-This “time lapse” feature includes the
option for a second block of recording with its own start/stop times.
Trigger signals generated by nearby wildlife activity will still generate
additional photos/videos as they normally would, independently of the
Field Scan operation.
• GPS Geotag Capability-allows the user to input the longitude and
latitude of the camera’s position, which will be embedded in each
photo file. This enables Google Earth, Picassa and other geotag
enabled software to automatically show a map pinpointing each
camera’s location when a group of photos are reviewed on a computer.

6
Especially useful for those who setup multiple Trophy Cam HDs to
monitor large or widely separated areas.
• Multi Flash Mode (LED Control)- prevents overexposed flash photos in
close range applications
• Hybrid Capture Mode-allows both still photos and videos to be
captured at each trigger, up to highest resolution settings for each.
• NV Shutter-user can select shutter speed for images captured at night
allowing control over brightness vs. ability to stop motion
• Camera Operating Mode can be limited to Day only, Night only, or 24
HRs
And many more features such as HD Video with Audio, widescreen or
fullscreen format still photos, imprintable camera name (user set) along with
current data including temperature, moon phase and barometric pressure*
(*imprinted barometer data only available on model 119678).
Applications
The Trophy Cam HD can be used as a trail camera for hunting or scouting
game. It is also suitable for surveillance usage.
PARTS AND CONTROLS
The Trophy Cam HD provides the following connections for external
devices: USB port, SD card slot and external DC power in ( . pg 7, Fig. 1)
A 3-way power switch is used to select the main operating modes: OFF,
SETUP ON , and ( .pg 7, Fig. 2)
A control key interface with six keys is primarily used in SETUP mode to
select operational functions and parameters. As shown on the next page,
these keys are: UP, DOWN, LEFT, RIGHT OK, and MENU. Three of the keys
can also perform a second function (shortcut operations in mode) in SETUP
addition to their main function: The DOWN key can be used to set the camera
to Photo mode (still camera icon), and the UP key can set the camera to
Video mode (movie camera icon). The key also serves as the manual RIGHT
shutter (“SHOT”) button of the camera. These secondary functions are
indicated by icons or text above the key as shown below.

7
Fig. 2: Button and
Switch Guide
ON
SETUP
OFF
INSIDE VIEW
LCD Screen
Power/Mode
Switch
UP/Video
DOWN/Photo
LEFT
MENU
OK
RIGHT/Shot
Cable to Battery
Compartment
Tripod Socket
DC in
Cover Plug
Video Mic
Fig. 1: Connections
USB Port
SD Card Slot
DC In
Video Mic
LED IR
Flash Motion/ Low
Battery Indicator
Lens
Lock
Hole
PIR
Sensor
FRONT VIEW
Latch
Light
Sensor
ARD
8
INSTALLING THE BATTERIES AND SD CARD
Before you begin learning how to use your Trophy Cam HD, you will first
need to install a set of batteries and insert an SD card. Although that may
only take you a minute, there are some important notes about both batteries
and SD cards you should be aware of, so please take the time to read the
following directions and cautions:
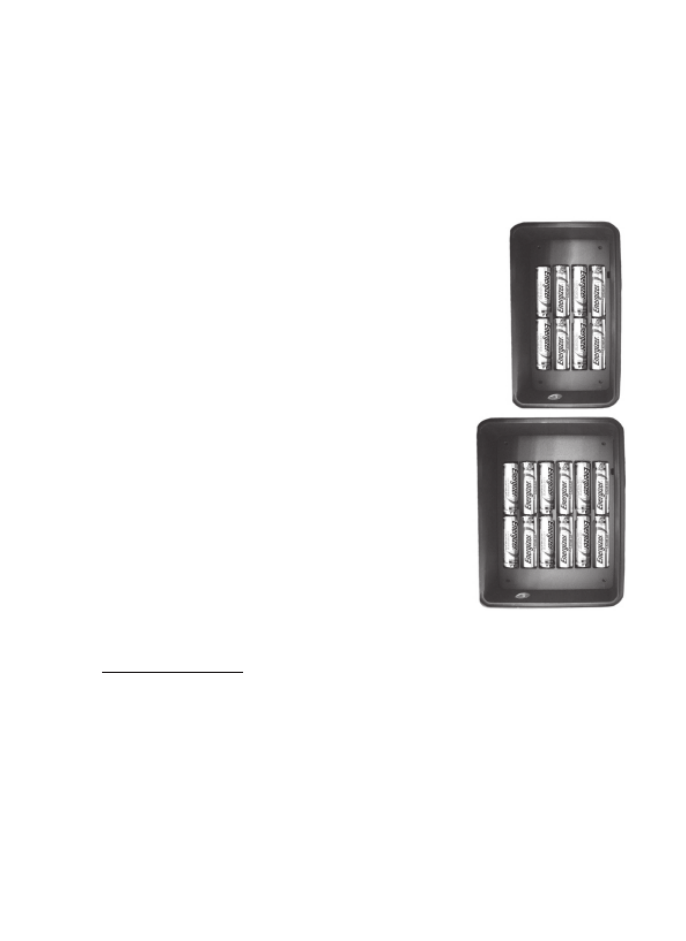
Loading Batteries
After opening the two latches on the right side of the
Trophy Cam HD, you will see that the Trophy Cam
HD has eight or twelve battery slots, depending on
your model. For maximum battery life, you should install
a full set of batteries. The Trophy Cam HD may also
be operated by just four batteries installed in the first
slots only (starting on the top or left-see photos).
Battery life will be shorter with 4 batteries, but the
camera will operate normally. Whether you use 4 or
a full set, be sure to insert each battery with correct
polarity (negative or “flat” end against the long spring
of each battery slot).
Bushnell recommends using a full set of new lithium
AA (Energizer® brand) or alkaline AA batteries. NiMh
Rechargeable batteries are not recommended, as the
lower voltage they produce can cause operational
issues.
Optionally, you can connect the #119656C Accessory Solar Panel (please
visit www.bushnell.com for more information) to the “DC In” jack at the
bottom of the Trophy Cam HD (other external power supplies should not
be used, as the camera and/or display may not function correctly). If the
solar panel is connected and AA batteries are installed, the Trophy Cam HD
will be powered by the solar panel's rechargeable lith-ion battery, as long as
it provides adequate voltage (if not, the camera will switch to battery power).
The solar panel's battery will power the camera at night.
When the batteries become weak (or a device with insufficient power is
connected to DC In), the low-battery indicator LED will glow blue, indicating
the batteries should be changed (pg 7, Front View).

9
Inserting the SD Card
The Trophy Cam HD has 32MB of internal memory, which can hold only
about 20 photos (@ 5MP resolution). This is handy for testing and getting
familiar with the camera, but you will no doubt want to leave the camera
unattended for longer than a day, so using an SD card is recommended for
all models. Insert the SD card (with the camera’s power switch in the OFF
position) before beginning to operate the camera. Don’t insert or remove the
SD card when the power switch is in the position. ON
The Trophy Cam HD uses a standard SD (Secure Digital) memory card to
save photos (in .jpg format) and/or videos (in .avi format). SD and SDHC
(High Capacity) cards up to a maximum 32GB capacity are supported.
Using high speed SD cards (SanDisk® Ultra® or Extreme® series or similar)
is recommended if you will use the 1280x720 or 1920x1080 video settings.
Before inserting the SD card into the card slot after opening the camera’s
front cover, please make sure that the write-protect switch on the side of the
card is “off” (NOT in the “Lock” position). The following describes how to
insert and remove the SD card:
• Insert the SD card into the card slot with its label side upwards (see
below). A “click” sound indicates that the card is installed successfully.
If the wrong side of the card is facing up, you will not be able to insert
it without force-there is only one correct way to insert cards. If the SD
card is not installed correctly, the device will not display an SD card icon
on the LCD in SETUP mode (the SD card icon displayed after switching
to SETUP mode will have a “lock” symbol inside it in it if the card is locked).
Formatting the SD card by using the Trophy Cam HD’s “Format”
parameter before using it for the first time is recommended, especially
when a card has been used in other devices (see pg. 23, “Format” for
details).
• To take out the SD card, just gently push in the card (do not try to pull it
out without pushing in first). The card is released from the slot and ready
to be removed when you hear the click. WARNING: Be sure the camera’s power is switched
OFF before inserting or removing SD cards or batteries.

11
when it is triggered by the PIR sensor’s detection of activity in the area it
covers.
You can either move the power switch directly from OFF to ON mode, or
stop at the SETUP position first to change one or more settings, then move
the switch to ON after you have finished doing so.
SETUP MODE
In the mode you can check and change the settings of the SETUP Trophy
Cam HD with the help of its built-in LCD. These settings, found in the SETUP
Menu, let you change the photo or video resolution, interval between photos,
switch the time imprint on, etc. Moving the power switch to the SETUP
position will turn on the LCD display, and you will see an information screen
that shows how many images have been taken, the battery level, camera or
video mode, etc ( ).Fig. 3, next page
NOTE: Always move the power switch from to mode. It OFF SETUP
is possible that the camera could lockup if it is switched from to ON
SETUP OFF mode. If this occurs, simply move the switch to and then
push it up to again.SETUP
SETUP Mode Shortcut Keys/Functions
As mentioned earlier in “Parts & Controls”, four of the keys below the LCD
have secondary, “shortcut” functions when the camera is switched to
SETUP mode (but the MENU key has not been pressed):
• Press the UP key to quickly set the camera to shoot video clips.
• Press the key to quickly set the camera to take still photos.DOWN
• Press the RIGHT key to manually trigger the shutter. This is useful
for testing the camera-make sure you are in mode, press the SETUP
RIGHT key, and a few seconds later a photo or video (depending on
how the camera was set) will be saved to the SD card (or internal
memory if no card is inserted). The “number of images taken” counter
on the bottom left of the LCD will increase by one. If the display
indicates “SD PROTECTED” when you press the SHOT key, switch
the camera OFF, remove the SD card and slide its protect switch off.
12
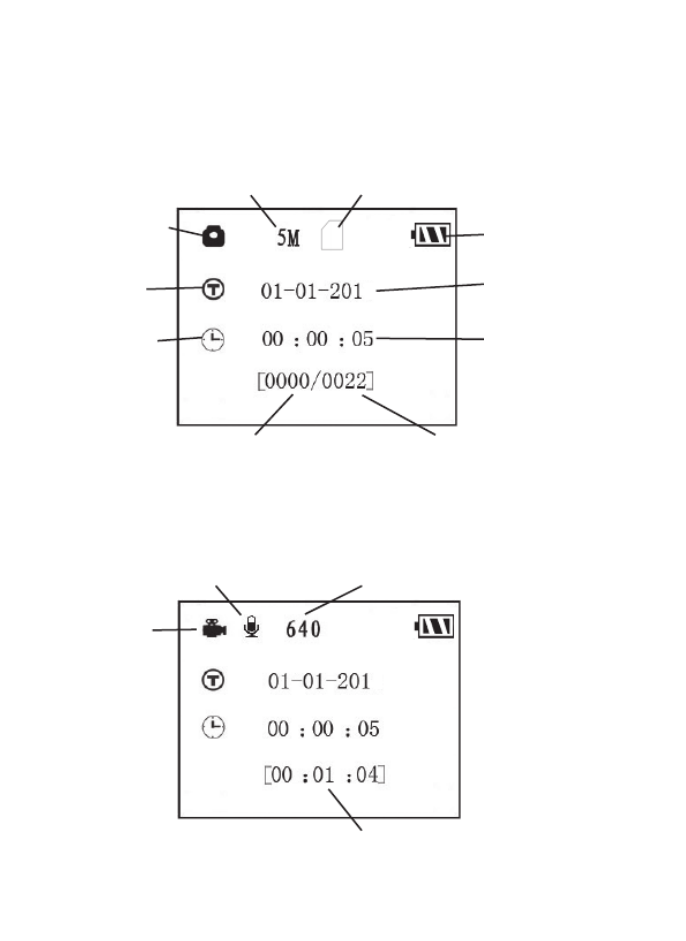
Fig. 3: SETUP Information Screen
4
4
Still Photo Mode
Time Stamp
Field Scan On
# of Photos Taken Remaining Photo Capacity
Date:Month-Day-Year
Battery Level
Image Size (Resolution) SD Card Status
Time
Hour:Minute:Second
Camera (Still Photo) Mode
Video Mode
Video Sound On Video Resolution
Available Video Recording Time
Video Mode

13
USING THE SETUP MENU TO CHANGE SETTINGS
The main purpose of the mode is to allow you to change the settings SETUP
of the camera’s parameters (19 different ones are available!) so your Trophy
Cam HD operates exactly the way you want it to. You will do this by entering
the SETUP Menu and pressing the keys below the LCD display, which will
show you each parameter and its setting.
Changing Parameter Settings in SETUP Mode
A wide range of options or “parameters” are provided to allow you to set the
Trophy Cam HD to your operational preferences. To change the setting of
any parameter you must rst switch to the mode. Once in SETUP SETUP
mode, pressing the MENU button will allow you to select any parameter and
change its setting. The name of the parameter and its current setting will be
shown on the LCD. Pressing the RIGHT or key scrolls to the next or LEFT
previous parameter (RIGHT key to move on to the next parameter and LEFT
key to go back to the previous parameter), and pressing the UP or DOWN
key lets you select a different setting for the currently displayed parameter.
Once you have selected your preferred new setting for a parameter, press
the OK button to save the new setting (actually change it). When you are
nished changing the settings of one or more parameters, press MENU
again to exit the menu. can also be pressed anytime you SETUP MENU
want to cancel changing a parameter’s setting after a new setting has been
selected (but has not been pressed yet). After setting the parameters OK
to your preferences, be sure to move the switch to to begin actually ON
taking photos or videos. No images will be captured if the switch is left in the
SETUP position (unless you press the RIGHT/Shot key after exiting the menu)-
in fact, the camera will power off automatically after a few minutes with no
key pressed.
Parameter Settings Display
The settings for each parameter are shown on the display screen of your
Trophy Cam HD. Only setting is displayed at a time, starting with the one
current setting for the parameter when it is rst selected (pg. 14, ). Fig. 4a
To change the setting, use the UP/DOWN keys to display the new setting
you want ( ), then press to “Execute” (make the actual change to Fig. 4b OK
this setting). If you want to conrm this setting is now the current one, just
press the RIGHT key to scroll to the next parameter, then press to go LEFT
back again to the previous one. You should see the parameter setting you
just made.

16
Field Scan 2x with Live Trigger Feature
Field Scan is a revolutionary new feature for the Bushnell Trophy Cam HD,
which allows you to monitor your food plots or eld edges with time lapse
images or video. When set to “On”, the Trophy Cam HD will take a photo
(or record a video clip) automatically at your choice of intervals (for example,
once every ve minutes) during one or two blocks of time you set up for each
day, without requiring a trigger from an active animal. This has the
advantage of giving you the ability to monitor the edge of a eld that might
be 50 or 150 yards away from the camera out of the PIR sensor’s range. The
result is an effective range much greater than it would normally be, with the
camera dependant on triggers generated by nearby animals. This is a great
tool for hunters to scout an entire eld with only one camera.
If an animal does enter the area covered by the PIR sensor and generate a
trigger event during a time in between the Field Scan intervals you set, the
camera will capture an image or video just as it normally would, based on
your other menu settings. Here’s how to setup and use Field Scan (be sure
you’ve set the current time in “Set Clock” rst, so your Field Scan recording
will stop and start at the correct times of day):
1. Move the main switch to , then press . SETUP MENU
2. Keep pressing the key, stepping through the Setup Menu until RIGHT
you reach Field Scan.
3. Press the UP key to select On, and press . You will OK (Step 1, pg.18)
see "A", representing the rst block of time you can dene (a second
block of time later in the day, "B" can also be setup if you wish). Press
OK (Step 2). This takes you to the screen to set Start and Stop times,
which determines the clock times when the rst block of Field Scan
recording will begin and end for each day. You can set these times to
the exact hour and minute you want, for a recording “window” that
lasts anywhere from just a minute to a full 24 hours.
4. Set the [Start] and [Stop] times, beginning with the Start hour, using
the UP/DOWN keys to change the setting . The hour setting (Step 3)
is based on a 24-hour clock, with “00” hours = midnight, “12” hours
= noon, “23” hrs = 11PM, etc. To move to the next setting, press the
RIGHT key, change the minute for the Start time with UP/DOWN,
then on to the hour and minute settings for the Stop time.

17
5. After you nish setting the Stop minutes, press to conrm your OK
settings for the rst block of Field Scan recording. If desired, you can
create a second block of time by pressing the key to select "B" DOWN
(Step 4), then press and follow the same process to set Start and OK
Stop times for Field Scan block "B" . As an example of how you (Step 5)
might use these two available time blocks, you could setup Field Scan
time block "A" for the dawn hours from 6 AM to 8 AM, and block "B"
to capture images between 5:30 and 7 PM. No Field Scan recording
would occur from 8AM to 5:30PM, or from 7PM to 6AM.
6. After setting Start/Stop times to dene Field Scan block "A" and/or
"B", press , then press the OK UP or key to select "Interval" DOWN
and press . The Field Scan "Interval" setting lets you OK (Step 6)
control how often a photo or video clip is recorded during the block(s)
of time you dened with the Start and Stop settings. Your options are
60 minutes, 30 minutes, 15 minutes, 5 minutes (this is the default), or
1 minute (still photo mode only). Use the keys to select UP/DOWN
your preference, then press OK to save it Note that for videos, (Step 7).
"Interval" is independent of the Length of each video recording-it’s
how often videos are recorded, not how long each one lasts.
7. Here’s an example of how the camera would operate, based on the
following Field Scan settings:
Field Scan: On
Field Scan A:
[Start]: 6:00
[Stop]: 8:00
Field Scan B:
[Start]: 17:30
[Stop]: 19:00
Interval: 15M
These settings would cause the camera to capture a photo (or video,
if the camera is set to that mode) once every 15 minutes, beginning at
6 AM, until the Field Scan "A" recording block stops at 8:00 AM. Later
that day, the camera would again take a photo or video every 15 minutes
between 5:30 PM and 7:00 PM (during Field Scan time block "B").
The next day, the camera would again record an image or video once
every 15 minutes between 6:00 and 8:00 AM, and between 5:30 and
Note: avoid any "overlap" of Field Scan A
recording blocks when setting their start an
times, to assure correct operation. Also-if the
Mode" menu parameter is set to "Day" or "N
operation only, that will take priority over y
Scan settings. Set the Camera Model to "24
you are setting both day and night start and/
times in Field Scan.

18
7:00 PM. No Field Scan recording would occur from 8AM to 5:30PM,
or from 7PM to 6AM. Remember, Field Scan recording is independent
of normal triggers due to animal activity–even if no animals enter the IR
sensor coverage zone, an image or video will still be captured every 15
minutes during the block(s) of time. If an animal triggers the camera “in
between” the 15 minute intervals, it will be recorded.
Note: Field Scan settings of frequent intervals and/or long periods
between start and stop time can reduce battery life.
(Step 1)-set Field
Scan Mode to “On” (Step 2)-select Field
Scan "A" (press OK) (Step 3)-set Field
Scan "A" Stop & Start
(Step 4) (opt)-select Field
Scan "B" (press OK) (Step 5) (opt)-set Field
Scan "B" Stop & Start
Steps 4 & 5 are
optional (only
required if you want
to set up a second
block of Field Scan
recording with
different stop and
start times)
(Step 6)-select Field
Scan "Interval" (Step 7)-set Field
Scan Interval
Note: the Interval
Setting sets the
timing between each
image for both Field
Scan "A" and "B"
recording blocks.

19
Parameter Settings
( =default)Bold
Description
Mode Camera, Video,
Hybrid
Selects whether still photos or video
clips are captured when the camera
is triggered. Hybrid mode combines
both Camera and Video, so a still
photo and a video clip are both
captured for each trigger.
Image Size
(only aects
still photos
in Camera or
Hybrid modes)
3M Pixel,
5M Pixel,
8M Pixel,
Selects resolution for still photos
from 3 to 8 megapixels. Higher
resolution produces better quality
photos, but creates larger les
that take up more of the SD card
capacity (lls up faster). 5M is a good
compromise between quality and
le size.
Image Format
(only aects still
photos-
format for video
is tied to Video
Size)
Full Screen,
Wide Screen
Selects 4:3 (Fullscreen, like old TV
sets) or 16:9 (Widescreen, like new
at TVs) “aspect ratio” for still photos.
If you like to view your photos on a
TV set or computer monitor, you can
set the format to match it.
Capture
Number
(only aects
still photos
in Camera or
Hybrid modes)
1 Photo,
2 Photo,
3 Photo
Selects how many photos are taken
in sequence per trigger in Camera
mode. This setting affects photos
taken in Field Scan mode as well (to
snap two photos every 10 minutes,
for example). Please also refer to the
Interval parameter.
The SETUP Menu – Parameters and Settings List
w/Descriptions

20
Parameter Settings
( =default)Bold
Description
LED Control
(Multi-Flash
feature)
Low, Medium,
High
Controls how many LED lamps re
when images are taken in low light.
“High”=all 33 LEDs re, which is
the default setting. Set to Medium or
Low if you are getting overexposed
ash photos or will place the camera
at very close range to the subject
you want to photograph. In general,
select High if most of your intended
subjects will be over 30 ft. from the
camera, Medium for the 15 to 30 ft.
range, and Low for subjects under
15 ft. away. Note: in video mode, 21
LEDs re in both High & Medium
(default) settings. Set to Low if
videos are overexposed.
Camera Name (Input)
See "Using the
Setup Menu Input
Screens"
Allows the user to set a custom
name for the camera. Useful for ID
purposes when multiple cameras are
setup, since each camera will imprint
its name on all photos (but not
videos) it captures.
Video Size
(only aects
video clips in
Video or Hybrid
modes)
(Model 119676/
119677):
1280x720,
640x360,
320x180
(Model 119678):
1920x1080,
1280x720,
640x360
Selects video resolution (in pixels
per frame). Higher resolution
produces better quality videos,
but creates larger les that take
up more of the SD card capacity
(lls up faster). 640x360 is VGA
video in "widescreen" 16:9 format.
The highest setting provides HD
video. Using high speed SD cards
(SanDisk ® Ultra® or Extreme® series
or similar) is recommended if you will
use the 1280x720 or 1920x1080
video settings.

21
Parameter Settings
( =default)Bold
Description
Video Length
(only aects
video clips in
Video or Hybrid
modes)
10S (second)
default, with 60S
to 5S possible
range
Sets length per captured video
clip. Settings begin with 10 second
default when parameter is rst
selected. After stepping down to
5S, video length settings start over
at 60S.
Interval 10S (second)
default, with a
60M (minute)
to1S (second)
range of settings
available.
(60M-1M are set
in one minute
increments,
59S-1S are set
in one second
increments)
Selects the length of time that the
camera will “wait” until it responds
to any additional triggers from the
PIR after an animal is rst detected
and remains within the sensor’s
range. During this user set “ignore
triggers” interval, the camera will not
capture photos/videos. This prevents
the card from lling up with too
many redundant images. Settings
begin with 10 second default when
parameter is rst selected. Note: after
setting down past “1S”, settings start
over at “60M”.

23
Parameter Settings
( =default)Bold
Description
Format Execute (followed
by an additional
No/Yes step)
Deletes (erases) all les stored
on a card to prepare it for reuse.
Always format a card that has been
previously used in other devices.
Caution! Make sure you have
downloaded and backed up any
les you want to preserve rst!
Press to execute, press OK MENU
( ) to exit or select then press NO OK
without formatting.
Time Stamp Off, On Select “On” if you want the date &
time (that the image was captured)
imprinted on every photo/video,
select “Off” for no imprint. Note:
the current temperature, moon
phase, and (user set) camera name
will also be imprinted on your still
photos. Model 119678 imprints the
barometric pressure as well (on still
photos only).
Set Clock (Set) Press and use the OK UP/DOWN
keys (to change the setting) and
LEFT/RIGHT keys ( to move
to the next eld) to set the hour
(24-hr format only, “00”=midnight,
“12”=noon) and minute, and then
(on the lower row), the year, month
and date.

24
Parameter Settings
( =default)Bold
Description
Field Scan Off On,
(After On is
selected): “A”
Start/Stop, “B”
Start/Stop,
Interval
Turns Field Scan (Time Lapse)
recording mode on/off. When
activated, Field Scan forces the
camera to take photos or videos
even when it is not triggered by a
nearby live animal, useful for constant
monitoring of an area that might be
far away from the camera. The user
can set the start and stop times for
up to two independent “blocks” of
Field Scan recording, as well as the
interval time between each photo/
video. To ensure correct operation,
avoid setting overlapping start/stop
times for Field Scan A and B. Please
read the “Field Scan 2x…” section of
this manual for details on using this
feature. NOTE: If the "Camera Mode"
parameter is set to "Day" or "Night"
operation only, that will take priority
over your Field Scan settings. Set
Camera Mode to "24HR" if you are
setting day and night Field Scan start
and/or stop times.
Coordinate
Input
, OnOff
See "Using the
Setup Menu
Input Screens"
Allows the user to input latitude
and longitude coordinates for the
camera’s location. This data will
be embedded in the les saved on
the camera’s SD card (if “On” is
selected). This makes it possible
to see each camera’s location as a
“pushpin” on Google Earth maps
when reviewing a folder full of pho-
tos from multiple cameras, or use
other “geotag” capable software
(Picassa, etc).

25
Parameter Settings
( =default)Bold
Description
Video Sound
(only affects
video clips in
Video or Hybrid
modes)
On, Off Select “On” to record audio along
with the video when the camera is
set to video mode (saved le sizes
will be slightly larger).
Default Set Cancel,
Execute
Select “Execute” and press OK
to restore all parameters to the
original factory default settings.
If the camera is behaving oddly
and you think you may have
changed the setting for something
accidently (but aren’t sure which
one), this will reset all parameters
to their most commonly used or
“generic” settings.

26
USING THE SETUP MENU INPUT SCREENS
Camera Name Input
After selecting the Camera Name parameter (the only setting is "Input"),
press OK. If necessary, delete the previous or default name by pressing the
RIGHT key until the backspace symbol ( ) (located between letters "A"
& "B", also between "j" & "k") is highlighted, then keep pressing . Select OK
(highlight) each alphanumeric character you want, using the LEFT/RIGHT
keys, and pressing after each one to set it. When nished naming the OK
camera, press MENU to save the name to memory.
Coordinate Input
After selecting the Coordinate Input parameter, press or UP DOWN to
select the On setting and press . The latitude and longitude for any OK
location where you plan to place the camera can be obtained at many
websites, for example: . You can enter http://itouchmap.com/latlong.html
a nearby street address, just zip code, or use the various types of maps to
locate the approximate position. The format you will need to use to enter the
coordinates in the Trophy Cam HD menu screen is shown below:
Longitude
Latitude
W=West,
E=East
N=North,
S=South Minutes Seconds
Minutes Seconds
Degrees
Latitude
(3 digits)
Degrees
Longitude
(3 digits)
(La) N000,00'00"
(Lo) W000,00'00"
Note: You may see "negative" latitude or longitude coordinates online. These
designate South latitudes and West longitudes. US/Canada locations will
have North (+) latitude coordinates and West (-) longitude coordinates.

27
Fig. 5: Attaching the Belt
MOUNTING and POSITIONING the TROPHY
CAM HD
Mounting
After you’ve set up the camera’s parameters to your personal preferences
at home or in your truck, you’re ready to take it outside and slide the power
switch to “ ”. When setting up the ON Trophy Cam HD for scouting game or
other outdoor applications, you must be sure to mount it in place correctly
and securely. We recommend mounting the Trophy Cam HD on a sturdy
tree with a diameter of about 6 in. (15cm). To get the optimal picture quality,
the tree should be about 16-17 ft. (5 meters) away from the place to be
monitored, with the camera placed at a height of 5-6.5 ft. (1.5~2 m). Also,
keep in mind that you will get the best results at night when the subject is
within the ideal ash range, no farther than 60’ (19m) and no closer than 10’
(3m) from the camera.
There are two ways to mount the Trophy Cam HD: using the provided
adjustable web belt, or the tripod socket.
Using the adjustable web belt: Fig. 5 illustrates using the web belt on
the Trophy Cam HD. Push one end of the belt through the two brackets
on the back of the Trophy Cam HD. Thread one plastic buckle part onto
each end of the belt. Fasten the belt securely around the tree trunk by
clicking the buckle ends together after tightening the belt so there is no
slack left.
Using the tripod socket: The camera is equipped with a socket at the
bottom end to enable mounting on a tripod or other mounting accessories
with a standard1/4-20 thread.
Belt
Channel
Strap Buckle

28
Another socket, on the back of the camera, is also provided for accessory
mounting devices. Two optional mounting accessories, a “Bear Safe” metal
camera box (#119657C for 119676/119677, #119658C for 119678)
and Deluxe Tree Bracket are also (# 119652C ts all 3 camera models)
available-please see your Bushnell dealer or website for more details.
Note: an accessory solar panel (#119656C) supplemental power source is
also available - please visit www.bushnell.com for more information.
Sensing Angle and Distance Test
To test whether the Trophy Cam HD can effectively monitor the area you
choose, this test is recommended to check the sensing angle and monitoring
distance of the Trophy Cam HD. To perform the test:
• Switch the Trophy Cam HD SETUP to the mode.
• Make movements in front of the camera at several positions within
the area where you expect the game or subjects to be. Try different
distances and angles from the camera.
• If the motion indicator LED light blinks, it indicates that position can be
sensed. If it does not blink, that position is outside of the sensing area.
The results of your testing will help you nd the best placement when
mounting and aiming the Trophy Cam HD. The height away from the ground
for placing the device should vary with the animal size appropriately. In
general, 3 to 6 feet is preferred.
You can avoid potential false triggers due to temperature and motion
disturbances in front of the camera by not aiming it at a heat source or nearby
tree branches or brush (especially on windy days).
Switching ON the Camera
Once you switch to the mode, the motion indicator LED (red) will blink for ON
about 10 seconds. This gives you time to close and lock the front cover of the
Trophy Cam HD and then walk away. During this time, the motion indicator
LED will blink red continuously. After it stops blinking, the PIR is active, and
any motion that is detected by it will trigger the capture of photos or videos
as programmed in the Menu. Be sure you have read the descriptions SETUP
of the Capture Number, Video Length, Interval and Sensor Level parameters.
Please note, the PIR is strongly sensitive to ambient temperature. The greater
the temperature difference between the environment and your subject, the

29
farther the possible sensing distance. The average sensing distance is about
45 ft.
Before leaving the camera unattended, please check for the following:
• Are the batteries or DC power supply inserted/connected with correct
polarity and is the power level is sufcient?
• Does the SD card have sufcient available space and is its write-
protection (lock) switch off?
• Is the Power switch in the position? (do not leave it in ).ON SETUP
About the ARD (Anti Reective Device)
A removable lter grid (ARD) covers the LED ash, so that light reections
from the protective black glass panel over the LED array are greatly reduced.
This helps to prevent detection of the camera by animals (and potential
thieves). If getting maximum light output from the LED ash is a higher priority
than concealment, the ARD grid may be easily removed by inserting a small
screwdriver, key, etc. in the slot at the lower center of the ARD (above the
camera lens), and gently pulling it up away from the camera . (see pg. 7)
REVIEWING/DELETING THE PHOTOS/VIDEOS
After you have setup, mounted and activated your Trophy Cam HD, you will
of course be eager to return later and review the images it has captured for
you. There are several different ways this can be done.
Reviewing Images Directly From the SD Card
This is the most popular method of viewing images. Since unmounting the
camera and taking it to your computer isn’t very convenient, you may nd it
easier to just take the card out. By removing the SD card (swapping it for a
new empty card if you like) and taking it to your home or campsite to view
the images by using an SD card “reader” connected to your (user supplied)
computer (some computers and TVs have a built in SD card slot), you can
leave the camera in place ready to capture more images. Once connected,
the card reader works the same way as described below-please read that
section if you have any problem nding your les.

30
Reviewing Images by Connecting the Camera to a Computer
You can always unmount the entire camera from the tree and connect its
USB port to a computer-it will be recognized as a “removable disk”, without
the need to install any drivers or software. When using a PC (or Mac*) to view
photos (or video clips*), rst connect the device to the computer with the
supplied USB cable. Then use commercial software with an image browser
feature, or an image browser included with the PC’s operating system to
view images saved on the SD card in the folder \DCIM\100EK113 (a new
folder will be created every 1000 images). Each new image or video will be
numbered incrementally in order of the time it was captured. For example, you
will see le names such as “EK0001.JPG” or “EK0001.AVI”, etc. Through the
le format sufx you can distinguish whether the le is a still photo (with sufx
.JPG) or a video (with sufx .AVI).
*video les may require additional software for viewing on a Mac.
The Trophy Cam HD supports 3 kinds of le system formats, FAT12, FAT16,
and FAT32. The default value is FAT16 to save photos and videos. Here are
some related notes:
• You don’t need to be concerned about the le system format of the
Trophy Cam HD unless your equipment has problems reading the SD
card. If this happens, please format the SD card with the Trophy Cam
HD or in your computer rst and then insert the card into your Trophy
Cam HD and try again.
• The default le system format of the Trophy Cam HD is FAT16, which
most computers can read. If you format an SD card for the Trophy
Cam HD in your computer, you should choose the le system format
FAT16. Normally FAT16 is recommended unless you have another
image viewer that uses FAT12 or FAT32 format.
Deleting Photos or Videos
To delete photos from the installed SD card, use the parameter all Format
(see pg. 23 for details).

31
DOWNLOADING THE PHOTOS/VIDEOS
To download your photos/videos to a PC or Mac*, first make sure the Trophy
Cam HD power switch is in the OFF position. Connect the supplied cable to
the camera’s USB port, then directly to a main USB port on your computer-
do not use front panel/keyboard USB ports or unpowered “hubs”.
The Trophy Cam HD will be recognized as a standard “USB Mass Storage”
device (this may take several seconds the first time you connect it). If you
would rather leave your camera in the woods and just pull its SD card out, an
SD card reader works the same way as described in this section once the
card is inserted and the reader is connected to your computer.
With Windows XP or later, you can then simply use the options in the pop-up
window to copy, view, or print your photos ( ). right
On all Windows OS, the Trophy Cam HD will also
be listed as a “Removable Disk” if you open the “My
Computer” window (on Macs, an icon will appear on
your desktop). The Trophy Cam HD’s photo les are
named “EK0001.JPG” etc, and are located in the
“DCIM\100EK113” folder on this “Removable Disk”.
Video le names will end with “.AVI”. You may copy the
photos/videos to your hard drive as you would any le-
just copy/paste or drag the le names or icons to your
drive or desktop.
After the photos are copied to your hard drive, you can disconnect the
Trophy Cam HD. (On Mac computers, drag the “disk” that appeared on
your desktop when the camera was connected into your Trash to “eject” it
before disconnecting.) The .JPG format photo les from the Trophy Cam
HD may be viewed and edited with any photo software you choose to use.
The .AVI video les may be viewed with the Windows Media Player on PCs
with Windows 7. If your computer is running an older version of Windows, or
you are on a Mac, and you don’t already have a compatible video player, you
can download a free version of the DivX player from http://www.divx.com/.

32
Camera takes continuous images of no subject
A camera has what is known as a “false trigger” if the PIR sensor thinks
that there is motion and heat in front of the camera lens when there is
no subject in the image. These “False Triggers” are the result of placing
the camera in an environment where there is motion associated with tree
branches creating motion in front of the camera or an area where there
is high heat in the foreground and any motion from wind could set off the
camera. Setting a camera up over water is also a potential cause for this
issue. To remedy this situation:
1. Try moving the camera to an area that does not have any of these is-
sues or try changing the sensor level on the menu settings.
2. If the camera continues to take images when there is no subject in
them, try placing the camera in an inside environment and aiming at a
location where there is no motion.
3. If the camera continues to show issues, then there is probably an
electronic component issue. If this is the case, please contact our
customer service to send the camera back for repair.
Battery life is shorter than expected
1. Battery life will vary with operating temperature and the number of
images taken over time. Typically, the Trophy Cam HD will be able to
capture several thousand images before the batteries die.
2. Check to make sure you have used new alkaline or lithium batteries.
Bushnell recommends using a full set of Energizer ® Lithium
AA batteries in your Trophy Cam HD model to obtain maximum
battery life.
3. Make sure that the power switch was turned to the “On” position and
that the camera was not left in “Setup” mode while in the eld.
4. Make sure that you are using a good quality name brand SD card in
your camera. Bushnell recommends SanDisk ® brand SD Cards up
to 32GB (Ultra ® or Extreme ® series for HD video). Our experience
indicates that poor quality SD cards can sometimes reduce your
Trophy Cam HD battery life.
Camera stops taking images or won’t take images
1. Please make sure that the SD card is not full. If the card is full, the
camera will stop taking images.
TROUBLESHOOTING / FAQ

33
2. Check the batteries to make sure that they are new alkaline or lithium
AA batteries. See note above about short battery life.
3. Make sure that the camera power switch is in the “On” position and not
in the or modes.“Off” “Setup”
4. Make sure that you are using a good quality SD card in your camera.
Bushnell recommends SanDisk ® SD Cards up to 32GB (Ultra® or
Extreme® series for HD video) .
5. If the SD card has its write protect switch in the lock position, the
camera will not take images.
6. If you have used an SD card in another device before inserting it in your
Trophy Cam HD, you might want to try formatting the card using the
“Format” parameter in Setup mode (make sure you have backed up any
important files first, as formatting will erase all previous files). In some
cases, other devices may change the formatting of the SD card so that
it will not work properly with the Trophy Cam HD.
Camera won’t power up
1. Make sure that you have installed at least 4 batteries (the required
minimum #) in the battery compartment, starting at the top, filling
battery spaces 1-4 with no “gaps”.
Bushnell recommends using a full set of 8 or 12 Energizer ®
Lithium AA batteries in your Trophy Cam HD (the max. capacity for
your model).
2. Make sure that the batteries are installed correctly, observing proper
polarity. Always place the negative (flat) end of each battery in contact
with the spring side of its slot inside the camera.
3. After moving the switch from “Off” to “Setup” or “On”, make sure
that the switch is correctly in position to ensure the proper mode (avoid
positions “between” two modes).
4. Do not move the switch directly from “On” to “Setup”-always move
the switch all the way down to first, then back up to .“Off” “Setup”
Still Photo and/or Video Quality Problems
1. Night photos or videos appear too dark
a. Check the battery indicator icon to see if battery power is full. The
flash will stop operating near the end of the battery life.
b. You will get the best results when the subject is within the ideal
flash range, no farther than 60' (19m) . Subjects may appear too dark
at greater distances.

34
c. Please note that when the Capture Number parameter is set higher
than "1 Photo", or with very short Interval settings, some images
may appear darker than others due to the quick response and rapid
retriggering of the camera, allowing less time for the flash to fully
recharge before firing again.
d. Make sure "LED Control" in the setup menu is set to "High" to
ensure maximum output. You can also try setting "NV Shutter" in the
menu to "Low" (slower shutter speed=brighter images, with tradeoff
of increased blur if subject moves rapidly).
e. The ARD (anti-reflective device) shield can be removed to maximize
flash output. See for more details.page 29
2. Daytime photos or videos appear too dark
Make sure that the camera is not aimed at the sun or other light sources
during the day, as this may cause the auto exposure to produce darker
results.
3. Night photos or videos appear too bright
If the subject is close to the camera (less than10ft/3m), change the
LED Control parameter in the Setup Menu to "Medium" or "Low".
4. Daytime photos or videos appear too bright
Make sure that the camera is not aimed at the sun or other light
sources during the day.
5. Photos with streaked subject
a. In some cases with low lighting conditions and fast moving subjects,
the 5MP or 8MP resolution settings may not perform as well as the
3MP setting.
b. If you have multiple images where fast moving subjects produce
streaks on the photo, try the 3MP setting instead.
c. Set "NV Shutter" to "High" to minimize motion blur.
6. Red, green or blue color cast
a. Under certain lighting conditions, the sensor can become confused
resulting in poor color images.
b. If this is seen on a consistent basis, then the sensor may need
servicing. Please contact Bushnell customer service.
7. Short video clips—not recording to the length set
a. Check to make sure that the SD card is not full.

35
b. Make sure that the camera has good batteries in it. Near the end
of the battery life, the camera may choose to record shorter video clips
to conserve power.
Date/Time Stamp not appearing on images
Make sure that the parameter is set to .“Time Stamp” “On”
Photos Do Not Capture Subject of Interest
1. Check the “Sensor Level” (PIR sensitivity) parameter setting. For
warm temperature conditions, set the Sensor Level to “High” and for
cold weather use, set the sensor for “Low”. For variable weather, use
"Auto".
2. Try to set your camera up in an area where there is not a heat source in
the camera’s line of sight.
3. In some cases, setting the camera near water will make the camera take
images with no subject in them. Try aiming the camera over ground.
4. Try to avoid setting the camera up on small trees that are prone to being
moved by strong winds.
5. Remove any limbs which are right in front of the camera lens.
PIR Sensor LED Flashes/Doesn’t Flash
1. When the camera is in the “Setup” mode, a special LED on the front of
the camera will ash when it senses motion. This is for setup purposes
only and will help the user aim the camera.
2. During use, the LED will not ash when the camera takes an image.
This is to help keep the camera hidden from game.
LCD Screen Issues
1. LCD screen powers on but no text is present.
a. After moving the switch from “Off” to “Setup” or “On”, make sure
that the switch is correctly in position to ensure the proper mode (avoid
positions “between” two modes).
b. Do not move the switch directly from “On” to “Setup”-always move
the switch all the way down to “Off” rst, then back up to “Setup”.
2. LCD screen shows a faint black line after turning from “Setup” to “On”.
The LCD will turn off when you slide the switch to the “On” position. In
some cases, this black line will appear and then fade in about 1
second. This is normal and the camera will function properly.

36
3. Screen comes on but then powers off
Make sure that you have installed the SD card correctly.
Camera won’t retain settings
Make sure that you have been saving the changes to any parameter
settings that you made while in Setup mode, by pressing after “OK”
changing the setting. If you don’t save your new setting after changing
it, the camera will continue to use the original default setting for that
parameter.
Moisture or Ants Inside Camera
1. To ensure humidity or rain is kept out of the camera, secure the DC In
plug rmly in place.
2. Ants can be attracted by low level electronic vibrations, and enter
through any gaps between the exterior and interior of the camera.
Make sure the DC In plug is securely attached.
Field Scan (Time Lapse) not working properly
1. Make sure that the stop and start times of Field Scan "A" and "B" do
not overlap (for example, do not set the start time of "B" to 8AM if the
stop time of "A" is 10AM).
2. When using Field Scan in video mode, the smallest interval time avail-
able is 5 min, to avoid potential overheating of the batteries and elec-
tronic components, which could cause operational failure or damage to
the camera. In still photo mode, a 1 min. Interval can be set.
Do not mix old and new batteries.
Do not mix battery types-use ALL lithium or ALL alkaline.
Rechargeable batteries are not recommended.

37
Maximum Pixel Size 3264x2448 (8MP)
Lens F = 3.1; FOV=45°; Auto IR-Cut-Remove (at night)
IR-Flash Range Selectable (Low/Med/High), up to 60’(19m) on High
Display Screen Monochrome Display: 24x32mm(1.5”)
Memory Card SD or SDHC Card, Maximum capacity 32GB
Internal RAM 32MB
Picture Size 8MP = 3264x2448; 5MP = 2592x1944;
3MP = 1920x1440
Video Size
1280x720, 640x360, 320x180 (119676/119677) or
1920x1080, 1280x720, 640x360 (119678) pixels per
frame at 20-30 fps (Day) / 15-20 fps (Night)
PIR sensitivity Hyper PIR with 4 sensitivity settings: Low/Normal/
High/Auto
Operation User selectable: 24 Hour, Day only, or Night only
(based on ambient light level)
Response Time 0.2 second
Triggering Interval 1 sec. - 60 min. programmable
Shooting Numbers 1— 3 programmable
Video Length 5-60sec. programmable
Power Supply 8x (119676/119677) (119678) or 12x AA batteries
recommended, 4xAA as emergency power
Stand-by Current < 0.25mA (<7mAh/day)
Power Consumption 250mA (+1300mA when all LEDs re)
Night Vision Shutter
Speed
User selectable (High/Med/Low)-affects night (NV)
photos/videos only
Interface USB; SD card holder; DC external (>7.5v)
Security Strap; ¼-20 attachment
Operating
Temperature -20 - 60°C (Storage temperature: -30 - 70°C)
Operating Humidity 5% - 90%
TECHNICAL SPECIFICATIONS

Specications and designs are subject to change without
any notice or obligation on the part of the manufacturer.
Your Bushnell® product is warranted to be free of defects in materials and workmanship for
one year after the date of purchase. In the event of a defect under this warranty, we will,
at our option, repair or replace the product, provided that you return the product postage
prepaid. This warranty does not cover damages caused by misuse, improper handling,
installation, or maintenance provided by someone other than a Bushnell Authorized Service
Department.
Any return made under this warranty must be accompanied by the items listed below:
1. A check/money order in the amount of $10.00 to cover the cost of postage and
handling
2. Name and address for product return
3. An explanation of the defect
4. Proof of Date Purchased
5. Product should be well packed in a sturdy outside shipping carton, to prevent dam-
age in transit, with return postage prepaid to the address listed below:
IN U.S.A. Send To: IN CANADA Send To:
Bushnell Outdoor Products Bushnell Outdoor Products
Attn.: Repairs Attn.: Repairs
9200 Cody 140 Great Gulf Drive, Unit # B
Overland Park, Kansas 66214 Vaughan, Ontario L4K 5W5
For products purchased outside the United States or Canada please contact your local
dealer for applicable warranty information. In Europe you may also contact Bushnell at:
Bushnell Germany GmbH
European Service Centre
Mathias-Brüggen-Str. 80
D-50827 Köln
GERMANY
Tel: +49 221 995568-0
Fax: +49 221 995568-20
This warranty gives you specic legal rights.
You may have other rights which vary from country to country.
©2014 Bushnell Outdoor Products
ONE YEAR LIMITED WARRANTY

FCC COMPLIANCE STATEMENT:
This equipment has been tested and found to comply with the limits for a Class B digital
device, pursuant to part 15 of the FCC Rules. These limits are designed to provide reasonable
protection against harmful interference in a residential installation.
Operation is subject to the following two conditions: (1) This device may not cause harmful
interference, and (2) this device must accept any interference received, including interference
that may cause undesired operation.
This equipment generates, uses and can radiate radio frequency energy and, if not installed
and used in accordance with the instructions, may cause harmful interference to radio
communications. However, there is no guarantee that interference will not occur in a particular
installation. If this equipment does cause harmful interference to radio or television reception,
which can be determined by turning the equipment off and on, the user is encouraged to try to
correct the interference by one or more of the following measures:
· Reorient or relocate the receiving antenna.
· Increase the separation between the equipment and receiver.
· Connect the equipment into an outlet on a circuit different from that to which the receiver
is connected.
· Consult the dealer or an experienced radio/TV technician for help.
The device does not contain any user-serviceable parts. Repairs should only be made by
an Authorized Bushnell repair center. Unauthorized repairs or modications could result in
permanent damage to the equipment, and will void your warranty and your authority to operate
this device under Part 15 regulations.
The shielded interface cable which is provided must be used with the equipment in order to
comply with the limits for a digital device pursuant to Subpart B of Part 15 of FCC Rules.
Disposal of Electric and Electronic Equipment
(Applicable in the EU and other European countries
with separate collection systems)
This equipment contains electric and/or electronic parts and must therefore not be disposed of
as normal household waste. Instead, it should be disposed at the respective collection points for
recycling provided by the communities. For you, this is free of charge.
If the equipment contains exchangeable (rechargeable) batteries, these too must be removed
before and, if necessary, in turn be disposed of according to the relevant regulations (see also the
respective comments in this unit’s instructions).
Further information about the subject is available at your community administration, your local
waste collection company, or in the store where you purchased this equipment.

40
FrANçAIS www.trophycam.fr
Nos de modèle: 119676 / 119677 / 119678
03-14
N O T I C E D ’ U T I L I S A T I O N

41
rEMArQuES IMPOrTANTES
Nous vous remercions pour votre achat de l’un des meilleurs appareils
photos de surveillance sur le marché ! Bushnell est extrêmement fier
de ce concentré de technologie et nous sommes certains qu’il vous
satisfera également. Nous vous sommes très reconnaissants de votre
choix et désirons gagner votre confiance. Veuillez vous référer aux
remarques ci-dessous et aux instructions de cette notice d’utilisation
pour vous assurer d'utiliser au mieux ce produit.
Si votre Trophy Cam HD Bushnell ne semble pas fonctionner
correctement, ou si vous avez des problèmes de qualité avec les
photos/vidéos, veuillez consulter la section Diagnostic / Questions
Fréquemment Posées aux pages 73 à 78 de cette notice.
Les problèmes ont souvent une cause simple qui n’a pas été
remarquée, ou demandent seulement un changement de réglage
pour être résolus.
Si votre problème persiste après avoir essayé les solutions de
la section Diagnostic / Questions Fréquemment Posées, nous
vous recommandons de contacter votre revendeur Bushnell. Ce
dernier se chargera de contacter le service après-vente Bushnell
si nécessaire.
Bushnell recommande d'utiliser un jeu complet de piles AA au lithium
Energizer
® (8 ou 12 selon le modèle) pour ses Trophy Cam HD afin de
garantir une autonomie maximale.
Ne mélangez pas des piles ayant déjà servi avec des piles neuves.
Ne mélangez pas différents types de piles. N'utilisez QUE des piles au
lithium ou QUE des piles alcalines. Les piles rechargeables ne sont pas
recommandées.
Bushnell recommande d’utiliser des cartes mémoires SanDisk
® et SDHC
(capacité de stockage pouvant atteindre 32 Go) dans ses Trophy Cam HDs.

42
INTRODUCTION
À propos du Trophy Cam HD
Le Trophy Cam HD de Bushnell est un appareil photo de surveillance
numérique. Il peut être déclenché par tout mouvement d'un animal ou d'un
individu dans un endroit donné – repéré par un détecteur de mouvement
ultra sensible à capteur infrarouge passif – puis prendre des photos de
haute qualité (résolution pouvant atteindre 8 MP par interpolation), ou des
séquences vidéo.
Le Trophy Cam HD consomme très peu d’électricité (moins de 0.25 mA) en
mode stand-by (surveillance). Ceci signifie qu’il peut fournir jusqu’à six mois
d’autonomie en mode stand-by lorsqu’il est alimenté par huit piles alcalines
AA, et jusqu’à douze mois avec des piles AA au lithium. Une fois qu’un
mouvement est détecté dans la zone surveillée, l’appareil photo numérique
se déclenche automatiquement (généralement dans la seconde qui suit)
pour prendre des photos ou des séquences vidéo selon la configuration
établie au préalable. Le Trophy Cam HD est équipé de LED infrarouges «
noires » intégrées qui fonctionnent comme un flash et peuvent fournir des
photos ou des vidéos (en noir et blanc) claires même dans le noir, et peuvent
prendre des photos ou des vidéos en couleur lorsqu’il y a assez de lumière.
Le Trophy Cam HD est conçu pour être utilisé à l’extérieur et résiste à l’eau
et à la neige.
Votre appareil de surveillance numérique fait partie de la dernière génération
de Trophy Cam HDs Bushnell et propose de nombreuses fonctions,
nouvelles ou améliorées, notamment :
• Sensibilité infrarouge passive automatique: l'appareil surveille la
température ambiante et ajuste automatiquement le capteur / signal de
déclenchement afin qu'il soit plus sensible aux faibles variations quand
il fait chaud, et moins sensible quand il fait froid.
• Hyper Vision nocturne: le flash à LED infrarouge possède désormais
une plus grande portée, un rendu plus lumineux et une meilleure
couverture pour de meilleures images de nuit.
• Mode Field Scan 2x : La fonction « intervalle de temps » inclut la
possibilité d'ajouter un second groupe d'enregistrement ayant ses
propres temps de démarrage et d'arrêt. Les signaux de déclenchement
provoqués par l'activité alentour continueront à générer des photos /
vidéos supplémentaires, indépendamment du mode Field Scan activé.

43
Fig. 1: Connexions
Flash LED infrarouge
Micro
Pas de vis
standard
Indicateur de mouvements /
de faible charge des piles
Objectif
Emplacement pour cadenas
Capteur infrarouge passif
FACE AVANT
Prise USB
Emplacement pour carte SD
Alimentation externe
Alimentation externe
(cache en place)
• Fonction de géomarquage GPS :elle permet à l'utilisateur de saisir
la latitude et la longitude de l'emplacement du Trophy Cam HD, qui
seront ensuite intégrées à chaque fichier photo. Ce système permet
à Google Earth, Picassa et à d'autres logiciels compatibles avec le
géomarquage d'afficher automatiquement une carte indiquant les lieux
/ sites des prises de vue lors de leur visionnage sur un ordinateur.
Fonction particulièrement utile pour ceux qui placent des Trophy
Cam HDs à de multiples endroits pour surveiller des zones vastes ou
éloignées les unes des autres.
• Mode Multi Flash (contrôle des LED): il évite les photos au flash
surexposées dans les gros plans.
• Mode Hybrid Capture (Saisie hybride) – permet des prises photo et
vidéo en même temps, à chaque déclenchement. Différents paramètres
sont disponibles pour les deux, allant jusqu'à un haut niveau de
résolution.
• NV Shutter (Obturateur pour la vision nocturne) – l'utilisateur peut
sélectionner la vitesse d'obturation pour la prise d'images pendant
la nuit, permettant ainsi de contrôler la luminosité et de figer tout
mouvement.
ARD

44
Fig. 2: Commutateur
d’alimentation et interface
de contrôle à six touches
MARCHE
CONFIGURATION
ARRÊT
Écran LCD
Marche (ON)/
Configuration
(SETUP)/
Arrêt (OFF)
HAUT/Vidéo
BAS/Photo
GAUCHE
MENU
OK
DROITE/Déclencheur
Manuel (SHOT)
Câble de raccord au
compartiment à piles
• Le mode Camera Operating (Fonctionnement de l'appareil) peut être
réglé sur Day only (Jour uniquement), Night only (Nuit uniquement), ou
24 HRs (24 h).
Et bien d'autres fonctions telles que la vidéo HD avec son, les photos au
format 16/9 , l'incrustation du nom du Trophy Cam HD (défini par l'utilisateur)
ainsi que des données ambiantes, notamment la température, la phase de la
lune et la pression barométrique*
(*incrustation des données barométriques disponible uniquement sur le
modèle 119678).
Applications
Le Trophy Cam HD peut être utilisé comme un appareil photo de détection
pour la chasse ou pour compter le gibier. Il convient également parfaitement
à la surveillance
PRÉSENTATION DU Trophy Cam HD
Le Trophy Cam dispose des connexions suivantes afin d’être raccordé
à des appareils externes: Port USB, port pour carte SD, et alimentation
externe ( p. 43, Fig. 1).
FACE
INTERNE

45
Un commutateur d’alimentation à trois positions sert à sélectionner les modes
d’opération principaux: OFF (ARRÊT), SETUP (CONFIGURATION), et
ON (MARCHE) ( .Fig. 2)
L’interface de contrôle à six touches sert principalement en mode SETUP
(CONFIGURATION), pour sélectionner les fonctions et paramètres
opérationnels. Comme indiqué à la , ces touches sont : Fig. 2 HAUT,
BAS, GAUCHE DROITE OK, , et MENU. Trois de ces touches peuvent
également servir pour une seconde fonction (raccourci opérations en
mode (SETUP CONFIGURATION) en plus de leur fonction principale :
La touche peut servir à mettre l’appareil photo en mode Photo (icône BAS
appareil photo), et la touche HAUT sert à mettre l’appareil photo en mode
Vidéo (icône caméscope). La touche sert également de bouton DROITE
de déclenchement manuel (« SHOT ») de l’appareil photo. Ces fonctions
secondaires sont indiquées par des icônes ou un texte au-dessus de la
touche comme le montre la Fig. 2 (p.44) .
INSTALLATION DES PILES ET DE LA CARTE SD
Avant de pouvoir utiliser votre Trophy Cam HD, vous devrez d’abord installer
des piles et insérer une carte SD. Même si cela ne
vous prendra qu’une minute, vous devez prendre
conscience de quelques remarques importantes
concernant à la fois les piles et les cartes SD. Nous
vous recommandons donc de prendre le temps de
lire les instructions et avertissements suivants:
Mise en place des piles
Après avoir ouvert les deux loquets à droite du Trophy
Cam HD, vous avez accès au compartiment à huit
ou douze piles, selon le modèle. Pour une autonomie
maximale, il faut installer un jeu complet de piles. Le
Trophy Cam HD peut également fonctionner avec
seulement quatre piles installées dans les premiers
compartiments (à partir du haut ou à gauche, voir
photos). L'autonomie de l'appareil est plus courte
avec 4 piles, mais il fonctionne normalement. Que
vous utilisiez 4 piles ou un jeu complet, veillez à
respecter la polarité de chaque pile (pôle négatif ou «

46
plat » en contact avec le long ressort de chaque emplacement).
Bushnell recommande d'utiliser un jeu complet de piles AA au lithium neuves
(de la marque Energizer®) ou des piles AA alcalines. Nous recommandons
de ne pas utiliser de piles rechargeables NiMh car leur faible voltage peut
entraîner des problèmes de fonctionnement.
Vous pouvez raccorder le panneau solaire Bushnell #119656C (vendu
séparément, plus d’informations sur www.bushnell.fr) à la prise «
Alimentation Externe » située sous le (g.1) Trophy Cam HD. Veuillez ne
pas utiliser d’autres sources de courant externes car cela pourrait entraîner
un dysfonctionnement de votre Trophy Cam HD. Si le panneau solaire
Bushnell est raccordé et que des piles AA sont en place dans le Trophy
Cam HD, alors ce dernier sera alimenté par la batterie li-ion interne du
panneau solaire, tant que celle-ci fournit le voltage suffisant (le cas contraire,
le Trophy Cam HD sera alimenté par ses piles AA). Ainsi, la batterie li-ion
du panneau solaire pourra même alimenter le Trophy Cam HD de nuit.
Lorsque les piles AA sont déchargées ou que la batterie li-ion du panneau
solaire ne fournit plus le voltage adéquat, alors le voyant indicateur (LED) de
faible charge des piles s’allumera en bleu, indiquant que les piles doivent être
remplacées ( , « voir p. 43 FACE AVANT »).
AVERTISSEMENT
Veillez à ce que l’alimentation de l’appareil soit sur OFF
(ARRÊT) avant d’insérer ou de retirer la carte SD ou les
piles.

49
Fig. 3 : Écran d’information du mode CONFIGURATION (SETUP)
Mode MARCHE (ON)
À n’importe quel moment après que les piles et la carte SD aient été insérées
vous pouvez allumer l’appareil. Lorsque le commutateur d’alimentation sera
placé en position haute, l’appareil sera en mode . L’indicateur MARCHE
LED de mouvements clignotera en rouge pendant (p.43, « Face Avant »)
environ 10 secondes. Cet intervalle vous laissera assez de temps pour
fermer le couvercle avant du Trophy Cam HD, le verrouiller et quitter la
zone surveillée. Une fois en mode , aucun contrôle manuel MARCHE
n’est nécessaire ou possible (les touches de contrôle n’ont aucun effet).
Le Trophy Cam HD prendra automatiquement des photos ou des vidéos
(selon vos réglages) lorsqu’il est déclenché, c’est-à-dire quand le capteur
infrarouge passif détecte de l’activité dans la zone qu’il couvre. Vous pouvez
soit déplacer le commutateur d’alimentation directement du mode ARRÊT
(OFF) au mode , soit vous arrêter d’abord en position MARCHE (ON)
CONFIGURATION (SETUP) pour changer l’un des réglages ou plus, puis
passer à ensuite. MARCHE (ON)
MODE CONFIGURATION (SETUP)
Dans le mode CONFIGURATION vous pouvez vérifier et changer les
réglages du Trophy Cam HD en utilisant l’écran LCD intégré. Ces réglages,
accessibles depuis le menu CONFIGURATION, vous permettent de
changer la résolution des photos ou des vidéos, l’intervalle de temps entre
les photos, de choisir la fonction impression de la date et de l’heure sur les
Mode appareil photo (photos) Mode vidéo
Impression de
la date et de
l’heure sur les
photos
Résolution Statut de la carte SD
Date: Mois-Jour-
Année
Mémoire disponibleNombre de
photos prises
Niveau de
charge des piles
Mode Photo Mode vidéo Résolution vidéo
Son vidéo activé
Durée d'enregistrement
vidéo disponible
Affichage de
l'heure:
Heures : Minutes :
Secondes
4
4

50
photos, etc. Le fait de déplacer le commutateur d’alimentation en position
CONFIGURATION (SETUP) allumera l’écran LCD, et vous pourrez voir un
écran d’information qui vous montrera combien de photos ont été prises, le
niveau de charge des piles, si l’appareil est en mode photo ou vidéo, etc.
(voir Fig. 3 ci-dessus).
REMARQUE : Actionnez toujours le commutateur d’alimentation
du mode ARRÊT (OFF) vers le mode CONFIGURATION (SETUP).
Il est possible que l’appareil se bloque s’il passe du mode MARCHE
(ON) au mode CONFIGURATION (SETUP). Si cela se produit, mettez
simplement le commutateur sur ARRÊT (OFF) puis poussez-le de
nouveau vers le haut sur CONFIGURATION (SETUP).
Touches Raccourcis en mode CONFIGURATION (SETUP) :
Comme mentionné auparavant dans la partie « Présentation du Trophy
Cam HD », quatre touches sous l’écran LCD servent de « raccourcis » de
fonctions lorsque l’appareil est mis en mode CONFIGURATION (SETUP) ,
et à la condition que vous n’ayez pas appuyé sur la touche MENU :
• Appuyez sur la touche HAUT pour rapidement mettre l’appareil en
mode Vidéo.
• Appuyez sur la touche pour rapidement mettre l’appareil en mode BAS
Photo.
• Appuyez sur la touche DROITE pour déclencher une photo (ou une
vidéo) manuellement. Ceci est utile pour tester l’appareil-veillez à être en
mode CONFIGURATION (SETUP) DROITE , appuyez sur la touche ,
et quelques secondes plus tard, une photo ou une séquence vidéo
(selon le réglage de l’appareil) sera sauvegardée sur la carte SD (ou la
mémoire interne si aucune carte n’est insérée). Le compteur « nombre
de photos prises » en bas et à gauche de l’écran LCD augmentera
d'une unité. Si l’écran indique « SD PROTECTED » lorsque vous
appuyez sur la touche , mettez l’appareil sur DROITE (SHOT) OFF
(ARRÊT), retirez la carte SD et glissez le curseur de protection contre
l’écriture situé sur la carte SD en position « off ».

51
Utilisation du Menu CONFIGURATION (SETUP)
pour changer les réglages
Le but principal du mode CONFIGURATION (SETUP) est de vous
permettre de changer les réglages des paramètres de l’appareil (jusqu'à
19 configurations différentes !) pour que votre Trophy Cam HD fonctionne
exactement comme vous le désirez. Vous ferez ceci en lançant le Menu
CONFIGURATION (SETUP) et en appuyant sur les touches situées sous
l’écran LCD. Cet écran vous indiquera chaque paramètre et son réglage.
Changement des réglages des paramètres en Mode
CONFIGURATION (SETUP)
De nombreux paramètres sont disponibles pour vous permettre de régler
le Trophy Cam HD selon vos préférences. Pour changer le réglage d’un
paramètre donné, vous devez d’abord passer au mode CONFIGURATION
(SETUP). Une fois que vous êtes dans ce mode, le fait d’appuyer sur la
touche MENU vous permettra de sélectionner n’importe quel paramètre
et changer son réglage. Le nom du paramètre et son réglage actuel sera
affiché à l’écran LCD. Le fait d’appuyer sur la touche ou DROITE GAUCHE
fait défiler vers le paramètre suivant ou précédent (la touche pour DROITE
passer au paramètre suivant et la touche GAUCHE pour revenir au paramètre
précédent), et le fait d’appuyer sur la touche HAUT ou BAS vous permet de
sélectionner un réglage différent pour le paramètre actuellement affiché. Une
fois que vous avez choisi votre nouveau réglage pour un paramètre, appuyez
sur la touche pour sauvegarder le nouveau réglage. Lorsque vous avez OK
fini de changer les réglages d’un ou de plusieurs paramètres, appuyez sur
MENU de nouveau pour sortir du menu CONFIGURATION (SETUP). Il
est possible d’appuyer sur MENU chaque fois que vous désirez annuler
un changement de réglage de paramètre après qu’un nouveau réglage ait
été sélectionné (à condition que vous n’ayez pas déjà appuyé sur OK).
Après avoir réglé les paramètres selon vos préférences, veillez à déplacer
le commutateur sur pour pouvoir prendre des photos ou ON MARCHE)(
des vidéos. Aucune image ne sera prise si le commutateur reste en position
RÉGLAGE Photo/DROITE (à moins que vous n’appuyiez sur la touche
après être sorti du menu) ; en effet, l'appareil s’éteindra automatiquement
après quelques minutes si vous n’appuyez sur aucune touche.

53
réglages possibles (ou plage de réglages), une description détaillée de ce
que contrôle le paramètre et le but des réglages. Si vous avez lu la section
précédente détaillant comment sélectionner les paramètres et changer leurs
réglages, vous devriez être en mesure de trouver le(s) paramètre(s) que vous
désirez, et régler l’appareil selon vos préférences. Mais vous préférez peut-
être pratiquer d’abord avec un exemple ou deux:
Pour changer le réglage de n’importe quel paramètre, commencez toujours
en vous assurant que le commutateur est en position CONFIGURATION
(SETUP). Une fois que l’écran LCD s’allume, appuyez sur la touche MENU.
Le premier paramètre rencontré quand on entre dans le menu
CONFIGURATION (SETUP) est "Mode". Par défaut, il est réglé sur
« Camera » (photos). Pour passer au mode « Vidéo » (enregistrement de
séquences vidéos), appuyez sur la touche BAS pour sélectionner le réglage
« Vidéo ». Appuyez sur la touche pour appliquer ("Execute") le nouveau OK
réglage que vous avez choisi pour ce paramètre.
Appuyez à présent sur la touche pour passer à un autre paramètre DROITE
dans le menu. En appuyant trois fois, vous allez accéder à "Capture Number"
(nombre de prises de vue). À l'aide des boutons HAUT et BAS, déplacez-
vous dans les différents réglages disponibles puis appuyez sur pour OK
enregistrer votre choix du nombre de photos prises par l'appareil à chaque
déclenchement.
En appuyant sur le bouton jusqu'à atteindre le dernier élément du DROIT
menu, vous aurez accès au paramètre "Default Set" (réglage par défaut).
Mettez-le en surbrillance ou sélectionnez « Execute » (en utilisant HAUT
ou BAS) et appuyez sur OK pour restaurer tous les paramètres (incluant
les paramètres Mode et Vidéo que vous venez de changer il y a quelques
minutes). Les réglages par défaut pour chaque paramètre sont indiqués en
caractères gras dans les tableaux du Menu CONFIGURATION (SETUP)
dans les pages suivantes.
Si vous choisissez de mettre le paramètre "time stamp" (impression date et
heure) sur ON, cela commandera à l'appareil d'imprimer la date et l'heure sur
chacune des photos qu'il prend. Dans ce cas, veillez donc bien à régler la
date et l'heure en utilisant le paramètre "set clock" (réglage horloge).

55
4. pour Quand vous avez réglé les minutes de l'heure d'arrêt, appuyez sur OK
conrmer le réglage de la première période d'enregistrement du balayage
de champ. Si vous le souhaitez, vous pouvez créer une seconde période
d'enregistrement en appuyant sur le bouton pour sélectionner "B" BAS
(Etape 4), puis appuyez sur OK et suivez le même procédé pour régler les
heures de démarrage et d'arrêt du balayage de champ pour la période
"B" ( ). Par exemple, vous pouvez congurer la période "A" pour un Etape 5
balayage de champ à l'aube de 6h à 8h, et une période "B" pour des prises
de vue entre 17h30 et 19h. Dans ce cas, il n'y aura aucun enregistrement via
balayage de champ entre 8h et 17h30 et entre 19h et 6h.
5. Après avoir réglé les heures de démarrage/d'arrêt de la période "A" et/ou
"B", appuyez sur puis sur les boutons ou OK BAS HAUT pour sélectionner
"Interval" (fréquence) et enn sur ( ). Ce paramètre "Interval" OK Etape 6
(fréquence) vous permet de dénir à quelle fréquence une photo ou une
vidéo est prise pendant les périodes congurées précédemment. Vous
avez le choix entre 60 minutes, 30 minutes, 15 minutes, 5 minutes (réglage
par défaut) ou 1 minute (en mode photo uniquement). Utilisez les boutons
HAUT/BAS pour sélectionner votre valeur, puis appuyez sur pour la OK
sauvegarder ( ). Notez que pour les vidéos, "Interval" est indépendant Etape 7
de la durée de la vidéo. Il s'agit de la fréquence à laquelle les vidéos sont
enregistrées, et non pas de la longueur de chacune.
6. Voici un exemple de fonctionnement de la caméra, sur la base des réglages
de balayage de champ suivants :
Field Scan : On
Période A :
[Start] : 6:00
[Stop] : 8:00
Période B :
[Start] : 17:30
[Stop] : 19:00
Interval : 15M
Selon ces réglages, l'appareil prend une photo (ou une vidéo, s'il fonctionne
dans ce mode) toutes les 15 minutes, à partir de 6h jusqu'à la n de la
période "A" du balayage de champ à 8h. Le même jour, l'appareil va à
nouveau prendre une photo ou une vidéo toutes les 15 minutes de 17h30 à
19h (pendant la période "B" du balayage de champ). Le lendemain, l'appareil
recommencera à prendre une photo ou une vidéo toutes les 15 minutes
entre 6h et 8h et entre 17h30 et 19h. Il n'y aura aucun enregistrement du
Remarque : pour garantir le bon fonctionnement de
veillez à ce que les périodes A et B de balayage de ch
chevauchent pas au moment de régler les horaires de
et d'arrêt. Aussi, lorsque le paramètre du mode Cam
(Mode appareil photo) est réglé sur « Day » (fonct
de jour uniquement) ou sur « Night » (fonctionnem
uniquement), il aura la priorité sur les paramètres du
Scan. Réglez le mode Appareil photo sur « 24HR » (2
paramétrez les temps de démarrage et/ou d'arrêt du m
Scan, pour le fonctionnement de jour et de nuit.

56
balayage de champ entre 8h et 17h30 et entre 19h et 6h. Rappelez-vous
que ceci est indépendant des déclenchements normaux dus à l'activité
détectée à proximité de l'appareil - même si aucun animal (ou humain) ne
pénètre dans la zone de couverture du détecteur à infrarouge, une image
sera prise, ou une vidéo enregistrée, toutes les 15 minutes pendant la/les
période(s) de temps déterminée(s). Si un animal (ou humain) déclenche la
caméra entre les intervalles de 15 minutes , cela sera enregistré. Remarque
: Des intervalles de balayage de champ courts et/ou des tranches
horaires longues risquent de réduire la durée de vie de la batterie.
(Etape 1)-placez le mode
Field Scan (balayage de
champ) sur "On"
(Etape 2)-sélectionnez
"Field Scan "A"
(appuyez sur OK)
(Etape 3)-réglez le
démarrage et l'arrêt de
la période "A"
(Etape 4)-sélectionnez
"Field Scan "B"
(appuyez sur OK)
(Etape 5)-réglez le
démarrage et l'arrêt
de la période "B"
Les étapes 4 et 5 sont facultatives (elles sont
nécessaires uniquement si vous souhaitez une
seconde période d'enregistrement du balayage
de champ avec des horaires de démarrage et
d'arrêt différents)
(Etape 6)-sélectionnez
"Field Scan Interval"
(Etape 7)-réglez la
fréquence de balayage
de champ
Remarque : le paramètre "Interval" dénit
l'intervalle de temps entre deux images à la fois
pour la période "A" et la période "B".

57
Paramètre Réglages
(Gras=défaut)
Description
Mode Camera
(photos)
Video, ou
Hybrid (Saisie
hybride)
Sélectionnez au choix la prise de
photos, de vidéos ou les deux lorsque
l’appareil se déclenche. Le mode de
saisie hybride combine la fonction
photo avec la fonction vidéo. Il
permet ainsi la prise de photo et de
vidéo, en même temps, et à chaque
déclenchement.
Image Size
(résolution
photo)
(aecte
uniquement
les photos
xes dans les
modes Appareil
photo ou Saisie
hybride)
5M Pixel,
8M Pixel,
3M Pixel
Sélectionne la résolution pour les
photos de 3 à 8 mégapixels. Une
résolution plus haute produit des
photos de meilleure qualité, mais crée
des chiers plus grands qui prennent
plus de place sur la carte SD (qui
se remplit plus vite). 5M est un bon
compromis entre la qualité et la taille
du chier.
Image
Format
(Format
d'image)
(n'aecte que
les photos. Le
format des
vidéos est lié
à la taille de la
vidéo
Plein écran,
écran large
Sélectionnez le format 4:3 (plein
écran, comme les anciens téléviseurs)
ou 16:9 (grand écran, comme les
nouveaux téléviseurs) pour les photos.
Si vous souhaitez regarder vos
photos sur un téléviseur ou un écran
d'ordinateur, vous pouvez dénir le
format de l'image pour qu'elle s'y
adapte.
Liste des paramètres et réglages du Menu
CONFIGURATION (SETUP) avec descriptions

58
Paramètre Réglages
(Gras=défaut)
Description
Capture
Number
(Nombre de
Photos)
(aecte
uniquement
les photos
xes dans les
modes Appareil
photo ou Saisie
hybride)
1 Photo,
2 Photo,
3 Photo
Sélectionne combien de photos
sont prises en rafale à chaque
déclenchement en mode Appareil
photo. Ce réglage concerne également
les photos prises en mode Field Scan
(pour prendre deux photos toutes les
10 minutes, par exemple). Veuillez
vous référer également au paramètre
INTERVAL (intervalle).
LED Control
(Contrôle des
LED) (Fonction
Multi-Flash)
Faible, Moyen,
Elevé
Contrôle le nombre de LED qui
ashent quand une photo est prise par
faible luminosité. "High" (élevé) = les
33 LED s'allument. C'est le réglage
par défaut. Choisissez "Medium" ou
"Low" si vous obtenez des photos
surexposées ou si vous comptez
placer l'appareil très près du sujet
que vous voulez photographier. En
général, il vous faudra sélectionner «
High » (Élevé) si les sujets visés se
trouvent à plus de 9,2 m de l'appareil
; « Medium » (Normal) s'ils se situent à
une distance entre 4,6 et 9,2 m ; et «
Low » (Faible) s'ils sont à moins de 4,6
m de l'appareil. Remarque: en mode
vidéo, 21 LED s'allument dans les
réglages "High" et "Medium" (réglage
par défaut). Réglez sur "Low" si les
vidéos sont surexposées.

59
Paramètre Réglages
(Gras=défaut)
Description
Camera
Name (Nom
de l'appareil)
(Saisie)
Voir
UTILISATION
DES
ECRANS
DE SAISIE
DU
MENU
SETUP (p. 65)
Permet à l'utilisateur de personnaliser
le nom de l'appareil. Très utile pour
l'identier quand de multiples appareils
sont installés puisque chacun d'entre
eux marque son nom sur toutes les
photos (mais pas sur les vidéos) qu'il
prend.
Video Size
(Résolution
Vidéo) (aecte
uniquement
les séquences
vidéo dans les
modes Video
ou Saisie
hybride)
( Nos de modèle
119676/
119677):
1280x720,
640x360,
320x180
( Nos de modèle
119678):
1920x1080,
1280x720,
640x360
Sélectionne la résolution vidéo (en
pixels par image). Une résolution plus
haute produit des séquences vidéo
de meilleure qualité, mais crée des
chiers plus grands qui prennent plus
de place sur la carte SD (qui se remplit
plus vite). 640 x 480 correspond à une
vidéo VGA au format 16:9
« grand écran ». Le réglage le plus
élevé offre une vidéo HD. Si vous
utilisez les congurations vidéo
1280 x 720 ou 1920 x 1080, il est
recommandé d'utiliser des cartes SD à
grande vitesse (séries SanDisk ® Ultra®
ou Extreme® ou similaires).
Video Length
(Durée
vidéo) (aecte
uniquement
les séquences
vidéo dans les
modes Video
ou Saisie
hybride)
10S (seconde)
par défaut,
avec une plage
possible de 5
s à 60 s
Fixe la durée de chaque séquence
vidéo prise. La durée des vidéos est
xée à 10 secondes par défaut lorsque
le paramètre est sélectionné pour la
première fois. Après être descendus
à 5 s, les réglages de la durée de la
vidéo reprennent à 60 s.

60
Paramètre Réglages
(Gras=défaut)
Description
Interval
(Intervalle)
10S (seconde)
par défaut,
avec une plage
de réglage
disponible
de 60 mn
(minute) à 1 s
(seconde).
(60 mn-1 mn
sont réglés
par incréments
d’une minute,
59S-1S sont
réglés par
incrément
d’une
seconde)
Sélectionne la durée pendant
laquelle l’appareil « attendra » avant
de répondre à des déclenchements
supplémentaires du capteur infrarouge
passif après qu’un mouvement ait
été initialement détecté et reste dans
les limites de la portée du capteur.
Pendant cet intervalle « ignorer
déclenchements » xé par l’utilisateur,
l’appareil ne prendra pas de photos/
vidéos. Ceci empêche que la carte
ne se remplisse d’images superues.
L'intervalle est réglé sur 10s par
défaut.

61
Paramètre Réglages
(Gras=défaut)
Description
Sensor Level
(Sensibilité
du Capteur
infrarouge)
Low (faible),
Normal, High
(élevée), Auto
(automatique)
Sélectionne la sensibilité du capteur
infrarouge passif. Le réglage « High
» rendra l’appareil plus sensible
aux infrarouges (chaleur) et il sera
plus facilement déclenché par les
mouvements, et le réglage « Low » le
rendra moins sensible à
la chaleur et aux mouvements. Le
réglage High peut être utile lorsque
la température ambiante est chaude
(quand il est plus difcile pour le
capteur de détecter les animaux),
et le réglage Low pourra être utile
lorsqu’il fait froid et si l’appareil
se déclenche trop souvent par
n'importe quel élément plus chaud
que l’espace environnant. La valeur
par défaut réglage "Auto" permettra
à l'appareil de déterminer le
meilleur réglage en fonction de sa
température de fonctionnement
actuel. C'est un réglage idéal si des
changements de météo importants
sont prévus pendant la période où la
caméra sera utilisée.
NV Shutter
(Obturateur
pour la vision
nocturne)
High (Élevé),
Medium
(Normal), Low
(Faible)
Affecte la vitesse d'obturation pendant
le fonctionnement en vision nocturne.
L'option « High » (Élevé) gera mieux
les mouvements, mais il se peut que
les photos soient plus sombres. Avec
une vitesse d'obturation plus faible,
on obtient des images plus nettes,
cependant, tout mouvement rapide les
rendra plus oues. L'option « Medium »
(Normal) est donc un bon compromis.

62
Paramètre Réglages
(Gras=défaut)
Description
Camera
Mode (Mode
appareil
photo)
24 Hrs (24
h), Day (Jour),
Night (Nuit)
Permet à l'utilisateur de limiter
le fonctionnement de l'appareil
uniquement pendant le jour ou la nuit,
si nécessaire. Le niveau de lumière
ambiante que perçoit le capteur de
l'appareil détermine automatiquement
s'il fait jour ou nuit. Ce paramètre a la
priorité sur les paramètres Field Scan.
Format
(Formater)
Execute
(Valider)
Efface tous les chiers sauvegardés
sur la carte pour la préparer pour sa
réutilisation. Formatez toujours une
carte qui a été utilisée auparavant dans
d’autres appareils. Avertissement !
Veillez à télécharger et sauvegarder
tous les chiers que vous désirez
conserver ! OK Appuyez sur pour
valider, appuyez sur MENU (ou
sélectionnez No (Non) puis appuyez
sur )OK pour sortir sans formater.
Time Stamp
(Incrustation
Date et Heure)
(concerne
les photos
uniquement)
Off, On Sélectionnez « On » si vous désirez
que la date et l’heure (quand la photo
a été prise) soit incrustées sur chaque
photo, sélectionnez « Off » pour ne
pas les incruster. Le modèle 119678
incruste également la pression
barométrique (uniquement sur les
photos).

63
Paramètre Réglages
(Gras=défaut)
Description
Set Clock
(Réglage
Horloge)
Set ( OKrégler) Appuyez sur et utilisez les
touches HAUT/BAS (pour changer
le réglage) et les touches GAUCHE/
DROITE (pour passer au champ
suivant) pour régler les heures (format
24h uniquement, « 00 »=minuit,
« 12 »=midi) et les minutes, puis (sur
la rangée du bas), l’année, le mois et
la date.

64
Paramètre Réglages
(Gras=défaut)
Description
Field Scan On, Off
(Après avoir
sélectionné
On) : "A"
Démarrage/
Arrêt, "B"
Démarrage/
Arrêt,
Fréquence)
Active/Désactive le mode Field Scan.
Si vous appuyez sur OK alors que «
On » est sélectionné, vous arriverez
à l'écran de conguration mode
Field Scan ; vous pourrez y régler les
horaires de démarrage et d’arrêt en
heures (0-24) et en minutes (00-59).
Cela dénit les horaires quotidiens
de début et de n d’enregistrement
(horloge de 24 heures, donc 13h00
= 1pm). Utilisez la touche de DROITE
pour faire déler les champs, et les
touches HAUT/BAS pour modier
les paramètres. Une fois les minutes
de l'horaire de n (« Stop ») réglées,
la pression suivante sur la èche
de déplacement vers la DROITE
vous mènera à l'écran de réglage de
l'intervalle (fréquence d'enregistrement
de photos ou de vidéos). Vous pouvez
choisir 60, 30, 15, 5 ou 1 minutes
(le réglage par défaut est 5 mn).
REMARQUE : Lorsque le paramètre
Camera mode (Mode appareil photo)
est réglé sur « Day » (fonctionnement
de jour uniquement) ou sur « Night »
(fonctionnement de nuit uniquement),
il aura la priorité sur les paramètres
du mode Field Scan. Réglez le mode
Appareil photo sur « 24HR » (24
h) si vous paramétrez les temps de
démarrage et/ou d'arrêt du mode Field
Scan, pour le fonctionnement de jour
et de nuit.

66
UTILISATION DES ECRANS DE SAISIE DU MENU
SETUP
Saisie du nom de l'appareil
Après avoir sélectionné le paramètre "Camera Name" (nom de la caméra, le
seul réglage possible est "Input"), appuyez sur . Si nécessaire, effacez OK
le nom précédent ou par défaut en appuyant sur le bouton jusqu'à DROITE
ce que le symbole "effacer" ( ) (situé entre les lettres "A" et "B" et entre
"j" et "k") soit surligné puis maintenez la touche enfoncée. Sélectionnez OK
(surlignez) chaque caractère alphanumérique dont vous avez besoin à l'aide
des boutons GAUCHE/DROITE OK , et en validant grâce à . Quand vous
avez renommé l'appareil, appuyez sur MENU pour sauvegarder le nom.
Saisie des coordonnées
Après avoir sélectionné le paramètre "Coordinate Input", appuyez sur HAUT
ou BAS pour sélectionner On et appuyez sur OK. Vous pouvez trouver la
latitude et la longitude de n'importe quel emplacement où vous voulez installer
votre appareil sur de nombreux site Internet. Par exemple : http://itouchmap.
com/latlong.html. Vous pouvez saisir l'adresse d'une rue avoisinante, un
code postal ou utiliser différents types de cartes pour localiser la position
approximative. Le format de saisie des coordonnées dans l'écran de menu
du Trophy Cam HD doit être le suivant :
Longitude
Latitude
W=Ouest,
E=Est
N=Nord,
S=Sud Minutes Secondes
Minutes Secondes
Latitude
en degrés
(3 chires)
Longitude
en degrés
(3 chires)
(La) N000,00'00"
(Lo) W000,00'00"
Remarque : Il se peut que vous trouviez des coordonnées de latitude ou de longitude
négatives en ligne. Elles désignent les latitudes sud et les longitudes ouest. Les
emplacements situés aux Etats-Unis et au Canada auront des coordonnées de latitude
nord (+) et des coordonnées de longitude ouest (-).

67
MONTAGE ET POSITIONNEMENT DU
Trophy Cam HD
Montage
Après avoir conguré les paramètres selon vos préférences, vous êtes
prêt à mettre le commutateur sur la position " " (marche) et à installer ON
le Trophy Cam HD sur le terrain. Lorsque vous congurez le Trophy Cam
HD pour détecter le gibier ou pour toute autre application en extérieur,
vous devez veiller à le mettre en place correctement et solidement. Nous
recommandons de monter le Trophy Cam HD à un arbre robuste d’un
diamètre d’environ 15 centimètres. Pour obtenir la qualité d’image optimale,
l’arbre devra se trouver à environ 5 mètres de l’endroit à surveiller, l’appareil
étant placé à une hauteur de 1,50 à 2 mètres Gardez à l’esprit que vous
obtiendrez les meilleurs résultats de nuit, lorsque le sujet est à portée idéale
du ash, idéalement entre 3 et 19 mètres du Trophy Cam HD.
Il y a deux manières de monter le Trophy Cam HD: en utilisant soit la sangle
réglable fournie, soit le pas de vis situé sous l'appareil.
En utilisant la sangle réglable fournie : Voir la Figure 5. Enlez l’une
des extrémités de la sangle dans l’un ou l’autre des supports à l’arrière du
Trophy Cam HD. Fixez une des parties de la boucle en plastique à chaque
extrémité de la sangle. Attachez solidement la sangle autour du tronc de
l’arbre en connectant ensemble les extrémités de la boucle jusqu’à ce
qu’il y ait un déclic, après avoir serré la sangle de manière à ce qu’elle ne
soit pas lâche.
En utilisant le pas de vis situé sous l’appareil : L’appareil est équipé
d’un pas de vis à son extrémité inférieure pour permettre de le monter à
Fig. 5: Fixation de la sangle

69
secondes. Cela vous laissera assez de temps pour fermer et verrouiller le
couvercle avant du Trophy Cam HD et sortir de la zone. Pendant ce temps,
le voyant LED de l’indicateur de mouvements clignotera en rouge de manière
continue. Après qu’il se soit arrêté de clignoter, l’infrarouge passif sera
activé, et tout mouvement qu’il détectera déclenchera la prise de photos ou
de vidéos selon la programmation faite dans le menu CONFIGURATION
(SETUP). Assurez-vous d’avoir lu les descriptions des paramètres du
nombre de photos, de la durée de la vidéo, de l’intervalle et de la sensibilité
du capteur infrarouge. Veuillez noter que l’infrarouge passif est très sensible
à la température ambiante. Plus la différence de température est élevée entre
l’environnement et votre sujet, plus la distance de détection possible est
grande. La distance de détection moyenne est d’environ 15 mètres.
Avant de laisser l’appareil, veuillez vérier les choses suivantes:
• Les piles ou l’alimentation externe sont elles installées/branchée
en respectant la polarité, et la puissance de l’alimentation est-elle
sufsante ?
• La carte SD a-t-elle assez d’espace disponible et le curseur de
protection contre l’écriture situé sur la carte SD est-il sur off ?
• Le commutateur d’alimentation est-il en position ? Ne MARCHE (ON)
le laissez pas sur CONFIGURATION (SETUP).
À propos du bouclier ARD (dispositif antireet)
Une grille de ltration amovible (baptisée ARD - AntiReective Device) couvre
le ash LED, de telle sorte que la réexion de la lumière sur le panneau noir
protégeant les LEDs est considérablement réduite. Cela permet d'éviter la
détection de la caméra par les animaux (et les humains). Si vous préférez
obtenir la puissance lumineuse maximale du ash LED plutôt que camouer
l'appareil, vous pouvez facilement retirer la grille du ARD en insérant un petit
tournevis, une clé, etc. dans la fente située sur la partie centrale inférieure du
ARD (au-dessus de l'objectif de l'appareil photo) et en tirant doucement vers
le haut de l'appareil . (voir p. 43)

70
VISIONNER/EFFACER LES PHOTOS/VIDÉOS
Après avoir conguré, monté et activé votre Trophy Cam HD, vous aurez
bien sûr hâte de revenir plus tard et regarder les photos (ou les vidéos) qu’il
aura prises pour vous. Il y a plusieurs manières différentes de visionner les
photos/vidéos prises.
Visionnage direct sur la carte SD
C’est la méthode la plus simple pour visionner des images. Vous n’avez
qu’à retirer la carte SD du Trophy Cam HD. En rentrant chez vous, il vous
suft de mettre cette carte dans l'emplacement prévu à cet effet, soit dans
votre ordinateur ou votre télévision (si elle est équipée d’un lecteur de carte
SD). De cette façon vous pouvez laisser le Trophy Cam HD en place sur le
terrain, prêt à prendre plus de photos. Une fois branché, le lecteur de carte
fonctionne comme expliqué ci-dessous.
Visionnage sur un ordinateur
Vous pouvez également retirer le Trophy Cam HD de l’arbre sur lequel vous
l’avez installé, et le brancher au port USB d’un ordinateur-il sera reconnu
comme un « disque amovible », sans avoir besoin d’installer de pilote ou de
logiciel. Lorsque vous utiliser un PC (ou Mac*) pour visionner des photos
(ou des séquences vidéo*), branchez d’abord l’appareil à l’ordinateur avec
le câble USB fourni. Puis, utilisez un logiciel de visualisation d’images
disponible dans le commerce, ou le navigateur inclus avec le système
d’exploitation du PC pour visionner les images sauvegardées sur la carte
SD dans le dossier \ DCIM\100EK113 (un nouveau dossier est créé toutes
les 1 000 images). Les vidéos et les photos sont numérotés dans l'ordre où
elles ont étés prises. Vous trouverez, par exemple, des noms de chier tels
que "EK0001.JPG" ou "EK0001.avi", etc. Grâce à l'extension du nom de
chier, vous pouvez déterminer si le chier est une photo (avec l'extension
.jpg) ou une vidéo (avec l'extension .avi).
*Un logiciel supplémentaire pourra être nécessaire pour visionner les
chiers vidéo « AVI » sur un Mac.

72
Avec Windows XP ou plus récent, vous n’avez qu’à faire votre choix dans
la fenêtre qui apparaîtra au moment du branchement du Trophy Cam HD
à un port USB de votre ordinateur. Vous pourrez ainsi copier, visionner ou
imprimer vos photos (voir capture d’écran ci-contre).
Le Trophy Cam HD sera reconnu comme un « Disque
amovible » si vous ouvrez la fenêtre « Mon ordinateur »
(sur les Macs, une icône apparaîtra sur votre bureau).
Les fichiers photos du Trophy Cam HD sont appelés
« PICT0001.JPG » etc., et se trouvent dans le dossier
« DCIM\100EK113 » sur ce « Disque amovible ». Les
noms des fichiers vidéo se termineront par « .avi ».
Vous pouvez copier les photos/vidéos sur votre disque
dur comme vous le feriez pour n’importe quel fichier -
copiez/ collez simplement ou glissez/posez vers votre
disque dur ou sur votre bureau.
Après que les photos aient été copiées sur votre disque dur, vous pouvez
débrancher le Trophy Cam HD. (Sur les ordinateurs Mac, une icône
apparaîtra sur votre bureau) Il est possible de visionner ou d’éditer les fichiers
au standard .jpg du Trophy Cam HD avec n’importe quel logiciel photo de
votre choix. Il est également possible de visionner les fichiers vidéos .avi
avec Windows Media Player (version 7 ou plus récente) ou un autre lecteur
similaire
* Il est possible qu’un logiciel supplémentaire soit nécessaire pour
visionner les chiers vidéo « AVI » sur un Mac.

79
Résolution Maximale 3264x2448 (8 MP)
Objectif Focale = 3,1 ; Champ de Vision = 42 ° ; Infrarouge à
activation automatique
Portée du ash
infrarouge
Sélectionnable par l'utilisateur (High/Med/Low, c.-à-d.
Élevé/Normal/Faible), jusqu'à 19 m si le paramétrage
est réglé sur « High » (Élevé).
Écran d’afchage Afchage noir et blanc : 24x32 mm(1.5 pouces)
Carte mémoire SD ou SDHC, capacité maximum 32 Go
Mémoire interne 32 Mo
Taille des photos 8MP = 3264x2448; 5MP = 2592x1944;
3MP =1920x1440
Taille des vidéos
1280x720, 640x360, 320x180 (119676/119677) ou
1920x1080, 1280x720, 640x360 (119678) pixels par
image à 20-30 fps (jour) / 15-20 fps (nuit)
Sensibilité de
l’infrarouge passif
Infrarouge passif avec 4 réglages de sensibilité : Faible /
Normal / Elevé / Auto
Fonctionnement
Sélectionnable par l'utilisateur : 24 Hour (24 h), Day only
(Jour uniquement), or Night only (Nuit uniquement), en
fonction du niveau de lumière ambiante
Vitesse de
déclenchement 0,2 s
Intervalle de
déclenchement Programmable 1s - 60 mn
Nombres de prises de
vue en rafale Programmable 1– 3
Durée des vidéos Programmable 5-60s
Alimentation 8xAA (119676/119677) ou 12xAA (119678)
recommandées, 4xAA alimentation d’urgence
Consommation en
stand-by (veille) <0,25 mA (<7 mA/jour)
Consommation 250 mA (+1300 mA lorsque LED-IR allumé)
Vitesse d'obturation
pour la vision nocturne
Sélectionnable par l'utilisateur (High/Med/Low, c.-à-d.
Élevé/Normal/Faible) – affecte uniquement la vision
nocturne des photos/vidéos.
Interface USB ; emplacement pour carte mémoire ; prise pour
alimentation externe (>7.5v)
Sécurité Sangle ; letage (¼-20) sous l’appareil pour xation
sur pied
Température de
fonctionnement
De -20°C à +60°C
(température de stockage : de -30°C à +70°C)
Taux d’humidité pour
un bon fonctionnement 5% - 90%
CARACTÉRISTIQUES TECHNIQUES
Specyfikacje produktu
| Marka: | Bushnell |
| Kategoria: | kamera |
| Model: | Trophy Cam 119678 |
Potrzebujesz pomocy?
Jeśli potrzebujesz pomocy z Bushnell Trophy Cam 119678, zadaj pytanie poniżej, a inni użytkownicy Ci odpowiedzą
Instrukcje kamera Bushnell

30 Grudnia 2025
30 Grudnia 2025
8 Grudnia 2024
8 Grudnia 2024
8 Grudnia 2024
13 Października 2024
4 Października 2024
2 Października 2024
17 Września 2024
12 Września 2024
Instrukcje kamera
- kamera Sony
- kamera Samsung
- kamera Leica
- kamera Logitech
- kamera Xiaomi
- kamera Joy-It
- kamera Braun
- kamera Lenovo
- kamera TP-Link
- kamera Philips
- kamera SilverCrest
- kamera Acer
- kamera Epson
- kamera Hikvision
- kamera EZVIZ
- kamera Panasonic
- kamera Canon
- kamera Mio
- kamera Viewsonic
- kamera Nedis
- kamera Reolink
- kamera Medion
- kamera Lenco
- kamera Fujifilm
- kamera D-Link
- kamera GE
- kamera Ring
- kamera Garmin
- kamera Imou
- kamera Blaupunkt
- kamera IOptron
- kamera Casio
- kamera Sigma
- kamera HP
- kamera Prixton
- kamera SJCAM
- kamera Creative
- kamera Swann
- kamera Nikon
- kamera Ozito
- kamera Kodak
- kamera Cisco
- kamera Scosche
- kamera DJI
- kamera Zenit
- kamera Gembird
- kamera Minox
- kamera Cobra
- kamera JVC
- kamera Trust
- kamera Fimi
- kamera AgfaPhoto
- kamera Vimar
- kamera Dahua Technology
- kamera Kyocera
- kamera Eufy
- kamera Ricoh
- kamera Rollei
- kamera Netgear
- kamera Velleman
- kamera Bolex
- kamera Pyle
- kamera Vtech
- kamera Speco Technologies
- kamera ARRI
- kamera Fluke
- kamera Olympus
- kamera Avaya
- kamera National Geographic
- kamera Maginon
- kamera SPC
- kamera Polaroid
- kamera Konica Minolta
- kamera Sanyo
- kamera Red Digital Cinema
- kamera Oregon Scientific
- kamera Lorex
- kamera Optoma
- kamera Bresser
- kamera Hama
- kamera GoPro
- kamera TomTom
- kamera Denver
- kamera Anker
- kamera Pentax
- kamera Berger & Schröter
- kamera Marshall Electronics
- kamera Hitachi
- kamera Emerson
- kamera SereneLife
- kamera Vemer
- kamera Azden
- kamera AVerMedia
- kamera RCA
- kamera Genius
- kamera Levenhuk
- kamera BenQ
- kamera Trevi
- kamera Technaxx
- kamera Lexibook
- kamera Hanwha
- kamera Sencor
- kamera Powerfix
- kamera Blackmagic Design
- kamera Foscam
- kamera Lumens
- kamera Daewoo
- kamera Dörr
- kamera Best Buy
- kamera EVE
- kamera POV
- kamera Elmo
- kamera UniView
- kamera Laserliner
- kamera Vivitar
- kamera PTZ Optics
- kamera Agfa
- kamera Argus
- kamera Easypix
- kamera Celestron
- kamera Yashica
- kamera Flir
- kamera Daitsu
- kamera Arlo
- kamera Nest
- kamera Ansco
- kamera Intel
- kamera Mamiya
- kamera Konig
- kamera Fuji
- kamera Minolta
- kamera Zorki
- kamera EverFocus
- kamera RunCam
- kamera SeaLife
- kamera Burris
- kamera Liiv360
- kamera Watec
- kamera Meade
- kamera Contax
- kamera Sinji
- kamera Traveler
- kamera Exakta
- kamera Digital Watchdog
- kamera MuxLab
- kamera AViPAS
- kamera ZeissIkon
- kamera Silvergear
- kamera Spypoint
- kamera HOLGA
- kamera Praktica
- kamera Hasselblad
- kamera Moto Mods (Motorola)
- kamera Fantasea Line
- kamera Kogan
- kamera Getac
- kamera Brinno
- kamera Z CAM
- kamera General
- kamera Ergoguys
- kamera Strex
- kamera General Electric
- kamera Leotec
- kamera Leitz Focomat IIc
- kamera Syrp
- kamera Cosina
- kamera Videology
- kamera InfiRay
- kamera Pelco
- kamera Videotec
- kamera Cambo
- kamera Kobian
- kamera Kyocera Yashica
- kamera Bauhn
- kamera Konica
- kamera Akaso
- kamera Seek Thermal
- kamera Aida
- kamera Ikegami
- kamera Ikelite
- kamera Adeunis
- kamera Hoppstar
- kamera Moultrie
- kamera PatrolEyes
- kamera Camouflage
- kamera HuddleCamHD
- kamera Aplic
- kamera Linhof
- kamera GoXtreme
- kamera KanDao
- kamera Aquapix
- kamera Kraken Sports
- kamera Voigtlander
Najnowsze instrukcje dla kamera

9 Kwietnia 2025

9 Kwietnia 2025

3 Kwietnia 2025
2 Kwietnia 2025
1 Kwietnia 2025
29 Marca 2025
29 Marca 2025
27 Marca 2025
27 Marca 2025
27 Marca 2025