Instrukcja obsługi Brother HL-L6415DW
Przeczytaj poniżej 📖 instrukcję obsługi w języku polskim dla Brother HL-L6415DW (2 stron) w kategorii drukarka. Ta instrukcja była pomocna dla 11 osób i została oceniona przez 2 użytkowników na średnio 4.5 gwiazdek
Strona 1/2
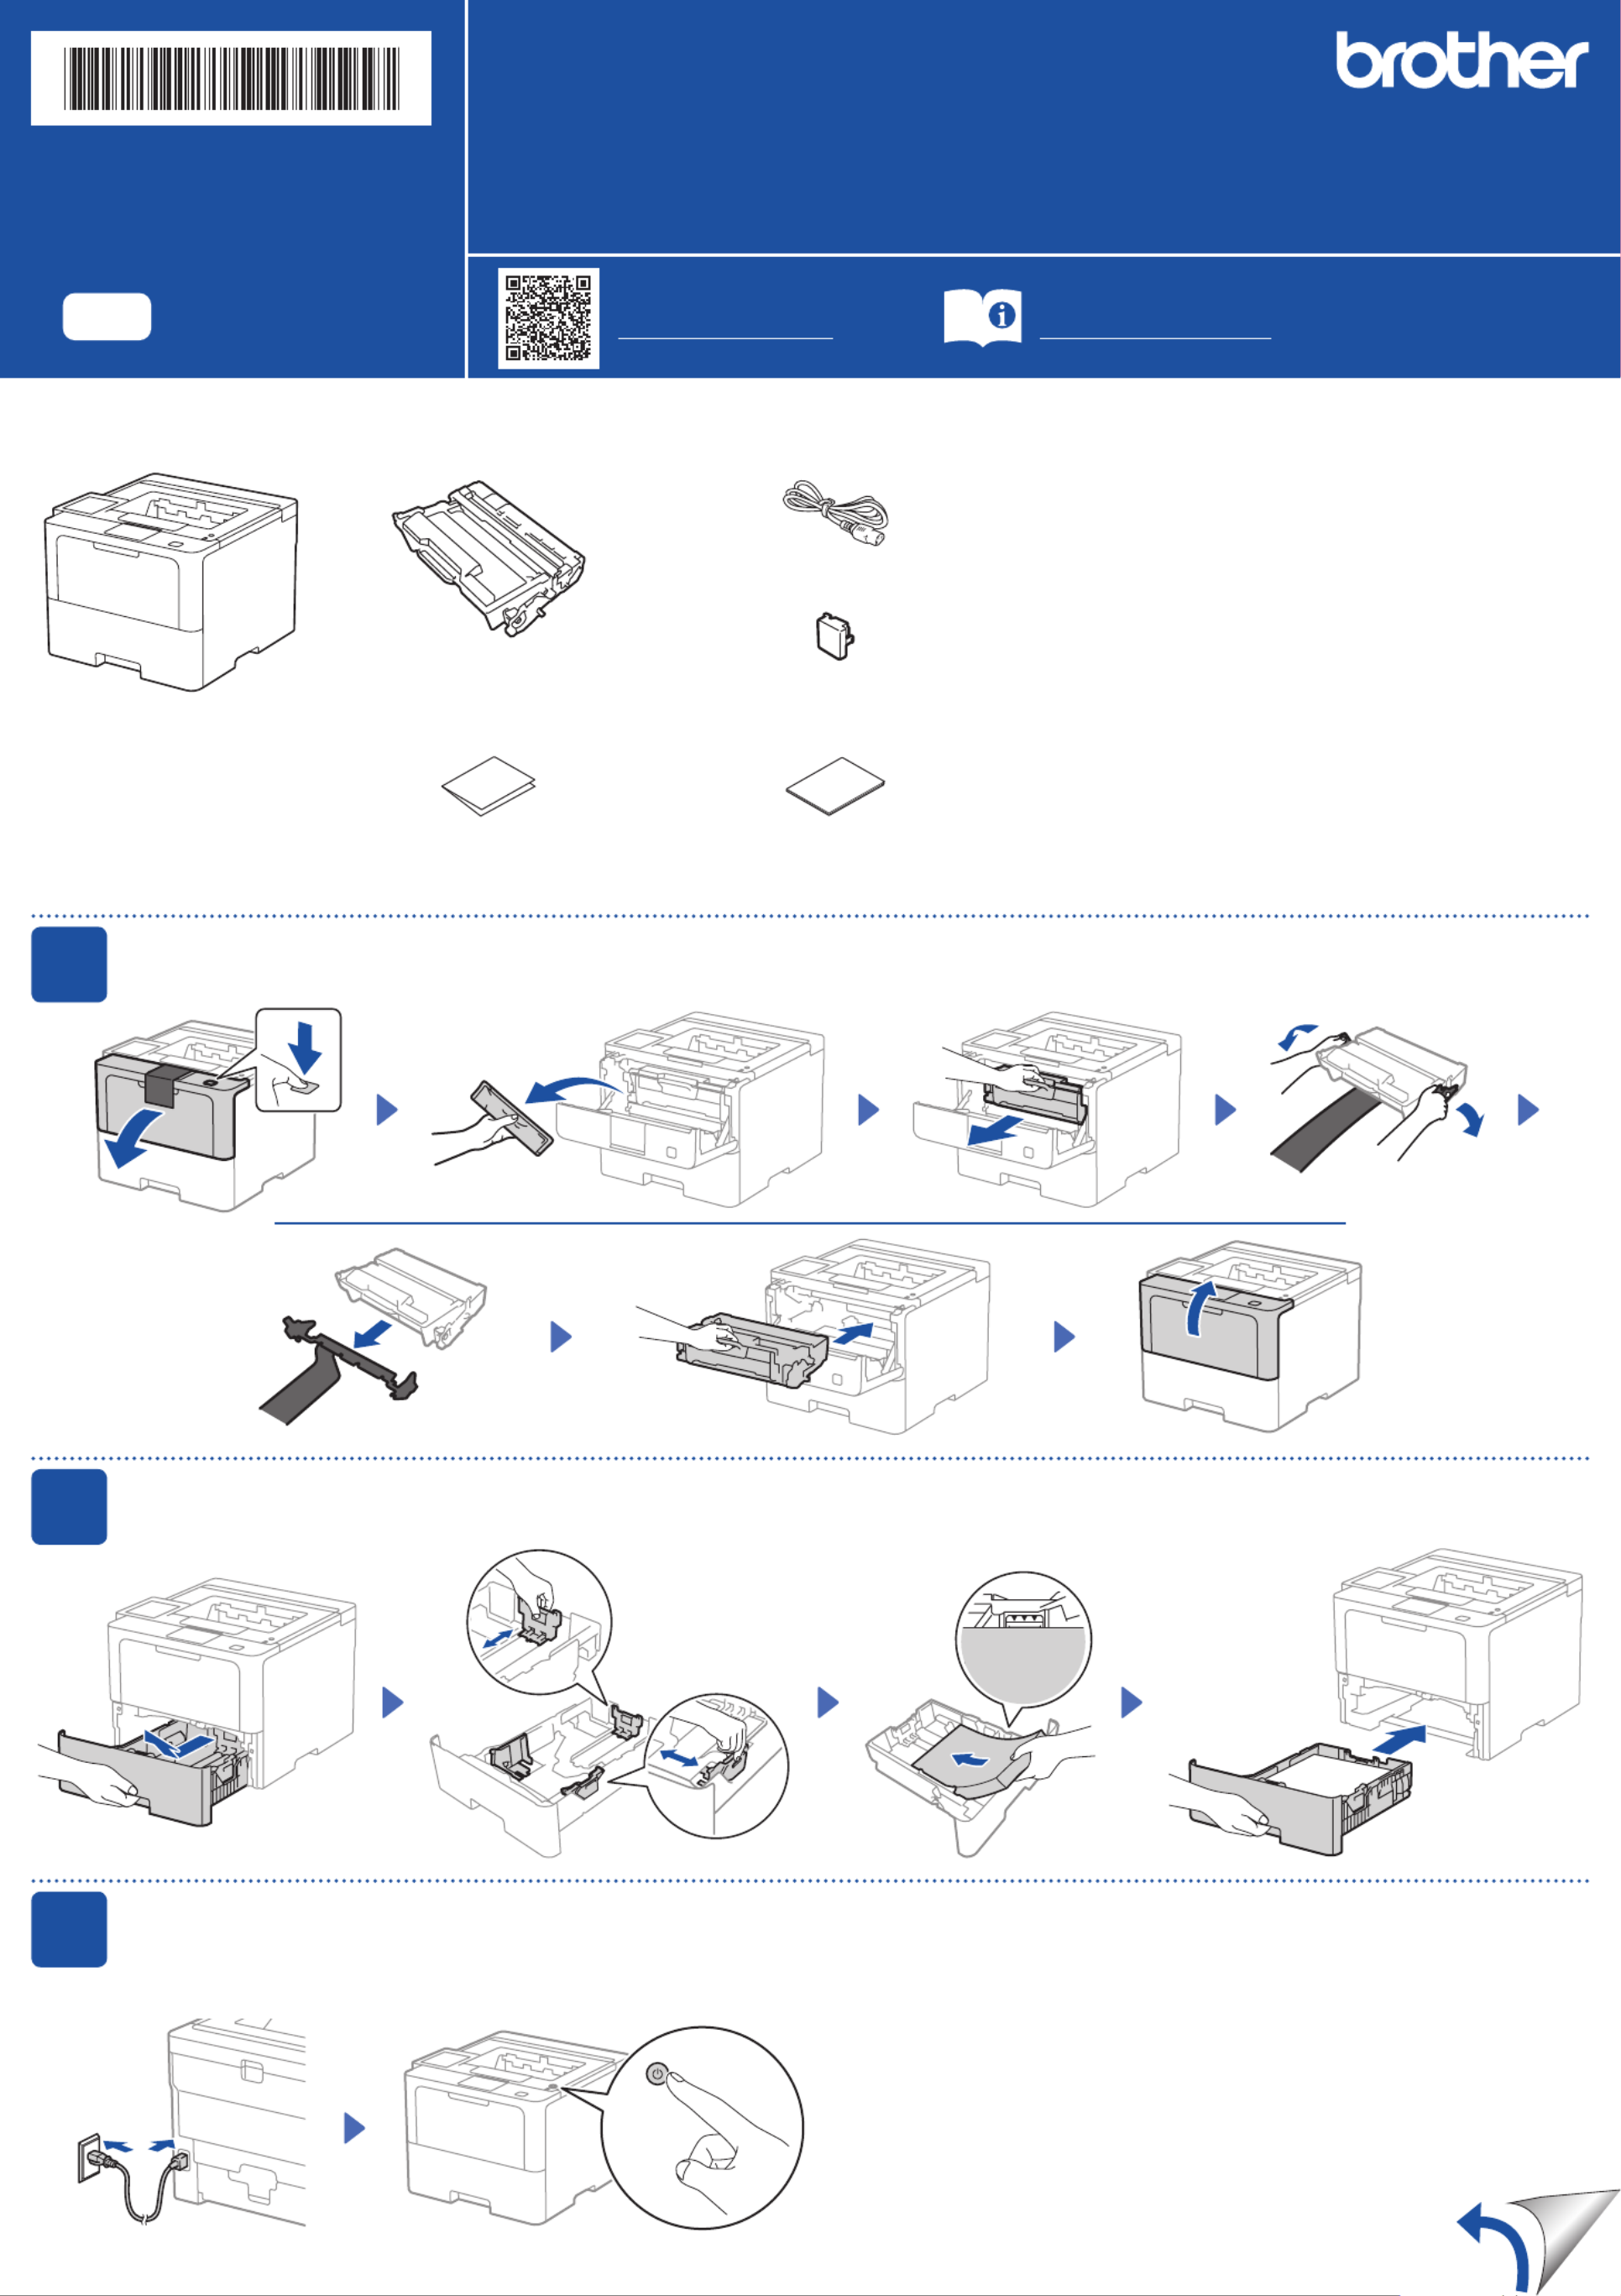
Unpack the machine and check the components
AC Power Cord
USB Port Cover
(Not included in all models)
Toner Cartridge and Drum Unit
Assembly
(Installed in the machine)
Quick Setup Guide Product Safety Guide
1Remove the packing materials and re-install the toner cartridge and drum unit assembly
2Load paper in the paper tray
Adjust the paper
guides.
3Connect the power cord and turn the machine on
Back Front
Do not exceed this mark.
Power button location may vary depending
on the model.
NOTE:
•The components included in the box may differ depending on your
country.
•The available connection interfaces vary depending on the model.
You must purchase the correct interface cable if you require one.
• USB cable
We recommend using a USB 2.0 cable (Type A/B) that is no more
than 2 metres long.
• Network cable
Use a straight-through Category 5 (or greater) twisted-pair cable.
•The illustrations in this show the HL-L6415DW.Quick Setup Guide
Remove the orange part.
Discard the silica
gel pack.
Quick Setup Guide
Read the for the correct installation procedure.Product Safety Guide Quick Setup Guidefirst,thenreadthis
Not all models are available in all countries.
The latest manuals are available at the Brother support website:
support.brother.com/manuals
Video setup instructions:
support.brother.com/videos
EN
HL-L5210DN / HL-L5210DW / HL-L6210DW / HL-L6410DN / HL-L6415DW
D02DT9001-00
OCE/ASA/SAF/GLF/TWN
Version 0

4
Select your language (if needed)
1. Press▼or▲toselect ,and[Initial Setup]
then press .OK
2. Press▼or▲toselect ,and[Local Language]
then press .OK
3. Press▼or▲toselectyourlanguage,andthen
press .OK
4. Press .Cancel
For LCD models For touchscreen models
1. Onthemachine’stouchscreen,press
[Settings] [All Settings] > >
[Initial Setup] [Local Language] > .
2. Press your language.
3. Press .
5Connect your computer or mobile device to your machine
Follow these steps to complete the setup using one of the connection types available on your machine.
Can’t Connect? Check the following:
Restart your wireless access point/
router (if possible).
Disconnect the cable.
Wired network
USB connection
Ifstillnotsuccessful,goto .
Ifstillnotsuccessful,visitsupport.brother.com
for FAQs and Troubleshooting.
Restart your machine and
computer,andthengoto .
6Manual wireless setup (Wireless models)
Find your SSID (Network Name) and
Network Key (Password) on your wireless
access point/router and write them in the
table provided below.
SSID
(Network Name)
Network Key
(Password)
Ifyoucannotfindthisinformation,ask
your network administrator or wireless
access point/router manufacturer.
SSID: XXXXXXX
Network Key: XXXX
For LCD models
Toselectmenuoptions,press
▲or▼,andthenpressOK to
confirm.
Select > [Network]
[WLAN(Wi-Fi)] >
[Find Network].
Follow the LCD instructions.
For touchscreen models
Press >
[Find Wi-Fi Network].
Follow the LCD instructions.
Go to to install software.
Ifsetupisnotsuccessful,restartyour
Brother machine and your wireless
accesspoint/router,andrepeat .
Ifstillnotsuccessful,visit
support.brother.com.
Select the SSID (Network Name) for your
access point/router and enter the Network
Key (Password).
Whenthewirelesssetupissuccessful,the
touchscreen/LCD displays .[Connected]
Important Notice for Network Security:
The default password to manage this
machine’s settings is located on the back of
the machine and marked “ ”. Pwd
We recommend immediately changing the
default password to protect your machine from
unauthorised access.
Visit setup.brother.com to download and install
Brother software.
Follow the on-screen
instructions and
prompts.
setup.brother.com
Setup Finished
You can now print using your
machine.
Tocheckforthelatestfirmware,
visit support.brother.com/up7.
For LCD models
Pressandhold(orpressrepeatedly)▲/▼
to select one of the following characters:
0123456789abcdefghijklmnopqrstuvwxyz
ABCDEFGHIJKLMNOPQRSTUVWXYZ
(space)!"#$%&'()*+,-./:;<=>?@[\]^_‘{|}~
Ifthewirelesssetupisnotsuccessful,trytosetuptheconnectionmanually.
Forcertainmodels,thewirelessnetworkconnectioncanbeusedonlywhentheoptionalWirelessModuleisinstalled.
Fordetailedmachineinformationandproductspecifications,seetheOnline User's Guide at support.brother.com/manuals. ©2023BrotherIndustries,Ltd.Allrightsreserved.
Wireless network*
*Forcertainmodels,thewirelessnetworkconnectioncanbeusedonlywhentheoptionalWirelessModuleisinstalled.
NOTE:
ForWindowsonly,CDinstallationisalsoavailable
(for some countries).
D02DT9001-00
Specyfikacje produktu
| Marka: | Brother |
| Kategoria: | drukarka |
| Model: | HL-L6415DW |
Potrzebujesz pomocy?
Jeśli potrzebujesz pomocy z Brother HL-L6415DW, zadaj pytanie poniżej, a inni użytkownicy Ci odpowiedzą
Instrukcje drukarka Brother

11 Marca 2025
11 Marca 2025
10 Marca 2025
11 Lutego 2025
11 Lutego 2025
10 Lutego 2025
13 Stycznia 2025
10 Stycznia 2025
5 Stycznia 2025
2 Stycznia 2025
Instrukcje drukarka
- drukarka Sony
- drukarka Samsung
- drukarka LG
- drukarka Xiaomi
- drukarka Sharp
- drukarka Huawei
- drukarka Lenovo
- drukarka Epson
- drukarka Fujitsu
- drukarka Roland
- drukarka Panasonic
- drukarka StarTech.com
- drukarka Canon
- drukarka Fujifilm
- drukarka MSI
- drukarka Toshiba
- drukarka D-Link
- drukarka Citizen
- drukarka HP
- drukarka Honeywell
- drukarka Kodak
- drukarka Testo
- drukarka Primera
- drukarka Xerox
- drukarka Godex
- drukarka Olivetti
- drukarka Zebra
- drukarka Dell
- drukarka Digitus
- drukarka AgfaPhoto
- drukarka Kyocera
- drukarka Ricoh
- drukarka Seiko
- drukarka Renkforce
- drukarka Thomson
- drukarka AVM
- drukarka Velleman
- drukarka Dymo
- drukarka Panduit
- drukarka Olympus
- drukarka OKI
- drukarka Mitsubishi
- drukarka Intermec
- drukarka NEC
- drukarka Polaroid
- drukarka Konica Minolta
- drukarka Bixolon
- drukarka Pantum
- drukarka Olympia
- drukarka Datamax O'Neil
- drukarka DNP
- drukarka Equip
- drukarka ZKTeco
- drukarka TSC
- drukarka HiTi
- drukarka Microboards
- drukarka Triumph-Adler
- drukarka Fargo
- drukarka Entrust
- drukarka Brady
- drukarka Tomy
- drukarka Lexmark
- drukarka Sagem
- drukarka Nilox
- drukarka Argox
- drukarka Royal Sovereign
- drukarka Minolta
- drukarka Oce
- drukarka Paxar
- drukarka IDP
- drukarka Metapace
- drukarka Ultimaker
- drukarka Ibm
- drukarka CSL
- drukarka Toshiba TEC
- drukarka Frama
- drukarka Builder
- drukarka Kogan
- drukarka Star Micronics
- drukarka Posiflex
- drukarka Dascom
- drukarka GG Image
- drukarka Vupoint Solutions
- drukarka Elite Screens
- drukarka DTRONIC
- drukarka Phoenix Contact
- drukarka Epson 7620
- drukarka Star
- drukarka EC Line
- drukarka Colop
- drukarka Approx
- drukarka Fichero
- drukarka Raspberry Pi
- drukarka Unitech
- drukarka Middle Atlantic
- drukarka Evolis
- drukarka Tally Dascom
- drukarka Custom
- drukarka Nisca
- drukarka Sawgrass
Najnowsze instrukcje dla drukarka

5 Marca 2025
27 Lutego 2025
27 Lutego 2025
25 Lutego 2025
25 Lutego 2025
25 Lutego 2025
25 Lutego 2025
21 Lutego 2025
20 Lutego 2025

13 Lutego 2025