Instrukcja obsługi Aqara Hub M2
Aqara
inteligentny dom
Hub M2
Przeczytaj poniżej 📖 instrukcję obsługi w języku polskim dla Aqara Hub M2 (80 stron) w kategorii inteligentny dom. Ta instrukcja była pomocna dla 11 osób i została oceniona przez 2 użytkowników na średnio 4.5 gwiazdek
Strona 1/80


Aqara Hub M2 Quick Start Guide · 01
Hub M2使用說明書 · 11
Bedienungsanleitung des Hub M2 · 17
Manuale di istruzione del Hub M2 · 25
Manual de usuario de Hub M2
Mode d’emploi pour Hub M2
· 33
· 41
Руководство пользователя Hub М2 · 50
Hub M�取扱説明書 · 59
허브 M2사용설명서 · 67
* This product is for indoor use only.
Product Introduction
The Aqara Hub M2 is a smart home control center. It can be connected with a WiFi or Ethernet
network, and supports interaction and connection with Aqara Zigbee accessories. It also has an
IR remote control function, which can add and manage the control of different IR devices. The
Aqara Hub M2 allows you to control your Aqara accessories more conveniently.
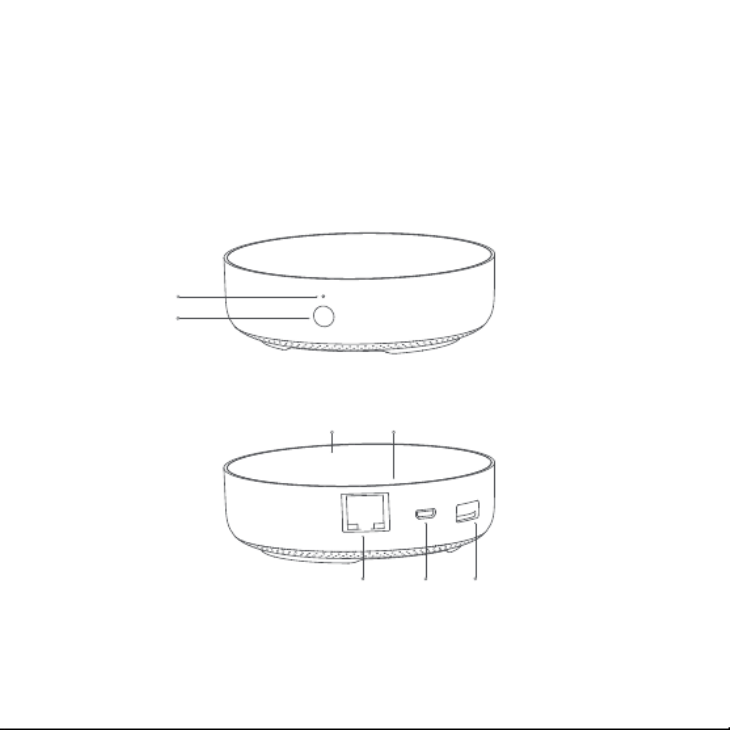
Indicator light
Button
LAN Port Micro-B
Power Port
USB Type A Port
(Reserved)
Infrared emission area Infrared receiving area
01

02
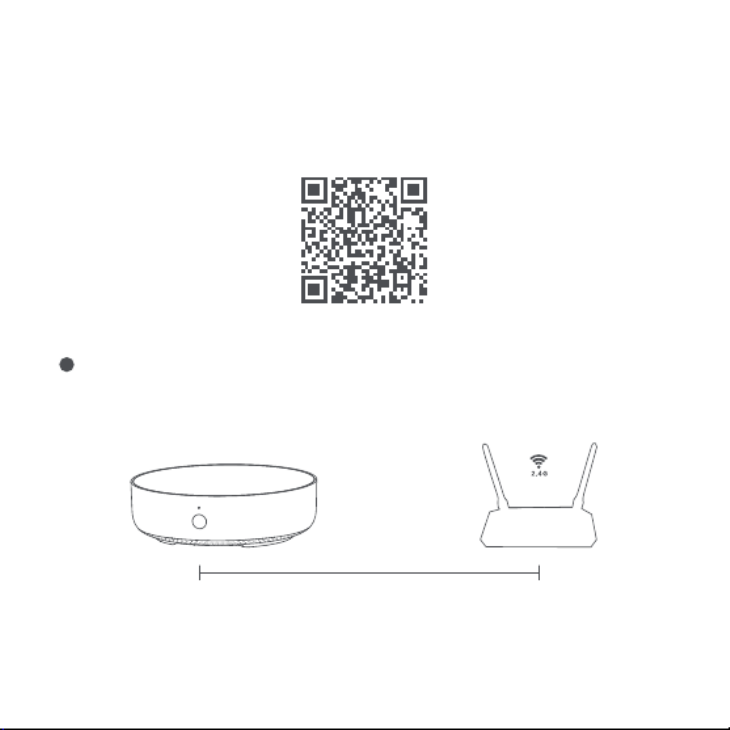
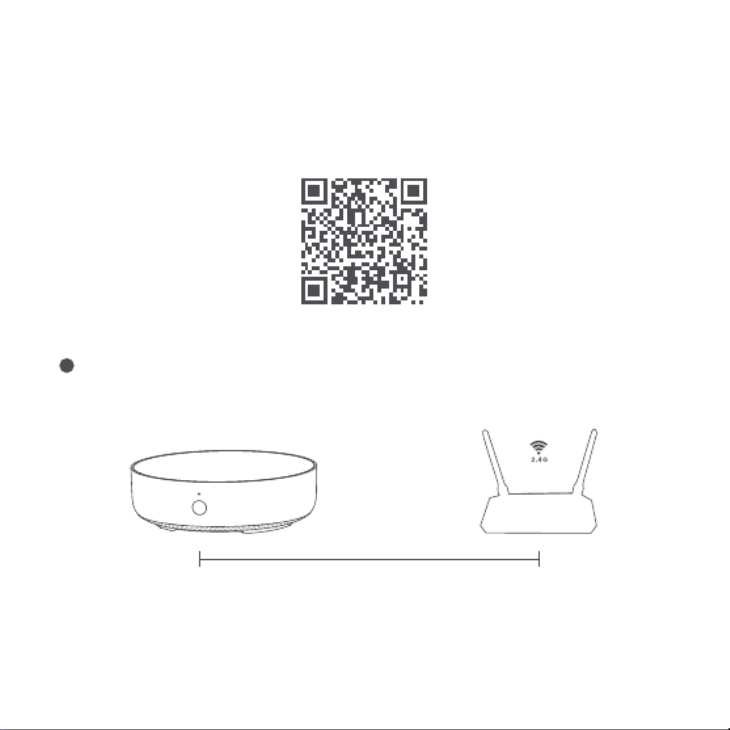
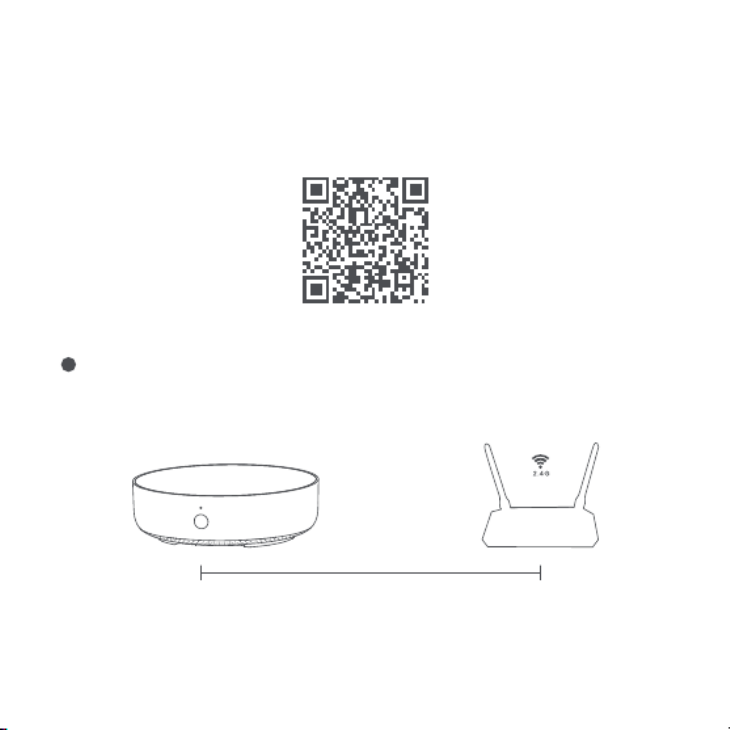
Search for "Aqara Home" on the app store (Apple Store , Google Play ,Huawei App Gallery etc) or
scan the QR code. Download and install the Aqara Home app.
Quick Setup
1. Download the app
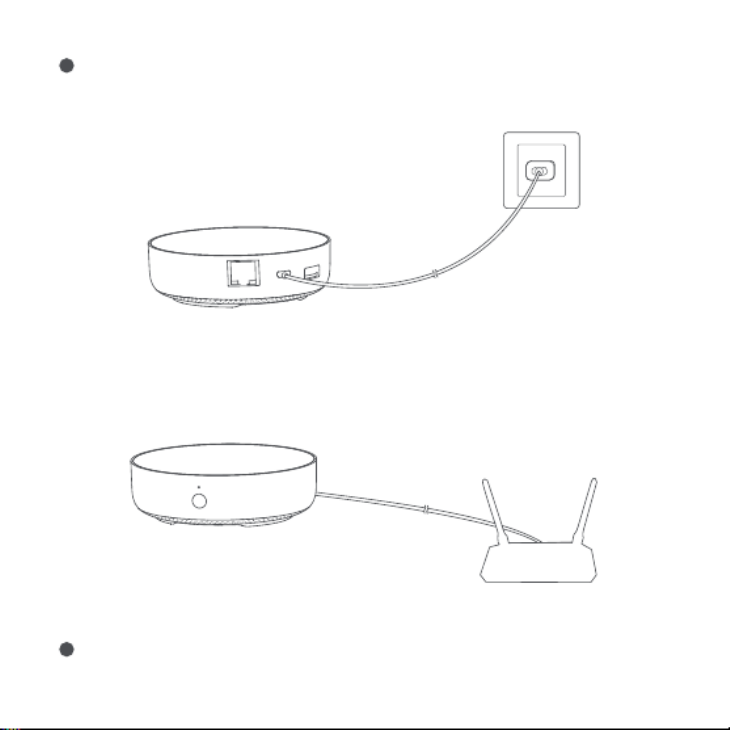
Choose the installation location of the hub: the hub should be 2-6 meters away from the
router in the house, and avoid metal obstacles between the hub and the router or around the
hub.
2. Set up the hub
2m~6m
1

03
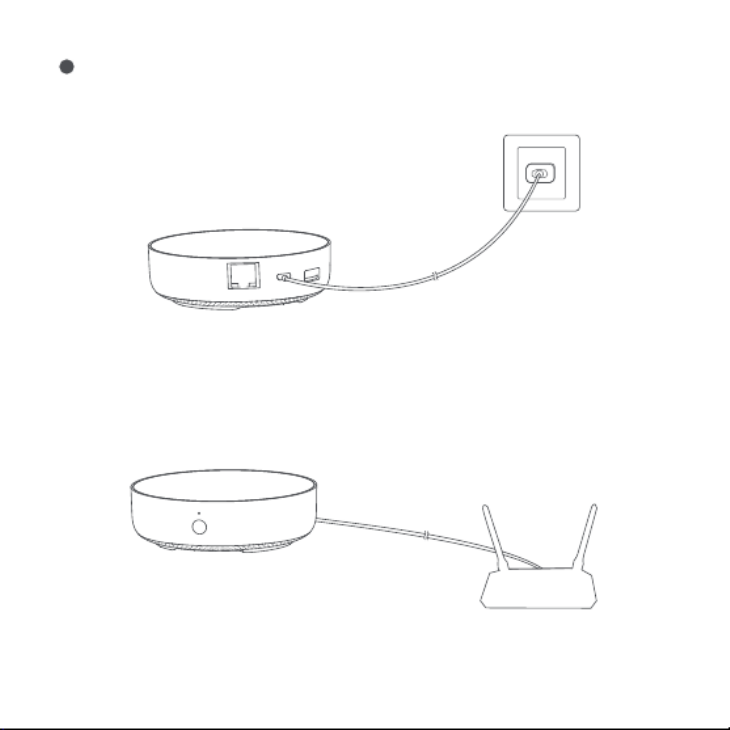
* If you need to use wired network communication between the hub and the router, please use a network cable
with RJ45 network port to connect the LAN ports of the hub and your router, and wait for the orange and green
lights on the side of the network port to light up.
Power the hub on: please use the 5V-1A or 5V-2A adapter (purchase it separately) and the USB
power cable to power the hub on.
2
04
Wait for the yellow/red hub indicator light to change from always on to flashing.
Make sure that the mobile phone is connected with the 2.4GHz Wi-Fi network.
3
4
*
*
If you use a dual-band router, please make sure your phone is connected with 2.4GHz Wi-Fi or disable 5GHz Wi-Fi.
Keep your phone close to the hub and make sure both of them are connected with the same Wi-Fi network.
* For iOS users, if you want to realize Apple HomeKit control, please scan or manually enter the HomeKit Setup
Code (keep the code in a safe place in case you need to add it again) on the bottom of the hub or on the manual
according to the app instructions during the hub adding process, and bind the hub to HomeKit. Aer it is bound
successfully, you can view the added hub in Apple Home app.
Please open the Aqara Home app, click “+” in the upper right corner, select “Hub M2” and
follow the instructions to complete adding the hub.
If you fail to add the hub, please press the button on the hub for more than 10 seconds until
the yellow/red light flashes quickly, and then add it again. If you need any help, please
contact www.aqara.com/en/support.html.
5
6
*
*
*
*
*
*
Please make sure the device is connected with the 2.4GHz Wi-Fi network.
Wi-Fi name or password may contain special characters. Please replace them with ordinary characters and try
again.
The device does not support the WAP/WAP2 Wi-Fi network.
Please check whether the router turns on the Wi-Fi connection watcher function, which causes network
connection failures.
Please check whether the router turns on the AP isolation function, which causes the phone to not be able to
search for the hub within the LAN.
It is recommended not to connect it to a bridge network.
If the device could not be added, please follow these steps:

05
*
*
*
”Failed to add accessory”. Due to multiple adding failures, the error information of iOS cache cannot be removed.
Please restart the iOS device and reset the hub.
”Accessory already added”. Aer restarting the iOS device and reset the hub, you can manually enter the HomeKit
setup code and add it again.
”Accessory not found”. Please wait for 3 minutes aer resetting the hub. You can manually enter the HomeKit setup
code and add it again.
Trouble adding to HomeKit :
3. Device Operations
Add an accessory: aer the hub is successfully added, please refer to the accessory
installation guide to add an accessory.
Control IR home appliances: please configure the brands and models of the IR home
appliances you need to control in the app according to the app guidelines, and then perform
the corresponding app control and automation control.
1
2
4. Restore to Factory Settings
Quick press the button on the hub ten times.

06
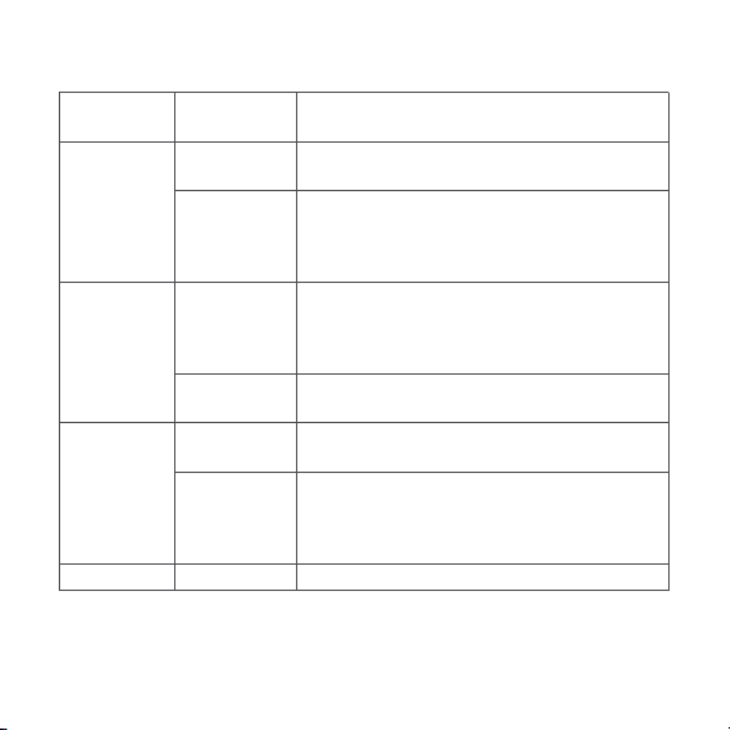
Indicator Light Description
Light Color Description
Yellow/Red
Aer the hub powers on, the system is starting up.
The hub enters the initialization status, waiting for
network connection; Flashing appears aer the first
use or within fieen minutes aer the reset
Light Status
Steady on
Flashing
Blue
Wi-Fi is connecting; the hub is connecting to the
network.
Working normally
White The hub enters the network connection failure
status; only aer you power the hub on/off or reset
the hub, it can enter the status to wait for the
network connection
Purple The hub is allowed to add accessoriesFlashing
Steady on
Flashing
Steady on
Flashing
Wi-Fi is connecting; app is connecting to the hub;
the network is down; the hub is reconnecting to the
network aer it is powered off and on
*Due to updates to the device firmware the actual operation may be slightly different from the above description. ,
Please follow the instructions in the current version of the Aqara Home app or operate the device according the
actual device status.

Specifications
Model: HM2-G01
Dimensions:φ100.5×30.75mm(φ3.95×1.21 in.)
Input Power: 5V 1A or 5V 2A
Wireless Protocol: Wi-Fi IEEE 802.11 b/g/n 2.4GHz, Zigbee3.0 IEEE 802.15.4, BLE 5.0
Operating Temperature: -5°C~+50°C(23°F~122°F)
Operating Humidity: 0%-95%RH, no condensation
Support System: Android 6.0 or iOS 12.0 and above
Wi-Fi Operation Frequency: 2412-2472 MHz
Wi-Fi Maximum Output Power< 20 dBm
Bluetooth Operation Frequency: 2402-2480 MHz
Bluetooth Maximum Output Power< 13 dBm
Zigbee Operation Frequency: 2405-2480 MHz
Zigbee Maximum Output Power < 13 dBm
Notice
CommunicationbetweeniPhone,iPad,AppleWatch,HomePod,orMacandtheHomeKit-
enabled Aqara Hub M2 issecuredbyHomeKittechnology.
AcustomerwhoownsanAppleTV(4thgenerationorlater)withtvOS10orlater,aniPadwithiOS
10orlater,oraHomePodcancontrolHomeKit-enabledaccessoriesawayfromhomeand
automaticallythroughtriggerssuchastimeofday,location,sensordetection,ortheactionofan
accessory.
UseoftheWorkswithApplebadgemeansthatanaccessoryhasbeendesignedtowork
specificallywiththetechnologyidentified inthebadgeandhasbeencertifiedbythedeveloper
tomeetAppleperformancestandards.Appleisnotresponsiblefortheoperationofthisdevice
oritscompliancewithsafetyandregulatorystandards.
07

FCC ID: 2AKIT-HM2-G01
Federal Communications Commission (FCC) compliance statement:
1. This device complies with part 15 of the FCC Rules.
Operation is subject to the following two conditions:
(1)This device may not cause harmful interference.
(2) This device must accept any interference received, including interference that may cause
undesired operation.
2. Changes or modifications not expressly approved by the party responsible for compliance
could void the user's authority to operate the equipment.
Note: This equipment has been tested and found to comply with the limits for a Class B digital
device, pursuant to part 15 of the FCC Rules. These limits are designed to provide reasonable
protection against harmful interference in a residential installation.
This equipment generates, uses and can radiate radio frequency energy and, if not installed and
used in accordance with the instructions, may cause harmful interference to radio communica-
tions. However, there is no guarantee that interference will not occur in a particular installation.
If this equipment does cause harmful interference to radio or television reception, which can be
determined by turning the equipment off and on, the user is encouraged to try to correct the
interference by one or more of the following measures:
-Reorient or relocate the receiving antenna.
-Increase the separation between the equipment and receiver.
-Connect the equipment into an outlet on a circuit different from that to which the
receiver is connected.
-Consult the dealer or an experienced radio/TV technician for help.
RF Exposure statement:
This equipment complies with FCC radiation exposure limits set forth for an uncontrolled
environment. This equipment should be installed and operated with minimum distance of 20
cm between the radiator and your body. This transmitter must not be co-located or operating in
conjunction with any other antenna or transmitter.
08

IC: 22635-HM2G01
IC NOTICE TO CANADIAN USERS
This device contains licence-exempt transmitter(s)/receiver(s) that comply with Innovation,
Science and Economic Development Canada’s licence-exempt RSS(s). Operation is subject to
the following two conditions:
(1) This device may not cause interference.
(2) This device must accept any interference, including interference that may cause undesired
operation of the device.
This Class B digital apparatus complies with Canadian ICES 003.-
This device complies with RSS 247 of Industry Canada. Operation is subject to the condition that -
this device does not cause harmful interference.
This equipment complies with IC radiation exposure limits set forth for an uncontrolled
environment. This equipment should be installed and operated with minimum distance of 20
cm between the radiator and your body. This transmitter must not be co-located or operating in
conjunction with any other antenna or transmitter.
L'émetteur/récepteur exempt de licence contenu dans le présent appareil est conforme aux CNR
d’Innovation, Sciences et Développement économique Canada applicables aux appareils radio
exempts de licence. L'exploitation est autorisée aux deux conditions suivantes :
(1)L'appareil ne doit pas produire de brouillage;
(2)L'appareil doit accepter tout brouillage radioélectrique subi, même si le brouillage est
susceptible d'en compromettre le fonctionnement.
Cet appareil numérique de la Classe B conforme à la norme NMB-003 du Canada.
Cet appareil est conforme à la norme RSS-247 d'Industrie Canada. Le fonctionnement est
soumis à la condition que cet appareil ne provoque pas d'interférences nuisibles.
Cet équipement est conforme aux limites d’exposition aux rayonnements de la IC établies pour
unenvironnement non contrôé. Cet équipement doit être installé et fonctionner à au moins
20cm de distance d’un radiateur ou de votre corps.Cet émetteur ne doit pas être co-localisé ou
fonctionner en conjonction avec une autre antenne ou un autre émetteur.
09

10
Hereby, [Lumi United Technology Co., Ltd.] declares that the radio equipment type
The Bluetooth® word mark and logos are registered trademarks owned by Bluetooth SIG, Inc.
and any use of such marks by [Lumi United Technology Co., Ltd.] is under license. Other
trademarks and trade names are those of their respective owners.
Under normal use of condition, this equipment should be kept a separation distance of at least
20cm between the antenna and the body of the user.
EU Declaration of Conformity
All products bearing this symbol are waste electrical and electronic equipment (WEEE
as in directive 2012/19/EU) which should not be mixed with unsorted household
waste. Instead, you should protect human health and the environment by handing
over your waste equipment to a designated collection point for the recycling of waste electrical
and electronic equipment, appointed by the government or local authorities. Correct disposal
and recycling will help prevent potential negative consequences to the environment and human
health. Please contact the installer or local authorities for more information about the location
as well as terms and conditions of such collection points.
WEEE Disposal and Recycling Information
[Hub M2, HM2-G01] is in compliance with Directive2014/53/EU. The full text of the EU declaration
of conformity is available at the following internet address: https://www.aqara.com/DoC/

產品介紹
Aqara Hub M2是智能家庭控制中心,支持WiFi或者以太網網絡接入;支持和Zigbee子設備
進行互聯互通;具備紅外外能遙控器功能,可以添加和管理不同的紅外設備的控制。讓你更
加便捷的控制插座,燈泡,窗簾,空調,風扇等。
*本產品僅限室內使用。
指示燈
按鍵
LAN接口
紅外發
射區域
紅外接
收區域
Micro-B
電源接口
USB Type A
接口(預留)
11

快速設定
在應用商店中搜索“Aqara Home”或者掃描以下二維碼下載“Aqara Home”app。
1、下載客戶端
選擇Hub安裝位置:Hub最好離家中路由器2-6米左右,Hub和路由器之間以及Hub周圍
避免出現金屬遮擋物。
2、設定Hub
2m~6m
12
1
給Hub接通電源:請使用5V-1A或5V-2A轉接器(需要您單獨準備)和USB電源線給Hub接
通電源。
等Hub指示燈從黃燈/紅燈常亮變為黃燈/紅燈閃爍。
*如果需要Hub和路由器之間使用有線網路通訊,請使用帶RJ45網口的網線將HubLAN口和你的路由器LAN
口連接起來,並且等待網口側的柳丁綠兩顆燈亮起。
13
2
3

確保手機已經連接2.4GHz頻段段Wi-Fi網絡。
如果設備添加失敗,請確認以下幾點:
打開Aqara Home app,點擊首頁右上角“+”,選擇“Hub M2”,並且依照app訓示進行操
作。
如添加失敗,請將按Hub重置按鍵10S以上,待黃燈/紅燈閃爍後,在app上重試添加。如
需幫助請査詢:www.aqara.com/en/support.html。
*
*
若使用雙頻路由器,請先確保手機連接的是2.4GHz WiFi或者關閉5GHz Wi-Fi網絡;
請將手機儘量靠近Hub進行連接,同時請確保手機與Hub處於同一Wi-Fi網絡。
*針對iOS用戶,若要實現Apple HomeKit控制,請在Hub添加過程中根據app提示,掃描或手動輸入Hub底部
或說明書上的HomeKit設定程式碼(請妥善保存),將Hub綁定至HomeKit,綁定成功後,即可在Apple“家庭”
app中查看到已添加的Hub。
*
*
*
*
*
*
請確保設備連接2.4GHz的Wi-Fi網絡;
Wi-Fi名稱或密碼包含不支持的特殊字符,導致無法連接路由器,請修改成常用的字符後再試;
設備暫時不支持WAP/WAP2企業級的Wi-Fi網絡;
檢查路由器是否開啟Wi-Fi防蹭設置,導致設備無法正常聯網;
檢查路由器是否開啟AP隔離,導致手機在局域網內無法搜索到設備;
建議不要連接橋接網絡。
如果HomeKit綁定失敗,請確認以下幾點:
*
*
*
提示“無法添加配件”。由於反復多次添加失敗,導致iOS系統緩存的錯誤信息無法釋放,請重啟iOS設備並重
置設備後再試。若仍失敗,請檢查路由器兼容性,並嘗試更換其他路由器再試。
提示“配件已添加”。請重啟iOS設備並重置設備後,採用手動輸入HomeKit設置代碼方式重新添加。
提示“未找到配件”。請重置設備後,等待3分鐘後,採用手動輸入HomeKit設置代碼方式重新添加。
14
4
5
6
添加子設備:Hub添加成功後,請參攷子設備快速安裝指南進行添加子設備的操作。
控制紅外類家電:請根據app指引,在app上配寘您需要控制的紅外家電的品牌和型號後
進行對應的app控制和自動化控制。
3、使用
1
2

15
指示燈說明
指示燈顏色 含義
黃色/紅色
通電後,系統啟動中
Hub進入初始化狀態,等待入網;首次使用或重置
後十五分鐘內出現
藍色
正在連接網絡中;設備連接網絡的過程中出現
正常運作中
白色 Hub進入不可入網狀態;需重新拔插電源或重置
Hub後,才能進入等待入網狀態
紫色 允許添加子設備
指示燈狀態
常亮
閃爍
閃爍
常亮
閃爍
常亮
閃爍 Wi-Fi正在連接,app連接Hub、網絡中斷或拔插電
源後Hub重新連接網絡時出現
*由於设备固件的陞級與更新,實際操作可能與以上描述略有差异,請按照當前app內指引或者實際設備狀態
提示進行操作。
快速按擊閘道按鍵十次。
4、恢復出廠設定

16
用戶須知
1、
2、
3、
本產品為支持HomeKit的配件,推薦使用最新版本iOS或iPadOS。要遠程控制支持HomeKit
的配件或設置自動化,需要安裝一台HomePod或Apple TV或一台已設為家居中樞的iPad,
建議將軟件和操作系統更新到最新版本。
Hub與iPhone、iPad、Apple Watch、HomePod或Mac之間的通訊受HomeKit技術保護。
使用帶有Works with Apple的徽章,意味著該配件經過專門設計,可與徽章中所標識的技術
配合使用,並且已通過開發者認證,符合Apple性能標準,Apple不對此產品的操作或其符合
的安規標準負責。
Bluetooth®文字商標及標誌為 Bluetooth SIG, Inc. 之註冊商標,任何按[Lumi United
Technology Co., Ltd.]使用商標的情況均已獲授權。其他商標和商標名稱分別為相關擁有者
所有。
基本參數
產品型號:HM2-G01
產品尺寸:φ100.5×30.75mm(φ3.95×1.21 in.)
輸入電壓:5V 1A 或 5V 2A
無線連接:Wi-Fi IEEE 802.11 b/g/n 2.4GHz,Zigbee3.0 IEEE 802.15.4,BLE 5.0
工作溫度:-5℃~+50℃(23℉~122℉)
工作濕度:0~95% RH,無冷凝
支持系統:Android 6.0或iOS 12.0及以上版本

* Dieses Produkt ist nur für die Verwendung in Innenräumen geeignet.
Einführung des Produkts
Der Aqara Hub M2 ist eine intelligente Haussteuerungszentrale. Er kann mit einem WiFi- oder
Ethernet-Netzwerk verbunden werden und unterstützt die Interaktion und Verbindung mit
Zigbee-Untergeräten. Außerdem verfügt er über eine IR-Fernbedienungsfunktion, mit der die
Steuerung verschiedener IR-Geräte hinzugefügt und verwaltet werden kann. Mit Aqara Hub M2
können Sie Stecker, Glühbirne, Vorhang, Klimaanlage, Ventilator usw. bequemer steuern.
Kontrollleuchte
Schaltfläche
LAN-Anschluss
Mikro-B-Stromanschluss
USB-Anschluss Typ A (Reserviert)
Bereich der
Infrarot Emission
Bereich des
Infrarot-Empfangs
17

Suchen Sie nach „Aqara Home“ im App Store oder scannen Sie den QR-Code. Laden Sie die
Aqara Home App herunter und installieren Sie sie.
Schnelle Einrichtung
1. App herunterladen
Wählen Sie den Installationsort des Hubs: Der Hub sollte 2-6 Meter vom Router im Haus
entfernt sein, und vermeiden Sie Metallblöcke zwischen dem Hub und dem Router oder um
den Hub herum.
2. Hub einrichten
2m~6m
18
1

*Wenn Sie eine kabelgebundene Netzwerkkommunikation zwischen dem Hub und dem Router verwenden
müssen, verwenden Sie bitte ein Netzwerkkabel mit RJ45-Netzwerkanschluss, um die LAN-Anschlüsse des Hubs
und Ihres Routers zu verbinden, und warten Sie, bis die orangefarbene und grüne Leuchte an der Seite des
Netzwerkanschlusses aufleuchtet.
Schalten Sie den Hub ein: Bitte verwenden Sie den 5V-1A oder 5V-2A-Adapter (muss separat
vorbereitet werden) und das USB-Stromkabel, um den Hub einzuschalten.
19
2

20
Warten Sie, bis die gelbe/rote Hub-Anzeigelampe von Dauerbetrieb auf Blinken wechselt.
Stellen Sie sicher, dass das Mobiltelefon mit dem 2,4 GHz Wi-Fi-Netzwerk verbunden ist.
3
4
*
*
Wenn Sie einen Dual-Band-Router verwenden, stellen Sie bitte sicher, dass Ihr Telefon mit 2,4 GHz Wi-Fi
verbunden ist, oder deaktivieren Sie 5 GHz Wi-Fi.
Halten Sie Ihr Telefon in der Nähe des Hubs und stellen Sie sicher, dass beide mit demselben Wi-Fi-Netzwerk
verbunden sind.
* Für iOS-Benutzer: Wenn Sie die Apple HomeKit-Steuerung realisieren möchten, scannen Sie bitte den
HomeKit-Einstellungscode (Bitte speichern Sie ihn ordnungsgemäß.) auf der Unterseite des Hubs oder im
Handbuch entsprechend den Anweisungen der App während des Hub-Hinzufügungsprozesses ein oder geben Sie
ihn manuell ein und binden Sie den Hub an HomeKit. Nachdem er erfolgreich gebunden wurde, können Sie den
hinzugefügten Hub in der Apple Home App ansehen.
*
*
*
*
*
*
Bitte stellen Sie sicher, dass das Gerät mit einem 2,4-GHz-WLAN-Netzwerk verbunden ist;
Der WLAN-Name oder das WLAN-Passwort enthält Sonderzeichen, die nicht unterstützt werden, wodurch der
Router nicht verbunden werden kann. Bitte ändern Sie auf ein allgemeines Zeichen und versuchen Sie es erneut;
Das Gerät unterstützt derzeit keine WAP/WAP2-WLAN-Netzwerke auf Unternehmensebene;
Überprüfen Sie, ob der Router die WLAN-Anti-Rub-Einstellung aktiviert hat, was dazu führt, dass das Gerät keine
normale Verbindung mit dem Netzwerk herstellen kann;
Überprüfen Sie, ob der Router die AP-Isolation aktiviert hat, was dazu führt, dass das Mobiltelefon nicht nach
Geräten im LAN suchen kann;
Es wird nicht empfohlen, eine Verbindung zu überbrückten Netzwerken herzustellen.
Bitte öffnen Sie die Aqara Home App, klicken Sie auf „+" in der oberen rechten Ecke, wählen
Sie „Hub M2" und folgen Sie den Anweisungen, um das Hinzufügen des Hubs abzuschließen.
Wenn Sie den Hub nicht hinzufügen können, drücken Sie bitte die Taste auf dem Hub länger
als 10 Sekunden, bis das gelbe/rote Licht schnell blinkt, und fügen Sie ihn dann erneut hinzu.
Wenn Sie Hilfe benötigen, wenden Sie sich bitte an www.aqara.com/en/support.html.:
Wenn die Gerätehinzufügung fehlschlägt, bestätigen Sie die folgenden Punkte:
5
6

21
*
*
*
Eingabeaufforderung „Zubehör kann nicht hinzugefügt werden“. Aufgrund wiederholter Fehlschläge beim
Hinzufügen können die vom iOS-System zwischengespeicherten Fehlerinformationen nicht freigegeben werden.
Bitte starten Sie das iOS-Gerät neu, setzen Sie das Gerät zurück und versuchen Sie es erneut. Wenn es immer noch
fehlschlägt, überprüfen Sie die Router-Kompatibilität und versuchen Sie, einen anderen Router zu ersetzen, um es
erneut zu versuchen.
Eingabeaufforderung „Zubehör hinzugefügt“. Bitte starten Sie das iOS-Gerät neu und setzen Sie das Gerät zurück,
dann fügen Sie es erneut durch manuelle Eingabe des HomeKit-Einstellcodes hinzu.
Eingabeaufforderung „Zubehör nicht gefunden“. Bitte setzen Sie das Gerät zurück, warten Sie 3 Minuten und fügen
Sie es erneut durch manuelle Eingabe des HomeKit-Einstellcodes hinzu.
Wenn die HomeKit-Bindung fehlschlägt, bestätigen Sie die folgenden Punkte:
3. Geräteoperationen
4. Wiederherstellen der Werkseinstellungen
Drücken Sie zehnmal kurz die Taste auf dem Hub.
Untergerät hinzufügen: Nachdem den Hub erfolgreich hinzugefügt wurde, lesen Sie bitte in
der Installationsanleitung für Untergeräte nach, um ein Untergerät hinzuzufügen.
IR-Heimgeräte steuern: Bitte konfigurieren Sie die Marken und Modelle der IR-Heimgeräte, die
Sie in der App steuern müssen, gemäß den App-Richtlinien und führen Sie dann die
entsprechende App-Steuerung und Automatisierungssteuerung durch.
2
1

Beschreibung der Kontrollleuchten
Gelb/Rot
Der Hub geht in den Initialisierungsstatus über und
wartet auf die Netzwerkverbindung; Blinken
erscheint nach der ersten Benutzung oder innerhalb
von fünfzehn Minuten nach dem Zurücksetzen
Farbe der
Leuchten Beschreibung
Nachdem der Hub eingeschaltet ist, wird das
System gestartet.
Zustand der
Leuchten
Immer hell
Blinkend
Blau
Wi-Fi stellt eine Verbindung her; der Hub verbindet
sich mit dem Netzwerk.
Normales Arbeiten
Weiß Der Hub geht in den Fehlerstatus der
Netzwerkverbindung über; erst nachdem Sie den
Hub ein-/ausschalten oder zurücksetzen, kann er auf
die Netzwerkverbindung warten.
Lila Man darf dem Hub Untergeräte hinzufügenBlinkend
Immer hell
Blinkend
Immer hell
Blinkend
Wi-Fi verbindet sich; die Anwendung verbindet sich
mit dem Hub; das Netzwerk ist ausgefallen; der Hub
verbindet sich wieder mit dem Netzwerk, nachdem
er aus- und eingeschaltet wurde
*Aufgrund des Firmware-Updates des Geräts kann der tatsächliche Betrieb von der obigen Beschreibung abweichen
anders. Bitte folgen Sie den Anweisungen in der aktuellen App oder bedienen Sie das Gerät entsprechend dem
aktuellen Gerätestatus.
22

Spezifikationen
Modell: HM2-G01
Abmessungen: φ100.5×30.75mm(φ3.95×1.21 in.)
Eingangsleistung: 5V 1A oder 5V 2A
Drahtloses Protokoll: Wi-Fi IEEE 802.11 b/g/n 2.4GHz Zigbee3.0 IEEE 802.15.4 BLE 5.0 , ,
Betriebstemperatur: -5°C~+50°C(23°F~122°F)
Betriebslufeuchtigkeit: 0%-95%rF, keine Kondensation
Unterstützungssystem: Android 6.0 oder iOS 12.0 und höher
WLAN-Betriebsfrequenz: 2412-2472 MHz
Maximale WLAN-Ausgangsleistung< 20 dBm
Bluetooth-Betriebsfrequenz: 2402-2480 MHz
Maximale Bluetooth-Ausgangsleistung< 13 dBm
Zigbee-Betriebsfrequenz: 2405-2480 MHz
Maximale Zigbee-Ausgangsleistung< 13 dBm
Hinweis für Benutzer
1.
2.
3.
Dieses Produkt ist ein HomeKit-Gerät. Es wird empfohlen, die neueste Version von iOS oder
iPadOS zu verwenden. Um HomeKit-Zubehör fernsteuern oder Automationen einstellen zu
können, müssen Sie einen HomePod, ein Apple TV oder ein iPad, das bereits als Home Center
eingestellt ist, installieren. Es wird empfohlen, die Soware und das Betriebssystem auf die
neueste Version zu aktualisieren.
Die Kommunikation zwischen dem Hub und iPhone, iPad, Apple Watch, HomePod oder Mac
ist durch die HomeKit-Technologie geschützt.
Die Verwendung des Badges mit “Works with Apple” bedeutet, dass das Zubehör speziell für
die Zusammenarbeit mit der Technologie entwickelt wurde und die Entwicklerzertifizierung
gemäß den Apple-Leistungsstandards bestanden hat. Apple übernimmt keine Verantwortung
für den Betrieb oder die Sicherheitsstandards des Produkts.
23

EU-Konformitätserklärung
WEEE-Informationen zur Entsorgung und zum Recycling
Hiermit bestätigt [Lumi United Technology Co., Ltd.] dass das Funkgerät des Typs
Alle mit diesem Symbol gekennzeichneten Produkte sind Elektroschrott und
Elektrogeräte (WEEE entsprechend EU-Richtlinie 2012/19/EU) und dürfen nicht mit
unsortiertem Haushaltsmüll vermischt werden. Schützen Sie stattdessen Ihre
Mitmenschen und die Umwelt, indem Sie Ihre zu entsorgenden Geräte an eine dafür
vorgesehene, von der Regierung oder einer lokalen Behörde eingerichtete Sammelstelle zum
Recycling von Elektroschrott und Elektrogeräten bringen. Eine ordnungsgemäße Entsorgung
und Recycling helfen, negative Auswirkungen auf die Gesundheit von Umwelt und Menschen zu
vermeiden. Wenden Sie sich bitte an den Installateur oder lokale Behörden, um Informationen
zum Standort und den allgemeinen Geschäsbedingungen solcher Sammelstel
Die Wortmarke und Logos von Bluetooth® sind eingetragene Handelsmarken von Bluetooth SIG,
Inc. und jede Verwendung dieser Marken durch [Lumi United Technology Co., Ltd.] unterliegt
einer Lizenz. Andere Handelsmarken und Handelsnamen gehören ihren jeweiligen Eigentümern.
Unter normalen Einsatzbedingungen muss dieses Gerät einen Abstand von mindestens 20 cm
zwischen der Antenne und dem Körper des Benutzers einhalten.
24
[Hub M2,HM2-G01] mit der Verordnung 2014/53/EU in Einklang steht. Der vollständige Wortlaut
der EU-Konformitätserklärung ist unter der folgenden Internetadresse abrufbar:
https://www.aqara.com/DoC/

Informazioni sul prodotto
Aqara Hub M2 consiste in un centro di controllo domestico intelligente che supporta l'accesso
alla rete WiFi o Ethernet e l’interazione e la connessione con i sotto-dispositivi Zigbee; possiede
una funzione di controllo remoto esterno a infrarossi ed è in grado di aggiungere e gestire il
controllo di diversi dispositivi a infrarossi. Aqara Hub M2 permette di controllare più facilmente
prese, lampadine, tende, condizionatori d'aria, ventole, ecc.
* Questo prodotto è solo per utilizzo interno.
Indicatore luminoso
Pulsante
LAN-Anschluss
Porta di alimentazione Micro-B
Porta USB Tipo A (lasciato libero)
Area di emissione a infrarossi Area di ricezione infrarossi
25
Cerca "Aqara Home" nell'app store o scansiona il codice QR che si trova qui sotto per scaricare
l'app "Aqara Home".
Impostazioni veloci
1. Scaricare l’APP
Scegli la posizione di installazione del Hub: il Hub dovrebbe essere a circa 2-6 metri di
distanza dal router di casa, ed evitare schermature metalliche tra il Hub e il router o intorno al
Hub.
2. Configurazione del Hub
2m~6m
26
1

*Se è necessario utilizzare la comunicazione di rete cablata tra il Hub e il router, utilizzare un cavo di rete con porta
di rete RJ45 per collegare la porta LAN del Hub alla porta LAN del router e attendere l'accensione delle spie
arancione e verde che si trovano sul lato della porta di rete.
Collega l'alimentazione al Hub: si prega di utilizzare un adattatore 5V-1A o 5V-2A (è necessario
prepararlo da soli) e il cavo di alimentazione USB per collegare il Hub all’alimentazione e
accenderlo.
27
2

28
Attendere che la spia del Hub passi da gialla/rosso fissa a gialla lampeggiante.
Assicurarsi che il telefono cellulare sia collegato alla rete Wi-Fi con banda di frequenza a 2,4
GHz.
3
4
*
*
Se si utilizza un router dual-band, assicurarsi che il telefono sia collegato al WiFi a 2,4 GHz o disattivare la rete Wi-Fi
a 5GHz;
Tenere il cellulare il più vicino possibile al Hub e assicurarsi che il cellulare e il Hub siano collegati alla stessa rete
Wi-Fi.
Aprire l'app Aqara Home, fare clic su "+" nell'angolo in alto a destra della home page,
selezionare "Hub M2" e seguire le istruzioni dell'app.
* Per gli utenti iOS, se si desidera realizzare il controllo Apple HomeKit, eseguire la scansione o inserire
manualmente il codice di impostazione HomeKit che si trova nella parte inferiore del Hub o sul manuale (si prega
di conservarlo correttamente) in base alle indicazioni dell'app durante il processo di aggiunta del Hub per
associare quest’ultimo a HomeKit. Dopo che l'associazione è riuscita, potrai visualizzare il Hub aggiunto nell'app
Apple Home.
*
*
*
*
*
*
Assicurarsi che il dispositivo sia collegato a una rete Wi-Fi a 2,4 GHz;
Il nome o la password Wi-Fi contiene caratteri speciali che non sono supportati, con conseguente mancata
connessione al router, si prega di passare ai caratteri comuni e riprovare.
Il dispositivo non supporta temporaneamente la rete Wi-Fi a livello aziendale WAP/WAP2;
Controllare se il router abilita l'impostazione Wi-Fi anti-graffio, che fa sì che il dispositivo non possa connettersi
normalmente;
Controllare se il router apre l'isolamento AP, con il risultato che i telefoni cellulari nella LAN non possono cercare il
dispositivo;
Si raccomanda di non collegare la rete a ponte.
Se l'aggiunta non riesce, premere il pulsante di ripristino del Hub per più di 10 secondi. Dopo
aver atteso il lampeggiamento della luce gialla/rosso, provare ad aggiungere di nuovo
sull'app. Se è necessario aiuto, si prega di contattare: www.aqara.com/en/support.html.
Se l'aggiunta dell'apparecchio non riesce, si prega di confermare quanto segue:
5
6

*
*
*
Prompt "Impossibile aggiungere un accessorio". Il messaggio di errore nella cache del sistema iOS non può essere
rilasciato a causa di ripetuti tentativi falliti di aggiungere accessori, si prega di riavviare il dispositivo iOS e di
resettare il dispositivo e riprovare. Se ancora non funziona, controllate la compatibilità del vostro router e cercate
di sostituirlo con un altro router.
Prompt "Sono stati aggiunti gli accessori". Riavviare il dispositivo iOS e resettare il dispositivo, quindi provare ad
aggiungerlo di nuovo inserendo manualmente il codice di impostazione di HomeKit.
Richieste "Accessori non trovati". Si prega di reimpostare il dispositivo, attendere 3 minuti, e poi riaggiungerlo
inserendo manualmente il codice di impostazione di HomeKit.
Se la rilegatura di HomeKit non riesce, si prega di verificare i seguenti punti:
29
3. Utilizzo del dispositivo
4. Ripristino delle impostazioni di fabbrica
Premere rapidamente il pulsante sul Hub per dieci volte.
Aggiungere sotto-dispositivo: dopo aver aggiunto correttamente il Hub, fare riferimento alla
guida di installazione rapida del sotto-dispositivo per aggiungere un sotto-dispositivo.
Controllo degli apparecchi a infrarossi: configurare la marca e il modello degli apparecchi a
infrarossi che è necessario controllare sull'app in base alle linee guida dell'app, dopo di che
eseguire il controllo dell'app corrispondente e il controllo automatico.
2
1

Colore luce Descrizione
Giallo/Rosso
Stato luce
Luce fissa
Lampeggiante
Blu
Bianca
Viola Lampeggiante
Luce fissa
Lampeggiante
Luce fissa
Lampeggiante
Descrizione degli indicatori luminosi
*A causa dell'aggiornamento del firmware del dispositivo, l'operazione reale potrebbe essere leggermente diversa
dalla descrizione sopra riportata. Seguire le linee guida nell'APP corrente o utilizzare il dispositivo secondo lo stato
attuale di questo.
30

Specifiche tecniche
Modello: HM2-G01
Dimensioni: φ100.5×30.75mm(φ3.95×1.21 in.)
Potenza di ingresso: 5V 1A o 5V 2A
Protocollo Wireless: Wi-Fi IEEE 802.11 b/g/n 2.4GHz Zigbee3.0 IEEE 802.15.4 BLE 5.0 , ,
Temperatura di operazione: -5°C~+50°C(23°F~122°F)
Umidità di operazione: 0%-95%RH, senza condensazione
Sistema di supporto: Android 6.0 o iOS 12.0 e successivi
Frequenza d’esercizio Wi-Fi: 2412-2472 MHz
Potenza in uscita massima Wi-Fi< 20 dBm
Frequenza d’esercizio Bluetooth: 2402-2480 MHz
Potenza in uscita massima Bluetooth< 13 dBm
Frequenza d’esercizio Zigbee: 2405-2480 MHz
Potenza in uscita massima Zigbee < 13 dBm
Avviso per l’utente
1.
2.
3.
Questo prodotto è un dispositivo HomeKit, si consiglia di utilizzare l'ultima versione di iOS o
iPadOS. Per supportare il controllo remoto degli accessori HomeKit o impostare le
automazioni, è necessario installare un HomePod, una Apple TV o un iPad che è già stato
impostato come home center. Si consiglia di aggiornare il soware e il sistema operativo alla
versione più recente.
La comunicazione tra Hub e iPhone, iPad, Apple Watch, HomePod o Mac è protetta dalla
tecnologia HomeKit.
L'utilizzo del badge con Works with Apple significa che l'accessorio è stato appositamente
progettato per funzionare con la tecnologia identificata nel badge ed è stato certificato dallo
sviluppatore in linea con gli standard di performance di Apple. Apple non si assume la
responsabilità delle operazioni o degli standard di sicurezza del prodotto.
31

Dichiarazione di conformità europea
Informazioni sullo smaltimento e sul riciclaggio dei RAEE
Con la presente, [Lumi United Technology Co., Ltd.] dichiara che l'apparecchiatura
Tutti i prodotti contrassegnati da questo simbolo sono rifiuti di apparecchiature
elettriche ed elettroniche (RAEE in base alla direttiva 2012/19/UE) che non devono
essere smaltiti assieme a rifiuti domestici non differenziati. Al contrario, è necessario
proteggere l’ambiente e la salute umana consegnando i rifiuti a un punto di raccolta autorizzato
al riciclaggio di rifiuti di apparecchiature elettriche ed elettroniche, predisposto dalla pubblica
amministrazione o dalle autorità locali. Lo smaltimento e il riciclaggio corretti aiutano a
prevenire conseguenze potenzialmente negative all’ambiente e alla salute umana. Contattare
l’installatore o le autorità locali per ulteriori informazioni sulla sede e per i termini e le condizioni
di tali punti di raccolta.
Il marchio e i loghi Bluetooth® sono di proprietà di Bluetooth SIG, Inc. e il loro utilizzo è concesso
in licenza a [Lumi United Technology Co., Ltd.]. Altri marchi e nomi appartengono ai rispettivi
proprietari.
In condizioni d'uso normali, questa apparecchiatura deve essere tenuta a una distanza minima
di 20 cm tra l’antenna e il corpo dell’utente.
32
radio di tipo [Hub M2,HM2-G01] è conforme alla Direttiva
2014/53/UE. Il testo completo della dichiarazione di conformità UE è disponibile al seguente
indirizzo Internet: https://www.aqara.com/DoC/

* Este producto es solo para uso en interiores
Introducción de producto
Aqara Hub M2 es un centro de control inteligente para el hogar que admite acceso a redes WiFi o
Ethernet; admite la interconexión con subdispositivos Zigbee; tiene una función de control
remoto de energía externa infrarroja y puede agregar y administrar diferentes controles de
dispositivos infrarrojos. Le permite controlar más convenientemente enchufes, bombillas,
cortinas, aires acondicionados, ventiladores, etc.
Luz indicadora
Botón
Interfaz LAN
Conector de alimentación Micro-B
Interfaz USB tipo A (reservada)
Área de emisión infrarroja Área de recepción de infrarrojos
33
Busque "Aqara Home" en la tienda de aplicaciones o escanee el código QR a continuación para
descargar la aplicación "Aqara Home".
Configuración rápida
1. Descargue el cliente
Elija la ubicación de instalación de Hub: Hub debe estar a unos 2-6 metros del enrutador de
la casa y evite las pantallas metálicas entre Hub y el enrutador y alrededor de Hub.
2. Configurar Hub
2m~6m
34
1
* Si necesita utilizar una comunicación de red cableada entre Hub y el enrutador, utilice un cable de red con puerto
de red RJ45 para conectar el puerto LAN de Hub al puerto LAN de su enrutador, y espere a que se enciendan las
luces naranja y verde en el costado del puerto de red.
Conecte la alimentación a Hub: use un adaptador 5V-1A o 5V-2A (debe prepararse por
separado) y un cable de alimentación USB para conectar Hub a la alimentación
35
2

36
Espere a que el indicador de puerta de enlace cambie de amarillo/rojo sólido a amarillo
parpadeante.
Asegúrese de que el teléfono móvil esté conectado a la red Wi-Fi en la banda de 2.4GHz.
3
4
*
*
Si usa un enrutador de doble banda, asegúrese de que su teléfono esté conectado a WiFi de 2.4GHz o apague la
red Wi-Fi de 5GHz;
Conecte el teléfono móvil lo más cerca posible de Hub y asegúrese de que el teléfono móvil y Hub estén en la
misma red Wi-Fi.
Abra la aplicación Aqara Home, haga clic en "+" en la esquina superior derecha de la página
de inicio, seleccione "Hub M2" y siga las instrucciones de la aplicación.
* Para usuarios de iOS, si desea implementar el control Apple HomeKit, escanee o ingrese manualmente el código
de configuración de HomeKit en la parte inferior de Hub o el manual (guárdelo correctamente) de acuerdo con la
solicitud de la aplicación durante el proceso de adición de Hub, enlace Hub a HomeKit Después de tener éxito,
puede ver Hub agregada en la aplicación "Inicio" de Apple.
*
*
*
*
*
*
Asegúrese de que el dispositivo esté conectado a una red Wi-Fi de 2.4GHz;
El nombre o la contraseña de Wi-Fi contiene caracteres especiales no compatibles, lo que hace que sea imposible
conectarse al enrutador. Modifíquelo a un carácter de uso común e intente nuevamente;
El dispositivo no es compatible con redes Wi-Fi empresariales WAP / WAP2 por el momento;
Verifique si el enrutador tiene habilitada la configuración de Wi-Fi anti-arañazos, lo que hace que el dispositivo no
se conecte a Internet;
Verifique si el enrutador ha encendido el aislamiento AP, lo que hace que el teléfono móvil no pueda buscar el
dispositivo en la LAN;
Se recomienda no conectarse a una red puenteada.
Si la adición falla, presione el botón de reinicio de Hub durante más de 10 S. Después de
esperar a que la luz amarillo/rojo parpadee, intente agregar nuevamente en la aplicación. Si
necesita ayuda, consulte: www.aqara.com/en/support.html.
Si el dispositivo no se puede agregar, confirme lo siguiente:
5
6

*
*
*
Nota "No se pueden agregar accesorios". Debido a las repetidas adiciones fallidas, la información de error
almacenada en caché por el sistema iOS no se puede liberar. Reinicie el dispositivo iOS y reinicie el dispositivo e
intente nuevamente. Si aún falla, verifique la compatibilidad del enrutador e reemplace otro enrutador.
Nota "Se han agregado accesorios". Después de reiniciar el dispositivo iOS y reiniciar el dispositivo, agreque
nuevamente ingregando manualmente el código de configuración de HomeKit.
Nota "No se encontraron accesorios". Reinicie el dispositivo, espere 3 minutos y luego agreque nuevamente
ingregando manualmente el código de configuración de HomeKit.
Si la vinculación de HomeKit falla, confirme lo siguiente:
37
3. Uso
4. Restaurar la configuración de fábrica
Presione el botón de Hub diez veces rápidamente.
Agregar subdispositivo: después de que Hub se haya agregado correctamente, consulte la
guía de instalación rápida de subdispositivo para agregar un subdispositivo.
Control de los electrodomésticos infrarrojos: configure la marca y el modelo de los
dispositivos infrarrojos que necesita controlar en la aplicación de acuerdo con las pautas de
la aplicación, y luego realice el control de la aplicación y el control automático correspondi-
entes.
2
1
Descripción de la luz indicadora
Amarillo / Rojo Hub ingresa al estado de inicialización, esperando el
acceso a la red; aparece dentro de los quince
minutos posteriores al primer uso o restablecimien-
to
Color del
indicador Descripción
Después de que el Hub se enciende, el sistema
se está iniciando.
Estado del
indicador
Siempre
encendido
Intermitente
Azul
El parpadeo se está conectando a la red; aparece
cuando el dispositivo está conectado a la red
Trabajando normalmente
Blanco Hub ingresa al estado de no poder acceder a la red;
solo después de volver a enchufar la fuente de
alimentación o restablecer Hub, puede ingresar al
estado de espera de acceso a la red
Púrpura Permitir agregar dispositivos secundariosIntermitente
Siempre
encendido
Intermitente
Siempre
encendido
Intermitente
El Wi-Fi se está conectando, la aplicación aparece
cuando Hub se conecta a Hub, la red se interrumpe
o la alimentación se desconecta o Hub se vuelve a
conectar a la red
*Debido a la actualización del firmware del dispositivo, la operación real puede ser ligeramente diferente de la
descripción anterior. Siga las instrucciones en la APLICACIÓN actual o el indicador de estado del dispositivo real
para la operación.
38

Parámetros básicos
Modelo de producto: HM2-G01
Tamaño del producto: φ100.5×30.75mm(φ3.95×1.21 in.)
Voltaje de entrada: 5V 1A o 5V 2A
Conexión inalámbrica: Wi-Fi IEEE 802.11 b / g / n 2.4GHz, Zigbee3.0 IEEE 802.15.4, BLE 5.0
Temperatura de trabajo: -5°C~+50°C
Humedad de trabajo: 0 ~ 95% HR, sin condensación
Sistema de soporte: Android 6.0 o iOS 12.0 y superior
Frecuencia de operación Wi-Fi: 2412-2472 MHz
Potencia máxima de salida Wi-Fi< 20 dBm
Frecuencia de operación Bluetooth: 2402-2480 MHz
Potencia máxima de salida Bluetooth< 13 dBm
Frecuencia de operación Zigbee: 2405-2480 MHz
Potencia máxima de salida Zigbee < 13 dBm
Avviso per l’utente
1.
2.
3.
Este producto es un accesorio compatible con HomeKit, se recomienda utilizar la última
versión de iOS o iPadOS. Para controlar de forma remota los accesorios habilitados para
HomeKit o configurar la automatización, debe instalar un HomePod o Apple TV o un iPad que
se haya configurado como centro de inicio. Se recomienda actualizar el soware y el sistema
operativo a la última versión.
La comunicación entre Hub y el iPhone, iPad, Apple Watch, HomePod o Mac está protegida
por la tecnología HomeKit.
El uso de la insignia con Works with Apple significa que el accesorio ha sido especialmente
diseñado para funcionar con la tecnología identificada en la insignia, y ha sido certificado por
el desarrollador para cumplir con los estándares de rendimiento de Apple. Apple no es
responsable del funcionamiento de este producto ni de su cumplimiento con los estándares
de seguridad. 39
Declaración de conformidad de la UE
Directiva RAEE de información de eliminación y reciclaje
Por la presente, [Lumi United Technology Co., Ltd.] declara que el tipo de equipo
Todos los productos que llevan este símbolo son residuos de aparatos eléctricos y
electrónicos (RAEE según la directiva 2012/19/UE) que no deben mezclarse con
residuos domésticos sin clasificar. En su lugar, debe proteger la salud humana y el
medio ambiente entregando sus equipos de desecho a un punto de recogida para el reciclaje de
residuos de equipos eléctricos y electrónicos, designado por el gobierno o las autoridades
locales. La eliminación y el reciclado correctos ayudarán a evitar posibles consecuencias
negativas para el medio ambiente y la salud humana. Póngase en contacto con el instalador o
con las autoridades locales para obtener más información sobre la ubicación y las condiciones
de dichos puntos de recogida.
La palabra Bluetooth® y sus logotipos son marcas registradas propiedad de Bluetooth SIG, Inc. y
cualquier uso de tales marcas por parte de [Lumi United Technology Co., Ltd.] se realiza bajo
licencia. Otras marcas y nombres comerciales son los de sus respectivos dueños.
En condiciones normales de uso, este equipo debe mantenerse a una distancia de, al menos, 20
cm entre la antena y el cuerpo del usuario.
40
radioeléctrico [Hub M2,HM2-G01] cumple con la Directiva
2014/53/UE. Encontrará el texto completo de la declaración de conformidad de la UE en esta
dirección de Internet: https://www.aqara.com/DoC/

*Ce produit est seulement employé dans la maison intérieure.
Présentation de produit
Aqara Hub M2 est une box domotique qui permet de raccorder à WIFI ou au réseau Ethernet;
celui qui permet l’interconnexion-l’intercommunication avec sous-appareil Zigbee. En plus, avec
la fonction de télécommande infrarouge à énergie externe, celui-ci qui peut ajouter et contrôler
de différents équipements infrarouges. Aqara Hub M2 vous permettra le contrôle plus pratique
sur prise électronique, ampoule, rideau, climatiseur, ventilateur, etc.
Voyant lumineux
Bouton
LAN interface
Micro-B interface d'alimentation
USB Type A interface (en attente)
zone d’émission infrarouge zone de réception infrarouge
41

*S’il faut employer la communication réseau limitée entre le Hub et le routeur, veuillez utiliser un câble réseau avec
une interface d’accès au réseau RJ45 pour connecter LAN interface du Hub au LAN interface de votre routeur. et
puis attendez que les voyants oranges et verts du côté de l’interface du réseau s'allument.
Connectez l'alimentation au Hub: Veuillez utiliser un adaptateur 5V-1A ou 5V-2A (vous devez
les préparer séparément) et un câble d'alimentation USB pour connecter le Hub à
l'alimentation.
43
2

44
Attendez que le voyant du Hub passe du jaune/rouge fixe au jaune/rouge clignotant.
Assurez que le téléphone portable est bien connecté avec le réseau Wi-Fi 2.4GHz (bande de
fréquences).
3
4
*
*
Si vous utilisez un routeur bi-bande, assurez-vous que votre téléphone portable est connecté au WiFi 2. 4 GHz ou
éteignez le réseau Wi-Fi 5 GHz.
Veuillez connecter le téléphone portable aussi près que possible du Hub et assurez-vous que le téléphone
portable et le Hub sont sur le même réseau Wi-Fi.
*Pour les utilisateurs iOS, si vous souhaitez contrôler Apple HomeKit, veuillez numériser ou saisir manuellement le
mot de passe de HomeKit au bas du Hub ou au mode d’emploi (veuillez le bien garder) selon les indications de
l'application lors de l'ajout du Hub. Liez la passerelle à HomeKit, après cela, vous pouvez confirmer le Hub ajouté
dans l'application Apple "Home".
*
*
*
*
*
*
Veuillez vous assurer que votre appareil est connecté à un réseau Wi-Fi à 2,4 GHz ;
Le nom ou le mot de passe Wi-Fi contient des caractères spéciaux qui ne sont pas pris en charge, ce qui entraîne
l'impossibilité de se connecter au routeur. Veuillez le changer pour un caractère commun et réessayer.
L'appareil n’est pas compatible temporairement avec le réseau Wi-Fi d'entreprise WAP/WAP2 ;
Vérifiez si le routeur active le réglage Wi-Fi anti-squatteur, ce qui conduit à l’appareil de ne pouvoir pas être mis en
réseau correctement ;
Vérifiez si le routeur active l'isolation AP, ce qui conduit à la téléphone de ne parvenir pas à rechercher l'appareil
dans le réseau local;
Il est recommandé de ne pas se connecter au réseau de passerelle.
Ouvrez l'application Aqara Home, cliquez sur "+" au coin en haut et à droite de la page
d'accueil, sélectionnez "Hub M2" et suivez les instructions de l'application.
si vous n’arrivez pas à l’ajouter, veuillez appuyer le bouton de réinitialisation du Hub pendant
plus de 10 secondes Jusqu'à ce que le voyant jaune/rouge clignote. Et puis vous le rajoutez à
nouveau. Si vous avez besoin d'aide, n'hésitez pas à visiter : www.aqara.com/en/support.ht-
ml.
Si l'ajout d'un appareil échoue, confirmez ce qui suit :
5
6

45
*
*
*
Indique "Ne peut pas ajouter des accessoires". Le message d'erreur dans le cache du système iOS ne peut pas être
libéré en raison de tentatives répétées et infructueuses d'ajout d'accessoires. Veuillez redémarrer l’appareil iOS et
réinitialiser l’appareil et réessayer. S'il ne fonctionne toujours pas, veuillez vérifier la compatibilité de votre routeur
et essayer de le remplacer par un autre routeur.
Indique "Des accessoires ont été ajoutés". Veuillez redémarrer l'appareil iOS et réinitialiser l'appareil, puis essayez
de l'ajouter à nouveau en entrant manuellement le code de réglage du HomeKit.
Indique "Accessoires non trouvés". Veuillez réinitialiser l'appareil, attendre 3 minutes, puis l'ajouter à nouveau en
entrant manuellement le code de réglage du HomeKit.
Si la liaison HomeKit échoue, confirmez ce qui suit :
3. Opération
4. Restaurer les paramètres d'usine
Appuyez dix fois rapidement sur le bouton du Hub.
Ajouter un sous-appareil : une fois l’installation correcte du Hub, reportez-vous au guide sur
l’installation rapide du sous-appareil pour l’installer.
Contrôler les appareils infrarouges: veuillez configurer la marque et le modèle des appareils
infrarouges que vous devez contrôler sur l'application selon les indications de l’application. Et
puis vous pouvez effectuer le contrôle automatique correspondant.
2
1

descriptions des voyants lumineux
jaune/rouge
Le Hub entre dans l'état d'initialisation, en attendant
l'accès au réseau; quand on l’utilise pour la première
fois ou bien en quinze minutes après la
réinitialisation.
couleur de
voyant Description
Après le branchement à l’électricité , le système
démarre.
État de
voyant
Voyant fixe
Clignotant
Bleu
Connexion en cours au réseau; lorsque l’appareil se
connecte au réseau
Fonctionnement normal
blanc Le Hub inaccessible au réseau; seulement après
avoir rebranché l'alimentation ou réinitialisé du Hub,
on est dans l’état d'attente d'accès au réseau
pourpre Autorisation de l'ajout de sous-appareilClignotant
Voyant fixe
Clignotant
Voyant fixe
Clignotant
Wi-Fi est en train de se connecter; l’application se
connecte au Hub; la rupture de réseau; ou bien le
Hub se reconnecte au réseau après l'alimentation
coupée.
*En raison de la mise à jour du micrologiciel de l'appareil, le fonctionnement réel peut être légèrement différent de
la description ci-dessus, veuillez suivre les indications de l'APP actuelle ou utiliser d’après la situation actuelle de
l’appareil.
46

IC: 22635-HM2G01
IC NOTICE TO CANADIAN USERS
This device contains licence-exempt transmitter(s)/receiver(s) that comply with Innovation,
Science and Economic Development Canada’s licence-exempt RSS(s). Operation is subject to
the following two conditions:
(1) This device may not cause interference.
(2) This device must accept any interference, including interference that may cause undesired
operation of the device.
This Class B digital apparatus complies with Canadian ICES 003.-
This device complies with RSS 247 of Industry Canada. Operation is subject to the condition that -
this device does not cause harmful interference.
This equipment complies with IC radiation exposure limits set forth for an uncontrolled
environment. This equipment should be installed and operated with minimum distance of 20
cm between the radiator and your body. This transmitter must not be co-located or operating in
conjunction with any other antenna or transmitter.
L'émetteur/récepteur exempt de licence contenu dans le présent appareil est conforme aux CNR
d’Innovation, Sciences et Développement économique Canada applicables aux appareils radio
exempts de licence. L'exploitation est autorisée aux deux conditions suivantes :
(1) L'appareil ne doit pas produire de brouillage;
(2) L'appareil doit accepter tout brouillage radioélectrique subi, même si le brouillage est
susceptible d'en compromettre le fonctionnement.
Cet appareil numérique de la Classe B conforme à la norme NMB-003 du Canada.
Cet appareil est conforme à la norme RSS-247 d'Industrie Canada. Le fonctionnement est
soumis à la condition que cet appareil ne provoque pas d'interférences nuisibles.
Cet équipement est conforme aux limites d’exposition aux rayonnements de la IC
établies pour
unenvironnement non contrôé. Cet équipement doit être installé et fonctionner à au moins
20cm de distance d’un radiateur ou de votre corps.Cet émetteur ne doit pas être co-localisé ou
48

Déclaration de conformité pour l’Union européenne
Informations sur la réglementation DEEE sur la mise au rebut et le recyclage
fonctionner en conjonction avec une autre antenne ou un autre émetteur.
Par la présente, [Lumi United Technology Co., Ltd.] déclare que cet équipement radio
Tous les produits portant ce symbole deviennent des déchets d’équipements
électriques et électroniques (DEEE dans la Directive européenne2012/19/UE) qui ne
doivent pas être mélangés aux déchets ménagers non triés. Vous devez contribuer à
la protection de l’environnement et de la santé humaine en apportant l’équipement usagé à un
point de collecte dédié au recyclage des équipements électriques et électroniques, agréé par le
gouvernement ou les autorités locales. Le recyclage et la destruction appropriés permettront
d’éviter tout impact potentiellement négatif sur l’environnement et la santé humaine. Contactez
l’installateur ou les autorités locales pour obtenir plus d’informations concernant l’emplacement
ainsi que les conditions d’utilisation de ce type de point de collecte.
La marque Bluetooth® et les logos associés sont des marques déposées de Bluetooth SIG, Inc. et
toute exploitation desdites marques par [Lumi United Technology Co., Ltd.] est effectuée sous
licence. Toutes les autres marques ainsi que tous les noms commerciaux sont ceux de leurs
propriétaires respectifs.
Dans des conditions normales d’utilisation, cet équipement doit être maintenu à une distance
d’au moins 20 cm entre l’antenne et le corps de l’utilisateur.
49
de type [Hub M2,HM2-G01] est conforme à la Directive
européenne 2014/53/UE. L’intégralité de la déclaration de conformité pour l’UE est disponible à
l’adresse suivante : https://www.aqara.com/DoC/

Описание продукта
Aqara Hub M2 - это центр управления «умным домом», который может быть подключен к
сети Wi-Fi или Ethernet, поддерживать взаимодействие и связь с дочерними устройствами
Zigbee. Благодаря функции инфракрасного дистанционного управления вы можете
добавлять различные инфракрасные устройства и управлять ими. Это позволяет более
удобно управлять розетками, лампами, умными шторами, кондиционером, вентилятором
и т. д.
*Этот продукт предназначен только для использования в помещении.
Индикатор
Кнопка
LAN порт
Порт питания Micro-B
USB порт Type A (зарезервировано)
Зона излучения инфракрасного сигнала Зона приема инфракрасного сигнала
50
Выполните поиск «Aqara Home» в магазине приложений или отсканируйте QR-код ниже,
чтобы загрузить приложение «Aqara Home».
Быстрая настройка
1. Скачайте приложение
Выберите место установки Hub: Hub должен находиться на расстоянии 2-6 метров от
маршрутизатора дома и избегать металлических преград между Hub и
маршрутизатором и вокруг Hub.
2. Настройте Hub
2m~6m
51
1

*Если вам необходимо использовать проводную сетевую связь между Hub и маршрутизатором,
используйте сетевой кабель с сетевым портом RJ45 для соединения Hub и маршрутизатора в единую сеть,
и дождитесь, чтобы загорелись оранжевые и зеленые индикаторы на стороне сетевого порта.
Подключите питание к Hub: используйте адаптер 5V-1A или 5V-2A (необходимо
приобрести его отдельно) и кабель питания USB для подключения питания к Hub.
52
2

53
Подождите, пока желтый / красный индикатор M2 изменится с постоянно включенного
на мигающий.
Убедитесь, что телефон подключен к сети Wi-Fi в диапазоне 2,4 ГГц.
3
4
*
*
Если вы используете двухдиапазонный маршрутизатор, убедитесь, что ваш телефон подключен к 2,4 ГГц
Wi-Fi или отключите 5 ГГц Wi-Fi.
Держите телефон рядом с M2 и убедитесь, что телефон и Hub находятся в одной сети Wi-Fi.
*Для пользователей iOS: если вы хотите использовать Apple HomeKit, отсканируйте или вручную введите
код настройки HomeKit (сохраните его) в нижней части Hub или в руководстве в соответствии с
инструкциями приложения, чтобы привязать Hub к HomeKit. После успешного связывания вы сможете
просмотреть добавленный Hub в приложении Apple Home.
*
*
*
*
*
*
Подтвердите, что устройство подключено к сети Wi-Fi 2.4 ГГЦ;
Имя или пароль Wi-Fi содержат неподдерживаемые специальные символы, что делает подключение к
роутеру невозможным, Пожалуйста, измените используемый символ и попробуйте снова;
Устройство пока не поддерживает корпоративные сети Wi-Fi WAP / WAP2;
Проверьте, включена ли установка защиты своего роутера, из-за этого устройство не может подключиться
к сети.
Проверьте, выключена ли функция изоляции AP на роутере, что часто приводит к тому, что мобильный
телефон не может найти устройство в локальной сети;
Рекомендуется не подключаться к bridge-сети.
Откройте приложение Aqara Home, нажмите «+» в правом верхнем углу главной
страницы, выберите «Hub M2» и следуйте инструкциям приложения.
Если добавление не удалось, нажмите кнопку на Hub и удерживайте ее более 10
секунд, пока желтый / красный свет не начнет быстро мигать, а затем добавьте его
снова. Если вам нужна помощь, обратитесь по адресу www.aqara.com/en/support.html.
Если устройство не может быть добавлено, пожалуйста, попробуйте следующее:
5
6

54
*
*
*
Подсказка "Невозможно добавить аксессуары". Из-за повторяющихся неудачных добавлений , поэтому
сообщение об ошибке, кэшированное системы iOS, не может быть выпущено .
Пожалуйста, перезагрузите устройство iOS, перезагрузите устройство и попробуйте снова. Если это не
помогло, проверьте совместимость роутера и попробуйте заменить его другим роутером.
Подсказка "Аксессуары были добавлены". После перезапуска устройства iOS и сброса устройства вручную
введите код настройки HomeKit, чтобы добавить его снова.
Подсказка "Аксессуары не найдены". Выполните сброс устройства, подождите 3 минуты, а затем вручную
введите код настройки HomeKit, чтобы добавить его снова.
Если привязка HomeKit не удалась, пожалуйста, подтвердите следующее:
3. Операции с устройством
4. Восстановить заводские настройки
Быстро нажмите кнопку Hub десять раз.
Добавление подустройства: после успешного добавления Hub обратитесь к
руководству по быстрой установке подустройства, чтобы добавить подустройства.
Управление инфракрасными бытовыми электроприборами: в соответствии с
рекомендациями приложения, после настройки марки и модели устройств с
инфракрасным приёмником, которые будут контролироваться в приложении,
выполняется соответствующее управление с помощью и автоматическое управление.
2
1

Описание индикатора
Желтый /
красный
Hub входит в состояние инициализации, ожидая
доступа к сети; мигание появляется в течение 15
минут после первого использования или сброса
Цвет
индикатора Описание
После включения система запускается.
Состояние
индикатора
Постоянное
свечение
Мигающий
свет
Синий
Работает нормально
Разрешить добавить подустройства.
Wi-Fi подключается. Появляется, когда
устройство подключено к сети
Белый Hub входит в недоступное состояние. Вам
необходимо снова подключить питание или
сбросить Hub, прежде чем вы сможете войти в
состояние ожидания сетевого подключения.
Фиолетовый Мигающий
свет
Постоянное
свечение
Мигающий
свет
Постоянное
свечение
Мигающий
свет
Wi-Fi подключается. Эта ситуация возникает,
когда приложение подключается к Hub, сеть
прерывается или Hub повторно подключается к
сети после выключения и включения.
*В связи с обновлением прошивки устройства, фактическая операция может немного отличаться от
приведенного выше описания. Следуйте инструкциям в актуальной версии приложения или фактического
состояния устройства.
55

1.отключите оборудование от электрической сети;
2.обратитесь в сервисный центр для получения консультации или ремонта оборудования
Сделано в Китае
* Оборудование не нуждается в периодическом обслуживании в течение срока службы
58

クイックセットアップ
60
1

61
2
Specyfikacje produktu
| Marka: | Aqara |
| Kategoria: | inteligentny dom |
| Model: | Hub M2 |
Potrzebujesz pomocy?
Jeśli potrzebujesz pomocy z Aqara Hub M2, zadaj pytanie poniżej, a inni użytkownicy Ci odpowiedzą
Instrukcje inteligentny dom Aqara

26 Grudnia 2024
8 Października 2024
7 Października 2024
7 Października 2024
7 Października 2024
7 Października 2024
7 Października 2024
7 Października 2024
7 Października 2024
28 Września 2024
Instrukcje inteligentny dom
- inteligentny dom Ikea
- inteligentny dom Tenda
- inteligentny dom Logitech
- inteligentny dom Xiaomi
- inteligentny dom Lenovo
- inteligentny dom TP-Link
- inteligentny dom Philips
- inteligentny dom Livoo
- inteligentny dom Acer
- inteligentny dom Bosch
- inteligentny dom Gigaset
- inteligentny dom Hikvision
- inteligentny dom Easy Home
- inteligentny dom Nobo
- inteligentny dom Origin Acoustics
- inteligentny dom Bose
- inteligentny dom EZVIZ
- inteligentny dom Panasonic
- inteligentny dom Theben
- inteligentny dom Crestron
- inteligentny dom Asus
- inteligentny dom Nedis
- inteligentny dom Nexa
- inteligentny dom Reolink
- inteligentny dom Tesla
- inteligentny dom D-Link
- inteligentny dom August
- inteligentny dom Niceboy
- inteligentny dom Ring
- inteligentny dom Imou
- inteligentny dom Blaupunkt
- inteligentny dom Vivax
- inteligentny dom ATen
- inteligentny dom Speed-Link
- inteligentny dom Gardena
- inteligentny dom Evolveo
- inteligentny dom KKT Kolbe
- inteligentny dom BTicino
- inteligentny dom Honeywell
- inteligentny dom Strong
- inteligentny dom Swann
- inteligentny dom Audac
- inteligentny dom Cisco
- inteligentny dom Sanus
- inteligentny dom TFA
- inteligentny dom Sungrow
- inteligentny dom Trust
- inteligentny dom Linksys
- inteligentny dom Cleanmaxx
- inteligentny dom TechniSat
- inteligentny dom Vimar
- inteligentny dom V-TAC
- inteligentny dom Eufy
- inteligentny dom Krüger&Matz
- inteligentny dom Emos
- inteligentny dom Renkforce
- inteligentny dom Osram
- inteligentny dom Perel
- inteligentny dom Redmond
- inteligentny dom Somfy
- inteligentny dom Netgear
- inteligentny dom DiO
- inteligentny dom Velleman
- inteligentny dom Ferguson
- inteligentny dom Homematic IP
- inteligentny dom One For All
- inteligentny dom Klarstein
- inteligentny dom Totolink
- inteligentny dom Danfoss
- inteligentny dom Intertechno
- inteligentny dom Delta Dore
- inteligentny dom Manta
- inteligentny dom NGS
- inteligentny dom Devolo
- inteligentny dom Gossen Metrawatt
- inteligentny dom Shelly
- inteligentny dom Edimax
- inteligentny dom AirLive
- inteligentny dom SPC
- inteligentny dom Brilliant
- inteligentny dom LevelOne
- inteligentny dom Digi
- inteligentny dom Oregon Scientific
- inteligentny dom Lorex
- inteligentny dom Aluratek
- inteligentny dom Abus
- inteligentny dom Elro
- inteligentny dom Hama
- inteligentny dom Eltako
- inteligentny dom Netatmo
- inteligentny dom Hager
- inteligentny dom Denver
- inteligentny dom Blumfeldt
- inteligentny dom CyberPower
- inteligentny dom Busch-Jaeger
- inteligentny dom Trevi
- inteligentny dom Fibaro
- inteligentny dom Salus
- inteligentny dom EQ-3
- inteligentny dom Inkbird
- inteligentny dom Alecto
- inteligentny dom JUNG
- inteligentny dom Burg Wächter
- inteligentny dom Byron
- inteligentny dom X-Sense
- inteligentny dom Smartwares
- inteligentny dom Dormakaba
- inteligentny dom RADEMACHER
- inteligentny dom Schellenberg
- inteligentny dom KanexPro
- inteligentny dom ABB
- inteligentny dom Profile
- inteligentny dom Ajax
- inteligentny dom Brennenstuhl
- inteligentny dom Caliber
- inteligentny dom KlikaanKlikuit
- inteligentny dom Energenie
- inteligentny dom Steren
- inteligentny dom Laica
- inteligentny dom Hive
- inteligentny dom FireAngel
- inteligentny dom Chacon
- inteligentny dom Hombli
- inteligentny dom Naxa
- inteligentny dom Logicom
- inteligentny dom Niko
- inteligentny dom Rain Bird
- inteligentny dom Veho
- inteligentny dom Gira
- inteligentny dom Sommer
- inteligentny dom Ranex
- inteligentny dom Popp
- inteligentny dom Qnect
- inteligentny dom Fanvil
- inteligentny dom Aiphone
- inteligentny dom EQ3
- inteligentny dom REV
- inteligentny dom Nous
- inteligentny dom Sonoff
- inteligentny dom Meross
- inteligentny dom Home Easy
- inteligentny dom Chuango
- inteligentny dom ETiger
- inteligentny dom Berker
- inteligentny dom Swisstone
- inteligentny dom Drayton
- inteligentny dom LSC Smart Connect - Action
- inteligentny dom MAC
- inteligentny dom Silvergear
- inteligentny dom Paulmann
- inteligentny dom Kogan
- inteligentny dom EKO
- inteligentny dom Airthings
- inteligentny dom Aeotec
- inteligentny dom Adurosmart
- inteligentny dom SEC24
- inteligentny dom Athom
- inteligentny dom Casambi
- inteligentny dom Tellur
- inteligentny dom TELE System
- inteligentny dom Iungo
- inteligentny dom Tjilla
- inteligentny dom WiZ
- inteligentny dom SwitchBot
- inteligentny dom Nanoleaf
- inteligentny dom Mach Power
- inteligentny dom Blebox
- inteligentny dom Lutron
- inteligentny dom Middle Atlantic
- inteligentny dom Winland
Najnowsze instrukcje dla inteligentny dom
29 Marca 2025
29 Marca 2025
29 Marca 2025
27 Marca 2025
18 Marca 2025
18 Marca 2025

12 Marca 2025
25 Lutego 2025
19 Lutego 2025

14 Lutego 2025