Instrukcja obsługi Allsee HB55B
Przeczytaj poniżej 📖 instrukcję obsługi w języku polskim dla Allsee HB55B (43 stron) w kategorii monitor. Ta instrukcja była pomocna dla 12 osób i została oceniona przez 2 użytkowników na średnio 4.5 gwiazdek
Strona 1/43

High Brightness Professional Monitor User Manual
Manual Version HBA2 .0

High Brightness Professional Monitor User Manual
Page 1
Safety Instructions
• Please keep the display away from any heat sources. Place the display in a
stable and well-ventilated place.
• Please handle with care as product contains glass.
• The holes or openings on the display are designed for ventilation. Do not
cover or block the ventilation holes or openings with any objects.
• Remove protective covering from the screen before you use the display.
• Shut off the power supply before cleaning. Use a soft lint free cloth -
instead of a tissue to wipe the screen.
• You may use a glass cleaner to clean the product as required. However,
never spray the cleaner directly onto the display surface.
• Do not attempt to repair this product yourself! Improper disassembly of
the product may invalidate the warranty and lead to possible danger
• If you have a problem that cannot be solved using the "Troubleshooting"
guidelines, please contact your supplier.

High Brightness Professional Monitor User Manual
Page 2
Quick Start Guide
This section of the guide is to allow swift set up and use of the unit. Please refer to the main part of
the User Guide for full information on use of the unit.
Please follow the steps detailed below:
1 Unpack unit and place in desired location.
2 Take the power lead from the accessories bag, connect power lead and plug into mains outlet.
The unit will power ON automatically (if it doesn’t please ensure the “AC Switch” is in the on
position). After powering up the screen will start to play -some pre loaded sample content.
3 Collect the files you wish to display and make sure they are supported by the unit (see Section
2.1)
4 On a PC copy the files you want to play onto an empty USB drive. These should be in the root
directory (without putting them into a folder). Remove USB from PC.
5 Insert USB drive into the one of the USB ports located on the rear of the unit (see Figure 1 ).
The screen should indicate that it is copying the files onto the unit. Please note that all files
currently stored in the unit will be deleted. Once completed, the screen will display a message
to remove the USB drive.
6 Remove the USB drive and the unit will reboot and play the stored files in a loop.
Figure 1 Position of USB ports

High Brightness Professional Monitor User Manual
Page 3
Contents:
1. Introduction ................................................................................................................................ 5
1.1 Box Contents ................................................................................................................... 5
1.2 Inputs Overview .............................................................................................................. 5
1.3 IR Remote Control Sensor Extension .............................................................................. 6
1.4 Remote Control ............................................................................................................... 7
1.5 Replacing the Remote Control Battery 8...........................................................................
1.6 Home Screen ................................................................................................................... 9
1.7 System Menu Operation ...............................................................................................10
1.7.1 System Settings ...................................................................................................... 10
1.7.2 System Control ....................................................................................................... 16
1.7.3 Date & Time ........................................................................................................... 19
1.7.4 Power On/Off ......................................................................................................... 21
1.7.5 Timer Strategy ........................................................................................................ 22
1.7.6 File Management ................................................................................................... 25
1.7.7 Exit .......................................................................................................................... 25
1.8 Display Settings ............................................................................................................. 26
2. System Operation .....................................................................................................................29
2.1 Supported Media Files .................................................................................................. 29
2.2 ............................................................................................. Steps to Load Media Files 30
3. Advanced Guide ........................................................................................................................ 31
3.1 Main Menu .................................................................................................................... 31
3.2 Creating Playlists ........................................................................................................... 31
3.2.1 Add Schedule .......................................................................................................... 32
3.2.2 Add Selected Items ................................................................................................. 32
3.2.3 Saving ..................................................................................................................... 35
3.3 Editing Playlists .............................................................................................................. 36
3.3.1 Deleting Items ........................................................................................................ 36
4. F.A.Qs and Troubleshooting Guide ...........................................................................................37
4.1 How do I play PowerPoint presentations on my display? ............................................. 37

High Brightness Professional Monitor User Manual
Page 4
4.1.1 Option 1 (for plain slides with no animation): ....................................................... 37
4.1.2 Options 2 (for presentations with animation): ......................................................37
4.2 Video Format Conversion .............................................................................................38
4.2.1 Format Factory ....................................................................................................... 38
4.2.2 HD Video Converter Deluxe ................................................................................... 40
4.3 Connecting screen to PC ............................................................................................... 41
4.4 My media file does not fit properly on the screen ....................................................... 41
4.5 My media file will not display or is missing from the playlist ....................................... 42
4.6 My media files will not update ...................................................................................... 42
4.7 My moving GIF files will not move. ............................................................................... 42
Table of Figures
Figure 1 Position of USB ports 2.............................................................................................................
Figure 2 Inputs Overview ..................................................................................................................... 5
Figure 3 Home Screen .......................................................................................................................... 9

High Brightness Professional Monitor User Manual
Page 5
1. Introduction
Congratulations on your purchase of our product. Please read carefully and follow all instructions
in the manual before first use.
The product should not be exposed to liquids dripping or splashing and no objects filled with
liquids, such as vases, should be placed on the product.
Attention:
1. Do not change any default setting when it is unnecessary.
2. Keep the product far away from water during installation e and us .
1.1 Box Contents
1 x High Brightness Professional Monitor.
1 x Power Cable.
1 x CD (User Manual).
1 x Remote Control (with 2xAAA batteries).
1 x IR Remote Control Sensor Extension
1 x HDMI Cable
1.2 Inputs Overview
Figure 2 Inputs Overview

High Brightness Professional Monitor User Manual
Page 6
1.3 IR Remote Control Sensor Extension
The port marked “IR” is for the IR remote control sensor extension included. This is for applications
where you may find it diffic e main IR remote control sensor and should be ult to access th
connected like so:

High Brightness Professional Monitor User Manual
Page 7
1.4 Remote Control

High Brightness Professional Monitor User Manual
Page 8
1.5 Replacing the Remote Control Battery
1. Slide the battery cover off, as shown below.
2. Remove the used batteries.
4. Insert the two new with theirAAA batteries terminals corresponding to the indicators.
5. Put the cover back on.
High Brightness Professional Monitor User Manual
Page 10
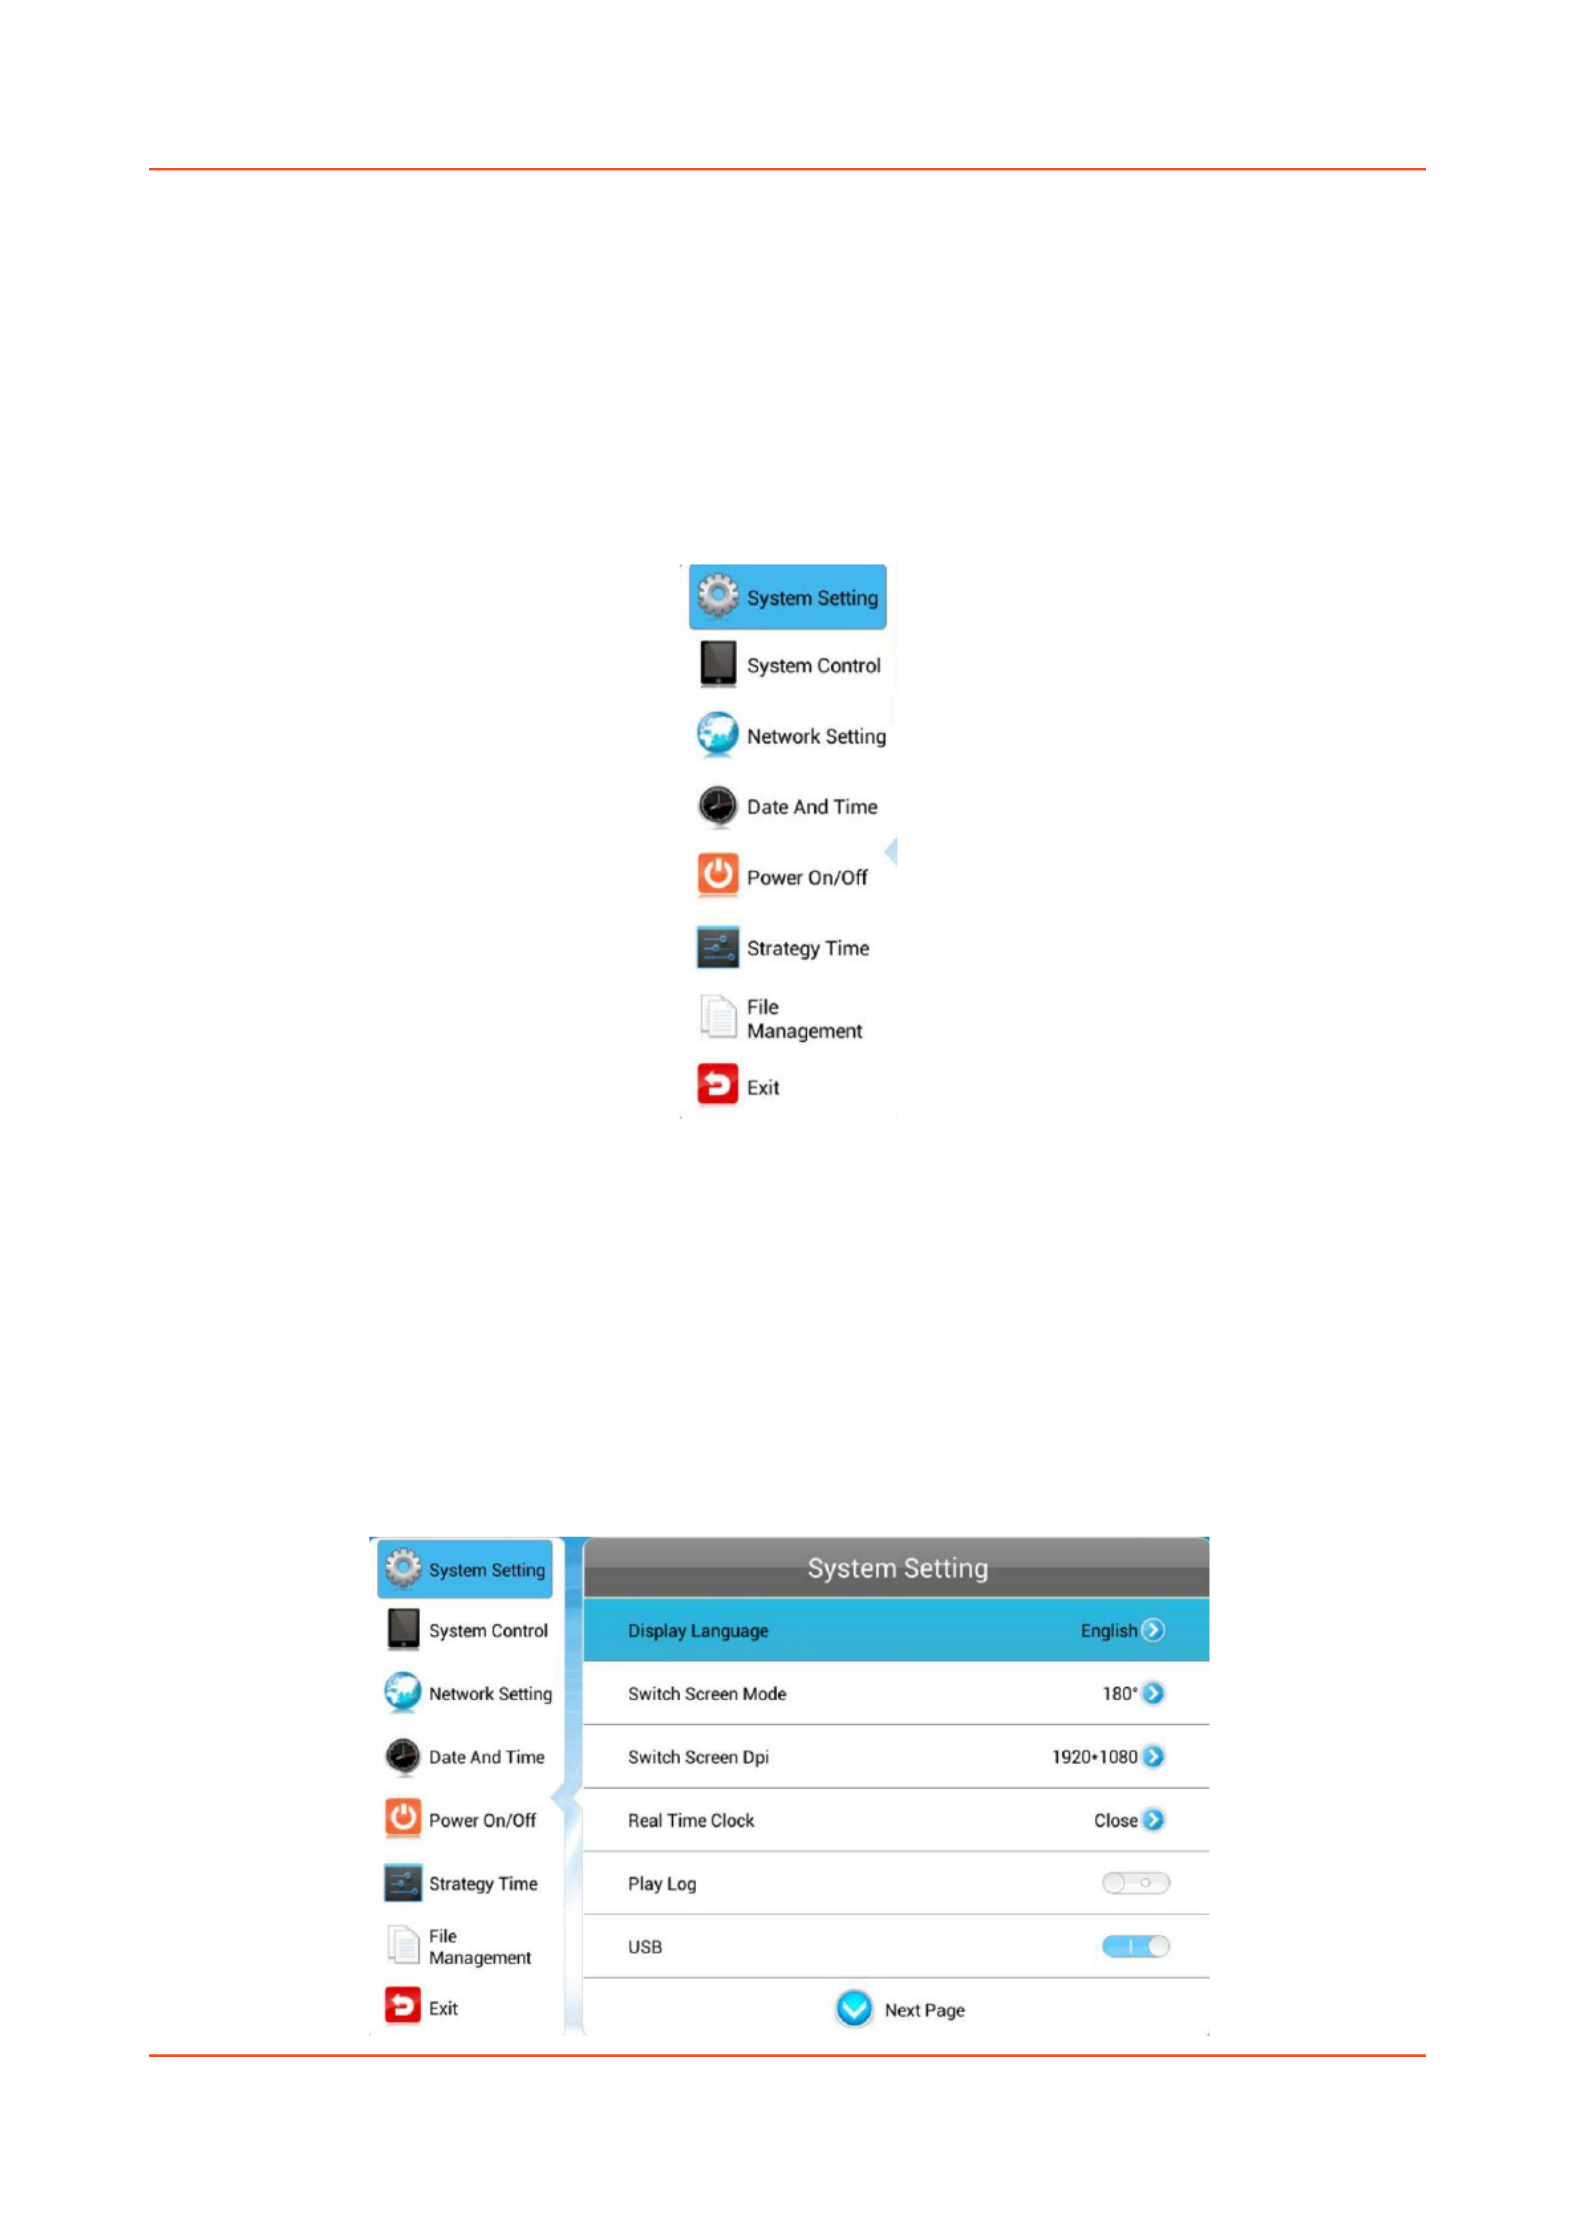
1.7 System Menu Operation
From the Home Screen you can bring up the Main Menu by pressing the “SETUP” button the
remote control. The Main Menu includes following sub- smenu : System Settings, System Control,
Date & Time, OnPower /Off, Timer Strategy, File Management and Exit.
P ress ↑ & ↓to select the right item, press “PLAY” to confirm selection. To get back to the side
menu press the “LEFT” navigation button on the remote control.
1.7.1 System Settings
The sub-menus within this section are: Display Language, Screen Mode, Screen Resolution, On
Screen Clock, USB, Scrolling Text, Sync Settings , Restore to Factory Settings and Auto Start. To exit a
sub-menu please press the “LEFT” navigation button the remote control, you can now navigate
though the Main Menus sub-menus.
High Brightness Professional Monitor User Manual
Page 11
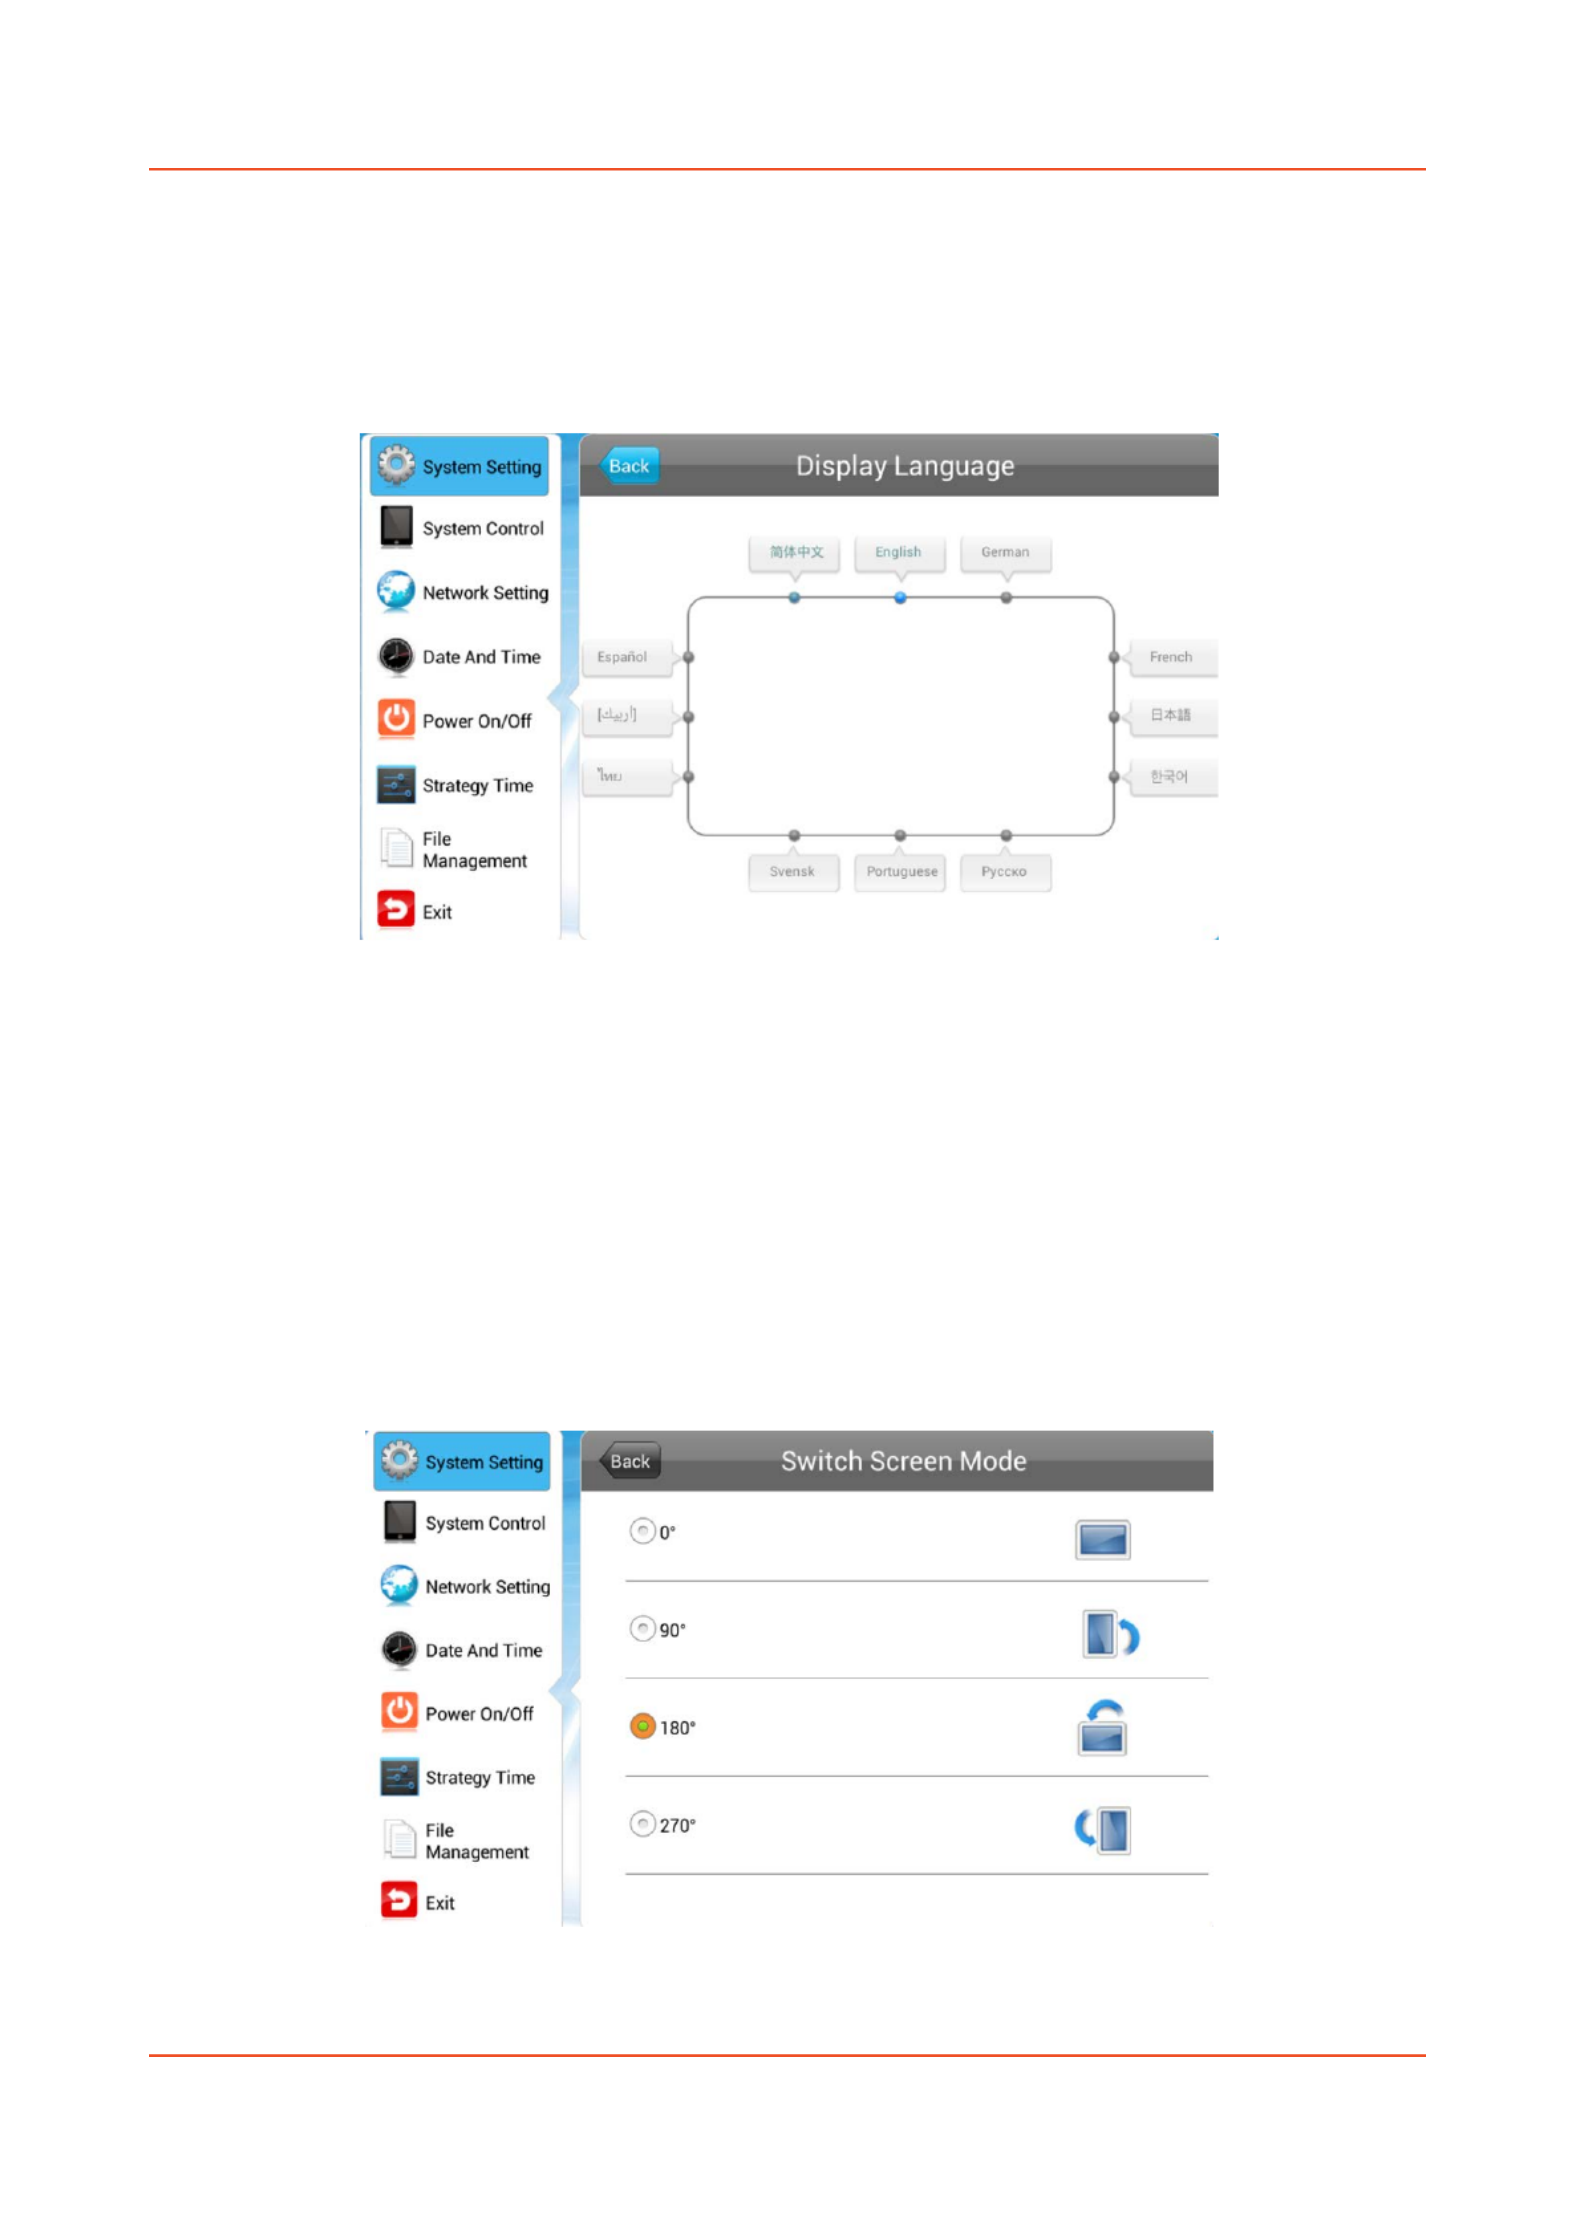
Display Language
The On Screen Display supports multiple languages, the default being English. As with all menu
operation press “DOWN” to access the sub-menu then use the navigation buttons to select the
right item, then “PLAY” to confirm selection.
Switch Screen Mode
Here you can set the screens orientation so as the OSD and content display correctly. There are 4
options as pictured below:
• 0° (default landscape) - Displays in landscape with the locker door on the left hand side.
• 90° - Displays in portrait with the locker door on the top.
• 180° - Displays in landscape with the locker door on the right hand side.
• 270° (default portrait) - Displays in portrait with the locker door on the bottom.

High Brightness Professional Monitor User Manual
Page 12
Screen Resolution
This menu allows you to set the screen resolution; this should be set to 1920x1080.
Real Time Clock
This option allows you to display a clock while content is playing. There are 5 options as pictured
below:
• Close: The screen doesn’t display time.
• Top Left: The time will be displayed on top left of the screen.
• Top Right: The time will be displayed on top right of the screen.
• Bottom Left: The time will be displayed on bottom left of the screen.
• Bottom Right: The time will be displayed on bottom right of the screen.

High Brightness Professional Monitor User Manual
Page 13
Play Log
This is a network function only and is disabled on this screen.
USB
This allows you to enable or disable the USB port. If you want to be able to update the screen
please ensure this is turned on (blue).

High Brightness Professional Monitor User Manual
Page 14
Scrolling Text
This allows you to enable or disable the scrolling text function. If you have included scrolling text in
your playlist (using the scheduling software) and want it to display please ensure this is turned on
(blue).
Sync Settings
This is a network function only and is disabled on this screen.

High Brightness Professional Monitor User Manual
Page 15
Restore To Factory Settings
Highlight “Yes” and press “PLAY” to restore factory settings; this will restore all system settings
back to default.
Auto Start
This feature allows your -screen to start playing the pre loaded content as soon as it has finished
booting up. If you want to enable this feature (recommended) please ensure this is turned on
(blue).

High Brightness Professional Monitor User Manual
Page 17
Play Mode
This feature is only available if the screen is set to “STANDALONE” mode and should be set to
“Open”.

High Brightness Professional Monitor User Manual
Page 18
Content Storage
This feature allows you to display content directly from a USB stick should you want to. We
recommend that you set this feature to “Internal Memory” however if you want your content to
displays directly from your USB stick (and not copy over) please select “USB”.
Image Duration
This feature allows you to set default duration time for your images (when not using the scheduling
software).

High Brightness Professional Monitor User Manual
Page 21
1.7.4 Power On/Off
Here is where you can set up your screens on/off timer, should you want it to power on and off
automatically at designated times. If you do not wish to set on/off times for your screen please set
the “Control Mode” to “Manual”.
There are two “Setting Modes” – “Daily”, allowing you to set the same on/off times for every day
of the week or “Weekly”, allowing you to set individual on/off times for each day of the week.
To activate the on/off timer set the “Control Mode” to “Timer”. Next set the “Setting Mode” to
either “Daily” or “Weekly”. Finally using the navigation buttons on your remote control navigate t
the timer fields, press “PLAY”, and assign on and off times.

High Brightness Professional Monitor User Manual
Page 22
1.7.5 Timer Strategy
This feature allows you to schedule your screen to play at different volumes at different times of
the day and switch to different AV inputs at different times of the day.
Volume Timer
To enable this feature turn the slider on (blue). New fields will now appear allowing you to set a
default volume level as well as timer fields for setting different volume levels for different periods
of the day.

High Brightness Professional Monitor User Manual
Page 24
Navigate to a timer field and press “PLAY” on your remote control. Activate the timer then set a
start and end time and an AV input. Finally navigate to and select “SAVE”.

High Brightness Professional Monitor User Manual
Page 25
1.7.6 File Management
Here, you can check storage information such as memory capacity, used space and free space. You
can also format the disk. You should be extremely careful here as formatting the disk will result in
a total loss of data.
1.7.7 Exit
Highlighting and selecting this section will exit the M M ain enu. If you have made any changes the
system will ask to if you want to reboot the screen so that the changes can take effect, select “YES”.

High Brightness Professional Monitor User Manual
Page 26
1.8 Display Settings
As well as having a main system menu that can be accessed through your home screen, the unit
also has a display setting menu for changing which input source is being displays as well as altering
values such as brightness, contrast and saturation. This can be accessed at any time by pressing the
“MENU” button on your remote control.
Source
Here you can select which video signal the screen displays. As a default it is set to “Digital Signage”
as this plays from the internal media player. You can also select HDMI and VGA, to do so navigate
to your desired input source and press the “PLAY” button on your remote control. To go back to
the previous menu navigate to Return and press “PLAY” on your remote control.

High Brightness Professional Monitor User Manual
Page 27
System Setting
Here you can set the OSD Language to either English or Chinese using the “LEFT” and “RIGHT”
buttons on your remote control. We recommend that you do not change any of the other settings
in this menu. To go back to the previous menu navigate to Return and press “PLAY” on your remote
control.
Picture
Here you can alter the overall image settings of your screen. The default value for all the image
settings (apart from Sharpness) is 50. To adjust the Brightness, Contrast and Colour of your display
navigate to the setting and use the left and right navigation buttons to adjust the value accordingly.
Note: it is recommended not to change the image settings of your screen unnecessarily.

High Brightness Professional Monitor User Manual
Page 28
Exit
To exit from this Display Settings menu, navigate to Exit and press “PLAY”. If inactive for more than
10 seconds, you will automatically exit this menu.

High Brightness Professional Monitor User Manual
Page 29
2. System Operation
2.1 Supported Media Files
Media Type
Supported File Type
Image
JPG
Video
MPG, AVI, MP4
Audio
MP3
1. This unit does NOT support WMV or FLV video file types.
2. This unit does NOT support Sony ATRAC3, DTS or Dobly HD audio file types.
Note: Video and image files should be a maximum 1920x1080 resolution (16:9 aspect ratio).

High Brightness Professional Monitor User Manual
Page 33
> Select Image switch mode
> Click “OK”
> Image appears in Schedule.
You can select multiple image files at once to add to a schedule, you can also move each item up
or down in the playlist by using the arrow buttons on the right hand side.
Adding Audio
Note: Before adding audio files please ensure that it has a file name of 11 characters or less and
contain no special characters (!ӣ$%^&* etc.).
Click the “Add MP3” button
> Select Schedule
> Click “Browse” and select MP3 file
> Enter volume level
> Click “OK”
> MP3 Appears in Schedule.
Note: You must add audio files after all mage files.i
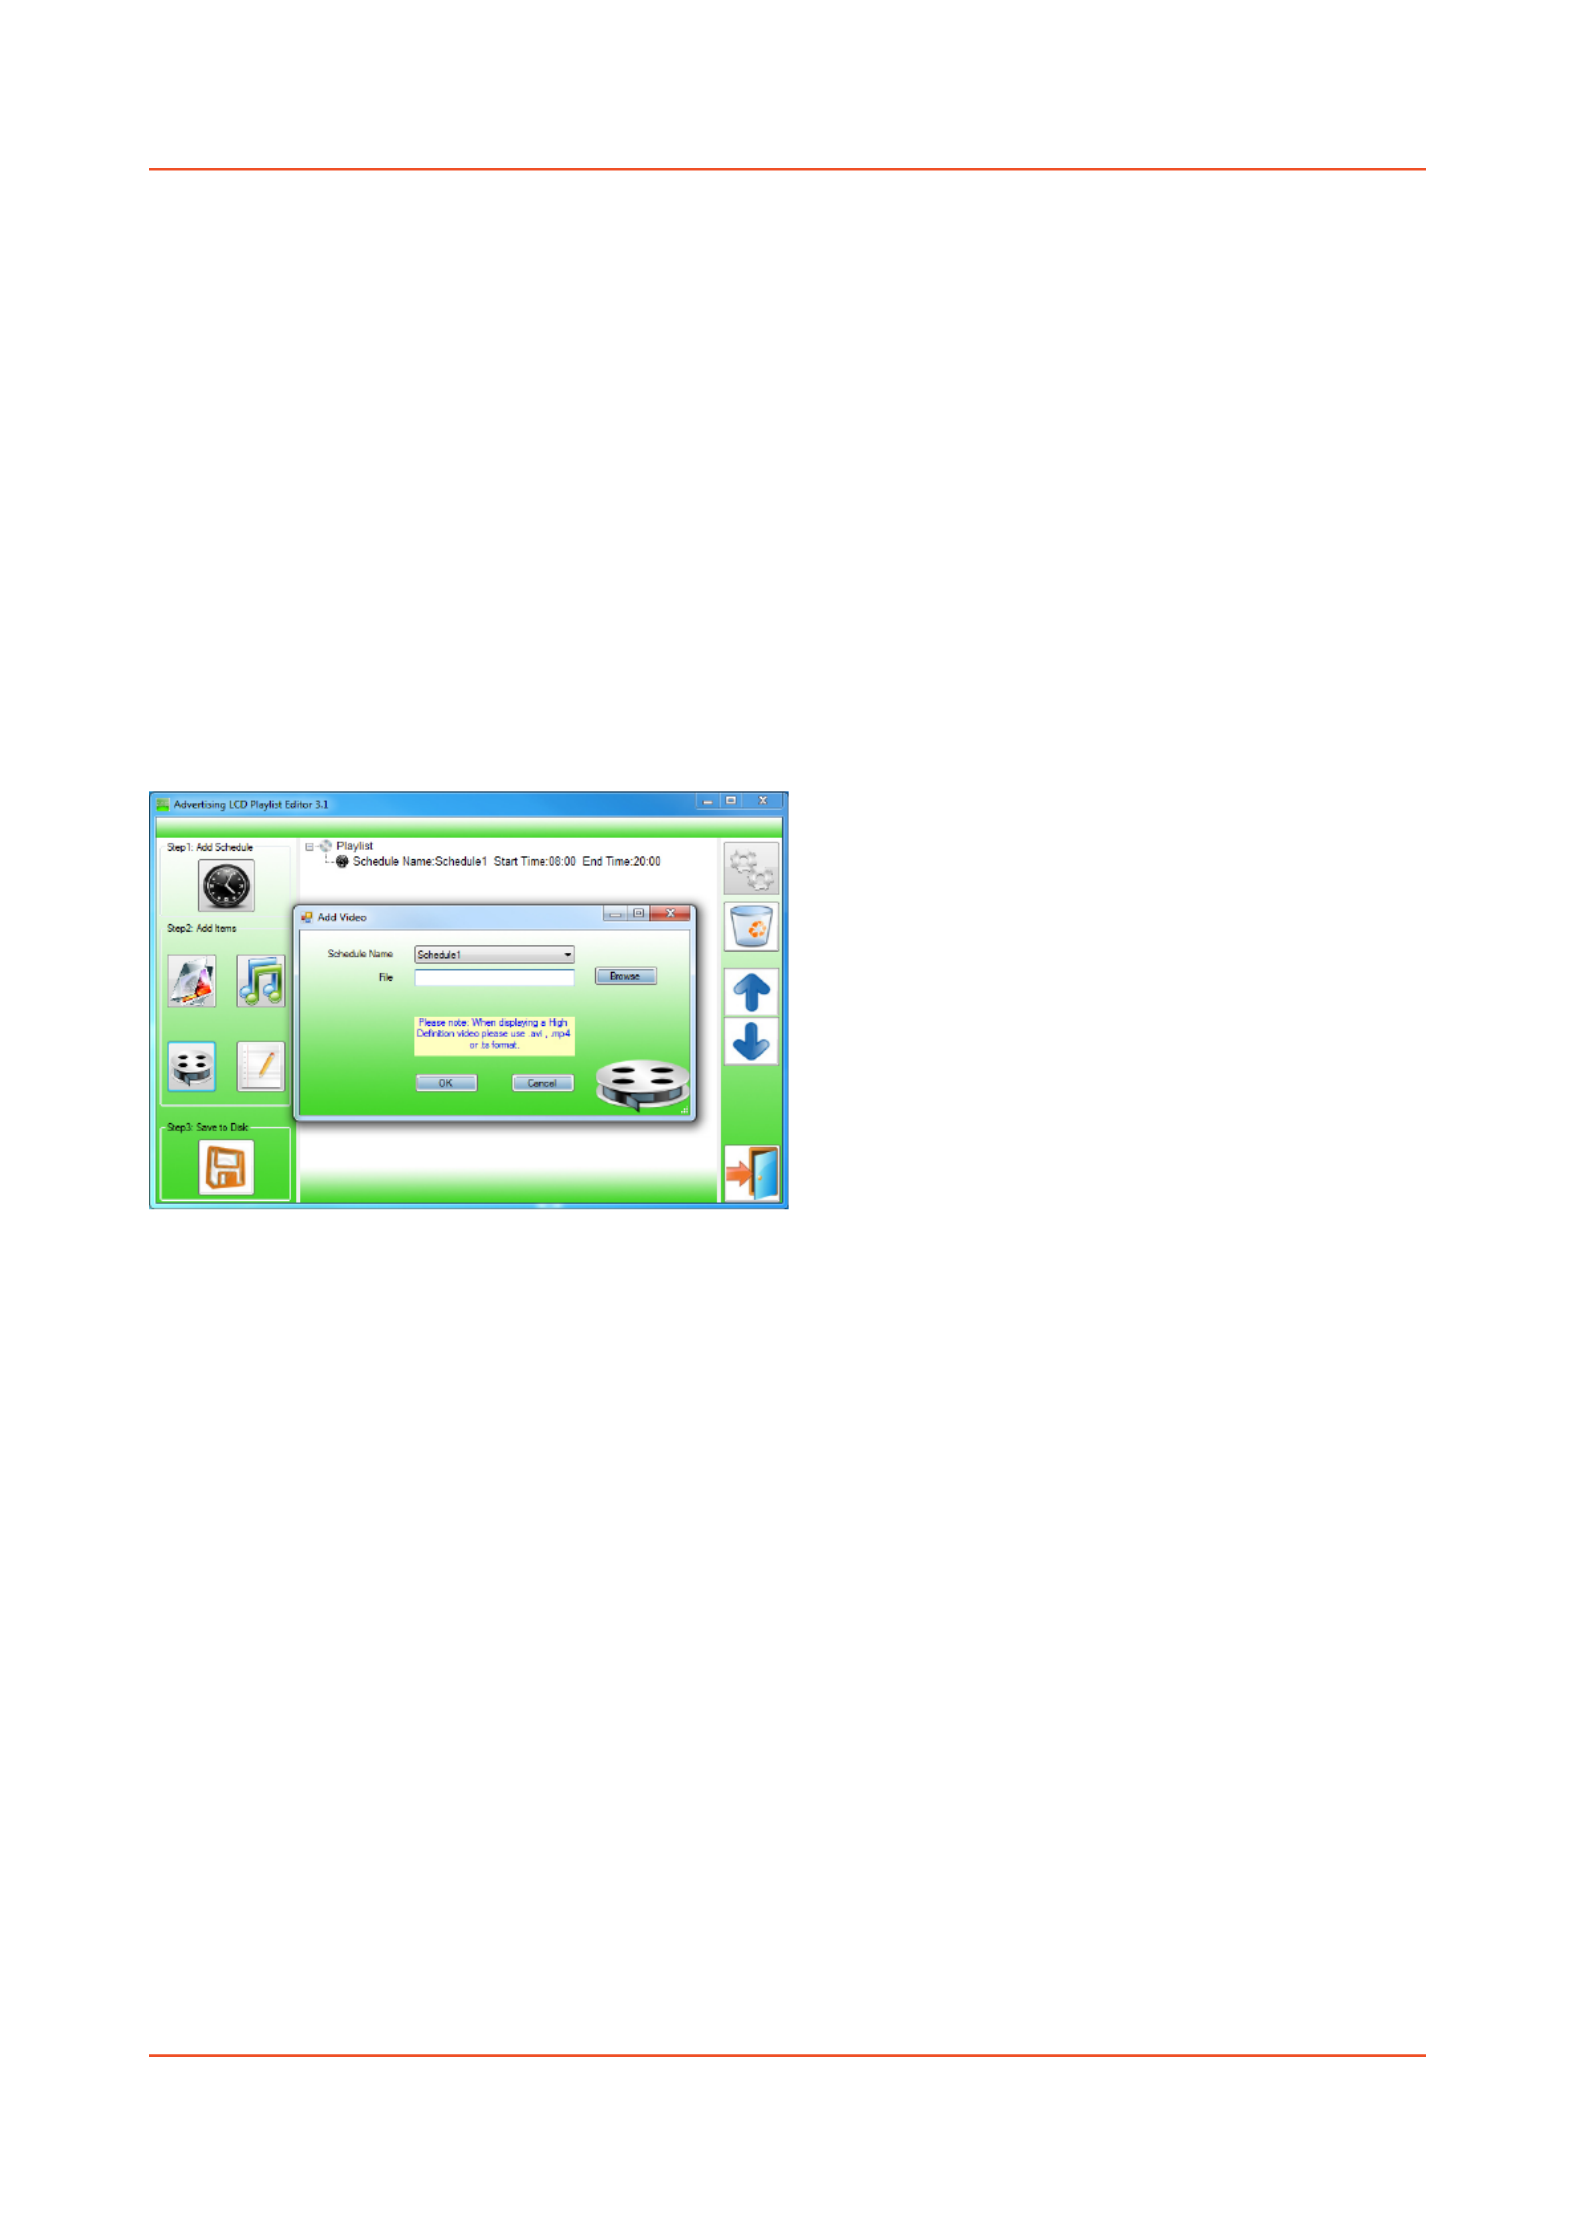
Adding Video
High Brightness Professional Monitor User Manual
Page 34
Note: Before adding video files please ensure that it has a file name of 11 characters or less and
contain no special characters (!ӣ$%^&* etc.).
Click the button“Add Video”
> Select Schedule
> Click “Browse” and locate Video file
> Enter preferred repeat
> Enter preferred volume
> Click “OK”
> Video appears in playlist.
Note: You cannot add Videos and MP3 audio files in the same schedule.
Adding Scrolling Text
Note: you must ensure that the scrolling text function is activated on your display, you can do this
by accessing the System Settings of the Main Menu (see 1.5.1 System Settings)
Click the “Add Scroll Message” button
>Enter the message you would like to run across the bottom of the screen
Or if you have a pre-existing .txt document containing your message:
>Highlight the “Import from file” checkbox and click “Browse”
>Locate .txt file and highlight
>Click “OK”
>Message appears at the bottom of the playlist.

High Brightness Professional Monitor User Manual
Page 36
3.3 Editing Playlists
From the main menu click “Load xisting PlaylistE ”
> Locate and select playlist to edit
> Playlist appears in playlist creator
> Select item to edit and click “Edit” button located on the top right hand side of the application.
Note: You can also add items to the playlist and add further schedules.
3.3.1 Deleting Items
To delete items within a playlist, select the item and click “Delete” - located on the right hand side
of the application. The item will be removed from the playlist.
Specyfikacje produktu
| Marka: | Allsee |
| Kategoria: | monitor |
| Model: | HB55B |
Potrzebujesz pomocy?
Jeśli potrzebujesz pomocy z Allsee HB55B, zadaj pytanie poniżej, a inni użytkownicy Ci odpowiedzą
Instrukcje monitor Allsee

24 Września 2024
24 Września 2024
24 Września 2024
24 Września 2024
24 Września 2024
24 Września 2024
24 Września 2024
24 Września 2024
24 Września 2024
24 Września 2024
Instrukcje monitor
- monitor Sony
- monitor Yamaha
- monitor Samsung
- monitor PeakTech
- monitor UPERFECT
- monitor LG
- monitor Xiaomi
- monitor Joy-It
- monitor Sharp
- monitor Huawei
- monitor TCL
- monitor Pioneer
- monitor Lenovo
- monitor Philips
- monitor Plantronics
- monitor SilverCrest
- monitor Gigabyte
- monitor Acer
- monitor Bosch
- monitor Epson
- monitor JBL
- monitor Hikvision
- monitor Fujitsu
- monitor HyperX
- monitor LC-Power
- monitor Hisense
- monitor Panasonic
- monitor Promethean
- monitor Canon
- monitor Crestron
- monitor Viewsonic
- monitor Behringer
- monitor Asus
- monitor AG Neovo
- monitor Allen & Heath
- monitor IK Multimedia
- monitor Medion
- monitor Boss
- monitor Marquant
- monitor MSI
- monitor Toshiba
- monitor Tesla
- monitor Westinghouse
- monitor Jensen
- monitor Yealink
- monitor Ring
- monitor Garmin
- monitor Blaupunkt
- monitor Salora
- monitor Iiyama
- monitor Citizen
- monitor APC
- monitor Haier
- monitor HP
- monitor Hyundai
- monitor Honeywell
- monitor Chauvet
- monitor Tripp Lite
- monitor Shure
- monitor Cisco
- monitor Xerox
- monitor Smart
- monitor Cooler Master
- monitor Alpine
- monitor Godox
- monitor Dynaudio
- monitor Deltaco
- monitor JVC
- monitor V7
- monitor Dell
- monitor IFM
- monitor Corsair
- monitor Alesis
- monitor Vimar
- monitor Dahua Technology
- monitor Schneider
- monitor Eurolite
- monitor Ricoh
- monitor SMART Technologies
- monitor NZXT
- monitor Emos
- monitor Renkforce
- monitor Marshall
- monitor Viessmann
- monitor Omron
- monitor Thomson
- monitor Velleman
- monitor Neumann
- monitor DataVideo
- monitor Danfoss
- monitor Pyle
- monitor Apple
- monitor Newline
- monitor Waeco
- monitor AOC
- monitor Peerless-AV
- monitor Speco Technologies
- monitor Samson
- monitor PreSonus
- monitor ARRI
- monitor Kindermann
- monitor Olympus
- monitor Mitsubishi
- monitor Fluid
- monitor Razer
- monitor ART
- monitor Continental Edison
- monitor RCF
- monitor NEC
- monitor Brandson
- monitor Prestigio
- monitor OSEE
- monitor Sanyo
- monitor Elvid
- monitor Optoma
- monitor Focal
- monitor Asrock
- monitor Monkey Banana
- monitor Abus
- monitor AMCV
- monitor Jay-Tech
- monitor Mackie
- monitor Palmer
- monitor Barco
- monitor Insignia
- monitor AVer
- monitor Akuvox
- monitor 3M
- monitor Element
- monitor Denver
- monitor Marshall Electronics
- monitor Orion
- monitor Hitachi
- monitor Postium
- monitor Kali Audio
- monitor IStarUSA
- monitor Seiki
- monitor Ernitec
- monitor Wohler
- monitor SmallHD
- monitor AJA
- monitor KRK
- monitor BenQ
- monitor Atlona
- monitor Thermaltake
- monitor Simrad
- monitor Hanwha
- monitor Odys
- monitor Elo
- monitor Ikan
- monitor BOOX
- monitor JUNG
- monitor Burg Wächter
- monitor Eizo
- monitor Monacor
- monitor Aputure
- monitor Daewoo
- monitor Tannoy
- monitor GVision
- monitor Positivo
- monitor Adj
- monitor Freedom Scientific
- monitor SPL
- monitor Qian
- monitor I3-Technologies
- monitor Stairville
- monitor Vitek
- monitor Planar
- monitor Mobile Pixels
- monitor REVO
- monitor Atomos
- monitor Newstar
- monitor SWIT
- monitor Kramer
- monitor RGBlink
- monitor AMX
- monitor Midas
- monitor Alienware
- monitor Archos
- monitor Acti
- monitor Emachines
- monitor Caliber
- monitor Maxdata
- monitor Sunstech
- monitor GlobalTronics
- monitor Sunny
- monitor BlueBuilt
- monitor Da-Lite
- monitor ProXtend
- monitor Kubo
- monitor GeoVision
- monitor LaCie
- monitor InFocus
- monitor Festo
- monitor Konig
- monitor Swissonic
- monitor IHealth
- monitor Peaq
- monitor QSC
- monitor Hannspree
- monitor ESI
- monitor Avocor
- monitor Vivitek
- monitor Genelec
- monitor Interlogix
- monitor Vorago
- monitor EverFocus
- monitor POSline
- monitor Peerless
- monitor M-Audio
- monitor Mad Catz
- monitor Krom
- monitor Monoprice
- monitor Eve Audio
- monitor Yorkville
- monitor HoverCam
- monitor Voxicon
- monitor Sonifex
- monitor TV One
- monitor Fostex
- monitor Prowise
- monitor Terra
- monitor Neets
- monitor Soundstream
- monitor Xoro
- monitor HKC
- monitor CTOUCH
- monitor Ozone
- monitor Ibm
- monitor Maxell
- monitor Packard Bell
- monitor Provision ISR
- monitor Mybeo
- monitor CSL
- monitor Bearware
- monitor Drawmer
- monitor Blue Sky
- monitor Zalman
- monitor Iadea
- monitor Advantech
- monitor Hercules
- monitor Avantone Pro
- monitor Ganz
- monitor TVLogic
- monitor Gamber-Johnson
- monitor Extron
- monitor Neat
- monitor Legamaster
- monitor Belinea
- monitor Adam
- monitor Triton
- monitor ITek
- monitor Kogan
- monitor Posiflex
- monitor Antelope Audio
- monitor MicroTouch
- monitor X-Rite
- monitor EKO
- monitor ONYX
- monitor IBoardTouch
- monitor Mirai
- monitor Elite Screens
- monitor Hollyland
- monitor Mitsai
- monitor Christie
- monitor Skytronic
- monitor Enttec
- monitor Feelworld
- monitor Phoenix Contact
- monitor COMMBOX
- monitor Yiynova
- monitor Alogic
- monitor Pelco
- monitor Lilliput
- monitor LightZone
- monitor AOpen
- monitor Planet Audio
- monitor EC Line
- monitor Datacolor
- monitor HELGI
- monitor Desview
- monitor Syscom
- monitor Night Owl
- monitor ProDVX
- monitor Varad
- monitor PureTools
- monitor DoubleSight
- monitor CTL
- monitor Game Factor
- monitor Nixeus
- monitor Chimei
- monitor Blue Sea
- monitor Faytech
- monitor Hamlet
- monitor Wyse - Dell
- monitor Approx
- monitor Bauhn
- monitor GeChic
- monitor Oecolux
- monitor ADS-TEC
- monitor Satco
- monitor Casalux
- monitor Jupiter
- monitor Transvideo
- monitor Innocn
- monitor KeepOut
- monitor Shimbol
- monitor Raysgem
- monitor Motrona
- monitor Ikegami
- monitor AORUS
- monitor Portkeys
- monitor Mimo Monitors
- monitor American Dynamics
- monitor AIS
- monitor Wortmann AG
- monitor Viotek
- monitor Vidi-Touch
- monitor KTC
- monitor CoolerMaster
- monitor Atlantis Land
- monitor HEDD
- monitor Colormetrics
- monitor IOIO
- monitor DTEN
- monitor Cocopar
- monitor Titan Army
- monitor Xenarc
- monitor Delvcam
- monitor Wimaxit
- monitor BookIT
- monitor SideTrak
- monitor TRIUMPH BOARD
- monitor Japannext
Najnowsze instrukcje dla monitor

8 Kwietnia 2025

8 Kwietnia 2025

8 Kwietnia 2025
7 Kwietnia 2025

5 Kwietnia 2025

4 Kwietnia 2025

4 Kwietnia 2025
3 Kwietnia 2025
2 Kwietnia 2025

2 Kwietnia 2025