Instrukcja obsługi Alesis Talent 61
Alesis
klawiatura
Talent 61
Przeczytaj poniżej 📖 instrukcję obsługi w języku polskim dla Alesis Talent 61 (36 stron) w kategorii klawiatura. Ta instrukcja była pomocna dla 9 osób i została oceniona przez 2 użytkowników na średnio 4.5 gwiazdek
Strona 1/36

User Guide
English ( 3 – 8 )
Guía del usuario
Español ( 9 – 14 )
Guide d’utilisation
Français ( 15 – 20 )
Guida per l’uso
Italiano ( 21 – 26 )
Benutzerhandbuch
Deutsch ( 27 – 33 )
Appendix
English ( 34 )

2

3
User Guide ( )English
Introduction
Box Contents
Talent 61 MKII
Microphone
Headphones
Music Rest
Keyboard Stand
Bench
Power Adapter
User Guide
Safety & Warranty Manual
Support
For the latest information about this product (system requirements, compatibility information,
etc.) and product registration, visit alesis.com.
For additional product support, visit alesis.com/support.

4
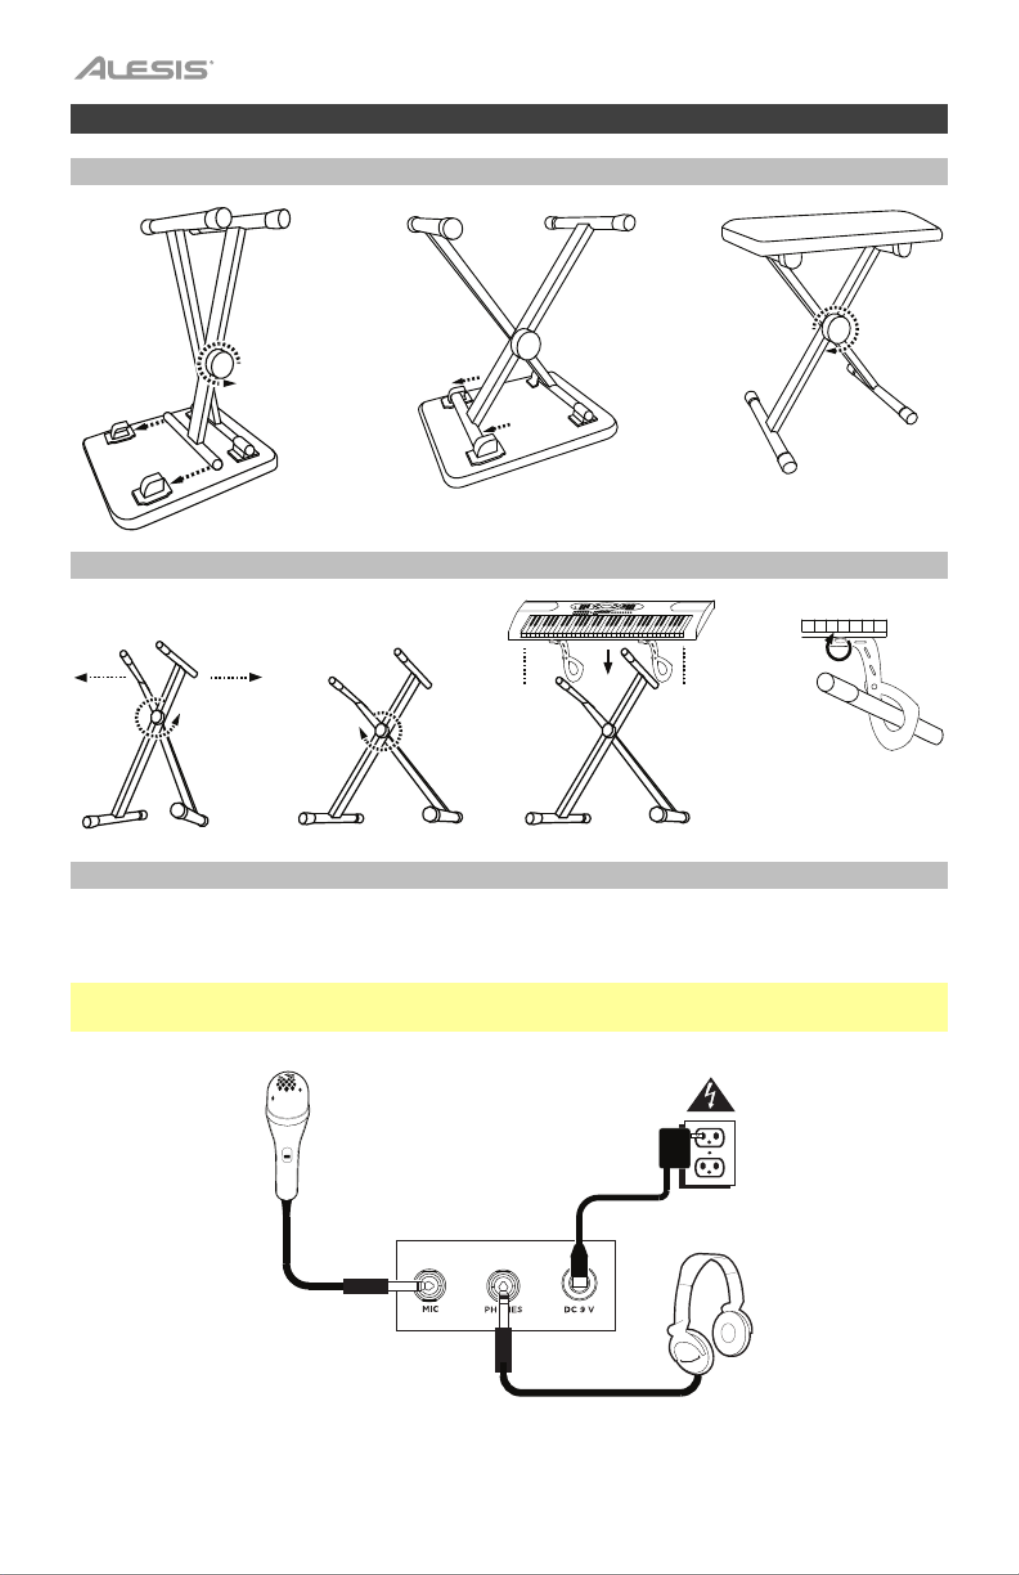
Setup
Bench
Stand
Connection Diagram
Items not listed in Introduction > Box Contents are sold separately.
Note: Make sure to unplug/remove headphones before moving away from the keyboard.
Microphone
Power
Headphones
1 2 3
Keyboard
Strap p4-x2
1 2 3 4
Rear Panel

5
Features
Top Panel
1
2
3
4
5
6
7
8
9
10
11
12
13
14
15
16
17 18
19
1. Power On/Off: Press this button to turn the keyboard on or off.
2. Transpose: Press the Transpose + or Transpose – button to increase or decrease the
pitch of the keyboard by a half-step. Press the Transpose + and Transpose – buttons
simultaneously to reset to the default value.
3. Rhythm Volume: Press the Rhythm Vol + or Rhythm Vol – button to increase or
decrease accompaniment rhythm volume. Press the Rhythm Vol + and Rhythm Vol –
simultaneously to reset to the default value.
4. Chord Volume: Press the Chord Vol + or Chord Vol – button to increase or decrease
accompaniment chord volume. Press the Chord Vol + and Chord Vol – buttons
simultaneously to reset to the default value.
5. Master Volume: Press the Master Vol + or Master Vol – button to increase or decrease
the overall volume for the sounds and rhythms. Press the Master Vol + and Master Vol –
buttons simultaneously to reset to the default value.
6. Tempo: Press the Tempo + or Tempo – button to increase or decrease the speed of the
rhythm and chord accompaniment, demo song and/or metronome. Press the Tempo +
and Tempo – buttons simultaneously to reset to the default value.
7. Demo: Press this button to begin playback of the demonstration songs. Use the number
buttons or + or - buttons to select another demonstration song. Press this button again to
stop the playback.
8. One-Key: Press this button to start the one-key function. This function lets you play
along with the demo songs by pressing any key to the rhythm of the song. Use the
number buttons or the + or - buttons to select another demonstration song.
9. LED Display: Shows the various keyboard functions and numerical values.
10. Program: Press this button to program a custom accompaniment
rhythm.
11. Play: Press this button to playback a custom accompaniment rhythm or recorded song.
12. Record: Press this button to record a custom song.
13. Tone: Press this button and then use the number buttons or the + or - buttons to select a
tone.
14. Rhythm: Press this button and then use the number buttons or the + or - buttons to
select an accompaniment rhythm.
15. Numbers: Use these buttons to select an instrument, rhythm, song, or tempo.
16. Sync: Press the Sync button, and then play the keys in the lowest two octaves
(corresponding to the chords/notes). The play-along feature starts immediately when
playing a key, instead of having to press the Start/Stop button to start it.
17. Start/Stop: Press to start or stop an accompaniment rhythm.

6
18. Fill In: Press this button to have a temporary rhythm play during the accompaniment
rhythm.
19. Single Chord: Press this button to enable the Single automatic chord feature. This
feature will generate chords for the accompaniment rhythms based on the keys you play
that are the second lowest F# key or lower on the keyboard. The available chords for this
function are described in Operation > Accompaniment Rhythm. Press this button again
or press the Chord Clear button to disable the chord function.
20. Fingered Chord: Press this button to enable the Fingered automatic chord feature. This
feature will generate chords for the accompaniment rhythms based on the keys you play
(the second lowest F# key or lower on the keyboard). The available chords for this
function are described in Operation > Accompaniment Rhythm. Press this button again
or press the Chord Clear button to disable the chord function.
21. Chord Clear: Press this button to turn the Single Chord/Fingered Chord feature off.
22. Sustain: Press this button to activate a sustain effect which simulates a sustain pedal
when playing the keyboard. Press this button again to disable the sustain effect.
23. Vibrato: Press this button to activate a pulsating change to the pitch when playing the
keyboard. Press this button again to disable to vibrato effect.
24. Dual: Press this button to layer two sounds together. The sound that you were using
before pressing the Dual button will be used for one part of the layer. To select the other
sound for the layer, enter a number for the sound or use the + and – buttons. Press the
Dual button again to disable the dual-tone function.
25. Split: Press this button to split the keyboard into two zones. The sound that you were
using before pressing the Split button will be applied to the left-hand side of the
keyboard. To select a sound for the right-hand side, enter a number for the sound or use
the + and – buttons. Press the Split button again to disable the keyboard split.
26. Percussion: Press this button to play the built-in drum kit and percussion sounds using
the keys. Press this button again to disable this function.
27. Intro/Ending: Press this button to play an intro and then start playback of an
accompaniment rhythm. Press this button while the accompaniment rhythm is playing to
play an outro and then stop playback of an accompaniment rhythm.
28. Beat: Press this button to start the metronome. Press this button again to change the
time signature of this button or turn off the metronome.
29. Drum Kit Buttons: Press these buttons to play percussion sounds. See the images on
the buttons to note which button plays which type of sound. The Drum Kit Buttons are
particularly useful for the Rhythm Programming feature.
Rear Panel
1. Mic: Connect the included microphone here to sing
while playing the keyboard.
2. Phones: Connect the included headphones here to
hear the keyboard and mute the internal speakers.
Note: Make sure to unplug/remove headphones
before moving away from the keyboard.
3. Power Input: Connect the included power adapter
here.
Bottom Panel
1. Battery Compartment: Install 6 “AA” batteries
here to power the keyboard if you are not using the
power adapter.
1 2 3
1
8
Recording Function
1. To record your playing, press the Record button to start recording a song.
2. During the recording process, press Play to stop recording. Press Play again to play the
recorded song.
3. Press Play again to stop playback.
Note: The recorded song will be erased when recording is started again or when the
keyboard is turned off. When the memory is full, the screen will display “FUL”, and
recording will automatically stop.
Rhythm Programming
To create custom accompaniment rhythms using the keyboard keys:
1. Press the Program button and start programming the rhythm by playing each note in the
pattern, one at a time.
2. Press Play to stop programming and hear the programmed rhythm.
3. Press the Program button again to disable the programming function and erase the
programming rhythm.
Note: The programmed rhythm will be erased when programming is performed again or if the
keyboard is turned off.
Auto-power Off
After 5 minutes of inactivity, Talent 61 MKII will power off. If you press any button or key, it will
turn back on.
Avoid touching the USB port, the headphone output, or the area around these connections while
using this keyboard with a computer. This may cause the keyboard to temporarily stop working or
act abnormally.

9
Guía del usuario ( )Español
Introducción
Contenido de la caja
Talent 61 MKII
Micrófono
Auriculares
Atril
Soporte para teclado
Banco
Adaptador de corriente
Guía del usuario
Manual sobre la seguridad y garantía
Soporte
Para obtener la información más reciente acerca de este producto (requisitos de sistema,
información de compatibilidad, etc.) y registrarlo, visite alesis.com.
Para obtener soporte adicional del producto, visite alesis.com/support.
10
Instalación
Banco
Soporte
Diagrama de conexión
Los elementos que no se enumeran en Introducción > Contenido de la caja se venden por
separado.
Hinweis: Stellen Sie sicher, dass Sie den Kopfhörer ausstecken / entfernen, bevor Sie sich
von der Tastatur entfernen.
Micrófono Suministro
eléctrico
Auriculares
1 2 3
Banda de
teclado p10-x2
1 2 3 4

12
19. Single Chord: Pulse este botón para activar la característica de acorde automático único. Esta
característica genera acordes para los ritmos de acompañamiento basados en las teclas que
usted toca que son la segunda tecla más baja fa sostenido (F#) o más baja en el teclado. Los
acordes disponibles para esta función se describen en Operación > Ritmo de
acompañamiento. Pulse nuevamente este botón o pulse el botón Chord Clear para
desactivar la función de acorde.
20. Fingered Chord: Pulse este botón para activar la característica de acorde automático con
teclas. Esta característica genera acordes para los ritmos de acompañamiento basados en las
teclas que usted toca (la segunda tecla más baja fa sostenido (F#) o más baja en el teclado).
Los acordes disponibles para esta función se describen en Operación > Ritmo de
acompañamiento. Pulse nuevamente este botón o pulse el botón Chord Clear para
desactivar la función de acorde.
21. Chord Clear: Pulse este botón para activar y desactivar las características de acorde
único/acorde con teclas.
22. Sostenido: Pulse este botón para activar un efecto de sostenido que simula el pedal de
sostenido cuando se toca el teclado. Pulse este botón nuevamente para desactivar el efecto de
sostenido.
23. Vibrato: Pulse este botón para activar un cambio pulsante al tono al tocar el teclado. Pulse
este botón nuevamente para desactivar el efecto de vibrato.
24. Dual: Pulse este botón para disponer dos sonidos en capas. El sonido que estaba utilizando
antes de pulsar el botón Dual se utilizará en una parte de la capa. Para seleccionar el otro
sonido de la capa, introduzca un número para el sonido o utilice los botones + y – . Pulse el
botón Dual nuevamente para desactivar la función de tono doble.
25. Split: Pulse este botón para dividir el teclado en dos zonas. El sonido que estaba utilizando
antes de pulsar el botón se aplicará al lado izquierdo Split del teclado. Para seleccionar el
sonido del lado derecho, introduzca un número para el sonido o utilice los botones + y – . Pulse
el botón Split nuevamente para desactivar la división del teclado.
26. Percussion: Pulse este botón para reproducir los sonidos de percusión y batería integrados
utilizando las teclas. Pulse este botón nuevamente para desactivar esta función.
27. Intro/Ending: Pulse este botón para reproducir una introducción y luego iniciar la reproducción
de un ritmo de acompañamiento. Pulse este botón mientras se reproduce el ritmo para
reproducir una secuencia final y luego detener la reproducción del ritmo de acompañamiento.
28. Beat: Pulse este botón para iniciar el metrónomo. Pulse este botón nuevamente para cambiar
la firma de tiempo de este botón o apagar el metrónomo.
29. Botones de Batería: Pulse estos botones para reproducir sonidos de percusión. Vea las
imágenes en los botones para saber qué botón reproduce qué tipo de sonido. Los botones de
Batería son particularmente útiles para la característica de programación de ritmos.
Panel trasero
1. Mic: Conecte aquí el micrófono incluido para cantar
mientras toca el teclado.
2. Phones: Conecte aquí los auriculares incluidos para
escuchar el teclado y silenciar los altavoces internos.
Nota: Asegúrese de desconectar / quitar los
auriculares antes de alejarse del teclado.
3. Entrada de corriente: Conecte aquí el adaptador de
corriente incluido.
Panel inferior
1. Compartimiento para pilas: Instale aquí 6 baterías
"AA" para alimentar el teclado digital Recital si no está
utilizando el adaptador de corriente.
123
1
13
Funcionamiento
Cómo seleccionar un tono
Para seleccionar un tono, pulse Tone y luego utilice los botones numéricos o los botones + y –.
Para tocar en capa dos sonido . El sonido que ess juntos, pulse el botón Dual taba utilizando antes
de pulsar el botón Dual se utilizará en una parte de la capa. Para seleccionar el otro sonido de la
capa, introduzca un número para el sonido o utilice los botones + y –. Pulse el botón Dual
nuevamente para desactivar la función de tono doble.
Para dividir el teclado en dos zonas, pulse el botón Split. El sonido que estaba utilizando antes de
pulsar el botón Split se aplicará al lado izquierdo del teclado. Para seleccionar el sonido del lado
derecho, introduzca un número para el sonido o utilice los botones + y –. Pulse el botón Split
nuevamente para desactivar la división del teclado.
Ritmo del acompañamiento
Para seleccionar un ritmo del acompañamiento, pulse Rhythm y luego utilice los botones numéricos
o los botones + y –.
Para iniciar o detener un ritmo del acompañamiento, pulse el botón Start/Stop.
Para que el ritmo del acompañamiento reproduzca un relleno, pulse el botón Fill In.
Pulse el botón Single Chord o Fingered Chord para activar las características de acorde
automático. Estas características generan acordes para los ritmos de acompañamiento basados en
las teclas que usted toca que son la segunda tecla más baja fa sostenido (F#) o más baja en el
teclado. Pulse nuevamente este botón o pulse el botón Chord Clear para desactivar la función de
acorde.
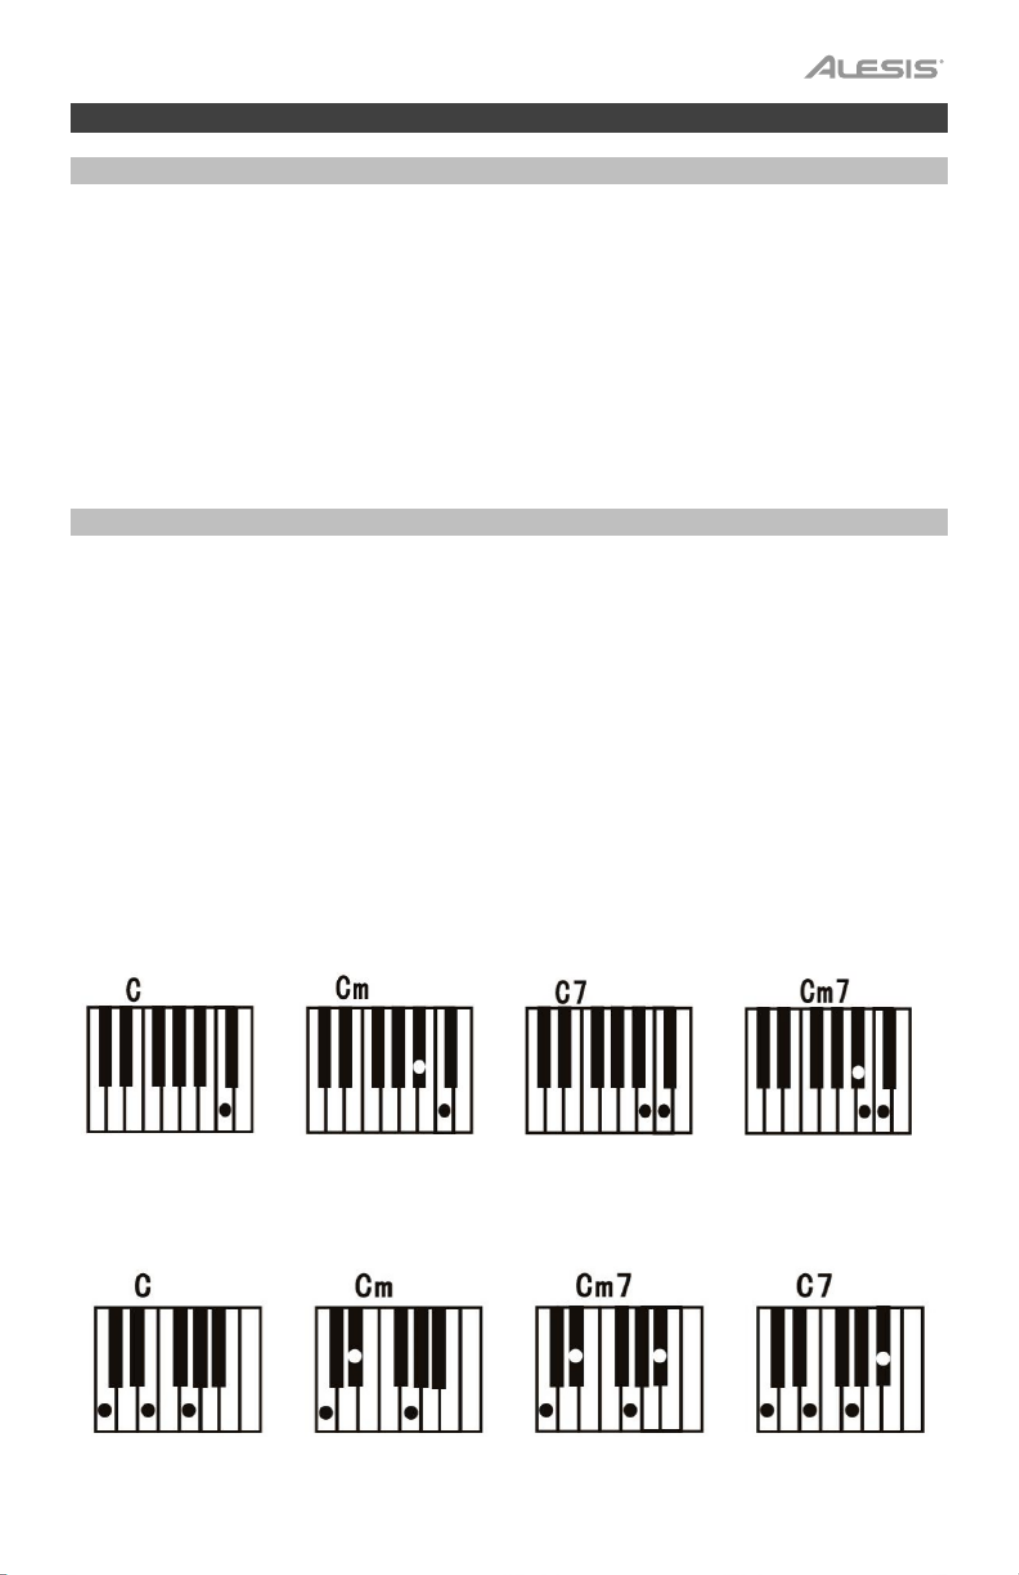
Single Chord:
Cuando utiliza la característica Single Chord (Acorde único), puede utilizar las formas de acordes
abreviadas mostradas a continuac ier nota a reproducir acordes ión antes de comenzar en cualqu
mayores, menores, de séptima o de séptima menores.
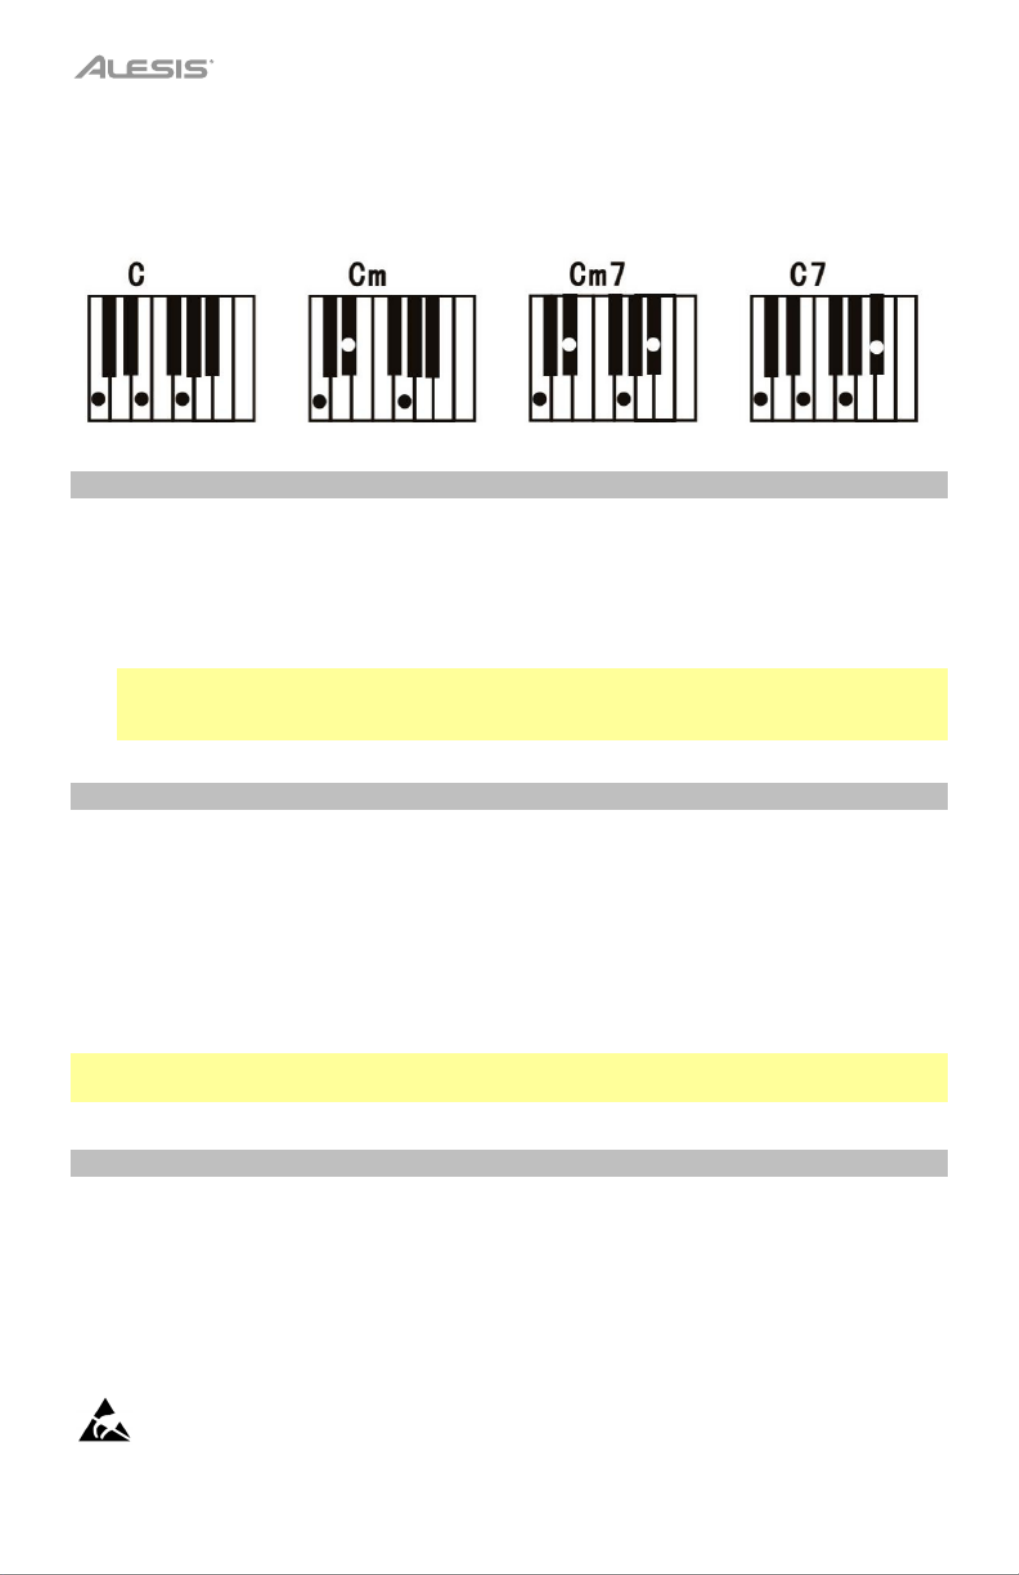
Fingered Chord:
Cuando utiliza la característica Single Chord, puede utilizar las formas de acordes completas
mostradas a continuación antes de comenzar en cualquier nota a reproducir acordes mayores,
menores, de séptima o de séptima menores.

14
Función de grabación
1. Para grabar su interpretación, pulse el botón Record a fin de iniciar la grabación de un
tema.
2. Durante el proceso de grabación, pulse Play para detener la grabación. Pulse Play
nuevamente para reproducir el tema grabado.
3. Pulse Play nuevamente para detener la reproducción.
Nota: El tema grabado se borrará cuando se inicie una nueva grabación o cuando se
apague el teclado. Cuando la memoria se encuentre llena, la pantalla mostrará “FUL” y la
grabación se detendrá automáticamente.
Programación de ritmos
Para crear ritmos de acompañamiento personalizados con las teclas del teclado:
1. Pulse el botón Program y comience a programar el ritmo tocando cada una de las notas
del patrón de a una a la vez.
2. Pulse Play para detener la programación y escuchar el ritmo programado.
3. Pulse el botón Program nuevamente para desactivar la función de programación y borrar
el ritmo de programación.
Nota: El ritmo programado se borrará cuando se realice una nueva programación o cuando se
apague el teclado.
Apagado automático
Después de 5 minutos de inactividad, el Talent 61 MKII se apaga. Si pulsa cualquier botón o
tecla, se encenderá nuevamente.
Evite tocar el puerto USB, la salida de auriculares o el área alrededor de estas conexiones mientras
usa este teclado con una computadora. Esto puede hacer que el teclado deje de funcionar
temporalmente o que actúe de manera anormal.

15
Guide d’utilisation (Français)
Présentation
Contenu de la boîte
Talent 61 MKII
Microphone
Casque d'écoute
Pupitre
Support pour clavier
Banc
Câble d’alimentation
Guide d'utilisation
Consignes de sécurité et informations concernant la garantie
Assistance technique
Pour les toutes dernières informations concernant la configuration système requise, la
compatibilité, etc., et l’enregistrement du produit, veuillez visiter alesis.com.
Pour de l’assistance supplémentaire, veuillez visiter alesis.com/support.

16
Installation
Banc
Support pour clavier
Schéma de connexion
Les éléments qui ne figurent pas dans la section Présentation > Contenu de la boîte sont
vendus séparément.
Remarque : veillez à débrancher / retirer le casque avant de vous éloigner du clavier.
Microphone
Alimentation
Casque d’écoute
1 2 3
2 courroies
pour clavier
1 2 3 4

17
Caractéristiques
Panneau supérieur
1
2
3
4
5
6
7
8
9
10
11
12
13
14
15
1617 18
19
1. Interrupteur d’alimentation : Cette touche permet de mettre le clavier sous et hors
tension.
2. Transposition : Utilisez les touches Transpose + et Transpose – afin d'augmenter ou de
diminuer la hauteur tonale du clavier en demi-tons. Appuyez sur les deux touches
Transpose + Transpose – et simultanément afin de réinitialiser la valeur par défaut.
3. Volume du rythme : Utilisez les touches Rhythm Vol + et Rhythm Vol – afin
d'augmenter ou de diminuer le volume du rythme d’accompagnement. Appuyez sur les
deux touches Rhythm Vol + et Rhythm Vol – simultanément afin de réinitialiser la valeur
par défaut.
4. Volume de l’accord : Utilisez les touches Chord Vol + et Chord Vol – afin d'augmenter
ou de diminuer le volume de l’accord d’accompagnement. Appuyez sur les deux
touches Rhythm Chord Vol + et Chord Vol – simultanément afin de réinitialiser la valeur
par défaut.
5. Volume général : Utilisez les touches Master Vol + Master Vol – et afin d'augmenter ou de
diminuer le volume général pour tous les sons et rythmes. Appuyez sur les deux touches
Master Vol + Master Vol – et simultanément afin de réinitialiser la valeur par défaut.
6. Tempo : Utilisez les touches Tempo + et Tempo – afin d'augmenter ou de diminuer la
vitesse du rythme et de l’accord d’accompagnement. Appuyez sur les deux touches
Tempo + Tempo – et simultanément afin de réinitialiser la valeur par défaut.
7. Demo : Cette touche permet de lancer la lecture des chansons de démonstration. Utiliser
les touches numériques ou les touches + et – permet de sélectionner une autre chanson
de démonstration. Appuyer de nouveau sur cette touche permet d’arrêter la lecture.
8. One-Key : Cette touche permet de lancer la fonction one-key. Cette fonction vous
permet de jouer avec les chansons de démonstration en appuyant sur n’importe quelle
touche au rythme de la chanson. Utiliser les touches numériques ou les touches + et –
permet de sélectionner une autre chanson de démonstration.
9. Affichage DEL : Affiche les diverses fonctions du clavier et les valeurs numériques.
10. Program : Cette touche permet de créer un rythme d’accompagnement personnalisé.
11. Play : Cette touche permet de lancer un rythme d’accompagnement personnalisé ou
d’une chanson enregistrée.
12. Record : Cette touche permet d’enregistrer une chanson personnalisée.
13. Tone : Appuyer sur cette touche puis utiliser les touches numériques ou les touches + et
– permet de sélectionner une sonorité.
14. Rythme : Appuyer sur cette touche puis utiliser les touches numériques ou les touches +
et – permet de sélectionner un rythme d’accompagnement.
15. Touches numériques : Ces touches permettent de sélectionner un instrument, un
rythme, une chanson ou un tempo.

18
16. Synchronisation : Appuyez sur la touche Sync puis jouer les touches dans les deux
octaves plus graves (correspondant aux accords/notes). La fonction d’accompagnement
commence immédiatement lorsqu’une touche est jouée sans avoir à appuyer sur la
touche Lancer/arrêter la lecture.
17. Lancer/arrêter la lecture : Cette touche permet de lancer ou d’arrêter un rythme
d’accompagnement.
18. Rythme temporaire : Cette touche permet d’activer un rythme temporaire durant la
lecture d’un rythme d’accompagnement.
19. Single Chord : Cette touche permet d’activer la fonction d’accompagnement avec
accords automatiques à un doigt. Cette fonction permet de générer des accords pour les
rythmes d’accompagnement basés sur les touches jouées à partir de la deuxième note
de fa dièse et les touches suivantes. Les accords disponibles pour cette fonction sont
décrits dans la section Fonctionnement > Rythme d’accompagnement. Appuyer de
nouveau sur cette touche ou sur la touche Chord Clear pour désactiver la fonction
d’accompagnement avec accords automatiques.
20. Fingered Chord : Cette touche permet d’activer la fonction d’accompagnement avec
accords automatiques à plusieurs doigts. Cette fonction permet de générer des accords
pour les rythmes d’accompagnement basés sur les touches jouées à partir de la
deuxième note fa dièse et les touches suivantes. Les accords disponibles pour cette
fonction sont décrits dans la section Fonctionnement > Rythme d’accompagnement.
Appuyer de nouveau sur cette touche ou sur la touche Chord Clear permet de désactiver
la fonction d’accompagnement avec accords automatiques.
21. Chord Clear : Cette touche permet d’activer la fonction d’accompagnement avec
accords automatiques à un ou à plusieurs doigts.
22. Sustain : Appuyez sur cette touche pour activer un effet de sustain qui simule une pédale
de sustain. Appuyez de nouveau sur cette touche pour désactiver l’effet de sustain.
23. Vibrato : Appuyez sur cette touche pour activer un changement de la tonalité pulsatoire.
Appuyez de nouveau sur cette touche pour désactiver l’effet de vibrato.
24. Dual : Cette touche permet de superposer deux sonorités. La sonorité sélectionnée avant
d’appuyer sur la touche Dual sera l’une des sonorités superposées. Pour sélectionner
l’autre sonorité qui sera superposée, entrez le numéro de la sonorité désirée ou utilisez
les touches + et – . Appuyer de nouveau sur la touche Dual permet de désactiver la
fonction à deux sonorités.
25. Split : Cette touche permet de séparer le clavier en deux sections. La sonorité
sélectionnée avant d’appuyer sur la touche Split sera utilisée pour le côté gauche du
clavier. Pour sélectionner une sonorité pour le côté droit du clavier, entrez le numéro de
la sonorité désirée ou utilisez les touches + et – . Appuyer de nouveau sur la touche Split
permet de désactiver la séparation du clavier.
26. Percussion : Cette touche permet d’utiliser les touches pour jouer les sons de batterie et
de percussion intégrés. Appuyer de nouveau sur cette touche permet de désactiver cette
fonction.
27. Intro/Ending : Appuyer sur cette touche permet de jouer une introduction puis de lancer
un rythme d’accompagnement. Appuyer sur cette touche lors de la lecture d’un rythme
d’accompagnement permet de jouer une outro puis d’arrêter la lecture du rythme
d’accompagnement.
28. Beat : Cette touche permet d’activer le métronome. Appuyer de nouveau sur cette
touche permet de modifier la division temporelle de cette touche ou de désactiver le
métronome.
29. Touches de Batterie : Ces touches permettent de lancer des sonorités de percussion.
L’image sur chaque touche correspond au type de sonorité déclenché. Les touches de
Batterie sont particulièrement utiles pour la programmation d’un rythme
d’accompagnement.

19
Panneau arrière
1. Mic : Cette entrée permet de brancher le
microphone fourni afin de chanter tout en jouant du
clavier.
2. Sortie casque : Cette entrée permet de brancher
le casque d’écoute fourni afin d’écouter les notes
jouées et de mettre en sourdine les haut-parleurs
internes.
Remarque : veillez à débrancher / retirer le casque
avant de vous éloigner du clavier.
3. Entrée d'alimentation : Cette entrée permet de
brancher l’adaptateur secteur fourni.
Panneau inférieur
1. Compartiment des piles : Insérez 6 piles de type
AA dans ce compartiment afin d’alimenter le le
clavier si vous n'utilisez pas l'adaptateur secteur.
Fonctionnement
Rythme d'accompagnement
Pour sélectionner un rythme d’accompagnement, appuyez sur la touche Rhythm puis utilisez
les touches numériques ou les touches + et –.
Pour lancer ou arrêter un rythme d'accompagnement, appuyez sur la touche Start/Stop.
Pour que le rythme d'accompagnement joue un rythme de fond, appuyez sur la touche Fill In.
Pour activer la fonction d’accompagnement avec accords automatiques, appuyez sur la
touche Single Chord ou Fingered Chord. Cette fonction permet de générer des accords pour
les rythmes d’accompagnement basés sur les touches jouées à partir de la deuxième note fa
dièse et les touches suivantes. Pour désactiver la fonction d’accompagnement avec accords
automatiques, appuyez de nouveau sur cette touche ou sur la touche Chord Clear.
Single Chord :
Lorsque vous utilisez la fonctionnalité d’accompagnement avec accords automatiques à un
doigt, vous pouvez utiliser les formes d’accord abrégées ci-dessous à partir de n’importe
quelle note pour jouer un accord majeur, mineur, de septième ou de septième mineur.
12 3
1
20
Fingered Chord :
Lorsque vous utilisez la fonctionnalité d’accompagnement avec accords automatiques à
plusieurs doigts, vous pouvez utiliser les formes d’accord complètes ci-dessous à partir de
n’importe quelle note pour jouer un accord majeur, mineur, de septième ou de septième
mineur.
Fonction d’enregistrement
1. Pour enregistrer votre performance, appuyez sur la touche Record.
2. Au cours du processus d’enregistrement, appuyez sur la touche Play pour arrêter
l’enregistrement. Appuyez de nouveau sur la touche Play pour faire jouer la chanson
enregistrée.
3. Appuyez de nouveau sur la touche Play afin d’arrêter la lecture.
Remarque : La chanson sera effacée lorsque l’enregistrement recommencera ou lorsque
le clavier sera mis hors tension. Lorsque la mémoire est pleine, l’écran affichera « FUL »,
et l’enregistrement s’arrêtera automatiquement.
Programmation d’un rythme
Pour créer des rythmes d’accompagnement personnalisés en jouant les touches du clavier :
1. Appuyez sur la touche Program et commencer à programmer le rythme en jouant
chaque note, une à la fois.
2. Appuyez sur la touche Play pour arrêter la programmation et écouter le rythme
programmé.
3. Appuyez de nouveau sur la touche Program pour désactiver la fonction de
programmation et effacer les données enregistrées.
Remarque : Le rythme programmé sera effacé lorsque la programmation recommencera ou
lorsque le clavier sera mis hors tension.
Mise à l’arrêt automatique
Après 5 minutes d'inactivité, le Talent 61 MKII se met automatiquement en mode veille. Si
vous appuyez sur une des touches, il se rallumera.
Évitez de toucher le port USB, la sortie casque ou la zone autour de ces connexions lorsque vous
utilisez ce clavier avec un ordinateur. Cela peut entraîner l'arrêt temporaire du fonctionnement du
clavier ou un fonctionnement anormal.

21
Guida per l'uso (Italiano)
Introduzione
Contenuti della confezione
Talent 61 MKII
Microfono
Cuffie
Leggio
Supporto per tastiera
Sedile
Adattatore di alimentazione
Guida per l'uso
Istruzioni di sicurezza e garanzia
Assistenza
Per le ultime informazioni in merito a questo prodotto (requisiti di sistema, informazioni sulla
compatibilità, ecc.) e per la registrazione del prodotto, recarsi alla pagina alesis.com.
Per ulteriore assistenza sul prodotto, recarsi alla pagina alesis.com/support.

22
Configurazione
Sedile
Supporto
Schema dei collegamenti
Elementi non elencati sotto Introduzione > Contenuti della confezione sono venduti
separatamente.
Nota: assicurarsi di scollegare / rimuovere le cuffie prima di allontanarsi dalla tastiera.
Microfono
Alimentazione
Cuffie
1 2 3
2 fasce di
supporto per
tastiera
1 2 3 4
Specyfikacje produktu
| Marka: | Alesis |
| Kategoria: | klawiatura |
| Model: | Talent 61 |
Potrzebujesz pomocy?
Jeśli potrzebujesz pomocy z Alesis Talent 61, zadaj pytanie poniżej, a inni użytkownicy Ci odpowiedzą
Instrukcje klawiatura Alesis

10 Września 2024
5 Września 2024
1 Września 2024
30 Sierpnia 2024
17 Sierpnia 2024
28 Czerwca 2024
Instrukcje klawiatura
- klawiatura Sony
- klawiatura Yamaha
- klawiatura Gamdias
- klawiatura Fellowes
- klawiatura Sven
- klawiatura Logitech
- klawiatura Xiaomi
- klawiatura Joy-It
- klawiatura Lenovo
- klawiatura Philips
- klawiatura Livoo
- klawiatura SilverCrest
- klawiatura Gigabyte
- klawiatura Acer
- klawiatura Ducky
- klawiatura Technics
- klawiatura Hikvision
- klawiatura Fujitsu
- klawiatura Roland
- klawiatura HyperX
- klawiatura Conceptronic
- klawiatura Crestron
- klawiatura Behringer
- klawiatura Asus
- klawiatura Nedis
- klawiatura IK Multimedia
- klawiatura Medion
- klawiatura Boss
- klawiatura Marquant
- klawiatura MSI
- klawiatura Niceboy
- klawiatura ILive
- klawiatura Native Instruments
- klawiatura Blaupunkt
- klawiatura Terris
- klawiatura Speed-Link
- klawiatura Casio
- klawiatura Evolveo
- klawiatura Sigma
- klawiatura HP
- klawiatura Genesis
- klawiatura Manhattan
- klawiatura Tripp Lite
- klawiatura Cooler Master
- klawiatura Scosche
- klawiatura 3Dconnexion
- klawiatura Natec
- klawiatura Gembird
- klawiatura Lindy
- klawiatura Zebra
- klawiatura Deltaco
- klawiatura JVC
- klawiatura Trust
- klawiatura V7
- klawiatura LogiLink
- klawiatura Dell
- klawiatura Corsair
- klawiatura Patriot
- klawiatura Steelseries
- klawiatura Digitus
- klawiatura TechniSat
- klawiatura Vimar
- klawiatura Dahua Technology
- klawiatura Mad Dog
- klawiatura NZXT
- klawiatura Hori
- klawiatura Renkforce
- klawiatura Keychron
- klawiatura BT
- klawiatura Korg
- klawiatura Homematic IP
- klawiatura Black Box
- klawiatura Pyle
- klawiatura CTA Digital
- klawiatura Apple
- klawiatura Zoom
- klawiatura Iogear
- klawiatura NGS
- klawiatura AOC
- klawiatura Cougar
- klawiatura Kingston
- klawiatura Perixx
- klawiatura Medeli
- klawiatura Samson
- klawiatura PreSonus
- klawiatura NACON
- klawiatura Ewent
- klawiatura Razer
- klawiatura ADATA
- klawiatura 4ms
- klawiatura ION
- klawiatura RCF
- klawiatura SPC
- klawiatura GoGen
- klawiatura AKAI
- klawiatura Kurzweil
- klawiatura Kawai
- klawiatura Ergoline
- klawiatura Viper
- klawiatura Aluratek
- klawiatura Abus
- klawiatura Hama
- klawiatura Microsoft
- klawiatura Marmitek
- klawiatura Verbatim
- klawiatura ModeCom
- klawiatura Sharkoon
- klawiatura Watson
- klawiatura Gravity
- klawiatura DeepCool
- klawiatura XPG
- klawiatura Vakoss
- klawiatura Denver
- klawiatura Anker
- klawiatura Fender
- klawiatura InLine
- klawiatura Rapoo
- klawiatura Tracer
- klawiatura Roccat
- klawiatura Genius
- klawiatura Media-Tech
- klawiatura The T.amp
- klawiatura Trevi
- klawiatura Thermaltake
- klawiatura Hammond
- klawiatura GPX
- klawiatura Hanwha
- klawiatura Vivanco
- klawiatura Arturia
- klawiatura Novation
- klawiatura Best Buy
- klawiatura Elgato
- klawiatura Adj
- klawiatura CM Storm
- klawiatura Blue Element
- klawiatura SureFire
- klawiatura Ketron
- klawiatura Nuki
- klawiatura Enermax
- klawiatura Clas Ohlson
- klawiatura Savio
- klawiatura Arctic Cooling
- klawiatura Cherry
- klawiatura Belkin
- klawiatura Xcellon
- klawiatura Erica Synths
- klawiatura TrekStor
- klawiatura AMX
- klawiatura Goodis
- klawiatura Alienware
- klawiatura A4tech
- klawiatura ACME
- klawiatura BeeWi
- klawiatura Eminent
- klawiatura Targus
- klawiatura Exibel
- klawiatura Logik
- klawiatura Energy Sistem
- klawiatura Doro
- klawiatura Aukey
- klawiatura Tiptop Audio
- klawiatura Kensington
- klawiatura Brigmton
- klawiatura Techly
- klawiatura BlueBuilt
- klawiatura Ednet
- klawiatura Connect IT
- klawiatura Steren
- klawiatura Sandberg
- klawiatura Buffalo
- klawiatura Evga
- klawiatura Millenium
- klawiatura Mede8er
- klawiatura Konig
- klawiatura Sweex
- klawiatura KeySonic
- klawiatura Essentiel B
- klawiatura RGV
- klawiatura Zagg
- klawiatura Veho
- klawiatura Maxxter
- klawiatura MT Logic
- klawiatura Saitek
- klawiatura Msonic
- klawiatura Vorago
- klawiatura Mitel
- klawiatura BakkerElkhuizen
- klawiatura CME
- klawiatura Adesso
- klawiatura Satel
- klawiatura Brookstone
- klawiatura M-Audio
- klawiatura Man & Machine
- klawiatura Brydge
- klawiatura Satechi
- klawiatura Mad Catz
- klawiatura Cyborg
- klawiatura Hawking Technologies
- klawiatura Krom
- klawiatura Iluv
- klawiatura Avanca
- klawiatura ENDORFY
- klawiatura Voxicon
- klawiatura Mousetrapper
- klawiatura Mediacom
- klawiatura AZIO
- klawiatura X9 Performance
- klawiatura Ozone
- klawiatura Woxter
- klawiatura Ibm
- klawiatura General Music
- klawiatura CSL
- klawiatura Moog
- klawiatura Matias
- klawiatura Keith MCmillen
- klawiatura Trkstor
- klawiatura Zalman
- klawiatura Thomann
- klawiatura SIIG
- klawiatura Contour Design
- klawiatura Micro Innovations
- klawiatura IQUNIX
- klawiatura Gamber-Johnson
- klawiatura Hohner
- klawiatura Accuratus
- klawiatura Goldtouch
- klawiatura Logickeyboard
- klawiatura Merkloos
- klawiatura Native
- klawiatura I-onik
- klawiatura Laney
- klawiatura MaxMusic
- klawiatura Inovalley
- klawiatura Bontempi
- klawiatura Logic3
- klawiatura Penclic
- klawiatura Kogan
- klawiatura Bakker Elkhuizen
- klawiatura Venom
- klawiatura IPort
- klawiatura R-Go Tools
- klawiatura Schubert
- klawiatura Nord Electro
- klawiatura Icon
- klawiatura X-keys
- klawiatura Stagg
- klawiatura PIXMY
- klawiatura Promate
- klawiatura Leotec
- klawiatura ISY
- klawiatura ThunderX3
- klawiatura Alogic
- klawiatura FURY
- klawiatura Pelco
- klawiatura Studiologic
- klawiatura Perfect Choice
- klawiatura ASM
- klawiatura NPLAY
- klawiatura Soundsation
- klawiatura NUX
- klawiatura Canyon
- klawiatura STANDIVARIUS
- klawiatura Dexibell
- klawiatura Eclipse
- klawiatura UGo
- klawiatura Krux
- klawiatura ActiveJet
- klawiatura Genovation
- klawiatura Rii
- klawiatura Sequenz
- klawiatura Redragon
- klawiatura Hamlet
- klawiatura Approx
- klawiatura Gamesir
- klawiatura SilentiumPC
- klawiatura The Box
- klawiatura Mars Gaming
- klawiatura Roline
- klawiatura Acme Made
- klawiatura Startone
- klawiatura Vultech
- klawiatura TEKLIO
- klawiatura Raspberry Pi
- klawiatura Kinesis
- klawiatura Urban Factory
- klawiatura Roadworx
- klawiatura KeepOut
- klawiatura Seal Shield
- klawiatura Kanex
- klawiatura GETT
- klawiatura Unitech
- klawiatura Akko
- klawiatura Mountain
- klawiatura Groove Synthesis
- klawiatura CoolerMaster
- klawiatura IOPLEE
- klawiatura Royal Kludge
- klawiatura Universal Remote Control
- klawiatura Montech
- klawiatura ID-Tech
- klawiatura Xtrfy
- klawiatura Polyend
- klawiatura Carlsbro
- klawiatura UNYKAch
- klawiatura Bluestork
- klawiatura Xtech
- klawiatura SMK-Link
- klawiatura Loupedeck
- klawiatura MK
- klawiatura Getttech
- klawiatura Xuma
- klawiatura Nanoxia
Najnowsze instrukcje dla klawiatura
5 Kwietnia 2025
5 Kwietnia 2025
5 Kwietnia 2025
4 Kwietnia 2025
4 Kwietnia 2025
4 Kwietnia 2025
30 Marca 2025
30 Marca 2025
30 Marca 2025
30 Marca 2025