Instrukcja obsługi Alesis Q61
Przeczytaj poniżej 📖 instrukcję obsługi w języku polskim dla Alesis Q61 (24 stron) w kategorii klawiatura midi. Ta instrukcja była pomocna dla 15 osób i została oceniona przez 2 użytkowników na średnio 4.5 gwiazdek
Strona 1/24

Q61
Q61
Q61
Q61 Q61
QUICKSTART GUIDE
ENGLISH ( 2 - 5 )
GUÍA DE INICIO RÁPIDO
ESPAÑOL ( 6 - 9 )
GUIDE D'UTILISATION RAPIDE
FRANÇAIS ( 10 - 13 )
GUIDA RAPIDA
ITALIANO ( 14 – 17 )
KURZANLEITUNG
DEUTSCH ( 18 - 21 )
2
BOX CONTENTS
• Q61
• USB Cable
• Quickstart Guide
• Safety Instructions & Warranty Information Booklet
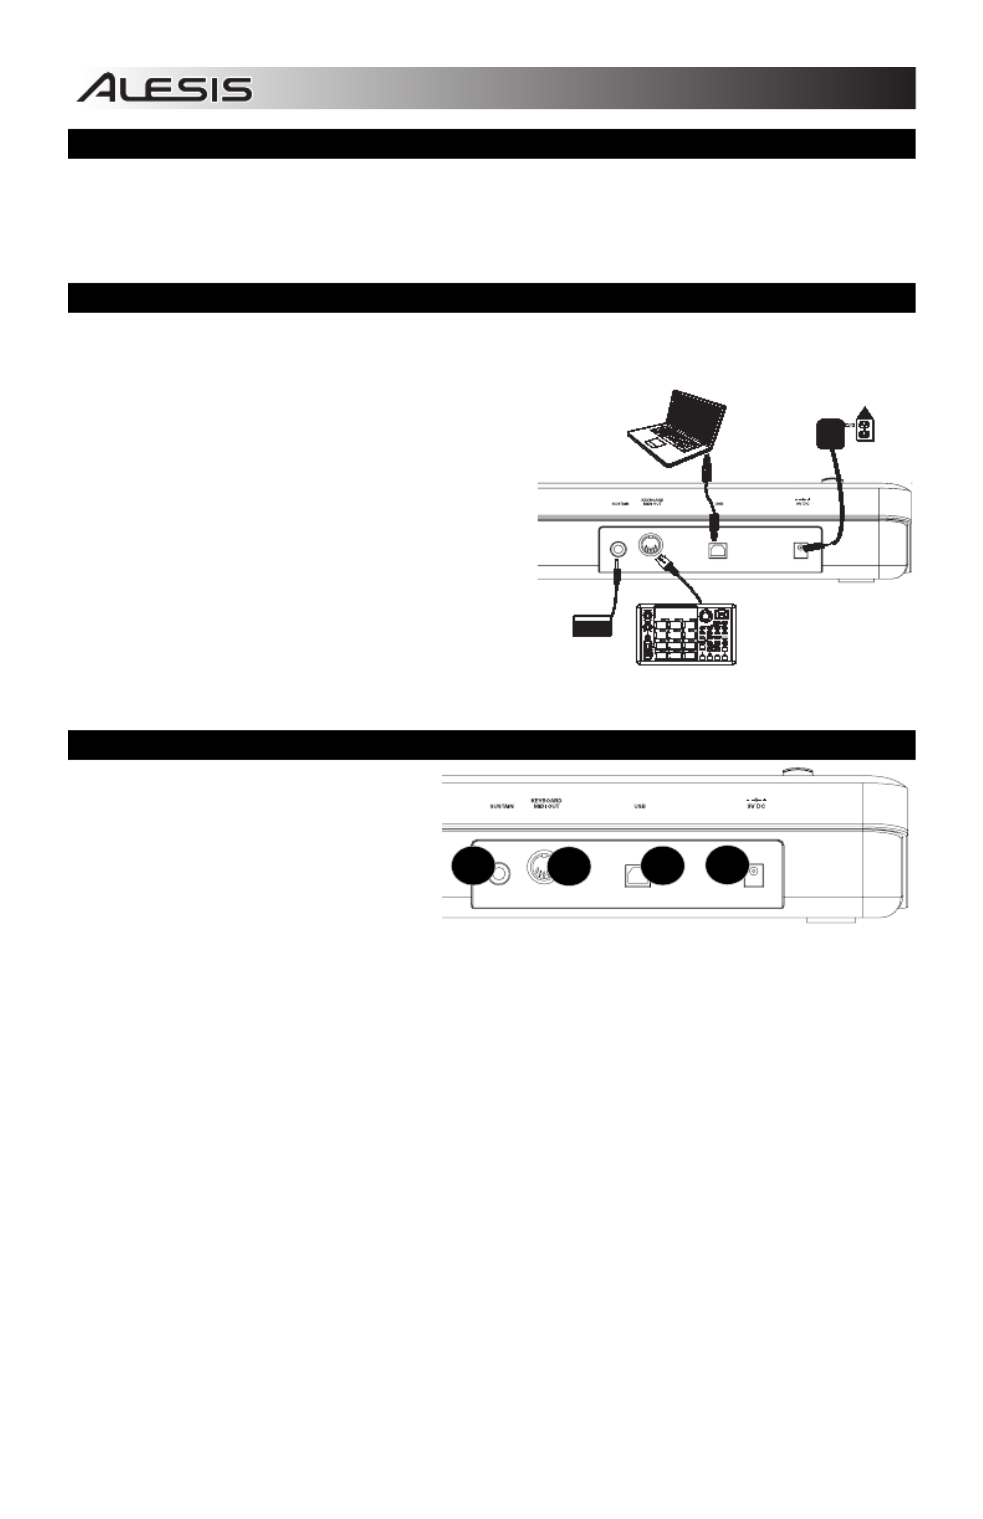
CONNECTION DIAGRAM
Please refer to the following scenario for connecting the Q61.
1. Connect a USB cable from your computer to the
Q61. The unit will be powered through the USB
connection. Alternatively, if you do not wish to use
a computer in your setup or if you wish to power the
Q61 externally, please plug in a 9V DC, 500mA
power adapter, center-positive, 5.46mm barrel
diameter.
2. If you would like to use an external sound module,
connect a 5-pin MIDI cable from the KEYBOARD
MIDI OUT of the Q61 to the MIDI IN of the external
device.
REAR PANEL OVERVIEW
1. DC POWER ADAPTER INPUT – Plug
in a 9V DC, 500mA power adapter,
center-positive, 5.46mm barrel
diameter (sold separately) if you do not
wish to power the Q61 through the
USB connection.
2. USB CONNECTION – Plug a standard
USB cable into this outlet and into the
USB port of your computer. The computer's USB port will provide power to the Q61. This connection is
used to send and receive MIDI data to and from your computer and may also be used to send MIDI
data from your computer to a device attached to the MIDI OUT port of the Q61.
3. MIDI OUT – Use a five-pin MIDI cable (sold separately) to connect this jack to the MIDI IN of an
external device. This jack sends the MIDI data output from the keyboard.
4. SUSTAIN PEDAL INPUT – Connect a 1/4" TS sustain pedal (sold separately) to this input.
EXTERNAL
SOUND MODULE
(not included)
COMPUTER
(not included)
POWER ADAPTER
(not included)
SUSTAIN
PEDAL
(not included)
1234
1
3
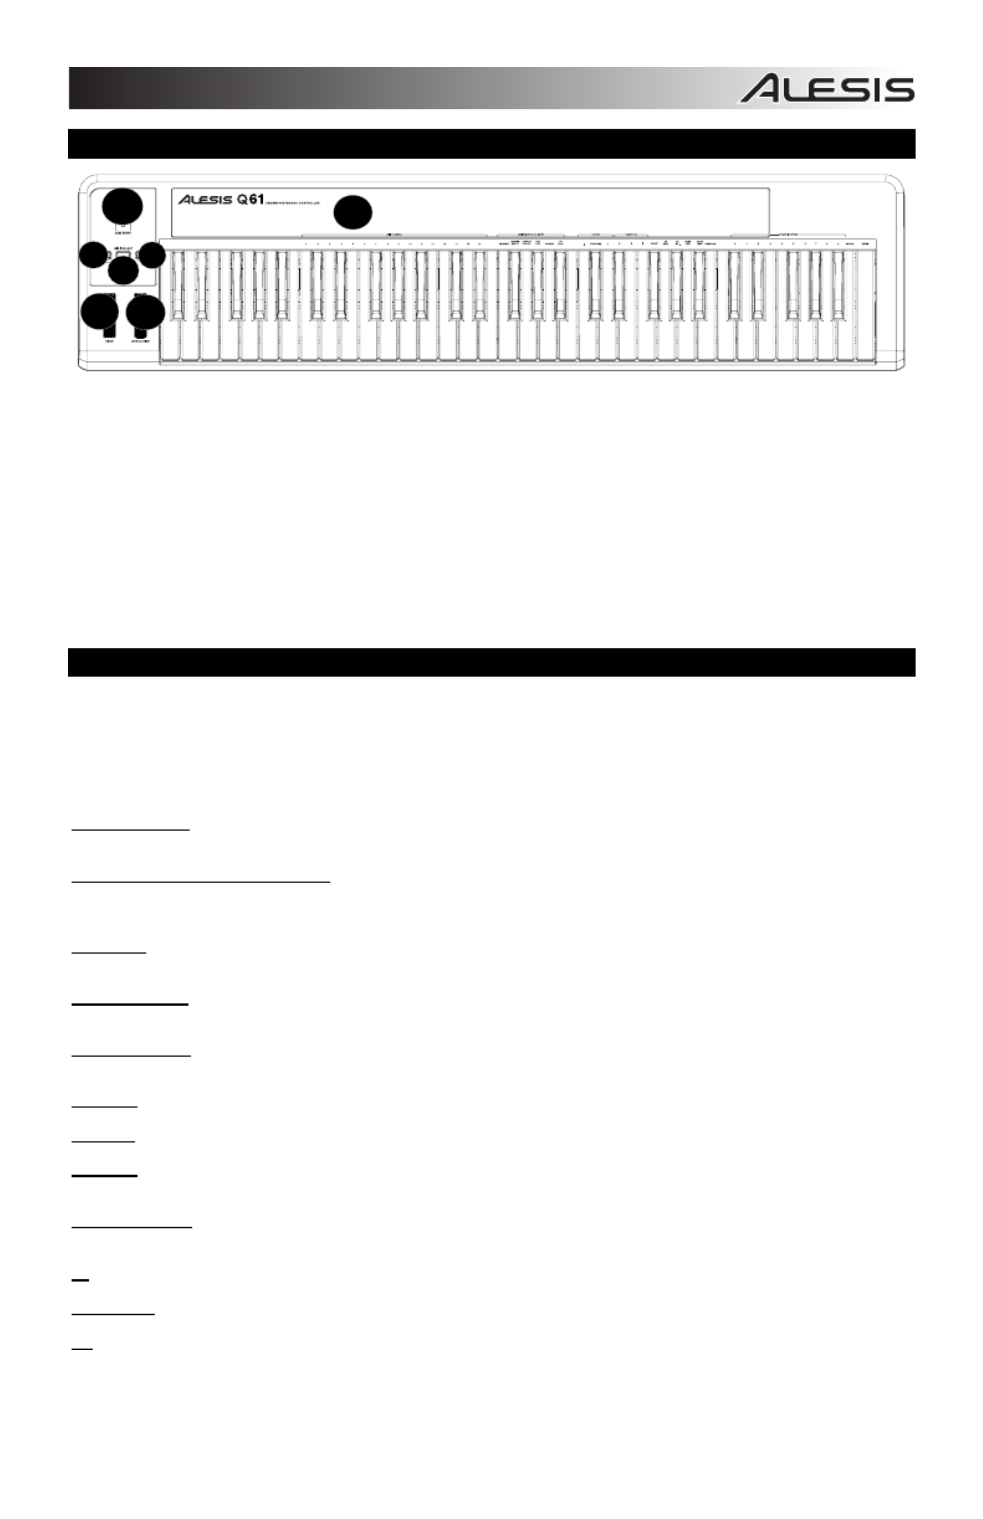
TOP PANEL OVERVIEW
1. KEYBOARD – The KEYBOARD functions as a normal electronic piano keyboard during performance but can also be
used to adjust MIDI settings and send MIDI messages. The labels above the keys indicate their functions. The
numbered keys allow you to enter values for settings. Press the Cancel or Enter key to cancel or confirm your selection,
respectively. See SELECTING & EDITING MIDI COMMANDS for more information.
2. PITCH BEND WHEEL – Transmits MIDI Pitch Bend information to raise or lower the pitch of a note temporarily.
3. MODULATION WHEEL – This wheel can be used to transmit continuous controller data (CC #1 – Modulation).
4. DATA ENTRY SLIDER – This slider lets you send MIDI messages for the currently selected parameter from the
KEYBOARD (e.g., REVERB DEPTH, VOLUME, etc.). You can select a parameter by pressing MIDI / SELECT then the
corresponding key on the KEYBOARD.
5. MIDI / SELECT – Pressing this button allows you to adjust MIDI settings and send MIDI messages by pressing labeled
keys on the KEYBOARD. See SELECTING & EDITING MIDI COMMANDS for more information.
6. OCTAVE UP / DOWN – These buttons can be used to shift the keyboard's range up and down.
SELECTING & EDITING MIDI COMMANDS
The MIDI / SELECT button and the keys on the KEYBOARD allow you to adjust MIDI parameters and send precise MIDI
messages and information quickly and easily:
1. Press MIDI / SELECT.
2. Press the key on the KEYBOARD whose MIDI setting (printed above the key) you want to adjust or send.
3. Enter a value with the numbered keys on the KEYBOARD.
4. Press the Enter or Cancel key on the KEYBOARD to confirm or cancel your choice, respectively.
MIDI CHANNELS – Selects the MIDI channel (1-16) over which the Q61 will transmit MIDI messages. The default is Channel
1.
ASSIGNMENT DATA ENTRY GROUP
These parameters change the MIDI command sent by the Data Entry Slider. To change the Values, press the
MIDI/SELECT button, then press the corresponding Key. Press the MIDI/Select Button to exit.
VELOCITY – Press this key to set the DATA ENTRY SLIDER to adjust the note velocity. Increasing this value increases the
MIDI velocity value generated by a light key press.
REVERB DEPTH – Press this key to set the DATA ENTRY SLIDER to CC #91 (Reverb Send Level). The default value for this
setting is 64.
CHORUS DEPTH – Press this key to set the DATA ENTRY SLIDER to CC #93 (Chorus Send Level). The default value for this
setting is 64.
PAN POT – Press this key to set the DATA ENTRY SLIDER to CC #10 (Pan). The default value is 64 (center).
VOLUME – Press this key to set the DATA ENTRY SLIDER to CC #7 (Channel Volume).
CC DATA – Press this key to set the DATA ENTRY SLIDER to the CC# designated by the CC NO. control.
OCTAVE GROUP -
These parameters change the octave range of the keyboard.
-1 – Lowers the octave range of the keyboard by one octave.
STANDARD- Sets the octave range to the default value with the first key being C0.
+1 – Raises the octave range of the keyboard by one octave.
1
2
3
4
5
6
6
Specyfikacje produktu
| Marka: | Alesis |
| Kategoria: | klawiatura midi |
| Model: | Q61 |
Potrzebujesz pomocy?
Jeśli potrzebujesz pomocy z Alesis Q61, zadaj pytanie poniżej, a inni użytkownicy Ci odpowiedzą
Instrukcje klawiatura midi Alesis

2 Września 2024
30 Sierpnia 2024
29 Sierpnia 2024
28 Sierpnia 2024
24 Sierpnia 2024
23 Sierpnia 2024
20 Sierpnia 2024
19 Sierpnia 2024
8 Sierpnia 2024
Instrukcje klawiatura midi
- klawiatura midi Yamaha
- klawiatura midi Roland
- klawiatura midi Behringer
- klawiatura midi IK Multimedia
- klawiatura midi Native Instruments
- klawiatura midi Casio
- klawiatura midi Korg
- klawiatura midi Pyle
- klawiatura midi Chord
- klawiatura midi Medeli
- klawiatura midi Samson
- klawiatura midi Peavey
- klawiatura midi ION
- klawiatura midi AKAI
- klawiatura midi Kurzweil
- klawiatura midi Doepfer
- klawiatura midi Arturia
- klawiatura midi Novation
- klawiatura midi Nektar
- klawiatura midi Reloop
- klawiatura midi Swissonic
- klawiatura midi ESI
- klawiatura midi Pinnacle
- klawiatura midi CME
- klawiatura midi M-Audio
- klawiatura midi Keith MCmillen
- klawiatura midi Motu
- klawiatura midi Icon
- klawiatura midi Evolution
- klawiatura midi Studiologic
- klawiatura midi Waldorf
Najnowsze instrukcje dla klawiatura midi
4 Marca 2025
4 Marca 2025

15 Stycznia 2025
14 Grudnia 2024
15 Października 2024
13 Października 2024

3 Października 2024
29 Września 2024
29 Września 2024
29 Września 2024