Instrukcja obsługi AEG X89464WV01
AEG
Okap wyciągowy
X89464WV01
Przeczytaj poniżej 📖 instrukcję obsługi w języku polskim dla AEG X89464WV01 (160 stron) w kategorii Okap wyciągowy. Ta instrukcja była pomocna dla 5 osób i została oceniona przez 2 użytkowników na średnio 4.5 gwiazdek
Strona 1/160

X89464MV01
X89464BV01
X89464WV01
X86464MV01
X09481BV-X
X89474BV01
X89474WV01
X89474MV01
X86474MV01
EN USER MANUAL
DE GEBRAUCHSANLEITUNG
FR MANUEL D’UTILISATIO
NL GEBRUIKSAANWIJZING
ES MANUAL DE USO
PT LIVRO DE INSTRUÇÕES PARA
UTILIZAÇÃO
IT LIBRETTO DI USO
SV ANVÄNDNINGSHANDBOK
NO BRUKSVEILEDNING
FI KÄYTTÖOHJEET
DA BRUGSVEJLEDNING
RU РУКОВОДСТВО ПО Э КСПЛУ
АТАЦИИ
ET KASUTUSJUHEND
LV LIETOŠANAS PAMĀCĪBA
LT NAUDOTOJO VADOVAS
UK ІНСТРУКЦІЯ З ЕКСПЛУАТАЦІЇ
HU HASZNÁLATI ÚTMUTATÓ
CS NÁVOD K POUŽITÍ
SK NÁVOD NA POUŽÍVANIE
RO MANUAL DE FOLOSIRE
PL INSTRUKCJA UŻYTKOWANIA
HR KNJIŽICA S UPUTAMA
SL NAVODILO ZA UPORABO
EL ΟΔΗΓΊΕΣ ΧΡΗΣΗΣ
TR KULLANIM KITAPÇIĞI
BG РЪКОВОДСТВО НА ПОТРЕ
БИТЕЛЯ
KK ПАЙДАЛАНУШЫ НҰСҚАУЛЫҒЫ
MK УПАТСТВО ЗА КОРИСНИК
SQ UDHËZUES PËR PËRDORIMIN
SR КОРИСНИЧКО УПУТСТВО
AR
2
7
12
18
24
30
36
42
47
52
57
62
68
73
78
83
89
94
99
104
109
114
119
124
130
135
141
147
153
159
165

2www.aeg.com
FOR PERFECT RESULTS
Thank you for choosing this AEG product. We have created it to give you
impeccable performance for many years, with innovative technologies that help
spend a few minutes reading to get the very best from it.
ACCESSORIES AND CONSUMABLES
appliances looking spotless and working perfectly. Along with a wide range of
accessories designed and built to the high quality standards you would expect,
from specialist cookware to cutlery baskets, from bottle holders to delicate laundry
bags…
Visit the webshop at:
www.aeg.com/shop
ENVIRONMENT CONCERNS
Recycle the materials with the symbol Put the packaging in applicable
containersto recycle it.
Help protect the environment and human health and to recycle waste of
electricaland electronic appliances. Do not dispose appliances marked with the
symbol with the household waste. Return the product to your local recycling
CUSTOMER CARE AND SERVICE
We recommend the use of original spare parts.
When contacting Service, ensure that you have the following data available
The information can be found on the rating plate.
Model ___________________________
PNC ____________________________
Serial Number ____________________

3
ENGLISH
1. RECOMMENDATIONS
AND SUGGESTIONS
• The Instructions for Use apply
to several versions of this ap-
pliance. Accordingly, you may
features that do not apply to
• The manufacturer will not be
held liable for any damages
resulting from incorrect or
improper installation.
• The minimum safety distance
between the cooker top and
the extractor hood is 650 mm
(some models can be installed
at a lower height, please refer
to the paragraphs on working
dimensions and installation).
• Check that the mains voltage
corresponds to that indicated
inside of the hood.
• For Class I appliances, check
that the domestic power supply
guarantees adequate earthing.
Connect the extractor to the
minimum diameter 120 mm.
as short as possible.
• Do not connect the extractor
hood to exhaust ducts carry-
ing combustion fumes (boilers,
• If the extractor is used in
conjunction with non-electrical
appliances (e.g. gas burn-
degree of aeration must be
guaranteed in the room in or-
exhaust gas. The kitchen must
have an opening communicat-
ing directly with the open air in
order to guarantee the entry
of clean air. When the cooker
hood is used in conjunction
with appliances supplied with
energy other than electric,
the negative pressure in the
room must not exceed 0,04
mbar to prevent fumes being
drawn back into the room by
the cooker hood.
• In the event of damage to
the power cable, it must be
replaced by the manufacturer
or by the technical service de-
partment, in order to prevent
any risks.
• If the instructions for installa-
tion for the gas hob specify
above, this has to be taken
into account. Regulations
concerning the discharge of
• Use only screws and small
parts in support of the hood.
Warning: Failure to install
accordance with these instruc-
tions may result in electrical
hazards.
• Connect the hood to the mains
through a two-pole switch hav-
ing a contact gap of at least
3 mm.
2. USE
• The extractor hood has been
designed exclusively for do-

4www.aeg.com
mestic use to eliminate kitchen
smells.
• Never use the hood for pur-
poses other than for which it
has been designed.
•
under the hood when it is in
operation.
•
direct it onto the bottom of the
pan only, making sure that it
does not engulf the sides.
• Deep fat fryers must be con-
tinuously monitored during
use: overheated oil can burst
•
• This appliance can be used
by children aged from 8 years
and above and persons with
reduced physical, sensory or
mental capabilities or lack of
experience and knowledge if
they have been given supervi-
sion or instruction concerning
use of the appliance in a safe
way and understand the haz-
ards involved. Children shall
not play with the appliance.
Cleaning and user mainte-
nance shall not be made by
children without supervision.
• “CAUTION: Accessible parts
may become hot when used
with cooking appliances.”
3. MAINTENANCE
• Switch off or unplug the ap-
pliance from the mains sup-
ply before carrying out any
maintenance work.
• Clean and/or replace the Fil-
period (Fire hazard).
-
is not washable and cannot
be regenerated, and must
be replaced approximately
every 4 months of operation,
or more frequently for particu-
larly heavy usage (W).
WW
-
cleaned every 2 months of
operation, or more frequently
for particularly heavy usage,
and can be washed in a dish-
washer (Z).
ZZ
- Control lights, if present.
• Clean the hood using a damp
cloth and a neutral liquid de-
tergent.

5
ENGLISH
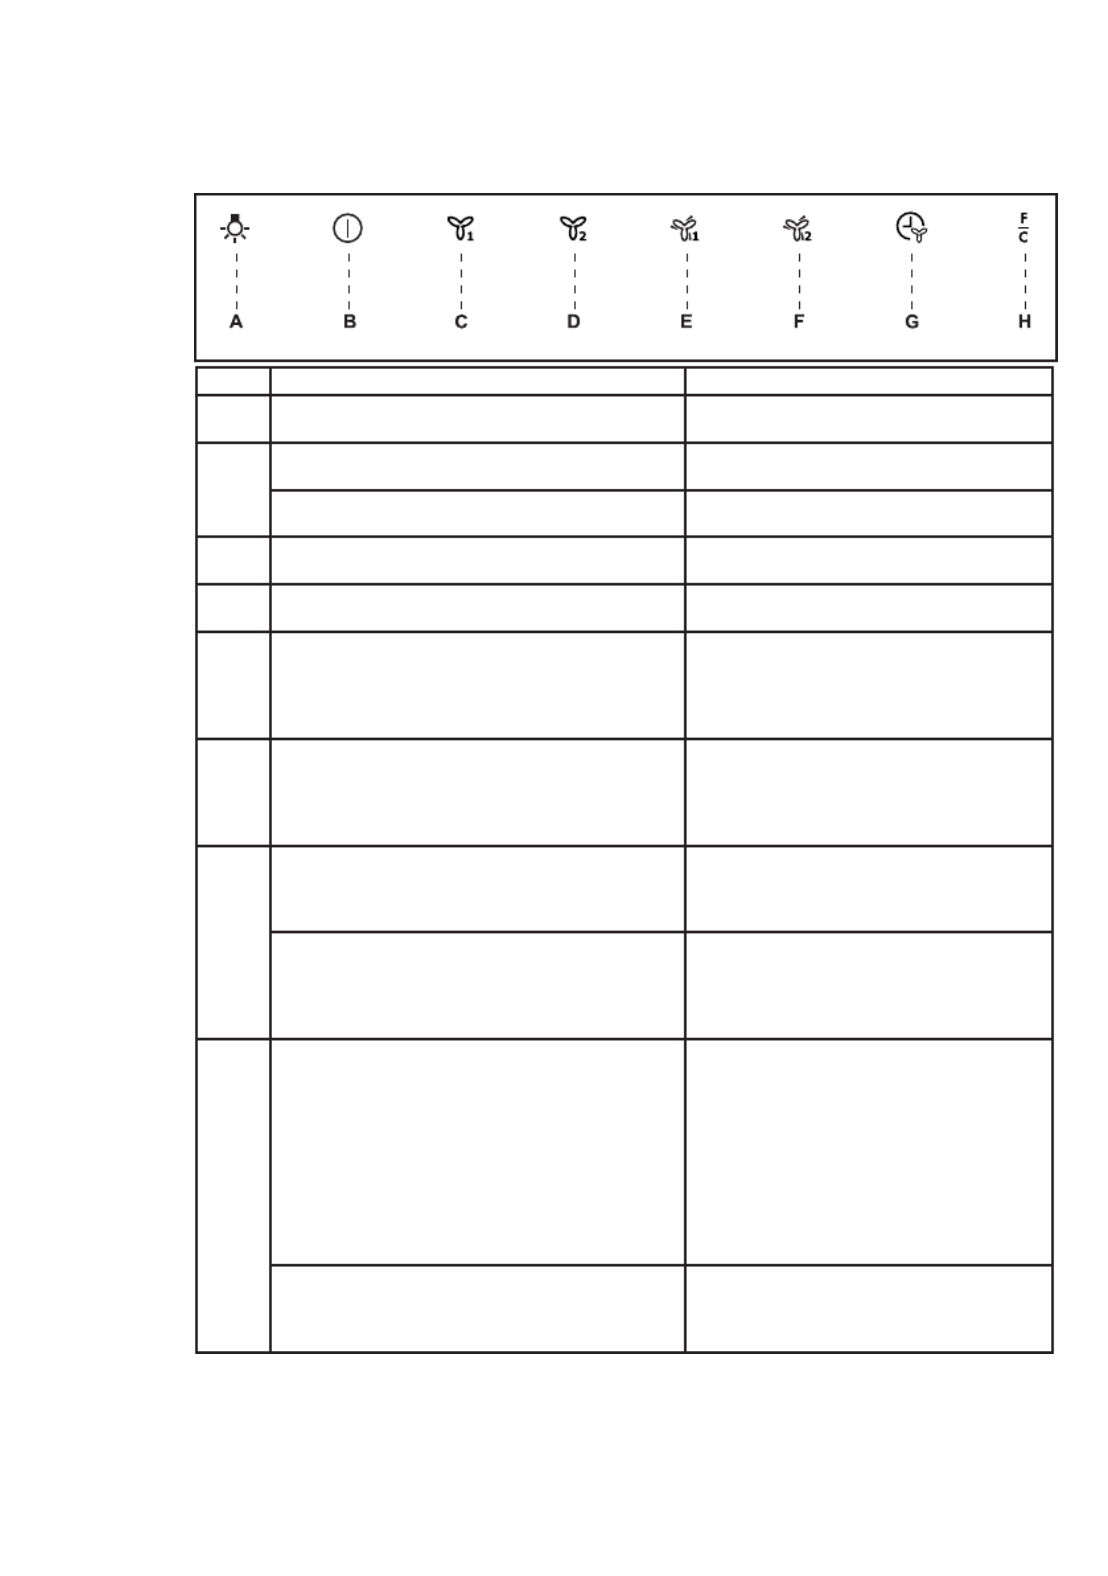
4. CONTROLS
Button Function Led
A Changes the intensity of the Lighting each time
the Button is pressed, in cycle, passing via Off.
-
BMotor off. The Leds indicating the Speed of the motor
turn off.
Enables / Disables Keyboard Lock mode if pres-
sed and held for 5 seconds.
All the Leds light up in cycle and run a
start-up sequence.
CActivates speed one. The Leds indicating Speed one and Motor
Off turn on.
DActivates speed two. The Leds indicating Speed two and Motor
Off turn on.
EActivates the speed Intensive 1. This speed is ti-
med to run for 10 minutes. At the end of this time
the system will return to the speed set previously.
It is disabled by pressing the Button or turning the
Motor off.
FActivates the speed Intensive 2. This speed is
timed to run for 8 minutes. At the end of this time
the system will return to the speed set previously.
It is disabled by pressing the Button or turning the
Motor off.
GActivates / Deactivates Delay mode, with automa-
tic shutdown of the Motor and the Lighting after
15 minutes. It is disabled by pressing the button
or turning the motor off.
The Led lights up.
Pressing and holding the button for 5 seconds
enables the remote control and the H2H function.
Pressing and holding the button for 5 seconds
disables the remote control and the H2H function.
H
Reset the alarm. These indications are only visible
when the motor is turned off.
When the procedure terminates, the indica-
tion shown previously turns off:
Led H on = Indicates the need to wash the
after the Hood has been in operation for
100 working hours.
alarm is triggered after the Hood has been
in operation for 200 working hours.
Press and hold the button for approximately 5
seconds, with all the loads turned off (Motor and
Lights), to turn the Activated Charcoal Filter alarm
on/off.

6www.aeg.com
5.
LIGHTING
Warning:
lamp classed as 1M according to EN 60825-1:
optical power emitted @439nm: 7µW. Do not
look directly at the light through optical devices
(binoculars, magnifying glasses…).
• For replacement contact technical support ("To
pur-chase contact technical support").

7
GERMAN
FÜR PERFEKTE ERGEBNISSE
Danke, dass Sie sich für dieses AEG Produkt entschieden haben. Wir haben es
geschaffen, damit Sie viele Jahre von seiner ausgezeichneten Leistung und den
sind. Nehmen Sie sich ein paar Minuten Zeit zum Lesen, um seine Vorzüge
kennen zu lernen.
ZUBEHÖR UND VERBRAUCHSMATERIALIEN
Besuchen Sie den Webshop unter:
www.aeg.com/shop
UMWELTTIPPS
Recyceln Sie Materialien mit dem Symbol . Entsorgen Sie die Verpackung in
Recyceln Sie zum Umwelt- und Gesundheitsschutz elektrische und elektronische
nicht mit dem Hausmüll.
Ihr Gemeindeamt.
KUNDENDIENST UND -BETREUUNG
Wir empfehlen die Verwendung von Originalersatzteilen.
Halten Sie folgende Angaben bereit, wenn Sie sich an den Kundendienst wenden.
Modell ___________________________
Produkt-Nummer PNC ______________
Seriennummer ____________________

8www.aeg.com
1. EMPFEHLUNGEN UND
HINWEISE
• Diese Gebrauchsanleitungen
beziehen sich auf die verschie-
denen Modelle der Abzugshau-
sein, dass die Beschreibung
bestimmter Merkmale für das
• Der Hersteller haftet nicht für
die fehlerhafte Installation oder
falschen Gebrauch entstehen
• Der min. Sicherheitsabstand
zwischen Kochfeld und Abzugs-
installiert werden; siehe Absatz
Installation).
• Kontrollieren Sie, ob die Netz-
spannung den Daten des
Typenschilds im Innern der
Haube entspricht.
•
kontrolliert werden, ob das
korrekt geerdet ist. Die Absaug-
haube mit Hilfe eines Rohrs
mit einem Mindestdurchmesser
von 120 mm mit dem Rauch-
abzug verbinden. Der Verlauf
des Rauchabzugs soll so kurz
• Die Abzugshaube darf nicht an
einen Schacht angeschlossen
werden, in den Rauchgase
geleitet werden (z. B. von
Heizkessel, Kaminen, usw.).
• Falls in dem Raum neben
dem Abzug auch nicht mit
werden, muss für eine aus-
reichende Belüftung gesorgt
der Abgase verhindert wird.
Die Küche muss eine direkte
Öffnung nach Außen aufwei-
sen, damit ein ausreichender
wird. Wird die Abzugshaube
zusammen mit nicht mit Strom
darf der Unterdruck im Raum
0,04 mbar nicht überschreiten,
damit die Abgase nicht wieder
angesaugt werden.
• Schadhafte Kabel müssen
durch den Hersteller oder vom
Kundendienst ausgewechselt
werden, damit jedes Risiko
ausgeschlossen wird.
• Falls die Montageanweisungen
für die gasbetriebene Kochmul-
vorschreiben, als der oben
angegebene, muss diese Vor-
gabe befolgt werden. Es sind
beachten.
• Nur für die Abzugshaube geeig-
nete Schrauben und Kleinteile
verwenden.
Achtung: Werden die Schrau-
ben und Befestigungselemente
nicht entsprechend der vorlie-
genden Anleitungen verwendet,
besteht Stromschlaggefahr.
• Die Abzugshaube mittels zwei-
poligem Schalter mit einer
Öffnung der Kontakte von

9
GERMAN
mindestens 3 mm an das Netz
anschließen.
2. GEBRAUCH
• Die Abzugshaube wurde aus-
Gebrauch entwickelt, um Koch-
dünste zu beseitigen.
• Die Haube darf nur für die ihr
zugedachten Zwecke benutzt
werden.
• Unter der eingeschalteten
Haube keine offenen Flammen
benutzen.
• Die Flamme so regulieren, dass
sie nicht über den Boden des
Kochgeschirrs hinausreicht.
•
-
wacht werden: überhitztes Öl
• Auf keinen Fall unter der Haube
• Kinder ab 8 Jahren und Per-
physischen, sensorischen oder
mit mangelnden Erfahrungen
oder Kenntnissen dürfen nicht
denn, sie werden von einer für
ihre Sicherheit verantwortlichen
Person beaufsichtigt oder ange-
leitet. Sicherstellen, dass Kinder
-
Wartungsarbeiten dürfen nicht
von unbeaufsichtigten Kindern
durchgeführt werden.
• ACHTUNG:
-
heiß werden.
3. WARTUNG
• Vor Reinigungs- oder War-
dieses ausgeschaltet und span-
nungslos gemacht werden.
• Die Filter stets nach den an-
gegebenen Intervallen reinigen
oder auswechseln (Brandge-
fahr).
-
waschbar, noch regenerier-
bar und muss bei normalem
Betrieb zirka alle 4 Monate
Gebrauchs (W).
WW
-
oder bei intensiver Nutzung
in der Spülmaschine gespült
werden (Z).
ZZ
- Kontrolllampen der Steuerun-
gen, wo vorhanden.
• Die Haube mit einem feuchten
Lappen und einem neutralen
Reinigungsmittel abwischen.
10 www.aeg.com
4. BEDIENELEMENTE
Taste Funktion LED
A
von Off, zyklisch mit jedem Drücken der Taste.
-
BOff Motor. Die LEDs, welche die Drehzahl des Motors
Aktiviert/Deaktiviert bei 5 Sekunden langem Drücken
den Modus Tastatursperre.
Alle LEDs schalten sich nacheinander nach
einer bestimmten Reihenfolge ein.
CSchaltet die erste Betriebsgeschwindigkeit ein. Die LEDs der ersten Betriebsgeschwindigkeit
und Motor Off schalten sich ein.
DSchaltet die zweite Betriebsgeschwindigkeit ein. Die LEDs für die zweite Betriebsgeschwindigkeit
und für Motor Off schalten sich ein.
EAktiviert die Intensivgeschwindigkeit 1. Diese Ge-
schwindigkeit ist auf 10 Minuten zeitgeregelt. Nach
Ablauf dieser Zeit kehrt das System zu der zuvor
-
tigen der Taste oder Abstellen des Motors deaktiviert.
Die LED blinkt.
FAktiviert die Intensivgeschwindigkeit 2. Diese Ge-
schwindigkeit ist auf 8 Minuten zeitgeregelt. Nach
Ablauf dieser Zeit kehrt das System zu der zuvor
-
tigen der Taste oder Abstellen des Motors deaktiviert.
Die LED blinkt.
GAktiviert/Deaktiviert das Delay, das um 15 Minuten
oder Abstellen des Motors deaktiviert.
LED eingeschaltet.
Mit zirka 5 Sekunden langem Gedrückthalten der Taste
wird die Fernbedienung und die Funktion H2H aktiviert.
Mit zirka 5 Sekunden langem Gedrückthalten der
Taste wird die Fernbedienung und die Funktion H2H
deaktiviert.
HBei laufendem Filteralarm wird durch Drücken der
sind nur bei abgestelltem Motor sichtbar.
vorherige Anzeige:
Taste H eingeschaltet = Zeigt an, dass die Me-
Alarm wird nach 100 effektiven Betriebsstunden
werden müssen. Dieser Alarm wird nach 200
effektiven Betriebsstunden der Abzugshaube
Mit zirka 5 Sekunden langem Gedrückthalten der Taste

11
GERMAN
5.
BELEUCHTUNG
LED-Strahler
• Für den Austausch der LED-Strahler wenden
Sie sich bitte an den Kundendienst.
Achtung: Dieses Gerät ist mit einer weißen
LED-Lampe der Klasse 1M gemäß EN 60825-1
ausgestattet: 1994 + A1:2002 + A2:2001; max.
gelieferte Lichtleistung @439nm: 7µW. Nicht direkt
mit optischen Instrumenten (Fernglas, Lupe, usw.)
in das Licht schauen.

13
FRENCH
1. CONSEILS ET
SUGGESTIONS
• Les instructions pour l’utilisa-
conséquent, certaines des-
criptions de caractéristiques
cet appareil.
• En aucun cas le fabricant ne
peut être tenu pour respon-
sable d’éventuels dommages
une utilisation impropre.
• La distance de sécurité mini-
mum entre le plan de cuisson
et la hotte aspirante est de 650
inférieure ; voir le paragraphe
concernant les dimensions de
travail et l’installation).
• Assurez-vous que la tension
de votre secteur correspond
l’intérieur de la hotte.
• Pour les appareils de Classe
I, s’assurer que l’installation
électrique de votre intérieur
adéquate. Relier l’aspirateur
au conduit de cheminée avec
-
mum de 120 mm. Le parcours
des fumées doit être le plus
court possible.
• Ne pas relier la hotte aspirante
aux conduits de cheminée
qui acheminent les fumées
de combustion (par exemple
etc.).
• Si vous utilisez l’aspirateur en
combinaison avec des appa-
reils non électriques (par ex.
garantir un degré d’aération
des gaz de sortie. La cuisine
doit présenter une ouverture
communiquant directement
vers l’extérieur pour garantir
l’amenée d’air propre. Si vous
utilisez la hotte de cuisine en
combinaison avec des appa-
-
cité, la pression négative dans
hotte ne réaspire les fumées
• Si le cordon d’alimentation est
endommagé, veuillez le faire
remplacer par le fabricant ou
agréé pour éviter tout risque
d’accident.
• Si les instructions d’installation
-
veuillez impérativement en te-
nir compte. Toutes les normes
concernant l’évacuation de l’air
doivent être respectées.
• Utiliser exclusivement des vis
adapté pour la hotte.
Attention : toute installation

14 www.aeg.com
des vis et des dispositifs de
présentes instructions peut
entraîner des risques de
décharges électriques.
• -
tation de secteur avec un
interrupteur bipolaire ayant
une ouverture des contacts
d’au moins 3 mm.
2. UTILISATION
• Cette hotte aspirante a été
conçue exclusivement pour
un usage domestique, dans
le but d’éliminer les odeurs
de cuisine.
• Ne jamais utiliser la hotte
pour des objectifs différents
de ceux pour lesquels elle a
été conçue.
• Ne jamais laisser un feu vif
allumé sous la hotte lorsque
celle-ci est en fonction.
• Régler l’intensité du feu de
-
vement vers le fond de la
casserole, en vous assurant
qu’il ne déborde pas sur les
côtés.
• Contrôler constamment les
friteuses durant leur utilisation
: l’huile surchauffée risque de
s’incendier.
•
sous la hotte : sous risque de
provoquer un incendie.
• Cet appareil n’est pas destiné
par des personnes dont les
capacités physiques, senso-
rielles ou mentales sont dimi-
nuées ou qui ont une expé-
rience et des connaissances
enfants ou ces personnes ne
soient attentivement surveillés
-
liser cet appareil en sécurité
et sur les dangers que cela
comporte. Assurez-vous que
les enfants ne jouent pas avec
cet appareil. Le nettoyage et
l’entretien de la part de l’uti-
lisateur ne doivent pas être
moins que ce ne soit sous la
surveillance d’une personne
responsable.
• ATTENTION : les parties
accessibles peuvent devenir
des appareils de cuisson.
3. ENTRETIEN
• Avant d’effectuer toute opéra-
tion de nettoyage et d’entre-
tien, éteindre ou débrancher
l’appareil du secteur.
• Nettoyer et/ou remplacer les
(danger d’incendie).
-
peut être ni lavé ni régénéré
et il doit être remplacé environ
tous les 4 mois de fonctionne-
ment ou plus souvent en cas
intense (W).

15
FRENCH
WW
-
tous les 2 mois de fonctionne-
ment ou plus souvent en cas
être lavés au lave-vaisselle
(Z).
ZZ
- Voyants commandes si pré-
sents.
• Nettoyer la hotte avec un
chiffon humide et un détergent
liquide neutre.

16 www.aeg.com
4. COMMANDES
Touche Fonction Led
A -
sion sur la touche de façon cyclique en passant
par Off.
-
BOff Moteur. Les leds d’indication de la vitesse du mo-
teur s’éteignent.
Appuyer pendant 5 secondes pour activer/désacti-
ver le mode de verrouillage du clavier.
Toutes les leds s’éclairent cycliquement et
effectuent une séquence d’allumage.
C
s’allument.
D
s’allument.
EActive la vitesse Intensive 1. Cette vitesse est
paramétrée. Pour la désactiver, appuyer sur cette
même touche ou éteindre le moteur.
La led clignote.
FActive la vitesse Intensive 2. Cette vitesse est
paramétrée. Pour la désactiver, appuyer sur cette
même touche ou éteindre le moteur.
La led clignote.
GActive/désactive le Delay, l’extinction automatique
d’éclairage. Pour la désactiver, appuyer sur cette
même touche ou éteindre le moteur.
La led est allumée.
Appuyer sur la touche pendant 5 secondes pour
valider la télécommande et la fonction H2H.
Appuyer sur la touche pendant 5 secondes pour
invalider la télécommande et la fonction H2H.
H
touche pour effectuer le reset de l’alarme. Ces
indications ne sont visibles que lorsque le moteur
est éteint.
Led H allumée = Signale la nécessité de
-
fonctionnement effectif de la hotte.
Led H clignotante = Signale la nécessité de
de fonctionnement effectif de la hotte.
Garder la touche appuyée pendant environ 5
secondes, toutes les charges étant éteintes
-

17
FRENCH
5. ÉCLAIRAGE
Attention : Cet appareil est doté d’une lumière
LED blanche de classe 1M conformément à la
norme EN 60825-1: 1994 + A1:2002 + A2:2001
: puissance op-tique maximum émise à 439nm
: 7µW. Ne pas observer directement avec
des instruments optiques (jumelles, lentilles
grossissantes…).
• Pour le remplacement, contacter le Service
après-vent (« Pour l’achat, s’adresser au
service après-vente »).

18 www.aeg.com
VOOR PERFECTE RESULTATEN
Bedankt dat u voor dit AEG product heeft gekozen. Dit apparaat is ontworpen
om vele jaren uitstekend te presteren, met innovatieve technologieën die het
leven gemakkelijker helpen maken – functies die gewone apparaten wellicht niet
hebben. Neem een paar minuten de tijd om het door te lezen zodat u er optimaal
ACCESSOIRES EN VERBRUIKSARTIKELEN
In de AEG webshop vindt u alles wat u nodig heeft om al uw apparaten van AEG
mooi te houden en perfect te laten functioneren. Ook vindt u hier een groot aantal
accessoires die zijn ontworpen en gebouwd volgens de hoge kwaliteitsnormen
tot waszakken…
Bezoek de webshop op:
www.aeg.com/shop
MILIEUBESCHERMING
Recycle de materialen met het symbool . Gooi de verpakking in een geschikte
verzamelcontainer om het te recyclen.
Help om het milieu en de volksgezondheid te beschermen en recycle het afval
van elektrische en elektronische apparaten. Gooi apparaten gemarkeerd met
het symbool niet weg met het huishoudelijk afval. Breng het product naar het
milieustation bij u in de buurt of neem contact op met de gemeente.
KLANTENSERVICE
Wij raden altijd het gebruik van originele onderdelen aan.
Zorg er als u contact opneemt met de klantenservice voor dat u de volgende
gegevens bij de hand hebt.
De informatie staat op het typeplaatje.
Model ___________________________
PRODUCTNUMMER _______________
Serienummer _____________________

19
DUTCH
1. ADVIEZEN EN
SUGGESTIES
• De gebruiksaanwijzingen heb-
ben betrekking op verschillen-
de modellen van dit apparaat.
Mogelijk vindt u dan ook
beschrijvingen van aparte
kenmerken die niet over uw
• De fabrikant is niet aanspra-
kelijk voor eventuele schade
als gevolg van een onjuiste in-
stallatie of oneigenlijk gebruik.
• De minimale veiligheidsaf-
stand tussen de kookplaat
en de afzuigkap is 650 mm
(sommige modellen kunnen op
een kleinere afstand worden
geïnstalleerd; zie de paragraaf
over de werkafmetingen en de
installatie).
• Controleer of de netspanning
overeenstemt met de spanning
die op het typeplaatje aan de
binnenkant van de afzuigkap
staat vermeld.
• Controleer voor apparaten
van klasse I of het elektrici-
teitsnet in uw woning over
een goede aarding beschikt.
Sluit de afzuiginrichting op het
rookkanaal aan met een pijp
met een minimale diameter
van 120 mm. De rook moet
een zo kort mogelijk traject
• Sluit de afzuigkap niet op
rookkanalen aan die verbran-
dingsgassen afvoeren (bijv.
van verwarmingsketels, open
haarden, enz.).
• Als de afzuiginrichting in com-
binatie met niet-elektrische
apparaten wordt gebruikt (bijv.
gasapparaten), moet het ver-
trek voldoende geventileerd
zijn om te voorkomen dat de
uitgestoten gassen terugstro-
men. De keuken dient over
een opening te beschikken die
direct in verbinding staat met
de buitenlucht om de toevoer
van schone lucht te garande-
ren. Wanneer de afzuigkap in
combinatie met niet-elektrische
apparaten wordt gebruikt, mag
de onderdruk in het vertrek niet
groter zijn dan 0,04 mbar om
te voorkomen dat de damp
opnieuw door de afzuigkap
in het vertrek gezogen wordt.
• Een beschadigd netsnoer
moet door de producent of
de technische servicedienst
worden gerepareerd om elk
risico te vermijden.
• Als de installatievoorschriften
van de gaskookplaat bepalen
dat een grotere afstand in
acht moet worden genomen
dan hierboven is aangegeven,
dan moet daar rekening mee
worden gehouden. Alle regels
voor de luchtafvoer moeten in
acht worden genomen.
• Gebruik alleen schroeven en
kleine onderdelen die geschikt
zijn voor de afzuigkap.
Waarschuwing: indien de
schroeven en bevestigings-
systemen niet volgens deze
aanwijzingen worden geïnstal-

20 www.aeg.com
leerd, bestaat het gevaar voor
elektrische schokken.
• Sluit de afzuigkap op het
elektriciteitsnet aan met een
tweepolige schakelaar met
een afstand tussen de con-
tacten van minstens 3 mm.
2. GEBRUIK
• De afzuigkap is uitsluitend
bedoeld voor huishoudelijk
gebruik om kookgeuren te
verwijderen.
• Gebruik de afzuigkap nooit
voor andere doeleinden dan
waarvoor hij bedoeld is.
• Laat nooit hoog brandende
branders onbedekt onder een
werkende afzuigkap.
• Regel de vlammen altijd zo
dat ze niet langs de pannen
omhoogkomen.
• Controleer frituurpannen tij-
dens het gebruik: de over-
verhitte olie zou vlam kunnen
vatten.
• Er mag niet onder de afzuig-
kap geflambeerd worden:
brandgevaar.
• Het apparaat mag worden
gebruikt door kinderen ouder
dan 8 jaar en door personen
met een lichamelijke, zintuiglij-
ke of geestelijke beperking of
met onvoldoende ervaring en
kennis, mits ze onder toezicht
staan en goed geïnstrueerd
zijn over een veilig gebruik van
het apparaat en de gevaren
die ermee samenhangen. Zorg
ervoor dat kinderen niet met
het apparaat spelen. Reiniging
en onderhoud door de gebrui-
ker mogen niet door kinderen
worden uitgevoerd, tenzij ze
onder toezicht staan.
• “LET OP: tijdens het gebruik
van de kooktoestellen kunnen
de toegankelijke delen erg
heet worden”.
3. ONDERHOUD
• Schakel het apparaat uit of
koppel het los van het elektrici-
teitsnet alvorens reinigings- of
onderhoudswerkzaamheden
uit te voeren.
• De filters reinigen en/ver-
vangen na de aangegeven
tijdsperiode (brandgevaar).
-
afwasbaar of regenereerbaar
en moeten ongeveer om de
4 maanden worden vervan-
gen, of vaker bij zeer intensief
gebruik (W).
WW
-
2 maanden worden schoon-
gemaakt, of vaker bij zeer
intensief gebruik. Ze kunnen
in de afwasmachine worden
gewassen (Z).

22 www.aeg.com
4. BEDIENINGSELEMENTEN
Toets Functie Led
A Verandert de lichtsterkte bij elke druk op de toets
op cyclische wijze via de Off-stand.
-
BOff motor. De leds die de snelheid van de motor
aanduiden gaan uit.
Als deze toets 5 seconden ingedrukt wordt gehou-
den, wordt de toetsenblokkering in-/uitgeschakeld.
Alle leds gaan cyclisch en na elkaar
branden.
C Schakelt de eerste snelheid in. De leds van de eerste snelheid en Off
motor gaan branden.
DSchakelt de tweede snelheid in. De leds van de tweede snelheid en Off
motor gaan branden.
E Schakelt de Hoge snelheid 1 in. Deze snelheid is
ingesteld op 10 minuten. Na deze tijdsduur keert
het systeem automatisch terug naar de eerder
ingestelde snelheid. Deze functie kan worden
uitgeschakeld door op dezelfde toets te drukken
of door de motor uit te zetten.
De led knippert.
F Schakelt de Hoge snelheid 2 in. Deze snelheid is
ingesteld op 8 minuten. Na deze tijdsduur keert
het systeem automatisch terug naar de eerder
ingestelde snelheid. Deze functie kan worden
uitgeschakeld door op dezelfde toets te drukken
of door de motor uit te zetten.
De led knippert.
G Schakelt de delay in/uit, d.w.z. dat de motor en
de verlichting met een vertraging van 15 minuten
automatisch worden uitgeschakeld. Deze functie
kan worden uitgeschakeld door op dezelfde toets
te drukken of door de motor uit te zetten.
De led brandt.
Door de toets 5 seconden ingedrukt te houden
worden de afstandsbediening en de functie H2H
ingeschakeld.
Door de toets 5 seconden ingedrukt te houden
worden de afstandsbediening en de functie H2H
uitgeschakeld.
H
wordt het alarm gereset. Deze signaleringen zijn
alleen zichtbaar als de motor uit staat.
Na de procedure gaat de eerder getoonde
signalering uit:
Toets H aan = Signaleert dat de metalen
alarm wordt na 100 bedrijfsuren van de
afzuigkap ingeschakeld.
Led H knippert = Signaleert dat de actieve
worden gewassen. Het alarm wordt na 200
bedrijfsuren van de afzuigkap ingeschakeld.
Als de toets ongeveer 5 seconden ingedrukt wordt
-
schakeld zijn, dan wordt het alarm van de actieve

23
DUTCH
5.
VERLICHTING
Let op: dit apparaat is voorzien van een wit
ledlampje van de klasse 1 M volgens de norm EN
60825-1: 1994 + A1:2002 + A2:2001; maximaal
uitgestraald optisch vermogen bij 439 nm: 7µW.
Niet direct met optische instrumenten (verrekijker,
vergrootglas…) waarnemen.
• Neem voor de vervanging contact op met de
klantenservice. (‘Wend u voor de aankoop
tot de klantenservice’).

24 www.aeg.com
PARA OBTENER RESULTADOS PERFECTOS
Gracias por escoger este producto AEG. Lo hemos creado para ofrecerle un
rendimiento impecable durante muchos años, con tecnologías innovadoras
que le facilitarán la vida: características que probablemente no encontrará en
electrodomésticos corrientes. Lea durante algunos minutos este documento para
aprovechar al máximo este electrodoméstico..
ACCESORIOS Y CONSUMIBLES
En la página web de AEG, encontrará todo lo necesario para la perfecta limpieza
y funcionamiento de todos sus electrodomésticos AEG. Junto con una amplia
gama de accesorios diseñados y fabricados conforme a los elevados estándares
de calidad característicos de la marca, desde utensilios de cocina especializados
a cestos de cubiertos, desde portabotellas a bolsas para el lavado de prendas
delicadas...
Visite la tienda virtual en:
www.aeg.com/shop
ASPECTOS MEDIOAMBIENTALES
Recicle los materiales con el símbolo . Coloque el material de embalaje en los
contenedores adecuados para su reciclaje.
Ayude a proteger el medio ambiente y la salud pública, así como a reciclar
residuos de aparatos eléctricos y electrónicos. No deseche los aparatos
marcados con el símbolo junto con los residuos domésticos. Lleve el producto
ATENCIÓN Y SERVICIO AL CLIENTE
Le recomendamos que utilice recambios originales.
Al contactar con Servicio, cerciórese de tener la siguiente información a la mano.
La información se puede encontrar en la placa de datos técnicos.
Modelo __________________________
Número de producto (PNC) __________
Número de serie ___________________

26 www.aeg.com
• Conectar la campana a la ali-
mentación de red interponien-
do un interruptor bipolar con
distancia entre los contactos
de por lo menos 3 mm.
2. USO
• La campana extractora está
diseñada exclusivamente para
uso doméstico, para eliminar
los olores de la cocina.
• Nunca utilice la campana para
los que fue diseñada.
• No deje nunca llamas altas
bajo la campana cuando está
en funcionamiento.
• Ajuste la intensidad de la
llama para dirigirla sólo a la
parte inferior del recipiente de
cocción, asegurándose de que
no llegue a los lados.
• Las freidoras deben ser con-
troladas continuamente duran-
te su uso: el aceite recalentado
puede incendiarse.
•
campana: se podría producir
un incendio.
• Este aparato puede ser usado
por niños de edad no inferior
a 8 años y por personas con
reducidas capacidades psico-
lógicas, físicas y sensoriales
o con experiencia o conoci-
miento inadecuados, siempre
que estén cuidadosamente
supervisados e instruidos
sobre cómo utilizar de forma
segura el equipo y los peligros
que esto implica. Asegúrese
de que los niños no jueguen
con el aparato. La limpieza y
mantenimiento por parte del
usuario no deben ser reali-
zados por los niños, a menos
que sean supervisados.
• ATENCIÓN: las partes accesi
-
bles pueden calentarse mucho
durante el uso de aparatos
de cocción.
3. MANTENIMIENTO
• Apague o desconecte el
aparato de la red eléctrica
antes de cualquier operación
de limpieza o mantenimiento.
• -
tros después del período de
de incendio).
-
se puede lavar ni regenerar,
y se debe cambiar cada 4
meses de funcionamiento
aproximadamente, o con
mayor frecuencia si se utiliza
muy frecuentemente (W).
WW
-
limpiarse cada 2 meses
de operación, o con mayor
frecuencia si se utilizan muy
frecuentemente y se pueden
lavar en el lavavajillas (Z).

27
SPANISH
ZZ
- Luces testigo mandos donde
estén presentes.
• Limpie la campana con un
paño húmedo y un detergente
líquido suave.

28 www.aeg.com
4. MANDOS
Tecla Función Led
A
que se presiona la tecla de manera cíclica pasan-
do por Off.
-
BOff motor. Los leds de indicación de la velocidad del
motor se apagan.
Si se presiona por 5 segundos, activa/desactiva la
modalidad bloqueo teclado.
Todos los leds se encienden cíclicamente y
ejecutan una secuencia de encendido.
C Activa la primera velocidad. Los leds de primera velocidad y off motor
se encienden.
DActiva la segunda velocidad. Los leds de segunda velocidad y off motor
se encienden.
E Activa la velocidad Intensiva 1. Dicha velocidad
-
po el sistema regresa a la velocidad implementa-
da precedentemente. Se desactiva presionando la
misma Tecla o apagando el Motor.
El led parpadea.
F Activa la velocidad Intensiva 2. Esta velocidad
el sistema regresa a la velocidad implementada
precedentemente. Se desactiva presionando la
misma Tecla o apagando el Motor.
El led parpadea.
G Activa/Desactiva el Delay, el apagado automático
retrasado 15 minutos del motor y de la instalación
de Iluminación. Se desactiva presionando la
misma Tecla o apagando el motor.
El led está encendido.
Manteniendo la tecla presionada por 5 segundos
se habilita el telemando y la función H2H.
Manteniendo la tecla presionada por 5 segundos
se deshabilita el telemando y la función H2H.
H
tecla se efectúa el Reset de la alarma. Dichas
señalizaciones son visibles sólo con el motor
apagado.
Una vez terminado el procedimiento se
apaga la señalización visualizada preceden-
temente:
Led H encendido = Señala necesidad de la-
se activa después de 100 horas de trabajo
efectivo de la campana.
Led H encendido = Señala la necesidad de
-
cos. La alarma se activa después de 200
horas de trabajo efectivo de la campana.
Manteniendo la tecla presionada aproximada-
mente 5 segundos, cuando todas las cargas

29
SPANISH
5.
ILUMINACIÓN
Atención: Este aparato está provisto de una
luz LED blanca de clase 1 M según la norma
EN 60825-1: 1994 + A1:2002 + A2:2001;
máxima potencia óptica emitida@439nm: 7µW.
No observar directamente con instrumentos
ópticos (catalejo, lupa..).
• Para la sustitución ponerse en contacto
con la asistencia técnica. (“Para la compra
dirigirse a la asistencia técnica”).

30 www.aeg.com
PARA RESULTADOS PERFEITOS
Obrigado por escolher este produto AEG. Criámo-lo para lhe oferecer um
desempenho impecável durante vários anos, com tecnologias inovadoras que
tornam a sua vida mais fácil – funcionalidades que poderá não encontrar em
aparelhos comuns. Continue a ler durante alguns minutos para tirar o máximo
partido do produto.
Na loja da AEG na Internet, encontrará tudo aquilo de que necessita para manter
os seus aparelhos AEG a funcionarem na perfeição. A par de uma vasta gama
de acessórios projectados e concebidos de acordo com os padrões de elevada
qualidade que esperaria, de tachos especiais a cestos de talheres, de suportes
para garrafas a delicados sacos para roupa...
Visite a loja na Internet em:
www.aeg.com/shop
PREOCUPAÇÕES AMBIENTAIS
Recicle os materiais que apresentem o símbolo . Coloque a embalagem nos
contentores indicados para reciclagem.
Ajude a proteger o ambiente e a saúde pública através da reciclagem de aparelhos
eléctricos e electrónicos. Não elimine os aparelhos que tenham o símbolo
juntamente com os resíduos domésticos. Coloque o produto num ponto de recolha
para reciclagem local ou contacte as suas autoridades municipais.
APOIO AO CLIENTE E ASSISTÊNCIA
Recomendamos a utilização de peças originais.
disponíveis.
A informação encontra-se na placa de características.
Modelo __________________________
PNC ____________________________
Número de série ___________________

31
PORTUGUESE
1. CONSELHOS
E SUGESTÕES
• As instruções para uso apli-
cam-se a vários modelos
deste aparelho. Por isso, é
possível que estejam aqui
descritas algumas caracte-
rísticas do equipamento que
não digam respeito ao seu
• O fabricante declina toda e
qualquer responsabilidade por
eventuais danos decorrentes
de instalação ou utilização
incorreta ou imprópria.
• -
rança entre a placa de coze-
dura e o exaustor é de 650
mm (alguns modelos podem
ser instalados a altura inferior;
consulte o parágrafo sobre as
dimensões de trabalho e a
instalação).
•
-
da na chapa de características
• Para os aparelhos da Classe
elétrica da habitação dispõe de
-
duta de fumos utilizando um
120 mm. O percurso do tubo
de exaustão de fumo deve ser
o mais curto possível.
• Não ligue o exaustor a con-
dutas de exaustão que trans-
portem fumos de combustão
(caldeiras, lareiras, etc.).
• Se o exaustor for utilizado em
conjunto com aparelhos não
elétricos (por ex. aparelhos ali-
mentados a gás), é necessário
que haja no aposento ventila-
retorno dos gases de escape.
Deve haver uma abertura na
cozinha que comunique dire-
tamente com o exterior, para
garantir a entrada de ar limpo.
-
do em conjunto com outros
aparelhos não alimentados
eletricamente, a pressão ne-
gativa no aposento não deve
ultrapassar 0,04 mbar, para
evitar que os fumos voltem
a entrar no aposento através
do exaustor.
• No caso de danos no cabo
elétrico, é necessário que seja
substituído pelo serviço de
evitar quaisquer riscos.
• Se as instruções de instala-
ção da placa de cozinha a
-
da, é necessário respeitá-las.
Devem ser respeitados todos
os regulamentos em matéria
de evacuação de ar.
• Utilize apenas parafusos e
peças pequenas apropriadas
para o exaustor.
Advertência: a não utilização
de parafusos ou elementos de
estas instruções pode causar
riscos elétricos.

33
PORTUGUESE
funcionamento, ou com maior
frequência no caso de uso
muito intenso, e podem ser
lavados na máquina de lavar
louça (Z).
ZZ
- Indicadores luminosos, onde
disponíveis.
• Limpe o exaustor com um
pano húmido e detergente
líquido neutro.

36 www.aeg.com
PER RISULTATI PERFETTI
Grazie per aver scelto di acquistare questo prodotto AEG. Lo abbiamo creato per
fornirvi prestazioni impeccabili per molti anni, grazie a tecnologie innovative che vi
Vi invitiamo di dedicare qualche minuto alla lettura per sapere come trarre il
massimo dal vostro elettrodomestico.
ACCESSORI E PRODOTTI DI CONSUMO
All’interno del webshop AEG troverete tutto ciò che vi serve per fare in modo
che i vostri elettrodomestici AEG siano sempre perfettamente puliti e funzionanti.
Non mancano inoltre una vasta gamma di accessori studiati e realizzati
conformemente agli elevati standard qualitativi che vi aspettate: pentole,
scolaposate, portabottiglie e sacchi biancheria delicati...
Visitate il webshop all’indirizzo:
www.aeg.com/shop
CONSIDERAZIONI AMBIENTALI
Riciclare i materiali con il simbolo . Buttare l’imballaggio negli appositi
contenitori per il riciclaggio.
apparecchiature elettriche ed elettroniche. Non smaltire le apparecchiature che
riportano il simbolo
punto di riciclaggio più vicino o contattare il comune di residenza.
ASSISTENZA
Consigliamo sempre l’impiego di ricambi originali.
Prima di contattare il centro di assistenza, assicurarsi di avere a portata di mano i
seguenti dati.
Le informazioni sono riportate sulla targhetta.
Modello __________________________
PNC ____________________________
Numero di serie ___________________

38 www.aeg.com
terruttore bipolare con distanza
tra i contatti di almeno 3 mm.
2. USO
• -
gettata esclusivamente per
l’uso domestico allo scopo di
eliminare gli odori dalla cucina.
• Non usare mai la cappa per
scopi diversi da quelli per cui
•
funzione.
•
esclusivamente verso il fondo
del recipiente di cottura, assi-
curandosi che non ne avvolga
i lati.
• Le friggitrici devono essere
costantemente controllate du-
rante l’uso: l’olio surriscaldato
potrebbe incendiarsi.
•
cappa: si potrebbe sviluppare
un incendio.
• -
sere utilizzato da bambini di
esperienza e conoscenze
-
mente sorvegliati e istruiti su
come utilizzare in modo sicuro
l'apparecchio e sui pericoli che
ciò comporta. Assicurarsi che
i bambini non giochino con
l'apparecchio. Pulizia e manu-
tenzione da parte dell'utente
non devono essere effettuate
da bambini, a meno che non
siano sorvegliati.
• “ATTENZIONE: le parti ac-
cessibili possono diventare
molto calde durante l’uso degli
apparecchi di cottura”.
3. MANUTENZIONE
• Spegnere o scollegare l’appa-
recchio dalla rete di alimen-
tazione prima di qualunque
operazione di pulizia o ma-
nutenzione.
•
(pericolo di incendio).
-
deve essere sostituito ogni 4
mesi di funzionamento circa
o più frequentemente in caso
di utilizzo molto intenso (W).
WW
- I filtri antigrasso devono
essere puliti ogni 2 mesi di
funzionamento o più frequen-
temente in caso di utilizzo
molto intenso e possono es-
sere lavati in lavastoviglie (Z).
ZZ
- Spie comandi ove presenti.

39
ITALIAN
• Pulire la cappa utilizzando un
panno umido e un detergente
liquido neutro.

40 www.aeg.com
4. COMANDI
Tasto Funzione Led
A -
ne del Tasto in modo ciclico passando per Off.
-
BOff Motore.
motore si spengono.
Premuto per 5 Secondi Attiva / Disattiva la moda-
Tutti i Leds si accendono ciclicamente ed
eseguono una sequenza di accensione.
C
accendono.
D
accendono.
E Intensiva 1
temporizzata a 10 minuti. Al termine del tempo il
-
postata. Si disattiva premendo il medesimo Tasto
o spegnendo il Motore.
Il Led Lampeggia.
F Intensiva 2
temporizzata a 8 minuti. Al termine del tempo il
-
postata. Si disattiva premendo il medesimo Tasto
o spegnendo il Motore.
Il Led Lampeggia.
G DelayAttiva / Disattiva il , lo spegnimento automa-
tico ritardato di 15 minuti del Motore e dell’Im-
pianto d’Illuminazione. Si disattiva premendo il
medesimo tasto o spegnendo il motore.
Tenendo il tasto premuto per 5 secondi si abilita il
telecomando e la Funzione H2H.
Tenendo il tasto premuto per 5 secondi si disabili-
ta il telecomando e la Funzione H2H.
2 lampeggi Leds Tasti .B+C
1 lampeggio Leds Tasti .B+C
H
effettua il reset dell’allarme. Tali segnalazioni sono
visibili solo a motore spento.
Terminata la procedura si spegne la segna-
lazione precedentemente visualizzata:
Led H acceso
entra in funzione dopo 100 ore di lavoro
effettivo della Cappa.
Led H lampeggiante = Segnala la neces-
metallici. L’allarme entra in funzione dopo
200 ore di lavoro effettivo della Cappa.
Tenendo il tasto premuto per circa 5 secondi,
si Attiva / Disattiva l’allarme dei Filtri al Carbone
attivo.
2 lampeggi Leds Tasti B+H
C.A. attivato.
1 lampeggio Leds Tasti B+H
C.A. disattivato.

41
ITALIAN
5.
ILLUMINAZIONE
Attenzione: Questo apparecchio è provvisto di
una luce LED bianca di classe 1M secondo la
norma EN 60825-1: 1994 + A1:2002 + A2:2001;
massima potenza ottica emessa@439nm:
7µW. Non osservare direttamente con strumenti
ottici (binocolo, lente d’ingrandimento….).
• Per la sostituzione contattare l’Assistenza
Tecnica (“Per l’acquisto rivolgersi
all’assistenza tecnica”).

42 www.aeg.com
FÖR PERFEKT RESULTAT
TILLBEHÖR OCH RESERVDELAR
www.aeg.com/shop
MILJÖSKYDD
Återvinn material med symbolen
kontakta kommunkontoret.
KUNDTJÄNST OCH SERVICE
Modell ___________________________
PNC (produktnr) ___________________
Serienummer _____________________

43
SWEDISH
1. REKOMMENDATIONER
OCH TIPS
• Bruksanvisningen refererar till
olika modeller av denna ap-
parat. Med anledning av detta
enskilda egenskaper som inte
•
eventuella skador som orsa-
kas av felaktig installation eller
•
650 mm (vissa modeller kan
•
• -
-
-
• -
o.s.v.
•
kombination med andra ap-
(t.ex. gasdrivna apparater),
-
i kombination med andra ap-
inte lokalens negativa lufttryck
• Om elkabeln skadas, ska den
bytas av tillverkaren eller av
varje risk.
• Om installationsanvisningarna
-
•
Obs! Om det inte installeras
dessa anvisningar kan det
•
brytare som har min. 3 mm
2. ANVÄNDNING
•
•
• Se till att det aldrig uppkommer

44 www.aeg.com
•
botten och inte slickar utmed
dess sidor.
•
-
kan ta eld.
• -
•
med nedsatt fysisk, sensorisk
eller personer som saknar
erfarenhet eller kunskap om
-
och gjort dem medvetna om
barn utan tillsyn av en vuxen.
• VARNING! -
larna kan bli mycket varma
matlagningsapparater o.dyl.
3. UNDERHÅLL
•
•
efter den angivna tidsperioden
(brandrisk).
-
diskas eller regenereras.
Filtret ska bytas cirka var 4:e
(W).
WW
- -
diskas i diskmaskin (Z).
ZZ
-
•
fuktig trasa och ett neutralt

45
SWEDISH
4. KOMMANDON
Knapp Funktion Lysdiod
A
-
B Lysdioderna som indikerar motorhastigheten
C
DAktiverar den andra hastigheten.
EAktiverar den 1:a intensiva hastigheten. Denna ha-
hastigheten. Den avaktiveras genom att knappen
Lysdioden blinkar.
FAktiverar den 2:a intensiva hastigheten. Denna ha-
hastigheten. Den avaktiveras genom att knappen
Lysdioden blinkar.
G -
av belysningen med 15 minuter. Den avaktiveras
genom att knappen trycks in eller genom att
H
visade meddelandet:
funktion efter 100 timmar av effektivt arbete
-
-
aktiverat.
-
avaktiverat.

46 www.aeg.com
5.
BELYSNING
Varning: Denna apparat är utrustad med ett
vitt LED-ljus av klass 1M enligt normen EN
60825-1: 1994 + A1:2002 + A2:2001; max.
avgiven optisk effekt@439nm: 7µW. Titta
inte direkt med optiska instrument (kikare,
förstoringsglas….).
• För byte kontakta servicecenter. (“För
inköpet vänd dig till ett service-centra”).

52 www.aeg.com
TÄYDELLISTEN TULOSTEN SAAVUTTAMISEKSI
Kiitämme teitä tämän AEG-tuotteen valitsemisesta. Olemme kehittäneet tämän
tuotteen tarjotaksemme teille huipputason suorituskyvyn moneksi vuodeksi.
Laitteen innovatiiviset teknologiat tekevät elämästänne yksinkertaisempaa –
kyseisiä ominaisuuksia ei välttämättä löydy tavallisista laitteista. Käyttäkää
muutama minuutti lukemiseen, jotta voitte hyödyntää laitteen ominaisuudet
parhaalla mahdollisella tavalla.
LISÄVARUSTEET JA KULUTUSHYÖDYKKEET
AEG-verkkomyymälästä löydätte kaiken tarvitsemanne kaikkien AEG-
laitteidenne ulkonäön ja toiminnan säilyttämiseksi huippukunnossa. Korkeiden
laatustandardien mukaan suunniteltujen ja valmistettujen lisävarusteiden lisäksi
löydätte myymälästämme erityisiä keittoastioita, ruokailuvälinekoreja, pullon
pidikkeitä, erityisiä pyykinpesupusseja, jne...
Vieraile verkkomyymälässämme sivulla:
www.aeg.com/shop
YMPÄRISTÖNSUOJELU
Kierrätä materiaalit, jotka on merkitty merkillä . Kierrätä pakkaus laittamalla se
asianmukaiseen kierrätysastiaan.
Suojele ympäristöä ja ihmisten terveyttä kierrättämällä sähkö- ja elektroniikkaromut.
Älä hävitä merkillä merkittyjä kodinkoneita kotitalousjätteen mukana. Palauta
tuote paikalliseen kierrätyskeskukseen tai ota yhteyttä paikalliseen viranomaiseen.
KULUTTAJANEUVONTA JA HUOLTO
Suosittelemme alkuperäisten varaosien käyttöä.
Pidä seuraavat tiedot saatavilla ottaessasi yhteyttä valtuutettuun
huoltoliikkeeseen.
Kyseiset tiedot löytyvät laitteen arvokilvestä.
Malli ____________________________
Tuotenumero _____________________
Sarjanumero ______________________

54 www.aeg.com
• Säädä liekkien koko sillä
tavoin, että ne kohdistuvat
vain kypsennysastian pohjaan.
Varmista, etteivät liekit tule
astian reunojen alta.
• Rasvakeittimiä on valvottava
jatkuvasti käytön aikana: yli-
kuumentunut öljy voi syttyä
palamaan.
• Älä liekitä liesituulettimen alla:
se voi aiheuttaa tulipalon.
• Alle 8-vuotiaat lapset ja
psyykkisesti, fyysisesti tai sen-
sorisesti rajoitteiset henkilöt tai
kokemattomat ja taitamattomat
henkilöt saavat käyttää tätä
laitetta vain, jos heitä valvo-
taan ja heille on annettu tiedot
laitteen turvallisesta käytöstä
ja siihen liittyvistä vaaroista.
Varmista, etteivät lapset pääse
leikkimään laitteella. Lapset
eivät saa tehdä käyttäjän puh-
distus- ja huoltotoimenpiteitä
ilman valvontaa.
• “HUOMIO: Kosketettavissa
olevat osat voivat tulla hyvin
kuumiksi keittolaitteiden käytön
aikana”.
3. HUOLTO
• Sammuta laite tai kytke se irti
sähköverkosta ennen minkään
puhdistus- tai huoltotoimenpi-
teen aloittamista.
• Puhdista ja/tai vaihda suodat-
timet määrätyn ajan kuluttua
(tulipalovaara).
- Aktiivihiilisuodattimia ei voi
pestä eikä regeneroida, ne
täytyy vaihtaa noin 4 kuukau-
den käytön jälkeen tai use-
ammin, jos laitetta käytetään
paljon (W).
WW
- Rasvasuodattimet täytyy
puhdistaa aina 2 kuukauden
käytön jälkeen tai useammin,
jos laitetta käytetään paljon.
Ne voidaan pestä astianpe-
sukoneessa (Z).
ZZ
- Kytkimien merkkivalot, malli-
kohtaiset.
• Puhdista liesituuletin kostealla
liinalla ja neutraalilla pesunes-
teellä.
Specyfikacje produktu
| Marka: | AEG |
| Kategoria: | Okap wyciągowy |
| Model: | X89464WV01 |
Potrzebujesz pomocy?
Jeśli potrzebujesz pomocy z AEG X89464WV01, zadaj pytanie poniżej, a inni użytkownicy Ci odpowiedzą
Instrukcje Okap wyciągowy AEG

9 Kwietnia 2025
9 Kwietnia 2025
5 Kwietnia 2025
10 Marca 2025
10 Marca 2025
10 Marca 2025
10 Marca 2025
9 Marca 2025
30 Grudnia 2025
6 Grudnia 2024
Instrukcje Okap wyciągowy
- Okap wyciągowy Bauknecht
- Okap wyciągowy Ikea
- Okap wyciągowy Samsung
- Okap wyciągowy Tesy
- Okap wyciągowy Bertazzoni
- Okap wyciągowy Electrolux
- Okap wyciągowy DeLonghi
- Okap wyciągowy Balay
- Okap wyciągowy Beko
- Okap wyciągowy Teka
- Okap wyciągowy LG
- Okap wyciągowy Küppersbusch
- Okap wyciągowy Smeg
- Okap wyciągowy Gram
- Okap wyciągowy Amica
- Okap wyciągowy Gorenje
- Okap wyciągowy Etna
- Okap wyciągowy LERAN
- Okap wyciągowy Sharp
- Okap wyciągowy Cookology
- Okap wyciągowy Russell Hobbs
- Okap wyciągowy Dometic
- Okap wyciągowy Bosch
- Okap wyciągowy Candy
- Okap wyciągowy Whirlpool
- Okap wyciągowy Miele
- Okap wyciągowy Midea
- Okap wyciągowy Toolcraft
- Okap wyciągowy Lamona
- Okap wyciągowy Hisense
- Okap wyciągowy Berg
- Okap wyciągowy Infiniton
- Okap wyciągowy Panasonic
- Okap wyciągowy Baumatic
- Okap wyciągowy OK
- Okap wyciągowy Hoover
- Okap wyciągowy Tesla
- Okap wyciągowy Westinghouse
- Okap wyciągowy Maytag
- Okap wyciągowy GE
- Okap wyciągowy Orbegozo
- Okap wyciągowy Blaupunkt
- Okap wyciągowy Brandt
- Okap wyciągowy Vivax
- Okap wyciągowy Siemens
- Okap wyciągowy Grundig
- Okap wyciągowy Haier
- Okap wyciągowy KKT Kolbe
- Okap wyciągowy Cylinda
- Okap wyciągowy Jocel
- Okap wyciągowy Silverline
- Okap wyciągowy Blomberg
- Okap wyciągowy Honeywell
- Okap wyciągowy Concept
- Okap wyciągowy Fisher & Paykel
- Okap wyciągowy ECG
- Okap wyciągowy Indesit
- Okap wyciągowy Ilve
- Okap wyciągowy Viking
- Okap wyciągowy Nodor
- Okap wyciągowy CATA
- Okap wyciągowy Broan
- Okap wyciągowy Hotpoint
- Okap wyciągowy V-Zug
- Okap wyciągowy Ariston Thermo
- Okap wyciągowy Zelmer
- Okap wyciągowy PKM
- Okap wyciągowy Unox
- Okap wyciągowy Thor
- Okap wyciągowy Amana
- Okap wyciągowy Dacor
- Okap wyciągowy Hotpoint Ariston
- Okap wyciągowy Furrion
- Okap wyciągowy Bomann
- Okap wyciągowy InAlto
- Okap wyciągowy Meireles
- Okap wyciągowy Schneider
- Okap wyciągowy MPM
- Okap wyciągowy CDA
- Okap wyciągowy Sam Cook
- Okap wyciągowy Philco
- Okap wyciągowy Neff
- Okap wyciągowy Corbero
- Okap wyciągowy Zanussi
- Okap wyciągowy Thermex
- Okap wyciągowy Fagor
- Okap wyciągowy Everdure
- Okap wyciągowy Thomson
- Okap wyciągowy Ardo
- Okap wyciągowy Klarstein
- Okap wyciągowy Coyote
- Okap wyciągowy Witt
- Okap wyciągowy Wolkenstein
- Okap wyciągowy Cecotec
- Okap wyciągowy Artusi
- Okap wyciągowy KitchenAid
- Okap wyciągowy Imperial
- Okap wyciągowy Helios
- Okap wyciągowy Sôlt
- Okap wyciągowy Exquisit
- Okap wyciągowy Bartscher
- Okap wyciągowy Hestan
- Okap wyciągowy Privileg
- Okap wyciągowy Dimplex
- Okap wyciągowy Falmec
- Okap wyciągowy Arçelik
- Okap wyciągowy Hanseatic
- Okap wyciągowy Continental Edison
- Okap wyciągowy Linarie
- Okap wyciągowy Atag
- Okap wyciągowy Rosieres
- Okap wyciągowy Franke
- Okap wyciągowy Novy
- Okap wyciągowy Rommer
- Okap wyciągowy Inventum
- Okap wyciągowy SVAN
- Okap wyciągowy Euro Appliances
- Okap wyciągowy Mora
- Okap wyciągowy Caple
- Okap wyciągowy AEG-Electrolux
- Okap wyciągowy Omega
- Okap wyciągowy Comfee
- Okap wyciągowy Classique
- Okap wyciągowy Kenmore
- Okap wyciągowy Kaiser
- Okap wyciągowy Zephyr
- Okap wyciągowy BORA
- Okap wyciągowy VOX
- Okap wyciągowy Hiberg
- Okap wyciągowy AYA
- Okap wyciągowy Pelgrim
- Okap wyciągowy Frilec
- Okap wyciągowy Orima
- Okap wyciągowy Rex
- Okap wyciągowy Kernau
- Okap wyciągowy Aspes
- Okap wyciągowy Weller
- Okap wyciągowy Twin Eagles
- Okap wyciągowy Respekta
- Okap wyciągowy Technika
- Okap wyciągowy Seiki
- Okap wyciągowy JennAir
- Okap wyciągowy Frigidaire
- Okap wyciągowy Matrix
- Okap wyciągowy Barazza
- Okap wyciągowy Summit
- Okap wyciągowy Gemini
- Okap wyciągowy Sirius
- Okap wyciągowy Foster
- Okap wyciągowy Chef
- Okap wyciągowy Fulgor Milano
- Okap wyciągowy Kelvinator
- Okap wyciągowy Gaggenau
- Okap wyciągowy Elica
- Okap wyciągowy Asko
- Okap wyciągowy Esatto
- Okap wyciągowy Signature
- Okap wyciągowy BlueStar
- Okap wyciągowy Porter & Charles
- Okap wyciągowy Kunft
- Okap wyciągowy Robinhood
- Okap wyciągowy Becken
- Okap wyciągowy Scandomestic
- Okap wyciągowy Ignis
- Okap wyciągowy Guzzanti
- Okap wyciągowy Venmar
- Okap wyciągowy Belling
- Okap wyciągowy De Dietrich
- Okap wyciągowy ZLine
- Okap wyciągowy Constructa
- Okap wyciągowy Proline
- Okap wyciągowy Euromaid
- Okap wyciągowy BLANCO
- Okap wyciągowy Scancool
- Okap wyciągowy Thermador
- Okap wyciągowy Bestron
- Okap wyciągowy Zanker
- Okap wyciągowy Kluge
- Okap wyciągowy Acec
- Okap wyciągowy Airlux
- Okap wyciągowy ABK
- Okap wyciągowy Ariston
- Okap wyciągowy Saturn
- Okap wyciągowy Progress
- Okap wyciągowy Bellini
- Okap wyciągowy Vestel
- Okap wyciągowy Itho
- Okap wyciągowy Prima
- Okap wyciągowy Junker
- Okap wyciągowy Monogram
- Okap wyciągowy Scholtes
- Okap wyciągowy Profilo
- Okap wyciągowy Heinner
- Okap wyciągowy Juno
- Okap wyciągowy Defy
- Okap wyciągowy Nordmende
- Okap wyciągowy Rangemaster
- Okap wyciągowy Friac
- Okap wyciągowy Boretti
- Okap wyciągowy Eico
- Okap wyciągowy Hansa
- Okap wyciągowy Air King
- Okap wyciągowy Elba
- Okap wyciągowy Steel Cucine
- Okap wyciągowy Jenn-Air
- Okap wyciągowy Limit
- Okap wyciągowy Freggia
- Okap wyciągowy Edesa
- Okap wyciągowy Lofra
- Okap wyciągowy New World
- Okap wyciągowy Leisure
- Okap wyciągowy Bompani
- Okap wyciągowy Glem Gas
- Okap wyciągowy Viva
- Okap wyciągowy M-System
- Okap wyciągowy German Pool
- Okap wyciągowy Falcon
- Okap wyciągowy Airforce
- Okap wyciągowy Ices
- Okap wyciągowy Mx Onda
- Okap wyciągowy Kleenmaid
- Okap wyciągowy Stoves
- Okap wyciągowy Faber
- Okap wyciągowy Eurotech
- Okap wyciągowy Wolf
- Okap wyciągowy Carrefour Home
- Okap wyciągowy Mepamsa
- Okap wyciągowy Upo
- Okap wyciągowy Belion
- Okap wyciągowy SIBIR
- Okap wyciągowy Sauter
- Okap wyciągowy Café
- Okap wyciągowy ARC
- Okap wyciągowy Lynx
- Okap wyciągowy FABER CASTELL
- Okap wyciągowy Tecnolux
- Okap wyciągowy Tisira
- Okap wyciągowy Cobal
- Okap wyciągowy Premier
- Okap wyciągowy Marynen
- Okap wyciągowy Axiair
- Okap wyciągowy La Germania
- Okap wyciągowy Gutmann
- Okap wyciągowy Roblin
- Okap wyciągowy Oranier
- Okap wyciągowy Bielmeier
- Okap wyciągowy Turbo Air
- Okap wyciągowy Schweigen
- Okap wyciągowy James
- Okap wyciągowy Apelson
- Okap wyciągowy Dominox
- Okap wyciągowy NuTone
- Okap wyciągowy Eudora
- Okap wyciągowy Steelmatic
- Okap wyciągowy Wells
- Okap wyciągowy Piccante
- Okap wyciągowy Kucht
- Okap wyciągowy Best
- Okap wyciągowy Wave
- Okap wyciągowy Halifax
- Okap wyciągowy Siku
- Okap wyciągowy Elin
- Okap wyciągowy High One
- Okap wyciągowy Whispair
- Okap wyciągowy Ciarra
- Okap wyciągowy XO
- Okap wyciągowy Adelberg
- Okap wyciągowy K&H
- Okap wyciągowy Cosmo
- Okap wyciągowy FAURE
- Okap wyciągowy Viali
- Okap wyciągowy Kobe
- Okap wyciągowy Qasair
- Okap wyciągowy Berbel
- Okap wyciągowy Samus
- Okap wyciągowy Royal Catering
- Okap wyciągowy Sedona
- Okap wyciągowy Vitrokitchen
- Okap wyciągowy Arthur Martin-Electrolux
- Okap wyciągowy Elektra Bregenz
- Okap wyciągowy CENDO
- Okap wyciągowy Pando
- Okap wyciągowy Applico
- Okap wyciągowy Airone
- Okap wyciągowy Trade-Wind
- Okap wyciągowy Mayer
- Okap wyciągowy Vent-A-Hood
- Okap wyciągowy HomeCraft
- Okap wyciągowy CEEM
- Okap wyciągowy Condor
- Okap wyciągowy Baumann
- Okap wyciągowy Pitsos
- Okap wyciągowy Windster
- Okap wyciągowy Conia
- Okap wyciągowy Hoffman
Najnowsze instrukcje dla Okap wyciągowy

9 Kwietnia 2025

9 Kwietnia 2025
9 Kwietnia 2025
9 Kwietnia 2025
9 Kwietnia 2025
9 Kwietnia 2025

9 Kwietnia 2025
9 Kwietnia 2025

9 Kwietnia 2025
9 Kwietnia 2025