Instrukcja obsługi Acti INR-411
Acti
rejestrator wideo
INR-411
Przeczytaj poniżej 📖 instrukcję obsługi w języku polskim dla Acti INR-411 (15 stron) w kategorii rejestrator wideo. Ta instrukcja była pomocna dla 13 osób i została oceniona przez 2 użytkowników na średnio 4.5 gwiazdek
Strona 1/15

Quick Installation Guide
INR-411
256-Channel 12-Bay Rackmount Standalone NVR

2 Standalone NVR Quick Installation Guide
Thank you for purchasing ACTi Standalone Network Video Recorder. This guide
contains all the information you need to quickly set up ACTi INR server system
via local interface.
For detailed instructions on installation, operation and how to log in to INR as
a web client, please refer to the product manuals provided on ACTi corporate
website.
The items below are prerequisite for installation:
• Network cameras
• Network cables
• Network switch
• Monitor (with HDMI, DVI or Display Port cable)
• USB mouse
• AtleastoneACTi-certied3.5-inchSATAharddisk
Findthecertieddiskmodelsathttp://www.acti.com/hddselector
BEFORE YOU START

Standalone NVR Quick Installation Guide 3
HARDWARE INSTALLATION
AT A GLANCE
This package contains:
• INR
• Rail Kit
• Power Cords
• Universal Socket Converter
UNPACK
• Disk Screws Pack
• Warranty Card
Front Panel
Rear Panel
Disk Bays x 12
USB Port
System LEDs
HDMI Port
AC Power Connector
Serial Port
USB Ports x4
USBPorts3.0x4
LAN1 Port
LAN2 Port
Audio Input /
Output
Power Button
Display Ports

4 Standalone NVR Quick Installation Guide
RACKMOUNT THE UNIT
This unit is designed to be mounted on a standard server rack, which
occupies2U(3.5″)ofverticalspace.
INR Sliding Rail Kit
HARD DISK INSTALLATION
REMOVE THE TRAY
Step 1
Slide the lock tab aside,
and the hinge tab will pop out by
itself.
Step 2
Hold the tab lever and
pull out the tray.
INSTALL THE TRAY
Step 4
Place your thumb on the lock to
push the tray into position in the
chassis.
Step 5
Press the hinge tab
until it clicks into place.
MOUNT THE DISK
Step 3
Loosen the two screws on the tray to remove the dummy disk. Secure the
hard disk on the tray with the provided disk screws. Make sure the disk
connector faces towards the SATA contacts inside the unit.
Make sure this unit is turned off, and insert the hard disks into the disk bays
following the sequence of tray numbers.
1. Allowaminimumof5cmclearanceatthe
frontandtherearforfront-to-backairowof
the unit.
2. Use the bundled rail kit, and install that to
support the entire unit.
3.Secure the unit onto the rack.

Standalone NVR Quick Installation Guide 5
START-UP
1. On the front panel, press the Power Button to turn on the unit.
2. On the Windows login screen, follow the on-screen instructions to setup
your login password. This will be used in succeeding Windows login. It is
strongly recommended not to leave the password blank.
CONNECT THE DEVICES
The example below displays a network consisting of only INR, network cameras
and required peripherals. Please remember to enable the DHCP service on your
router for INR to obtain an IP address automatically.
Note
To assign a static IP address to INR, enter Windows
andcongurethenetworksettingsinNetwork
and Sharing Center.
Power Source
USB Devices
Monitor
Switch
Cameras

6 Standalone NVR Quick Installation Guide
CREATE HARDWARE RAID (OPTIONAL)
AsthisunitsupportshardwareRAIDconguration,youcanmakediskarrays
using the bundled software utility.
1. On Windows Desktop, double-click on the shortcut to initialize the
RAID management utility.
2. On Remote servers list, select the IP address of this server and click on
“ “. On the login window, input the credentials and click “Login Login“.
3.On the page, click on “ ” .Dashboard Create virtual drive
User Name: ACTi
Password: 123456
Standalone NVR Quick Installation Guide 7
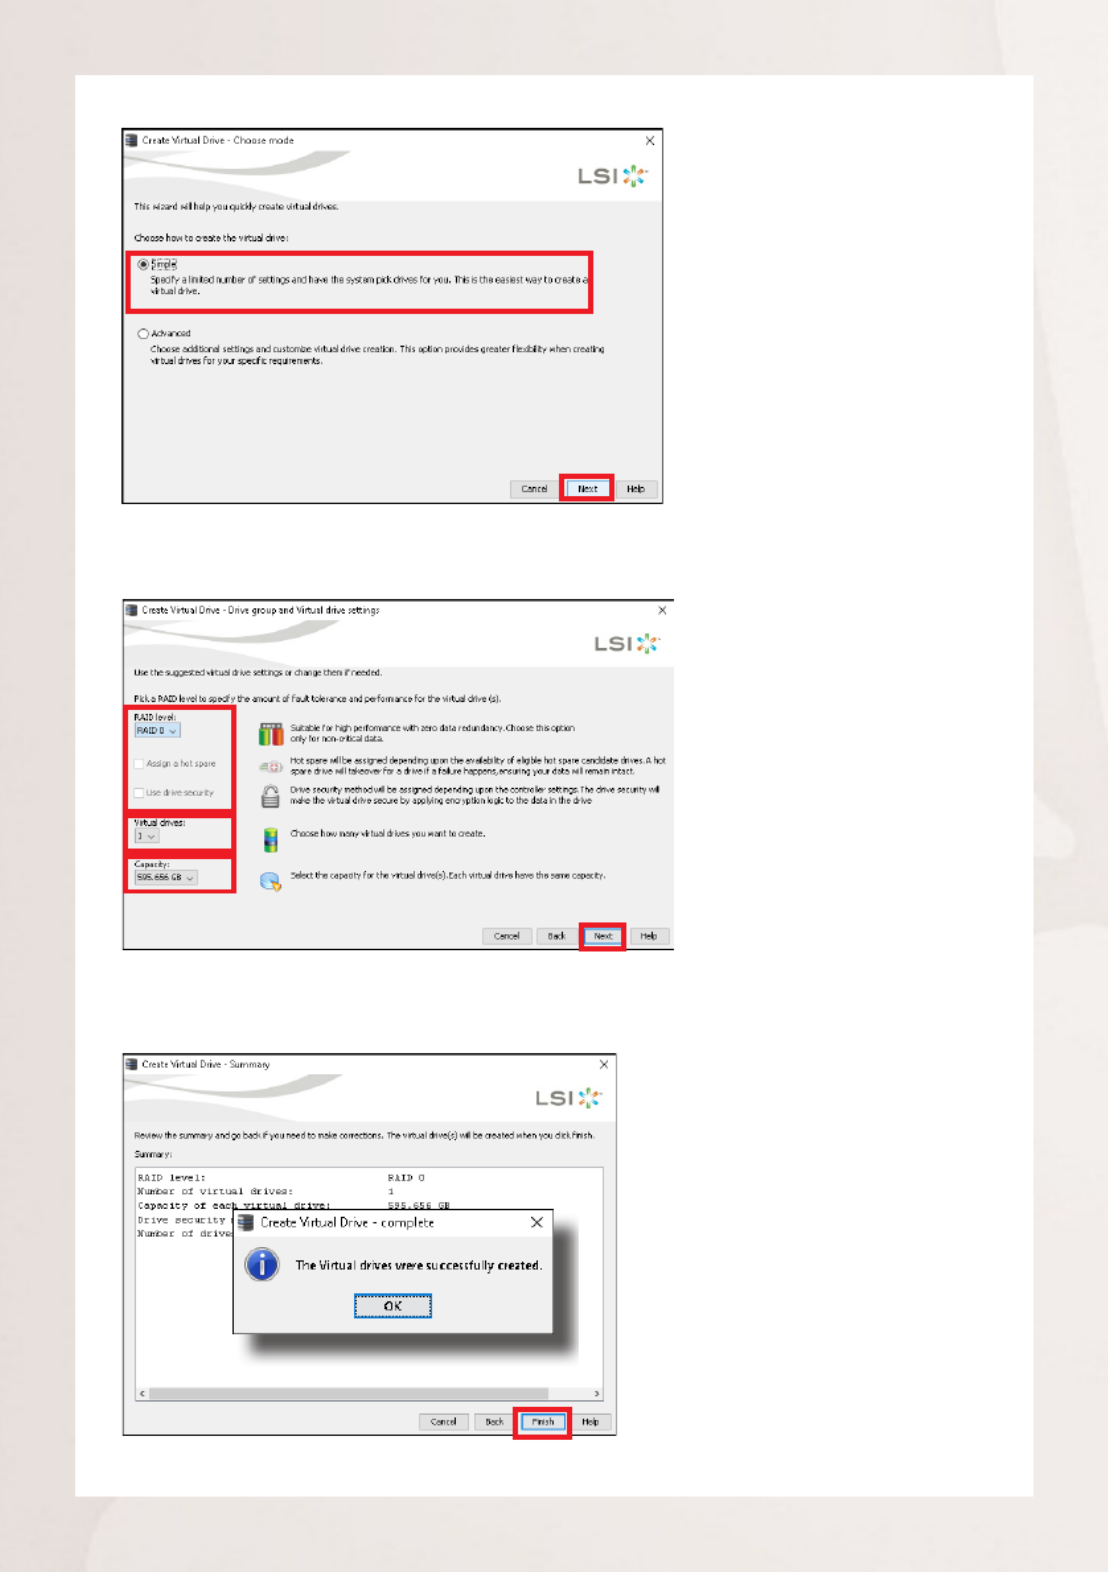
4. Choose “ “ mode and then click on “Simple Next“.
5. Select the , number of (arrays) and the RAID level Virtual drives Capacity
of the array, and then click on “Next”.
6.Onconrmationwindow,clickon“Finish“.

8 Standalone NVR Quick Installation Guide
CREATE DISK VOLUMES
Use Windows Disk Management to create disk volumes so that INR can
access the available storage space.
1. On Windows Search Box, search and enter “computer management”.
SOFTWARE CONFIGURATION
2. Select “ ”, right-click on a disk title and select “Disk Management Initialize
Disk”, choose “ ” as the partition style and click on“GPT OK”.
3. Right-click on the initialized disk and select the volume type to make a
new volume.

Standalone NVR Quick Installation Guide 9
4. Follow the on-screen Wizard to complete. Make sure you assign the
desired drive letter and give a proper label name to this volume.
Note
TomakeaStripedvolume,aMirroredvolumeoraRAID-5volume,itisrecommendedthat
you select disks of the same model and capacity.
Note
For detailed instructions on choosing the RAID types and troubleshooting hard disk issues,
please refer to System Administrator’s manual provided on ACTi Download Center at
http://www.acti.com/downloadcenter
5.After the volume is created, it is shown on Volume List and is ready for
recording.

10 Standalone NVR Quick Installation Guide
SET ADMIN PASSWORD
Forrst-timeuse,makesuretosetup
the administrator password.
1. On Windows Search Box, search and
enter “administrator tool”.
2. Click NVR3 Administrator Tool to
open the application.
LOG IN
On Windows Destop, double-click on
to enter NVR interface.
Type the and Account Password, and click
Login.
3.On the tool interface, go
to the page, then Account
click the Password Setup
button.
4. Type the preferred
password, and then click
Apply.
Specyfikacje produktu
| Marka: | Acti |
| Kategoria: | rejestrator wideo |
| Model: | INR-411 |
| Kolor produktu: | Czarny, Srebrny |
| Moc: | 550 W |
| Napięcie wejściowe AC: | 100-240 V |
| Wysokość produktu: | 87.2 mm |
| Szerokość produktu: | 482 mm |
| Głębokość produktu: | 692.1 mm |
| Waga produktu: | 11700 g |
| Certyfikaty: | CE, FCC, UL |
| Pojemność pamięci wewnętrznej: | 16000 MB |
| Procesor wbudowany: | Tak |
| Prędkość transferu danych przez Ethernet LAN: | 1000 Mbit/s |
| Ilość portów Ethernet LAN (RJ-45): | 2 |
| Zakres temperatur (eksploatacja): | 0 - 40 °C |
| Zakres wilgotności względnej: | 10 - 85 % |
| Taktowanie procesora: | 2.6 GHz |
| Wi-Fi: | Nie |
| Obsługiwane formaty plików wideo: | H.264, H.265, M-JPEG, MPEG4 |
| Liczba portów USB 2.0: | 2 |
| Całkowita pojemność zainstalowanej pamięci: | 256 GB |
| Usługa RAID: | Tak |
| Liczba rdzeni procesora: | 8 |
| Typ pamięci wewnętrznej: | DDR4 |
| Ilość portów USB 3.2 Gen 1 (3.1 Gen 1) Typu-A: | 5 |
| Zainstalowany system operacyjny: | Windows 10 IoT |
| Poziomy raid: | 0, 1,5, 6,10, 50, 60 |
| Ilość portów HDMI: | 1 |
| Liczba obsługiwanych HDD: | 12 |
| Maks. rozdzielczość: | - px |
| Ilość DisplayPort: | 2 |
| Możliwości montowania w stelażu: | Tak |
| System dźwięku: | 2-drożny |
| Obsługiwane protokoły sieciowe: | IPv4/v6, TCP, UDP, DHCP Client, HTTP, DNS, NTP, RTP, RTSP, SMTP, FTP, ICMP, ARP, UPnP, LDAP (client), iSCSi |
| Tryb odtwarzania: | Digital zoom |
| Pojemność HDD: | 0 GB |
| Rozmiar HDD: | 3.5 " |
| Pojemność stelaża: | 2U |
| PTZ: | Tak |
| Interfejs HDD: | SATA, SATA II, SATA III |
| Maksymalna pojemność przchowywania: | 168 TB |
| Tryb nagrywania: | Harmonogram |
| Wejścia kanałów wideo: | 256 kan. |
| Wyjście HDMI: | Tak |
| Porty RS-485: | 1 |
| Zdjęcie: | Tak |
Potrzebujesz pomocy?
Jeśli potrzebujesz pomocy z Acti INR-411, zadaj pytanie poniżej, a inni użytkownicy Ci odpowiedzą
Instrukcje rejestrator wideo Acti

26 Sierpnia 2024
26 Sierpnia 2024
26 Sierpnia 2024
26 Sierpnia 2024
26 Sierpnia 2024
26 Sierpnia 2024
26 Sierpnia 2024
26 Sierpnia 2024
26 Sierpnia 2024
26 Sierpnia 2024
Instrukcje rejestrator wideo
- rejestrator wideo Sony
- rejestrator wideo TP-Link
- rejestrator wideo Hikvision
- rejestrator wideo Panasonic
- rejestrator wideo Canon
- rejestrator wideo Blaupunkt
- rejestrator wideo Dahua Technology
- rejestrator wideo Zoom
- rejestrator wideo Speco Technologies
- rejestrator wideo AirLive
- rejestrator wideo Axis
- rejestrator wideo Lorex
- rejestrator wideo AVer
- rejestrator wideo UniView
- rejestrator wideo HiLook
- rejestrator wideo GeoVision
Najnowsze instrukcje dla rejestrator wideo
16 Września 2024
14 Września 2024
12 Września 2024
22 Sierpnia 2024
22 Sierpnia 2024
22 Sierpnia 2024
22 Sierpnia 2024
22 Sierpnia 2024
22 Sierpnia 2024
22 Sierpnia 2024