Instrukcja obsługi Acer S1210
Przeczytaj poniżej 📖 instrukcję obsługi w języku polskim dla Acer S1210 (62 stron) w kategorii Projektor. Ta instrukcja była pomocna dla 15 osób i została oceniona przez 2 użytkowników na średnio 4.5 gwiazdek
Strona 1/62

Acer Projector
S1110/T200/XS-S10/S1210/T210/XS-
X10/S1210Hn/S1213/T212/XS-X13/
S1213Hn/T212DT/XS-X13HG/
S1310W/T220/XS-W10/S1310WHn/
S1313W/S1313WHn Series User's
Guide

Copyright © 2012. Acer Incorporated.
All Rights Reserved.
Acer Projector S1110/T200/XS-S10/S1210/T210/XS-X10/S1210Hn/S1213/T212/XS-X13/S1213Hn/
T212DT/XS-X13HG/S1310W/T220/XS-W10/S1310WHn/S1313W/S1313WHn Series User's Guide
Original Issue: 4/2012
Acer Projector S1110/T200/XS-S10/S1210/T210/XS-X10/S1210Hn/S1213/T212/XS-X13/S1213Hn/
T212DT/XS-X13HG/S1310W/T220/XS-W10/S1310WHn/S1313W/S1313WHn Series
Acer and the Acer logo are registered trademarks of Acer Incorporated. Other companies'
product names or trademarks are used herein for identification purposes only and belong to
their respective companies.
"HDMITM, the HDMI logo and High-Definition Multimedia Interface are trademarks or
registered trademarks of HDMI Licensing LLC."
Changes may be made periodically to the information in this publication without obligation
to notify any person of such revisions or changes. Such changes will be incorporated in new
editions of this manual or supplementary documents and publications. This company makes
no representations or warranties, either expressed or implied, with respect to the contents
hereof and specifically disclaims the implied warranties of merchantability or fitness for a
particular purpose.
Record the model number, serial number, purchase date and place of purchase information in
the space provided below. The serial number and model number are recorded on the label
affixed to your projector. All correspondence concerning your unit should include the serial
number, model number and purchase information.
No part of this publication may be reproduced, stored in a retrieval system, or transmitted, in
any form or by any means, electronically, mechanically, by photocopy, recording or otherwise,
without the prior written permission of Acer Incorporated.
Model number: __________________________________
Serial number: ___________________________________
Date of purchase: ________________________________
Place of purchase: ________________________________

iii
Information for Your Safety and
Information for Your Safety and
Information for Your Safety and
Information for Your Safety and Information for Your Safety and
Comfort
Comfort
Comfort
ComfortComfort
Read these instructions carefully. Keep this document for future reference.
Follow all warnings and instructions marked on the product.
Turning the product off before cleaning
Unplug this product from the wall outlet before cleaning. Do not use liquid
cleaners or aerosol cleaners. Use a damp cloth for cleaning.
Caution for plug as disconnecting device
Observe the following guidelines when connecting and disconnecting power to
the external power supply unit:
•Install the power supply unit before connecting the power cord to the AC
power outlet.
•Unplug the power cord before removing the power supply unit from the
projector.
•If the system has multiple sources of power, disconnect power from the
system by unplugging all power cords from the power supplies.
Caution for Accessibility
Be sure that the power outlet you plug the power cord into is easily accessible
and located as close to the equipment operator as possible. When you need to
disconnect power to the equipment, be sure to unplug the power cord from the
electrical outlet.
Warnings!
Warnings!
Warnings!
Warnings!Warnings!
•Do not use this product near water.
•Do not place this product on an unstable cart, stand or table. If the product
falls, it could be seriously damaged.
•Slots and openings are provided for ventilation to ensure reliable
operation of the product and to protect it from overheating. These
openings must not be blocked or covered. The openings should never be
blocked by placing the product on a bed, sofa, rug or other similar surface.
This product should never be placed near or over a radiator or heat register, or
in a built-in installation unless proper ventilation is provided.
•Never push objects of any kind into this product through cabinet slots as
they may touch dangerous voltage points or short-out parts that could
result in a fire or electric shock. Never spill liquid of any kind onto or into
the product.

v
Product servicing
Do not attempt to service this product yourself, as opening or removing covers
may expose you to dangerous voltage points or other risks. Refer all servicing to
qualified service personnel.
Unplug this product from the wall outlet and refer servicing to qualified service
personnel when:
•the power cord or plug is damaged, cut or frayed
•liquid was spilled into the product
•the product was exposed to rain or water
•the product has been dropped or the case has been damaged
•the product exhibits a distinct change in performance, indicating a need
for service
•the product does not operate normally after following the operating
instructions
Note: Adjust only thos
Note: Adjust only thos
Note: Adjust only thos
Note: Adjust only thosNote: Adjust only those controls that are covered by the operati
e controls that are covered by the operati
e controls that are covered by the operati
e controls that are covered by the operatie controls that are covered by the operating
ng
ng
ng ng
instruction
instruction
instruction
instructioninstructions, since i
s, since i
s, since i
s, since is, since improper
mproper
mproper
mproper mproper adjustme
adjustme
adjustme
adjustmeadjustment of othe
nt of othe
nt of othe
nt of othent of other contro
r contro
r contro
r contror controls may re
ls may re
ls may re
ls may rels may result in
sult in
sult in
sult in sult in
damage and will often require extensive work by a qualified technician to
damage and will often require extensive work by a qualified technician to
damage and will often require extensive work by a qualified technician to
damage and will often require extensive work by a qualified technician to damage and will often require extensive work by a qualified technician to
restore the product t
restore the product t
restore the product t
restore the product trestore the product to normal condit
o normal condit
o normal condit
o normal condito normal condition.
ion.
ion.
ion.ion.
Warning! For safety reasons,
Warning! For safety reasons,
Warning! For safety reasons,
Warning! For safety reasons,Warning! For safety reasons, do not use non-compliant parts when addi
do not use non-compliant parts when addi
do not use non-compliant parts when addi
do not use non-compliant parts when addi do not use non-compliant parts when adding
ng
ng
ng ng
or changing components. Consult your reseller
or changing components. Consult your reseller
or changing components. Consult your reseller
or changing components. Consult your reseller or changing components. Consult your reseller for purchase options.
for purchase options.
for purchase options.
for purchase options.for purchase options.
Your device and its enhancements may contain small parts. Keep them out of
the reach of small children.
Additional safety information
•Do not look into the projector's lens when the lamp is on. The bright light
may hurt your eyes.
•Turn on the projector first and then signal sources.
•Do not place the product in the following environments:
• Space that is poorly ventilated or confined. At least 50cm clearance from walls
and free flow of air around the projector are necessary.
• Locations where temperatures may become excessively high, such as inside of a
car with all windows rolled up.
• Locations where excessive humidity, dust, or cigarette smoke may contaminate
optical components, shorten the life span and darken the image.
• Locations near fire alarms.
• Locations with an ambient temperature above 40 ºC/104 ºF.
• Locations where the altitudes are higher than 10000 feet.
•Unplug immediately if there is something wrong with your projector. Do
not operate if smoke, strange noise or odor comes out of your projector. It
vii
Caution for Listening
To protect your hearing, follow these instructions.
•Increase the volume gradually until you can hear clearly and comfortably.
•Do not increase the volume level after your ears have adjusted.
•Do not listen to music at high volumes for extended periods.
•Do not increase the volume to block out noisy surroundings.
•Decrease the volume if you can't hear people speaking near you.
Disposal instructions
Do not throw this electronic device into the trash when discarding. To minimize
pollution and ensure utmost protection of the global environment, please
recycle. For more information on the Waste from Electrical and Electronics
Equipment (WEEE) regulations, visit http
http
http
httphttp://www.acer-group.com/p
://www.acer-group.com/p
://www.acer-group.com/p
://www.acer-group.com/p://www.acer-group.com/public/
ublic/
ublic/
ublic/ublic/
Sustainability/sustainability01.htm
Sustainability/sustainability01.htm
Sustainability/sustainability01.htm
Sustainability/sustainability01.htmSustainability/sustainability01.htm
Mercury advisory
For projectors or electronic products containing an LCD/CRT monitor or display:
Lamp(s) inside this product contain mercury and must be recycled or disposed of
according to local, state or federal laws. For more information, contact the
Electronic Industries Alliance at www.eiae.org. For lamp-specific disposal
information, check www.lamprecycle.org
www.lamprecycle.org
www.lamprecycle.org
www.lamprecycle.orgwww.lamprecycle.org
"Lamp(s) contain Mercury,
Dispose Properly."

viii
First Thing First
Usage Notes
Do:
•Turn off the product before cleaning.
•Use a soft cloth moistened with mild detergent to clean the display
housing.
•Disconnect the power plug from AC outlet if the product is not being used
for a long period of time.
Don't:
•Block the slots and openings on the projector provided for ventilation.
•Use abrasive cleaners, waxes or solvents to clean the unit.
•Use under the following conditions:
•In extremely hot, cold or humid environments.
•In areas susceptible to excessive dust and dirt.
•Near any appliance that generates a strong magnetic field.
•Place in direct sunlight.
Precautions
Follow all warnings, precautions and maintenance as recommended in this
user's guide to maximize the life of your unit.
Warning:
Warning:
Warning:
Warning:Warning:
•Do not look into the projector's lens when the lamp is on. The bright light may hurt
your eyes.
•To reduce the risk of fire or electric shock, do not expose this product to rain or
moisture.
•Please do not open or disassemble the product as this may cause electric shock.
•When changing the lamp, please allow the projector to cool down, and follow all
changing instructions.
•This product will detect the life of the lamp itself. Please be sure to change the lamp
when it shows warning messages.
•Reset the "Lamp Hour Reset" function from the Onscreen Display "Management"
menu after replacing the lamp module.
•When switching the projector off, please ensure the projector completes its cooling
cycle before disconnecting power.
•Turn on the projector first and then the signal sources.
•Do not use lens cap when projector is in operation.
•When the lamp reaches the end of its life, it will burn out and may make a loud
popping sound. If this happens, the projector will not turn back on until the lamp
module has been replaced. To replace the lamp, follow the procedures listed under
"Replacing the Lamp".

Information for Your Safety and Comfort iii
First Thing First viii
Usage Notes viii
Precautions viii
Introduction 1
Product Features 1
Package Overview 2
Projector Overview 3
Projector Outlook 3
Control Panel 4
Remote Control Layout 5
Getting Started 7
Connecting the Projector 7
Turning the Projector On/Off 9
Turning On the Projector 9
Turning Off the Projector 10
Adjusting the Projected Image 11
Adjusting the Height of the Projected Image 11
How to Optimize Image Size and Distance 12
How to Get a Preferred Image Size
by Adjusting Distance and Zoom 14
User Controls 16
Installation Menu 16
Acer Empowering Technology 17
Onscreen Display (OSD) Menus 18
Color 19
Image 21
Setting 24
Management 27
Audio 28
Timer 28
Language 29
Appendices 30
Contents

Troubleshooting 30
LED & Alarm Definition Listing 34
Replacing the Lamp 35
Ceiling Mount Installation 36
Specifications 39
Compatibility Modes 41
Regulations and safety notices 45

1
English
Introduction
Introduction
Introduction
IntroductionIntroduction
Product Features
Product Features
Product Features
Product FeaturesProduct Features
This product is a single-chip DLP® projector, including the following
outstanding features:
•DLP® technology
•S1110/T200/XS-S10: Native 800 x 600 SVGA resolution
Auto / 4:3 / 16:9 aspect ratio supported
S1210/T210/XS-X10/S1210Hn/S1213/T212/XS-X13/S1213Hn/T212DT/XS-
X13HG:
Native 1024 x 768 XGA resolution
Auto / 4:3 / 16:9 aspect ratio supported
S1310W/T220/XS-W10/S1310WHn/S1313W/S1313WHn: Native 1280 x 800
WXGA resolution
Auto/ Full / 4:3 /16:9 / L.Box aspect ratio supported
•Acer ColorBoost technology delivers vivid, life-like images
•High brightness and contrast ratio
•Versatile display modes (Bright, Presentation, Standard, Video, Picture,
Game, Education, User) enable optimum performance in any situation
•NTSC/PAL/SECAM compatible and HDTV (720p, 1080i, 1080p) supported
•Lower power consumption and economy (ECO) mode extends lamp life
•Acer EcoProjection Technology delivers Intelligent power management
approach and physical efficiency improvement
•Empowering Key reveals Acer Empowering Technology functions (Acer
eView, eTimer, ePower Management) for easy adjustment of settings
•Advanced keystone correction delivers optimum presentations
•Multi-language Onscreen Display (OSD) menus
•Manual focus projection lens
•2X digital zoom and pan move function
•Microsoft® Windows® 2000, XP, 7, Vista®, Macintosh OS compliant

2
English
Package Overview
Package Overview
Package Overview
Package OverviewPackage Overview
This projector comes with all the items shown below. Check to make sure you
have them all. Contact your dealer immediately if any thing is missing.
Projector with lens cap Power cord VGA cable
Security card User’s guide (CD-ROM) Remote control
Quick start guide Battery x 2 Dust filter
(Optional)
Acer Projector
Security Card
Acer Projecto r
This CD contai ns
• Us er’s manual
• Quick Start Guide
• A crobat
®
Reader
®
www .a cer.com
PgDn
PgUp
SD/USB A HDMI/DVI LAN/WiFi USBB
ENTER BACK
Quick Start Guide

3
English
Projector Overview
Projector Overview
Projector Overview
Projector OverviewProjector Overview
Projector Outlook
Projector Outlook
Projector Outlook
Projector OutlookProjector Outlook
Front / upper side
Rear side
#
#
#
## #
#
#
##
Description
Description
Description
DescriptionDescription Description
Description
Description
DescriptionDescription
1 Control panel 5 Power key and Power indicator LED
2 Projection lens 6 Focus ring
3 Elevator button 7 Remote control receiver
4 Lens cap
#
#
#
## #
#
#
##
Description
Description
Description
DescriptionDescription Description
Description
Description
DescriptionDescription
1 USB connector 8 Tilt adjusting wheel
2 Monitor loop-through output connector 9 Kensington™ lock port
3 PC analog signal/HDTV/component
video input connector
10 LAN (RJ45 port for 10/100M
Ethernet)
4 RS232 connector 11 Remote control receiver
5 S-Video input connector
Composite video input connector
12 HDMI input connector
6 Audio input connector
Audio output connector
13 Audio input connector (L/R)
7 Power socket
1
2
4
7
3
5
6
AUDIO-R
AUDIO-L
AUDIO
IN 1
AUDIO
IN 2
AUDIO
OUT
VGA IN 1
VGA IN 2
VGA OUT
HDMIUSB BLANRS232 S-VIDEO
VIDEO
AUDIO-R
AUDIO-L
AUDIO
IN 1
AUDIO
IN 2
AUDIO
OUT
VGA IN 1
VGA IN 2
VGA OUT
USB BRS232 S-VIDEO
VIDEO
10 1 1211 2 3 5 13 64
S1213Hn
1 11 2 3 5 13 64
S1213
2 3 4 5 6
87 9
1
(S1110/T200/XS-S10/S1210/T210/XS-
X10/S1310W/T220/XS-W10)
(S1210Hn/S1213Hn/T212DT/XS-X13HG/
S1310WHn/S1313WHn)
(S1213/T212/XS-X13/
S1313W)

4
English
Control Panel
Control Panel
Control Panel
Control PanelControl Panel
#
#
#
## Function
Function
Function
FunctionFunction Description
Description
Description
DescriptionDescription
1 LAMP Lamp Indicator LED
2 Power key and Power
indicator LED
Refer to the "Turning the Projector On/
Off" section.
3 Keystone Adjusts image distortion caused by tilting
projection (±40 degrees).
4 MENU •Launches the Onscreen Display (OSD)
menu, returns to the previous step for
the OSD menu operation or exits the
OSD menu.
•Confirms your selection of items.
5 HIDE Hides the screen picture.
6 TEMP Temp Indicator LED
7 SOURCE Chooses RGB, component video, S-Video,
composite video or HDTV source.
8 Four directional select keys Selects items or makes adjustments to your
selection.
9 Empowering key Enables unique Acer functions: eView,
eTimer, ePower Management.
10 RESYNC Automatically synchronizes the projector
to the input source.
16
7
3
3
4
510
9
2
2
8

6
English
13 FREEZE To pause the screen image.
14 HIDE Press "HIDE
HIDE
HIDE
HIDEHIDE" to hide screen image; press again to
display the image.
15 SOURCE Chooses RGB, component video, S-Video, composite
video or HDTV source.
16 MENU •Launches the Onscreen Display (OSD) menu,
returns to the previous step for the OSD menu
operation or exits the OSD menu.
•Confirms your selection of items.
17 PgUp/PgDn For computer mode only. Use this button to select the
next or previous page. This function is only available
when connected to a computer via a USB cable.
18 VIDEO To change source to Composite video.
.
.
..
19 MUTE To turn on/off the volume.
20 WIRELESS;
LAN/WiFi
(No function)
21 Rewind
Play/Pause
Stop
Fast-forward
(No function)
22 SD/USB A (No function)
23 USB B (No function)
#
#
#
## Function
Function
Function
FunctionFunction Description
Description
Description
DescriptionDescription
VZ .JDW00.001
7
English
Getting Started
Getting Started
Getting Started
Getting StartedGetting Started
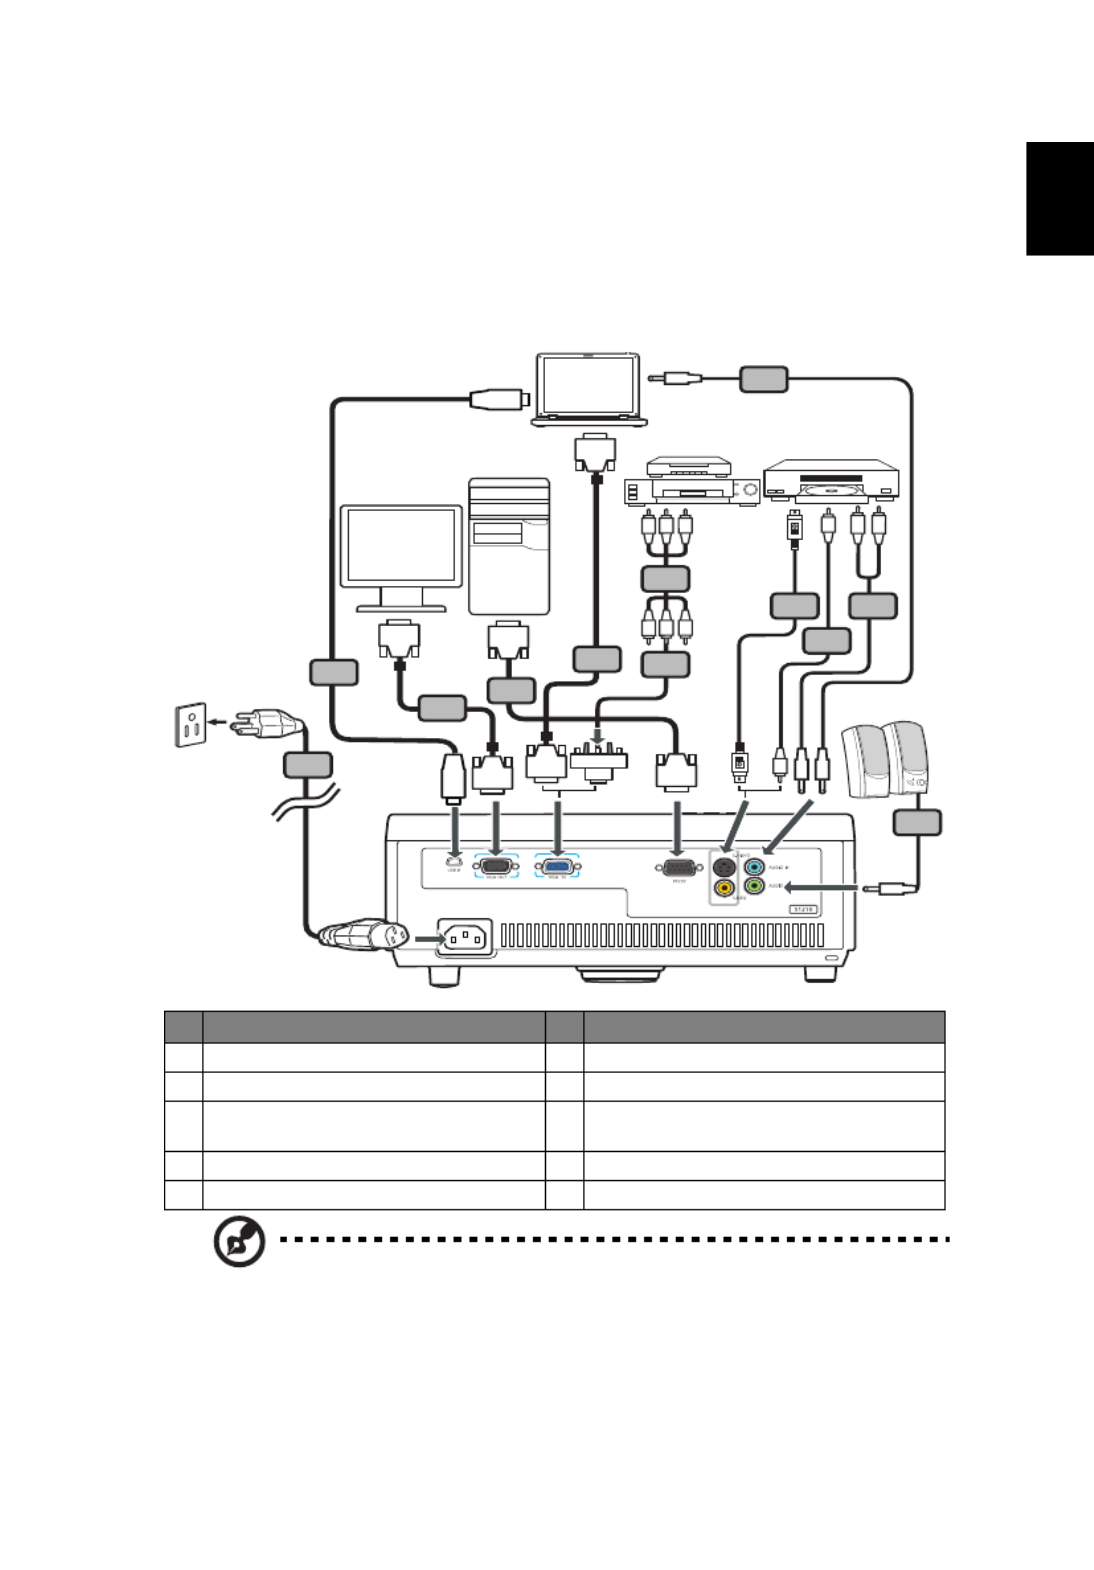
Connecting the Projector
Connecting the Projector
Connecting the Projector
Connecting the ProjectorConnecting the Projector
•S1110/T200/XS-S10/S1210/T210/XS-X10/S1310W/T220/XS-W10
Note:
Note:
Note:
Note:Note: To ensure the projector works well with your computer,
please make sure the timing of the display mode is compatible
with the projector.
#
#
#
## #
#
#
##
Description
Description
Description
DescriptionDescription Description
Description
Description
DescriptionDescription
1 Power cord 6 S-Video cable
2 VGA cable 7 RS232 cable
3 VGA to component video/HDTV
adapter
8 USB cable
4 Composite video cable 9 3 RCA component cable
5 Audio cable
RS232
RS232
R B G
R B G
HDTV adapter
D-Sub
D-Sub
7
8
D-Sub
D-Sub
2
5
5
6
4
5
2
USB
USB
1
R
W
9
3
Y
Y
DVD player,
Set-top box,
HDTV receiver
VGA
RS232
Video/S-Video
Output
Display
Speakers

8
English
•S1210Hn/S1213/T212/XS-X13/S1213Hn/T212DT/XS-X13HG/S1313W/
S1310WHn/S1313WHn
Note:
Note:
Note:
Note:Note: To ensure the projector works well with your computer,
please make sure the timing of the display mode is compatible
with the projector.
#
#
#
## #
#
#
##
Description
Description
Description
DescriptionDescription Description
Description
Description
DescriptionDescription
1 Power cord 7 RS232 cable
2 VGA cable 8 USB cable
3 VGA to component video/HDTV
adapter
9 3 RCA component cable
4 Composite video cable 10 RJ45 cable
5 Audio cable 11 HDMI cable
6 S-Video cable
AUDIO-R
AUDIO-L
AUDIO
IN 1
AUDIO
IN 2
AUDIO
OUT
VGA IN 1
VGA IN 2
VGA OUT
HDMIUSB BLANRS232 S- VIDEO
VIDEO
AUDIO-R
AUDIO-L
AUDIO
IN 1
AUDIO
IN 2
AUDIO
OUT
VGA IN 1
VGA IN 2
VGA OUT
USB BRS232 S-VIDEO
VIDEO
USB
USB
S1213Hn
S1213
RS232
R B G
R B G
HDT V adapt er
RS232
D-Sub
7
D-Sub
D-Sub
2
5
5
6
5
2
1
R
W
R
L
L
R
9
3
Y
10
10
11
8
D-Sub
4
Y
5
Y
DVD player,
Set-top box,
HDTV receiver
VGA
RS232 Video/S-
Video
Output
Display
Speakers

9
English
Turning the Projector On/Off
Turning the Projector On/Off
Turning the Projector On/Off
Turning the Projector On/Off Turning the Projector On/Off
Turning On the Projector
Turning On the Projector
Turning On the Projector
Turning On the ProjectorTurning On the Projector
1 Remove the lens cap.
2 Ensure that the power cord and signal cable are securely connected.
The Power LED will light red.
3 Turn on the projector by pressing (POWER) on the control panel or
remote control, and the Power indicator LED will turn blue.
4 Turn on your source (computer, notebook, video player, etc.). The
projector will detect your source automatically.
• If the screen displays "No Signal", please make sure the signal cables
are securely connected.
• If you connect to multiple sources at the same time, use "SOURCE" on
the control panel or remote control, or the direct source key on the
remote control to switch between inputs.
2&3
1
Lens cap

10
English
Turning Off the Projector
Turning Off the Projector
Turning Off the Projector
Turning Off the ProjectorTurning Off the Projector
1 To turn the projector off, press the power button. This message
appears:
"Please press the power button again to
"Please press the power button again to
"Please press the power button again to
"Please press the power button again to"Please press the power button again to complete the shutdown process."
complete the shutdown process."
complete the shutdown process."
complete the shutdown process." complete the shutdown process."
Press the power button again.
2 The LED power indicator will turn solid red to indicate standby mode.
3 It is now safe to unplug the power cord.
When
Instant Resume is selected:
1 The LED power indicator will turn RED and blink rapidly after the
projector is turned off, and the fan(s) will continue to operate for
about 2 minutes to ensure that the system cools properly.
2 As long as the power cord remains plugged in, you can press the
power button to turn the projector immediately back on anytime
during the 2-minute shutdown process.
3 Once the system has finished cooling, the LED power indicator will
stop blinking and turn solid red to indicate standby mode.
4 It is now safe to unplug the power cord.
Warning indicators:
Warning indicators:
Warning indicators:
Warning indicators:Warning indicators:
•"Projector Overheated. Lamp will a
"Projector Overheated. Lamp will a
"Projector Overheated. Lamp will a
"Projector Overheated. Lamp will a"Projector Overheated. Lamp will automatically turn off soon."
utomatically turn off soon."
utomatically turn off soon."
utomatically turn off soon."utomatically turn off soon."
This onscreen message indicates that the projector has overheated.
The lamp will automatically turn off, the projector will automatically
shut down, and the LED temp indicator will turn solid red. Contact
your local dealer or service center.
•"Fan failed. Lamp will auto
"Fan failed. Lamp will auto
"Fan failed. Lamp will auto
"Fan failed. Lamp will auto"Fan failed. Lamp will automatically turn off soon."
matically turn off soon."
matically turn off soon."
matically turn off soon."matically turn off soon."
This onscreen message indicates that the fan has failed. The lamp will
automatically turn off, the projector will automatically shut down,
and the LED temp indicator will blink. Contact your local dealer or
service center.
Note:
Note:
Note:
Note:Note: Whenever the projector automatically shuts down and
the LED lamp indicator turns solid red, contact your local
reseller or service center.

11
English
Adjusting the Projected Image
Adjusting the Projected Image
Adjusting the Projected Image
Adjusting the Projected ImageAdjusting the Projected Image
Adjusting the Height
Adjusting the Height
Adjusting the Height
Adjusting the Height Adjusting the Height of the Projected Image
of the Projected Image
of the Projected Image
of the Projected Imageof the Projected Image
The projector is equipped with an elevator foot for adjusting the image height.
To raise the image:
1 Press the elevator button.
2 Raise the image to the desired height angle, then release the button
to lock the elevator foot into position.
3 Use Tilt adjusting wheel to fine-tune the display angle.
To lower the image:
1 Press the elevator button.
2 Lower the image to the desired height angle, then release the button
to lock the elevator foot into position.
3 Use Tilt adjusting wheel to fine-tune the display angle.
32
1
Tilt adjusting wheel
Elevator
button
Elevator foot

12
English
How to Optimize Image
How to Optimize Image
How to Optimize Image
How to Optimize ImageHow to Optimize Image Size and Distance
Size and Distance
Size and Distance
Size and Distance Size and Distance
Consult the table below to find the optimal image sizes achievable when the
projector is positioned at a desired distance from the screen.
•S1110/T200/XS-S10/S1210/T210/XS-X10/S1210Hn/S1213/T212/XS-X13/
S1213Hn/T212DT/XS-X13HG
If the projector is 1 m from the screen, good image quality is possible for image
sizes around 81".
Note:
Note:
Note:
Note:Note: Remind as below figure, the space of 160 cm height is
required when located at 1 m distance.
Desired
Distance
(m)
< A
A
A
AA >
Screen Size
Diagonal
(inch)
< B
B
B
BB >
W (cm) x H (cm)
From base to
top of image
(cm)
< C
C
C
CC >
0.5 40 82 x 61 80
0.6 48 98 x 74 96
0.7 56 115 x 86 112
0.8 65 131 x 98 128
0.9 73 148 x 111 144
1 81 160164 x 123
1.5 121 246 x 184 240
2 161 328 x 246 320
2.5 202 410 x 307 400
3 242 492 x 369 480
3.7 299 607 x 455 591
Zoom Ratio: 1.0 x
C
A
B
1 m
1 m
1 m
1 m1 m
Desired dista
Desired dista
Desired dista
Desired distaDesired distance
nce
nce
ncence
Height:
Height:
Height:
Height:Height:
160 cm
160 cm
160 cm
160 cm160 cm
From
From
From
From From
base to
base to
base to
base to base to
top of
top of
top of
top of top of
image
image
image
imageimage
81"
81"
81"
81"81"

13
English
•S1310W/T220/XS-W10/S1310WHn/S1313W/S1313WHn
If the projector is 4 m from the screen, good image quality is possible for image
sizes around 379".
Note:
Note:
Note:
Note:Note: Remind as below figure, the space of 510 cm height is
required when located at 2 m distance.
Desired
Distance
(m)
< A
A
A
AA >
Screen Size
Diagonal
(inch)
< B
B
B
BB >
W (cm) x H (cm)
From base to
top of image
(cm)
< C
C
C
CC >
0.5 47 102 x 64 70
1 95 204 x 128 140
0.5 142 306 x 191 210
2 189 408 x 255 281
2.5 237 510 x 319 351
3 284 612 x 383 421
3.5 332 714 x 446 491
4 379 816 x 510 561
4.5 426 918 x 574 631
5 474 1020 x 638 702
6 568 1224 x 765 842
Zoom Ratio: 1.0 x
C
A
B
4 m
4 m
4 m
4 m4 m
Desired dista
Desired dista
Desired dista
Desired distaDesired distance
nce
nce
ncence
Height:
Height:
Height:
Height:Height:
510 cm
510 cm
510 cm
510 cm510 cm
From
From
From
From From
base to
base to
base to
base to base to
top of
top of
top of
top of top of
image
image
image
imageimage
379"
379"
379"
379"379"

14
English
How to Get a Preferred Image Size by Adjusting
How to Get a Preferred Image Size by Adjusting
How to Get a Preferred Image Size by Adjusting
How to Get a Preferred Image Size by Adjusting How to Get a Preferred Image Size by Adjusting
Distance and Zoom
Distance and Zoom
Distance and Zoom
Distance and ZoomDistance and Zoom
The table below shows how to achieve a desired image size by adjusting either
the position or the zoom ring.
•S1110/T200/XS-S10/S1210/T210/XS-X10/S1210Hn/S1213/T212/XS-X13/
S1213Hn/T212DT/XS-X13HG
To obtain an image size of 50" set the projector at a distance 0.6 m from the
screen.
Desired Image Size Distance (m) Top (cm)
Diagonal (inch)
< A
A
A
AA > W (cm) x H (cm) Max zoom
< B
B
B
BB >
Min zoom
< C
C
C
CC >
From base to top of
image < D
D
D
DD >
30 61 x 46 0.4 0.4 59
40 81 x 61 0.5 0.5 79
50 102 x 76 0.6 0.6 99
60 122 x 91 0.7 0.7 119
70 142 x 107 0.9 0.9 139
80 163 x 122 1.0 1.0 158
90 183 x 137 1.1 1.1 178
100 203 x 152 1.2 1.2 198
120 244 x 183 1.5 1.5 238
150 305 x 229 1.9 1.9 297
180 366 x 274 2.2 2.2 357
200 406 x 305 2.5 2.5 396
250 508 x 381 3.1 3.1 495
300 610 x 457 3.7 3.7 594
Zoom Ratio: 1.0 x
D
B&C
A
Desired distance
Desired distance
Desired distance
Desired distanceDesired distance
Height:
Height:
Height:
Height:Height:
99 cm
99 cm
99 cm
99 cm99 cm
From
From
From
From From
base to
base to
base to
base to base to
top of
top of
top of
top of top of
image
image
image
imageimage
50"
50"
50"
50"50"
Desired
Desired
Desired
DesiredDesired
image s
image s
image s
image simage size
ize
ize
izeize
0.6 m
0.6 m
0.6 m
0.6 m0.6 m

15
English
•S1310W/T220/XS-W10/S1310WHn/S1313W/S1313WHn
To obtain an image size of 50" set the projector at a distance 0.5 m from the
screen.
Desired Image Size Distance (m) Top (cm)
Diagonal (inch)
< A
A
A
AA > W (cm) x H (cm) Max zoom
< B
B
B
BB >
Min zoom
< C
C
C
CC >
From base to top of
image < D
D
D
DD >
30 65 x 40 0.3 0.3 44
40 86 x 54 0.4 0.4 59
50 108 x 67 0.5 0.5 74
60 129 x 81 0.6 0.6 89
70 151 x 94 0.7 0.7 104
80 172 x 108 0.8 0.8 118
90 194 x 121 0.9 0.9 133
100 215 x 135 1.1 1.1 148
120 258 x 162 1.3 1.3 178
150 323 x 202 1.6 1.6 222
180 388 x 242 1.9 1.9 267
200 431 x 269 2.1 2.1 296
250 538 x 337 2.6 2.6 370
300 646 x 404 3.2 3.2 444
Zoom Ratio: 1.0 x
D
B&C
A
Desired distance
Desired distance
Desired distance
Desired distanceDesired distance
Height:
Height:
Height:
Height:Height:
74 cm
74 cm
74 cm
74 cm74 cm
From
From
From
From From
base to
base to
base to
base to base to
top of
top of
top of
top of top of
image
image
image
imageimage
50"
50"
50"
50"50"
Desired
Desired
Desired
DesiredDesired
image s
image s
image s
image simage size
ize
ize
izeize
0.5 m
0.5 m
0.5 m
0.5 m0.5 m
Specyfikacje produktu
| Marka: | Acer |
| Kategoria: | Projektor |
| Model: | S1210 |
Potrzebujesz pomocy?
Jeśli potrzebujesz pomocy z Acer S1210, zadaj pytanie poniżej, a inni użytkownicy Ci odpowiedzą
Instrukcje Projektor Acer

11 Lutego 2025
7 Lutego 2025
30 Stycznia 2025
30 Stycznia 2025
30 Stycznia 2025
30 Stycznia 2025
30 Stycznia 2025
30 Stycznia 2025
30 Stycznia 2025
15 Stycznia 2025
Instrukcje Projektor
- Projektor Sony
- Projektor Yamaha
- Projektor Samsung
- Projektor Leica
- Projektor LG
- Projektor Xiaomi
- Projektor Sharp
- Projektor Lenovo
- Projektor Philips
- Projektor Livoo
- Projektor Epson
- Projektor Hisense
- Projektor Panasonic
- Projektor Promethean
- Projektor Canon
- Projektor Viewsonic
- Projektor Asus
- Projektor Medion
- Projektor OK
- Projektor Lenco
- Projektor Toshiba
- Projektor D-Link
- Projektor Blaupunkt
- Projektor Salora
- Projektor Casio
- Projektor HP
- Projektor Prixton
- Projektor Strong
- Projektor Steinel
- Projektor Kodak
- Projektor Smart
- Projektor ZTE
- Projektor JVC
- Projektor Dell
- Projektor Auna
- Projektor Dahua Technology
- Projektor Eurolite
- Projektor Ricoh
- Projektor Krüger&Matz
- Projektor Renkforce
- Projektor Klarstein
- Projektor Pyle
- Projektor Marantz
- Projektor Showtec
- Projektor Mitsubishi
- Projektor ION
- Projektor XGIMI
- Projektor NEC
- Projektor Polaroid
- Projektor Sanyo
- Projektor Optoma
- Projektor Vogel's
- Projektor Hama
- Projektor Cameo
- Projektor Barco
- Projektor 3M
- Projektor Nebula
- Projektor Anker
- Projektor Hitachi
- Projektor Futurelight
- Projektor RCA
- Projektor BenQ
- Projektor Technaxx
- Projektor GPX
- Projektor Overmax
- Projektor Odys
- Projektor EasyMaxx
- Projektor Smartwares
- Projektor Adj
- Projektor Miroir
- Projektor Stairville
- Projektor Elmo
- Projektor Planar
- Projektor Acco
- Projektor Aiptek
- Projektor ASK Proxima
- Projektor Reflecta
- Projektor Yaber
- Projektor Da-Lite
- Projektor Steren
- Projektor Eiki
- Projektor Derksen
- Projektor InFocus
- Projektor Bauer
- Projektor Naxa
- Projektor Vivitek
- Projektor Emtec
- Projektor Celly
- Projektor Vankyo
- Projektor Laserworld
- Projektor Ibm
- Projektor Maxell
- Projektor La Vague
- Projektor Kogan
- Projektor Tzumi
- Projektor EKO
- Projektor MicroVision
- Projektor Elite Screens
- Projektor Celexon
- Projektor Christie
- Projektor Fun Generation
- Projektor Beghelli
- Projektor Magnavox
- Projektor PLUS
- Projektor Varytec
- Projektor AOpen
- Projektor Ultimea
- Projektor Dracast
- Projektor Dukane
- Projektor Dream Vision
- Projektor Knoll
- Projektor DTS
- Projektor Touchjet
- Projektor Boxlight
- Projektor AAXA Technologies
- Projektor Mimio
- Projektor AWOL Vision
- Projektor Smart Tech
- Projektor Atlantis Land
- Projektor KickAss
- Projektor Microtek
- Projektor VAVA
- Projektor Panamorph
- Projektor Mirabella Genio
Najnowsze instrukcje dla Projektor

9 Kwietnia 2025
9 Kwietnia 2025

2 Kwietnia 2025

5 Marca 2025
5 Marca 2025

3 Marca 2025

1 Marca 2025

26 Lutego 2025

20 Lutego 2025
20 Lutego 2025