Instrukcja obsługi ZTE V9A
Przeczytaj poniżej 📖 instrukcję obsługi w języku polskim dla ZTE V9A (403 stron) w kategorii smartfon. Ta instrukcja była pomocna dla 8 osób i została oceniona przez 2 użytkowników na średnio 4.5 gwiazdek
Strona 1/403

1
V9A Light
User Manual


2
Table of Content
Getting Started ...........................................................................................25
Taking a Glance at Your Light ................................................................................. 25
Over view .......................................................................................................... 25
Key Denition .................................................................................................... 26
Starting Up .............................................................................................................. 26
Install the SIM/USIM Card/ microSD Card/ Battery .......................................... 26
Remove the SIM/USIM Card/ microSD Card/ Battery ...................................... 29
Charge the Battery ............................................................................................ 29
Power on/off Your Light ..................................................................................... 30
Knowing Your Device ................................................................................31
Getting to Know the Home Screen .......................................................................... 31
Wake up the Light ............................................................................................. 32
Return to the Home Screen .............................................................................. 32
Using the Touchscreen ............................................................................................ 33
Monitoring the Light Status ..................................................................................... 34
Status Icons ...................................................................................................... 35
Notication Icons ............................................................................................... 37
Managing Notications ............................................................................................ 38


3
Open the Notications Panel ............................................................................ 38
Respond to a Notication .................................................................................. 38
Clear All Notications ........................................................................................ 39
Close the Notications Panel ............................................................................ 39
Using the On-screen Keyboard ............................................................................... 39
Enter Text by Typing.......................................................................................... 39
Enter Numbers, Symbols, and Other Characters ............................................. 41
Change the Keyboard Orientation .................................................................... 41
Editing Text .............................................................................................................. 41
Edit Text ............................................................................................................ 42
Select Text ........................................................................................................ 42
Cut or Copy Text ............................................................................................... 42
Paste Text ......................................................................................................... 43
Opening and Switching Applications ....................................................................... 43
Open and Close the Launcher .......................................................................... 43
Open an Application .......................................................................................... 44
Switch to a Recently Used Application .............................................................. 44
Locking Your Screen ............................................................................................... 44
Customizing the Home Screen ............................................................................... 46
Add an Item to the Home Screen ...................................................................... 46
Move an Item on the Home Screen .................................................................. 47


4
Remove an Item from the Home Screen .......................................................... 47
Change the Home Screen Wallpaper ............................................................... 47
Rename a Folder .............................................................................................. 47
Connecting to Networks and Devices .....................................................48
Connecting to Mobile Networks .............................................................................. 48
Determine What Network You’re Using ............................................................. 48
Disable Data When Roaming ............................................................................ 49
Use Only 2G Networks ..................................................................................... 49
Edit or Create a New Access Point ................................................................... 50
Connecting to Wi-Fi Networks ................................................................................. 50
Turn Wi-Fi on and connect to a Wi-Fi Network ................................................. 51
Receive Notications When Open Networks are Available ............................... 51
Add a Wi-Fi Network ......................................................................................... 52
Forget a Wi-Fi Network ..................................................................................... 53
Connecting to Bluetooth Devices ............................................................................ 53
Turn Bluetooth on or off .................................................................................... 53
Change the Bluetooth Name ............................................................................. 54
Pair Your Light with a Bluetooth Device ............................................................ 54
Connect to a Bluetooth Device ......................................................................... 55
Disconnect from a Bluetooth Device ................................................................. 55
Unpair a Bluetooth Device ................................................................................ 56


5
Connecting to Computer via USB ........................................................................... 56
Connect Your Light to a Computer via USB ...................................................... 56
Disconnect Your Light from the Computer ........................................................ 57
Safely Remove an SD Card from Your Light ..................................................... 57
Erase Your Light’s USB Storage or SD Card .................................................... 57
Sharing Light’s Mobile Data Connection ................................................................. 58
Share Light’s Data Connection via USB ........................................................... 58
Share Your Light’s Data Connection as a Portable Wi-Fi Hotspot .................... 58
Rename or Secure Your Portable Hotspot ........................................................ 59
Connecting to Virtual Private Networks ................................................................... 60
Add a VPN ........................................................................................................ 60
Connect to a VPN ............................................................................................. 60
Edit a VPN ........................................................................................................ 61
Delete a VPN .................................................................................................... 61
Placing and Receiving Calls .....................................................................62
Placing and Ending Calls ........................................................................................ 62
Place a Call by Dialing ...................................................................................... 62
End a Call ......................................................................................................... 62
Disable Phone Calls (Airplane Mode) ............................................................... 63
Answering or Rejecting Calls .................................................................................. 63
Answer a Call .................................................................................................... 63


6
Reject a Call ...................................................................................................... 64
Working with the Call Log........................................................................................ 64
Open the Call Log ............................................................................................. 64
Dial a Number in the Call Log ........................................................................... 65
Add an Entry’s Number to Your Contacts ......................................................... 65
Take Other Actions on a Call Log Entry ............................................................ 65
Delete the Call Log ........................................................................................... 65
Calling Your Contacts .............................................................................................. 66
Call a Contact ................................................................................................... 66
Call a Favorite Contact ..................................................................................... 66
Listening to Your Voicemail ..................................................................................... 66
Using Options during a Call .................................................................................... 67
Place a Call on Hold ......................................................................................... 67
Mute the Microphone during a Call ................................................................... 67
Switch between a Bluetooth Headset and the Light ......................................... 67
Managing Multiple Calls .......................................................................................... 68
Switch between Current Calls ........................................................................... 68
Set up a Conference Call .................................................................................. 68
End Conference Call and Disconnect All Callers .............................................. 68
Contacts .....................................................................................................69
Opening Your Contacts ........................................................................................... 69


7
Open Your Contacts .......................................................................................... 69
Open a List of Your Favorite Contacts .............................................................. 70
View Details about a Contact ............................................................................ 70
Adding a New Contact ............................................................................................ 70
Importing, Exporting, and Sharing Contacts ........................................................... 71
Import Contacts from Your SIM Card ................................................................ 71
Import Contacts from Your SD Card or USB Storage ....................................... 72
Export Contacts to Your SD Card ..................................................................... 72
Share a Contact ................................................................................................ 73
Adding a Contact to Your Favorites ......................................................................... 73
Add a Contact to Your Favorites ....................................................................... 73
Remove a Contact from Your Favorites List ..................................................... 73
Searching for a Contact .......................................................................................... 74
Editing Contact Details ............................................................................................ 74
Edit Contact Details .......................................................................................... 74
Set a Ringtone for a Contact ............................................................................. 75
Delete a Contact ............................................................................................... 75
Accounts ....................................................................................................76
Adding and Removing Accounts ............................................................................. 76
Add an Account ................................................................................................. 76
Remove an Account .......................................................................................... 77


8
Conguring Account Sync ....................................................................................... 78
Congure General Sync Settings ...................................................................... 78
Sync Information Manually ................................................................................ 79
Change an Account’s Sync Settings ................................................................. 79
Gmail...........................................................................................................80
Opening Gmail and Your Inbox ............................................................................... 80
Open Gmail ....................................................................................................... 80
Open Your Inbox ............................................................................................... 81
Switch Accounts ................................................................................................ 81
Go to Labels ...................................................................................................... 81
Work with Attachments ..................................................................................... 82
Copy text from a Message ................................................................................ 82
Composing and Sending a Message ...................................................................... 82
Compose and Send a Message ........................................................................ 82
Send a Copy or Blind Copy of a Message ........................................................ 83
Attach a Photo to a Message ............................................................................ 83
Replying to or Forwarding a Message .................................................................... 84
Searching for Messages ......................................................................................... 84
Adding Signature to Your Gmail Messages ............................................................. 85
Changing Gmail Settings ........................................................................................ 85
General Settings ............................................................................................... 85


9
Notication Settings .......................................................................................... 86
Calendar .....................................................................................................87
Viewing Your Calendar and Events ......................................................................... 87
Open Calendar .................................................................................................. 87
Change Your Calendar View ............................................................................. 88
Viewing Event Details.............................................................................................. 88
Creating an Event ................................................................................................... 88
Editing an Event ...................................................................................................... 90
Deleting an Event .................................................................................................... 90
Changing Calendar Settings ................................................................................... 90
Google Talk ................................................................................................92
Signing in and Open Your Friends List .................................................................... 92
Open Google Talk and Sign in .......................................................................... 92
Return to Your Friends List ............................................................................... 92
Sign out of Google Talk ..................................................................................... 92
Chatting with Friends .............................................................................................. 93
Chat with a Friend ............................................................................................. 93
Accept an Invitation to Chat .............................................................................. 93
Switch between Active Chats ............................................................................ 94
Invite a Friend to Join a Group Chat ................................................................. 94


10
End the Chat ..................................................................................................... 94
Changing and monitoring Online Status ................................................................. 95
Change Your Online Status ............................................................................... 97
Change Your Status Message .......................................................................... 97
Change Your Picture ......................................................................................... 97
Managing Your Friends List ..................................................................................... 98
Add a Friend to Your Friends List ...................................................................... 98
View and Accept an Invitation to Become a Friend ........................................... 98
Block a Friend ................................................................................................... 98
Changing Google Talk Settings ............................................................................... 99
Congure Notications for New Google Talk Messages ................................... 99
Congure Notications for New Friend Invitations .......................................... 100
Set Whether You Sign Into Google Talk Automatically .................................... 100
Email .........................................................................................................101
Opening Email and the Account Screen ............................................................... 101
Open Email ..................................................................................................... 101
Open the Accounts Screen ............................................................................. 101
Reading Your Messages ....................................................................................... 102
Responding to a Message .................................................................................... 103
Reply to or Forward a Message ...................................................................... 103
Mark a Message as Unread ............................................................................ 103


11
Delete a Message ........................................................................................... 103
Working with Message in Batches ........................................................................ 104
Composing and Sending Email ............................................................................. 104
Viewing an Account Folders .................................................................................. 104
Adding Signature to Your Message ....................................................................... 105
Adding and Editing Email Account ........................................................................ 105
Add an Email Account ..................................................................................... 106
Edit an Email Account ..................................................................................... 107
Delete an Email Account ................................................................................. 108
Changing Email Account Settings ......................................................................... 108
Account Settings ............................................................................................. 108
Incoming Server Settings ................................................................................ 109
Outgoing Server Settings ................................................................................. 111
Changing System Settings ..................................................................................... 211
Messaging ................................................................................................ 311
Opening Messaging ............................................................................................... 311
Open Message ................................................................................................. 311
Delete a Message Thread From the Messaging Window ................................ 311
Send a Text Message ...................................................................................... 311
Create and Send a Multimedia Message ......................................................... 411
Respond to Messages You Receive ................................................................ 411


12
Forward a Message ......................................................................................... 511
Lock a Message ............................................................................................... 511
View Details about a Message ......................................................................... 611
Changing Message Settings .................................................................................. 611
Storage Settings .............................................................................................. 611
Text Message (SMS) Settings .......................................................................... 611
Multimedia Message (MMS) Settings .............................................................. 711
Notication Settings ......................................................................................... 811
Signature settings ............................................................................................ 811
Browser .................................................................................................... 911
Opening Browser ...................................................................................................119
Open Browser .................................................................................................. 911
Open a Webpage or Search the Web .............................................................. 911
Refresh Current Page ..................................................................................... 120
Stop Opening a Page ...................................................................................... 120
Get More Information about the Current Page ................................................ 120
Set Your Home Page ...................................................................................... 121
Operating a Webpage ........................................................................................... 121
Scroll a Webpage ............................................................................................ 121
Zoom in/out on a Webpage ............................................................................. 121
Find Text on a Webpage ................................................................................. 122


13
Navigating Among Web Pages.............................................................................. 122
Open a Link ..................................................................................................... 122
Go Back and Forward Among the Opened Pages .......................................... 122
View Your Browser History .............................................................................. 123
View the Most Frequently Visited Pages......................................................... 123
Follow Shortcuts for Links, Phone Numbers, and Addresses ......................... 124
Working with Multiple Browser Windows............................................................... 124
Open a New Browser Window ........................................................................ 124
Switch Browser Window ................................................................................. 124
Close a Browser Window ................................................................................ 125
Downloading Files ................................................................................................. 125
Allow Installing Applications from the Web or Email ....................................... 125
Download a File .............................................................................................. 125
Cancel Download ............................................................................................ 126
View the Files You’ve Downloaded ................................................................. 126
Working with Bookmarks ....................................................................................... 126
Bookmark a Webpage .................................................................................... 126
Open a Bookmark ........................................................................................... 127
Edit a Bookmark .............................................................................................. 127
Share a Bookmark .......................................................................................... 127
Delete a Bookmark ......................................................................................... 128


14
Changing Browser Settings ................................................................................... 128
Page content Settings ..................................................................................... 128
Privacy Settings .............................................................................................. 130
Security Settings ............................................................................................. 131
Advanced Settings .......................................................................................... 131
Maps, Navigation, Places, and Latitude ................................................132
Opening Maps ....................................................................................................... 132
Open Maps ..................................................................................................... 132
Move the Map ................................................................................................. 132
Zoom on the Map ............................................................................................ 132
Viewing My Location and Location Services ......................................................... 133
Enable Location Service ................................................................................. 133
View Your Location ......................................................................................... 133
Searching Places .................................................................................................. 134
Search ............................................................................................................. 134
View Search Results ....................................................................................... 134
Clear Your Search History ............................................................................... 135
Getting Directions .................................................................................................. 135
Finding Your Friends with Google Latitude ........................................................... 136
Join Latitude .................................................................................................... 136
Open Latitude ................................................................................................. 136


15
Invite Friends to Share Their Locations .......................................................... 136
Respond to an Invitation ................................................................................. 137
View Your Friends’ Locations .......................................................................... 137
Camera .....................................................................................................139
Opening Camera and Taking Pictures or Videos .................................................. 139
Open Camera ................................................................................................. 139
Take a Picture ................................................................................................. 139
Shoot a Video ................................................................................................. 139
Changing Camera Settings ................................................................................... 140
Change Camera Settings ................................................................................ 140
Camera Mode Settings ................................................................................... 140
Video Mode Settings ....................................................................................... 142
Gallery ......................................................................................................143
Opening Gallery and Viewing Your Albums ........................................................... 144
Working with Albums ............................................................................................. 144
Open an Album and View its Contents ........................................................... 144
Work with Batches of Pictures & Videos ......................................................... 145
Share an Album .............................................................................................. 145
Get Details about an Album ............................................................................ 146
Delete an Album .............................................................................................. 146


16
Working with Pictures ............................................................................................ 146
View and Browse Pictures .............................................................................. 146
Watch a Slideshow of Your Pictures ............................................................... 147
Rotate a Picture .............................................................................................. 147
Use a Picture as a Contact Icon or as Home Screen Wallpaper .................... 147
Share a Picture ............................................................................................... 148
Delete a Picture .............................................................................................. 148
Working with Videos .............................................................................................. 148
Play videos ...................................................................................................... 148
Share a video .................................................................................................. 148
Delete a video ................................................................................................. 149
Music ........................................................................................................150
Copying Music Files to Your Light ......................................................................... 150
Opening Music and Working with Your Library...................................................... 151
Open Music and View Your Music Library ...................................................... 151
Delete a Song from the SD Card .................................................................... 151
Playing Music ........................................................................................................ 152
Play Music ....................................................................................................... 152
Use a song as a ringtone ................................................................................ 153
Working with Playlists............................................................................................ 153
Create a playlist .............................................................................................. 153


17
Add a Song to a Playlist .................................................................................. 153
Rearrange songs in a playlist .......................................................................... 154
Remove a song from a playlist ........................................................................ 154
Rename or delete a playlist ............................................................................ 154
FM Radio ..................................................................................................155
Opening FM Radio .......................................................................................... 155
Listening to FM Radio ..................................................................................... 155
News & Weather ......................................................................................156
Checking the News and Weather .......................................................................... 156
Open News & Weather ................................................................................... 156
Get Details about the News and Weather ....................................................... 156
Changing News & Weather Settings ..................................................................... 156
Weather Settings ............................................................................................ 157
News Settings ................................................................................................. 157
Refresh Settings ............................................................................................. 158
Alarm ........................................................................................................159
Setting Alarms ....................................................................................................... 159
Changing Clock Alarm Settings ............................................................................. 159
Calculator .................................................................................................160
Using the Calculator .............................................................................................. 160


18
Market .......................................................................................................161
Opening Android Market and Finding Applications ............................................... 161
Open Android Market ...................................................................................... 161
Get Help with Android Market ......................................................................... 161
Browse for Applications ................................................................................... 161
Open a Screen with Details About an Application ........................................... 162
Search for Applications ................................................................................... 162
Return to the Android Market Home Screen ................................................... 162
Downloading and Installing Applications ............................................................... 163
Download and Install an Application ............................................................... 163
Create a Google Checkout Account ................................................................ 164
Managing Your Downloads ................................................................................... 164
View Your Downloaded Applications .............................................................. 164
Uninstall an Application ................................................................................... 165
Settings ....................................................................................................166
Wireless & Networks ............................................................................................. 166
Airplane mode ................................................................................................. 166
Wi-Fi settings .................................................................................................. 166
Bluetooth settings ........................................................................................... 167
Tethering & Portable Hotspot .......................................................................... 167


19
VPN settings ................................................................................................... 167
Mobile Networks ............................................................................................. 168
Call Settings .......................................................................................................... 168
Fixed Dialing Numbers .................................................................................... 169
Voicemail service ............................................................................................ 169
Voicemail settings ........................................................................................... 169
Speed Dial ...................................................................................................... 169
Call Baring Settings ........................................................................................ 170
Call broadcast settings .................................................................................... 170
Call forwarding ................................................................................................ 170
Additional Settings .......................................................................................... 170
Sound Settings ...................................................................................................... 170
Silent mode ..................................................................................................... 170
Silence Ringer when face down ...................................................................... 171
Switch Your Light to Vibration Mode ............................................................... 171
Enable Dolby Mobile ....................................................................................... 171
Volume ............................................................................................................ 171
Set Ringtone ................................................................................................... 172
Set Default Notication Ringtone .................................................................... 172
Enable Touch Tones ........................................................................................ 172
Enable Screen Selection Tones ...................................................................... 172


20
Enable Screen lock sounds ............................................................................ 173
Enable Haptic Feedback ................................................................................. 173
Display Settings .................................................................................................... 173
Adjust the Screen Brightness .......................................................................... 173
Switch the Screen Orientation Automatically .................................................. 173
Show Animation When Opening/Closing Windows ......................................... 174
Adjust the Delay Before the Screen Turns off ................................................. 174
Location & Security Settings ................................................................................. 174
Application Settings ............................................................................................... 176
Allow the Installation of Non-Market Applications ........................................... 176
View Applications Installed ............................................................................. 176
Running services ............................................................................................ 176
Storage use ..................................................................................................... 176
Battery use ...................................................................................................... 177
Development ................................................................................................... 177
Install an Application ....................................................................................... 177
Remove an Application ................................................................................... 177
Accounts & Sync Settings ..................................................................................... 178
General sync settings ..................................................................................... 178
Accounts screen ............................................................................................. 179
Privacy Settings .................................................................................................... 179


21
Back up My Data ............................................................................................. 179
Automatic Restore .......................................................................................... 180
Factory Data Reset ......................................................................................... 180
Storage Settings .................................................................................................... 180
SD Card Storage ............................................................................................. 180
Unmount SD Card ........................................................................................... 181
Erase SD Card ................................................................................................ 181
Internal Storage .............................................................................................. 181
Language & Keyboard Settings ............................................................................ 181
Select Language ............................................................................................. 181
Using Android Keyboard ................................................................................. 181
XT9 Text Input ................................................................................................. 182
Keyboard Settings ........................................................................................... 185
Voice Input & Output Settings ............................................................................... 186
Voice Recognizer Settings .............................................................................. 186
Text to Speech Settings .................................................................................. 186
Accessibility Settings ............................................................................................. 187
Date & time Settings ............................................................................................. 187
Automatic ........................................................................................................ 187
Set Date .......................................................................................................... 188
Select Time Zone ............................................................................................ 188


22
Set Time .......................................................................................................... 188
Use 24-Hour Format ....................................................................................... 188
Select Date Format ......................................................................................... 188
About phone .......................................................................................................... 188
System updates .............................................................................................. 188
Status .............................................................................................................. 188
Battery Use ..................................................................................................... 189
Legal information ............................................................................................ 189
Version Information ......................................................................................... 189
Light Specications ................................................................................190
Legal & Safety Information .....................................................................191
Legal Notice .......................................................................................................... 191
Safety Information ................................................................................................. 191
RF Exposure ......................................................................................................... 192
General Statement on RF Energy ................................................................... 192
Specic Absorption Rate (SAR) ...................................................................... 193
Body-Worn Operation ..................................................................................... 193
Limiting Exposure to Radio Frequency (RF) Fields ........................................ 194
Regulatory Information .................................................................................... 194
Distraction ............................................................................................................. 194


23
Driving ............................................................................................................. 194
Operating Machinery ....................................................................................... 195
Product Handling ................................................................................................... 195
General Statement on Handling and Use ....................................................... 195
Small Children ................................................................................................. 196
Demagnetization ............................................................................................. 196
Electrostatic Discharge (ESD) ........................................................................ 196
Air Bags .......................................................................................................... 196
Seizures/ Blackouts ........................................................................................ 196
Repetitive Motion Injuries ................................................................................ 197
Emergency Calls ............................................................................................. 197
Loud Noise ...................................................................................................... 197
Light Heating ................................................................................................... 197
Electrical Safety .................................................................................................... 197
Accessories ..................................................................................................... 197
Connection to a Car ........................................................................................ 198
Faulty and Damaged Products ....................................................................... 198
Interference ........................................................................................................... 198
General Statement on Interface ...................................................................... 198
Pacemakers .................................................................................................... 198
Hearing Aids .................................................................................................... 199


24
Medical Devices .............................................................................................. 199
Hospitals ......................................................................................................... 199
Aircraft ............................................................................................................. 199
Interference in Cars ........................................................................................ 200
Explosive Environments ........................................................................................ 200
Petrol Stations and Explosive Atmospheres ................................................... 200
Blasting Caps and Areas ................................................................................. 200
EC DECLARATION OF CONFORMITY ...................................................201


25
Getting Started
Taking a Glance at Your Light
Over view
Speaker
Headset
Jack
Power
Key
Back
Cover
Volume
Keys
Touch
Screen
Back
Camera
Speaker
Menu KeyHome Key
Back Key
Front
Camera
Light
Sensor
Indicator
Charger/
USB Jack


26
Key Denition
Key Function
Power Key
• Hold to get the light options. You can select Silent mode, Airplane
mode, or Power off your light.
• Press to switch your light to sleep mode.
• Press to wake up your light.
Home Key • Press to return to the Home Screen from any application or screen.
• Hold to see the recently- used applications.
Menu Key Press to get the options on the current screen.
Back Key Press to go to the previous screen.
Volume Keys • Press Volume Up Key to turn the volume up.
• Press Volume Down Key to turn the volume down.
Starting Up
Install the SIM/USIM Card/ microSD Card/ Battery
Power off your light before installing or replacing the battery, SIM card, and microSD
card.


27
1. Remove the battery cover.
Locate and open the thumb catch on the lower left hand corner (viewed from the back)
2. Hold your SIM card with the cut corner oriented as shown below and then insert it
into the card holder properly.

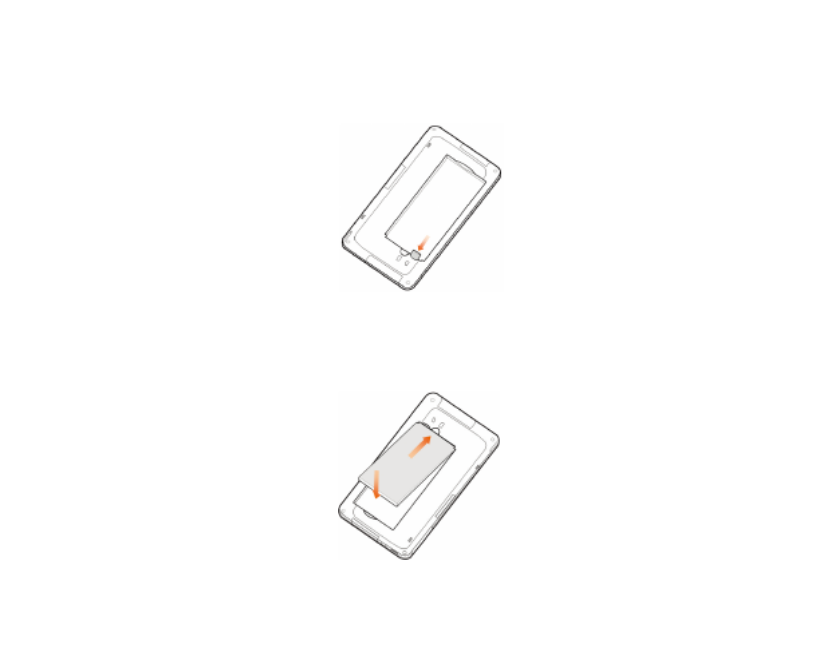
28
3. Hold your microSD card with the cut corner oriented as shown in the following
picture and then insert it into the card holder properly.
Notes: microSD logo is a trade mark of SD Card Association.
4. Insert the battery by aligning the gold contacts on the battery with the gold contacts
in the battery compartment on the light. Push down the battery until it clicks into
place.

29
5. Replace the battery cover and press it gently until you hear a click.
Remove the SIM/USIM Card/ microSD Card/ Battery
1. Make sure that your light is powered off.
2. Remove the battery cover.
3. Pull the battery up and remove it from the light.
4. Pull the SIM card out and remove it from the light.
5. Pull the microSD card out gently and remove it from the holder.
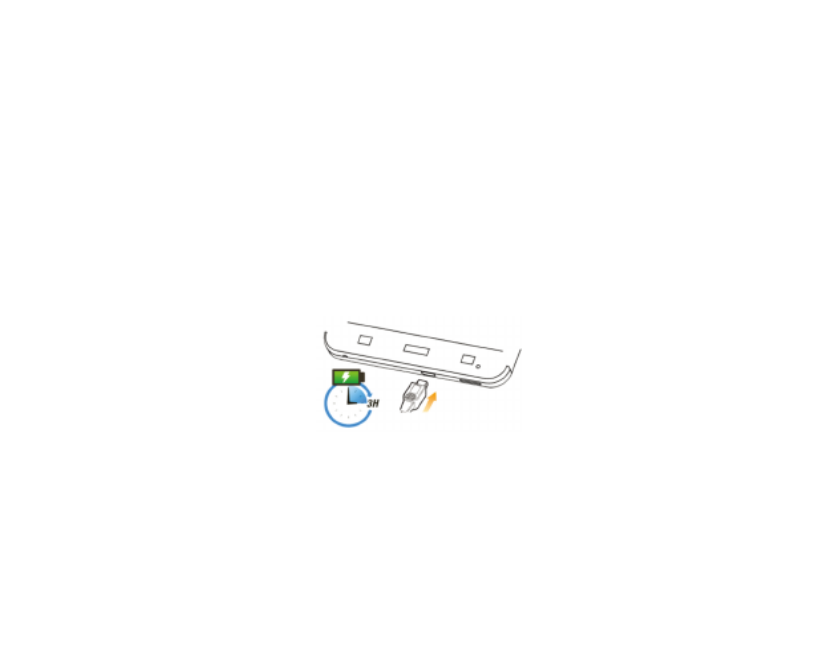
Charge the Battery
The new battery is not fully charged. To charge the battery, you need to:
1. Connect the adapter to the charger jack.
2. Connect the charger to a standard AC wall outlet.
Notes:
If the battery is low, there will be a pop-up message on the screen and the indicator
light will be red.
When you charge your light, the indicator light will change according to the battery
level:

30
Indicator color Battery level
Red Less than 10% of the total battery level
Orange More than 10%, but less than 90% of the total battery level
Green More than 90% of the total battery level
If the light is powered on, the icon will appear on the status bar. When charging
is completed, the battery indicator appears on the status bar.
3. Disconnect the charger when the battery is fully charged.
Power on/off Your Light
1. Make sure that your SIM card is in your device and the battery is charged.
2. Hold the to power on your light. Power Key
To power off your light, hold the to get the light options, select , Power Key Power off
and then touch OK.


31
Knowing Your Device
Getting to Know the Home Screen
The Home screen is your starting point to access all the features on your light. It
displays application icons, widgets, shortcuts, and other features. You can customize
the Home screen with different wallpapers and display the items you want.
At the top of the screen, the Status bar displays the time, information about the status of
your light, and icons for notications that you’ve received.
Touch the Launcher icon to view all installed applications.

32
Notications Displays the reminders and status icons of your device. Flick
down to open the notications panel.
Bars Shows you which part of the Home Screen you are looking at.
Shortcuts & Widgets Tap to start related applications.
Applications Tap to open the main menu.
Wake up the Light
If you don’t use the light for a while, the screen dims and then darkens, to conserve the
battery.
1. Press the Power key.
If you’ve locked your screen, you must draw an unlock pattern or enter a PIN or
password to unlock it.
2. Drag the lock icon to the right. The last screen you were viewing opens.
Return to the Home Screen
Press the at any time, in any application to return to the Home screen.Home Key


33
Using the Touchscreen
The main way to control Android features is by using your nger to manipulate icons,
buttons, menu items, the onscreen keyboard, and other items on the touch screen. You
can also change the screen’s orientation.
Touch
To act on items on the screen, such as application and settings
icons, to type letters and symbols using the onscreen keyboard, or
to press onscreen buttons, you simply touch them with your nger.
Touch & Hold
Touch & hold an item on the screen by touching it and not lifting
your nger until an action occurs. For example, to open a menu
for customizing the Home screen, you touch an empty area on the
Home screen until the menu opens.
Drag
Touch & hold an item for a moment and then, without lifting your
nger, move your nger on the screen until you reach the target
position. You can drag items on the Home screen to reposition
them, and drag to open the Notications panel.
Swipe or Slide
To swipe or slide, you quickly move your nger across the surface
of the screen, without pausing when you rst touch it (so you don’t
drag an item instead). For example, you slide the screen up or down
to scroll a list, and in some Calendar views you swipe quickly across
the screen to change the range of time visible.


34
Double Touch
Touch quickly twice on a webpage, map, or other screen to zoom.
For example, you can double-touch a section of a webpage in
Browser to zoom that section to t the width of the screen. Double-
touching after pinching to zoom in some applications, such as
Browser, reows a column of text to t the width of the screen.
Pinch
In some applications (such as Maps, Browser, and Gallery), you can
zoom in and out by placing two ngers on the screen at once and
pinching them together (to zoom out) or spreading them apart (to
zoom in).
Rotate the
Screen
On most screens, the orientation of the screen rotates with the light
as you turn it from upright to its side and back again. You can turn
this feature on and off, as described in “Display settings”.
Monitoring the Light Status
The Status bar appears at the top of every screen. It displays icons indicating that you’
ve received notications (on the left) and icons indicating the light’s status (on the right),
along with the current time.


35
Status Icons
Connected to GPRS mobile
network Mobile network signal strength
GPRS in use No signal
Connected to EDGE mobile
network Roaming
EDGE in use Light speaker is mute
Connected to 3G mobile
network Light microphone is mute
3G in use No SIM card installed
Battery is very low GPS is on


36
Battery is low Receiving location data from GPS
Battery is full Connected to a Wi-Fi network
Battery is charging Alarm is set
Vibrate mode Bluetooth is on
Airplane mode Connected to a Bluetooth device
Wired microphone headset Speaker is on


37
Notication Icons
New Mail New Google Talk message
New SMS/MMS Upcoming event
New voicemail Song is playing
Missed call Downloading data
Call in progress Uploading data
Call on hold Data is syncing
Call forwarding is on USB is connected
Problem with SMS/MMS delivery


38
Managing Notications
Notication icons report the arrival of new messages, calendar events, and alarms, as
well as ongoing events, such as when call forwarding is on or the current call status.
Open the Notications Panel
From the Notifications Panel, you can get the information of calendar events, new
messages, and ongoing settings such as call forwarding or the current call status. You
can open the message, reminder, event notication etc. from the Notication Panel.
1. Hold the notications bar until appears on the top of the Screen.
2. Drag the downwards.
Tips:
You can also open the Notications Panel from the Launcher Home Screen by pressing
the Menu Key > Notications.
Respond to a Notication
1. Open the Notications panel. Your current notications are listed in the panel, each
with a brief description.
2. Touch a notication to respond to it. The Notications panel closes. What happens
next depends on the notification. For example, new voicemail notifications dial
your voicemail box, and network disconnect notications open the list of congured
networks so you can reconnect.


39
Clear All Notications
1. Open the Notications panel.
2. Touch Clear at the top right of the panel. All event-based notications are cleared;
ongoing notications remain in the list.
Close the Notications Panel
Drag the tab at the bottom of the Notications panel to the top of the screen. Or just
press the Back Key. The panel also closes when you touch a notication to respond to
it.
Using the On-screen Keyboard
You enter text using the onscreen keyboard. Some applications open the keyboard
automatically. In others, you touch a text eld where you want to enter text to open the
keyboard.
Enter Text by Typing
1. Touch a text eld. The onscreen keyboard opens.
If you touch in a text eld where there is already text entered, the insertion point is
set where you touch and the insertion point tab appears. You can drag the insertion
point by its tab to move the insertion point, to pick exactly where you want to add
more text. You can also select a word or more at a time and copy, cut, and paste
text.


40
2. Touch the keys on the keyboard to enter text. What you type appears in the text eld
and in the strip above the keyboard, in black text on a white background. When the
keyboard has a suggestion for what you might be typing, the word you’re typing is
underlined in the text eld and the suggestions appear in orange in the strip above
the keyboard. The boldfaced suggestion at the left of the strip is the keyboard’s best
suggestion. You can drag the strip to the left to bring any additional suggestions into
view.


41
3. Press space or a punctuation mark to enter the boldfaced suggested word. If you
touch the space key, the suggestion strip offers a series of punctuation marks you
can touch, to replace the space with. Or touch another suggested word to enter it.
If you touch a word that is not in the system or user dictionary, it’s entered and you’
re prompted to touch the word again if you want to add it to the user dictionary. You
can view, edit, or delete the words that you add to the dictionary.
4. Use the Delete key to erase characters to the left of the cursor.
5. When you’re nished typing, press the Back Key to close the keyboard.
Enter Numbers, Symbols, and Other Characters
1. Enter a eld that needs text or numbers.
2. Touch to open the symbol panel.
3. Select the numbers and symbols.
Change the Keyboard Orientation
Turn the light sideways or upright. The keyboard is redrawn to take best advantage of
the new light orientation.
Editing Text
You can edit the text and enter in text elds and use menu commands to cut, copy, and
paste text, within or across applications. Some applications don’t support editing some
or all of the text they display; others may offer their own way to select text you want to
work with.


42
Edit Text
1. Touch the text you want to edit. The cursor is inserted where you are touching.
2. Type, cut, paste, or delete text.
3. When you nish typing, press the Back Key to close the keyboard.
Select Text
You select text that you want to cut, copy, delete, or replace.
1. Touch & hold the text or word you want to select.
2. Touch in the menu that opens. The selected text is Select text Select allor
highlighted in orange. Drag to expand or reduce the range of selected text.
3. If you change your mind, you can unselect the text by touching unselected text in
the same or in another text eld, or press the Back Key.
4. Touch the selected text to open a menu you can use to cut or copy your selection
Cut or Copy Text
1. Select the text to cut or copy.
2. Touch the selected text. The selection tabs must be showing to cut or copy selected
text. If the selection tabs aren’t showing, they reappear when you touch the text, so
you can touch the text again to open the Edit Text menu.
3. Touch Cut Copy or in the Edit Text menu. If you touch Cut, the selected text is
removed from the text eld. In either case, the text is stored in a temporary area on
the light, so that you can paste it into another text eld.


43
Paste Text
1. Cut or copy the text to paste.
2. Place the cursor in the text eld where you want to paste the text, or select text you
want to replace by pasting. You can paste text that you copied from one application
into a text eld in any application.
3. Touch in the menu that opens. The text is inserted at the cursor. The text that Paste
you pasted also remains in a temporary area on the light, so you can paste that
same text in another location.
Opening and Switching Applications
The Launcher has icons for all of the applications on your light, including any
applications that you downloaded and installed from Android Market or other sources.
When you open an application, the other applications you’ve been using don’t stop;
they keep on running: playing music, opening webpages, and so on. You can quickly
switch among your applications, to work with several at once. The Android operating
system and applications work together to ensure that applications you aren’t using don’t
consume resources unnecessarily, stopping and starting them as needed.
Open and Close the Launcher
On the Home screen, touch the Launcher icon to open it.
If you have more applications than can t on the Launcher in one view, you can slide
the Launcher up or down to view more.


44
You can add an application icon to the Home screen by touching & holding it on the
Launcher until it vibrates and then dragging it to a location on the Home screen.
Touch the Home icon on the Launcher or the to close the Launcher.Home Key
Open an Application
Touch an application's icon on the Launcher or the Home screen to open it.
Switch to a Recently Used Application
1. Hold from any screen until the following recently used applications Home Key
interface appears.
2. Touch an application you want to open.
Locking Your Screen
You can lock your screen so that only you can unlock it to make calls, access your data,

45
buy applications, and so on. You may also be required to lock your screen by a policy
set by an email or other account you add to your light.
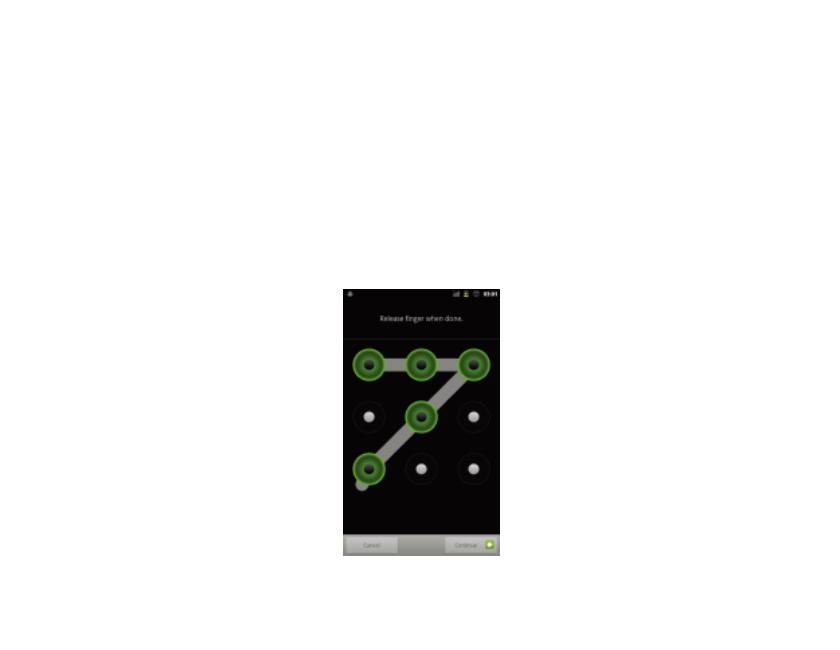
1. On the Home screen, press the Menu Key and touch Settings > Location &
security.
2. Touch . If you already have a screen lock configured, touch Set up screen lock
Change screen lock to change how you lock your screen or to turn off screen
locking.
3. Touch you’re guided to create Pattern PIN Password Pattern,, , or . If you touch
a pattern you must draw to unlock the screen. The rst time you do this, a short
tutorial about creating an unlock pattern appears.


46
Customizing the Home Screen
You can add application icons, shortcuts, widgets, and other items to any part of any
Home screen where there’s free space. You can also change the wallpaper.
Add an Item to the Home Screen
1. Open the Home screen where you want to add the item.
2. Press the and touch Or just touch & hold an empty location on the Menu Key Add.
Home screen.
3. In the menu that opens, touch the type of item to add.
You can add the following types of items to the Home screen.
Shortcuts Add shortcuts to applications, a bookmarked webpage, a favorite contact,
a destination in Maps, a Gmail label, a music playlist, and many other items. The
shortcuts available depend on the applications you have installed.
Widgets Add any of a variety of miniature applications (widgets) to your Home screen,
including a clock, a music player, a picture frame, the Google search bar, a power
manager, a calendar that shows upcoming appointments, and a News & Weather
widget. You can also download widgets from Android Market.
Folders Add a folder where you can organize Home screen items, or folders that
contain all your contacts, contacts with light numbers, or starred contacts. Your folders’
contents are kept up to date automatically.
Wallpapers Select wallpaper from Gallery, Live Wallpapers or Wallpapers, and set it as
your favorite wallpaper.


47
Move an Item on the Home Screen
1. Touch & hold the item you want to move, until it vibrates. Don’t lift your nger.
2. Drag the item to a new location on the screen. Pause at the edge of the screen to
drag the item onto another Home screen pane.
3. When the item is where you want it, lift your nger.
Remove an Item from the Home Screen
1. Touch & hold the item you want to remove, until it vibrates. Don’t lift your nger.
2. The Launcher icon changes to a Trash Can icon .
3. Drag the item to the Trash Can icon.
4. When the icon turns red, lift your nger.
Change the Home Screen Wallpaper
1. Press the and select .Menu Key Wallpaper
2. Select the wallpaper you want to use from , or Gallery Live wallpapers,
Wallpapers.
3. Touch or .Save Set wallpaper
Rename a Folder
1. Touch the folder to open it.
2. Touch & hold the folder window’s title bar.
3. Enter a new name in the dialog that appears.
4. Touch OK.


48
Connecting to Networks and Devices
Your light can connect to a variety of networks and devices, including mobile networks
for voice and data transmission, Wi-Fi data networks, and Bluetooth devices, such as
headsets. You can also connect your light to a computer, to transfer les from your light,
and share your light’s mobile data connection via USB or as a portable Wi-Fi hotspot.
Connecting to Mobile Networks
When you assemble your light with a SIM card from your wireless service provider,
your light is congured to use your provider’s mobile networks for voice calls and for
transmitting data.
Your light is congured to work with many mobile carriers’ networks. If your light does
not connect to a network when you insert a SIM card and turn it on, contact your carrier
to obtain the details of its access point name.
Different locations may have different mobile networks available. Initially, your light is
congured to use the fastest mobile network available for data. But you can congure
your light to use only a slower 2G network for data, to extend the life of your battery
between charges. You can also congure your light to access a different set of networks
entirely, or to behave in special ways when roaming.
Determine What Network You’re Using
1. Press the Home Key Menu Key, Settings , press the and touch to open the
Settings application.


49
2. Touch Wireless & networks > Mobile networks > Access Point Names.
The name of the wireless service provider you’re currently registered with is selected in
the list.
Disable Data When Roaming
You can prevent your light from transmitting data over other carriers’ mobile networks
when you leave an area that is covered by your carrier’s networks. This is useful for
controlling expenses if your cell plan doesn’t include data roaming.
1. Press the to open the Home Key Menu Key Settings , press the , and touch
Settings application.
2. Touch and uncheck .Wireless & networks > Mobile networks Data Roaming
With Data roaming unchecked, you can still transmit data with a Wi-Fi connection.
Use Only 2G Networks
You can extend your battery life by limiting your data connections to 2G networks (GPRS
or EDGE). When you are connected to a 2G network, you may want to postpone
activities that transmit a lot of data, such as sending, uploading, or downloading pictures
or video, until you are connected to a faster mobile or other wireless network.
1. Press the to open the Home Key Menu Key Settings, press the , and touch
Settings application.
2. Touch Wireless & networks > Mobile networks > Network mode and select GSM
only.


50
Edit or Create a New Access Point
If you and your wireless service provider determine that you need to change the settings
of your current access point name (APN) or to create a new one, you must obtain the
APN and detailed settings from your provider.
1. Press the to open the Home Key Menu Key Settings, press the , and touch
Settings application.
2. Touch Wireless & networks > Mobile networks > Access Point Names.
3. Touch an existing APN to edit it. Or press the . Enter Menu Key New APN and touch
the APN settings that you obtained from your wireless service provider by touching
each setting that you need to edit.
4. When you’re nished, press the Menu Key Save and touch .
5. If you created a new APN, touch it in the APNs screen to start using it.
Connecting to Wi-Fi Networks
Wi-Fi is a wireless networking technology that can provide Internet access at distances
of up to 100 meters, depending on the Wi-Fi router and your surroundings.
To use Wi-Fi on your light, you access a wireless access point, or “hotspot.” Some
hotspots are open and you can simply connect to them. Others are hidden or implement
other security features, so you must congure your light so it can connect to them.
There are numerous systems for securing Wi-Fi connections, including some that
rely on secure certicates or other schemes to ensure that only authorized users can
connect.


51
Turn off Wi-Fi when you’re not using it, to extend the life of your battery between
charges.
Turn Wi-Fi on and connect to a Wi-Fi Network
If you’re adding a Wi-Fi network when first setting up your light, Wi-Fi is turned on
automatically, so you can skip to step 4.
1. Press the to open the Home Key Menu Key, Settings , press the and touch
Settings application.
2. Touch Wireless & networks > Wi-Fi Settings.
3. Check to turn it on.Wi-Fi
The light scans for available Wi-Fi networks and displays the names of those it
nds. Secured networks are indicated with a Lock icon. If the light nds a network
that you connected to previously, it connects to it.
4. Touch a network to connect to it.
If the network is open, you are prompted to conrm that you want to connect to that
network by touching Connect.
If the network is secured, you’re prompted to enter a password or other credentials.
(Ask your network administrator for details.)When you’re connected to a network,
you can touch its name in the Wi-Fi settings screen for details about the speed,
security, address, and related settings.
Receive Notications When Open Networks are Available
By default, when Wi-Fi is on, you receive notications in the Status bar when your light
detects an open Wi-Fi network.


52
1. Turn on Wi-Fi, if it’s not already on.
2. In the Wi-Fi settings screen, check . You can uncheck this Network notification
option to stop receiving notications.
Add a Wi-Fi Network
You can add a Wi-Fi network so the light will remember it, along with any security
credentials, and connect to it automatically when it is in range. You must also add a Wi-
Fi network to connect to it, if the network does not broadcast its name (SSID), or to add
a Wi-Fi network when you are out of range of it.
To join a secured network, you need to contact the network’s administrator to learn what
security scheme is deployed on it and to obtain the password or other required security
credentials.
1. Turn on Wi-Fi, if it’s not already on. If you’re adding a Wi-Fi network when first
setting up your light, Wi-Fi is turned on automatically.
2. In the Wi-Fi settings screen, touch Add Wi-Fi network (at the bottom of the list of
discovered networks).
3. Enter the SSID (name) of the network. If the network is secured, touch the Security
menu and then touch the type of security deployed on the network.
4. Enter any required security credentials.
5. Touch . The light connects to the wireless network. Any credentials that you Save
entered are saved, so you are connected automatically the next time you come
within range of this network.


53
Forget a Wi-Fi Network
You can make the light forget about the details of a Wi-Fi network that you added— for
example, if you don’t want the light to connect to it automatically or if it is a network that
you no longer use.
1. Turn on Wi-Fi, if it’s not already on.
2. On the Wi-Fi settings screen, touch & hold the name of the network.
3. Touch in the dialog that opens.Forget network
Connecting to Bluetooth Devices
Bluetooth is a short-range wireless communications technology that devices can use to
exchange information over a distance of about 8 meters. The most common Bluetooth
devices are headphones for making calls or listening to music, hands-free kits for cars,
and other portable devices, including laptops and cell phones.
To connect to a Bluetooth device, you must turn on your light’s Bluetooth radio. The rst
time you use a new device with your light, you must “pair” them, so that they know how
to connect securely to each other. After that, you can simply connect to a paired device.
Turn off Bluetooth when you’re not using it, to extend the life of your battery between
charges.
Turn Bluetooth on or off
1. Press the Home Key Menu Key, Settings, press the and touch to open the
Settings application.
2. Touch .Wireless & networks

55
5. If your light stops scanning before you make the other device discoverable, touch
Scan for devices.
6. Touch the ID of the other device in the list in Settings to pair them. The devices pair
with each other. If you’re prompted to enter a passcode, try entering 0000 or 1234
(the most common passcodes). If the pairing is successful, your light connects to
the device.
Connect to a Bluetooth Device
Once paired, you can connect to a Bluetooth device—for example, to switch devices or
to reconnect after the light and the device come back into range.
1. Press the Home Key Menu Key, Settings , press the and touch to open the
Settings application.
2. Touch > . The Bluetooth settings screen Wireless & networks Bluetooth Settings
opens.
3. If Bluetooth isn’t turned on, check to turn it on. Bluetooth
4. In the list of devices, touch a paired but unconnected device in the list.
If the device you expected isn’t displayed, touch . When the light and Scan for devices
the device are connected, the device is displayed as connected in the list.
Disconnect from a Bluetooth Device
1. Touch the device in the Bluetooth settings screen.
2. Touch OK to conrm that you want to disconnect.

56
Unpair a Bluetooth Device
1. Touch & hold the device in the Bluetooth settings screen.
2. Touch or in the menu that opens.Unpair Disconnect & unpair
Connecting to Computer via USB
You can connect your light to a computer with a USB cable, to transfer music, pictures,
and other files between your light and the computer. Your light stores these files in
internal USB storage or on a removable SD card.
If you are using USB tethering, you must turn that off before you can use USB to
transfer les between your light and computer.
Connect Your Light to a Computer via USB
1. Use the USB cable that comes with your light to connect the light to a USB port on
your computer. You receive a notication that the USB is connected.
2. Open the Notications panel and touch USB connected.
3. Touch Turn on USB storage in the screen that opens to conrm that you want to
transfer les. When the light is connected as USB storage, the screen indicates that
USB storage is in use and you receive a notication.
Your light’s USB storage or SD card is mounted as a drive on your computer. You can
now copy les back and forth. For more information, see the documentation for your
computer.
During this time, you can’t access the USB storage or SD card from your light, so you
can’t use applications that rely on them, such as Camera, Gallery, and Music. You also


57
can’t share your light’s data connection with your computer via USB.
Disconnect Your Light from the Computer
1. Unmount the USB storage or SD card on your computer.
2. Open the Notications panel and touch Turn off USB storage.
3. Touch Turn off USB storage in the screen that opens.
Safely Remove an SD Card from Your Light
If your light has an SD card (rather than internal USB storage), you can safely remove
the SD card from your light any time the light is turned off, as described in your light’
s owner’s guide. If you need to remove the SD card while the light is on, you must
unmount the SD card form the light rst, to prevent corrupting or damaging the SD card.
1. Press the to open the Home Key Menu Key Settings, press the , and touch
Settings application.
2. Touch .Storage
3. Touch You can now safely remove the SD card from the light.Unmount SD card.
Erase Your Light’s USB Storage or SD Card
If your light uses an SD card, you may need to erase a new one before you can use it
with your light. You can also erase your light’s USB storage or SD card, for example, if
you are giving the light or SD card to someone else and want to erase your personal
information from it.
1. Press the Home Key Menu Key, Settings , press the and touch to open the
Settings application.


58
2. Touch .Storage
3. Touch . On the screen that warns you that formatting will erase its Erase SD card
contents, touch .Erase SD card
Sharing Light’s Mobile Data Connection
You can share your light’s mobile data connection with a single computer via a USB
cable: USB tethering. You can also share your light’s data connection with up to ve
devices at once, by turning your light into a portable Wi-Fi hotspot.
Share Light’s Data Connection via USB
1. Use the USB cable that comes with your light to connect your light to your computer.
2. Press the to open the Home Key Menu Key Settings , press the , and touch
Settings application.
3. Touch Wireless & networks > Tethering & portable hotspot.
4. Check . The light starts sharing its mobile network data connection USB tethering
with your computer, via USB connection. An ongoing notication is added to the
Status bar and Notications panel.
5. Uncheck to stop sharing your data connection. Or just disconnect USB tethering
the USB cable.
Share Your Light’s Data Connection as a Portable Wi-Fi Hotspot
1. Press the to open the Home Key Menu Key Settings, press the , and touch
Settings application.


60
6. Touch .Save
Connecting to Virtual Private Networks
Virtual private networks (VPNs) allow you to connect to the resources inside a secured
local network, from outside that network. VPNs are commonly deployed by corporations,
schools, and other institutions so that their users can access local network resources
when not on campus, or when connected to a wireless network.
There are numerous systems for securing VPN connections, including some that rely on
secure certicates or other schemes to ensure that only authorized users can connect.
Add a VPN
1. Press the to open the Home Key Menu Key Settings, press the , and touch
Settings application.
2. Touch .Wireless & networks > VPN Settings
3. Touch .Add VPN
4. Touch the type of VPN to add.
5. In the screen that opens, follow the instructions from your network administrator to
congure each component of the VPN settings.
6. Press the . The VPN is added to the list on the VPN Menu Key Save and touch
settings screen.
Connect to a VPN
1. Open the Settings application.


72
1. Open your contacts.
2. Press the and touch Menu Key Import/Export.
3. Touch .Import from SIM
4. If you have more than one account on your light, touch the account into which you
want to import the contacts. A list of the contacts on the SIM appears.
5. Select the contact and touch to import.
Import Contacts from Your SD Card or USB Storage
You can copy individual or group contacts in vCard format onto your SD card or USB
storage and then import them into one of your accounts on the light.
1. Open your contacts.
2. Press the and touchMenu Key Import/Export.
3. Touch Import from SD card.
4. If you have more than one account on your light, touch the account into which you
want to import the contacts.
5. If you have more than one vCard le on the SD card or USB storage, touch the
option to import a single contact le, multiple contact les, or all of the contact les.
Export Contacts to Your SD Card
You can export all of the contacts on your light to your SD card, as a group vCard le.
You can then copy this le to a computer or another device that can work with les in
this format, such as an address book application.


75
Set a Ringtone for a Contact
1. Open your contacts or favorites.
2. Touch the name of a contact in the list to view its details.
3. Press the and touch .Menu Key Options
4. In the scrolling list of ringtones that opens, touch the one to play when the contact
calls. The ringtone plays a sample.
5. Touch .OK
Delete a Contact
1. Open your contacts or favorites.
2. Touch the name of a contact in the list to view its details.
3. Touch the icon at the bottom of the contact details screen.
4. Touch OK to conrm that you want to delete the contact.


76
Accounts
You can sync contacts, email, calendar events, and other information with your
light from multiple Google Accounts or other kinds of accounts, depending on the
applications installed on your light.
For example, you could start by adding your personal Google Account, so your personal
email, contacts, and calendar are always available. Then you could add another
account from work, so you can read your work email and have your work contacts
handy.
You configure how your account interacts with the applications on your light using
the Account & Sync settings and the setting s in Gmail, Calendar, Email, and other
applications. Use a web browser to change your password and other general account
settings.
Adding and Removing Accounts
You can add multiple Google Accounts. You may also be able to add other kinds of
accounts, depending on your applications. Some you can add in the Accounts & Sync
settings, as described in this section. Others you add using an application that works
with those kinds of accounts; for example, you can add IMAP and POP3 email accounts
with the Email application.
Add an Account
To add some accou nts, yo u may need to obtain details from an IT sup p ort


77
representative about the service to which the account connects. For example, you may
need to know the account’s domain or server address.
1. Open the Accounts & Sync Settings screen. You can do this in Contacts by pressing
the and touching , or directly in the Settings application.Menu Key Accounts
The Accounts & Sync Settings screen displays your current sync settings and a list
of your current accounts.
2. Press the and touch .Menu Key Add account
3. Touch the kind of account to add.
4. Follow the onscreen steps to enter the required and optional information about the
account. Most accounts require a username and password, but the details depend
on the kind of account and the conguration of the service you’re connecting to.
5. Congure the account.
Remove an Account
You can remove an account to delete it and all information associated with it from your
light, including email, contacts, settings, and so on.
You can’t remove the first Google Account you signed into on the light, except by
deleting all personal information from your light.
1. Open the Accounts & Sync Settings screen. You can do this in Contacts by pressing
the and touching , or directly in the Settings application.Menu Key Accounts
2. Touch the account to delete.
3. Touch Remove account.
4. Conrm that you want to remove the account.


79
3. Check or uncheck to control whether changes you make to information Auto-sync
on the light or on the web are automatically synced with each other.
For example, when this option is checked, changes that you make in Contacts on
the light are automatically made in Google Contacts on the web. If you uncheck this
option, you may be able to use an application’s tools to sync data manually.
Sync Information Manually
1. Open the Accounts & Sync Settings screen.
2. Touch the account whose data you want to sync.
3. Press the and touch . Menu Key Sync now
Change an Account’s Sync Settings
1. Open the Accounts & Sync Settings screen.
2. Touch the account whose sync settings you want to change.
The Data and Synchronization screen opens, displaying a list of the kinds of
information the account can sync. Checked items are congured to sync to your
light.
3. Check or uncheck the kinds of information you want to sync to the light.
Unchecking an option does not remove the information from your light; it simply
stops it from being kept in sync with the version on the web. To remove the
information previously synced for the account, you must remove the account.


80
Gmail
Gmail is Google’s web-based email service. When you first set up your light, you
congured it to use an existing Gmail Account, or you created a new account. The rst
time you open the Gmail application on your light, your Inbox contains the messages
from your Gmail Account on the web.
Opening Gmail and Your Inbox
When you open Gmail, your most recent conversations are displayed in your Inbox.
When you return to Gmail after using other applications, the last screen you were
working with is displayed.
Open Gmail
Touch the Gmail icon on the Home screen or in the Launcher.
Your Inbox displays those conversations with the newest messages at the top. All of
your conversations are displayed in your Inbox unless you delete, archive, or lter them
.If you change your preferred inbox to the Priority Inbox in Gmail in the web, you can
also view it and set it as your default inbox in Gmail on your light.
The current Google Account is displayed at the top right of the Inbox. If you have more
than one account, you touch the current account to switch accounts, as described in
“Switch accounts”.

83
2. Set the address you want to send the email from.
The Gmail account you are sending the email from is displayed at the top of the
screen. If you have more than one Gmail account, you can touch the displayed
account to pick the one you want to send the message from.
3. Address the message.
4. Enter a subject for the message.
5. Enter the text of the message.
6. Touch the icon Send .
If you’re not ready to send the message, touch the Save As Draft icon instead. You
can read your drafts by opening messages with the Draft label.
You can also press the and touch Menu Key Discard to abandon the message,
including any saved drafts.
Send a Copy or Blind Copy of a Message
You can send a copy or blind copy of a message to one or more addresses.
While composing a message, press the and touch to add Cc Menu Key Add Cc/Bcc
and Bcc elds which you can enter addresses in.
Attach a Photo to a Message
While composing a message, press the and touch to send a photo Menu Key Attach
with the message.
If you change your mind, touch the small box to the right of an attachment to remove it
from your message.


84
Replying to or Forwarding a Message
You can continue a conversation by replying to a message or by forwarding it.
1. Touch the Reply button in the message header. Or touch the arrow and
touch or .Reply all Forward
You can change the default button from to Reply Reply all.
2. Edit the message and then touch the icon Send .
Searching for Messages
You can search for messages that contain one or more words in their contents or in
their addresses, subjects, labels, and so on.
When you search for messages, all of the messages in your Gmail account on the
web are included (except those labeled Trash or Spam), not just those that you’ve
synchronized onto your light. For this reason, you must have a data connection to
search for messages in Gmail.
You can also use the advanced search options that are described on the Gmail website.
1. In the Inbox, press the and touch Menu Key Search.
2. Enter the word or words to search for and touch the Go button on the onscreen
keyboard or the magnifying glass icon at the right of the search box.
A conversation list opens, displaying all of the conversations with messages that contain
the words you searched for. The words you searched for are displayed in the title bar.


85
Adding Signature to Your Gmail Messages
You can append one or a few lines of plain text to every message you send from your
light, such as your name, contact information, or even “Sent by an android.” This
signature is independent of any signature you append to messages you send from
Gmail on the web.
1. Open your Inbox or another labeled list of conversations.
2. Press the and touch Menu Key More > Settings > Signature.
3. Enter a signature.
4. Touch .OK
Changing Gmail Settings
You can change a number of settings for Gmail. Each Gmail account has its own
settings, so your changes affect only the current account.
To change Gmail settings, open your Inbox, press the and touch Menu Key More >
Settings.
General Settings
Signature Opens a dialog where you can enter text to append to every message you
send.
Conrm actions Opens a dialog where you can check which actions open a dialog
asking you to conrm that action: archiving, deleting, and sending messages.
Reply all When checked, replaces the Reply button in message headers with the Reply
all button, so you don’t need to touch the arrow to access it.


86
Auto-advance Opens a dialog where you can set which screen opens when you delete
or archive a conversation whose messages you are viewing: the messages in the next
conversation, the previous conversation, or the Inbox or other conversation list you’re
working with.
Message text size Opens a dialog where you can select the size of text in the
messages you read.
Batch operations When checked, adds a check box to the left of each conversation,
so you can add it to a batch.
Clear search history Touch to remove the history of the words you’ve searched for
previously in Gmail in any account.
Labels Opens the Labels screen, where you can manage which conversations are
synchronized.
Notication Settings
Email notifications When checked, you receive a notification when you have new
email.
Select ringtone Opens a dialog where you can select the ringtone to sound when you
receive a new email notication, including the light’s default ringtone and a silent option.
Vibrate Opens a dialog where you can configure the light to vibrate whenever you
receive a Gmail notication, only when the light is in Silent mode, or never.
Notify once Check to receive a notication from Gmail only the rst time you have new
email since you last read your messages, rather than each time a new message arrives.


87
Calendar
Calendar on the light works with the web-based Google Calendar calendaring service
for creating and managing events, meetings, and appointments.
Calendar on the light is optimized for the light. Some Calendar features, such as
creating Calendars, are only available in Google Calendar on the Web.
Viewing Your Calendar and Events
Open Calendar to view events you’ve created or that others have invited you to.
When you rst set up your light, you congured it to use an existing Google Account, or
you created a new account. The rst time you open the Calendar application on your
light, it displays any existing calendar events from your Google Account on the web.
You can add additional accounts to your light, and configure them to display in
Calendar.
When you rst set up Calendar to synchronize events on your light, it includes events
from the previous month through one year in the future. Subsequently, Calendar keeps
a year’s worth of future events synchronized between your light and the web, plus any
later events that you add to your calendar using Calendar on your light.
Open Calendar
Touch the Calendar icon on the application list.
Events from each account you’ve added to your light and congured to synchronize
calendars are displayed in Calendar.

88
Calendar shows the current time (the red marker and horizontal line in some views)
and the time for events using your local time zone by default, as provided by the mobile
network you’re connected to. If you’re traveling, you can set a home time zone and use
it in Calendar instead.
Change Your Calendar View
Press the and touch , , or Menu Key Agenda Day, Week Month. Each view displays
the events in your calendar for the period of time that you specify.
To view more information about an event in Agenda view, touch the event.
To view the events of a day in Month view, touch a day.
Viewing Event Details
In Agenda, Day, or Week view, touch an event to view its details.
In Month view, touch a day to switch to Day view. Then touch an event to view its
details.
Creating an Event
You can use Calendar on your light to create events that appear on your light and in
Google Calendar on the web.
1. In any Calendar view, press the and touch to open Menu Key More > New event
an Event details screen for a new event.
You can also touch & hold a spot in Day, Week, or Month view. In the menu that
opens, touch New event to open the Event details screen with that day and time
already entered.


93
You no longer receive chat notifications or see others’ Google Talk status in other
applications, such as Gmail.
Chatting with Friends
Chat with a Friend
Touch a friend in your Friends list. If you’re already chatting with someone, you can
press the and touch Friends List to invite a friend to chat.Menu Key
1. Open the chat screen.
2. Enter your message and touch Send.
The messages that you exchange are interleaved on the screen with information about
the chat, such as whether it’s on the record, the time a message was sent if there’s no
response after a short while, and so on.
You can enter a smiley icon (an emoticon) on the onscreen keyboard by touching &
holding the Smiley key and then touching a smiley. You can also press the Menu key
and touch to open a scrolling list of smileys. More > Insert smiley
Accept an Invitation to Chat
When a friend sends you a Google Talk message, you receive a notication. Their entry
in the Friends list jumps to the top and displays the message.
Touch the friend in your Friends list.
OR
Open the Notifications panel and touch the chat notification. A chat window opens
where you can exchange messages with your friend.


94
Switch between Active Chats
If you have more than one chat going, you can switch between chats.
In the Friends list, touch the name of the person you want to chat with.
OR
On a chat screen or in the Friends list, press the and touch Menu Key Switch chats,
then touch the friend you want to chat with.
OR
While chatting with a friend, swipe left or right across the screen.
Invite a Friend to Join a Group Chat
When you’re chatting, you can invite additional friends to join a group chat.
1. On a chat screen, press the and touch .Menu Key Add to chat
2. Touch the name of the friend to invite.
The friend you invited and the current participants receive an invitation to a group chat.
Each one who accepts the invitation joins the group chat. In a group chat, everyone can
see everyone else’s messages. Group chats appear at the top of your Friends list, with
a group chat icon.
End the Chat
When you end a chat, the friend is no longer at the top of your Friends list and the chat
is not displayed in the Switch Chats screen. The text of the chat is not discarded—if you
restart the chat, the conversation is displayed in the new chat window where you left off.
In your Friends list, touch & hold the friend you want to stop chatting with. In the menu
that opens, touch .End chat


95
OR
While on a chat screen, press the and touch .Menu Key End chat
Changing and monitoring Online Status
Icons in Google Talk, Gmail, Google Maps, and other applications indicate you and your
friends’ Google Talk status.
Your Google Talk Status:
Signed into Google Talk and unavailable to chat
Signed into Google Talk and available to chat
Signed into Google Talk but too busy to chat
Busy but available to chat.
Invisible: Signed into Google Talk but appear signed out to others


96
Your friend’s Google Talk status:
Signed into Google Talk and unavailable to chat
Signed into Google Talk and available to chat
Signed into Google Talk but too busy to chat
Busy but available to chat.
Unavailable to chat but not modify the information or chat for a long time
Available to chat but not modify the information or chat for a long time
Signed out of Google Talk
You can change your online status. You can also change the status message you share
with other Google Talk users and the picture that others see.


98
Managing Your Friends List
Your Google Talk Friends list contains the friends you’ve invited or accepted invitations
from, to become friends in Google Talk. Friends can invite each other to chat in Google
Talk and see each others’ online status in Google Talk and other applications, such as
in Gmail and Maps.
The Google Talk Friends list is sorted by your friends’ online status: active chats, online,
busy, and ofine. Within each status group, friends are listed alphabetically.
Add a Friend to Your Friends List
1. In the Friends list, press the and touch .Menu Key Add friend
2. Enter your friend’s address and touch Send invitation.
Your friend’s address in Google Talk is a Gmail or other email address that is congured
to connect to Google Talk.
View and Accept an Invitation to Become a Friend
When a contact invites you to become a friend in Google Talk, you receive a notication
in the Status bar and the invitation appears in your Friends list.
1. Touch the invitation in the Friends list.
2. Touch if you don't want to chat Accept Cancel in the menu that opens. Or touch
with and share your Google Talk status with the sender.
Block a Friend
You can block a friend from sending you messages. When blocked, your friend is also
removed from your Friends list.


101
Email
You use the Email application to read and send email from services other than Gmail.
Email includes a wizard that makes it easy to configure it for several popular email
service providers.
Opening Email and the Account Screen
You use the Email application to read email from services other than Gmail.
Open Email
Touch the icon on the Home screen or in the Launcher. Email
The rst time you open Email, a setup wizard opens to help you add an email account,
as described in “Adding and editing email accounts”.
After the initial setup, Email opens to the last screen you were viewing or, if you have
not used Email recently, it displays the contents of your Inbox (if you have only one
account) or the Accounts screen (if you have multiple accounts).
You can also add a shortcut to your Home screen to an account’s Inbox, so that you
can open it directly from the Home screen.
Open the Accounts Screen
The Accounts screen lists your Combined Inbox and each of your email accounts. If you
have starred, draft, or unsent messages in any of your accounts, the folders for those
items from all accounts are displayed as well.


102
From a folder screen, press the and touch .Menu key Accounts
Each folder and account on the Accounts screen displays the number of unread
messages in green, or the total number of messages in gray.
You can touch a combination folder, such as the Combined Inbox folder, to view the
messages it contains. You can also touch an account to view its Inbox, or an account’s
folder icon to view a list of that account’s folders.
The account from which you send email by default is indicated with a checkmark.
Reading Your Messages
You can read messages in your Inbox or other folders for individual accounts.
When you receive a new message, you also receive a notication in the Status bar,
unless you’ve turned off Email notications using the Email Account settings, where you
can also set whether Email notications vibrate the light and pick a ringtone.
1. Open an account’s Inbox, or another folder of messages.
2. Touch the message to read. The message opens in a screen with information about
who sent it, the date it was sent, and related information at the top, followed by the
contents of the message.
Some attached images are displayed in the message; others have buttons for opening
them. Attachments you download are stored on your light’s USB storage or SD card.
You can reply to, forward, delete, or take other actions on a message, as described in
“Responding to a message”.


103
Responding to a Message
You can reply to or forward a message that you receive. You can also delete messages
and manage them in other ways.
Reply to or Forward a Message
While reading a message, touch or Reply Reply all.
OR
Press the and touch , , or .Menu Key Reply Reply all Forward
A Compose Message window opens with the addresses (when replying), subject, and a
copy of the message you’re responding to lled in.
Mark a Message as Unread
You can return a read message to the unread state—for example, to remind yourself to
read it again later. You can also mark a batch of messages as unread.
While reading a message, press the and touch Menu Key Mark as unread.
Delete a Message
You can delete a message from its folder. You can also delete a batch of messages.
While reading a message, touch .Delete
OR
Press the and touch Menu Key Delete.
For most kinds of accounts, deleted messages are moved to a Trash folder, so you can
retrieve them if you deleted them in error.


104
Working with Message in Batches
You can delete, star, or mark unread a batch of messages at once.
In the Inbox or mailbox, check the messages that you want to work with as a batch.
When you check one or more messages, the , , andMark unread Add star Delete
buttons appear at the bottom of the screen.
Touch , , or . You can also press the and touch Mark unread Add star Delete Menu Key
Deselect all. Your action affects the entire batch of messages.
Composing and Sending Email
1. Press the and touch Menu Key Compose.
2. Address the message. As you enter text, matching addresses are offered from
your Contacts. You can touch a suggested address or enter a new one. Separate
multiple addresses with commas.
3. Press the and touch to address a copy or blind copy of the Menu Key Add Cc/Bcc
message.
4. Enter a subject for the message.
5. Enter the text to the message.
6. Press the and touch to send a photo with the message.Menu Key Add attachent
7. Touch .Send
Viewing an Account Folders
1. Open the Accounts screen.


105
2. Touch an account’s folder icon. You can also open an account’s folders while
viewing its Inbox or other folder, by pressing the and touching .Menu Key Folders
The account’s Folders screen opens, with a scrolling list of the folders in the account.
Touch a folder to view a list of the messages it contains.
Adding Signature to Your Message
You can append one or a few lines of text to every message you send from an account,
such as your name, contact information, or even “Sent by an android.”
1. Open the Accounts screen.
2. Touch & hold the account whose settings you want to change. In the menu that
opens, touch Account settings. You can also open the settings for an account
while you’re viewing its inbox, by pressing the and touching Menu Key Account
Settings.
3. Touch .Signature
4. Enter a signature.
5. Touch .OK
6. When you’re nished changing settings, press the Back Key.
Adding and Editing Email Account
The first time you open Email, you are prompted to set up an email account. After
that, you can congure Email to send and receive email from additional accounts. The
accounts that you congure are displayed in the Accounts screen.


106
The Email setup wizard helps you set up your account for many popular email systems,
including those based on IMAP and POP3, so you can read and work with the same
email as you do on a computer in Thunderbird, Mac Mail, in a web browser, or with
another email application. If your service provider requires additional settings, or if your
service provider is unknown to Email, you can enter the necessary details manually,
though you will typically need to contact your email service provider to determine the
right settings for your account.
Add an Email Account
1. Open the Accounts screen.
2. Press the . In the Setup Email screen, enter Menu Key Add account and touch
your email address and password. If you’re adding a second or subsequent email
address, you can also check the option to use the new account to send all outgoing
messages.
3. Touch Next. Or, if you need to enter email account settings the wizard can’t congure
for you, touch Manual setup. If you touch Next, Email attempts to communicate
with your email service provider to validate your account for sending and receiving
mail, using your email address and password. This is sufficient for most email
services.
Depending on the service provider, you may be asked what kind of email account
you have. If you’re not sure, check the settings in the application you use to send
and receive email on your computer, or ask your email service provider.

111
Outgoing Server Settings
If you use an IMAP or POP3 account for receiving email, you typically use an SMTP
server to send email from that account.
SMTP server The fully resolved domain name of your email service provider’s SMTP
server, for example, smtp.example.com.
Port
Set the Security type rst to enter the typical server port number in this
eld automatically. Or enter a different port number if your email service
provider requires it.
Security
type
Select the security type required by your email service provider. Select
the (Accept all certicates) option for your security type to accept a
server certicate from your SMTP server that is self-signed, out of date,
or in some other way not accepted by the Email application.
Require
sign-in
Check this option to enter a username and password for your SMTP
server, if your email service provider requires that you enter them to
send email.
Username
Your username on the SMTP server (this may not be the same as your
username on the POP3 or IMAP server for incoming mail). Visible only
if Require sign-in is checked.
Password
Your password on the SMTP server (this may not be the same as your
username on the POP3 or IMAP server for incoming mail). Visible only
if Require sign-in is checked.


112
Changing System Settings
You can change a number of settings for the system, including storage, exchange, and
other settings.
1. Open the Email screen.
2. Press the to configure the following Menu Key System settingsand touch
parameters.
Storage location Select extended storage or Data memory as your storage
location.
Storage Warning Disable storage warning or enable it when the storage is lower
than a certain amount.
Exchange policy refresh internal Select how often the exchange refreshes.
Use the APN proxy Check to use the APN proxy and congure the certicate.
Enable file logs Check to enable file logs and enter email address to set the
Blacklist.
3. When you’re nished changing settings, touch Done at the bottom of the screen.


113
Messaging
Opening Messaging
Open Message
Touch the Messaging icon in the Launcher.
The Messaging window opens, where you can create a new message or open an
ongoing message thread.
Touch to start a new text or multimedia message.New message
Touch an existing message thread to open it.
Delete a Message Thread From the Messaging Window
1. Touch & hold the message thread.
2. Touch in the menu that opens. You can also press the Menu Key and Delete thread
touch to delete all message threads from the window.Delete threads
Send a Text Message
1. On the messages screen, touch .New message
2. Touch the field, and enter the recipient’s number. You can also enter the To
first letters of the recipient’s name to display a list of matching names stored in
Contacts, and then select a recipient from the list.
3. Touch the Type to compose eld, and enter the contents of your text message.


114
4. Touch . The Message window opens, with your message after your name. Send
Responses appear in the window. As you view and send additional messages, a
message thread is created.
Create and Send a Multimedia Message
1. On the messages screen, touch .New message
2. Touch the field, and enter the recipient’s number. You can also enter the To
first letters of the recipient’s name to display a list of matching names stored in
Contacts, and then select a recipient from the list.
3. Touch the Type to compose eld, and enter the contents of your message.
4. Press the and touch to add a message subject.Menu key Add subject
5. Press the and touch to open a menu where you can touch the Menu Key Attach
kind of media le to attach to the message.
Pictures: Select a picture to add to your message.
Capture picture: Take a photo and add to your message.
Videos: Select a video clip to attach to your message.
Capture video: Shoot a video clip and add to your message.
Audio: Select an audio le to add to your message.
Record audio: Record an audio le and add to your message.
Slideshow: Edit a slideshow and add to your message.
6. Touch .Send
Respond to Messages You Receive
If you’re working in a message window, messages that you receive are displayed in it.

119
Browser
Opening Browser
Use Browser to surf the web.
Some websites have two versions of their sites: full-size for computer-based web
browsers and another for mobile devices. They may allow you to switch back and forth.
Full-size sites are often harder to navigate on a mobile browser than sites designed for
use on mobile devices.
Open Browser
Press the and touch Home Key > Browser to start this function.
Browser also opens when you touch a web link—for example, in an email or text
message. When you open Browser, the last webpage you were viewing is displayed. If
you have not used Browser recently, your home page opens.
The web address (URL) of the current page is displayed at the top of the window,
unless a mobile site scrolls the URL bar off the top of the screen (if so, just drag the
page down to bring the URL bar into view).
Open a Webpage or Search the Web
1. Touch the URL box at the top of the Browser screen. If the URL box isn’t visible,
press the or just drag the page down until the URL box comes into view. Menu Key


120
2. Enter the address (URL) of a webpage. Or enter terms you want to search for.
As you enter text, your web search engine makes suggestions of webpages and
queries. You can also touch the Microphone icon to search by voice.
3. Touch a suggestion or enter an address and touch the arrow icon .
If you touch a suggested page or enter an address and touch the arrow icon , that
webpage opens. If you touch a suggested query, your web search engine opens with
the results.
Refresh Current Page
Press the and touch Menu Key Refresh. The webpage is reopened, updating any
content that has changed.
Stop Opening a Page
If a webpage is taking a long time to open, or if you change your mind, you can stop it
from opening.
Touch the Cancel icon to the right of the URL.
OR
Press the and touch . Menu Key Stop
Get More Information about the Current Page
Press the and touch . A dialog opens with the page’s title Menu Key More > Page Info
and full address (URL).


122
Find Text on a Webpage
1. Press the Menu Key and touch .More > Find on page
2. Enter the text you’re looking for. As you type, the rst word with matching characters
is highlighted on the screen, and subsequent matches are boxed.
3. Touch the left or right arrow to scroll to and highlight the previous or next matching
word.
Navigating Among Web Pages
You can open links on a webpage, navigate back and forward, and review your
browsing history, just as in any web browser. You can also take advantage of some
shortcuts for working with links and other kinds of information.
Open a Link
Touch a link to open it.
Links that you touch are highlighted in orange until the webpage they refer to opens in
the window.
Go Back and Forward Among the Opened Pages
Press the ,Back Key
OR
Press the and touch .Menu Key Forward


127
3. Edit the name and the address if necessary and touch . The bookmark is added OK
to your list of bookmarks.
Open a Bookmark
1. Touch the bookmark icon at the top of the screen (or press the and Menu Key
touch ). A window opens with a list of your bookmarks, sorted by how Bookmarks
often you visit them. Bookmarks are displayed in thumbnail view by default. To see
them as a list, press the and touch . Menu Key List view
2. Touch a bookmark to open it. The bookmark opens in the current window. If you
prefer to open it in a new window, touch & hold the bookmark and touch Open in
new window in the menu.
Edit a Bookmark
1. Touch the bookmark icon at the top of the screen (or press the and Menu Key
touch ).Bookmarks
2. Touch & hold the bookmark to edit.
3. Touch in the menu. Edit bookmark
4. Edit the name or address in the dialog that opens.
5. Touch .OK
Share a Bookmark
1. Touch the bookmark icon at the top of the screen (or press the and Menu Key
touch ).Bookmarks


128
2. Touch & hold the bookmark to share.
3. Touch in the menu.Share link
4. Touch the application you want to use to send the bookmark.
The application opens with the bookmark’s address entered.
Delete a Bookmark
1. Touch the bookmark icon at the top of the screen (or press the and Menu Key
touch ).Bookmarks
2. Touch & hold the bookmark to delete.
3. Touch in the menu.Delete bookmark
4. Touch .OK
Changing Browser Settings
You can congure a number of Browser settings, including several that you can use to
manage your privacy.
To open the Browser settings screen, press the and touch .Menu Key More > Settings
Page content Settings
Text size Opens a dialog where you can increase or decrease the size of the text that
Browser uses when displaying webpages.
Default zoom Opens a dialog where you can increase or decrease the magnication
level that Browser uses when rst opening a webpage.
Open pages in overview Uncheck to open webpages displaying their top-left corners
at 100% size. Check to open webpages zoomed out, in an overview.


129
Text encoding Opens a dialog where you can change the character-encoding standard
that Browser uses when displaying text on a webpage.
Block pop-up windows Check to prevent websites from opening windows unless you
request it.
Load images Uncheck to omit images when Browser displays a webpage. This speeds
webpage display, which can be useful if you have a slow connection, but many websites
make little sense with text alone.
Auto-t pages Check to have Browser optimized the presentation of text and other
elements of webpages to t your light’s screen. Checking this option also causes the
browser to reflow a column of text to fit the screen if you double-touch the screen
directly after zooming with your fingers. Uncheck to view pages as designed for a
computer screen, and to cause double-touching to simply switch between zoomed-in
and default view.
Landscape-only display Check to display pages in landscape (horizontal) orientation
on your screen, regardless of how you are holding the light.
Enable JavaScript Uncheck to prevent JavaScript from running on webpages. Many
webpages function correctly only if they can run JavaScript on your light.
Enable plug-ins Uncheck to disable plug-ins from webpages.
Open in background Check to open new windows in the background when you touch
& hold a link and touch Open in new window. This is useful when you are working
with windows that take a long time to download and display. Press the and Menu Key
touch , and then touch the new window to view it. Uncheck if you prefer new Windows
windows that you open in this way to open in place of the current window.


132
Maps, Navigation, Places, and Latitude
Opening Maps
Google Maps for Android includes the Maps application as well as the Latitude,
Navigation, and Places components, each available within Maps and as a separate
shortcut in the Launcher.
Open Maps
Press the and touchHome Key > Maps to start this function.
Move the Map
Drag the map with your nger.
Zoom on the Map
Touch the plus or minus side of the Zoom control.
Or
Double-touch a location on the map with one nger zoom in that location; touch once
with two ngers to zoom out.
Or
Touch an area with two ngers at once and spread them apart to zoom in; pinch them
together to zoom out.
Not all zoom levels are available for all locations.


133
Viewing My Location and Location Services
The My Location feature on Google Maps lets you center the map on your current
approximate location using a variety of methods to determine where you're located.
Enable Location Service
You must have location services turned on to view your location in Maps and to use
your location to nd local resources.
1. Press the , press the , and then touch Home Key Menu Key Settings > Location &
security.
2. Check the My Location options that you want to use.
Check Use wireless networks to allow the light to determine your approximate location
by using Wi-Fi and mobile networks.
Check to allow your light to determine your location to street-level Use GPS satellites
accuracy. (GPS works best when you have a clear view of the sky.)
View Your Location
Touch the icon in the search bar.My Location
The map centers on a blue arrow that indicates your location. A blue circle around the
arrow indicates that your actual location is within the circle.
Depending on which My Location options you’ve enabled, you’ll see varying degrees
of approximation, with GPS satellites providing the best accuracy, followed by wireless
networks, then cell networks.

144
Opening Gallery and Viewing Your Albums
Press the and touchHome Key > to open the gallery.Gallery
Or open Gallery from Camera by touching the thumbnail image at the top right.
Or open Gallery from Camera by pressing the and touching Menu Key Gallery.
Gallery presents the pictures and videos on your SD card or USB storage, including
those you’ve taken with Camera and those you downloaded from the web or other
locations.
If you have a Picasa account associated with a Google Account that you’ve added to
your light, and if you have congured it to sync with Picasa, Gallery also presents your
Picasa web albums.
If you have a great many pictures or videos on your SD card or USB storage or in
Picasa web albums, it may take Gallery a few minutes when you open it to discover and
organize them.
Working with Albums
Open an Album and View its Contents
Open Gallery and touch the album whose contents you want to view. Albums open
displaying the pictures and videos they contain in a chronologically ordered grid. The
name of the album is shown at the top of the screen. You can touch a picture or video to
view it, as described in “Working with pictures”.
Specyfikacje produktu
| Marka: | ZTE |
| Kategoria: | smartfon |
| Model: | V9A |
Potrzebujesz pomocy?
Jeśli potrzebujesz pomocy z ZTE V9A, zadaj pytanie poniżej, a inni użytkownicy Ci odpowiedzą
Instrukcje smartfon ZTE

29 Września 2024
29 Września 2024
29 Września 2024
29 Września 2024
24 Września 2024
24 Września 2024
24 Września 2024
24 Września 2024
24 Września 2024
24 Września 2024
Instrukcje smartfon
- smartfon Sony
- smartfon Samsung
- smartfon AEG
- smartfon LG
- smartfon Motorola
- smartfon Xiaomi
- smartfon MyPhone
- smartfon Sharp
- smartfon Huawei
- smartfon TCL
- smartfon Lenovo
- smartfon TP-Link
- smartfon Philips
- smartfon SilverCrest
- smartfon Gigabyte
- smartfon Acer
- smartfon Realme
- smartfon Gigaset
- smartfon Geemarc
- smartfon Nokia
- smartfon Hisense
- smartfon Infiniton
- smartfon Panasonic
- smartfon Mio
- smartfon Asus
- smartfon Nedis
- smartfon Medion
- smartfon OK
- smartfon Audioline
- smartfon Toshiba
- smartfon Tesla
- smartfon Alcatel-Lucent
- smartfon Majestic
- smartfon Bluebird
- smartfon Garmin
- smartfon Blaupunkt
- smartfon Profoon
- smartfon Vivax
- smartfon Evolveo
- smartfon Alcatel
- smartfon Haier
- smartfon HP
- smartfon Hyundai
- smartfon Honeywell
- smartfon Honor
- smartfon Kodak
- smartfon MaxCom
- smartfon Dell
- smartfon Google
- smartfon Intex
- smartfon Oppo
- smartfon Kyocera
- smartfon Krüger&Matz
- smartfon Qilive
- smartfon Thomson
- smartfon Manta
- smartfon Apple
- smartfon NGS
- smartfon CRUX
- smartfon Emporia
- smartfon Nevir
- smartfon Mitsubishi
- smartfon Razer
- smartfon GoClever
- smartfon SPC
- smartfon Intermec
- smartfon NEC
- smartfon Polaroid
- smartfon Prestigio
- smartfon Aiwa
- smartfon Sanyo
- smartfon Telefunken
- smartfon OnePlus
- smartfon Amazon
- smartfon Olympia
- smartfon Microsoft
- smartfon Bush
- smartfon HTC
- smartfon CAT
- smartfon Denver
- smartfon Saiet
- smartfon Albrecht
- smartfon RCA
- smartfon Media-Tech
- smartfon BenQ
- smartfon Trevi
- smartfon Lexibook
- smartfon Overmax
- smartfon Micromax
- smartfon Sencor
- smartfon NUU Mobile
- smartfon Alecto
- smartfon Binatone
- smartfon Hammer
- smartfon Allview
- smartfon Oukitel
- smartfon Best Buy
- smartfon Cyrus
- smartfon Kazam
- smartfon Tecdesk
- smartfon KPN
- smartfon Swissvoice
- smartfon I.safe Mobile
- smartfon TrekStor
- smartfon Brondi
- smartfon Fysic
- smartfon Wiko
- smartfon Yarvik
- smartfon Aligator
- smartfon Amplicomms
- smartfon AQISTON
- smartfon Amplicom
- smartfon Archos
- smartfon Androidtech
- smartfon Crosscall
- smartfon Ecom
- smartfon Sony Ericsson
- smartfon Vestel
- smartfon Sonim
- smartfon Energy Sistem
- smartfon Doro
- smartfon Sagem
- smartfon Lava
- smartfon Blu
- smartfon Easypix
- smartfon Konrow
- smartfon Brigmton
- smartfon Sunstech
- smartfon Aspera
- smartfon Sunny
- smartfon Nordmende
- smartfon Blackberry
- smartfon Vivo
- smartfon Wolder
- smartfon NGM
- smartfon Vodafone
- smartfon Switel
- smartfon InFocus
- smartfon GreatCall
- smartfon XD
- smartfon Pantech
- smartfon Alba
- smartfon RugGear
- smartfon Umidigi
- smartfon AT&T
- smartfon Mpman
- smartfon Bury
- smartfon Logicom
- smartfon Karbonn
- smartfon Palm
- smartfon Hannspree
- smartfon Phicomm
- smartfon Plum
- smartfon Lumigon
- smartfon Infinix
- smartfon Keneksi
- smartfon Klipad
- smartfon Iget
- smartfon T-Mobile
- smartfon JCB
- smartfon Casper
- smartfon Unnecto
- smartfon Wileyfox
- smartfon ITT
- smartfon Yota
- smartfon Avus
- smartfon Spice
- smartfon Wolfgang
- smartfon BQ
- smartfon ORA
- smartfon Danew
- smartfon Echo
- smartfon Primux
- smartfon Tiptel
- smartfon UTStarcom
- smartfon Zipy
- smartfon Mediacom
- smartfon Beafon
- smartfon BGH
- smartfon Billow
- smartfon Telstra
- smartfon Ulefone
- smartfon CSL
- smartfon ToughGear
- smartfon Benefon
- smartfon Komu
- smartfon Doogee
- smartfon Energizer
- smartfon Tremay
- smartfon Kurio
- smartfon Piranha
- smartfon Coolpad
- smartfon Syco
- smartfon TAG Heuer
- smartfon Mobistel
- smartfon Itel
- smartfon Garmin-Asus
- smartfon Handheld
- smartfon Fero
- smartfon AT Telecom
- smartfon Xtreamer
- smartfon Verykool
- smartfon O2
- smartfon General Mobile
- smartfon Mustang
- smartfon Kogan
- smartfon Pharos
- smartfon Storex
- smartfon Fairphone
- smartfon Freeman
- smartfon HomTom
- smartfon Leotec
- smartfon Auro
- smartfon Maxx
- smartfon ITTM
- smartfon Posh Mobile
- smartfon THL
- smartfon NGM-Mobile
- smartfon POCO
- smartfon Nothing
- smartfon Lark
- smartfon Senifone
- smartfon Tecno
- smartfon Telme
- smartfon UMi
- smartfon Olitech
- smartfon Mobiola
- smartfon Meizu
- smartfon Neffos
- smartfon Gionee
- smartfon TIM
- smartfon Cubot
- smartfon Leagoo
- smartfon NTech
- smartfon Nubia
- smartfon LeEco
- smartfon GSmart
- smartfon Bea-fon
- smartfon Opticon
- smartfon EStar
- smartfon Facom
- smartfon Jitterbug
- smartfon Custom
- smartfon Aplic
- smartfon HMD
- smartfon Opis
- smartfon Volla
- smartfon Nothing Tech
- smartfon Maxwest
- smartfon Kalley
Najnowsze instrukcje dla smartfon

2 Kwietnia 2025

30 Marca 2025
10 Marca 2025
7 Marca 2025
5 Marca 2025
5 Marca 2025
3 Marca 2025

2 Marca 2025

26 Lutego 2025
26 Lutego 2025