Instrukcja obsługi Zagg ID8RGK-BBG
Zagg
klawiatura
ID8RGK-BBG
Przeczytaj poniżej 📖 instrukcję obsługi w języku polskim dla Zagg ID8RGK-BBG (24 stron) w kategorii klawiatura. Ta instrukcja była pomocna dla 9 osób i została oceniona przez 2 użytkowników na średnio 4.5 gwiazdek
Strona 1/24

Rugged Book
Keyboard Instructions
See the important Health and Safety information on page 6 before using this product.
*WARRANTY REGISTRATION
Your ZAGG® Rugged Book comes with a one-year manufacturer’s warranty. In order to activate the warranty,
you must register your Rugged Book as well as keep your purchase receipt. If you purchased your ZAGG
Rugged Book from ZAGG.com, ZAGG® has already registered it and has a copy of your proof of purchase.
NEED MORE HELP? PLEASE SEE OUR FAQ SECTION AT: www.ZAGG.com/faq
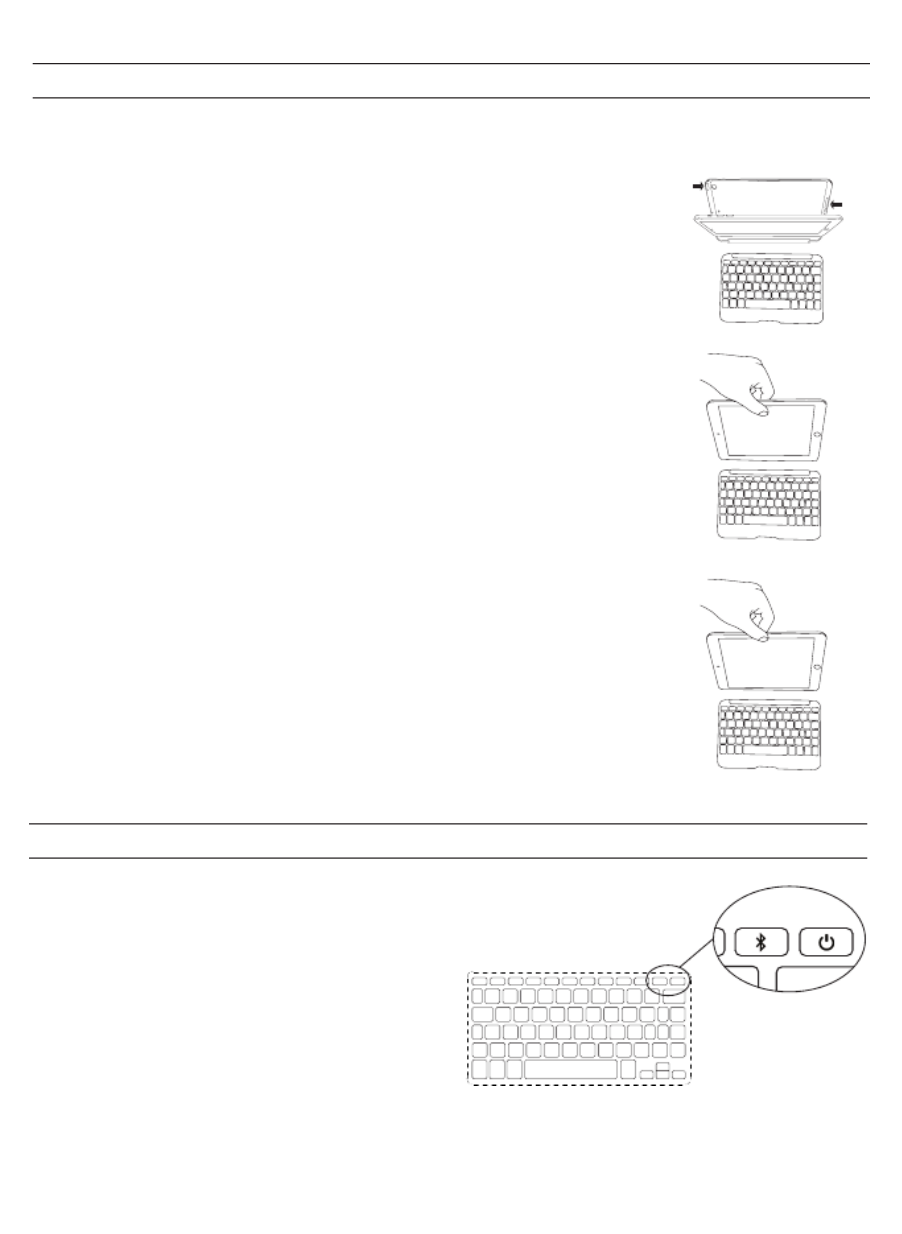
INSERTING/REMOVING YOUR TABLET
To insert your tablet into the Rugged Book open the Book’s
case and remove it from the keyboard (to do this pull the case
up and away from the keyboard). Then, line up your tablet with
the holes in the case. Make sure the camera hole is aligned
properly as well as the opening for your charging cable. When
everything is aligned, set the bottom half of your tablet in the
cover and apply light pressure to ensure it’s properly settled.
Snap the top half of your tablet into the cover. Check all
corners to make sure they have seated properly.
When your tablet is secure in the case, you can connect it to
the keyboard by placing it in the magnetic trough. Powerful
magnets will secure it in place, but will also allow you to
remove your tablet any time it benefits you.
To easily remove your tablet from the case, separate the case
from the keyboard, and then gently roll the rubber overmold
away from the edges while pressing the tablet from behind.
Grasp your tablet’s exposed side and lift/pull away from the
Rugged Book.
1
POWERING ON AND OFF
To turn your Rugged Book on, press the Power button. A green
LED on the battery key will illuminate briefly while the keyboard
powers up. To turn your Rugged Book
off, press and hold the Power button
for three seconds. A red LED will flash,
indicating your Rugged Book has
turned off.
PAIRING YOUR ZAGG Rugged Book
Pairing your Rugged Book with your tablet is easy. It should only need to be
paired once, using the following directions. If the connection between your
tablet and Rugged Book is ever lost, repeat these steps.
1. Access the Bluetooth settings on your tablet.
2. Press and hold the Bluetooth button for three
seconds. A blue LED under the Power key will
flash until your Rugged Book and tablet
are paired.
3. Your tablet will display “ZAGG Rugged Book”
as an available device. Select this option to
complete pairing.
2
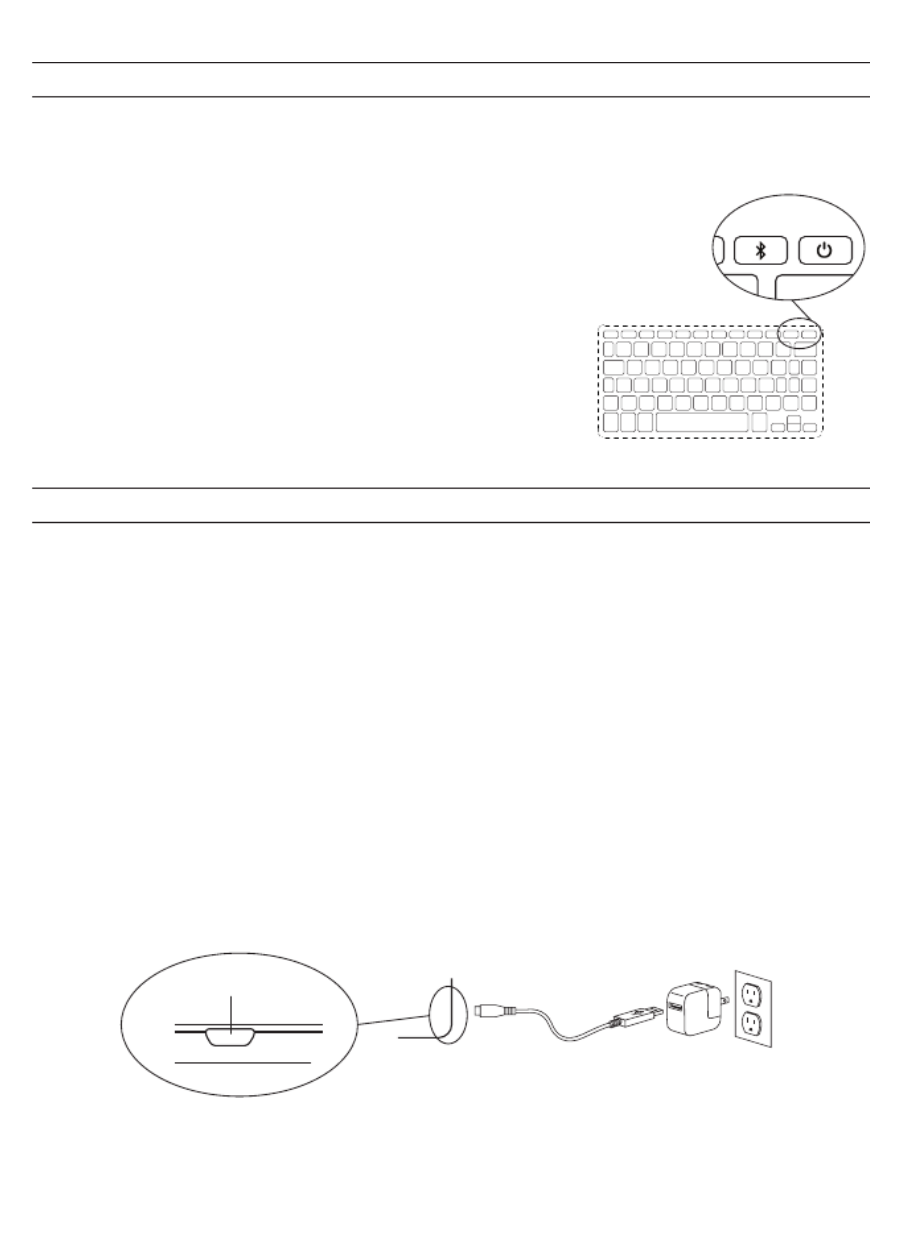
CHARGING
Your Rugged Book features a powerful lithium polymer battery that lasts for up
to two years of normal use between charges*. It comes with a charging cable
you can use to charge your keyboard quickly and conveniently. To charge your
Rugged Book, follow these steps:
1. Plug the micro USB connector into the charging port.
2. Plug the regular USB connector into any USB outlet.
3. A red LED under the Power button will illuminate to indicate your Rugged
Book is charging. Wait until this light turns off, indicating a full charge. It
usually takes 2-4 hours to completely charge your Rugged Book.
4. Remove the micro USB connector and enjoy your Rugged Book for up to
two years before you need to charge it again.
* Normal use is approximately one hour of use per day without the backlit feature. Using the backlit feature will impact
battery life and will require more frequent charging.
CHARGING PORT
Specyfikacje produktu
| Marka: | Zagg |
| Kategoria: | klawiatura |
| Model: | ID8RGK-BBG |
Potrzebujesz pomocy?
Jeśli potrzebujesz pomocy z Zagg ID8RGK-BBG, zadaj pytanie poniżej, a inni użytkownicy Ci odpowiedzą
Instrukcje klawiatura Zagg

1 Października 2024
23 Września 2024
23 Września 2024
22 Września 2024
21 Września 2024
17 Września 2024
17 Września 2024
17 Września 2024
17 Września 2024
17 Września 2024
Instrukcje klawiatura
- klawiatura Sony
- klawiatura Yamaha
- klawiatura Gamdias
- klawiatura Fellowes
- klawiatura Sven
- klawiatura Logitech
- klawiatura Xiaomi
- klawiatura Joy-It
- klawiatura Lenovo
- klawiatura Philips
- klawiatura Livoo
- klawiatura SilverCrest
- klawiatura Gigabyte
- klawiatura Acer
- klawiatura Ducky
- klawiatura Technics
- klawiatura Hikvision
- klawiatura Fujitsu
- klawiatura Roland
- klawiatura HyperX
- klawiatura Conceptronic
- klawiatura Crestron
- klawiatura Behringer
- klawiatura Asus
- klawiatura Nedis
- klawiatura IK Multimedia
- klawiatura Medion
- klawiatura Boss
- klawiatura Marquant
- klawiatura MSI
- klawiatura Niceboy
- klawiatura ILive
- klawiatura Native Instruments
- klawiatura Blaupunkt
- klawiatura Terris
- klawiatura Speed-Link
- klawiatura Casio
- klawiatura Evolveo
- klawiatura Sigma
- klawiatura HP
- klawiatura Genesis
- klawiatura Manhattan
- klawiatura Tripp Lite
- klawiatura Cooler Master
- klawiatura Scosche
- klawiatura 3Dconnexion
- klawiatura Natec
- klawiatura Gembird
- klawiatura Lindy
- klawiatura Zebra
- klawiatura Deltaco
- klawiatura JVC
- klawiatura Trust
- klawiatura V7
- klawiatura LogiLink
- klawiatura Dell
- klawiatura Corsair
- klawiatura Patriot
- klawiatura Steelseries
- klawiatura Digitus
- klawiatura Alesis
- klawiatura TechniSat
- klawiatura Vimar
- klawiatura Dahua Technology
- klawiatura Mad Dog
- klawiatura NZXT
- klawiatura Hori
- klawiatura Renkforce
- klawiatura Keychron
- klawiatura BT
- klawiatura Korg
- klawiatura Homematic IP
- klawiatura Black Box
- klawiatura Pyle
- klawiatura CTA Digital
- klawiatura Apple
- klawiatura Zoom
- klawiatura Iogear
- klawiatura NGS
- klawiatura AOC
- klawiatura Cougar
- klawiatura Kingston
- klawiatura Perixx
- klawiatura Medeli
- klawiatura Samson
- klawiatura PreSonus
- klawiatura NACON
- klawiatura Ewent
- klawiatura Razer
- klawiatura ADATA
- klawiatura 4ms
- klawiatura ION
- klawiatura RCF
- klawiatura SPC
- klawiatura GoGen
- klawiatura AKAI
- klawiatura Kurzweil
- klawiatura Kawai
- klawiatura Ergoline
- klawiatura Viper
- klawiatura Aluratek
- klawiatura Abus
- klawiatura Hama
- klawiatura Microsoft
- klawiatura Marmitek
- klawiatura Verbatim
- klawiatura ModeCom
- klawiatura Sharkoon
- klawiatura Watson
- klawiatura Gravity
- klawiatura DeepCool
- klawiatura XPG
- klawiatura Vakoss
- klawiatura Denver
- klawiatura Anker
- klawiatura Fender
- klawiatura InLine
- klawiatura Rapoo
- klawiatura Tracer
- klawiatura Roccat
- klawiatura Genius
- klawiatura Media-Tech
- klawiatura The T.amp
- klawiatura Trevi
- klawiatura Thermaltake
- klawiatura Hammond
- klawiatura GPX
- klawiatura Hanwha
- klawiatura Vivanco
- klawiatura Arturia
- klawiatura Novation
- klawiatura Best Buy
- klawiatura Elgato
- klawiatura Adj
- klawiatura CM Storm
- klawiatura Blue Element
- klawiatura SureFire
- klawiatura Ketron
- klawiatura Nuki
- klawiatura Enermax
- klawiatura Clas Ohlson
- klawiatura Savio
- klawiatura Arctic Cooling
- klawiatura Cherry
- klawiatura Belkin
- klawiatura Xcellon
- klawiatura Erica Synths
- klawiatura TrekStor
- klawiatura AMX
- klawiatura Goodis
- klawiatura Alienware
- klawiatura A4tech
- klawiatura ACME
- klawiatura BeeWi
- klawiatura Eminent
- klawiatura Targus
- klawiatura Exibel
- klawiatura Logik
- klawiatura Energy Sistem
- klawiatura Doro
- klawiatura Aukey
- klawiatura Tiptop Audio
- klawiatura Kensington
- klawiatura Brigmton
- klawiatura Techly
- klawiatura BlueBuilt
- klawiatura Ednet
- klawiatura Connect IT
- klawiatura Steren
- klawiatura Sandberg
- klawiatura Buffalo
- klawiatura Evga
- klawiatura Millenium
- klawiatura Mede8er
- klawiatura Konig
- klawiatura Sweex
- klawiatura KeySonic
- klawiatura Essentiel B
- klawiatura RGV
- klawiatura Veho
- klawiatura Maxxter
- klawiatura MT Logic
- klawiatura Saitek
- klawiatura Msonic
- klawiatura Vorago
- klawiatura Mitel
- klawiatura BakkerElkhuizen
- klawiatura CME
- klawiatura Adesso
- klawiatura Satel
- klawiatura Brookstone
- klawiatura M-Audio
- klawiatura Man & Machine
- klawiatura Brydge
- klawiatura Satechi
- klawiatura Mad Catz
- klawiatura Cyborg
- klawiatura Hawking Technologies
- klawiatura Krom
- klawiatura Iluv
- klawiatura Avanca
- klawiatura ENDORFY
- klawiatura Voxicon
- klawiatura Mousetrapper
- klawiatura Mediacom
- klawiatura AZIO
- klawiatura X9 Performance
- klawiatura Ozone
- klawiatura Woxter
- klawiatura Ibm
- klawiatura General Music
- klawiatura CSL
- klawiatura Moog
- klawiatura Matias
- klawiatura Keith MCmillen
- klawiatura Trkstor
- klawiatura Zalman
- klawiatura Thomann
- klawiatura SIIG
- klawiatura Contour Design
- klawiatura Micro Innovations
- klawiatura IQUNIX
- klawiatura Gamber-Johnson
- klawiatura Hohner
- klawiatura Accuratus
- klawiatura Goldtouch
- klawiatura Logickeyboard
- klawiatura Merkloos
- klawiatura Native
- klawiatura I-onik
- klawiatura Laney
- klawiatura MaxMusic
- klawiatura Inovalley
- klawiatura Bontempi
- klawiatura Logic3
- klawiatura Penclic
- klawiatura Kogan
- klawiatura Bakker Elkhuizen
- klawiatura Venom
- klawiatura IPort
- klawiatura R-Go Tools
- klawiatura Schubert
- klawiatura Nord Electro
- klawiatura Icon
- klawiatura X-keys
- klawiatura Stagg
- klawiatura PIXMY
- klawiatura Promate
- klawiatura Leotec
- klawiatura ISY
- klawiatura ThunderX3
- klawiatura Alogic
- klawiatura FURY
- klawiatura Pelco
- klawiatura Studiologic
- klawiatura Perfect Choice
- klawiatura ASM
- klawiatura NPLAY
- klawiatura Soundsation
- klawiatura NUX
- klawiatura Canyon
- klawiatura STANDIVARIUS
- klawiatura Dexibell
- klawiatura Eclipse
- klawiatura UGo
- klawiatura Krux
- klawiatura ActiveJet
- klawiatura Genovation
- klawiatura Rii
- klawiatura Sequenz
- klawiatura Redragon
- klawiatura Hamlet
- klawiatura Approx
- klawiatura Gamesir
- klawiatura SilentiumPC
- klawiatura The Box
- klawiatura Mars Gaming
- klawiatura Roline
- klawiatura Acme Made
- klawiatura Startone
- klawiatura Vultech
- klawiatura TEKLIO
- klawiatura Raspberry Pi
- klawiatura Kinesis
- klawiatura Urban Factory
- klawiatura Roadworx
- klawiatura KeepOut
- klawiatura Seal Shield
- klawiatura Kanex
- klawiatura GETT
- klawiatura Unitech
- klawiatura Akko
- klawiatura Mountain
- klawiatura Groove Synthesis
- klawiatura CoolerMaster
- klawiatura IOPLEE
- klawiatura Royal Kludge
- klawiatura Universal Remote Control
- klawiatura Montech
- klawiatura ID-Tech
- klawiatura Xtrfy
- klawiatura Polyend
- klawiatura Carlsbro
- klawiatura UNYKAch
- klawiatura Bluestork
- klawiatura Xtech
- klawiatura SMK-Link
- klawiatura Loupedeck
- klawiatura MK
- klawiatura Getttech
- klawiatura Xuma
- klawiatura Nanoxia
Najnowsze instrukcje dla klawiatura
5 Kwietnia 2025
5 Kwietnia 2025
5 Kwietnia 2025
4 Kwietnia 2025
4 Kwietnia 2025
4 Kwietnia 2025
30 Marca 2025
30 Marca 2025
30 Marca 2025
30 Marca 2025