Instrukcja obsługi Toshiba TLP-681U
Przeczytaj poniżej 📖 instrukcję obsługi w języku polskim dla Toshiba TLP-681U (107 stron) w kategorii Projektor. Ta instrukcja była pomocna dla 5 osób i została oceniona przez 2 użytkowników na średnio 4.5 gwiazdek
Strona 1/107

CONTENTS
1
Before use
TLP680U
TLP681U
OWNER’S MANUAL
(WITH DOCUMENT IMAGING CAMERA)
3LCD DATA PROJECTOR


CONTENTS
2
Before use
SAFETY PRECAUTIONS
The lightning flash with arrowhead
symbol, within an equilateral triangle,
is intended to alert the user to the
presence of uninsulated “dangerous
voltage” within the product’s
enclosure that may be of sufficient
magnitude to constitute a risk of
electric shock to persons.
The exclamation point within an
equilateral triangle is intended to
alert the user to the presence of
important operating and
maintenance (servicing) instructions
in the literature accompanying the
appliance.
WARNING: TO REDUCE THE RISK OF FIRE OR ELECTRIC SHOCK, DO NOT EXPOSE THIS
APPLIANCE TO RAIN OR MOISTURE. DANGEROUS HIGH VOLTAGES ARE
PRESENT INSIDE THE ENCLOSURE. DO NOT OPEN THE CABINET. REFER
SERVICING TO QUALIFIED PERSONNEL ONLY.
FCC Radio Frequency Interference Statement
Note: This equipment has been tested and found to comply with the limits for a Class A
digital device, pursuant to part 15 of the FCC Rules. These limits are designed to
provide reasonable protection against harmful interference when the equipment is
operated in a commercial environment. This equipment generates, uses, and can
radiates radio frequency energy and, if not installed and used in accordance with the
instruction manual, may cause harmful interference to radio communications.
Operation of this equipment in a residential area is likely to cause harmful
interference in which case the user will be required to correct the interference at his
own expense.
WARNING: Changes or modifications made to this equipment, not expressly approved by
Toshiba, or parties authorized by Toshiba, could void the user’s authority to operate
the equipment.
Notice: This Class A digital apparatus complies with Canadian ICES-003.
Cet appareil numérique de la classe A est conforme à la norme NMB-003 du
Canada.
CAUTION: Laser beam is emitted when the laser button of the remote control is pressed. Do not
look from the front of the remote control. Do not face toward a person or to a mirror.


CONTENTS
3
Before use
IMPORTANT PRECAUTIONS In the spaces provided below, record the Model and Serial No. located
at the rear of your LCD projector.
Model No. Serial No.
Retain this information for future reference.
Save Original Packing Materials
The original shipping carton and packing materials will come in
handy if you ever have to ship your LCD projector. For maximum
protection, repack the set as it was originally packed at the factory.
Avoid Volatile Liquid
Do not use volatile liquids, such as an insect spray, near the unit.
Do not leave rubber or plastic products touching the unit for a long
time. They will mar the finish.
Moisture Condensation
Never operate this unit immediately after moving it from a cold
location to a warm location. When the unit is exposed to such a
change in temperature, moisture may condense on the crucial
internal parts. To prevent the unit from possible damage, do not use
the unit for at least 2 hours when there is an extreme or sudden
change in temperature.


CONTENTS
5
Before use
5. Heat
The product should be situated away from
heat sources such as radiators, heat
registers, stoves, or other products
(including amplifiers) that produce heat.
IMPORTANT SAFETY INSTRUCTIONS
6. Water and Moisture
Do not use this product near water – for
example, near a bath tub, wash bowl,
kitchen sink, or laundry tub; in a wet
basement; or near a swimming pool and the
like.
7. Cleaning
Unplug this product from the wall outlet
before cleaning. Do not use liquid cleaners
or aerosol cleaners. Use a damp cloth for
cleaning.
8. Power-Cord Protection
Power-supply cords should be routed so
that they are not likely to be walked on or
pinched by items placed upon or against
them, paying particular attention to cords at
plugs, convenience receptacles, and the
point where they exit from the product.
9. Overloading
Do not overload wall outlets; extension
cords, or integral convenience receptacles
as this can result in a risk of fire or electric
shock.
10. Lightning
For added protection for this product during
storm, or when it is left unattended and
unused for long periods of time, unplug it
from the wall outlet.
This will prevent damage to the product due
to lightning and power-line surges.


CONTENTS
6
Before use
11. Object and Liquid Entry
Never push objects of any kind into this
product through openings as they may
touch dangerous voltage points or short-out
parts that could result in a fire or electric
shock. Never spill liquid of any kind on the
product.
IMPORTANT SAFETY INSTRUCTIONS
12. Do not place the product vertically
Do not use the product in the upright
position to project the pictures at the
ceiling, or any other vertical positions.
It may fall down and dangerous.
13. Stack Inhibited
Do not stack other equipment on this
product or do not place this product on the
other equipment.
Top and bottom plates of this product
develops heat and may give some
undesirable damage to other unit.
14. Attachments
Do not use attachments not recommended
by the product manufacturer as they may
cause hazards.
15. Accessories
Do not place this product on an unstable
cart, stand, tripod, bracket, or table. The
product may fall, causing serious injury to a
child or adult, and serious damage to the
product. Use only with a cart, stand, tripod,
bracket, or table recommended by the
manufacturer, or sold with the product. Any
mounting of the product should follow the
manufacturer’s instructions, and should use
a mounting accessory recommended by the
manufacturer.
A product and cart combination should be
moved with care. Quick stops, excessive
force, and uneven surfaces may cause the
product and cart combination to overturn.
S3125A


CONTENTS
8
Before use
IMPORTANT SAFETY INSTRUCTIONS
21. Do not carry by the camera arm.
Do not carry the projector by the camera
arm.
Doing so can result in damage or injury.
22. Do not leave documents on the unit for
long periods of time while using the
document imaging function.
Do not leave texts, papers or other
documents for projection on the unit for
long periods of time. The heat could erase
the letters on a thermal paper.
23. Do not move the projector while the arm
is still erect.
Always store the arm back in position when
moving the projector. Otherwise injury or
damage may result.
24. Do not look into the arm light while it is lit.
The strong light may cause damage to your
eyes or sight.
25. If glass components, including lens and
lamp, should break, contact your dealer
for repair service.
This product incorporates glass
components, including a lens and a lamp. If
such parts should break, please handle
with care to avoid injury and contact your
dealer for repair service. The broken pieces
of glass may cause to injury.


CONTENTS
9
Before use
Power supply cord
selection
If your line voltage is 220 to 240, use one of the
following types of cable.
Plug type
EURO
240V
10 – 15A
UK
240V
6A
Australian
240V
10A
North American
240V
15A
Switzerland
240V
6A
Line voltage
220 – 240V
200 – 240V
200 – 240V
200 – 240V
200 – 240V
Plug
configuration


CONTENTS
10
Before use
Contents
Before use
SAFETY PRECAUTIONS ............................................................... 2
IMPORTANT PRECAUTIONS....................................................... 3
IMPORTANT SAFETY INSTRUCTIONS ..................................... 4
Power supply cord selection ............................................................. 9
Part names and functions .............................................................. 11
Connections and installation
Connections .................................................................................... 16
Projector placement ........................................................................ 18
Operations
Picture projection ........................................................................... 21
Operating the computer by the remote control .............................. 25
Adjustments
Settings and adjustments on the menu .......................................... 27
Initial settings – Default ................................................................. 28
Keystone correction – Keystone ..................................................... 30
Projection adjustments – Image..................................................... 31
Picture adjustments – Picture ........................................................ 32
Sound adjustments – Audio............................................................ 33
Saving data – Save .......................................................................... 34
Camera
Part names and functions of document imaging camera ............. 35
Picture projection with the document imaging camera ................ 37
Overlaying projection ..................................................................... 39
Maintenance
Trouble indications ......................................................................... 40
Air filter, lens and main unit cleaning ........................................... 41
Lamp replacement .......................................................................... 42
Others
Before calling service personnel .................................................... 43
Input signal ..................................................................................... 45
Adjustments with RS-232C ............................................................ 49
Specifications .................................................................................. 51
LIMITED WARRANTY ................................................................. 53


CONTENTS
11
Before use
ON/STANDBY MENU ENTER
SELECT/ADJUST
INPUT
ON
LAMP
TEMP
Part names and functions
Main unit
Lens cover
Exhaust holes
Foot adjuster
release button
20
Foot adjuster
20
Projection lens
Zooming ring
21
Focusing ring
21
Infrared remote sensor
Intake holes
ON/STANDBY button
21
To turn the projector on or off.
MENU button
27
To display or close the menu.
SELECT/ADJUST button
28
( / / / )
To select items or adjust values on the
menu.
ENTER button
30
To enter your selection on the menu.
INPUT button
21
To select the input source.
ON indicator
21
40
LAMP indicator
21
40
TEMP indicator
40
(Continued)
5
8
7
6
1
3
2
4
5 8761 32 4
Control panel


CONTENTS
12
Before use
(Continued)
Left side Right side
AC IN socket
19
Carrying handle
Open to carry the projetor.
Rear side CONTROL connector
17
49
To connect a computer to control the projector.
MONITOR OUTPUT connectors
(RGB output, AUDIO output)
17
To connect to a monitor or audio equipment.
RGB INPUT connectors (RGB input, AUDIO input)
16
To connect a computer, etc.
VIDEO INPUT connectors
(S-VIDEO input, VIDEO input, AUDIO input)
17
To connect a video equipment, etc.
(Continued)
Document imaging camera model
1
2
3
4
RS-232C
CONTROL
RGB AUDIO
MONITOR OUTPUT
RGB
S-VIDEO VIDEO
VIDEO INPUT
L - AUDIO -R
AUDIO
RGB INPUT
1 2 3 4
Speaker
Infrared remote sensor
Intake holes
Anti-theft lock

CONTENTS
13
Before use
AUTO SET
POINTER
PJ
MARKER
LASER
MENU ENTER
KEYSTONE
ON/STANDBY
R-CLICKL-CLICK
VIDEO CAMERARGB
RESET
MUTE CALL
FREEZERESIZE
(Continued)
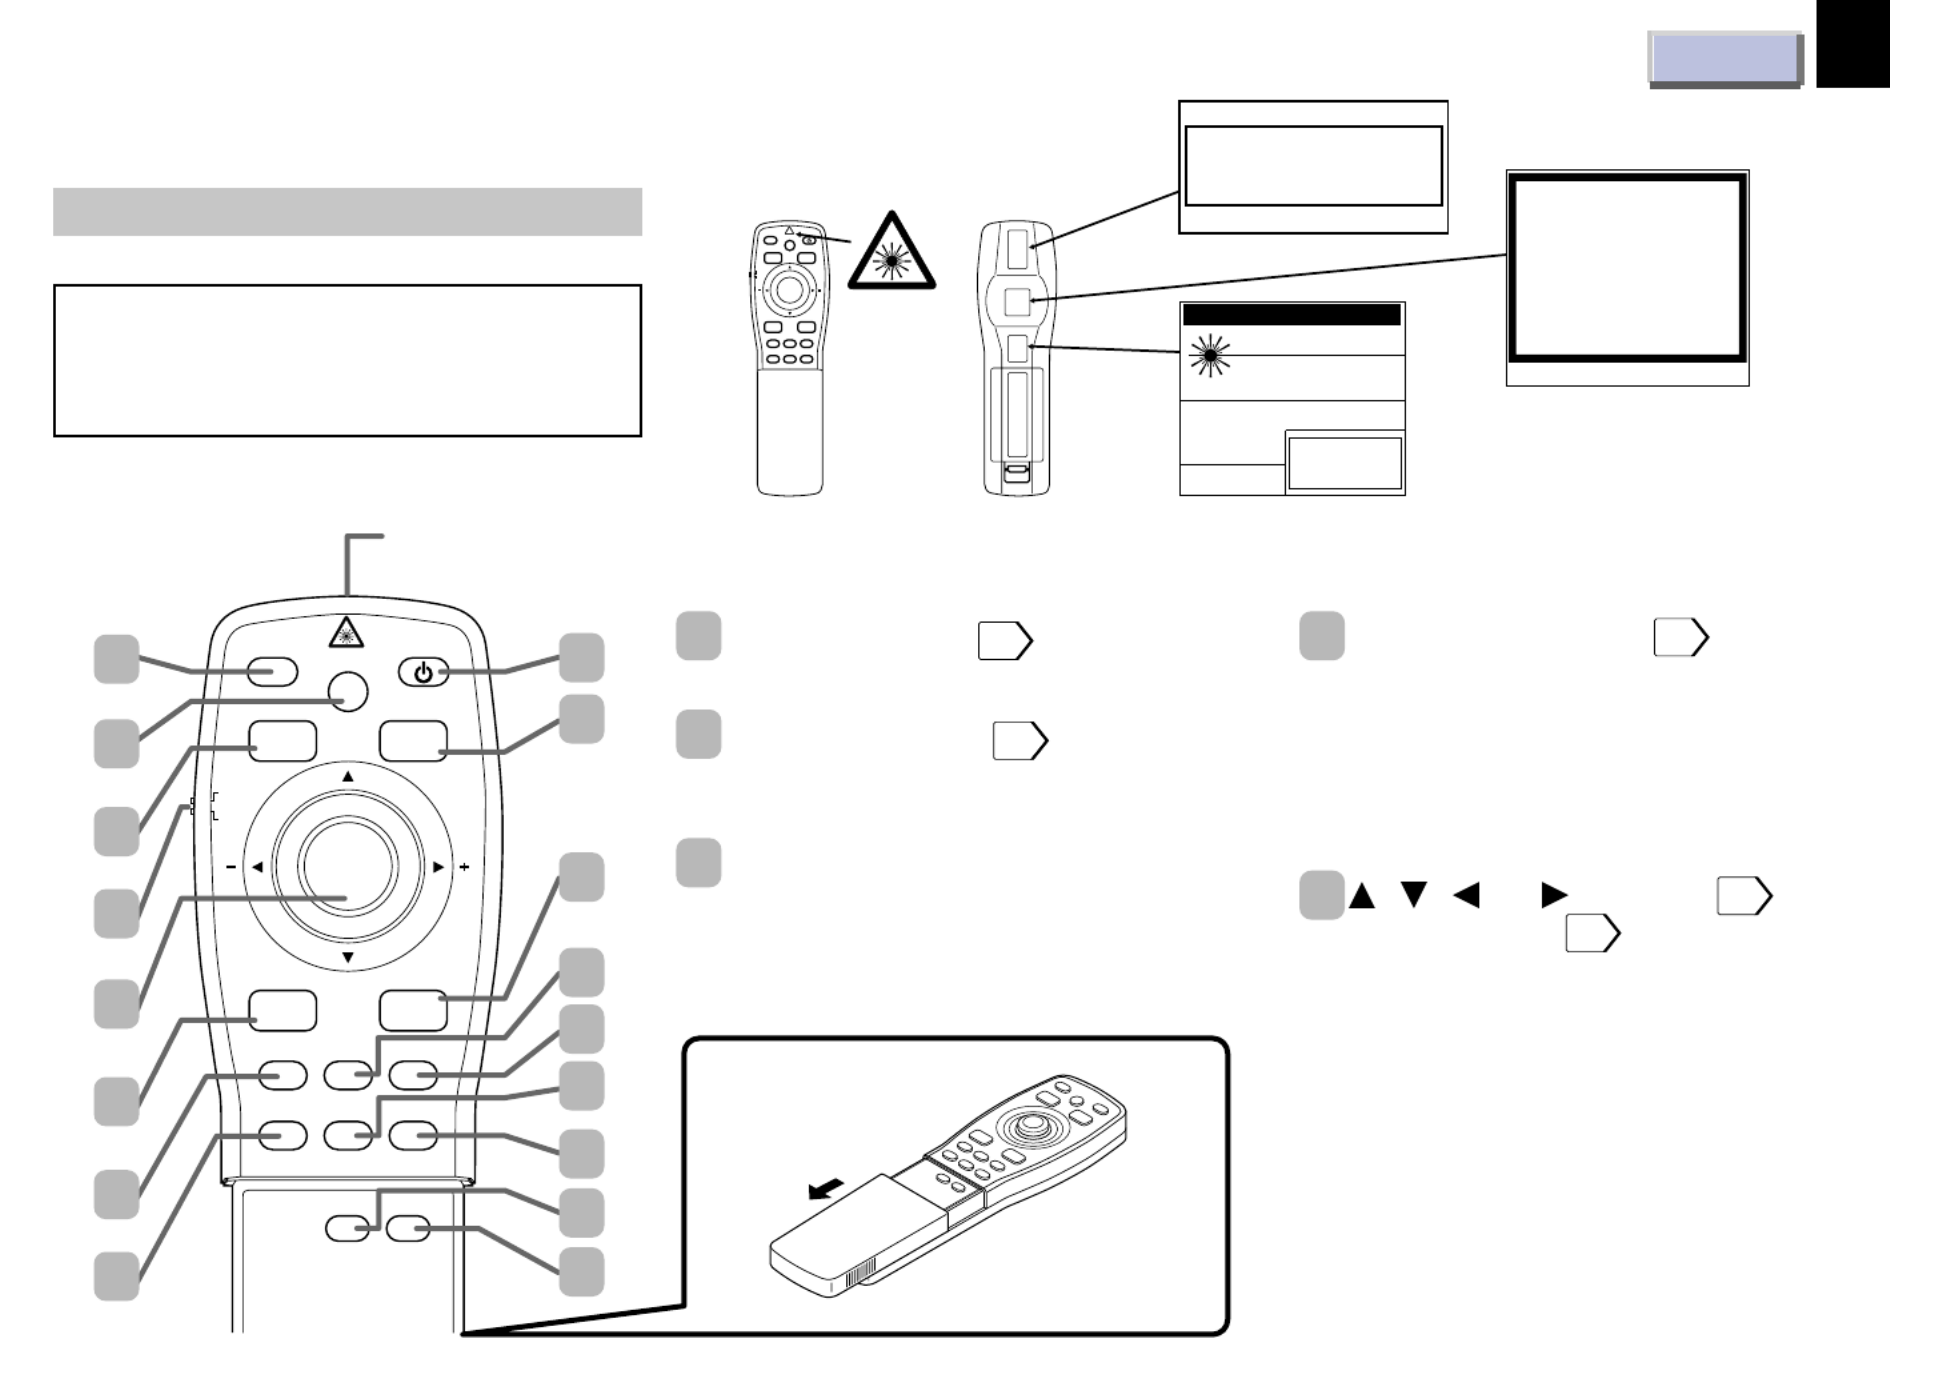
Remote control
* Functions when the POINTER/PJ selector is
set to “POINTER”.
AUTO SET button
23
To adjust the image automaticcally.
KEYSTONE button
22
To correct the keystone distortion of the
picture automatically.
MARKER button
To display a marker on the screen.
Each time the button is pressed, the
marker changes the shape, and finally
disappears.
POINTER/PJ selector
26
To switch the operation modes of the
remote control.
POINTER: To operate a computer. (The
supplied REMOTE MOUSE RECEIVER
should be connected to the computer.)
PJ: To operate the projector.
, , (–), (+) button
28
/
Pointer control*
26
• To select items or adjust values on the
menu.
• To shift a picture after changing its size
with the RESIZE button.
• To move the marker displayed with the
MARKER button.
• To move the pointer of the computer.*
• To substitute for the L-CLICK button by
pressing the center.*
(Continued)
Caution - use of controls or adjustments or
performance of procedures other than those
specified herein may result in hazardous
radiation exposure.
4
5
3
2
1
Laser emission part
17
16
15
14
13
12
11
10
9
1
2
3
4
5
6
7
8
AUTO SET
POINT ER
PJ
MARKER
LASER
MENU ENTER
KEYSTONE
ON/STANDBY
R-CLICKL-CLICK
VIDEO CAMERARGB
RESET FREEZERESIZE
Location of the labels
REAR
AVOID EXPOSURE
-LASER
RADIATION IS EMITTED
FROM THIS APERTURE
MADE IN JAPAN
LASER RADIATION
DO NOT STARE INTO BEAM
CLASS 2 LASER PRODUCT
LASER–STRAHLUNG
NICHT IN DEN STRAHL BLICKEN
LASER KLASSE 2 PRODUKT
RAYONNEMENT LASER
NE PAS REGARDER DANS LE FAISCEAU
APPAREIL A LASER DE CLASSE 2
WAVE LENGTH (WELLENLÄNGE,
LONGUEUR D'ONDE): 650nm
MAX OUTPUT
(MAX AUSGANGSLEISTUNG,
PUISSANCE MAXIMA): 1mW
IEC60825–1 A1;1997
CAUTION
LASER RADIATION
DO NOT STARE INTO BEAM
WAVE LENGTH: 650nm
MAX OUTPUT: 1mW
CLASS II LASER PRODUCT
COMPLIES WITH DHHS 21 CFR SUBCHAPTER J
TOSHIBA AMERICA CONSUMER PRODUCTS, INC.
82 TOTOWA RD.,
WAYNE, NJ 07470,
U.S.A
REMOTE CONTROL
MODEL CT-90009
MANUFACTURED:
SEPTEMBER 1999
PLACE OF
MANUFACTURER: A

CONTENTS
14
Before use
(Continued)
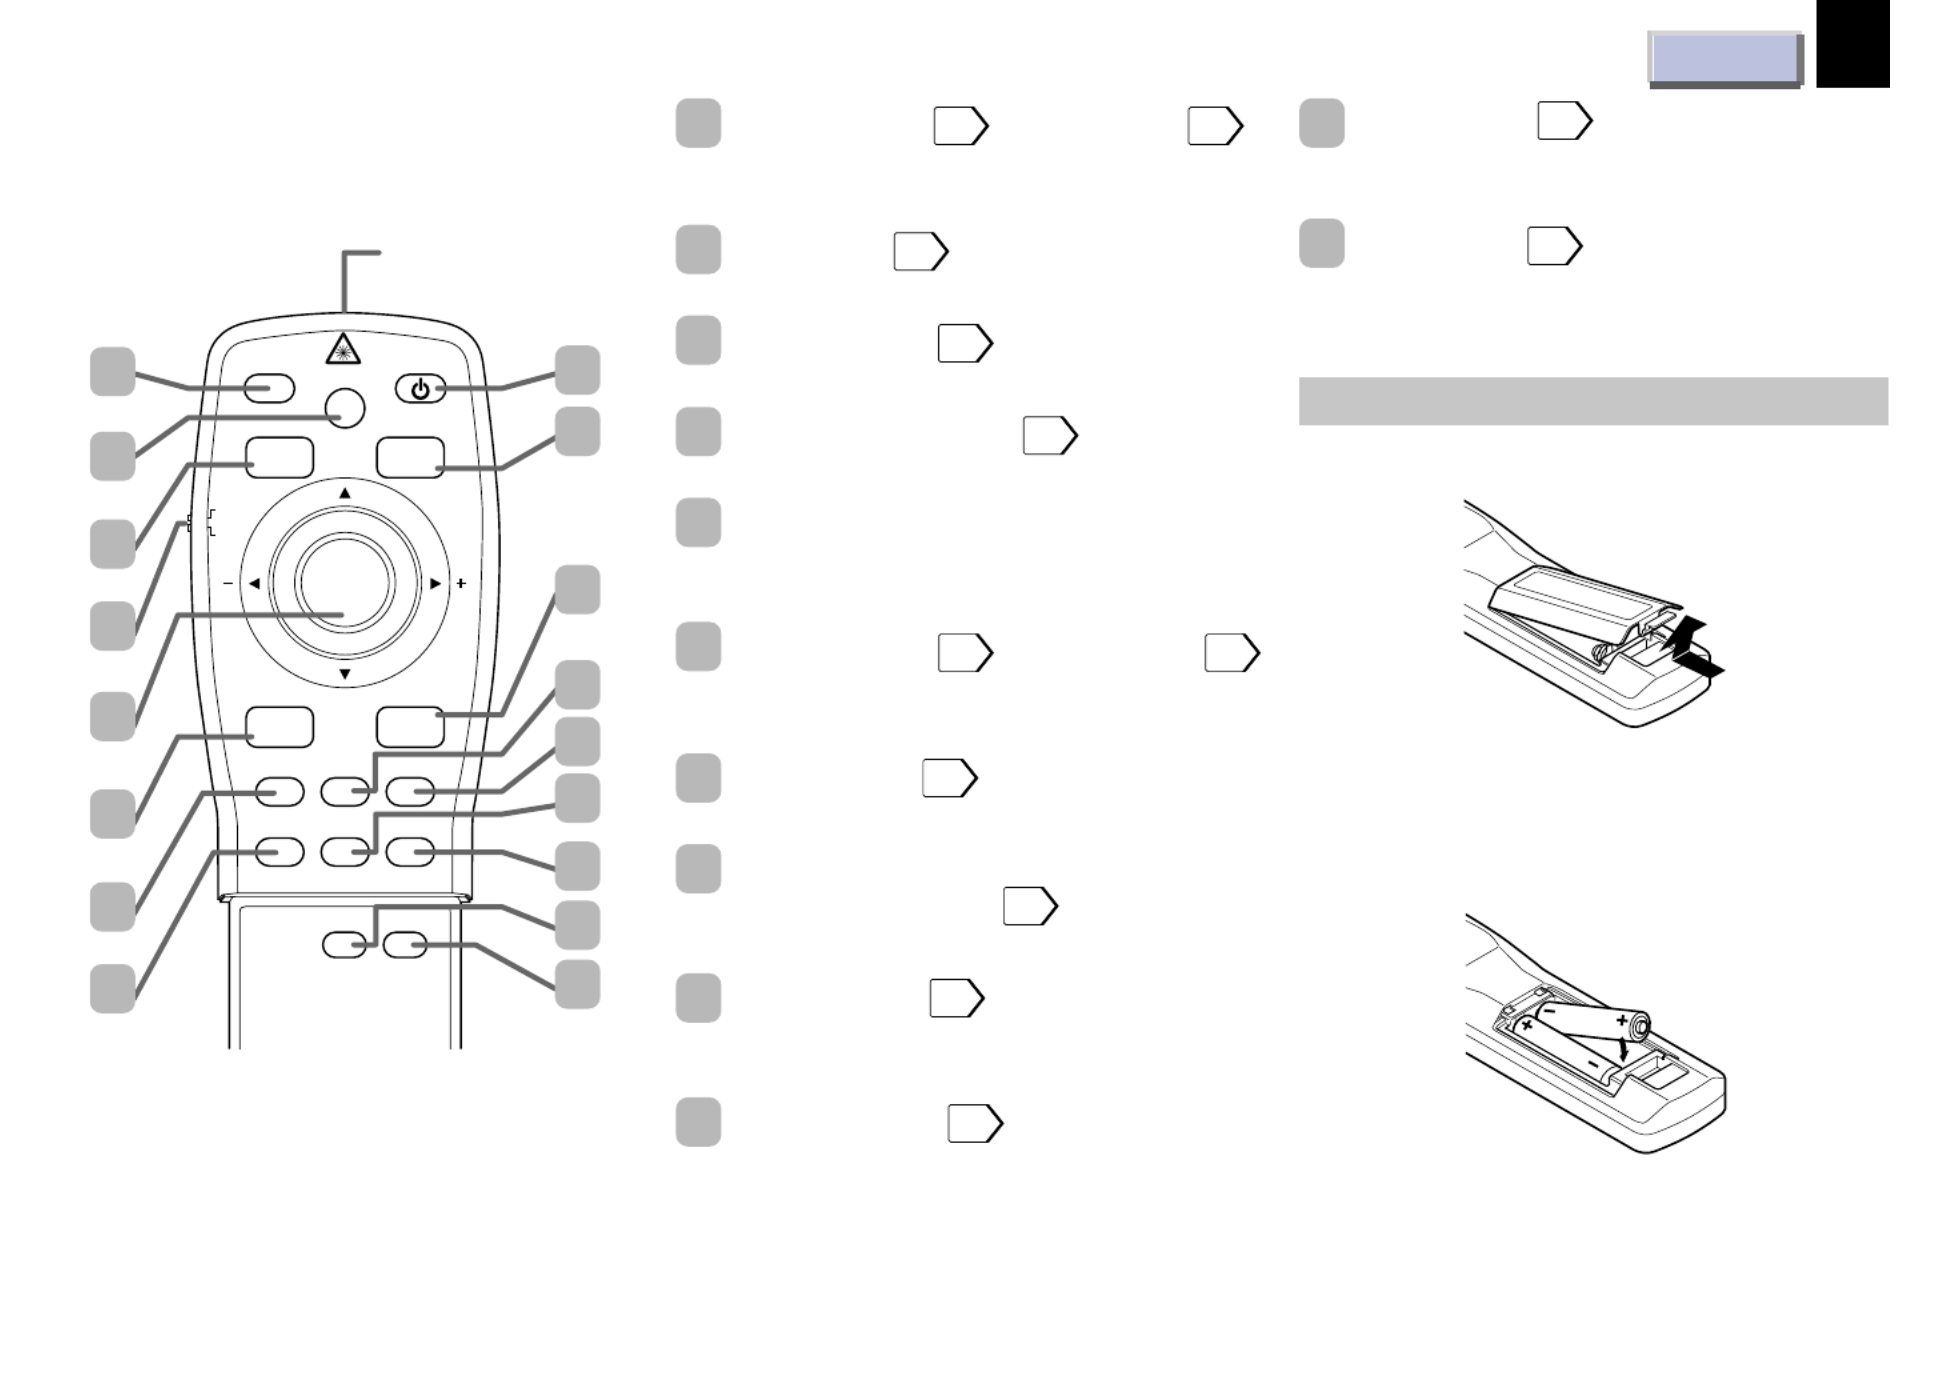
Installing batteries
1) Open the cover.
2) Install the batteries.
Make sure that the +/– polarities match the
illustration in the compartment.
3) Attach the cover.
(Continued)
L-CLICK button*
26
/ MENU button
28
• To left-click.*
• To display or close the menu.
RGB button
21
To select the RGB input.
RESIZE button
24
To change the picture size.
ON/STANDBY button
21
To turn the projector on or off.
LASER button
To display the laser pointer by pointing the
laser emission part toward the screen.
R-CLICK button*
26
/ ENTER button
30
• To right-click.*
• To enter your selection on the menu.
VIDEO button
21
To select the video input.
CAMERA button (for document imaging
camera model only)
37
To select the camera input.
RESET button
29
To restore the settings and adjustments to
the default.
FREEZE button
23
To freeze the picture.
6
7
8
14
13
12
11
10
9
15
MUTE button
23
To cut off the picture and sound
temporarily.
CALL button
23
To display the current input source and
signal status information.
17
16
AUTO SET
POINTER
PJ
MARKER
LASER
MENU ENTER
KEYSTONE
ON/STANDBY
R-CLICKL-CLICK
VIDEO CAMERARGB
RESET
MUTE CALL
FREEZERESIZE
Laser emission part
17
16
15
14
13
12
11
10
9
1
2
3
4
5
6
7
8


CONTENTS
15
Before use
Remote control operation
Point the remote control at the infrared
remote sensor and press a button.
Distance : within about 5 meters from the front
of the remote sensor.
Angle : within about 15 of the remote°
sensor in every direction.
Notes
• Do not leave the remote control unit turned
the face down as it may make the buttons
pressed to hasten the battery end.
• The remote control may not operate when
there is sunlight or other strong light such as
a fluorescent lamp shining on the remote
sensor.
• Operate the remote control from a position
where the remote sensor is visible.
• Do not drop the remote control or otherwise
jolt it.
• Keep the remote control out of locations with
excessively high temperature or humidity.
• Do not get water on the remote control or
place wet objects on it.
• Do not disassemble the remote control.
• Under unusual circumstances the remote
control may not operate well due to the
location being used or the surroundings.
At such times, change the direction of the
remote control to the projector and retry the
operation.
Rear side (document imaging camera model)
Rear side
Front side
Notes
Using batteries incorrectly can cause them to
leak or burst. Strictly observe the following.
• –Install the batteries with their + and ends
facing correctly.
• Do not charge, heat, disassemble, or short
the batteries or throw them into a fire.
• Do not leave exhausted batteries in the
remote control.
• Do not mix different types of batteries or new
and old batteries.
• When you will not be using the remote control
for a prolonged period, take the batteries out
of the remote control.
• When the remote control stops working or
only works from very close distance, replace
all the batteries with new ones.
• When replacing the batteries, use a more
longer life alkaline batteries.
• If a battery leaks, carefully wipe off any
residue inside the battery case before loading
new batteries.
(Continued)
15°15°
15°15°
15°15°

CONTENTS
16
Connections and installation
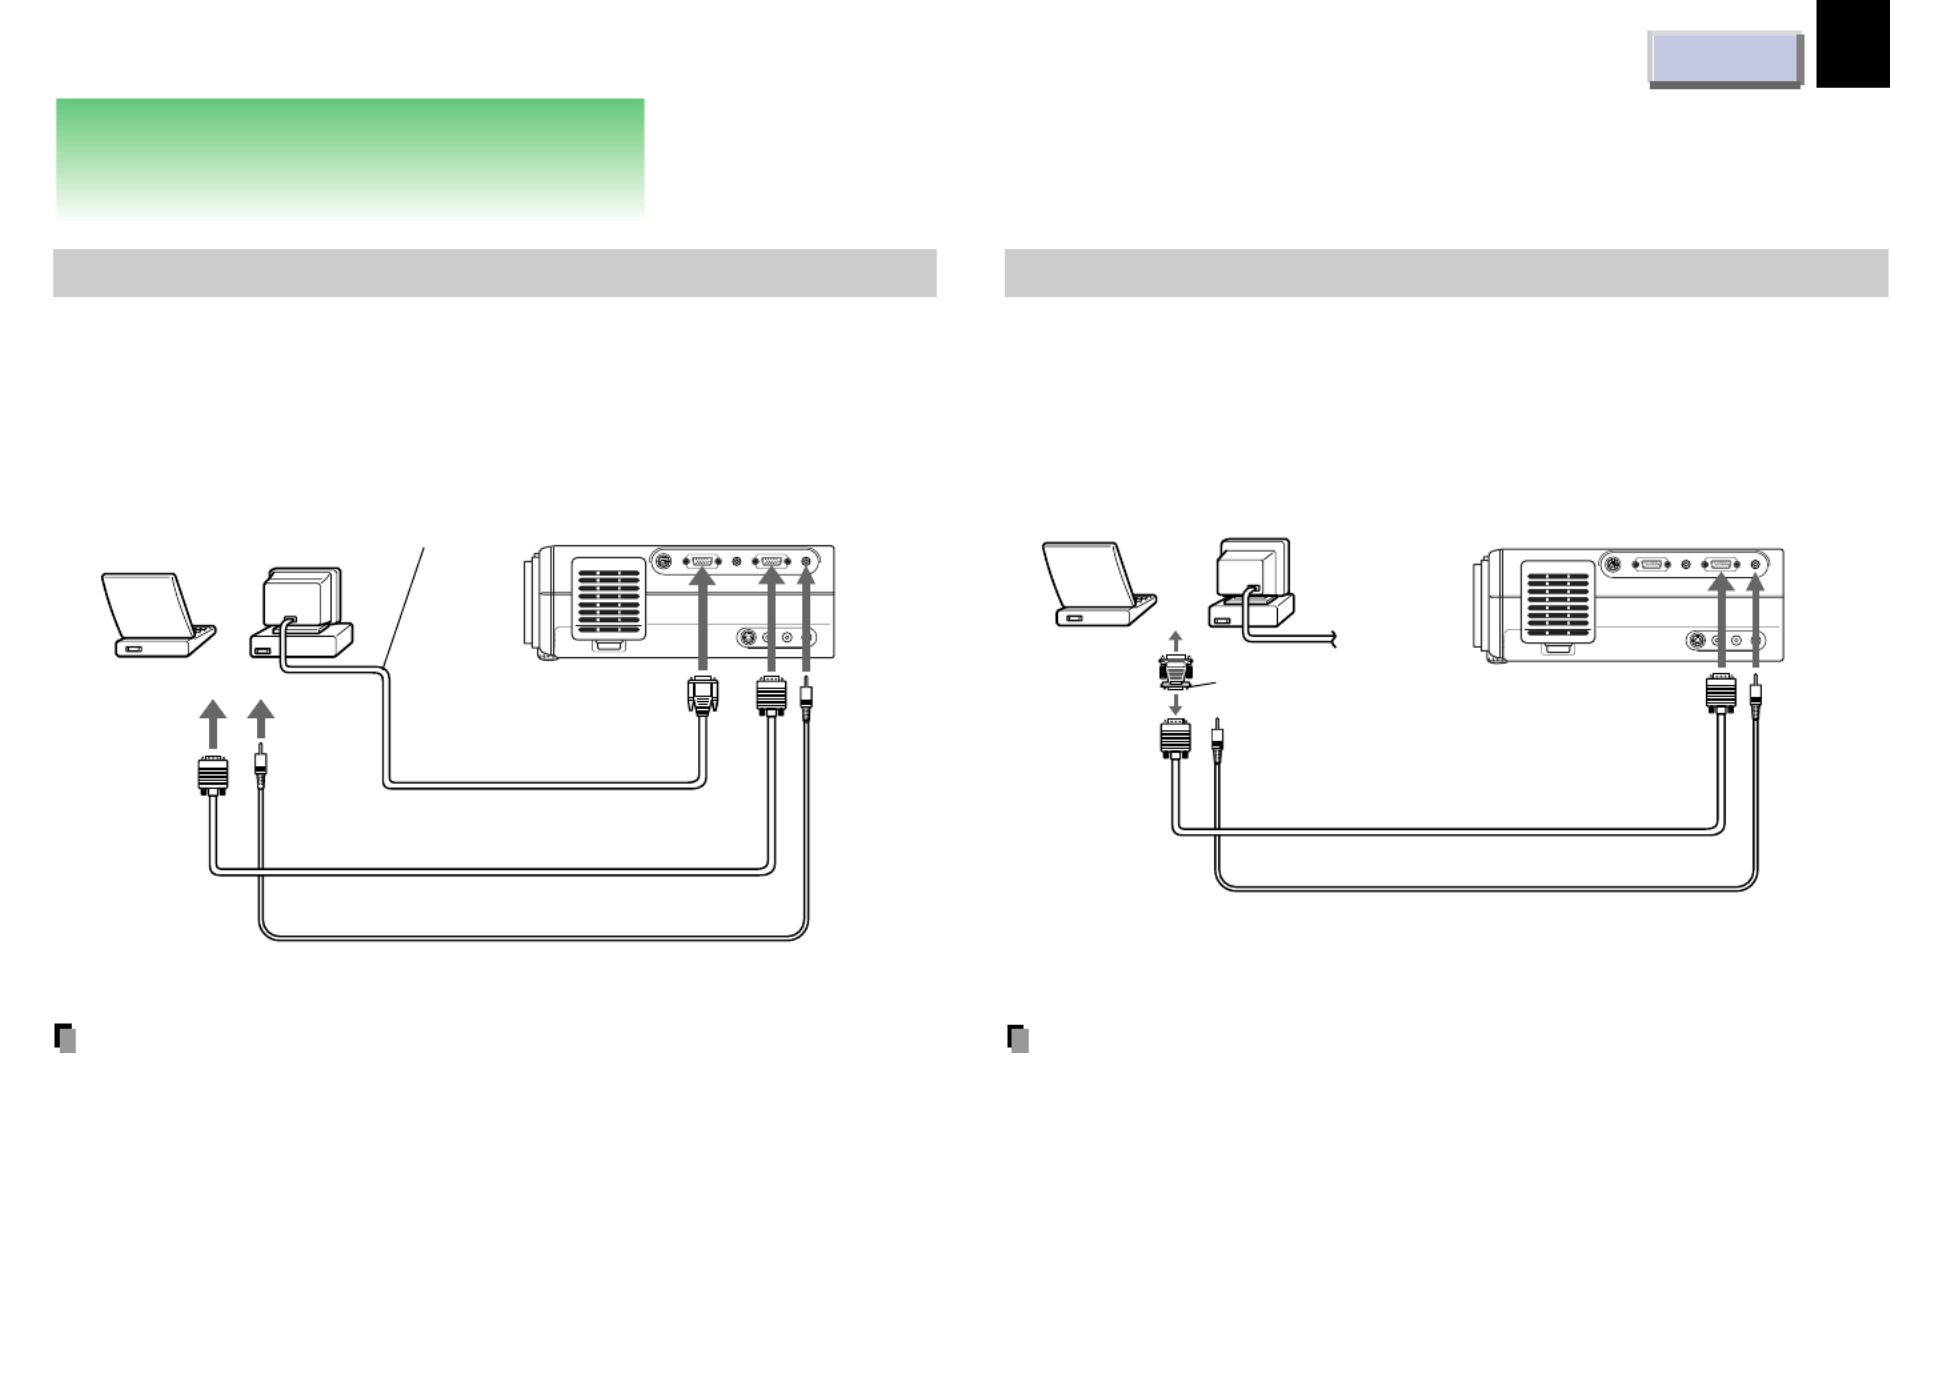
Connections
Connecting an IBM PC or compatible computer (DOS/V)
Check that the power for the projector and computer is off before
connecting the cables.
Notes
• The projector cannot be connected to a computer that does not have
an analog RGB output terminal. For details, refer to the computer
manual.
• You may not be able to connect some computers to the projector. For
details, consult the dealer.
• If NTSC/PAL/SECAM signals are input to the RGB INPUT connector,
they cannot be displayed. (Input NTSC/PAL/SECAM signals to the
VIDEO INPUT jack.)
Connecting a Macintosh computer
• Attach the supplied adapter for Macintosh computers.
• Check that the power for the projector and computer is off before
connecting the cables.
Notes
• The projector cannot be connected to a computer that does not have
an analog RGB output terminal. For details, refer to the computer
manual.
• You may not be able to connect some computers to the projector. For
details, consult the dealer.
• The adapter for Macintosh computers is conformable to MULTIPLE
SCAN 21.
(Continued)
RS-232C
CONT ROL
RGB AUDIO
MONIT OR OUTPU T
RGB
S-VIDEO VIDEO
VIDEO INPU T
L - AU DIO - R
AUDIO
RGB INPUT
To
monitor
port
To
audio
output port
Connect when you
want to view a picture
on the computer monitor.
RGB cable (supplied)
PC audio cable (supplied)
Computer
monitor
cable
Desktop
computers
Laptop
computers
or
To
MONITOR
OUTPUT
(RGB)
To
RGB
INPUT
(AUDIO)
To RGB
INPUT (RGB)
RS-232C
CONT ROL
RGB AUDIO
MONIT OR OUTPU T
RGB
S-VIDEO VIDEO
VIDEO INPU T
L - AU DIO - R
AUDIO
RGB INPUT
RGB cable (supplied)
PC audio cable (supplied)
To monitor port
To audio output port
Adapter for Macintosh
computers (supplied) To
RGB
INPUT
(RGB)
To
RGB
INPUT
(AUDIO)
Desktop
computers
Laptop
computers
or


CONTENTS
17
Connections and installation
RS-232C
CONT ROL
RGB AUDIO
MONIT OR O UTPUT
RGB
S-VIDEO VIDEO
VIDEO INPUT
L - AU DIO - R
AUDIO
RGB IN PUT
To MONITOR OUTPUT (AUDIO)
Ø3.5mm STEREO mini plug
(Audio output level is constant.)
To audio input
Audio cable
(not supplied)
Connect a stereo system
for dynamic sound.
You can connect an
extra monitor to view
the picture.
You can connect a computer
to control the projector.
49
(Continued)
Connecting video equipment
Check that the power for the projector and computer is off before
connecting the cables.
Output terminals
Check that the power for the projector and computer is off before
connecting the cables.
Notes
• Sound of the source which you select is output to the connected
stereo system, etc.
• The MONITOR OUTPUT (RGB output) connector always sends out a
signal which is input to the RGB INPUT (RGB input) connector
regardless of your source selection.
• Even while the projector is in standby mode, the MONITOR OUTPUT
(RGB output) connector continues its output.
Note
Signal input to the S-VIDEO jack takes priority over that to the VIDEO
jack.
RS-232C
CONT ROL
RGB AUDIO
MONIT OR OUTPU T
RGB
S-VIDEO VIDEO
VIDEO INPU T
L - AU DIO - R
AUDIO
RGB I NPUT
To VIDEO
INPUT
(S-VIDEO)
To S-VIDEO output
To Video output (yellow)
To Audio output (white)
To Audio output (red)
Audio/Video cable (supplied)
S-VIDEO cable (not supplied)
To RGB
INPUT
(RGB)
To RGB
INPUT
(AUDIO)
To CR(PR) output
To CB(PB) output
To Y output
Audio cable (not supplied)
(not supplied)
To audio output L
(white)
To audio output R
(red)
To VIDEO INPUT (VIDEO) (yellow)
To VIDEO INPUT (AUDIO L) (white)
To VIDEO INPUT (AUDIO R) (red)
Video tape player
Video player with color difference output


CONTENTS
19
Connections and installation
(Continued)
1
Place the projector on a steady,
level surface such as a table.
Point the projector squarely at the screen
for the best possible picture.
Point the lens straight at the center of the
screen as above.
Place the projector horizontally so that the
projecting light hits the screen squarely.
Top view
Side view
a: Distance between the lens and the screen
b: Distance between the lens height and the
bottom of projection area
Adjust the distance between
the lens and the screen.
The projection size depends on the
distance between the lens and the
screen.
Adjust the projection size by changing the
distances as shown below.
2
Screen size
(inches)
23
40
60
80
100
150
200
250
b (cm)
4
6
9
12
15
23
30
38
Minimum
(WIDE)
–
1.56
2.373
3.186
3.999
6.031
8.064
10.096
Maximum
(TELE)
1.132
2.017
3.059
4.1
5.142
7.746
10.35
–
a (m)
Connect the power cord.
• Insert one end in the AC IN socket on
the projector.
• Insert the other end in a wall outlet.
The ON indicator lights in orange and the
projector turns to standby mode.
Take off the lens cover.
3
• The values are approximations.
4
(Continued)
To a wall outlet.
Screen
90°
Screen
90°
Screen
90°
Lens
a
b


CONTENTS
21
Operations
Picture projection
CAUTION
Do not look into the projection lens while
operating the projector.
Preparation
• Install and connect the projector properly.
• Take off the lens cover.
• Set the POINTER/PJ to “PJ”.
Press ON/STANDBY.
Both the ON and LAMP indicators light up
in green.
Turn on the connected
equipment and put it in
playback mode.
1
2
3
(Continued)
Select the input source.
(On the remote control)
Press RGB or VIDEO.
(On the control panel of the main unit)
Press INPUT repeatedly.
Each time the button is pressed, the
source indication on the screen changes
as follows:
RGB: To project pictures from a
computer connected to RGB
INPUT.
Video: To project pictures from a
video player connected to
VIDEO INPUT.
Camera: To project pictures from a
document imaging camera.
(For document imaging
camera model only)
Adjust the picture size by
turning the zooming ring.
Turn to the right to enlarge the picture.
Turn to the left to reduce the picture.
Focus on the picture by
turning the focusing ring.
A still picture is recommended for
focusing.
→
→ →
4
5
Indicators
3
5 4
ON/STANDBY MENU ENTER
SELECT/ADJUST
INPUT
ON
LAMP
TEMP
1
AUTO SET
POINTER
PJ
MARKER
LASER
MENU ENTER
KEYSTONE
ON/STANDBY
R-CLICKL-CLICK
VIDEO CAMERARGB
RESET FREEZERESIZE
1
3
On (Green)
Flashing (Green)
On (Green)
On (Green)
LAMP
ON
LAMP
ON


CONTENTS
22
Operations
Notes
• “ ” is displayed on the screen if the
projector does not receive any signal from the
connected equipment. Put the equipment in
playback mode.
• Due to the lamp characteristic, flickers may
occasionally occur in a picture. This is not
malfunction of the unit.
• When an RGB source is selected and no
signal is sent from the computer for about 30
minutes, the projector turns to standby mode
for power saving. It automatically turns on
when the signal resumes. Pressing
ON/STANDBY also turns it on.
• While operating the projector, “ ” may be
displayed on the screen. This means that the
operation cannot be completed.
Turning the power off
1) Press ON/STANDBY after using the
projector.
An instruction message appears.
2) Press ON/STANDBY again.
The LAMP indicator turns off, and the
projector turns to standby mode. (The ON
idicator lights in orange.)
3) After confirming the exhaust fan stops,
unplug the power cord.
The ON indicator turns off.
(Continued)
(Continued) Notes
• Even after turning the power off, the intake
and exhaust fans continue to work for a while
to cool the inside of the projector.
• Immediately after the power off, the projector
may not be turned on while the LAMP
indicator is flashing in green.
• Before unplugging the power cord, make sure
that the fans are stopped.
Correcting the keystone distortion
A picture may be expanded on the upper side if
projected upward from the projector lifted up by
the foot adjuster. The projector can correct this
keystone distortion automatically.
Press KEYSTONE.
The keystone distortion is corrected
automatically.
To correct further, make the “Keystone”
adjustment on the menu.
30
AUTO SET
POINTER
PJ
MARKER
LASER
MENU ENTER
KEYSTONE
ON/STANDBY
R-CLICKL-CLICK
VIDEO CAMERARGB
RESET FREEZERESIZE
IndicatorsON/STANDBY
ON/STANDBY
KEYSTONE
ON/STANDBY MENU ENTER
SELECT/ADJUST
INPUT
ON
LAMP
TEMP


CONTENTS
23
Operations
(Continued) Contents of displayed items
(Continued)
Adjusting the image automatically
An image which is flickering, blurred or is not
centered, can be adjusted automatically.
Press AUTO SET.
The image is adjusted automatically.
To adjust further, make the “ ”Image adjustment
on the menu.
31
Cutting off the picture and sound
temporarily
1) Press MUTE.
The sound is cut off temporarily.
“ ” appears.
2) Press MUTE again.
The picture is also cut off temporarily.
“ ” appears.
To restore, press MUTE again.
Note
If you press MUTE while the menu is displayed,
the menu disappears.
Freezing the picture
Press FREEZE.
The picture freezes.
“ ” mark appears on the screen.
To release the picture, press FREEZE again.
Any other operations can also release the
picture.
Note
This function is convenient for the case where
you are using the document imaging camera
model and change documents to project
through the camera.
Displaying the input source
information
Press CALL.
The current input source and the signal status
information is displayed.
To close the display, press CALL again.
Note
If you press CALL while the menu is displayed,
the menu disappears.
AUTO SET
POINTER
PJ
MARKER
LASER
MENU ENTER
KEYSTONE
ON/STANDBY
R-CLICKL-CLICK
VIDEO CAMERARGB
RESET FREEZERESIZE
MUTE CALL
AUTO SET
FREEZE
CALL
MUTE
[ S t a t u s ]
I n p u t : RGB
S i gn a l : XGA 6 0
S c r e e n : XGA 6 0
V e r / r e v
cS y n h r : N / N
Current input source
Signal system of the input source
Signal system automatically detected
by the projector
(Mode determination )
Synchronizing polarity of input signal
P=Positive N=Negative
Version number of software
45
o
: V0 1 / R0 1
.
. .


CONTENTS
24
Operations
(Continued)
Changing the picture size
Pictures are projected at the maximal
projection size regardless of the signal types.
Optionally you can change the picture size to
through size or enlarge it.
Press RESIZE.
Each time the button is pressed, the picture
size changes from the center of the picture.
When the picture size does not correspond with
the projection area, the picture can be moved
by pressing , , and .
When the picture size is smaller than the
projection area:
: To move the picture upward
: To move the picture down
: To move the picture leftward
: To move the picture rightward
When the picture size is larger than the
projection area:
: To view the upper side of the picture
: To view the lower side of the picture
: To view the left side of the picture
: To view the right side of the picture
Notes
• Picture size returns to normal after the power
is turned off. The values are not saved.
• You may not change the picture size
depending to the signal.
• Pictures of VGA signals, etc. may be slightly
inferior in quality at the initial size because
they are enlarged.
• The picture returns to the normal position
when the RESET button is pressed after the
picture is moved.
• The picture may not be projected properly
while moving the picture.
AUTO SET
POINTER
PJ
MARKER
LASER
MENU ENTER
KEYSTONE
ON/STANDBY
R-CLICKL-CLICK
VIDEO CAMERARGB
RESET FREEZERESIZE
MUTE CALL
, , ,
RESET
RESIZE


CONTENTS
25
Operations
Operating the computer
by the remote control
If you connect the iREMOTE MOUSE
RECEIVER to the computer, the supplied
remote control can work as a mouse of the
computer.
Connecting the REMOTE MOUSE RECEIVER
Check that the power of the computer is turned off.
Connect the REMOTE MOUSE RECEIVER.
Remove the mouse actually used and change it to the supplied cable.
Notes
• To operate the projector and the computer by
the remote control, place the REMOTE
MOUSE RECEIVER close to the projector.
• When connecting the REMOTE MOUSE
RECEIVER to an IBM PC/DOS V computer,
use the supplied PS/2 mouse adapter if you
are using a PS/2 mouse, or connect the
supplied IBM/MAC cable directly to your
computer if you are using a serial mouse.
• When connecting the REMOTE MOUSE
RECEIVER to the USB PORT for the first
time, insert the “Windows98 CD-ROM” and
install the device drivers for a USB
interchangeability device and a USB human
interface devices (two kinds). The installation
starts automatically when you connect a USB
mouse cable connected to the remote mouse
receiver to the USB port of your computer.
(Continued)
USB
PORT
SERIAL
PORT
PS/2
MOUSE
PORT
MAC
MOUSE
PORT
USB Mouse cable
(supplied)
IBM PC
DOS/V
PS/2
Mouse adapter
(supplied)
IBM/MAC
Mouse cable
(supplied)
REMOTE MOUSE RECEIVER
(supplied)
MAC
Mouse adapter
(supplied)
PV-98 IBM/Mac USB
Macintosh


CONTENTS
26
Operations
(Continued)
Operating the computer by the
remote control
Use the supplied remote control pointing it at
the connected REMOTE MOUSE RECEIVER.
Preparation
Set the POINTER/PJ selector to “POINTER”.
To move the pointer
Press the pointer control.
The pointer moves to the pressed direction.
To left-click
Press L-CLICK.
To right-click
Press R-CLICK.
To drag and drop
While holding down the center of the pointer
control, press the rim and release the
center.
Notes
• The remote control operating range is about 5
meter from the front of the remote sensor.
• The remote control may not operate when
there is sunlight or other strong light such as
a fluorescent lamp shining on the remote
sensor.
AUTO SET
POINTER
PJ
MARKER
LASER
MENU ENTER
KEYSTONE
ON/STANDBY
R-CLICKL-CLICK
VIDEO CAMERARGB
RESET FREEZERESIZE
R-CLICK
Pointer control
POINTER/PJ
selector
L-CLICK


CONTENTS
27
Adjustments
Settings and adjustments on
the menu
Most of adjustments and settings are made on
the menu.
To display the menu, press MENU.
The followings are adjustments and settings on
the menu. For details, see page in
29
.
When using this projector for the first time, see
“Default”.
28
Keystone
Auto set : To correct the keystone distortion
automatically.
Adjust : To make the correction of keystone
distortion beyond the automatic
correction.
Image
Auto sync. : To adjust the image automatically.
Phase : To adjust the phase.
H-position : To shift the image position
horizontally
V-position : To shift the image position
vertically.
Clock : To adjust the clock frequency.
Picture
Contrast : To adjust the contrast.
Brightness : To adjust the brightness.
Color : To adjust the color depth.
Tint : To adjust the tint.
Sharpness : To adjust the sharpness.
R-level : To adjust the amount of red in the
picture.
G-level : To adjust the amount of green in
the picture.
B-level : To adjust the amount of blue in the
picture.
Camera gain
: To adjust the sensitivity of the
document imaging camera.
(For document imaging camera
model only)
Audio
Volume : To adjust the sound volume of the
speaker.
Bass : To adjust the bass of the sound
output.
Treble : To adjust the treble of the sound
output.
Default
Language : To select the language for displays.
Proj. mode :To set the projecting orientation
according to the way of installation.
RGB input
: To set the signal type of RGB
input.
Video signal
: To set the signal type of video
input.
Scrn display
: To use or disable on-screen
displays.
Save
Save data : To save the adjustments and
settings on the menu.
All preset : To restore the adjustments and
setings on the menu to the factory
set.
30
31
32
33
28
34


CONTENTS
28
Adjustments
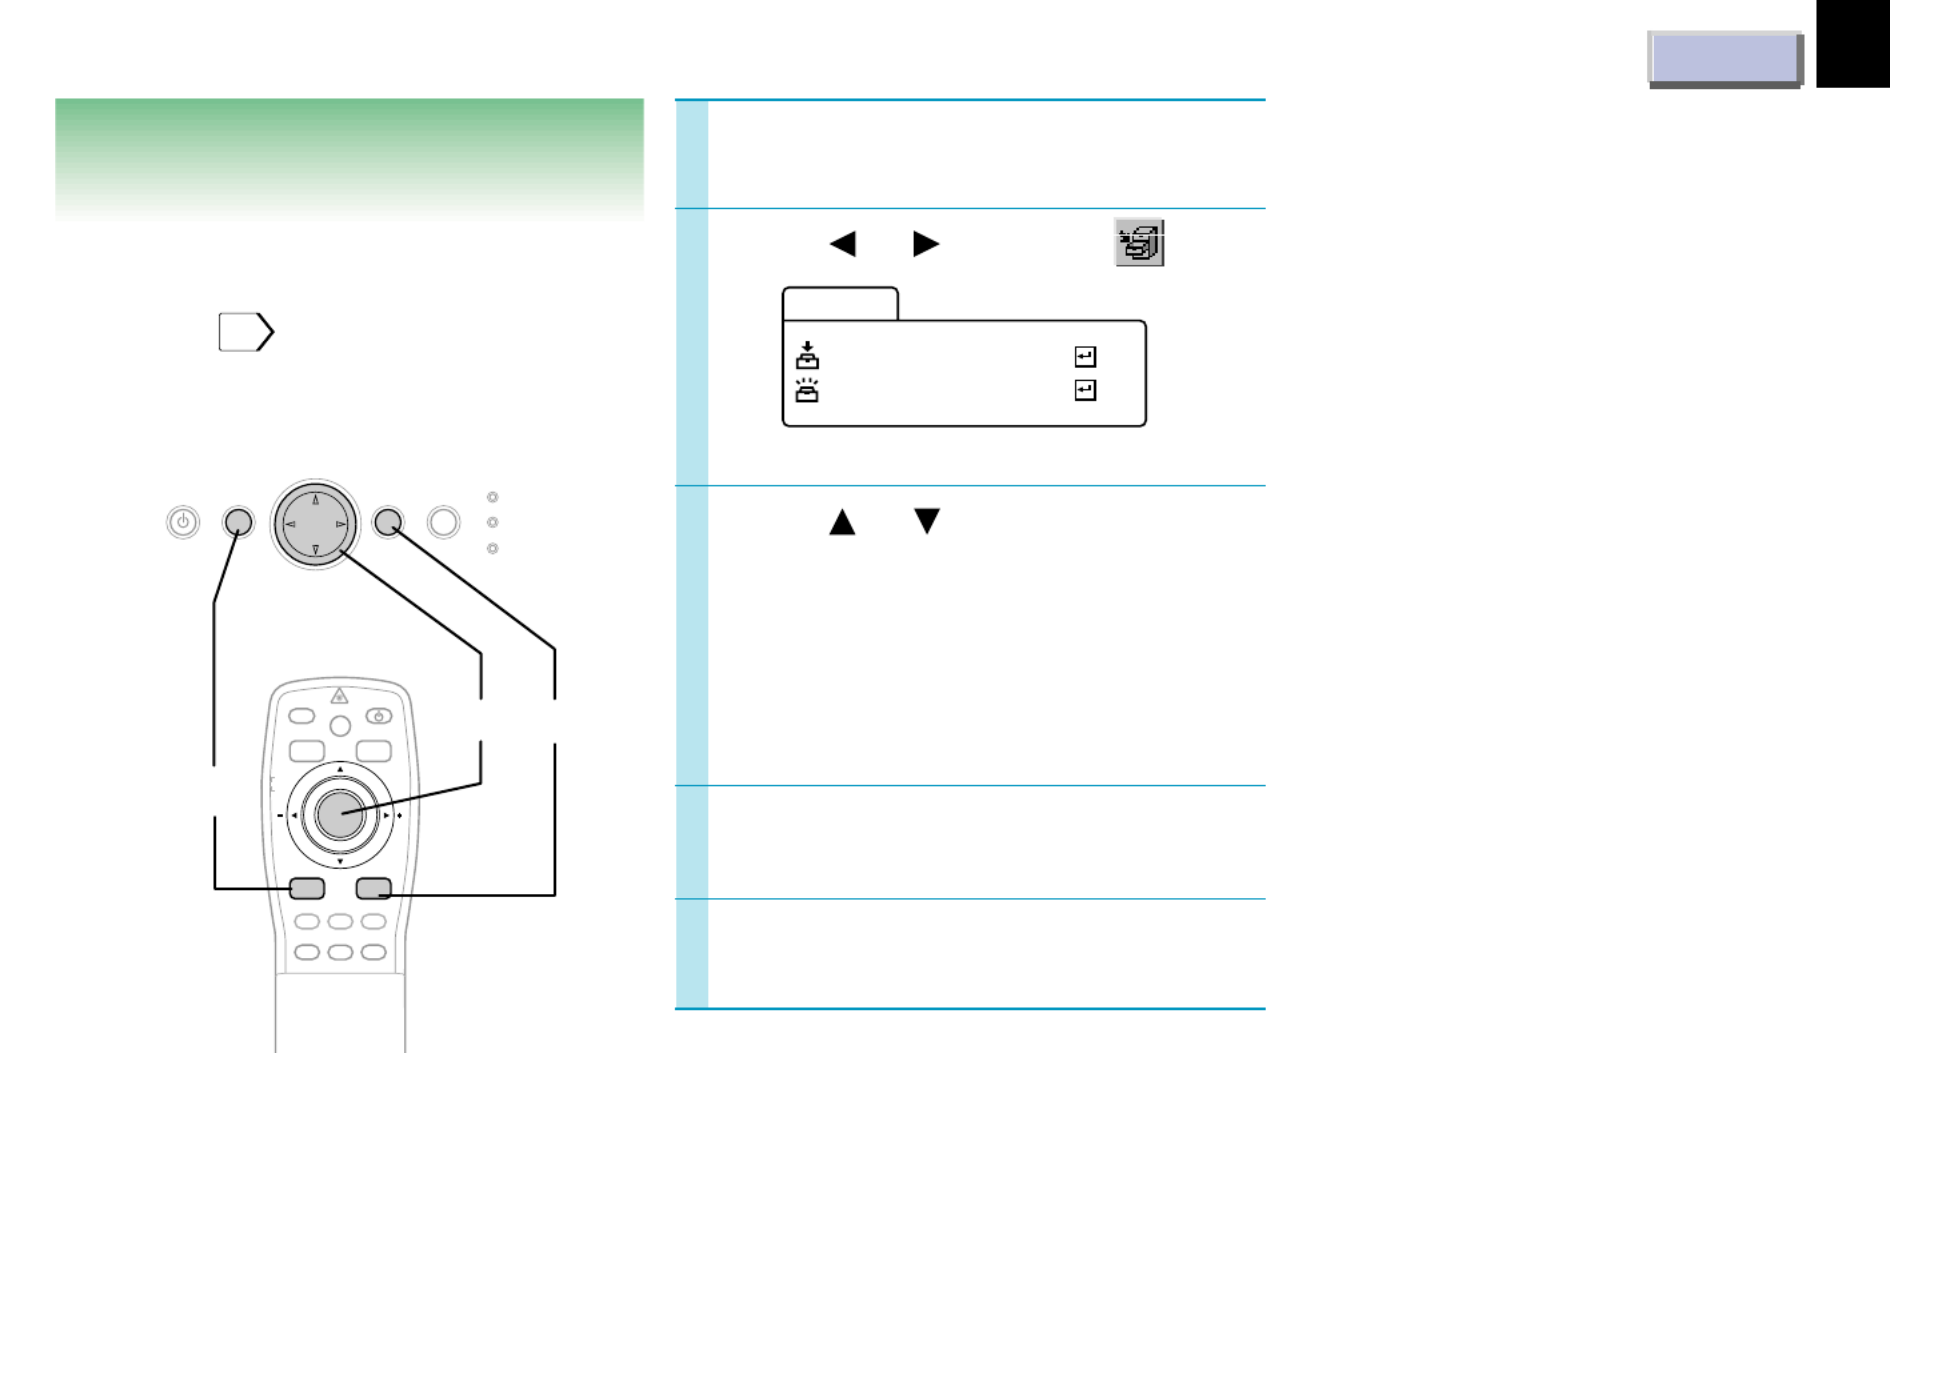
Initial settings
– Default
1
Press MENU to display the menu.
Make the basic settings for projecting.
Preparation
• Display the image as explained in “Picture
Projection . ”
21
• Set the POINTER/PJ selector to “ ”PJ .
3
4
Proj. mode
Confirm your installation type on the
chart on page
18
.
Standard: Floor-mounted front
projection
Rear: Floor-mounted rear
projection
Ceiling: Ceiling-mounted front
projection
R. ceil.: Ceiling-mounted rear
projection
RGB input
To set the signal type of RGB input.
RGB: RGB signal
Y/Pb/Pr: Color difference (Component)
video signal from the DVD
video player, etc.
Video signal
To set the signal type of video input.
Auto:
Automatic signal detection
works on video input. If it
does not properly, set the
signal type of the source
from the followings.
NTSC M: NTSC M signal
NTSC443A: NTSC4.43A signal
NTSC J: NTSC J signal
NTSC N: NTSC N signal
NTSC443B: NTSC4.43B signal
PAL: PAL signal
PAL N: PAL N signal
SECAM: SECAM signal
PAL443: PAL4.43 signal
PAL M: PAL M signal
2
(Continued)
Press or to select .
Press or to select a
preferred item.
Press or to make the
setting.
To select another item, go back to step 3.
Language
Select a language for the menu or on-
screen displays.
English: English
Français: French
Deutsch: German
Italiano : Italian
Español : Spanish
Português : Portuguese
: Japanese
AUTO SET
POINTER
PJ
MARKER
LASER
MENU ENTER
KEYSTONE
ON/STANDBY
R-CLICKL-CLICK
VIDEO CAMERARGB
RESET FREEZERESIZE
RESET
ON/STANDBY ENTERMENU
SELECT/ADJUST
INPUT
ON
LAMP
TEMP
1,5
2-4
A u t o s e t
Ke y s t o n e
A d j u s t
–+
L a n g u a g e
De f a u l t
P r o j . m o d e
RG B i n p u t
V i d e o s i g n a l
y S c r n d i s p l a
E n g l i s h
S t a n d a r d
R G B
A u t o
O n


CONTENTS
29
Adjustments
Scrn display
On: On-screen displays
(indications of input
selection, signal absent or
mute mode, etc.) appear.
Off: On-screen displays do
not appear.
Press MENU.
The menu disappears.
Notes
• These settings are stored until you turn the
power off.
• To store the settings even if the power is
turned off, follow the procedure of “Saving
data . ”
34
• Pressing RESET will return the adjustment or
setting currently selected to default.
(Continued)
5


CONTENTS
30
Adjustments
Keystone correction
– Keystone
1
3
2
Notes
• Pressing KEYSTONE on the remote control
can also correct the keystone distortion
automatically.
22
• These adjustments are stored until you turn
the power off.
• Pressing RESET will return the adjustment or
setting currently selected to default.
• Pictures may be slightly deteriorated by the
keystone correction.
0 degrees setting for the automatic
keystone correction
Depending on the operating condition such as
vibration, the distortion may be beyond the
automatic keystone correction. The horizontal
condition setting (0 degrees setting) may be
disordered. In such a case, perform the
following 0 degrees setting to correct the
distortion.
1) Place the projector on a level surface.
2) On the menu, select “Auto set” in
“Keystone .”
3) Press RESET.
Notes
• Do not make the 0 degrees setting on an
inclined or unstable surface or in a shaky
place as it may not be performed properly.
• To store this setting even if the power is
turned off, follow the procedure of “Saving
data . ”
34
Preparation
• Display the image as explained in “Picture
Projection . ”
21
• Set the POINTER/PJ selector to “ ”PJ .
Press MENU to display the
menu.
Press or to select .
Press to select “Auto set”.
Press ENTER.
The keystone distortion is corrected
automatically. For further correction,
follow the below steps.
Press .
Press or to correct the
distortion.
(–): To reduce the upper width.
(+): To reduce the lower width.
Press MENU.
The menu disappears.
5
6
4
7
AUTO SET
POINTER
PJ
MARKER
LASER
MENU ENTER
KEYSTONE
ON/STANDBY
R-CLICKL-CLICK
VIDEO CAMERARGB
FREEZERESIZE
RESET
KEYSTONE
ON/STANDBY MENU ENTER
SELECT/ADJUST
INPUT
ON
LAMP
TEMP
RESET
1,7
4
2,3,5,6
A u t o s e t
Ke y s t o n e
A d j u s t
–+


CONTENTS
31
Adjustments
Projection adjustments
– Image
1
3
2
Press to select “Auto sync.”
Press ENTER.
The image is automatically adjusted.
For further adjustments, follow the below
steps.
Press or to select a
preferred item.
Press or to adjust the
item.
To select another item, go back to step 5.
Phase: To reduce flickers.
H-position: To shift the image to the
left ( ), to the right (+).–
V-position:
To shift the image down (–),
to up (+).
Clock To remove vertical stripes.
Press MENU.
The menu disappears.
Preparation
• Display the image as explained in “Picture
Projection . ”
21
• Set the POINTER/PJ selector to “ ”PJ .
Press MENU to display the
menu.
Press or to select .
4
5
6
Notes
• When performing the automatic projection
adjustment, use a bright and distinctly edged
picture.
• Pressing AUTO SET on the remote control
can also adjust the image automatically.
23
• If you project an image from a computer with
an LCD screen while monitoring the image on
the computer, the image may not be projected
properly, depending on the computer model.
In this case, turn off the computer display, or
make the necessary picture adjustments on
the projector. For details on controlling the
computer display, etc., refer to the computer’s
manual and description on the software for
the computer used.
• “ ”During adjustments of H-position or “V-
position”, the image may not be projected
properly.
• While using, an aberration of the phase may
occur. In that case, adjust “ ”Phase again.
• Some item may be displayed in gray
depending on an input source. The item
displayed in gray cannot be adjusted and/or
set.
• These adjustments are stored until you turn
the power off.
• To store the adjustments even if the power is
turned off, follow the procedure of “Saving
data”.
34
• Pressing RESET will return the adjustment or
setting currently selected to default.
7
AUTO SET
POINTER
PJ
MARKER
LASER
MENU ENTER
KEYSTONE
ON/STANDBY
R-CLICKL-CLICK
VIDEO CAMERARGB
RESIZE
RESET
AUTO SET
ON/STANDBY MENU ENTER
SELECT/ADJUST
INPUT
ON
LAMP
TEMP
FREEZERESET
4
1,7 2,3,5,6
A u t o s y n
I ma g e
c .
P h a s e
–+
H – p o s i t i o n
V – p o s i t i o n
C l o c k
–+
–+
–+


CONTENTS
32
Adjustments
Picture adjustments
– Picture
1
3
2
Press or to select a
preferred item.
Press or to adjust the item.
To select another item, go back to step 3.
– : + :
Contrast : (–) Lower
(+) Higher
Brightness
: (–) Darker
(+) Brighter
Color: (–) Duller
(+) Brighter
Tint: (–) Redder
(+) Greener
Sharpness: (–) Softer
(+) Sharper
R-level: (–) To reduce red
(+) To increase red
G-level: (–) To reduce green
(+) To increase green
B-level: (–) To reduce blue
(+) To increase blue
Preparation
• Display the image as explained in “Picture
Projection”.
21
• Set the POINTER/PJ selector to “ ”PJ .
Press MENU to display the
menu.
Press or to select .
4
Camera gain: (For document imaging
camera model only)
(–) To lower the camera
sensitivity when the
subject is too bright.
(+) To raise the camera
sensitivity when the
subject is too dark.
Press MENU.
The menu disappears.
Notes
• The adjustment can be stored on each input
source (RGB, Video, Camera).
• Some item may be displayed in gray
depending on an input source. The item
displayed in gray cannot be adjusted and/or
set.
• These adjustments are stored until you turn
the power off.
• To store the adjustments even if the power is
turned off, follow the procedure of “Saving
data . ”
34
• Pressing RESET will return the adjustment or
setting currently selected to default.
5
AUTO SET
POINTER
PJ
MARKER
LASER
MENU ENTER
KEYSTONE
ON/STANDBY
R-CLICKL-CLICK
VIDEO CAMERARGB
RESET FREEZERESIZE
RESET
ON/STANDBY ENTERMENU
SELECT/ADJUST
INPUT
ON
LAMP
TEMP
1,5
2-4
C o n t r a s t
P i c t u r e
–+
B r i g h t n e s s
C o l o r
–+
–+
T i n t
S h a r p n e s s
–+
–+
R - l e v e l
–+
G - l e v e l
–+
B - l e v e l
–+
C a m e r a g a i n
–+

CONTENTS
33
Adjustments
Sound adjustments
– Audio
1
3
2
Notes
• These adjustments are stored until you turn
the power off.
• To store the adjustments even if the power is
turned off, follow the procedure of “Saving
data”.
34
• Pressing RESET will return the adjustment or
setting currently selected to default.
Preparation
• Display the image as explained in “Picture
Projection . ”
21
• Set the POINTER/PJ selector to “ ”PJ .
Press MENU to display the
menu.
Press or to select .
Press or to select a
preferred item.
Press or to adjust the
item.
To select another item, go back to step 3.
–
:
+ : Volume : (–) To turn down.
(+) To turn up.
Bass: (–) To reduce the bass.
(+) To increase the bass.
Treble: (–) To reduce the treble.
(+) To increase the treble.
Press MENU.
The menu disappears.
4
5
AUTO SET
POINTER
PJ
MARKER
LASER
MENU ENTER
KEYSTONE
ON/STANDBY
R-CLICKL-CLICK
VIDEO CAMERARGB
FREEZERESIZE
RESET
ON/STANDBY ENTERMENU
SELECT/ADJUST
INPUT
ON
LAMP
TEMP
RESET
1,5
2-4
V o l u m e
A u d i o
–+
B a s s
T r e b l e
–+
–+
CONTENTS
34
Adjustments
Saving data
– Save
1
3
2
Preparation
• Display the image as explained in “Picture
Projection . ”
21
• Set the POINTER/PJ selector to “ ”PJ .
Press MENU to display the
menu.
Press or to select .
Press or to select a
preferred item.
Save data : To save the adjustments
and settings on the menu.
All preset : To restore the adjustments
and settings on the menu
to the factory set.
Press ENTER.
Press MENU.
The menu disappears.
4
5
S a v e d a t
S a v e
a
A l l p r e s e t
AUTO SET
POINTER
PJ
MARKER
LASER
MENU
KEYSTONE
ON/STANDBY
L-CLICK
VIDEO CAMERARGB
RESIZE
ON/STANDBY MENU ENTER
SELECT/ADJUST
INPUT
ON
LAMP
TEMP
FREEZERESET
ENTER
R-CLICK
4
1,5
2,3


CONTENTS
35
Camera
OVERLAY PHOTO/TEXT ARM LIGHT
LOCK W.BALANCE CAMERA
Part names and functions of
document imaging camera
CAUTION
• When using the camera, be careful to not
pinch your hand or fingers into the arm.
• Do not look into the projection lens while
operating the projector.
On the document imaging camera model, you
can project pictures using the document
imaging camera.
The document imaging camera can directly
project any materials (documents, illustrations,
etc.) without using an OHP film.
Camera head
Arm
OVERLAY button
39
To activate the overlaying projection.
PHOTO/TEXT button
38
To switch modes between text and photo.
ARM LIGHT button
37
To turn on or off the light.
LOCK (W.BALANCE) indicator
38
Lights when the white balance is locked.
W.BALANCE button
38
To switch white balance settings between
automatic adjustment and lock.
CAMERA button
37
To select the camera source.
Press again to return to the previous input
source.
(Continued)
1
2
3
4
5
6
Camera control panel
1 2 3
4 5 6
Camera lens
Light
Focusing ring
38


CONTENTS
36
Camera
(Continued)
Preparation of the document imaging
camera
1) Raise up the arm.
2) Stretch the arm.
3) Turn the arm.
4) Open the camera head.
5) Turn the camera head.
6) Pull up the light.
7) Turn the light.
Notes
• Never give shocks or impacts to the camera
or arm as this may cause breakdowns.
• While raising up the arm in step 2), be careful
not to hit your face or your body.


CONTENTS
37
Camera
Picture projection with the
document imaging camera
Preparation
Display the image as explained in “Picture
Projection” .
21
Press ARM LIGHT.
The light turns on.
Place a document (text,
illustration) onto or around the
projector, and turn the camera
head to direction of the
document.
Press CAMERA to select the
camera input mode.
Pressing CAMERA on the camera control
panel or INPUT on the main unit can also
select it.
“Camera” is displayed.
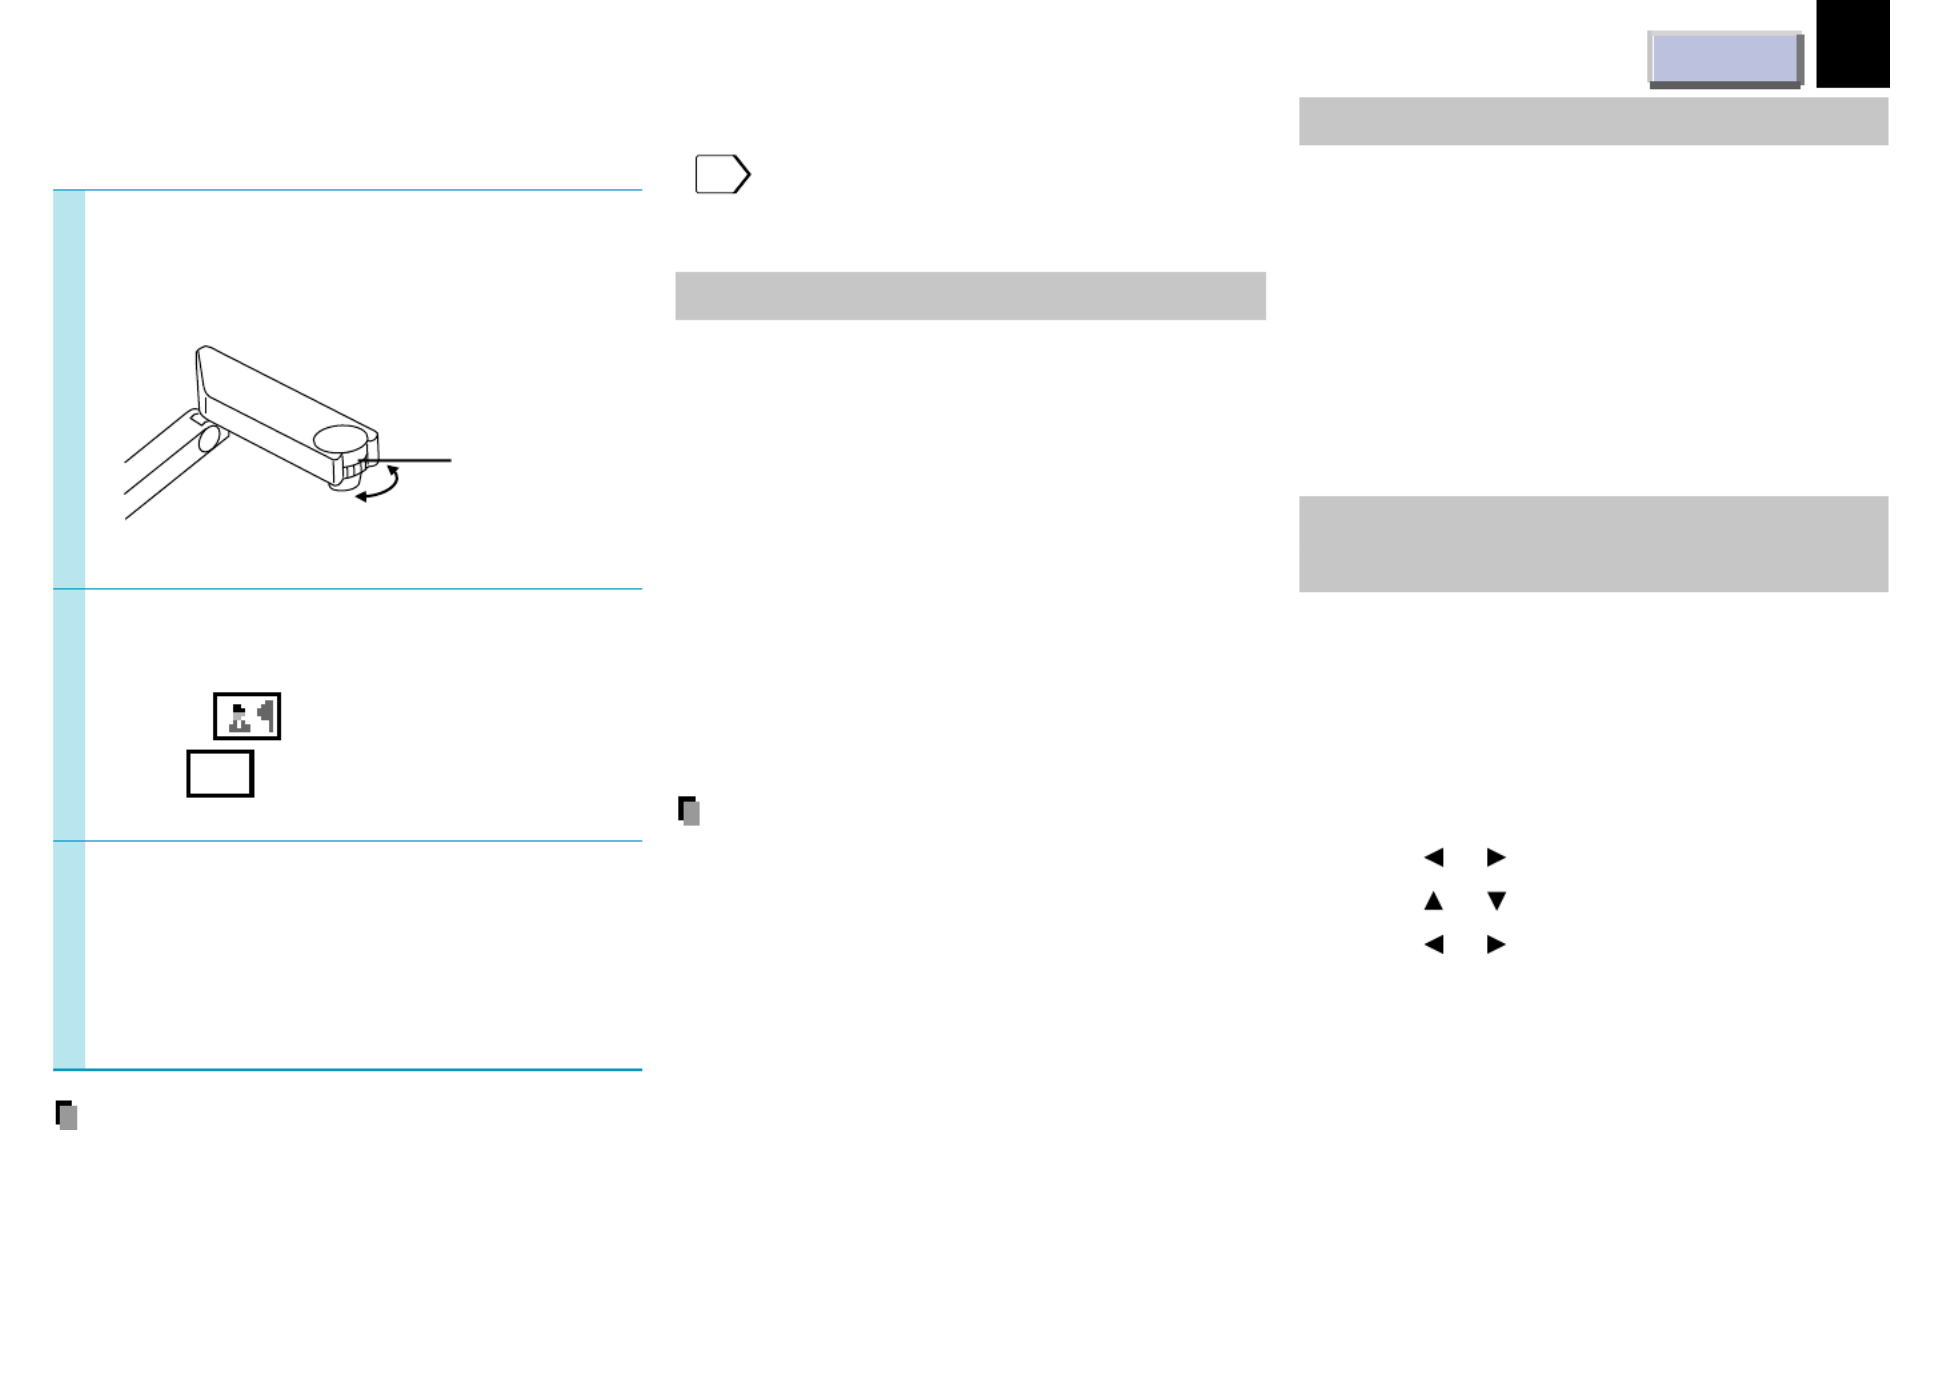
Move the camera head to
adjust the size of the picture.
You can project around the projector by
moving the arm and the camera head.
2
1
3
(Continued)
Up : To reduce.
Down : To enlarge.
4
AUTO SET
POINTER
PJ
MARKER
LASER
MENU ENTER
KEYSTONE
ON/STANDBY
R-CLICKL-CLICK
VIDEO CAMERARGB
RESET FREEZERESIZE
ON/STANDBY MENU ENTER
SELECT/ADJUST
INPUT
ON
LAMP
TEMP
OVERLAY PHOTO/TEXT ARM LIGHT
LOCK W.BALANCE CAMERA
1
3
3
6
3
LCD PROJECTOR
LCD PROJECTOR
LCD PROJECTOR
LCD
PROJECTOR

CONTENTS
38
Camera
Focus on the picture by
turning the focusing ring on
the camera head.
(Continued)
5
Press PHOTO/TEXT to select
the mode of the document.
PHOTO:
when using a photograph.
TEXT:
AB
when using a text.
When finished, turn off the
light and close it, and put back
the arm.
Follow the steps of Preparation of the“
document imaging camera” in reverse.
Notes
• The light turns off automatically when the arm
is leaned.
• When the arm is not raised up, the camera
source cannot be projected.
• In the camera input selected, audio signals
from the RGB INPUT (AUDIO) is selected.
6
7
Locking the white balance
Normally, this camera automatically adjusts the
color balance to project the picture. If the
adjustment is not sufficient, follow the steps
below to lock the white balance.
1) Project a white paper and enlarge it to
fill the screen.
2) Press W.BALANCE to turn the LOCK
indicator on.
The white balance is locked.
To release the white balance, press
W.BALANCE again to turn the LOCK
indicator off.
Notes
• If you raise up the arm while the camera input
is selected, the color of the picture may vary
for an instant due to the white balance
adjustment. This is not malfunction.
• If you put back the arm and raise it up while
the white balance is locked (the LOCK
indicator is lit), the projector releases the
white balance but leaves the LOCK indicator
on. In this case, press W.BALANCE to restore
the indicator to the normal status.
Correcting illuminated defects
If there are some luminous dots on a projected
picture, make the following correction.
1) While the camera is active, cover the
camera lens with a black paper
completely.
2) Press OVERLAY and ARM LIGHT at the
same time.
Focusing ring
N: Near
F: Far When flickering occurs by a
fluorescent lighting in the room
In this case, turn off the lighting of the room or
adjust the Camera gain in the following
manner.
1) Press ARM LIGHT to turn off the arm
lighting.
2) Press MENU to display the menu.
3) Press or to select “ ”Picture .
4) Press or to select “ ”Camera gain .
5) Press or to adjust the value.
• “Camera gain” adjustment may improve view
of a camera subject which is too dark or vivid.
32


CONTENTS
40
Maintenance
If there is some problem inside the projector,
the indicators light up or flash.
Trouble indications
ON Off or lit (red)
LAMP –
TEMP –
The power does not come on.
→ Malfunction of the unit.
• Unplug the power cord and call the
dealer.
ON Lit (red)
LAMP Lit (red)
TEMP –
The lamp turns off or does not light up.
→ The lamp’s end, or malfunction of the
unit.
• Lamp’s life length is over, replace the
lamp with new one.
42
• Unplug the power cord and call the
dealer.
ON Lit (red)
LAMP –
TEMP Lit (red)
The power turns off or does not come on.
→ The inside is too hot, or the projector has
been working in an area of high
temperature.
• Place the projector correctly so the
intake and exhaust fans’ holes are not
covered.
• Turn the projector off, and leave it for
a while, and turn it on again.
• Clean the air filter.
41
ON Lit (red)
LAMP –
TEMP Flashing (red)
The power turns off or does not come on.
→ Trouble with the intake fan.
• Unplug the power cord and call the
dealer.
ON Lit (red)
LAMP –
TEMP Flashing (orange)
The power turns off or does not come on.
→ Trouble with the exhaust fan.
• Unplug the power cord and call the
dealer.
Note
Before attempting any maintenance, unplug the
power cord.
ON Indicator
LAMP Indicator
TEMP Indicator
ON/STANDBY MENU ENTER
SELECT/ADJUST
INPUT
ON
LAMP
TEMP


CONTENTS
41
Maintenance
Air filter, lens and main unit
cleaning
CAUTION
If you use the projector mounted on the
ceiling, ask the dealer to carry out the
maintenance such as cleaning.
Cleaning the air filter
The filter under the air filter cover is the device
to shut out dusts or dregs.
Do not use the projector with the filter taken off.
Give a frequent clean especially to the air filter.
(The cleaning period is once per about 50
hours).
1) Unplug the power cord.
2) Take off the air filter cover.
The filter is on the right side of the projector.
Pull up the filter tabs.
3) Clean the air filter cover.
Remove dust and stains with a vacuum
cleaner.
Cleaner’s
nozzle
4) Attach the air filter cover.
Notes
• When the air filter is dusty, the ventilation is
impaired. This causes the temperature inside
the projector to rise, and may damage the
unit.
• Attach the air filter cover firmly after the
cleaning. If it is not set correctly, the dusts will
enter and they will be projected and
overlapped on the picture.
Cleaning the lens
Use a blower or a lens cleaner to clean the
lens.
Never rub or tap the lens with a hard object as
the lens surface is fragile.
Cleaning the main unit
• Pull out the power cord before cleaning.
• Use a soft cloth to wipe off stains from the
surface.
• To remove difficult stains, use a soft cloth
slightly moistened with a weak solution of
synthetic detergent and water, and finish with
a soft, dry cloth.
Replacing the intake, exhaust fans
and air filter
To maintain the efficiency of the projector,
replace the intake and exhaust fans about
every two to three years.
Ask the dealer for the replacement.
Specyfikacje produktu
| Marka: | Toshiba |
| Kategoria: | Projektor |
| Model: | TLP-681U |
Potrzebujesz pomocy?
Jeśli potrzebujesz pomocy z Toshiba TLP-681U, zadaj pytanie poniżej, a inni użytkownicy Ci odpowiedzą
Instrukcje Projektor Toshiba

29 Września 2024
17 Września 2024
5 Września 2024
4 Września 2024
3 Września 2024
2 Września 2024
1 Września 2024
31 Sierpnia 2024
30 Sierpnia 2024
28 Sierpnia 2024
Instrukcje Projektor
- Projektor Sony
- Projektor Yamaha
- Projektor Samsung
- Projektor Leica
- Projektor LG
- Projektor Xiaomi
- Projektor Sharp
- Projektor Lenovo
- Projektor Philips
- Projektor Livoo
- Projektor Acer
- Projektor Epson
- Projektor Hisense
- Projektor Panasonic
- Projektor Promethean
- Projektor Canon
- Projektor Viewsonic
- Projektor Asus
- Projektor Medion
- Projektor OK
- Projektor Lenco
- Projektor D-Link
- Projektor Blaupunkt
- Projektor Salora
- Projektor Casio
- Projektor HP
- Projektor Prixton
- Projektor Strong
- Projektor Steinel
- Projektor Kodak
- Projektor Smart
- Projektor ZTE
- Projektor JVC
- Projektor Dell
- Projektor Auna
- Projektor Dahua Technology
- Projektor Eurolite
- Projektor Ricoh
- Projektor Krüger&Matz
- Projektor Renkforce
- Projektor Klarstein
- Projektor Pyle
- Projektor Marantz
- Projektor Showtec
- Projektor Mitsubishi
- Projektor ION
- Projektor XGIMI
- Projektor NEC
- Projektor Polaroid
- Projektor Sanyo
- Projektor Optoma
- Projektor Vogel's
- Projektor Hama
- Projektor Cameo
- Projektor Barco
- Projektor 3M
- Projektor Nebula
- Projektor Anker
- Projektor Hitachi
- Projektor Futurelight
- Projektor RCA
- Projektor BenQ
- Projektor Technaxx
- Projektor GPX
- Projektor Overmax
- Projektor Odys
- Projektor EasyMaxx
- Projektor Smartwares
- Projektor Adj
- Projektor Miroir
- Projektor Stairville
- Projektor Elmo
- Projektor Planar
- Projektor Acco
- Projektor Aiptek
- Projektor ASK Proxima
- Projektor Reflecta
- Projektor Yaber
- Projektor Da-Lite
- Projektor Steren
- Projektor Eiki
- Projektor Derksen
- Projektor InFocus
- Projektor Bauer
- Projektor Naxa
- Projektor Vivitek
- Projektor Emtec
- Projektor Celly
- Projektor Vankyo
- Projektor Laserworld
- Projektor Ibm
- Projektor Maxell
- Projektor La Vague
- Projektor Kogan
- Projektor Tzumi
- Projektor EKO
- Projektor MicroVision
- Projektor Elite Screens
- Projektor Celexon
- Projektor Christie
- Projektor Fun Generation
- Projektor Beghelli
- Projektor Magnavox
- Projektor PLUS
- Projektor Varytec
- Projektor AOpen
- Projektor Ultimea
- Projektor Dracast
- Projektor Dukane
- Projektor Dream Vision
- Projektor Knoll
- Projektor DTS
- Projektor Touchjet
- Projektor Boxlight
- Projektor AAXA Technologies
- Projektor Mimio
- Projektor AWOL Vision
- Projektor Smart Tech
- Projektor Atlantis Land
- Projektor KickAss
- Projektor Microtek
- Projektor VAVA
- Projektor Panamorph
- Projektor Mirabella Genio
Najnowsze instrukcje dla Projektor

9 Kwietnia 2025
9 Kwietnia 2025

2 Kwietnia 2025

5 Marca 2025
5 Marca 2025

3 Marca 2025

1 Marca 2025

26 Lutego 2025

20 Lutego 2025
20 Lutego 2025