Instrukcja obsługi Technoline WS 9032
Technoline
Stacja pogodowa
WS 9032
Przeczytaj poniżej 📖 instrukcję obsługi w języku polskim dla Technoline WS 9032 (16 stron) w kategorii Stacja pogodowa. Ta instrukcja była pomocna dla 18 osób i została oceniona przez 2 użytkowników na średnio 4.5 gwiazdek
Strona 1/16
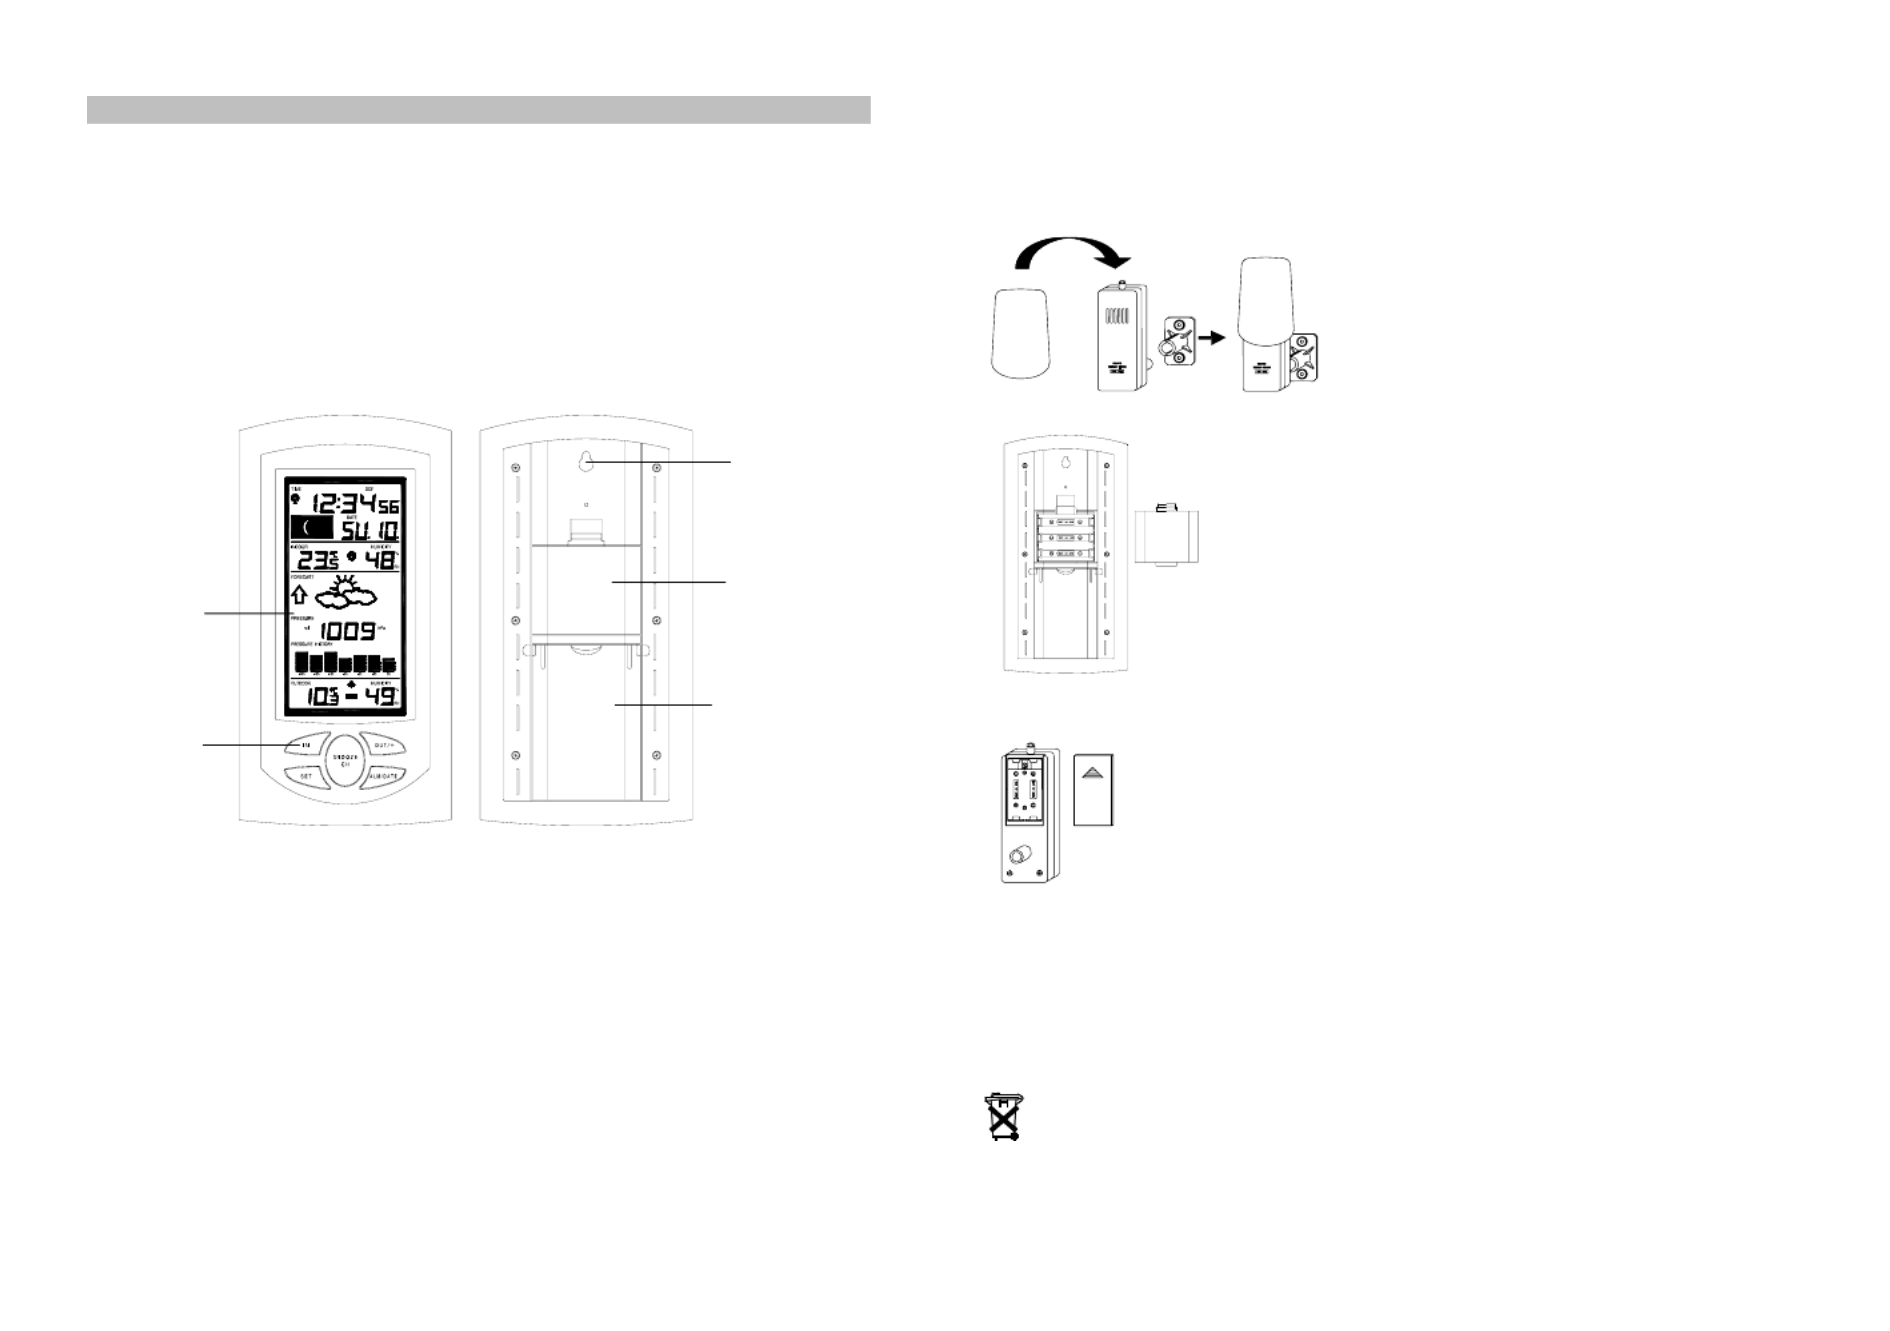
Stand
LCD Display
Function keys
WEATHER STATION
Instruction Manual
INTRODUCTION:
Congratulations on purchasing this state-of-the-art weather station as an example of innovative
design and quality piece of engineering. Providing radio controlled time, date, calendar, Moon
phase, indoor and outdoor temperature, indoor and outdoor relative humidity, and air pressure
history information. This unit will never keep you guessing on current and future weather conditions.
Operation of this product is simple and straightforward. By reading this operating manual, the user
will receive a better understanding of the Weather Station together with the optimum benefit of all its
features.
FEATURES:
The Weather Station
DCF Radio controlled time with manual setting option
Time reception ON/OFF (user selectable)
12/24 hour time display
Time zone option ±12 hours
Weekday and day calendar display (year and month only in setting mode)
Alarm setting with snooze function
Display 12 Moon phases throughout the year
Weather forecasting with weather tendency indicator
Indoor comfort indicator
Temperature display in ºC/ºF
Indoor and outdoor temperature display with MIN/MAX records and time of reception
Humidity data display as RH%
Indoor and outdoor humidity display with MIN/MAX records
Relative air pressure hPa/ inHg with adjustable reference value
Weather icon sensitivity setting
Relative air pressure history for the past 24 hours (electronic barometer with barometric
pressure trend)
LCD contrast selectable
Can receive up to 3 outdoor transmitters
LED back light
Low battery indicator
Table standing or wall mounting
The Outdoor Thermo-Hygro Transmitter
Remote transmission of outdoor temperature
and humidity to weather station by 433MHz
signals
Shower proof casing
Wall mounting case
TO INSTALL AND REPLACE BATTERIES IN THE WEATHER STATION
The Weather Station uses 3 x AA, IEC LR6, 1.5V batteries. To
install and replace the batteries, please follow the steps below:
Hanging hole
1. Insert finger or other solid object in the space at the bottom
center of the battery compartment and lift up to remove the
cover.
2. Insert batteries observing the correct polarity (see
marking).
Battery
compartment 3. Replace compartment cover.
TO INSTALL AND REPLACE BATTERIES IN THE THERMO-HYGRO
TRANSMITTER
The Thermo-hygro transmitter uses 2 x AA, IEC LR6, 1.5V batteries. To install
and replace the batteries, please follow the steps below:
1. Remove the battery cover.
2. Insert the batteries, observing the correct polarity (see marking).
3. Replace the battery cover on the unit.
Note:
In the event of changing batteries in any of the units, all units need to be reset by following the
setting up procedures. This is because a random security code is assigned by the transmitter at
start-up and this code must be received and stored by the Weather station in the first 3 minutes of
power being supplied to it.
BATTERY CHANGE:
It is recommended to replace the batteries in all units on an annual basis to ensure optimum
accuracy of these units.
Please participate in the preservation of the environment. Return used batteries to
an authorized depot.
SETTING UP
1. First, insert the batteries into the Weather station (see “How to install and replace batteries
in the Weather station” above). Once the batteries are in place, all segments of the LCD will
light up briefly and a short signal tone will sound. Then the indoor temperature and humidity,


the time as 0:00 the date as TH.1., the moon icon, the weather icons (sun and clouds) will be
displayed. If the indoor temperature and humidity are not displayed after 15 seconds, remove
the batteries and wait for at least 1 minute before reinserting them. Once the indoor data is
displayed proceed to step 2.
2. Within 3 minutes of activating the Weather station, place the batteries into the transmitter (see
“How to install and replace batteries in the Thermo-Hygro outdoor transmitter“ above).
3. After inserting the batteries into the transmitter, the Weather station will start receiving data
from the transmitter. The outdoor temperature and humidity data should then be displayed on
the Weather station. If this does not happen after 3 minutes, the batteries will need to be
removed from both units and reset from step 1.
4. The Weather station can take up to 3 remote transmitters. If you have purchased additional
transmitters, follow step 2 for all extra transmitters. However, ensure that you leave 10
seconds in between the reception of the last transmitter and the set-up of the following
transmitter. The Weather station will number the transmitters in the order of set-up, i.e. the
first transmitter will have the temperature and humidity displayed with the number 1 against it
and so on.
5. Before all the transmitters are set up, there is a testing period, during which the display
switches quickly between all the received transmitters at random, according to which random
transmission it receives. The process will stop automatically if up to 3 transmitters are
received or no keys are pressed for a few minutes.
6. Once the remote data have been received and displayed on the Weather station, the DCF-77
time code reception is automatically started. This takes typically between 3-5 minutes in good
conditions. This time period is an excellent opportunity to locate the transmitter(s) in suitable
location(s) outdoors. In order to ensure sufficient 433 MHz transmission however, this should
under good conditions be no more than 100 meters from where the Weather station will be
finally positioned (see notes on “Positioning” and “433MHz Reception”).
IN key OUT/+ key
ALM/DATE key
SET key
7. If after 10 minutes, the DCF time has not been received, use the SET key to manually enter a
time and date initially. The clock will automatically attempt to receive the DCF time at each full
hour. When this is successful, the received time will override the manually set time. The date
is also updated with the received time. (Please refer also to notes on “Radio controlled Time
Reception” and “Manual Time Setting”).
SNOOZE/CH key
Note:
In the event of changing batteries of the units, ensure the batteries do not spring free from the
contacts. Always wait at least 1 minute after removing the batteries before reinserting, otherwise
start up and transmission problems may occur.
RESETTING
The Weather Station and the Thermo-hygro transmitter need to be reset when one of the following
conditions occur:
Unsuccessful 433MHz signal reception.
Malfunction on the units.
Batteries replacement.
For resetting, remove all batteries from the units. Wait at least for 1 minute before powering up the
Weather station again. Proceed from step 1 in “Setting Up”.
DCF RADIO CONTROLLED TIME
The time base for the radio controlled time is a Cesium Atomic Clock operated by the Physikalisch
Technische Bundesanstalt Braunschweig which has a time deviation of less than one second in one
million years. The time is coded and transmitted from Mainflingen near Frankfurt via frequency
signal DCF-77 (77.5 kHz) and has a transmitting range of approximately 1,500 km. Your radio-
controlled Weather Station receives this signal and converts it to show the precise time in summer
or wintertime.
The quality of the reception depends greatly on the geographic location. In normal cases, there
should be no reception problems within a 1500km radius of Frankfurt.
Once the outdoor data reception test period is completed, the DCF tower icon in the clock display
will start flashing in the upper left corner. This indicates that the clock has detected that there is a
radio signal present and is trying to receive it. When the time code is received, the DCF tower
becomes permanently lit and the time will be displayed.
If the tower icon flashes, but does not set the time or the DCF tower does not appear at all, then
please take note of the following:
Recommended distance to any interfering sources like computer monitors or TV sets is a
minimum of 1.5 - 2 meters.
Within ferro-concrete rooms (basements, superstructures), the received signal is naturally
weakened. In extreme cases, please place the unit close to a window and/ or point its front or
back towards the Frankfurt transmitter.
During nighttime, the atmospheric disturbances are usually less severe and reception is
possible in most cases. A single daily reception is adequate to keep the accuracy deviation
below 1 second.
FUNCTION KEYS:
Weather Station:
The Weather Station has 5 easy to use function keys:
SET key
Press and hold the key to enter manual setting modes: LCD contrast, time zone, time
reception ON/OFF, 12/24 hour display, manual time setting, calendar, temperature °C/°F,
pressure hPa / inHg, relative pressure value, and weather icon sensitivity setting
Reset all MIN/MAX records
Stop the alarm during alarm ringing
Stop snooze mode
Back-light on
ALM/DATE key
Press and hold key for 3 seconds to enter the alarm setting mode
Active/de-active the alarm time
Stop the alarm during alarm ringing
Stop snooze mode
Display date
Back-light on
IN key
Press to toggle between MAX/MIN and current indoor temperature/humidity data
Press to set the alarm hour (inside alarm setting mode)
Decrease relative pressure value (within manual set mode)
Stop the alarm during alarm ringing
Stop snooze mode
Back-light on
Specyfikacje produktu
| Marka: | Technoline |
| Kategoria: | Stacja pogodowa |
| Model: | WS 9032 |
Potrzebujesz pomocy?
Jeśli potrzebujesz pomocy z Technoline WS 9032, zadaj pytanie poniżej, a inni użytkownicy Ci odpowiedzą
Instrukcje Stacja pogodowa Technoline

15 Września 2024
13 Września 2024
12 Września 2024
10 Września 2024
9 Września 2024
5 Września 2024
5 Września 2024
2 Września 2024
29 Sierpnia 2024
28 Sierpnia 2024
Instrukcje Stacja pogodowa
- Stacja pogodowa PeakTech
- Stacja pogodowa Beurer
- Stacja pogodowa Braun
- Stacja pogodowa Livoo
- Stacja pogodowa Theben
- Stacja pogodowa Muse
- Stacja pogodowa Nedis
- Stacja pogodowa Adler
- Stacja pogodowa Marquant
- Stacja pogodowa Majestic
- Stacja pogodowa Blaupunkt
- Stacja pogodowa Hyundai
- Stacja pogodowa ECG
- Stacja pogodowa Krontaler
- Stacja pogodowa TFA
- Stacja pogodowa Chauvin Arnoux
- Stacja pogodowa Minox
- Stacja pogodowa Auriol
- Stacja pogodowa Lowrance
- Stacja pogodowa Tanita
- Stacja pogodowa Vimar
- Stacja pogodowa Techno Line
- Stacja pogodowa Emos
- Stacja pogodowa Renkforce
- Stacja pogodowa Perel
- Stacja pogodowa Thomson
- Stacja pogodowa La Crosse Technology
- Stacja pogodowa Velleman
- Stacja pogodowa Homematic IP
- Stacja pogodowa Pyle
- Stacja pogodowa Setti+
- Stacja pogodowa Camry
- Stacja pogodowa Greisinger
- Stacja pogodowa National Geographic
- Stacja pogodowa GoGen
- Stacja pogodowa Brandson
- Stacja pogodowa Rocktrail
- Stacja pogodowa Prestigio
- Stacja pogodowa Clatronic
- Stacja pogodowa Telefunken
- Stacja pogodowa Oregon Scientific
- Stacja pogodowa Bresser
- Stacja pogodowa Elro
- Stacja pogodowa Hama
- Stacja pogodowa Taylor
- Stacja pogodowa Netatmo
- Stacja pogodowa Optex
- Stacja pogodowa Extech
- Stacja pogodowa Denver
- Stacja pogodowa Orion
- Stacja pogodowa Levenhuk
- Stacja pogodowa Trevi
- Stacja pogodowa Lexibook
- Stacja pogodowa EQ-3
- Stacja pogodowa Eurochron
- Stacja pogodowa Sencor
- Stacja pogodowa Alecto
- Stacja pogodowa Avidsen
- Stacja pogodowa Steinberg
- Stacja pogodowa JUNG
- Stacja pogodowa Daewoo
- Stacja pogodowa ADE
- Stacja pogodowa EVE
- Stacja pogodowa Elgato
- Stacja pogodowa Cotech
- Stacja pogodowa Profile
- Stacja pogodowa Ascot
- Stacja pogodowa Cresta
- Stacja pogodowa Brigmton
- Stacja pogodowa GlobalTronics
- Stacja pogodowa Jacob Jensen
- Stacja pogodowa Soehnle
- Stacja pogodowa AcuRite
- Stacja pogodowa Ventus
- Stacja pogodowa Davis
- Stacja pogodowa Chacon
- Stacja pogodowa Goddess
- Stacja pogodowa Irox
- Stacja pogodowa Konig
- Stacja pogodowa UPM
- Stacja pogodowa Gira
- Stacja pogodowa Balance
- Stacja pogodowa Day
- Stacja pogodowa ELV
- Stacja pogodowa Dexford
- Stacja pogodowa Kemot
- Stacja pogodowa Waldbeck
- Stacja pogodowa EQ3
- Stacja pogodowa Buienradar
- Stacja pogodowa Solar
- Stacja pogodowa Saxon
- Stacja pogodowa IT
- Stacja pogodowa Garni
- Stacja pogodowa HomeMatic
- Stacja pogodowa La Crosse
- Stacja pogodowa Durabase
- Stacja pogodowa Meade
- Stacja pogodowa Guardo
- Stacja pogodowa Sempre
- Stacja pogodowa Digi-tech
- Stacja pogodowa Unitec
- Stacja pogodowa TFA Dostmann
- Stacja pogodowa Nor-tec
- Stacja pogodowa DMV Electronics
- Stacja pogodowa Inovalley
- Stacja pogodowa Balance Meteo
- Stacja pogodowa Ease Electronicz
- Stacja pogodowa Mebus
- Stacja pogodowa Saphir
- Stacja pogodowa Paget Trading
- Stacja pogodowa YONO
- Stacja pogodowa Ytora
- Stacja pogodowa JDC
- Stacja pogodowa Greenure
- Stacja pogodowa PCE Instruments
- Stacja pogodowa Nasa
- Stacja pogodowa Thierry Mugler
- Stacja pogodowa ChiliTec
- Stacja pogodowa Global Water
- Stacja pogodowa Uzoli
- Stacja pogodowa Xeecom ApS
- Stacja pogodowa Marathon
- Stacja pogodowa Ea2 LABS
- Stacja pogodowa Hesdo
- Stacja pogodowa Weinberger
- Stacja pogodowa EMOS SELECT
- Stacja pogodowa Prologue
- Stacja pogodowa Gewiss
- Stacja pogodowa Browin
- Stacja pogodowa ClimeMET
- Stacja pogodowa Otio
- Stacja pogodowa Baldr
- Stacja pogodowa Konyks
Najnowsze instrukcje dla Stacja pogodowa
2 Kwietnia 2025
27 Marca 2025
27 Marca 2025
4 Marca 2025
27 Lutego 2025
5 Lutego 2025
27 Stycznia 2025
27 Stycznia 2025
15 Stycznia 2025
14 Stycznia 2025