Instrukcja obsługi TCL 32S6800S
Przeczytaj poniżej 📖 instrukcję obsługi w języku polskim dla TCL 32S6800S (20 stron) w kategorii telewizor. Ta instrukcja była pomocna dla 10 osób i została oceniona przez 2 użytkowników na średnio 4.5 gwiazdek
Strona 1/20

Figures and illustrations in this User’s Guide are
provided for reference only and may dier from
actual product appearance. Product design and
specications may be changed without notice.
OPERATION MANUAL
For use with models: S6800 series

2
Table of Contents
Chapter 1: Safety Information
Precautions ...............................................................3
Warning ...................................................................3
Product ....................................................................3
Power and Plug .......................................................3
Power Cord and Signal Cable .................................3
Use Environment .....................................................3
Cleaning ..................................................................3
Hanging the TV Set on the Wall ...............................3
Chapter 2: Connections and Setup
TV Buttons ................................................................4
Initial Setup ...............................................................4
Sockets ......................................................................6
Remote Control Functions ......................................7
Installing Batteries ...................................................7
Exclusive Remote Control .......................................8
How to Use the Remote Control................................8
Installing Batteries ...................................................8
Network Connection .................................................9
Switching On ...........................................................10
Switching Off ...........................................................10
Chapter 3: Basic TV Operations
Accessing Channels ..............................................11
Watching Connected Devices ...............................11
Adjusting Volume ...................................................11
Accessing Smart TV Homepage ...........................11
Accessing Google Play ..........................................11
Accessing T recommended ...................................12
Using System Settings menu ................................12
Using Instant Power On ..........................................12
Using TV Settings menu .........................................12
Chapter 4: Using more of your TV
Installing Channels .................................................13
Using Subtitles ........................................................13
Turning On/Off Subtitles ........................................13
Enabling Subtitle Languages on Digital TV
Channels ................................................................13
Selecting a Subtitle Type on Digital TV Channels ...13
Using Teletext .........................................................13
Selecting Decoding Page Language ......................13
Digital Teletext Language .......................................13
Network waking up .................................................13
T-Link .......................................................................14
Enabling or Disabling T-Link ...................................14
Using Auto Power On .............................................14
Using Auto Standby ................................................14
HbbTV ......................................................................14
HbbTV Access .......................................................14
HbbTV Deactivation ...............................................14
Google Cast .............................................................14
Using EPG (Electronic Program Guide) ...................14
Bluetooth Function .................................................15
Freeview Plus ..........................................................15
What You Need .....................................................15
To Launch Freeview Plus .......................................15
Netix Settings ........................................................15
HDR Playback ........................................................15
Password in Parental Control ................................15
Chapter 5: Other Information
Problems & Solutions ............................................16
Troubleshooting .....................................................17
Legal Statement ......................................................18
Licence ....................................................................19

3
Chapter 1 Safety Information
Precautions
Read all of the instructions before operating the set.
Keep these instructions well for future use.
Warning
Never place a television set in an unstable location. A
television set may fall, causing serious personal injury
or death. Many injuries, particularly to children, can be
avoided by taking simple precautions such as:
-Using cabinets or stands recommended by the
manufacturer of the television set.
-Only using furniture that can safely support the
television set.
-Ensuring the television set is not overhanging the
edge of the supporting furniture.
-Not placing the television set on tall furniture
(for example, cupboards or bookcases)
without
anchoring both the furniture and the television set to
a suitable support.
-Not placing the television set on cloth or other
materials that may be located between the television
set and supporting furniture.
-Educating children about the dangers of climbing on
furniture to reach the television set or its controls.
If your existing television set is being retained and
relocated, the same considerations as above should be
applied.
Product
• Do not block or cover the ventilation openings on the
back cover.
• Do not push objects of any kind into this unit through
the cabinet slots as they could touch the current
carryingpartsorshort-circuitparts,resultinginre,
electric shock, or damage to the unit.
• Do not attempt to open the cabinet as this may cause
damage. There are no parts inside you can service by
yourself.Referallservicingtoqualiedpersonnel.
• Donottouchthescreensurfacewithngersasthis
may scratch or mar the TV screen.
• Do not impact the TV screen with hard pressure as
this may damage the TV screen severely.
• This appliance is not intended for use by young
childrenorinrmpersonswithoutsupervision.Young
children should be supervised to ensure that they do
not play with the appliance.
Power and Plug
• Unplug the set under the following conditions:
-If the set will not be used for a long period of time.
-If the power cord or the power outlet/plug is
damaged.
-Follow the instructions to install and adjust the
product. Adjust those controls that are covered in
these operating instructions as improper adjustment
of other controls may result in damage. If this
happens, unplug the set and refer to the service
personnel.
-If the set is subject to impact or has been dropped
and the cabinet has been damaged.
• Where the mains plug or an appliance coupler is used
as disconnect device, the disconnect device shall
remain readily operable.
Power Cord and Signal Cable
• Do not allow anything to rest on or roll over the power
cord and the signal cable.
• Protect the power cord and the signal cable from
being trampled.
• Do not overload the power cord or the power outlet.
• Do not expose the power cord and the signal cable to
moisture.
Use Environment
• Do not place the set on an unstable cart, stand, or
table.
• Place the set on a place that allows good ventilation.
• Do not use the set near damp, and cold areas.
• Do not expose the set to excessive heat such as direct
sunlight,re,orthelikeandnonakedamesources,
such as lighted candles, should be placed on the
apparatus.
• Do not expose the set to dripping or splashing and
noobjectslledwithliquids,suchasvases,shallbe
placed on the apparatus.
• Do not use the set in dusty environments.
• Operating Temperature: 5°C
to 35°C (41°F to 95°F)
Operating Humidity: 20% to 80%, non-condensing
Storage Temperature: -15°C to 45°C (5°F to 113°F)
Storage Humidity: 10% to 90%, non-condensing
Cleaning
• Dust the set by wiping the screen and the cabinet with
a soft, clean cloth or some special liquid cleaner.
• Do not apply excessive force to the screen when
cleaning.
• Do not use water or other chemical cleaner to clean
the screen as this may damage the surface of the TV
screen.
Hanging the TV Set on the Wall
Warning This operation requires two people.:
To ensure a safe installation, observe the following
safety notes:
• Check that the wall can support the weight of the TV
set and wall mount assembly.
• Follow the mounting instructions provided with the
wall mount.
• The TV set must be installed on a vertical wall.
• Make sure to use only screws suitable for the material
of the wall.
• Make sure that the TV set cables are placed so that
there is no danger of tripping over them.
All other safety instructions about our TV sets are also
applicable here. Wall mount bracket not included.
( Note: Certain TV models are not designed to be
mounted to the wall.)

4
Chapter 2 Connections and Setup
TV Buttons
If the batteries in your remote control are run down, you can use the buttons on your TV set. They have the
following functions:
For models with below buttons on the set: For models with below buttons on the set:
/◄TV mode In menus
P ▲
/►P ▼
►
Features (Short press)
(Long press)
◄
Features (Long press)
OK (Short press)
Features (Long press)
OK (Short press)
For models with only one button on the set:
Note:
Figures and illustrations are provided for reference only and may vary depending on the model.
Initial Setup
Thersttimeyouswitchtheseton,theWelcome screen appears, which guides you through the initial setup
process.Followtheon-screeninstructionstonishtheinitialsetupprocesssuchasselectingthelanguage,
connecting to the network, scanning channels, and more. During each step, either make a choice or skip the step. If
you skip a step, you can perform the setup later from the settings menu.
Note: If the channel search retrieved only the analogue channels it could be caused by poor broadcasting and
therefore is not covered by manufacturer warranty. Manufacturers cannot be held responsible for lack of or poor
broadcasting in some areas.
Google setup and TCL initial setup
or Power on/Standby

5
Chapter 2 Connections and Setup
6
Connections and Setup
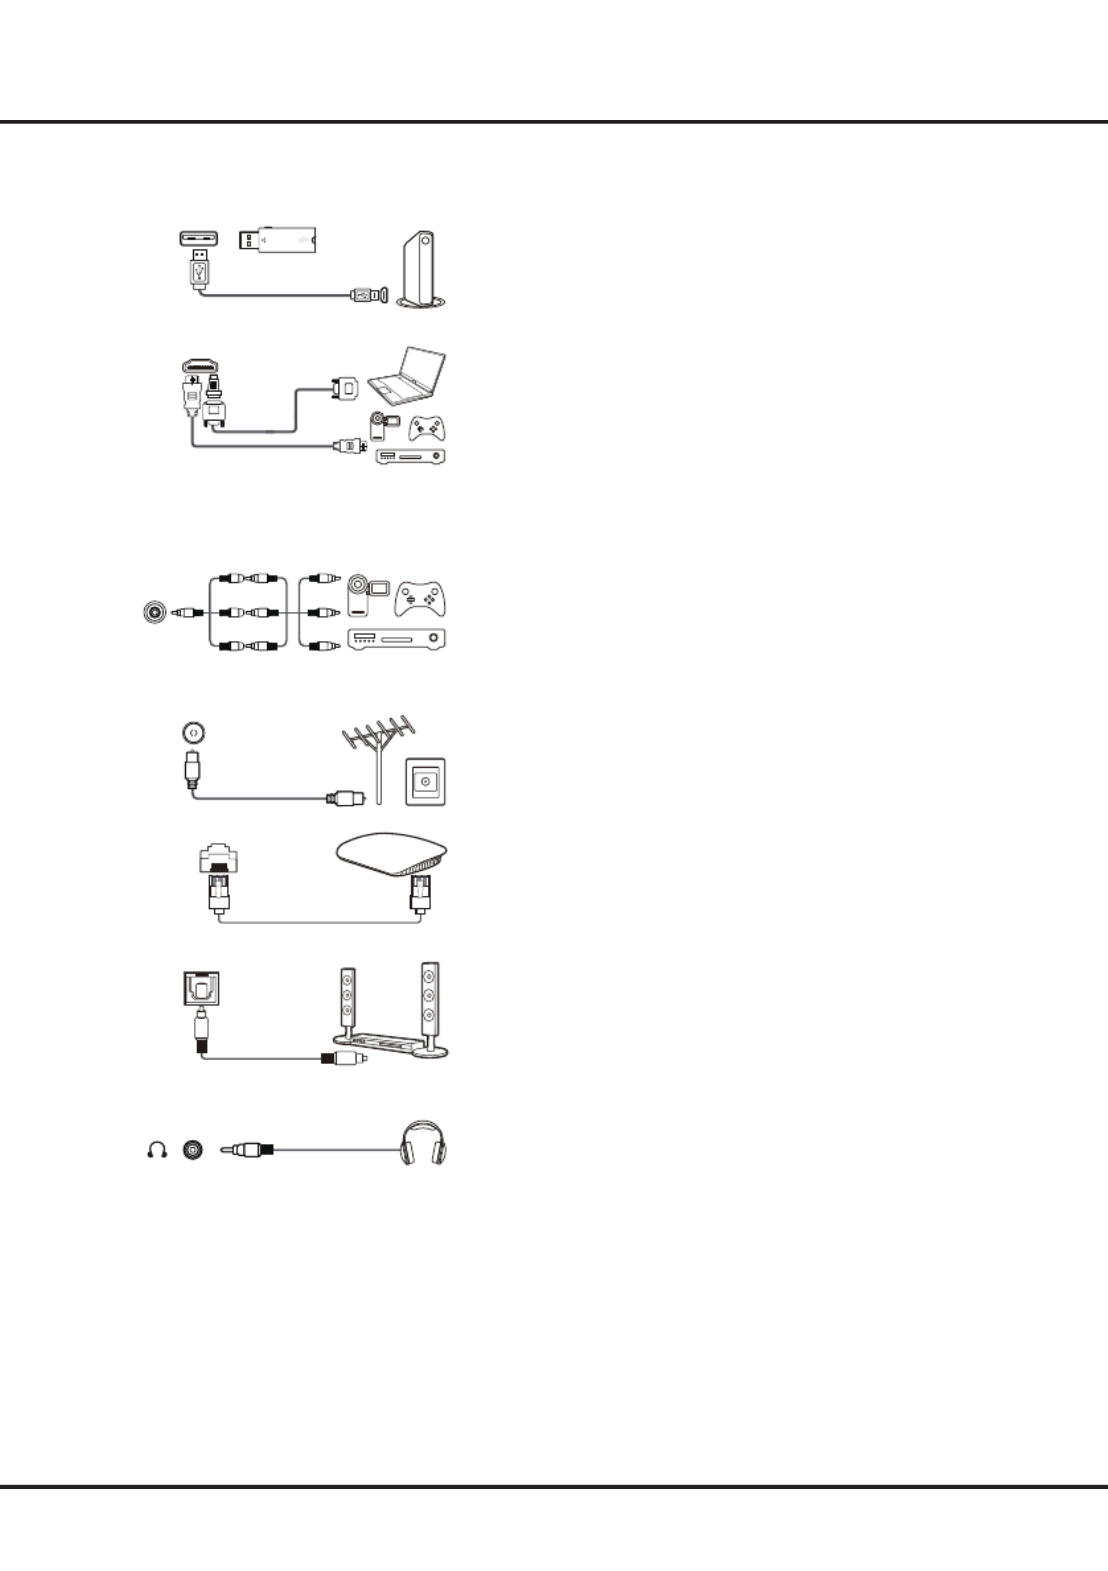
Sockets
Note: The location and names of the sockets on the TV may vary according to TV model, and not all sockets are available on all models.
USB2.0 socket (input)
These sockets can be used to connect a USB device.
Note: The number of USB sockets on the TV may vary according to
TV model.
HDMI(SERVICE) or HDMI(ARC) socket (input)
TheHDMI(High-DenitionMultimediaInterface)socketcanbe
used to connect a Blu-ray player, PC with a compatible video card
installed,certainDVDplayersorahigh-denitioncompatibledigital
satellite decoder. This socket provides an uncompressed digital
connection that carries both video and audio data by way of an
integrated mini-plug cable.
AV IN adapter socket
The AV IN adapter socket can be used to connect the attached
AV adapter cable with VIDEO and AUDIO L & R IN sockets. The
AV IN sockets can be used to connect a range of equipment,
including video recorders, camcorders, decoders, satellite receivers,
DVD players, or games consoles. The VIDEO IN socket provides
composite video connection.
ANTENNA IN socket (input)
This socket can be used to connect an outside aerial.
LAN
RJ45 plug for connecting to external modem or network access
equipment.
SPDIF socket (output)
The SPDIF socket can be used to connect a compatible digital audio
receiver.
Headphone socket (output)
This socket can be used to connect headphones or stereo
earphones.
Warning: Excessive sound pressure from earphones and
headphones can cause hearing loss.
SPDIF
LAN
Router / Modem
ANTENNA IN
AV IN
adapter
V L R
V L R
V L R
HDMI
(SERVICE)
or HDMI
(ARC)
USB 2.0
HDD

7
Remote Control Functions
Most of your television's functions are available via the menus that appear on the screen. The remote control supplied
withyoursetcanbeusedtonavigatethroughthemenusandtocongureallthegeneralsettings.
Note: Figures and illustrations in this operation manual are provided for reference only and may differ from actual
product appearance. Certain function may not be available for some models, e.g. GUIDE/SUBTITLE functions
are only available under DTV source. And DTV is not available for certain model.
Connections and Setup
To switch the sound off and back on.
Standby / quit standby.
Numeric buttons To enter channel numbers or a digit.
To access T recommended apps.
LIST To display the channel list.
/ To control the volume.
To display program information, if available.
To display the Settings menu.
P / To change channels.
To access the Smart TV homepage.
To display the Option menu.
▲/▼/◄ ►/ Navigation direction buttons.
OK Toconrmanentryorselection.
To return to the previous menu or quit an App.
To select input source.
EXIT To exit the Settings menu.
LANG To select an audio language available for selected digital TV
program.
GUIDE To toggle the Electronic Program Guide on or off . (only
available for digital channels.)
TEXT To toggle Teletext on or off.
SUBT. To select a subtitle language available for selected digital TV
program.
Colour buttons To select tasks or Teletext pages; to be used for HbbTV
function.
To start fast reverse.
To pause playback.
To start fast forward.
ZOOM To select the desired screen format.
Note: You are recommended to use the full screen mode. Do
not use the display mode with black bars on both sides of the
picture (such as 4:3) for a long time; otherwise the TV screen
may be damaged permanently.
To start playback.
To stop playback.
To access the NETFLIX application. (Not available for some
models.)
Installing Batteries
1. Push to open the back cover as illustrated.
2. Insert two AAA batteries according to the
polarities marked on the battery case.
3. Replace the back cover as illustrated.
1 2
3
RC802N

8
Connections and Setup
Standby / quit standby..
To display the Settings menu.
To access the Smart TV homepage.
To display the Option menu.
▲/▼/◄/► Navigationdirectionbuttons.The▲/▼buttonsarealso
..used to change channels in TV mode.
OK Toconrmanentryorselection.The button is also used to
..display the channel list in TV mode.
To return to the previous menu or quit an App.
To select input source.
Google
Assistant
Press to activate and use Google Assistant. (Available only
..when the network connection works normally.)
To pop up the virtual remote control keyboard when available.
/ To control the volume.
P / To change channels.
ToaccessNetix. (Not available for some models.)
To access T recommended Apps.
This remote control is available only for selected models. The remoteNote:
control type may be changed without notice.
Exclusive Remote Control
How to Use the Remote Control
When using buttonforthersttime,youwillbepromptedtopairtheremotewiththeTV.Pleasefollowtheon-
screen guide for pairing instructions.
a. Keep the remote control and TV in 1 meter, press and button on the remote at the same time. You can OK
use button after activating successfully.
b. This voice search function is only available for content search from certain Apps.
c. Set languages in the TV -settingstoyourlocallanguageorofciallanguagetoenhancevoicesearchsuccess
fully.
Installing Batteries
1. Push to open the back cover as illustrated.
2. Insert two AAA batteries according to the
polarities marked on the battery case.
3. Replace the back cover as illustrated.
1 2
3
RC802V

11
Chapter 3 Basic TV Operations
Accessing Channels
-Using the remote control of RC802N
Using the numeric buttons: press the corresponding
numeric buttons on the remote control to access the
channels.
Using the P / buttons P /: press the buttons
on the remote control to scroll through the channels.
Using the LIST button LIST: press the button to
display the channel list and press and to ▲▼◄►/ / / OK
select channels.
-Using the remote control of RC802V
Using the buttons▲/▼ : press the buttons on the ▲/▼
remote control to scroll through the channels.
Using the OK button OK: press the button to display
the channel list and press and to select ▲▼◄►/ / / OK
channels.
Using the button: press
to display the virtual
remote control keyboard, then you can use the numeric
buttons, the buttons or the P+/P- LIST
button to operate
accordingly.
Watching Connected Devices
Press on the remote control to display the source
list. Press to select or other input sources and ▲ ▼/ TV
press OKtoconrm.
You can also press on the remote control to display
the homepage, press to move the cursor to ▲◄►/ /
the area on the right top of the screen, and (Inputs)
press to enter. Then press and to select OK ▲ ▼/ OK
the input source.
Adjusting Volume
Volume control /: press the buttons on the
remote control or the corresponding buttons on the TV
set to increase or decrease the volume.
Sound mute: press the button to temporarily mute
the sound. Press this button again or the button to
restore the sound.
Accessing Smart TV Homepage
Allows you to enjoy Internet Applications (Apps) and
specially adapted Internet websites, and perform system
settings for your TV. You can make controlling with the
TV remote control.
WARNING:
• CongurethenetworksettingsbeforeusingSmart TV
applications.
• Slow responses and/or interruptions may occur,
depending on your network conditions.
• If you experience a problem using an application,
please contact the content provider.
• According to circumstances of the content provider, an
application’s updates or the application itself may be
discontinued.
• Depending on your country's regulations, some
applications may have limited service or not be
supported.
• Changes in application content may be made without
prior notice by the service provider.
1. Press on the remote control to display the Smart
TV homepage.
2. / / / OKPress ▲▼◄► and to enter the desired Apps,
functions or settings.
3. Press to return to the homepage.
4. To exit the homepage, press to move the ▲/◄/►
cursor to the area on the right top of the (Inputs)
screen, press to enter and then press and OK ▲ ▼/
OK to select your desired input source.
Note: Since the connection with Internet takes time, it’s
recommended that you wait a few minutes to use the
Smart TV feature after activation of TV from standby.
Accessing Google Play
Google Play is your entertainment unbound. It brings
together all of the entertainment you love and helps
you explore it in new ways, anytime, anywhere. We’ve
brought the magic of Google to music, movies, TV,
books, magazines, apps and games, so you get more
from your content every day.

12
Basic TV Operations
1. Press on the remote control to display the Smart
TV homepage.
2. / / (Settings)Press ▲◄► to move the cursor to on
the right top of the screen and press to enter the OK
system settings.
3. / OKPress ▲ ▼ to choose the items and press to
enter.
4. Press to return to previous interface.
5. EXIT Press to close the menu.
Using Instant Power On
It enables you to turn on your TV faster from standby
mode than turning this function off, but it will also
increase standby power consumption.
1. Press on the remote control to display the
homepage, Press to select ▲/▼/◄/► > Power >
Device > Instant power on OK and press to toggle
between and .On Off
2. Press to return to the homepage.
Using TV Settings menu
Allows you to adjust TV settings, such as picture and
sound.
1. Press on the remote control to display the Settings
menu.
2. /Press ▲ ▼ ► to select the desired item, then press
to enter the corresponding submenu.
3. /In submenus, press ▲ ▼ to select menu options,
then press to enter the option list, the OK/►
adjustment interface, or the corresponding submenu.
4. Press to return to the previous menu.
5. EXIT or Press to close the menu.
Notes:
- You can also press o n the remote control, select
Settings OK (if available) and press to enter the
Settings menu. Some options may not be available
for certain signal sources.
- Setting on will make fast moving LED Motion clear
images clearer by controlling the LED backlight, but
the picture will be darker and more ickering than
with off.LED Motion clear
1. Press on the remote control to display the Smart
TV homepage.
2. / Apps OKPress ▲ ▼ to select the , and press to
enter. Then press and to enter the ▲▼◄►/ / / OK
desired Apps.
3. Press to return to the homepage.
Accessing T recommended
Allows you to enjoy Internet Applications (Apps).
1. Press on the remote control to display the
recommended apps.
2. / / / OKPress ▲▼◄► and to enter the desired Apps.
3. Press to return to the recommend page and exit.
Using System Settings menu
Allows you to not only adjust device settings, such as
Network, Inputs, Google Cast, Power and Apps, etc.,
but also set preferences.
Specyfikacje produktu
| Marka: | TCL |
| Kategoria: | telewizor |
| Model: | 32S6800S |
Potrzebujesz pomocy?
Jeśli potrzebujesz pomocy z TCL 32S6800S, zadaj pytanie poniżej, a inni użytkownicy Ci odpowiedzą
Instrukcje telewizor TCL

21 Września 2024
16 Września 2024
16 Września 2024
16 Września 2024
16 Września 2024
16 Września 2024
23 Sierpnia 2024
23 Sierpnia 2024
23 Sierpnia 2024
23 Sierpnia 2024
Instrukcje telewizor
- telewizor Sony
- telewizor Samsung
- telewizor LG
- telewizor Sharp
- telewizor Pioneer
- telewizor Lenovo
- telewizor Philips
- telewizor SilverCrest
- telewizor Fujitsu
- telewizor Nokia
- telewizor Hisense
- telewizor Infiniton
- telewizor Panasonic
- telewizor Viewsonic
- telewizor AG Neovo
- telewizor Medion
- telewizor OK
- telewizor Lenco
- telewizor Toshiba
- telewizor Tesla
- telewizor Westinghouse
- telewizor Majestic
- telewizor Jensen
- telewizor Blaupunkt
- telewizor Brandt
- telewizor Vivax
- telewizor Salora
- telewizor Teac
- telewizor Grundig
- telewizor Haier
- telewizor Soundmaster
- telewizor Hyundai
- telewizor Strong
- telewizor ECG
- telewizor Matsui
- telewizor Oyster
- telewizor Bang & Olufsen
- telewizor JVC
- telewizor Furrion
- telewizor Funai
- telewizor Oppo
- telewizor TechniSat
- telewizor Krüger&Matz
- telewizor Philco
- telewizor CHiQ
- telewizor Uniden
- telewizor Thomson
- telewizor Velleman
- telewizor Ferguson
- telewizor Manta
- telewizor Pyle
- telewizor AOC
- telewizor Peerless-AV
- telewizor Nevir
- telewizor OKI
- telewizor Mitsubishi
- telewizor Arçelik
- telewizor Continental Edison
- telewizor GoGen
- telewizor NEC
- telewizor Polaroid
- telewizor Aiwa
- telewizor AKAI
- telewizor Sanyo
- telewizor Telefunken
- telewizor Jay-Tech
- telewizor Bush
- telewizor Loewe
- telewizor VOX
- telewizor Insignia
- telewizor AYA
- telewizor Element
- telewizor Denver
- telewizor Hitachi
- telewizor Technika
- telewizor Emerson
- telewizor Seiki
- telewizor Sencor
- telewizor Odys
- telewizor Daewoo
- telewizor Metz
- telewizor Kunft
- telewizor Grunkel
- telewizor Alphatronics
- telewizor XD Enjoy
- telewizor RevolutionHD
- telewizor FFalcon
- telewizor QBell Technology
- telewizor Planar
- telewizor Dyon
- telewizor Reflexion
- telewizor Megasat
- telewizor Sogo
- telewizor Proline
- telewizor Schaub Lorenz
- telewizor Newstar
- telewizor Finlux
- telewizor Palsonic
- telewizor Logik
- telewizor Luxor
- telewizor Mitchell & Brown
- telewizor Aconatic
- telewizor Voxicon
- telewizor Orava
- telewizor SYLVOX
- telewizor Doffler
- telewizor Kogan
- telewizor SunBriteTV
Najnowsze instrukcje dla telewizor

25 Października 2024
25 Października 2024

25 Października 2024
25 Października 2024
25 Października 2024

23 Października 2024
23 Października 2024
23 Października 2024
23 Października 2024

20 Października 2024