Instrukcja obsługi Sony Vaio VGN-NW27MF
Przeczytaj poniżej 📖 instrukcję obsługi w języku polskim dla Sony Vaio VGN-NW27MF (105 stron) w kategorii laptop. Ta instrukcja była pomocna dla 5 osób i została oceniona przez 2 użytkowników na średnio 4.5 gwiazdek
Strona 1/105

N
Operating Instructions - Hardware Guide
Personal Computer
VGN-NW Series

2
n N
Contents
Before Use.......................................................................... 4
Finding More about Your VAIO Computer .................... 5
Ergonomic Considerations ............................................ 7
Getting Started.................................................................... 9
Locating Controls and Ports........................................ 10
About the Indicator Lights ........................................... 16
Connecting a Power Source ....................................... 17
Using the Battery Pack................................................ 19
Shutting Down Your Computer Safely ........................ 25
Using the Power Saving Modes .................................. 26
Updating Your Computer ............................................ 28
Using Your VAIO Computer.............................................. 29
Using the Keyboard..................................................... 30
Using the Touch Pad................................................... 32
Using Special-function Buttons ................................... 33
Using the Quick Web Access Function ....................... 34
Using the Built-in Camera ........................................... 36
Using the Optical Disc Drive ....................................... 37
Using "Memory Stick".................................................. 45
Using Other Modules / Memory Cards........................ 51
Using the Internet........................................................ 57
Using the Network (LAN) ............................................ 59
Using the Wireless LAN...............................................60
Using the Bluetooth Function ......................................67
Using Peripheral Devices..................................................73
Connecting External Speakers or Headphones ..........74
Connecting an External Display ..................................75
Selecting Display Modes .............................................80
Using the Multiple Monitors Function ..........................81
Connecting an External Microphone ...........................83
Connecting a USB Device ...........................................84
Connecting an i.LINK Device.......................................86
Customizing Your VAIO Computer....................................88
Setting the Password...................................................89
Using Intel® VT ...........................................................94
Using the VAIO Control Center ...................................95
Using the VAIO Power Management...........................96
Configuring Your Modem.............................................97
Upgrading Your VAIO Computer.......................................98
Adding and Removing Memory ...................................99
Precautions .....................................................................105
Safety Information .....................................................106
Care and Maintenance Information ...........................109
Handling Your Computer ...........................................110

3
n N
Handling the LCD Screen ......................................... 112
Using the Power Source ........................................... 113
Handling the Built-in Camera .................................... 114
Handling Discs .......................................................... 115
Using the Battery Pack.............................................. 116
Handling "Memory Stick"........................................... 117
Handling the Built-in Storage Device ........................ 118
Troubleshooting .............................................................. 119
Computer .................................................................. 121
System Security ........................................................ 128
Battery....................................................................... 129
Built-in Camera ......................................................... 131
Internet ...................................................................... 133
Networking ................................................................ 135
Bluetooth Technology ............................................... 139
Optical Discs ............................................................. 143
Display ...................................................................... 147
Printing ...................................................................... 151
Microphone ............................................................... 152
Speakers................................................................... 153
Touch Pad................................................................. 154
Keyboard................................................................... 155
Floppy Disks.............................................................. 156
Audio/Video............................................................... 157
"Memory Stick" ..........................................................159
Peripherals ................................................................160
Trademarks .....................................................................161
Notice ..............................................................................163

4
n N
Before Use >
Before Use
Congratulations on your purchase of this Sony VAIO® computer, and welcome to the on-screen User Guide. Sony has
combined leading-edge technology in audio, video, computing, and communications to provide a state-of-the-art personal
computing experience.
!
External views illustrated in this manual may look slightly different from those of your computer.
How to find specifications
Some features, options, and supplied items may not be available on your computer.
To find out about the configuration of your computer, see the Specifications (supplied with your computer).

7
n N
Before Use >
Ergonomic Considerations
Ergonomic Considerations
You will be using your computer as a portable device in a variety of environments. Whenever possible, you should attempt
to take account of the following ergonomic considerations for both stationary and portable environments:
❑Position of your computer – Place the computer directly in front of you. Keep your forearms horizontal, with your wrists
in a neutral, comfortable position while using the keyboard or the pointing device. Let your upper arms hang naturally at
your sides. Take frequent breaks while using your computer. Excessive use of the computer may strain eyes, muscles, or
tendons.
❑Furniture and posture – Sit in a chair with good back support. Adjust the level of the chair so your feet are flat on the
floor. A footrest may make you more comfortable. Sit in a relaxed, upright posture and avoid slouching forward or leaning
far backwards.

8
n N
Before Use >
Ergonomic Considerations
❑Viewing angle of the computer's display – Use the display's tilting feature to find the best position. You can reduce eye
strain and muscle fatigue by adjusting the tilt of the display to the proper position. Adjust the brightness level of the display
as well.
❑Lighting – Choose a location where windows and lights do not cause glare and reflection on the display. Use indirect
lighting to avoid bright spots on the display. Proper lighting adds to your comfort and work efficiency.
❑Positioning an external display – When using an external display, set the display at a comfortable viewing distance.
Make sure the display screen is at eye level or slightly lower when you are sitting in front of the monitor.

10
n N
Getting Started >
Locating Controls and Ports
Locating Controls and Ports
Take a moment to identify the controls and ports shown on the following pages.
!
The appearance of your computer may be different from those illustrated in this manual due to variations in specifications. It may also vary in some
countries or areas.

13
n N
Getting Started >
Locating Controls and Ports
Right
AHeadphones jack (page 74)
BMicrophone jack (page 83)
CHi-Speed USB (USB 2.0) ports *1 (page 84)
DOptical disc drive (page 37)
EDrive eject button (page 37)
FManual eject hole (page 143)
GModem port *2 (page 57)
HSecurity slot
*1 Support high-/full-/low- speeds.
*2 On selected models only.

20
n N
Getting Started >
Using the Battery Pack
3Slide the battery pack diagonally into the battery compartment until the projection (2) on either side of the battery
compartment fits into the U-shaped cut (3) on either side of the battery pack.
4Push the battery pack down into the compartment until it clicks into place.
5Slide the battery LOCK switch outward to secure the battery pack on the computer.

26
n N
Getting Started >
Using the Power Saving Modes
Using the Power Saving Modes
You can take advantage of the power management settings to conserve battery life. In addition to the normal operating mode,
your computer has two distinct power saving modes to suit your preference: Sleep and Hibernate.
!
If you do not intend to use your computer for an extended period of time while it is disconnected from AC power, place the computer into Hibernate
mode or turn it off.
If the battery pack runs out of power while your computer is in Sleep mode, you will lose all unsaved data. Going back to the previous work state is
impossible. To avoid loss of data, you should save your data frequently.
Mode Description
Normal mode This is the normal state of your computer while it is in use. The green power indicator light is lit while the
computer is in this mode.
Sleep mode Sleep mode turns off the LCD screen and places the built-in storage device(s) and the CPU into a low power
consumption mode. The orange power indicator light blinks slowly while your computer is in this mode. Your
computer comes out of Sleep mode quicker than out of Hibernate mode. However, Sleep mode uses more
power than Hibernate mode.
Hibernate mode While your computer is in Hibernate mode, the state of the system is saved on the built-in storage device(s) and
power is turned off. Even when the battery pack runs out of power, no data will be lost. The power indicator light
is unlit while your computer is in this mode.
27
n N
Getting Started >
Using the Power Saving Modes
Using Sleep Mode
To activate Sleep mode
Click Start, the arrow next to the Shut down button, and Sleep.
To return to Normal mode
❑Press any key.
❑Press the power button on your computer.
!
If you press and hold the power button for more than four seconds, your computer will turn off automatically. You will lose all unsaved data.
Using Hibernate Mode
To activate Hibernate mode
Press the Fn F12+ keys.
Alternatively, you can click Start, the arrow next to the Shut down button, and Hibernate.
!
Do not move your computer before its power indicator light turns off.
To return to Normal mode
Press the power button.
!
If you press and hold the power button for more than four seconds, your computer will turn off automatically.

32
n N
Using Your VAIO Computer >
Using the Touch Pad
Using the Touch Pad
You can point to, select, drag, and scroll objects on the screen using the touch pad.
✍
You can disable/enable the touch pad while a mouse is connected to your computer. To change the touch pad settings, use the VAIO Control Center.
!
Be sure to connect a mouse before disabling the touch pad. If you disable the touch pad before connecting a mouse, you will be able to use only the
keyboard for pointer operations.
Action Description
Point Slide your finger on the touch pad (1) to place the pointer (2) on an item or object.
Click Press the left button (3) once.
Double-click Press the left button twice in a row.
Right-click Press the right button (4) once. With many applications, this action displays a context-sensitive shortcut menu (if any).
Drag Slide your finger on the touch pad while pressing the left button.
Scroll Slide your finger along the right edge of the touch pad to scroll vertically. Slide your finger along the bottom edge to scroll
horizontally. Once vertical or horizontal scrolling is engaged, you can move your finger in circles on the touch pad to
keep scrolling without taking the finger off the touch pad (the scroll function is available only with applications that
support a touch pad scroll feature).

33
n N
Using Your VAIO Computer >
Using Special-function Buttons
Using Special-function Buttons
Your computer is equipped with special buttons to help you use specific functions of the computer.
Special-function button Functions
WEB button
While the computer is in Normal mode, the WEB button launches the web browser assigned to the button by
default.
While the computer is off, the WEB button activates the Quick Web Access function and launches the web
browser used with this function. See Using the Quick Web Access Function (page 34) for more
information.
!
The WEB button is not functional while the computer is in Sleep mode or Hibernate mode.
Muting (S1) button
While the computer is in Normal mode, the muting (S1) button executes the task that is assigned to the button
by default. You can change the default assignment with the VAIO Control Center.
While the Quick Web Access function is activated, the muting (S1) button turns the volume on and off.
!
Even if you change the button assignment with the VAIO Control Center, the button works only as the muting button while
the Quick Web Access function is activated.
DISPLAY OFF button
Turns off the LCD backlight.
To turn on the LCD backlight, do any of the following:
- Press any key.
- Press any special-function button.
- Slide your finger on the touch pad.
!
You cannot turn on the LCD backlight with a USB device, such as a mouse.

34
n N
Using Your VAIO Computer >
Using the Quick Web Access Function
Using the Quick Web Access Function
The Quick Web Access function enables you immediately to access the Internet without launching the Windows operating
system.
Activating the Quick Web Access Function
To activate the Quick Web Access function, your computer must be off.
To activate the Quick Web Access function
1 Press the WEB button on the computer.
2 Follow the instructions in the initial setup wizard.
Once you have completed the initial setup, the web browser used with the Quick Web Access function launches just by
pressing the WEB button from the next time.
Exiting the Quick Web Access Function
!
To launch the Windows operating system, you first need to exit the Quick Web Access function.
To exit the Quick Web Access function, do any of the following:
❑Click the icon located at the lower left corner of the screen.
❑Press the WEB button.
❑Press the power button on the computer.
For detailed information on how to use or restrictions on the Quick Web Access function, click the icon located at the
lower right corner of the screen.

35
n N
Using Your VAIO Computer >
Using the Quick Web Access Function
Notes on using the Quick Web Access function
While the Quick Web Access function is activated, you cannot use:
❑any function key, except the F2 F3, , and F4 keys, in combination with the Fn key for shortcuts.
❑the Scr Lk key in combination with the Fn key for a shortcut.
❑any port and jack except the DC IN port, the network (LAN) port, the USB ports, and the headphones jack.
❑the "Memory Stick" slot, the SD memory card slot, and the ExpressCard slot.

36
n N
Using Your VAIO Computer >
Using the Built-in Camera
Using the Built-in Camera
Your computer is equipped with a built-in MOTION EYE camera.
With the preinstalled image capture software, you can perform the following:
❑Capture still images and movies
❑Sense and capture object movements for monitoring purposes
❑Edit captured data
✍
Turning on the computer activates the built-in camera.
Video conferences are possible with the appropriate software.
!
Launching or exiting your instant messaging or video editing software does not activate or deactivate the built-in camera.
Do not place your computer into Sleep or Hibernate mode while you are using the built-in camera.
To use the preinstalled image capture software
1 Click Start, All Programs, ArcSoft WebCam Companion 3, and WebCam Companion 3.
2 Click your desired icon in the main window.
For detailed information on how to use the software, see the help file included with the software.
✍
When capturing an image or a movie in a dark place, click the Capture icon in the main window, and then click the WebCam Settings icon and select
the low light or low light compensation option in the properties window.

37
n N
Using Your VAIO Computer >
Using the Optical Disc Drive
Using the Optical Disc Drive
Your computer is equipped with an optical disc drive.
Features and options in this section may not be available on your computer.
See the specifications to find out about the configuration of your computer.
To insert a disc
1 Turn on the computer.
2 Press the drive eject button (1) to open the drive.
The drive tray slides out.

41
n N
Using Your VAIO Computer >
Using the Optical Disc Drive
Notes on Using the Optical Disc Drive
Notes on writing data to a disc
❑Only use circular discs. Do not use discs in any other shape (star, heart, card, etc.), as this may damage the optical disc
drive.
❑Do not strike or shake your computer while the optical disc drive is writing data to a disc.
❑Do not plug or unplug the power cord or the AC adapter while the optical disc drive is writing data to a disc.
Notes on playing discs
To achieve optimum performance of disc playback, you should follow these recommendations:
❑Some CD players and computer optical disc drives may not be able to play audio CDs created with the CD-R or CD-RW
media.
❑Some DVD players and computer optical disc drives may not be able to play DVDs created with the DVD+R DL, DVD-R
DL, DVD+R, DVD+RW, DVD-R, DVD-RW, or DVD-RAM media.
❑You may not be able to play some Blu-ray Disc content on your computer, or the computer may become unstable during
Blu-ray Disc playback. To play content normally, download and install the latest updates for the WinDVD BD using the
VAIO Update.
For information on how to use the VAIO Update, see Updating Your Computer (page 28).
❑Depending on system environment, you may find sound interruptions and/or dropped frames during AVC HD playback.
❑Do not place your computer into either of the power saving modes while your computer is playing a disc.

43
n N
Using Your VAIO Computer >
Using the Optical Disc Drive
!
You can change the region code only a limited number of times. When you have exceeded this number, the drive's region code is permanently assigned
and you will not be able to change it again. Reconfiguring your computer does not reset this count.
If you change the region code while the WinDVD or WinDVD BD software is running, restart the software or eject the disc and re-insert it to make the
new setting effective.

44
n N
Using Your VAIO Computer >
Using the Optical Disc Drive
Playing Discs
To play a disc
1Insert a disc into the optical disc drive.
!
Connect the AC adapter to the computer and close all running software applications before playing a disc.
2If nothing appears on the desktop, click Start, All Programs, and your desired software to play the disc.
For instructions on how to use the software, see the help file included with the software.
Copying Files to Discs
To copy files to a disc
1Insert a recordable disc into the optical disc drive.
!
Connect the AC adapter to the computer and close all running software applications before copying files to a disc.
2If nothing appears on the desktop, click Start, All Programs, and your desired disc burning software to copy files to the
disc.
For instructions on how to use the software, see the help file included with the software.

48
n N
Using Your VAIO Computer >
Using "Memory Stick"
Formatting "Memory Stick"
To format "Memory Stick"
"Memory Stick" has been formatted by default and is ready for use.
If you want to reformat the media with your computer, follow these steps.
!
Be sure to use the device that is designed to format the media and supports "Memory Stick" when formatting the media.
Formatting "Memory Stick" erases the entire data stored on the media. Before formatting the media, make sure that it does not contain your valuable
data.
Do not remove "Memory Stick" from the slot while formatting. This could cause a malfunction.
1Locate the "Memory Stick" slot.
2Carefully slide "Memory Stick" into the slot until it clicks into place.
3Click Start and Computer to open the Computer window.
4Right-click the "Memory Stick" icon and select Format.
5Click Restore device defaults.
!
The size of the allocation unit and file system may change.
Do not select NTFS from the File system drop-down list as it may cause a malfunction.
✍
The formatting process will be completed more quickly if you select Quick Format in Format options.

50
n N
Using Your VAIO Computer >
Using "Memory Stick"
Notes on Using "Memory Stick"
❑Your computer has been tested and found compatible with Sony branded "Memory Stick" with capacity of up to 16 GB
that are available as of May 2009. However, not all "Memory Stick" are guaranteed of compatibility.
❑Inserting "Memory Stick" with multiple conversion adaptors is not guaranteed of compatibility.
❑"MagicGate" is the general name of the copyright protection technology developed by Sony. Use "Memory Stick" with the
"MagicGate" logo to take advantage of this technology.
❑Except for your personal use, it is against the copyright law to use any audio and/or image data you recorded without prior
consent from the respective copyright holders. Accordingly, "Memory Stick" with such copyrighted data can be used only
within the law.
❑Do not insert more than one "Memory Stick" into the slot. Improper insertion of the media may damage both your
computer and the media.

51
n N
Using Your VAIO Computer >
Using Other Modules / Memory Cards
Using Other Modules / Memory Cards
Using the ExpressCard Module
Your computer is equipped with an ExpressCard/34 slot* for transferring data among digital cameras, camcorders, music
players, and other audio/video devices. This slot can only accommodate an ExpressCard/34 (34 mm wide) module*.
* Referred to as the ExpressCard slot and the ExpressCard module in this manual.
To insert an ExpressCard module
1Locate the ExpressCard slot.
2Carefully slide the ExpressCard module into the slot until it clicks into place.
Do not force it into the slot.

52
n N
Using Your VAIO Computer >
Using Other Modules / Memory Cards
✍
If the module does not go into the slot easily, remove it gently and verify you are inserting it in the proper direction.
Make sure you use the most recent driver software provided by the ExpressCard module manufacturer.
To remove an ExpressCard module
✍
You can skip steps 1 to 4 when:
- your computer is off.
- the Safely Remove Hardware icon is not displayed on the taskbar.
- the hardware you want to unplug is not displayed in the Safely Remove Hardware window.
1Locate the ExpressCard slot.
2Double-click the Safely Remove Hardware icon on the taskbar.
3Select the hardware you want to unplug and click Stop.
4Follow the on-screen instructions for removing the ExpressCard module.
5Push in the ExpressCard module toward the computer so that the module pops out.
6Gently take hold of the ExpressCard module and pull it out of the slot.

53
n N
Using Your VAIO Computer >
Using Other Modules / Memory Cards
Using the SD Memory Card
Your computer is equipped with an SD memory card slot. You can use this slot to transfer data among digital cameras,
camcorders, music players, and other audio/video devices.
Before you use the SD memory card
The SD memory card slot on your computer supports the following memory cards:
❑SD memory card
❑SDHC memory card
For the latest information on compatible memory cards, see Finding More about Your VAIO Computer (page 5) to visit the
appropriate support web site.
54
n N
Using Your VAIO Computer >
Using Other Modules / Memory Cards
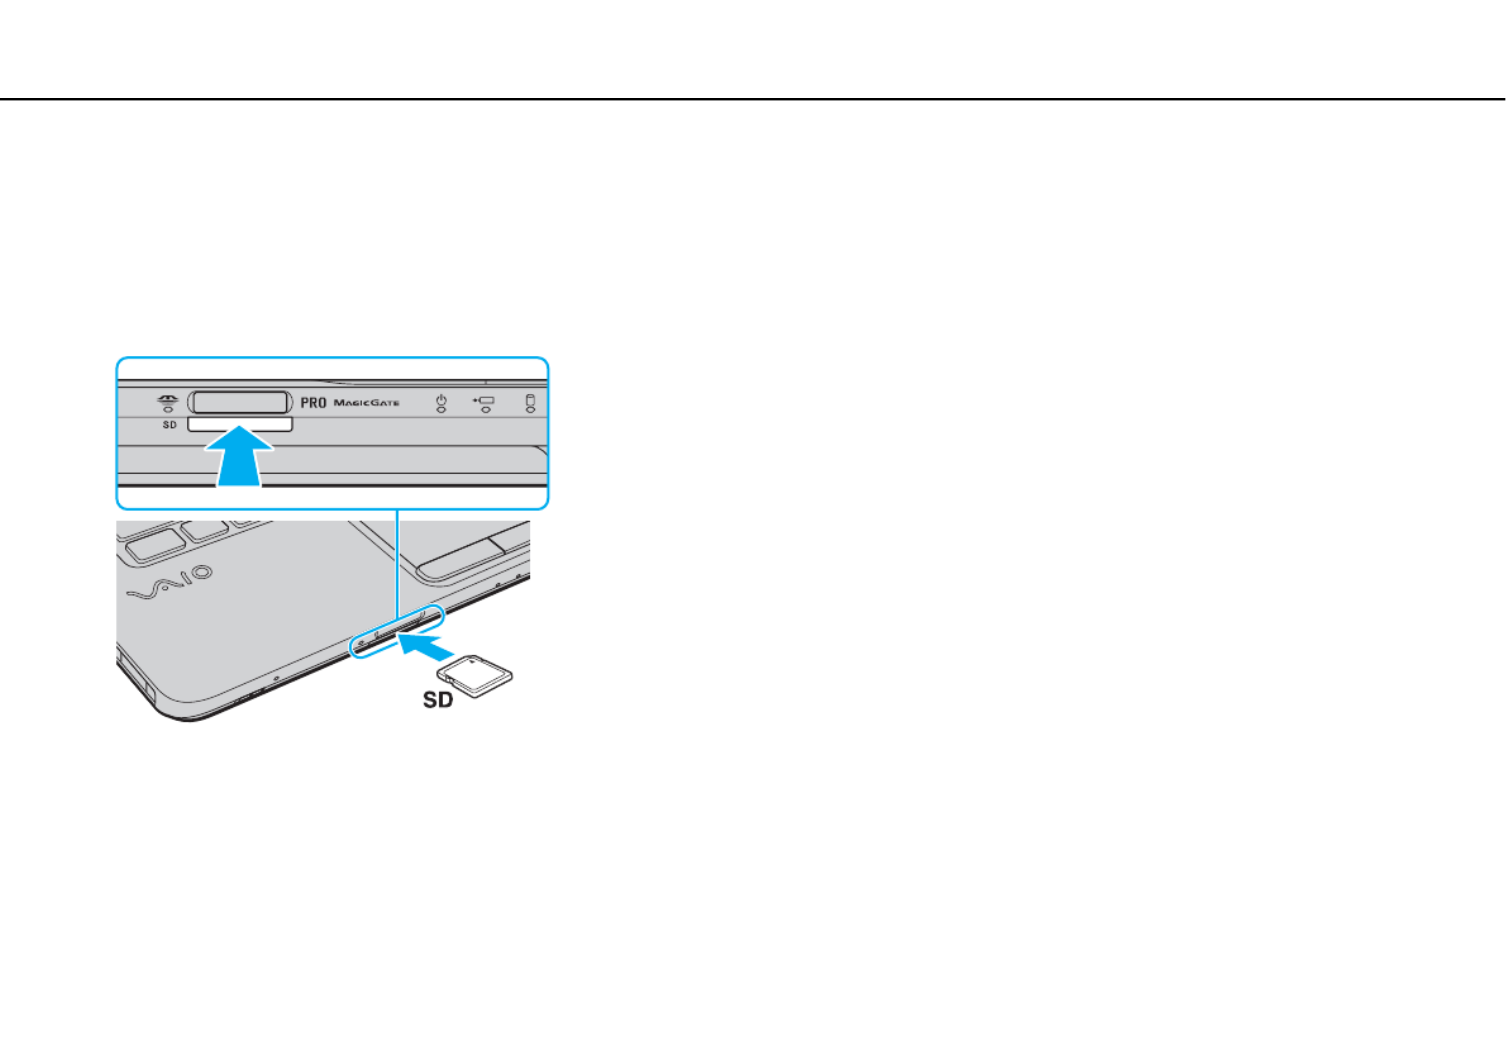
To insert an SD memory card
1Locate the SD memory card slot.
2Hold the SD memory card with the arrow facing upward and pointing toward the slot.
3Carefully slide the SD memory card into the slot until it clicks into place.
Do not force the card into the slot.
✍
If the SD memory card does not go into the slot easily, remove it gently and verify you are inserting it in the proper direction.
The SD memory card icon will appear in the Computer window after you insert the card into the slot.

55
n N
Using Your VAIO Computer >
Using Other Modules / Memory Cards
To remove an SD memory card
1Locate the SD memory card slot.
2Check that the Media Access indicator light is unlit.
3Push in the SD memory card toward the computer and release.
The SD memory card ejects.
4Pull the SD memory card out of the slot.

56
n N
Using Your VAIO Computer >
Using Other Modules / Memory Cards
Notes on Using Memory Cards
General notes on using the memory card
❑Be sure to use memory cards that are compliant with the standards supported by your computer.
❑Be sure to hold the memory card with the arrow pointing in the correct direction as you insert it into the slot. To avoid
damaging your computer or the media, do not force the memory card into the slot if you cannot insert it smoothly.
❑Use care when inserting or removing the memory card from the slot. Do not force it in or out of the slot.
❑Do not remove the memory card while the media access indicator light is lit. If you do, you may lose data.
❑Do not attempt to insert a memory card or memory card adaptor of a different type into the memory card slot. An
incompatible memory card or memory card adaptor may cause difficulty in removing from the slot and can cause damage
to your computer.
Notes on using the SD memory card
❑Your computer has been tested and found compatible only with major memory cards available as of May 2009. However,
not all memory cards that meet the same specifications as the compatible media are guaranteed of compatibility.
❑SD memory cards with capacity of up to 2 GB and SDHC memory cards with capacity of up to 32 GB have been tested
and found compatible with your computer.
❑The SD memory card slot on your computer does not support the high-speed data transfer feature of the SD memory
card and the SDHC memory card.

60
n N
Using Your VAIO Computer >
Using the Wireless LAN
Using the Wireless LAN
Using the Wireless LAN (WLAN), all your digital devices with the built-in WLAN function communicate freely with each other
through a network. A WLAN is a network in which a user can connect to a Local Area Network (LAN) through a wireless (radio)
connection.
The WLAN supports all normal LAN connectivity, but with the added benefits of mobility and roaming. You can still access
information, Internet/intranet and network resources, even in the middle of a meeting, or as you move from one place to
another.
You can communicate without an access point, which means that you can communicate with a limited number of computers
(ad-hoc). Or you can communicate through an access point, which allows you to create a full infrastructure network.
✍
In some countries, using WLAN products may be restricted by the local regulations (e.g. limited number of channels). Therefore, before activating the
WLAN function, read the Safety Regulations carefully.
WLAN uses the IEEE 802.11a*/b/g standard or the IEEE 802.11n* draft standard, which specifies the type of technology used. The standard includes
the encryption methods: Wired Equivalent Privacy (WEP), which is a security protocol, Wi-Fi Protected Access 2 (WPA2), and Wi-Fi Protected Access
(WPA). Proposed jointly by the IEEE and Wi-Fi Alliance, both WPA2 and WPA are specifications of standards based on interoperable security
enhancements that increase the level of data protection and access control for existing Wi-Fi networks. WPA is designed to be forward compatible with
the IEEE 802.11i specification. It utilizes the enhanced data encryption Temporal Key Integrity Protocol (TKIP) in addition to user authentication using
802.1X and Extensible Authentication Protocol (EAP). Data encryption protects the vulnerable wireless link between clients and access points. Besides
that, there are other typical LAN security mechanisms to ensure privacy, such as: password protection, end-to-end encryption, virtual private networks,
and authentication. WPA2, the second generation of WPA, provides stronger data protection and network access control and is also designed to secure
all versions of 802.11 devices, including 802.11b, 802.11a, 802.11g, and 802.11n draft standard, multi-band and multi-mode. In addition, based on
the ratified IEEE 802.11i standard, WPA2 provides government grade security by implementing the National Institute of Standards and Technology
(NIST) FIPS 140-2 compliant AES encryption algorithm and 802.1X-based authentication. WPA2 is backward compatible with WPA.
*See the specifications to find out about the configuration of your computer.

62
n N
Using Your VAIO Computer >
Using the Wireless LAN
Communicating without an Access Point (Ad-hoc)
An ad-hoc network is a network in which a LAN is created only by wireless devices themselves, with no other central controller
or access point. Each device communicates directly with other devices in the network. You can set up an ad-hoc network
easily at home.

63
n N
Using Your VAIO Computer >
Using the Wireless LAN
To communicate without an access point (ad-hoc)
!
The IEEE 802.11a standard, using the 5 GHz band, and the IEEE 802.11n draft standard, using the 2.4 GHz or 5 GHz band, are not available on ad-hoc
networks.
1Turn on the WIRELESS switch.
2Click the VAIO Smart Network icon on the taskbar.
3Click the switch next to your desired wireless option(s) to toggle it to On in the VAIO Smart Network window.
Make sure the WIRELESS indicator light turns on.
4Click Start and Control Panel.
5Click View network status and tasks under Network and Internet.
6Click Set up a new connection or network.
7Select an option to specify the ad-hoc network settings and click Next.
8Follow the on-screen instructions.
Specyfikacje produktu
| Marka: | Sony |
| Kategoria: | laptop |
| Model: | Vaio VGN-NW27MF |
Potrzebujesz pomocy?
Jeśli potrzebujesz pomocy z Sony Vaio VGN-NW27MF, zadaj pytanie poniżej, a inni użytkownicy Ci odpowiedzą
Instrukcje laptop Sony

14 Października 2024
13 Października 2024
11 Października 2024
11 Października 2024
6 Października 2024
2 Października 2024
1 Października 2024
28 Września 2024
21 Września 2024
19 Września 2024
Instrukcje laptop
- laptop Samsung
- laptop Fellowes
- laptop LG
- laptop Xiaomi
- laptop Huawei
- laptop Lenovo
- laptop Gigabyte
- laptop Acer
- laptop Fujitsu
- laptop Panasonic
- laptop Viewsonic
- laptop Asus
- laptop Medion
- laptop MSI
- laptop Toshiba
- laptop Haier
- laptop HP
- laptop Prixton
- laptop Hyundai
- laptop Honor
- laptop Tripp Lite
- laptop Zebra
- laptop Dell
- laptop Schneider
- laptop Thomson
- laptop Pyle
- laptop Apple
- laptop Razer
- laptop ADATA
- laptop GoClever
- laptop SPC
- laptop NEC
- laptop Oregon Scientific
- laptop Jay-Tech
- laptop Microsoft
- laptop ECS
- laptop XPG
- laptop Denver
- laptop Lexibook
- laptop Micromax
- laptop Odys
- laptop TechBite
- laptop TrekStor
- laptop Alienware
- laptop Airis
- laptop Emachines
- laptop Hähnel
- laptop Sylvania
- laptop Coby
- laptop Evga
- laptop Naxa
- laptop Ricatech
- laptop Mpman
- laptop Vizio
- laptop Targa
- laptop Peaq
- laptop Ematic
- laptop Hannspree
- laptop Inovia
- laptop Ergotron
- laptop Ibm
- laptop Atdec
- laptop Packard Bell
- laptop Compaq
- laptop SIIG
- laptop Hercules
- laptop Kogan
- laptop Getac
- laptop Vulcan
- laptop System76
- laptop General Dynamics Itronix
- laptop CTL
- laptop Everex
- laptop Olidata
- laptop Dynabook
- laptop Hamilton Buhl
- laptop AORUS
- laptop Humanscale
- laptop Aplic
- laptop Schenker
Najnowsze instrukcje dla laptop

3 Kwietnia 2025

2 Kwietnia 2025

28 Marca 2025

28 Marca 2025
26 Marca 2025
13 Marca 2025
7 Marca 2025

4 Marca 2025
1 Marca 2025
26 Lutego 2025