Instrukcja obsługi Sony Vaio VGN-NS230D
Przeczytaj poniżej 📖 instrukcję obsługi w języku polskim dla Sony Vaio VGN-NS230D (175 stron) w kategorii laptop. Ta instrukcja była pomocna dla 5 osób i została oceniona przez 2 użytkowników na średnio 4.5 gwiazdek
Strona 1/175

N
User Guide
Personal Computer
V G N - N S S e r i e s

2
n N
Contents
Before Use .........................................................................................................................................................................6
Documentation .............................................................................................................................................................7
Ergonomic Considerations...........................................................................................................................................9
Getting Started .................................................................................................................................................................11
Locating Controls and Ports.......................................................................................................................................12
About the Indicator Lights ..........................................................................................................................................18
Connecting a Power Source ......................................................................................................................................20
Using the Battery Pack ..............................................................................................................................................21
Shutting Down Your Computer Safely .......................................................................................................................29
Using Your VAIO Computer .............................................................................................................................................30
Using the Keyboard ...................................................................................................................................................31
Using the Touch Pad .................................................................................................................................................33
Using Special-function Buttons ..................................................................................................................................34
Using the Built-in MOTION EYE Camera...................................................................................................................35
Using the Optical Disc Drive ......................................................................................................................................38
Using the ExpressCard Module .................................................................................................................................48
Using the Memory Stick .............................................................................................................................................51
Using the SD Memory Card .......................................................................................................................................57
Using the Internet.......................................................................................................................................................60
Using the Network (LAN) ...........................................................................................................................................62
Using the Wireless LAN (WLAN) ...............................................................................................................................63

3
n N
Using Peripheral Devices.................................................................................................................................................66
Connecting External Speakers ..................................................................................................................................67
Connecting an External Display .................................................................................................................................68
Selecting Display Modes............................................................................................................................................71
Using the Multiple Monitors Function .........................................................................................................................73
Connecting an External Microphone ..........................................................................................................................76
Connecting a Universal Serial Bus (USB) Device......................................................................................................77
Connecting a Printer ..................................................................................................................................................80
Connecting an i.LINK Device .....................................................................................................................................81
Customizing Your VAIO Computer ..................................................................................................................................83
Setting the Password .................................................................................................................................................84
Setting Up Your Computer with the VAIO Control Center..........................................................................................89
Using the Power Saving Modes.................................................................................................................................90
Managing Power with the VAIO Power Management ................................................................................................95
Upgrading Your VAIO Computer......................................................................................................................................97
Adding and Removing Memory..................................................................................................................................98

4
n N
Precautions ....................................................................................................................................................................104
Handling the LCD Screen ........................................................................................................................................105
Using the Power Source ..........................................................................................................................................106
Handling Your Computer .........................................................................................................................................107
Handling the Built-in MOTION EYE Camera............................................................................................................109
Handling Floppy Disks .............................................................................................................................................110
Handling Discs .........................................................................................................................................................111
Using the Battery Pack ............................................................................................................................................112
Using Headphones ..................................................................................................................................................114
Handling the Memory Stick ......................................................................................................................................115
Handling the Hard Disk ............................................................................................................................................116
Updating Your Computer .........................................................................................................................................117
Troubleshooting .............................................................................................................................................................118
Computer .................................................................................................................................................................120
System Security .......................................................................................................................................................126
Battery......................................................................................................................................................................127
Built-in MOTION EYE Camera.................................................................................................................................129
Internet.....................................................................................................................................................................132
Networking ...............................................................................................................................................................134
Optical Discs ............................................................................................................................................................137
Display .....................................................................................................................................................................141
Printing .....................................................................................................................................................................146
Microphone ..............................................................................................................................................................147
Mouse ......................................................................................................................................................................148

5
n N
Speakers ..................................................................................................................................................................149
Touch Pad................................................................................................................................................................151
Keyboard..................................................................................................................................................................152
Floppy Disks ............................................................................................................................................................153
Audio/Video..............................................................................................................................................................154
Memory Stick ...........................................................................................................................................................156
Peripherals...............................................................................................................................................................157
Support Options .............................................................................................................................................................158
Sony Support Information ........................................................................................................................................159
Program Support Information...................................................................................................................................162
Trademarks ....................................................................................................................................................................173

6
n N
Before Use
Before Use
Congratulations on your purchase of this Sony VAIO® computer, and welcome to the on-screen User Guide. Sony has
combined leading-edge technology in audio, video, computing, and communications to provide state-of-the-art personal
computing experience.
!
External views illustrated in this manual may look slightly different from those of your computer.
Information in the supplied manuals including this User Guide is intended for users of the VAIO computers with the Microsoft
® Windows Vista® 32-
bit operating system. You may find differences in the information when your computer comes preinstalled with the 64-bit operating system.
7
n N
Before Use
Documentation
Your documentation includes printed information and user guides to read on your VAIO computer.
Printed Documentation
❑Quick Start Guide — Contains an overview of components connection, set-up information, etc.
❑Safety Information — Contains safety guidelines and owner information.
Non-printed Documentation
❑User Guide (this manual) — Explains features of your computer. It also includes information about the software programs
included with your computer, as well as information on solving common problems.
✍
To go to web sites described in this manual by clicking their respective URLs beginning with http://, your computer must be connected to the Internet.
❑Specifications — The online specifications describe the hardware and software configurations of your VAIO computer.
To view the online specifications:
1Connect to the Internet.
2Go to the Sony online support web site at the following URLs:
http://esupport.sony.com/EN/VAIO/ for customers in USA
http://www.sony.ca/support/ for customers in Canada
http://esupport.sony.com/LA/ for customers in Spanish-speaking Latin American countries or areas
http://esupport.sony.com/BR/ for customers in Brazil

8
n N
Before Use
❑VAIO Recovery Center User Guide — Provides information about restoring individual software programs, hardware
drivers, and drive partition(s) or your entire hard disk drive to the original factory settings.
To access this on-screen guide:
1 Click Start and Help and Support.
2 Click Use my VAIO.
3 Click VAIO Recovery Center User Guide.
Help and Support
Help and Support is easy to access and provides a single location for general information and technical assistance for your
VAIO computer. Choose from the following categories to find the answers you need.
To access Help and Support, click Start and Help and Support.
❑Get started with my VAIO
Get help with Internet and wireless setup, security setup, personalizing your VAIO computer, and creating recovery DVDs
and more.
❑Use my VAIO
Access your VAIO user guide, interactive help in the form of VAIO tutorials, how-to articles, the VAIO technology page,
specifications, and system and software information.
❑Troubleshoot my VAIO
Maintain and troubleshoot your VAIO computer with VAIO Care, system restore, backup and recovery, and contact Sony
support.

10
n N
Before Use
❑Viewing angle of the computer's display – Use the display's tilting feature to find the best position. You can reduce eye
strain and muscle fatigue by adjusting the tilt of the display to the proper position. Adjust the brightness level of the display
as well.
❑Lighting – Choose a location where windows and lights do not cause glare and reflection on the display. Use indirect
lighting to avoid bright spots on the display. Proper lighting adds to your comfort and work efficiency.
❑Positioning an external display – When using an external display, set the display at a comfortable viewing distance.
Make sure the display screen is at eye level or slightly lower when you are sitting in front of the monitor.

11
n N
Getting Started
Getting Started
This section describes how to get started using your VAIO computer.
!
Before starting your computer for the first time, do not connect any other hardware that did not originally come with your computer. Be sure to start
up your computer with only the supplied accessories connected and set up your system. Upon completion, connect one device (for example, a printer,
an external hard disk drive, a scanner, and so on) at a time, following the manufacturers' instructions.
❑Locating Controls and Ports (page 12)
❑About the Indicator Lights (page 18)
❑Connecting a Power Source (page 20)
❑Using the Battery Pack (page 21)
❑Shutting Down Your Computer Safely (page 29)

13
n N
Getting Started
ABuilt-in MOTION EYE camera *1 (page 35)
BBuilt-in MOTION EYE camera indicator *1 (page 18)
CBuilt-in microphone (monaural) *1
DWIRELESS switch (page 63)
EWIRELESS indicator (page 18)
FSD memory card slot (page 57)
GSD memory card indicator (page 18)
HPower indicator (page 18)
ICharge indicator (page 18)
JHard disk drive/Optical disc drive indicator (page 18)
KMemory Stick indicator (page 18)
LMemory Stick slot *2 (page 51)
*1 On selected models only.
*2 Your computer supports both standard- and Duo-size Memory Stick.

14
n N
Getting Started
Back
ADC IN port (page 20)
BNetwork (Ethernet) port (page 62)
CModem port (page 60)

16
n N
Getting Started
Left
AAir vent
BMonitor port (page 68)
CMicrophone jack (page 76)
DHeadphones jack (page 67)
EHi-Speed USB (USB 2.0) ports* (page 77)
Fi.LINK 4-pin (S400) port (page 81)
GExpressCard/34 slot (page 48)
* Support high-/full-/low- speeds.

18
n N
Getting Started
About the Indicator Lights
Your computer is equipped with the following indicator lights:
Indicator Functions
Power 1Illuminates in green when the computer is on, blinks slowly in orange while the computer is in Sleep mode, and
turns off when the computer is off or in Hibernate mode.
Charge Illuminates while the battery pack is charging. See Charging the Battery Pack (page 24) for more information.
Built-in MOTION EYE camera*Illuminates while the built-in MOTION EYE camera is in use.
Memory Stick Illuminates when data is read from or written to the Memory Stick in the Memory Stick slot. (Do not place the
computer into Sleep mode or turn it off when this indicator is lit.) When the indicator is unlit, the Memory Stick
is not in use.
SD memory card Illuminates when data is read from or written to the card in the SD memory card slot. (Do not place the computer
into Sleep mode or turn it off when this indicator is lit.) When the indicator is unlit, the memory card is not in use.
Optical disc drive Illuminates while the drive is reading or writing data. When the indicator is unlit, the optical disc media is not in
use.
Hard disk drive/Optical disc drive Illuminates while the drive is reading or writing data. Do not place the computer into Sleep mode or turn it off
when this indicator is lit.
Num lock Press the Num Lk key to activate the numeric keypad. Press it a second time to deactivate the numeric keypad.
The numeric keypad is not active when the indicator is unlit.
Caps lock Press the Caps Lock key to type letters in uppercase. Letters appear in lowercase if you press the Shift key
while the indicator is lit. Press the key a second time to turn off the indicator. Normal typing resumes when the
Caps lock indicator is unlit.
Scroll lock Press the Scr Lk key to change how you scroll the display. Normal scrolling resumes when the Scroll lock
indicator is unlit. The Scr Lk key functions differently depending on the program you are using and does not
work with all programs.

19
n N
Getting Started
WIRELESS WIRELESSIlluminates when the switch is turned on.
* On selected models only.
Indicator Functions

20
n N
Getting Started
Connecting a Power Source
You can use either an AC adapter or a rechargeable battery pack for supplying power to your computer.
Using the AC Adapter
✍
Use only the supplied AC adapter for your computer.
To use the AC adapter
1Plug one end of the power cord (1) into the AC adapter (3).
2Plug the other end of the power cord into an AC outlet (2).
3Plug the cable connected to the AC adapter (3) into the DC IN port (4) on the computer.
!
The shape of the DC In plug varies depending on the AC adapter.
✍
To disconnect your computer completely from AC power, unplug the AC adapter.
Make sure that the AC outlet is easily accessible.
If you do not intend to use your computer for a long period of time, place the computer into Hibernate mode. See Using Hibernate Mode (page 93).
This power saving mode saves the time of shutting down and resuming.

21
n N
Getting Started
Using the Battery Pack
The battery pack supplied with your computer is not fully charged at the time of delivery.
Installing the Battery Pack
To install the battery pack
1 Turn off the computer and close the LCD screen lid.
2 Slide the battery LOCK switch (1) inward.
22
n N
Getting Started
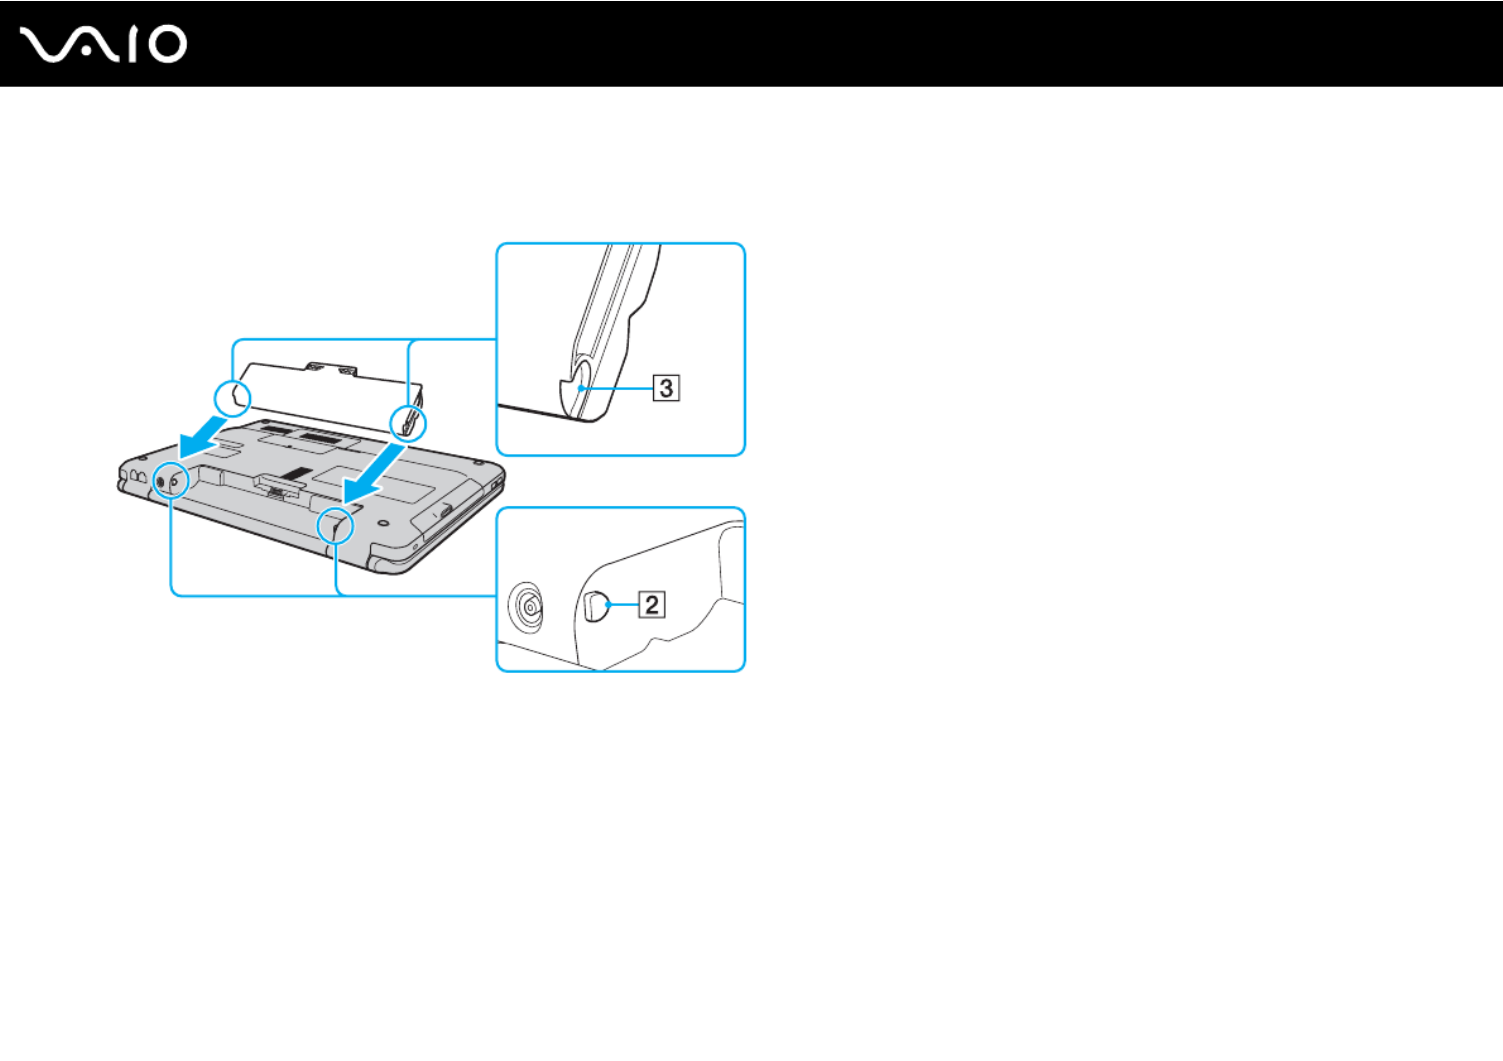
3 Slide the battery pack diagonally into the battery compartment until the projections (2) on either side of the battery
compartment fit into the U-shaped cuts (3) on either side of the battery pack.
23
n N
Getting Started
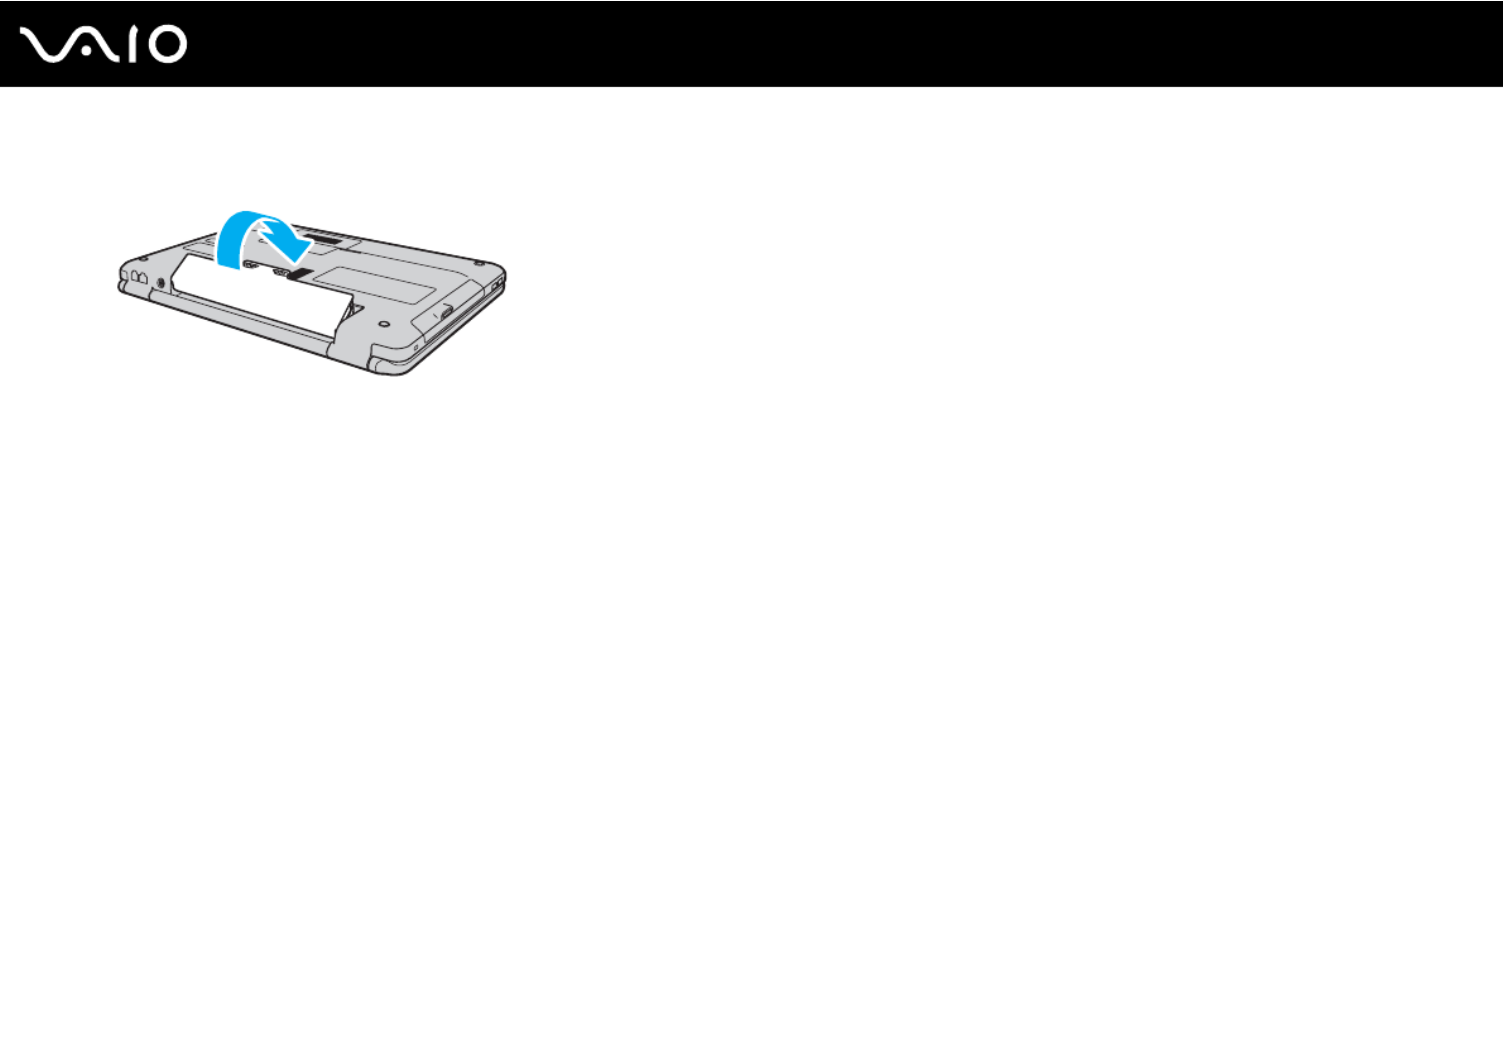
4Push the battery pack down into the compartment until it clicks into place.
5Slide the battery LOCK switch outward to secure the battery pack on the computer.
✍
When your computer is directly connected to AC power and has a battery pack installed, it uses power from the AC outlet.
!
This computer is designed to operate only with genuine Sony battery packs.

24
n N
Getting Started
Charging the Battery Pack
The battery pack supplied with your computer is not fully charged at the time of delivery.
To charge the battery pack
1Install the battery pack.
2Connect the AC adapter to the computer.
The charge indicator light turns on while the battery pack is charging. When the battery pack charges close to the
maximum charge level you selected with the battery charge functions, the charge indicator turns off. To select your desired
maximum charge level, see Using the Battery Charge Functions (page 26).
!
Charge the battery pack as described in this manual from your first battery charge.
Charge indicator status Meaning
Lit in orange The battery pack is charging.
Blinks along with the green power
indicator
The battery pack is running out of power. (Normal
mode)
Blinks along with the orange power
indicator
The battery pack is running out of power. (Sleep mode)
Blinks fast in orange A battery error has occurred due to a failed battery
pack or an unlocked battery pack.

26
n N
Getting Started
Using the Battery Charge Functions
You can select the battery charging method for your battery pack with the Battery Charge Functions. To make the life of
battery longer, enable the battery care function.
To enable the battery care function
1Click Start, All Programs, and VAIO Control Center.
2Click Power Management and then Battery Charge Functions.
3Click Advanced.
4Click to select the Enable Battery Care Function check box in the right pane.
5Select the desired maximum charge level.
6Click OK.
To check the battery charge capacity
Follow steps 1 to 4 in To enable the battery care function above and check detailed information. If the battery charge
capacity is low, replace the battery pack with a new genuine Sony battery pack.

28
n N
Getting Started
Removing the Battery Pack
!
You may lose data if you remove the battery pack while your computer is on and not connected to the AC adapter or if you remove the battery pack
while the computer is in Sleep mode.
To remove the battery pack
1Turn off the computer and close the LCD screen lid.
2Slide the battery LOCK switch (1) inward.
3Slide and hold the battery RELEASE latch (2) inward, put your fingertip underneath the tab (3) on the battery pack, and
lift the battery pack in the direction of the arrow, and then slide it away from the computer.

30
n N
Using Your VAIO Computer
Using Your VAIO Computer
This section describes how to get the most out of using your VAIO computer.
❑Using the Keyboard (page 31)
❑Using the Touch Pad (page 33)
❑Using Special-function Buttons (page 34)
❑Using the Built-in MOTION EYE Camera (page 35)
❑Using the Optical Disc Drive (page 38)
❑Using the ExpressCard Module (page 48)
❑Using the Memory Stick (page 51)
❑Using the SD Memory Card (page 57)
❑Using the Internet (page 60)
❑Using the Network (LAN) (page 62)
❑Using the Wireless LAN (WLAN) (page 63)
31
n N
Using Your VAIO Computer
Using the Keyboard
Your keyboard is very similar to a desktop computer keyboard, but has additional keys that perform model-specific tasks.
Combinations and Functions with the Fn Key
✍
Some keyboard functions can be used only after the operating system is finished launching.
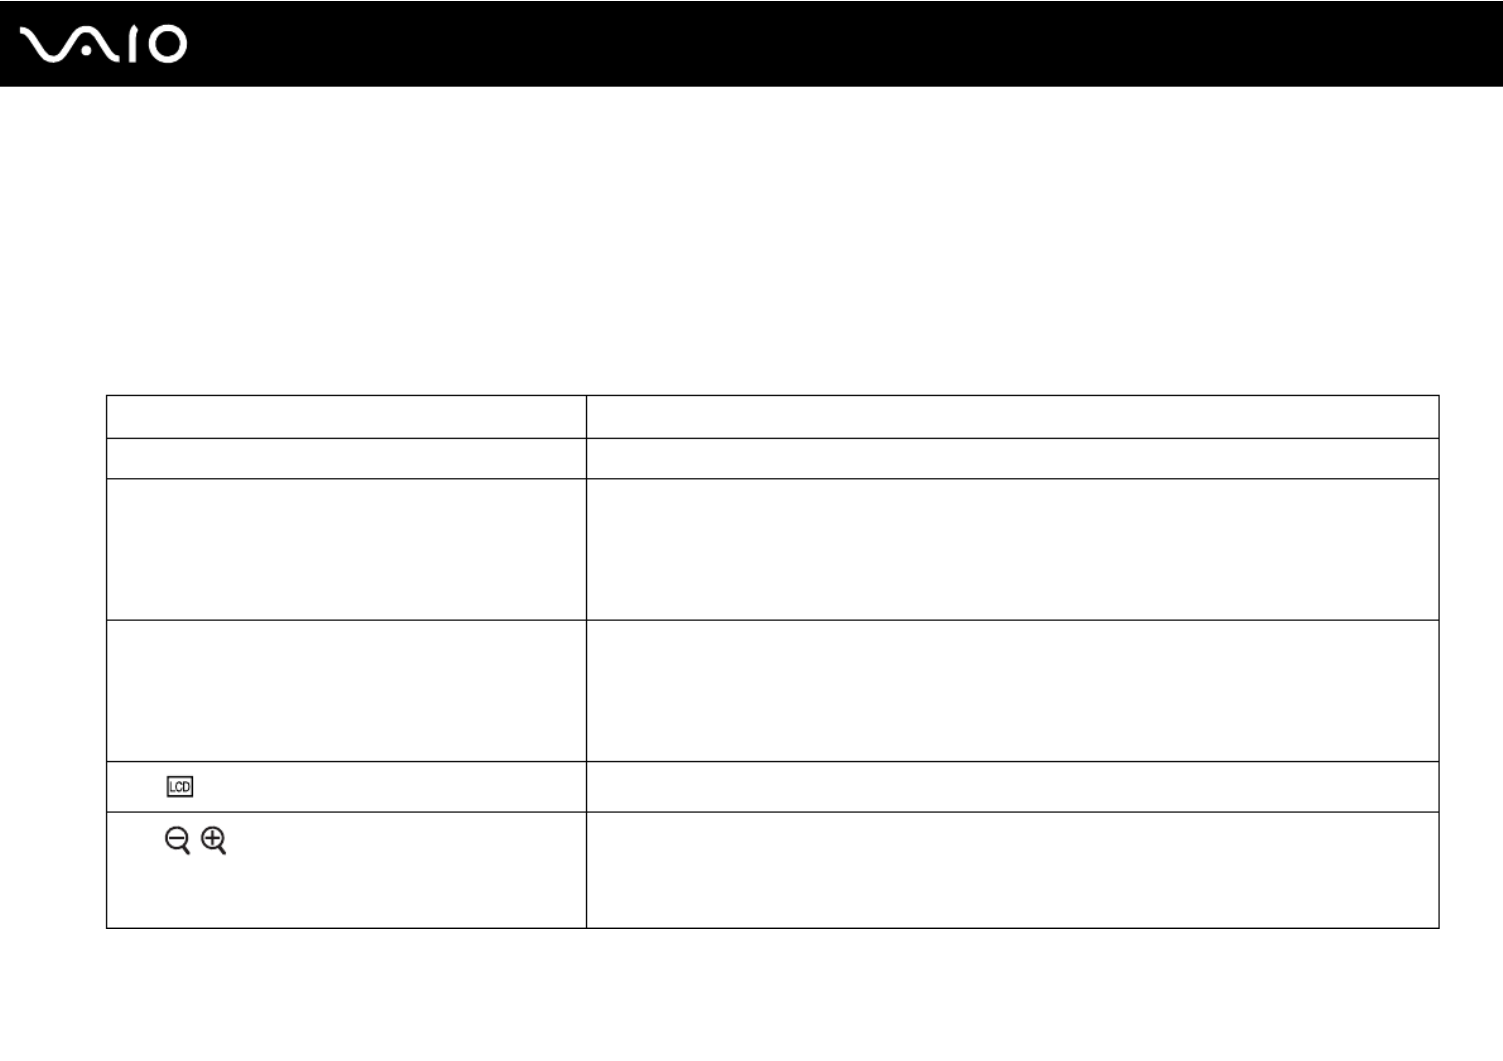
Combinations/Feature Functions
Fn + % (F2): speaker switch Turns on and off the built-in speakers and the headphones.
Fn + 2 (F3/F4): speaker volume Changes the volume level.
To increase the volume, keep pressing the Fn F4+ keys or press the Fn+F4 keys and then the
M , or key.
To decrease the volume, keep pressing the Fn+F3 keys or press the Fn F3+ keys and then the
m < or key.
Fn + 8 (F5/F6): brightness control Changes the LCD brightness of your computer screen.
To increase lighting intensity, keep pressing the Fn F6+ keys or press the Fn+F6 keys and then
the M or , key.
To decrease lighting intensity, keep pressing the Fn+F5 keys or press the Fn+F5 keys and then
the m or < key.
Fn + /T (F7): display output Toggles among your computer screen, an external display, and simultaneous output to both.
Fn + / (F9/F10): zoom Changes the view size of your screen.
To make the screen view look smaller and further away (zoom out), press the Fn+F9 keys.
To make the screen view look bigger and closer (zoom in), press the Fn+F10 keys.
See the help file included with the VAIO Control Center for more information.

32
n N
Using Your VAIO Computer
Fn + (F12): hibernate Provides the lowest level of power consumption. When you execute this command, the states
of the system and the connected peripheral devices are saved to the hard disk drive and the
system power is turned off. To return the system to its original state, use the power button to
turn on the power.
For details on power management, see Using the Power Saving Modes (page 90).
Combinations/Feature Functions

33
n N
Using Your VAIO Computer
Using the Touch Pad
You can point to, select, drag, and scroll objects on the screen using the touch pad.
✍
You can disable/enable the touch pad while a mouse is connected to your computer. To change the touch pad settings, click Start, All Programs, VAIO
Control Center, Keyboard and Mouse and Pointing Device.
!
Be sure to connect a mouse before disabling the touch pad. If you disable the touch pad before connecting a mouse, you will be able to use only the
keyboard for pointer operations.
Action Description
Point Slide your finger on the touch pad (1) to place the pointer (2) on an item or object.
Click Press the left button (3) once.
Double-click Press the left button twice.
Right-click Press the right button (4) once. In many applications, this action displays a shortcut menu.
Drag Slide your finger on the touch pad while pressing the left button.
Scroll Slide your finger along the right edge of the touch pad to scroll vertically. Slide your finger along the bottom edge to scroll
horizontally (the scroll function is available only with applications that support a touch pad scroll feature).

34
n N
Using Your VAIO Computer
Using Special-function Buttons
Your computer is equipped with special buttons to help you use specific functions of the computer.
Special-function button Functions
Muting (S1) button
By default, the muting (S1) button turns the volume on and off.
✍
To change the muting (S1) button assignment, press and hold the button or click Start and VAIO Control Center to display
the setup window.
AV MODE button
Launches the VAIO Launcher for selecting the desired software.
You can change the default software options in the VAIO Launcher. To do so, press and hold the AV MODE
button to display the setup window.

35
n N
Using Your VAIO Computer
Using the Built-in MOTION EYE Camera
Your computer may be equipped with a built-in MOTION EYE camera. See the online specifications to find out whether your
model is equipped with the built-in MOTION EYE camera.
The built-in MOTION EYE camera adds video functionality to instant messaging software and video editing software and
enables you to capture still images and movies with the preinstalled image capture software.
Turning on the computer activates the built-in MOTION EYE camera. Video conference is possible with the appropriate
software.
Note that launching or exiting your instant messaging or video editing software does not activate or deactivate the built-in
MOTION EYE camera, respectively.
✍
The built-in MOTION EYE camera cannot be shared by more than one software application. If another software application is using the camera, exit the
application before using the built-in MOTION EYE camera with your desired application.
!
The viewer window may show some noise, for example horizontal streaks, if you view a rapid-moving object. This is normal and does not indicate a
malfunction.
You cannot operate the built-in MOTION EYE camera with the Microsoft Windows Movie Maker software.

36
n N
Using Your VAIO Computer
Capturing Still Images
To capture a still image
1 Click Start, All Programs, ArcSoft WebCam Companion 2, and WebCam Companion 2 to launch the WebCam
Companion 2.
2 Click the Capture icon in the main window.
3 Frame your subject in the viewfinder.
4 Click the Capture button below the displayed image.
The current image in the viewfinder is captured and its thumbnail image is added as a the thumbnail in the left pane of
the main window.
✍
When capturing an image in a dark place, click the WebCam Settings icon after step 2 and select the low light or low light compensation option in the
properties window.
The WebCam Companion 2 provides many more features. See the help file included with the software for more information.

37
n N
Using Your VAIO Computer
Capturing Movies
To capture a movie
1 Click Start, All Programs, ArcSoft WebCam Companion 2, and WebCam Companion 2 to launch the WebCam
Companion 2.
2 Click the Record icon in the main window.
3 Frame your subject in the viewfinder.
4 Click the Record Video button below the displayed image to start movie recording.
5 When finished, click the Record Video button once again to stop movie recording.
The first scene of the captured movie is added as a thumbnail in the left pane of the main window.
✍
When capturing a movie in a dark place, click the WebCam Settings icon after step 2 and select the low light or low light compensation option in the
properties window.
The WebCam Companion 2 provides many more features. See the help file included with the software for more information.

40
n N
Using Your VAIO Computer
Reading and Writing Optical Discs
Your computer plays and records CDs, DVDs, and Blu-ray Disc™ media, depending on the model you purchased. Check your
specifications for the type of optical disc drive installed on your model.
Use the table below to see which types of media your optical disc drive supports.

42
n N
Using Your VAIO Computer
!
This product is designed to play back discs that conform to the Compact Disc Digital Audio standard specifications (CD Standard). A DualDisc is a two
sided disc product with a DVD recorded layer on one side and a digital audio layer on the other side. Be aware that the audio side (non-DVD side) of a
DualDisc may not play on this product because it does not conform to the CD Standard.
When you buy pre-recorded or blank discs for use with your VAIO computer, be sure to read the notices on the disc package carefully to check both
playback and recording compatibility with your computer's optical disc drives. Sony does NOT guarantee the compatibility of VAIO optical disc drives
with discs that are not compliant with the official "CD," "DVD," or "Blu-ray Disc" standard. USING NON-COMPLIANT DISCS CAN CAUSE FATAL DA
TO YOUR VAIO PC OR CREATE SOFTWARE CONFLICTS AND CAUSE SYSTEM HANGING.
For inquiries about disc formats, contact the individual publisher of the pre-recorded disc or the manufacturer of the recordable disc.
✍
8 cm disc writing is not supported.
!
To play copyright protected Blu-ray Disc media continuously, you need to update the AACS key. Note that the AACS key update requires Internet access.
As with other optical media devices, circumstances may limit compatibility or prevent Blu-ray Disc media playback. VAIO computers may not support
movie playback on packaged media recorded in AVC or VC1 format at high bit rates.
Region settings are required for some contents on DVDs and BD-ROM Disc media. If the region setting on the optical disc drive does not match the
region coding on the disc, playback is not possible.
Unless your external display is compliant with the High-bandwidth Digital Content Protection (HDCP) standard, you cannot play or view the contents
on copyright protected Blu-ray Disc media.
Some contents may restrict video output to standard definition or prohibit analog video output. It is strongly recommended that a digital HDCP-
compliant environment be implemented for optimum compatibility and viewing quality.
Do not use memory-resident utility software while the optical disc drive is playing a disc or writing data to a disc. This may cause your computer to
malfunction.

43
n N
Using Your VAIO Computer
Notes on writing data to a disc
❑Only use circular discs. Do not use discs in any other shape (star, heart, card, etc.), as this may damage the optical disc
drive.
❑Do not strike or shake your computer while the optical disc drive is writing data to a disc.
❑Do not plug or unplug the AC adapter while the optical disc drive is writing data to a disc.

45
n N
Using Your VAIO Computer
Playing CDs
To play an audio CD
1 Insert a disc into the optical disc drive.
2 If nothing appears on the desktop, click Start, All Programs, and the desired CD software to play the CD.
If the Audio CD window appears, click to select an option.
Copying Files to CDs
To copy files to a disc
1 Insert a recordable disc into the optical disc drive.
If the AutoPlay window appears, click Burn files to disc and follow the on-screen instructions until the empty disc folder
appears.
2 Open the folder that contains the file(s) you want to copy and drag them to the empty disc folder.
3 Close the disc folder.

46
n N
Using Your VAIO Computer
Playing DVDs
To play a DVD
1 Close all running software applications.
2 Insert a DVD into the optical disc drive.
3 If nothing appears on the desktop, click Start, All Programs, and the desired DVD software to play the DVD.
For instructions on how to use the software, see the help file included with your DVD software.
Copying Files to DVDs
To copy files to a disc
1 Connect the AC adapter to the computer.
2 Close all running software applications.
3 Insert a recordable disc into the optical disc drive.
4 If nothing appears on the desktop, click Start, All Programs, and the desired DVD burning software to copy files to the
disc.
For instructions on how to use the software, see the help file included with your DVD burning software.

47
n N
Using Your VAIO Computer
Playing Blu-ray Disc Media
!
The Blu-ray Disc playback function is available on selected models only. See the online specifications to find out the type of your optical disc drive, and
then Reading and Writing Optical Discs (page 40) to find out about the supported disc media.
To play a Blu-ray Disc media
1 Close all running software applications.
2 Insert a Blu-ray Disc media into the optical disc drive.
3 If nothing appears on the desktop, click Start, All Programs, and the desired Blu-ray Disc software to play the disc.
For instructions on how to use the software, see the help file included with your software.

48
n N
Using Your VAIO Computer
Using the ExpressCard Module
Your computer is equipped with an ExpressCard/34 slot *
for transferring data among digital cameras, camcorders, music
players, and other audio/video devices. This slot can accommodate an ExpressCard/34 (34 mm wide) module *
only.
* Referred to as the ExpressCard slot and the ExpressCard module in this manual.
Inserting an ExpressCard Module
!
Use care when inserting or removing the ExpressCard module from the slot. Do not force it in or out of the slot.
✍
You do not need to shut down your computer before inserting or removing the ExpressCard module.

49
n N
Using Your VAIO Computer
To insert an ExpressCard module
1 Locate the ExpressCard slot.
2 Carefully slide the ExpressCard module into the slot until it clicks into place.
Do not force it into the slot.
✍
If the module does not go into the slot easily, remove it gently and verify you are inserting it in the proper direction.
Make sure you use the most recent software driver provided by the ExpressCard module manufacturer.

51
n N
Using Your VAIO Computer
Using the Memory Stick
Memory Stick is a compact, portable, and versatile IC recording media especially designed for exchanging and sharing digital
data with compatible products, such as digital cameras, mobile phones, and other devices. Because it is removable, it can
be used for external data storage.
52
n N
Using Your VAIO Computer
Before You Use the Memory Stick
The Memory Stick slot on your computer can accommodate both standard- and Duo-size media and supports Memory Stick
PRO and Memory Stick PRO-HG Duo formats with high speed data transfer and large data capacity capabilities.
✍
You can insert a Duo-size Memory Stick directly into the Memory Stick slot without using a Memory Stick Duo adaptor.
!
Before using a Memory Stick Micro (M2), be sure to insert it into an M2 Standard-size adaptor or M2 Duo adaptor. If you insert the media directly into
the Memory Stick slot without the adaptor, you may not be able to remove it from the slot.
For the latest information about the Memory Stick, visit the Memory Stick web site at http://www.memorystick.com/en/.
!
Your computer has been tested and found compatible with Sony branded Memory Stick with capacity of up to 16 GB that are available as of September
2008. However, not all Memory Stick that meet the same specifications as the compatible media are guaranteed of compatibility.
Inserting a Memory Stick with multiple conversion adaptors is not guaranteed of compatibility.
MagicGate is the general name of the copyright protection technology developed by Sony. Use a Memory Stick with the MagicGate logo to use this
feature.
Except for your personal use, it is against the copyright law to use any audio and/or image data you recorded without prior consent from the respective
copyright holders. Accordingly, the Memory Stick with such copyrighted data can be used only within the law.
The Memory Stick slot on your computer does not support 8-bit parallel data transfer (high speed data transfer).
The Memory Stick Micro in an M2 Duo adaptor may not operate properly if it is additionally inserted into a Memory Stick Duo adaptor.

54
n N
Using Your VAIO Computer
To view the contents on the Memory Stick
1 Click Start and Computer to open the Computer window.
2 Double-click the Memory Stick icon to view the list of data files saved in the Memory Stick.
To format a Memory Stick
The Memory Stick has been formatted in the factory default setting and is ready for use.
If you want to reformat the media with your computer, follow these steps.
!
Be sure to use the device that is designed to format the media and supports the Memory Stick when formatting the media.
Formatting the Memory Stick erases the entire data on the media. Before formatting the media, make sure that it does not contain your valuable data.
Do not remove the Memory Stick from the slot while formatting. This could cause a malfunction.
1 Carefully slide the Memory Stick into the slot until it clicks into place.
2 Click Start and Computer to open the Computer window.
3 Right-click the Memory Stick icon and select Format.
4 Click Restore device defaults.
!
The size of the allocation unit and file system may change.
Do not select NTFS from the File system drop-down list as it may cause a malfunction.
✍
The formatting process will be completed more quickly if you select Quick Format in Format options.

55
n N
Using Your VAIO Computer
5 Click Start.
6 Follow the on-screen instructions.
!
It may take time to format the Memory Stick depending on the media type.

56
n N
Using Your VAIO Computer
Removing a Memory Stick
!
Do not remove the Memory Stick while the Memory Stick indicator light is lit. If you do, you may lose data. Large volumes of data may take time to
load, so make sure the indicator is unlit before removing the Memory Stick.
To remove a Memory Stick
1 Check that the Memory Stick indicator light is unlit.
2 Push in the Memory Stick toward the computer and release.
The Memory Stick ejects.
3 Pull the Memory Stick out of the slot.
!
Always remove the Memory Stick gently, or it may pop out unexpectedly.
62
n N
Using Your VAIO Computer
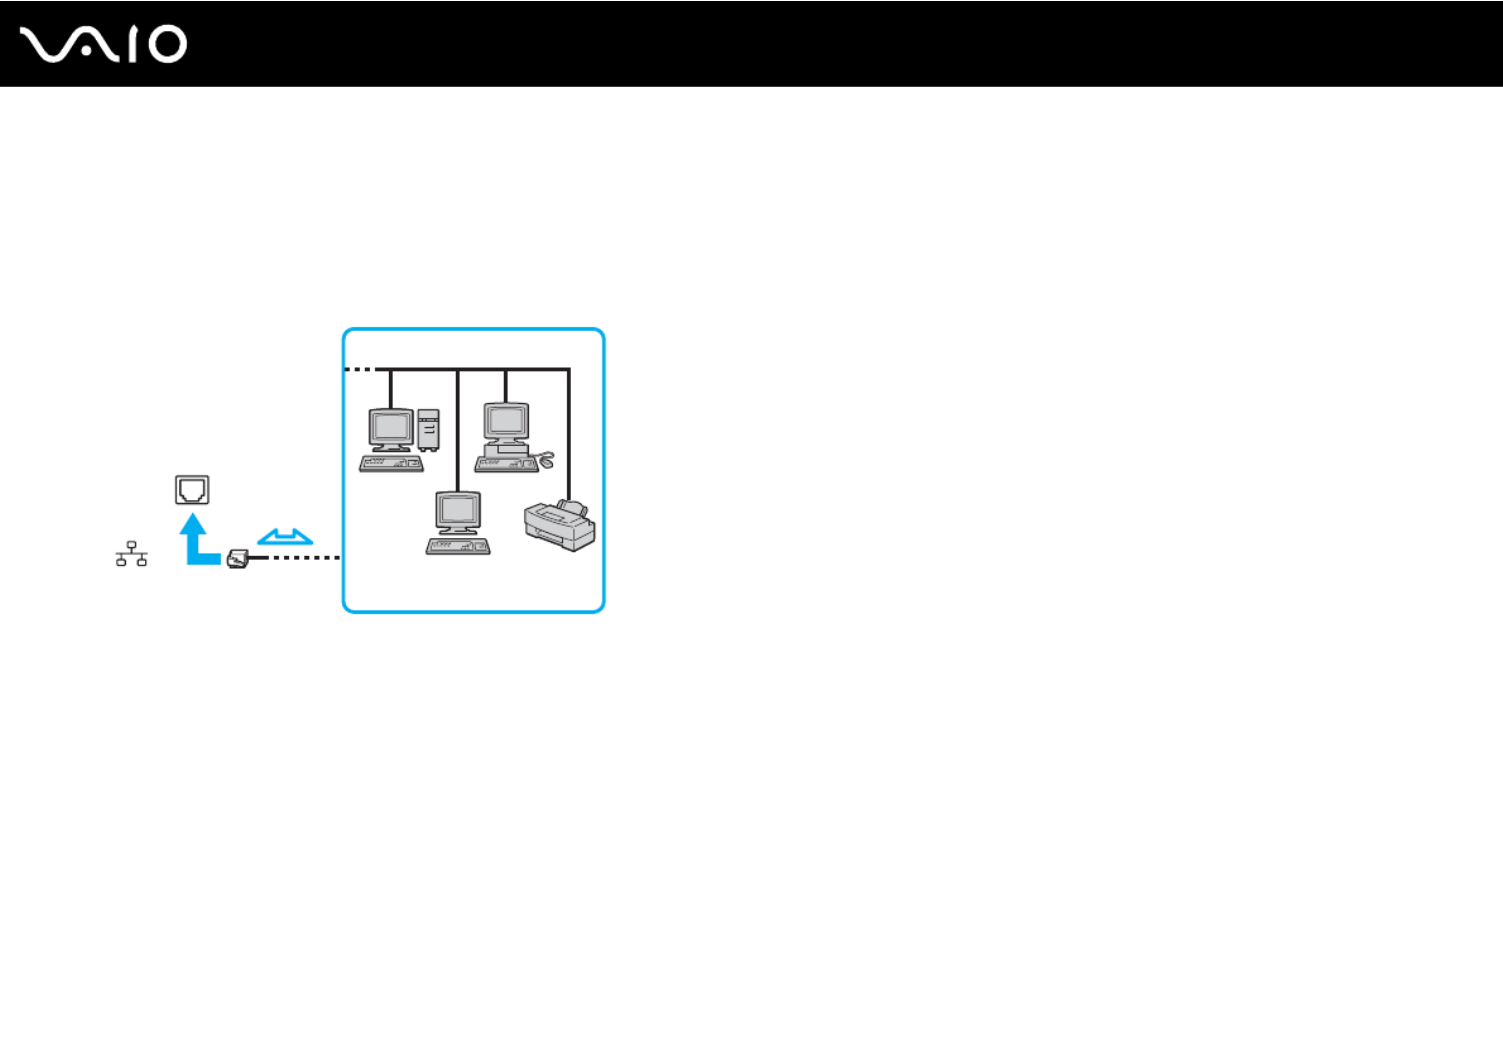
Using the Network (LAN)
You can connect your computer to 1000BASE-T/100BASE-TX/10BASE-T-type networks with an Ethernet network cable.
Connect one end of a network cable (not supplied) to the network (Ethernet) port on the computer and the other end to your
network. For detailed settings and devices needed to connect to the network, ask your network administrator.
✍
Your computer can be connected to the network with the default settings.
!
Do not plug a telephone cable into the network (LAN) port on your computer.
If the network (LAN) port is connected to one of the telephone lines mentioned below, high electric current to the port may cause damage, overheating,
or fire.
- Home (intercom speakerphone) or business-use telephone lines (multi-line business telephone)
- Public telephone subscriber line
- PBX (private branch exchange)
Do not plug a telephone cable into the network (Ethernet) port.

63
n N
Using Your VAIO Computer
Using the Wireless LAN (WLAN)
Using the Sony Wireless LAN (WLAN), all your digital devices with built-in WLAN function communicate freely with each other
through a network. A WLAN is a network in which a user can connect to a Local Area Network (LAN) through a wireless (radio)
connection. This eliminates the need to pull cables or wires through walls and ceilings.
The Sony WLAN supports all normal Ethernet connectivity, but with the added benefits of mobility and roaming. You can still
access information, Internet/intranet and network resources, even in the middle of a meeting, or as you move from one place
to another.
You can communicate without an access point, which means that you can communicate with a limited number of computers
(ad-hoc). Or you can communicate through an access point, which allows you to create a full infrastructure network.
To use the wireless LAN function
To use the wireless LAN function, you first need to set up the wireless LAN function. For setting up and using the wireless
LAN function, search for wireless LAN information using Windows Help and Support. To open Windows Help and
Support, click Start and Help and Support.
!
Be sure to turn on the WIRELESS switch before starting the wireless LAN function.
You cannot select the 5 GHz band, which is used for the IEEE 802.11a standard, on ad-hoc networks.
The IEEE 802.11n draft standard, using the 2.4 GHz or 5 GHz band, is not available on ad-hoc networks.

66
n N
Using Peripheral Devices
Using Peripheral Devices
You can add functionality to your VAIO computer by using the various ports on the computer.
❑Connecting External Speakers (page 67)
❑Connecting an External Display (page 68)
❑Selecting Display Modes (page 71)
❑Using the Multiple Monitors Function (page 73)
❑Connecting an External Microphone (page 76)
❑Connecting a Universal Serial Bus (USB) Device (page 77)
❑Connecting a Printer (page 80)
❑Connecting an i.LINK Device (page 81)

71
n N
Using Peripheral Devices
Selecting Display Modes
You can select which display to use as the primary monitor when an external display (desktop monitor, etc.) is connected to
your computer.
The procedure for selecting a display depends on the video controller used in the computer. See the online specifications for
detailed information on the video controller.
If you want to work on your computer screen and the external display at the same time, see Using the Multiple Monitors
Function (page 73) for more information.

72
n N
Using Peripheral Devices
To select a display
Models with the Intel Graphics Media Accelerator
1 Right-click on the desktop and select Personalize.
2 Click Display Settings.
3 Follow the on-screen instructions to change the settings.
✍
You may not be able to display the same contents on your computer screen and the external display or projector at the same time, depending on the
type of your external display or projector.
Before turning on your computer, turn on the external display.
Models with the ATI video controller
When the computer has an external display connected, you can change the Main/Clone setting as follows:
1 Click Start, All Programs, and Catalyst Control Center.
2 Click CCC.
3 Follow the on-screen instructions to change the settings.
See the help file for more information.
✍
You may not be able to display the same contents on your computer screen and the external display or projector at the same time, depending on the
type of your external display or projector.
Before turning on your computer, turn on the external display.

73
n N
Using Peripheral Devices
Using the Multiple Monitors Function
The Multiple Monitors function allows you to distribute portions of your desktop across separate displays. For example, if you
have an external display connected to the monitor port, your computer screen and the external display can function as a
single desktop.
You can move the cursor from one display to the other. This allows you to drag objects, such as an open application window
or a toolbar, from one display to the other.
✍
Your external display may not support the Multiple Monitors function.
Certain software applications may not be compatible with Multiple Monitors settings.
Make sure that your computer does not enter Sleep or Hibernate mode while you are using the Multiple Monitors function. Otherwise, the computer
may not return to Normal mode.
If you set different colors on each display, do not expand a single window across two displays. Otherwise, your software may not work properly.
Set fewer colors or a lower resolution for each display.

75
n N
Using Peripheral Devices
✍
You can also change the muting (S1) button assignment to activate the Multiple Monitors function with the muting (S1) button. To change the muting
(S1) button assignment, press and hold the muting (S1) button to display the window for changing the assignment. For details on the muting (S1)
button, see Using Special-function Buttons (page 34).
Additionally, you can set the display colors and resolution for each display and customize the Multiple Monitors function.
76
n N
Using Peripheral Devices
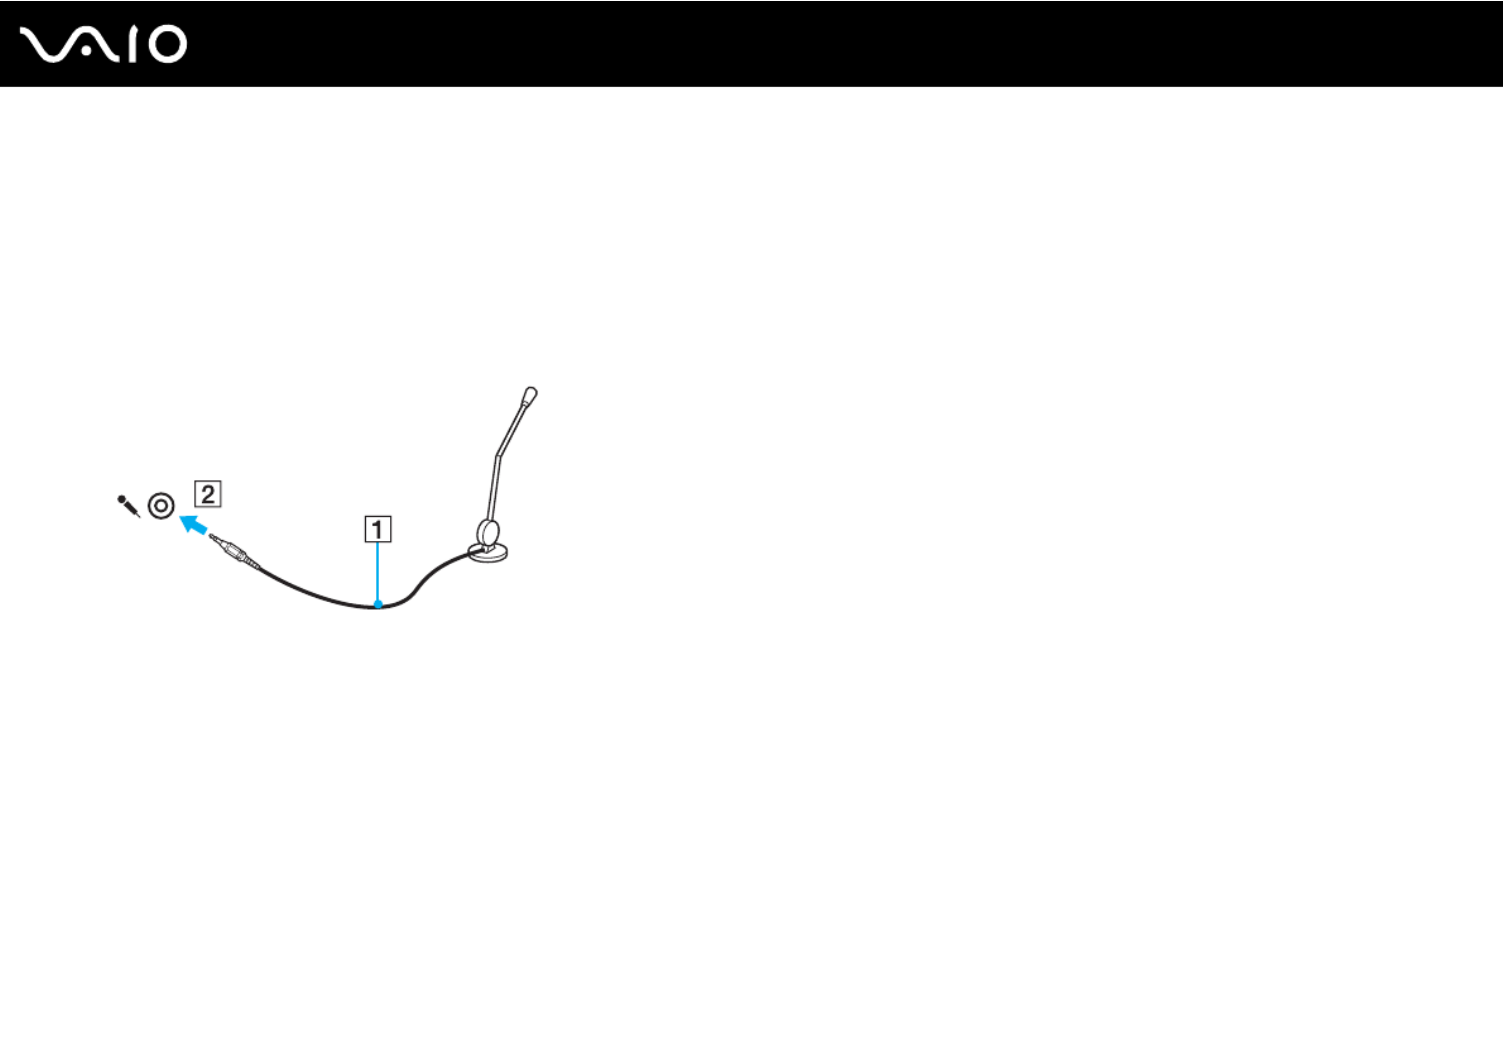
Connecting an External Microphone
If you need to use a sound input device (for example, to chat over the Internet), you need to plug in an external microphone
(not supplied).
To connect an external microphone
Plug the microphone cable (1) into the microphone jack (2) m.
✍
Make sure your microphone is designed for computer use.
Specyfikacje produktu
| Marka: | Sony |
| Kategoria: | laptop |
| Model: | Vaio VGN-NS230D |
Potrzebujesz pomocy?
Jeśli potrzebujesz pomocy z Sony Vaio VGN-NS230D, zadaj pytanie poniżej, a inni użytkownicy Ci odpowiedzą
Instrukcje laptop Sony

14 Października 2024
13 Października 2024
11 Października 2024
11 Października 2024
6 Października 2024
2 Października 2024
1 Października 2024
28 Września 2024
21 Września 2024
19 Września 2024
Instrukcje laptop
- laptop Samsung
- laptop Fellowes
- laptop LG
- laptop Xiaomi
- laptop Huawei
- laptop Lenovo
- laptop Gigabyte
- laptop Acer
- laptop Fujitsu
- laptop Panasonic
- laptop Viewsonic
- laptop Asus
- laptop Medion
- laptop MSI
- laptop Toshiba
- laptop Haier
- laptop HP
- laptop Prixton
- laptop Hyundai
- laptop Honor
- laptop Tripp Lite
- laptop Zebra
- laptop Dell
- laptop Schneider
- laptop Thomson
- laptop Pyle
- laptop Apple
- laptop Razer
- laptop ADATA
- laptop GoClever
- laptop SPC
- laptop NEC
- laptop Oregon Scientific
- laptop Jay-Tech
- laptop Microsoft
- laptop ECS
- laptop XPG
- laptop Denver
- laptop Lexibook
- laptop Micromax
- laptop Odys
- laptop TechBite
- laptop TrekStor
- laptop Alienware
- laptop Airis
- laptop Emachines
- laptop Hähnel
- laptop Sylvania
- laptop Coby
- laptop Evga
- laptop Naxa
- laptop Ricatech
- laptop Mpman
- laptop Vizio
- laptop Targa
- laptop Peaq
- laptop Ematic
- laptop Hannspree
- laptop Inovia
- laptop Ergotron
- laptop Ibm
- laptop Atdec
- laptop Packard Bell
- laptop Compaq
- laptop SIIG
- laptop Hercules
- laptop Kogan
- laptop Getac
- laptop Vulcan
- laptop System76
- laptop General Dynamics Itronix
- laptop CTL
- laptop Everex
- laptop Olidata
- laptop Dynabook
- laptop Hamilton Buhl
- laptop AORUS
- laptop Humanscale
- laptop Aplic
- laptop Schenker
Najnowsze instrukcje dla laptop

3 Kwietnia 2025

2 Kwietnia 2025

28 Marca 2025

28 Marca 2025
26 Marca 2025
13 Marca 2025
7 Marca 2025

4 Marca 2025
1 Marca 2025
26 Lutego 2025