Instrukcja obsługi Sony Clie PEG-TJ35
Przeczytaj poniżej 📖 instrukcję obsługi w języku polskim dla Sony Clie PEG-TJ35 (193 stron) w kategorii PDA. Ta instrukcja była pomocna dla 17 osób i została oceniona przez 2 użytkowników na średnio 4.5 gwiazdek
Strona 1/193
© 2003 Sony Corporation
CLIÉ™ handheld basic operations
Customizing your CLIÉ™ handheld
(Preferences)
Exchanging and updating files/data using the
HotSync
®
operation (Other HotSync
®
operations)
Using “Memory Stick™” media
Beaming
Using the Calculator and finding records
Backing up your CLIÉ™ handheld data and
applications
Protecting your data with a password
Enhancing features with add-on applications
Transferring data from another CLIÉ™
handheld
Handbook
A-BQJ-100-11 (1)
Entering text on your CLIÉ™
handheld
Exchanging and updating files/data
using the HotSync® operation
Personal Entertainment Organizer
PEG-TJ35
PEG-TJ25

2
Introduction
This manual explains the basic operations and useful features of
your CLIÉ™ handheld.
Using your CLIÉ™ handheld for the first time
The basic features and operations are explained in detail
(pages 9-72).
CLIÉ™ handheld basic operations
Explains the basic operations of your CLIÉ handheld and how to use the
applications.
Entering text on your CLIÉ™ handheld
Explains how to enter text on your CLIÉ handheld.
Exchanging and updating files/data using the HotSync
®
operation
Explains how to use the HotSync feauture with your computer.
CLIÉ™ handheld advanced operations
Useful and advanced features to make full use of your CLIÉ™
handheld are explained in detail (pages 73-185).
Customizing your CLIÉ™ handheld (Preferences)
Explains how to customize your CLIÉ handheld.
Exchanging and updating files/data using the HotSync®
operation (Other HotSync® operations)
Explains the various methods of HotSync® operations.
Using “Memory Stick™” media
Explains how to use files/data stored on “Memory Stick” media.
Beaming
Explains how to exchange data or applications with another CLIÉ handheld
by beaming.
Using the Calculator and finding records
Explains how to use the Calculator and how to find records.
Backing up your CLIÉ™ handheld data and applications
Explains how to back up the data and applications of your CLIÉ handheld.
Protecting your data with a password
Explains how to assign a password to restrict the use of your CLIÉ handheld
or to protect your data.
Enhancing features with add-on applications
Explains how to install additional applications on your CLIÉ handheld.
Transferring data from another CLIÉ™ handheld
Explains how to transfer data from your old CLIÉ handheld to your new CLIÉ handheld.

3
The following manuals are included with your CLIÉ handheld.
Refer to the following together with this manual.
* You can read the manual on your computer window using Adobe Acrobat
Reader. If Adobe Acrobat Reader is not installed on your computer, install it
from the supplied Installation CD-ROM.
** You can read the manual on your computer using Internet Explorer Version 5.0
or later.
Notes
• Some of the illustrations in this manual (Handbook) may not be consistent with your CLIÉ
handheld.
b
For details on your CLIÉ handheld, refer to “Read This First (Operating Instructions)”.
• Some of the accessories described in this manual (Handbook) may not be supported by your
CLIÉ handheld.
• This manual supports PEG-TJ35 and PEG-TJ25.
–
The illustrations used in this manual are for PEG-TJ35, unless specified otherwise.
– Differences between PEG-TJ35 and PEG-TJ25 are specified in each corresponding
section.
Printed manual
Read This First (Operating Instructions)
Explains how to set up your CLIÉ handheld and computer, and basic operations.
For safe use, make sure to read the supplied “Safety & Regulations
Guide”.
Manuals to be read on your computer
The following manuals are automatically installed on your computer after you set up
your CLIÉ handheld and computer.
bFor details on each manual, refer to “Using CLIÉ Manuals installed on your computer” in
“Read This First (Operating Instructions)”.
Applications Guide (PDF format*)
Introduces the supplied applications and briefly explains how to use them.
Handbook (This manual, PDF format*)
Explains the basic operations and advanced features of your CLIÉ handheld.
CLIÉ Application Manual (HTML format**)
Explains how to use the supplied applications in detail.
Troubleshooting Q&A (PDF format*)
Helps in solving common problems that you may have while using your CLIÉ
handheld.

4
Table of Contents
CLIÉ™ handheld basic operations
Basic operations . . . . . . . . . . . . . . . . . . . . . . . . . . . . . . . . . . . . . 10
Using the stylus . . . . . . . . . . . . . . . . . . . . . . . . . . . . . . . . . . . . . . . . 10
Using the Jog Dial™ navigator . . . . . . . . . . . . . . . . . . . . . . . . . . . . 12
Starting an application . . . . . . . . . . . . . . . . . . . . . . . . . . . . . . . . 14
Starting an application on the CLIE Launcher. . . . . . . . . . . . . . . . . . 15
Quitting an application . . . . . . . . . . . . . . . . . . . . . . . . . . . . . . . . . . 16
Using CLIE Launcher. . . . . . . . . . . . . . . . . . . . . . . . . . . . . . . . . . 17
Locating the components . . . . . . . . . . . . . . . . . . . . . . . . . . . . . . . . 17
CLIE Launcher group . . . . . . . . . . . . . . . . . . . . . . . . . . . . . . . . . . . . 18
Using Favorite Applications (shortcuts). . . . . . . . . . . . . . . . . . . . . . . 22
Application Manager icons . . . . . . . . . . . . . . . . . . . . . . . . . . . . . . . 24
Displaying information about applications . . . . . . . . . . . . . . . . . . . . 25
Menu List . . . . . . . . . . . . . . . . . . . . . . . . . . . . . . . . . . . . . . . . . . . . 26
Using the Palm OS® Standard screen . . . . . . . . . . . . . . . . . . . . . 28
Switching to the Palm OS® Standard screen . . . . . . . . . . . . . . . . . . 28
Starting an application . . . . . . . . . . . . . . . . . . . . . . . . . . . . . . . . . . 30
Changing the display style of the Palm OS® Standard screen . . . . . . 35
Displaying applications by category . . . . . . . . . . . . . . . . . . . . . . . . . 37
Changing fonts . . . . . . . . . . . . . . . . . . . . . . . . . . . . . . . . . . . . . 39
Common menu items . . . . . . . . . . . . . . . . . . . . . . . . . . . . . . . . 40
Continued on next page
• • • • • • • • • • • • • • •

5
Entering text on your CLIÉ™ handheld
Entering text on your CLIÉ™ handheld. . . . . . . . . . . . . . . . . . . . 42
Using Graffiti® 2 writing to enter text . . . . . . . . . . . . . . . . . . . . 43
What is Graffiti® 2? . . . . . . . . . . . . . . . . . . . . . . . . . . . . . . . . . . . . 43
Writing a stroke on your CLIÉ™ handheld . . . . . . . . . . . . . . . . . . . . 44
Using the Graffiti® 2 writing area . . . . . . . . . . . . . . . . . . . . . . . . . . 45
Graffiti® 2 character list . . . . . . . . . . . . . . . . . . . . . . . . . . . . . . . . . 47
Entering text . . . . . . . . . . . . . . . . . . . . . . . . . . . . . . . . . . . . . . . . . . 53
Using navigation strokes and shortcuts . . . . . . . . . . . . . . . . . . . . . . 55
Using Decuma Input to enter text (for PEG-TJ35 only) . . . . . . . . 57
Entering text . . . . . . . . . . . . . . . . . . . . . . . . . . . . . . . . . . . . . . . . . . 57
Using the on-screen keyboard to enter text . . . . . . . . . . . . . . . . 62
Entering text . . . . . . . . . . . . . . . . . . . . . . . . . . . . . . . . . . . . . . . . . . 62
Exchanging and updating files/data using the
HotSync® operation
What is the HotSync® operation?. . . . . . . . . . . . . . . . . . . . . . . . 66
Performing the HotSync® operation . . . . . . . . . . . . . . . . . . . . . . 68
Performing the HotSync® operation with the USB cable
(Local HotSync®) . . . . . . . . . . . . . . . . . . . . . . . . . . . . . . . . . . . . . . . 68
Using Palm™ Desktop for CLIÉ. . . . . . . . . . . . . . . . . . . . . . . . . . 70
Starting Palm™ Desktop for CLIÉ. . . . . . . . . . . . . . . . . . . . . . . . . . . 70
Locating components of Palm™ Desktop for CLIÉ . . . . . . . . . . . . . . 71
Basic operations of Palm™ Desktop for CLIÉ . . . . . . . . . . . . . . . . . . 72
Continued on next page
• • • • • • • • • • • • • • •

6
Customizing your CLIÉ™
handheld (Preferences)
What you can do
with Preferences. . . . . . . . . . . . . . . 74
Setting the Graffiti® 2 . . . . . . . . . . 76
Creating Graffiti® 2 ShortCuts . . . . 77
Viewing the battery information and
media information, and changing the
volume level . . . . . . . . . . . . . . . . . . 78
Adjusting the Digitizer . . . . . . . . . . 79
Setting the Network preferences for
your provider and dial-up server . . . 80
Selecting a service template . . . 80
Entering a user name . . . . . . . . 80
Entering a password . . . . . . . . . 81
Selecting a connection . . . . . . . 81
Setting the telephone
information . . . . . . . . . . . . . . . 82
Adding detailed information to a
service template . . . . . . . . . . . . 84
Duplicating/deleting additional
service templates . . . . . . . . . . . 86
Creating log-in scripts. . . . . . . . 87
Using the Network preferences
menus . . . . . . . . . . . . . . . . . . . 90
Assigning applications to application
buttons . . . . . . . . . . . . . . . . . . . . . 91
Customizing the full-screen pen stroke
activities . . . . . . . . . . . . . . . . . . . . . 92
Setting the automatic
power-off time. . . . . . . . . . . . . . . . 93
Setting sounds . . . . . . . . . . . . . . . . 94
Turning the Alarm LED on or off. . . 95
Turning the Beam Receive feature
on or off . . . . . . . . . . . . . . . . . . . . 96
Selecting the screen color
theme . . . . . . . . . . . . . . . . . . . . . . 97
Setting the display format for time,
date, and numbers . . . . . . . . . . . . . 98
Selecting a regional default. . . . 98
Customizing your own
settings . . . . . . . . . . . . . . . . . . . 98
Adding/Changing communication
device preferences. . . . . . . . . . . . . .99
Setting up the Date &
Time preferences. . . . . . . . . . . . . .100
Setting the date. . . . . . . . . . . .100
Setting the time. . . . . . . . . . . .100
Setting the time zone and
daylight saving time. . . . . . . . .101
Exchanging and updating
files/data using the
HotSync® operation (Other
HotSync® operations)
Customizing HotSync® application
settings (Conduit) . . . . . . . . . . . . .103
Synchronizing with external data
(File Link). . . . . . . . . . . . . . . . . . . .105
Customizing HotSync® Manager
startup and HotSync® setup
options . . . . . . . . . . . . . . . . . . . . .106
Performing the IR HotSync®
operation . . . . . . . . . . . . . . . . . . .107
Performing the HotSync® operation
via a modem . . . . . . . . . . . . . . . . .110
Performing the HotSync® operation
via a network . . . . . . . . . . . . . . . .116
Performing the HotSync® operation
via LAN (LANSync) . . . . . . . . . . . . .120
Continued on next page
• • • • • • • • • • • • • • •

7
Using
“Memory Stick™” media
Using
“Memory Stick™” media . . . . . . . 124
The type of storage media
you can use with your CLIÉ
handheld . . . . . . . . . . . . . . . . 124
Using “Memory Stick”
media. . . . . . . . . . . . . . . . . . . 124
Protecting the files/data on
“Memory Stick” media. . . . . . 127
Starting an application on
“Memory Stick” media. . . . . . 128
Viewing information of
“Memory Stick” media
(Card Info) . . . . . . . . . . . . . . . 130
Assigning a name to “Memory
Stick” media. . . . . . . . . . . . . . 131
Formatting
“Memory Stick” media. . . . . . 132
Exchanging data via
“Memory Stick” media. . . . . . . . . 134
Starting CLIE Files . . . . . . . . . . 134
Copying your CLIÉ handheld data to
“Memory Stick” media. . . . . . 137
Copying data on “Memory Stick”
media to your CLIÉ
handheld . . . . . . . . . . . . . . . . 140
Deleting files/directories on
“Memory Stick” media. . . . . . 142
Extracting a Zip file . . . . . . . . . 144
CLIE Files menu items . . . . . . . 147
Exchanging files/data without
using CLIE Files . . . . . . . . . . . . 148
Notes on starting applications from
“Memory Stick” media. . . . . . 149
Beaming
Beaming between your CLIÉ handheld
and another Palm OS® PDA. . . . . .151
What you can do with
beaming . . . . . . . . . . . . . . . . .151
Beaming information . . . . . . . .152
Using the Calculator and
finding records
Using the Calculator (Calc) . . . . . .156
Making Calculations . . . . . . . .156
The functions of the Calculator
buttons . . . . . . . . . . . . . . . . . .157
Using the Calculator menus . . .158
Finding records . . . . . . . . . . . . . . .159
Using the Find option . . . . . . .159
Backing up your CLIÉ™
handheld data and
applications
Backing up your CLIÉ™ handheld data
and applications . . . . . . . . . . . . . .162
Backing up data and applications to
your computer with the HotSync®
operation. . . . . . . . . . . . . . . . .162
Backing up data and applications to
“Memory Stick” media using
Memory Stick Backup . . . . . . .163
Continued on next page
• • • • • • • • • • • • • • •

8
Protecting your data with a
password
Entering personal information . . . 167
Locking your CLIÉ handheld with a
password (Data protection). . . . . . 169
Turning off your CLIÉ handheld
after locking . . . . . . . . . . . . . . 169
Setting your CLIÉ handheld to be
locked automatically . . . . . . . . 171
Protecting data. . . . . . . . . . . . . . . 172
Assigning a password . . . . . . . 172
Changing or deleting
a password. . . . . . . . . . . . . . . 173
Hiding or masking
private data . . . . . . . . . . . . . . 174
Enhancing features with
add-on applications
Enhancing features with add-on
applications . . . . . . . . . . . . . . . . . 176
Installing . . . . . . . . . . . . . . . . . . . 177
Installing from your
computer . . . . . . . . . . . . . . . . 177
Installing applications on
“Memory Stick” media. . . . . . 179
Installing from the Internet . . . 179
Deleting installed add-on
applications . . . . . . . . . . . . . . 180
Transferring data from
another CLIÉ™ handheld
Transferring data from another CLIÉ™
handheld . . . . . . . . . . . . . . . . . . . 183
Transferring data using Palm™
Desktop for CLIÉ. . . . . . . . . . . 183
INDEX. . . . . . . . . . . . . . . . . . .186

CLIÉ™ handheld
basic operations
This chapter explains the basic operations of your
CLIÉ handheld such as using the stylus and the
Jog Dial™ navigator, locating components and
starting applications.
This chapter also gives an overview of menus that
are common to applications and explains how to
select character fonts.
Basic operations . . . . . . . . . . . . . . . . . . . . . . 10
Starting an application. . . . . . . . . . . . . . . . . . 14
Using CLIE Launcher . . . . . . . . . . . . . . . . . . . 17
Using the Palm OS® Standard screen. . . . . . . . 28
Changing fonts . . . . . . . . . . . . . . . . . . . . . . . 39
Common menu items . . . . . . . . . . . . . . . . . . . 40

CLIÉ™ handheld basic operations 10
Basic operations
Using the stylus and the Jog Dial™ navigator.
Using the stylus
Tip
Where is the stylus located?
The stylus is stored in your CLIÉ handheld.
The exact storage location varies depending on your model.
bFor details, refer to “CLIÉ™ handheld components” in “Read This
First (Operating Instructions)”.
Note
To prevent losing the stylus, always put it back in its holder on your
CLIÉ handheld after use.
What is a stylus?
A stylus is a pen-like device for operating
your CLIÉ handheld by directly touching
the screen.
Continued on next page
• • • • • • • • • • • • • • •

CLIÉ™ handheld basic operations 11
Basic operations
You can operate your CLIÉ handheld using the stylus in the
following ways.
Tapping
Lightly pressing the required item on the
screen with the stylus is called “Tapping”.
When entering text with the on-screen
keyboard or starting an application, “tap”
the desired button or icon with the stylus.
Dragging
Touching the required item on the screen
with the stylus and moving it along the
screen surface is called “Dragging”.
Just as you “drag” the mouse of your
computer, you can use the stylus to “drag”
the scroll bar to scroll the screen, or to
“drag” across characters to highlight them.

CLIÉ™ handheld basic operations 12
Basic operations
Using the Jog Dial™ navigator
What is the Jog Dial™
navigator?
Your CLIÉ handheld is equipped with
a Jog Dial™ navigator, located on the
front side of your CLIÉ handheld.
Rotating the Jog Dial™ navigator
Rotate the Jog Dial™ navigator to
select the application you want to
start.
Continued on next page
• • • • • • • • • • • • • • •

CLIÉ™ handheld basic operations 13
Basic operations
Note
The operations you can perform using the Jog Dial™ navigator vary
depending on the application.
bFor details on the operations of each application, refer to “CLIÉ
Application Manual” (HTML format).
Tip
Rotating while pressing the Jog Dial™ navigator
In some applications, operations are executed by pressing and rotating
the Jog Dial™ navigator.
Pressing the Jog Dial™ navigator
Press the Jog Dial™ navigator to
select an item or to start a selected
application.

CLIÉ™ handheld basic operations 14
Starting an application
Software that you can use on your CLIÉ handheld to execute a
task, such as Date Book, To Do List, is called an
“application”. You need to start an application to operate your
CLIÉ handheld.
Note
For details on starting applications from “Memory Stick”
media, refer to page 128.
There may be some system limitations when starting applications that
are stored on “Memory Stick” media in the Home screen.
Tip
What is the Home screen?
The screen displayed when you turn on your CLIÉ handheld or tap
(Home), is called the Home screen. In your CLIÉ handheld, the CLIE
Launcher and the Palm OS Standard screen are installed as the Home
screen. The screen specific to your CLIÉ handheld, the CLIE
Launcher, is displayed by default. The CLIE Launcher is used in this
manual as the Home screen.

CLIÉ™ handheld basic operations 15
Starting an application
Starting an application on the CLIE Launcher
1Tap (Home).
The CLIE Launcher is displayed.
2Select an application icon by rotating the Jog
Dial™ navigator and press the Jog Dial™
navigator to start the application.
Tip
You can also tap an application icon on the CLIE Launcher to start
the application.

CLIÉ™ handheld basic operations 16
Starting an application
Quitting an application
You do not need to save data manually on your CLIÉ handheld
as you do with the computer.
All the changes in the application that you are working on are
automatically saved, and the last screen you worked on is
displayed when you restart the application.
Display the CLIE Launcher to switch to another application
while you are working on an application.
You can select one of two methods to display the CLIE Launcher
as follows.
Return to the CLIE Launcher by tapping
(Home), then start another application.
Switch to another application assigned to
application buttons by pressing one
application button on your CLIÉ handheld.
Note
For some applications, you need to save data manually.
bFor details, refer to “CLIÉ Application Manual” (HTML format).
CLIÉ™ handheld basic operations 17
Using CLIE Launcher
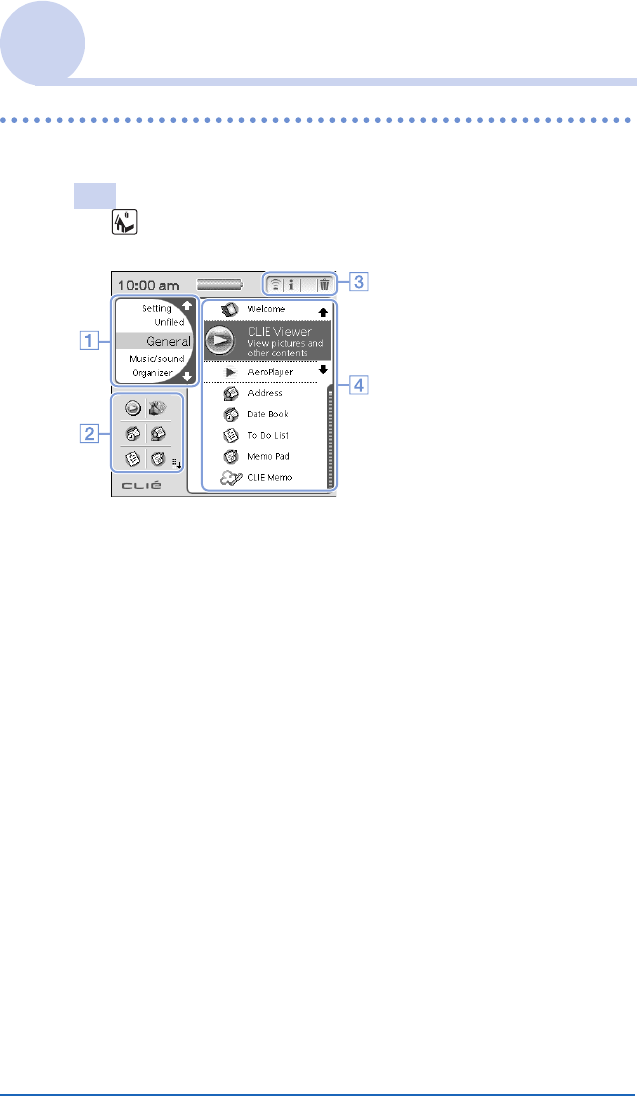
Locating the components
Tip
Tap (Home) to display the CLIE Launcher if it is not displayed.
ACLIE Launcher groups list (page 18)
The list of CLIE Launcher groups is displayed.
BFavorite Applications (shortcuts) (page 22)
You can create shortcuts to favorite applications.
CApplication Manager icons (page 24)
DApplication icon list
The application names and their icons are displayed.

CLIÉ™ handheld basic operations 18
Using CLIE Launcher
CLIE Launcher group
You can organize applications by group.
Note
Applications stored on “Memory Stick” media cannot be grouped.
Editing groups
1Tap (Home).
The CLIE Launcher is displayed.
2Tap (Menu).
The menu is displayed.
3Tap [Edit CLIE Launcher Group] from [CLIE
Launcher].
The CLIE Launcher Group screen is displayed.
Note
CLIE Launcher groups differ from Palm OS® Standard
screen categories.
Continued on next page
• • • • • • • • • • • • • • •

CLIÉ™ handheld basic operations 19
Using CLIE Launcher
4Select a group to edit, and tap [Edit].
The display of the CLIE Launcher Group screen is
changed.
Name: You can rename groups.
Ordering listed applications: Select an application and
tap [Up] or [Down] to reposition applications on the CLIE
Launcher.
Adding applications: Tap [Add] to display the list, and
select an application to add.
Removing applications: Select an application to be
removed and tap [Remove]. Removed applications will be
listed in the Unfiled group.
Note
The Unfiled group cannot be renamed.
5Tap [Done].
The CLIE Launcher Group screen display returns.
6Tap [Done].
The CLIE Launcher is displayed.
Continued on next page
• • • • • • • • • • • • • • •

CLIÉ™ handheld basic operations 20
Using CLIE Launcher
Tip
When the check box next to [Use Drag&Drop] (page 27) on the CLIE
Launcher Preferences screen is , you can add an application
to a group by dragging its icon and dropping it in the group on the CLIE
Launcher.
Ordering listed groups
1Select a group on the CLIE Launcher Group
screen.
2Tap [Up] or [Down].
The order of listed groups on the CLIE Launcher is changed.
Creating a new group
1Tap [New] on the CLIE Launcher Group
screen.
The
New CLIE Launcher Group
dialog box is displayed.
2Enter a new group name, and then tap [OK].
Note
Groups that do not include an application are not listed on the
CLIE Launcher.
Continued on next page
• • • • • • • • • • • • • • •

CLIÉ™ handheld basic operations 21
Using CLIE Launcher
Deleting a group
1Select a group you want to delete and tap
[Delete] on the CLIE Launcher Group screen.
If the group to be deleted includes any applications, the
Delete CLIE Launcher Group dialog box will be
displayed. In the dialog box, tap [Yes] to delete the group.
The applications included in the deleted group will be listed
in the Unfiled group.
Note
You cannot delete the Unfiled group.
Selecting a group
1Tap (Home).
The CLIE Launcher is displayed.
2Press (the Left button).
You can now scroll the CLIE Launcher groups list with the
Jog Dial™ navigator.
3
Rotate the Jog Dial™ navigator to select a group.
If you press the Jog Dial™ navigator, the selection area
moves to an application icon of the selected group.
Tips
• When you press (the Right button), the selection area moves
to an application icon.
• Applications saved on “Memory Stick” media will be listed in
(Card).
• You can select a group by tapping (Home) repeatedly, by
tapping J/j at the right of the CLIE Launcher groups list on the
CLIE Launcher groups list, or by tapping a group name on the
CLIE Launcher groups list directly.

CLIÉ™ handheld basic operations 22
Using CLIE Launcher
Using Favorite Applications (shortcuts)
You can create Favorite Applications (shortcut) for frequently
used applications.
Note
You cannot create a Favorite Application (shortcut) for an application
on “Memory Stick” media.
Creating a Favorite Application (shortcut)
1Tap (Home).
The CLIE Launcher is displayed.
2Tap (Menu).
The menu is displayed.
3Select [Edit Favorite Applications] from [CLIE
Launcher].
The Favorite Application screen is displayed.
Tip
You can also tap the empty Favorite Application (shortcut) box on
the CLIE Launcher to display the Favorite Application
screen.
Continued on next page
• • • • • • • • • • • • • • •

CLIÉ™ handheld basic operations 23
Using CLIE Launcher
4Tap a Favorite Application (shortcut) number
that you want to assign to an application.
The list of applications is displayed. Tap the application
name to create a Favorite Application (shortcut).
Tip
You can create 12 shortcuts.
5Tap [Done].
Note
When you delete an application that is saved as a shortcut, the
shortcut is also automatically deleted from the Favorite
Application list.
Tip
When the check box next to [Use Drag&Drop] (page 27) on the
CLIE Launcher Preferences screen is , you can assign a
Favorite Application (shortcut) box to an application by dragging
the application icon and dropping it in an empty Favorite
Application (shortcut) box.
Continued on next page
• • • • • • • • • • • • • • •

CLIÉ™ handheld basic operations 24
Using CLIE Launcher
To delete a Favorite Application (shortcut)
In step 4, tap the Favorite Application (shortcut) number that you
want to delete, and select [ (None) ] at the top of the list.
Tip
When the check box next to [Use Drag&Drop] (page 27) on the
CLIE Launcher Preferences screen is , you can cancel the
assigned Favorite Application (shortcut) by dragging the
application icon and dropping it in (page 24) at the top right of
the CLIE Launcher.
Application Manager icons
You can manage your applications with the application manager
icons.
The following icons are featured as standard functions:
: Transferring applications
Displays the Beam screen (page 152).
: Displaying application information (page 25)
: Deleting applications (page 25)
Tips
• Additional functions will be added to manager icons when you install
certain applications.
• When the check box next to [Use Drag&Drop] (page 27) on the CLIE
Launcher Preferences screen is , you can manage an
application by dragging its icon and dropping it in each application
manager icon.

CLIÉ™ handheld basic operations 25
Using CLIE Launcher
Displaying information about applications
1Tap (Home).
The CLIE Launcher is displayed.
2Tap .
The list of applications is displayed.
3Tap an application name whose information
you want to display.
The CLIE Launcher Info screen is displayed.
Tap [OK] to close the screen.
Tip
When the check box next to [Use Drag&Drop] (page 27) on the
CLIE Launcher Preferences screen is , you can display
information of an application by dragging its icon and dropping it
in at the top right of the CLIE Launcher.
Continued on next page
• • • • • • • • • • • • • • •
CLIÉ™ handheld basic operations 26
Using CLIE Launcher
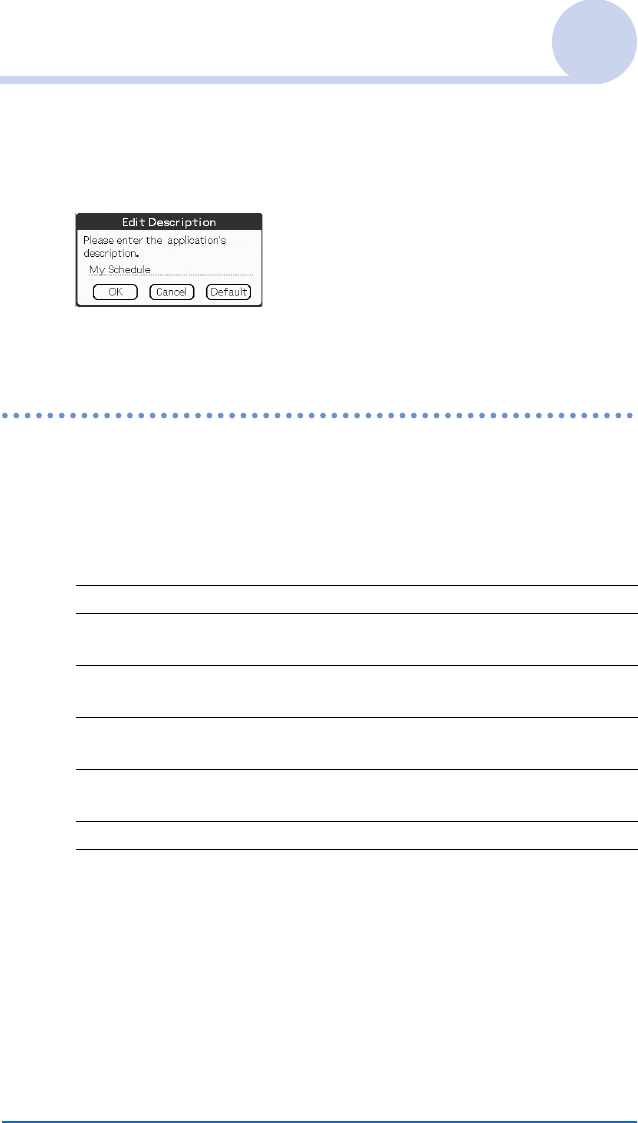
Editing a description
Tap [Edit] to display the Edit Description dialog box and
enter the new description.
[OK]: Changes to the description entered.
[Cancel]: Cancels the description entered.
[Default]: Restores the default description.
Menu List
The following list describes the functions of each menu on the
CLIE Launcher.
CLIE Launcher menu
[Delete…] Deletes an application (page 180).
[Beam…] Sends an application or data to another Palm
OS PDA device via the IR port (page 151).
[Edit CLIE Launcher
Group]
Edits a group of applications (page 18).
[Edit Favorite
Applications]
Creates a shortcut to an application (page 22).
[Info…] Displays the version, memory size, and the
number of records of an application.
[Copy…] Copies an application.
Continued on next page
• • • • • • • • • • • • • • •

CLIÉ™ handheld basic operations 27
Using CLIE Launcher
Options menu
[Preferences…] Makes settings for the CLIE Launcher screen.
[Show Expansion Cards]
Check the box to display the applications on
“Memory Stick” media. (Default: )
[Display Animation]
Check the box to adjust on-screen motion
such as the scrolling operation. (Default: )
[Use Drag&Drop]
Check the box to enable the Drag&Drop
function. (Default: )
[Use Beam Icon To Beam Only]
(On the model of your CLIÉ handheld,
beaming starts automatically by tapping
(Beam) regardless if the box is or .)
Check the box to display the Beam screen
automatically when you tap (Beam).
(Default: )
[Display]
[Icon]: Displays a simple description for any
application.
[Icon (Small)]: Displays a simple description
for a selected application.
(Default: Icon (Small))
[Go To Standard View]
Switches to the Palm OS Standard screen (page 28).
[About Applications]
Displays version information of the application.

CLIÉ™ handheld basic operations 30
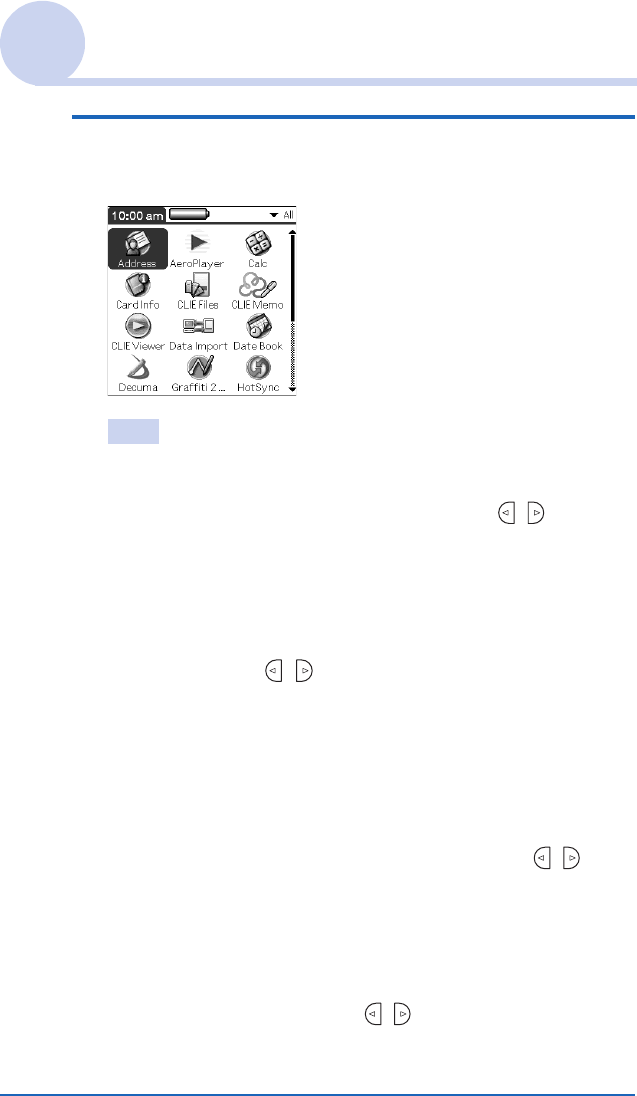
Using the Palm OS® Standard screen
Starting an application
Note
For details on starting applications on “Memory Stick”
media, refer to page 128.
There may be some system limitations when starting applications on
“Memory Stick” media in the Palm OS Standard screen.
Starting an application with the Jog Dial™
navigator and / (the Left/Right buttons)
Tip
There are three different modes you can set the Jog Dial™ navigator
and / (the Left/Right buttons) to select applications on the CLIE
Launcher screen.
bFor details, refer to “Changing the preferences of the start-up screen
for the Jog Dial™ navigator operation and / (the Left/Right
buttons)” on page 31.
1Tap (Home).
The Palm OS® Standard screen is displayed.
2Move the selection area with the Jog Dial™
navigator and / (the Left/Right buttons) to
select the application you want to start.
Continued on next page
• • • • • • • • • • • • • • •
CLIÉ™ handheld basic operations 31
Using the Palm OS® Standard screen
3Press the Jog Dial™ navigator.
The application starts.
Tips
• When you rotate the Jog Dial™ navigator, the selection area
moves up and down.
• To move the selection area left or right, press / (the Left/
Right buttons). When the selection area reaches the end of a
row, it moves to the beginning of the next row.
Changing the preferences of the start-up
screen for the Jog Dial™ navigator
operation and / (the Left/Right buttons)
When you rotate the Jog Dial™ navigator, the reaction is one of the
following three modes.
[PopUp] : The selection area moves up and down in the pop-
up list of applications.
[Direct] : The selection area moves from left to right across
each line, moving to the next line when it reaches
the end of each line. When you press / (the
Left/Right buttons), the display shifts to the top
half (left button) or bottom half (right button) of
the application icons.
[CrossNavigation] : (Default setting) The selection area moves up and
down a row when you rotate the Jog Dial™ navigator.
When you press / (the Left/Right buttons), the
selection area moves over one row left or right.
Continued on next page
• • • • • • • • • • • • • • •

CLIÉ™ handheld basic operations 32
Using the Palm OS® Standard screen
To change the Jog Dial™ navigator / / (the Left/Right
buttons) mode, follow these steps.
1Tap (Menu) on the Palm OS® Standard
screen.
The menu is displayed.
2Tap [Options].
The Options menu is displayed.
3Tap [Preferences...] from [Options].
The Preferences dialog box is displayed.
Continued on next page
• • • • • • • • • • • • • • •

CLIÉ™ handheld basic operations 33
Using the Palm OS® Standard screen
4Tap V next to [Jog Select:], and select the
desired reaction-mode.
5Tap [OK].
When the Jog Dial™ navigator is rotated or / (the Left/
Right buttons) are pressed, the selection area moves
according to the selected mode.
PopUp mode Direct mode
Continued on next page
• • • • • • • • • • • • • • •

CLIÉ™ handheld basic operations 34
Using the Palm OS® Standard screen
Starting an application by tapping an
application icon
1Tap (Home).
The Palm OS® Standard screen is displayed.
2Tap the icon of the application you want to
start.
The application starts.

CLIÉ™ handheld basic operations 36
Using the Palm OS® Standard screen
Setting to display the last-opened category
or the last-used application when the Palm
OS® Standard screen is displayed
1Tap (Home).
The Palm OS® Standard screen is displayed.
2Tap (Menu).
The menu is displayed.
3Tap [Options].
The Options menu is displayed.
4Tap [Preferences...] from [Options].
5Tap / (check boxes) next to [Remember
Last Category] or [Remember Last Used App], to
select the desired settings.
The check boxes are selected/deselecteded by tapping.
Tip
The check boxes are , in the default setting.
6Tap [OK].
Note
Applications are not recognized as the last-used applications and
categories in the following cases:
• Pressing an application button to start an application or category.
• Switching the screen from the Palm OS Standard screen to the
CLIE Launcher.

CLIÉ™ handheld basic operations 39
Changing fonts
You can change the font style in applications such as Date
Book or Address Book according to your preference. A font
style can be assigned to each application.
1Start an application whose font style you want
to change.
2Tap (Menu).
The menu is displayed.
3Tap [Options].
The Options menu is displayed.
4Tap [Font...] from [Options].
The Select Font dialog box is displayed.
5Tap the font style you want to use.
6Tap [OK].
The text in the application is displayed in the font style you
selected.
Note
The font style cannot be changed for some applications.

Entering text on your CLIÉ™ handheld 43
Using Graffiti® 2 writing to enter text
This section describes the procedure for creating letters,
numbers, punctuation marks and symbols, and teaches you some
Graffiti® 2 tips and tricks.
What is Graffiti® 2?
Graffiti® 2 is a unique writing method for quickly and easily
entering text into CLIÉ applications. Text is entered in the
Graffiti® 2 area using the stylus. Graffiti® 2 recognizes your
handwriting and immediately converts it into typed text.
Displaying the on-screen Graffiti 2 Help
Drag the stylus to the top of the screen from the Graffiti® 2
writing area. Graffiti 2 Help opens a series of screens that show
the character set of Graffiti® 2 writing.
Tip
You can customize the way you write the characters t, p, y, and $. For
details, refer to “Setting the Graffiti® 2” on page 76.
Examples of Graffiti® 2
shapes of A, B, C, K, and
T

Entering text on your CLIÉ™ handheld 44
Using Graffiti® 2 writing to enter text
Writing a stroke on your CLIÉ™ handheld
The dot on each stroke shows where to begin the
stroke
Certain characters have similar stroke shapes, but different
beginning and end points. Always begin each stroke from the dot
and lift the stylus at the end.
Note
You do not need to create the dot when you actually write a stroke. It
is only shown in this manual to illustrate where to begin the stroke.
Lift the stylus
at the end
Begin the stroke
from the dot
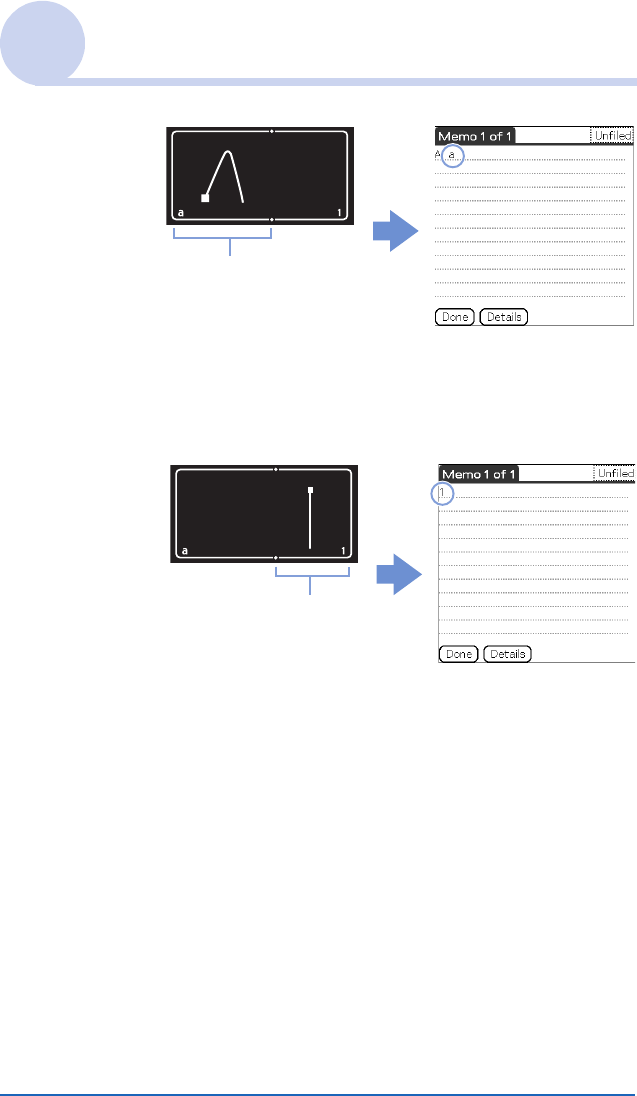
Entering text on your CLIÉ™ handheld 46
Using Graffiti® 2 writing to enter text
•
Writing numbers
To enter a number, write the stroke(s) on the Number area of the
Graffiti® 2 writing area.
•
Write the stroke(s)
within this area
Write the stroke(s)
within this area
Specyfikacje produktu
| Marka: | Sony |
| Kategoria: | PDA |
| Model: | Clie PEG-TJ35 |
Potrzebujesz pomocy?
Jeśli potrzebujesz pomocy z Sony Clie PEG-TJ35, zadaj pytanie poniżej, a inni użytkownicy Ci odpowiedzą
Instrukcje PDA Sony

11 Września 2024
7 Września 2024
4 Września 2024
28 Sierpnia 2024
27 Sierpnia 2024
27 Sierpnia 2024
25 Sierpnia 2024
24 Sierpnia 2024
22 Sierpnia 2024
22 Sierpnia 2024
Instrukcje PDA
- PDA Sharp
- PDA Acer
- PDA Fujitsu
- PDA Canon
- PDA Mio
- PDA Viewsonic
- PDA Asus
- PDA Toshiba
- PDA Garmin
- PDA Casio
- PDA HP
- PDA Intermec
- PDA Oregon Scientific
- PDA Navman
- PDA HTC
- PDA Qtek
- PDA Ecom
- PDA Palm
- PDA Getac
- PDA Pharos
- PDA Yakumo
- PDA Ockel
Najnowsze instrukcje dla PDA

15 Stycznia 2025
11 Stycznia 2025
28 Września 2024
27 Września 2024
27 Września 2024
26 Września 2024
25 Września 2024
24 Września 2024
24 Września 2024
23 Września 2024