Instrukcja obsługi Sharp Aquos Xx 304SH
Przeczytaj poniżej 📖 instrukcję obsługi w języku polskim dla Sharp Aquos Xx 304SH (130 stron) w kategorii smartfon. Ta instrukcja była pomocna dla 7 osób i została oceniona przez 2 użytkowników na średnio 4.5 gwiazdek
Strona 1/130

304SH User Guide


1
SoftBank 304SH
304SH User Guide Contents
Introduction
Introduction.........................................................................3
Getting Started
Package Contents............................................................... 6
Parts & Functions.............................................................. 6
USIM Card Installation....................................................... 7
Handset Memory & SD Card.............................................. 8
Charging Handset..............................................................11
Power On/Off................................................................... 13
Touchscreen Operations...................................................14
Basic Operations
Basic Operations...............................................................16
Applications.......................................................................18
Handset Phone Number.................................................... 19
Mobile Manners.................................................................19
Text Entry.........................................................................20
Google Accounts............................................................... 23
Google Play....................................................................... 25
Security Codes.................................................................. 26
USIM PIN............................................................................27
Screen Lock....................................................................... 28
Software Updates.............................................................29
Handset Interface
Welcome Sheet (Lock Screen) Basics...............................32
Feel UX Home Basics........................................................33
Status Bar......................................................................... 33
Notifications Window.......................................................35
Using Quick Launcher.......................................................36
Using Mini-Applications & Mini-Widgets........................37
Customizing Feel UX Home.............................................. 38
Phone
Calling................................................................................ 42
Optional Services..............................................................43
Address Book.................................................................... 48
Messaging & Browser
Messaging.......................................................................... 50
Setting at Initial Mail Startup........................................50
Sending S! Mail/SMS.........................................................51
Opening & Replying to S! Mail/SMS................................53
Opening Received S! Mail/SMS........................................ 54
Creating/Sending Gmail....................................................55
Opening Received Gmail................................................... 56
Using Internet Mail.......................................................... 57
Web Browsing (Browser).................................................. 59
Camera
Photo Camera....................................................................64
Video Camera.................................................................... 65

2
Music & Images
Music & Images.................................................................68
Music Files (Music)........................................................... 68
Still Images & Video (Album)...........................................69
Connectivity
Wi-Fi...................................................................................72
Tethering Option.............................................................. 74
Bluetooth®........................................................................ 75
Global Services
Global Roaming................................................................. 80
Calling from Outside Japan.............................................81
Settings
About Settings..................................................................84
Sound Settings..................................................................85
Wallpaper & Display Settings..........................................86
Recent Apps Key Setting.................................................87
Device Info........................................................................ 88
Add Account......................................................................89
Wi-Fi Settings...................................................................90
Home Applications Setting.............................................. 90
Storage Settings...............................................................91
Application Settings.........................................................92
Data Transfer................................................................... 92
Other Settings..................................................................94
Appendix
File Storage.....................................................................104
Backup & Restore...........................................................104
Specifications..................................................................105
Customer Service............................................................106
Safety Precautions
Safety Precautions.........................................................108
Important Product Information.....................................116
Handset & Hardware Care............................................. 117
General Notes................................................................. 119
FCC Notice...................................................................... 120
RF Exposure Information/Specific Absorption Rate (SAR)
Information..................................................................... 121
Water Resistance............................................................122

3
Introduction SoftBank 304SH
Introduction
Introduction
Thank you for purchasing SoftBank 304SH.
Before You Begin
・Read "Quick Tips" (in お願いとご注意) and this guide
thoroughly beforehand for proper usage.
・Accessible services may be limited by contract conditions.
・Unauthorized copying of any part of this guide is
prohibited.
・Guide content subject to change without prior notice.
Guide Usage Notes
・SoftBank 304SH is referred to as "handset" in this guide.
・Most operation descriptions are based on default settings.
・Unless noted otherwise, descriptions are for app sheet in
Feel UX Home.
・"Confirmation" refers to a window that appears after
operation, such as authentication prompt window, selection
window or caution window.
・Some operation descriptions may be omitted.
・In this guide and on handset, "abroad" means "outside Japan"
with regard to handset/service usage.
・In this guide, microSD/microSDHC/microSDXC Card is
referred to as "SD Card."
Screenshots & Key Labels
Screenshots and key labels are provided for reference only.
Actual handset windows, menus, etc. may differ in appearance.
Accessing Functions Guide
In app sheet, (Guide)
・Guide usage information and confirmation for automatic
updates appear at initial startup. Follow onscreen prompts.
Guide indicator appears on Status Bar by default. To hide
Guide indicator:
In app sheet, (Guide) Indicator off
Back

4

Getting Started
Package Contents............................................................... 6
Parts & Functions.............................................................. 6
USIM Card Installation....................................................... 7
Handset Memory & SD Card.............................................. 8
Charging Handset..............................................................11
Power On/Off................................................................... 13
Touchscreen Operations...................................................14

6
Package Contents
Package Contents
・Handset (SoftBank 304SH)
・Battery is built into handset.
・Handset back cover is not removable.
・クイックスタート (Japanese)
・お願いとご注意 (Japanese) with English "Quick Tips"
・Warranty
Parts & Functions
Handset Parts
Name Description
Headphone
Port
Connect Headphones with Mic (optional
accessories) here.
TV
Antenna
Pull out for TV (Full Seg/One Seg)
reception.
Proximity/
Light Sensor
Detects ambient light level and prevents
Touchscreen misoperation during call.
Notification
Lamp
Illuminates while charging or for
notifications (missed calls, new messages,
etc.).
Mic Talk to other party through this.
SD/USIM
Card Slot Insert/remove SD Card and USIM Card.
Earpiece Hear other party's voice through this.
External
Device Port
(Side)
Connect AC Charger or Micro USB Cable
here.
Display Touch Display to select menu items, open
functions, scroll pages, etc.
Internal
Camera Shoot photos or videos.

7
Getting Started SoftBank 304SH
Name Description
External
Camera Shoot photos or videos.
Infrared
Port Transfer files using Infrared.
Mic
(Recorder Mic)
Captures ambient sounds while recording
videos.
Mobile
Light Use as a camera flash, flashlight, etc.
FeliCa Logo Place over reader/writer to use NFC/
Osaifu-Keitai®.
Speaker Listen to music, video sounds, TV (Full
Seg/One Seg) audio, etc.
Handset Keys
Name Description
Power Key Activate/cancel Screen lock. Long Press
for power on/off or phone options.
(Volume Down
Key)
Decrease Volume. In Welcome sheet (lock
screen) or Feel UX Home, Touch & Hold to
activate/cancel Silent mode.
(Volume Up
Key)
Increase Volume. In Welcome sheet (lock
screen), Touch & Hold to turn on/off
Mobile Light1.
1 Alternatively, to turn off Mobile Light, open Notifications
Window and Tap .Mobile light on
USIM Card Installation
USIM Card is an IC card containing customer and
authentication information, including handset number.
Inserting USIM Card
Always power off beforehand.
If SD Card is inserted, remove it first. (SD Card needs to be
removed to insert USIM Card.)
・For SD Card removal procedure, see " ."Removing SD Card
Open Card Slot Cover
Pull out USIM Tray
・Do not pull USIM Tray forcefully or at an angle; damage may
result. Gently pull it straight out from the edge.
Place USIM Card in USIM Tray
・Check orientation of USIM Card (see the notch), then gently
place it with metal contacts facing up.
Insert USIM Tray into USIM Card Slot (bottom opening)
・Check orientation of USIM Tray, then insert it all the way.
Close Card Slot Cover
・Close Card Slot Cover firmly. Debris trapped between gasket
and Card Slot may allow ingress of liquid.

8
Removing USIM Card
Always power off beforehand.
If SD Card is inserted, remove it first. (SD Card needs to be
removed to remove USIM Card.)
・For SD Card removal procedure, see " ."Removing SD Card
Open Card Slot Cover
Pull out USIM Tray
・Do not pull USIM Tray forcefully or at an angle; damage may
result. Gently pull it straight out from the edge.
Remove USIM Card
Insert USIM Tray into USIM Card Slot (bottom opening)
・Check orientation of USIM Tray, then insert it all the way.
Close Card Slot Cover
・Close Card Slot Cover firmly. Debris trapped between gasket
and Card Slot may allow ingress of liquid.
Handset Memory & SD Card
Handset supports SD Card up to 128 GB. However, some SD
Cards may not operate properly.
In addition to SD Cards, use handset memory as storage for
system files, applications, shot photos/videos, etc.
Inserting SD Card
Always power off beforehand.
Open Card Slot Cover
Insert SD Card into SD Card Slot (top opening)
・Insert SD Card all the way with terminals facing up.
Close Card Slot Cover
・Close Card Slot Cover firmly. Debris trapped between gasket
and Card Slot may allow ingress of liquid.

9
Getting Started SoftBank 304SH
Formatting SD Card
When using a new SD Card for the first time, format it on
handset before trying to save images, music, etc.
・Formatting deletes all SD Card files.
・Charge handset while formatting or charge it adequately
beforehand.
In app sheet, (Settings)
Storage
Erase microSD
Erase SD card
Enter Operation Password OK
・If Operation Password is unset, follow onscreen prompts.
Erase everything
All SD Card files will be deleted.

11
Getting Started SoftBank 304SH
Handset Memory & SD Card Usage Notes
Handset Memory/SD Card Files
Handset memory/SD Card files may be lost/altered due
to accidents, malfunctions, repairs, handset upgrade/
replacement, mishandling, etc. Back up important files
regularly. SoftBank Mobile Corp. is not liable for any
damages resulting from loss/alteration of files.
・Never power off while files are being accessed.
microSDXC Card
Handset supports microSDXC Cards (SDXC-compatible SD
Cards). microSDXC Cards are supported by SDXC-compatible
devices only.
Exchanging Files with Non-SDXC-Compatible
Devices
To exchange files between handset and non-SDXC-
compatible devices, use SD Cards (microSD/microSDHC
Cards) supported by handset and those devices. Inserting a
microSDXC Card used on handset in a non-SDXC-compatible
device may corrupt card files. In addition, do not format
the microSDXC Card on that device even if prompted to do
so.
・Formatting deletes all microSDXC Card files and changes
the file system. The original memory capacity may
be unavailable after formatting. To use a corrupted
microSDXC Card, format it on an SDXC-compatible device.
Handling SD Cards Used on Other Mobiles
After installing SD Card used on other mobiles (such as
previously used handsets) into handset, the notification
Application data is present in the microSD. may appear on
Status Bar. To use files on such SD Cards on handset, copy
files to handset memory as follows.
Drag Status Bar down for Notifications Window
Application data is present in the microSD. Follow
onscreen prompts
・If the same folder/file name exists in handset memory,
overwrite confirmation appears. Handset memory files
cannot be restored once overwritten.
Handset Memory
Photos and videos shot on handset are saved to handset
memory by default. Depending on downloaded application
(sold separately), corresponding files are saved to handset
memory even if SD Card is specified as their save location
in application description.
SD Card Caution
Keep SD Card away from infants; may cause choking if
swallowed.
Charging Handset
Battery is built into handset.
AC Charger (optional accessory), Micro USB Cable (optional
accessory), Micro USB Charging Adapter (optional accessory)
and In-Car Charger (optional accessory) are not water proof.
Never connect Micro USB plug while handset or Charger is wet.
Handset is water resistant; however, if Micro USB plug
is inserted while it is wet, liquid (tap water, beverage,
sea water, pet urine, etc.) or a foreign object adhered to
handset or Micro USB plug may cause overheating, burnout,
fire, malfunction, burns, etc. due to electric shock, short-
circuiting, etc.
AC Charger
AC Charger is an optional accessory. Be sure to use SHCEJ1 or
ZTDAC1 (Micro USB, 1.0 A) specified by SoftBank Mobile Corp.
The following explains how to charge handset using SHCEJ1.
・See User Guide for corresponding AC Charger.
・Never connect Micro USB plug while handset or AC Charger
is wet.
Insert Micro USB plug of AC Charger into External Device Port
・Insert Micro USB plug in correct orientation; otherwise,
External Device Port may be damaged. Check contours and
orientation of Micro USB plug before inserting it.
Extend blades and plug AC Charger into AC outlet
Notification Lamp goes out when charge is full.
・Check that Notification Lamp illuminates red (Notification
Lamp illuminates green when charge is almost full).
After charging, remove Micro USB plug from External Device
Port, then unplug AC Charger and retract blades

12
USB Charging
Connect handset to a PC with Micro USB Cable (SHDDL1;
optional accessory).
・Turn on PC first.
・Handset may not charge or charge slowly depending on
connection/PC status.
・Never connect Micro USB plug while handset or Micro USB
Cable is wet.
Insert Micro USB plug of Micro USB Cable into External Device
Port
・Insert Micro USB plug in correct orientation; otherwise,
External Device Port may be damaged. Check contours and
orientation of Micro USB plug before inserting it.
Insert USB plug of Micro USB Cable into PC USB port
Notification Lamp goes out when charge is full.
・Check that Notification Lamp illuminates red (Notification
Lamp illuminates green when charge is almost full).
After charging, remove Micro USB Cable from handset and PC
Lithium-ion Battery
This product requires a lithium-ion battery. Lithium-
ion batteries are recyclable. To recycle a used lithium-
ion battery, take it to any shop displaying the recycling
symbol.
・To avoid fire or electric shock, do not short-circuit or
disassemble Battery.
Troubleshooting
Q. Notification Lamp flashes while charging
A. Charging is not in progress. Use specified Charger for
charging.
If charging still does not start, contact a SoftBank
Shop or SoftBank Customer Support, General
Information.
Q. Cannot charge handset abroad
A. SoftBank Mobile Corp. is not liable for problems
resulting from charging handset abroad.
Charging Cautions
Handling Cables
Do not pull, bend, or twist cable; may damage the cable.
Battery Care
To help maintain performance and life of Internal Battery,
do not store in the following conditions.
・Full (immediately after charging is complete)
・Exhausted (too low to power on handset)
Periods of Disuse
Charge handset to approximately 40% at least once every 6
months; if left uncharged, handset may become unusable or
files/settings may be affected.
Bulges of Internal Battery
Depending on usage, bulges may appear near end of battery
life; this does not affect safety.
Internal Battery Replacement
Internal Battery is a consumable item; may need to be
replaced if operating time shortens noticeably. Internal
Battery is not user replaceable; its replacement incurs fees
and requires handset submission to a SoftBank Shop or
other appropriate servicer. For details, contact a SoftBank
Shop or SoftBank Customer Support, .General Information

13
Getting Started SoftBank 304SH
Power On/Off
Power On
Long Press Power Key until SHARP appears
After Power On Graphics, Welcome sheet (lock screen)
appears.
Drag down
Initial setting window appears.
Power Off
Long Press Power Key
Power off
OK
Handset shuts down.
When Powering On for the First Time
At initial power on, handset reboots upon USIM Card
detection and setting window appears. Follow onscreen
prompts. After setup is complete, handset reboots again
and initial setting window appears.
14
Touchscreen Operations
Touch Display to select menu items, open functions, scroll
pages, etc.
Tap
Tap item or key to open or execute corresponding function/
operation.
Touch & Hold
Touch item for 1+ seconds to move icon, open menu, etc.
Drag
Drag item to move it.
Flick
Flick to toggle sheets, pages, etc.
Pinch/Spread
Pinch or Spread to zoom in or out on images, maps, etc.

Basic Operations
Basic Operations...............................................................16
Applications.......................................................................18
Handset Phone Number.................................................... 19
Mobile Manners.................................................................19
Text Entry.........................................................................20
Google Accounts............................................................... 23
Google Play....................................................................... 25
Security Codes.................................................................. 26
USIM PIN............................................................................27
Screen Lock....................................................................... 28
Software Updates.............................................................29

16
Basic Operations
Home (Feel UX Home)
Most operations start from Feel UX Home. Activate
applications in app sheet, and access widgets or save
shortcuts to frequently used applications in desktop sheet.
See " " for details.Feel UX Home Basics
・Flick left/right to toggle sheets.
・To return to Feel UX Home, Tap at Display bottom.
Handset Navigation
Tap item, icon, key, etc. to open menu/window or execute
corresponding function/operation.
・To return to the previous screen, Tap .
Navigation Bar
Tap icons on Navigation Bar (Display bottom) for the
following functions/operations.
Icon Description
(Back key) Return to the previous screen.
(Close
key) Close keyboard.
(Home
key) Return to Feel UX Home.
(Menu
key) Open Options menu.
(Recent
apps key)
Activate/exit Quick Launcher. (To open/
close recent applications window instead,
change Recent apps key setting.)
Touch & Hold to open/close Notifications
Window.
Action Bar
Current menu/window title appears on Action Bar (Display
top). On the right side of Action Bar, icons for functions
frequently used in that menu/window appear.
・When or is on Action Bar, Tap to turn
corresponding setting off or on.
・When (check all) and (uncheck all) are on Action Bar,
Tap to select or cancel all items together at once.

17
Basic Operations SoftBank 304SH
Menu Operations
Tap at Display bottom to open Options menu.
・In some windows, Touch & Hold for menu or settings.
One-Hand Operation
Shrink screen for easier one-hand operation.
Touch Navigation Bar then Drag up Drag to or and
release finger
Screen shrinks.
・To restore the original screen size, perform again.
Handset Settings
In app sheet, Tap (Settings) to customize settings.
・Checkbox ( or ) appears beside some options. Tap to
enable ( ) or disable ( ) option.
・Drag/Flick slider, spinner, etc. to adjust some settings. If
available, Tap or for additional settings.
Handset & Display Orientation
Rotate handset 90 degrees; Display orientation changes
accordingly.
・Display orientation may not change in some windows.
Capturing Screenshots
Press Power Key and at the same time.
・Open captured screenshots from in ContentsPhoto
Manager or other locations.

19
Basic Operations SoftBank 304SH
Handset Phone Number
My Phone Number
In app sheet, (Settings) Profile
Profile opens.
・Handset number appears in Own phone number field.
Mobile Manners
Silent Mode
Mute ringtones and other handset sounds to avoid disturbing
others around you.
・Camera shutter sound, video recording tones, music, video/
game sounds, etc. still play even in Silent mode.
In Welcome sheet (lock screen) or Feel UX Home, Touch & Hold
Silent mode activates.
・To cancel, Touch & Hold in Welcome sheet (lock screen)
or Feel UX Home.
Airplane Mode
Leaving power on, suspend signal-transmitting functions.
Long Press Power Key
Phone options appear.
Airplane mode
Airplane mode activates.
・To cancel, Long Press Power Key, then Tap .Airplane mode
Selecting Silent Mode Option
Long Press Power Key Tap icon (e.g., )
Airplane Mode Caution
Activating disables Wi-Fi and BluetoothAirplane mode ®,
interrupting corresponding transmissions.
Wi-Fi/Bluetooth® connections can be used even in Airplane
mode by enabling Wi-Fi/Bluetooth® after activating
Airplane mode ; make sure that such connection/
transmission is allowed in your current location before use.

20
Text Entry
Keyboards
Use onscreen keyboards for text entry. In 12-key Keyboard,
multiple characters are assigned to each key. In QWERTY
Keyboard, a single letter is assigned to each key.
・Tap a text entry field for keyboard. To hide it, Tap .
・Text entry descriptions are for iWnn IME - SH edition
(default input method).
Switching Keyboards
In a text entry window, Change input UI
Set QWERTY keyboard Set 12 keyboard or
Keyboard is switched.
12-Key Keyboard Layout
Enter characters.
Undo conversion; reverse-toggle character options
before confirming entry.
Backspace cursor.
Move keyboard in the arrow direction.
Current entry mode
Delete characters.
Advance cursor; add space at text end.
Open text entry options; enter space; convert hiragana.
Insert line break; confirm current characters.
Enter pictograms, symbols, or emoticons; switch
conversion options.
Toggle entry modes.
Enter space; toggle case; add ゛ or ゜ for hiragana.

21
Basic Operations SoftBank 304SH
QWERTY Keyboard Layout
Enter characters.
Toggle case.
Toggle entry modes.
Enter pictograms, symbols, or emoticons; switch
conversion options.
Undo conversion.
Open text entry options.
Current entry mode
Delete characters.
Insert line break; confirm current characters.
Advance cursor; add space at text end.
Backspace cursor.
Enter space; convert hiragana.
Switching Entry Modes
Tap to toggle Half Numeric, Kanji, and Half Alphabet
modes. Alternatively, Flick to toggle these entry modes.
To use other entry modes:
In a text entry window, Change input mode
Tap mode
Keyboard interface changes accordingly. Current entry mode
indicator, such as (Half Alphabet) or (Kanji), appears.

22
Entering Letters
In 12-key Keyboard, to enter keitai in Half Alphabet:
Check Half Alphabet mode is selected ( on Status Bar)
(twice: k) (twice: e) (three times: i)
(once: t) (once: a) (three times: i)
Now, keitai is entered.
・To toggle case, type a letter and Tap .
・Set handset to automatically capitalize the first letter as
needed.
Flick Input
In 12-key Keyboard, Flick key for target character (instead of
Tapping key repeatedly).
・Touch & Hold key for guide; Flick toward target character
to enter.
Target
Character Operation
p Tap once.
q Touch and Flick left.
rTouch and Flick up.
s Touch and Flick right.
7 Touch and Flick down.
・To enable/disable key preview and Flick input guide, in a
text entry window, Tap Display / Layout Key
input guide .
23
Basic Operations SoftBank 304SH
Google Accounts
Create a Google Account to use Google services. A Google
Account is required to fully use some services and
applications/functions.
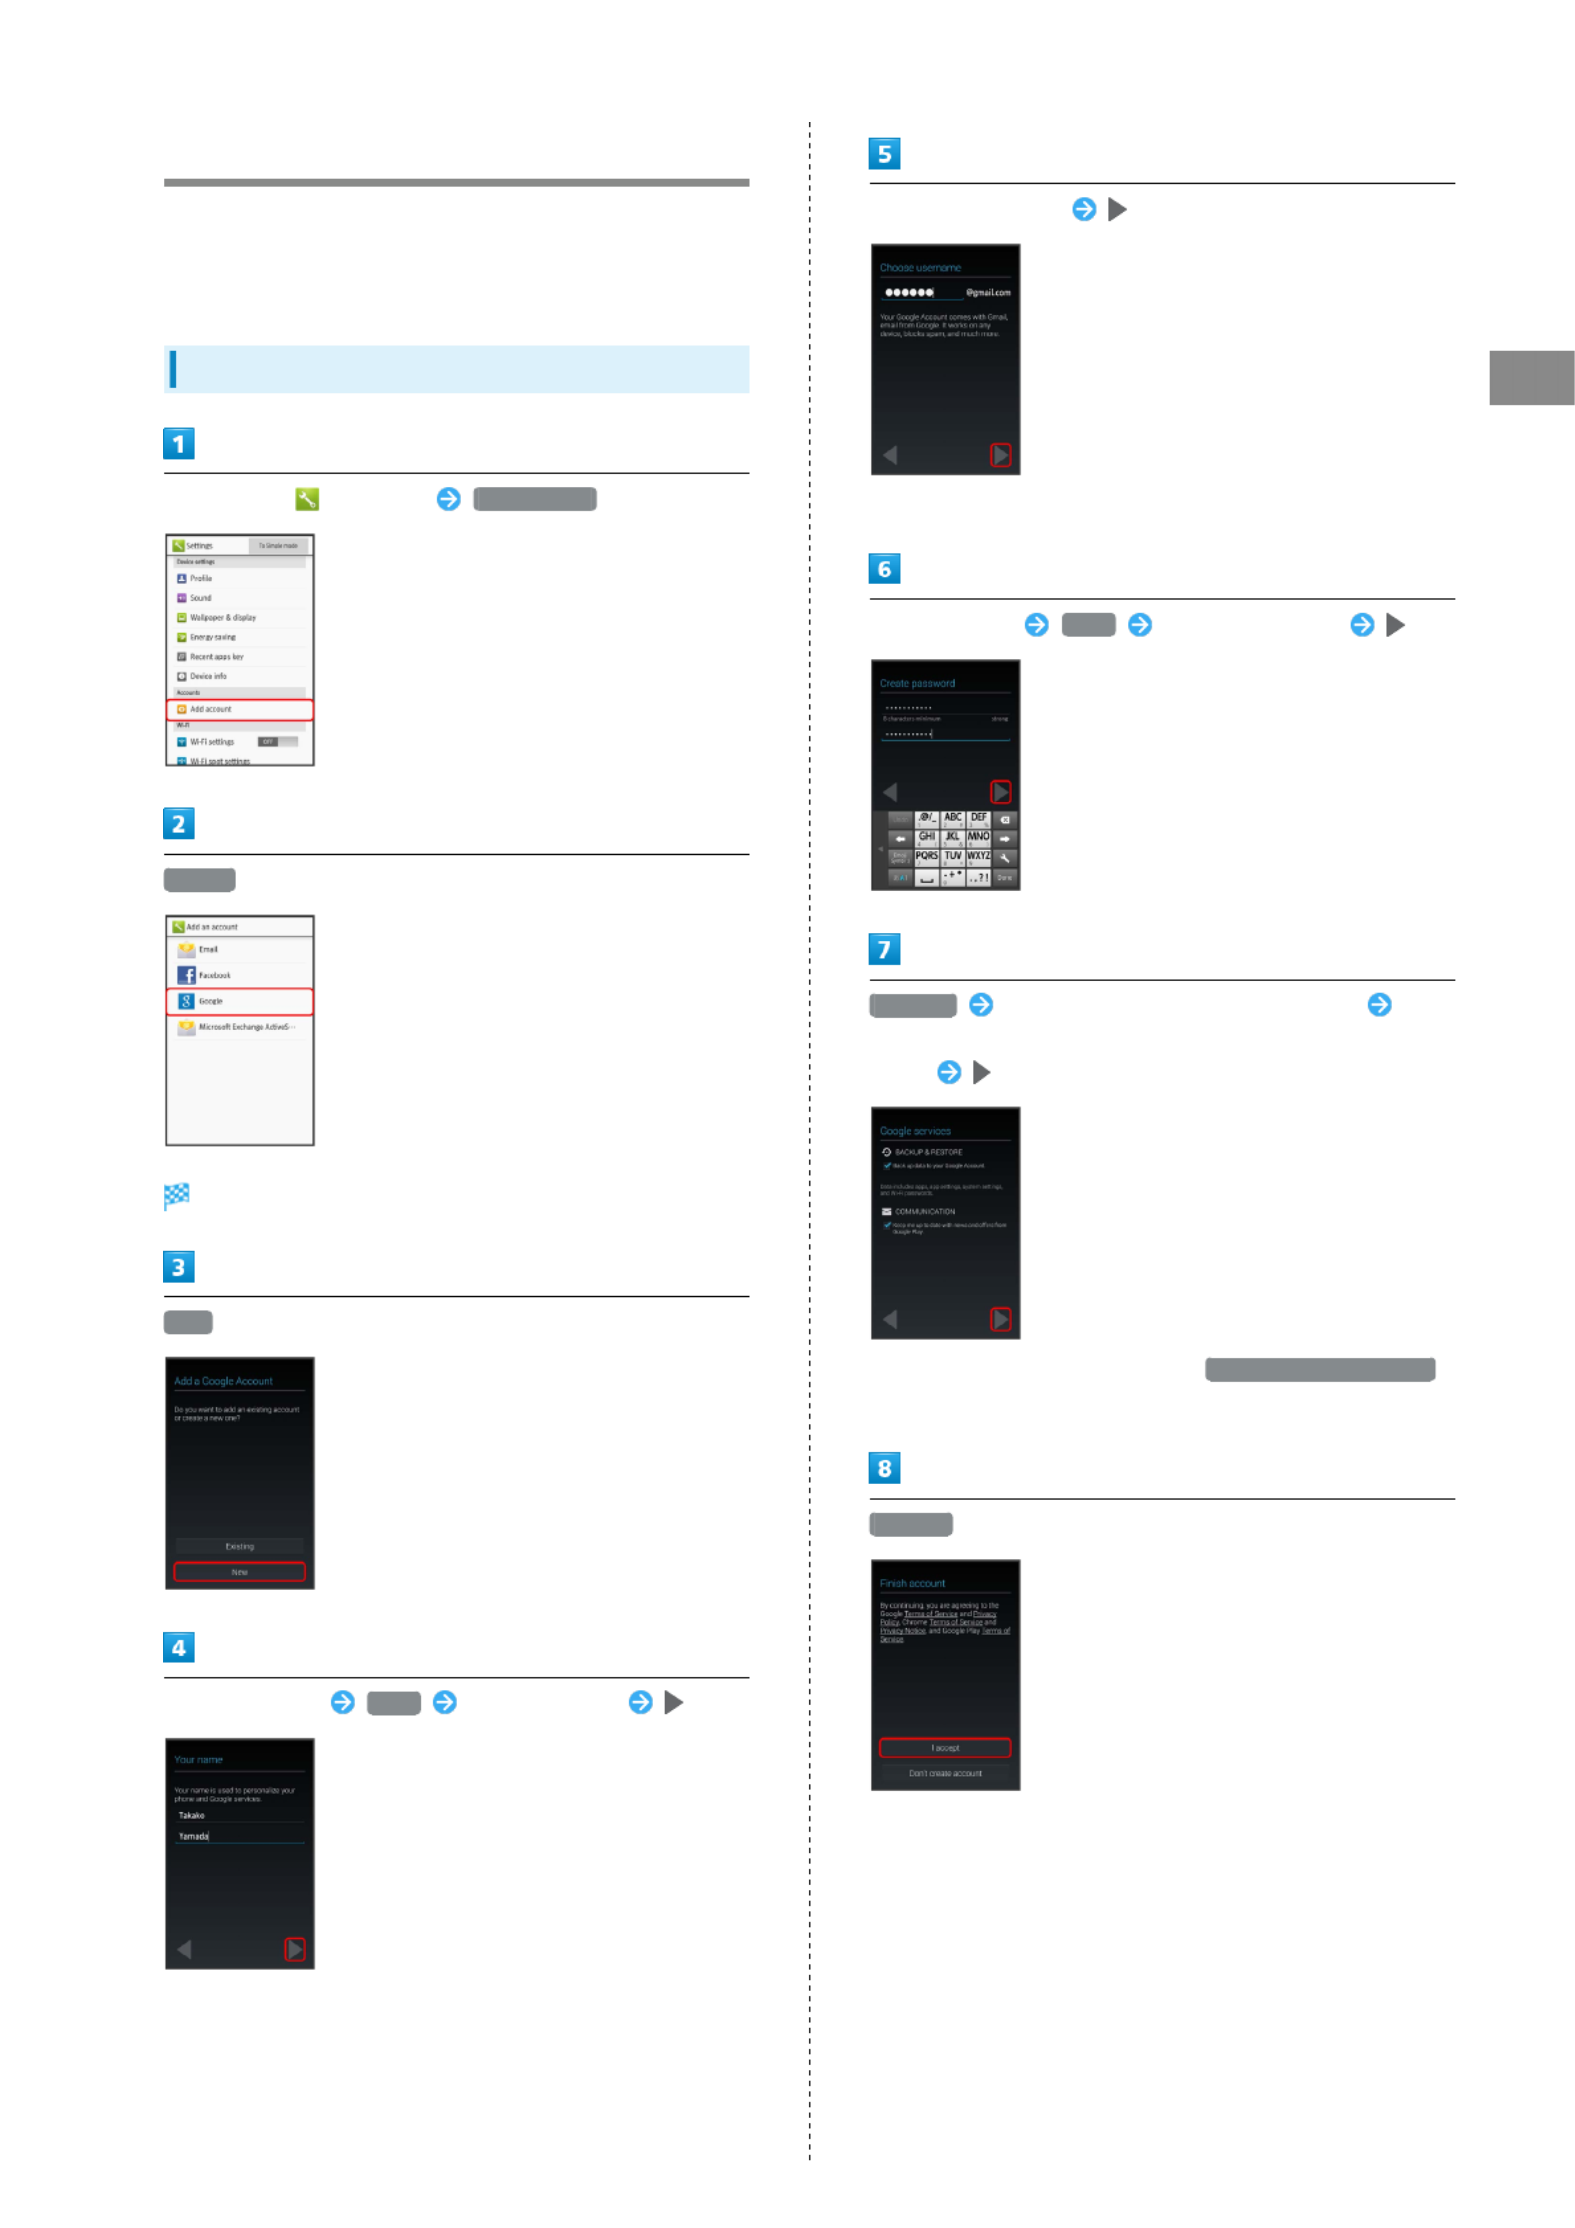
Creating a Google Account
In app sheet, (Settings) Add account
Google
Add a Google Account appears.
New
Enter first name Enter last nameNext
Enter e-mail address
・If confirmation appears, follow onscreen prompts.
Enter password Re-enter passwordNext
Not now Select whether to enable data backup
Select whether to receive news and offers from Google
Play™
・To specify recovery options, Tap .Set up recovery options
Follow onscreen prompts.
I accept
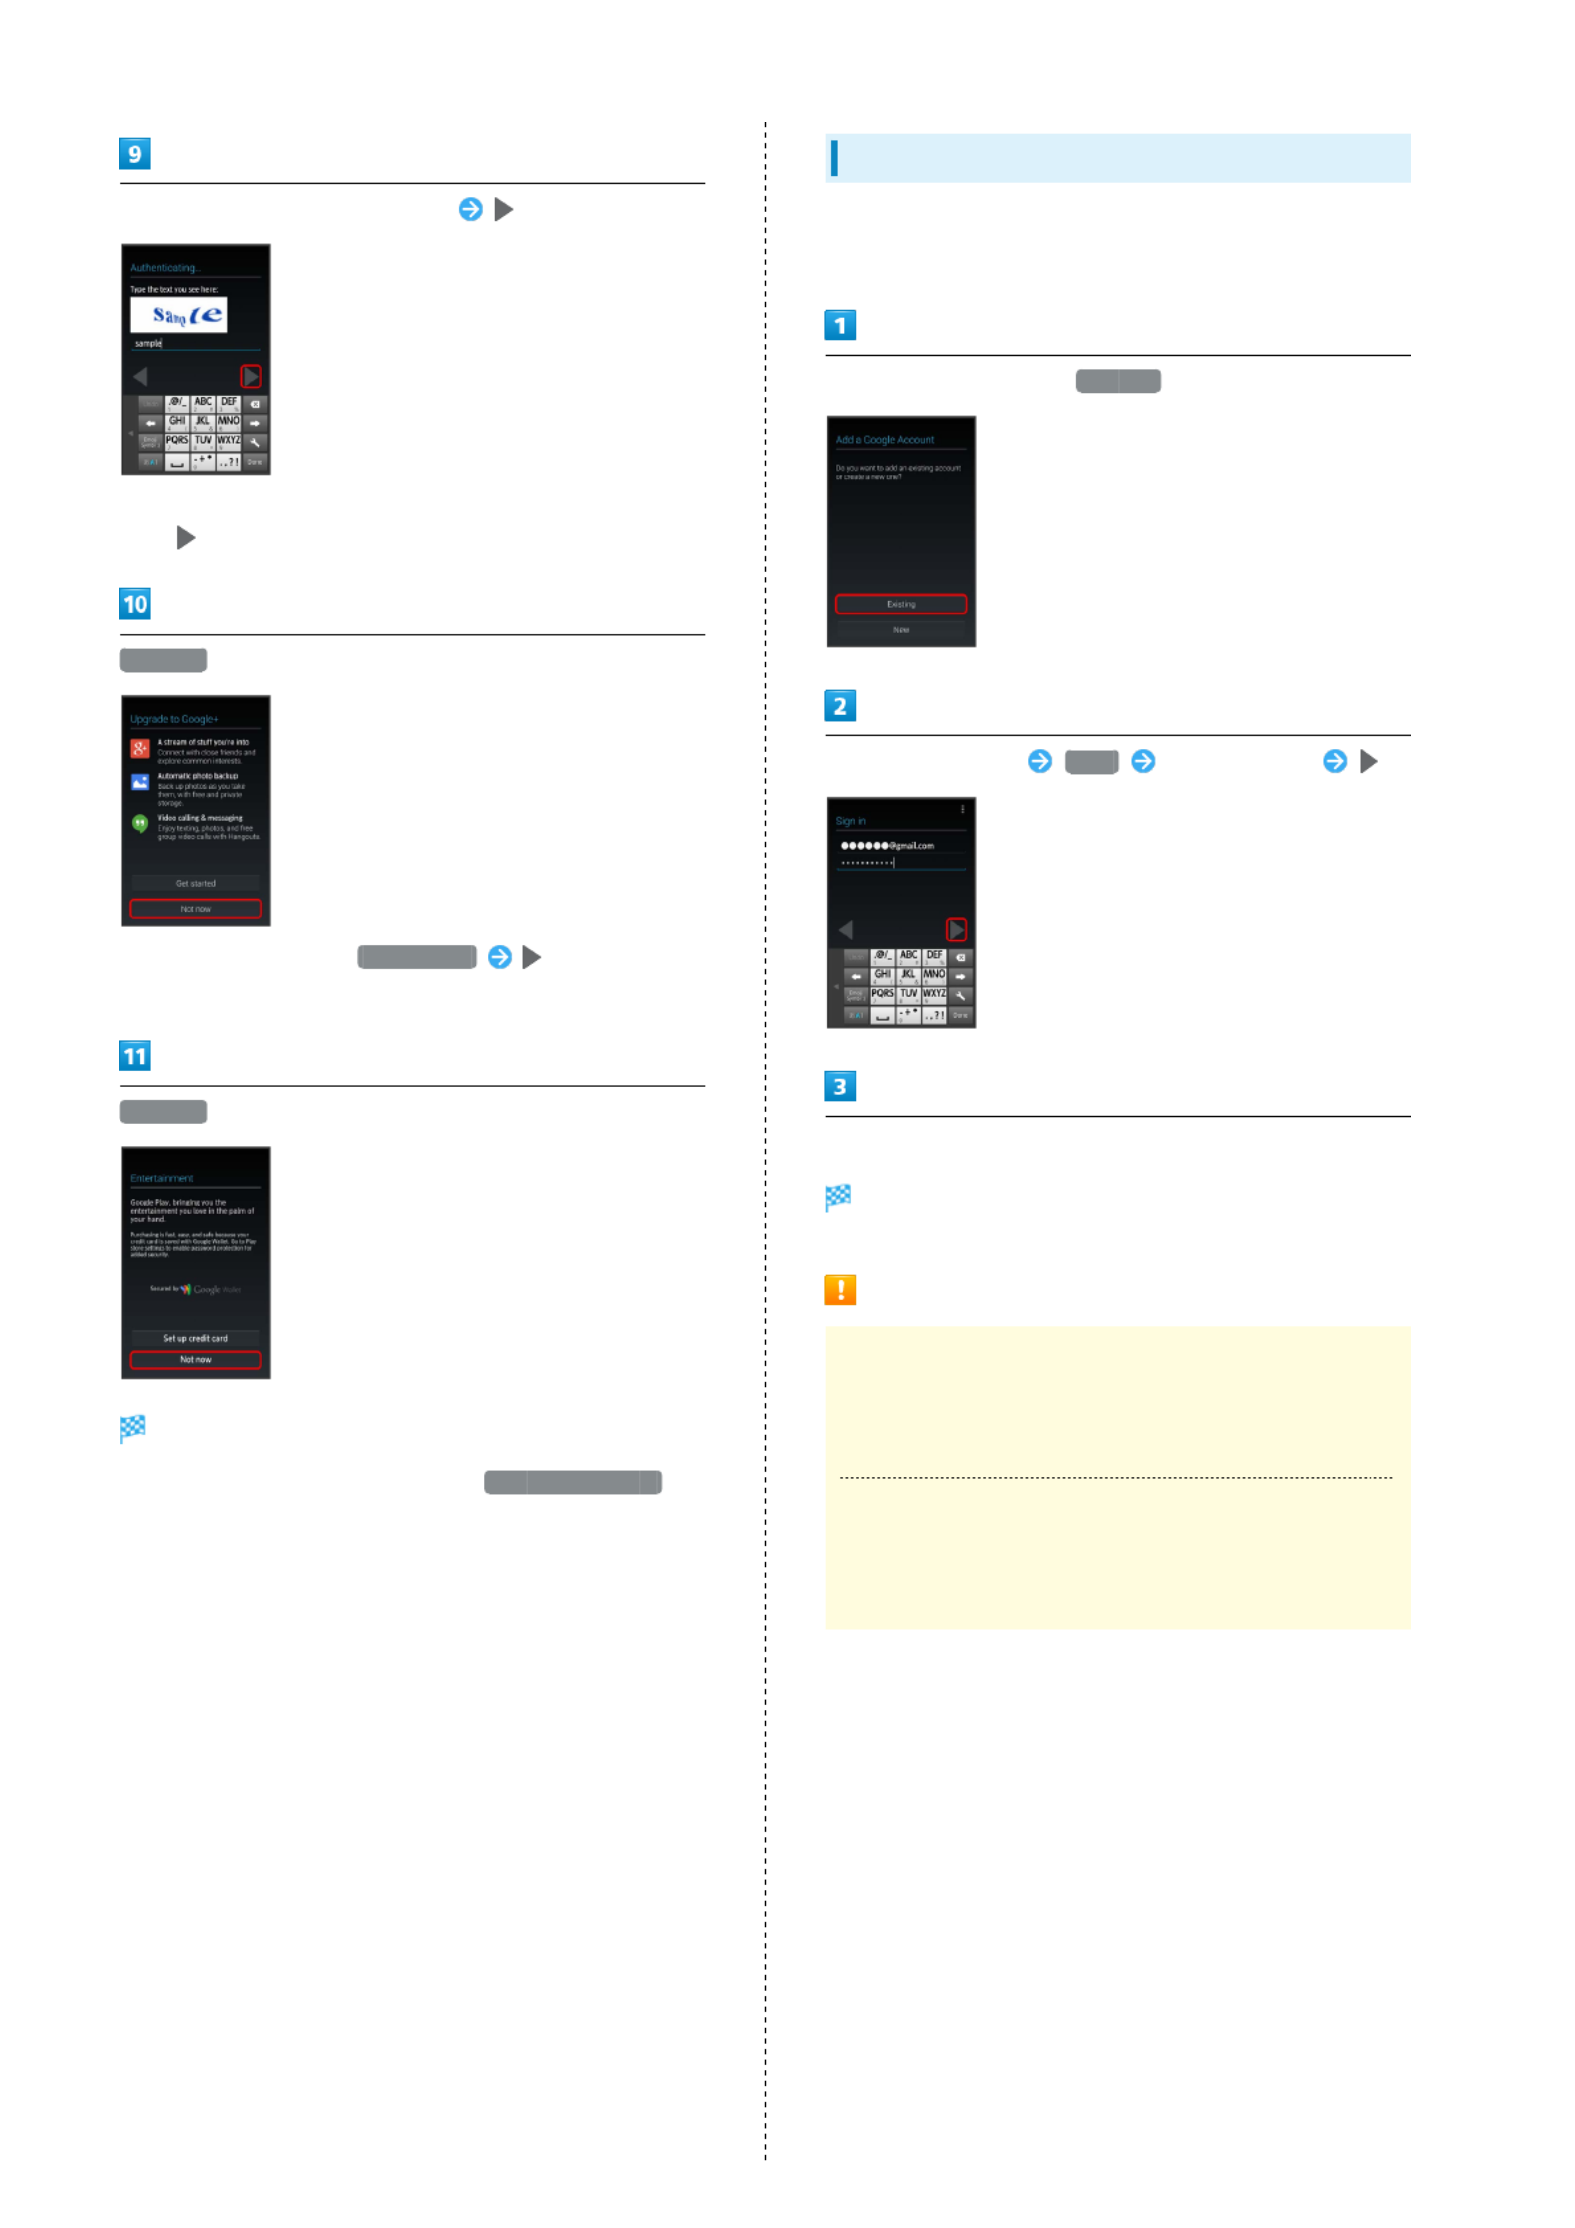
24
Enter shown characters (distorted)
・If shown characters are unreadable, enter a character then
Tap ; other distorted characters appear.
Not now
・To use Google+™, Tap . FollowGet started
onscreen prompts.
Not now
A Google Account is added.
・To add credit card information, Tap ,Set up credit card
then follow onscreen prompts.
・If confirmation appears, follow onscreen prompts.
Signing in to a Google Account
If an application requires a Google Account, Add a Google
Account appears. Sign in to use the application.
In Add a Google Account, Existing
Enter e-mail address Enter passwordNext
Follow onscreen prompts
You are signed in to your Google Account.
Google Account Cautions
Google Account E-mail Address & Password
Do not forget your Google Account e-mail address and
password.
Google Account Operations & User Interface
Operations and user interface are subject to change due to
automatic application updates or other reasons.

25
Basic Operations SoftBank 304SH
Google Play
Download applications via Google Play. Downloaded
applications can be updated manually or automatically. Sign in
to a Google Account beforehand.
Installing Free Applications
In app sheet, (Play Store)
Google Play opens.
・If confirmation appears, follow onscreen prompts.
Tap free application INSTALL ACCEPT
Application downloads and installs.
Purchasing Applications
In app sheet, (Play Store)
Google Play opens.
・If confirmation appears, follow onscreen prompts.
Tap paid application Tap price Follow onscreen
prompts
Application downloads and installs.
Updating Installed Applications
In app sheet, (Play Store)
Google Play opens.
・If confirmation appears, follow onscreen prompts.
on Action Bar Tap applicationMy apps
UPDATE Follow onscreen prompts
Application downloads and installs.
・If confirmation appears, follow onscreen prompts.
Uninstalling Applications
Applications installed via Google Play can be uninstalled.
In app sheet, (Play Store)
Google Play opens.
・If confirmation appears, follow onscreen prompts.
on Action Bar Tap applicationMy apps
UNINSTALL OK
Application uninstalls.

26
Purchased Applications
Payment
Pay once. Re-downloads of uninstalled applications are free
of charge.
Use on Other Android Devices
Install same application on other Android devices under
same Google Account at no added cost.
Application Operations
Refund Requests
Request refunds within designated period. Returned
applications are deleted from handset; no payment is
required. (One refund request per application.)
In Google Play, on Action Bar TapMy apps
application REFUND
・For details, Tap in Google Play, then referHelp
to Google Play Help.
Enabling Automatic Updates
In Google Play, on Action Bar TapMy apps
application ( )Auto-update
・Automatic update is not available for some applications.
Google Play Cautions
Application Installation Disclaimer
Download and install applications on this handset via
Google Play (developed by Google Inc.) at your own
risk. SoftBank Mobile Corp. is not responsible for user
installed application content (quality, reliability, legality,
appropriateness, accuracy, etc.) or malfunctions installed
applications may cause (due to viruses, etc.).
Application Purchase Disclaimer
Purchase applications at your own risk. SoftBank Mobile
Corp. is not responsible for transactions between users and
third party publishers.
Google Play Operations & User Interface
Operations and user interface are subject to change due to
automatic application updates or other reasons.
Security Codes
Code Types
Center Access Code (Call Barring Password; 4-digit code in
contract) is required to use Optional Services from landlines
or subscribe to fee-based information.
・Do not forget Operation Password and Center Access Code
(Call Barring Password). If you forget these codes, contact
us for recovery. For details, contact SoftBank Customer
Support, .General Information
・Do not reveal Operation Password or Center Access Code
(Call Barring Password). SoftBank Mobile Corp. is not liable
for misuse or damages.
・Call Barring settings will be locked if incorrect Center
Access Code (Call Barring Password) is entered three times
consecutively when making a setting. To unlock, the code
must be changed. For details, contact SoftBank Customer
Support, .General Information
・If Call Barring Password has been previously changed on a
mobile phone, enter the latest code to set Call Barring.

27
Basic Operations SoftBank 304SH
Setting Operation Password
Do not forget Operation Password; write it down if necessary.
In app sheet, (Settings) Other settings Lock &
Security
Operation password setting OK Enter Operation
Password OK
Re-enter Operation Password OK OK
Operation Password is set.
・To change Operation Password, refer to the steps above.
(In , enter current Operation Password to proceed.)
USIM PIN
9999 by default; enable USIM card lock to restrict handset
use.
Enabling USIM Card Lock
In app sheet, (Settings) Other settings Lock &
Security
USIM card lock settings Lock USIM card Enter PIN
OK ( )
USIM card lock is enabled.
Changing USIM PIN
Lock USIM Card first. See " " forEnabling USIM Card Lock
details.
In app sheet, (Settings) Other settings Lock &
Security
USIM card lock settings Change USIM PIN Enter
current PIN Enter new PIN Re-OK OK
enter new PIN OK
PIN is changed.

28
PIN Cautions
Entering incorrect PIN three consecutive times activates
PIN Lock. To cancel, Personal Unblocking Key (PUK) is
required; contact SoftBank Customer Support, General
Information. Entering incorrect PUK ten consecutive times
activates PUK Lock, disabling handset. For recovery, USIM
Card must be reissued at a SoftBank Shop (fees apply).
Screen Lock
After a period of inactivity, Display goes completely dark to
save battery power (Screen lock active). Screen lock prevents
accidental Touchscreen operation.
Activating Screen Lock Manually
When Display is active, Press Power Key
Display goes completely dark and Screen lock activates.
Canceling Screen Lock
Press Power Key to open Welcome sheet (lock screen).
In Welcome sheet (lock screen), Drag down
Screen lock is canceled.
・Screen lock option can be changed. See "Lock & Security
Settings" for details.
Screen Lock Usage Notes
When Screen Lock Activates while Playing
Music
Music continues to play. For operation, Press Power Key to
open Welcome sheet (lock screen) and use operation panel
(operations may vary depending on application).
If You Forget Pattern for Canceling Screen
Lock
When drawing a pattern to cancel Screen Lock with a
Google Account set up, appears afterPattern reminder
failing to cancel Screen Lock five consecutive times.
Tap and sign in to the Google AccountPattern reminder
to cancel Screen Lock.

29
Basic Operations SoftBank 304SH
Screen Lock Caution
Do not forget pattern, Lock No. passcode or password set
for canceling Screen lock (write it down if necessary). If
you forget it, visit the nearest SoftBank Shop for recovery
procedure. Note that your files and settings will be lost
during the recovery process.
Software Updates
Software Updates
At specified time, handset automatically checks for/downloads
firmware updates as required. To update firmware manually:
In app sheet, (Settings) Device info
Software update
Software update menu appears.
Software update Execute Follow onscreen prompts
Software Update starts.
Before Software Update
Handset data may be lost to damage, malfunction, etc.
Back up important information before updating software.
SoftBank Mobile Corp. is not liable for loss or associated
damages.
30
Software Update Operations
Enabling/Disabling Automatic Updates
In Software update menu, Auto update settings Do
not update automatically Update automatically or
Changing Automatic Update Start Time
In Software update menu, Update time settings
Select time Set
・Available when is set in Update automatically Auto
update settings .
Software Update Cautions
During Update
Handset cannot be used until Software Update completes;
it may take some time to complete.
Signal Conditions
Check signal strength and battery charge beforehand.
Poor signal strength or low battery charge may disrupt
updates leading to update failure. Update failure may
disable handset.

32
Welcome Sheet (Lock Screen)
Basics
Welcome sheet (lock screen) appears at power on or when
Power Key is Pressed while Display is completely dark (Screen
lock active).
From Welcome sheet (lock screen), cancel Screen lock, activate
an application such as Phone or Mail, etc.
Welcome Sheet (Lock Screen) Layout
Wallpaper (and widget) 1
Drag down to cancel Screen lock; Tap for applications,
settings, etc.
Tap to show owner information.2
Notifications of missed calls, new messages, etc. appear
here.
Date and time, weather, widget name, etc.1
1 Flick left/right to toggle view.
2 Set owner information beforehand. See "Lock & Security
Settings" for details.
Activating Applications
Activate applications from Welcome sheet (lock screen) as
follows.
・Change assigned applications as needed.
In Welcome sheet (lock screen), Tap
Menu appears.
Tap application
Application activates.
・Tap for a video tutorial (Japanese) onVideo tutorial
functions.
・Tap to open menu for customizingWelcome sheet setting
Welcome sheet (lock screen). Alternatively, Tap (Settings)
in app sheet Wallpaper & display Welcome Sheet
(lock screen) . See " " forWallpaper & Display Settings
details.
Notifications (Missed Calls, New
Messages, Etc.)
Notifications such as New missed call(s) and New mail(s)
appear in Welcome sheet (lock screen).
Drag notification down to open it.

33
Handset Interface SoftBank 304SH
Feel UX Home Basics
Feel UX Home consists of app sheet and desktop sheet. Most
operations start here.
Access applications and widgets, change handset settings, etc.
Toggling Sheets
Activate applications in app sheet, and access widgets or save
shortcuts to frequently used applications in desktop sheet.
・Flick left/right to toggle sheets.
App Sheet Layout
Activate applications. (Flick up for hidden pages.)
Tap to toggle pages (larger dot indicates current page
position).
Desktop Sheet Layout
Use widgets. (Flick up for hidden pages.)
Activate applications. (Flick up for hidden pages.)
Tap to toggle pages (larger dot indicates current page
position).
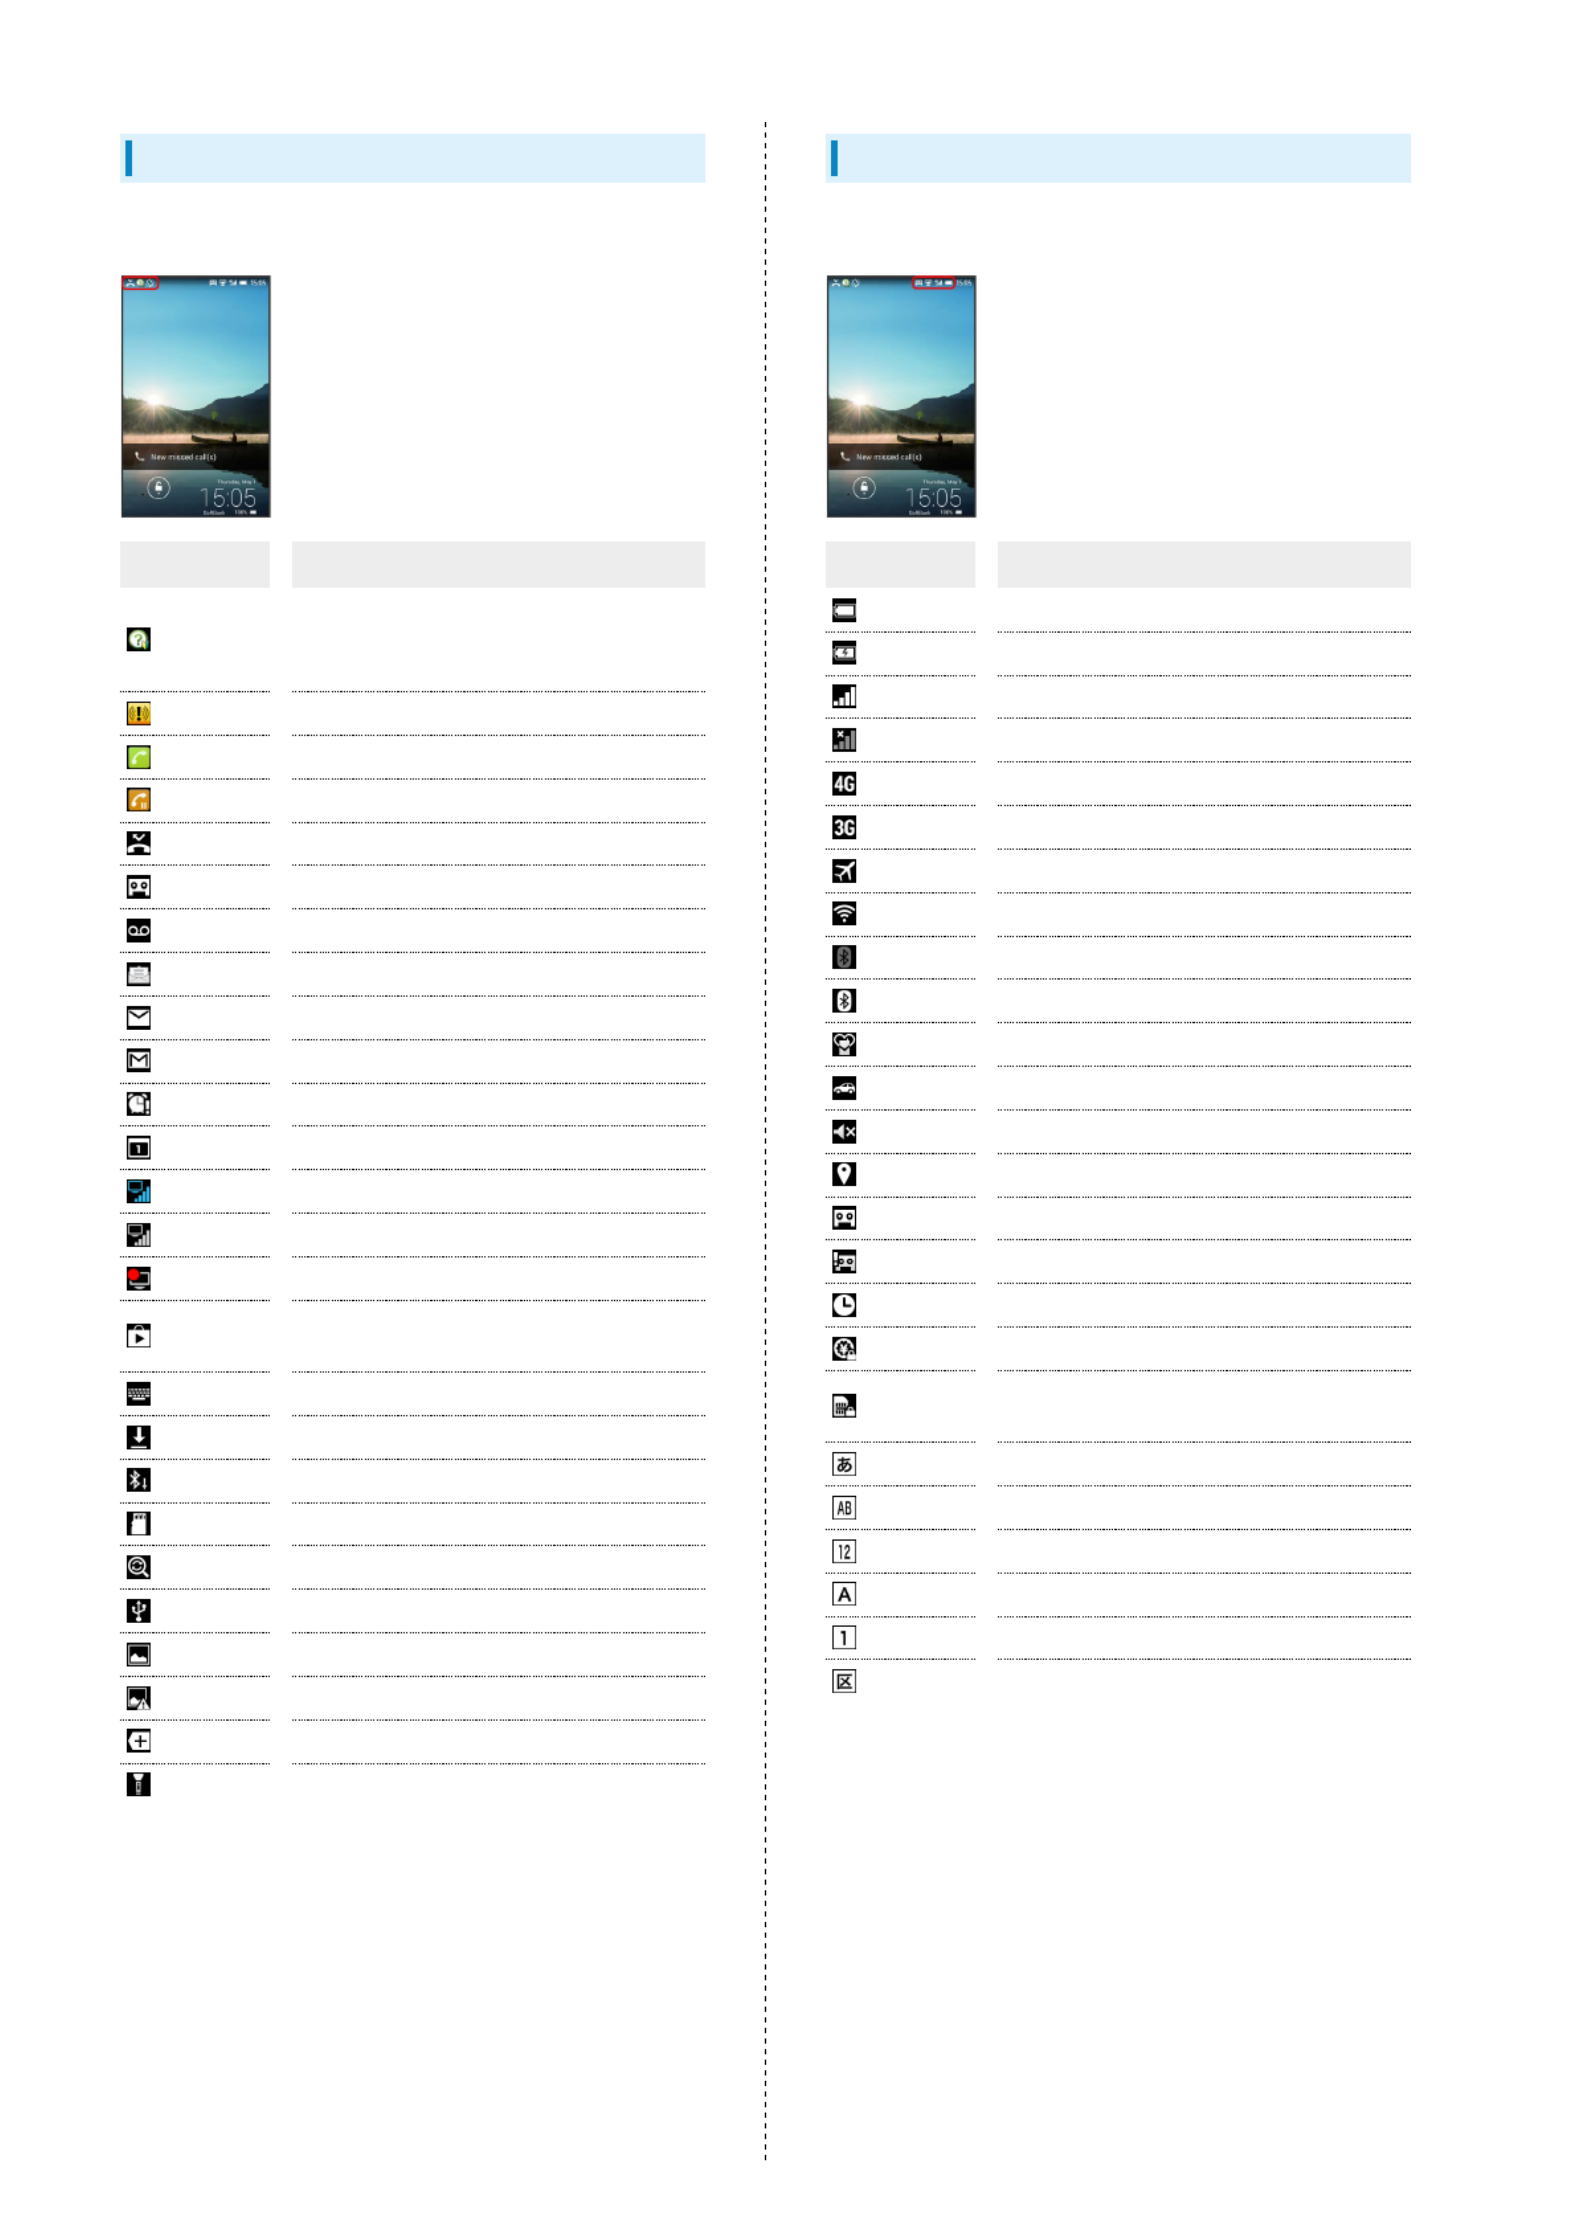
Status Bar
Indicators (new message notification, handset status, etc.)
appear at the top of Display.
Status Bar Layout
Notifications, warnings, etc. appear here. (Notification
Indicators)
Handset status and other information appear here.
(Status Indicators)
34
Notification Indicators
Notification Indicators appear on the left.
Indicator Description
Functions Guide Available (Drag Status
Bar down and open from Notifications
Window)
Urgent News
Call Arriving/in Progress
Call on Hold
Missed Call
New Answer Phone Message
New Voicemail
New SMS/S! Mail
New Internet Mail
New Gmail
Unchecked Alarm
Event
Viewing TV (Full Seg)
Viewing TV (One Seg)
Recording TV (Full Seg/One Seg)
Application Installation Complete/Update
Available
Text Entry Window (Choose Input Method)
Data Downloading
Bluetooth® File Reception Request
SD Card Unmounted
Reading SD Card
Connected via USB
Screenshot Captured
Screenshot Failed
More Notifications
Mobile Light On
Status Indicators
Status Indicators appear on the right.
Indicator Description
Battery Strength
Charging
Signal Strength
No Signal (4G LTE/4G/3G)
4G LTE/4G Data in Use 1
3G Data in Use
Airplane Mode
Wi-Fi Connected
Bluetooth ® On
Bluetooth ® Connected
Silent (Standard) Mode
Silent (Drive) Mode
Silent Mode
Getting Location Information
Answer Phone Set
Answer Phone Set (Message Recorded)
Alarm Set
NFC/Osaifu-Keitai ® Locked
NFC/Osaifu-Keitai ® Locked (USIM Card
Only)2
Kanji Mode
Half Alphabet Mode
Half Numeric Mode
Full Alphabet Mode
Full Numeric Mode
Character Code Mode
1 Corresponding indicator appears when handset is connected
to FDD-LTE (SoftBank 4G LTE) or AXGP (SoftBank 4G).
Between these Networks, handset connects to SoftBank 4G
whenever possible.
2 Appears upon inserting USIM Card into handset after using
that USIM Card to lock NFC on another mobile.
35
Handset Interface SoftBank 304SH
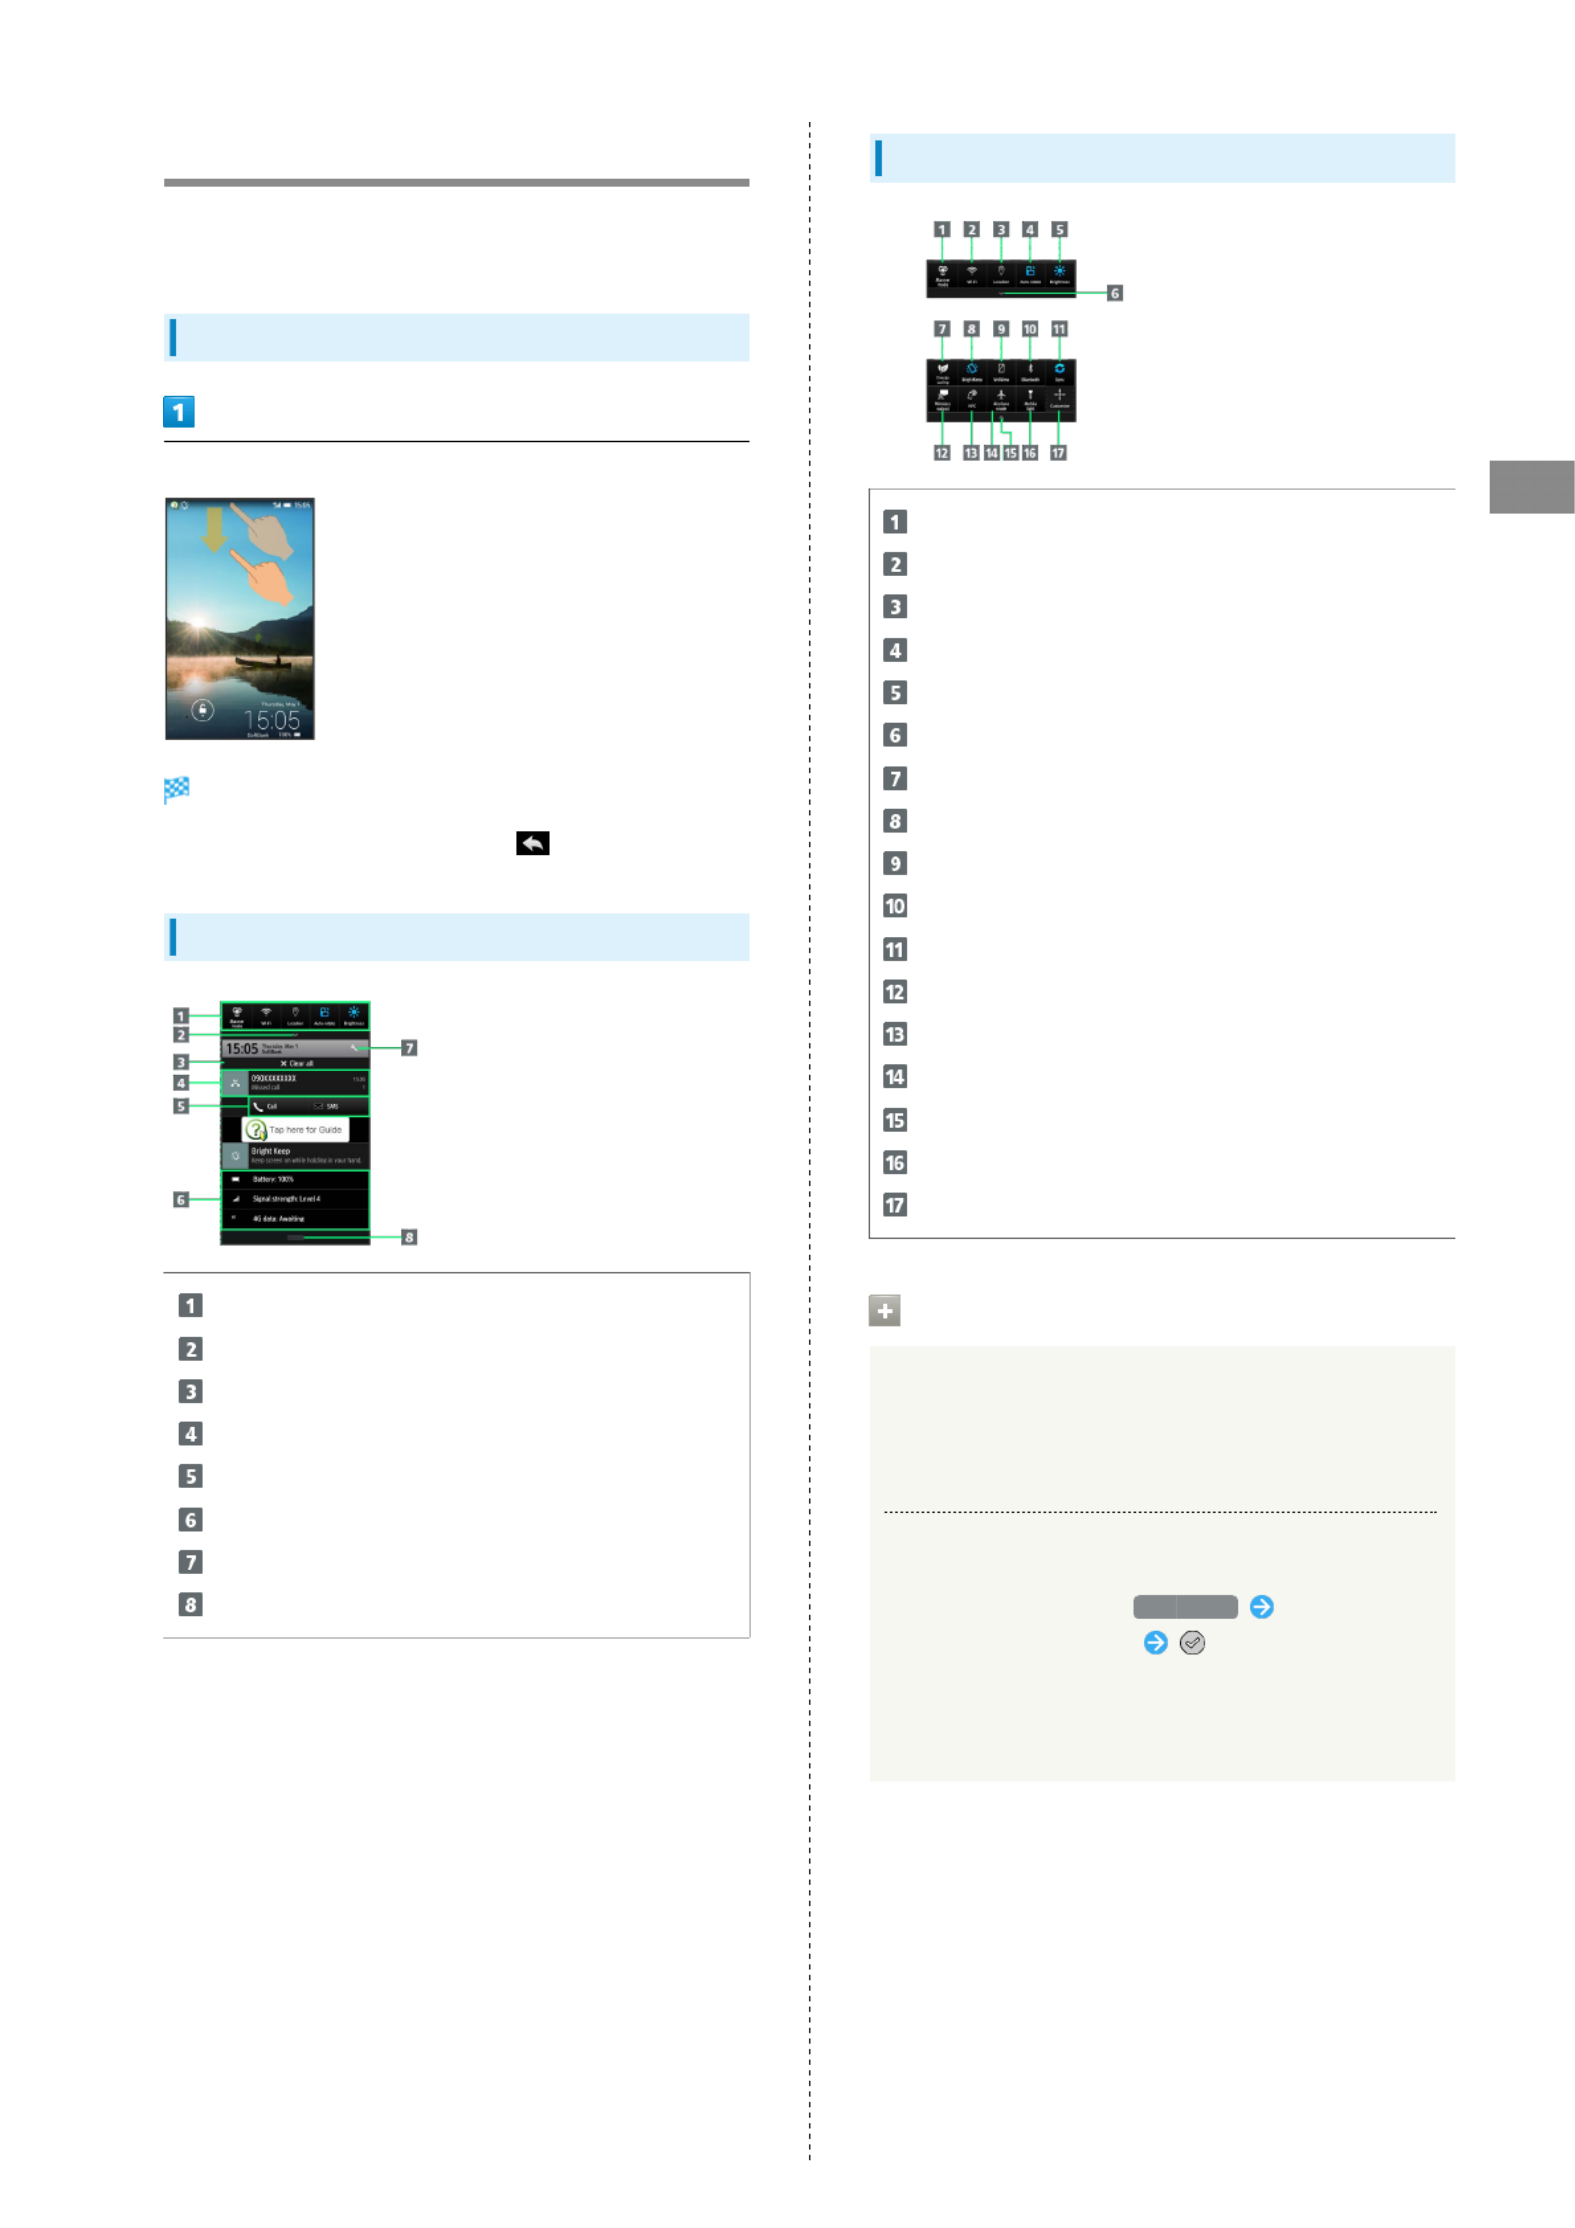
Notifications Window
Open notifications, check handset status or change various
settings.
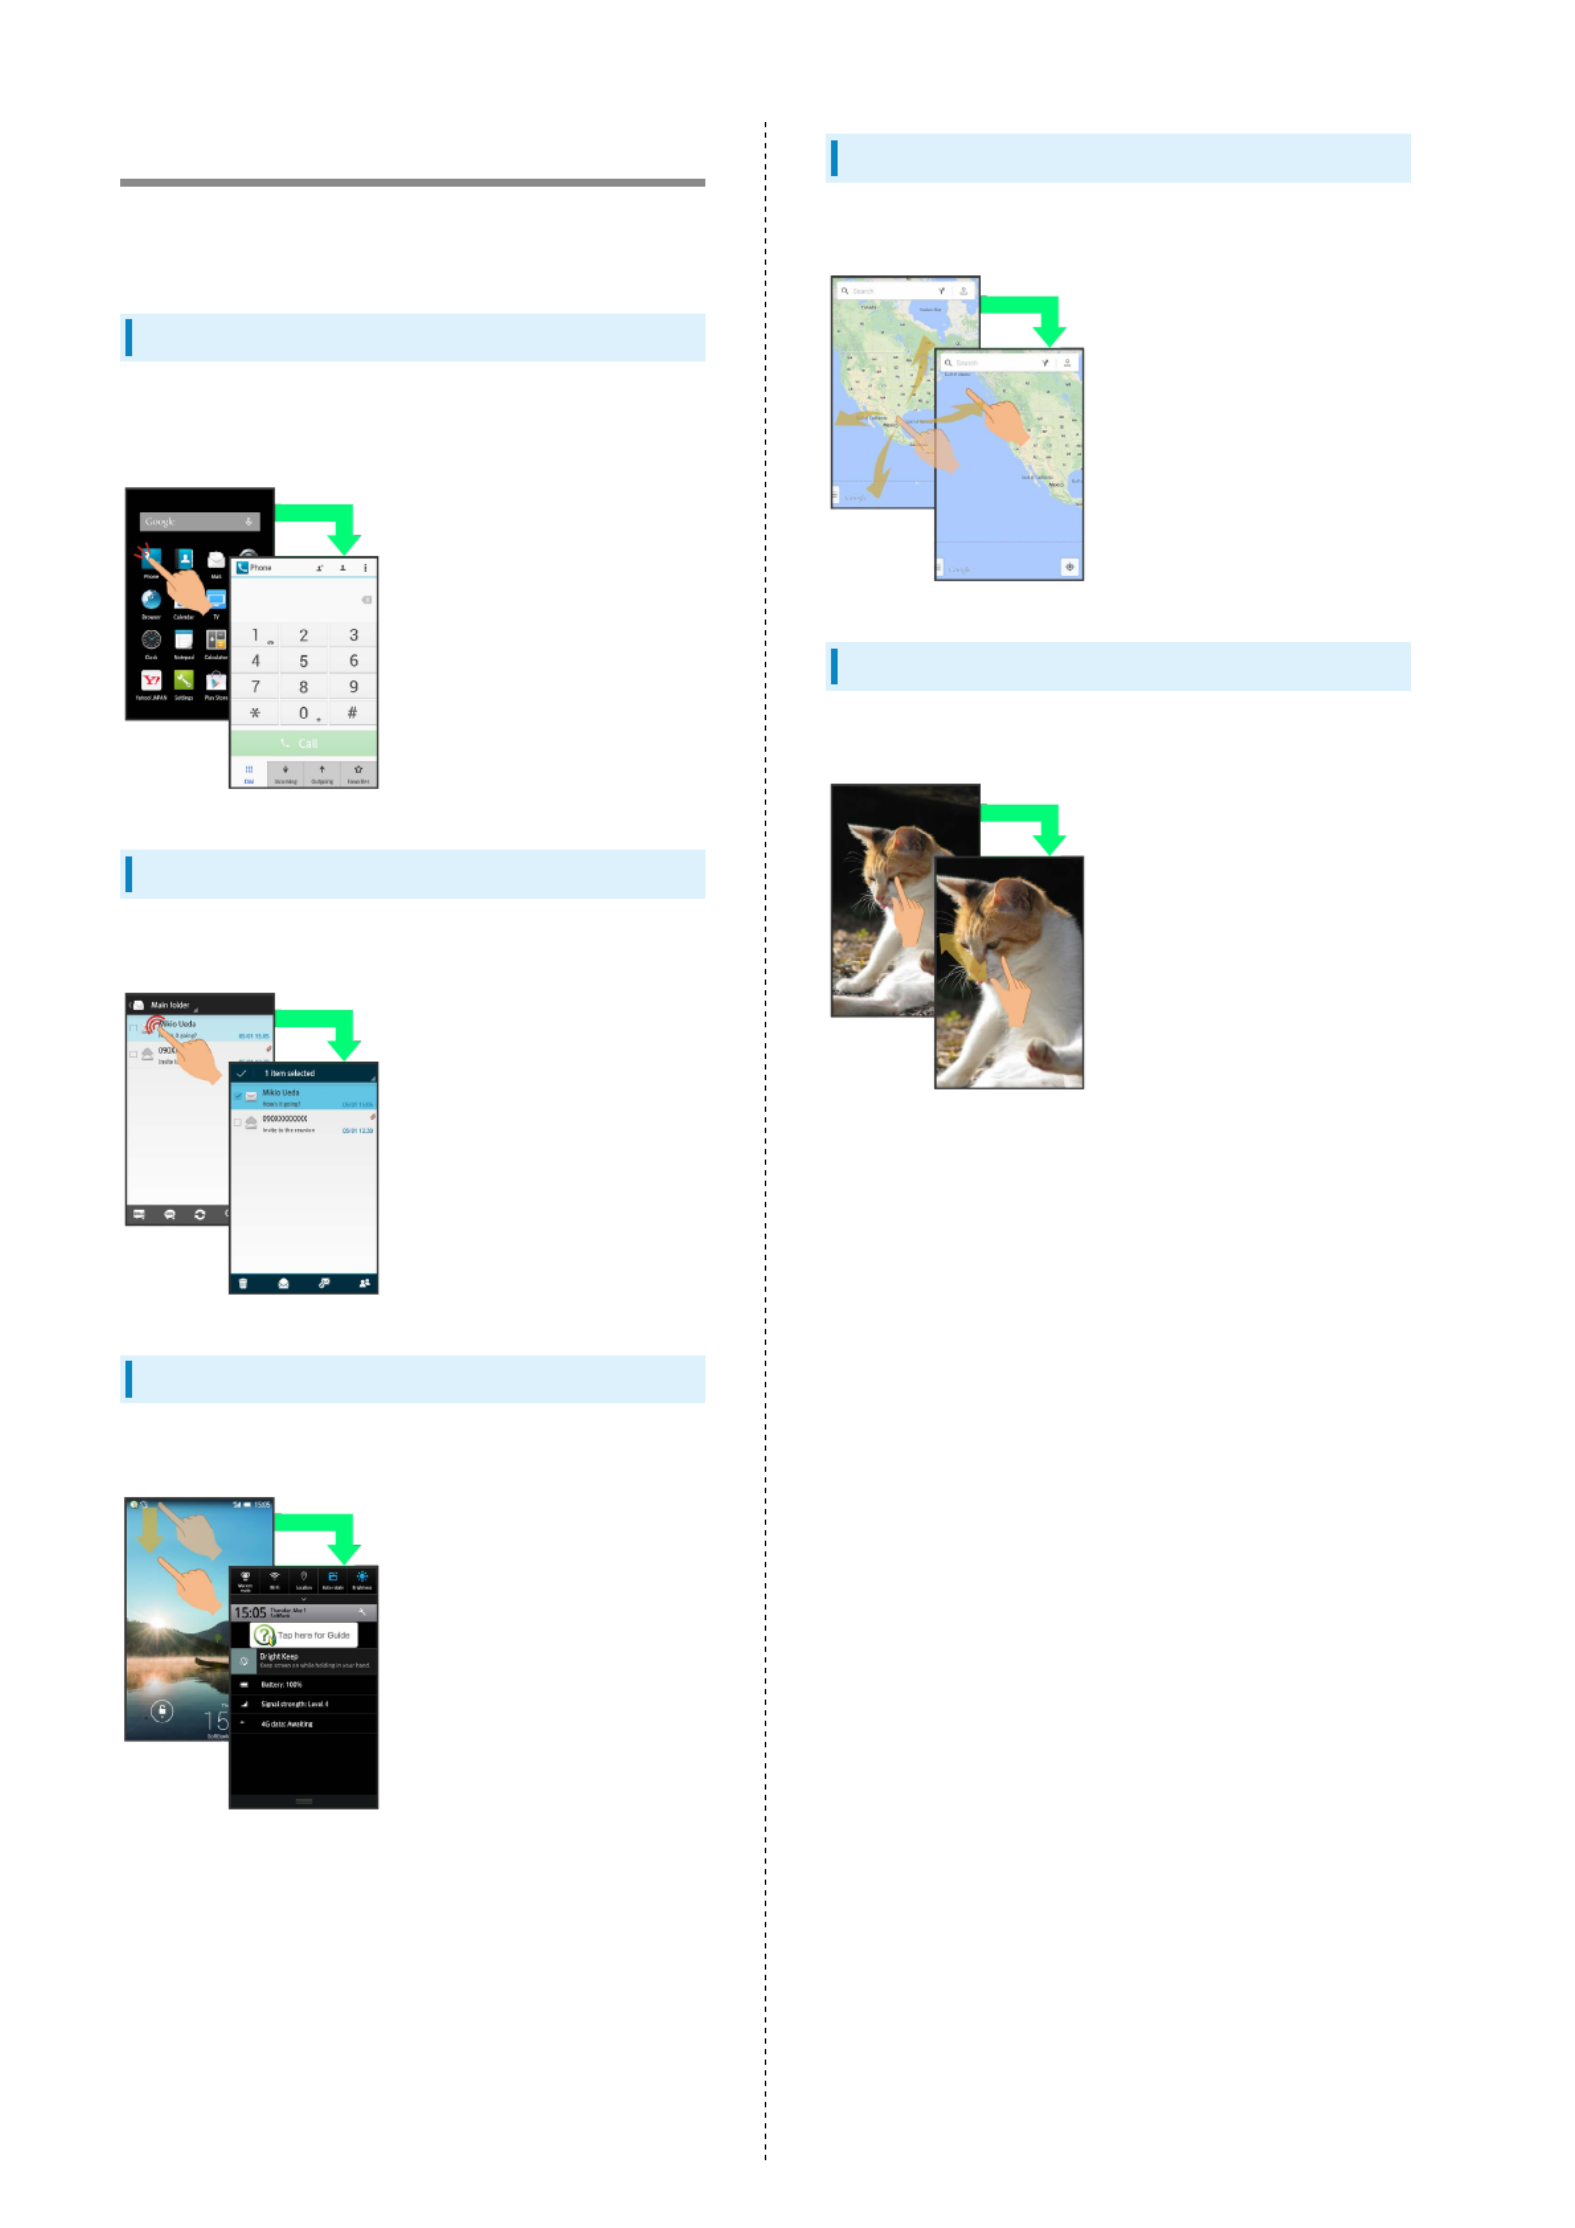
Opening Notifications Window
Drag Status Bar down
Notifications Window appears.
・To close Notifications Window, Tap .
Notifications Window Layout
Setting keys
Show second and subsequent lines of Setting keys.
Delete all notifications and close Notifications Window.
Notifications and active functions
Use corresponding functions.
Handset status1
Open Settings.
Close Notifications Window. (Flick up.)
1 Tap for corresponding settings.
Setting Keys
Set Silent mode option.
Toggle Wi-Fi on/off.
Manage use of location information.
Enable/disable Auto-rotate screen.
Set Display brightness.
Show second and subsequent lines of Setting keys.
Toggle Energy saving settings on/off.
Set Bright Keep.
Enable/disable VeilView.
Toggle Bluetooth® on/off.
Enable/disable account sync.
Open Wireless output menu.
Enable/disable Reader/Writer, P2P.
Enable/disable Airplane mode.
Hide second and subsequent lines of Setting keys.
Turn on/off Mobile Light.
Open window for customizing Setting keys.
Notifications Window Operations
Deleting Notifications
In Notifications Window, Flick notification left/right
・Some notifications may not be deleted.
Rearranging, Adding or Deleting Setting Keys
In Notifications Window, Drag icon toCustomize
rearrange, add or delete it on Action Bar
・To delete, Drag icon to unused key area (right above
Navigation Bar). To add, Drag icon from unused key area
to target location.

36
Using Quick Launcher
Activate recently used applications as well as assigned
applications, mini-applications and mini-widgets.
Opening Quick Launcher
Quick Launcher appears.
・If is set in , recentRecent applications Recent apps key
applications window appears instead. For details on Recent
apps key , see " ."Recent Apps Key Setting
Quick Launcher Layout
Activate recently used application.
Delete all history items for recently used applications.
Indicates application state. (Appears blue when
corresponding application is running.)
Show history items for recently used applications.
Show shortcuts to frequently used applications,
bookmarks, etc.
Show mini-applications and mini-widgets.
Recent Applications Window Layout
Activate application that supports the assist function.
Shortcuts to applications, bookmarks, etc.
Delete all history items for recently used applications.
Activate recently used application.
Indicates application state. (Appears blue when
corresponding application is running.)
Quick Launcher/Recent Applications
Operations
Deleting Single Usage History Item
In Quick Launcher, Flick item downHistory
・In recent applications window, Flick item left/right.
・Corresponding application exits if running.
Adding Shortcuts to Quick Launcher's Favorites
In Quick Launcher, Select itemFavorites
Changing Shortcuts in Recent Applications
Window
In recent applications window, Touch & Hold shortcut
Select Application or Shortcut Select item
・To reset shortcuts, Touch & Hold shortcut in recent
applications window .To default Yes
Deleting Shortcuts
In Quick Launcher, Touch & Hold shortcutFavorites
Peel off
・In recent applications window, Touch & Hold
shortcut .Peel off Yes
・Some applications can be uninstalled as follows; Touch &
Hold application .Delete application OK
Rearranging Shortcuts in Quick Launcher's
Favorites
In Quick Launcher, Touch & Hold shortcutFavorites
Drag to target location
37
Handset Interface SoftBank 304SH
Using Mini-Applications & Mini-
Widgets
Activating Mini-Applications/Mini-
Widgets
While using applications, watch TV (Full Seg/One Seg), play
videos, open a map, etc. in mini-application window or mini-
widget window.
・May be unavailable depending on current application window.
Quick Launcher appears.
Mini apps Tap mini-application or mini-widget
Mini-application window or mini-widget window appears.
・Follow onscreen prompts.
Mini-Application Window/Mini-Widget
Window Layout
If Operation Bar, indicators, etc. are hidden during playback,
Tap mini-application window or mini-widget window to show
them again.
・Window interface varies by application/widget.
Switch to/open standard application window.1
Application/widget name
Open menu.
Exit mini-application/mini-widget. 1
Operation Bar
Drag to change size of mini-application window/mini-
widget window.
1 Icon may be hidden if mini-application window or mini-
widget window is reduced. In this case, use menu for
corresponding operation.
Mini-Application/Mini-Widget Usage
Note
While using a mini-application or mini-widget, videos may
not play properly in other applications.

38
Customizing Feel UX Home
Set theme and Wallpaper, move icons/widgets or add
shortcuts/widgets.
Setting Theme & Wallpaper
In Feel UX Home,
Menu appears.
Home settings
Tap theme ( , or )Standard Color pop Natural
Tap image, color, pattern, etc.
Theme and Wallpaper are set.
・To select from images, Tap . Follow onscreenFrom list
prompts.
・To show/hide icon background, Tap or .Visible Invisible
・Tap to use image set in under Wallpaper Wallpaper
Wallpaper & display .
Moving Icons/Widgets
In Feel UX Home, Touch & Hold icon/widget
Drag to target location
Release to place icon/widget.
・To a folder: Drag icon to target folder.

39
Handset Interface SoftBank 304SH
Adding Shortcuts
Add an application shortcut as follows.
In Feel UX Home,
Add shortcut
Application Tap application
Shortcut is added.
Adding Widgets
Add Album, Calendar, etc. as follows.
In Feel UX Home,
Menu appears.
Add widget
Tap widget
Widget is added.
Removing Widgets/Shortcuts
In desktop sheet, Touch & Hold widget or shortcut
Peel off

40

Phone
Calling................................................................................ 42
Optional Services..............................................................43
Address Book.................................................................... 48

42
Calling
See below to dial directly or answer calls. (Handset does not
support Video Call.)
Placing Calls
In app sheet, (Phone) Dial
Call Window appears.
・When missed call window appears, Tap . If Feel UX Home
returns, perform again.
Use onscreen dialpad to enter number
・Include area code for landline numbers.
Call
Handset dials the number.
・Wait for other party to accept the call.
To end the call, End call
Call ends.
・After calls to/from numbers not saved in Address Book,
save to Address Book confirmation appears. Follow onscreen
prompts.
Answering Calls
When a call arrives, Drag downAnswer
Call connects.
・When Screen lock is canceled, Tap .Answer
To end the call, End call
Call ends.
・After calls to/from numbers not saved in Address Book,
save to Address Book confirmation appears. Follow onscreen
prompts.

43
Phone SoftBank 304SH
Emergency Location Report
Using SoftBank 3G handset for emergency calls (110, 119 or
118) automatically reports handset location to corresponding
agency (police, etc.).
・Location Report does not incur registration/transmission
fees.
・Location/signal conditions affect positioning accuracy.
Always provide location and call purpose.
・Hiding Caller ID (using 184, etc.) cancels Location Report.
However, corresponding agency may obtain location
information in life threatening situations.
・Location Report is not sent for calls made while outside
Japan.
Missed Calls
For unanswered calls, appears. In Welcome sheet (lock
screen), notification appears.
Notification Indicator
Notification
・Drag Status Bar down for Notifications Window, then Tap
missed call notification to open Incoming History. When
Call SMS and are below missed call notification, Tap
to call back or send SMS.
・Drag notification down to open Incoming History.
Emergency Call Caution
Emergency calls cannot be placed when Airplane mode is
active. Long Press Power Key and cancel it.
Optional Services
Use these SoftBank Optional Services:
Optional Services
Service Description
Call
Forwarding
Divert all/unanswered calls to a preset
number.
Voicemail
Divert all/unanswered calls to Voicemail
Center; access messages via handset/
touchtone phones.
Call Waiting 1Answer calls during a call.
Group Calling1Switch between open lines/connect
multiple lines.
Caller ID Show or hide your number when placing
calls.
Call Barring Restrict incoming/outgoing calls by
conditions.
1 Requires separate subscription

44
Call Forwarding
In app sheet, (Settings) Call
Call settings opens.
Voicemail/divert
Voicemail/divert menu appears.
Settings/stop
Divert menu appears.
Always No answer or Enter number
・For , Tap and select ring time asNo answer Wait time
needed.
・To cancel Call Forwarding, Tap Stop call forward
Yes .
OK
Call Forwarding is set.
Voicemail
In app sheet, (Settings) Call
Call settings opens.
Voicemail/divert
Voicemail/divert menu appears.
Settings/stop
Divert menu appears.
Always No answer Voicemail or
・For , Tap and select ring time asNo answer Wait time
needed.
・To cancel Voicemail, Tap .Stop call forward Yes
OK
Voicemail is set.
・When a new message is recorded, appears. To play
messages, Tap in Voicemail/divert menu,Play voicemail
then follow voice guidance.

45
Phone SoftBank 304SH
Call Waiting
Requires separate subscription.
In app sheet, (Settings) Call
Call settings opens.
Other service settings
Other service settings opens.
Call waiting ( )
Call waiting is set.
・During a call, a tone sounds for incoming calls;
Drag right to answer.
・To cancel Call Waiting, Tap ( ).Call waiting
Group Calling
Requires separate subscription.
During a call, Add Call
Enter number Call
When call connects, Merge calls
Group Calling starts.
Caller ID
In app sheet, (Settings) Call
Call settings opens.
Other service settings
Other service settings opens.
Notify caller ID Hide number Show number or
Caller ID is set.

46
Call Barring
Restrict outgoing/incoming calls and SMS messages.
・Call Barring requires Center Access Code (Call Barring
Password).
・Call Barring settings will be locked if incorrect Center
Access Code (Call Barring Password) is entered three times
consecutively when making a setting. To unlock, the code
must be changed. For details, contact SoftBank Customer
Support, .General Information
・If Call Barring Password has been previously changed on a
mobile phone, enter the latest code to set Call Barring.
・When attempting to place/send a call/SMS while calling is
restricted, a message appears. Message may take time to
appear in some areas.
Restriction Description
All outgoing
calls Restrict all outgoing calls.
Bar int'l call
Restrict international calls; while outside
Japan, calls within current country are
allowed.
Local & home
only
Restrict international calls; while outside
Japan, calls within current country and to
Japan are allowed.
Restrict all
incomings Reject all calls.
Bar if abroad Reject calls while outside Japan.
In app sheet, (Settings) Call
Call settings opens.
Call barring
Call barring menu appears.
Bar outgoing calls Bar incoming calls or Tap option
Enter Center Access Code (Call Barring Password) OK
Restriction is set.

47
Phone SoftBank 304SH
Optional Services Operations
Setting Missed Call Notification
Activate this function for records of calls missed when
handset is off/out-of-range. Initiate Voicemail then follow
these steps:
In Call settings, Missed calls Settings Call
Follow voice guidance
Setting Handset Response to Missed Calls
In Call settings, Missed calls Sounds & alerts
Tap item Follow onscreen prompts
・Set Missed calls sound, Vibration pattern, Incoming calls
lamp and Ring duration.
Canceling All Outgoing Call Restrictions
In Call barring menu, Bar outgoing calls Stop all
outgoing calls Enter Center Access Code (Call Barring
Password) OK
Canceling All Incoming Call Restrictions
In Call barring menu, Bar incoming calls Stop all
incoming calls Enter Center Access Code (Call Barring
Password) OK
Restricting Outgoing Calls to Specified
Numbers
In Call barring menu, EnterRestrict destinations
Operation Password OK Specified phone number
Switch on/off Call permitted list ( )
<Empty> OKEnter number
Restricting Outgoing Calls to Numbers Saved in
Address Book
In Call barring menu, EnterRestrict destinations
Operation Password OK Restrict address book
( )
Rejecting Calls from Specified Numbers
In Call barring menu, Reject call Specified numbers
Switch on/off Reject numbers list ( )
<Empty> OKEnter number
Rejecting Calls from Numbers Not Saved in
Address Book
In Call barring menu, Reject call Not registered
numbers ( )
Rejecting Calls with No/Undisplayable Caller ID
or from Payphones
In Call barring menu, ,Reject call Number not sent
Payphone Unavailable or ( )
48
Address Book
Save phone numbers and e-mail addresses as well as birthdays,
nicknames, etc.
Set ringtones for each contact as needed.
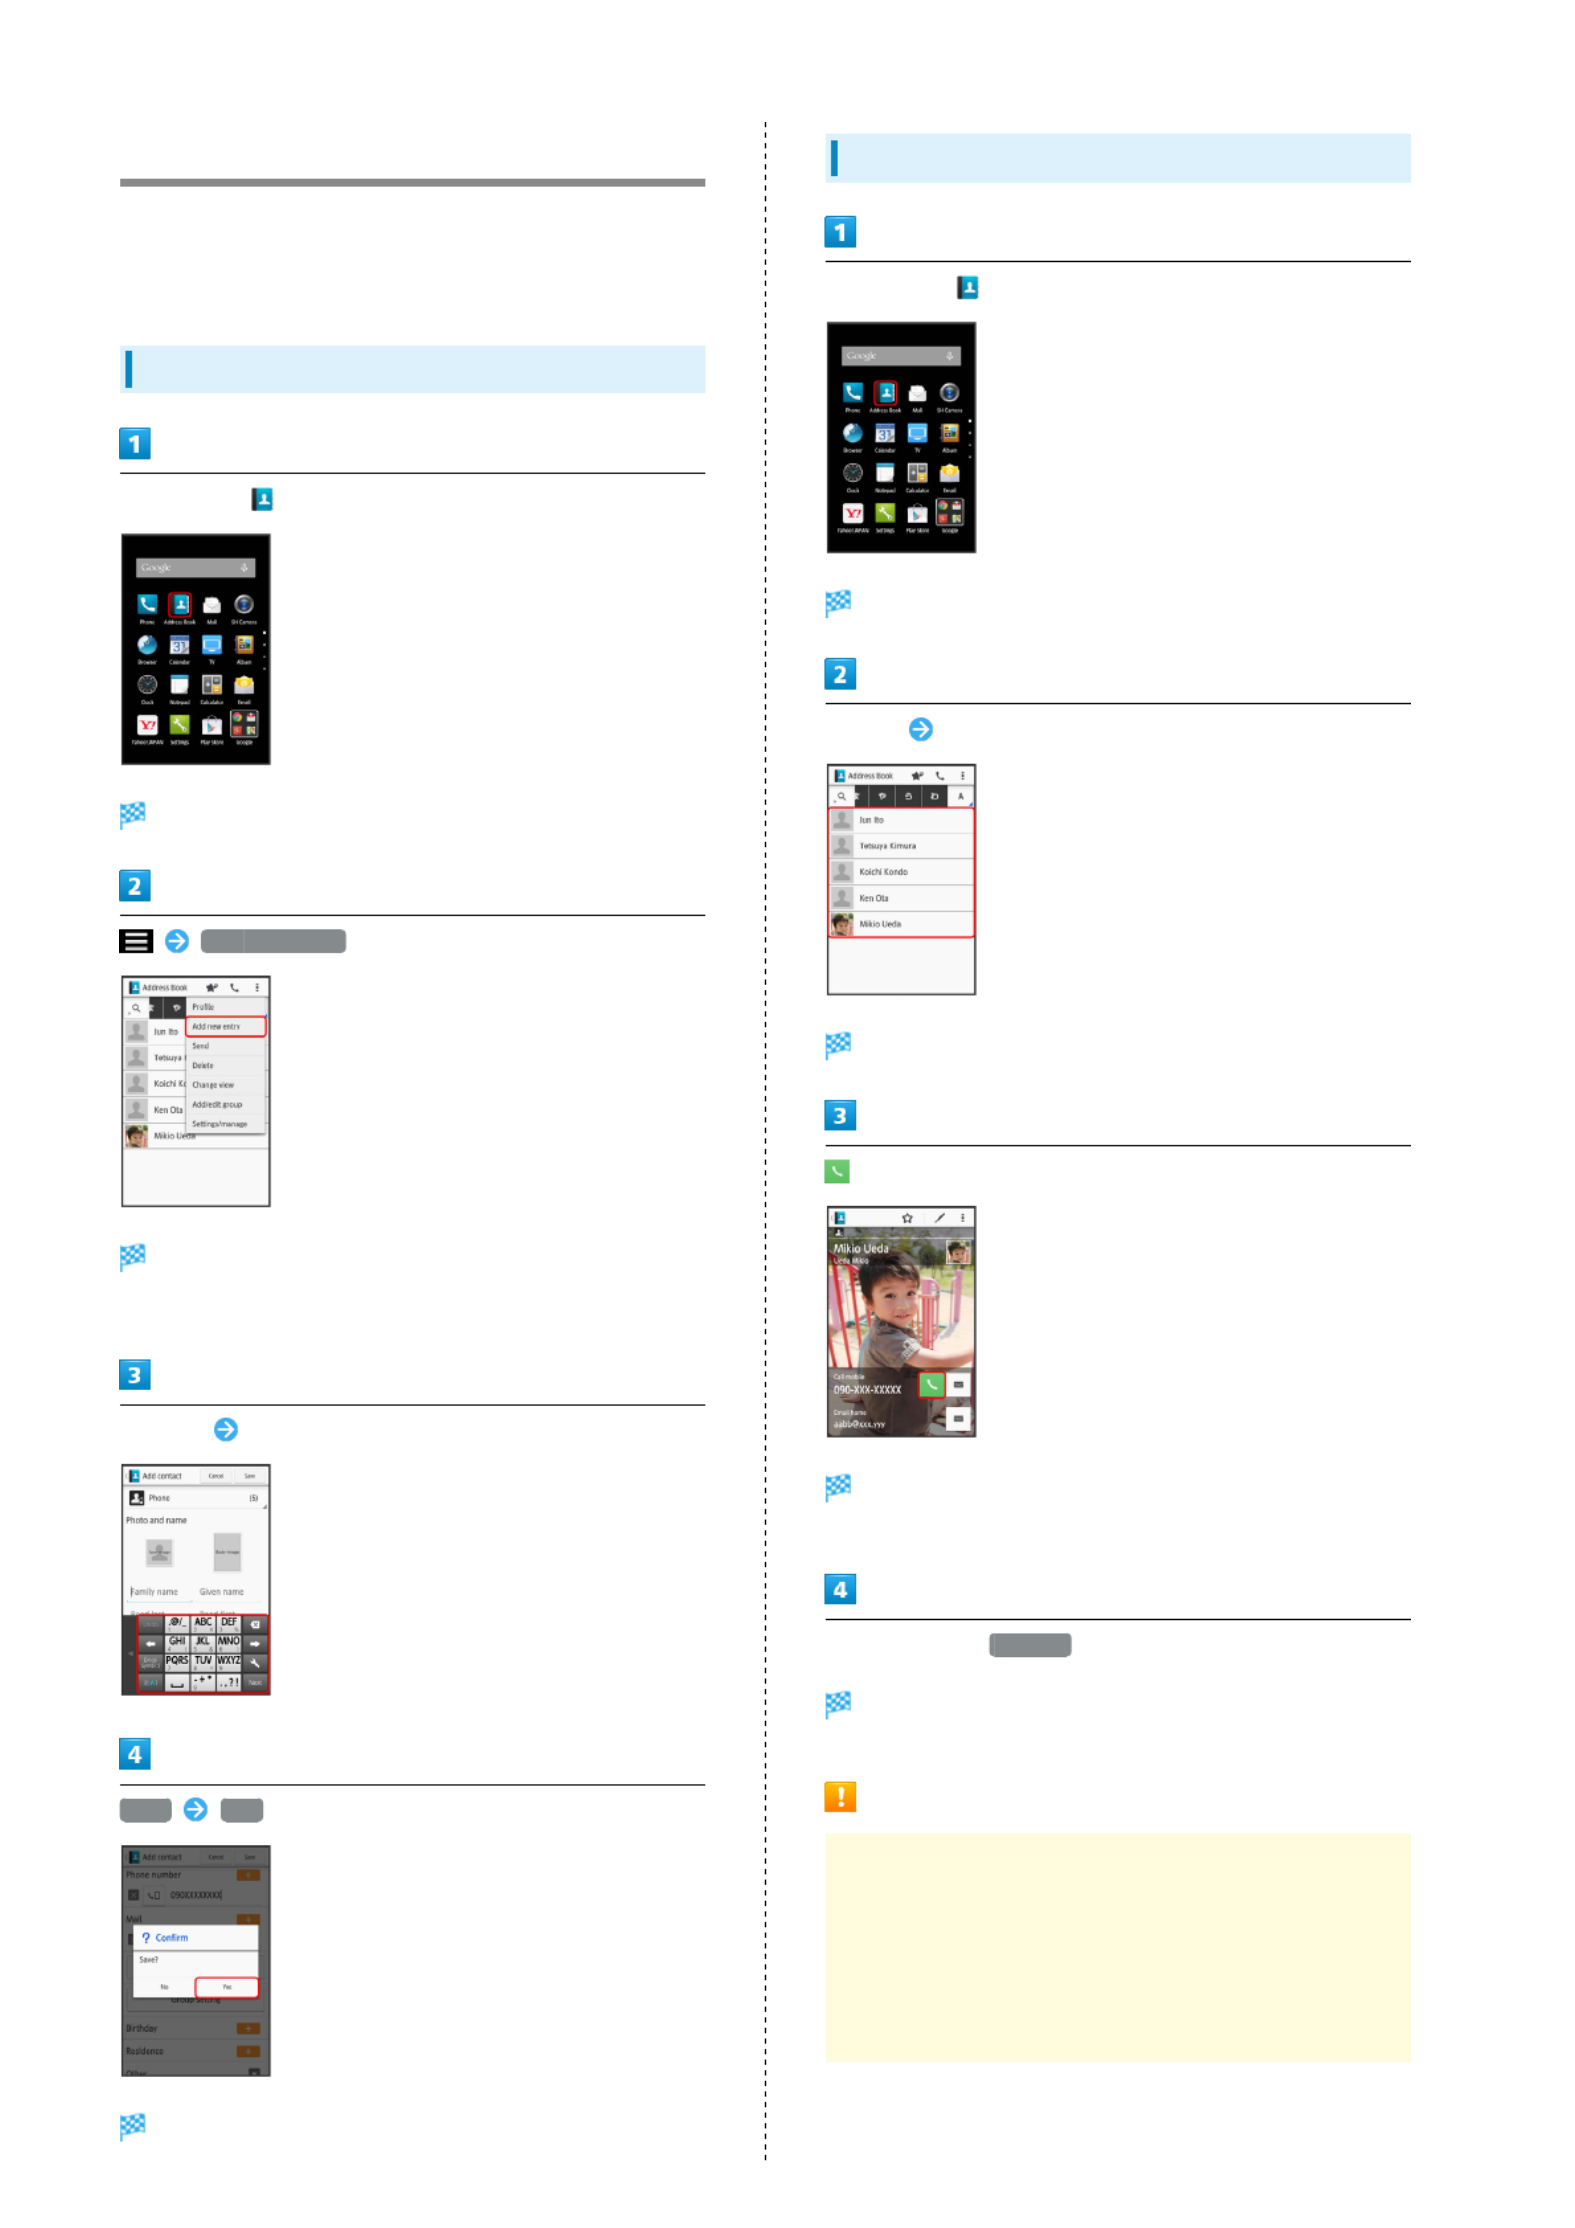
Adding New Contacts
In app sheet, (Address Book)
Address Book opens.
Add new entry
Add contact window appears.
・If confirmation appears, follow onscreen prompts.
Tap item Complete entry
Save Yes
Contact is saved.
Dialing from Address Book
In app sheet, (Address Book)
Address Book opens.
Tap tab Tap contact
Contact opens.
Handset dials the number. Wait for other party to accept
the call.
To end the call, End call
Call ends.
Address Book Caution
Contacts may be altered/lost if handset is left uncharged
or due to accidents, malfunctions, repairs, handset
upgrade/replacement, mishandling, etc. Back up important
contacts and other data regularly. SoftBank Mobile Corp. is
not liable for any damages resulting from loss/alteration
of contacts.

Messaging & Browser
Messaging.......................................................................... 50
Setting at Initial Mail Startup........................................50
Sending S! Mail/SMS.........................................................51
Opening & Replying to S! Mail/SMS................................53
Opening Received S! Mail/SMS........................................ 54
Creating/Sending Gmail....................................................55
Opening Received Gmail................................................... 56
Using Internet Mail.......................................................... 57
Web Browsing (Browser).................................................. 59

50
Messaging
S! Mail
Exchange messages with S! Mail-compatible SoftBank handsets
and e-mail compatible devices (other mobiles, PCs, etc.)
beyond SMS character entry limit; attach media files.
SMS
Exchange short messages (up to 160 single-byte characters)
using handset numbers as addresses.
Gmail
Gmail is Google's webmail service. Handset automatically syncs
with Gmail.
Internet Mail
Use Internet Mail (POP3/IMAP4) on handset.
・Set up an Internet Mail account beforehand.
・Sending/receiving Internet Mail on handset syncs handset
and mail server; sent/received messages (in the POP
protocol, received messages only) are also accessible from
PCs.
Setting at Initial Mail Startup
S! Mail Initial Setup
When activating Mail for the first time, complete setup to
send/receive S! Mail using Wi-Fi.
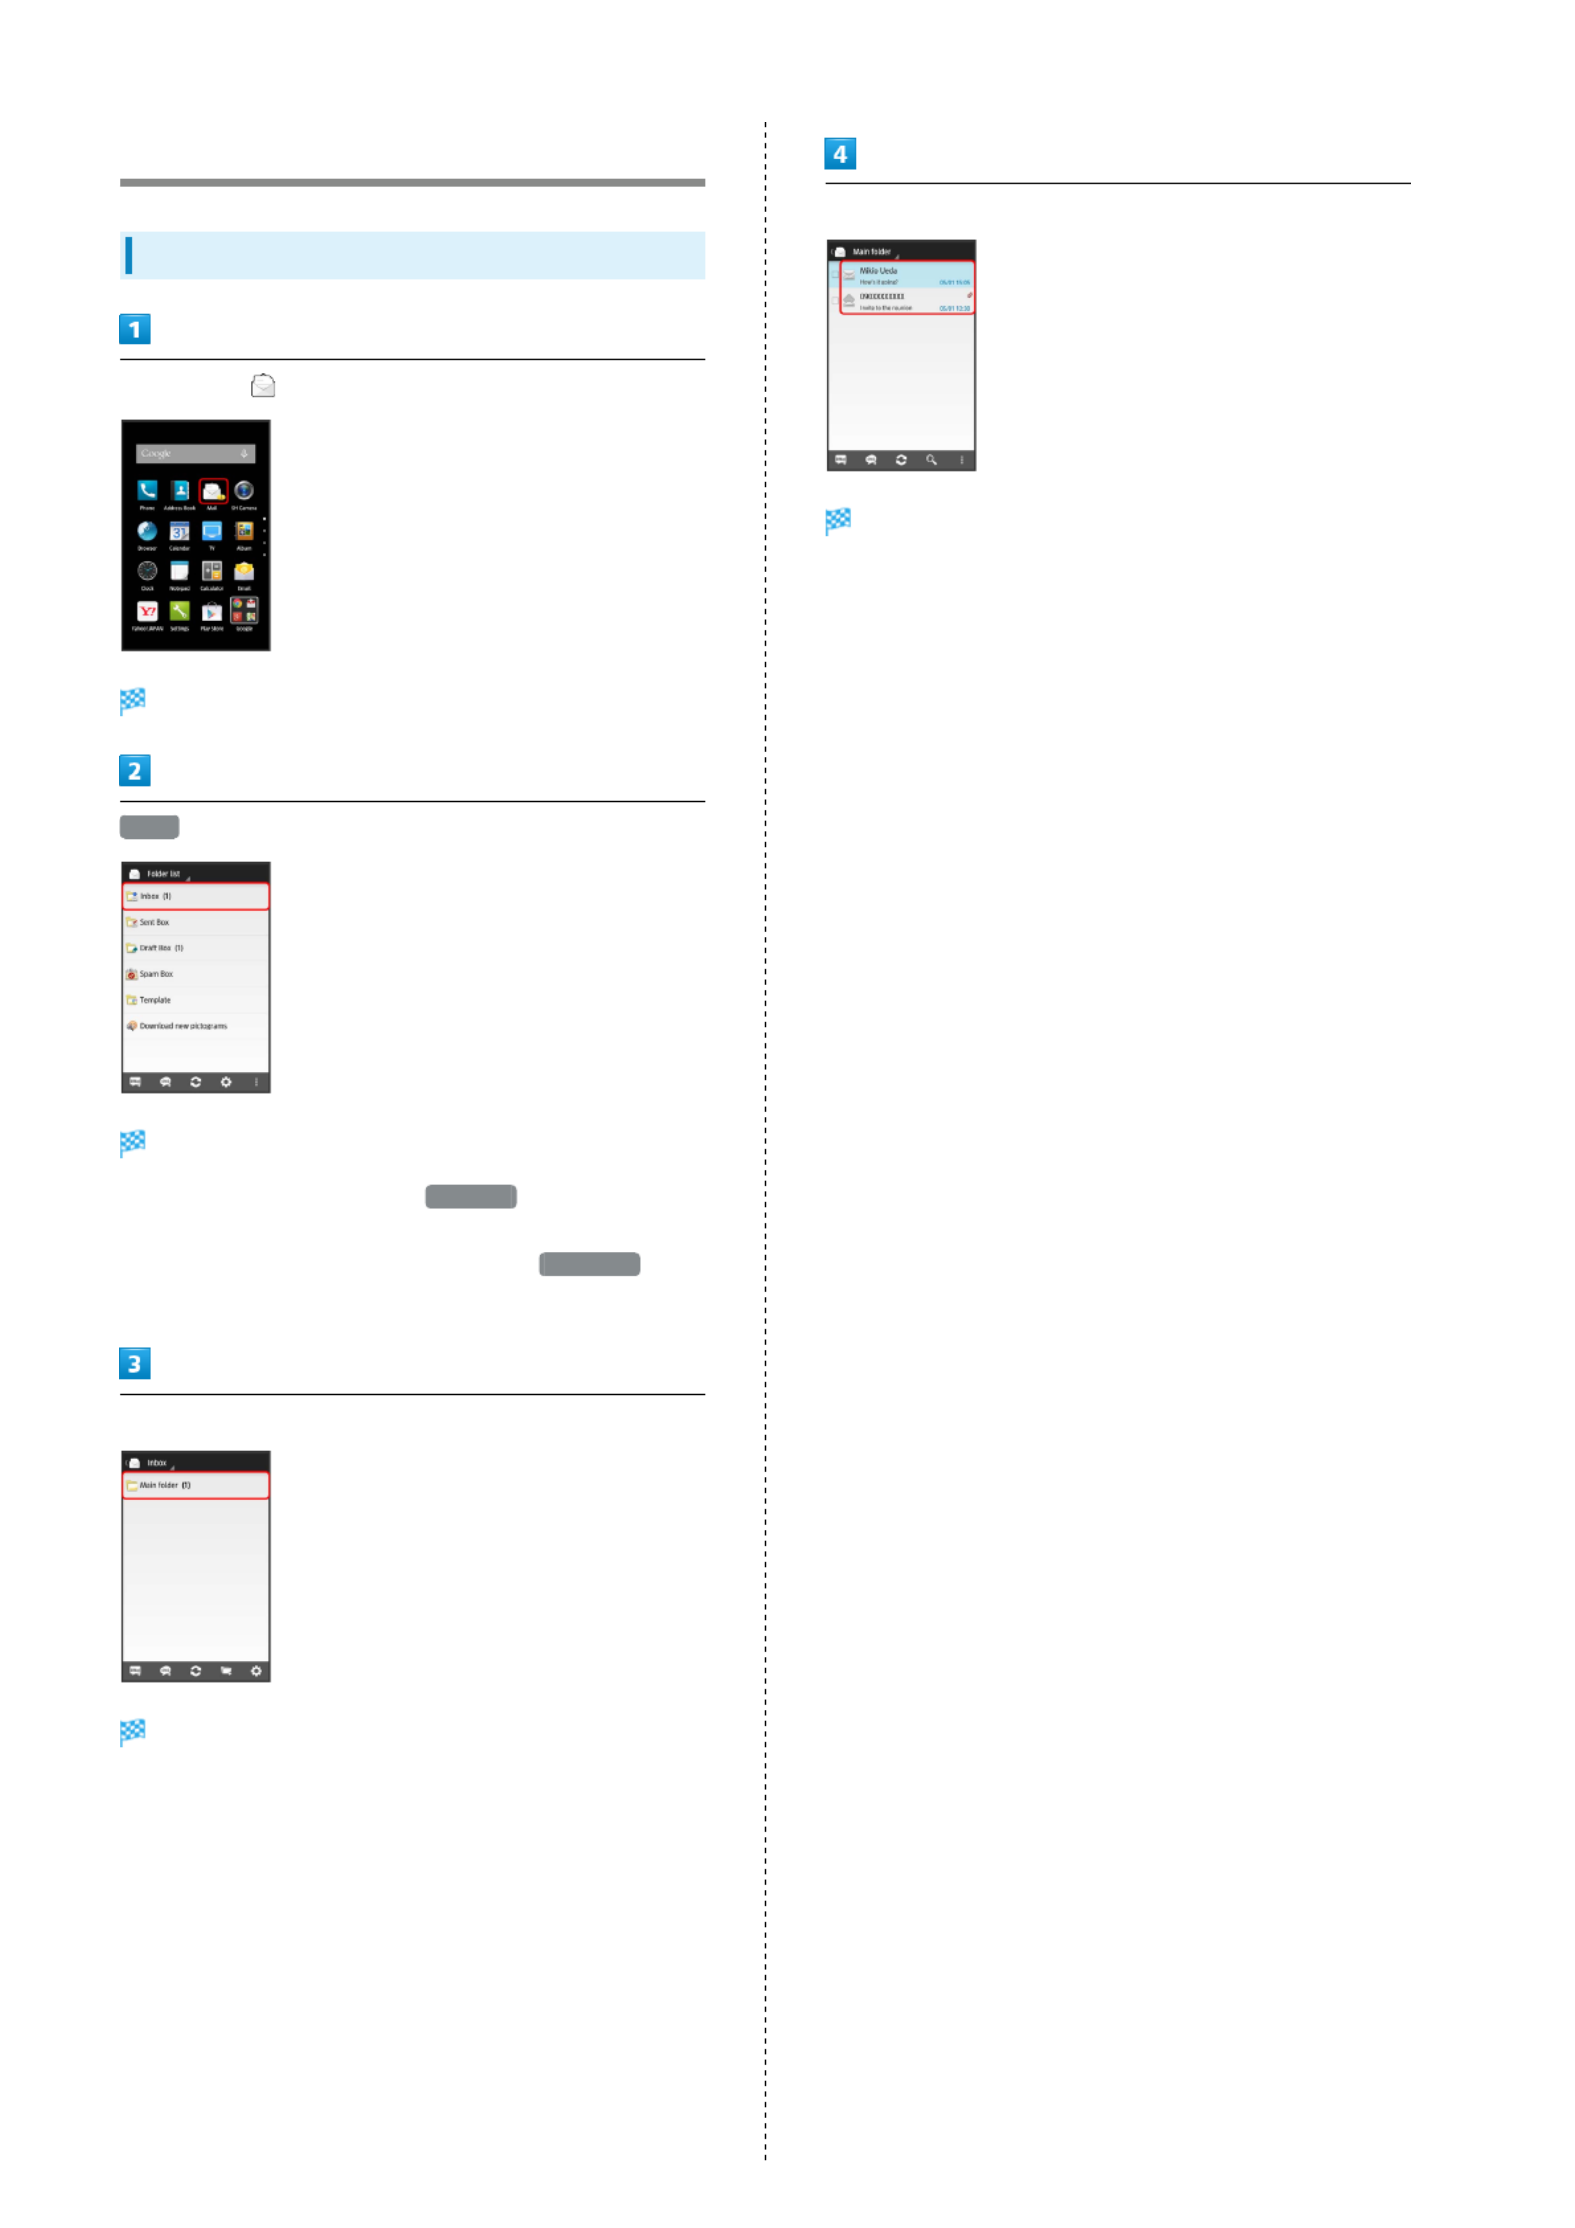
In app sheet, (Mail)
Setup to Wi-Fi connection window appears.
Set Now
Wi-Fi connection setup is complete and folder list appears.
・To perform setup later, Tap .Set Later
Completing Wi-Fi Connection Setup for
S! Mail via Menu Items
If you Tap at initial startup, complete setupSet Later
to send/receive S! Mail using Wi-Fi as follows.
In folder list, Send/Receive Settings Wi-Fi
Connection
Cautions for Sending/Receiving S! Mail
Using Wi-Fi
International S! Mail Transmission Fees
Transmission fees apply when sending international S! Mail
messages even if Wi-Fi is in use.
S! Mail Reception while Display is Completely
Dark (Screen Lock Active)
To receive S! Mail messages using Wi-Fi even when Display
is completely dark (Screen lock active), disable Wi-Fi sleep
policy in Wi-Fi settings.

51
Messaging & Browser SoftBank 304SH
Sending S! Mail/SMS
Sending S! Mail
In app sheet, (Mail)
・Alternatively, enter phone number or e-mail address in
Recipient field directly.
Select recipient (phone number or e-mail address) OK
・Tap , or Phonebook Outgoing History Incoming
History to select recipient from Address Book, Outgoing
History or Incoming History, respectively.
・After setting recipient, Tap to check recipient's
phone number/e-mail address or set recipient to Cc/Bcc.
・To delete recipient, Tap then Tap .
Tap Subject field Enter subject
Tap Compose email field Enter text
SEND
Send
S! Mail is sent.
・Failed S! Mail message is saved as a draft.

52
Sending SMS
In app sheet, (Mail)
・Alternatively, enter phone number in Recipient field directly.
Tap recipient (phone number)
・Tap , or Phonebook Outgoing History Incoming
History to select recipient from Address Book, Outgoing
History or Incoming History, respectively.
・After setting recipient, Tap to check recipient's
phone number.
・To delete recipient, Tap then Tap .
Tap Compose SMS field Enter text
SEND
Send
SMS is sent.
・Failed SMS message is saved as a draft.
About Drafts
When is Tapped while creating S! Mail or SMS,
confirmation appears asking whether to save the message
as a draft. Follow onscreen prompts.
Drafts are saved to in folder list. Open aDraft Box
draft to edit and send it.
54
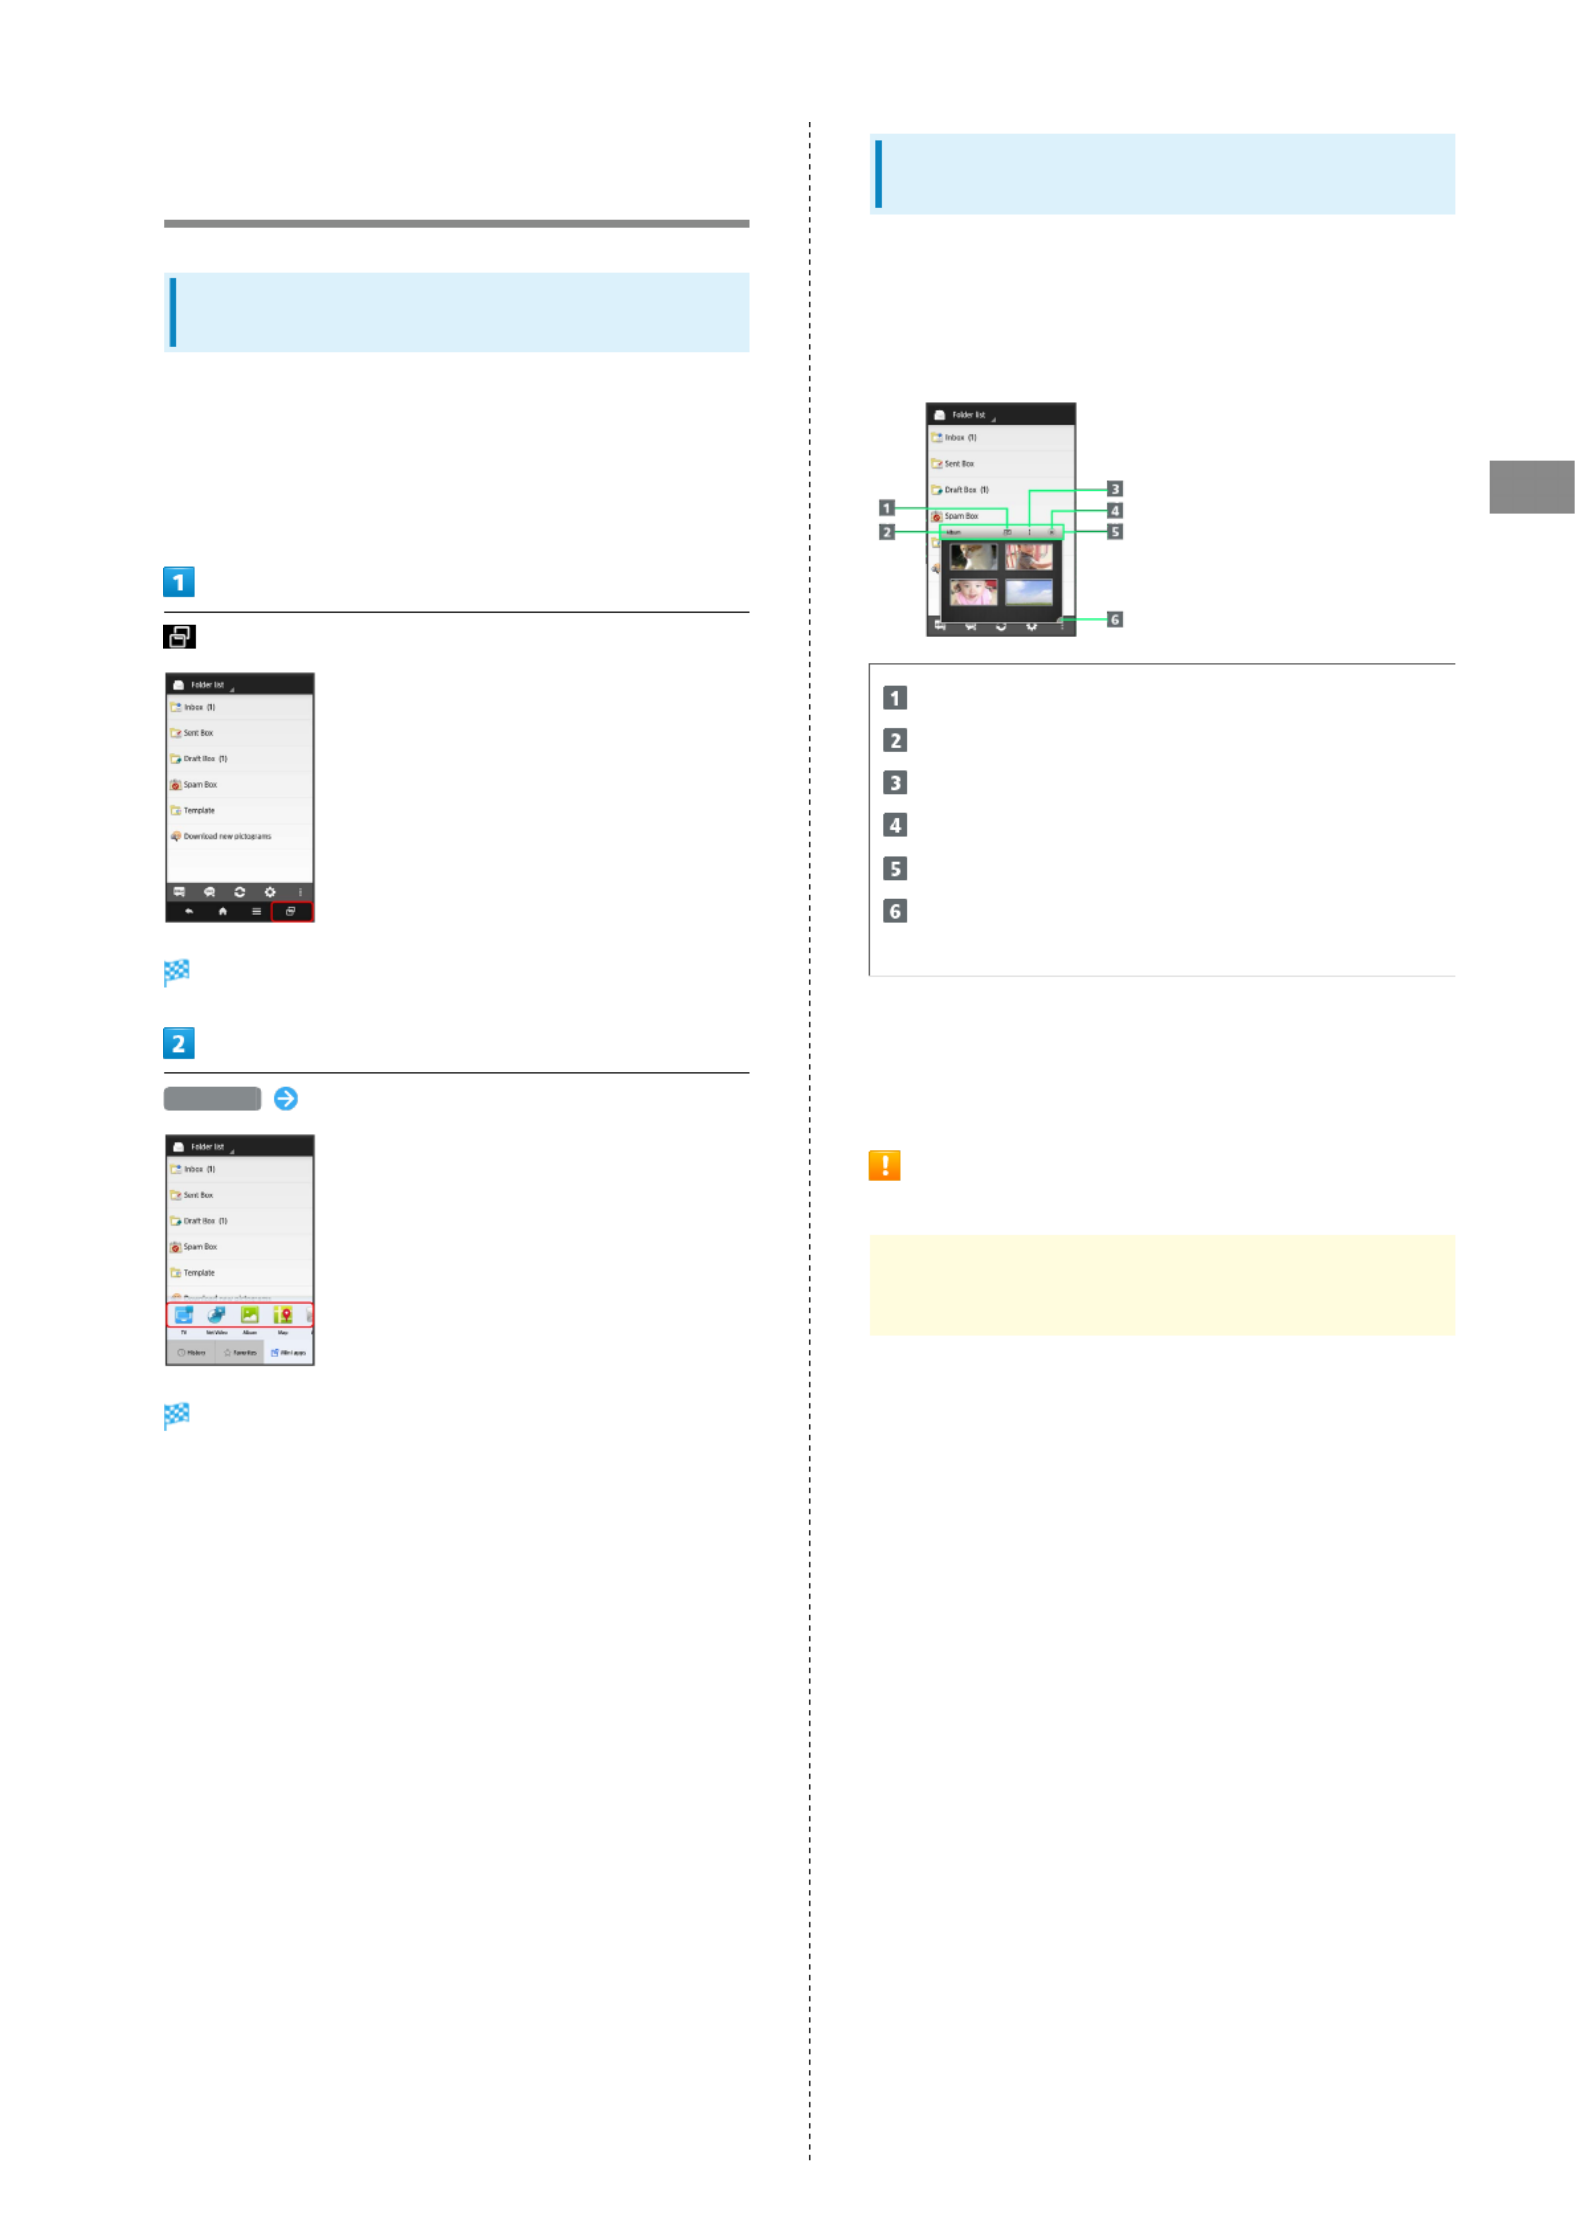
Opening Received S! Mail/SMS
Opening S! Mail/SMS
In app sheet, (Mail)
Folder list appears.
Inbox
Subfolder list appears.
・To access sent messages, Tap ; sent S! Mail/SMSSent Box
message list appears.
・To access drafts or unsent messages, Tap ;Draft Box
draft/unsent S! Mail/SMS message list appears.
Tap folder
S! Mail/SMS message list appears.
Tap message
S! Mail/SMS message window appears.

55
Messaging & Browser SoftBank 304SH
Creating/Sending Gmail
Use Google's webmail service. Sign in to a Google Account
beforehand.
Creating/Sending Gmail
In app sheet, (Google) (Gmail)
Inbox opens.
・If confirmation appears, follow onscreen prompts.
Mail Composition window appears.
Enter recipient, subject and text on Action Bar
Message is sent.
Gmail Composition Operations
Adding Cc/Bcc Recipients
In Mail Composition window, Add Cc/Bcc
Add recipient
Attaching Files
In Mail Composition window, TapAttach file
application Select file
・If confirmation appears, follow onscreen prompts.
Saving without Sending
While creating message, Save draft
・Message is saved as a draft.
Discarding Current Message
While creating message, Discard Discard
Gmail Caution
Gmail messages are not received if recipient device is set
to reject messages sent from PCs.

57
Messaging & Browser SoftBank 304SH
Using Internet Mail
Adding Accounts
Check usernames (user IDs), passwords, server names, etc. of
your Internet Mail account beforehand.
In app sheet, (Email)
Account setup menu appears (if no account is set up).
Follow onscreen prompts to set up account
Internet Mail setup is complete.
Creating/Sending Internet Mail
In app sheet, (Email)
Inbox opens.
Mail Composition window appears.
Enter recipient, subject and text
Message is sent.
58
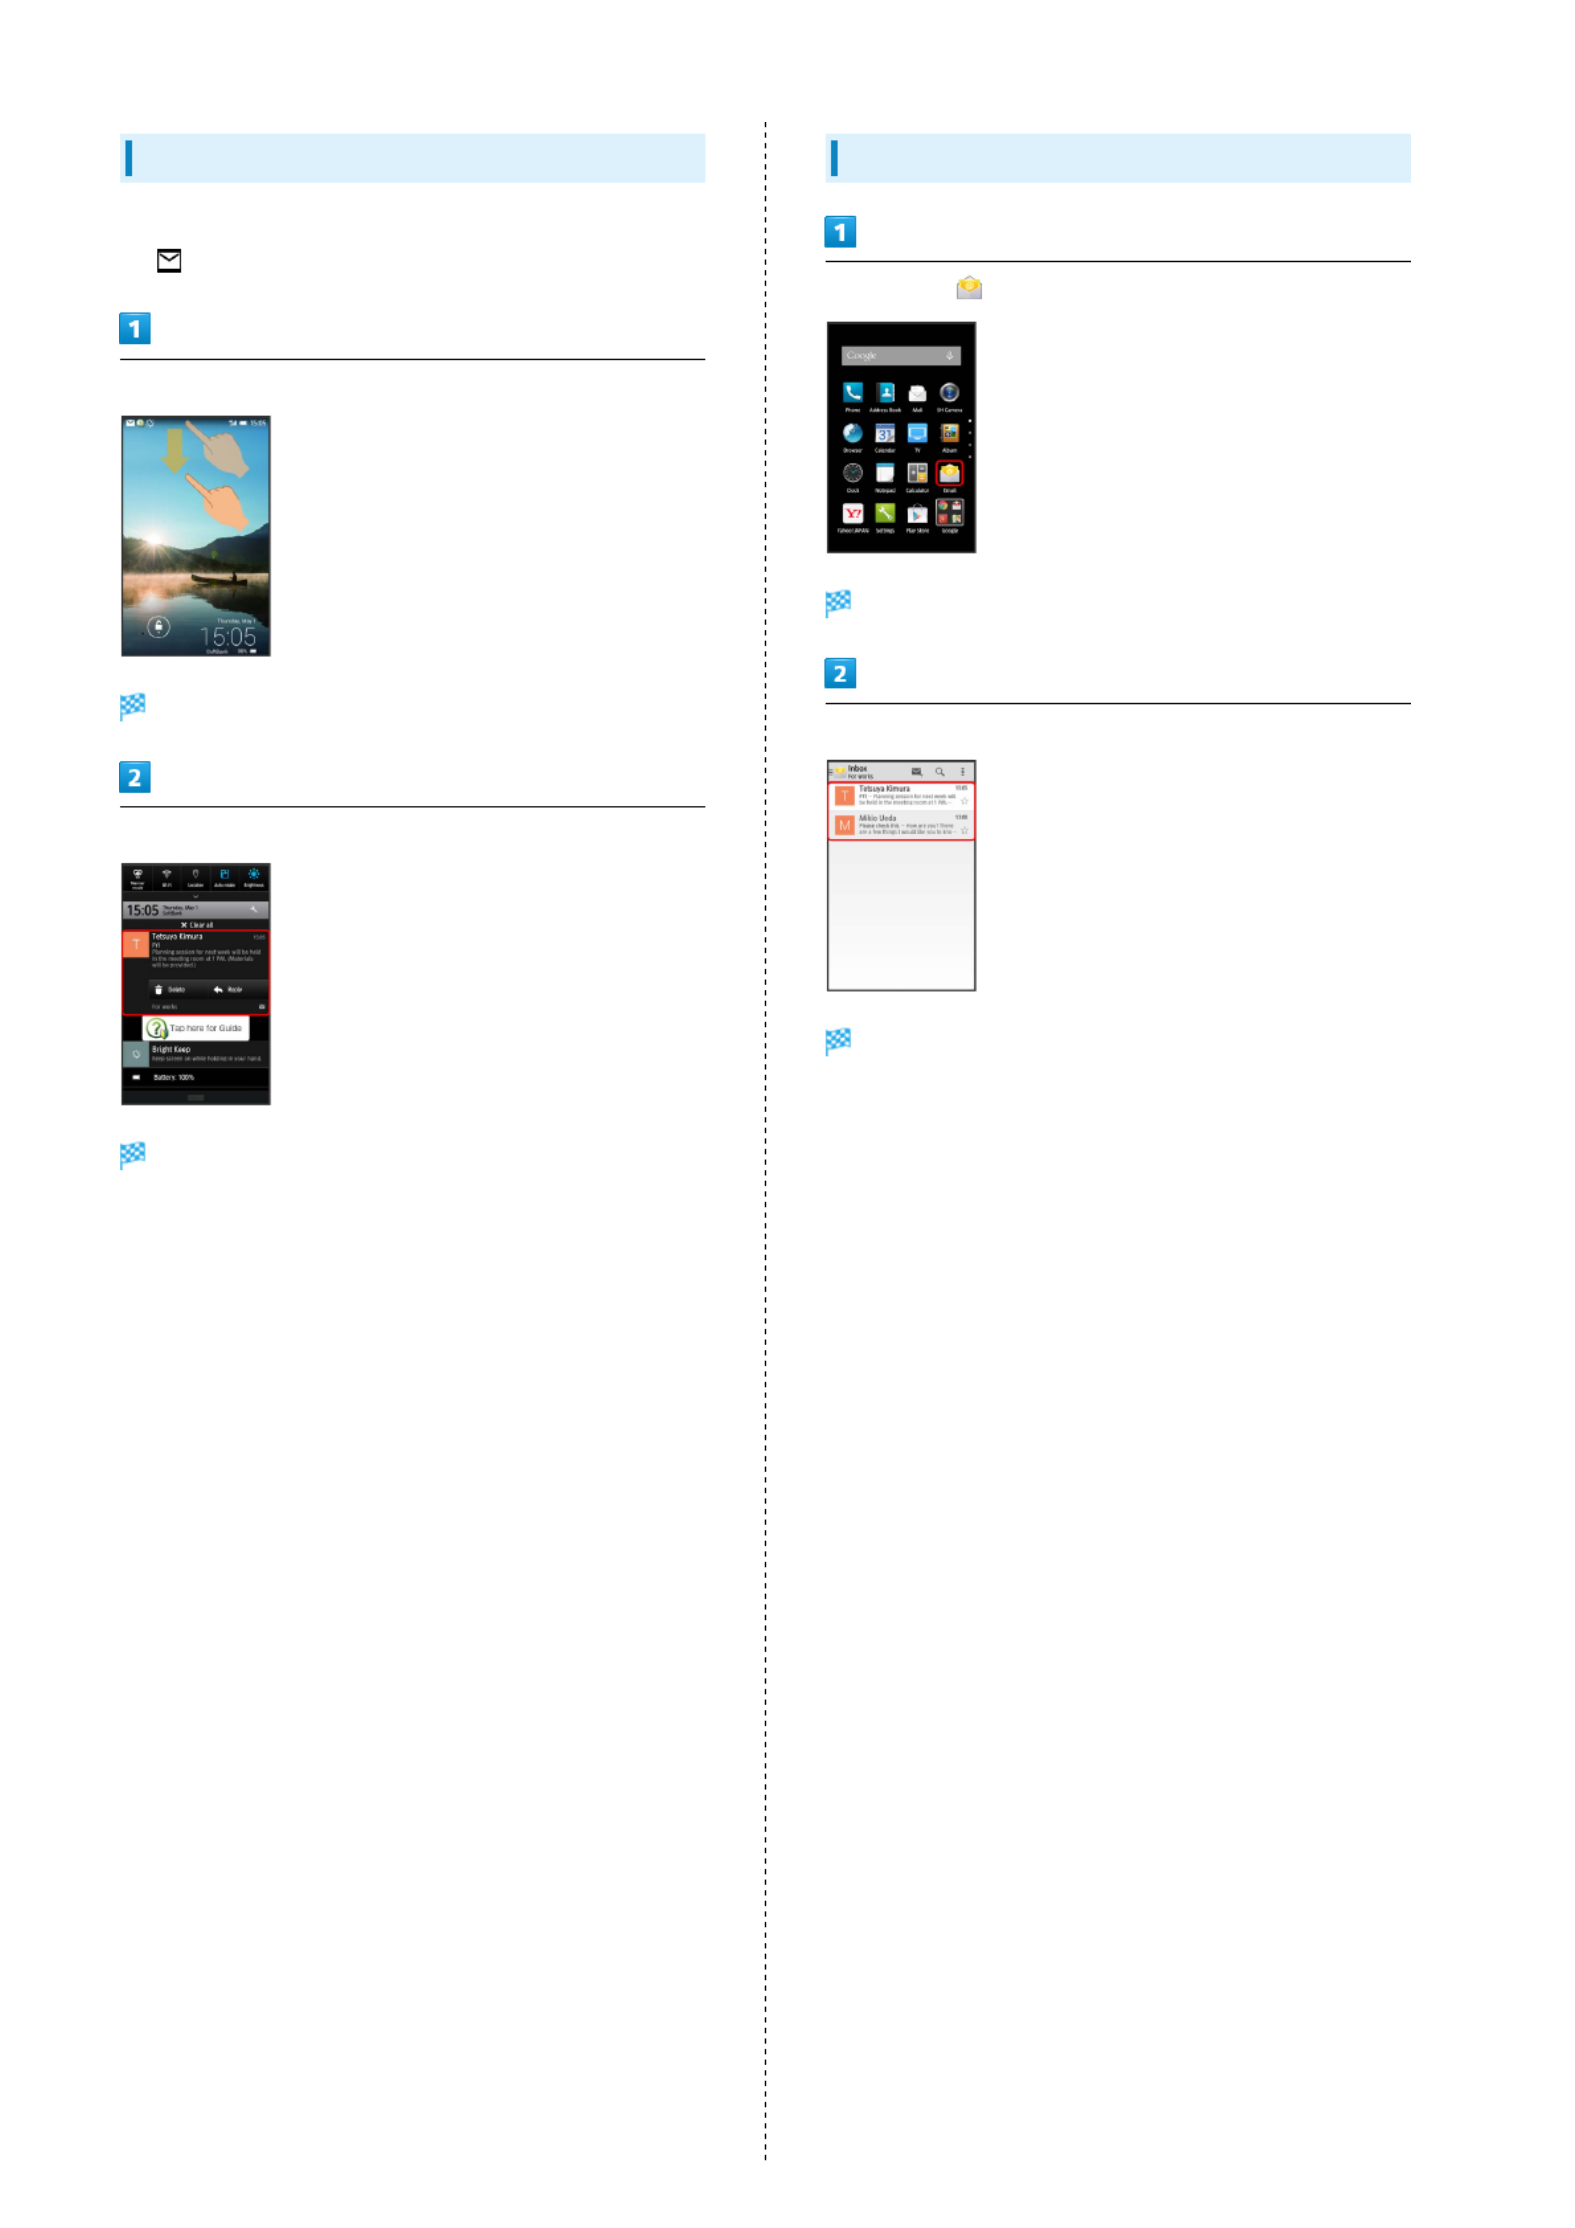
Opening New Internet Mail
When Internet Mail message arrives, ringtone plays
and appears.
Drag Status Bar down for Notifications Window
Notifications Window appears.
Tap new Internet Mail notification
Message window appears.
・For two or more new messages, Inbox opens; select one.
Opening Internet Mail
In app sheet, (Email)
Inbox opens.
Tap message
Message window appears.

59
Messaging & Browser SoftBank 304SH
Web Browsing (Browser)
View Internet sites in Browser.
Using Browser
By default, Quick toolbox guidance appears when activating
Browser.
・To disable it thereafter, Tap ( ) andDon't show again
Tap .Close
In app sheet, (Browser)
Browser activates.
・Flick to scroll.
Adding Bookmarks
In app sheet, (Browser)
Browser activates.
Open target webpage Add bookmark
Add bookmark window appears.
Check/edit label, URL, etc. OK
Current webpage is saved as a bookmark.

60
Opening Bookmarks
In app sheet, (Browser)
Browser activates.
Bookmark list
Bookmark window appears.
Tap bookmark
Corresponding webpage opens.
Using History
In app sheet, (Browser)
Browser activates.
Bookmark list
Bookmark window appears.
HISTORY
History list appears.
Tap item (e.g., ) Tap recordToday
Corresponding webpage opens.
・Frequently visited webpages are saved in .Most visited

61
Messaging & Browser SoftBank 304SH
Opening New Tabs
Open up to 16 webpages in different tabs to switch between
them easily.
In app sheet, (Browser)
Browser activates.
New tab
Another tab opens.
・When multiple tabs are open, Tap Tab list
to open another tab.
・To switch tabs, Tap in Browser, then TapTab list
target tab.
SSL & TLS
Secure Sockets Layer (SSL) and Transport Layer Security
(TLS) are encryption protocols that secure Internet
transmissions of important/sensitive information such
as credit card numbers and corporate secrets, providing
protection against online threats (eavesdropping,
falsification, impersonation, etc.).
Browser Operations
Signing in to My SoftBank
Access My SoftBank to check service charges or reward
points, change contract details (subscribed price plan,
optional services, etc.), check handset e-mail address, use
anti-spam settings, etc.
In Browser, Bookmark list My SoftBank
Follow onscreen prompts
Searching for Information
In Browser, Tap URL entry field Enter search text
Go Tap link
Editing Bookmarks
In Browser, Touch & HoldBookmark list
bookmark EditEdit or move bookmark OK
Deleting Bookmarks
In Browser, Touch & HoldBookmark list
bookmark Delete bookmark Yes
Searching within Current Webpage
In Browser, Enter search textFind on page
Search results are highlighted.
SSL/TLS Caution
When a security notice appears upon opening a webpage,
subscribers must decide for themselves whether or not
to open the page. Opening secure pages constitutes
agreement to the terms of SSL/TLS usage. SoftBank Mobile
Corp., Sharp Corporation, Symantec Website Security G.K.
and Cybertrust cannot be held liable for any damages
associated with the use of SSL/TLS.

62

Camera
Photo Camera.................................................................... 64
Video Camera.................................................................... 65
64
Photo Camera
Photo Camera
Capture JPEG images.
・Captured photos are saved to handset memory by default.
・To capture photos with a blurred background quickly,
capture close-ups with set.Macro
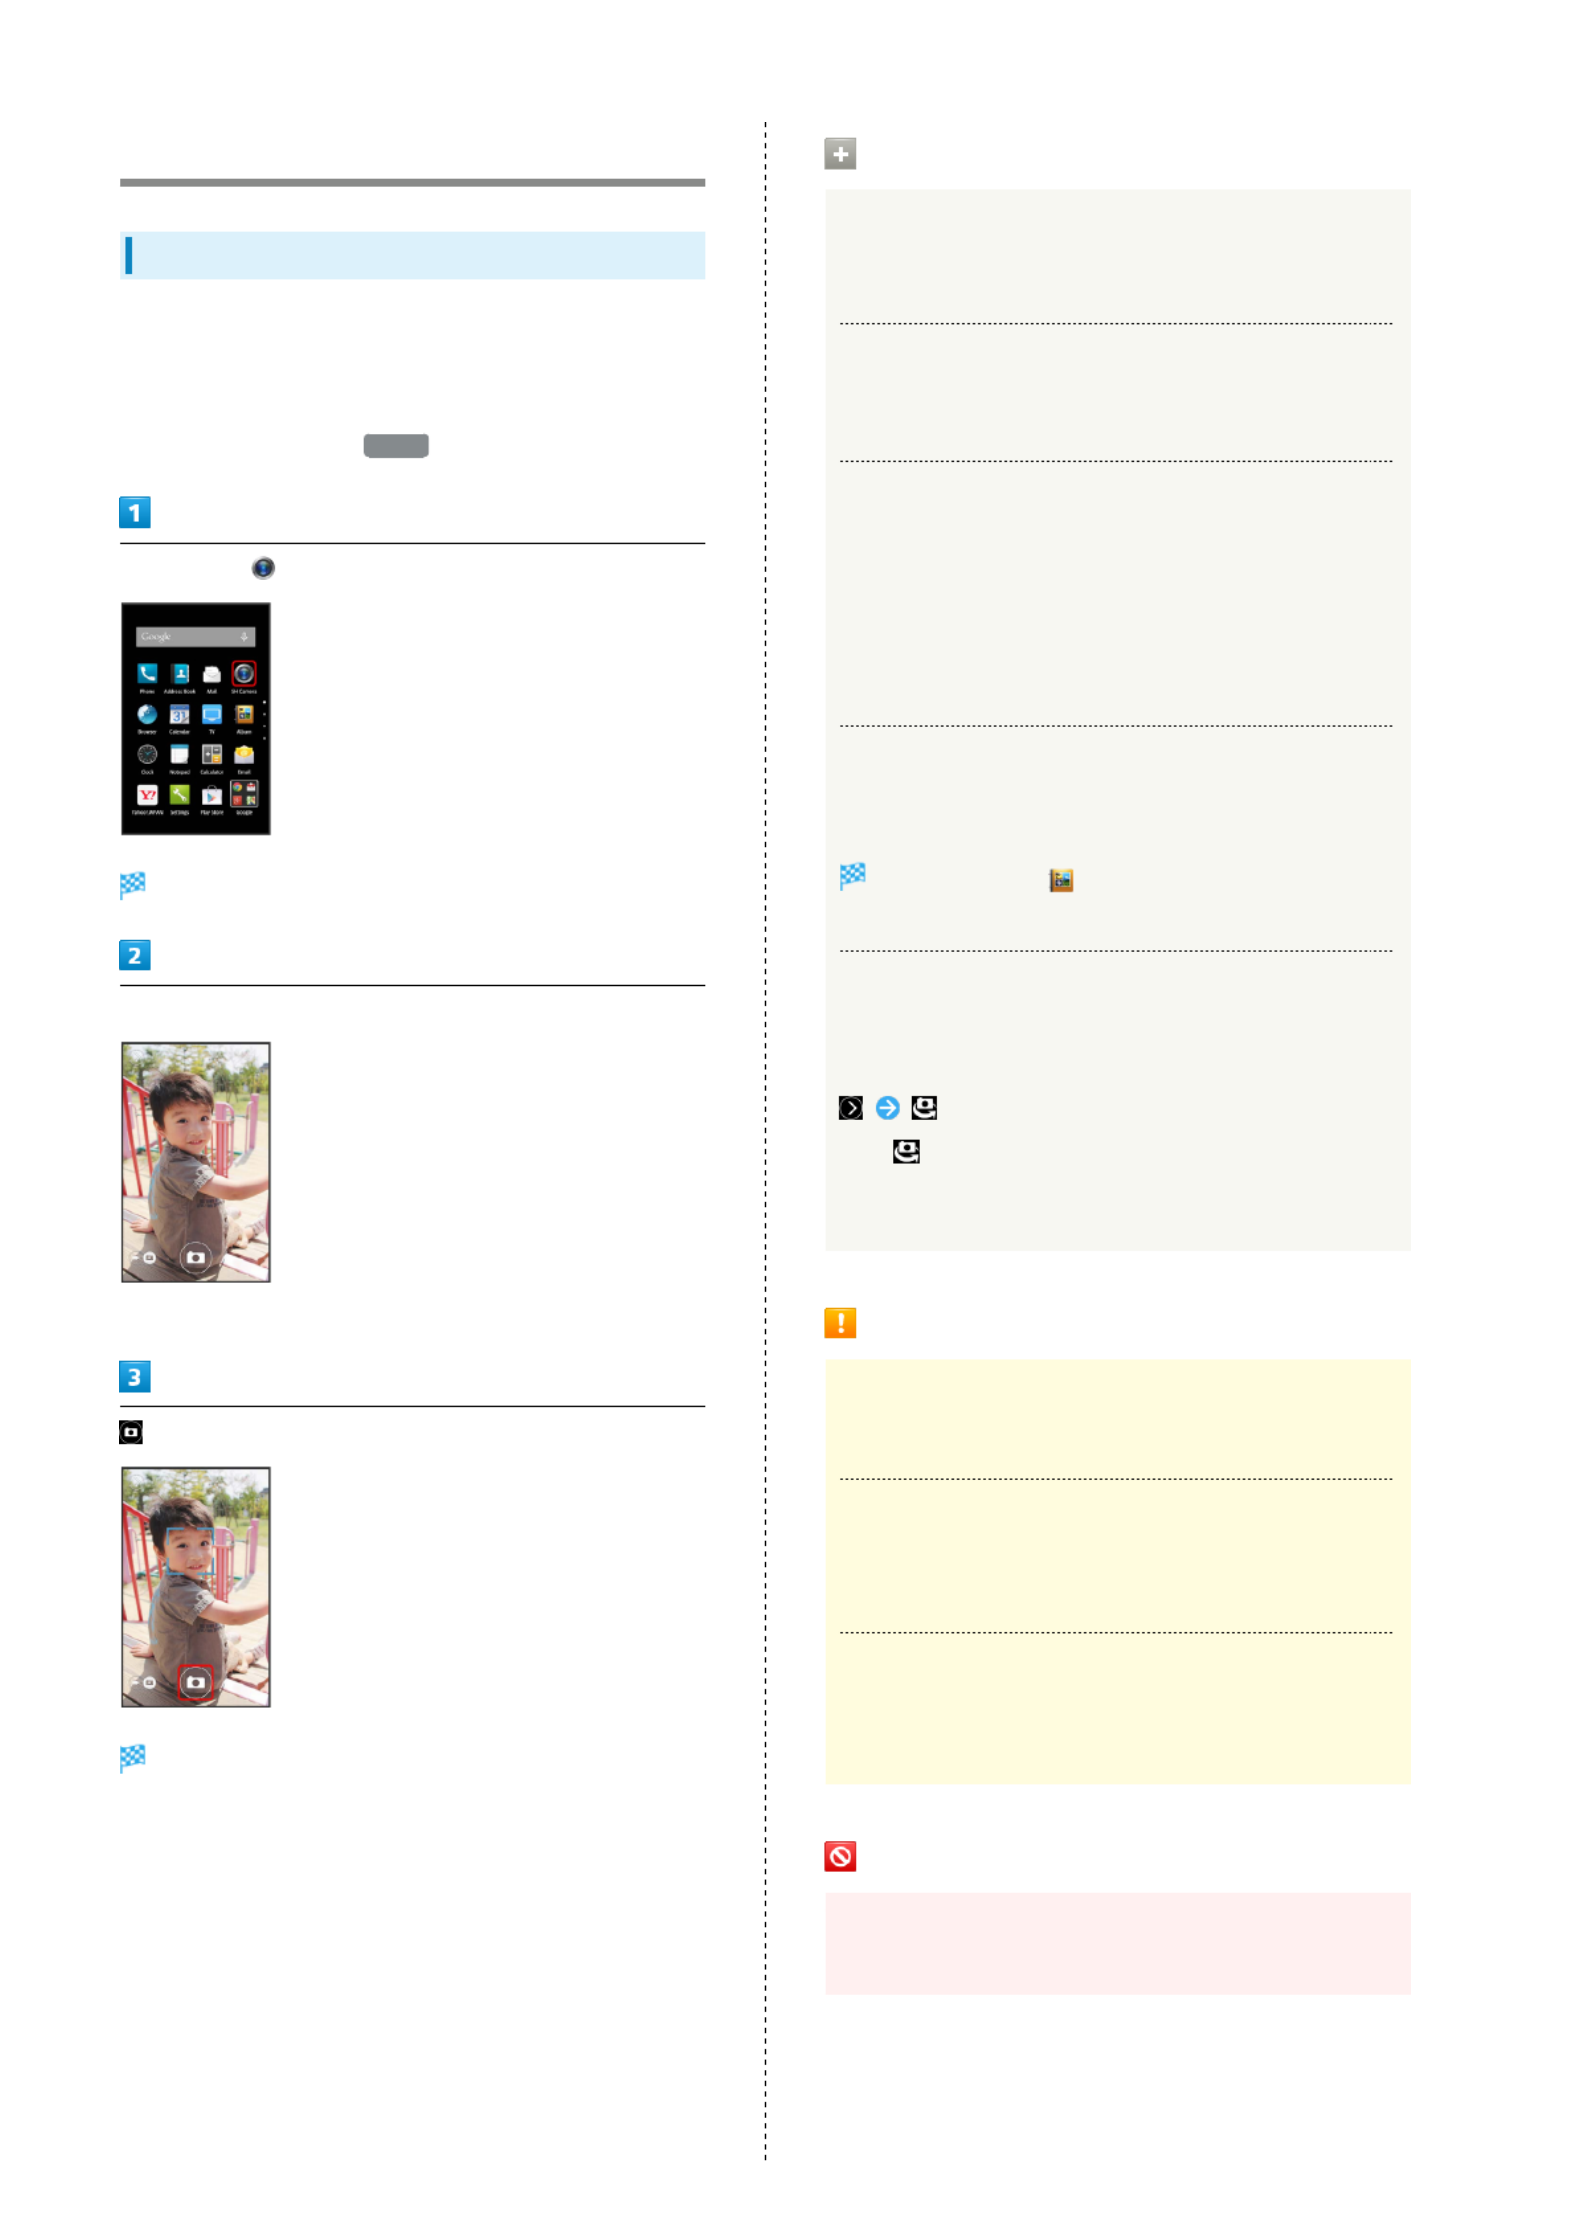
In app sheet, (SH Camera)
Photo Viewfinder appears.
Aim External Camera at subject
・For people, focus automatically locks on detected face.
Shutter sound plays; photo is saved to handset memory.
Photo Viewfinder Operations
Adjusting Brightness
Drag up/down for Brightness Scale
Adjusting Zoom
Drag left/right or Pinch/Spread for Zoom Slider
Locking Focus
Tap subject for focus lock
・To release shutter, Tap the subject again.
・External Camera uses color to track subjects; may not
correctly track faintly colored subjects or ones similar to
background color.
Opening Captured Photo
Tap preview thumbnail
Album activates ( appears) and file view window
appears.
Using Internal Camera
Use Internal Camera to capture self or others with Lens on
Display side.
・Tap to toggle Internal/External Camera.
・Some functions/settings are not available for Internal
Camera.
Camera Cautions
General Use
Mind etiquette when using Camera.
Keep Lens Clean
Fingerprints/smudges may hinder handset imaging. Clean
Lens with a soft cloth beforehand.
Avoid Direct Sunlight Exposure
Do not expose Lens area to direct sunlight for extended
periods; may damage color filter, altering images.
Mobile Light Warning
Do not shine Mobile Light in eyes; may affect eyesight or
cause other problems.

65
Camera SoftBank 304SH
Video Camera
Recording Videos
Record H.264/AAC videos.
・Recorded videos are saved to handset memory by default.
In app sheet, (SH Camera)
Photo Viewfinder appears.
Video Viewfinder appears.
・If confirmation appears, follow onscreen prompts.
Aim External Camera at subject (recording starts)
Tone sounds and recording starts.
(recording stops)
Tone sounds and recording stops; video is saved to handset
memory.
Video Viewfinder Operations
Adjusting Brightness
Drag up/down for Brightness Scale
Adjusting Zoom
Drag left/right or Pinch/Spread for Zoom Slider
Opening Recorded Video
Tap preview thumbnail
Album activates ( appears) and file view window
appears.
Using Internal Camera
Use Internal Camera to record self or others with Lens on
Display side.
・Tap to toggle Internal/External Camera.
・Some functions/settings are not available for Internal
Camera.
Camera Cautions
General Use
Mind etiquette when using Camera.
Keep Lens Clean
Fingerprints/smudges may hinder handset imaging. Clean
Lens with a soft cloth beforehand.
Avoid Direct Sunlight Exposure
Do not expose Lens area to direct sunlight for extended
periods; may damage color filter, altering images.
Continuous Recording Time
Recording capacity is 2 GB per file (recording stops when
exceeded). To continue recording, start another session.
Mobile Light Warning
Do not shine Mobile Light in eyes; may affect eyesight or
cause other problems.
Specyfikacje produktu
| Marka: | Sharp |
| Kategoria: | smartfon |
| Model: | Aquos Xx 304SH |
Potrzebujesz pomocy?
Jeśli potrzebujesz pomocy z Sharp Aquos Xx 304SH, zadaj pytanie poniżej, a inni użytkownicy Ci odpowiedzą
Instrukcje smartfon Sharp

27 Września 2024
15 Września 2024
15 Września 2024
15 Września 2024
15 Września 2024
15 Września 2024
15 Września 2024
15 Września 2024
15 Września 2024
15 Września 2024
Instrukcje smartfon
- smartfon Sony
- smartfon Samsung
- smartfon AEG
- smartfon LG
- smartfon Motorola
- smartfon Xiaomi
- smartfon MyPhone
- smartfon Huawei
- smartfon TCL
- smartfon Lenovo
- smartfon TP-Link
- smartfon Philips
- smartfon SilverCrest
- smartfon Gigabyte
- smartfon Acer
- smartfon Realme
- smartfon Gigaset
- smartfon Geemarc
- smartfon Nokia
- smartfon Hisense
- smartfon Infiniton
- smartfon Panasonic
- smartfon Mio
- smartfon Asus
- smartfon Nedis
- smartfon Medion
- smartfon OK
- smartfon Audioline
- smartfon Toshiba
- smartfon Tesla
- smartfon Alcatel-Lucent
- smartfon Majestic
- smartfon Bluebird
- smartfon Garmin
- smartfon Blaupunkt
- smartfon Profoon
- smartfon Vivax
- smartfon Evolveo
- smartfon Alcatel
- smartfon Haier
- smartfon HP
- smartfon Hyundai
- smartfon Honeywell
- smartfon Honor
- smartfon Kodak
- smartfon ZTE
- smartfon MaxCom
- smartfon Dell
- smartfon Google
- smartfon Intex
- smartfon Oppo
- smartfon Kyocera
- smartfon Krüger&Matz
- smartfon Qilive
- smartfon Thomson
- smartfon Manta
- smartfon Apple
- smartfon NGS
- smartfon CRUX
- smartfon Emporia
- smartfon Nevir
- smartfon Mitsubishi
- smartfon Razer
- smartfon GoClever
- smartfon SPC
- smartfon Intermec
- smartfon NEC
- smartfon Polaroid
- smartfon Prestigio
- smartfon Aiwa
- smartfon Sanyo
- smartfon Telefunken
- smartfon OnePlus
- smartfon Amazon
- smartfon Olympia
- smartfon Microsoft
- smartfon Bush
- smartfon HTC
- smartfon CAT
- smartfon Denver
- smartfon Saiet
- smartfon Albrecht
- smartfon RCA
- smartfon Media-Tech
- smartfon BenQ
- smartfon Trevi
- smartfon Lexibook
- smartfon Overmax
- smartfon Micromax
- smartfon Sencor
- smartfon NUU Mobile
- smartfon Alecto
- smartfon Binatone
- smartfon Hammer
- smartfon Allview
- smartfon Oukitel
- smartfon Best Buy
- smartfon Cyrus
- smartfon Kazam
- smartfon Tecdesk
- smartfon KPN
- smartfon Swissvoice
- smartfon I.safe Mobile
- smartfon TrekStor
- smartfon Brondi
- smartfon Fysic
- smartfon Wiko
- smartfon Yarvik
- smartfon Aligator
- smartfon Amplicomms
- smartfon AQISTON
- smartfon Amplicom
- smartfon Archos
- smartfon Androidtech
- smartfon Crosscall
- smartfon Ecom
- smartfon Sony Ericsson
- smartfon Vestel
- smartfon Sonim
- smartfon Energy Sistem
- smartfon Doro
- smartfon Sagem
- smartfon Lava
- smartfon Blu
- smartfon Easypix
- smartfon Konrow
- smartfon Brigmton
- smartfon Sunstech
- smartfon Aspera
- smartfon Sunny
- smartfon Nordmende
- smartfon Blackberry
- smartfon Vivo
- smartfon Wolder
- smartfon NGM
- smartfon Vodafone
- smartfon Switel
- smartfon InFocus
- smartfon GreatCall
- smartfon XD
- smartfon Pantech
- smartfon Alba
- smartfon RugGear
- smartfon Umidigi
- smartfon AT&T
- smartfon Mpman
- smartfon Bury
- smartfon Logicom
- smartfon Karbonn
- smartfon Palm
- smartfon Hannspree
- smartfon Phicomm
- smartfon Plum
- smartfon Lumigon
- smartfon Infinix
- smartfon Keneksi
- smartfon Klipad
- smartfon Iget
- smartfon T-Mobile
- smartfon JCB
- smartfon Casper
- smartfon Unnecto
- smartfon Wileyfox
- smartfon ITT
- smartfon Yota
- smartfon Avus
- smartfon Spice
- smartfon Wolfgang
- smartfon BQ
- smartfon ORA
- smartfon Danew
- smartfon Echo
- smartfon Primux
- smartfon Tiptel
- smartfon UTStarcom
- smartfon Zipy
- smartfon Mediacom
- smartfon Beafon
- smartfon BGH
- smartfon Billow
- smartfon Telstra
- smartfon Ulefone
- smartfon CSL
- smartfon ToughGear
- smartfon Benefon
- smartfon Komu
- smartfon Doogee
- smartfon Energizer
- smartfon Tremay
- smartfon Kurio
- smartfon Piranha
- smartfon Coolpad
- smartfon Syco
- smartfon TAG Heuer
- smartfon Mobistel
- smartfon Itel
- smartfon Garmin-Asus
- smartfon Handheld
- smartfon Fero
- smartfon AT Telecom
- smartfon Xtreamer
- smartfon Verykool
- smartfon O2
- smartfon General Mobile
- smartfon Mustang
- smartfon Kogan
- smartfon Pharos
- smartfon Storex
- smartfon Fairphone
- smartfon Freeman
- smartfon HomTom
- smartfon Leotec
- smartfon Auro
- smartfon Maxx
- smartfon ITTM
- smartfon Posh Mobile
- smartfon THL
- smartfon NGM-Mobile
- smartfon POCO
- smartfon Nothing
- smartfon Lark
- smartfon Senifone
- smartfon Tecno
- smartfon Telme
- smartfon UMi
- smartfon Olitech
- smartfon Mobiola
- smartfon Meizu
- smartfon Neffos
- smartfon Gionee
- smartfon TIM
- smartfon Cubot
- smartfon Leagoo
- smartfon NTech
- smartfon Nubia
- smartfon LeEco
- smartfon GSmart
- smartfon Bea-fon
- smartfon Opticon
- smartfon EStar
- smartfon Facom
- smartfon Jitterbug
- smartfon Custom
- smartfon Aplic
- smartfon HMD
- smartfon Opis
- smartfon Volla
- smartfon Nothing Tech
- smartfon Maxwest
- smartfon Kalley
Najnowsze instrukcje dla smartfon

2 Kwietnia 2025

30 Marca 2025
10 Marca 2025
7 Marca 2025
5 Marca 2025
5 Marca 2025
3 Marca 2025

2 Marca 2025

26 Lutego 2025
26 Lutego 2025