Instrukcja obsługi Sharp 20F640
Przeczytaj poniżej 📖 instrukcję obsługi w języku polskim dla Sharp 20F640 (60 stron) w kategorii Telewizja. Ta instrukcja była pomocna dla 8 osób i została oceniona przez 2 użytkowników na średnio 4.5 gwiazdek
Strona 1/60

COLOR TELEVISION
MODEL
20F640
L OPERATION MANUAL L
B177 WJ
CONTENTS
PAGE
•IMPORTANT INFORMATION/IMPORTANT
SAFEG ARDSU .................................................. 2 ~ 4
• Supplied Accesso iesr ........................................... ... 5
• Be ore Ope el visionf rating Your T e .......................... ... 5
• Antenna Connections ................................... ..... 5 6 ~
• Qui k Re erence Control Ope ationc f r .............. ..... 7 8 ~
• EZ SETUP du ing First Us .................................. .r e .. 9
• Demo Mode ........................................................... 10
• Accessing the MAIN MENU screen without
Remote Contro ......................................................l 10
• Language ............................................................... 11
• Sleep Timer ........................................................... 12
• Video Adjust .......................................................... 13
• Audio Adjus ...........................................................t 14
• Audio Selec ...................................................t 15 16 ~
MTS (Multichannel TV Sound) ............................ 15
INTERNAL SPEAKER SWITCH ......................... 15
FAO (Fi ed udio Output)x A ................................... 15
PAGE
• Closed Caption ...................................................... 17
• Parental Control ............................................. 18 28 ~
V-CHIP ........................................................ 18 25 ~
View Timer .................................................. 26 28 ~
• Ch Setup ........................................................ 29 34 ~
EZ Setup ............................................................. 29
Channel Setting .......................................... 3 ~ 30 2
Personal Pre erencef ........................................... 33
Uni ersal Plus Functionv ...................................... 34
• Set Up ............................................................ 35 36 ~
Energy S eav ....................................................... 35
Blue Screen ........................................................ 36
• Using the Video and udio Input a ks A J c ......... 37 38 ~
• Using the udio Output a ksA J c ............................... 39
• Ope ation of Remote Controlr ......................... 40 44 ~
• Be ore Calling or Se vicef f r ............................ .......... 45
• Calling or Se vicef r ....................................... .......... 45
• Specifications ........................................................ 46
• Limited ar antyW r .................................................... 60
This operating manual includes basic operating
instructions in Spanish and French.
SPANISH is on page ~ .47 52
FRENCH is on page ~ .53 58

2
Welcome to the SHARP Family. We are pleased that you are now the owner of a SHARP Color Television
– built for outstanding quality, reliability and performance.
Every SHARP Color Television set is tuned and adjusted for proper color and sound, and has passed
through the most stringent quality control tests at the factory. We have prepared this OPERATION MANUAL
so that you may adjust the picture and color to your personal viewing preference.
We sincerely hope that you receive the greatest satisfaction and enjoyment from your new SHARP Color
Television set for years to come.
Please read these instructions carefully, and keep them handy for your future reference.
Model No.:
Serial No.:
IMPORTANT
To aid reporting in case of loss or theft, please record the TV’s
model and serial numbers in the space provided. The numbers
are located at the rear of the TV.
IMPORTANT INFORMATION
There are two important reasons for prompt warranty registration of your new SHARP television set. Use
the REGISTRATION CARD packed in with the set.
FIRST – WARRANTY
This is to assure that you will immediately receive the full consumer benefit of the parts, service and labor
warranty applicable to your purchase.
SECOND – CONSUMER PRODUCT SAFETY ACT
To assure that you will promptly receive any safety notification on inspection, modification or recall that
SHARP may be required to give under the 1972 Consumer Product Safety Act. PLEASE READ
CAREFULLY THE IMPORTANT “LIMITED WARRANTY” CLAUSE ON THE LAST PAGE.
WARNING: TO REDUCE THE RISK OF FIRE OR ELECTRIC SHOCK, DO NOT
EXPOSE THIS APPLIANCE TO WET LOCATIONS.
CAUTION: TO REDUCE THE RISK OF
ELECTRIC SHOCK,
DO NOT REMOVE COVER (OR BACK).
NO USER-SERVICEABLE PARTS INSIDE.
REFER SERVICING TO QUALIFIED SERVICE
PERSONNEL.
The lightning flash with
arrowhead within a triangle is
intended to tell the user that
parts inside the product are a
risk of electric shock to
persons.
The exclamation point within a
triangle is intended to tell the
user that important operating
and servicing instructions are
in the papers with the
appliance.
“Note to CATV system installer: This reminder is provided to call the CATV system installer’s attention
to Article 820-40 of the National Electrical Code that provides guidelines for proper grounding and, in
particular, specifies that the cable ground shall be connected to the grounding system of the building,
as close to the point of cable entry as practical.”
WARNING – FCC Regulations state that any unauthorized changes or modifications to this equipment not
expressly approved by the manufacturer could void the user’s authority to operate this
equipment.
PRODUCT DISPOSAL
This product utilizes a Cathode Ray Tube (CRT) containing lead and tin-lead solder.
Disposal of these materials may be regulated due to environment considerations. For disposal or
recycling information, please contact your local authorities or the Electronics Industries Alliance:
www.eiae.org

3
IMPORTANT INFORMATION (Continued)
CAUTION:
•Do not place the AC power cord under the TV set or other heavy items.
•To prevent fire, never place any type of candle or naked flames on the top or near the TV set.
•To prevent fire or shock hazard, do not expose this products to dripping or splashing. No objects filled with
liquids, such as vases, should be placed on the product.
CAUTION: Please read all of these instructions before you operate your television and save
these instructions for later use.
Electrical energy can perform many useful functions. This unit has been engineered and manufactured to assure
your personal safety. BUT IMPROPER USE CAN RESULT IN POTENTIAL ELECTRICAL SHOCK OR FIRE
HAZARDS. In order not to defeat the safeguards incorporated in this equipment, observe the following basic
rules for its installation, use and servicing.
1. Unplug this television equipment from the wall outlet before cleaning.
2. Do not use liquid cleaners or aerosol cleaners. Use a damp cloth for cleaning.
3. Do not use attachments not recommended by the television equipment manufacturer as they may cause
hazards.
4. Do not use this television equipment near water for example, near a bath tub, washbowl, kitchen sink or—
laundry tub, in a wet basement, or near a swimming pool, etc.
5. Do not place this equipment on an unstable cart, stand, or table. The television equipment may fall, causing
serious injury to a child or an adult, and serious damage to the equipment. Use only with a cart or stand
recommended by the manufacturer or sold with the television equipment.
6. Television equipment and cart combination should be moved with care. Quick stops,
excessive force, and uneven surfaces may cause the equipment and cart combination to
overturn.
7. Wall or shelf mounting should follow the manufacturer’s instructions, and should use a
mounting kit approved by the manufacturer.
8. Slots and openings in the cabinet and the back or bottom are provided for ventilation. To
insure reliable operation of the television equipment and to protect it from overheating, these openings must
not be blocked or covered. This television equipment should not be placed in a built-in insulation such as a
bookcase unless proper ventilation is provided.
9. The openings should never be covered with a cloth or other material, and the bottom openings should not
be blocked by placing the television equipment on a bed, sofa, rug, or other similar surface. This television
equipment should never be placed near or over a radiator or heat register.
10. This television equipment should be operated only from the type of power source indicated on the marking
label. If you are not sure of the type of power supplied to your home, consult your television dealer or local
power company.
For television equipment designed to operate from battery power, refer to the operating instructions.
11. As a safety feature, television equipment is equipped with a 2-wire polarized plug (one plug blade bigger
than the other). The 2-wire polarized plug will fit only one way into the power outlet.
If the plug does not fit, ask your electrician to replace your obsolete outlet. Do not modify the plug and defeat
this safety feature.
12. Do not allow anything to rest on the power cord. Do not locate this television equipment where the cord will
be abused by persons walking on it.
IMPORTANT SAFEGUARDS

4
IMPORTANT SAFEGUARDS (Continued)
13. Follow all warnings and instructions marked on the television equipment.
14. If an outside antenna is connected to the television equipment, be sure the antenna system is grounded
so as to provide some protection against voltage surges and built-up static charges. Section 810 of the
National Electrical Code provides information with respect to proper grounding of the mast and
supporting structure, grounding of the lead-in wire to an antenna discharge unit, size of grounding
conductors, location of antenna-discharge unit, connection to grounding electrodes, and requirements
for the grounding electrode.
15. For added protection for this television equipment during a lightning storm, or when it is left unattended and
unused for long periods of time, unplug it from the wall outlet and disconnect the antenna. This will prevent
damage to the equipment due to lightning and power-line surges.
16. An outside antenna system should not be located in the vicinity of overhead power lines or other electric
light or power circuits, or where it can fall into such power lines or circuits. When installing an outside
antenna system, extreme care should be taken to keep from touching such power lines or circuits as contact
with them might be fatal.
17. Do not overload wall outlets and extension cords as this can result in fire or electric shock.
18. Never push objects of any kind into this television equipment through cabinet slots as they may touch
dangerous voltage points or short out parts that could result in a fire or electric shock. Never spill liquid
of any kind on the television equipment.
19. Do not attempt to service this television equipment yourself as opening or removing covers may expose you
to dangerous voltage or other hazards. Refer all servicing to qualified service personnel.
20. Unplug this television equipment from the wall outlet and refer servicing to qualified service personnel
under the following conditions:
A. When the power cord or plug is damaged or frayed.
B. If liquid has been spilled into the television equipment.
C. If the television equipment has been exposed to rain or water.
D. If the television equipment does not operate normally by following the operating instructions. Adjust
only those controls that are covered by the operating instructions as improper adjustment of other
controls may result in damage and will often require extensive work by a qualified technician to
restore the television equipment to normal operation.
E. If the television equipment has been dropped or the cabinet has been damaged.
F. When the television equipment exhibits a distinct change in performance this indicates a need for—
service.
21. Upon completion of any service or repairs to this television equipment, ask the service technician to
perform routine safety checks to determine that the television is in safe operating condition.
22. When replacement parts are required, be sure the service technician has used replacement parts
specified by the manufacturer that have the same characteristics as the original part. Unauthorized
substitutions may result in fire, electric shock, or other hazards.
ANTENNA
LEAD IN
WIRE
ANTENNA
DISCHARGE UNIT
(NEC SECTION 810-20)
GROUNDING CONDUCTORS
(NEC SECTION 810-21)
GROUND CLAMPS
POWER SERVICE GROUNDING
ELECTRODE SYSTEM
(NEC ART 250, PART H)
ELECTRIC
SERVICE
EQUIPMENT
NEC NATIONAL ELECTRICAL CODE—
GROUND
CLAMP
EXAMPLE OF ANTENNA GROUNDING AS PER
NATIONAL ELECTRICAL CODE

5
Supplied Accessories
321
654
987
100
0
TV • CATV • VCR • DVD
A B C D
PERSONAL PREFERENC E
9
VCR-CH
8
FLASHBACK
POWER (D VD/VCR)
REC
PLAY
:
L
ST OP
FWD
)
REW
(
PAUSE
J
POWER
DISP LAY
CAT V
INPUT
T V
DVD V CR
ENT ER
; :
CH
8
VOL– VOL+
9
CH
MENU MUT E
g
SKIP
f
Infrared Remote Control/Part Number
RRMCGA108WJSA
Dry batteries size “AA”/
1.5 V cc
Before Operating Your Television
Location
• For normal operation, your TV should be located in an area of the room where cool adequate ventilation
is provided. Do not place the back of the television set in a place where free airflow will be restricted.
• Any magnetic force may disturb the color picture. Make sure that magnets, electric clocks, toys
using magnets or any other magnetic substance, such as iron are kept well away from the TV set.
Power
Your TV operates on 120 Volts, 60 Hz (normal household current) and has a polarized plug. If you
are unable to insert the plug fully into the outlet, try reversing the plug. Should it fail to fit, contact an
electrician. Do not defeat the safety feature of the polarized plug.
Note:
• If the set will not be used for a long period, such as during a vacation, unplug the set from the wall
outlet to economize power. (If the TV set is plugged in, a slight current still flows, even with the
POWER BUTTON in the OFF position.)
• Lines and other noise may appear in TV broadcast images when an FM tuner or radio is located
near the TV and both radio and TV broadcasts are being received. Should such noise appear, turn
off either the TV or the radio.
• If you are listening to an AM broadcast, turn the TV off. AM broadcast signals may not be received
due to interference from the TV.
LBefore using the television, prepare the Remote Control
To use the remote control, insert batteries first.
Insert the batteries
•
With your thumbnail, pull up the slit as indicated by the arrow to remove the back cover. Insert two batteries
(size “AA”/1.5 V cc). Be sure to match the battery
e
/
d
terminals with the
e
/
d
marks inside the compartment.
Baterry
Cover
Antenna Connections
Antennas
• The antenna requirements for good color television reception are more important than those for black
& white television reception. For this reason, a good quality outdoor antenna is strongly recommended.
The following is a brief explanation of the type of connections that are provided with the various
antenna systems:
1. A 75 ohm system is generally a round cable with F-type
connector that can easily be attached to a terminal without
tools (not supplied).
2. A 300 ohm system is a flat “twin-lead” cable that can be
attached to a 75 ohm terminal through a 300-75 ohm
ADAPTOR (not supplied).
F-type connector
75-ohm coaxial cable (round)
300-ohm twin-lead cable (flat)
Pull up
6
Antenna Connections (Continued)
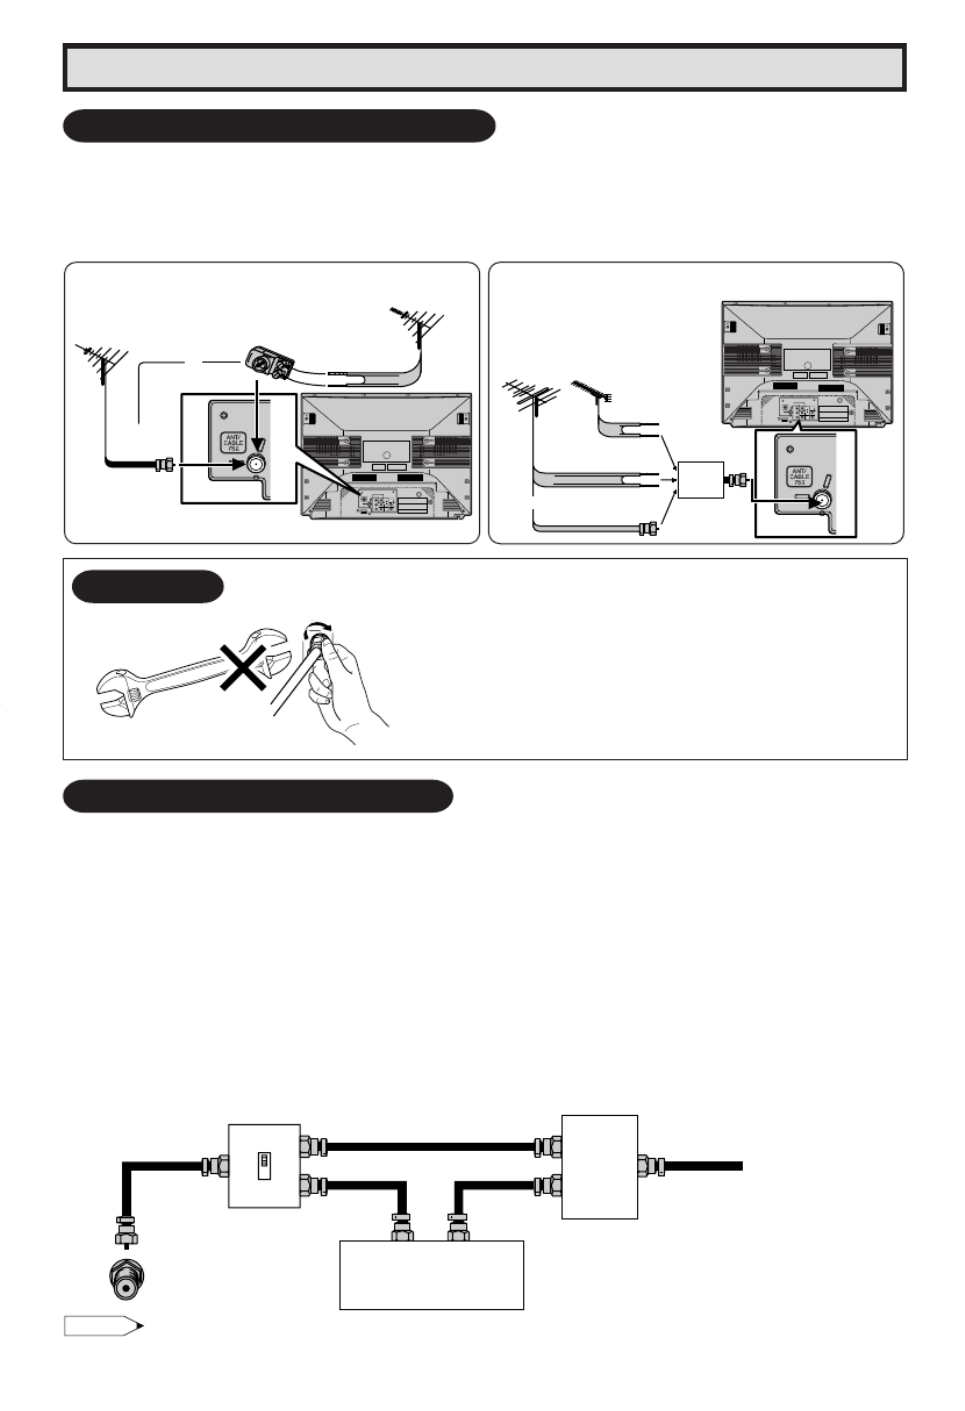
OUTDOOR ANTENNA CONNECTION
• Use one of the following two diagrams if you connect an outdoor antenna.
A: Using a VHF/UHF combination outdoor antenna.
B: Using separate VHF and/or UHF outdoor antenna.
• Connect an outdoor antenna cable lead-in to the COAXIAL CABLE CONNECTOR on the rear of
the TV set.
PR
PB
Y
IN 1
LINEOUT
R
L
AUDIO
VIDEO
R
L
COMPO NENT
REAR OF TV
75-ohm
coaxial cable
300-ohm
twin-lead
VHF/UHF ANTENNA
VHF/UHF ANTENNA
A. Combination VHF/UHF Antennas
300/75-ohm
ADAPTOR
(Not supplied)
or
P
R
P
B
Y
IN 1
LINE
OUT
R
L
AUDIO
VIDEO
R
L
COMPO NENT
IN OUT
300-ohm
twin-lead
300-ohm
twin-lead
75-ohm coaxial
cable
VHF
ANTENNA
UHF
ANTENNA
COMBINER
(not supplied)
or
REAR OF TV
B. Separate VHF/UHF Antenna
NOTICE F-type connector should be finger tightened only
When connecting the RF cable to the TV set, do not tighten
F-type connector with tools.
If tools are used, it may cause damage to your TV set.
(The breaking of Internal circuit, etc.)
F-type connector
75-ohm coaxial cable
CABLE TV (CATV) CONNECTION
•A 75 ohm coaxial cable connector is built into the set for easy hookup. When connecting the 75 ohm
coaxial cable to the set, screw the 75 ohm cable to the COAXIAL CABLE CONNECTOR.
•Some cable TV companies offer “ ”premium pay channels . Since the signals of these premium pay
channels are scrambled, a cable TV converter/descrambler is generally provided to the subscriber by
the cable TV company. This converter/descrambler is necessary for normal viewing of the scrambled
channels. (Set your TV on channel 3 or 4. Typically one of these channels is used. If this is unknown,
consult your cable TV company.) For more specific instructions on installing cable TV, consult your
cable TV company. One possible method of utilizing the converter/descrambler provided by your
cable TV company is explained below.
Please note: RF switch equipped with position A/B (not provided) is required.
“ ”A position on the RF switch (not supplied): You can view all unscrambled channels using the TV’s
channel keys.
“B” position on the RF switch (not supplied): You can view the scrambled channels via the converter/
descrambler using the converter’s channel keys.
OUT
OUT
RF switch (not supplied)
Cable TV Line
IN
Two-set
signal
splitter
(not
supplied)
Cable TV converter/
descrambler
(not supplied)
A
IN
B
Note:
•
Consult your SHARP Dealer or Service Center for the type of splitter, RF switch or combiner that might be required.

P
R
P
B
Y
IN 1
LINE
OUT
R
L
AUDIO
VIDE O
R
L
COM PO NE NT
P
R
P
B
Y
IN 1
L INE
OU T
R
L
AU D IO
VI DEO
R
L
C OMP ON EN T
7
Quick Reference Control OperationQuick Reference Control Operation
Note:
COMPONENT (VIDEO) TERMINALS
•Part Names
Front Panel
VIDEO/AUDIO
TERMINALS
IN 2
CHANNEL UP/DOWN
(a) Selects next higher channel.
(s) Selects next lower channel.
POWER
Press → On.
MENU
Press → Accesses MAIN MENU.
Press again Exits MAIN MENU.→
INSIDE DOOR
VOLUME UP/DOWN
(k) Increases sound.
(l) Decreases sound.
IN 1 (VIDEO/AUDIO) TERMINALS
LINE OUT (AUDIO) TERMINALS
REMOTE CONTROL
• The TV set and remote control illustrations and the on-screen displays in this manual may differ from their actual
appearance.
To open the door
Using the projection located under the "PULL-OPEN" indication,
pull and lift the door open.
To close the door
Using the projection, lower the door until closed.
Caution:
• When opening or closing the door, do not insert your fingers into
the gap between the door and front panel. This may result in an
injury.
Rear Panel
ANTENNA/CABLE INPUT
SENSOR
Press again → Off.
TERMINAL

321
654
987
100
0
TV • CATV • VCR DVD•
A B C D
PERSONAL PREFERENCE
9
VCR-CH
8
FLASHBACK
POWER (DVD/VCR)
REC
PLAY
:
L
STOP
FWD
)
REW
(
PAUSE
J
POWER
DISPLAY
CATV
INPUT
TV
DVD VCR
ENTER
; :
CH
8
VOL
–
VOL
+
9
CH
MENU MUTE
g
SKIP
f
8
Quick Reference Control Operation
•
Part Names
Quick Reference Control Operation (Continued)
Note:
• The above shaded buttons on the Remote Control glow in the dark. To use the glow-in-the-dark display on the
remote control, place it under a fluorescent light or other lighting.
• The phosphorescent material contains no radioactive or toxic material, so it is safe to use.
• The degree of illumination will vary depending on the strength of lighting used.
• The degree of illumination will decrease with time and depending on the temperature.
• The time needed to charge the phosphorescent display will vary depending on the surrounding lighting.
• Sunlight and fluorescent lighting are the most effective when charging the display.
Basic Remote Control Functions
POWER
Press → On.
Press again → Off.
REMOTE KEYPAD
Accesses any channel from keypad.
FLASHBACK
Returns to previous channel.
PERSONAL PREFERENCE
With the Personal Preference buttons,
you can program your favorite
programs by using the 4 categories A,
B, C and D. The channels can be
accessed quickly by using these
buttons. (See page 33.)
VOLUME UP/DOWN
(k) Increases sound.
(l) Decreases sound.
•Changes or selects the TV
adjustments on On-Screen Display.
MENU
Press → Accesses MAIN MENU.
Press again Exits MAIN MENU.→
MUTE
Press → Mutes sound.
Press again Restores sound.→
•When sound is muted, CLOSED
CAPTION appears if available.
POWER (DVD/VCR)
Press → On.
Press again → Off.
DVD/VCR CONTROL
(See page 40.)
Infrared Transmitter Window
CATV/DVD-TV/VCR MODE buttons
Press TV/VCR Signals sent will be for→
TV and VCR control.
Press CATV/DVD → Signals sent will be
for cable TV converter and DVD control.
DISPLAY
Press → Displays receiving channel for
4 seconds.
Press again Removes display.→
•Temporarily displays receiving
channel when in Closed Caption
mode.
INPUT
Press → Switches to external video
INPUT 1 mode.
Press twice Switches to external video→
INPUT 2 mode.
Press 3 times Switches to external→
video INPUT 3 mode or COMPONENT
mode.
Press 4 times Switches back to the→
original TV mode. (See page 38.)
ENTER
Used in some instances where a Cable
Converter Box requires an “enter”
command after selecting channels, when
using the REMOTE KEYPAD button.
(See page 40.)
CHANNEL UP/DOWN
(a) Selects next higher channel.
(s) Selects next lower channel.
• See pages 30–32 for Channel Setting.
•Moves the “E” mark on the MENU
screen
SKIP/VCR-CH
(See page 40.)
REC
(See page 40.)
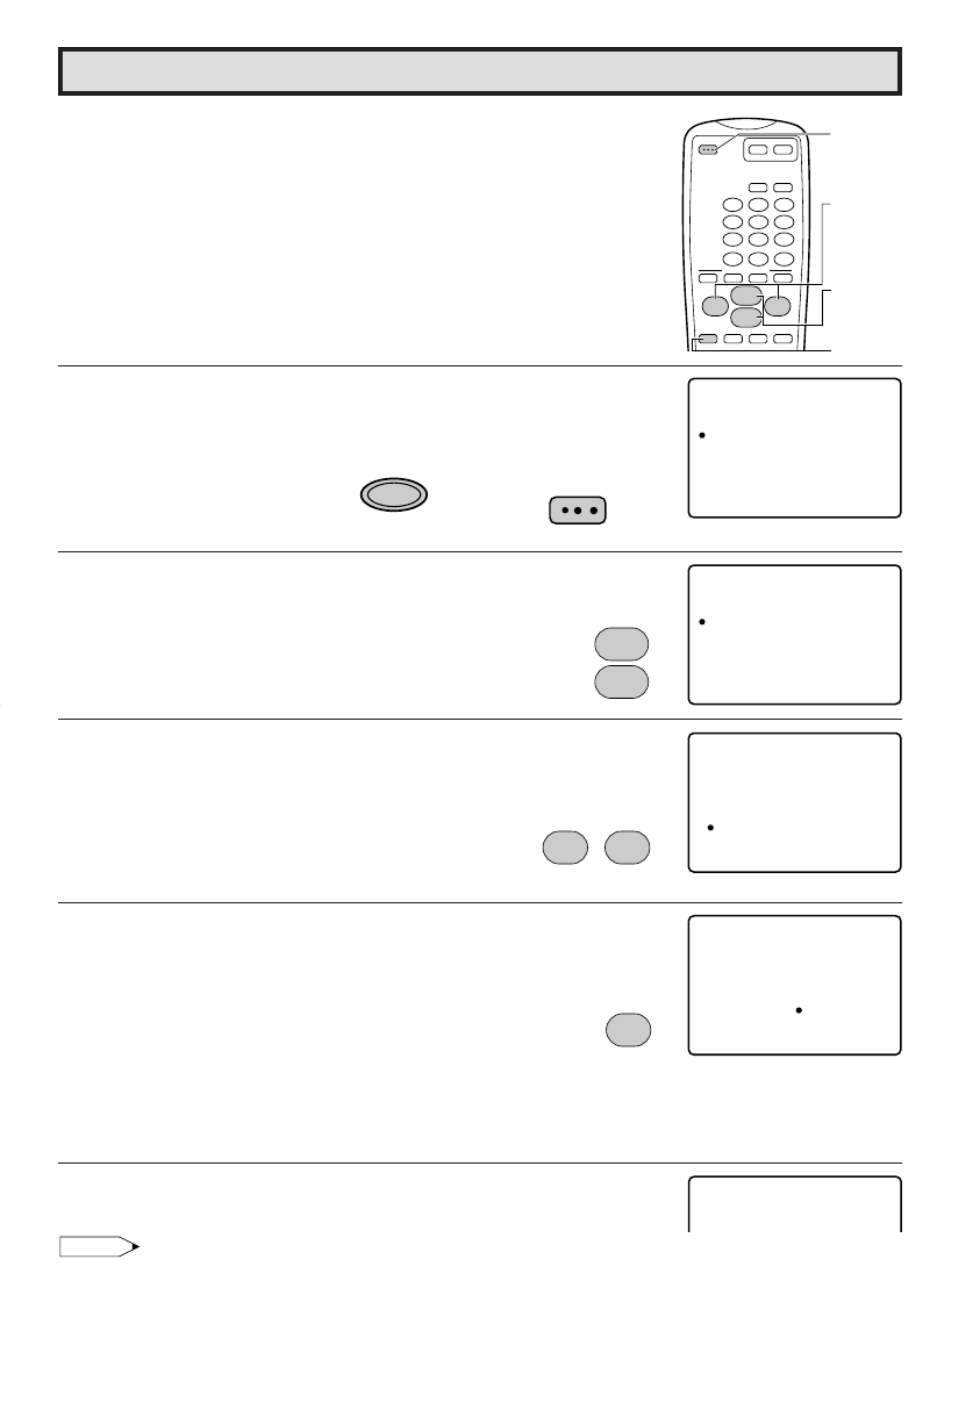
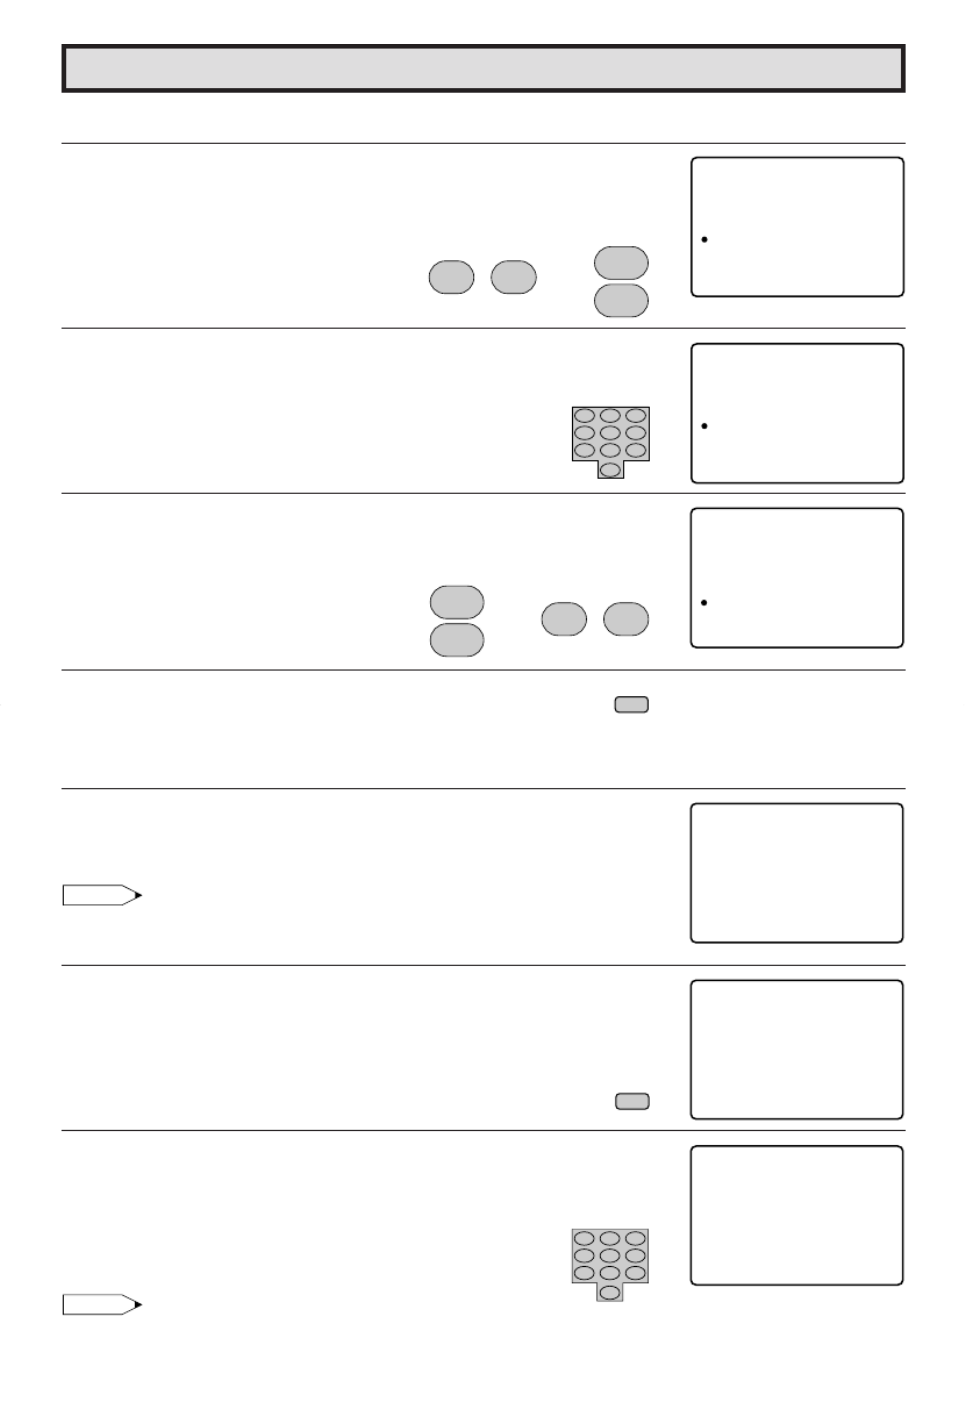
1Press
POWER
on the TV set or on the Remote Control to turn on
the TV. The SELECT LANGUAGE mode will be displayed.
2 Press to select “S ANISH “ENGLISH”, P
(ES AÑOL)”P or “FRENCH (FRANCAIS)”.
3 Press to SET LANG GE and access EZ SETUPUA
mod .e
4 Press
The tuner will automatically search or the broadcastf
and ca TV channel .ble s (The CH N .o will automatically
increase when it appear .)s
If ou ant to stop the EZ SETUP process once it hasy w
sta ted, pressr and it will be canceled.
If ou ant to SETUP again, please re er to page y w f 29
on CH SETU .P
To cancel EZ SETUP
Press
5 Once EZ SETUP is completed, the l est channel umberow n
memo i ed will be displ ed.r z ay
Note:
8 / 9
SE L L A ANG GEUE TC
E N LG SHI
E S AP OLÑ
F R NA A SIC
S E EL T CH:
S E T VOL + / –:
C
8 / 9
SE L L A ANG GEUE TC
E N LG SHI
E S AP OLÑ
F R NA A SIC
S E EL T CH:
S E T VOL + / –:
C
CON T A NN T NA OREN E
CAB EL
C
S T E ZA TR S E ?T UP
S T PO S ART T
P L E WA I TA ES
A U R OG GT O P
521
R A MM I N
S T PO S A RT T
2
; :
VOL
–VOL
+
:
VOL
+
321
654
987
100
0
A B C D
PERSONAL PREFERENCE
9
VCR-CH
8
FLASHBACK
POWER (DVD/VCR)
POWER
DISPLAY
CATV
INPUT
TV
DVD VCR
ENTER
; :
CH
8
VOL
–VOL
+
9
CH
MENU MUTE
g
SKIP
f
POWER
POWER
CHANNEL
UP (8)/
DOWN (9)
MENU
VOLUME
(+)/(–)
(EZ SETUP mode)
EZ SETUP during First Use
(On the Set)
(Remote Control)
(SELECT LANGUAGE mode)
CH
8
9
CH
CH a/s
V LO k/l
V LO l
V LO k
• If EZ SETUP does not memo i e all the channels in our region, please re er to page or more r z y f 30 f
in o mation on manually memorizing the channels using CHANNEL SETTING.f r
• It m y be difficult to PRESET when the broadcast signals are eak, the channel cycle frequency isa w
incorrect or frequency jamming is occu ing around the area. Please re er to pages ~ or morer f 30 32 f
in o mation on manually memorizing the channels using CHANNEL SETTING.f r
V LO l
9
LWhen you turn on the TV for the first time, it will automatically
memorize the broadcast channels.
Please perform the following instructions before pressing the
POWER button.
(1) Inse t the batteries into the remote cont ol.r r (See p ge )a 5
(2) Connect the antenna ca le to the TV set.b (See page ~ )5 6
(3) Plug in the AC POWER cord to the wall outlet.

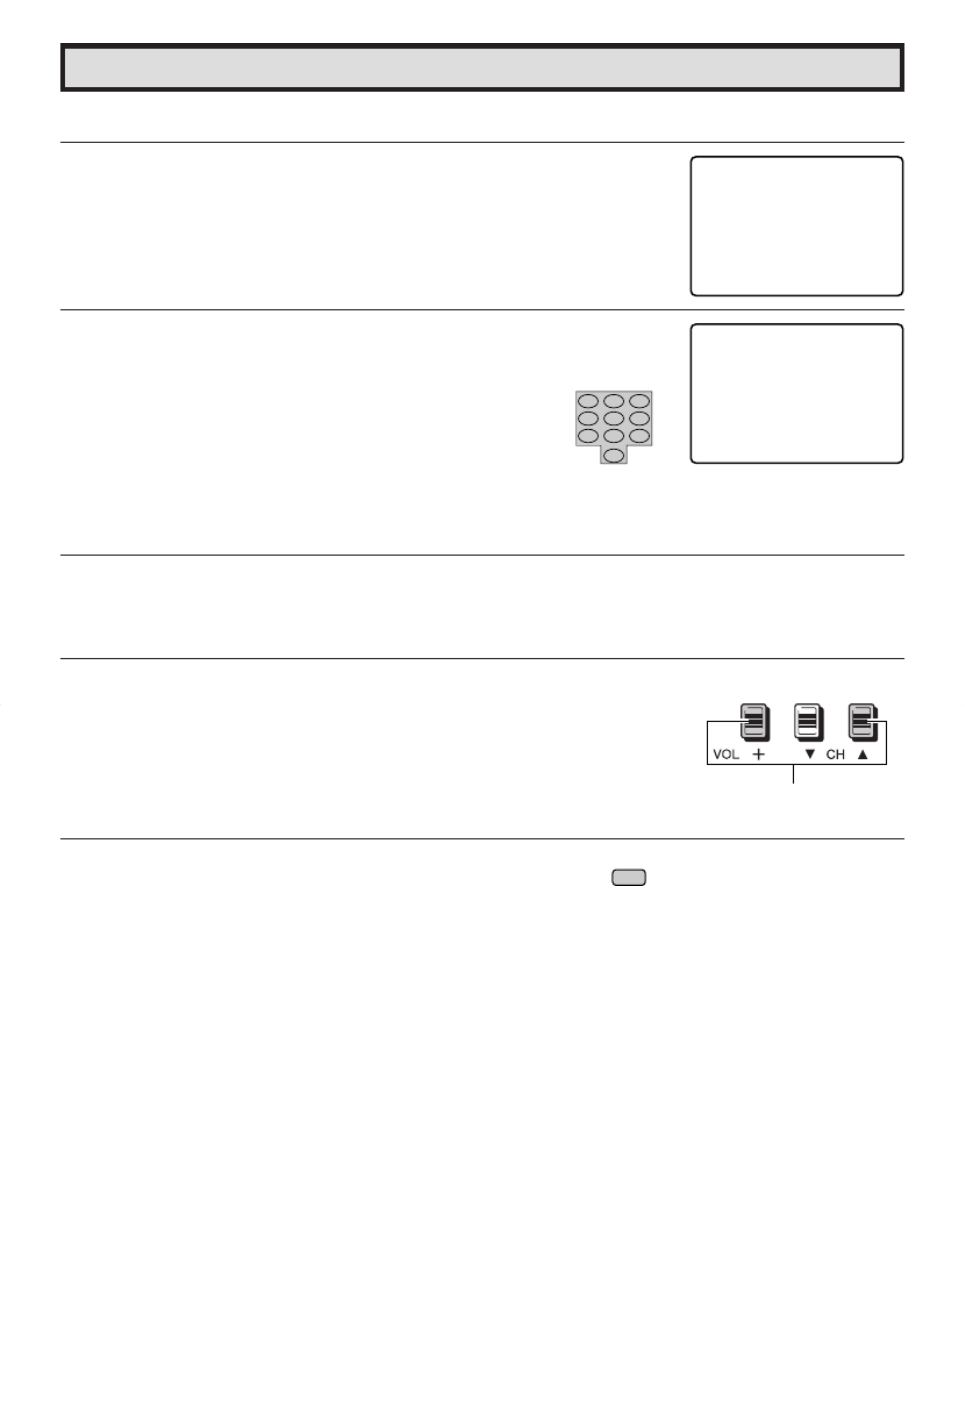
Demo Mode
•To quickly learn more about the TV set, press and hold for
more than three seconds both or and
MENU
on the TV set. The TV set will go into DEMO mode and
briefly explain the various features.
•To cancel DEMO mode, again press and hold for more than
three seconds both or
MENU
on the TV set.
Example:
DEMO mode display
Note:
•Without signal on COMPONENT IN, video input and antenna in, the DEMO mode cannot be activated.
Accessing the MAIN MENU screen without Remote Control
•If you misplaced your Remote Control you can still access most settings via
the MAIN MENU screen when you press
MENU
on the TV set.
•Some features of your TV set will not be accessible without the Remote Control.
If you lost your Remote Control, contact a Sharp Service Center for a
replacement.
(On the Set)
C
F
o
r
m
o
e
m
SHARP
SHARP
P
M
r
i
o
n
d
d
uc
t
s
s
(On the Set)
MENU
button
or
CH s CH a
CH a/s
10
CH a/s
buttons
MENU
button

11
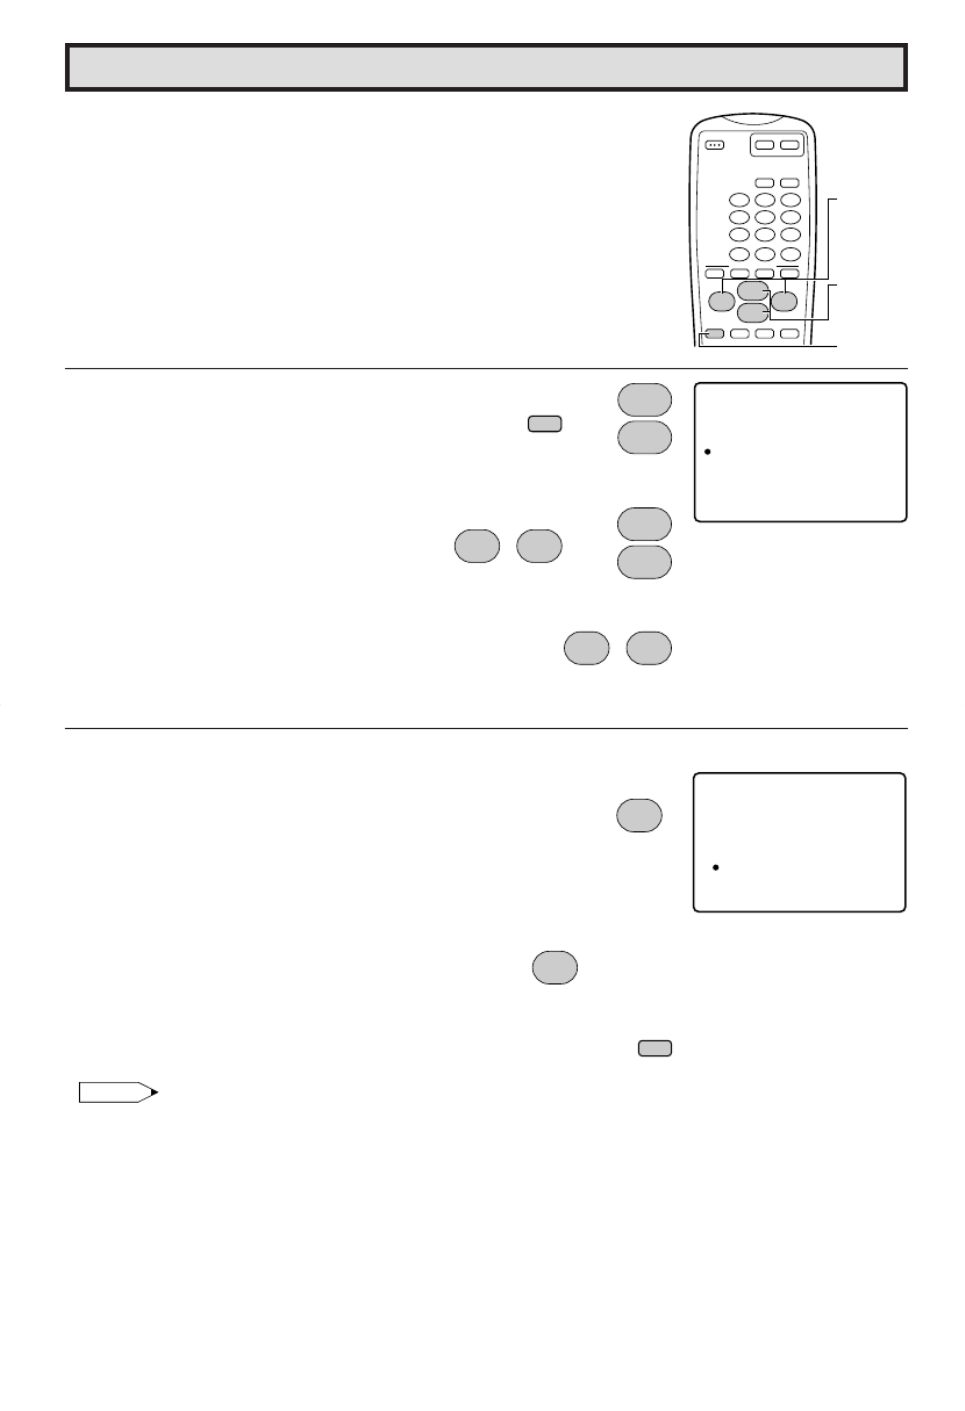
LThe language for the ON SCREEN DISPLAY can be set to ENGLISH, SPANISH or FRENCH.
LSetting the ON SCREEN DISPLAY Language.
1Press
MENU
to access the MAIN MENU screen.
2 Press to m e theov “a” mark to “ ”SETUP .
3 Press to access SETUP mod .e
4 Press to access LANG GE change mod .UA e
5 Press to select “ ”ENGLISH , “S ANISHP
(ESPA OL)Ñ ” or “FRENCH (FRANCAIS)”.
6Press
MENU
to exit.
Language
MENU
S L E E P T I M E R
V I DEO AD J U S T
A UD I O A D J U S T
A UD I O SE L E C T
C L O S ED C A P T
CH TS E U P
I ON
P A R E N
SE T U P
T A L CON ROLT
(MAIN MENU screen)
MENU
S L E E P T I M E R
V I DEO AD J U S T
A UD I O A D J U S T
A UD I O SE L E C T
C L O S ED C A P T
CH TS E U P
I ON
P A R E N
SE T U P
T A L CON ROLT
SE T PU
L A NG GUA E
E NE R GY SA V E
B L U E S CR E E N
L
E NGL HI S
A NG GU A E
E S P A ÑOL
F R A N A IC S
(SETUP mode)
(LANGUAGE change mode)
I
E NGL HI S
D I OMA
E S P A ÑOL
F R A N A IC S
MENU
CH
8
9
CH
; :
VOL
–VOL
+
CH
8
9
CH
; :
VOL
–VOL
+
MENU
CH a/s
CH a/s
V LO k/l
V LO k/l

12
LYou can preset your television to turn off automatically in increments of 30, 60, 90 or 120
minutes.
1Press
MENU
to access the MAIN MENU screen.
2 Press to access SLEEP TIMER mod . e
3 Press to set a sleep time of 30, 60, 90 or 120 mi ute .n s
4Press
MENU
to exit.
Note:
•To turn off the SLEEP TIMER, repeat the above SLEEP TIMER steps and select “– – – ” M REMAIN
during step 3.
•While SLEEP TIMER is active, the time remaining will be briefly displayed on-screen at regular
intervals or when the remote’s DISPLAY key is pressed.
Sleep Timer
MENU
S L E E P T I M E R
V I D E O AD J U S T
A UD I O A D J U S T
AUD I O SE L E CT
C L O S ED C A P T
CH TS E U P
I ON
P A R E N
SE T U P
T A L CON ROLT
(MAIN MENU screen)
S L E E P T I ME R
1 2 M0 AR E M NI
(SLEEP TIMER mode)
; :
VOL
–VOL
+
→
MENU
;:
VOL
–VOL
+
MENU
V LO k/l
V LO k/l

13
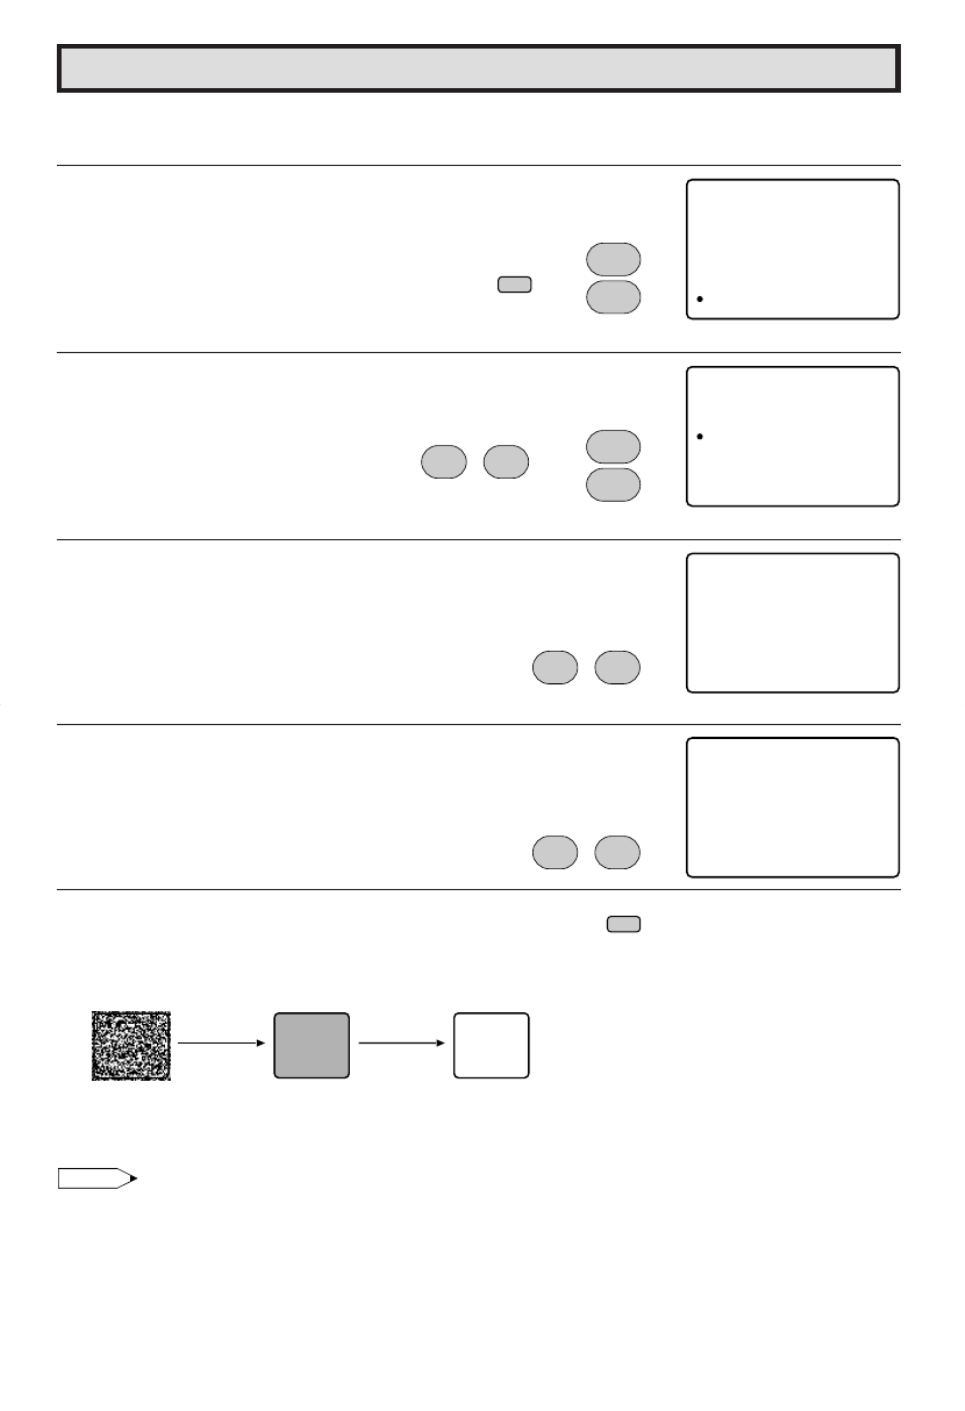
Description of Adjustment Items
1Press
MENU
to access the MAIN MENU screen.
2 Press to m e the ma k toov “a” r “VIDEO
ADJUST”.
3 Press to access PICTURE adjust mod .e
4 Press to select the desired mod .e
(Refer to the diagram below.)
5 Press to adjust the setting.
6Repeat steps 4 5 to to adjust other settings.
7Press
MENU
to exit.
Note:
•VIDEO ADJUST setting is available for AIR or CABLE/INPUT 1/INPUT 2 and COMPONENT respectively.
Video Adjust
Selected utton b button
item
PICTURE To increase contrast To decrease contrast
TINT To make skin tones greenish To make skin tones purplish
COLOR To increase color intensity To decrease color intensity
BRIGHT To increase brightness To decrease brightness
SHARP To increase sharpness To decrease sharpness
COLOR To choose a MH, HIGH, LOW or ML COLOR TONE.
TEMP.
RESET To return all adjustments to factory preset levels.
A B C D
PERSONAL PREFERENCE
9
VCR-CH
8
POWER (DVD/VCR)
; :
CH
8
VOL
–
VOL
+
9
CH
MENU MUTE
g
SKIP
f
CHANNEL
UP (8)/
DOWN (9)
MENU
VOLUME
(+)/(–)
MENU
S L E E P T I MER
V I DE O AD J U S T
A UD I O A D J US T
A UD I O SE L E CT
C L OSE D C A P T
CH TS E U P
I ON
P A R E N
SE T U P
T A L CON RO LT
(MAIN MENU screen)
P I CT UR E
_______
2 7
VOL UP (+)
increase contrast
PICTURE TINT COLOR
SHARPCOLOR TEMP.RESET
: CH 9: CH 8
BRIGHT
P I CT UR E
_ _ _ _ _ _ _
2 7
VOL DOWN (–)
decrease contrast
→
CH
8
9
CH
MENU
; :
VOL
–VOL
+
CH
8
9
CH
; :
VOL
–VOL
+
MENU
(PICTURE adjust mode)
V LO l
CH a/s
V LO k
V LO k/l
V LO k/l
V LO l
CH a/s
V LO k
V LO k/l
V LO k/l
CH a/s

14
1Press
MENU
to access the MAIN MENU screen.
2 Press to m e the ”ov “a ma k to “ UDIOr A
ADJUST”.
3 Press to access TREBLE adjust mod . e
4 Press to select the desired mod .e
(Refer to the diagram below.)
5 Press to adjust the setting.
6Repeat steps 4 5 to to adjust other settings.
7Press
MENU
to exit.
MENU
S L E E P T I M E R
V I DE O AD J UST
A UD I O AD J U S T
A UD I O S E L E C T
C L O S ED C A P T
CH TS E U P
I ON
P A R E N
SE T U P
T A L CON RO LT
Audio Adjust
(MAIN MENU screen)
Selected item utton utton b b
TREBLE To increase treble response To decrease treble response
BASS To increase bass response To decrease bass response
BALANCE To emphasize the right speaker’s volume To emphasize the left speaker’s volume
RESET To return all adjustments to factory preset levels.
→
CH
8
9
CH
MENU
T R E E 0B L
(TREBLE adjust mode)
TREBLE RESETBASS BALANCE
T R E E 0B L
; :
VOL
–
VOL
+
CH
8
9
CH
; :
VOL
–
VOL
+
MENU
V LO k
V LO l
V LO k/l
CH a/s
V LO k/l
CH a/s

15
Audio Select
LMTS (Multichannel TV Sound)
This circuit allows reception of stereo or bilingual TV sound.
LINTERNAL SPEAKER SWITCH
This function turns the TV’s internal speakers “ ”ON or “ ”OFF when listening to sound from
external speake s y using the UDIO OUTPUT CKS on page .r b A JA 39
LFAO (Fixed Audio Output)
This function turns the TV’s internal speakers “ ”OFF and allows fixed audio output from the
AUDIO OUTPUT CKS on p ge . With ,JA a 39 FAO the TV’s olume cont ol is disa led.v r b
1Press
MENU
to access the MAIN MENU screen.
2 Press to m e theov “a” ma k tor “AUDIO
SELECT”.
3 Press to access UDIO SELECT mod .A e
4 Press to m e the ma k toov “a” r “ ”MTS ,
“ ”SPEAKER or “ ”FAO .
5 Press to select “ ”STEREO , “ ”SAP or “ ”MONO when
the “ ”a mark is at “ ”MTS position.
6Press
MENU
to exit.
Ex: Actual screen indicating ON AIR when receiving STEREO
broadcasts
Actual channel number
“ ”← ON AIR will appear next to STEREO or
SAP when receiving STEREO or SAP broadcasts.
MEN U
S L E E P T I M E R
V I DE O A D J US T
AUD I O A D J U S T
A UD I O SE L E C T
C L O SED C A P T
CH TSE U P
I ON
P A R E N
SE T U P
T A L CON RO LT
(MAIN MENU screen)
A UD I O S E L E C T
MT S : S A P
F AO F: O F
S P E A K E R : O N
(AUDIO SELECT mode)
A UD I O S E L E C T
M T S : S T E R E O
F AO F: O F
S P E A K E R : O N
MTS
STEREO
SAP
MONO
SPEAKER
ON
OFF
FAO
ON
OFF
MENU
1 2
S T E E O O N A I RR
M O N O
S A P O N A I R
(CHANNEL call on screen)
MENU
→
CH
8
9
CH
CH
8
9
CH
(AUDIO SELECT mode)
→
; :
VOL
–VOL
+
; :
VOL
–VOL
+
V LO k/l
CH a/s
CH a/s
V LO k/l
17
Closed Caption
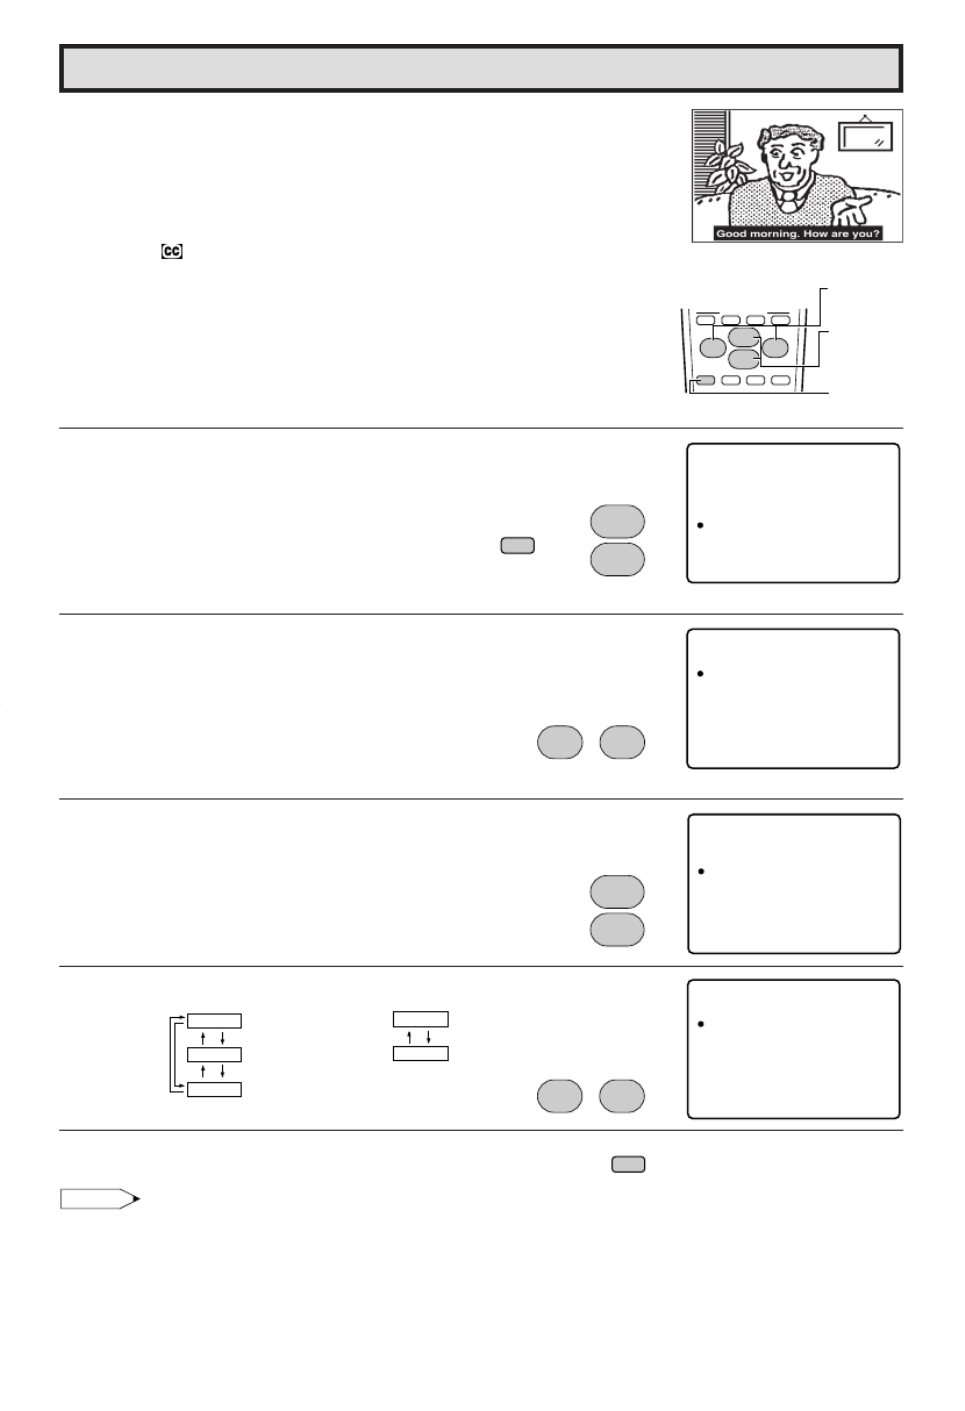
LHOW TO SET CLOSED CAPTION
• Your TV is equipped with an internal Closed Caption decoder. “Closed
Caption” is a system which allows you to view conversations, narration,
and sound effects in TV programs and home videos as subscript on
your TV screen as shown on the right.
• Not all the programs and videos will offer closed caption. Please look
for the “ ” symbol to ensure that captions will be shown.
• Closed Caption broadcast can be viewed in two modes: CAPTION
and TEXT. For each mode, two channels are available, CH1 and CH2:
The [CAPTION] mode subscripts dialogues and commentaries of TV
dramas and news programs while allowing clear view of the picture.
The [TEXT] mode displays over the picture other various information
(such as TV program schedule, weather forecast, etc.) that is
independent of the TV programs.
1Press
MENU
to access the MAIN MENU screen.
2 Press to m e theov “a” ma k tor “CLOSED
CAPTION”.
3 Press to access CLOSED CAPTION setting mod .e
4 Press to m e theov “a” ma k to eitherr
“ ”MODE or “DATA”.
5 Press to change the CLOSED CAPTION setting.
MODE: DATA:
6Press
MENU
to exit.
Note:
•
If a broadcast has CLOSED CAPTION and the
MUTE
button is pressed, the set enters [CAPTION] mode
automatically. Pressing
MUTE
again will return the set to its previous condition.
•
CLOSED CAPTION may malfunction (white blocks, strange characters, etc.) if signal conditions are poor or if
there are problems at the broadcast source. This does not necessarily indicate a problem with your TV.
•
If any button is pressed to call up the ON SCREEN DISPLAY while viewing a CLOSED CAPTION broadcast, the
CLOSED CAPTION will disappear momentarily.
•
When viewing in TEXT mode, if no TEXT broadcast is being received, for some programs the screen may
become dark and blank. Should this occur, set the CLOSED CAPTION mode to “ ”OFF .
9
VCR-CH
8
POWER (DVD/VCR)
; :
CH
8
VOL
–VOL
+
9
CH
MENU MUTE
g
SKIP
f
A B C D
PERSONAL PREFERENCE
CHANNEL
UP (8)/
DOWN (9)
MENU
VOLUME
(+)/(–)
MEN U
S L E EP T I ME R
V I DE O A D J US T
AUD I O AD J U S T
AUD I O SE L E C T
C L OS ED C A P T
CH TS E U P
I ON
PA R E N
SE T U P
TA L CO N RO LT
(MAIN MENU screen)
CH
8
9
CH
→
MENU
C L OS ED C A P T I O N
MOD E : CA P
DAT A : CH 1
T I ON
(CLOSED CAPTION setting mode)
;:
VOL
–VOL
+
C L OS ED C A P T I O N
MOD E : CA P
DAT A : CH 1
T I ON
CH
8
9
CH
CAPTION
TEXT
OFF
CH 1
CH 2
C L OS ED C A P T I O N
MOD E : CA P
DAT A : CH 1
T I ON
; :
VOL
–VOL
+
MENU
V LO k/l
CH a/s
CH a/s
V LO k/l

18
Note:
•MPAA RATING is only age based ratings.
[2] TV PARENTAL GUIDELINES
RATING
y content base x
AGE D L S V FV
(Sexually (Adult (Sexual (Violence) (Fantasy
Suggestive Language) Situation) Violence)
Dialog)
TV-Y (All children) V – – – – –
TV-Y7 (Direct to Older Children) V – – – – V
E
TV-G (General Audience) V – – – – –
Age TV-PG (Parental Guidance V V V V V –
base Suggested)
D
TV-14 (Parents Strongly V V V V V –
Cautioned)
TV-MA (Mature Audience Only) V – V V V –
V: Content Rating can be set.
–: Content Rating cannot be set (not normally broadcast by TV station).
Parental Control (V-CHIP Operation)
LV-CHIP
•This function allows you to restrict TV programs and also allows you to control TV usage based on
FCC data. This function is to prevent your children from watching violence or sexual scenes that may
be harmful.
•Restriction of TV programs includes two characters that contain information about the program’s
MPAA rating and the TV Parental Guidelines. MPAA is restricted by age. TV Parental Guidelines are
restricted by age and contents.
•Since a TV program may use either the MPAA rating or the TV Guidelines you should adjust both for
complete control.
[1] MPAA RATING
RATING
G GENERAL AUDIENCES. All ages admitted.
PG PARENTAL GUIDANCE SUGGESTED. Some material may not be suitable for
children.
age PG-13 PARENTAL STRONGLY CAUTIONED. Some material may be inappropriate
base for children under 13.
R RESTRICTED. Under 17 requires accompanying parent or adult guardian.
NC-17 NO ONE 17 AND UNDER ADMITTED.
X X Rating is an older rating that is unified with NC-17 but may be encoded on
older movie’s data.
•MPAA RATING (Example)
Example 1.
“ ”PG-13 in the age based RATING is blocked,
this will automatically block the high ratings
“ ”R , “ ”NC-17 , “ ”X also.
Example 2.
“ ”R in the age based RATING is blocked, this
will automatically block the high rating “NC-
17 , X” “ ” also.
1. User setting 2. Block table
PG
age
base
not to
block
not to
block
Select
block
auto-
block
auto-
block
auto-
block
G
G
PG
PG-13
R
NC-17
X
– – – – –
– – – – –
BLOCK
BLOCK
BLOCK
BLOCK
PG-13
R
NC-17
X
1. User setting 2. Block table
PG
age
base
not to
block
not to
block
not to
block
Select
block
auto-
block
auto-
block
G
G
PG
PG-13
R
NC-17
X
– – – – –
– – – – –
– – – – –
BLOCK
BLOCK
BLOCK
PG-13
R
NC-17
X

19
Parental Control (V-CHIP Operation Continued)
• TV-PARENTAL GUIDELINES (Example)
Example 1.1 : Age Based setting
Go through all select ratings and select unblocked for “AGE”.
This will automatically unblock everything.
Example 1.2 : Age Based setting
For “TV-G” select “BLOCK” for “AGE”. This will automatically block the
higher age ratings “TV-PG”, “TV-14” and “TV-MA” as well as
“TV-G”.
Furthermore, the content ratings “D”, “L”, “S”, “V”, “FV” are automatically
blocked as well for “TV-PG”, “TV-14” and “TV-MA” as well as “TV-G”.
Example 2.1 : Content Based setting
For “TV-PG”, “TV-14” and “TV-MA” select unblocked for each content
ratings (“D”, “L”, “S”, “V”, “FV”) by leaving “AGE” unblocked for
“TV-PG”, “TV-14” and “TV-MA”. If you choose to unblock for each one in
content base.
Example 2.2 : Content Based setting
Then for “TV-PG” and select “BLOCK” for only “V” (Violence). This will
automatically block the higher ratings “TV-14-V” and “TV-MA-V”
(“TV-14” and “TV-MA” for Violence content only).
Please note that with these settings blocking does NOT occur. If a program
is rated only “TV-MA”; it must be rated “TV-MA-V” to be blocked.
Example 3 : Reset an Age Based setting
For “TV-14” and select again “BLOCK” for “AGE”.
This will again automatically block the content ratings “D”, “L”, “S”, “V”,
“FV” for “T -MA”V as ell as “T -14”.w V
Please note that the lower age rating “TV-PG” did not change from its
pr vious setting .e s
Note:
• Content ratings can be modified but only in the combinations indicated by an in the table on pageV
18.
• Changing a lower age rating’s content setting to “BLOCK” automatically changes the same higher
age rating’s content setting to “BLOCK” regardless of their previous settings.
• Changing a lower rating’s “AGE” setting to “BLOCK” automatically changes all higher ratings to “BLOCK”
regardless of their previous settings.
• Any rating’s “AGE” set to unblocked must have its content settings individually set.
[3] ADDITIONAL MODE
Besides the above “MPAA RATINGS” and “TV PARENTAL GUIDELINES” new ratings system’s data
can be d wnloaded when th y become aila l .o e av b e (See page 2 .)2
E D L S V F VGA
T V – Y 7 – – – –
–
–
– –
V : B L OCK
T V – Y – – – – –
T V – G
T V GP–
– – – – –
T V – 41
T V – AM
RET RNU
E D L S V F VGA
T V – Y 7 – – – –
V
V V V V V –
V V V V –
– V V V –
V
V
V : B L OCK
T V – Y – – – – –
T V – G
T V GP–
–––––
T V – 41
T V – AM
RET RNU
E D L S V F VGA
T V – Y 7 – – – –
–
–
– –
V : B L OCK
T V – Y – – – – –
T V – G
T V GP–
– – – – –
T V – 41
T V – AM
RET RNU
E D L S V F VGA
T V – Y 7 – – – –
V –
V –
– V –
V : B L OCK
T V – Y – – – – –
T V – G
T V GP–
–––––
T V – 41
T V – AM
RET RNU
E D L S V F VGA
T V – Y 7 – – – –
–
V V V V –
– V V V –
V
V
V : B L OCK
T V – Y – – – – –
T V – G
T V GP–
– – – – –
T V – 41
T V – AM
RET RNU

20
Parental Control (V-CHIP Operation Continued)
LHOW TO SET V-CHIP
[1] MPAA RATING
1Press
MENU
to access the MAIN MENU screen.
2 Press to m e the ma k toov “a” r
“PARENTAL CONTROL”.
3 Press to access AREN AL CONT OL mod .P T R e
4 Press to access -CHIP BLOCK select mod , then V e
press to select M AA R TING “P A ”.
5 Press to m e theov “a” mark to “ ”PG ,
then press to select BLOCK. If ou sety “PG” to
BLOCK, “ ” “ ”PG-13 , R , “ ”NC-17 and “ ”X are automatically blocked.
6 Press to m e theov “a” ma k to "RETURN",r
then press to -CHIP BLOCK select mod . exit V e
Note:
Ex.
•If you set “ ”G to BLOCK , all RATING are automatically blocked.
•If you set “ ”X to BLOCK, “ ” “ ”G , PG , “ ” “ ”PG-13 , R and NC-17“ ” are not blocked.
(MAIN MENU screen)
MENU
→
CH
8
9
CH
(PARENTAL CONTROL mode)
→
; :
VOL
–VOL
+
; :
VOL
–VOL
+
321
654
987
100
0
FLASHBACK
ENTER
9
VCR-CH
8
POWER (DVD/VCR)
; :
CH
8
VOL
–VOL
+
9
CH
MENU MUTE
g
SKIP
f
A B C D
PERSONAL PREFERENCE
CHANNEL
UP (8)/
DOWN (9)
MENU
VOLUME
(+)/(–)
REMOTE
KEYPAD
MEN U
S L E E P T I ME R
V I DE O AD J U S T
AUD I O A D J US T
AUD I O SE L E CT
C L OS E D CA P T
CH TSE UP
I ON
P A R E N
SE T U P
T A L CON RO LT
P A R E N T CON T O LA L
V–CH I P B L OC K
V I EW T I ME R
V–CH I P OCKLB
MP A A
T V UG I
OP OI NT
DE L I NE S
SE C ER T – –N o .
S T A UT S O: F F
:– –
(V-CHIP BLOCK select mode)
MP A A
G
PG
PG 31–
R
N
X
–
B
B
B
B
B
:
:
:
:
:
:
–
O
O
O
O
O
–
C
C
C
C
C
–
K
K
K
K
K
–
L
L
L
L
L
C 71–
R E T RNU
; :
VOL
–VOL
+
; :
VOL
–VOL
+
→
CH
8
9
CH
MP A A
G
PG
PG 31–
R
N
X
–
B
B
B
B
B
:
:
:
:
:
:
–
O
O
O
O
O
–
C
C
C
C
C
–
K
K
K
K
K
–
L
L
L
L
L
C 71–
R E T RNU
; :
VOL
–VOL
+
→
CH
8
9
CH
V LO k/l
CH a/s
V LO k/l
V LO k/l
CH a/s
V LO k/l
V LO k/l
CH a/s
21
Parental Control (V-CHIP Operation Continued)
[2] TV GUIDELINES
1Repeat steps 1 3 to of [1] MPAA RATING.
2 Press to access -CHIP BLOCK select mod , then V e
press to m e theov “a” ma k tor “TV
GUIDELINES”.
3 Press to access TV GUIDELINES mod . e
4 To change CONTENT SETTING, press to move
the ma k to the desired ating and then press “a” r r
to select.
5 Press to m e theov “a” ma k to the desiredr content and
then press to select either BLOCK or “ ” unblock
(“–––––” ).
6 Press to m e theov “a” ma k to "RETURN",r
then press to retu n to TV GUIDELINES mod . r e
7Repeat steps to until all ratings and their contents are set.4 5
8When done, press
MENU
to exit.
V–CH I P OCKLB
MP A A
T V UG I
OP OI NT
DE L I NE S
SE C ER T – –N o .
S T A UT S O: F F
:– –
(V-CHIP BLOCK select mode)
CH
8
9
CH
; :
VOL
–VOL
+
E D L S V F VGA
T V – Y 7 V
V– – – –
V
V
V
V
V
V–
V
VV
V–
–
V
V
V–
V
V
V : B L O CK
T V – Y–––––
T V –G
T V GP–
–––––
T V –41
T V –AM
R E T RNU
(TV GUIDELINES mode)
; :
VOL
–VOL
+
; :
VOL
–VOL
+
→
CH
8
9
CH
T V – Y 7
AGE
D
L
S
V
F V
B
–
–
–
–
B
:
:
:
:
:
:
O
–
–
–
–
O
C
–
–
–
–
C
K
–
–
–
–
K
L
–
–
–
–
L
R E T RNU
(CONTENT RATING mode)
; :
VOL
–VOL
+
→
CH
8
9
CH
E D L S V F VGA
T V – Y 7 – – – –
V
V
V V V V –
V
V
V V –
–V
V V –
V
V
V : B LO C K
T V – Y– – – – –
T V –G
T V GP–
–––––
T V –41
T V –AM
R E T RNU
; :
VOL
–VOL
+
→
CH
8
9
CH
MENU
→
CH a/s
CH a/s
CH a/s
CH a/s
V LO k/l
V LO k/l
V LO k/l
V LO k/l
V LO k/l

22
→
Parental Control (V-CHIP Operation Continued)
[3] ADDITIONAL MODE (DOWNLOAD)
There will be an additional new rating system. In that case, please set up as follows.
Subsequently the new rating system will set up automatically.
1Repeat steps 1 3 to of [1] MPAA RATING.
2 Press to access -CHIP BLOCK select mod , then V e
press to m e theov “a” ma k tor “OPTION”.
3 Press to access OPTION mod , then press e
to m e the ma k to , thenov “a” r “ ”D WNL ADO O press
to “D WNL AD : ONO O ”.
4Press
MENU
to exit.
•DOWNLOAD V-CHIP DATA
1If you watch the program containing “ ”New Rating System Data ,
the DOWNLOAD screen will be displayed.
2The DOWNLOAD screen will disappear, once downloading is
finished.
Note:
• DOWNLOAD will not start, if you do not watch a program containing “ ”New Rating System Data .
V – CH I P OCKLB
MP A A
T V UG I
OP OI NT
DE L I N E S
S EC ER T – –N o .
S TA UT S O: F F
: – –
(V-CHIP BLOCK select mode)
CH
8
9
CH
; :
VOL
–VOL
+
O P T I O N
D OWN L O
R E T U R N
A D : ON
(OPTION mode)
; :
VOL
–
VOL
+
CH
8
9
CH
; :
VOL
–VOL
+
→→
MENU
321
654
987
100
0
FLASHBACK
ENTER
9
VCR-CH
8
POWER (DVD/VCR)
; :
CH
8
VOL
–VOL
+
9
CH
MENU MUTE
g
SKIP
f
A B C D
PERSONAL PREFERENCE
CHANNEL
UP (8)/
DOWN (9)
MENU
VOLUME
(+)/(–)
REMOTE
KEYPAD
P L E A S E W A I T
N OW D O W N L O A D I N G
V – C H I P D A T A
(DOWNLOAD screen)
V LO k/l
CH a/s
V LO k/l CH a/s
V LO k/l

23
Parental Control (V-CHIP Operation Continued)
• How to set Additional mode (Example)
1Repeat steps 1 2 [3] to of ADDITIONAL MODE.
2 Press to m e theov “a” ma k tor “Cdn.
English Ratings , then press” .
3You can select “BLOCK” or “– – – – –” (unblock) from each RATING
mode y pressingb and .
4You can select “BLOCK” or “– – – – –” (unblock) from each RATING
mode y pressingb and if
you select “Cdn. French Ratings” in step 2.
Note:
•In additional mode
Including two types (English mode, French mode), altogether you are able to download 4 different
modes.
O P T I O N
C d n . E n g l i s h R a t i n g s
C d n . F r e n c h R a t i n g s
D OWN L O
R E T U R N
A D : O N
(After download the rating data)
CH
8
9
CH
; :
VOL
–VOL
+
→
C
P G
14+
18+
A N A D I A
R E T U R N
C
C 8 +
G
N E N G L I S H
( T H R E S H O L D B L O C K )
B: L O C K
–:––––
–:––––
–:––––
–:––––
–:––––
(ENGLISH THRESHOLD BLOCK
mode)
CH
8
9
CH
; :
VOL
–VOL
+
→
C A N A D I A
R E T U R N
G
8ans+
31 a n s +
61 a n s +
81 a n s +
N F R E N C H
( T H R E S H O L D B L O C K )
B: L O C K
–:– – – –
–:– – – –
–:– – – –
–:– – – –
(FRENCH THRESHOLD BLOCK
mode)
CH
8
9
CH
; :
VOL
–VOL
+
→
CH a/s
V LO k/l
CH a/sV LO k/l
CH a/sV LO k/l
24
Parental Control (V-CHIP Operation Continued)
L Turning On (Activating) the V-Chip Blocks
1Repeat steps 1 3 [1] to of MPAA RATING.
2 Press to access -CHIP BLOCK select mod , then V e
press to m e the ”ov “a ma k to “SECRETr No.”.
3Enter a 4-digit SECRET No. using the
REMOTE KEYPAD
.
4 Press to m e theov “a” mark to “S TUS”, TA
then press to acti ate the -CHIP BLOCK.v V (If S TUSTA
is OFF, V-CHIP BLOCK will not operate.)
5When done, press
MENU
to exit.
L To cancel the V-CHIP BLOCK screen while V-CHIP BLOCK has been activated.
1“V-CHIP HAS BEEN ACTIVATED” will be displayed if you view a
program containing Program Rating data as same as you
configured.
Note:
• “V-CHIP HAS BEEN ACTIVATED” will not be displayed if STATUS is
not configured to “ON”.
2Press
MENU
, then “INPUT SECRET No.” will be displayed.
3Enter the 4-digit SECRET No. using the
REMOTE KEYPAD
, then
V-CHIP BLOCK temporarily will be canceled. If the wrong SECRET
No. is chosen, “SECRET No. IS INCORRECT” will be displayed.
Input the SECRET No. again in this case.
Note:
• If you turn the power from OFF, the V-CHIP BLOCK will automatically reset to ON again.
V–CH I P OCKLB
MP A A
T V UG I
OP OI NT
DE L I NE S
SE C ER T – –N o .
S T A UT S O: F F
:– –
(V-CHIP BLOCK select mode)
CH
8
9
CH
; :
VOL
–
VOL
+
V–CH I P OCKLB
MP A A
T V UG I
OP OI NT
DE L I NE S
S E C ER T 3 4N o .
S T A UT S O: F F
: 1 2
; :
VOL
–
VOL
+
→
CH
8
9
CH
MENU
→
321
654
987
0
V–CH I P OCKLB
MP A A
T V UG I
OP OI NT
DE L I NE S
S E C ER T 3 4N o .
S T A UT S O: F F
: 1 2
MENU
2 3
V–C IH P
AC VI A ET DT
HAS B E E N
T V –Y 7
F V
I NP TU S
– – ––
E ECR T oN .
I NP TU SE ECR T oN .
∗∗∗∗
321
654
987
0
CH a/s
V LO k/l
CH a/s
V LO k/l
25
Parental Control (V-CHIP Operation Continued)
L To change the V-CHIP BLOCK setting. (Secret No. is registered.)
1Repeat steps 1 3 to of [1] MPAA RATING, then INPUT SECRET“
No.” will be displayed.
2Enter the 4-digit “INPUT SECRET No.” using the
REMOTE
KEYPAD
and the V-CHIP select mode will be displayed. Repeat
configuration of the V-CHIP BLOCK.
L If you forget or need to change your Secret No., clear the original Secret No. and set up a
new one.
1Repeat steps 1 3 to of [1] MPAA RATING, or 1 to 2 of [L To cancel
the V-CHIP BLOCK screen while V-CHIP BLOCK has been
activated], then “INPUT SECRET No.” will be displayed.
2 Press and hold both on the TV set and
simultaneously until the message “INPUT SECRET No.” disappears.
3Press the
MENU
button to exit.
I N P TU S
– – ––
E ECR T oN .
I N P TU S E EC R T oN .
∗∗∗∗
(On the Set)
MENU
321
654
987
0
V LO k CH a
VOL k and CH a
buttons

26
Parental Control (VIEW TIMER)
LVIEW TIMER
This function allows you to restrict TV viewing time and also allows you to control TV usage.
This function is to prevent your children from watching too much TV.
VIEWING TIME (an accumulative timer: counts only the time
duration acquired while the TV is on.)
•VIEWING TIME can be set from 30M (30 minutes) to 10H00M (10
hours) in 30 minutes intervals.
OFF TIME (Restricts TV watching after the VIEWING TIME reaches
zero.)
•OFF TIME can be set from 30M (30 minutes) to 10H00M (10 hours) in
30 minutes intervals.
STATUS (ON/OFF setting of VIEW TIMER)
LHow to set VIEW TIMER.
1Press
MENU
to access the MAIN MENU screen.
2 Press to m e the ma k toov “a” r
“PARENTAL CONTROL”.
3 Press to access AREN AL CONT OL mod .P T R e
4 Press to m e the ma k toov “a” r “VIEW
TIMER”.
5 Press to access TIMER mod . VIEW e
6 Press to select “VIEWING TIME” and
“ ”OFF TIME . For each selection, press to set the
time duration.
7 Press to select SECRET N . “o.” Enter a
4-digit SECRET No. using
REMOTE KEYPAD
.
8 Press to select . “ ”S TUSTA Press
to tu n ON the .r “VIEW TIMER” (If S TUS is OF ,TA F
VIEW TIMER will not operate.)
CH
8
9
CH
; :
VOL
–VOL
+
→
→
V I EW IT REM
V I EW I NG T I ME
–H–
OF IT MF E
– – M
–H– – – M
SE C ER T : – – ––N o .
S T A UT S O: F F
MENU
S L E E P T I ME R
V I DE O AD J U ST
A UD I O A D J U S T
A UD I O SE L E C T
C L OS E D CA P T
CH TS E U P
I ON
P A R E N
SE T U P
T A L CON ROLT
(MAIN MENU screen)
→
CH
8
9
CH
MENU
P A R E N AT C OL N RT O L
V - CH I P B L OCK
EIV TW I ME R
(PARENTAL CONTROL mode)
V I EW IT REM
V I EW I NG T I ME
–H–
OF IT MF E
– – M
–H– – – M
SE C ER T : – – ––N o .
S T A UT S O: F F
(VIEW TIMER mode)
; :
VOL
–VOL
+
V I EW IT REM
V I EW I NG T I ME
H2
OF IT MF E
0 0M
–H– – – M
SE C ER T : – – ––N o .
S T A UT S O: F F
; :
VOL
–VOL
+
CH
8
9
CH
V I EW IT REM
V I EW I NG T I ME
H2
OF IT MF E
0 0M
H5 0 0 M
SE C ER T : – – ––N o .
S T A UT S O: F F
321
654
987
0
→
CH
8
9
CH
V I EW IT REM
V I EW I NG T I ME
H2
OF IT MF E
0 0M
H5 0 0 M
S E C ER T : 1 2 43N o .
S T A UT S O: N
; :
VOL
–VOL
+
CH
8
9
CH
→
V LO k/l
CH a/s
CH a/s
V LO k/l
V LO k/l
V LO k/l
CH a/s
CH a/s
CH a/s

27
Parental Control (VIEW TIMER Continued)
9Press
MENU
to exit.
Example
•To restrict anybody from watching the TV for 5 hours, after watching
the TV for 2 hours, your settings would look like this:
•They can choose to watch the 2 hours of TV however they wish. For
example, they could watch 1 hour of TV, turn TV off for 30 minutes,
then turn TV on and watch the remaining 1 hour on the VIEWING
TIMER.
LTo change the VIEW TIMER settings. (SECRET No. is registered)
1Repeat “How to set VIEW TIMER steps and select ” “PARENTAL
CONT OL VIEW TIMERR ” du ing step .r 3 Press , and
“INPUT SECRET No.” will be displayed.
2Enter the 4-digit SECRET No. using the
REMOTE KEYPAD
, and
the VIEW TIMER mode will be displayed. Repeat step
6 ~ 9
.
Note:
•When you choose the correct SECRET No., the VIEW TIMER mode is
displayed. If the wrong SECRET No. is chosen, SECRET No. IS“
INCORRECT” is displayed. Input the SECRET No. again in this case.
LTo cancel the VIEW TIMER (While the TV set is OFF but the VIEW
TIMER is set)
1Turn on TV; a blue screen message “TIME OVER will appear. If”
you do nothing, the TV will turn off in approximately 30 seconds.
2Enter the 4-digit SECRET No. using the
REMOTE KEYPAD
. When
you choose the correct SECRET No., the VIEW TIMER is canceled.
If the wrong SECRET No. is chosen, SECRET No. IS INCORRECT“ ”
is displayed. Input the SECRET No. again in this case.
LTo cancel the VIEW TIMER setting or change the SECRET No.
(When you forget the SECRET No.)
1Repeat “How to set VIEW TIMER steps and select ” “PARENTAL
CONT OL VIEW TIMERR ” du ing step .r 3 Press , and
“INPUT SECRET No.” will be displayed.
MENU
V I EW IT REM
V I EW I NG T I ME
H2
OF IT MF E
0 0M
H5 0 0M
S E C ER T : 1 2 43N o .
S T A UT S O: N
I NP TU S
– – ––
E ECR T oN .
; :
VOL
–VOL
+
V I EW IT REM
V I EW I NG T I ME
H2
OF IT MF E
0 0M
H5 0 0 M
S E C ER T : 1 2 43N o .
S T A UT S O: F F
321
654
987
0
S E CR E T
I NCOR R E C T
N o . SI
T I
I NP U T TRS E E .N oC
– – ––
ME O EV R
T I
I NP U T TRS E E .N oC
ME O EV R
∗ ∗ ∗ ∗
I NP TU S
– – ––
E ECR T oN .
321
654
987
0
V LO k/l
V LO k/l

28
Parental Control (VIEW TIMER Continued)
2 Press and hold both on the TV set and
simultaneously until the VIEW TIMER mode is displayed. Now you
can cancel the VIEW TIMER settings or change the SECRET No.
while “INPUT SECRET No.” is displayed.
LNotice of Remaining VIEWING TIME
•For every 30 minute interval, the “ ”remaining time will be displayed for
4 seconds. For the last 5 minutes, the remaining time“ ” will be displayed
every minute.
• “0H00M REMAIN” will be displayed for 10 seconds just before the
VIEWING TIME is complete.
(On the Set)
0 3 0 RMH E IAM
V EW ITI M RE
N
0 0 5 RMH E IAM
V EW ITI M RE
N
0 0 0 RMH E IAM
V EW ITI M RE
N
V LO k CH a
VOL k and CH a
buttons

30
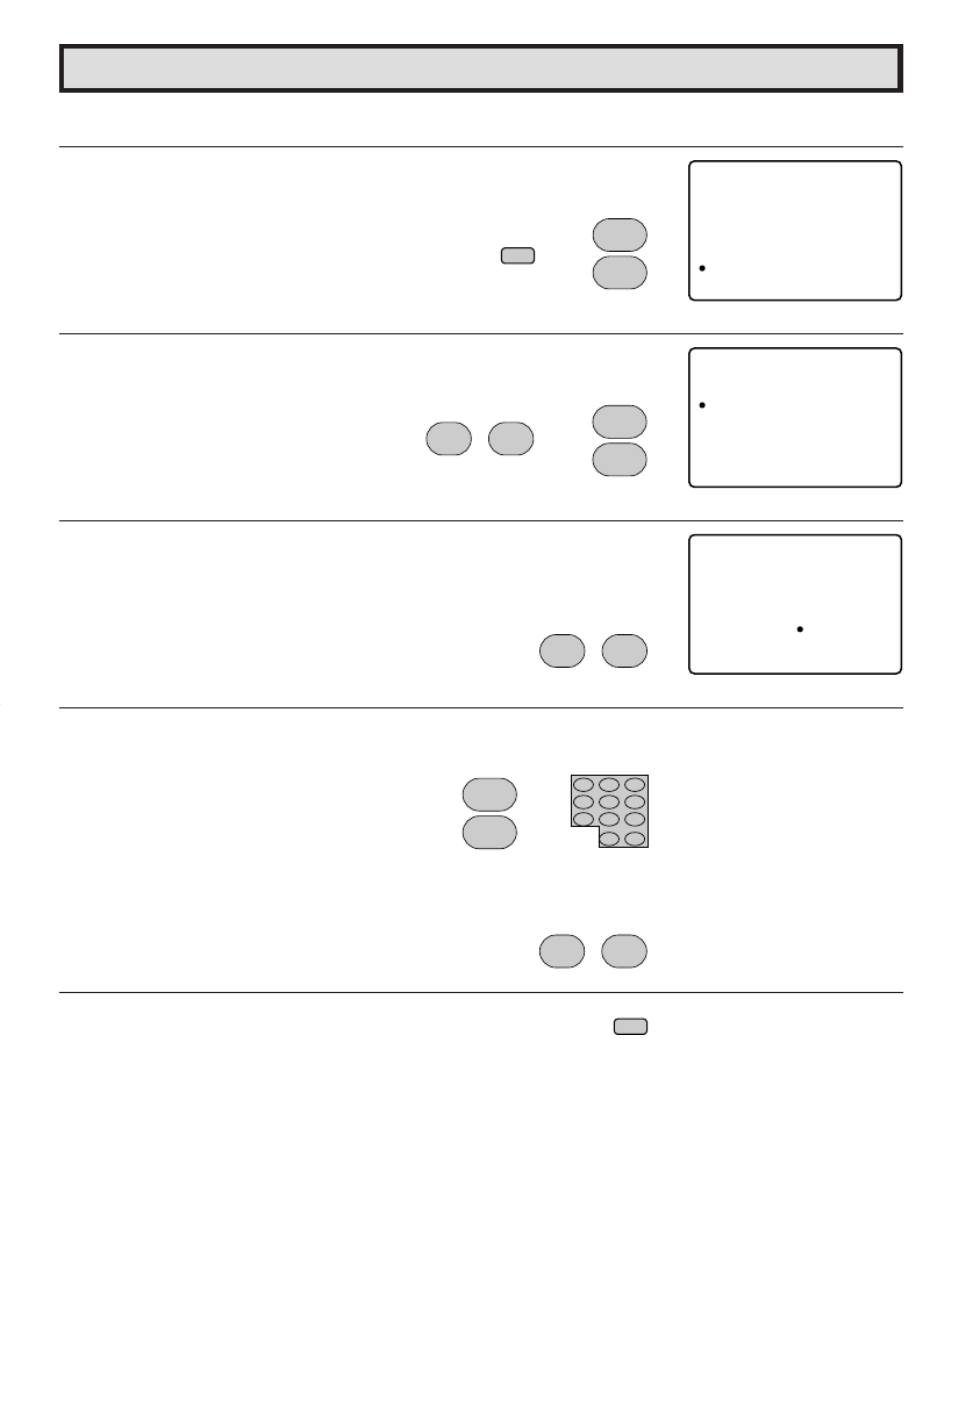
Ch Setup (Continued)
LCHANNEL SETTING
If EZ SETUP does not memorize all the channels in your region, follow the instructions below
to manually memorize the channel.
1AIR/CABLE setting
1Press
MENU
to access the MAIN MENU screen.
2 Press to m e theov “a” ma k tor “CH
SETUP”.
3 Press to access CH SETUP mod .e
4 Press to access AIR/CABLE mod .e
5 Press to m e the ma k to the desiredov “a” r
mode.
6Press
MENU
to exit.
Note:
•Receivable channels of your TV set are:
AIR channels: CABLE channels:
VHF: 2 through 13. 1 (HRC and IRC mode only)
UHF: 14 through 69. 2 through 125 (STD, HRC and IRC)
MENU
S L E E P T I ME R
V I DE O AD J U S T
A UD I O A D J U S T
A UD I O S E L E CT
C L O S E D C A P T
CH TS E U P
I ON
P A R E N
SE T U P
T A L CON RO LT
(MAIN MENU screen)
CH ES U PT
A I R AC/ B L E
CH MME OR Y
CH AS E R CH
P E RSO NA L PR
E Z TSE U P
E F .
UN I V E R SA L P L SU
(CH SETUP mode)
A I C/R B ELA
A I R
CAB L E ST D
CA LB E HRC
CAB L E CI R
(AIR/CABLE mode)
A I C/R B ELA
A I R
CAB L E ST D
CA LB E HRC
CAB L E CI R
(AIR/CABLE mode)
AIR CABLE STD CABLE HRC CABLE IRC
CH
8
9
CH
→
MENU
; :
VOL
–VOL
+
; :
VOL
–VOL
+
CH
8
9
CH
MENU
CH a/s
V LO k/l
V LO k/l
CH a/s
31
Ch Setup (Continued)
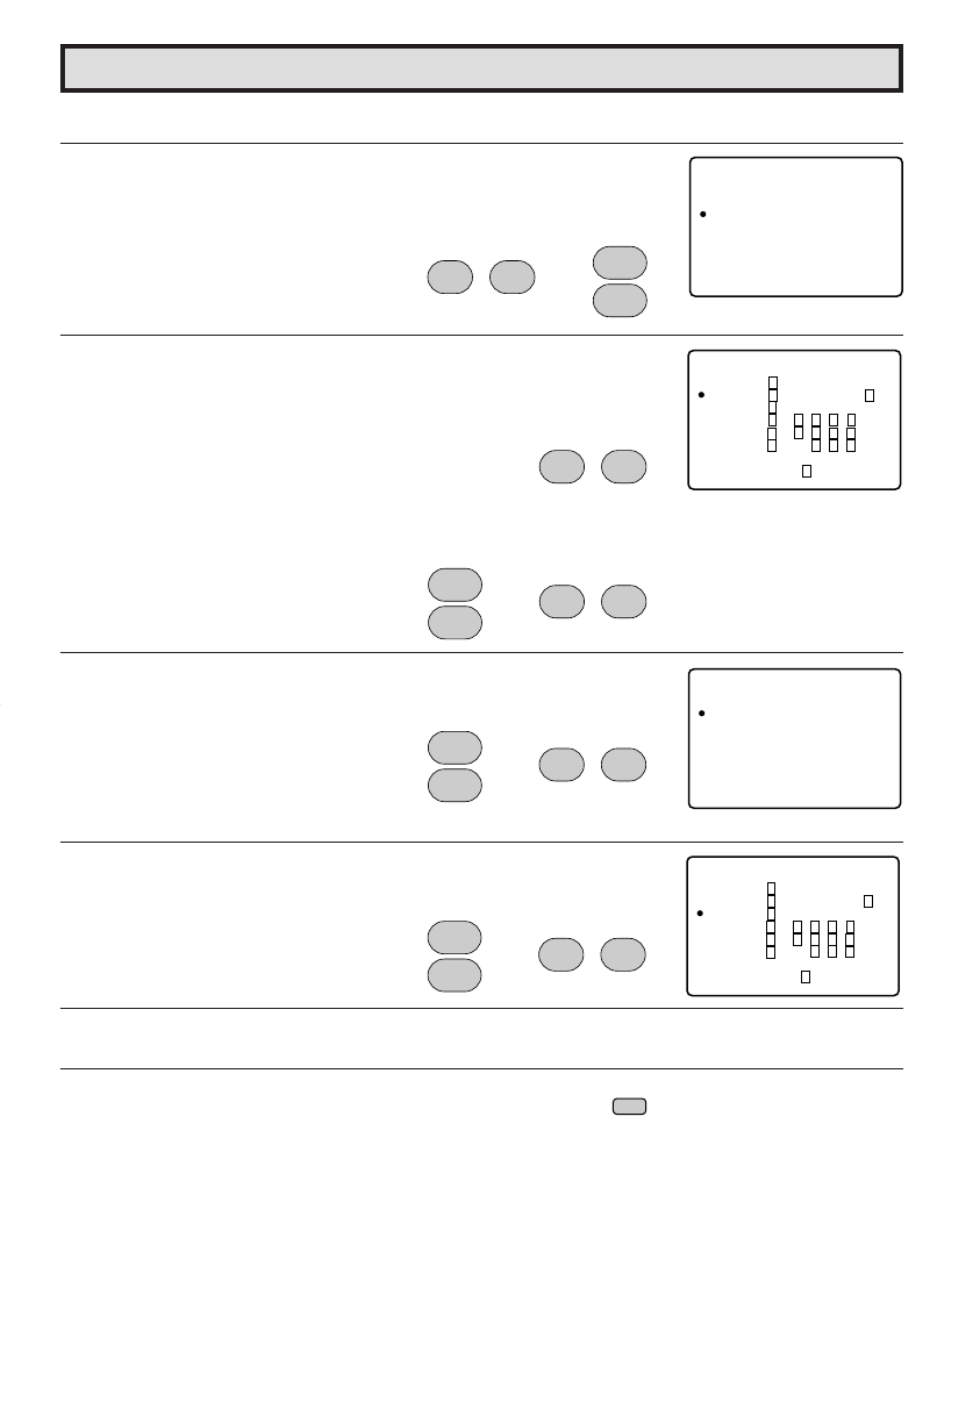
2 H w to s ve b TV hannels into memo .o a roadcast c ry
1 Press
MENU
to access the MAIN
MENU screen, then press
to move the “ ”a mark to “CH SETUP”.
2 Press to access CH
SETUP mode, then press
to move the mark“ ”a to “CH SEARCH”.
3 Press to access CH
SEARCH mode.
To start:
Press . The tuner will search
through all available channels in your
area and add them into the TV’s
memory.
To stop:
Press .CH SEARCH will stop
at the current channel and will not
add any higher channels.
4 Press
MENU
to xit.e
Note:
• If ou pressy again while in the CH SEARCH mod , auto-e
program will start again, and the previously memorized channels will
be lost.
321
654
987
100
0
A B C D
PERSONAL PREFERENCE
9
VCR-CH
8
FLASHBACK
POWER (DVD/VCR)
POWER
DISPLAY
CAT V
INPUT
TV
DVD VCR
ENTER
; :
CH
8
VOL
–
VOL
+
9
CH
MENU MUTE
g
SKIP
f
CHANNEL
UP ( )/8
DOWN (9)
MENU
VOLUME
(+)/(–)
CH ES U PT
A I R / AC B L E
CH MME ORY
CH AS E R CH
P E RSO N A L P R
E Z TS E UP
E F .
UN I V E R SA L P L SU
(CH SETUP mode)
CH
8
9
CH
→
MENU
CH
8
9
CH
; :
VOL
–VOL
+
→
; :
VOL
–
VOL
+
(START)
:
VOL
+
(STOP)
;
VOL
–
MENU
CH ES RCHA
A RI 1 2
S T OP S AT R T
(CH SEARCH mode)
V LO k/l
CH a/s
CH a/s
V LO k/l
V LO k
V LO k
V LO l
32
Ch Setup (Continued)
3 How to add or erase weak, additional or unwanted channels from TV memory.
1 Press
MENU
to access the MAIN MENU screen, then press
to m e theov “a” ma k tor “ ”CH SETUP .
2 Press to access CH SETUP mode, then press
to m e theov “a” ma k tor “ ”CH MEMO YR .
3 Press to access CH MEMO Y mod .R e
4 Use or
REM TE KEY ADO P
to select
each desired channel to add or erase.
5 Press to add a channel to the TV s memo y or press ’r
to e ase a channel from the TV s memo .r ’ry
6Press
MENU
to exit.
MEN U
S L E E P T I ME R
V I DE O A D J U S T
A UD I O A D J U S T
A UD I O S E L E C T
C L OS E D C A P T
CH TSE U P
I ON
P A R E N
SE T U P
T A L CON RO LT
(MAIN MENU screen)
CH ES U PT
A I R AC/ B L E
CH MME OR Y
CH AS E R C H
P E RSO N A L P R
E Z TS E U P
E F .
UN I V ER SA L P L SU
(CH SETUP mode)
CH EM O RYM
A RI 1 2
E ER AS A DD
(CH memory mode)
CH
8
9
CH
→
MENU
CH
8
9
CH
→
; :
VOL
–VOL
+
; :
VOL
–VOL
+
321
654
987
100
0
ENTER
CH
8
9
CH
or
; :
VOL
–VOL
+
MENU
CH a/s
V LO k/l
CH a/s
V LO k/l
CH a/s
V LO l
V LO k

33
Ch Setup (Continued)
LPERSONAL PREFERENCE
By setting the PERSONAL PREFERENCE channels in advance,
you can select your favorite channels easily.
1Press
MENU
to access the MAIN MENU screen.
2 Press to m e the ma k toov “a” r
“ ”CH SETUP .
3 Press to access CH SETUP mode, then press
to move t he mar k to PERSON AL“ ”a“
PREFERENCE”.
4 Press to select PERSONAL PREFERENCE select
mode in which you can program 4 favorite channels, in 4 different
categories. (total of 16 channels)
5 P r e s s to move th e mark to the desi r ed“ ”a
position.
6Press
REMOTE KEYPAD
on the Remote to input the CHANNEL
Number into the memory.
Example:
125 —Press “ ”100 followed by “ ”2 and then “ ”5 .
25 — “ ”Press 2 and then “ ”5 .
4 Press — “ ”0 and then “ ”4 .
7Repeat steps 4 6 to to input the next CHANNEL Number.
8Press
MENU
to exit.
To select the PERSONAL PREFERENCE channel.
If the channels are memorized as shown to the right,
press the Remote’s A“ ” button to select the Channels below.
321
654
987
100
0
FLASHBACK
ENTER
9
VCR-CH
8
POWER (DVD/VCR)
; :
CH
8
VOL
–
VOL
+
9
CH
MENU MUTE
g
SKIP
f
A B C D
PERSONAL PREFEREN CE
CHANNEL
UP (8)/
DOWN (9)
MENU
VOLUME
(+)/(–)
REMOTE
KEYPAD
PERSONAL
PREFERENCE
MENU
S L E EP T I ME R
V I DE O AD J US T
A UD I O A D J U S T
A UD I O S E L E CT
C L OS E D C A P T
CH TS E U P
I ON
P A R E N
SE T U P
T A L CON RO LT
(MAIN MENU screen)
CH ES U PT
A I R AC/ B L E
CH MME O R Y
CH AS E R C H
P E RSO N A L P R
E Z TS E U P
E F .
UN I V E R SA L P L SU
(SETUP mode)
P E R OS P RE .FA LN
>< A B C D
– – – – – – – – – – – –
– – – – – – – – – – – –
– – – – – – – – – – – –
– – – – – – – – – – – –
P E R OS P RE .FA LN
>< A B C D
– – – – – – – – – – – –
– – – – – – – – – – – –
– – – – – – – – – – – –
– – – – – – – – – – – –
(PERSONAL PREFERENCE select mode)
P E R OS P RE .FA LN
>< A B C D
1 2 5 – – – – – – – – –
– – – – – – – – – – – –
– – – – – – – – – – – –
– – – – – – – – – – – –
→
CH
8
9
CH
MENU
CH
8
9
CH
→
; :
VOL
–
VOL
+
; :
VOL
–VOL
+
CH
8
9
CH
321
654
987
100
0
ENTER
MENU
P E R OS P RE .FA LN
>< A B C D
1 2 5 8 5 3 8 – – –
2 5 1 2 3 3 0 –––
4 0 5 5 – – – – – –
4––– ––– –––
125 25
40 4
CH a/s
V LO k/l
/C H a s
V LO k/l
CH a/s

34
Ch Setup (Continued)
LUNIVERSAL PLUS FUNCTION
VCR or DVD input mode will be selected automatically by pressing
the VCR or DVD PLAY buttons on the UNIVERSAL REMOTE
CONTROL.
1Press
MENU
to access the MAIN MENU screen.
2 Press to m e the ”ov “a ma k to “CHr SETUP”.
3 Press to access CH SETUP mode, then press
to move the “ ” mark to “UNIVERSALa PLUS”.
4 Press to access UNIVERSAL PLUS to select VCR
or DVD mode.
5 Press to select the VCR or DVD, and press
to select “CH3, CH4”, “IN PUT 1 (or
COMPONENT)”, “INPUT 2” or “OFF”.
Set model to the input in which your
VCR or DVD is connected to. If done
through RF, select either channel 3 or
4 to match the setting of the VCR or
DVD.
6Press
MENU
to exit.
(MAIN MENU screen)
→
9
VCR-CH
8
POWER (DVD/VCR)
; :
CH
8
VOL
–VOL
+
9
CH
MENU MUTE
g
SKIP
f
A B C D
PERSO NAL PREFERE NCE
CHANNEL
UP ( )/8
DOWN (9)
MENU
VOLUME
(+)/(–)
MEN U
S L E E P T I ME R
V I D EO AD J US T
AUD I O A D J US T
A UD I O S E L E CT
C L OS E D CA P T
CH TSE UP
I ON
P A R E N
SE T U P
T A L CON RO LT
CH
8
9
CH
MENU
CH ES U PT
A I R AC/ B L E
CH MME OR Y
CH AS E R C H
P E RSON A L PR
E Z TS E U P
E F .
UN I V ERS A L P L SU
(CH SETUP mode)
CH
8
9
CH
; :
VOL
–VOL
+
→
UN I EV S LAR P L SU
VCR F F: O
DVD F F: O
(EZ SETUP mode)
; :
VOL
–VOL
+
UN I EV S LAR P L SU
VCR H 3: C
DVD F F: O
MENU
CH3 CH4
OFF
INPUT 1 (or COMPONENT)
INPUT 2
CH
8
9
CH
; :
VOL
–
VOL
+
→
(UNIVERSAL PLUS select mode)
CH a/s
V LO k/l
CH a/s
V LO k/l
CH a/s
V LO k/l
36
Set Up (Continued)
LBLUE SCREEN
Automatically turns the screen blue if a broadcast signal is not received.
1Press
MENU
to access MAIN MENU screen.
2 Press to m e theov “a” ma k tor “ ”SETUP .
3 Press to access SETUP mod , then presse
to m e theov “a” mark to “ ”BLUE SCREEN .
4 Press to access BLUE SCREEN select mod .e
5 Press to select “ ”ON .
6Press
MENU
to exit.
When BLUE SCREEN is set to “ ”ON .
Note:
•Poor reception due to weak signals, or too much noise might activate the BLUE SCREEN function
despite the presence of a broadcast signal. To continue watching TV under these conditions, switch
the BLUE SCREEN “ ”OFF .
MEN U
S L E E P T I ME R
V I DE O A DJ U ST
A UD I O A D J U S T
A UD I O S E L E C T
C L OS E D C A P T
CH TSE U P
I ON
P A R E N
SE T U P
T A L CON RO LT
(MAIN MENU screen)
SE T PU
L A NG GU A E
E NE R GY S A V E
B L U E S CR E E N
(SETUP mode)
B L U E CS R E E N
: O F F
(BLUE SCREEN select mode)
B L U E CS R E E N
: ON
CH
8
9
CH
→
MENU
CH
8
9
CH
→
; :
VOL
–VOL
+
; :
VOL
–VOL
+
; :
VOL
–VOL
+
MENU
No signal Blue screen TV off
After five
seconds
After 15
minutes Standby
mode
V LO k/l
CH a/s
CH a/s
V LO k/l
V LO k/l

Using the Video and Audio Input Jacks
L Connecting video equipment for playback of video material.
• When the television is connected to video equipment as shown below, the material being played back
on the video equipment can be seen on the television screen.
Connecting video device equipped with video output terminals.
CONNECTIONS
(Front connection
terminals of TV)
To AUDIO OUTPUT (L)
To AUDIO OUTPUT (R)
(Pull open for inside door)
To VIDEO OUTPUT
VIDEO EQUIPMENT
P
R
P
B
Y
IN 1
LINE
OUT
R
L
AUDIO
VIDEO
R
L
COMPONENT
(Rear connection
terminals of TV)
To VIDEO OUTPUT
To AUDIO OUTPUT (L)
To AUDIO OUTPUT (R)
CAMCORDER
TV GAME
VCR
DVD
37
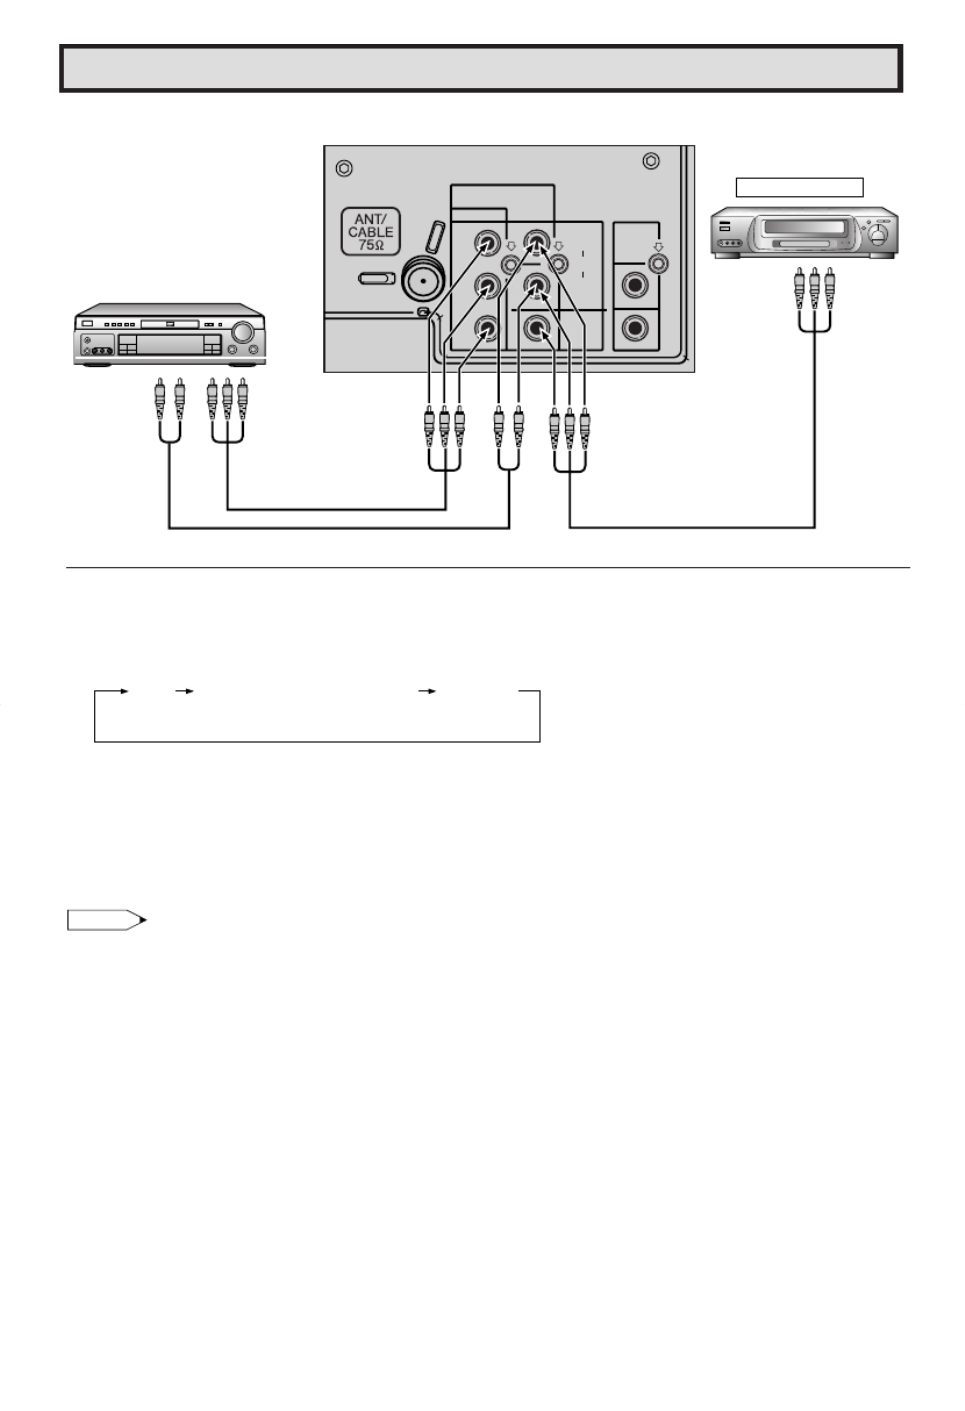
Using the Video and Audio Input Jacks (Continued)
P
B
Y
IN 1
LINE
OUT
R
L
AUDIO
VIDEO
R
L
COMPONENT
Video Equipment
(Rear connection terminals of TV)
To COMPONENT
VIDEO OUTPUT
Jacks
To AUDIO
OUTPUT
(L/R)
Video Equipment with
Component Video
(Component Color)
Output Jacks (Y, P
B
and P
R
)
P
R
To AUDIO OUTPUT (L)
To AUDIO OUTPUT (R)
To VIDEO OUTPUT
38
L To watch video material playback.
• ’Press the Remote s
INPUT
button to select the VIDEO INPUT mode for the video equipment you wish
to play.
• The external VIDEO INPUT mode will change as follows each time the
INPUT
button is pressed.
• When the AV cables are being connected to the VIDEO INPUT 1 and COMPONENT Y terminals
simultaneously, the COMPONENT terminal has priority over the VIDEO terminal.
• INPUT mode can be selected by pressing either the on the TV remote control when the TV
is set to the highest channel stored in memory, or by pressing the when it is set to the
lowest channel.
Note:
• When connecting video or audio equipment to the television, be sure that the power is turned off in
order to prevent damage to either the television or the equipment being connected.
• It is the intent of SHARP that this product be used in full compliance with the copyright law of the
United States and that prior permission be obtained from copyright owners whenever necessary.
• For detailed information on the connection and use of auxiliary equipment, refer to the instruction
manuals of the equipment being used.
• The connection cords can be obtained from your local video store.
AIR
or
CABLE
INPUT 1 (or COMPONENT)
(IN 1)
Rear
INPUT 2
(IN 2)
Front
CH a
CH s

39
Using the Audio Output Jacks
L These jacks are used for connecting an external audio amplifier. The STEREO/MONO/SAP,
VOLUME, MUTE and FAO functions can all be controlled via the television’s remote control or
directly on the TV itself. These jacks relay the audio signal of all programs being displayed on
the TV screen.
(AUDIO OUTPUT JACKS are located on the rear of the cabinet.)
CONNECTIONS
P
R
P
B
Y
IN 1
LINE
OUT
R
L
AUDIO
VIDEO
R
L
COMPONENT
PR
PB
Y
IN 1
LINE
OUT
R
L
AUDIO
VIDEO
R
L
COMPONENT
(Rear connection
terminals of TV)
Stereo Amplifier Speaker System
To the audio
input terminals
(1) Before connecting the cables, turn on the TV and adjust the VOLUME control on the TV to a moderate
listening level.
(2) Turn off the TV and connect the audio cables to the AUDIO LINE OUTPUT JACKS on the TV.
(3) Turn the TV set and stereo amplifier on.
(4) If you desire, you can turn off the sound to the TV’s internal speakers by acessing the TV’s AUDIO
SELECT mode. See page 22 ~ 23.
(5) Adjust the VOLUME control on the stereo amplifier for a moderate listening level.
(6) Control of the audio can be adjusted using the audio controls (STEREO/MONO/SAP, VOLUME,
MUTE and FAO), from either the remote control, or directly from the TV set.
Note:
• For detailed information on the connection and use of auxiliary equipment, refer to the operation
manuals of the equipment being used.
• When connecting monaural equipment to the AUDIO INPUT or OUTPUT of this set, use an audio
connection cord and plug adaptor as shown below.
• For optimal sound quality, we recommend you to keep the TV’s audio output level high.
Plug adapter
Pin jack/Mini plug
To the equipment
being connected
Pin plug x 2 Pin Plug
To the TV

40
Operation of Remote Control
L Universal Remote Control
With the purchase of your television set you
also have received the latest innovation in
remote control technology. With its easy-to-use
push button keyboard, your Remote can control
your television set and most infrared remote
controlled VCRs, cable TV converters and
DVDs as well.
Note:
• Depending on the model, year produced, brand
and type of VCR, cable TV converter and DVD,
some models may not be compatible with the
remote control.
• Some brands may not enable channel selection
until the ENTER button is pressed.
Example:
When you select channel 24,
(1) Press REMOTE KEYPAD “ ”2 .
(2) Press REMOTE KEYPAD “ ”4 .
(3) Press ENTER.
For detailed information on the use of the Cable
TV converter Box refer to their operating
manuals.
L Using Your Remote With Your TV
After installing the batteries, press the
TV/VCR
on the remote to select the TV mode. (If you
can change the channel of the TV by pressing
on the Remote Control, it is the
TV mod .)e
L“ ”Identifying Remote VCRs, cable TV
conveters and DVDs
Your Remote Control has been set at the factory
to operate your TV and many remote control
VCRs, cable TV conver ters and DVDs.
However, in some cases an easy one-time set-
up step may be necessary before the Remote
will operate accessory VCRs, cable TV
converters and DVDs.
• In this set-up step, the Remote locates and
memorizes the remote control transmitter code
for the VCR, cable TV converters and DVDs.
• Once “ ”identified , the Remote sends the proper
remote signals to operate your accessory.
• This identify step will not have to be repeated
until power to the Remote is interrupted due to
a battery failure.
L USING YOUR REMOTE CONTROL WITH A
VCR
Once you make certain the Remote Control has
“ ”identified your remote controlled VCR or DVD,
the Remote Control is ready to operate your
unit. The various VCR or DVD function buttons
on the Remote Control will not operate your
VCR or DVD if those features are not already
found on your unit.
• All VCR buttons will operate whether the
Remote Control is in TV or VCR modes.
• For detailed information on the use of the VCR
or DVD, refer to the operation manual of the
VCR or DVD.
321
654
987
100
0
TV CATV • • VCR DVD•
A B C D
PERSONAL PREFERENCE
9
VCR-CH
8
FLASHBACK
POWER (DVD/VCR)
REC
PLAY
:
L
STOP
FWD
)
REW
(
PAUSE
J
POWER
DISPLAY
CATV
INPUT
TV
DVD VCR
ENTER
; :
CH
8
VOL
–VOL
+
9
CH
MENU MUTE
g
SKIP
f
PLAY -
Press to playback a tape or disc.
POWER (DVD/VCR)
Press to turn the VCR or DVD on and
off.
REWIND 3
Press to rewind a tape or reverse a
disc. For some VCRs or DVDs you
may need to press STOP first, then
REWIND.
STOP L
Press to stop the tape or disc.
PAUSE J
Press to temporarily stop the tape or
disc during playback or recording (VCR
only).
Press again to release Pause.
REMOTE KEYPAD
Use to enter two-digit code numbers
when identifying your VCR.
ENTER
VCR
Press to scan up or down through
channels on the VCR.
DVD SKIP
Press to jump forward to the beginning
of the next chapter/track, or backward
to the beginning of the current chapter/
track, and automatically start to play
that chapter/track.
FF 2
Press to rapidly advance the tape or
disc. For some VCRs or DVDs, you
may need to press STOP first, then
FF.
CH a/s
CH a/s

41
Operation of Remote Control (Continued)
321
654
987
100
0
TV CATV • • VCR DVD•
A B C D
PERSONAL PREFERENCE
9
VCR-CH
8
FLASHBACK
POWER (DVD/VCR)
REC
PLAY
:
L
STOP
FWD
)
REW
(
PAUSE
J
POWER
DISPLAY INPUT
ENTER
; :
CH
8
VOL
–
VOL
+
9
CH
MENU MUTE
g
SKIP
f
CATV TV
DVD VCR
Note:
LHOW TO IDENTIFY A VCR
The remote control may already be set to
operate your VCR. Try this initial check before
going on to the following “ ”identify section.
(1) Press
TV/VCR
button.
(2) Point remote towards VCR and press
POWER
(DVD/VCR)
.
(3) Does the remote turn the VCR ON and OFF?
•If yes, the remote is ready to operate the VCR
and no further steps are needed.
•If no, continue to the “ ”identify section.
LTo Identify Your VCR Direct Entry Method.–
Use the following steps and list to quickly find
the remote control code for your accessory
VCR.
•First look up your VCR s remote control code’
number before going through the direct code
entry steps control.
•If this procedure does not identify your
accessory VCR, use the Search method of
identification (described in the next section).
(1) Press
TV/VCR
button.
(2) Press and hold down
DISPLAY
and
on our remote control.y
Then release both buttons.
(3) Within ten seconds after releasing
DISPLAY
and , enter VCRyour ’s two-digit
remote control code number using the
REMOTE KEYPAD
(refer to list).
•The remote control is now ready to send
commands to your VCR.
Some brands have more than one remote code
listed, due to changes in the remote codes from
early to later model years, or due to format
differences (VHS/BETA). In such cases, you
may have to try more than one code to find the
code your VCR accepts.
Depending on the model, year produced, brand,
and type of VCR, some models may not be
compatible with the remote control.
LTo Identify Your VCR – Search Method.
(1) Press
TV/VCR
button.
(2) Press POWER on the VCR to ON.
(3) Stand at least six feet away from the front of
the VCR.
Point the remote towards the VCR.
Hold down
DISPLAY
and at the
same time. KEEP HOLDING THE BUTTONS
DOWN.
(4) Watch the Channel Number indicator on the
VCR, Channel numbers will scan up when the
VCR has been identified.
Release
DISPLAY
and as soon as
the channel numbers start to scan up.
The VCR’s remote control code number has
been identified, and the remote is ready to
operate the VCR.
TV POWER
REMOTE
KEYPAD
POWER
(DVD/VCR)
CATV/DVD-TV/VCR
DISPLAY
CHANNEL UP (,)/
DOWN(9)
CH a
CH s
CH s CH a

42
Operation of Remote Control (Continued)
321
654
987
100
0
TV CATV • • VCR DVD•
A B C D
PERSONAL PREFERENCE
9
VCR-CH
8
FLASHBACK
POWER (DVD/VCR)
REC
PLAY
:
L
STOP
FWD
)
REW
(
PAUSE
J
POWER
DISPLAY INPUT
ENTER
; :
CH
8
VOL
–
VOL
+
9
CH
MENU MUTE
g
SKIP
f
CATV TV
DVD VCR
VCR BRAND REMOTE CONTROL
CODE NUMBER
Akai 25, 26, 37
Audio Dynamics 15, 22, 30
Broksonic 32
Canon 04
Capehart 34
Craig 10, 31
Curtis Mathis 04
Daewoo 34
DBX 15, 22, 30
Dynatech 29
Emerson 21, 32, 35
Fisher 09, 10, 11
Funai 28, 29
GE 04
Goldstar 24
Hitachi 06
Instant Replay 04
JC Penney 04, 06, 24, 30
JVC 15, 41, 42
Kenwood 14, 15
Lloyds 29
Magnavox 04, 05, 08
Magnin 31
Marantz 30
Memorex 04, 10, 24, 29
Minolta 06
Mitsubishi 17, 18, 39, 40
Montgomery Ward 02, 43
Multitech 29
NEC 15, 22, 30
Panasonic 04, 44
Pentax 05, 06
Philco 04, 05
Philips 04, 05, 08
Quasar 04
RCA 06, 07, 33
Realistic 01, 02, 10, 24
Samsung 23, 31
Sanyo 14, 10
Scott 20
Sears 06, 11, 24
Sharp 01, 02, 03
Shintom 36
Sony 12, 13, 38
Sound Design 29
Sylvania 04, 05, 08
Symphonic 29
Tatung 15
Teac 15, 29
Teknika 27, 29
Thomas 29
TMK 21
Toshiba 19, 20
Video Concepts 30
Yamaha 15, 29, 30
Zenith 16
TIPS ON IDENTIFYING YOUR VCR:
If your VCR model does not have the CHANNEL
UP function on its remote control, it cannot be
identified using the SEARCH method for
identifying. For such models, please try the
DIRECT ENTRY method of identifying.
Be Patient: a minute or two can seem a lot longer
when you’re waiting for something to happen, but
the code should be identified within 2 minutes.
Remember, it is only a one-time set-up.
Be careful not to let the VCR scan more than five
channels when the indicator starts to move up. If
yo u c on t in u e h o l di ng do wn t h e
after five channel scans, the proper remote
code can be passed up, and the two minutes
identify cycle will have to be repeated.
If a channel change does not occur on the VCR
within two minutes, read the identifying instructions
again and repeat the steps. Should a channel
change still not occur the remote will not operate
with the desired VCR.
TV
POWER
REMOTE
KEYPAD
CATV/DVD-
TV/VCR
DISPLAY
CHANNEL
UP (,)/
DOWN(9)
CH a/s

43
Operation of Remote Control (Continued)
321
654
987
100
0
TV CATV • • VCR DVD•
A B C D
PERSONAL PREFERENCE
9
VCR-CH
8
FLASHBACK
POWER (DVD/VCR)
REC
PLAY
:
L
STOP
FWD
)
REW
(
PAUSE
J
POWER
DISPLAY INPUT
ENTER
; :
CH
8
VOL
–
VOL
+
9
CH
MENU MUTE
g
SKIP
f
CATV TV
DVD VCR
LHOW TO IDENTIFY A DVD
The remote control may already be set to
operate your DVD. Try this initial check before
going on to the following “ ”identify section.
(1) Press
CATV/DVD
button.
(2) Point remote towards DVD and press
POWER
(DVD/VCR)
.
(3) Does the remote turn the DVD ON and OFF?
•If yes, the remote is ready to operate the DVD
and no further steps are needed.
•If no, continue to the “ ”identify section.
LTo identify your DVD Direct Entry Method.–
Use the following steps and list to quickly find
the remote control code for your accessory
DVD.
•First look up your DVD’s remote control code
number before going through the direct code
entry steps control.
(1) Press
CATV/DVD
button.
(2) Press and hold down
INPUT
and
on our remote control.y
Then release both buttons.
(3) Within ten seconds after releasing
INPUT
and
, enter your DVDs two-digit remote
con trol c ode number us ing
REMO TE
KEYPAD
(refer to list).
•The remote control is now ready to send
commands to your DVD.
DVD BRAND REMOTE CONTROL
CODE NUMBER
Denon 02
JVC 09
Magnavox 04
Marantz 04
Mitsubishi 06
Panasonic 02
Philips 04
Pioneer 08
Proscan 03
RCA 03
Samsung 07
Sharp 01, 10
Sony 05
Toshiba 04
Yamaha 02
Zenith 04
Note:
Depending on the model, year produced, brand,
and type of DVD, some models may not be
compatible with the remote control.
TV POWER
REMOTE
KEYPAD
POWER
(DVD/VCR)
CATV/DVD-TV/VCR
DISPLAY
CHANNEL UP (,)/
DOWN(9)
INPUT
CH s
CH s

44
Operation of Remote Control (Continued)
LHOW TO IDENTIFY A CABLE CONVERTER
LTo Identify Your Cable Converter –Direct
Entry Method.
Use the following steps and list to quickly find
the remote control code for your cable TV
converter.
• First look up your converter’s remote code
number before going through the direct code
entry steps below.
• If this procedure does not identify your
conver ter, use the Search method for
identification.
(1) Press
CATV/DVD
button.
(2) Press and hold down
DISPLAY
and
on our remote control.y
Then release both buttons.
(3) Within ten seconds after releasing
DISPLAY
and , enter your converter’s two-
digit code number using
REMOTE KEYPAD
(refer to list).
• The remote control is now ready to send
commands to your converter.
• Some brands have more than one remote code
listed due to changes in the remote codes from
early to later model years. In such cases, you
may have to try more than one code to find the
code your converter accepts.
Note:
Depending on the model, year produced, brand,
and type of CATV converter, some models may
not be compatible with the remote control.
LTo Identify Your Cable Converter – Search
Method.
(1) Press
CATV/DVD
button.
(2) Press the POWER button on the cable
converter to ON.
(3) Stand at least six feet away from the converter.
Point the remote towards the converter.
Hold down the
DISPLAY
and at the
same time. KEEP HOLDING THE BUTTONS
DOWN.
(4) Watch the Channel Number indicator on the
converter.
Channel numbers will scan up when the
converter has been identified.
Release the
DISPLAY
and as soon
as the channel numbers start to scan up.
The converter’s remote control code number
has been identified, and the remote is ready to
operate the converter.
TIPS ON IDENTIFYING YOUR CABLE
CONVERTER:
Be Patient: a minute or two can seem a lot
longer when you’re waiting for something to
happen, but the code should be identified within
2 minutes. Remember, it is only a one-time set-
up.
Be careful not to let the CATV converter scan
more than five channels when the indicator
starts to move up. If you continue holding down
the
DISPLAY
and after five channel
scans, the proper remote code can be passed
up, and the two minute identify cycle will have
to be repeated.
If a channel change does not occur on the cable
conver ter within two minutes, read the
identifying instructions again and repeat the
steps. Should a channel change still not occur,
the remote will not operate with the desired
converter.
Note:
Some satellite receivers can be operated by the
REMOTE CONTROL. If you have a Satellite
Receiver, you can use the above method to
search for available channels.
CATV CONVERTER REMOTE CONTROL
BRAND CODE NUMBER
Anvision 07, 08
Cable Star 07, 08
Eagle 08
General Instrument 04, 05, 15, 23, 24, 25,
30, 36
Jerrold 04, 05, 15, 23, 24, 25,
30, 36
Magnavox 07, 08, 19, 25, 28, 29,
32, 33, 40, 41
Oak Sigma 18
Panasonic 27, 39
Philips 07, 08, 19, 26, 28, 29,
32, 33, 40, 41
Pioneer 18, 20
Randtek 07, 08
RCA 27, 43
Scientific Atlanta 03, 22, 42
Sony 44
Viewstar 07, 08, 19, 26, 28, 29,
32, 33, 40, 41
Zenith 14
CH s
CH s
CH a
CH a
CH a

45
Before Calling for Service
Check these items and see if you can correct the trouble with a slight adjustment of the controls.
(Dark and Blank Picture)
Note:
• If no TEXT broadcast is being received while viewing in the TEXT
mode, the screen may become dark and blank for some programs.
Should this occur, switch the Closed Caption mode to “OFF”.
QUICK SERVICE
CHECK LIST
POSSIBLE REMEDY
Try a new channel, if OK, then there
is a possible station trouble.
Is TV plugged in? Power at outlet?
Is TV’s POWER button on?
Is antenna connected to terminal on
the back of the set?
If outside antenna is being used,
check for broken wire.
Check for local interference or
external electrical noise.
Turn off the POWER and then turn it
on after about a minute.
Adjust COLOR control.
Adjust PICTURE control.
Check external Video/Audio products:
look for loose/broken connection
leads. (Refer to pages 39–41)
Check batteries of Remote Control.
Press TV/VCR button on the Remote
to select TV mode.
Are audio cables connected firmly?
Check the volume level.
Is SPEAKER ON? See pages 13,14.
Change Closed Caption mode to
“OFF”/Energy Save mode to “OFF”.
Unplug the TV and plug it in again
after 2 minutes or longer.
X X X X X X X X X X X X X X X X X X
XX X X X X X X X X X X X X XX X X
XXX X X X X X X X X X X X XX X X
X X X X X X X X X XXXX X X X X X
X X X X X X X X X X X X X XXX X X
X X X XXXXX X X X X XX X X X X
XXX X X X X X X X X X X X XX X X
X X X X X X XX X X X X X X X X X X
X X X X X X X X XX X X XX X X X X
X X X X X X X X X X X X X X X X X X
X X XX X X X X X X X X X X X X X X
X X XX X X X X X X X X X X X X X X
X X X X X X X X X X X X X X X X X
X X X X X X X X X X X X X X XX X X
X X X X X X X X X X X X X X X XX X
X X XX X X X X X X X X X X X X X X
For location of the nearest Sharp Authorized Servicer, or to obtain product literature accessories, supplies,
or customer assistance, please call 1-800-BE-SHARP.
Calling for Service
PROBLEM
No Playback of VCR and Disc
Player
No Picture or Sound from
External Video/Audio Products
Remote Control Doesn’t Work
Bars on Screen
Picture Distorted
Picture Rolls Vertically
No Color
Poor Reception on Some
Channels
Weak Picture
Lines or Streaks in Picture
Ghosts in Picture
Picture Blurred
Sound OK, Picture Poor
Picture OK, Sound Poor
No Picture or Sound
Dark and Blank Picture
External Electrical Noise
Interfering with TV’s Operation
Color on Part of the Screen
Appears Distorted

46
Specifications
MODEL 20F6 04
Receiving System NTSC
Stereo Broadcast MTS/SAP
Reception Channels
AIR VHF 2-13 ch
UHF 14-69 ch
CATV 1-125 ch
Channel Tuning 181-channel Reception PLL tuning system
Antenna Input Impedance VHF/UHF 75 ohm Unbalanced
Screen Size 21˝ Diagonally Measured
(Visible Area) (50.8 cm)
Terminals Audio/Video input 2 (Front x 1, Rear x 1),×
COMPONENT-IN 1 (Rear), Audio Output 1 (Rear)× ×
Sound Output 2.5 W (RMS) × 2
Power Source AC 120 V, 60 Hz
Power Consumption 90 W
Dimensions 2325/64˝ × 181/2˝ × 193/32˝
(W) x (H) x (D) [594 mm × 470 mm × 485 mm]
Weight (approx.) 56.22 lbs. (25.5 kg)
• Design and specifications are subject to change without notice.

47
Lea estas instrucciones cuidadosamente y consérvelas a la mano para consultarlas en el futuro.
IMPORTANTE
Sírvase anotar el modelo del televisor y los números de serie
en el espacio provisto, para ayudar a reportar en caso de
pérdida o robo. Los números están ubicados en la parte
posterior del televisor.
N° de modelo :
N° de serie :
(ESPAÑOL)
INFORMACIÓN IMPORTANTE
Existen dos razones importantes para registrar dentro del plazo límite la garantía de su nuevo televisor
SHARP, mediante la TARJETA DE REGISTRO incluida con el aparato.
PRIMERA – GARANTÍA
Garantiza al cliente la recepción inmediata de todas las prestaciones de consumidor en cuanto a piezas, servicio
técnico y mano de obra aplicable a su adquisición.
SEGUNDA – ACTA DE SEGURIDAD DE PRODUCTOS DE CONSUMIDOR
Con el fin de garantizar al cliente la recepción puntual de cualquier notificación de seguridad sobre inspección,
modificación o cancelación que se le pueda solicitar a SHARP bajo el Acta de seguridad de productos de
consumidor de 1972. LEA CUIDADOSAMENTE LA CLÁUSULA “GARANTÍA LIMITADA” DE LA ÚLTIMA PÁGINA.
ADVERTENCIA :PARA REDUCIR EL RIESGO DE INCENDIO O DESCARGA
ELÉCTRICA, NO EXPONGA ESTE APARATO A LA HUMEDAD.
PRECAUCIÓN : PARA REDUCIR EL RIESGO DE
DESCARGAS EL CTRICAS, NO RETIRE LA CUBIERTAÉ
(NI EL PANEL POSTERIOR).
NO CONTIENE PIEZAS REPARABLES POR EL USUARIO.
SOLICITE ASISTENCIA T CNICA A PERSONAL DEÉ
SERVICIO TÉCNICO ESPECIALIZADO.
El rel mpago con cabeza deá
flecha dentro de un tri ngulo trataá
de indicar al usuario que las partes
dentro del producto representan
riesgo de electrochoque para las
personas.
El signo de exclamación dentro de
un tri ngulo trata de indicar alá
usuario que las instrucciones
impor tantes de operaci n yó
ser vicio se encuentran en los
documentos con el aparato.
“Nota para el instalador del sistema de TV por cable: Esta nota tiene el propó ósito de llamar la atenci n del
instalador del sistema de cable acerca del Art culo 820-40 del C digo Elí ó éctrico Nacional, que contiene las
directrices para la puesta a tierra y, en particular, especifica que el cable de puesta a tierra debe estar
conectado al sistema de puesta a tierra del edificio lo más cerca a la entrada del cable.”
ADVERTENCIA - Las Normas de la FCC establecen que cualquier cambio o modificaci n no autorizada queó
se realice en este equipo y que no est expresamente aprobado por el fabricante podr a anular la autoridadé í
del usuario para utilizar este equipo.
DESECHO DEL PRODUCTO
Este producto utiliza un Tubo de rayos catódicos (TRC) que contiene soldadura de esta o y plomo.ñ
El desecho de estos materiales deber ser considerando regulaciones ambientales. Para obtenerá
información sobre el desecho o el reciclado, p ngase en contacto con las autoridades locales o conó
Electronics Industries Alliance: www.eiae.org
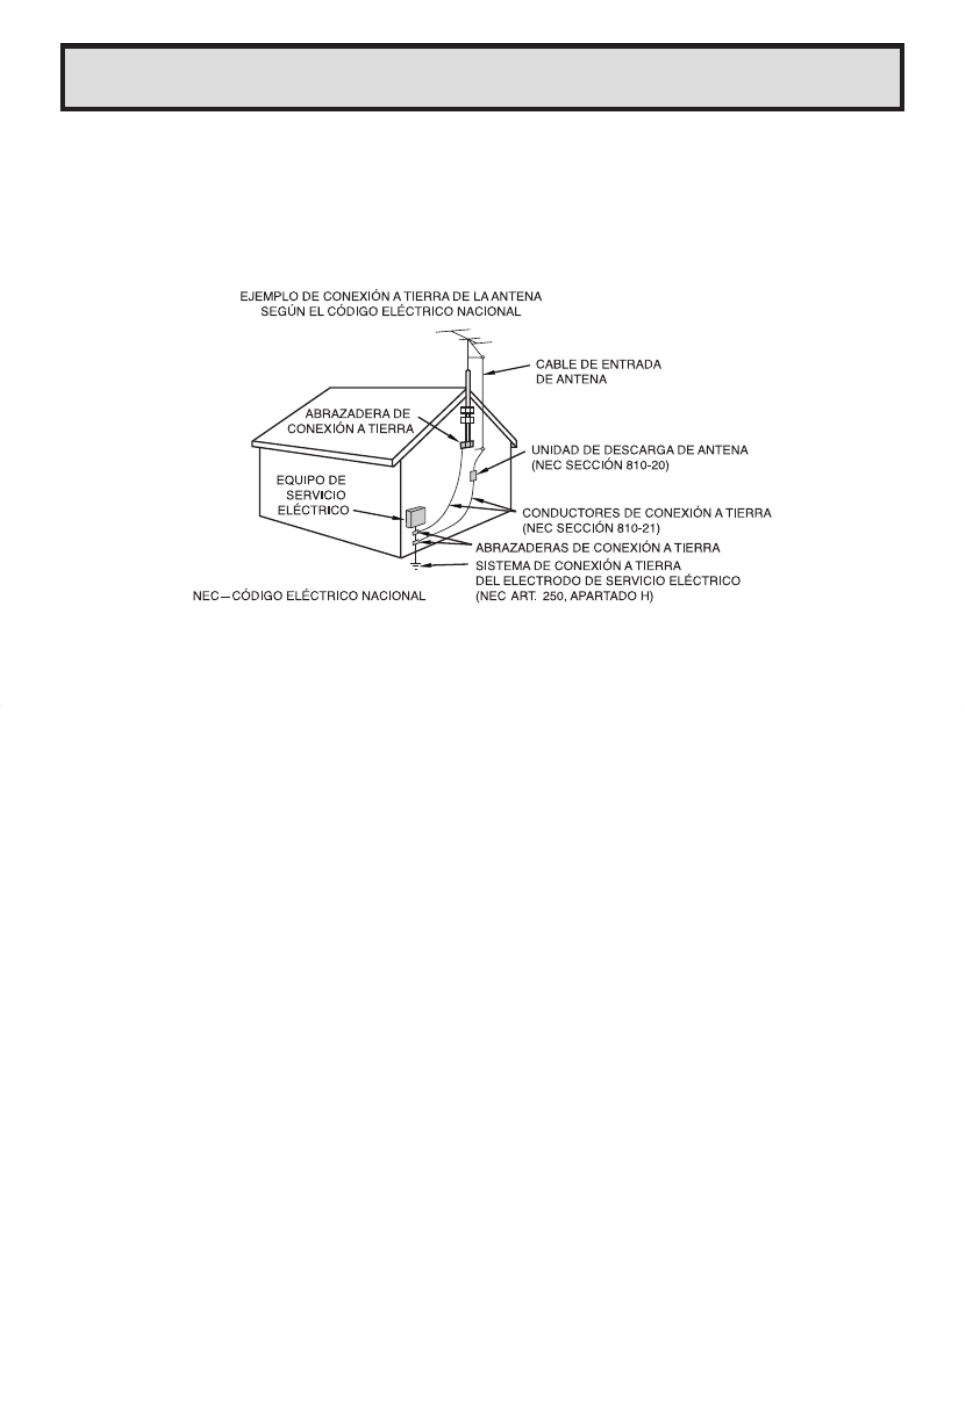
49
MEDIDAS DE SEGURIDAD IMPORTANTES
(Continuación)
13. Cumpla con todos los avisos y las instrucciones marcados en el televisor.
14. Si se conecta una antena exterior al televisor, asegúrese de que el sistema de antena esté conectado a
tierra para obtener cierta protección ante los aumentos de voltaje y la acumulación de cargas estáticas.
La sección 810 del Código Eléctrico Nacional ofrece información relacionada con la conexión a tierra
correcta del poste y la estructura de apoyo, la conexión a tierra del cable de entrada a una unidad de
descarga, el tamaño de los conductores de conexión a tierra, la ubicación de la unidad de descarga de
antena, la conexión a los electrodos de conexión a tierra, y los requisitos para el electrodo de conexión a
tierra.
15. Para proteger aún más este televisor durante tormentas eléctricas o cuando se deje sin atender y sin
utilizar durante largos periodos de tiempo, desenchufe el cable de alimentación del tomacorriente y
desconecte la antena. Esto evitará que el aparato pueda estropearse debido a los relámpagos y la
sobretensión en la línea de alimentación.
16. Un sistema de antena exterior no debe ubicarse cerca de líneas de alimentación elevadas, ni cerca de
luces eléctricas o circuitos de alimentación. Tampoco debe ubicarse donde pueda caer sobre tales líneas
o circuitos de alimentación. Cuando instale un sistema de antena exterior, tenga muchísimo cuidado
para no tocar las líneas o circuitos de alimentación porque el contacto podría causar un accidente mortal.
17. No sobrecargue los tomacorrientes ni los cables de extensión porque esto podría causar un incendio o
descarga eléctrica.
18. No meta nunca ningún objeto en el interior del televisor porque podría tocar piezas con alta tensión o
causar un cortocircuito con otras piezas causando un incendio o descarga eléctrica. No derrame nunca
ningún tipo de líquido sobre el televisor.
19. No trate de reparar el televisor usted mismo porque al abrir o quitar las tapas podría exponerse a una
descarga de tensión u otros peligros. Las reparaciones debe realizarlas el personal de servicio CALIFICADO.
20. Desenchufe este televisor del tomacorriente y solicite el servicio de un técnico calificado cuando se
produzcan las condiciones siguientes:
A. Cuando el cable de la alimentación o el enchufe estén estropeados.
B. Cuando haya derramado un líquido sobre el televisor.
C. Si el televisor ha quedado expuesto a la lluvia o al agua.
D. Si el televisor no funciona normalmente siguiendo las instrucciones de utilización. Ajuste solamente
los controles indicados en las instrucciones de utilización. Un ajuste inadecuado de otros controles
podría estropear el aparato y, entonces, sería necesario acudir a un técnico CALIFICADO para que
éste lo repare y lo devuelva a su condición normal.
E. Si el televisor se ha caído o la caja se ha estropeado.
F. Cuando las prestaciones del televisor cambien considerablemente será necesario llamar al servicio
de reparaciones.
21. Al finalizar cualquier servicio o reparación de este televisor, pida al técnico de servicio que realice
comprobaciones de seguridad rutinarias para determinar si el televisor puede funcionar sin causar ningún
problema.
22. Cuando sea necesario cambiar piezas, cerciórese de que el técnico de servicio utiliza las piezas de
CAMBIO especificadas por el fabricante, aquellas que tengan las mismas características que las piezas
originales. Las piezas de recambio no autorizadas pueden causar incendios, descargas eléctricas u
otros peligros.
Specyfikacje produktu
| Marka: | Sharp |
| Kategoria: | Telewizja |
| Model: | 20F640 |
Potrzebujesz pomocy?
Jeśli potrzebujesz pomocy z Sharp 20F640, zadaj pytanie poniżej, a inni użytkownicy Ci odpowiedzą
Instrukcje Telewizja Sharp

9 Kwietnia 2025
10 Marca 2025
10 Marca 2025
10 Marca 2025
4 Marca 2025
9 Lutego 2025
9 Lutego 2025
9 Lutego 2025
9 Lutego 2025
9 Lutego 2025
Instrukcje Telewizja
- Telewizja Sony
- Telewizja Yamaha
- Telewizja Samsung
- Telewizja Electrolux
- Telewizja AEG
- Telewizja Beko
- Telewizja LG
- Telewizja Küppersbusch
- Telewizja Xiaomi
- Telewizja TCL
- Telewizja Pioneer
- Telewizja Lenovo
- Telewizja Philips
- Telewizja SilverCrest
- Telewizja Acer
- Telewizja Nokia
- Telewizja Hisense
- Telewizja Infiniton
- Telewizja Panasonic
- Telewizja Muse
- Telewizja Viewsonic
- Telewizja Nedis
- Telewizja AG Neovo
- Telewizja Medion
- Telewizja OK
- Telewizja Lenco
- Telewizja Polar
- Telewizja Marquant
- Telewizja Toshiba
- Telewizja Tesla
- Telewizja Westinghouse
- Telewizja Majestic
- Telewizja Jensen
- Telewizja ILive
- Telewizja Blaupunkt
- Telewizja Brandt
- Telewizja Vivax
- Telewizja Terris
- Telewizja Salora
- Telewizja Siemens
- Telewizja Teac
- Telewizja Casio
- Telewizja Iiyama
- Telewizja Citizen
- Telewizja Dual
- Telewizja Grundig
- Telewizja Haier
- Telewizja Soundmaster
- Telewizja Hyundai
- Telewizja Manhattan
- Telewizja Strong
- Telewizja ECG
- Telewizja Oyster
- Telewizja Icy Box
- Telewizja Bang & Olufsen
- Telewizja JVC
- Telewizja V7
- Telewizja Dell
- Telewizja Furrion
- Telewizja Funai
- Telewizja Oppo
- Telewizja TechniSat
- Telewizja Schneider
- Telewizja Krüger&Matz
- Telewizja Philco
- Telewizja CHiQ
- Telewizja Qilive
- Telewizja Uniden
- Telewizja Thomson
- Telewizja Ferguson
- Telewizja Wharfedale
- Telewizja Manta
- Telewizja Pyle
- Telewizja Cecotec
- Telewizja Marantz
- Telewizja AOC
- Telewizja Monster
- Telewizja Peerless-AV
- Telewizja Caratec
- Telewizja Nevir
- Telewizja Mitsubishi
- Telewizja Arçelik
- Telewizja Continental Edison
- Telewizja GoGen
- Telewizja Intenso
- Telewizja NEC
- Telewizja Polaroid
- Telewizja Aiwa
- Telewizja AKAI
- Telewizja Sanyo
- Telewizja Clatronic
- Telewizja Telefunken
- Telewizja Optoma
- Telewizja SVAN
- Telewizja Innoliving
- Telewizja Abus
- Telewizja Jay-Tech
- Telewizja Bush
- Telewizja Loewe
- Telewizja Kemo
- Telewizja VOX
- Telewizja Insignia
- Telewizja AYA
- Telewizja Element
- Telewizja Orima
- Telewizja Denver
- Telewizja Kernau
- Telewizja Aspes
- Telewizja Albrecht
- Telewizja Orion
- Telewizja Hitachi
- Telewizja Technika
- Telewizja Seiki
- Telewizja SereneLife
- Telewizja RCA
- Telewizja MBM
- Telewizja BenQ
- Telewizja Trevi
- Telewizja Lexibook
- Telewizja GPX
- Telewizja Sencor
- Telewizja Odys
- Telewizja Nabo
- Telewizja Nextbase
- Telewizja Zenith
- Telewizja Daewoo
- Telewizja Allview
- Telewizja Metz
- Telewizja Kunft
- Telewizja Grunkel
- Telewizja Alphatronics
- Telewizja XD Enjoy
- Telewizja RevolutionHD
- Telewizja FFalcon
- Telewizja Dyon
- Telewizja Reflexion
- Telewizja Megasat
- Telewizja Sogo
- Telewizja Proline
- Telewizja Finlux
- Telewizja Alden
- Telewizja Aldi
- Telewizja Airis
- Telewizja Aristona
- Telewizja Apex
- Telewizja Ziggo
- Telewizja Techwood
- Telewizja Walker
- Telewizja Saba
- Telewizja Antarion
- Telewizja Tevion
- Telewizja Proscan
- Telewizja Vestel
- Telewizja Tucson
- Telewizja Energy Sistem
- Telewizja Sagem
- Telewizja Sunstech
- Telewizja Sylvania
- Telewizja Sunny
- Telewizja Luxor
- Telewizja Nordmende
- Telewizja AudioAffairs
- Telewizja Magnum
- Telewizja Audiosonic
- Telewizja Kubo
- Telewizja Coby
- Telewizja Seg
- Telewizja Vivo
- Telewizja Daitsu
- Telewizja Changhong
- Telewizja Alba
- Telewizja Naxa
- Telewizja Star-Light
- Telewizja Fantec
- Telewizja Mpman
- Telewizja Sweex
- Telewizja Vizio
- Telewizja Cello
- Telewizja Mx Onda
- Telewizja Nikkei
- Telewizja Peaq
- Telewizja Hannspree
- Telewizja DGM
- Telewizja Yasin
- Telewizja Roadstar
- Telewizja Humax
- Telewizja MT Logic
- Telewizja Superior
- Telewizja Difrnce
- Telewizja ITT
- Telewizja Avtex
- Telewizja Inovia
- Telewizja Lin
- Telewizja Aconatic
- Telewizja NPG
- Telewizja Bluesky
- Telewizja Videocon
- Telewizja Xoro
- Telewizja Durabase
- Telewizja HKC
- Telewizja Edenwood
- Telewizja Woxter
- Telewizja Premier
- Telewizja Onn
- Telewizja Teleco
- Telewizja Packard Bell
- Telewizja Opera
- Telewizja LTC
- Telewizja JTC
- Telewizja Zalman
- Telewizja Horizon
- Telewizja United
- Telewizja SYLVOX
- Telewizja Doffler
- Telewizja FOX Electronics
- Telewizja Viewpia
- Telewizja XS4ALL
- Telewizja JGC
- Telewizja Online
- Telewizja DirecTV
- Telewizja Tele 2
- Telewizja Graetz
- Telewizja Kogan
- Telewizja Telesystem
- Telewizja EKO
- Telewizja E-motion
- Telewizja Mitsai
- Telewizja Selfsat
- Telewizja High One
- Telewizja Tve
- Telewizja ISymphony
- Telewizja Pantel
- Telewizja Magnavox
- Telewizja ATYME
- Telewizja HCI
- Telewizja Inno-Hit
- Telewizja Engel
- Telewizja Bang Olufsen
- Telewizja TechLine
- Telewizja Elements
- Telewizja Digihome
- Telewizja Englaon
- Telewizja Time
- Telewizja Reflex
- Telewizja Astar
- Telewizja Visco
- Telewizja Tivax
- Telewizja H&B
- Telewizja Norcent
- Telewizja TELE System
- Telewizja TIM
- Telewizja Belson
- Telewizja Vision Plus
- Telewizja Sbr
- Telewizja Bauhn
- Telewizja Voxx
- Telewizja Rm 2000
- Telewizja Hoher
- Telewizja Felson
- Telewizja Mach Power
- Telewizja Elbe
- Telewizja Axing
- Telewizja CGV
- Telewizja Smart Tech
- Telewizja Séura
- Telewizja Mitzu
- Telewizja JTC24
- Telewizja Coocaa
- Telewizja Kivi
- Telewizja Smart Brand
- Telewizja Mystery
- Telewizja Linsar
Najnowsze instrukcje dla Telewizja

9 Kwietnia 2025

9 Kwietnia 2025

9 Kwietnia 2025
9 Kwietnia 2025
9 Kwietnia 2025
9 Kwietnia 2025
9 Kwietnia 2025

9 Kwietnia 2025
9 Kwietnia 2025
9 Kwietnia 2025