Instrukcja obsługi Samsung SlimFit TX-T2082
Przeczytaj poniżej 📖 instrukcję obsługi w języku polskim dla Samsung SlimFit TX-T2082 (25 stron) w kategorii Telewizja. Ta instrukcja była pomocna dla 3 osób i została oceniona przez 2 użytkowników na średnio 4.5 gwiazdek
Strona 1/25
COLOR TELEVISION
TX-T2781
TX-T2782
TX-T2082
Owner’s
Instructions
Register your product at www.samsung.com/global/register
Record your Model and Serial number here for future reference.
▪ Model _______________ ▪ Serial No. _______________

English - 2
© 2007 Samsung Electronics Co., Ltd. All rights reserved.
Important Warranty Information Regarding Television Format Viewing
Standard screen format televisions(4:3, the aspect ratio of the screen width to height) are primarily designed to view standard format
full-motion video. The images displayed on them should primarily be in the standard 4:3 ratio format and constantly moving. Displaying
stationary graphics and images on screen, such as the dark top and bottom letterbox bars(wide screen pictures), should be limited to no
more than 15% of the total television viewing per week.
Wide screen format televisions(16:9, the aspect ratio of the screen width to height) are primarily designed to view wide screen format
full-motion video. The images displayed on them should primarily be in the wide screen 16:9 ratio format, or expanded to fill the screen
if your model offers this feature, and constantly moving. Displaying stationary graphics and images on screen, such as the dark side-
bars on non-expanded standard format television video and programming, should be limited to no more than 15% of the total television
viewing per week.
Additionally, viewing other stationary images and text such as stock market reports, video game displays, station logos, web sites or
computer graphics and patterns, should be limited as described above for all televisions. Displaying any stationary images that
exceed the above guidelines can cause uneven aging of picture tubes(CRTs) that leave subtle, but permanent burned-in ghost
images in the television picture. To avoid this, vary the programming and images, and primarily display full screen moving
images, not stationary patterns or dark bars. On television models that offer picture sizing features, use these controls to view the
different formats as a full screen picture.
Be careful in the selection and duration of television formats used for viewing. Uneven CRT aging as a result of format selection and
use, as well as other burned-in images, is not covered by your Samsung limited warranty.
Contents
General Information
Accessories ............................................................................. 3
Viewing the Control Panel ....................................................... 3
Viewing the Connection Panel ................................................ 4
Remote Control ....................................................................... 5
Connection
Connecting VHF and UHF Antennas ...................................... 6
Connecting Cable TV .............................................................. 6
Connecting a VCR .................................................................. 7
Connecting a Camcorder ........................................................ 7
Connecting a DVD Player/Set-Top Box .................................. 8
Connecting an Amplifier/DVD Home Theater - Analog ........... 8
Operation
Plug & Play Feature ................................................................ 9
Memorizing the Channels ..................................................... 10
To Select the Source ............................................................. 11
To Edit the Input Source Name ............................................. 11
Picture Control
Using Automatic Picture Settings .......................................... 11
Changing the Screen Size .................................................... 12
Digital Noise Reduction ......................................................... 12
Tilt (TX-T2781/TX-T2782 only) ............................................. 13
Sound Control
Using Automatic Sound Settings ........................................... 13
Customizing the Sound ......................................................... 13
Choosing a Multi-Channel Sound (MTS) Track - Digital ....... 14
Choosing a Multi-Channel Sound (MTS) Track - Analog ...... 14
Automatic Volume Control .................................................... 14
Using Pseudo Stereo ............................................................ 15
Using Turbo Plus ................................................................... 15
Channel Control
Clearing Scrambled Channels - Digital ................................. 15
Adding and Erasing Channels - Analog ................................ 15
Adding and Erasing Channels - Digital ................................. 16
Fine Tuning Analog Channels - Analog ................................. 16
Labeling Channels - Analog .................................................. 16
Checking the Digital-Signal Strength - Digital ....................... 17
Using the R.Surf Feature ...................................................... 17
Function Description
Selecting a Menu Language ................................................. 17
Setting the Time .................................................................... 18
Viewing Closed Captions
(On-Screen Text Messages) - Digital .................................... 19
Viewing Closed Captions
(On-Screen Text Messages) - Analog ................................... 19
Setting the Blue Screen Mode .............................................. 20
Setting the On/Off Melody ..................................................... 20
Using the V-Chip ................................................................... 20
Upgrading the Software ........................................................ 23
Appendix
Identifying Problems ............................................................. 23
Specifications
Symbols
☛ ➢
Press
Important
Note One-Touch
Button

English - 3
Viewing the Control Panel
You can control your TV’s basic features, including the on-screen menu.
To use the more advanced features, you must use the remote control.
1
SOURCE
Toggles between all the available input sources (TV, AV1,
AV2, Component).
In the on-screen menu, use this button as you would use the
ENTER button on the remote control.
2
MENU
Press to see an on-screen menu of your TV’s features.
3
+ VOL −
Press to increase or decrease the volume.
In the on-screen menu, use the buttons as you would + VOL –
use the ◄ and ► buttons on the remote control.
4
CH
Press to change channels.
In the on-screen menu, use the buttons as you CH
would use the ▲ and ▼ buttons on the remote control.
5
Power Indicator
Lights up when you turn the power off.
- Power Off: Red
- Power On: Off
6
Remote Control Sensor
Aim the remote control towards this spot on the TV.
7
POWER
Press to turn the TV on and off.
Accessories
Please make sure the following items are included with your TV.
If any items are missing, contact your dealer.
Remote Control (AA59-00405B)/
AAA Batteries
Owner’s Instructions/
Safety Guide Manual
Warranty Cards/
Registration Card
➢ The product color and shape may vary depending on the model.
TX-T2781
TX-T2082
TX-T2782
English - 4
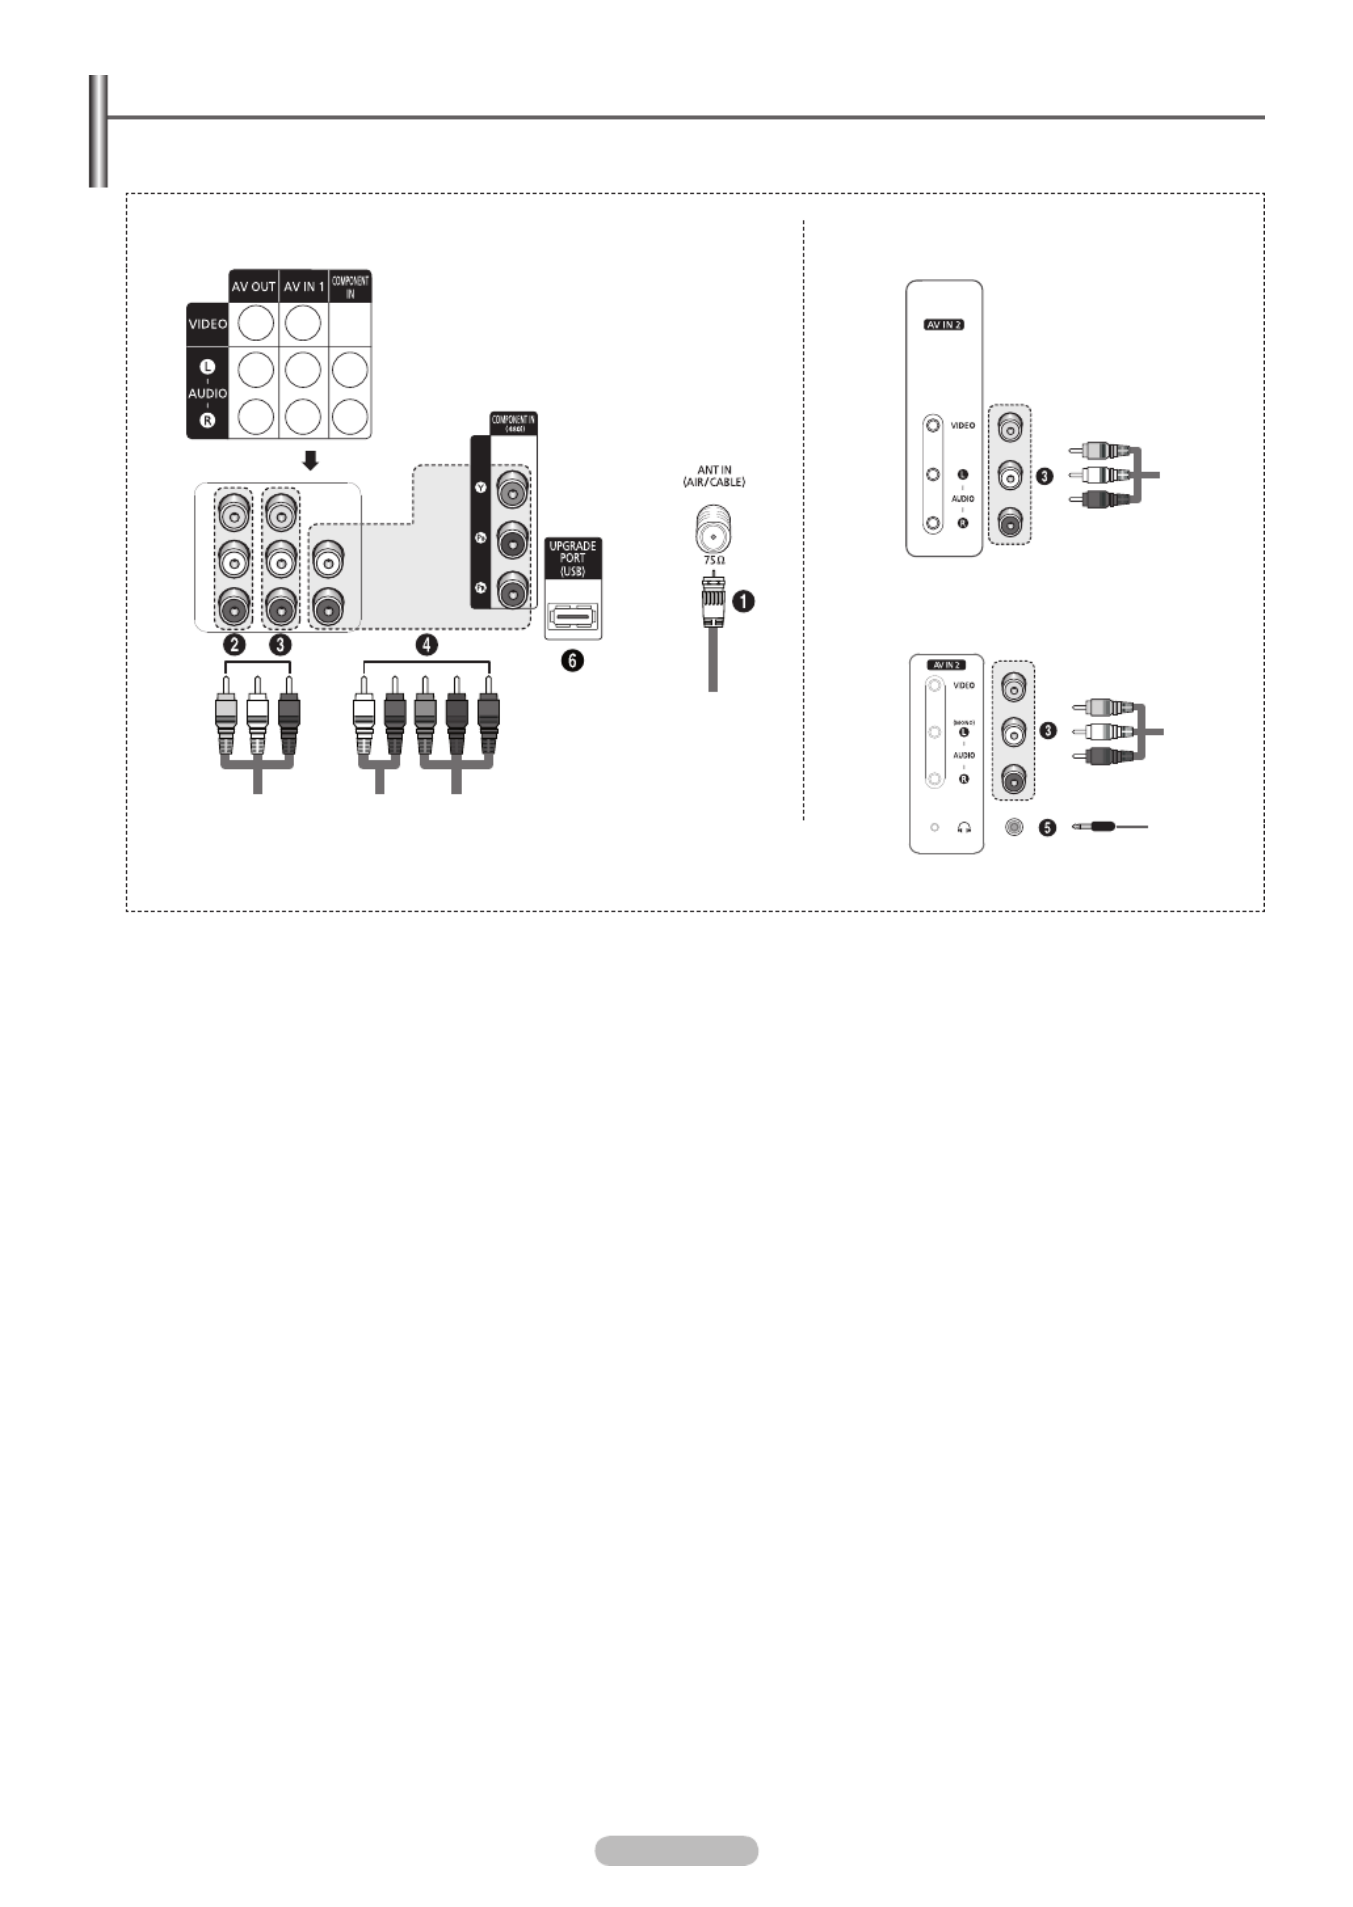
Viewing the Connection Panel
Use the rear panel jacks to connect A/V components that will be connected continuously, such as VCR or DVD players.
1
ANT IN (AIR/CABLE)
Connect to an antenna(air) or cable TV system.
2
AV OUT
Connect to the audio/video input jacks of a recording VCR.
3
AV IN 1 / AV IN 2
Video and audio inputs for external devices, such as a
camcorder or VCR.
4
COMPONENT IN
Connect Component video/audio.
5
Headphone
Connect a set of external headphones to this jack for private
listening.
6
UPGRADE PORT (USB)
Connect for service and software upgrade.
➢ The product color and shape may vary depending on the model.
Side of the TVRear of the TV
TX-T2082
TX-T2781/TX-T2782

English - 5
1
POWER
Turns the TV on and off.
2
NUMERIC BUTTONS
Press to directly select a channel.
3
–
Press to select additional channels
being broadcast by the same station.
For example, to select channel “54-
3”, press “54”, then press “–” and “3”.
4
VOL +, VOL –
Press to increase or decrease the
volume.
5
MENU
Displays the main on-screen menu.
6
UP▲/DOWN▼/LEFT◄/RIGHT►/
ENTER
Use to select on-screen menu items
and change menu values.
7
S.MODE
Press to select the sound mode.
8
P.MODE
Press to select the picture mode.
9
AUTO PROG.
Press to automatically store selected
Air/Cable channels.
0
ADD/DEL
Use to store and delete channels
to/from memory.
!
PRE-CH
Tunes to the previous channel.
@
SOURCE
Press to display all of the available
video sources.
#
INFO
Press to display information on the
TV screen.
$
TV/DTV
Press to switch between TV (Analog)
and DTV (Digital) mode.
%
CH , CH
Press to change channels.
^
EXIT
Press to exit from the menu.
&
MUTE
Press to temporarily cut off the sound.
*
P.SIZE
Press to change the screen size.
(
SLEEP
Press to select a preset time interval
for automatic shut off.
)
MTS
Press to choose stereo, mono
or Separate Audio Program(SAP
broadcast).
a
CAPTION
Controls the caption decoder.
b
R.SURF
Press to automatically return to a
preferred channel after a user-preset
time delay.
c
TURBO
Press to select Turbo sound.
Remote Control
You can use the remote control up to a distance of about 23 feet from the TV. When using the remote control, always point it
directly at the TV.
➢ This is a special remote control for the visually impaired, and has Braille points on the POWER, Channel, and Volume buttons.
The performance of the remote control may be affected by bright light.
Installing Batteries in the Remote Control
1 Lift the cover at the back of the remote control upward as shown in the figure.
2 Install two AAA size batteries.
➢ Make sure to match the and ends of the batteries with the diagram inside the + –
compartment.
Do not mix battery types, i.e. alkaline and manganese.
3 Replace the cover.
➢ Remove the batteries and store them in a cool and dry place if you won’t be using the
remote control for a long time. The remote control can be used up to about 23 feet from
the TV. (Assuming typical TV usage, the batteries last for about one year.)

English - 6
Connecting VHF and UHF Antennas
Antennas with 300 Ω Flat Twin Leads
If you are using an off-air antenna(such as a roof antenna or “rabbit ears”) that has 300 Ω twin flat leads, follow the directions
below.
1 Place the wires from the twin leads under the screws on a 300-75 Ω adapter(not supplied).
Use a screwdriver to tighten the screws.
2 Plug the adaptor into the ANT IN (AIR/CABLE) terminal on the back of the TV.
Antennas with 75 Ω Round Leads
1 Plug the antenna lead into the ANT IN (AIR/CABLE) terminal on the back of the TV.
Separate VHF and UHF Antennas
If you have two separate antennas for your TV(one VHF and one UHF), you must combine the two antenna signals before
connecting the antennas to the TV. This procedure requires an optional combiner-adaptor(available at most electronics
shops).
1 Connect both antenna leads to the combiner.
2 Plug the combiner into the ANT IN (AIR/CABLE) terminal on the back of the TV.
Connecting Cable TV
Cable without a Cable Box
1 Plug the incoming cable into the ANT IN (AIR/CABLE) terminal on the back of the TV.
➢ Because this TV is cable-ready, you do not need a cable box to view unscrambled cable
channels.
Connecting to a Cable Box that Descrambles All Channels
1 Find the cable that is connected to the ANT OUT terminal on your cable box.
➢ This terminal might be labeled “ANT OUT”, “VHF OUT” or simply, “OUT”.
2 Connect the other end of this cable to the ANT IN (AIR/CABLE) terminal on the back of the TV.
Connecting to a Cable Box that Descrambles Some Channels
If your cable box descrambles only some channels(such as premium channels), follow the instructions below. You will need a
two-way splitter, an RF (A/B) switch, and four lengths of Antenna cable. (These items are available at most electronics stores.)
1 Find and disconnect the cable that is connected to the
ANT IN terminal on your cable box.
➢ This terminal might be labeled “ANT IN”, “VHF IN” or
simply, “IN”.
2 Connect this cable to a two-way splitter.
3 Connect an Antenna cable between an OUT terminal on
the splitter and the IN terminal on the cable box.
4 Connect an Antenna cable between the ANT OUT terminal
on the cable box and the B-IN terminal on the RF(A/B)
switch.
5 Connect another cable between the other OUT terminal on
the splitter and the A-IN terminal on the RF (A/B) switch.
6 Connect the last Antenna cable between the OUT terminal
on the RF (A/B) switch and the ANT IN (AIR/CABLE)
terminal on the back of the TV.
After you have made this connection, set the A/B switch to the
“A” position for normal viewing. Set the A/B switch to the “B”
position to view scrambled channels. (When you set the A/B
switch to “B”, you will need to tune your TV to the cable box’s
output channel, which is usually channel 3 or 4.)
1
2
1
1
2
1
ANT OUTANT IN
2
1
Cable Box Splitter
Cable Box
Incoming
cable RF (A/B)
Switch
TV Rear
6
4
5
3
2
1
English - 7
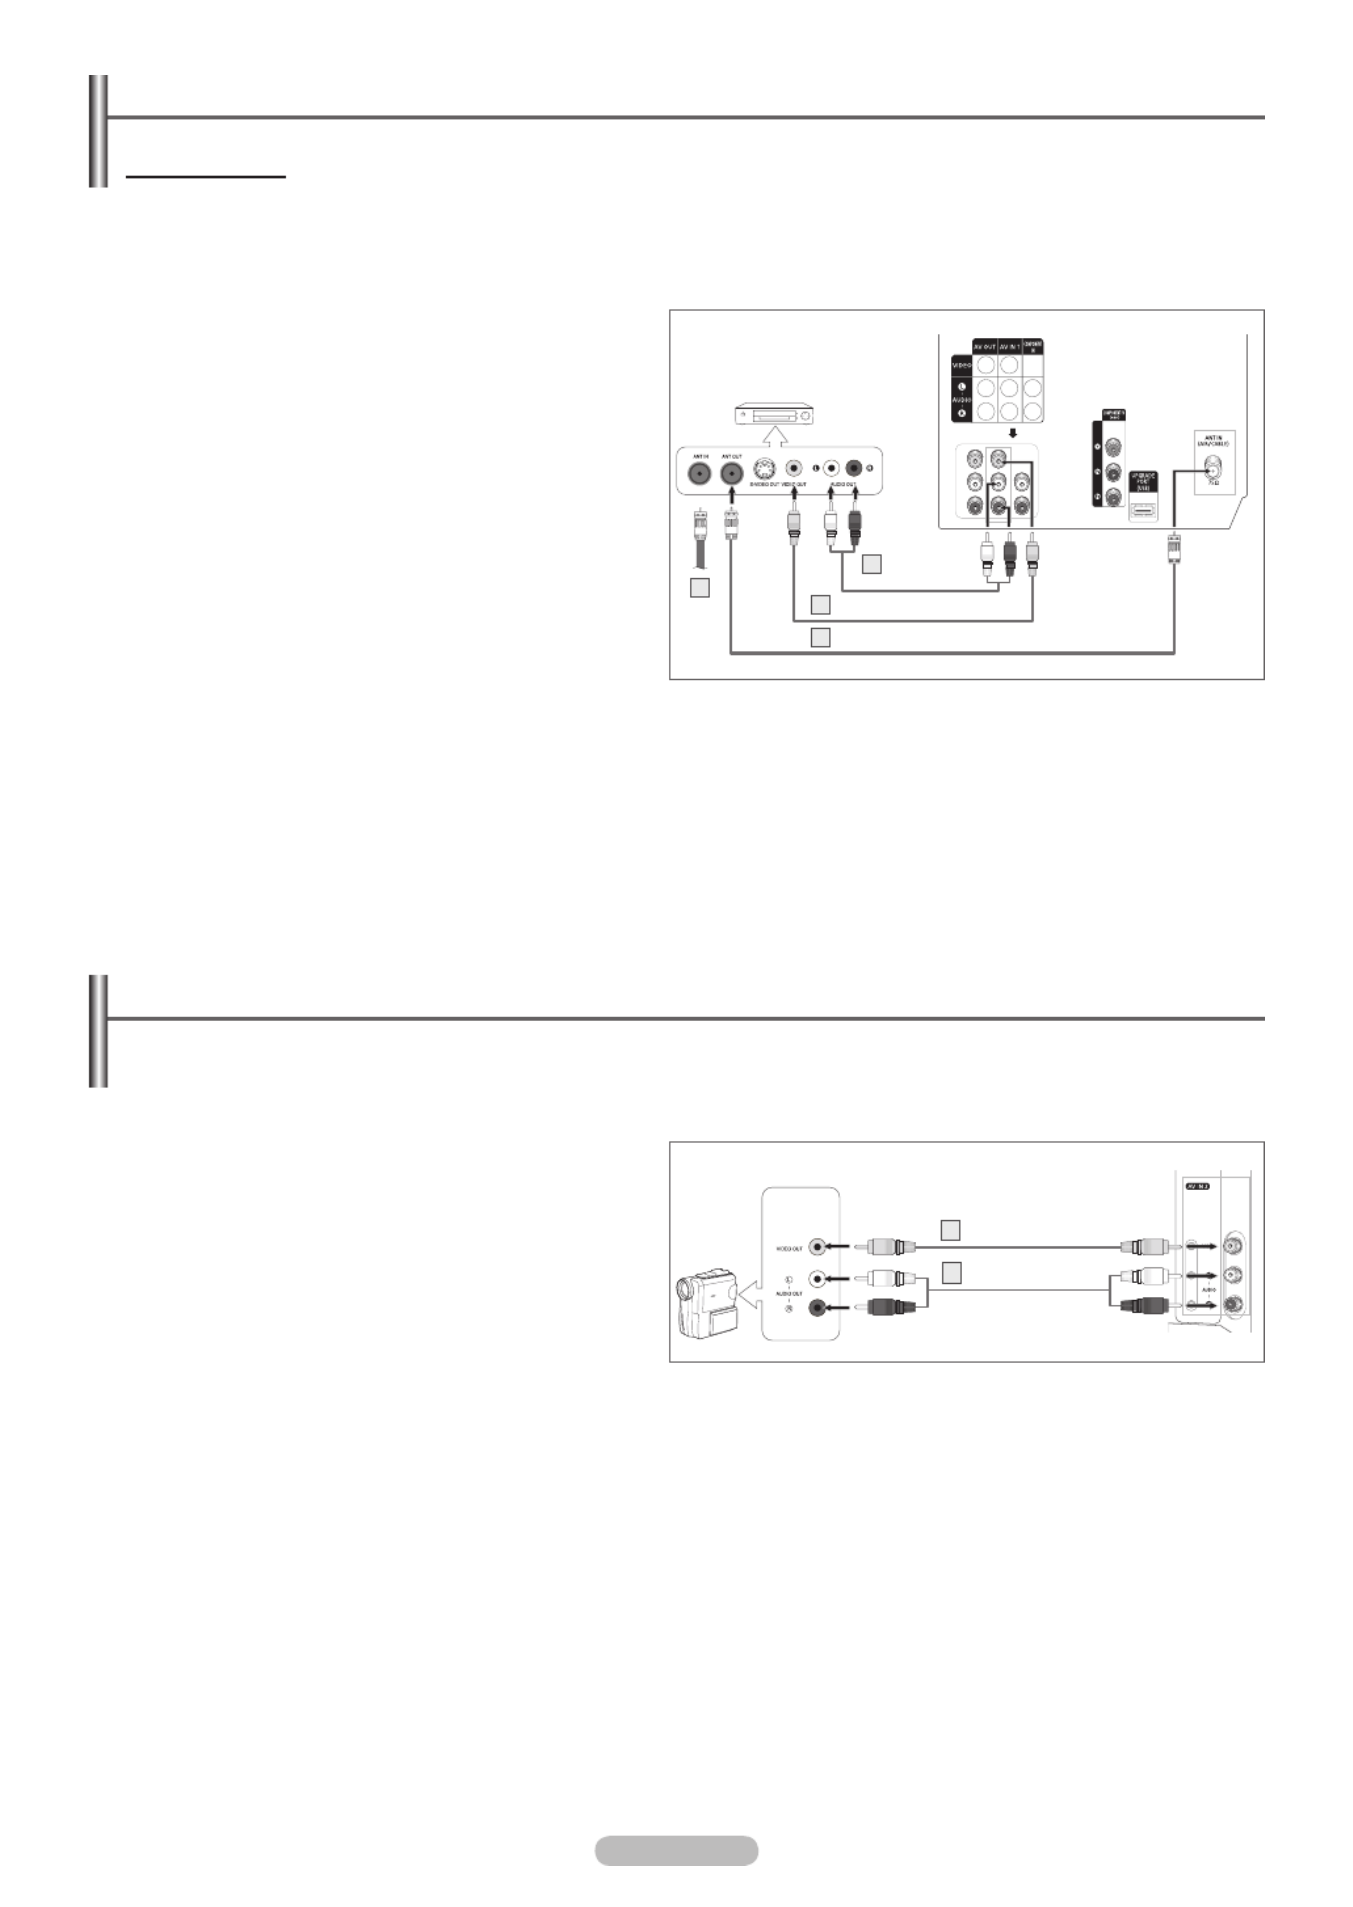
Connecting a VCR
Video Connection
These instructions assume that you have already connected your TV to an antenna or a cable TV system(according to the
instructions on page 6). Skip step 1 if you have not yet connected to an antenna or a cable system.
➢ Each VCR has a different back panel configuration.
When connecting a VCR, match the color of the connection terminal to the cable.
1 Unplug the cable or antenna from the back of the TV.
2 Connect the cable or antenna to the ANT IN terminal on
the back of the VCR.
3 Connect an Antenna cable between the ANT OUT terminal
on the VCR and the ANT IN (AIR/CABLE) terminal on the
TV.
4 Connect a Video Cable between the VIDEO OUT jack on
the VCR and the AV IN 1 [VIDEO] jack on the TV.
5 Connect Audio Cables between the AUDIO OUT jacks on
the VCR and the AV IN 1 [L-AUDIO-R] jacks on the TV.
➢ If you have a “mono” (non-stereo) VCR, use a
Y-connector(not supplied) to hook up to the right and
left audio input jacks of the TV. If your VCR is stereo,
you must connect two cables.
➢ Also, you can connect to AV IN 2 on the side panel of TV.
Rear of the TV
VCR
Audio Cable
(Not supplied)
5
Video Cable(Not supplied)4
Antenna cable(Not supplied)
3
Connecting a Camcorder
The side panel jacks on your TV make it easy to connect a camcorder to your TV.
They allow you to view the camcorder tapes without using a VCR.
➢ Each Camcorder has a different back panel configuration.
When connecting a Camcorder, match the color of the connection terminal to the cable.
1 Connect a Video Cable between the AV IN 2 [VIDEO] jack
on the TV and the VIDEO OUT jack on the camcorder.
2 Connect Audio Cables between the AV IN 2
[L-AUDIO-R] jacks on the TV and the AUDIO OUT jacks
on the camcorder.
Side of the TV
Camcorder
Video Cable(Not supplied)
1
Audio Cable(Not supplied)
2
2

English - 8
Connecting a DVD Player/Set-Top Box
The rear panel jacks on your TV make it easy to connect a DVD player/Set-Top Box.
➢ Each DVD Player/Set-Top Box has a different back panel configuration.
When connecting a DVD Player/Set-Top Box, match the color of the connection terminal to the cable.
1 Connect Component Cables between the COMPONENT
IN [Y, P , P ] jacks on the TV and the COMPONENT OUT B R
[Y, P , P ] jacks on the DVD Player/Set-Top Box.B R
2 Connect Audio Cables between the COMPONENT IN
[L-AUDIO-R] jacks on the TV and the AUDIO OUT jacks
on the DVD Player/Set-Top Box.
➢ Component video separates the video into Y(Luminance
(brightness)), P (Blue), and P (Red) for enhanced video B R
quality. Be sure to match the component video and audio
connections.
For example, if connecting the video cable to
COMPONENT IN, connect the audio cable to
COMPONENT IN also.
➢ This product is an SD-grade DTV and must be connected
in the resolution of 480i.
If this product is connected in the resolution of 480p, 720p
or 1080i, the screen may be displayed abnormally or may
not be displayed at all.
Connecting an Amplifier/DVD Home Theater - Analog
➢ Each Amplifier/DVD Home Theater has a different back panel configuration.
When connecting an Amplifier/DVD Home Theater, match the color of the connection terminal to the cable.
1 Connect Audio Cables between the AV OUT
[L-AUDIO-R] on the TV and AUDIO IN on the Amplifier/
DVD Home Theater.
When an audio amplifier is connected to the AUDIO OUT
[L-AUDIO-R] terminals: Decrease the volume of the TV,
and adjust the volume level with the Amplifier’s volume
control.
Rear of the TV
DVD Player/Set-Top Box
Component Cable(Not supplied)1
Audio Cable
(Not supplied)
2
Rear of the TV
Amplifier/
DVD Home Theater
Audio Cable(Not supplied)1
English - 9
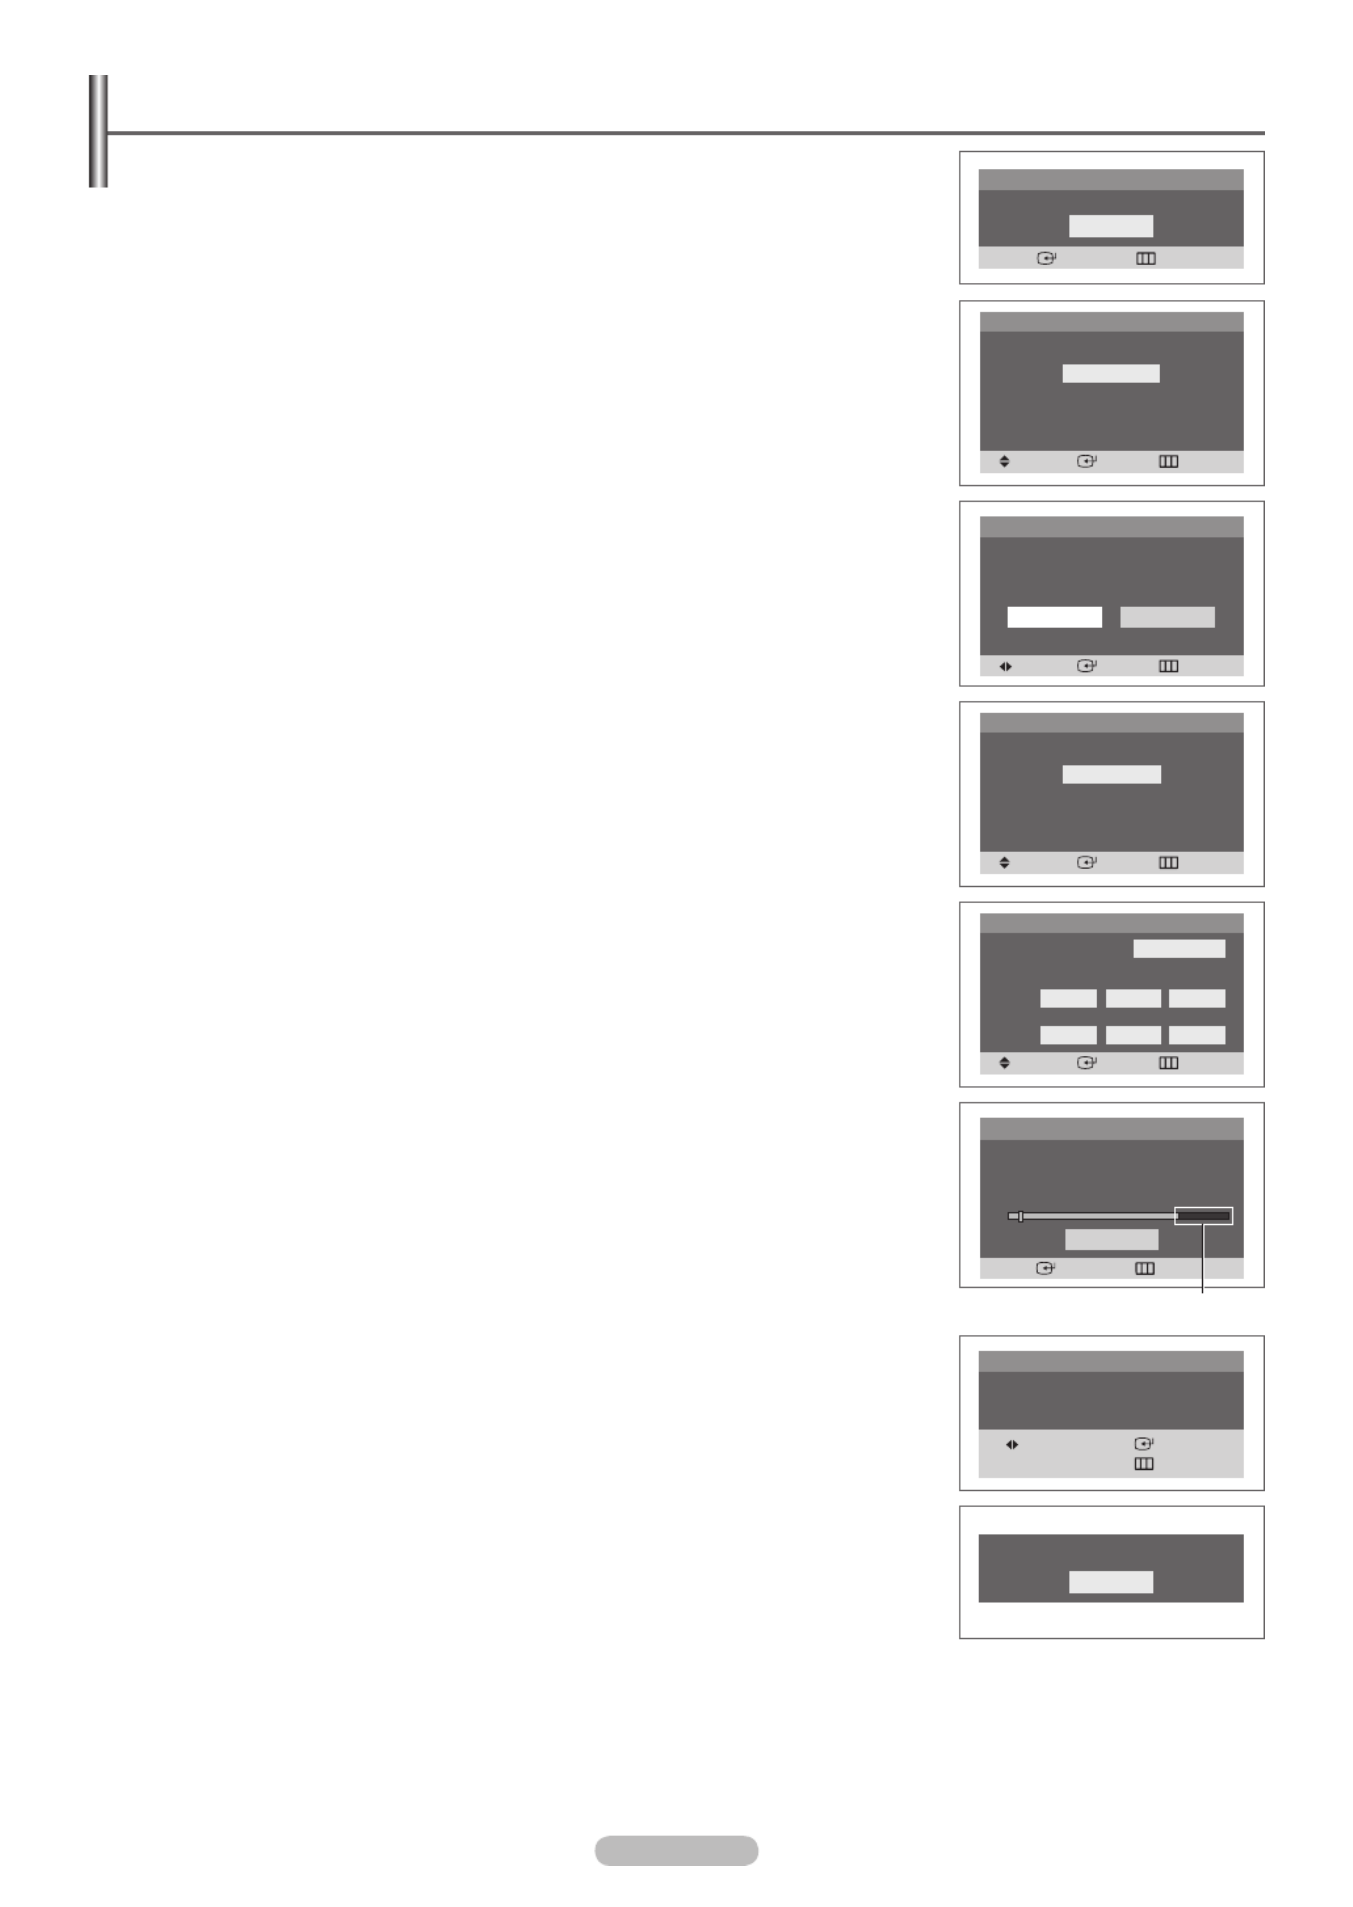
Plug & Play Feature
When the TV is initially powered on, basic settings proceed automatically and
subsequently:
1 POWER Press the button on the remote control.
The message is displayed. Start Plug & Play
Press the button, then the menu is displayed.ENTER Language
2 ENTER Press the ▲ or ▼ button to select the desired language, then press the button.
The message is displayed.Select Home Mode when installing this TV at home.
3 Shop Home ENTER Press the ◄ or ► button to select or , then press the button.
The menu is displayed.Check antenna input.
➢ The default selection is Home.
We recommend setting the TV to Home mode for the best picture in your home
environment.
Shop mode is only intended for use in retail environments.
If the unit is accidentally set to Shop mode and you want to return to Dynamic (Home)
mode, press the Volune button and then hold down the button for five seconds MENU
on the TV panel.
4 Make sure that an antenna is connected to the TV.
Press the button, then the menu is displayed.ENTER Antenna
5 Press the ▲ or ▼ button to select the desired connection.
Press the button to memorize the channels of the selected connection.ENTER
6 ENTER Press the button to start.
First analog, then digital channels will be memorized.
When selecting Cable TV:
7 Cable ENTER Press the ▲ or ▼ button to select , then press the button.
The menu is displayed.Cable System
8 Press the ▲/▼/◄/► buttons to select the cable system for analog and digital channels
respectively, then press the button.ENTER
9 ENTER Press the button to start. The TV begins memorizing all available channels.
Press the button to stop. ENTER
After all available channels are stored, the menu is displayed. Clock Set
➢ When you select or , it also executes “Clearing Scrambled Channels” Cable Air+Cable
simultaneously. See page 15.
10 Press the ◄ or ► button to move to the hour or minute.
Set the clock by pressing the ▲ or ▼ button, then press the button.ENTER
11 The message Enjoy your watching. is displayed.
When you have finished, press the button.ENTER
➢ Even if the button is not pressed, the message will automatically disappear after ENTER
several seconds.
If you want to reset this feature...
1 MENUPress the button to display the menu.
Press the ▲ or ▼ button to select , then press the button.Setup ENTER
2 ENTER Plug & PlayPress the button to select .
For further details on setting up options, refer to the top of this page.
➢ The Plug & Play feature is only available in TV and DTV mode.
Plug & Play
Move Enter Skip
Language
English
Español
Français
Plug & Play
Move Enter Skip
Shop Home
Select Home Mode
when installing this TV
at home.
Plug & Play
Move Enter Skip
Auto Program
Air
Cable
Air+Cable
Plug & Play
Enter Skip
Stop
Auto Program in progress
STD 120 3%
Scrambled Channels Searched
Move
Enter
Skip
Plug & Play
Clock Set -- : -- am
Enter Exit
Plug & Play
OK
Start Plug & Play
Plug & Play
Move Enter Skip
Start
STD
Auto Program
Cable System
Analog
HRC IRC
STD
Digital
HRC IRC
OK
Enjoy your watching.

English - 10
Memorizing the Channels
Your TV can memorize and store all of the available channels for both air and cable
channels. After the available channels are memorized, use the CH and CH button
to scan through the channels. This eliminates the need to change channels by entering
the channel digits. There are three steps for memorizing channels: selecting a broadcast
source, memorizing the channels(automatic) and adding or deleting channels(manual).
Selecting the Video Signal-source
Before your television can begin memorizing the available channels, you must specify the
type of signal source that is connected to the TV(i.e. an air or a cable system).
1 MENU Press the button to display the menu.
Press the ▲ or ▼ button to select , then press the button.Channel ENTER
2 ENTER Antenna Press the button select .
Press the ▲ or ▼ button to select or , then press the button. Air Cable ENTER
Storing Channels in Memory (Automatic Method)
3 Auto Program ENTER Press the ▲ or ▼ button to select , then press the button.
4 ENTER Press the ▲ or ▼ button to select the antenna connection, then press the button.
5 ENTER Press the button to start.
First analog, then digital channels will be memorized.
When selecting Cable TV:
7 Cable ENTER Press the ▲ or ▼ button to select , then press the button.
The menu is displayed.Cable System
8 Press the ▲/▼/◄/► buttons to select the cable system for analog and digital channels
respectively, then press the button.ENTER
➢ STD, HRC, and IRC identify various types of cable TV systems. Contact your local cable
company to identify the type of cable system that exists in your particular area.
At this point the signal source has been selected.
9 ENTER Press the button to start.
The TV begins memorizing all available channels.
Press the button to stop.ENTER
➢ When you select or it also executes “Clearing Scrambled Channels” Cable Air+Cable
simultaneously. See page 15.
➢ This TV can receive Digital HD (High Definition) signals, but converts them to SD (Standard
Definition) for viewing.
You can also press the AUTO PROG. Auto button on the remote control to bring up the
Program menu.
Move Enter Return
Antenna :
Auto Program
Clear Scrambled Channel
Add/Delete
Fine Tune
Name
Signal Strength
Channel
Air
Cable
Move Enter Return
Channel
Antenna : Air ►
Auto Program ►
Clear Scrambled Channel ►
Add/Delete ►
Fine Tune ►
Name ►
Signal Strength ►
Auto Program
Move Enter Return
Air
Cable
Air+Cable
Auto Program
Move Enter Return
Start
STD
Cable System
Analog
HRC IRC
STD
Digital
HRC IRC
Auto Program
Enter Return
Stop
Auto Program in progress
STD 120 3%
Scrambled Channels Searched
Specyfikacje produktu
| Marka: | Samsung |
| Kategoria: | Telewizja |
| Model: | SlimFit TX-T2082 |
Potrzebujesz pomocy?
Jeśli potrzebujesz pomocy z Samsung SlimFit TX-T2082, zadaj pytanie poniżej, a inni użytkownicy Ci odpowiedzą
Instrukcje Telewizja Samsung

5 Kwietnia 2025
5 Kwietnia 2025
5 Kwietnia 2025
5 Kwietnia 2025
5 Kwietnia 2025
5 Kwietnia 2025
5 Kwietnia 2025
5 Kwietnia 2025
5 Kwietnia 2025
5 Kwietnia 2025
Instrukcje Telewizja
- Telewizja Sony
- Telewizja Yamaha
- Telewizja Electrolux
- Telewizja AEG
- Telewizja Beko
- Telewizja LG
- Telewizja Küppersbusch
- Telewizja Xiaomi
- Telewizja Sharp
- Telewizja TCL
- Telewizja Pioneer
- Telewizja Lenovo
- Telewizja Philips
- Telewizja SilverCrest
- Telewizja Acer
- Telewizja Nokia
- Telewizja Hisense
- Telewizja Infiniton
- Telewizja Panasonic
- Telewizja Muse
- Telewizja Viewsonic
- Telewizja Nedis
- Telewizja AG Neovo
- Telewizja Medion
- Telewizja OK
- Telewizja Lenco
- Telewizja Polar
- Telewizja Marquant
- Telewizja Toshiba
- Telewizja Tesla
- Telewizja Westinghouse
- Telewizja Majestic
- Telewizja Jensen
- Telewizja ILive
- Telewizja Blaupunkt
- Telewizja Brandt
- Telewizja Vivax
- Telewizja Terris
- Telewizja Salora
- Telewizja Siemens
- Telewizja Teac
- Telewizja Casio
- Telewizja Iiyama
- Telewizja Citizen
- Telewizja Dual
- Telewizja Grundig
- Telewizja Haier
- Telewizja Soundmaster
- Telewizja Hyundai
- Telewizja Manhattan
- Telewizja Strong
- Telewizja ECG
- Telewizja Oyster
- Telewizja Icy Box
- Telewizja Bang & Olufsen
- Telewizja JVC
- Telewizja V7
- Telewizja Dell
- Telewizja Furrion
- Telewizja Funai
- Telewizja Oppo
- Telewizja TechniSat
- Telewizja Schneider
- Telewizja Krüger&Matz
- Telewizja Philco
- Telewizja CHiQ
- Telewizja Qilive
- Telewizja Uniden
- Telewizja Thomson
- Telewizja Ferguson
- Telewizja Wharfedale
- Telewizja Manta
- Telewizja Pyle
- Telewizja Cecotec
- Telewizja Marantz
- Telewizja AOC
- Telewizja Monster
- Telewizja Peerless-AV
- Telewizja Caratec
- Telewizja Nevir
- Telewizja Mitsubishi
- Telewizja Arçelik
- Telewizja Continental Edison
- Telewizja GoGen
- Telewizja Intenso
- Telewizja NEC
- Telewizja Polaroid
- Telewizja Aiwa
- Telewizja AKAI
- Telewizja Sanyo
- Telewizja Clatronic
- Telewizja Telefunken
- Telewizja Optoma
- Telewizja SVAN
- Telewizja Innoliving
- Telewizja Abus
- Telewizja Jay-Tech
- Telewizja Bush
- Telewizja Loewe
- Telewizja Kemo
- Telewizja VOX
- Telewizja Insignia
- Telewizja AYA
- Telewizja Element
- Telewizja Orima
- Telewizja Denver
- Telewizja Kernau
- Telewizja Aspes
- Telewizja Albrecht
- Telewizja Orion
- Telewizja Hitachi
- Telewizja Technika
- Telewizja Seiki
- Telewizja SereneLife
- Telewizja RCA
- Telewizja MBM
- Telewizja BenQ
- Telewizja Trevi
- Telewizja Lexibook
- Telewizja GPX
- Telewizja Sencor
- Telewizja Odys
- Telewizja Nabo
- Telewizja Nextbase
- Telewizja Zenith
- Telewizja Daewoo
- Telewizja Allview
- Telewizja Metz
- Telewizja Kunft
- Telewizja Grunkel
- Telewizja Alphatronics
- Telewizja XD Enjoy
- Telewizja RevolutionHD
- Telewizja FFalcon
- Telewizja Dyon
- Telewizja Reflexion
- Telewizja Megasat
- Telewizja Sogo
- Telewizja Proline
- Telewizja Finlux
- Telewizja Alden
- Telewizja Aldi
- Telewizja Airis
- Telewizja Aristona
- Telewizja Apex
- Telewizja Ziggo
- Telewizja Techwood
- Telewizja Walker
- Telewizja Saba
- Telewizja Antarion
- Telewizja Tevion
- Telewizja Proscan
- Telewizja Vestel
- Telewizja Tucson
- Telewizja Energy Sistem
- Telewizja Sagem
- Telewizja Sunstech
- Telewizja Sylvania
- Telewizja Sunny
- Telewizja Luxor
- Telewizja Nordmende
- Telewizja AudioAffairs
- Telewizja Magnum
- Telewizja Audiosonic
- Telewizja Kubo
- Telewizja Coby
- Telewizja Seg
- Telewizja Vivo
- Telewizja Daitsu
- Telewizja Changhong
- Telewizja Alba
- Telewizja Naxa
- Telewizja Star-Light
- Telewizja Fantec
- Telewizja Mpman
- Telewizja Sweex
- Telewizja Vizio
- Telewizja Cello
- Telewizja Mx Onda
- Telewizja Nikkei
- Telewizja Peaq
- Telewizja Hannspree
- Telewizja DGM
- Telewizja Yasin
- Telewizja Roadstar
- Telewizja Humax
- Telewizja MT Logic
- Telewizja Superior
- Telewizja Difrnce
- Telewizja ITT
- Telewizja Avtex
- Telewizja Inovia
- Telewizja Lin
- Telewizja Aconatic
- Telewizja NPG
- Telewizja Bluesky
- Telewizja Videocon
- Telewizja Xoro
- Telewizja Durabase
- Telewizja HKC
- Telewizja Edenwood
- Telewizja Woxter
- Telewizja Premier
- Telewizja Onn
- Telewizja Teleco
- Telewizja Packard Bell
- Telewizja Opera
- Telewizja LTC
- Telewizja JTC
- Telewizja Zalman
- Telewizja Horizon
- Telewizja United
- Telewizja SYLVOX
- Telewizja Doffler
- Telewizja FOX Electronics
- Telewizja Viewpia
- Telewizja XS4ALL
- Telewizja JGC
- Telewizja Online
- Telewizja DirecTV
- Telewizja Tele 2
- Telewizja Graetz
- Telewizja Kogan
- Telewizja Telesystem
- Telewizja EKO
- Telewizja E-motion
- Telewizja Mitsai
- Telewizja Selfsat
- Telewizja High One
- Telewizja Tve
- Telewizja ISymphony
- Telewizja Pantel
- Telewizja Magnavox
- Telewizja ATYME
- Telewizja HCI
- Telewizja Inno-Hit
- Telewizja Engel
- Telewizja Bang Olufsen
- Telewizja TechLine
- Telewizja Elements
- Telewizja Digihome
- Telewizja Englaon
- Telewizja Time
- Telewizja Reflex
- Telewizja Astar
- Telewizja Visco
- Telewizja Tivax
- Telewizja H&B
- Telewizja Norcent
- Telewizja TELE System
- Telewizja TIM
- Telewizja Belson
- Telewizja Vision Plus
- Telewizja Sbr
- Telewizja Bauhn
- Telewizja Voxx
- Telewizja Rm 2000
- Telewizja Hoher
- Telewizja Felson
- Telewizja Mach Power
- Telewizja Elbe
- Telewizja Axing
- Telewizja CGV
- Telewizja Smart Tech
- Telewizja Séura
- Telewizja Mitzu
- Telewizja JTC24
- Telewizja Coocaa
- Telewizja Kivi
- Telewizja Smart Brand
- Telewizja Mystery
- Telewizja Linsar
Najnowsze instrukcje dla Telewizja

9 Kwietnia 2025

9 Kwietnia 2025

9 Kwietnia 2025
9 Kwietnia 2025
9 Kwietnia 2025
9 Kwietnia 2025
9 Kwietnia 2025

9 Kwietnia 2025
9 Kwietnia 2025
9 Kwietnia 2025