Instrukcja obsługi Samsung QN65LS01TAF
Przeczytaj poniżej 📖 instrukcję obsługi w języku polskim dla Samsung QN65LS01TAF (191 stron) w kategorii Telewizja. Ta instrukcja była pomocna dla 4 osób i została oceniona przez 2 użytkowników na średnio 4.5 gwiazdek
Strona 1/191

E-MANUAL
Thank you for purchasing this Samsung product.
To receive more complete service, please register your
product at
www.samsung.com
Model Serial No.
To directly go to the page that provides instructions on
how to use the manual for visually impaired users, select
the Learn the Menu Screen link below.
“Learn the Menu Screen” Link

Contents
Guide
Connections
5 Connection Guide
6 Connecting an Antenna
7 Connecting to the Internet
10 Screen Sharing (Smart View) with your Mobile Device
12 Connection Cables for External Devices
14 Switching between external devices connected to the TV
16 Connection Notes
Peripherals
18 Controlling External Devices with a Samsung Remote
Control - Using the Universal Remote
19 Using Anynet+ (HDMI-CEC)
20 Controlling the TV with a Keyboard, Mouse, or Gamepad
22 Entering Text using the On-Screen Virtual Keyboard
Smart Features
24 Using Smart Hub
32 Using a Samsung account
34 Using Remote Access
40 Using the Apps Service
44 Using the Gallery App
45 Using the SmartThings App
46 Using the e-Manual
49 Using the Internet
50 Playing pictures/video/music
55 Using Bixby
TV Viewing
60 Using the Guide
61 Setting Up a Schedule Viewing
63 Using the Channel List
64 Editing Channels
65 Using a Personal Favorites List
66 TV-Viewing Support Functions
Picture and Sound
69 Adjusting the Picture Quality
71 Setting the Viewing Environment for External Devices
73 Changing the Picture Size and Position
74 a Sound Mode and Expert SettingsConguring
76 Using the Sound Support Functions
System and Support
78 Using the Time Functions and the Timers
81 Using the Auto Protection Time and Energy Saving
Functions
82 Updating the TV's Software
83 Audio and Video Functions for the Visually or Hearing
Impaired
88 Using Voice Assistants on TV
89 Using Other Functions
Precautions and Notes
91 Read Before Using Apps
92 Read Before Using the Internet Function
94 Read Before Playing Photo, Video, or Music Files
103 Read After Installing the TV
104 Supported Resolutions for UHD Input Signals
105 Read Before Connecting a Computer (Supported
Resolutions)
108 Supported Resolutions for Video Signals
110 Read Before Using Bluetooth Devices
111 Blocking programs based on their TV Rating
114 Licenses

Troubleshooting
Picture Issues
115 Testing the picture
Sound and Noise Issues
119 Testing the sound
Channel and Broadcast Issues
External Device Connectivity Issues
Network Issues
Anynet+ (HDMI-CEC) Issues
Remote Control Issues
Apps
Media Files
Voice Assistant Issues
Other issues
Diagnosing TV operational issues
Getting Support
133 Getting support through Remote Management
133 Finding the contact information for service
133 Requesting service
FAQ
The TV Screen does not Display Properly
134 When the TV screen does not display properly
The TV does not Turn On
141 When your TV does not turn on
The Picture is Distorted, or No Sound Comes Out of the
Sound Bar
147 When the TV does not connect with an external device
properly
Internet Access is not Available
152 When the TV can't connect to the Internet
There is No Sound or the Speakers are Making an Odd Sound
157 When no sound comes out of the TV, or the sound is
breaking up
The Remote Control does not Work
164 When the remote control does not work
Updating the Software
169 Updating to the latest TV software

Connecting an Antenna
You can connect a coaxial cable to your TV.
An antenna connection is not necessary if you connect a cable box or satellite box.
- 6 -

Connecting to the Internet
You can get access to the Internet through your TV.
Settings General Network Open Network Settings Try Now
Congure network settings to connect to an available network.
Establishing a wired Internet connection
Settings General Network Open Network Settings Wired
If you connect a LAN cable, the TV automatically accesses the Internet.
If the TV does not automatically connect to the network, refer to "Network Issues" in "Troubleshooting."
Use a CAT 7 (*STP type) cable for the connection.
* Shielded Twisted Pair
The TV will not be able to connect to the Internet if your network speed is below 10 Mbps.
This function may not be supported depending on the model.
- 7 -

Establishing a wireless Internet connection
Settings General Network Open Network Settings Wireless
Make sure that you have the wireless access point's SSID (name) and password settings before attempting to
connect. The network name (SSID) and security key are available on the wireless access point's conguration
screen. See the wireless access point's user manual for more information.
Wireless Connection
Select your wireless network.
Refresh
Manage Saved Networks
The image on your TV may differ from the image above depending on the model and geographical area.
If no wireless access point is found, select at the bottom of the list and enter the network name (SSID).Add Network
If your wireless access point has a WPS or PBC button, select at the bottom of the list, and then push the WPS orUse WPS
PBC button on your access point within 2 minutes. The TV will connect automatically.
To view or delete previously connected network names (SSIDs), move the focus to , and then pressManage Saved Networks
the Select button.
- 8 -

Screen Sharing (Smart View) with your Mobile Device
You can watch the screen of your mobile device on the TV screen through Smart View or Tap View.
For information on how to share the screen with your mobile device, refer to Source Connection Guide
Smartphone Screen Sharing (Smart View).
• To turn off Screen Sharing (Smart View), disconnect the mobile device or press the button on the remote
control.
• Using the Smart View menu on your mobile device, you can change the settings such as aspect ratio.
• Use AirPlay if you are an iPhone or iPad user. For more information, refer to Source Connection Guide
Smartphone Apple AirPlay.
- 10 -

Using the Tap View
By tapping the mobile device on your TV, you can watch mobile device's screen through the TV screen.
This function may not be supported depending on the model.
This function is available in Samsung mobile devices with Android 8.1 or higher.
1.
Enable on your mobile device.Tap View
For more information about refer to 'Enabling the Tap View' below for how to set.conguration,
2.
Turn on the screen of your mobile device.
3.
Tap your mobile device on the TV. The TV screen switches to mobile device's screen.
4.
Watch mobile device's screen on the TV screen.
This function enables mirroring (Smart View) by detecting vibrations generated when you tap the mobile device on the TV.
Be sure to tap away from the TV screen and bezel corners. It may scratch or break the TV or mobile device screen.
We recommend using your mobile device with the cover in place and lightly tap it on any external edge of the TV.
Enabling the Tap View
Enable in the SmartThings app.Tap View
Depending on the SmartThings app version, you may need to register the TV with your mobile device.
1.
Launch the SmartThings app on your mobile device.
2.
Select Settings ( ) in SmartThings app on your mobile device.
3.
Set the to on.Tap View
Upon connection for the time, select on a pop-up window of the TV.rst Allow
- 11 -

Connection Cables for External Devices
You can view detailed information about the connection cables for external devices that can be connected to the TV.
Cable name
Cable name
Cable name
Cable nameCable name Image
Image
Image
ImageImage Description
Description
Description
DescriptionDescription
HDMI
to
HDMI
Each cable simultaneously transmits digital video and audio signals
from an external device to the HDMI port on the TV.
Cables are divided into various types according to the types of input
or output ports on external devices.
HDMI
to
MINI HDMI
HDMI
to
Micro HDMI
HDMI
to
USB Type-C
HDMI
to
DisplayPort
Mini DisplayPort
to
HDMI
- 12 -

Cable name
Cable name
Cable name
Cable nameCable name Image
Image
Image
ImageImage Description
Description
Description
DescriptionDescription
DVI
to
HDMI
DVI to HDMI cables can transmit only digital video signals and not
audio signals. We recommend that you use HDMI to HDMI cables.
Optical
Optical cables are used to transmit audio signals to external
speakers with low signal loss.
Optical cables do not transmit video signals.
Component
Component cables transmit analogue signals.
The video signal is separated and transmitted to the red, green, and
blue terminals to provide HD (1080i) pictures. The audio signal is
transmitted to the red and white terminals.
Composite
Composite cables transmit analogue signals.
The video signal is transmitted to the yellow terminal, and the audio
signal is transmitted to the red and white terminals.
Available connection cables may differ depending on the model or geographical area.
- 13 -

Switching between external devices connected to the TV
You can switch between TV programs and the content of external devices.
Source
When you select a connected external device on the screen, the output of the selected device is displayed onSource
the TV's screen.
On the standard remote control, press the SOURCE button.
To control a device (Blu-ray player, game console, etc.) that supports universal remote control with the TV's remote control,
connect the device to an HDMI port on the TV, and then turn on the device. The output displayed on the TV is automatically
switched to the output of the device or you can universal remote control for the device automatically. For morecongure
information, refer to "Controlling External Devices with a Samsung Remote Control - Using the Universal Remote."
When a USB device is connected to the USB port, a pop-up message appears that lets you switch easily to the media
content listed on the device.
This function may not be supported depending on the device and geographical area.
Editing the name and icon of an external device
Source
You can change the port name for a connected external device or add it to the Home Screen.
Sources
Universal Remote
Edit
Information
Add to Home
Source
The image on your TV may differ from the image above depending on the model and geographical area.
1.
Move the focus to a connected external device.
2.
Press the up directional button. The following functions become available:
Available functions may differ depending on the port type.
- 14 -

Connection Notes
When connecting an external device, note the following:
The number of connectors, and their names and locations may differ with the model.
Refer to the external device's operating manual when connecting it to the TV. The number of external device connectors,
and their names and locations may differ with the manufacturer.
Connection notes for HDMI
• The following types of HDMI cables are recommended:
– High Speed HDMI Cable
– High Speed HDMI Cable with Ethernet
– Premium High Speed HDMI Cable
– Premium High Speed HDMI Cable with Ethernet
– Ultra High Speed HDMI Cable
• Use an HDMI cable with a thickness of 0.66 inches (17 mm) or less.
• Using a non-certified HDMI cable may result in a blank screen or a connection error.
• Some HDMI cables and devices may not be compatible with the TV due to different HDMI specifications.
• This TV does not support HDMI Ethernet Channel. Ethernet is a Local Area Network (LAN) built with coaxial
cables standardized by the IEEE.
• Use a cable shorter than 10 feet (3 m) to get the best UHD viewing quality.
• Many computer graphics adaptors do not have HDMI ports, but have DVI or DisplayPort ports instead. If your PC
does not support HDMI video out, connect your PC with a DVI to HDMI or HDMI to DisplayPort cable.
• When the TV is connected to an external device, such as a DVD/BD player or a set-top box via HDMI, power sync
mode will be automatically activated. In the power sync mode, the TV continues to detect and connect external
devices via HDMI cable. This function can be deactivated by removing the HDMI cable of the connected device.
This function may not be supported depending on the model.
- 16 -

Peripherals
Connect external devices such as a keyboard for ease of use.
Controlling External Devices with a Samsung Remote Control - Using the
Universal Remote
Control the TV and connected external devices with a Samsung remote control.
Source Universal Remote
You can control external devices connected to the TV using a Samsung remote control. To control external devices,
register them by following the instructions on the screen.
This function may not be supported depending on the model or geographical area.
You can also use the function to operate external Samsung devices with your TV's remote controlAnynet+ (HDMI-CEC)
without any additional setup. For more information, refer to "Using Anynet+ (HDMI-CEC)."
Specic external devices connected to the TV may not support the universal remote feature.
Do not place any obstacles in front of an external device and TV's logo. It may cause signals from the remote control to be
transmitted improperly.
The TV memorizes both the external device and its connection port (HDMI 1, HDMI 2, etc.).
If you have controlling external devices with the Universal Remote, try adjusting the positions of the externaldifculty
devices.
This function may not operate properly depending on the TV installation environment and the features of external devices.
- 18 -

Using Anynet+ (HDMI-CEC)
Control an external device connected via Anynet+ (HDMI-CEC) with the remote control.
You can use the TV's remote control to control external devices that are connected to the TV by an HDMI cable and
that support Anynet+ (HDMI-CEC). Note that you can only set up and operate Anynet+ (HDMI-CEC) with the remote
control.
Connecting an external device through Anynet+ and using their menus
Settings General External Device Manager Anynet+ (HDMI-CEC) Try Now
1.
Set to .Anynet+ (HDMI-CEC) On
2.
Connect an HDMI-CEC-compliant device to the TV.
3.
Turn on the connected external device.
The device is automatically connected to the TV. After the connection process is you can access the menunished,
of the connected device using your TV remote and control the device.
The connecting process can take up to 2 minutes to complete.
Read before connecting an Anynet+ (HDMI-CEC) device
Anynet+ (HDMI-CEC)-enabled devices must be connected to the TV with an HDMI cable. Note that some HDMI cables may
not support Anynet+ (HDMI-CEC).
You can the TV's Universal Remote to control third-party cable boxes, Blu-ray players, and home theaters that docongure
not support HDMI-CEC. For more information, refer to "Controlling External Devices with a Samsung Remote Control -
Using the Universal Remote."
Anynet+ cannot be used to control external devices that do not support HDMI-CEC.
The TV remote control may not work under certain circumstances. If this occurs, set up the device as an Anynet+ (HDMI-
CEC)-enabled device again.
Anynet+ (HDMI-CEC) works only with external devices that support HDMI-CEC, and only when those devices are either in
standby mode or turned on.
Anynet+ (HDMI-CEC) can control up to 12 compliant external devices (up to 3 of the same type) except for home theaters.
Anynet+ (HDMI-CEC) can control only one home theater system.
To listen to 5.1 channel audio from an external device, connect the device to the TV via an HDMI cable and connect a 5.1
home theater system directly to the external device's digital audio output connector.
If an external device has been set up for both Anynet+ and a universal remote control, the device can be controlled only
with the universal remote control.
- 19 -

Controlling the TV with a Keyboard, Mouse, or Gamepad
Connecting a keyboard, mouse, or gamepad to make it easier to control the TV.
Settings General External Device Manager Input Device Manager Try Now
You can connect a keyboard, mouse, or gamepad to make it easier to control the TV.
Connecting a USB keyboard, mouse, or gamepad
Plug the keyboard, mouse or gamepad cable into the USB port.
If you connect a mouse, it is available only in the app and function.Internet Remote Access
XInput USB gamepads are supported.
For more information, refer to in ( ).Input Device Connection Guide Source Connection Guide Input Device
Connecting a Bluetooth keyboard, mouse, or gamepad
Settings General External Device Manager Input Device Manager Bluetooth
Device List
If your device was not detected, position the keyboard close to the TV, and then select . The TV scans for availableRefresh
devices again.
If you connect a mouse, it is available only in the app.Internet
For more information, refer to the Bluetooth device's user manual.
This function may not be supported depending on the model or geographical area.
- 20 -

Using the keyboard and mouse
Button
Button
Button
ButtonButton Description
Description
Description
DescriptionDescription
Directional keys Use to navigate the menu, or move the focus to highlight items on the Home Screen.
Windows key Displays the TV settings
Enter key Selects or runs a focused item
ESC key Returns to the previous screen
F1 / F2 / F3 / F4 key Color buttons ― / / /
F5 key Displays the Home Screen
F6 key Displays the screenSource
F7 key Displays the Channel List
F8 key Mutes the sound
F9 / F10 key Adjusts the volume
F11 / F12 key Changes the channel
Page Up / Page Down Scrolls a web page displayed by the app.Internet
Left-click Available only in the app. You can click a menu or link to start a function as you doInternet
on a PC.
Right-click
Available only in the app. You can use the following functions:Internet
The options displayed in the menu may differ depending on the selected item.
•Open
•Open Link in New Tab
•Enable Scroll Mode
The key operation may differ depending on some apps or the keyboard.
- 21 -

Setting up the input devices
Settings General External Device Manager Input Device Manager
•Keyboard Settings
You can set up the keyboard with the Keyboard Language and Keyboard Type functions.
•Mouse Settings
You can set up the mouse with the Primary Button and Pointer Speed functions.
Entering Text using the On-Screen Virtual Keyboard
Use the virtual keyboard to enter text on your TV.
Recommended text
Options
Predict Next Character
The image on your TV may differ from the image above depending on the model and geographical area.
1.Recommended text
When you type a word you want to use as a search term, this function displays related suggestions from which you
can choose one.
- 22 -

2.Options
Select on the virtual keyboard screen. The following options are available:
The options available may differ depending on the function running currently.
•Recommended text
•Reset Recommended Text Memory
•Accented Character Preview
•Predict Next Character (when using direction buttons)
•Language
3.Predict Next Character
Each time you type a character on the virtual keyboard, the next characters predicted to be typed are displayed. You
can use the directional buttons on the remote control to select one.
- 23 -

Smart Features
You can enjoy various apps with Smart Hub.
Using Smart Hub
View descriptions of Smart Hub's basic functions.
From Smart Hub, you can use the Internet search function, install and use various apps, view photos and videos, or
listen to music stored on external storage devices, and perform more functions.
Some Smart Hub services are paid services.
To use Smart Hub, the TV must be connected to the Internet.
Some Smart Hub features may not be supported depending on the service provider, language, or geographical area.
Smart Hub service outages can be caused by disruptions in your Internet service.
To use Smart Hub, you must agree to the Smart Hub service agreement and the collection and use of personal information.
Without giving consent, you cannot use the additional features and services. You can view the entire text of the Terms &
Privacy Settings Terms & Privacy by navigating to . Try Now
If you want to stop using Smart Hub, you can cancel the agreement. To cancel the Smart Hub service agreement, select
Reset Smart Hub Settings Support Device Care Self Diagnosis Reset Smart Hub ( ).
- 24 -

Displaying the Home Screen
Press the button.
Sources
TV HDMI 1 USB
Remote Access
Connection Guide
Universal Remote
Source
The image on your TV may differ from the image above depending on the model and geographical area.
On the Home Screen, you can easily run the apps you have used previously or frequently. The apps can also be
moved or deleted from the screen.
1. Settings
When the focus is moved to , a list of quick settings icons appears above the top of the menu. You canSettings
quickly set frequently used functions by clicking the icons.
•e-Manual
You can open the user manual embedded in your TV.
- 25 -

•Picture Mode
You can select the picture mode that provides the best viewing experience. To change the picture mode, press
the Select button. To make adjustments, press the up directional button, and then select .ne Picture Setup
•Sound Mode
You can select a sound mode to optimize your listening experience. To change the sound mode, press the Select
button. To make adjustments, press the up directional button, and then select .ne Equalizer Setup
•Sound Output
You can select which speakers the TV uses for audio output. To change the audio output, press the Select
button. To connect to a Bluetooth speaker, press the up directional button, and then select Bluetooth Speaker
List.
Connecting Bluetooth speaker may not be supported depending on the model or geographical area.
•Game Mode
You can enable game mode to optimize the TV's settings for playing video games with a gaming console, such
as a PlayStation™, Xbox™, or Nintendo Switch™. To turn on or off, press the Select button.Game Mode
For more information, refer to "Setting the Viewing Environment for External Devices."
This function is only available when an external input source is being used.
This function may not be supported depending on the model.
•Caption
You can watch TV broadcasts with captions. To activate or deactivate the function, press the SelectCaption
button. To run , press the up directional button, and then select .Accessibility Shortcuts Accessibility Shortcuts
•Sleep Timer
You can have the TV automatically turn off at a time. To change the sleep time, press the Select button.specic
To set the time at which the TV turns off automatically, press the up directional button, and then selectspecic
Set Up Off Timer.
•Network
You can view the current network and Internet status. Press the up directional button, and then select Network
Status Network Settings or .
- 26 -

•Color Tone
You can select a color tone suitable for your viewing preferences. To change to a color tone that you want,
press the Select button.
•Picture Clarity
You can optimize pictures that contain a lot of motions. To turn this function on or off, press the Select button.
To set the detailed options, press the up directional button, and then select .Picture Clarity Settings
•Digital Output Audio Format
You can select an output format for digital audio. Note that the option is only available via HDMIDolby Digital+
(eARC) for external devices that support the Dolby Digital+ format.
HDMI (ARC) is supported by some models. Check the HDMI port name of the purchased product's model.
•Device Care
You can run to diagnose and optimize your TV. can also check and optimize the TV'sDevice Care Device Care
storage. If any problem is found, the TV can call for technical support.
•All Settings
Display the menu.Settings
This function may not be supported depending on the model or geographical area.
2. Source
You can select an external device connected to the TV.
For more information, refer to "Switching between external devices connected to the TV."
3. Search
You can search for channels, programs, movie titles, and apps from Smart Hub.
To use this feature, the TV must be connected to the Internet.
This function may not be supported depending on the model.
4. Apps
You can enjoy a wide range of content, including news, sports, weather, and games by installing the corresponding
apps on your TV.
To use this feature, the TV must be connected to the Internet.
For more information, refer to "Using the Apps Service."
- 27 -

6.Universal Guide
Universal Guide is an app that allows you to search for and enjoy various content, such as TV shows, dramas, and
movies, in one place. can recommend content tailored to your preferences.Universal Guide
You can use this feature on your mobile device with the Samsung SmartThings app.
To enjoy the content from these apps on your TV, they must be installed on the TV.
When you watch some paid content, you may need to make a payment using their associated app.
Some content may be restricted depending on your network conditions and your subscriptions to paid channels.
Parental control is necessary when children use this service.
Images may look blurry depending on the service provider's circumstances.
This function may not be supported depending on the model or geographical area.
. Art
When you are not watching TV or when the TV is turned off, you can use the mode function to edit imageArt
content, such as artworks, photos, or to display the content.
This function is supported only in The Frame.
For more information, refer to the provided user manual.
- 29 -

Move
Remove
The image on your TV may differ from the image above depending on the model and geographical area.
7.Moving an item on the Home Screen
Move the focus to the app you want to move, press and hold the Select button on the remote control, and then
select in option menu. Move the app to the desired position by pressing the left or right directional button,Move
and then press the Select button. The selected app is moved on the Home screen.
In the region that does not support the , press the down directional button on the remote control.Universal Guide
8.Removing an item on the Home Screen
Move the focus to the app you want to delete, press and hold the Select button on the remote control, and then
select in option menu. The selected app is deleted.Remove
You can add the apps you want to use often to the Home Screen using Apps. To add your favorite apps to the Home Screen,
refer to "Managing installed apps."
- 30 -

Launching Smart Hub automatically
Settings General Smart Features Autorun Smart Hub Try Now
When you set to on, the TV displays the Home Screen automatically when you turn the TV on.Autorun Smart Hub
You can turn this function on or off. Press the Select button at the current menu.
Launching the last used app automatically
Settings General Smart Features Autorun Last App Try Now
If is set to on, the last used app is automatically run when you turn on the TV. You can turn thisAutorun Last App
function on or off. Press the Select button at the current menu.
This function may not be supported depending on the app.
Testing Smart Hub connections
Settings Support Device Care Self Diagnosis Smart Hub Connection Test Try Now
Resetting Smart Hub
Settings Support Device Care Self Diagnosis Reset Smart Hub Try Now
You can reset the Smart Hub settings. To reset Smart Hub, enter the PIN. The default PIN is "0000." You can set the PIN in
.Settings General System Manager Change PIN
- 31 -

Using a Samsung account
Create and manage your own Samsung account.
Settings General System Manager Samsung Account Try Now
You can view the entire text of the Terms & Policy in Settings General System Manager Samsung Account
My Account Terms & Conditions, Privacy Policy after logging in to your Samsung account.
You can create a Samsung account at http://account.samsung.com. Once you have an account, you can use the same ID on
both the TV and the Samsung website.
Signing in to a Samsung account
Settings General System Manager Samsung Account Sign In
Creating a new account
Settings General System Manager Samsung Account Create Account
Sign up for a Samsung account on your mobile or PC. Visit : https://account.samsung.com.
- 32 -

Using Remote Access
Use the TV to access your PC via Remote PC, Screen Sharing (Wireless) or Cloud Service.
Source Remote Access
You can use the TV to access your PC via Remote PC, Screen Sharing (Wireless) or Cloud Service.
For easy computer use, connect a keyboard and a mouse to your TV in advance.
Remote Access secured by Knox
Access to remote PC and your work resources with this function.
Connect a keyboard and mouse to this TV before starting.
Featured Functions
Remote PC Screen Sharing
(Wireless)
Samsung DeX 365Ofce
Added Cloud Services
Add Cloud Service
The image on your TV may differ from the image above depending on the model and geographical area.
Connecting a Remote PC
Provides for remotely connecting to a PC running on Windows and Remote Desktop Connection (RDP) Virtual
Network Computing (VNC) for a PC running on Mac. To remotely connect to a PC, you must enter the IP address of
the remote PC or select a saved Enter a correct username and password and select a correct protocol. Ifprole.
there is any computer that can be accessed via the same network, the found IP and protocol are displayed.
To register a frequently used PC, move the focus to , and then press the Select button. When a pop-Manage User Proles
up window appears, select , and then enter the PC information.Add
When your PC enters in power saving mode, connection is not available. It is recommended to cancel the power saving
mode.
It is recommended to connect the wired network because the screen or sound may be interrupted depending on the
network condition.
- 34 -

1.
Congure your computer’s settings to use the Remote Access function.
Remote connection to a PC running on Windows via the RDP protocol is only supported for Windows 7 or later. And the
operating system must be a Professional or higher edition.
Remote connection to a PC running on Mac via the VNC protocol is only supported for Mac OS X 10.5 or later.
• Windows OS:
1)
Right-click the My Computer icon on Desktop or Windows Explorer and then click Properties.
2)
Click Advanced System Settings. The System Properties window appears.
3)
Click the Remote tab and then select the Allow Remote Assistance connections to this computer.
• Mac OS:
1)
Select Menu System Preferences and then click Sharing.
2)
Select the Screen Sharing and Remote Login check box.
3)
Run the resolution changing app downloaded from App Store and then change the resolution to 1440 x
900 or lower.
If you do not change the resolution in Mac OS, the previous image may appear while connecting a remote
computer.
- 35 -

2.
Enter the required settings for connecting the computer remotely.
Connect to Remote PC
Make sure the PC is on and remote access is set to "Allow".
PC/Prole
IP address or prole
Username
Enter a username.
Protocol
RDP (for Windows users)
Password
Enter a password.
Remember my credentials Username, Protocol and Password)(PC/Prole,
Connect
Cancel
Manage User Proles
The image on your TV may differ from the image above depending on the model and geographical area.
1.Enter the IP address of the PC you want to connect to.
• In case of Windows, when the computer to connect is within the same network (router/AP), run “cmd" command
in Settings Network and Internet View Network properties or in Start Run, and then run “ipconfig” to
check the IPv4 address of the computer.
• In case of Mac, you can check the IP address in Settings Remote Access.
• When the TV and computer are not within the same network, it is required to know the public IP and configure
the router and AP. Check whether the router connected to the computer supports port forwarding. When the
company provides additional security features such as firewall, seek help from a security officer.
Home Ofce
2.Enter the Username of the computer.
How to check the : in Windows, Username Control Panel User Account Control System Preferences Users &
Groups in Mac.
3.Select the Protocol for the computer’s OS. (Windows: RDP, Mac: VNC)
4.Enter the password for the login account.
For use of PIN, do not enter PIN but the password of the computer.specied
- 36 -

Playing Multimedia Content on a Remote PC
When you move the mouse cursor to the top of the screen after accessing a remote computer, the top bar appears.
When the sharing folder icon is clicked in the top bar, the folders shared on Windows or Mac OS appear. You can
play back any media content in a folder.
For more information, refer to "Playing pictures/video/music."
To use this function, the folder sharing option on the computer to access must have been enabled as shown below:
• Windows OS:
1.
Run Windows Explorer and then move to the folder to share.
2.
Right-click the folder and then click Properties.
3.
After the Properties window appears, click the Sharing tab and then click Advanced Sharing.
4.
After the Advanced Sharing window appears, select the Share this folder check box.
• Mac OS:
1.
Select Menu System Preferences and then click Sharing.
2.
Select the File Sharing check box.
3.
To add a folder to share, click the Add+ button at the bottom.
4.
Select a folder and then click Add+.
It is recommended to connect the wired network because the screen or sound may be interrupted depending on the
network condition.
When playing a video via a remote computer, the screen or sound breaking may be encountered.le
- 37 -

Using Screen Sharing (Wireless)
Follow the instructions on the screen to adjust the PC settings and wirelessly connect the TV to the PC.
This function is only available for PCs that support wireless screen sharing.
This function is supported by Windows 10.
You can connect AirPlay in Mac.
Using Samsung DeX
Samsung DeX can be connected from the TV via wireless network.
When the mobile device does not appear on the screen, select and then follow the screenMobile Connection Guide
instructions.
This function is available only on mobile devices that support the wireless Samsung DeX.
Using 365Ofce
You can read or create a document after accessing the 365 website.Ofce
Run the browser in full-screen mode.
URL is impossible in the 365 page.modication Ofce
Adding the Cloud Service
Select the icon. Use the bookmarking function of the browser, you can add or delete the cloudAdd Cloud Service
service link to or from .Remote Access
To add the cloud service, you must be signed in to your Samsung account.
The number of cloud services that can be added to is limited.Remote Access
- 38 -

Using Cloud Service
You can access the cloud service by selecting the cloud service icon added to .Remote Access
The screen on the web page may differ from that of a computer.
You can copy or paste any text. Some image formats are supported.
For easy and secured login in Cloud Service, is additionally supported as well as .Remote Access Pass Samsung Pass
Setting or .Samsung Pass Remote Access Pass
Set or to Use in Run the browserSamsung Pass Remote Access Pass Source Remote Access Remote Access
(Additionally select or ) .Ofce 365 Add Cloud Service Internet Menu Settings
Remote Access Pass allows you to easily manage the cloud service ID and password without biometric authentication on
mobile devices. For this purpose, you must be signed in to your Samsung account. The password is encrypted to be safely
stored on your TV.
However, the log in to may not work depending on the site policy.Remote Access Pass
To securely access the cloud service, you can use the browser's automatic shutdown or clear the history logs.
Before accessing the cloud service, refer to "Read Before Using the Internet Function."
The cloud service supports the following keyboard shortcuts:
• F1: Returns to Remote Access's Home screen.
• F8: Mutes the sound.
• F9/F10: Adjusts the volume.
• F11: Switches between full screen or default screen.
- 39 -

Using the Apps Service
Download and run various apps from Smart Hub.
Apps
You can enjoy a wide range of content, including news, sports, weather, and games by installing the corresponding
apps on your TV.
To use this feature, the TV must be connected to the Internet.
When Smart Hub is launched for the time, the default apps are automatically installed. The default apps may differrst
depending on the geographical area.
It is recommended to use the landscape mode in some apps for The Frame.
Apps
Editor's Choice
Most Popular
The image on your TV may differ from the image above depending on the model and geographical area.
1. Samsung Account
Go to the screen to create a new account or sign out of your account.Samsung Account
If you are signed out of your Samsung account, select to sign in.Sign In
If you want to download new apps using , sign in to your Samsung account.Apps rst
2. App Search
You can search for available apps.
3. Settings
You can manage the installed apps.
- 40 -

Managing installed apps
Select on . You can manage installed apps.Settings Apps
Settings
Auto Update : ON
Copyright
Delete
Add to Home
Lock
Move
Reinstall
View Details
The image on your TV may differ from the image above depending on the model and geographical area.
1.Removing an app
1.
Select an app to delete.
2.
Select .Delete
The selected app is deleted.
Ensure that the related app data is also removed when you remove an app.
Standard apps cannot be uninstalled.
2.Adding apps to the Home Screen
1.
Select an app to add.
2.
Select .Add to Home
3.
After the Home Screen appears, move the selected app to the desired location.
4.
Press the Select button.
The selected app is added to the Home Screen.
If the selected app is already added to the Home Screen, this function is disabled.
- 42 -

3.Locking and unlocking apps
1.
Select an app to lock or unlock.
2.
Select .Lock/Unlock
The selected app is locked or unlocked.
To lock or unlock an app, enter the PIN. The default PIN is "0000." You can set the PIN in Settings General
System Manager Change PIN.
4.Moving apps
1.
Select an app to move.
2.
Select .Move
3.
Move the app to the desired location.
4.
Press the Select button.
The selected app is moved.
This function may not be supported depending on the model or geographical area.
5.Reinstalling an app
1.
Select the app to install again.
2.
Select .Reinstall
Reinstallation starts.
6.Checking the app information details
1.
Select the app to check.
2.
Select .View Details
The app information screen appears.
You can rate an app on the screen.View Details
7.Automatically updating apps
To automatically update the installed apps, set to .Auto Update ON
Automatic update is enabled only when the TV is connected to the Internet.
- 43 -

Using the Gallery App
View photos and videos synchronized with the Samsung Cloud.
Gallery
Gallery
View: Daily
The image on your TV may differ from the image above depending on the model and geographical area.
You can enjoy various content synchronized with a mobile device that supports the Samsung Cloud. The available
content types are photos, videos, stories, and other content shared through your groups.
If you have shared content from your groups, you can access them in notications.
To use the app, you must be signed in to your Samsung account that uses the Samsung Cloud.Gallery
This function may not be supported depending on the model.
1. Open category
Move to at the top left of the screen using the directional buttons on the remote control to view by category the
content synchronized with the Samsung Cloud.
2.View: Daily View: Monthly /
Sort the content by day or month.
3. Samsung Account
Go to the screen to create a new account or sign out of your account.Samsung Account
If you are signed out of your Samsung account, select to sign in.Sign In
4. Gallery Settings
Set a PIN for screen lock to restrict access to the app, or view the terms and condition.Gallery
- 44 -

Using the SmartThings App
Monitor and the smart devices you have connected to the SmartThings service.congure
SmartThings
All Devices
Scenes
Device List
The image on your TV may differ from the image above depending on the model and geographical area.
From your TV, you can monitor and smart devices you connected to the SmartThings service via thecongure
SmartThings app installed on them. You can receive about the statuses of your connected devices.notications
To use this function, you must be logged in to your Samsung account.
This function may not be supported depending on the model or geographical area.
1.Location selection list
Press the Select button to identify all connected devices or the devices to a location.specic
2. Samsung Account
Go to the screen to create a new account or sign out of your account.Samsung Account
If you are signed out of your Samsung account, select to sign in.Sign In
- 45 -

Using the buttons in the e-Manual
e-Manual
Guide
Troubleshooting
First Time Use
Recently Viewed
Topics
FAQ
The image on your TV may differ from the image above depending on the model and geographical area.
1. ( )Search
Select an item from the search results to load the corresponding page.
2. ( )Sitemap
It displays the lists for each item in e-Manual.
3. ( )Index
Select a keyword to navigate to the relevant page.
This function may not be supported depending on the model or geographical area.
4.Moving to FAQ
You can the troubleshooting of the selected symptom.nd
5. ( )Recently Viewed Topics
Select a topic from the list of recently viewed topics.
- 47 -
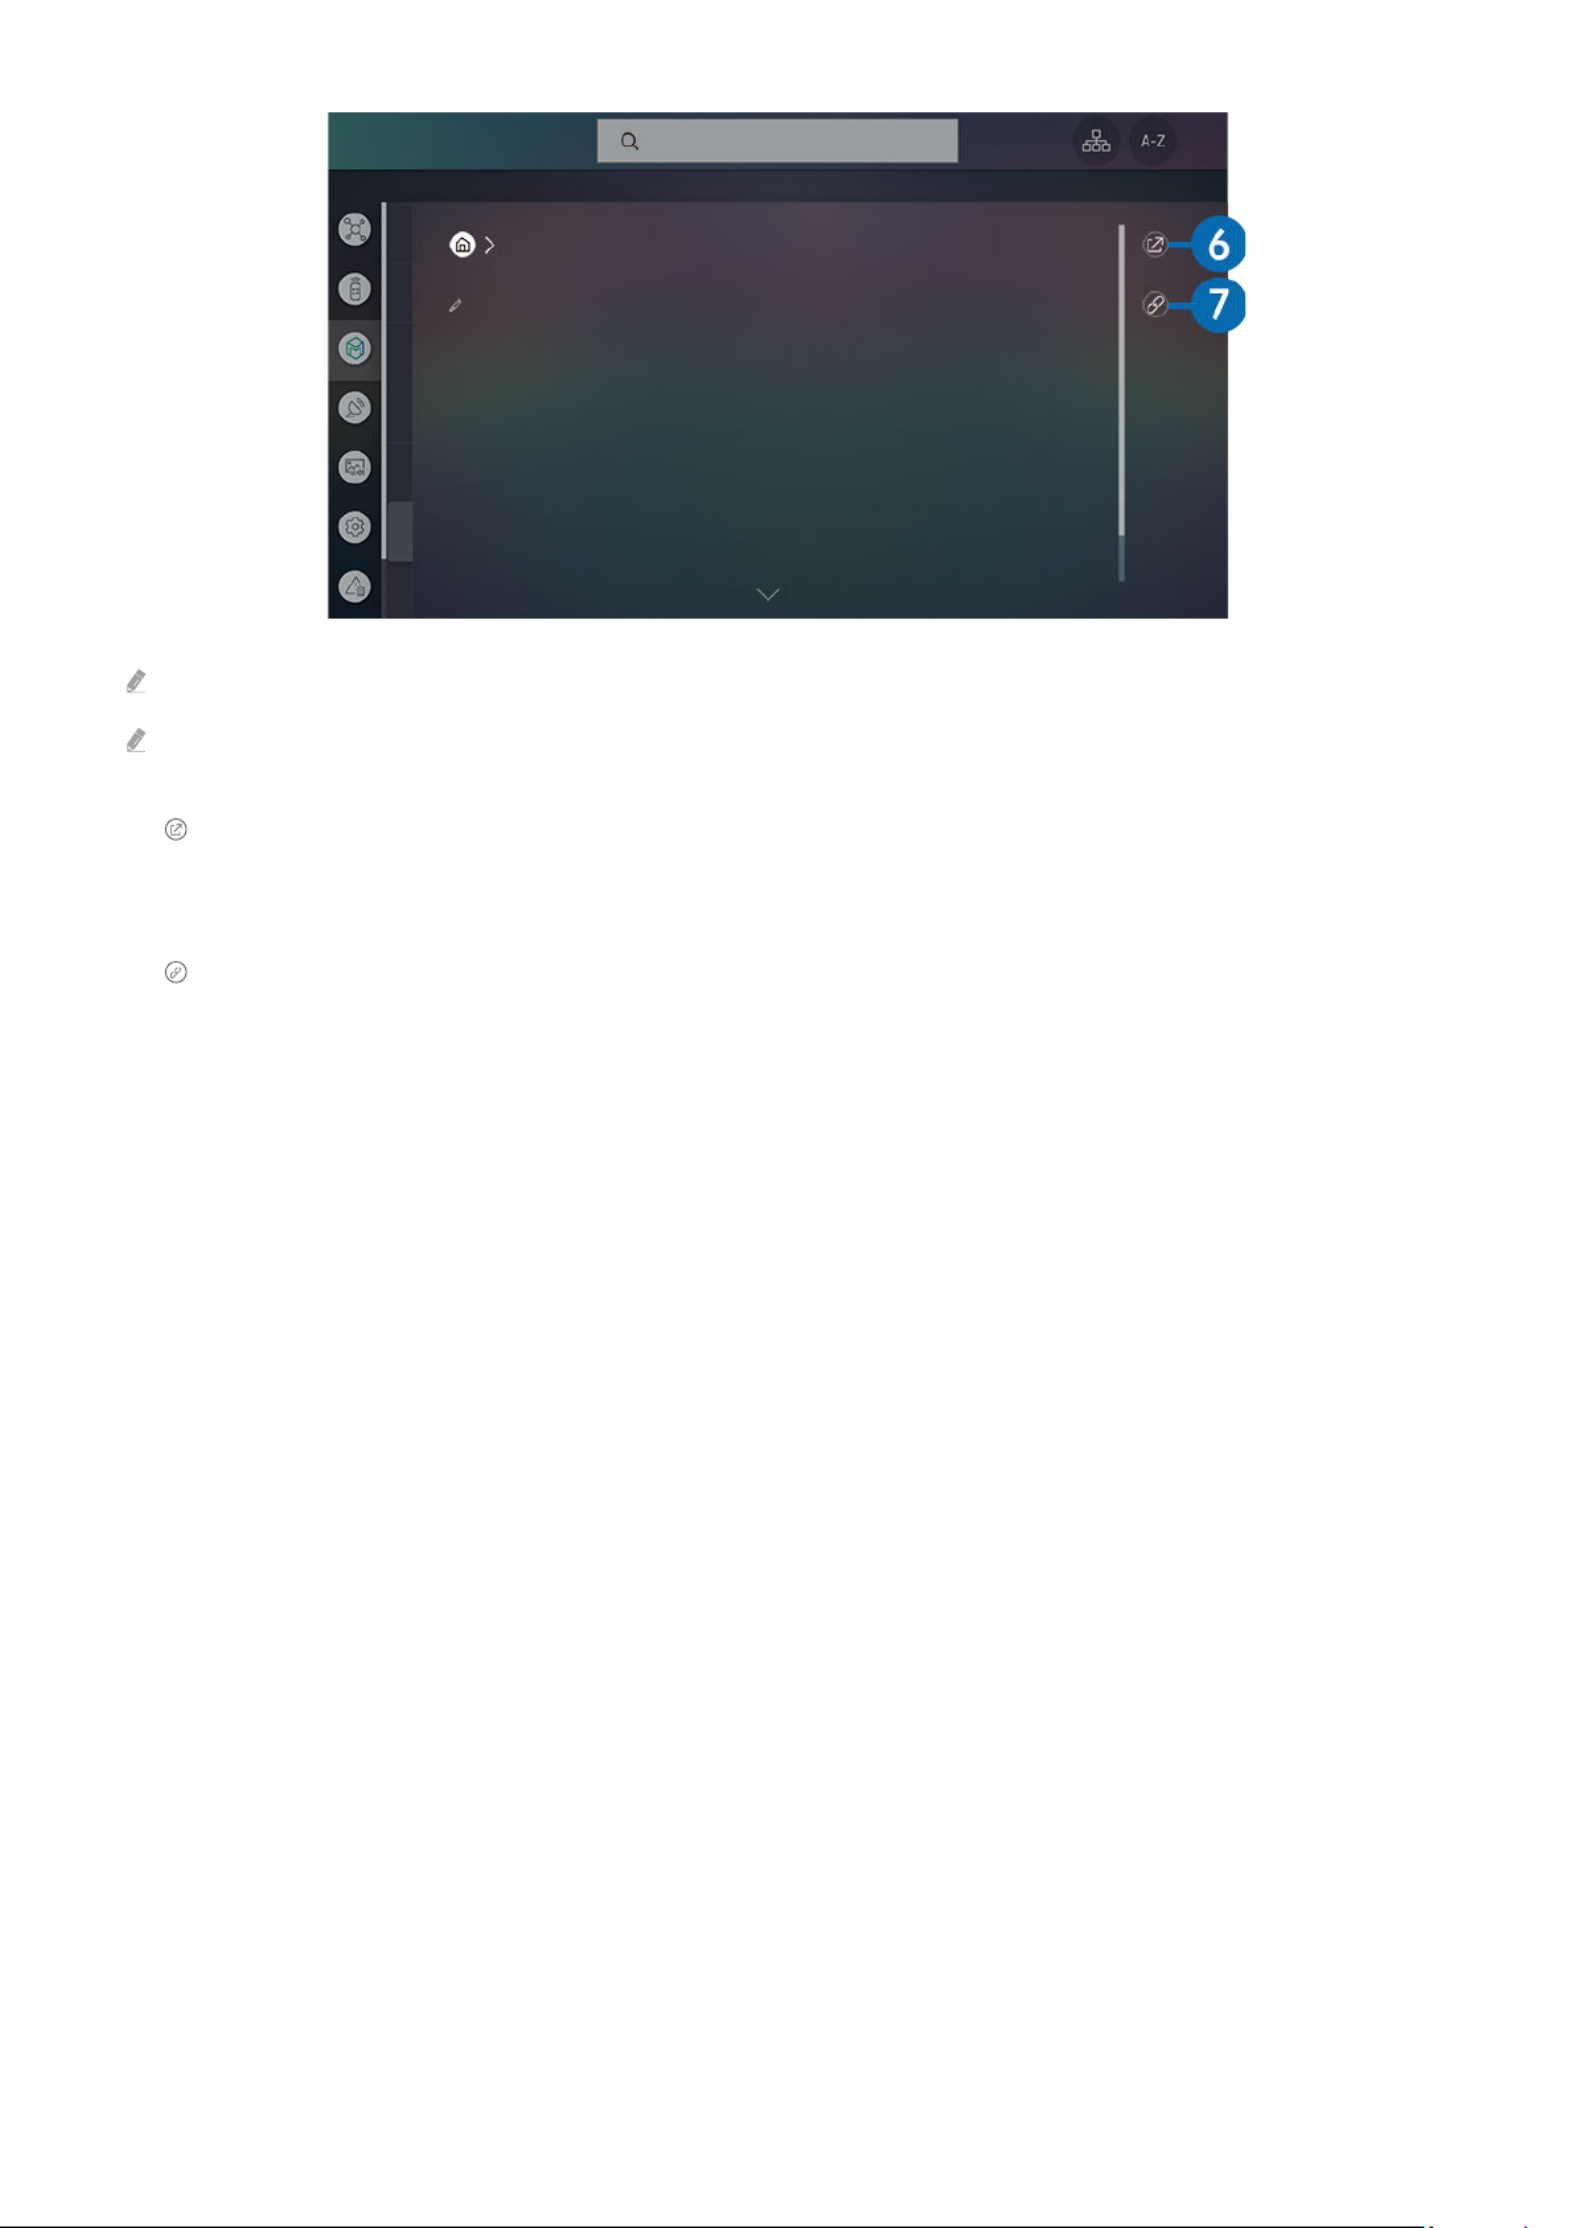
e-Manual
Internet
Surf the Internet on your TV.
Before using the Internet, refer to "Read Before Using the Internet Function."
Words in blue (e.g., Internet) indicate a menu item.
The image on your TV may differ from the image above depending on the model and geographical area.
6. ( )Try Now
Allows you to access the corresponding menu item and try out the feature right away.
7. ( )Link
Access an underlined topic referred to on an e-Manual page immediately.
- 48 -

2.Sort By
Sorts the content list by or .Title Date
This function may not be supported depending on the type of external device.
3.Options
Deletes or plays the selected media content in the media content list. When you select , the content list isRefresh
reloaded.
Playing multimedia content on a PC or mobile device
1.
Select a device with media content in . The media content list in the device appears.Source
2.
Select a media content item from the list.
The selected content is played.
The content may not be played depending on the encoding method or format. Furthermore, several functions may bele
restricted.
Content on devices connected to the TV via your network may not play smoothly due to network communication problems.
If this occurs, use a USB device.
Playing multimedia content on a USB device
1.
Connect a USB device to the USB port.
2.
When a pop-up message appears on the screen, select to easily move to the list of multimedia contentBrowse
stored on the device.
If a USB device that contains the content you want to play is already connected to the TV, select the USB device in the
screen.Source
3.
Select a content item to play from the list.
The selected content is played.
- 51 -

Listening to your mobile device sound through the TV speaker using Sound Mirroring
1.
Search for and connect to your TV from the (Bluetooth) device list on your mobile device.
2.
Select media content to play on your mobile device.
The selected media is played through the TV speaker.
If the TV and the sound bar are connected wirelessly, the operation may be restricted.
This function may not be supported depending on the model or geographical area.
Buttons and functions available while playing multimedia content
Press the Select button while playing any video, or photo content. The following buttons appear.
The provided buttons and functions may not be supported depending on the model or geographical area.
The available buttons and functions may differ with the content you are viewing or playing.
• , Pause Play
Pauses or plays the multimedia content.
• Jump Backward, Jump Forward
Press the up directional button to move the focus to the playback control bar, and then select the left or right
directional button in the playback control bar to move backward or forward by 10 seconds in the video.
- 52 -

Using Bixby
Set Voice Assistant to Bixby. Speak into the microphone on your Samsung Smart Remote to control your TV.
This function is available only if Voice Assistant is set to Bixby. ( )Settings General Voice Voice Assistant
This function is supported only in The Frame.
Bixby is available only when the TV is connected to the Internet.
To use Bixby, you must register and sign in to your Samsung account. Some functions may not be supported if you are not
signed in to your Samsung account.
Bixby only supports some languages, and the supported functions may differ depending on the geographical area.
Bixby may not be supported depending on the geographical area.
- 55 -
Specyfikacje produktu
| Marka: | Samsung |
| Kategoria: | Telewizja |
| Model: | QN65LS01TAF |
Potrzebujesz pomocy?
Jeśli potrzebujesz pomocy z Samsung QN65LS01TAF, zadaj pytanie poniżej, a inni użytkownicy Ci odpowiedzą
Instrukcje Telewizja Samsung

5 Kwietnia 2025
5 Kwietnia 2025
5 Kwietnia 2025
5 Kwietnia 2025
5 Kwietnia 2025
5 Kwietnia 2025
5 Kwietnia 2025
5 Kwietnia 2025
5 Kwietnia 2025
5 Kwietnia 2025
Instrukcje Telewizja
- Telewizja Sony
- Telewizja Yamaha
- Telewizja Electrolux
- Telewizja AEG
- Telewizja Beko
- Telewizja LG
- Telewizja Küppersbusch
- Telewizja Xiaomi
- Telewizja Sharp
- Telewizja TCL
- Telewizja Pioneer
- Telewizja Lenovo
- Telewizja Philips
- Telewizja SilverCrest
- Telewizja Acer
- Telewizja Nokia
- Telewizja Hisense
- Telewizja Infiniton
- Telewizja Panasonic
- Telewizja Muse
- Telewizja Viewsonic
- Telewizja Nedis
- Telewizja AG Neovo
- Telewizja Medion
- Telewizja OK
- Telewizja Lenco
- Telewizja Polar
- Telewizja Marquant
- Telewizja Toshiba
- Telewizja Tesla
- Telewizja Westinghouse
- Telewizja Majestic
- Telewizja Jensen
- Telewizja ILive
- Telewizja Blaupunkt
- Telewizja Brandt
- Telewizja Vivax
- Telewizja Terris
- Telewizja Salora
- Telewizja Siemens
- Telewizja Teac
- Telewizja Casio
- Telewizja Iiyama
- Telewizja Citizen
- Telewizja Dual
- Telewizja Grundig
- Telewizja Haier
- Telewizja Soundmaster
- Telewizja Hyundai
- Telewizja Manhattan
- Telewizja Strong
- Telewizja ECG
- Telewizja Oyster
- Telewizja Icy Box
- Telewizja Bang & Olufsen
- Telewizja JVC
- Telewizja V7
- Telewizja Dell
- Telewizja Furrion
- Telewizja Funai
- Telewizja Oppo
- Telewizja TechniSat
- Telewizja Schneider
- Telewizja Krüger&Matz
- Telewizja Philco
- Telewizja CHiQ
- Telewizja Qilive
- Telewizja Uniden
- Telewizja Thomson
- Telewizja Ferguson
- Telewizja Wharfedale
- Telewizja Manta
- Telewizja Pyle
- Telewizja Cecotec
- Telewizja Marantz
- Telewizja AOC
- Telewizja Monster
- Telewizja Peerless-AV
- Telewizja Caratec
- Telewizja Nevir
- Telewizja Mitsubishi
- Telewizja Arçelik
- Telewizja Continental Edison
- Telewizja GoGen
- Telewizja Intenso
- Telewizja NEC
- Telewizja Polaroid
- Telewizja Aiwa
- Telewizja AKAI
- Telewizja Sanyo
- Telewizja Clatronic
- Telewizja Telefunken
- Telewizja Optoma
- Telewizja SVAN
- Telewizja Innoliving
- Telewizja Abus
- Telewizja Jay-Tech
- Telewizja Bush
- Telewizja Loewe
- Telewizja Kemo
- Telewizja VOX
- Telewizja Insignia
- Telewizja AYA
- Telewizja Element
- Telewizja Orima
- Telewizja Denver
- Telewizja Kernau
- Telewizja Aspes
- Telewizja Albrecht
- Telewizja Orion
- Telewizja Hitachi
- Telewizja Technika
- Telewizja Seiki
- Telewizja SereneLife
- Telewizja RCA
- Telewizja MBM
- Telewizja BenQ
- Telewizja Trevi
- Telewizja Lexibook
- Telewizja GPX
- Telewizja Sencor
- Telewizja Odys
- Telewizja Nabo
- Telewizja Nextbase
- Telewizja Zenith
- Telewizja Daewoo
- Telewizja Allview
- Telewizja Metz
- Telewizja Kunft
- Telewizja Grunkel
- Telewizja Alphatronics
- Telewizja XD Enjoy
- Telewizja RevolutionHD
- Telewizja FFalcon
- Telewizja Dyon
- Telewizja Reflexion
- Telewizja Megasat
- Telewizja Sogo
- Telewizja Proline
- Telewizja Finlux
- Telewizja Alden
- Telewizja Aldi
- Telewizja Airis
- Telewizja Aristona
- Telewizja Apex
- Telewizja Ziggo
- Telewizja Techwood
- Telewizja Walker
- Telewizja Saba
- Telewizja Antarion
- Telewizja Tevion
- Telewizja Proscan
- Telewizja Vestel
- Telewizja Tucson
- Telewizja Energy Sistem
- Telewizja Sagem
- Telewizja Sunstech
- Telewizja Sylvania
- Telewizja Sunny
- Telewizja Luxor
- Telewizja Nordmende
- Telewizja AudioAffairs
- Telewizja Magnum
- Telewizja Audiosonic
- Telewizja Kubo
- Telewizja Coby
- Telewizja Seg
- Telewizja Vivo
- Telewizja Daitsu
- Telewizja Changhong
- Telewizja Alba
- Telewizja Naxa
- Telewizja Star-Light
- Telewizja Fantec
- Telewizja Mpman
- Telewizja Sweex
- Telewizja Vizio
- Telewizja Cello
- Telewizja Mx Onda
- Telewizja Nikkei
- Telewizja Peaq
- Telewizja Hannspree
- Telewizja DGM
- Telewizja Yasin
- Telewizja Roadstar
- Telewizja Humax
- Telewizja MT Logic
- Telewizja Superior
- Telewizja Difrnce
- Telewizja ITT
- Telewizja Avtex
- Telewizja Inovia
- Telewizja Lin
- Telewizja Aconatic
- Telewizja NPG
- Telewizja Bluesky
- Telewizja Videocon
- Telewizja Xoro
- Telewizja Durabase
- Telewizja HKC
- Telewizja Edenwood
- Telewizja Woxter
- Telewizja Premier
- Telewizja Onn
- Telewizja Teleco
- Telewizja Packard Bell
- Telewizja Opera
- Telewizja LTC
- Telewizja JTC
- Telewizja Zalman
- Telewizja Horizon
- Telewizja United
- Telewizja SYLVOX
- Telewizja Doffler
- Telewizja FOX Electronics
- Telewizja Viewpia
- Telewizja XS4ALL
- Telewizja JGC
- Telewizja Online
- Telewizja DirecTV
- Telewizja Tele 2
- Telewizja Graetz
- Telewizja Kogan
- Telewizja Telesystem
- Telewizja EKO
- Telewizja E-motion
- Telewizja Mitsai
- Telewizja Selfsat
- Telewizja High One
- Telewizja Tve
- Telewizja ISymphony
- Telewizja Pantel
- Telewizja Magnavox
- Telewizja ATYME
- Telewizja HCI
- Telewizja Inno-Hit
- Telewizja Engel
- Telewizja Bang Olufsen
- Telewizja TechLine
- Telewizja Elements
- Telewizja Digihome
- Telewizja Englaon
- Telewizja Time
- Telewizja Reflex
- Telewizja Astar
- Telewizja Visco
- Telewizja Tivax
- Telewizja H&B
- Telewizja Norcent
- Telewizja TELE System
- Telewizja TIM
- Telewizja Belson
- Telewizja Vision Plus
- Telewizja Sbr
- Telewizja Bauhn
- Telewizja Voxx
- Telewizja Rm 2000
- Telewizja Hoher
- Telewizja Felson
- Telewizja Mach Power
- Telewizja Elbe
- Telewizja Axing
- Telewizja CGV
- Telewizja Smart Tech
- Telewizja Séura
- Telewizja Mitzu
- Telewizja JTC24
- Telewizja Coocaa
- Telewizja Kivi
- Telewizja Smart Brand
- Telewizja Mystery
- Telewizja Linsar
Najnowsze instrukcje dla Telewizja

9 Kwietnia 2025

9 Kwietnia 2025

9 Kwietnia 2025
9 Kwietnia 2025
9 Kwietnia 2025
9 Kwietnia 2025
9 Kwietnia 2025

9 Kwietnia 2025
9 Kwietnia 2025
9 Kwietnia 2025