Instrukcja obsługi Samsung OMNIA
Przeczytaj poniżej 📖 instrukcję obsługi w języku polskim dla Samsung OMNIA (176 stron) w kategorii smartfon. Ta instrukcja była pomocna dla 17 osób i została oceniona przez 2 użytkowników na średnio 4.5 gwiazdek
Strona 1/176
P O R T A B L E D u a l - M o d e
S M A R T P H O N E
Windows Mobile 6.5 Professional
User Manual
Please read this manual before operating your
phone, and keep it for future reference.

VZW_SCH-I920_OmniaII_English_UM_CJ10D_TE_110909_F14
Intellectual Property
All Intellectual Property, as defined below, owned by or which is otherwise the property of Samsung or its respective suppliers relating to
the SAMSUNG Phone, including but not limited to “Phone System”), is pro, accessories, parts, or software relating there to (the prietary to
Samsung and protected under federal laws, state laws, and international treaty provisions. Intellectual Property includes, but is not limited
to, inventions (patentable or unpatentable), patents, trade secrets, copyrights, software, computer programs, and related documentation
and other works of authorship. You may not infringe or otherwise violate the rights secured by the Intellectual Property. Moreover, you
agree that you will not (and will not attempt to) modify, prepare derivative works of, reverse engineer, decompile, disassemble, or
otherwise attempt to create source code from the software. No title to or ownership in the Intellectual Property is transferred to you. All
applicable rights of the Intellectual Property shall remain with SAMSUNG and its suppliers.
Samsung Telecommunications America (STA), LLC
Headquarters: Customer Care Center:
1301 E. Lookout Drive 1000 Klein Rd.
Richardson, TX 75082 Plano, TX 75074
Toll Free Tel: 1.888.987.HELP (4357)
Internet Address:
http://www.samsungusa.com
©
2009 Samsung Telecommunications America, LLC is a registered trademark of Samsung Electronics America, Inc. and its related
entities.
Do you have questions about your Samsung Mobile Phone?
For 24 hour information and assistance, we offer a new FAQ/ARS System (Automated Response System) at:
www.samsungtelecom.com/support

GH46-00985A
Licensed by Qualcomm Incorporated under one or more of the following patents: U.S. Patent No. 4, 901, 307; 5, 056, 109; 5, 099, 204; 5,
101, 501; 5, 103, 459; 5, 107, 225; 5, 109, 390.
T9 Text Input is licensed by Tegic Communications and is covered by U.S. Pat. 5,818,437; U.S. Pat. 5,953,541; U.S. Pat. 6,011,554 and
other patents pending.
The Bluetooth
® word mark, figure mark (stylized “B De word mark and “B Desisign”), and combination mark (Bluetooth gn”) are registered
trademarks and are wholly owned by the Bluetooth SIG.
microSD™ and the microSD logo are Trademarks of the SD Card Association.
Swype and the Swype logos are trademarks of Swype, Inc.
© 2009 Swype, Inc. All rights reserved.
ABOUT DIVX VIDEO: DivX
® is a digital video form official DivX Certifat created by DivX, Inc., Pat. 7,295,673. This is an ied device that plays
DivX video. Visit www.divx.com for more information and software tools to convert your files into DivX video. Visit www.divx.com for more
information and software tools to convert your files into DivX video. ABOUT DIVX VIDEO-ON-DEMAND: This DivX Certified
® device must be
registered in order to play DivX Video-on-Demand (VOD) content. To generate the registration code, locate the DivX section in the General
Settings menu. Go to vod.divx.com with this code to complete the registration process and learn more about DivX VOD.
SRS CS Headphone™, SRS WOW HD™, SRS and the symbol are trademarks of SRS
Labs, Inc. CS Headphone and WOW HD
technologies are incorporated under license from SRS Labs, Inc.
Some software components of this product incorporate source code covered under GNU General Public License (GPL), GNU Lesser General
Public License (LGPL), OpenSSL License, BSD License and other open source licenses. To obtain the source code covered under the open
source licenses, please visit:
http://www.samsungnetwork.com/Home/opensource
.

Disclaimer of Warranties; Exclusion of Liability
EXCEPT AS SET FORTH IN THE EXPRESS WARRANTY CONTAINED ON THE WARRANTY PAGE ENCLOSED WITH THE PRODUCT, THE
PURCHASER TAKES THE PRODUCT "AS IS", AND SAMSUNG MAKES NO EXPRESS OR IMPLIED WARRANTY OF ANY KIND WHATSOEVER
WITH RESPECT TO THE PRODUCT, INCLUDING BUT NOT LIMITED TO THE MERCHANTABILITY OF THE PRODUCT OR ITS FITNESS FOR ANY
PARTICULAR PURPOSE OR USE; THE DESIGN, CONDITION OR QUALITY OF THE PRODUCT; THE PERFORMANCE OF THE PRODUCT; THE
WORKMANSHIP OF THE PRODUCT OR THE COMPONENTS CONTAINED THEREIN; OR COMPLIANCE OF THE PRODUCT WITH THE
REQUIREMENTS OF ANY LAW, RULE, SPECIFICATION OR CONTRACT PERTAINING THERETO. NOTHING CONTAINED IN THE INSTRUCTION
MANUAL SHALL BE CONSTRUED TO CREATE AN EXPRESS OR IMPLIED WARRANTY OF ANY KIND WHATSOEVER WITH RESPECT TO THE
PRODUCT. IN ADDITION, SAMSUNG SHALL NOT BE LIABLE FOR ANY DAMAGES OF ANY KIND RESULTING FROM THE PURCHASE OR USE OF
THE PRODUCT OR ARISING FROM THE BREACH OF THE EXPRESS WARRANTY, INCLUDING INCIDENTAL, SPECIAL OR CONSEQUENTIAL
DAMAGES, OR LOSS OF ANTICIPATED PROFITS OR BENEFITS.

1
Table of Contents
Section 1: Getting Started ..............................................4
Understanding this User Manual . . . . . . . . . . . . . . . . . . . . . . . . 4
Notes and Tips . . . . . . . . . . . . . . . . . . . . . . . . . . . . . . . . . . . . . 4
Activating Your Phone . . . . . . . . . . . . . . . . . . . . . . . . . . . . . . . 4
Remove and Replace the Rear Cover . . . . . . . . . . . . . . . . . . . . 5
Attach a Strap . . . . . . . . . . . . . . . . . . . . . . . . . . . . . . . . . . . . . 5
Battery . . . . . . . . . . . . . . . . . . . . . . . . . . . . . . . . . . . . . . . . . . . 6
Powering the Phone On and Off . . . . . . . . . . . . . . . . . . . . . . . . 9
Turning the Phone Feature On and Off . . . . . . . . . . . . . . . . . . . 9
Sounds and Ringtones . . . . . . . . . . . . . . . . . . . . . . . . . . . . . . . 9
Voice Mail . . . . . . . . . . . . . . . . . . . . . . . . . . . . . . . . . . . . . . . 11
Visual Voice Mail . . . . . . . . . . . . . . . . . . . . . . . . . . . . . . . . . . 12
microSD Memory Card (Optional) . . . . . . . . . . . . . . . . . . . . . . 13
Rebooting your Phone . . . . . . . . . . . . . . . . . . . . . . . . . . . . . . 15
Resetting Phone Settings . . . . . . . . . . . . . . . . . . . . . . . . . . . . 15
Section 2: Understanding Your Phone .........................16
Features of Your Phone . . . . . . . . . . . . . . . . . . . . . . . . . . . . . 16
Front View of Your Phone . . . . . . . . . . . . . . . . . . . . . . . . . . . . 17
Side View of Your Phone . . . . . . . . . . . . . . . . . . . . . . . . . . . . 18
Rear View of Your Phone . . . . . . . . . . . . . . . . . . . . . . . . . . . . 19
Home Screen . . . . . . . . . . . . . . . . . . . . . . . . . . . . . . . . . . . . . 20
Notification Bar Icons . . . . . . . . . . . . . . . . . . . . . . . . . . . . . . . 22
Cube . . . . . . . . . . . . . . . . . . . . . . . . . . . . . . . . . . . . . . . . . . . 23
Section 3: Displays ...................................................... 24
Home Screen . . . . . . . . . . . . . . . . . . . . . . . . . . . . . . . . . . . . . 24
Widgets and the Widget Bar . . . . . . . . . . . . . . . . . . . . . . . . . 26
Main Menus . . . . . . . . . . . . . . . . . . . . . . . . . . . . . . . . . . . . . 32
Cube . . . . . . . . . . . . . . . . . . . . . . . . . . . . . . . . . . . . . . . . . . . 40
Section 4: Navigation ................................................... 41
Navigation Keys . . . . . . . . . . . . . . . . . . . . . . . . . . . . . . . . . . . 41
Touch Screen Navigation . . . . . . . . . . . . . . . . . . . . . . . . . . . . 42
Section 5: Call Functions ............................................. 43
Making a Call . . . . . . . . . . . . . . . . . . . . . . . . . . . . . . . . . . . . 43
Answering a Call . . . . . . . . . . . . . . . . . . . . . . . . . . . . . . . . . . 45
Call Logs . . . . . . . . . . . . . . . . . . . . . . . . . . . . . . . . . . . . . . . . 46
Call Forwarding . . . . . . . . . . . . . . . . . . . . . . . . . . . . . . . . . . . 48
Three-way Calling . . . . . . . . . . . . . . . . . . . . . . . . . . . . . . . . . 49
Voice Recognition . . . . . . . . . . . . . . . . . . . . . . . . . . . . . . . . . 49
Roaming . . . . . . . . . . . . . . . . . . . . . . . . . . . . . . . . . . . . . . . . 50
TTY Mode . . . . . . . . . . . . . . . . . . . . . . . . . . . . . . . . . . . . . . . 51
Section 6: Entering Text ............................................... 52
Virtual QWERTY keyboards . . . . . . . . . . . . . . . . . . . . . . . . . . 52
Text Input Methods . . . . . . . . . . . . . . . . . . . . . . . . . . . . . . . . 52
Changing the Text Input Method . . . . . . . . . . . . . . . . . . . . . . 52

2
Section 7: My Contacts ................................................ 57
Adding a New Contact . . . . . . . . . . . . . . . . . . . . . . . . . . . . . . 57
Finding a Contact . . . . . . . . . . . . . . . . . . . . . . . . . . . . . . . . . . 59
Editing a Contact . . . . . . . . . . . . . . . . . . . . . . . . . . . . . . . . . . 60
Deleting a Contact . . . . . . . . . . . . . . . . . . . . . . . . . . . . . . . . . 60
Making a Call from My Contacts . . . . . . . . . . . . . . . . . . . . . . . 61
Sending a Contact via vCard . . . . . . . . . . . . . . . . . . . . . . . . . . 61
Sending Contact(s) via Bluetooth . . . . . . . . . . . . . . . . . . . . . . 61
Categories . . . . . . . . . . . . . . . . . . . . . . . . . . . . . . . . . . . . . . . 62
Speed dial . . . . . . . . . . . . . . . . . . . . . . . . . . . . . . . . . . . . . . . 62
Favorites . . . . . . . . . . . . . . . . . . . . . . . . . . . . . . . . . . . . . . . . 63
Section 8: Messaging Applications .............................64
Types of Messages . . . . . . . . . . . . . . . . . . . . . . . . . . . . . . . . . 64
Creating and Sending Messages . . . . . . . . . . . . . . . . . . . . . . . 64
Message Folders . . . . . . . . . . . . . . . . . . . . . . . . . . . . . . . . . . 69
Viewing Messages . . . . . . . . . . . . . . . . . . . . . . . . . . . . . . . . . 70
Quick Text . . . . . . . . . . . . . . . . . . . . . . . . . . . . . . . . . . . . . . . 72
E-mail . . . . . . . . . . . . . . . . . . . . . . . . . . . . . . . . . . . . . . . . . . 73
Mobile Email . . . . . . . . . . . . . . . . . . . . . . . . . . . . . . . . . . . . . . 75
Mobile IM . . . . . . . . . . . . . . . . . . . . . . . . . . . . . . . . . . . . . . . . 75
Section 9: Multimedia and Music Applications ...........76
Media Player . . . . . . . . . . . . . . . . . . . . . . . . . . . . . . . . . . . . . 76
V CAST Music with Rhapsody . . . . . . . . . . . . . . . . . . . . . . . . . 82
V CAST Song ID . . . . . . . . . . . . . . . . . . . . . . . . . . . . . . . . . . . 84
VZW Tones . . . . . . . . . . . . . . . . . . . . . . . . . . . . . . . . . . . . . . . 84
V CAST Videos . . . . . . . . . . . . . . . . . . . . . . . . . . . . . . . . . . . . 85
Streaming Player . . . . . . . . . . . . . . . . . . . . . . . . . . . . . . . . . . 86
VZ Navigator . . . . . . . . . . . . . . . . . . . . . . . . . . . . . . . . . . . . . 86
FM Radio . . . . . . . . . . . . . . . . . . . . . . . . . . . . . . . . . . . . . . . . 87
Connected Home . . . . . . . . . . . . . . . . . . . . . . . . . . . . . . . . . . 88
Video Editor . . . . . . . . . . . . . . . . . . . . . . . . . . . . . . . . . . . . . . 89
Section 10: Document Applications ............................ 91
Office Mobile . . . . . . . . . . . . . . . . . . . . . . . . . . . . . . . . . . . . . 91
Section 11: Personal Information Applications .......... 95
Smart Search . . . . . . . . . . . . . . . . . . . . . . . . . . . . . . . . . . . . . 95
My Calendar . . . . . . . . . . . . . . . . . . . . . . . . . . . . . . . . . . . . . . 96
Tasks . . . . . . . . . . . . . . . . . . . . . . . . . . . . . . . . . . . . . . . . . . . 98
Task Switcher . . . . . . . . . . . . . . . . . . . . . . . . . . . . . . . . . . . 101
Memo . . . . . . . . . . . . . . . . . . . . . . . . . . . . . . . . . . . . . . . . . 102
Voice Recorder . . . . . . . . . . . . . . . . . . . . . . . . . . . . . . . . . . . 104
Clock and Alarm . . . . . . . . . . . . . . . . . . . . . . . . . . . . . . . . . . 105
Calculator . . . . . . . . . . . . . . . . . . . . . . . . . . . . . . . . . . . . . . 106
Unit Converter . . . . . . . . . . . . . . . . . . . . . . . . . . . . . . . . . . . 107
MS File Explorer . . . . . . . . . . . . . . . . . . . . . . . . . . . . . . . . . . 107
My Files . . . . . . . . . . . . . . . . . . . . . . . . . . . . . . . . . . . . . . . . 108
City ID . . . . . . . . . . . . . . . . . . . . . . . . . . . . . . . . . . . . . . . . . 108
WeatherBug . . . . . . . . . . . . . . . . . . . . . . . . . . . . . . . . . . . . . 109
ActiveSync . . . . . . . . . . . . . . . . . . . . . . . . . . . . . . . . . . . . . . 109
Windows Mobile Device Center for Windows Vista . . . . . . . . 112
Games . . . . . . . . . . . . . . . . . . . . . . . . . . . . . . . . . . . . . . . . . 113

3
Section 12: Photo and Image Applications ...............114
Camera . . . . . . . . . . . . . . . . . . . . . . . . . . . . . . . . . . . . . . . . 114
My Pictures . . . . . . . . . . . . . . . . . . . . . . . . . . . . . . . . . . . . . 118
Camcorder . . . . . . . . . . . . . . . . . . . . . . . . . . . . . . . . . . . . . . 120
Digital Frame . . . . . . . . . . . . . . . . . . . . . . . . . . . . . . . . . . . . 122
Smart Reader . . . . . . . . . . . . . . . . . . . . . . . . . . . . . . . . . . . . 123
Section 13: Web Applications .................................... 124
BingTM . . . . . . . . . . . . . . . . . . . . . . . . . . . . . . . . . . . . . . . . . 124
Opera Browser . . . . . . . . . . . . . . . . . . . . . . . . . . . . . . . . . . . 125
Internet Explorer . . . . . . . . . . . . . . . . . . . . . . . . . . . . . . . . . 126
RSS Reader . . . . . . . . . . . . . . . . . . . . . . . . . . . . . . . . . . . . . 127
Podcast . . . . . . . . . . . . . . . . . . . . . . . . . . . . . . . . . . . . . . . . 128
Communities . . . . . . . . . . . . . . . . . . . . . . . . . . . . . . . . . . . . 128
Facebook . . . . . . . . . . . . . . . . . . . . . . . . . . . . . . . . . . . . . . . 129
Section 14: Bluetooth and Wi-Fi Services ................. 130
Wireless Manager . . . . . . . . . . . . . . . . . . . . . . . . . . . . . . . . 130
Bluetooth Wireless Technology . . . . . . . . . . . . . . . . . . . . . . . 131
About Wi-Fi . . . . . . . . . . . . . . . . . . . . . . . . . . . . . . . . . . . . . 137
Section 15: Changing Your Settings .......................... 139
Basic Settings . . . . . . . . . . . . . . . . . . . . . . . . . . . . . . . . . . . 139
Advanced Settings . . . . . . . . . . . . . . . . . . . . . . . . . . . . . . . . 144
Section 16: Health and Safety Information ............... 146
Health and Safety Information . . . . . . . . . . . . . . . . . . . . . . . 146
Samsung Mobile Products and Recycling . . . . . . . . . . . . . . . 147
UL Certified Travel Adapter . . . . . . . . . . . . . . . . . . . . . . . . . . 148
Consumer Information on Wireless Phones . . . . . . . . . . . . . . 148
Road Safety . . . . . . . . . . . . . . . . . . . . . . . . . . . . . . . . . . . . . 154
Responsible Listening . . . . . . . . . . . . . . . . . . . . . . . . . . . . . 155
Operating Environment . . . . . . . . . . . . . . . . . . . . . . . . . . . . 157
Using Your Phone Near Other Electronic Devices . . . . . . . . . 157
FCC Hearing-Aid Compatibility (HAC) Regulations
for Wireless Devices . . . . . . . . . . . . . . . . . . . . . . . . . . . . 158
Potentially Explosive Environments . . . . . . . . . . . . . . . . . . . 159
Emergency Calls . . . . . . . . . . . . . . . . . . . . . . . . . . . . . . . . . 160
FCC Notice and Cautions . . . . . . . . . . . . . . . . . . . . . . . . . . . 161
Other Important Safety Information . . . . . . . . . . . . . . . . . . . 161
Product Performance . . . . . . . . . . . . . . . . . . . . . . . . . . . . . . 161
Availability of Various Features/Ring Tones . . . . . . . . . . . . . 162
Battery Standby and Talk Time . . . . . . . . . . . . . . . . . . . . . . 163
Battery Precautions . . . . . . . . . . . . . . . . . . . . . . . . . . . . . . . 163
Care and Maintenance . . . . . . . . . . . . . . . . . . . . . . . . . . . . . 164
Section 17: Warranty Information ............................. 166
Standard Limited Warranty . . . . . . . . . . . . . . . . . . . . . . . . . 166
Index ............................................................................ 170

4
Section 1: Getting Started
This section helps you to start using your phone by activating
your service, inserting and charging the battery, inserting an
optional memory card, and setting up your voicemail.
Understanding this User Manual
The chapters of this guide generally follow the same order as the
menus and sub-menus in your phone. A robust index for quick
reference to most features begins on page 170.
Also included in this manual is important safety information that
you should know before using your phone. You can find this
information beginning on page 146.
Notes and Tips
Throughout this guide are icons and text that are set apart from
the rest. These are intended to point out important information,
quick methods for activating features, to define terms, and more.
The definitions for these are as follows:
•
Notes
: Additional information about the current feature, menu, or sub-
menu.
•
Tips
: Quick or innovative methods for performing functions related to
the subject at hand.
•
Important!
: Points out important information that could affect
performance, or even damage your phone.
Activating Your Phone
If you purchased your phone at a Verizon Wireless store, it is
probably activated and ready to use. If you have upgraded your
phone or received a new phone by mail, it probably needs to be
activated before you can use it.
To activate your phone, follow these steps:
1. Visit a Verizon Wireless store to activate your phone, or
visit
www.verizonwireless.com
, and enter your User ID and
password in the
My Verizon
➔
Manage Your Account
option
available on the home page.
2. When you have accessed the My Account Overview page,
select
Activate a new phone
to display instructions needed
to activate your phone online.
After gathering the required materials, follow the instructions to
complete the activation process.
䊳
Press the
Main Menu
key ➔
Settings
➔
Basic
Settings
tab ➔
Phone Settings
➔
My Phone Number
.
Getting Started 5
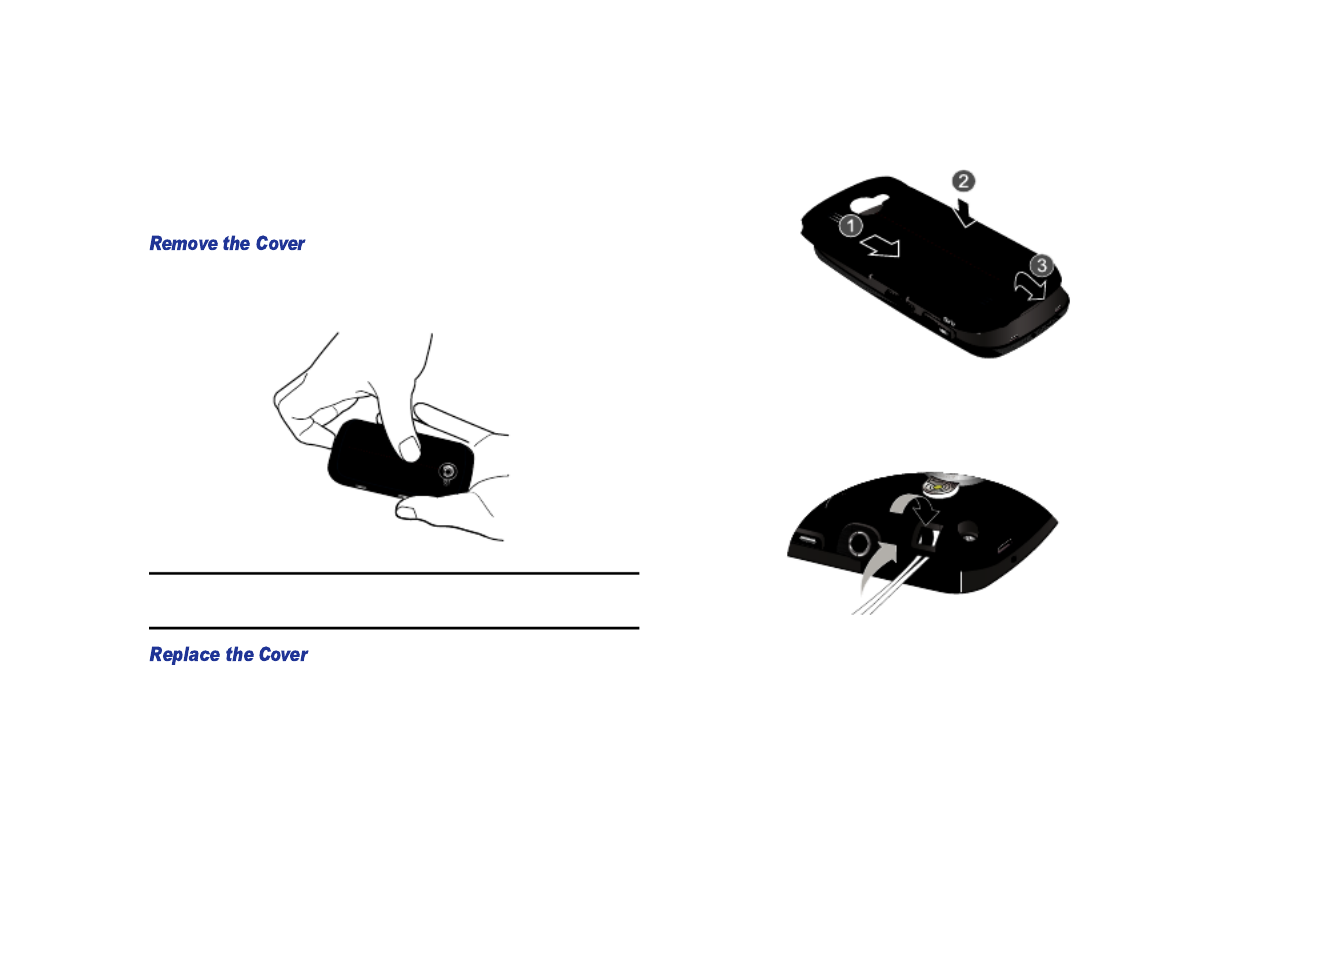
Remove and Replace the Rear Cover
Your Omnia II has a removable rear cover, which covers the
battery, microSD card slot and a slot for attaching a strap.
䊳
Remove the cover by pulling up using the slot provided, while
lifting the cover up and off the phone.
Warning!:
Take care when removing the battery cover with a fingernail, to
prevent breaking your fingernail.
䊳
Align the cover and press it firmly into place, being sure it
snaps into place at the corners.
Attach a Strap
You can attach an optional strap (not included) to your Omnia II.
1. Remove the rear cover as shown at left.
2. Slide the loop of the strap or lanyard into the slot and over
the tab to secure it.
3. Snap the cover into place.

6
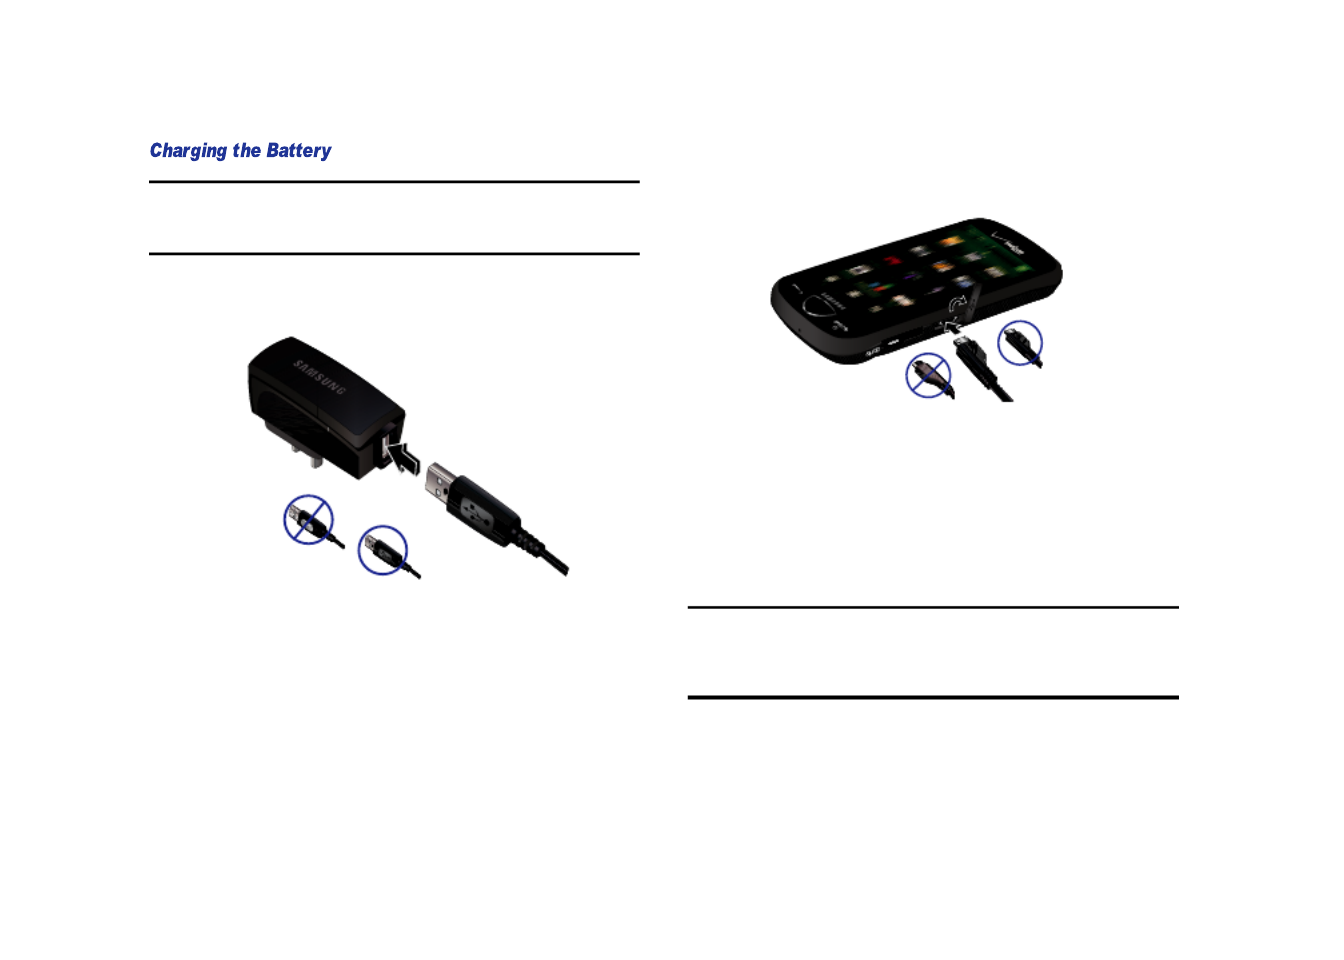
Battery
Your Omnia II is powered by a rechargeable standard Li-Ion
battery, and comes with a wall charger for charging.
Note:
The battery comes partially charged. You must fully charge the battery
before using your phone for the first time. A fully discharged battery
requires up to 4 hours of charge time.
Warning!:
Use only Samsung-approved charging devices and batteries.
Samsung accessories are designed to maximize battery life. Using
other accessories may invalidate your warranty and may cause
damage.
1. Remove the rear cover (see “Remove and Replace the
Rear Cover” on page 5.)
2. Insert the top end
of the battery into
the phone,
aligning the gold
contacts on the
battery with the
phone’s contacts.
3. Snap the rear cover back into place.
1. Remove the rear cover (see “Remove and Replace the
Rear Cover” on page 5.)
2. Lift the battery up
and out of the
phone.
3. Snap the rear
cover back into
place.
Getting Started 7
Note:
The battery comes partially charged. You must fully charge the battery
before using your phone for the first time. A fully discharged battery
requires up to 4 hours of charge time.
1. Connect the USB cable to the Charging Head.
2. Insert the USB cable into the phone’s power/accessory
port.
3. Plug the Wall/USB charger into a standard AC power outlet.
When the phone is completely charged (the indicator light
turns green), unplug the charger from the power outlet.
Remove the USB cable from the phone.
Warning!:
Please use only an approved charging accessory to charge your
phone. Improper handling of the charging port, as well as the use
of an incompatible charger, may cause damage to your phone and
void the warranty.
Charging Head
USB Cable
Correct
Incorrect
Correct
Incorrect

8
Your Omnia II is powered by a rechargeable standard Li-ion
battery. There is also an internal backup battery that saves all
phone settings if the regular battery is discharged. The internal
battery maintains data for approximately four hours. This internal
backup battery needs an initial charge of 24 hours.
Perform ActiveSync operations or use a backup utility frequently
to avoid losing any information in case the battery is fully
discharged. For more information see “ActiveSync” on page 109.
Note:
Long backlight settings, simultaneous use of Wi-Fi and Bluetooth,
searching for service, vibrate mode and browser use affect the
battery’s talk and standby times.
For more information about Battery and External power settings, see
“General Settings” on page 140.
Battery Indicator
The battery indicator in the upper-right corner of the display
indicates battery charge level. Four bars indicate a full charge,
while an empty icon indicates an almost-empty battery.
Two to three minutes before the battery becomes too low to
operate, a blinking empty battery icon appears and a tone
sounds. If you continue to operate the phone without charging, it
will shut down.
Checking Battery Charge
Keeping track of the battery’s charge is important. If the battery
level becomes too low, your phone automatically shuts down and
you could lose important data.
䊳
To quickly check your battery charge level, tap the
Battery
indicator on the Title Bar, then tap the
Charging
icon
to display the
Battery
Power
settings.
Only use Samsung-approved charging devices and batteries.
Samsung accessories are designed to maximize battery life.
Using other accessories may invalidate your warranty and may
cause damage.
Samsung handsets do not support the use of a non-supported
battery. When using a non-supported battery, you will hear a
series of beeps and you will see a warning message that
indicates “
NON-SUPPORTED BATTERY. SEE USER MANUAL.
” If you
receive this warning, battery charging has been disabled.
Samsung charging accessories (i.e. wall charger, and cigarette
lighter adapter) will only charge a Samsung approved battery.
Important!:
When using a non-supported battery the handset can only be
used for the duration of the life of the battery and cannot be
recharged.

Getting Started 9
Powering the Phone On and Off
1. Press and hold the End/Power
key .
2. When powering
On
, the phone
receives a signal from your
home network and then logs
in. At this point, the phone
displays the
home
screen
(page 24) and only functions
as a PDA (allowing you to run
applications) until you activate
the phone features.
3. When powering
Off
, the
message “Shutdown the device?” displays. Tap
Yes
to
power off the phone.
Turning the Phone Feature On and Off
Before you can use your Omnia II™ phone features, the onboard
phone must first be activated. To turn the phone on or off:
䊳
Tap the
Signal
icon on the
Annunciator line
➔
Wireless
Manager
, ➔
Phone
.
Sounds and Ringtones
When starting to use your phone, it’s helpful to set the sounds
and tones your phone will use to alert you to its status, and to
notify you of incoming calls and messages.
For information on setting all Sound Settings, see “Sound
Settings” on page 139.
Tip:
You can easily access System Volume and Ring Volume, Wireless
Manager, and Power Settings by tapping in the Annunciator Line.
Sound Profile
provides an easy way to quickly set the sounds for
your phone.
1. From the
Widget Bar
, tap the
Sound Profile
widget to
move it to the
home screen
.
2. On the
Sound
Profile
widget, choose from:
• Vibrate
: The phone vibrates, but plays no tones.
• Volume On
: The phone plays all selected tones.
• Volume Off
: No tones are played.

10
Your Omnia II contains a number of standard ringtones, or you
may choose to purchase and download special ringtones using
VZW Tones. For more information, refer to “VZW Tones” on
page 84.
You may also set your phone to notify you by vibrating.
1. Press the
Main Menu
key ➔ then
Settings
➔
Basic Settings
tab ➔
Sound Settings
➔
Ring
.
2. Tap the
Call alert type
field, then tap an alert from the drop-
down list. A sample of the alert will play. Tap the left soft
key
Done
to save your selection.
3. Tap the
Ringtone
field, then tap a tone from the drop-down
list. A sample of the tone will play. Tap the left soft key
Done
to save your selection.
4. Tap the
Vibration type
field, then tap a pattern from the
drop-down list. A sample of the tone will play. Tap the left
soft key
Done
to save your selection.
5. Tap the left soft key
Done
to save your selections.
Airplane Mode
turns off all radio communications for your Omnia
II (phone, FM Radio, Bluetooth, Wi-Fi, and Data connections), but
allows you to use your phone’s other features. When your phone
is in Airplane Mode, it cannot send or receive calls or messages,
or access online information.
䊳
Tap the
Signal
icon on the
Annunciator line
➔
Wireless
Manager
➔
Airplane Mode
.
Getting Started 11
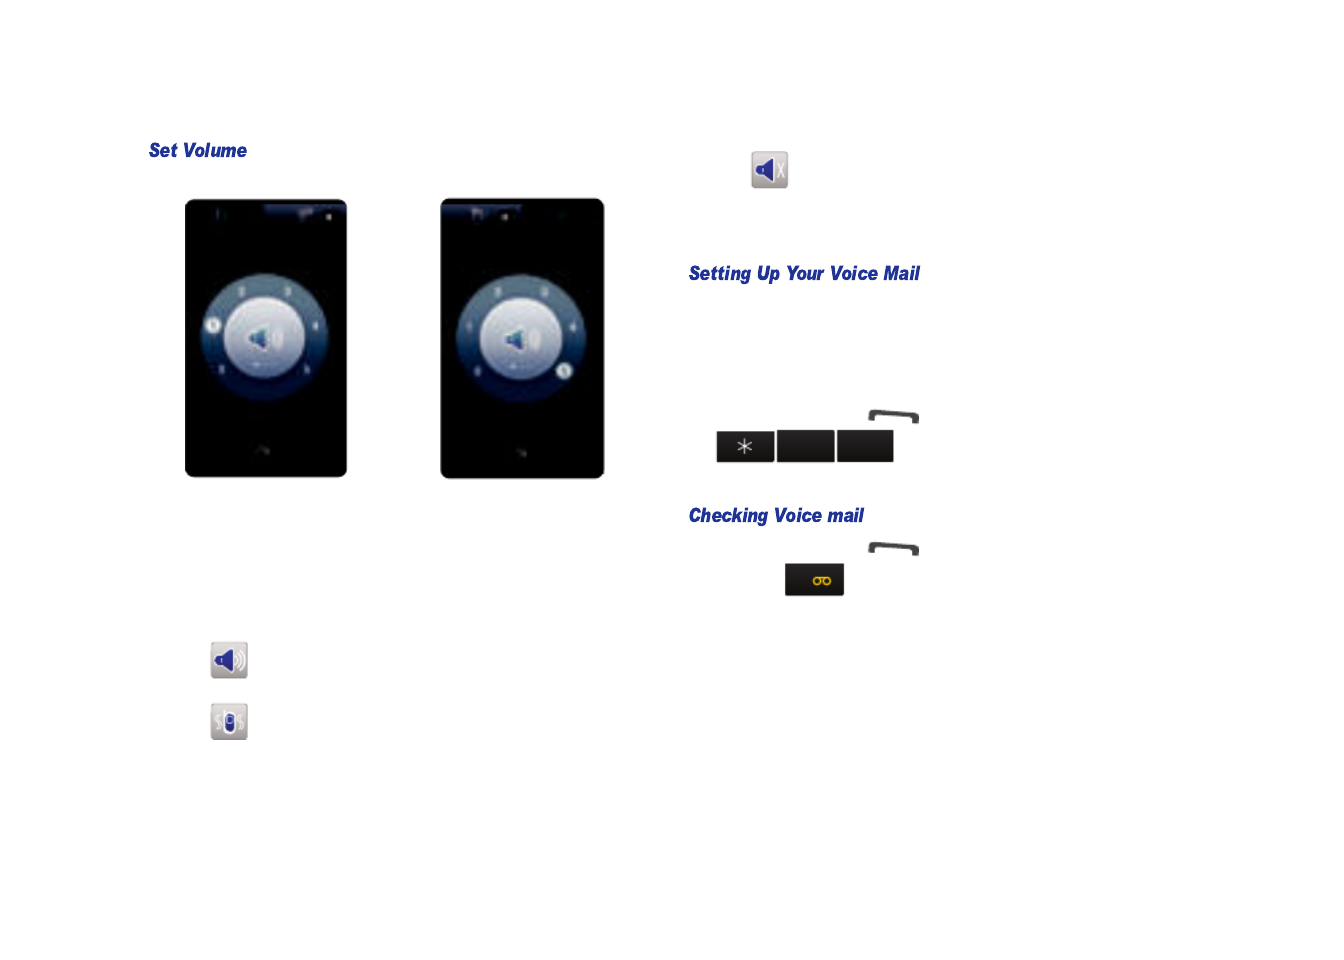
䊳
Press the
Volume
key on the side of the phone.
Tap the
System Volume
tab to set the volume for alerts, key tones
and other system sounds. Tap the
Ring Volume
tab to set the
ringer volume.
Tap the icon in the center of the ring to toggle between these
settings:
Voice Mail
All unanswered calls to your phone are sent to voice mail, even if
your device is turned off. Therefore, you’ll want to set up your
voicemail and personal greeting as soon as you activate your
phone.
䊳
Press the
Send
key to launch the
Dialer
, then tap
and follow the automated instructions
to set up your voice mail.
䊳
Press the
Send
key to launch the
Dialer
, then touch
and hold to connect to
Voice mail
. Follow the
automated instructions to access your voice mail.
Sound Profile
: Tap the number on the ring to set the
volume level.
Vibration
: Tap the number on the ring to set the
vibration pattern.
No Sound
: No sounds will be played.
tuv
8
mno
6
1
12
Visual Voice Mail
Visual Voice Mail
allows you to manage voice mail directly from
the device, without having to dial voice mail, listen to voice
instructions, or listen to prior messages.
You must set up your Voice Mail before using Visual Voice Mail.
For more information, refer to “Setting Up Your Voice Mail” on
page 11.
Note:
Extra service charges may apply when using Visual Voice Mail service.
Contact Verizon Wireless for more information.
1. Tap the
Visual Voice Mail
widget .
– or –
Press the
Main Menu
key ➔
Main Menu 1
➔
Visual Voice Mail
.
2. Follow the prompts to
Accept
the terms and conditions.
3. When prompted, enter the voice mail password that you
established during voice mail set up.
4. Continue to follow the prompts and instructions to
complete the activation of Visual Voice Mail. When
activation is complete, exit the application and return after
about 5 minutes to begin using Visual Voice Mail.
Note:
Visual Voice Mail may store voicemail messages in electronic form on
the device. Anyone in possession of the device can access the
voicemail. To limit unauthorized access to the voicemail, consider
using
Password Lock
to lock the phone when not in use.
For more information about setting a
Password Lock
, For more
information, refer to “Security Settings” on page 143.

Getting Started 13
microSD Memory Card (Optional)
Your phone supports the use of microSD
TM or microSDHCTM
memory cards of up to 16GB capacity. These memory cards are
specifically designed for mobile phones and other ultra-small
devices, and are ideal for storing media-rich files such as music,
programs, videos, and photographs for use with your phone.
Note:
Use only compatible memory cards with your phone. Using
incompatible memory cards may damage the card and data stored on
the card, as well as the phone.
The memory card slot is located on the side of the phone, under
the battery cover.
1. Remove the rear cover (see “Remove and Replace the
Rear Cover” on page 5.).
2. Locate the memory card slot and orient the microSD card
so the contact pins are facing up (see illustration).
3. Carefully insert the microSD memory card into the opening
and firmly push it in until you hear a click that indicates the
card is securely installed. The card is secure when it is not
protruding from the slot within the phone.
4. Snap the rear cover back into place.
1. Remove the rear cover (see “Remove and Replace the
Rear Cover” on page 5.)
2. Firmly push in the microSD memory card, then release so
that it pops out from the slot.
3. Carefully pull the card out of the slot.
4. Snap the rear cover back into place.

14
You can format your microSD memory card to delete all data
stored on the card.
Note:
Repeated formatting may shorten the life of the memory card.
1. Press the
Main Menu
key ➔
Settings
➔
Basic Settings
tab ➔
Memory Settings
➔
Storage Card
.
2. Tap the
Format
button to format your microSD card.
3. At the
Format
prompt, tap Yes. The card will be formatted,
and the display will return to the Storage Card settings.
1. Insert the microSD card into the card slot of your Omnia II.
For information on inserting the microSD card, see
“Installing the microSD Memory Card” on page 13.
2. Synchronize your Omnia II with your PC via ActiveSync.
3. Open Windows Explorer on your PC, then highlight the
application or folder that you wish to transfer to the
microSD card.
4. Highlight and copy the file(s) or folder(s) to your computer’s
clipboard.
5. Using the ActiveSync menu, click the Explore icon to open
the Mobile Device folder.
6. Double-click on the My Windows Mobile-Based Device
folder.
7. Double-click the Storage Card folder to open. Any contents
of the microSD card appear in t he display.
8. Locate the folder or sub folder on the microSD card where
you wish to paste the files that you’ve copied.
9. Paste the files or folders on your computer’s clipboard onto
the microSD card.
Once you’ve transferred files from your computer to the microSD
card using ActiveSync, you can access the files that have been
transferred to your microSD card.
For example, if you’ve transferred any multimedia files onto your
microSD card that are compatible with Media Player, simply open
Media Player and use the Search feature to find the media files
you wish to play.

Getting Started 15
Rebooting your Phone
The
Reboot
button
allows you to
quickly reboot the
phone in the event
of a program or
application error.
Note:
This action is similar to that of a reboot action on your computer, which
only restarts the machine while maintaining all data intact.
1. Remove the rear cover (see “Remove and Replace the
Rear Cover” on page 5.)
2. Locate the recessed
Reboot
button located on the left side
of the phone, adjacent to the
OK
key.
3. Carefully insert the stylus into the recessed Reboot button.
After depressing the button, the phone will reboot.
4. Snap the rear cover back into place.
Resetting Phone Settings
Note:
To completely remove any personal information stored on your device,
see “Precautions for Transfer and Disposal” on page 169.
Resetting your phone resets your phone to its factory default
settings, ends all applications currently running, and erases all
data (pictures/video/contacts) from your phone.
Note:
You can save important files by storing them on a removable microSD
memory card (not included).
1. Press the
Main Menu
key ➔
Settings
➔
Basic Settings
tab ➔
Memory Settings
➔
Clear All Data
.
2. At the
Clear all data
prompt, tap
Yes
.
3. Enter the
Device Lock Code
, then tap
Done
to proceed. Your
phone will reset to the factory settings and reboot. After
the phone reboots, you will need to align the screen and
set your local time. Follow the on-screen prompts when
directed.
Note:
During the reset process, you will be prompted to enter your Device
Lock Code. The default Device Lock Code is the last four digits of the
phone number.

16
Section 2: Understanding Your Phone
Congratulations on your purchase of the Samsung Omnia II.
This section outlines many key features of your phone. It also
describes your display, frequently used keys, and how to install
and charge your battery.
Features of Your Phone
•
16M color 3.7” 480x800 AMOLED (Active Matrix Organic LED) Touch
Screen with virtual QWERTY keyboard
•
512MB ROM/208MB RAM and 8GB internal user memory
•
Supports microSD™/microSDHC™ Expansion Memory (up to 16GB
capacity)
•
High Speed Data (3G-capable) Technology
•
Open and Assisted Global Positioning (GPS) Technology with VZ
Navigator
SM
•
Wireless Internet Capability
•
Full Internet Browser with touch gesture support
•
Windows Mobile
®
6.5 Professional
•
Built-in Bluetooth
®
Technology
•
802.11b/g Wi-Fi Support
•
5.0 Megapixel Camera with Auto Focus, Flash and DVD-quality
Camcorder
•
Messaging Services, including:
–
Standard Text Messaging (SMS)
–
Multimedia Messaging (MMS) for Picture and Video Messaging
–
E-mail Messaging, including support for mobile and corporate E-mail
–
Mobile Instant Messenger (IM)
–
Visual Voice Mail
•
Nuance Voice Recognition technology for no-training voice recognition
of dialing and commands
•
Personal organization tools, including Calendar, Clock and Alarm,
Memos and Tasks
•
V CAST Music with Rhapsody
®
(Subscription, Wireless & PC
Downloads)
•
V CAST Videos
•
V CAST Song ID
•
VZW Tones
•
Social Networking Service applications (Facebook and Communities)
and one-touch upload
•
Ferrari GT Evolution racing game
•
Bing Search
•
Podcasts and RSS Reader

Understanding Your Phone 17
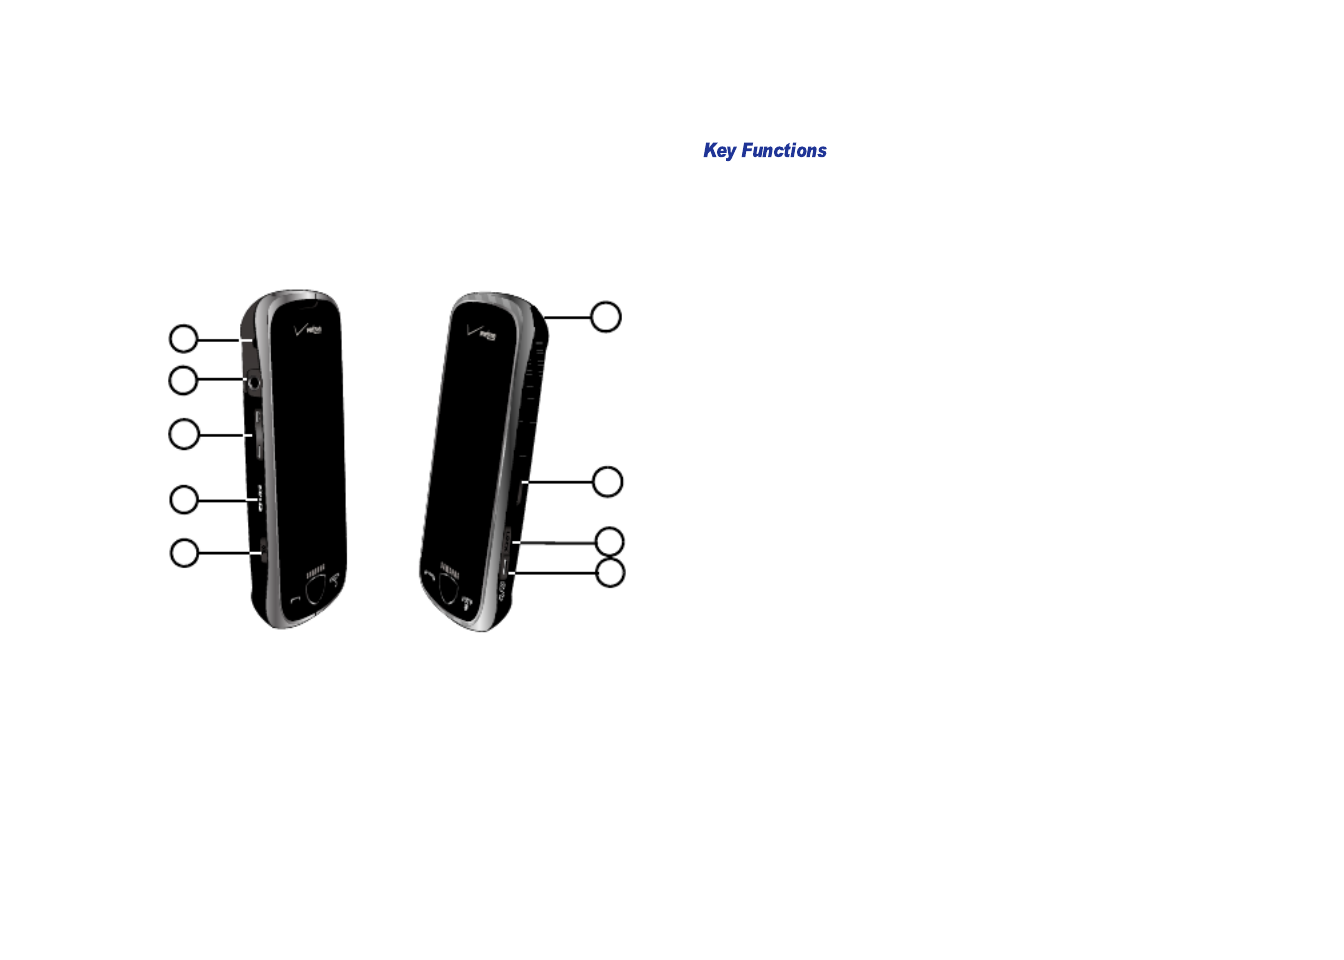
Front View of Your Phone
1.
Earpiece
: Allows you to hear callers and other audio played
by the phone.
2.
AMOLED Display/Touch Screen
: Displays phone information.
3.
Send key
: Press to display the Dialer, or to dial a call after
entering a telephone number. Press and hold to launch
Voice Recognition.
4.
Main Menu key
: Press to open the
Main Menu
. Press and
hold to open
Task Switcher
.
5.
End/Power key
: Press and hold to turn the phone On or Off.
Press to wake up display. Press to end a call, or to hide an
application. Press to ignore an incoming call and send the
caller to voice mail.
Warning!:
Please note that a touch screen responds best to a light touch
from the pad of your finger or a non-metallic stylus. Using
excessive force or a metallic object when pressing on the touch
screen may damage the tempered glass surface and void the
warranty. For more information, please refer to the “Standard
Limited Warranty” on page 166.
3 5
2
1
4
18
Side View of Your Phone
1.
Strap attachment
: Attach a strap (not included).
2.
Headset Jack
: Plug in an optional 3.5mm headset or other
device. For best reception when using the FM Radio, use
the included FM antenna/Microphone adaptor.
3.
Volume key
: Press to adjust audio volume, adjust the
master volume in idle mode, adjust the voice volume
during a call, or to mute the ringer for an incoming call.
4.
Memory card slot
: Remove cover to access microSD slot.
5.
OK key
: Press to accept entries, close an item, or hide an
application. Press and hold to go to the home screen.
6.
Camera/Camcorder key
: Press to launch the camera. Press
and hold to launch the camcorder. In camera/camcorder
mode, press to take the picture or begin/stop recording.
7.
Lock key
: Press to put the screen to sleep. Press to wake
the screen, or press and hold to unlock the phone.
8.
Power/Accessory Port
: Plug in the charging cable or
optional accessory cables.
9.
Stylus
: Use the stylus for screen navigation and entries.
Store the stylus in the slot.
2
4
1
8
7
3
9
5
6

Understanding Your Phone 19
Rear View of Your Phone
1.
Camera/Camcorder lens
: The lens of the built-in camera/
camcorder.
2.
Flash
: The built-in flash has manual and automatic
capabilities.
3.
Stereo speakers
: Allows you to hear and play music,
ringtones and sounds.
1 2
3

20
Home Screen
1.
Start
: Tap Start to display Main Menu for access to
applications, Settings and Task Switcher.
2.
Annunciator Line
: Displays the active program, and icons to
show Connectivity, Phone status, Ring/Volume, and Power
status. Tap the icons to quickly access Wireless Manager,
Volume, and Power Settings.
3.
ERI Banner
: Displays “
Verizon Wireless
” when the device is
activated and functioning in the Verizon Wireless Home
Network.
4.
Widget Bar
: Contains user-selectable widgets such as
Analog and Digital Clock, Calendar, and Shortcuts. Tap the
Widget Bar tab to open and close the bar.
5.
Notification Bar
: Presents notification of text, multimedia
and e-mail messages, voice mails and missed calls. Tap
an icon to launch the application.
6.
Right Soft Key
: Presents commands based on the status or
open application.
7.
Left Soft Key
: Presents commands based on the status or
open application.
1
3
4
6
7
2
5

Understanding Your Phone 21
Icons in the Annunciator line display network, phone and battery
status, as well as notifications for events and connections. .
Signal strength
: More bars mean better signal.
GPS Location On
: GPS for location is active.
GPS 911 Only
: GPS only active for 911 calls.
Airplane Mode
: Phone is turned off, but other features are
available. For more information, refer to “Airplane Mode”
on page 10.
Ringer On
: The ringer is set to On.
Ringer Off
: The ringer is set to Off.
Vibrate On
: The ringer is set to Vibrate.
1xRTT
: 1xRTT high speed data transfer service is available,
which is required for MMS and data services.
3G
: 3G high speed data protocol is available, which is
required for video streaming and downloads.
Information
: Alerts you to informational messages.
Roaming
: Your phone is outside of the home service area,
and is in Roaming mode.
Connecting
: ActiveSync or Data session is currently in use.
No Connection
: There are no data sessions active.
Attention
: Two or more message icons are being displayed.
Reminder
: A calendar event is upcoming.
Speakerphone
: The phone is in Speakerphone mode.
Voice Privacy
: Voice Privacy Enhanced Mode is available.
Wi-Fi Inactive
: A Wi-Fi connection is available, but inactive.
Wi-Fi Active
: A Wi-Fi connection is available and active.
Battery Status
: Current battery charge (shown fully
charged).
Battery Charge Needed
: Battery is fully discharged. Phone
will shut off if not charged.
Battery Charging
: Charger is connected and battery is
charging.

22
Notification Bar Icons
The
Notification Bar
displays at the bottom of the home screen to
inform you of new messages and e-mails, missed calls, and
voice mail.
A number beside an icon indicates the number
of notifications for
the type.
New SMS/MMS Message
: Tap the icon to go to the
Inbox.
New E-mail
: Tap the icon to go to Messaging.
Missed Calls
: Tap the icon to go to Call Logs.
New Voice mail
: Tap the icon to go to Visual Voice
Mail. For more information, see “Visual Voice Mail”
on page 12.

Understanding Your Phone 23
Cube
1.
Close/Back
: Tap to close
Cube
, or Back to return to Cube.
2.
Cube
: Flick or drag with your finger or stylus to rotate the
Cube. Choose from Photo, Music, Video, Shop, Game, or
Web.
3.
Menu
: Tap to select from Photo, Music, Video, Shop, Game,
or Web.
1
2
3

24
Section 3: Displays
Home Screen
The
home screen
is your starting point for using the applications
on your phone. You can customize each home screen by placing
Widgets according to your preference.
The home screen ex y width to provide tends beyond the displa
more space for adding icons, widgets, and more.
Slide your finger horizontally across the screen to scroll to the
left or right side of the extended home screen.
You can scroll continuously between home screens, as shown in
the illustration.
The wallpaper for each home screen is different to aid you in
navigation.
The indicator at the top of the screen indicates the current
screen.

Displays 25
Each home screen can be customized to fit your needs by
docking widget(s) on the home screen, and by selecting
wallpaper.
Docking and Undocking Widgets
For more information about using widgets, see “Docking and
Undocking Widgets” on page 27.
Moving Widgets
Widgets are locked in place when docked on a
home screen
. To
move a widget on a home screen, touch and hold the widget until
it resizes, then drag it to a new area of the home screen.
Note:
A widget can only exist in one place, so if a widget is undocked on a
home screen, it is no longer available in the Widget Bar or on another
home screen.
Change the Home Screen Wallpaper
1. From a home screen, display the
Widget Bar
by tapping the
Widget Bar Tab.
2. Tap the
Wallpapers
widget . Use the left or right
triangle to scroll through preloaded or downloaded images.
3. Tap
Images
to view Photos captured using the camera, or
copied to your phone or memory card.
4. Tap
Set
to use the displayed image as the new wallpaper.
Note:
Wallpaper settings can also be made in Settings. For more
information, see “Display Settings” on page 139.

26
Widgets and the Widget Bar
Widgets
are links to mini-applications or tools, which can be
docked in the
Widget Bar
, or on a home screen. For a list of
available widgets and their functions, see page 29.
The
Widget
Bar
, located at the left of the home screen:
•
Provides quick access
to widgets
•
Keeps widgets
organized and always
accessible
•
Maximizes available
display space.
•
Gives you information
at a glance
䊳
To
access
the
Widget Bar, tap the
Widget bar tab, located on the left side of the main display.
䊳
To
close
the Widget Bar, tap the Widget Bar tab, or tap the
home screen.
Note:
The Widget Bar tab can be moved vertically on the screen by dragging.
Use your fingertip or stylus along the Widget Bar to flick up and
down to scroll through the list
By default, widgets are docked in the Widget Bar. You can drag
widgets to a home screen to use the application or feature
(undocking), then drag it back to dock it in the Widget Bar when
you are finished.
Widget
Bar Tab

Displays 27
Docking and Undocking Widgets
You can easily customize the Widget Bar and home screens by
keeping widgets docked in the bar or undocking them by
dragging anywhere onto your home screen.
To move a widget from the Widget bar to a home screen
:
䊳
Tap the widget in the Widget Bar.
– or –
䊳
Touch and hold the widget, and drag it to the home screen (1)
To move a widget from a home screen to the Widget Bar
:
䊳
Tap the Widget Bar tab to open it, then touch and drag the
widget onto the bar.
Note:
A widget can only exist in one place, so if a widget is undocked on a
home screen, it is no longer available in the Widget Bar.
Moving Widgets
Widgets are locked in place when docked on the
Widget Bar
. You can
change the order of widgets on the Widget Bar by undocking and
dragging to a new position.
If the widget is on the Widget bar, tap the widget on the Widget
Bar to move it to the home screen, then tap the widget to launch
its application.
If the widget is on a home screen, just tap the widget.
Widget

28
Widget Manager
The
Widget Manager
allows you to select widgets for display in
the Widget Bar, which makes the widgets available for use from
the Widget Bar, or for docking on a home screen.
1. Tap the
Widget Bar
, then tap
Widget Manager
.
2. In the Widget Manager,
tap the checkbox for a
widget to display the
widget on the Widget Bar.
For a list of Widgets, see
“Widgets” on page 29.
3. Tap
Menu
for options:
• Options
: Toggle
Tray Auto
Hiding
to choose whether
the Widget Bar automatically
collapses after each use.
• Delete
: Mark widgets for
deletion. You can only delete
widgets that you’ve downloaded; default widgets cannot be
deleted.
• Exit
: Close Widget Manager.
Widget Store
Use Widget Store to download new widgets to your Omnia II.
1. In the Widget Bar, tap the
Widget Store
widget to
move it to a home screen, then tap the widget. The first
time you launch Widget Store, you’ll be prompted to agree
to the terms of the service.
2. Scroll through the list of
widgets by flicking.
3. Tap a widget to read
information about it. To
download the widget to
your phone, tap
Get
.
4. The new widget will be
downloaded to your phone,
and automatically placed
on the current home
screen.

Displays 29
These widgets are available for display in the Widget Bar or on
the home screens:
Widget Manager
: Customize the Widget Bar by
choosing widgets for display. For more information,
refer to “Widget Manager” on page 28.
Visual Voice Mail
: Tap to launch Visual Voice Mail. For
more information, refer to “Visual Voice Mail” on
page 12.
V CAST Videos
: Launches V CAST Videos. For more
information, refer to “V CAST Videos” on page 85.
V CAST Music with Rhapsody
: Launch V CAST Music
with Rhapsody. For more information, refer to “V
CAST Music with Rhapsody” on page 82.
VZ Navigator
: Launch VZ Navigator. For more
information, refer to “VZ Navigator” on page 86.
Analog Clock
: Displays current time in analog format.
Tap the widget to launch Clock and Alarm. For more
information, refer to “Clock and Alarm” on page 105.
Bing
: Search for content on the web. For more
information, refer to “Bing” on page 124
Browser
: Tap the widget to launch the Opera Mobile
browser for browsing the web. For more information,
refer to “Opera Browser” on page 125.
Calendar
: Displays a Month-view calendar. Tap to
launch My Calendar. For more information about
Calendar, see “My Calendar” on page 96.
Digital Clock
: Displays the current time in a digital
format. Tap to launch Clock and Alarm. For more
information, refer to “Clock and Alarm” on page 105.
ERI
: Displays a banner on the first home screen to
show current network status. See “ERI Banner” on
page 20.
Facebook
: Launches the Facebook mobile
application. For more information, refer to
“Facebook” on page 129.
Flickr
: Launches Flickr in a browser window.

30
FM Radio
: Activates the FM Radio. For more
information, refer to “FM Radio” on page 87.
Friendster
: Launches Friendster in a browser
window.
Help
: Provides links to a Quick manual and Video
tutorial for various features of your Omnia II.
Mini Player
: Quickly control playlists being played
with Media Player. Tap and hold to switch to Media
Player. For more information, refer to “Media Player”
on page 76.
My Favorites
: A toolbar that you can customize to
create shortcuts to your favorite contacts. For more
information, refer to “Favorites” on page 63.
My Shortcuts
: A toolbar that you can customize to
create shortcuts to your favorite programs.
MySpace
: Launches MySpace in a browser window.
New Message
: Starts a new message. For more
information about creating and sending messages,
see “Creating and Sending Messages” on page 64.
Photobucket
: Launches Photobucket in a browser
window.
Smart Memo
: Create a memo. For more information,
refer to “Memo” on page 102.
Sound Profile
: Set your phone to
Vibrate
mode, or turn
Volume on
or
Volume off
.
Today
: Shows today’s date, current time and
upcoming calendar events. For more information,
refer to “My Calendar” on page 96.
Voice Recorder
: Record an Audio Note. For more
information, refer to “Voice Recorder” on page 104.
Wallpapers
: Change the wallpaper on the home
screen(s). For more information, see “Change the
Home Screen Wallpaper” on page 25.
Let Samsung
can do f or good
a product and a

Displays 31
WeatherBug
: Displays weather for your selected
location.
Widget Store
: Download new widgets. For more
information, refer to “Widget Store” on page 28.
Wireless Manager
: Enable/disable Airplane Mode, the
Phone feature, Bluetooth and Wi-Fi. For more
information, refer to “Wireless Manager” on
page 130.
World Clock
: Displays the current time in two time
zones. For information about configuring World
Clock, see “Clock and Alarm” on page 105.
YouTube
: Launches YouTube in a browser window.
zone1
zone2
32
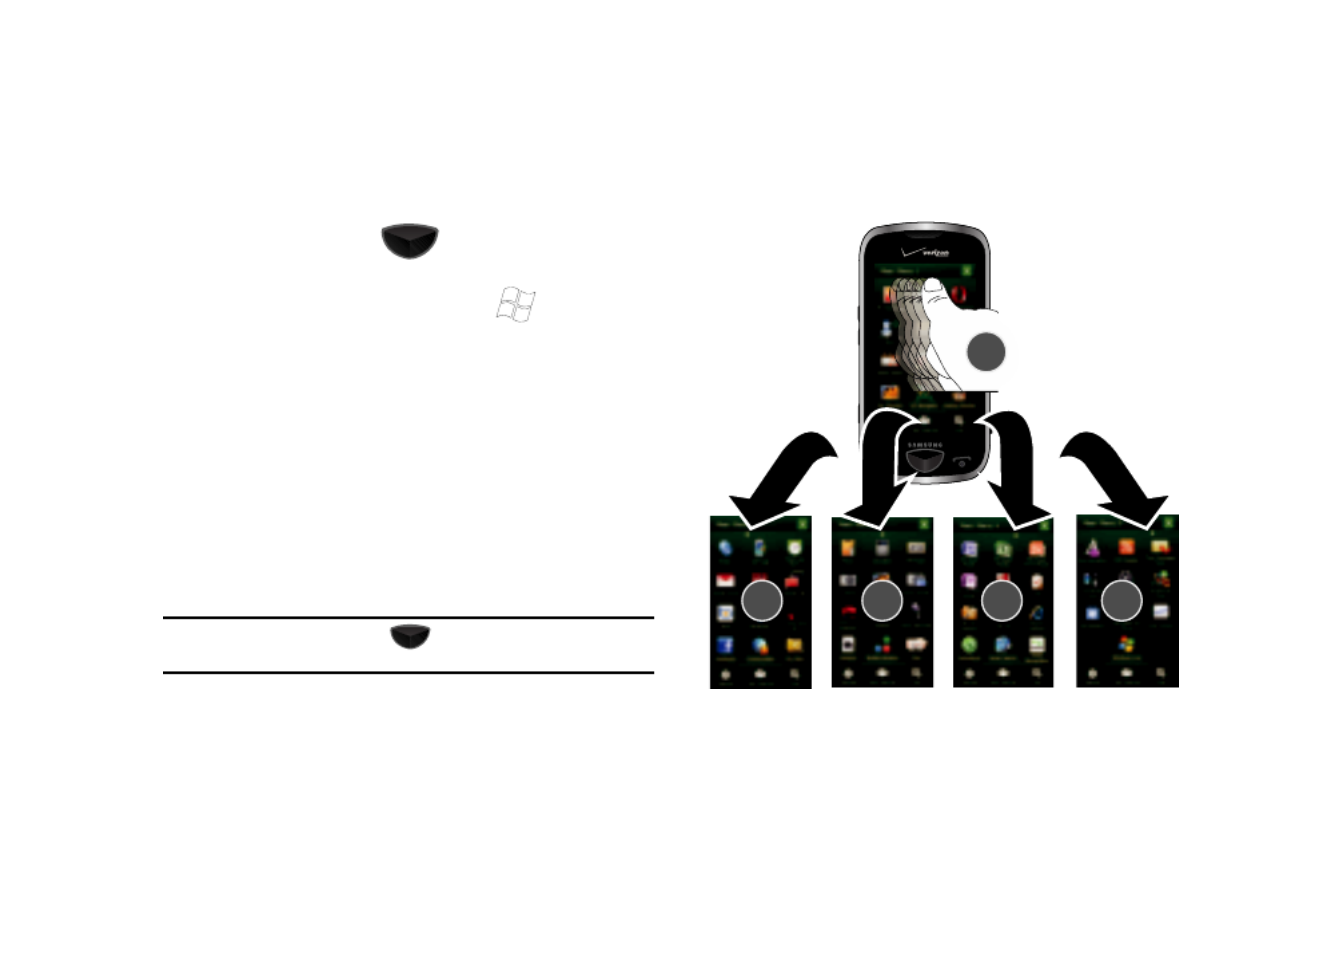
Main Menus
The
Main Menus
are the starting point for launching Omnia II’s
applications. To access the Main Menus:
䊳
Press the
Main Menu
key .
– or –
䊳
From the
home
screen, tap the
Start
icon
(in the upper
left hand corner).
There are 5 default Main Menus: Main Menu 1, Main Menu 2,
Main Menu 3, Main Menu 4, and Main Menu 5. To access the
Main Menus, scroll left and right (sliding your stylus or finger to
the left or right). You can add additional Main Menus, up to a
total of 10.
For a list of all applications, refer to the Main Menu lists
beginning on page 34 Descriptions for each application are
included, along with references to detailed information about
each application.
Note:
Pressing the
Main Menu
key at any time will automatically
open the last-used Main Menu.

Displays 33
The main menus of the Omnia II can be customized by:
•
Renaming
•
Adding/rearranging application icons
•
Adding Main Menus, up to a total of 10
Note:
If you install a new application on your Omnia II, you can add it to a
Main Menu using this procedure.
To customize a Main Menu:
1. Press the
Main Menu
key , then tap
Edit
.
2. Slide your finger across the display horizontally to select a
Main Menu, then:
•
Tap the
Name
field to enter a new name for the menu.
•
Tap <
+
> , then tap an application you would like to add.
•
Tap <
-
> to remove the application from the selected Main Menu.
•
Touch and hold an application and drag it to a new location on the
menu.
•
Tap the
Save
soft key to save your changes.
To add a Main Menu:
1. Press the
Main Menu
key , then tap
Edit
.
2. Slide your finger across the display horizontally to select a
blank Main Menu, then customize the new Main Menu by
adding applications.

Displays 35
The following applications appear by default on
Main Menu 2
.
Dialer
: Make phone calls and set phone options and
services. For more information, refer to “Dialer” on
page 43.
Call Logs
: Display a history of incoming,
outgoing,
and missed calls. For more information, refer to “Call
Logs” on page 46.
Clock and Alarm
: Set the time that appears in the
Clocks, set alarms, and use a Stop Watch. For more
information, see “Clock and Alarm” on page 105.
Mobile Email
: Access Email with a specialized
mobile application. For more information, refer to
“Mobile Email” on page 75.
VZW Tones
: Purchase and download ringtones and
sounds for your phone. For more information, refer
to “VZW Tones” on page 84.
Mobile IM
:
Send and receive instant messages
using AIM™, WL Messenger, or Yahoo!®. For more
information, refer to “Mobile IM” on page 75.
Bing
: Search for content on the web. For more
information, refer to “Bing” on page 124
Bluetooth
: Access the Bluetooth features of your
Omnia II. For more information, refer to “Bluetooth
Wireless Technology” on page 131.
V CAST Song ID
: Find information about songs. For
more information, refer to “V CAST Song ID” on
page 84.
Facebook
: Launch the Facebook mobile
application. For more information, refer to
“Facebook” on page 129.
Communities
: Update your favorite social
networking sites, like Facebook, Flickr, Friendster,
MySpace and Photobucket. For more information,
refer to “Communities” on page 128.
My Files
: Locate and view files on your Omnia II.
For more information, see “My Files” on page 108.
36
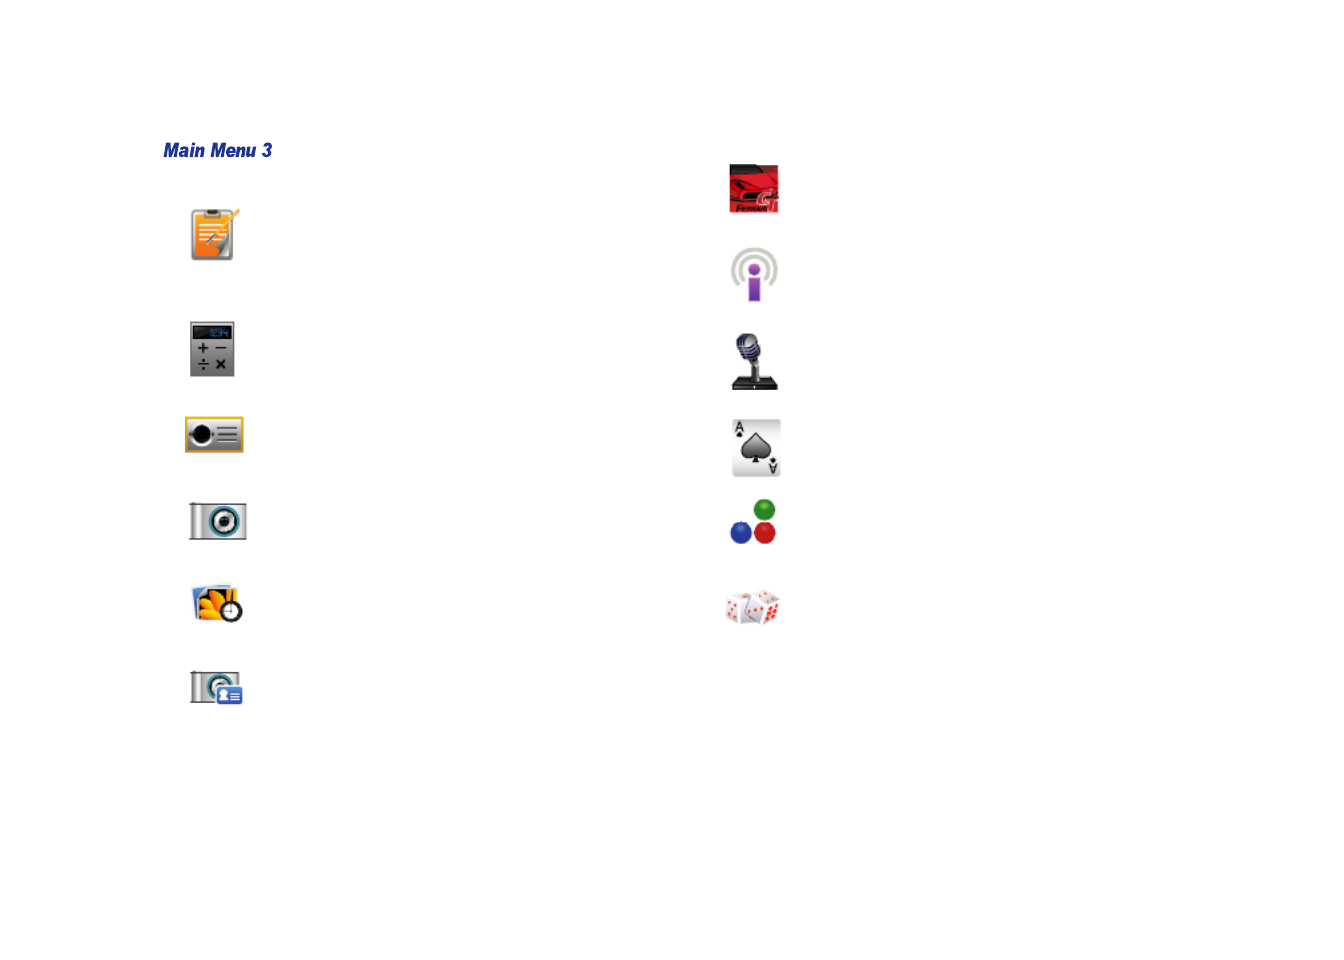
The following applications appear by default on
Main Menu 3
.
Memo
: Capture thoughts, reminders, ideas,
drawings, and phone numbers by writing or voice
recording. For more information, refer to “Memo”
on page 102.
Calculator
: Launch the calculator. For more
information, refer to “Calculator” on page 106.
FM Radio
: Activates the FM Radio. For more
information, refer to “FM Radio” on page 87.
Camera
: Launch the Camera/Camcorder. For more
information, refer to “Photo and Image
Applications” on page 114.
Digital Frame
: View your photos as a slideshow in
Digital Frame. For more information, refer to
“Digital Frame” on page 122.
Smart Reader
: Take a photo of a business card or
document and capture the text contents. For more
information, refer to “Smart Reader” on page 123.
Ferrari GT Evolution
: Launch Ferrari GT Evolution
game. For more information, refer to “Ferrari GT
Evolution” on page 113.
Podcast
: Subscribe and view/listen to podcasts on
your phone. For more information, refer to
“Podcast” on page 128.
Voice Recorder
: Record an Audio Note. For more
information, refer to “Voice Recorder” on
page 104.
Solitaire
: Launch the Solitaire game. For more
information, refer to “Games” on page 113.
Bubble Breaker
: Launch the Bubble Breaker game.
For more information, refer to “Games” on
page 113.
Dice
: Launch the Dice game. For more information,
refer to “Games” on page 113.
E V O L U T I O N

Displays 37
The following applications appear by default on
Main Menu 4
.
MS Word Mobile
: Create, open, and save Word
documents. For more information see see “MS
Word Mobile” on page 93.
MS Excel Mobile
: Create, open, and save Excel
documents. For more information, see “MS Excel
Mobile” on page 91.
MS Power Point Mobile
: Open and save Power Point
documents. For more information see “MS Power
Point Mobile” on page 92.
MS OneNote Mobile
: Create, open, and save Notes.
For more information, see
“MS OneNote Mobile”
on
page 92.
Adobe Reader LE
: Open and view Adobe PDF
documents. For more information, see “Adobe
Reader LE” on page 94.
Tasks
: Create and track tasks. For more
information, refer to “Tasks” on page 98.
MS
File Explorer
: Browse all the files and folders on
your device. For more information, refer to “MS File
Explorer” on page 107.
City ID
: Look up the city and state information for
telephone numbers. For more information, refer to
“City ID” on page 108.
Internet Explorer
: Launch Internet Explorer. For
more information, refer to “Internet Explorer” on
page 126.
ActiveSync
: Synchronize your device with your PC.
For more information, refer to “ActiveSync” on
page 109.
Smart Search
: Search for files, folders, contacts,
numbers, etc. on your phone or the web, by
keyword or type. For more information, refer to
“Smart Search” on page 95.
Voice Recognition
: Use your voice to look up
contacts, make phone calls, get calendar
information, or launch applications. For more
information, see “Voice Recognition” on page 49.

38
The following applications appear by default on
Main Menu 5
.
Unit
Converter
: Convert values for Length, Weight,
Area, Volume or Temperature. For more
information, refer to “Unit Converter” on page 107.
RSS Reader
: Read news updates from web sites,
formatted for your phone. For more information,
refer to “RSS Reader” on page 127.
Text Messages Retry
: Manage delivery of un-sent
messages. For more information, refer to “Text
Messages Retry” on page 68.
Connected Home
: Use your phone as a Mobile
Digital Media Server (M-DMS). For more
information, refer to “Connected Home” on
page 88.
Video Editor
: Create custom slide shows using your
own images and videos. For more information,
refer to “Video Editor” on page 89.
Streaming Player
: View streaming video from the
web, right on your phone. For more information,
refer to “Streaming Player” on page 86.
Marketplac
e: Download applications for your
phone.
Microsoft My Phone
: Back up files from your phone
to the Microsoft Windows Live site.
MSN Money
: Track financial data from your phone.
Uses your data connection, which may incur
additional charges depending on your plan.
Windows Live
: Keep in touch via your Windows Live
service.

Displays 39
The following icons are available for use on the Main menus by
editing. For more information, refer to “Customizing Main
Menus” on page 33.
Calendar
: Record events on a basic calendar.
Contacts
: Directory listing of contacts stored on the
device. For more information, see “My Contacts” on
page 57.
Notes
: Record or draw a note.
Search Phone
: Search for information and files on
your phone.
Search Widget
: Launch Bing to find web content.
Uses your data connection, which may incur
additional charges depending on your plan.
Settings
: Customize your phone. For more
information, refer to “Changing Your Settings” on
page 139.
Task Manager
: View status of open applications,
including memory and CPU usage.
Windows Media
: Play music, videos and TV clips using
Windows Media Player.

40
Cube
The
Cube
is an interactive way to access various multimedia
features on your Omnia II.
䊳
From any home screen, tap the right soft key
Cube
.
The
Cube
has six sides, corresponding to types of features on
your phone:
•
Photo
: View photos stored on
your phone, launch My Pictures,
launch Camera.
•
Music
: Select music for playing
with Media Player.
•
Video
: Select videos stored on
your phone, for viewing with
Media Player.
•
Shop
: Browse and shop for
music, tones and videos by
launching V CAST Music with
Rhapsody, V CAST Videos, VZW
Tones, V CAST Song ID, or shop
for widgets using Widget Store.
•
Game
: Launch Solitaire, Bubble
Breaker, Dice or Ferrari GT Evolution.
•
Web
: Launch web sites saved to your browser favorites.
To use the
Cube
:
䊳
Swipe your finger over the
Cube
to navigate to a side.
– or –
䊳
Tap a menu icon to go directly to a specific side on the
Cube
.
When you select a side, the
Cube display changes to allow
you to scroll through available
options.
Photos
Navigation 41
Section 4: Navigation
This section explains navigation using your finger or the stylus on
the Touch Screen, or by pressing the phone’s keys.
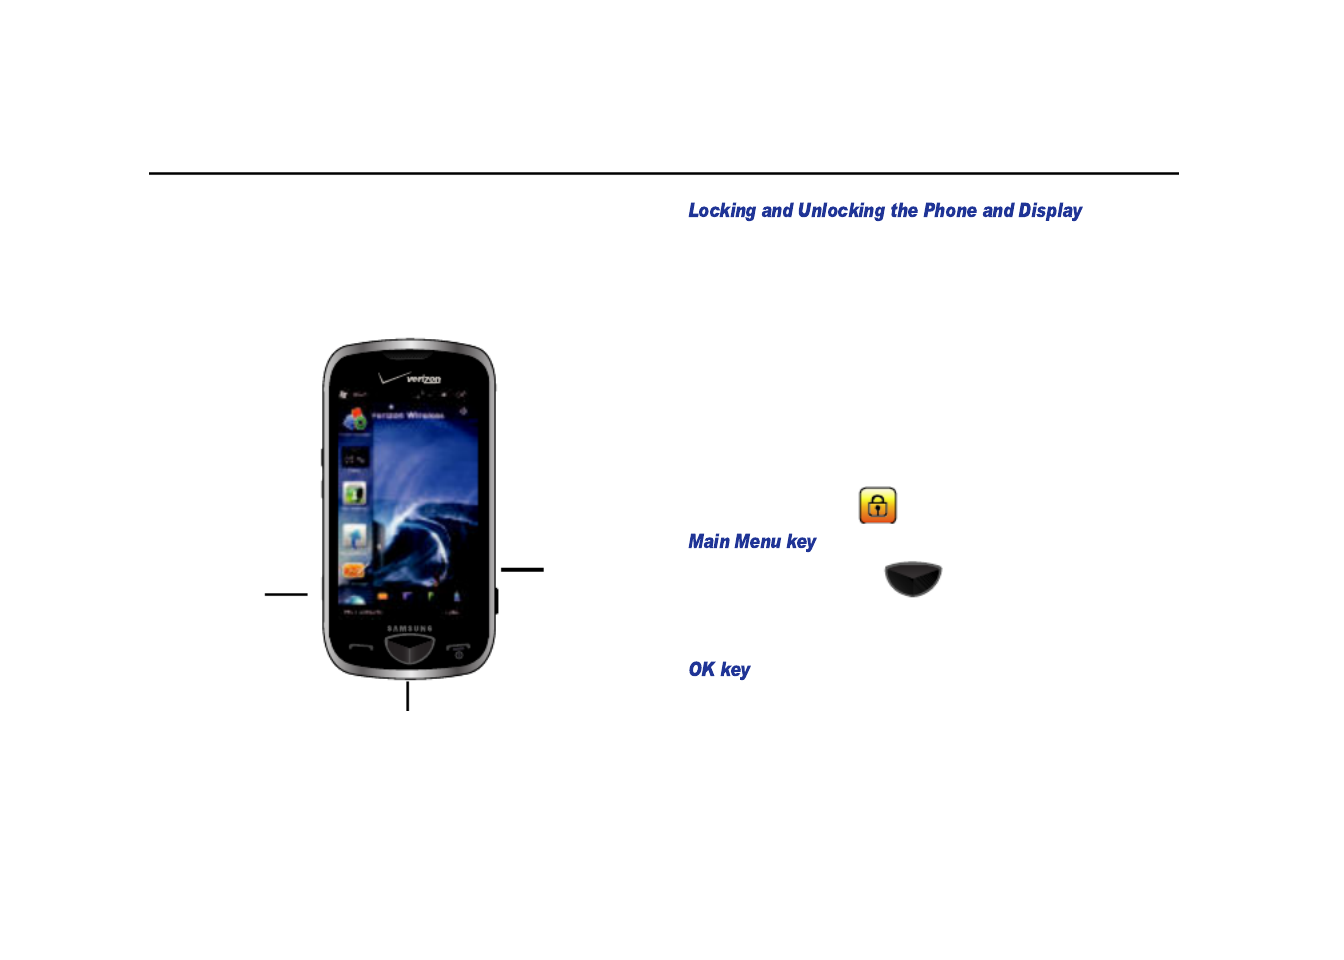
Navigation Keys
Because this is a touch screen phone, locking the phone can
prevent unintentional use of the phone, and preserve battery life.
To
Lock
the Omnia II:
䊳
Press and hold the
Lock
key on the right side of the phone.
To
Unlock
the Omnia II:
䊳
Press and hold the
Lock
key.
To
Unlock
the display:
䊳
Press the
Lock
key. To unlock the Omnia II after unlocking the
display, tap
Unlock
on the screen.
Press the
Main Menu key
at any time to display the Main
Menu screens.
Press and hold the
Main Menu key
to launch the
Task Switcher
.
The
OK
key is used to move up one level, for example, from an
application up to the home screen, or in Settings to move one
level up.
Lock/
Unlock
Main Menu
OK

42
Touch Screen Navigation
To type using the virtual QWERTY keyboard, select items
onscreen such as icons, or press onscreen buttons, simply
Tap
with your finger or the stylus.
Some items are activated by a
Touch and Hold
action with your
finger or stylus, for example to bring up a pop-up menu of
options or to move a widget on the screen.
To
Swipe
or
Slide
means to quickly drag your finger vertically or
horizontally across the screen.
A
Flick
is similar to a Swipe or Slide, except that you move your
finger or stylus in lighter, quicker strokes. This gesture is always
in a vertical direction, such as when flicking the contacts or
message list.
Touch and hold with your finger or stylus, then
Drag
the item to a
new location. While dragging, do not release your finger until you
have reached the target position. Dragging is often used to move
widgets or shortcuts.
The
Stylus
is used for navigating via the screen, may also be
used for writing or drawing on the screen

44
To make a call from
My Contacts
:
1. Press
Send
, then tap the
My Contacts
button in the
Dialer
.
2. Find the contact and tap it to display the contact. For more
information, see “Finding a Contact” on page 59.
3. Tap the call type (
Call Mobile
,
Call Work
, or
Call Home
) to
dial the call.
To make a call from
Favorites
:
1. Press
Send
, then tap the
Favorites
button
in the
Dialer
.
2. Find the contact and tap it to display the contact. For more
information, see “Finding a Contact” on page 59.
3. Tap the call type (
Call Mobile
,
Call Work
, or
Call Home
) to
dial the call.
Note:
For more information about creating favorite contacts, see “Favorites”
on page 63.
Caller ID displays the phone number of the person calling when
you receive an incoming call. Similarly, if you call someone who
has this feature, your phone number displays on their phone. If
the caller’s name and number are stored in My Contacts, their
name appears with the number.
To block caller ID from displaying when you call another user:
䊳
Press
Send
➔ ➔ <
the
phone number
> ➔
Send
.
Note:
When you receive a call, you can silence the ringer by pressing the
volume key on the side of your phone.
mno
6
pqrs
7

Call Functions 45
Answering a Call
Make sure the phone is turned on. When you receive an incoming
call, the
Phone
screen appears in the display.
䊳
Tap the
Answer
button, or press
Send
.
䊳
Tap the
Ignore
button, or press
End
to send the call to
voice mail.
䊳
Select a preloaded message to send to the caller, then tap
.
䊳
If the screen is
locked
when a call is incoming, tap
Unlock
, before choosing an action above.
You can answer an incoming call while on an existing call. If you
are on an existing call and another call is received, you’ll hear a
tone played through the earpiece or speaker and an incoming
screen is displayed on the screen. If the caller is stored in My
Contacts, their name is also displayed.
䊳
Tap the left soft key
Answer
䊳
Press the
Send
key
.
During a call, you have these options:
After a call ends, you have these options:
Ignore + TXT
Ignore + TXT
Ignore + TXT
Ignore + TXT
Ignore + TXTIgnore + TXT
Speaker On/Speaker Off
toggles the speakerphone.
Mute/Unmute
toggles muting.
Talk
dials another call.
Note
attaches a note to the call.
My Contacts
launches My Contacts.
End
disconnects the call.
Call Logs
launches Call Logs.
Save
saves the caller to My Contacts.
Talk
returns to the Dialer.
Note
attaches a note to the call.
My Contacts
launches My Contacts.
46
Call Logs
Call Logs
records all calls, incoming, outgoing, and missed. To
access
Call Logs
:
䊳
Press
Send
, then tap the
Call Logs
button in the
Dialer
.
– or –
䊳
Press the
Main Menu
key, then
Main Menu 2
➔
Call Logs
.
Calls are displayed on these tabs:
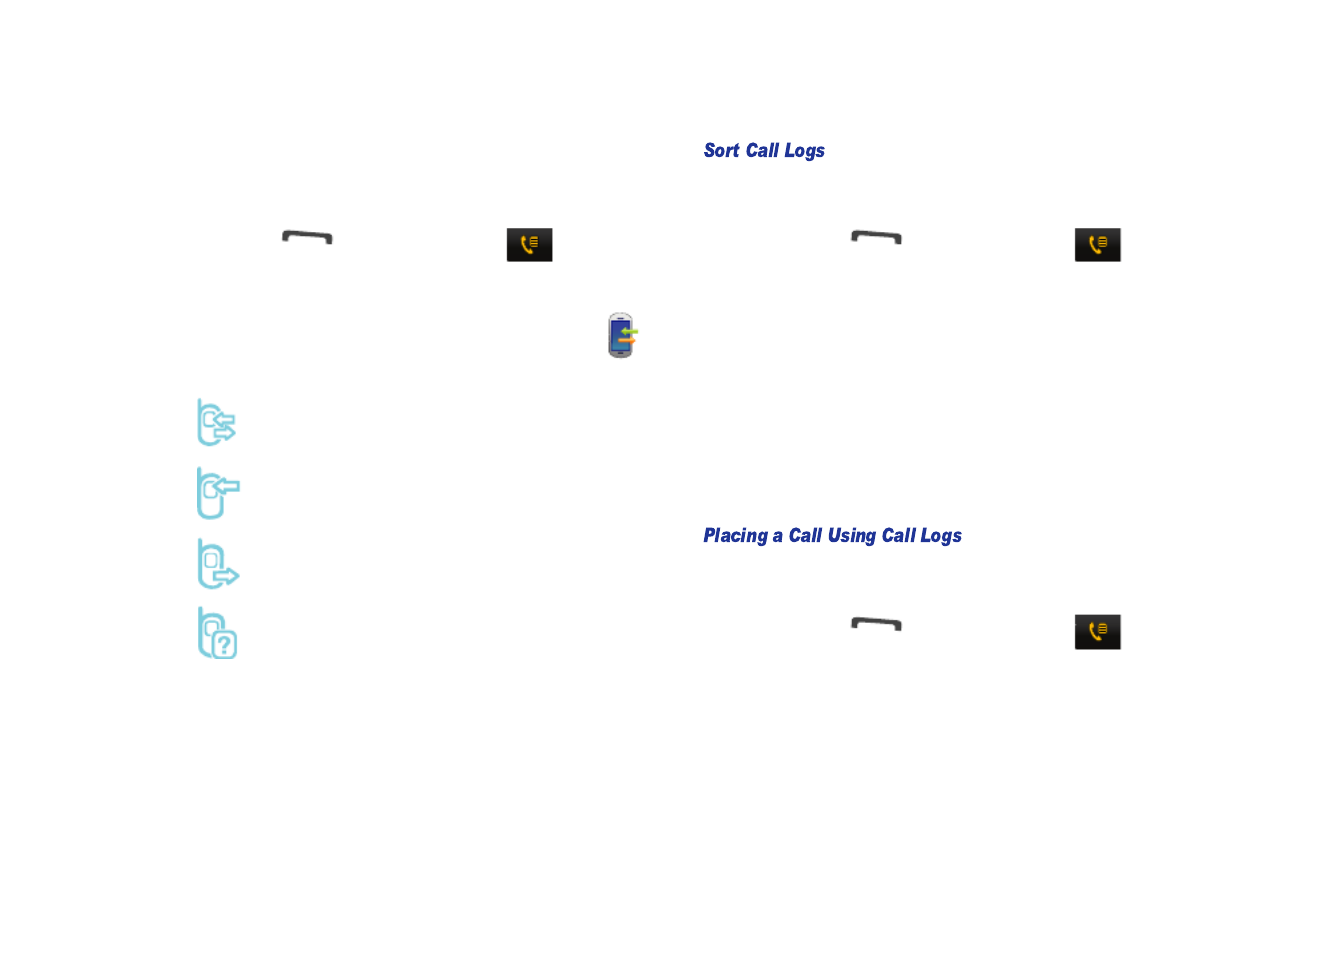
Sorting allows you to view calls by selecting from one of the
preset sort criteria.
1. Press
Send
, then tap the
Call Logs
button in
the
Dialer
.
2. Tap the desired tab (
All Calls
,
Incoming Calls
,
Outgoing
Calls
, or
Missed Calls
.
)
3. Tap the right soft key
Menu
➔
Sort
for these options:
• Time
: sorts by time dialed or received.
• Name
: sorts by the caller’s first name (if stored in My Contacts).
• Frequency
: sorts by the number of calls for each caller.
4. Tap the desired sort type to refresh the screen entries.
You can place a call to a recipient you’ve called in the past, or
return a call to a caller by retrieving a call stored in the Call Log.
1. Press
Send
, then tap the
Call Logs
button in
the
Dialer
.
2. Find a call on a
Call Logs
tab and tap the call.
3. Tap the call type (
Call Mobile
,
Call Work
, or
Call Home
) to
dial the call.
All Calls
: Incoming, outgoing or missed calls
Incoming Calls
: Calls that were answered
Outgoing Calls
: Calls made with the phone.
Missed Calls
: Incoming calls that were not answered.

Call Functions 47
Create a contact, or update an existing contact, from a Call Log.
1. Press
Send
, then tap the
Call Logs
button in
the
Dialer
.
2. Find a call on a
Call Logs
tab and tap the call log entry.
3. Tap the left soft key
Save
.
4. At the
Save to
pop-up, tap
New contact
to add a new entry
or tap
Existing contact
to update an existing entry and tap
.
5. Enter the contact information such as name, and number
type. The phone number is already entered.
6. Tap the left soft key
Done
or to save your contact
and return to the previous screen.
Call Logs can be deleted individually or as a whole. Deleting all
call entries will remove all currently displayed call entries. These
entries are dependant on the
Filter
used for call log display (
All
Calls
,
Missed
,
Outgoing
, or
Incoming
).
Note:
If your currently-selected tab is displaying Missed Calls, for example,
deleting all calls in this instance would only delete Missed Calls, while
leaving all remaining Incoming and Outgoing Call entries.
1. Press
Send
, then tap the
Call Logs
button in
the
Dialer
.
2. Tap the desired
Call Log
tab (
All Calls
,
Incoming Calls
,
Outgoing Calls
, or
Missed Calls
.
)
3. Tap right soft key
Menu
➔
Delete
.
4. Tap the entries you want to delete or tap
Delete
to delete all
calls in the selected call log tab.
5. Tap the left soft key
Done
or .
6. At the
Permanently delete call(s)?
pop-up, tap .
Ok
Ok
Ok
Ok
OkOk
Ok
Ok
Ok
Ok
OkOk

Call Functions 49
Three-way Calling
Three-way calling
allows you to talk to two different people at the
same time. When using this feature, normal airtime rates apply
for each of the two calls.
To use three-way calling:
1. Dial the number for the first person and press
Send
.
2. Dial the number for the second person and press
Send
.
3. When the second person answers, press
Send
again to connect all three parties.
Note:
There is no on screen indication of the two other parties currently in
the active three-way call.
If one of the people you called hangs up, you and the remaining
caller stay connected. If you initiated the call and are the first one
to hang up by pressing
End
, all three calls are
disconnected.
Voice Recognition
Your Omnia II includes Nuance
Voice Recognition
, state-of-the-art
voice recognition software that transforms your device into your
own virtual personal assistant, letting you use your voice to look
up contacts, make phone calls, get calendar information, and to
start applications.
There is no need to “train” Voice Recognition; it is designed to
recognize natural speech.
1. Press and hold
Send
to launch
Voice Recognition
.
2. An audio prompt says “Say a Command”. Say the name of
the command you want to perform, from the following
options (visible on screen):
• Call <Name or #>
: Say the name or number of the person from My
Contacts you would like to call.
•
Send Text
<Name or #>
:
Say the name or number of the person
from My Contacts to whom you would like to send a message.
• Send Email <Name>
: Say the name or number of the person from
My Contacts to whome you would like to send an E-mail.
• Lookup <Name>
: Say the name or number of the person from My
Contacts you would like to look up.
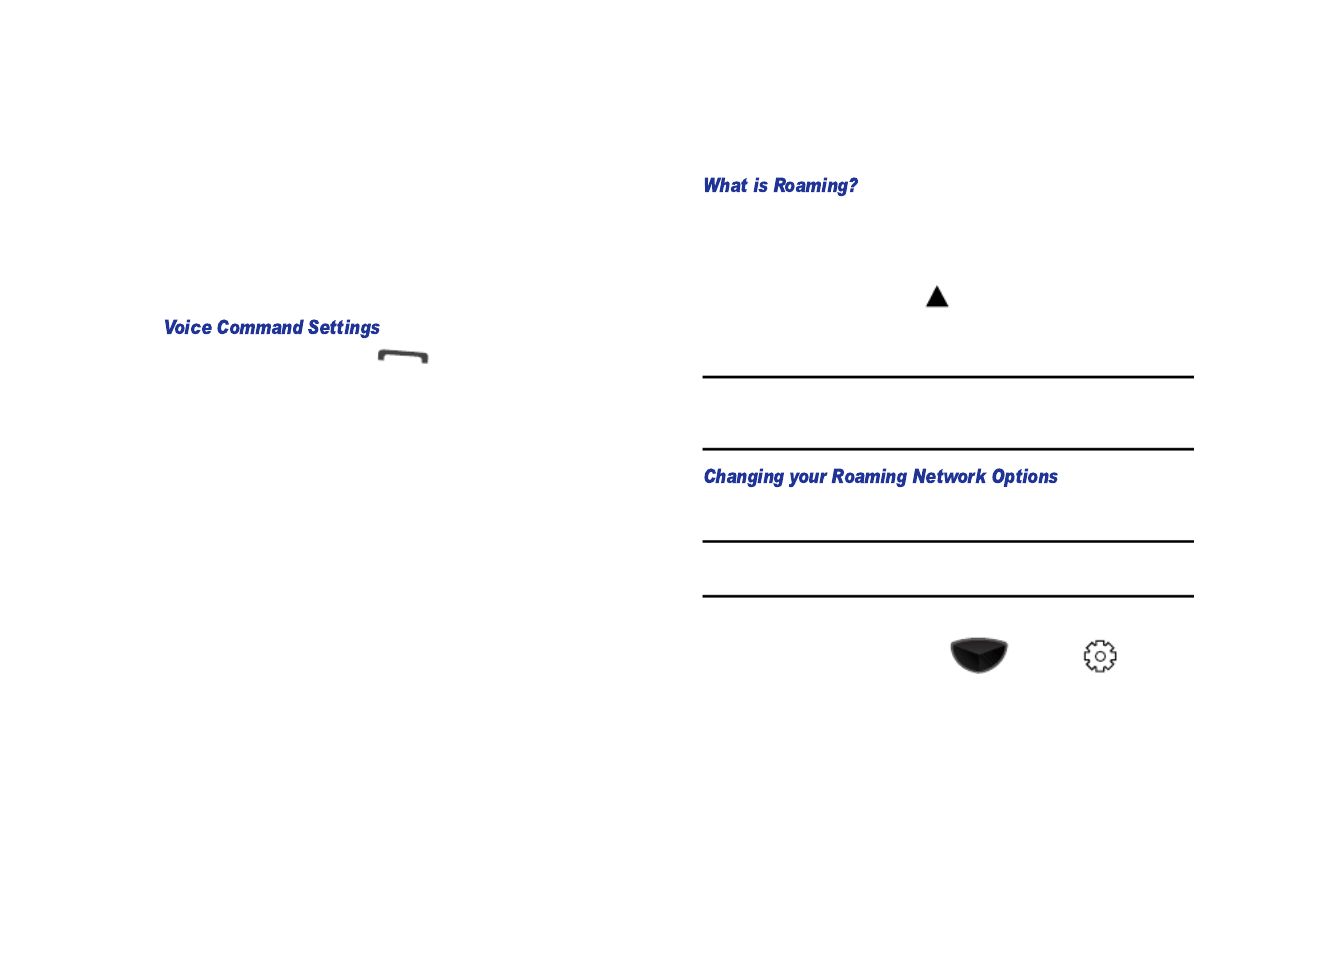
50
•
Go To <Menu>
: Say the name of an application or shortcut to open
the item. A list of items appears on the screen. Say <More Items>
to display additional lists of items.
• Play <Playlist>
: Say the name of a playlist to launch Windows
Media and play the playlist.
• Check <Item>
: Say the name of a status item to check. A list of
items appears on the screen.
1. Press and hold
Send
to launch
Voice Recognition
.
2. Tap the right soft key
Settings
for these options:
• Confirmation
: Control when the system asks you to confirm a
name or number. Tap
Automatic
,
Always Confirm
, or
Never
Confirm
.
• Adaptation
: Adapt your phone’s Voice Recognition to your voice, to
improve results. Tap
Adapt Voice
➔
Start
, then follow the audio
prompts.
• Audio Modes
: Set the level of audio assistance provided by Voice
Recognition. Tap
Expert Mode
for no audio prompts,
Prompt
Mode
for audio prompts, or
Readout Mode
to have the phone read
out all commands to you.
• Sensitivity
: Control the sensitivity of the system. Tap
Most
Sensitive
,
Recommended
or
Least Sensitive
.
•
About
: View information about Nuance Voice Recognition.
Roaming
Roaming occurs when you travel outside your phone’s
designated home network’s coverage area. Your phone can roam
to other digital networks to maintain service outside your home
network. The roaming icon appears in the Annunciator line
when roaming is active, and extra charges may apply when
making or receiving a call while roaming.
Note:
Some features may be unavailable while roaming. Roaming also
consumes additional power from the battery, requiring more frequent
battery charges.
You can change your phone’s default roaming behavior.
Note:
Contact your service provider for information regarding your home
network and roaming.
To change your Roaming settings:
1. Press the
Main Menu
key ,
Settings
➔
Basic
Settings
tab ➔
Phone Settings
➔
Network Selection
.
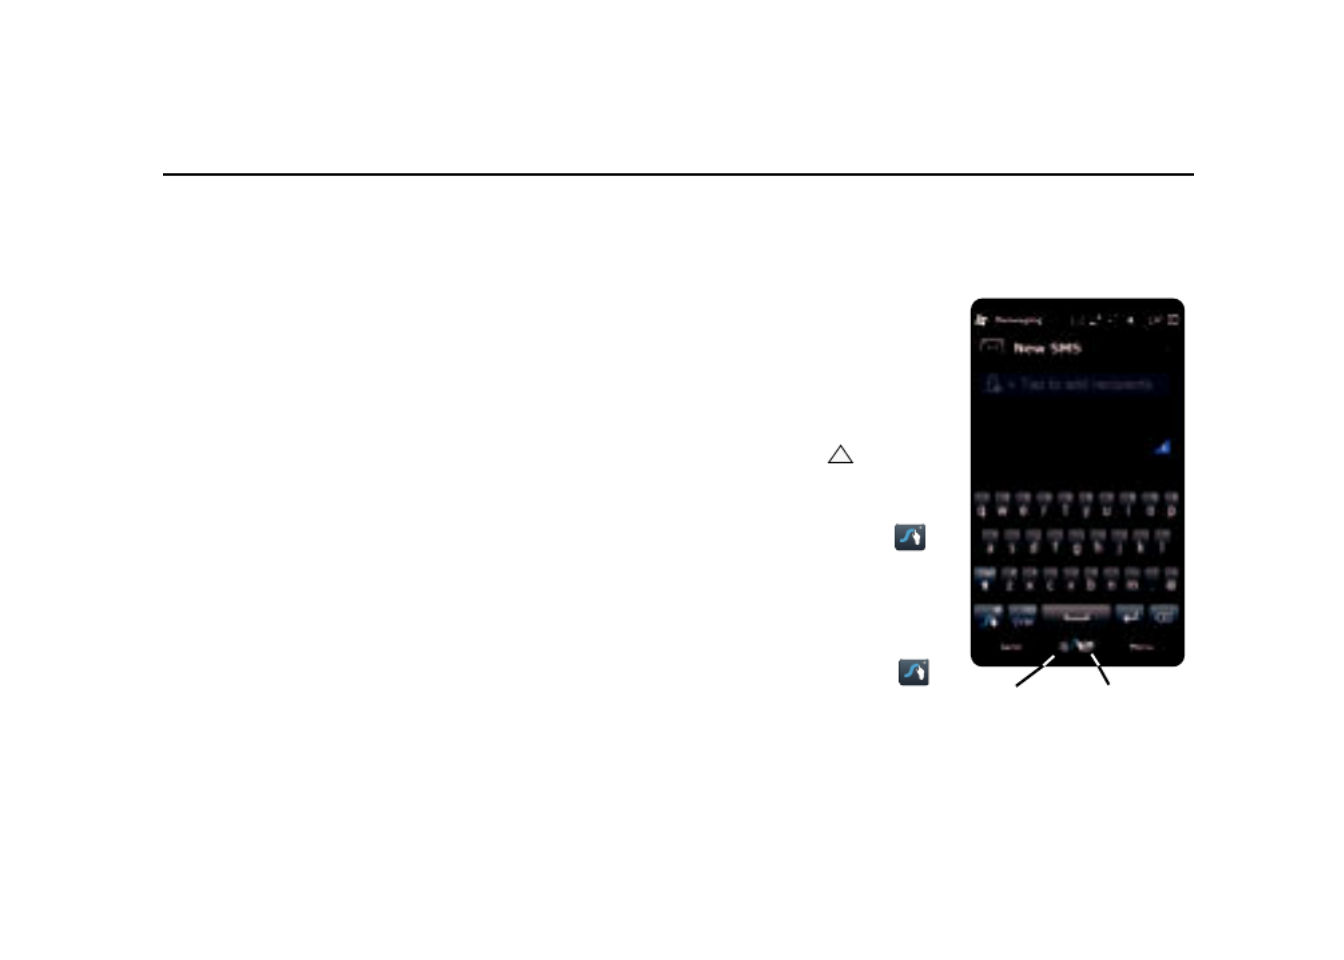
52
Section 6: Entering Text
This section outlines how to select the desired text input method
when entering characters into your Omnia II. This section also
describes the predictive text entry system that reduces the
amount of key strokes associated with entering text.
Virtual QWERTY keyboards
Your Omnia II includes virtual QWERTY keyboards for character
entry. Using the keyboards, you can type letters, punctuation,
numbers, and other special characters into text entry fields or
other applications. You can access the keyboards by tapping the
text entry icon located at the bottom of the display, to choose the
Swype, Samsung Keypad, or Keyboard text input methods.
Text Input Methods
There are six text input methods available:
•
Block Recognizer
•
Keyboard
•
Letter Recognizer
•
Samsung Keypad
•
Swype
•
Transcriber
Each of these methods allow you to input alphanumeric
characters and symbols into your phone. In addition to these
input methods, there are other settings you can select, such as
Word Completion, associated with the input mode selected.
Changing the Text Input Method
When entering characters into
a field in an application or
message, all text input
methods are available and can
be selected by tapping the
white triangle portion of the
center soft key and
selecting a method from the
pop-up menu.
The center soft key icon
reflects the current text entry
method. In this example, the
current text input method is
Swype.
Touch the text input icon
to hide or display the QWERTY
keyboard or text input area, or
to attach or insert files to a
MMS message.
Tap to show or Tap to select
text input
method or
options
hide text input

Entering Text 53
Swype is a new way to enter text on touch screens. Instead of
tapping each key, use your finger (or the stylus) to trace over
each letter of a word. For each word, place your finger or the
stylus on the first letter and glide to the subsequent letters, lifting
on the last letter.
This example shows
a user entering the
word “this”. Put your
finger or stylus down
on the “t”, and
without lifting, glide it
to the “h”, then to the
“i” then over to the
“s”.
When entering
sentences, don’t worry about putting in the spaces between
words - Swype does that for you to speed things up. Here are a
few tips to get you started:
•
Spacing is automatic
: When you finish a word, just lift your finger or
stylus and start the next word.
•
Double letters
: Just do a “squiggle” on the key.
•
Punctuation
: Tap and hold a key to view a punctuation menu and
make a selection.
•
Contractions
: Move your finger or stylus over the apostrophe
•
Error correction
: If you make a mistake, double-tap on the word you
want to change.
Note:
Swype is the default text entry method on your Omnia II.
The
Swype
key
at the
bottom left of the keyboard provides
information to help you learn more about Swype:
•
Tap the
Swype
key to show
Tips
.
•
Tap the
Swype
key
➔
Help
to view Help and an introductory
Video.
•
Tap the
Swype
key
➔
Tutorial
for an interactive tutorial.
•
Launch an introduction video from the Getting Started application
(Main Menu 1
➔
Getting Started
)
To access
Swype options
:
䊳
While entering text, touch the center soft key and select
Options
from the pop-up menu, then choose
Swype
➔
Options
.
Swype key
54
Block Recognizer uses the traditional writing area box, split in the
middle, to allow you to enter characters using single strokes.
The left side is used to write letters and the right side is for
number entry. Symbols and common functions are located in
other smaller boxes located to the right of the writing box area.
To access Block Recognizer mode:
䊳
Tap the center soft key ➔
Block Recognizer
.
There are no user-configurable options for Block Recognizer.
This input method displays an on-screen virtual QWERTY
keyboard that can be used to input characters by tapping the
screen with the stylus.
To access Keyboard mode:
䊳
Tap the center soft key ➔
Keyboard
.
To access Keyboard options:
1. Tap the center soft key ➔
Options
2. Choose
Keyboard
from the
Input method
list, then tap
Options
.
Letter Recognizer allows you to enter text using natural writing
strokes to write each letter. The screen is divided into three
different areas: capital letters, small letters, and numbers. Write
characters in the appropriate area with the stylus. The character
is analyzed and typed on the screen automatically.
To access Letter Recognizer mode:
䊳
Tap the center soft key ➔
Letter Recognizer
.
To access Letter Recognizer options:
1. Tap the center soft key ➔
Options
2. Choose
Letter Recognizer
from the
Input method
list, then
tap
Options
.
The Samsung Keypad offers a custom virtual QWERTY keyboard,
featuring xt9 predictive text. Input characters by tapping the on-
screen keys with your finger or the stylus.
As you enter characters, xt9 predictive text matches your input to
common words and displays them. Select a word from the
display to insert it into your text. During text entry, you can turn
off the xt9 feature by tapping the xt9 Mode key on the keyboard.
To access Samsung Keypad mode:

Entering Text 55
䊳
Tap the center soft key ➔
Samsung Keypad
.
To access Samsung Keypad options:
1. Tap the center soft key ➔
Options
2. Choose
Samsung Keypad
from the
Input method
list, then
tap
Options
.
The Transcriber method is similar to Letter Recognizer, except
instead of entering characters into a designated area, you can
enter entire words and sentences using your own handwriting,
print, or mixed formats. Transcriber supports both printing and
cursive writing styles and then automatically types the
information on the screen.
To access Transcriber mode:
䊳
Tap the center soft key ➔
Transcriber
.
To access Transcriber options:
1. Tap the center soft key ➔
Options
2. Choose
Transcriber
from the
Input method
list, then tap
Options
.
Tip: Options
includes an Intro tips for using the Transcriber input method.
To access text input method options, use one of the following
methods:
䊳
While entering text, tap the center soft key and select
Options
from the pop-up menu.
– or –
䊳
Press the
Main Menu
key , then tap
Settings
➔
Advanced Settings
tab ➔
System
➔
Input Method Options
.
Note:
For more information about selecting a default text entry method and
settings for the text entry modes, see “System” on page 144.
Text Input Options - Word Completion
Word Completion settings determine how words are
automatically identified and displayed while entering a defined
number of characters on the screen.
1. From the
Input Method
settings, touch the
Word
Completion
tab.
2. Tap the
Suggest words when entering text
checkbox to
enable or disable word suggestion.

56
3. Tap the
Suggest after entering
drop down list and choose
the minimum number of letters a word must contain before
a word is suggested.
4. Tap the
Suggest # words
drop down list and choose the
numbers of words your Omnia II will suggest once the
word completion parameters are met.
5. To enter an empty space after each recognized word, tap
Add a space after word
.
6. To enable the auto correction feature which dynamically
corrects for spelling errors and other mistakes, tap
Enable
Auto Correct
.
7. Tap to save your changes and return to the previous
screen.
Text Input Options - Options
Note:
These options only apply when writing or recording is supported.
1. From the
Input Method
settings, touch the
Options
tab.
2. Tap
Voice recording format
and choose a format from the
drop down list.
3. Tap
Default zoom level for writing
and choose a zoom level.
4. Tap
Default zoom level for typing
and choose a zoom level.
5. Tap
Capitalize first letter of sentence
to enable or disable
initial capitalization.
6. Tap
Scroll upon reaching the last line
to scroll the text entry
field when you reach the last line.
7. Tap to save your changes and return to the previous
screen.

My Contacts 57
Section 7: My Contacts
This section describes how to manage your daily contacts by
saving contact information for your friends, colleagues, or
business acquaintances.
My Contacts
contains the list of contacts, plus Search criteria and
navigation aids.
To access
My Contacts
:
•
Press
the
Main Menu
key
➔
Main Menu 1
➔
My Contacts
.
•
From a home screen, tap the left soft key
My Contacts
.
Adding a New Contact
1. Press the
Main Menu
key ➔
My Contacts
.
2. Tap the left soft key
New
.
3. Use the keypad or the QWERTY keyboard to enter the
contact information into the fields provided:
4. Tap to add additional fields:
Picture ID
First Name
Last Name
Mobile Telephone
E-mail
Work Telephone
Home Telephone
Categories
Middle Name
Suffix
Nick name
Title
Company
Add field
Add field
Add field
Add field
Add fieldAdd field

58
Department
Job title
File as
Work fax
Company telephone
Work2 telephone
Work address
IM
Ring tone
Web page
Office location
Home address
Other address
Pager
Car telephone
Home fax
Home2 telephone
Radio telephone
IM2
IM3
E-mail 2
E-mail 3
Assistant
Assistant telephone
Manager
Govt. ID

My Contacts 59
5. Tap
Notes
to enter text information about the contact.
6. Tap the left soft key
Done
or to save your new contact
information and return to the previous screen.
Finding a Contact
Find a Contact using Search Criteria
1. Press the
Main Menu
key ➔
Main Menu 1
➔
My Contacts
.
2. Tap the
Phonebook
tab.
3. Tap
Search
.
4. Enter the first few
characters of the contact
entry. With each
consecutive character, the
list of matching contacts
updates to show matches.
5. Tap an entry from the list to
display its information.
Account
Customer ID
Birthday
Anniversary
Spouse
Children

60
Finding a Contact using the Accelerator tab
The
Accelerator tab
allows you to quickly scroll through the
Contacts list. The Accelerator tab is located along the right side
of the screen. To use the Accelerator tab:
1. Press the
Main Menu
key ➔
Main Menu 1
➔
My Contacts
.
2. Touch and hold the
Accelerator tab
, then drag it up and
down the screen to scroll through the Contacts list.
3. Select a
Contact
from the list.
Editing a Contact
1. Press the
Main Menu
key ➔
Main Menu 1
➔
My Contacts
.
2. Find the contact to be edited and tap it to display it. For
more information on finding a contact, see “Finding a
Contact” on page 59.
3. Tap the left soft key
Edit
.
4. Tap the field(s) to be edited and enter the new information.
Deleting a Contact
1. Press the
Main Menu
key ➔
Main Menu 1
➔
My Contacts
.
2. Find the contact to be deleted and tap it to display it. For
more information on finding a contact, see “Finding a
Contact” on page 59.
3. Tap the right soft key
Menu
➔
Delete
.
4. Confirm the deletion by tapping .
Important!:
When a contact is deleted, it cannot be recovered.
Accelerator tab

My Contacts 61
Making a Call from My Contacts
To make a call from
My Contacts
:
1. Press the
Main Menu
key ➔
Main Menu 1
➔
My Contacts
.
2. Find the contact to be called, and tap it to display the
contact. For more information on finding a contact, see
“Finding a Contact” on page 59.
3. Tap the desired number for the contact to place the call.
Sending a Contact via vCard
To send contact information as a message attachment:
1. Press the
Main Menu
key ➔
Main Menu 1
➔
My Contacts
.
2. Find the contact to be sent, and tap it to display it. For
more information on finding a contact, see “Finding a
Contact” on page 59.
3. Tap the right soft key
Menu
➔
Send contact via vCard
.
4. Add a recipient and tap the left soft key
Send
.
Sending Contact(s) via Bluetooth
You can send contact information via Bluetooth to another
Bluetooth device.
Your Omnia II also supports sending multiple contacts, or your
entire phonebook, via Bluetooth.
To send contact information wirelessly with another Bluetooth-
enabled device, first make sure Bluetooth is on. For more
information, refer to “Bluetooth Modes” on page 132.
1. Press the
Main Menu
key ➔
Main Menu 1
➔
My Contacts
➔
Phonebook
tab.
2. Tap the right soft key
Menu
➔
Send via Beam
.
3. Select contact(s) by tapping. For more information on
finding a contact, see “Finding a Contact” on page 59. To
select all contacts, tap the
Select contacts
checkbox.
4. Tap the left soft key
Done
. Your phone begins to search for
a compatible device.
5. Tap the device to which you wish to transmit. When the
contact(s) are successfully transmitted, the selected
device displays
Done
.

62
Categories
Categories allow you to group contacts so that you can send
messages or e-mails, or set appointments, for members of a
category.
1. Press the
Main Menu
key ➔
Main Menu 1
➔
My Contacts
➔
Category
.
2. To create a category:
•
Tap the left soft key
New
•
Enter a name, then press
Done
.
3. To delete a category:
•
Tap the right soft key
Menu
➔
Delete.
•
Tap a category or categories to
mark them for deletion, then
press
Done
.
4. To assign contact(s):
•
From the
Category
list, tap a
category to select it.
•
Tap the left soft key
Add
member
, then tap contact(s) to mark them.
•
Tap the left soft key
Done
to add the contact(s) to the category.
Speed dial
Speed dial can be used to quickly dial contacts that you talk to
the most. by pressing up to two numeric keys.
1. Press the
Main Menu
key ➔
Main Menu 1
➔
My Contacts
➔
Speed Dial.
2. To set a speed dial number:
•
Tap the left soft key
New
.
•
From the list of contacts, tap an
entry for speed dial assignment.
•
From
Select phone number
,
select one of the phone numbers.
• Select a Location
by tapping an
available location (2 - 94).
3. To
edit
a speed dial number,
tap
Menu
for these options:
• Move
: Drag and drop the speed
dial entry to a new position.
• Delete
: Mark entries for deletion.
• Exit
: close My Contacts and return to the home screen.
Note:
Memory locations 2-94 are available for speed dialing. Locations 1, 95,
96, 97, 98 and 99 are pre-configured and cannot be altered.

My Contacts 63
Favorites
Favorites allows you to create shortcuts to favorite contacts.
After you’ve created the Favorites shortcuts, they can be
accessed via these methods:
•
The
My Favorites
widget , which can be placed on a home
screen to quickly call or send a message to a Favorite.
•
The Favorites button in the Dialer.
To create Favorites:
1. Press the
Main Menu
key ➔
Main Menu 1
➔
My
Contacts
.
2. Tap the
Favorites
tab
➔
Edit
.
3. To
add
a Favorite, tap the
Plus key, then choose a
contact to associate.
4. To
delete
a Favorite, tap the
Minus key on the Favorite.
5. Tap the left soft key
Done
.

64
Section 8: Messaging Applications
This section discusses the types of messages you can send and
receive, how to set up your phone to work with E-mail and how
to send E-mail messages using different types of connections.
Types of Messages
Your Omnia II is capable of sending
•
Text (SMS)
•
Multimedia (MMS)
•
E-mail
•
Mobile IM
When you exchange text messages with a friend or colleague,
the messages are threaded together into a single conversation,
so you can view the entire conversation as you type.
Creating and Sending Messages
1. Press the
Main Menu
key ➔
Main Menu 1
➔
Messages
.
2. Select
Messaging
from the pulldown menu at top left.
3. Tap the right soft key
Menu
➔
New
.
Note:
Use the
New Message
widget to quickly start a new message
from a home screen.
4. Tap
Tap to
add recipients
and select a source:
• PhoneBook
: Add a recipient from your Phonebook.
• Call Log
: Add a recipient from recent calls in the Call Log.
• Group
: Send a message to a group or a group member.
• Enter Manually
: Add a recipient manually. Enter a semicolon
between multiple contacts. As you enter the phone number or
email address, matching contacts will appear on screen.
• To Online Album
: Send a message to an online blog.
Tap
To
to switch to the CC or BCC list for recipients.
Tap the left soft key
Done
to continue.

66
New SMS Messages Features
䊳
While creating a new message, tap the right soft key
Menu
for
these features:
• Add Subject
: Create a subject field for this message.
• Insert
: Converts to an MMS message, to attach Picture, Sound,
Video, New Picture, New Sound, New Video, Quick Text, Emoticon,
Contact, Appointment or MMS Template.
• Attach
: Attach vCard, vCalendar or File to the message.
• Edit Page
: Add a page to the message, or set the Page Duration.
• Save to
: Saves the message in Drafts, or as an MMS Template.
• Cancel Message
: Cancels the new message.
• Message Options
: For descriptions, see
“Text Message
Options”
on page 66..
New MMS Message Features
Several features are available when creating a new Multimedia
(MMS) message.
䊳
While creating a new MMS message, tap the right soft key
Menu
for these features:
• Preview
: View the new MMS message prior to delivery.
• Delete Subject
: Delete the Subject field from this message. A
Subject field is automatically added when the message is changed
to MMS, but is not required for sending.
• Insert
: Insert a Picture, Sound, Video, New Picture, New Sound,
New Video, Quick Text, Emoticon, Contact, Appointment, or MMS
Template to this message.
• Attach
: Attach a vCard, vCalendar or File.
• Edit Page
: Add, Delete or Order pages, set Page Duration, and
move a Page Up or Down within the message.
• Save to
: Save this MMS message as a Draft or MMS Template.
• Cancel Message
: Discard the current MMS message.
• Message Options
: Set options for all MMS messages. For
descriptions, see
“MMS Message Options”
on page 67.
Message Options allow you to define options for all messages
sent or received on your phone. To access message options, use
the following steps:
Text Message Options
1. Press the
Main Menu
key ➔
Main Menu 1
➔
Messages
.
2. Select
Messaging
from the pulldown menu at top left.
3. Tap the right soft key
Menu
➔
Text Message Options
to set
these options:
• Priority
: Choose whether messages are sent with Normal or Urgent
delivery.

Messaging Applications 67
• Auto Save Sent
: Saves sent messages sent to the Sent box.
Choose Yes, No or Prompt to be prompted to save each message.
• SMS Callback Number
: Includes a telephone number for
recipients to call you back; you can use your phone’s number or
enter a new number. Tap On or Off to enable or disable the option,
and enter/edit the number.
• Delivery Report
: Reports on the delivery status of your message (if
the recipient’s system supports this feature).
MMS Message Options
1. Press the
Main Menu
key ➔
Main Menu 1
➔
Messages
.
2. Select
Messaging
from the pulldown menu at top left.
3. Tap the right soft key
Menu
➔
MMS Options
.
• Sending
:
– Priority
: Set default priority for messages to Urgent, Normal or Low.
– Expiration
: Choose expiration period for outgoing messages, from
None, 6 Hours, 1 Day, 2 Days, 1 Week, 2 Weeks, or set a Custom time.
– Delivery time
: Choose whether messages are sent Immediately,
after 1 Hour, 1 Day or 1 Week.
– Message size
: Set the default maximum message size, from 95 KB,
300 KB, 495 KB or 1195 KB.
– Auto Save Sent
:
Saves sent messages to the Sent box. Choose
Yes, No or Prompt to be prompted to save each message.
– MMS Callback Number
:
Includes a telephone number for
recipients to call you back; you can use your phone’s number or
enter a new number. Tap On or Off to enable or disable the
option, and enter/edit the number.
– Request delivery report
: Request delivery report from the
recipient’s system.
– Request read report
: Request read report from recipient’s system.
• Receiving
:
– Home network
: For downloading of messages while on the home
network, choose Auto download, Manual or Reject.
– Roaming network
: For downloading of messages while not on the
home network, choose Auto download, Manual or Reject.
– Send delivery report
: Send a delivery report if requested by
recipient.
– Send read report
: Sends a read report when you read the message,
if requested by the recipient.
– Auto Erase
: Erases the oldest message of the same type when the
maximum number of messages of the type is exceeded in the Inbox.
• Advanced
: Choose
Warn before message type change
to have
the phone warn you when the message type changes from SMS to
MMS.
• About
: View information about Samsung messaging.
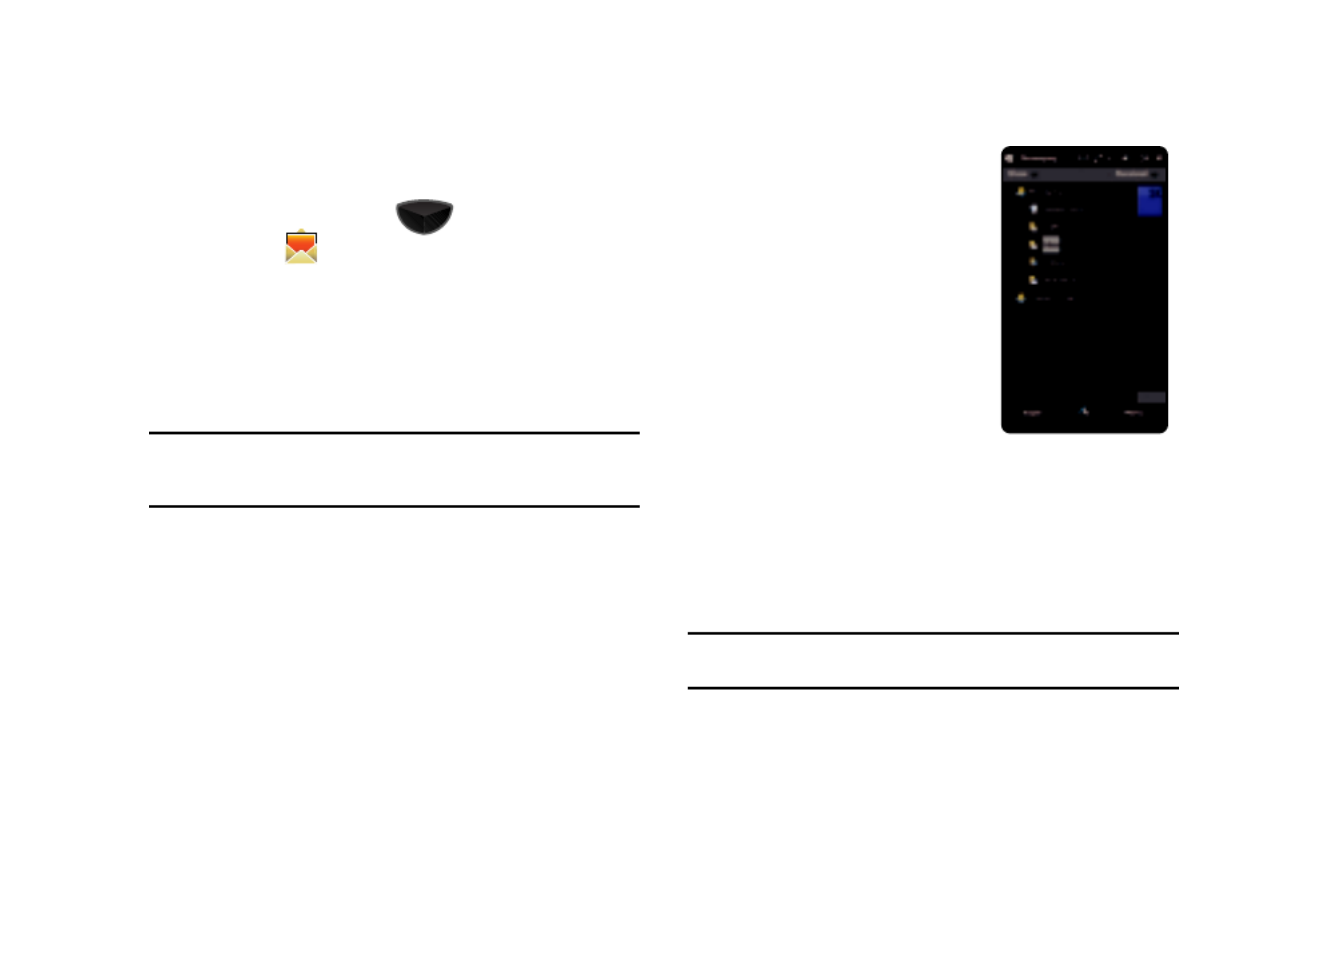
Messaging Applications 69
Message Folders
All messages are stored on the phone in the Message folders.
1. Press the
Main Menu
key ➔
Main Menu 1
➔
Messages
.
2. At the top left of the screen is an
Inbox
drop-down menu.
Tap this arrow to display a menu tree listing folders for the
following message types:
• Messaging
: text, picture and video messages
• Outlook E-mail
: e-mail from Outlook.
Note:
You can create additional e-mail accounts, which will be displayed as
separate message folders here. For more information, refer to “Using
an ISP for E-mail” on page 73.
3. Tap any of the folders within any of the account trees to
viewits contents.
4. Tap the drop-down menu at the top right of the screen to
sort the folder contents by
Message Type
,
From
field,
Received
date, or
Subject
.
The folders and their functions are similar to the folders in the
ActiveSync directory, except for Outbox. In ActiveSync, E-mail is
stored in the Outbox until you synchronize with your PC.
In Messaging, new messages are
stored in the Outbox folder until
message sending is complete.
There are five folder types in the
Messaging and Outlook E-mail
directories:
•
Deleted Items
: Messages deleted
from other folders. When removed
from the Deleted Items folder,
messages are permanently erased.
•
Drafts
: Incomplete messages, or
those saved to be sent later.
•
Inbox:
Incoming messages, which are stored in the Inbox until deleted.
If memory is full, new messages are rejected. Delete older messages
to free up space for incoming messages.
•
Outbox:
When you send a message, it is stored in the Outbox until the
message sent is complete.
•
Sent Items
: All sent messages selected for storage.
Note:
You can adjust the size of text displayed in Messaging in the Display
Settings. For more information, see
Text Size
on page 140.

72
• Message Info
: Shows you information about the message, such as
subject, date and time, senders email address or phone number,
size, expiration date, and message type.
• Save to Contacts
: Saves the sender’s information to Contacts.
• Save as MMS Template
: Saves the message as a template.
• Attachments:
View and/or save all attached media files.
• Call Sender
: Return a call to the sender of the message.
Note:
You can also touch and hold on a message to choose from a pop-up
menu of options.
Quick Text
Quick Text
is a default text phrase you can quickly insert into the
body of a new message or as a response to a received message.
Use the Quick Text as-is, or add your own text.
1. Create a new text message. For more information, refer to
“Creating and Sending Messages” on page 64.
2. Tap the right soft key
Menu
➔
Insert
➔
Quick Text
.
3. Tap a desired message from the list:
–
What’s up?
–
Wanna meet up?
–
Check this out!
–
Whatcha doin?
–
Want to get together later?
–
On my way
–
You’re the best!
–
Call me
–
I love you!
–
Miss you!
–
Where are you!
–
Good morning!
–
Good night
–
How are you?
–
Thanks
4. Tap
Select
. The selected Quick Text is inserted into the
body of the message. Use the Quick Text as-is, or add
your own text to complete the message.
5. To
edit
a Quick Text entry:
•
Tap the right soft key
Menu
➔
Insert
➔
Quick Text
.
•
Tap a
Quick Text
entry to highlight it.
•
Tap
Menu
➔
Edit Quick Text
.
•
Edit the
Quick Text
.
•
Tap to save your changes and return to the message.
6. To create a
new
Quick Text:
•
Tap the
Plus
button at the top right of the
Insert Quick Text
screen.

Messaging Applications 73
•
Enter the new
Quick Text
.
•
Press the left soft key
Done
to save the new
Quick Text
.
7. Tap the
Send
soft key to transmit your message to the
selected recipients.
E-mail
E-mail can be sent and received using Outlook via ActiveSync, or
you can use your ISP account.
Note:
For more information on how to wirelessly sync E-mail, refer to the
Wireless Sync documentation included on the Companion CD.
1. Press the
Main Menu
key ➔
Main Menu 1
➔
Email
.
2. The first time you access the E-Mail application:
•
Tap
Messaging
to view the Messaging folders.
•
Tap
Setup E-mail
to configure a new account.
3. After setting up your E-mail accounts, the E-Mail
application will take you directly to the folders for your
account(s).
Note:
You can adjust the size of text displayed in Messaging in the Display
Settings. For more information, see
Text Size
on page 140.
You can configure your Omnia II to send and receive E-mail
directly using an Internet Service Provider (ISP), without
connecting to your PC.
1. Press the
Main Menu
key ➔
Main Menu 1
➔
Email
.
2. Tap
Setup E-mail
to launch the E-mail Setup screen and
begin the setup process.
3. Follow the prompts to enter your account credentials and
complete the setup.

74
You can synchronize Outlook on your PC with your Omnia II using
ActiveSync, allowing you to read and compose e-mails off-line on
your Omnia II. E-mails composed off-line are sent the next time
you synchronize.
You’ll need to first install ActiveSync on your PC and set up a
Standard Partnership with your Omnia II, then synchronize your
Omnia II with your PC. For more information, refer to “Setting Up
a Partnership” on page 110.
1. Press the
Main Menu
key ➔
Main Menu 1
➔
Email
.
2. Choose
Outlook E-mail
from the pull-down
Folders
list at
the top left. You can see the Outlook folders that appear on
your PC.
3. To create a new E-mail, tap the right soft key
Menu
➔
New
.
When you’re finished, press the left soft key
Send
. The
E-mail will be sent the next time you synchronize with
AutoSync.
4. Tap
Menu
for options:
• New
: Create a new E-mail.
• Reply/Forward
: Choose Reply, Reply All or Forward.
• Mark as Read/Unread
: Change the status of the E-mail.
• Follow up
: Choose from Set Flag, Complete Flag or Clear Flag.
• Move...
: Move the message to other folders.
• Go to
: Navigate to Folders, Messaging, or Outlook E-mail.
• Tools
:
–
Sort by
: Choose sort method for message lists.
–
Manage Folders
: Choose folders for synchronization. Tap and hold a
folder name to create a new folder, or modify an existing folder.
–
New Account...
: Allows you to set up a new Outlook E-mail account.
–
Options...
: Displays Security..., Signature...and Account options.
• Select Messages
: Choose All, All Below the highlighted message,
or Several.
• Send/Receive
: Activate AutoSync (if Omnia II is connected to PC)
and send and receive messages.
Messaging Applications 75
Mobile Email
The Mobile Email application provides access to personal email
services like Yahoo, Windows Live, and AOL.
Note:
Contact Verizon Wireless for more information, or to purchase Mobile
Email service.
1. Press the
Main Menu
key ➔
Main Menu 2
➔
Mobile Email
.
2. Click on the
Download Email & Web for Smartphone
link to
download and install the Mobile Email application on your
phone.
3. Follow the prompts to enter your credentials for your ISP
E-mail provider.
Mobile IM
The Instant Messaging function allows you to send and receive
instant messages using one of the following communities:
•
AIM™
•
WL Messenger
•
Yahoo!
®
Note:
You must first create the Instant Message account before accessing it
on your phone.
1. Press the
Main Menu
key ➔
Main Menu
2
➔
Mobile IM
.
2. Tap
Accept
to accept the Mobile IM Terms and Conditions.
3. Select your instant message community and use the
community-specific functions and options for the instant
message applications.

76
Section 9: Multimedia and Music Applications
The applications described in this section allow you to manage,
play and view multimedia content, such as music and videos.
Media Player
Media Player
offers a single interface to play and view your music
and video files.
1. Press the
Main Menu
key ➔
Main Menu 1
➔
Media
Player
.
2. Media Player prompts you to
search for new files by
tapping the left soft key
Search
. Searched files are
added to Media Player’s
library. Click
Done
to display
the Library.
3. Rotate the phone to Landscape mode, to scroll through a
3-D array of items.
4. Media files are displayed on five tabs in the Library:
Standard Mode
All Music
: All music files in the Library.
Album
: Music sorted by album.
Artist
: Music sorted by artist.
Video
: All videos.
Playlist
: Playlists you’ve created.
Landscape Mode

Multimedia and Music Applications 77
You can rotate the phone to landscape mode for optimal viewing
of the Library or watching videos. When viewing the Library,
items are displayed in a scroll view. In scroll view, you can swipe
to scroll through the selections, using your finger or the stylus.
On the
All Music
,
Albums
, and
Artist
tabs, album covers
are displayed.
On the
Videos
tab,
videos are
displayed as DVD
covers.
1. Press the
Main Menu
key ➔
Main Menu 1
➔
Media Player
.
2. Tap a tab to list items,
then tap an item to
play it.
3. Tap
Play/Pause
to start
and stop playing.
4. Tap
Back
to move to
the previous file.
Touch and hold
Back
to scan backward
through the file.
5. Tap
Forward
to move
to the next file. Touch
and hold
Forward
to scan forward through the current file.
To adjust the playing volume, tap
Volume
, then drag the
slider to the desired level.
Note:
You can also adjust volume using the Volume key on the side of the
phone.
Now
Volume
Back
Play/Pause Forward
Settings
Playing

78
6. Tap
Menu
for these options:
•
V CAST Music Rhapsody
: Launches V CAST Music with Rhapsody.
•
V CAST Videos
: Launches V CAST Videos.
• Play via Connected Home
: Streams multimedia files from memory
to other Digital Living Network Alliance (DLNA) certified devices.
Note:
For more information, refer to
“Connected Home” on page 88.
• Set as Ringtone
: Sets the selected audio file as a ringtone.
• Audio Effect
: Choose to use DNSe or SRS audio effects, or None.
Some options are only available when using headphones or
headset.
• Update
: Search for new audio and video files on your Omnia II.
•
Options
: Set Resume playback after a phone call, Pause playback
while using another program, Show time as, and Image ratio
adjustment.
• Properties
: Displays properties for this media file.
• Exit
: Closes the Media player.
7. Tap
Settings
to customize your playback:
•
Tap
DNSe
to select Digital
Natural Sound engine
settings: Normal, Rock,
Jazz, Live, Classic, Full
Bass, Concert Hall, Wide,
Bass Enhancement, Music
Clarity, Externalization, or
m-Theater Movie.
•
Tap
SRS
to set SRS audio
effects: Normal, WoW HD
for improved playback
quality, or CS-HP (CS
Headphone), available
when using headphones or
headset).
•
Tap
Shuffle and Repeat
to
set the play mode: Normal, Repeat 1, Repeat All, or Shuffle.
•
Tap
A-B Repeat
to set a repeat period: A->B sets the start point.
A<->B sets the end point. A-B plays through the entire track.
DNSe
SRS
Shuffle and A-B
Repeat Repeat

Multimedia and Music Applications 79
1. Tap
Menu
➔
New Playlist
.
2. Tap
Name
to enter a name for the new playlist.
3. Tap
Photo
to assign a photo to the playlist, if desired.
4. Click the left soft key
Done
to
create the playlist. The new
playlist appears in the Playlists
tab of Media Player.
5. While viewing the list of
playlists, tap
Menu
for these
options:
• New Playlist
: Create a new
playlist by entering a Name and
selecting a photo, if desired. Tap
Done
when finished.
• Delete
: Mark playlists for removal, then tap
Done
to delete them.
• Add to Now Playing
: Choose playlists to play, then tap
Done
.
• Options
: Make general playlist selections, including Resume
playback after a phone call, Pause playback while using another
program, Show time as, and Image ratio adjustment. After making
selections, tap
Done
to save your changes.
• Exit
: Close Media Player
Add Songs to a Playlist
1. Press the
Main Menu
key ➔
Main Menu 1
➔
Media Player
➔
Playlist
.
2. Tap a playlist, then tap
Add
to choose songs from the
Library
.
Add Songs from the Library to a Playlist
1. Press the
Main Menu
key ➔
Main Menu 1
➔
Media Player
.
2. Tap the right soft key
Menu
➔
Add to Playlist
.
3. Tap song(s) you want to add, then tap the left soft key
Done
.
4. Tap the playlist to add the selected songs.

Multimedia and Music Applications 81
Mini Player Widget
1. Tap the
Mini Player
widget
on the Widget Bar to move the
widget to a home screen.
2. When the Media Player is active,
the song title is displayed, and
you can use the
Back
,
Play/
Pause
and
Forward
controls
Tap the
Mini Player
widget to go
to Media Player.
Task Switcher
Note:
For more information, see “Task Switcher Playback Controls” on
page 102.
䊳
Press and hold the
Main Menu
key to launch T
ask
Switcher
.
– or –
䊳
Press the
Main Menu
key , then tap the center soft key
Task Switcher
.
Lock Screen
The
lock screen
offers playback
controls when music is playing and the
display is locked.
1. Album art, song title, and
elapsed time are displayed.
2. To display Volume, Back, Play/
Pause and Forward controls for 5
seconds:
•
Swipe your finger or stylus from the
top of the screen toward the center.
•
Press the Main Menu button.

Multimedia and Music Applications 83
Install V CAST Music with Rhapsody on your PC
V CAST Music wth Rhapsody
is compatible with Windows
®
Vista,
XP or 2000 (32-bit versions only). MacOS and Linux are not
supported. See complete system requirements and download V
CAST Music with Rhapsody for free at
www.verizonwireless.com/
music
. Follow the online instructions and prompts to install V
CAST Music with Rhapsody.
1. Open
V CAST Music with Rhapsody
and log in.
2. Once logged in, you can:
•
Download a PC copy of a track purchased over the air.
•
Purchase songs or albums.
•
Add subscription music to your Library.
To download a PC copy:
Note:
For each V CAST Music with Rhapsody track you’ve downloaded to
your phone, you can download a copy to your computer at no
additional charge.
•
Tracks available for download will pop up upon log-in completion.
•
Check the boxes of songs you wish to download.
•
Select Download Tracks.
To purchase music:
•
Browse the catalog and select the track or album you wish to
purchase.
•
Re-enter your password.
•
Confirm the purchase, and the download will begin shortly.
To add subscription music:
•
Add music to your collection by simply dragging and dropping it to
My Library or, if connected, your V CAST Music with Rhapsody
subscription-cabable device (both found under Sources). This can
also easily be done by clicking on the Add button next to each song.
With your Omnia II and
V CAST Music with Rhapsody
installed on
your PC, you can sync your music from your PC to your phone.
Note:
To transfer licensed music from your PC to your Omnia II, you must
install V CAST Music with Rhapsody and either Microsoft ActiveSync
(for Windows versions prior to Windows Vista) or Windows Mobile
Device Center (for Windows Vista) on your PC.
Note:
For best syncing results for non-Windows 7 users, install the patch
available at:
http://support.microsoft.com/kb/935551
.
1. Open
V CAST Music with Rhapsody
on your PC.
84
2. Plug the USB cable into your phone and connect it to a USB
port on your PC.
3. Allow ActiveSync or Windows Mobile Device Center to
recognize your device. Your device is now available under
Sources
.
4. Drag and drop the song(s) you want to sync from
My
Library
to your V CAST mobile phone, listed under
Sources
.
5. Once synchronization is complete, right-click on the device
name and select
Disconnect
and click
OK
. You can now
safely disconnect the USB cable from the USB port on your
PC.
V CAST Song ID
V CAST Song ID
provides the title, artist and album for virtually
any recorded music.
1. Press the
Main Menu
key ➔
Main Menu 2
➔
V CAST Song ID
.
2. The first time you start V CAST Song ID, you’ll be prompted
to download and install the application. Follow the
prompts to install and use V CAST Song ID.
Note:
Airtime or download charges may apply for using V CAST Song ID.
VZW Tones
VZW Tones
allows you to preview, download and manage sound
clips of your favorite songs as ring tones for your Omnia II.
1. Press the
Main Menu
key ➔
Main Menu 2
➔
VZW Tones
.
2. The first time you start VZW Tones, you’ll be prompted to
download and install the application. Follow the prompts
to install and use VZW Tones.
Note:
Airtime or download charges may apply for using VZW Tones.

86
Streaming Player
Streaming Player
provides a handy way to view streaming video
content, right on your Omnia II.
Note:
Use Streaming Player to play YouTube videos when accessing the
YouTube mobile site.
1. Press the
Main Menu
key ➔
Main Menu 5
➔
Streaming Player
.
2. Tap
Menu
➔
Open
to enter the URL for the streaming
website. Tap
Connect
to connect to the server.
3. While viewing video, tap
Menu
for additional options:
• Full Screen
: Display video on full screen.
• Auto Full Screen
: Show videos full-screen automatically.
• Effect:
Select video effects.
• Options
: Set RTSP and Proxy settings.
• Properties
: Display information about the current video.
• About
: Display information about Streaming Player.
• Exit
: Close Streaming Player.
VZ Navigator
VZ Navigator
uses GPS positioning to tell you where you are,
what’s nearby, and to give you directions - quickly and easily.
With audible turn-by-turn directions, you can locate nearly
fourteen million points of interest in the U.S., including
landmarks, restaurants, and even ATMs.
Note:
VZ Navigator requires service activation. Airtime or download charges
may apply for using VZ Navigator. Contact Verizon Wireless for more
information.
䊳
Tap the
VZ Navigator
widget .
– or –
䊳
Press the
Main Menu
key ➔
Main Menu 1
➔
VZ Navigator
.
The first time you start VZ Navigator, you’ll be prompted to
download and install the application. Follow the prompts to
install VZ Navigator.
Tip:
You must have enabled
GPS Location On
to use VZ Navigator. For
information about enabling this setting see
General Settings
➔
GPS
on
page 141
Multimedia and Music Applications 87
FM Radio
FM Radio
allows you to listen to your favorite radio stations with
your phone.
Note:
To use FM Radio, you must plug the included FM antenna/Microphone
adapter into the Headset Jack on the side of the phone.
To activate
FM Radio
via widget:
1. From the
Widget Bar
, tap the
FM Radio
widget to
move it
to the
home screen
.
2. Tap the widget to open
FM Radio
.
To activate
FM Radio
from the Main Menu:
1. Press the
Main Menu
key ➔
Main Menu 3
➔
FM Radio
.
2.
FM Radio
will automatically begin a scan for radio stations.
FM Radio Controls
Use these controls to play radio stations:
•
Scanning
:
–
To
automatically scan
for channels and save them as favorites, tap the
left soft key
Scan
.
–
To
manually scan
available channels, drag the tuner’s slider or tap the
Plus
and
Minus
icons. To save a favorite, tap a favorite button
.
•
To adjust the volume, tap
Volume
, then drag the slider on the
scale.
•
To switch sound output between the headphones/headset and the
phone’s speaker, tap
Headphone /Speaker
.
•
To record from the radio, tap the right soft key
Menu
➔
Record
.
FM Radio Options
Tap the right soft key
Menu
➔
Options
for these settings:
•
Tap
Region
to select a geographical location.
•
Tap
Alternative Frequency
to use an alternative frequency.
•
Tap
Turn radio off while using another program
to have FM Radio
automatically turned off when you open another program.
•
Tap
Turn radio on again after a phone cal
l to have FM Radio
automatically turn on after you end a call.
•
Tap
Record location
to set a default storage location when recording
from the radio.
Choose from:
My Storage
,
My Device
,
Storage Card

Multimedia and Music Applications 89
Video Editor
Video Editor allows you to create custom, interactive slide shows
with music and effects.
䊳
Press the
Main Menu
key ➔
Main Menu 5
➔
Video Editor
.
Use Storyboard to create a multimedia slide show using pictures,
videos and music stored on your phone.
1. Tap
Storyboard
to start a new storyboard.
2. Tap
Select Media
to choose pictures and video.
3. Tap
Set BGM
to choose background music.
4. Tap
Add Text
to create a slide to display text.
5. Use
Clip Manager
to arrange pictures and videos.
6. Tap
Settings
for these options:
• Resolution
: Automatic, 176X144, 320X240 or 640X480.
• Save Mode
: Normal, or MMS (176X144)
• Save in
: My Device, My Storage, or Storage Card.
7. When you are finished, tap
Next
to
Preview
the storyboard.
8. Tap
Save
to save the slide show.
Select Media Set BGM Add Text Clip Manager
Back Next

Document Applications 93
MS Word Mobile works with Microsoft Word on your computer to
give you easy access to copies of your documents. You can
create new documents or copy documents from your computer
to your Omnia II. Synchronize the documents between your
computer and your Omnia II to ensure you have the most up-to-
date content in both locations.
Create a New Document
1. Press the
Main Menu
key ➔
Main Menu 4
➔
MS
Word Mobile
.
2. Tap the left soft key
New
.
Note:
If this is the first document being created, you will automatically be in a
new document screen.
3. Enter text using the desired character input method.
4. When finished, tap to save and exit.
You can open one document at a time. If you try to open a second
document, the first is saved automatically and closed. Using the
Menu
➔
File
➔
Save As
menu, you can save a document in one
of these formats:
•
Word Document (*.docx)
•
Word Template (*.dotx)
•
Rich Text Format (*.rtf)
•
Plain Text (*.txt)
Word Mobile options
1. Press the
Main Menu
key ➔
Main Menu 4
➔
MS
Word Mobile
.
2. Tap the right soft key
Menu
➔
Options...
. The following
options are available:
Note:
While viewing a document access the
Options
menu by tapping
Menu
➔
Tools
➔
Options...
• Default template
- Allows you to select: Word Document (.docx),
Meeting Notes, Memo, Phone Memo, To Do and Word 97-2003
Document (.doc) as the default document.
• Save to
- Allows you to select Main memory or My storage as the
default document storage location.
• Display in list view
- Allows you to display Word Files, Rich Text
Files, Plain Text Files, All Known File Types.
3. When finished, tap to save and exit.

Personal Information Applications 95
Section 11: Personal Information Applications
The applications described in this section allow you to schedule
appointments, view the calendar, create task lists, set an alarm,
perform simple math calculations, and set up your phone to
synchronize your files and folders with your desktop PC.
Owner Information is where you can store information on the
owner or user of the device. Name, Company, Address,
Telephone, E-mail, and Notes information fields are available.
1. Press the
Main Menu
key ➔
Settings
➔
Basic Settings
tab ➔
General Settings
➔
Owner
Information
.
2. Tap
Identification
, then enter information for these fields:
• Name
• Company
• Address
• Telephone number
• Email address
Note:
For more information, refer to “Entering Text” on page 52.
3. Tap
Notes
to enter any notes applicable to the owner.
4. Tap
Device Name
to enter a name for your Omnia II. Device
name is used when communicating with other devices.
5. Tap
Lock Screen
to set locking options:
•
Tap
Lock when display times out
to toggle screen lock.
•
Tap
Edit lock screen
to customize the screen displayed when the
phone is locked.
•
Tap
Display Owner Information on lock screen
to toggle display
of owner information, then tap
Owner Information
to enter/confirm
the information from Step 2.
Smart Search
Smart Search provides a single search tool to find all kinds of
information on your Omnia II device, including Contacts, Calls,
Video, Image or Music files, Scheduled events, Messages, or
Applications.
1. Press the
Main Menu
key ➔
Main Menu 4
➔
Smart Search
.
2. Enter keyword(s) in the search field and tap
Search
.
To narrow the search to a specific type of information, tap
the
Select items
field and choose from All, Contact, Call
Log, Video, Image, Music, Schedule, Message or Program.
Specyfikacje produktu
| Marka: | Samsung |
| Kategoria: | smartfon |
| Model: | OMNIA |
| Kolor produktu: | Biały |
| Położenie urządzenia: | Wolnostojący |
| Wysokość produktu: | 845 mm |
| Szerokość produktu: | 494 mm |
| Głębokość produktu: | 494 mm |
| Roczne zużycie energii: | 146 kWh |
| Pojemność brutto: | 102 l |
| Światło wewnątrz lodówki: | Tak |
| Automatyczne rozmrażanie (lodówka): | Tak |
| Liczba półek w lodówce: | 3 |
| Wbudowana zamrażarka: | Nie |
Potrzebujesz pomocy?
Jeśli potrzebujesz pomocy z Samsung OMNIA, zadaj pytanie poniżej, a inni użytkownicy Ci odpowiedzą
Instrukcje smartfon Samsung

30 Marca 2025
27 Stycznia 2025
27 Stycznia 2025
24 Stycznia 2025
11 Stycznia 2025
19 Grudnia 2024
9 Października 2024
9 Października 2024
9 Października 2024
5 Października 2024
Instrukcje smartfon
- smartfon Sony
- smartfon AEG
- smartfon LG
- smartfon Motorola
- smartfon Xiaomi
- smartfon MyPhone
- smartfon Sharp
- smartfon Huawei
- smartfon TCL
- smartfon Lenovo
- smartfon TP-Link
- smartfon Philips
- smartfon SilverCrest
- smartfon Gigabyte
- smartfon Acer
- smartfon Realme
- smartfon Gigaset
- smartfon Geemarc
- smartfon Nokia
- smartfon Hisense
- smartfon Infiniton
- smartfon Panasonic
- smartfon Mio
- smartfon Asus
- smartfon Nedis
- smartfon Medion
- smartfon OK
- smartfon Audioline
- smartfon Toshiba
- smartfon Tesla
- smartfon Alcatel-Lucent
- smartfon Majestic
- smartfon Bluebird
- smartfon Garmin
- smartfon Blaupunkt
- smartfon Profoon
- smartfon Vivax
- smartfon Evolveo
- smartfon Alcatel
- smartfon Haier
- smartfon HP
- smartfon Hyundai
- smartfon Honeywell
- smartfon Honor
- smartfon Kodak
- smartfon ZTE
- smartfon MaxCom
- smartfon Dell
- smartfon Google
- smartfon Intex
- smartfon Oppo
- smartfon Kyocera
- smartfon Krüger&Matz
- smartfon Qilive
- smartfon Thomson
- smartfon Manta
- smartfon Apple
- smartfon NGS
- smartfon CRUX
- smartfon Emporia
- smartfon Nevir
- smartfon Mitsubishi
- smartfon Razer
- smartfon GoClever
- smartfon SPC
- smartfon Intermec
- smartfon NEC
- smartfon Polaroid
- smartfon Prestigio
- smartfon Aiwa
- smartfon Sanyo
- smartfon Telefunken
- smartfon OnePlus
- smartfon Amazon
- smartfon Olympia
- smartfon Microsoft
- smartfon Bush
- smartfon HTC
- smartfon CAT
- smartfon Denver
- smartfon Saiet
- smartfon Albrecht
- smartfon RCA
- smartfon Media-Tech
- smartfon BenQ
- smartfon Trevi
- smartfon Lexibook
- smartfon Overmax
- smartfon Micromax
- smartfon Sencor
- smartfon NUU Mobile
- smartfon Alecto
- smartfon Binatone
- smartfon Hammer
- smartfon Allview
- smartfon Oukitel
- smartfon Best Buy
- smartfon Cyrus
- smartfon Kazam
- smartfon Tecdesk
- smartfon KPN
- smartfon Swissvoice
- smartfon I.safe Mobile
- smartfon TrekStor
- smartfon Brondi
- smartfon Fysic
- smartfon Wiko
- smartfon Yarvik
- smartfon Aligator
- smartfon Amplicomms
- smartfon AQISTON
- smartfon Amplicom
- smartfon Archos
- smartfon Androidtech
- smartfon Crosscall
- smartfon Ecom
- smartfon Sony Ericsson
- smartfon Vestel
- smartfon Sonim
- smartfon Energy Sistem
- smartfon Doro
- smartfon Sagem
- smartfon Lava
- smartfon Blu
- smartfon Easypix
- smartfon Konrow
- smartfon Brigmton
- smartfon Sunstech
- smartfon Aspera
- smartfon Sunny
- smartfon Nordmende
- smartfon Blackberry
- smartfon Vivo
- smartfon Wolder
- smartfon NGM
- smartfon Vodafone
- smartfon Switel
- smartfon InFocus
- smartfon GreatCall
- smartfon XD
- smartfon Pantech
- smartfon Alba
- smartfon RugGear
- smartfon Umidigi
- smartfon AT&T
- smartfon Mpman
- smartfon Bury
- smartfon Logicom
- smartfon Karbonn
- smartfon Palm
- smartfon Hannspree
- smartfon Phicomm
- smartfon Plum
- smartfon Lumigon
- smartfon Infinix
- smartfon Keneksi
- smartfon Klipad
- smartfon Iget
- smartfon T-Mobile
- smartfon JCB
- smartfon Casper
- smartfon Unnecto
- smartfon Wileyfox
- smartfon ITT
- smartfon Yota
- smartfon Avus
- smartfon Spice
- smartfon Wolfgang
- smartfon BQ
- smartfon ORA
- smartfon Danew
- smartfon Echo
- smartfon Primux
- smartfon Tiptel
- smartfon UTStarcom
- smartfon Zipy
- smartfon Mediacom
- smartfon Beafon
- smartfon BGH
- smartfon Billow
- smartfon Telstra
- smartfon Ulefone
- smartfon CSL
- smartfon ToughGear
- smartfon Benefon
- smartfon Komu
- smartfon Doogee
- smartfon Energizer
- smartfon Tremay
- smartfon Kurio
- smartfon Piranha
- smartfon Coolpad
- smartfon Syco
- smartfon TAG Heuer
- smartfon Mobistel
- smartfon Itel
- smartfon Garmin-Asus
- smartfon Handheld
- smartfon Fero
- smartfon AT Telecom
- smartfon Xtreamer
- smartfon Verykool
- smartfon O2
- smartfon General Mobile
- smartfon Mustang
- smartfon Kogan
- smartfon Pharos
- smartfon Storex
- smartfon Fairphone
- smartfon Freeman
- smartfon HomTom
- smartfon Leotec
- smartfon Auro
- smartfon Maxx
- smartfon ITTM
- smartfon Posh Mobile
- smartfon THL
- smartfon NGM-Mobile
- smartfon POCO
- smartfon Nothing
- smartfon Lark
- smartfon Senifone
- smartfon Tecno
- smartfon Telme
- smartfon UMi
- smartfon Olitech
- smartfon Mobiola
- smartfon Meizu
- smartfon Neffos
- smartfon Gionee
- smartfon TIM
- smartfon Cubot
- smartfon Leagoo
- smartfon NTech
- smartfon Nubia
- smartfon LeEco
- smartfon GSmart
- smartfon Bea-fon
- smartfon Opticon
- smartfon EStar
- smartfon Facom
- smartfon Jitterbug
- smartfon Custom
- smartfon Aplic
- smartfon HMD
- smartfon Opis
- smartfon Volla
- smartfon Nothing Tech
- smartfon Maxwest
- smartfon Kalley
Najnowsze instrukcje dla smartfon

2 Kwietnia 2025
10 Marca 2025
7 Marca 2025
5 Marca 2025
5 Marca 2025
3 Marca 2025

2 Marca 2025

26 Lutego 2025
26 Lutego 2025
26 Lutego 2025