Instrukcja obsługi Samsung GQ75Q67TGU
Przeczytaj poniżej 📖 instrukcję obsługi w języku polskim dla Samsung GQ75Q67TGU (108 stron) w kategorii Telewizja. Ta instrukcja była pomocna dla 7 osób i została oceniona przez 2 użytkowników na średnio 4.5 gwiazdek
Strona 1/108

Thank you for purchasing this Samsung product.
To receive more complete service, please register your product at www.samsung.com
Model Serial No.
USER MANUAL
Q87T Q85T Q84T Q80T
Q67T Q65T Q64T Q60T
Q77T Q75T Q74T Q70T

English - 2
Before Reading This User Manual
This TV comes with this user manual and an embedded e-Manual.
Before reading this user manual, review the following:
User Manual Read this provided user manual to see information
about product safety, installation, accessories,
initial configuration, and product specifications.
e-Manual For more information about this TV, read the
e-Manual embedded in the product.
•To open the e-Manual,
> > > Settings Support Open e-Manual
On the website (www.samsung.com), you can download the manuals and see its contents on your PC or mobile
device.
Learning the e-Manual's assistance functions
•Some menu screens cannot be accessed from the e-Manual.
Search Select an item from the search results to load the corresponding page.
Index Select a keyword to navigate to the relevant page.
– The menus may not appear depending on the geographical area.
Site Map It displays the lists for each item in e-Manual.
Recently Viewed
Topics Select a topic from the list of recently viewed topics.
Learning the functions of the buttons that appear on e-Manual topic
pages
Try Now Allows you to access the corresponding menu item and try out the feature
right away.
Link Access an underlined topic referred to on an e-Manual page immediately.

English - 3
English
Warning! Important Safety Instructions
Please read the Safety Instructions before using your TV.
Refer to the table below for an explanation of symbols which may be on your Samsung product.
CAUTION Class II product: This symbol indicates that a
safety connection to electrical earth (ground)
is not required. If this symbol is not present on
a product with a mains lead, the product MUST
have a reliable connection to protective earth
(ground).
RISK OF ELECTRIC SHOCK. DO NOT OPEN.
CAUTION: TO REDUCE THE RISK OF ELECTRIC SHOCK, DO
NOT REMOVE COVER (OR BACK). THERE ARE NO USER
SERVICEABLE PARTS INSIDE. REFER ALL SERVICING TO
QUALIFIED PERSONNEL.
AC voltage: Rated voltage marked with this
symbol is AC voltage.
This symbol indicates that high voltage is
present inside. It is dangerous to make any kind
of contact with any internal part of this product.
DC voltage: Rated voltage marked with this
symbol is DC voltage.
This symbol indicates that this product has
included important literature concerning
operation and maintenance.
Caution. Consult instructions for use: This
symbol instructs the user to consult the user
manual for further safety related information.
•The slots and openings in the cabinet and in the back or bottom are provided for necessary ventilation. To
ensure reliable operation of this apparatus and to protect it from overheating, these slots and openings
must never be blocked or covered.
– Do not place this apparatus in a confined space, such as a bookcase or built-in cabinet, unless proper
ventilation is provided.
– Do not place this apparatus near or over a radiator or heat register, or where it is exposed to direct
sunlight.
– Do not place vessels (vases etc.) containing water on this apparatus, as this can result in a fire or
electric shock.
•Do not expose this apparatus to rain or place it near water (near a bathtub, washbowl, kitchen sink, or
laundry tub, in a wet basement, or near a swimming pool, etc.). If this apparatus accidentally gets wet,
unplug it and contact an authorised dealer immediately.
•This apparatus uses batteries. In your community, there might be environmental regulations that require
you to dispose of these batteries properly. Please contact your local authorities for disposal or recycling
information.
•Do not overload wall outlets, extension cords, or adaptors beyond their capacity, since this can result in fire
or electric shock.
•Power-supply cords should be placed so that they are not likely to be walked on or pinched by items placed
upon or against them. Pay particular attention to cords at the plug end, at wall outlets, and at the point
where they exit from the appliance.

English - 4
•To protect this apparatus from a lightning storm, or when left unattended and unused for long periods of
time, unplug it from the wall outlet and disconnect the antenna or cable system. This will prevent damage
to the set due to lightning and power line surges.
•Before connecting the AC power cord to the DC adaptor outlet, make sure that the voltage designation of
the DC adaptor corresponds to the local electrical supply.
•Never insert anything metallic into the open parts of this apparatus. This may cause a danger of electric
shock.
•To avoid electric shock, never touch the inside of this apparatus. Only a qualified technician should open
this apparatus.
•Be sure to plug in the power cord until it is firmly seated. When unplugging the power cord from a wall
outlet, always pull on the power cord's plug. Never unplug it by pulling on the power cord. Do not touch the
power cord with wet hands.
•If this apparatus does not operate normally - in particular, if there are any unusual sounds or smells coming
from it - unplug it immediately and contact an authorised dealer or Samsung service centre.
•Be sure to pull the power plug out of the outlet if the TV is to remain unused or if you are going to leave the
house for an extended period of time (especially when children, elderly, or disabled people will be left alone
in the house).
– Accumulated dust can cause an electric shock, an electric leakage, or a fire by causing the power cord
to generate sparks and heat or by causing the insulation to deteriorate.
•Be sure to contact an authorised Samsung service centre for information if you intend to install your TV in
a location with heavy dust, high or low temperatures, high humidity, chemical substances, or where it will
operate 24 hours a day such as in an airport, a train station, etc. Failure to do so may lead to serious damage
to your TV.
•Use only a properly grounded plug and wall outlet.
– An improper ground may cause electric shock or equipment damage. (Class l Equipment only.)
•To turn off this apparatus completely, disconnect it from the wall outlet. To ensure you can unplug this
apparatus quickly if necessary, make sure that the wall outlet and power plug are readily accessible.
•Store the accessories (batteries, etc.) in a location safely out of the reach of children.
•Do not drop or strike the product. If the product is damaged, disconnect the power cord and contact a
Samsung service centre.
•To clean this apparatus, unplug the power cord from the wall outlet and wipe the product with a soft, dry
cloth. Do not use any chemicals such as wax, benzene, alcohol, thinners, insecticide, aerial fresheners,
lubricants, or detergents. These chemicals can damage the appearance of the TV or erase the printing on
the product.
•Do not expose this apparatus to dripping or splashing.
•Do not dispose of batteries in a fire.
•Do not short-circuit, disassemble, or overheat the batteries.
•CAUTION: There is danger of an explosion if you replace the batteries used in the remote with the wrong
type of battery. Replace only with the same or equivalent type.
* Figures and illustrations in this User Manual are provided for reference only and may differ from the actual
product appearance. Product design and specifications may change without notice.
CIS languages (Russian, Ukrainian, Kazakhs) are not available for this product, since this is manufactured for
customers in EU region.

English - 6
01 What's in the Box?
Make sure the following items are included with your TV. If any items are missing, contact your dealer.
•Samsung Smart Remote & Batteries
•Remote Control & Batteries (Not available in some
locations)
•User Manual
•Warranty Card / Regulatory Guide (Not available in
some locations)
•TV Power Cable
CI Card Adapter
•The items’ colours and shapes may vary depending on the models.
•Cables not included can be purchased separately.
•Check for any accessories hidden behind or in the packing materials when opening the box.
•The type of battery may vary depending on the model.
An administration fee may be charged in the following situations:
(a) An engineer is called out at your request, but it is found that the product has no defect (i.e., where the
user manual has not been read).
(b) You bring the unit to the Samsung service centre, but it is found that the product has no defect (i.e.,
where the user manual has not been read).
You will be informed of the administration fee amount before a technician visits.
Warning: Screens can be damaged from direct pressure
when handled incorrectly. We recommend lifting the
TV at the edges, as shown.
Do Not Touch
This Screen!

English - 7
English
02 TV Installation
Mounting the TV on a wall
If you mount this TV on a wall, follow the instructions exactly as set out by the manufacturer. Unless
it is correctly mounted, the TV may slide or fall and cause serious injury to a child or adult and
serious damage to the TV.
•Refer to the installation manual included with the Samsung wall mount kit.
•You can mount the TV on the wall using a wall mount kit (sold separately).
TVWall mount bracket
C
•Samsung Electronics is not responsible for any damage to the product or injury to yourself or others if you
choose to install the wall mount on your own.
•You can install your wall mount on a solid wall perpendicular to the floor. Before attaching the wall mount
to surfaces other than plaster board, contact your nearest dealer for additional information. If you install
the TV on a ceiling or slanted wall, it may fall and result in severe personal injury.
•Standard dimensions for wall mount kits are shown in the table on the next page.
•If you are installing a third-party wall mount, note that the length of the screws you can use to attach the
TV to the wall mount is shown in column C in the table on the next page.
•When installing a wall mount kit, we recommend you fasten all four VESA screws.
•If you want to install a wall mount kit that attaches to the wall using two top screws only, be sure to use a
Samsung wall mount kit that supports this type of installation. (You may not be able to purchase this type
of wall mount kit, depending on the geographical region.)

English - 8
TV size in
inches
VESA screw hole specs (A * B)
in millimetres C (mm) Standard
Screw Quantity
43-55 200 x 200
39-41
*26-28
M8 4
58-65 400 x 300
75 400 x 400
85 600 x 400 39-41
*25-27
*: These specifications are supported by Q80T, Q84T, Q85T, Q87T.
Do not install your wall mount kit while your TV is turned on. This may result in personal injury from
electric shock.
•Do not use screws that are longer than the standard dimension or do not comply with the VESA standard
screw specifications. Screws that are too long may cause damage to the inside of the TV set.
•For wall mounts that do not comply with the VESA standard screw specifications, the length of the screws
may differ depending on the wall mount specifications.
•Do not fasten the screws too firmly. This may damage the product or cause the product to fall, leading to
personal injury. Samsung is not liable for these kinds of accidents.
•Samsung is not liable for product damage or personal injury when a non-VESA or non-specified wall mount
is used or when the consumer fails to follow the product installation instructions.
•Do not mount the TV at more than a 15 degree tilt.
•Always have two people mount the TV onto a wall.
– For 82 inch or larger models, have four people mount the TV onto a wall.
Providing proper ventilation for your TV
When you install your TV, maintain a distance of at least 10 cm between the TV and other objects (walls, cabinet
sides, etc.) to ensure proper ventilation. Failing to maintain proper ventilation may result in a fire or a problem
with the product caused by an increase in its internal temperature.
•When you install your TV with a stand or a wall mount, we strongly recommend you use parts provided by
Samsung Electronics only. Using parts provided by another manufacturer may cause difficulties with the
product or result in injury caused by the product falling.
Installation with a stand Installation with a wall mount
10 cm10 cm
10 cm 10 cm
10 cm
10 cm10 cm

English - 9
English
Safety Precaution: Securing the TV to the wall to prevent falling
Caution: Pulling, pushing, or climbing on the TV may cause the TV to fall. In particular,
ensure your children do not hang on or destabilise the TV. This action may cause the TV
to tip over, causing serious injuries or death. Follow all safety precautions provided in the
Safety Flyer included with your TV. For added stability and safety, you can purchase and
install the anti-fall device as described on the next page.
WARNING: Never place a television set in an unstable location. The television set may fall, causing
serious personal injury or death. Many injuries, particularly to children, can be avoided by taking
simple precautions such as:
•Always use cabinets or stands or mounting methods recommended by the manufacturer of the
television set.
•Always use furniture that can safely support the television set.
•Always ensure the television set is not overhanging the edge of the supporting furniture.
•Always educate children about the dangers of climbing on furniture to reach the television set
or its controls.
•Always route cords and cables connected to your television so they cannot be tripped over,
pulled or grabbed.
•Never place a television set in an unstable location.
•Never place the television set on tall furniture (for example, cupboards or bookcases) without
anchoring both the furniture and the television set to a suitable support.
•Never place the television set on cloth or other materials that may be located between the
television set and supporting furniture.
•Never place items that might tempt children to climb, such as toys and remote controls, on the
top of the television or furniture on which the television is placed.
If the existing television set is going to be retained and relocated, the same considerations as above
should be applied.
•When you have to relocate or lift the TV for replacement or cleaning, be sure not to pull out the
stand.

English - 10
Preventing the TV from falling
1. Using the appropriate screws, firmly fasten a set of brackets to the
wall. Confirm that the screws are firmly attached to the wall.
– You may need additional material such as wall anchors
depending on the type of wall.
2. Using the appropriately sized screws, firmly fasten a set of brackets
to the TV.
– For the screw specifications, refer to the standard screw part in
the table under "Mounting the TV on a wall".
3. Connect the brackets fixed to the TV and the brackets fixed to the
wall with a durable, heavy-duty string, and then tie the string tightly.
– Install the TV near the wall so that it does not fall backwards.
– Connect the string so that the brackets fixed to the wall are at
the same height as or lower than the brackets fixed to the TV. •The product colour and shape
may vary depending on the
model.

English - 11
English
03 The Samsung Smart Remote
About the Buttons on the Samsung Smart Remote
•The images, buttons, and functions of the Samsung Smart Remote may differ depending on the model.
•The Universal Remote function operates normally only when you use the Samsung Smart Remote that
comes with the TV.
( )Power
Press to turn the TV on or off.
(Colour / Number button)
Each time you press this button, the
coloured buttons window and the virtual
numeric pad are displayed alternately.
•Use these coloured buttons to
access additional options specific to
the feature you are using.
•Press to bring up the virtual numeric
pad on the screen. Use the numeric
keypad to enter numeric values.
Select numbers and then select
Done to enter a numeric value. Use
to change the channel, enter a PIN,
enter a ZIP code, etc.
•When pressed for 1 second or more,
the TTX menu appears.
(Return)
Returns to the previous menu. When
pressed for 1 second or more, the
running function is terminated. When
pressed while you are watching a
programme, the previous channel
appears.
(Play/pause)
When pressed, the playback controls
appear. Using these controls, you
can control the media content that is
playing.
(Smart Hub)
Returns to the Home Screen.
(Volume)
Move the button up or down to adjust
the volume. To mute the sound, press
the button. When pressed for 1 second or
more, the Accessibility Shortcuts menu
appears.
(Channel)
Move the button up or down to change
the channel. To see the screen, Guide
press the button.
•When pressed for 1 second or more,
the Channel List screen appears.
Press each button to run its function.
Select
Selects or runs a focused item. When
pressed while you are watching a
broadcast programme, detailed
programme information appears.
Directional button (up/down/left/
right)
Moves the focus and changes the values
seen on the TV's menu.
(Bixby)
Runs Bixby. Press and hold the button,
say a command, and then release the
button to run Bixby.
When you press the button, the Explore
Now menu appears at the bottom of the
screen.
•The supported 's languages Bixby
and features may differ by
geographical region.
(Ambient Mode)
In TV mode, press this button to enter
Ambient Mode.
If you press the button when the TV is
turned off, the TV turns on in Ambient
Mode.
•When pressed for 1 second or more,
the Shortcuts menu screen appears.

English - 12
Pairing the TV to the Samsung Smart Remote
When you turn on the TV for the first time, the Samsung Smart Remote pairs
to the TV automatically. If the Samsung Smart Remote does not pair to the TV
automatically, point it at the remote control sensor of the TV, and then press
and hold the buttons labelled and as shown in the figure on the left
simultaneously for 3 seconds or more.
Installing batteries into the Samsung Smart Remote
<Q87T, Q85T, Q84T, Q77T, Q75T, Q74T, Q67T, Q65T, QT64T>
1
1
2
2
1. Press the button at the top rear of the Samsung Smart Remote. The body will pop out slightly from the
body cover.
2. Turn the remote over, and then slide the body of the remote upwards until the battery compartment is
revealed.
3. If there are batteries in the remote, press the and buttons on both sides of the battery compartment to r l
remove the existing batteries.
4. Insert two new batteries (1.5V AAA type) into the battery compartment making sure that the batteries'
polarities (+, -) are oriented correctly. When done, slide the body of the remote until it is nearly in its
original position.
5. Turn the remote over, press and hold the button on the top rear, and then slide the body of the remote
down into place.
•Alkaline batteries are recommended for longer battery life.
<Q80T, Q70T, Q60T>
To install the batteries (1.5V AA type), push the rear cover open in the direction of the arrow at the bottom of
the illustration, and then insert the batteries as shown in the figure. Make sure that the positive and negative
ends are facing in the correct direction. Close the rear cover as shown.
•Alkaline batteries are recommended for longer battery life.

English - 13
English
04 The Remote Control
About the Buttons on the Remote Control
•This remote control has Braille points on the , , Power Channel Volume Select, and buttons and can be used
by visually impaired persons.
•The images, buttons, and functions of the remote control may differ depending on the model.
•If you use the remote control that comes with your TV to control another TV, some functions may not
operate normally.
<Q87T, Q85T, Q84T, Q67T, Q65T, Q64T>
Displays and selects available video
sources.
Turns the sound on/off.
Launches the Channel List.
Changes the current channel.
Exits the menu.
Use these buttons according to the
directions on the TV screen.
Use these buttons with specific
features. Use these buttons
according to the directions on the
TV screen.
Press each button to run its function.
Displays the Guide screen.
Moves the cursor, selects the on-
screen menu items, and changes the
values seen on the TV's menu.
P ( )Power
Turns the TV on and off.
Adjusts the volume.
Alternately selects Teletext mode,
Full TTX Double TTX Live TV / / Mix / .
Returns to the previous channel.
Gives direct access to channels.
Press each button to run its function.
Returns to the previous menu or
channel.
SETTINGS
Displays the main on-screen menu.
INFO
Displays information about the
current programme or content.
AD/SUBT.
Displays the Accessibility Shortcuts.
E (Select)
Selects or runs a focused item.
(Smart Hub)
Launches Home Screen.

English - 14
Installing batteries into the remote control (Battery size: AAA)
Match the polarities of the batteries to the symbols on the battery compartment.
2
3
1
•The colour and shape of the remote may vary depending on the model.
•Use the remote control within 7 m of the TV.
•Bright lights may affect the performance of the remote control. Avoid using the remote control near special
fluorescent lights or neon signs.
•Alkaline batteries are recommended for longer battery life.
1. Gently pull on the battery cover's notch and then remove the cover completely once it comes loose.
2. Insert 2 AAA alkaline batteries, making sure to align the positive and negative polarities correctly.
3. Place the battery cover on the remote control and insert the cover into the remote control.
4. Slide the battery cover in the order shown above so that the cover is completely attached to the remote
control.

English - 15
English
05 Running the Initial Setup
When you turn on your TV for the first time, it immediately starts the Initial Setup. The Initial Setup allows you
to configure the basic settings for the TV to operate, such as broadcast reception, channel search, and network
connection, at one time.
•Before starting the Initial Setup, be sure to connect external devices first.
•To use the TV's smart features, the TV must be connected to the Internet.
•To perform Initial Setup using the SmartThings app, you must connect your mobile device via Wi-Fi.
•If the pop-up for setup does not appear automatically on the SmartThings app on your mobile device,
continue setup manually after adding the TV using Add Device on the dashboard of the SmartThings app.
•The SmartThings app is available for mobile devices running Android 6.0 or higher or iOS 10 or higher.
•Noise may occur temporarily when the TV communicates with mobile devices.
You can also start the Initial Setup using the TV's menu ( > > > Settings General Reset).
Follow the instructions displayed on the Initial Setup screen and configure the TV's basic settings to suit your
viewing environment.
Using the TV Controller
You can turn on the TV with the TV Controller button at the bottom of the TV, and then use the Control menu.
The Control menu TV Controller appears when the button is pressed while the TV is On. For more information
about its usage, refer to the figure below.
•The screen may dim if the protective film on the SAMSUNG logo or the bottom of the TV is not detached.
Please remove the protective film.
Control menu
:Power off :Volume Up
:Channel Up :Volume Down
:Channel Down :Source
TV Controller button / Remote control sensor
Press: Move
Press & Hold: Select
The TV Controller button is located on the bottom of the TV.

English - 16
Setting the sound sensor
•This function is supported by Q7, Q8 series.
You can turn on or off the sound sensor by using its button at the bottom of the TV.
With the TV on, you can push the button to the left (or backward) to turn on the sound sensor or to the right (or
forward) to turn off it.
See the pop-up window on the TV to check whether the sound sensor is turned on or off.
•The position and shape of the sound sensor may differ depending on the model.
•During analysis using data from the sound sensor, the data is not saved.
English - 18
07 Troubleshooting and Maintenance
Troubleshooting
If the TV seems to have a problem, first review this list of possible problems and solutions. Alternatively, review
the Troubleshooting or FAQ Section in the e-Manual. If none of these troubleshooting tips apply, please visit
“www.samsung.com” and click on Support, or contact the Samsung service centre listed on the back cover of
this manual.
•This TFT LED panel is made up of sub pixels which require sophisticated technology to produce. There may
be, however, a few bright or dark pixels on the screen. These pixels will have no impact on the performance
of the product.
•To keep your TV in optimum condition, upgrade to the latest software. Use the Update Now Auto update or
functions on the TV's menu ( > > > Settings Support Software Update Update Now Auto update > or ).
The TV won’t turn on.
•Make sure that the AC power cable is securely plugged in to the TV and the wall outlet.
•Make sure that the wall outlet is working and the remote control sensor at the bottom of the TV is lit and
glowing a solid red.
•Try pressing the TV Controller button at the bottom of the TV to make sure that the problem is not with the
remote control. If the TV turns on, refer to “The remote control does not work”.
There is no picture/video/sound, or a distorted picture/video/sound from an external
device, or “Weak or No Signal” is displayed on the TV, or you cannot find a channel.
•Make sure the connection to the device is correct and that all cables are fully inserted.
•Remove and reconnect all cables connected to the TV and the external devices. Try new cables if possible.
•Confirm that the correct input source has been selected ( > ).Source
•Perform a TV self diagnosis to determine if the problem is caused by the TV or the device ( > Settings
> > Support Device Care Self Diagnosis Picture Test Sound Test > > or ).
•If the test results are normal, reboot the connected devices by unplugging each device's power cable and
then plugging it in again. If the issue persists, refer to the connection guide in the user manual of the
connected device.
•If you are not using a cable box or satellite box, and your TV is receiving TV signals from an antenna or a
cable wall connector, run Auto Tuning to search for channels ( > > Settings Broadcasting > (Auto
Tuning Settings Auto Tuning) > ).
– The Auto Tuning Settings may not appear depending on the model or geographical area.
– If you are using a cable box or satellite box, please refer to the cable box or satellite box manual.

English - 19
English
The CI+ does not work.
•Your Samsung TV conforms to the CI+ 1.4 standards.
•Where a CI+ Common Interface module is incompatible with this device, then please remove the module
and contact the CI+ operator for assistance.
The remote control does not work.
•Check if the power indicator at the bottom of the TV blinks when you press the remote's Power button. If it
does not, replace the remote control's batteries.
•Make sure that the batteries are installed with their poles (+/–) in the correct direction.
•Try pointing the remote directly at the TV from 1.5-1.8 m away.
•If your TV came with a Samsung Smart Remote (Bluetooth Remote), make sure to pair the remote to the TV.
The cable box or satellite box remote control doesn’t turn the TV on or off or adjust the
volume.
•Programme the cable box or satellite box remote control to operate the TV. Refer to the cable box or
satellite box user manual for the SAMSUNG TV code.
The TV settings are lost after 5 minutes.
•The TV is in the ( > Retail Mode. Change the Usage Mode in the General Menu to Home Mode Settings
> > General System Manager Usage Mode Home Mode > > ).
Intermittent Wi-Fi
•Make sure the TV has a network connection ( > > > Settings General Network Network Status > ).
•Make sure the Wi-Fi password is entered correctly.
•Check the distance between the TV and the modem or access point. The distance should not exceed 15.2 m.
•Reduce interference by not using or turning off wireless devices. Also, verify that there are no obstacles
between the TV and the modem or access point. (The Wi-Fi strength can be decreased by appliances,
cordless phones, stone walls/fireplaces, etc.)
Single story Multi story
Wireless access point
Wireless repeater
•Contact your Internet Service Provider (ISP) and ask them to reset your network circuit to re-register the
MAC addresses of your modem or access point and the TV.
English - 20
Video Apps problems (Youtube etc)
•Change the DNS to 8.8.8.8. Select > > > Settings General Network Network Status IP Settings > > >
DNS setting Enter manually DNS Server > > > enter 8.8.8.8 > .OK
•Reset by selecting > > > Settings Support Device Care Self Diagnosis Reset Smart Hub > > .
What is Remote Support?
Samsung Remote Support service offers you one-on-one support with a Samsung Technician who can
remotely:
•Diagnose your TV
•Adjust the TV settings for you
•Perform a factory reset on your TV
•Install recommended firmware updates
How does Remote Support work?
You can easily get Samsung Remote Support service for your TV:
1. Call the Samsung service centre and ask for remote support.
2. Open the menu on your TV, and go to the menu. ( > > )Support Settings Support
3. Select Remote Management, then read and agree to the service agreements. When the PIN screen
appears, provide the PIN number to the technician.
4. The technician will then access your TV.
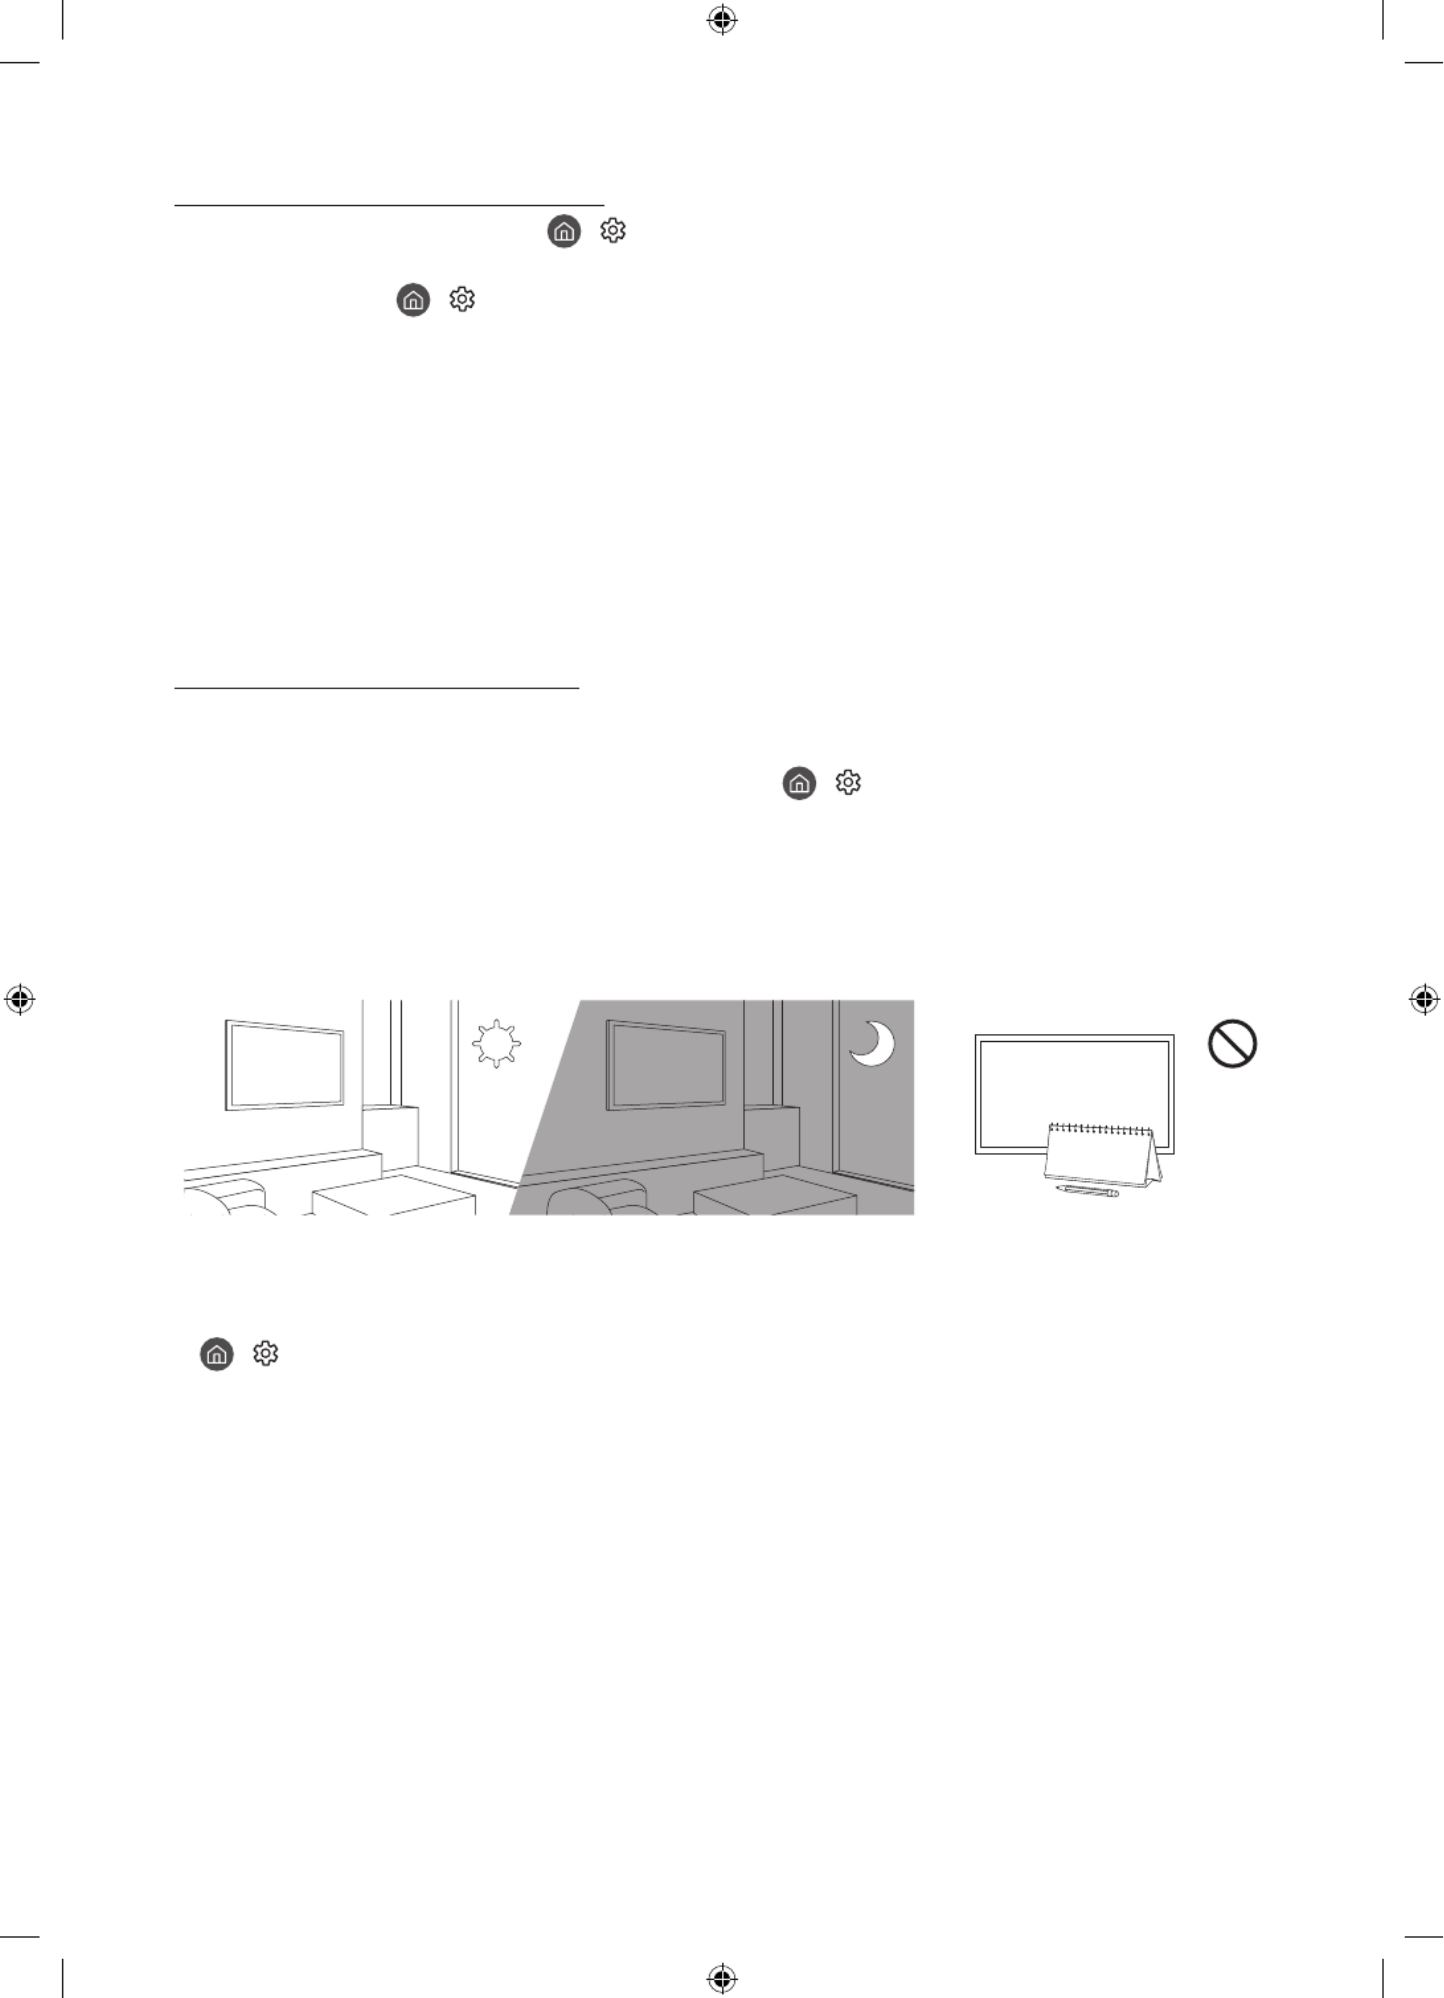
Eco Sensor and screen brightness
Eco Sensor adjusts the brightness of the TV automatically. This feature measures the light in your room and
optimises the brightness of the TV automatically to reduce power consumption. If you want to turn this off, go
to > > > Settings General Eco Solution Ambient Light Detection > .
•If the screen is too dark while you are watching TV in a dark environment, it may be due to the Ambient
Light Detection function.
•The eco sensor is located at the bottom of the TV. Do not block the sensor with any object. This can decrease
picture brightness.
English - 21
English
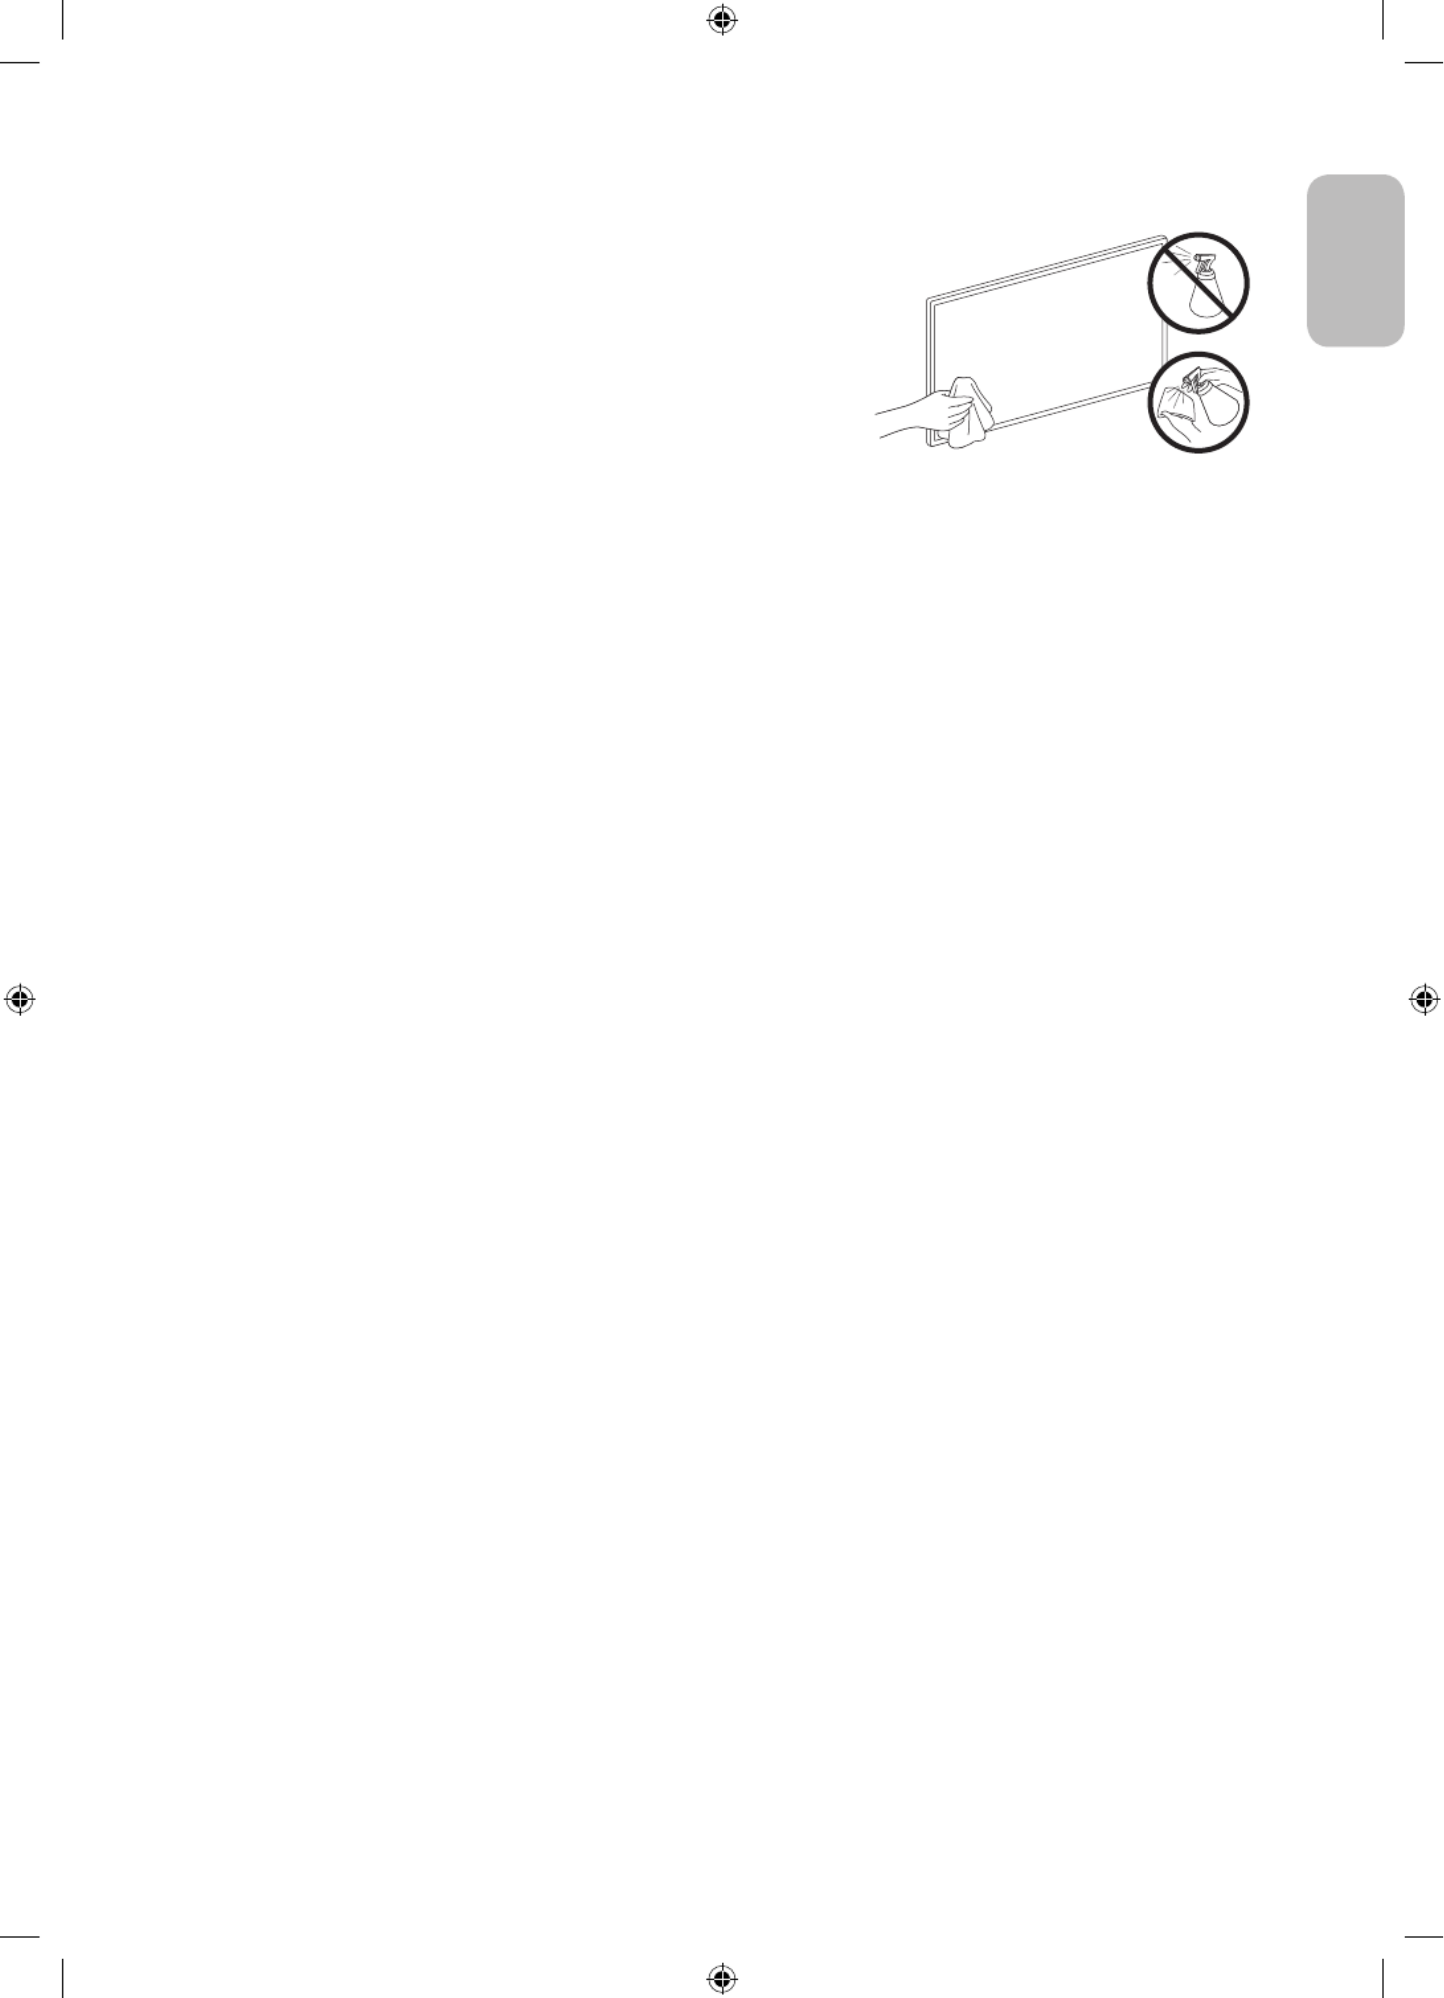
Caring for the TV
•If a sticker was attached to the TV screen, some debris can
remain after you remove the sticker. Please clean the debris off
before watching TV.
•The exterior and screen of the TV can get scratched during
cleaning. Be sure to wipe the exterior and screen carefully using
a soft cloth to prevent scratches.
•Do not spray water or any liquid directly onto the TV. Any liquid
that goes into the product may cause a failure, fire, or electric
shock.
•To clean the screen, turn off the TV, then gently wipe away
smudges and fingerprints on the panel with a micro-fiber
cloth. Clean the body or panel of the TV with a micro-fiber cloth
dampened with a small amount of water. After that, remove the
moisture with a dry cloth. While cleaning, do not apply strong
force to the surface of the panel because it can damage the
panel. Never use flammable liquids (benzene, thinner, etc.) or a
cleaning agent. For stubborn smudges, spray a small amount of
screen cleaner on a micro-fiber cloth, and then use the cloth to
wipe away the smudges.

English - 22
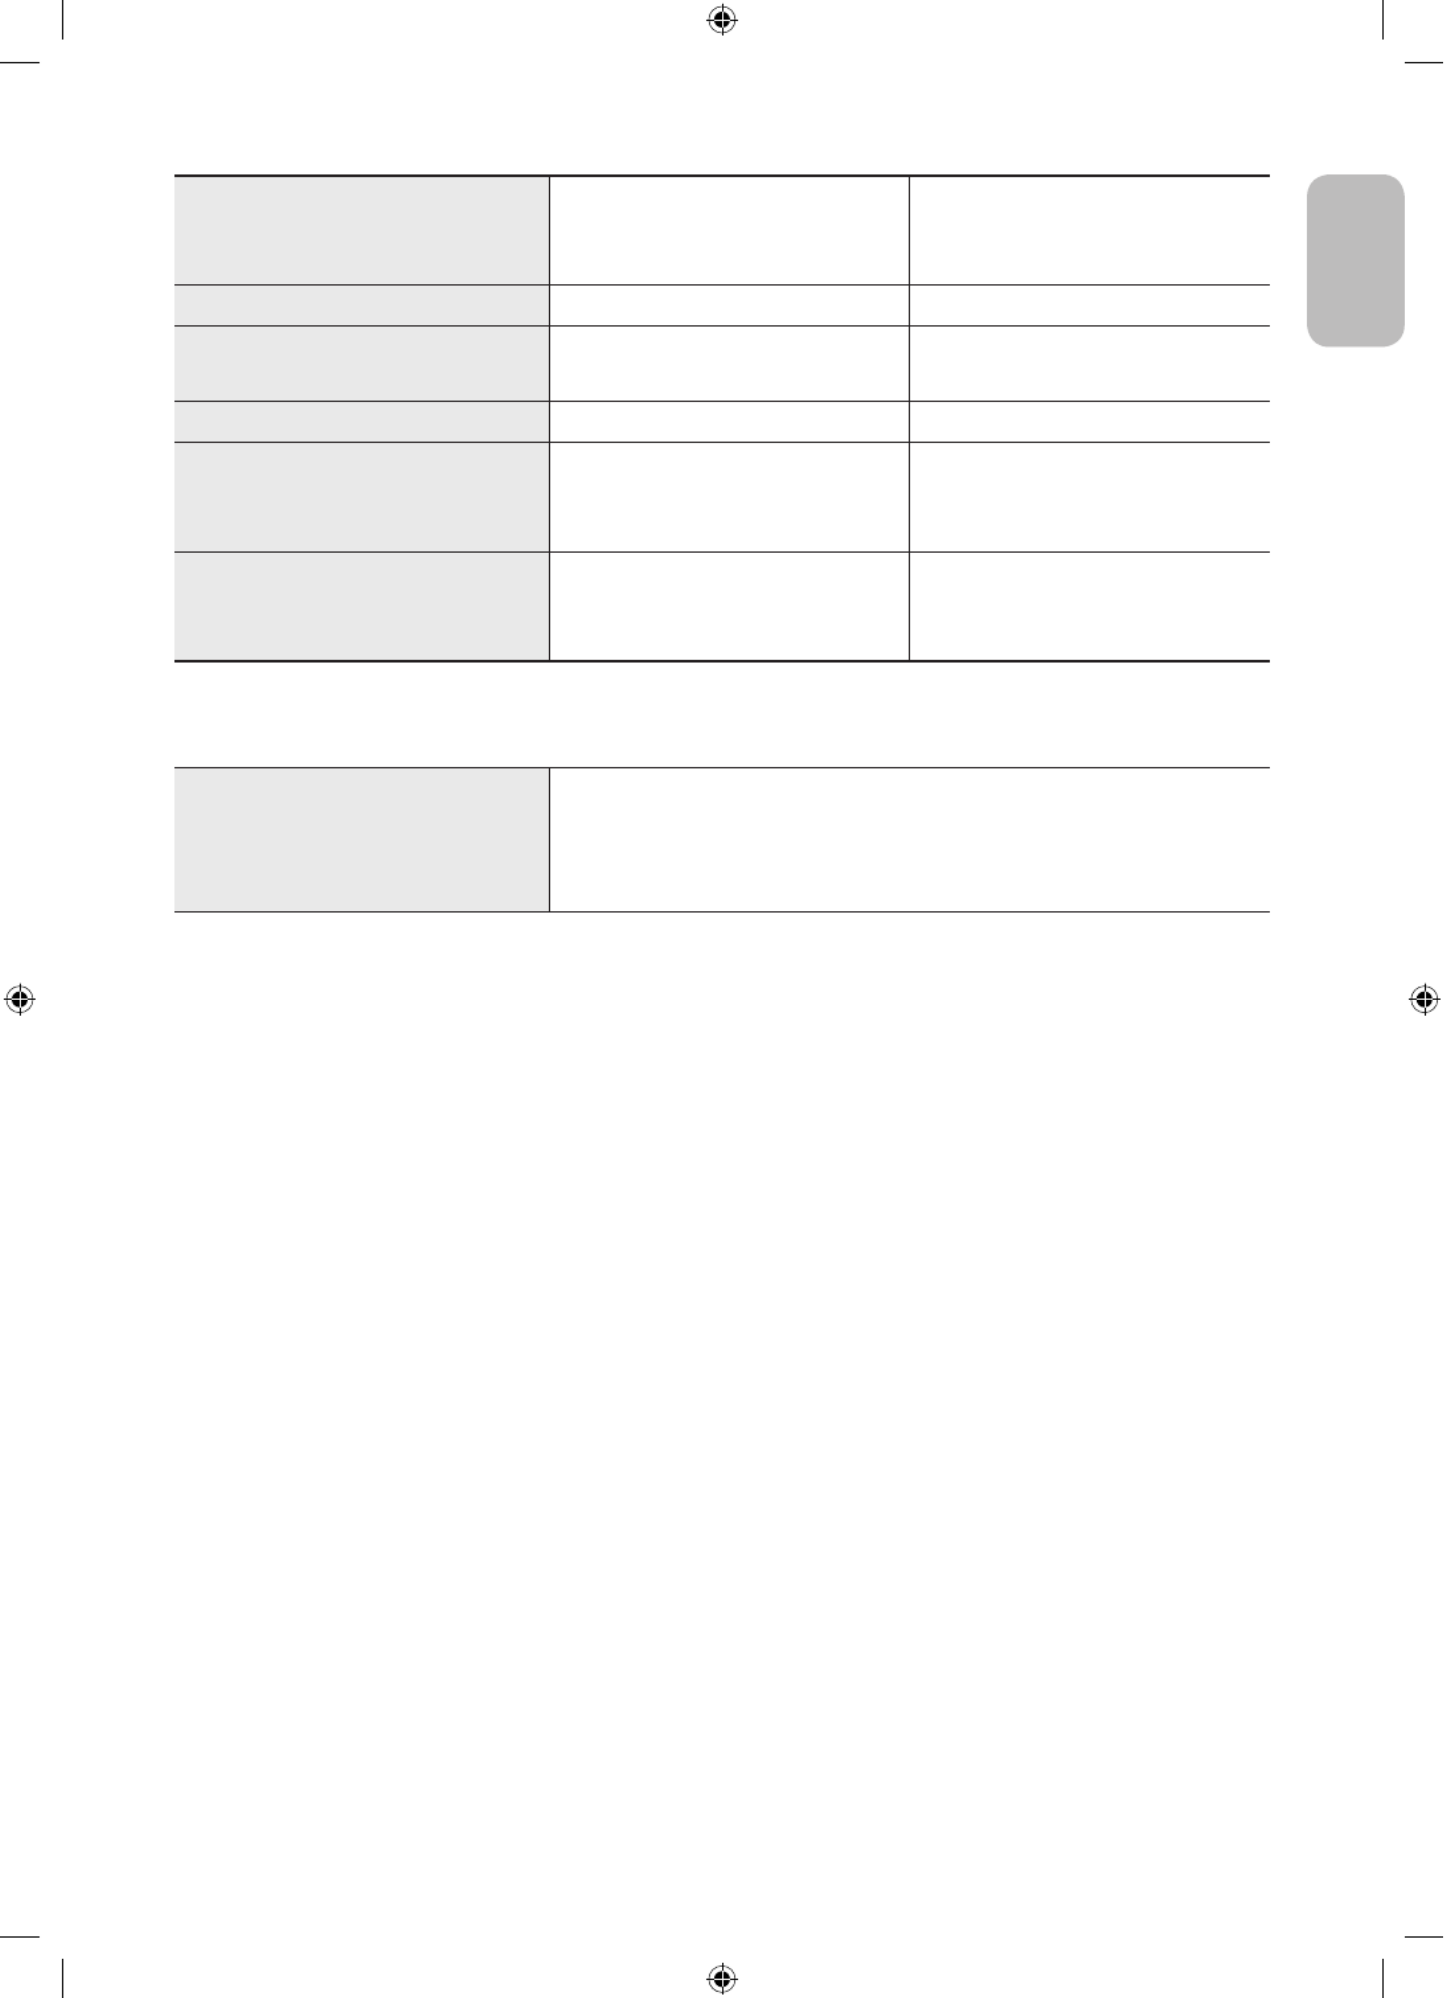
08 Specifications and Other Information
Specifications
Model Name GQ43Q60T / QE43Q60T
QE43Q64T / QE43Q65T
QE43Q67T
GQ43Q64T / GQ43Q65T
GQ43Q67T
Display Resolution 3840 x 2160 3840 x 2160
Screen Size
Measured Diagonally
43 inches
108 cm
43 inches
108 cm
Sound (Output) 20 W 20 W
Dimensions (W x H x D)
Body
With Stand
963.5 x 557.7 x 56.8 mm
963.5 x 629.4 x 195.2 mm
963.5 x 557.7 x 56.8 mm
963.5 x 645.2 x 334.3 mm
Weight
Without Stand
With Stand
9.0 kg
9.2 kg
9.0 kg
11.3 kg
Model Name GQ50Q60T / QE50Q60T
QE50Q64T / QE50Q65T
QE50Q67T
GQ50Q64T / GQ50Q65T
GQ50Q67T
Display Resolution 3840 x 2160 3840 x 2160
Screen Size
Measured Diagonally
50 inches
125 cm
50 inches
125 cm
Sound (Output) 20 W 20 W
Dimensions (W x H x D)
Body
With Stand
1116.4 x 642.9 x 57.1 mm
1116.4 x 720.5 x 243.3 mm
1116.4 x 642.9 x 57.1 mm
1116.4 x 728.1 x 326.5 mm
Weight
Without Stand
With Stand
12.9 kg
13.1 kg
12.9 kg
15.2 kg
Model Name GQ55Q60T / QE55Q60T
QE55Q64T / QE55Q65T
QE55Q67T
GQ55Q64T / GQ55Q65T
GQ55Q67T
Display Resolution 3840 x 2160 3840 x 2160
Screen Size
Measured Diagonally
55 inches
138 cm
55 inches
138 cm
Sound (Output) 20 W 20 W
Dimensions (W x H x D)
Body
With Stand
1230.1 x 705.9 x 57.4 mm
1230.1 x 783.7 x 243.3 mm
1230.1 x 705.9 x 57.4 mm
1230.1 x 793.0 x 340.4 mm
Weight
Without Stand
With Stand
17.2 kg
17.4 kg
17.2 kg
18.8 kg

English - 23
English
Model Name
GQ58Q60T / QE58Q60T
GQ65Q60T / QE65Q60T
QE65Q64T / QE65Q65T
QE65Q67T
Display Resolution 3840 x 2160 3840 x 2160
Screen Size
Measured Diagonally
58 inches
146 cm
65 inches
163 cm
Sound (Output) 20 W 20 W
Dimensions (W x H x D)
Body
With Stand
1290.6 x 748.0 x 57.5 mm
1290.6 x 826.4 x 243.3 mm
1449.6 x 829.3 x 57.6 mm
1449.6 x 907.7 x 289.1 mm
Weight
Without Stand
With Stand
18.4 kg
18.6 kg
22.3 kg
22.6 kg
Model Name GQ65Q64T / GQ65Q65T
GQ65Q67T
GQ75Q60T / QE75Q60T
QE75Q64T / QE75Q65T
QE75Q67T
Display Resolution 3840 x 2160 3840 x 2160
Screen Size
Measured Diagonally
65 inches
163 cm
75 inches
189 cm
Sound (Output) 20 W 20 W
Dimensions (W x H x D)
Body
With Stand
1449.6 x 829.3 x 57.6 mm
1449.6 x 918.5 x 371.4 mm
1675.4 x 959.6 x 60.4 mm
1675.4 x 1049.4 x 352.3 mm
Weight
Without Stand
With Stand
22.3 kg
24.9 kg
36.0 kg
36.3 kg
Model Name GQ75Q64T / GQ75Q65T
GQ75Q67T
GQ85Q60T / QE85Q60T
GQ85Q70T / QE85Q70T
Display Resolution 3840 x 2160 3840 x 2160
Screen Size
Measured Diagonally
75 inches
189 cm
85 inches
214 cm
Sound (Output) 20 W 20 W
Dimensions (W x H x D)
Body
With Stand
1675.4 x 959.6 x 60.4 mm
1675.4 x 1040.6 x 323.0 mm
1896.3 x 1082.5 x 59.9 mm
1896.3 x 1186.4 x 392.1 mm
Weight
Without Stand
With Stand
36.0 kg
39.5 kg
47.5 kg
48.7 kg

English - 24
Model Name GQ55Q70T / QE55Q70T
GQ55Q74T / QE55Q74T
GQ55Q75T / QE55Q75T
GQ55Q77T / QE55Q77T
GQ65Q70T / QE65Q70T
GQ65Q74T / QE65Q74T
GQ65Q75T / QE65Q75T
GQ65Q77T / QE65Q77T
Display Resolution 3840 x 2160 3840 x 2160
Screen Size
Measured Diagonally
55 inches
138 cm
65 inches
163 cm
Sound (Output) 20 W 20 W
Dimensions (W x H x D)
Body
With Stand
1230.1 x 705.9 x 57.4 mm
1230.1 x 788.8 x 264.1 mm
1449.6 x 829.3 x 57.6 mm
1449.6 x 911.9 x 307.2 mm
Weight
Without Stand
With Stand
17.2 kg
19.2 kg
22.3 kg
24.8 kg
Model Name GQ75Q70T / QE75Q70T
GQ75Q74T / QE75Q74T
GQ75Q75T / QE75Q75T
GQ75Q77T / QE75Q77T
GQ49Q80T / QE49Q80T
GQ49Q84T / GQ49Q85T
GQ49Q87T
Display Resolution 3840 x 2160 3840 x 2160
Screen Size
Measured Diagonally
75 inches
189 cm
49 inches
123 cm
Sound (Output) 20 W 40 W
Dimensions (W x H x D)
Body
With Stand
1675.4 x 959.6 x 60.4 mm
1675.4 x 1040.6 x 323.0 mm
1094.8 x 634.4 x 54.9 mm
1094.8 x 711.4 x 239.8 mm
Weight
Without Stand
With Stand
36.0 kg
39.5 kg
13.1 kg
17.5 kg
Model Name GQ55Q80T / QE55Q80T
GQ55Q84T / GQ55Q85T
GQ55Q87T
GQ65Q80T / QE65Q80T
GQ65Q87T / GQ65Q85T
GQ65Q84T
Display Resolution 3840 x 2160 3840 x 2160
Screen Size
Measured Diagonally
55 inches
138 cm
65 inches
163 cm
Sound (Output) 60 W 60 W
Dimensions (W x H x D)
Body
With Stand
1227.6 x 706.7 x 53.9 mm
1227.6 x 783.4 x 255.8 mm
1446.5 x 829.8 x 53.9 mm
1446.5 x 905.7 x 289.1 mm
Weight
Without Stand
With Stand
17.9 kg
21.0 kg
24.1 kg
27.8 kg
English - 25
English
Model Name GQ75Q80T / QE75Q80T
GQ75Q84T / GQ75Q85T
GQ75Q87T
GQ85Q80T / QE85Q80T
Display Resolution 3840 x 2160 3840 x 2160
Screen Size
Measured Diagonally
75 inches
189 cm
85 inches
214 cm
Sound (Output) 60 W 60 W
Dimensions (W x H x D)
Body
With Stand
1670.6 x 958.7 x 53.9 mm
1670.6 x 1036.2 x 316.8 mm
1892.8 x 1083.2 x 54.9 mm
1892.8 x 1163.1 x 338.8 mm
Weight
Without Stand
With Stand
34.4 kg
40.3 kg
43.3 kg
50.1 kg
Environmental Considerations
Operating Temperature
Operating Humidity
Storage Temperature
Storage Humidity
10°C to 40°C (50°F to 104°F)
10% to 80%, non-condensing
-20°C to 45°C (-4°F to 113°F)
5% to 95%, non-condensing
•The design and specifications are subject to change without prior notice.
•For information about the power supply, and more information about power consumption, refer to the
label-rating attached to the product.
•Typical power consumption is measured according to IEC 62087.
•You can see the label-rating attached to the back of the TV. (For some models, you can see the label-rating
inside the cover terminal.)
Decreasing power consumption
When you shut the TV off, it enters Standby mode. In Standby mode, it continues to draw a small amount of
power. To decrease power consumption, unplug the power cord when you don't intend to use the TV for a long
time.
English - 26
Licences
The terms HDMI and HDMI High-Definition Multimedia Interface, and the HDMI Logo are trademarks or
registered trademarks of HDMI Licensing LLC in the United States and other countries.
Recommendation - EU Only
Hereby, Samsung Electronics, declares that this equipment is in compliance with Directive 2014/53/EU.
The full text of the EU declaration of conformity is available at the following internet address: http://www.
samsung.com go to Support and enter the model name.
This equipment may be operated in all EU countries.
The 5 GHz WLAN(Wi-Fi) function of this equipment may only be operated indoors.
BT max transmitter power : 100mW at 2.4GHz – 2.4835GHz
Wi-Fi max transmitter power : 100mW at 2.4GHz-2.4835GHz, 200mW at 5.15GHz-5.25GHz, 100mW 5.25GHz-
5.35GHz & 5.47GHz - 5.725GHz
For information on Samsung’s environmental commitments and product-specific regulatory obligations,
e.g. REACH, WEEE, Batteries, visit http://www.samsung.com/uk/aboutsamsung/samsungelectronics/
corporatecitizenship/data_corner.html
WARNING - TO PREVENT THE SPREAD OF FIRE, KEEP CANDLES OR OTHER ITEMS WITH OPEN
FLAMES AWAY FROM THIS PRODUCT AT ALL TIMES.
English - 27
English
Correct Disposal of This Product (Waste Electrical & Electronic Equipment)
(Applicable in countries with separate collection systems)
This marking on the product, accessories or literature indicates that the product and its electronic
accessories (e.g. charger, headset, USB cable) should not be disposed of with other household
waste at the end of their working life. To prevent possible harm to the environment or human
health from uncontrolled waste disposal, please separate these items from other types of waste
and recycle them responsibly to promote the sustainable reuse of material resources.
Household users should contact either the retailer where they purchased this product, or
their local government office, for details of where and how they can take these items for
environmentally safe recycling.
Business users should contact their supplier and check the terms and conditions of the purchase
contract. This product and its electronic accessories should not be mixed with other commercial
wastes for disposal.
Correct disposal of the batteries in this product
(Applicable in countries with separate collection systems)
This marking on battery, manual or packaging indicates that the batteries in this product should
not be disposed of with other household waste at the end of their working life. Where marked,
the chemical symbols Hg, Cd or Pb indicate that the battery contains mercury, cadmium or lead
above the reference levels in EC Directive 2006/66. If batteries are not properly disposed of, these
substances can cause harm to human health or the environment.
To protect natural resources and to promote material reuse, please separate batteries from other
types of waste and recycle them through your local, free battery return system.

Deutsch - 2
Vor dem Lesen der Bedienungsanleitung
Dieser Fernseher wurde mit dieser Bedienungsanleitung und einem eingebetteten e-Manual geliefert.
Überprüfen Sie die Folgendes, ehe Sie die Bedienungsanleitung lesen:
Benutzerhandbuch Lesen Sie dieses Handbuch, um Informationen zu
Fragen der Sicherheit, Installation, des Zubehörs,
der Ersteinrichtung und zu den technischen
Daten des Geräts anzuzeigen.
e-Manual Weitere Informationen zu diesem Fernsehgerät
erhalten Sie in dem in das Gerät eingebetteten
e-Manual.
•So öffnen Sie das e-Manual.
> > > Einstellungen Unterstützung
e-Manual öffnen
Auf der Website (www.samsung.com) können Sie die Handbücher herunterladen und ihren Inhalt auf einem PC
oder Mobilgerät anzeigen.
Lernen der Assistenzfunktionen des e-Manual
•Auf manche Menübildschirme können Sie über das e-Manual nicht zugreifen.
Suchen Hiermit wählen Sie einen Treffer in der Liste mit den Suchergebnissen
aus, um die entsprechende Seite zu laden.
Index
Hiermit wählen Sie ein Stichwort aus, um zur entsprechenden Seite zu
navigieren.
– Die Menüs werden, je nach Region, möglicherweise nicht angezeigt.
Plan der Website Sie enthält Listen mit den verschiedenen Themen im e-Manual.
Kürzlich
angesehen
Hiermit wählen Sie ein Thema aus der Liste der kürzlich angesehenen
Themen aus.
Lernen der Funktionen für die auf den Themenseiten des e-Manuals
angezeigten Tasten
Jetzt testen Hiermit können Sie die entsprechende Menüoption auswählen und die
Funktion sofort ausprobieren.
Verknüpfung Hiermit können Sie sofort auf ein unterstrichenes Thema zugreifen, das
mit einer e-Manual-Seite verbunden ist.

Deutsch - 3
Deutsch
Achtung! Wichtige Sicherheitshinweise
Lesen Sie die Sicherheitshinweise sorgfältig, bevor Sie das Fernsehgerät verwenden.
In der folgenden Tabelle finden Sie eine Erklärung für die Symbole, die Sie möglicherweise auf Ihrem Samsung-
Produkt sehen.
ACHTUNG Produkt der Klasse II: Dieses Symbol zeigt
an, dass das Gerät einen elektrischen
Erdungsanschluss (Masse) nicht benötigt.
Wenn dieses Symbol auf einem Produkt mit
Netzkabel nicht vorhanden ist, MUSS das
Produkt über eine zuverlässige Verbindung mit
der Erde (Masse) verfügen.
GEFAHR DURCH STROMSCHLAGNICHT ÖFFNEN
ACHTUNG: UM DAS RISIKO EINES STROMSCHLAGS ZU
VERRINGERN, DÜRFEN SIE DIE ABDECKUNG (ODER
RÜCKSEITE) NICHT ÖFFNEN. ES BEFINDEN SICH IM
INNEREN KEINE TEILE, DIE VON BENUTZERN GEWARTET
WERDEN KÖNNEN. ALLE WARTUNGSARBEITEN SIND
QUALIFIZIERTEM FACHPERSONAL ZU ÜBERLASSEN.
Wechselspannung: Bei einer mit diesem
Symbol gekennzeichneten Nennspannung
handelt es sich um eine Wechselspannung.
Dieses Symbol zeigt an, dass im Inneren
Hochspannung vorhanden ist. Es ist gefährlich,
Teile im Inneren dieses Bildschirms zu
berühren.
Gleichspannung: Bei einer mit diesem Symbol
gekennzeichneten Nennspannung handelt es
sich um eine Gleichspannung.
Dieses Symbol weist darauf hin, dass diesem
Gerät wichtige Anweisungen zum Betrieb und
zur Wartung beigefügt sind.
Achtung! Gebrauchsanweisung beachten:
Dieses Symbol weist den Benutzer an, weitere
sicherheitsrelevante Informationen der
Gebrauchsanweisung zu entnehmen.
•Die Schlitze und Öffnungen im Gehäuse und in der Rückwand oder im Boden sind wichtig und dienen der
Belüftung. Um den zuverlässigen Betrieb des Geräts zu gewährleisten und es vor Überhitzung zu schützen,
dürfen diese Öffnungen keinesfalls blockiert oder bedeckt werden.
– Stellen Sie das Gerät nicht an Orten mit beengten Platzverhältnissen auf, wie z.B. in einem Bücherregal
oder einem Einbauschrank. Dies ist nur dann zulässig, wenn für ausreichende Belüftung gesorgt wird.
– Außerdem darf das Gerät keinesfalls in der Nähe oder oberhalb eines Heizstrahlers oder -körpers
aufgestellt werden oder an Orten, an denen es direkter Sonneneinstrahlung ausgesetzt ist.
– Stellen Sie keine mit Flüssigkeit gefüllten Behälter (Vasen usw.) auf das Gerät, da dies zu einem Brand
oder Stromschlag führen kann.
•Setzen Sie das Gerät keinesfalls dem Regen aus und stellen Sie es nicht in der Nähe von Wasser auf
(Badewanne, Küchenspüle, feuchter Keller, Schwimmbecken usw.). Falls das Gerät dennoch Nässe
ausgesetzt war, trennen Sie es von der Stromversorgung und wenden Sie sich umgehend an den
nächstgelegenen Händler.
•Für dieses Gerät werden Batterien benötigt. Entsorgen Sie die Batterien ordnungsgemäß und in
Übereinstimmung mit den für Sie geltenden Umweltschutzbestimmungen. Bitte wenden Sie sich bei
Fragen zur ordnungsgemäßen Entsorgung an Ihre örtlichen Behörden.
•Überlasten Sie Steckdosen, Verlängerungskabel und Netzteile keinesfalls, da dies zu einem Brand oder
Stromschlag führen kann.
•Netzkabel müssen so verlegt werden, dass niemand auf das Kabel treten kann oder es durch Gegenstände
gequetscht wird, die auf dem Kabel stehen oder gegen das Kabel drücken. Insbesondere ist auf Stecker,
Netzteile und die Kabeldurchführung am Gerätegehäuse zu achten.

Deutsch - 4
•Trennen Sie das Gerät aus Sicherheitsgründen bei einem Gewitter oder bei längerer Nutzungspause vom
Netz und von der Antenne bzw. vom Kabelsystem. Auf diese Weise werden Schäden durch Blitzschlag oder
Spannungsstöße vermieden.
•Stellen Sie sicher, dass die Nennspannung des Gleichstromnetzteils für die örtliche Stromversorgung
geeignet ist, bevor Sie das Netzkabel an die Stromversorgung anschließen.
•Führen Sie niemals Metallgegenstände in die Öffnungen des Geräts ein. Dies kann zu Stromschlägen führen.
•Berühren Sie zur Vermeidung von Stromschlägen keinesfalls Bauteile im Inneren des Geräts. Das Gerät darf
nur von einem qualifizierten Techniker geöffnet werden.
•Stellen Sie sicher, dass der Netzstecker fest in der Steckdose sitzt. Ziehen Sie das Netzkabel nie am Kabel
selbst, sondern stets am Stecker aus der Steckdose. Ziehen Sie niemals am Kabel, um den Netzstecker aus
der Steckdose zu ziehen. Berühren Sie das Netzkabel niemals mit feuchten Händen.
•Wenn das Gerät nicht einwandfrei funktioniert, insbesondere beim Auftreten ungewöhnlicher Geräusche
oder Gerüche aus dem Inneren, trennen Sie es unverzüglich von der Stromversorgung und wenden Sie sich
umgehend an Ihren nächstgelegenen Händler oder das nächste SamsungKundendienstzentrum.
•Ziehen Sie unbedingt den Netzstecker aus der Steckdose, wenn das Gerät längere Zeit nicht verwendet
werden soll oder Sie längere Zeit außer Haus sind (insbesondere wenn Kinder und ältere Personen allein im
Haus bleiben).
– Staubablagerungen können Stromschläge, Kurzschlüsse oder Brände verursachen, da sie zu
Funkenbildung, übermäßiger Erwärmung und Beschädigung der Isolierung am Netzkabel führen können.
•Wenden Sie sich für weiterführende Informationen an ein autorisiertes Kundendienstzentrum, wenn das
Gerät an einem Ort mit hoher Konzentration an Staubpartikeln, außergewöhnlich hohen oder niedrigen
Temperaturen, hoher Luftfeuchtigkeit oder in unmittelbarer Nähe zu Chemikalien aufgestellt oder z.B.
an einem Bahnhof oder Flughafen im Dauerbetrieb verwendet werden soll. Eine nicht fachgerechte
Aufstellung kann zu schweren Schäden am Gerät führen.
•Verwenden Sie nur ordnungsgemäß geerdete Stecker und Steckdosen.
– Eine fehlerhafte Erdung kann zu Stromschlägen oder Schäden am Gerät führen. (Nur Geräte der Klasse I.)
•Um dieses Gerät vollständig abzuschalten, müssen Sie den Netzstecker aus der Steckdose ziehen. Um
sicherzustellen, dass Sie das Gerät bei Bedarf schnell vom Netz trennen können, müssen die Steckdose und
der Netzstecker jederzeit leicht zugänglich sein.
•Bewahren Sie die Zubehörteile (Batterien usw.) an einem sicheren Ort außerhalb der Reichweite von Kindern auf.
•Lassen Sie das Gerät nicht fallen, und setzen Sie es keiner Schlag- oder Stoßeinwirkung aus. Wenn
das Gerät beschädigt ist, trennen Sie es vom Stromnetz und wenden Sie sich an ein Samsung
Kundendienstzentrum.
•Ziehen Sie zum Reinigen den Netzstecker aus der Steckdose, und wischen Sie das Gerät mit einem weichen,
trockenen Tuch ab. Verwenden Sie keine Chemikalien wie Wachs, Benzol, Alkohol, Verdünner, Insektizide,
Luftverbesserer, Schmiermittel oder Reinigungsmittel. Diese Chemikalien können die Oberfläche des
Geräts beschädigen und aufgedruckte Kennzeichnungen lösen bzw. entfernen.
•Setzen Sie das Gerät niemals Regen oder Feuchtigkeit aus.
•Entsorgen Sie Batterien niemals in einem Feuer.
•Schließen Sie die Batterien nicht kurz, nehmen Sie sie nicht auseinander und setzen Sie sie keiner Hitze aus.
•ACHTUNG: Wenn Sie die für die Fernbedienung mitgelieferten Batterien durch neue Batterien des falschen
Typs ersetzen, besteht Explosionsgefahr. Setzen Sie nur Batterien des gleichen oder eines gleichwertigen
Typs ein.
* Die Abbildungen und Illustrationen in diesem Handbuch dienen nur zur Information und können vom
tatsächlichen Aussehen des Geräts abweichen. Änderungen an Ausführung und technischen Daten
vorbehalten.
Einige GUS-Sprachen (Russisch, Ukrainisch, Kasachisch) stehen für dieses Produkt nicht zur Verfügung, da das
Gerät für Kunden in der EU hergestellt wurde.
Deutsch - 5
Deutsch
Vor dem Lesen der Bedienungsanleitung 2 ----------------------------------------------------------------------------
Achtung! Wichtige Sicherheitshinweise ---------------------------------------------------------------------------- 3
01 Lieferumfang
02 Installation des Fernsehgeräts
Montieren des Geräts an der Wand 7 ----------------------------------------------------------------------------
Ausreichende Belüftung Ihres Geräts ---------------------------------------------------------------------------- 8
Sicherheitshinweis: Befestigen des Geräts an der
Wand, damit es nicht kippt ---------------------------------------------------------------------------- 9
03 Die Samsung Smart Remote
Über die Buttons auf der Samsung Smart Remote 11 ----------------------------------------------------------------------------
Koppeln des Fernsehgeräts mit der
Samsung Smart Remote ---------------------------------------------------------------------------- 12
Einsetzen der Batterien in die
Samsung Smart Remote ---------------------------------------------------------------------------- 12
04 Die Fernbedienung
Zu den Tasten der Fernbedienung 13 ----------------------------------------------------------------------------
Einsetzen der Batterien in die Fernbedienung
(Batteriegröße: AAA) ---------------------------------------------------------------------------- 14
05 Ausführen der Ersteinrichtung
Verwenden des TV-Steuerungs 15 ----------------------------------------------------------------------------
06 Verbinden mit einem Netzwerk
Netzwerkverbindung – Drahtlos 17 ----------------------------------------------------------------------------
Netzwerkverbindung – Kabel ---------------------------------------------------------------------------- 17
07 Fehlerbehebung und Wartung
Fehlerbehebung 18 ----------------------------------------------------------------------------
Was ist Fernunterstützung? ---------------------------------------------------------------------------- 20
Öko-Sensor und Bildschirmhelligkeit ---------------------------------------------------------------------------- 20
Pflegen des Fernsehgeräts ---------------------------------------------------------------------------- 21
08 Technische Daten und weitere Informationen
Technische Daten 22 ----------------------------------------------------------------------------
Umgebungsbedingungen ---------------------------------------------------------------------------- 25
Verringern des Stromverbrauchs ---------------------------------------------------------------------------- 25
Lizenzen ---------------------------------------------------------------------------- 26
Inhalt
Specyfikacje produktu
| Marka: | Samsung |
| Kategoria: | Telewizja |
| Model: | GQ75Q67TGU |
Potrzebujesz pomocy?
Jeśli potrzebujesz pomocy z Samsung GQ75Q67TGU, zadaj pytanie poniżej, a inni użytkownicy Ci odpowiedzą
Instrukcje Telewizja Samsung

5 Kwietnia 2025
5 Kwietnia 2025
5 Kwietnia 2025
5 Kwietnia 2025
5 Kwietnia 2025
5 Kwietnia 2025
5 Kwietnia 2025
5 Kwietnia 2025
5 Kwietnia 2025
5 Kwietnia 2025
Instrukcje Telewizja
- Telewizja Sony
- Telewizja Yamaha
- Telewizja Electrolux
- Telewizja AEG
- Telewizja Beko
- Telewizja LG
- Telewizja Küppersbusch
- Telewizja Xiaomi
- Telewizja Sharp
- Telewizja TCL
- Telewizja Pioneer
- Telewizja Lenovo
- Telewizja Philips
- Telewizja SilverCrest
- Telewizja Acer
- Telewizja Nokia
- Telewizja Hisense
- Telewizja Infiniton
- Telewizja Panasonic
- Telewizja Muse
- Telewizja Viewsonic
- Telewizja Nedis
- Telewizja AG Neovo
- Telewizja Medion
- Telewizja OK
- Telewizja Lenco
- Telewizja Polar
- Telewizja Marquant
- Telewizja Toshiba
- Telewizja Tesla
- Telewizja Westinghouse
- Telewizja Majestic
- Telewizja Jensen
- Telewizja ILive
- Telewizja Blaupunkt
- Telewizja Brandt
- Telewizja Vivax
- Telewizja Terris
- Telewizja Salora
- Telewizja Siemens
- Telewizja Teac
- Telewizja Casio
- Telewizja Iiyama
- Telewizja Citizen
- Telewizja Dual
- Telewizja Grundig
- Telewizja Haier
- Telewizja Soundmaster
- Telewizja Hyundai
- Telewizja Manhattan
- Telewizja Strong
- Telewizja ECG
- Telewizja Oyster
- Telewizja Icy Box
- Telewizja Bang & Olufsen
- Telewizja JVC
- Telewizja V7
- Telewizja Dell
- Telewizja Furrion
- Telewizja Funai
- Telewizja Oppo
- Telewizja TechniSat
- Telewizja Schneider
- Telewizja Krüger&Matz
- Telewizja Philco
- Telewizja CHiQ
- Telewizja Qilive
- Telewizja Uniden
- Telewizja Thomson
- Telewizja Ferguson
- Telewizja Wharfedale
- Telewizja Manta
- Telewizja Pyle
- Telewizja Cecotec
- Telewizja Marantz
- Telewizja AOC
- Telewizja Monster
- Telewizja Peerless-AV
- Telewizja Caratec
- Telewizja Nevir
- Telewizja Mitsubishi
- Telewizja Arçelik
- Telewizja Continental Edison
- Telewizja GoGen
- Telewizja Intenso
- Telewizja NEC
- Telewizja Polaroid
- Telewizja Aiwa
- Telewizja AKAI
- Telewizja Sanyo
- Telewizja Clatronic
- Telewizja Telefunken
- Telewizja Optoma
- Telewizja SVAN
- Telewizja Innoliving
- Telewizja Abus
- Telewizja Jay-Tech
- Telewizja Bush
- Telewizja Loewe
- Telewizja Kemo
- Telewizja VOX
- Telewizja Insignia
- Telewizja AYA
- Telewizja Element
- Telewizja Orima
- Telewizja Denver
- Telewizja Kernau
- Telewizja Aspes
- Telewizja Albrecht
- Telewizja Orion
- Telewizja Hitachi
- Telewizja Technika
- Telewizja Seiki
- Telewizja SereneLife
- Telewizja RCA
- Telewizja MBM
- Telewizja BenQ
- Telewizja Trevi
- Telewizja Lexibook
- Telewizja GPX
- Telewizja Sencor
- Telewizja Odys
- Telewizja Nabo
- Telewizja Nextbase
- Telewizja Zenith
- Telewizja Daewoo
- Telewizja Allview
- Telewizja Metz
- Telewizja Kunft
- Telewizja Grunkel
- Telewizja Alphatronics
- Telewizja XD Enjoy
- Telewizja RevolutionHD
- Telewizja FFalcon
- Telewizja Dyon
- Telewizja Reflexion
- Telewizja Megasat
- Telewizja Sogo
- Telewizja Proline
- Telewizja Finlux
- Telewizja Alden
- Telewizja Aldi
- Telewizja Airis
- Telewizja Aristona
- Telewizja Apex
- Telewizja Ziggo
- Telewizja Techwood
- Telewizja Walker
- Telewizja Saba
- Telewizja Antarion
- Telewizja Tevion
- Telewizja Proscan
- Telewizja Vestel
- Telewizja Tucson
- Telewizja Energy Sistem
- Telewizja Sagem
- Telewizja Sunstech
- Telewizja Sylvania
- Telewizja Sunny
- Telewizja Luxor
- Telewizja Nordmende
- Telewizja AudioAffairs
- Telewizja Magnum
- Telewizja Audiosonic
- Telewizja Kubo
- Telewizja Coby
- Telewizja Seg
- Telewizja Vivo
- Telewizja Daitsu
- Telewizja Changhong
- Telewizja Alba
- Telewizja Naxa
- Telewizja Star-Light
- Telewizja Fantec
- Telewizja Mpman
- Telewizja Sweex
- Telewizja Vizio
- Telewizja Cello
- Telewizja Mx Onda
- Telewizja Nikkei
- Telewizja Peaq
- Telewizja Hannspree
- Telewizja DGM
- Telewizja Yasin
- Telewizja Roadstar
- Telewizja Humax
- Telewizja MT Logic
- Telewizja Superior
- Telewizja Difrnce
- Telewizja ITT
- Telewizja Avtex
- Telewizja Inovia
- Telewizja Lin
- Telewizja Aconatic
- Telewizja NPG
- Telewizja Bluesky
- Telewizja Videocon
- Telewizja Xoro
- Telewizja Durabase
- Telewizja HKC
- Telewizja Edenwood
- Telewizja Woxter
- Telewizja Premier
- Telewizja Onn
- Telewizja Teleco
- Telewizja Packard Bell
- Telewizja Opera
- Telewizja LTC
- Telewizja JTC
- Telewizja Zalman
- Telewizja Horizon
- Telewizja United
- Telewizja SYLVOX
- Telewizja Doffler
- Telewizja FOX Electronics
- Telewizja Viewpia
- Telewizja XS4ALL
- Telewizja JGC
- Telewizja Online
- Telewizja DirecTV
- Telewizja Tele 2
- Telewizja Graetz
- Telewizja Kogan
- Telewizja Telesystem
- Telewizja EKO
- Telewizja E-motion
- Telewizja Mitsai
- Telewizja Selfsat
- Telewizja High One
- Telewizja Tve
- Telewizja ISymphony
- Telewizja Pantel
- Telewizja Magnavox
- Telewizja ATYME
- Telewizja HCI
- Telewizja Inno-Hit
- Telewizja Engel
- Telewizja Bang Olufsen
- Telewizja TechLine
- Telewizja Elements
- Telewizja Digihome
- Telewizja Englaon
- Telewizja Time
- Telewizja Reflex
- Telewizja Astar
- Telewizja Visco
- Telewizja Tivax
- Telewizja H&B
- Telewizja Norcent
- Telewizja TELE System
- Telewizja TIM
- Telewizja Belson
- Telewizja Vision Plus
- Telewizja Sbr
- Telewizja Bauhn
- Telewizja Voxx
- Telewizja Rm 2000
- Telewizja Hoher
- Telewizja Felson
- Telewizja Mach Power
- Telewizja Elbe
- Telewizja Axing
- Telewizja CGV
- Telewizja Smart Tech
- Telewizja Séura
- Telewizja Mitzu
- Telewizja JTC24
- Telewizja Coocaa
- Telewizja Kivi
- Telewizja Smart Brand
- Telewizja Mystery
- Telewizja Linsar
Najnowsze instrukcje dla Telewizja

9 Kwietnia 2025

9 Kwietnia 2025

9 Kwietnia 2025
9 Kwietnia 2025
9 Kwietnia 2025
9 Kwietnia 2025
9 Kwietnia 2025

9 Kwietnia 2025
9 Kwietnia 2025
9 Kwietnia 2025