Instrukcja obsługi Reolink Go
Przeczytaj poniżej 📖 instrukcję obsługi w języku polskim dla Reolink Go (36 stron) w kategorii Kamera monitorująca. Ta instrukcja była pomocna dla 13 osób i została oceniona przez 2 użytkowników na średnio 4.5 gwiazdek
Strona 1/36

User Manual V2.0
4 MegaPixels Network Camera
1080P Network Camera
Reolink Client Software !

Thank you for purchasing the Reolink Network Camera .
For the latest User Manual, Product Updates and more
information about the products , please visit our website at :
https://reolink.com/
RISK OF ELECTRIC SHOCK
DO NOT OPEN
CAUTION: TO REDUCE THE RICK OF ELECTRIC SHOCK DO
NOT REMOVE COVER. NO USER SERVICEABLE PARTS INSIDE.
REFER SERVICING TO QUALIFIED SERVICE PERSONNEL.
The lightning flash with arrowhead symbol, within an equilateral
triangle, is intended to alert the user to the presence of uninsulated
"dangerous voltage" within the products ' enclosure that may be of
sufficient magnitude to constitute a risk of electric shock.
The exclamation point within an equilateral triangle is intended to alert
the user to the presence of important operating and maintenance
(servicing) instructions in the literature accompanying the appliance.
WARNING: TO PREVENT FIRE OR SHOCK HAZARD, DO
NOT EXPOSE THIS UNIT TO RAIN OR MOISTURE.
CAUTION: TO PREVENT ELECTRIC SHOCK, MATCH
WIDE BLADE OF THE PLUG TO THE WIDE SLOT AND
FULLY INSERT.
CAUTION
Getting Started
2

We have developed user-friendly products and
documentation. You may download the software and
manual from https://reolink.com/software-and-manual/
If you have any questions, you may refer to https://re
o link.com/faqs/ IRUWKHDQVZHU
tcatnoc esaelp ,troppus lacinhcet yna deen yam uoy fI
us at service@reolink.com support@reolink.comRU
You may download Firmware from
https://reolink.com/firmware/
GETTING STARTED

FCC Verification
Note: This equipment has been tested and found to comply with the limits for Class B digital device, pursuant to part 15
of the FCC Rules. These limits are designed to provide reasonable protection against harmful interference in a
residential installation. This equipment generates, uses and can radiate radio frequency energy and, if not installed and
used in accordance with the instructions, may cause harmful interference to radio or television reception, which can be
determined by turning the equipment off and on, the user is encouraged to try to correct the interference by one or more
of the following measures:
•Reorient or relocate the receiving antenna
•Increase the separation between the equipment and the receiver
•Connect the equipment into an outlet on a circuit different from that to which the receiver is connected
•Consult the dealer or an experienced radio/TV technician for help
These devices comply with part 15 of the FCC Rules. Operation is subject to the following two conditions:
•These devices may not cause harmful interference, and
•These devices must accept any interference received, including interference that may cause undesired operation. !
Important Note :
All jurisdictions have specific laws and regulations relating to the use of cameras. Before using any camera for
any purpose, it is the buyer’s responsibility to be aware of all applicable laws and regulations that prohibit or
limit the use of cameras and to comply with the applicable laws and regulations. !
FCC Regulation (for USA):
Prohibition against eavesdropping
Except for the operations of law enforcement officers conducted under lawful authority, no person shall use,
either directly or indirectly, a device operated pursuant to the provisions of this Part for the purpose of
overhearing or recording the private conversations of others unless such use is authorised by all of the parties
engaging in the conversation.
WARNING
Modifications not approved by the party responsible for compliance could void user’s authority to operate the equipment.
IMPORTANT SAFETY INSTRUCTIONS
•Make sure product is fixed correctly and stable if fastened in place
•Do not operate if wires and terminals are exposed
•Do not cover vents on the side or back of the Camera and allow adequate space for ventilation
RoHS:
This product is fully compliant with the European Union Restriction of the Use of Certain Hazardous Substances in
Electrical and Electronic Equipment ("RoHS") Directive (2002/95/EC). The RoHS directive prohibits the sale of electronic
equipment containing certain hazardous substances such as lead, cadmium, mercury, and hexavalent chromium, PBB,
and PBDE in the European Union.
BATTERY INFORMATION
This product contains a removable battery. If you need to replace or dispose of the internal battery.
The battery is located on the main board of the Camera. It is a primary lithium CR2032 button cell.
To access, remove and/or replace the battery:!
• Ensure the Camera is turned OFF. NEVER open the Camera’s case while power is connected.
• Remove the five screws holding the cover on the Camera.
• If replacing the battery, ensure that it is an exact match for size, type and capacity.
•Be sure to safely dispose of the battery. The process for battery disposal/recycling varies from location to
location, please check with the relevant local authority for method.
BATTERY SAFETY INSTRUCTIONS
•Do NOT attempt to open, puncture, disassemble or modify the battery in any way.
•Do NOT subject it to sudden shock or heat.
•Do NOT dispose of battery in fire. !
NOTICES
4

Getting Started………………………
Notice………..………………………..
Contents………………………………
Connection Diagram ………………..
Client Software
Install Software……………………….
Live View………………………………
Local Setting………………………….
Device Settings…..…………………
Display Camera …….………………
Recording
Encode………………………………
Option……………………………….
Schedule…………………………….
Network
General……………………………….
Advanced.……………………………
DDNS Setup.………………………..
NTP Setup……….……………..……
Email Setup……..……………………
FTP Setup…………………………….
Network Status……………..………..
WiFi Settings……………..…………..
Alarm
Motion Detection…………………….
Alarm Motion……………………….…
Motion Detection Schedule………….
System
General ………………………………
Information……………………………
Maintenance…………………………
Performance…………………………
Reboot……………………………….
Device
SD Card……………………………..
User
Online User………..…………………
Add User………..……………………
Manager User………..…………………
Preview Basic Setting………………
Preview Advanced Setting…………
Warranty Terms & Conditions
2
4
5
6
7
8
11
12
13
14
15
15
16
17
18
19
20
21
22
23
24
25
26
27
28
CONTENTS
5
29
30
30
31
32
32
33
34
35
36

This page shows how Camera connect to the Network System
1. Connect Network Cable to the Camera, and other end to the POE Switch or Router.
2. Connect Power adapter to the camera and turn on the power.
3. You may use your Mobile devices or PC to setup the camera.
You may view the camera from local network or Internet after successful set-up.
Connection Diagram
6
Client Software - Local Settings
Log on to Reolink
After installing the Software, you will see below screen.
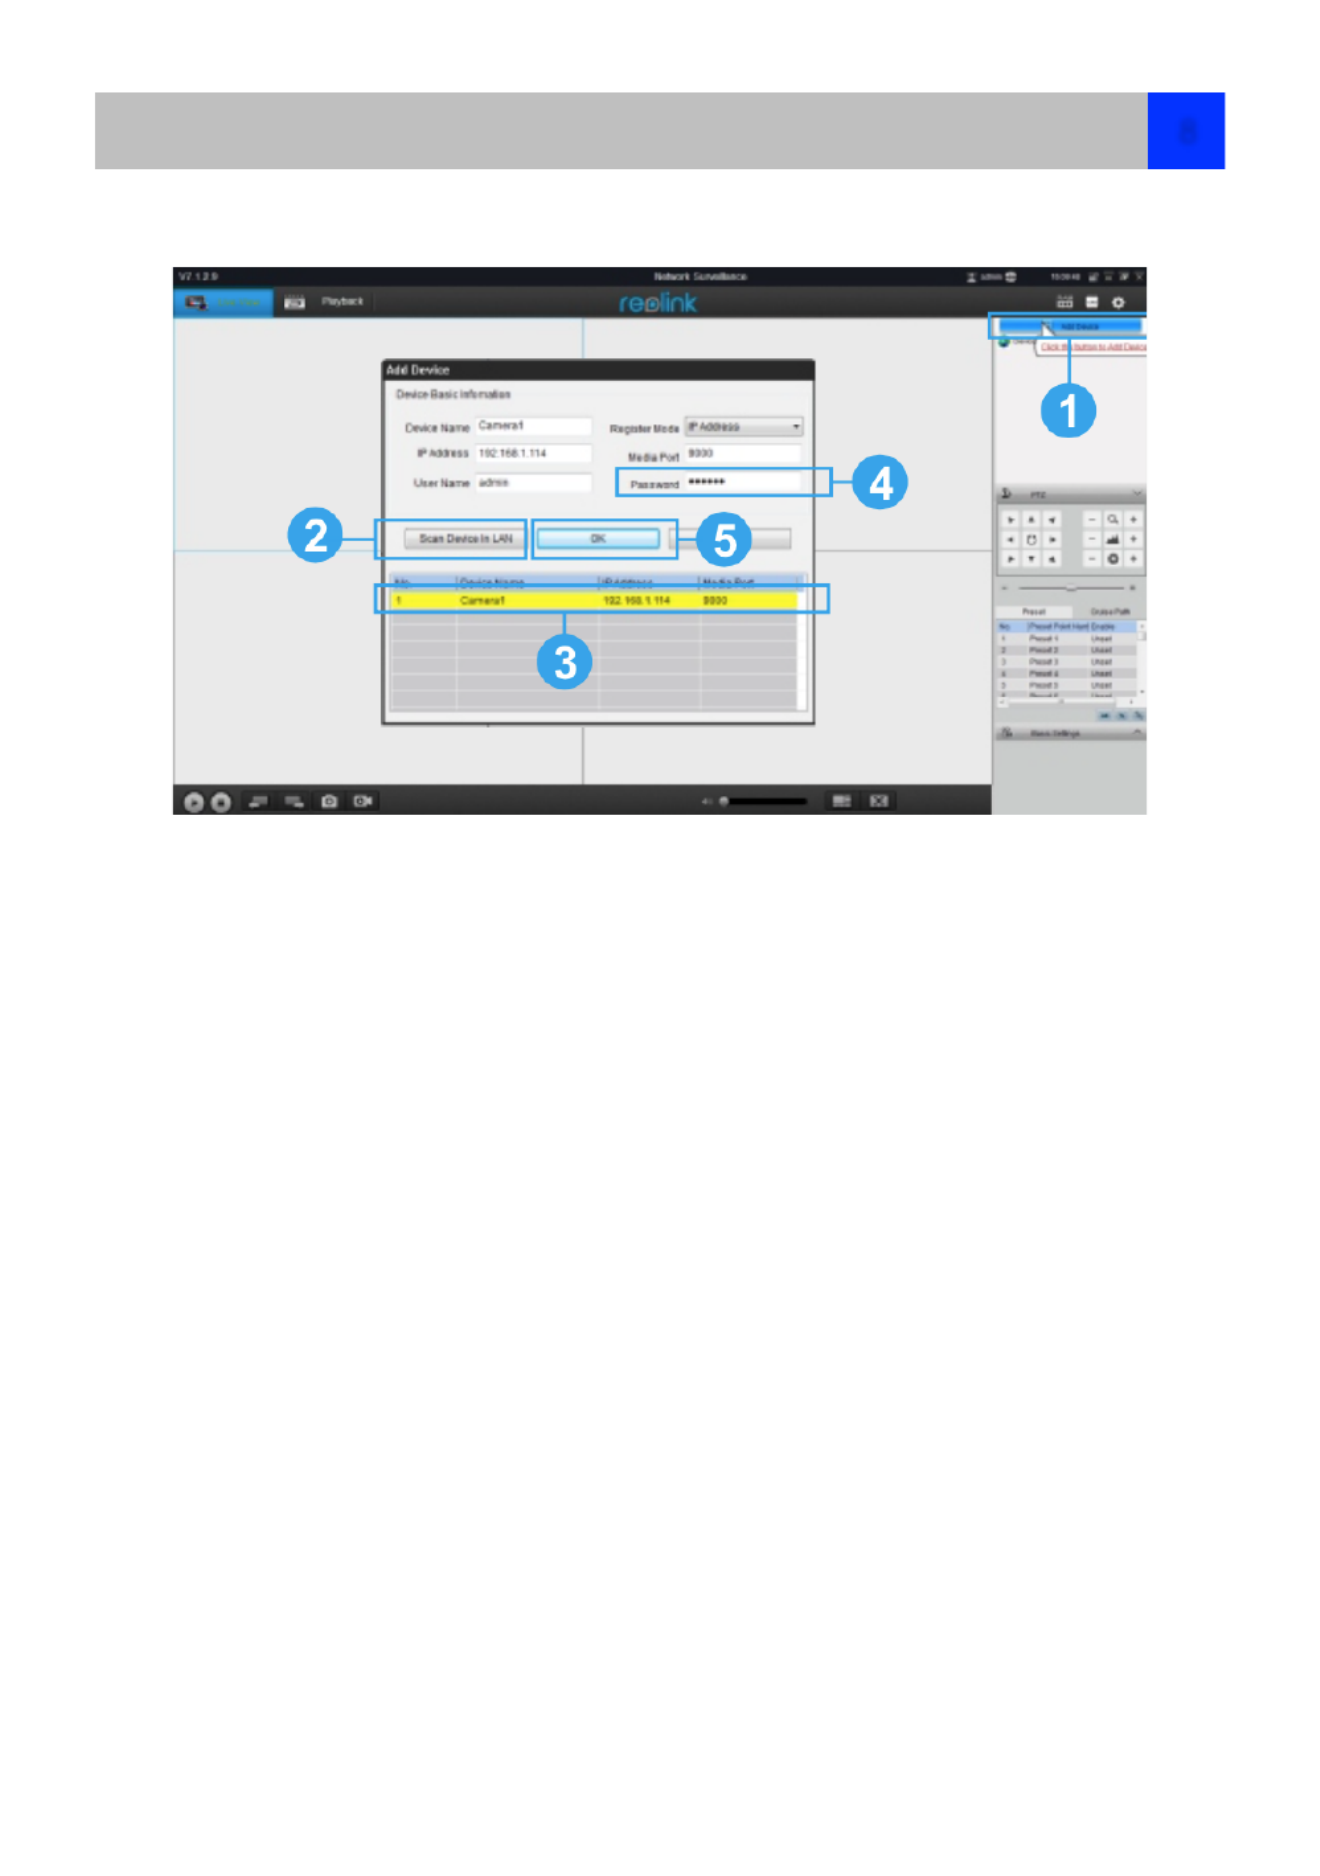
1. Click Add Device Button on the top right.
2. Click Scan Device in LAN.
3. Double click the device you want to add then device info will be displayed.
4. Input the password(default password is Blank), if you already create password on Reolink App , you
need to use the password you created to log in
5. Then click OK to Log in .
To connect from your PC to your Camera, make sure your Camera is on and all connections are ok.
IP Address
• If your Camera is in the same LAN network with your PC , you can click Search to automatically get the
IP address
•Then, enter your (the default of is already entered) and (default is ), Username admin Password blank
you need to use the password which you created on Mobile or create a new password here to continue ,
then click . After a few seconds, you will see your cameras live on your PC.Login
UID
•If your camera is not in the same LAN network with your PC , you can use UID connect mode.
•You can manually type the UID under the UID QR code which on the body of camera UID field .
•Then, enter your (the default of is already entered) and (default is Username admin Password
blank), you need to use the password which you create on Mobile or create a new password here to
continue , then click . After a few seconds, you will see your cameras live on your PC.Login
Client Software - Live View
8
Client Software - Local Settings
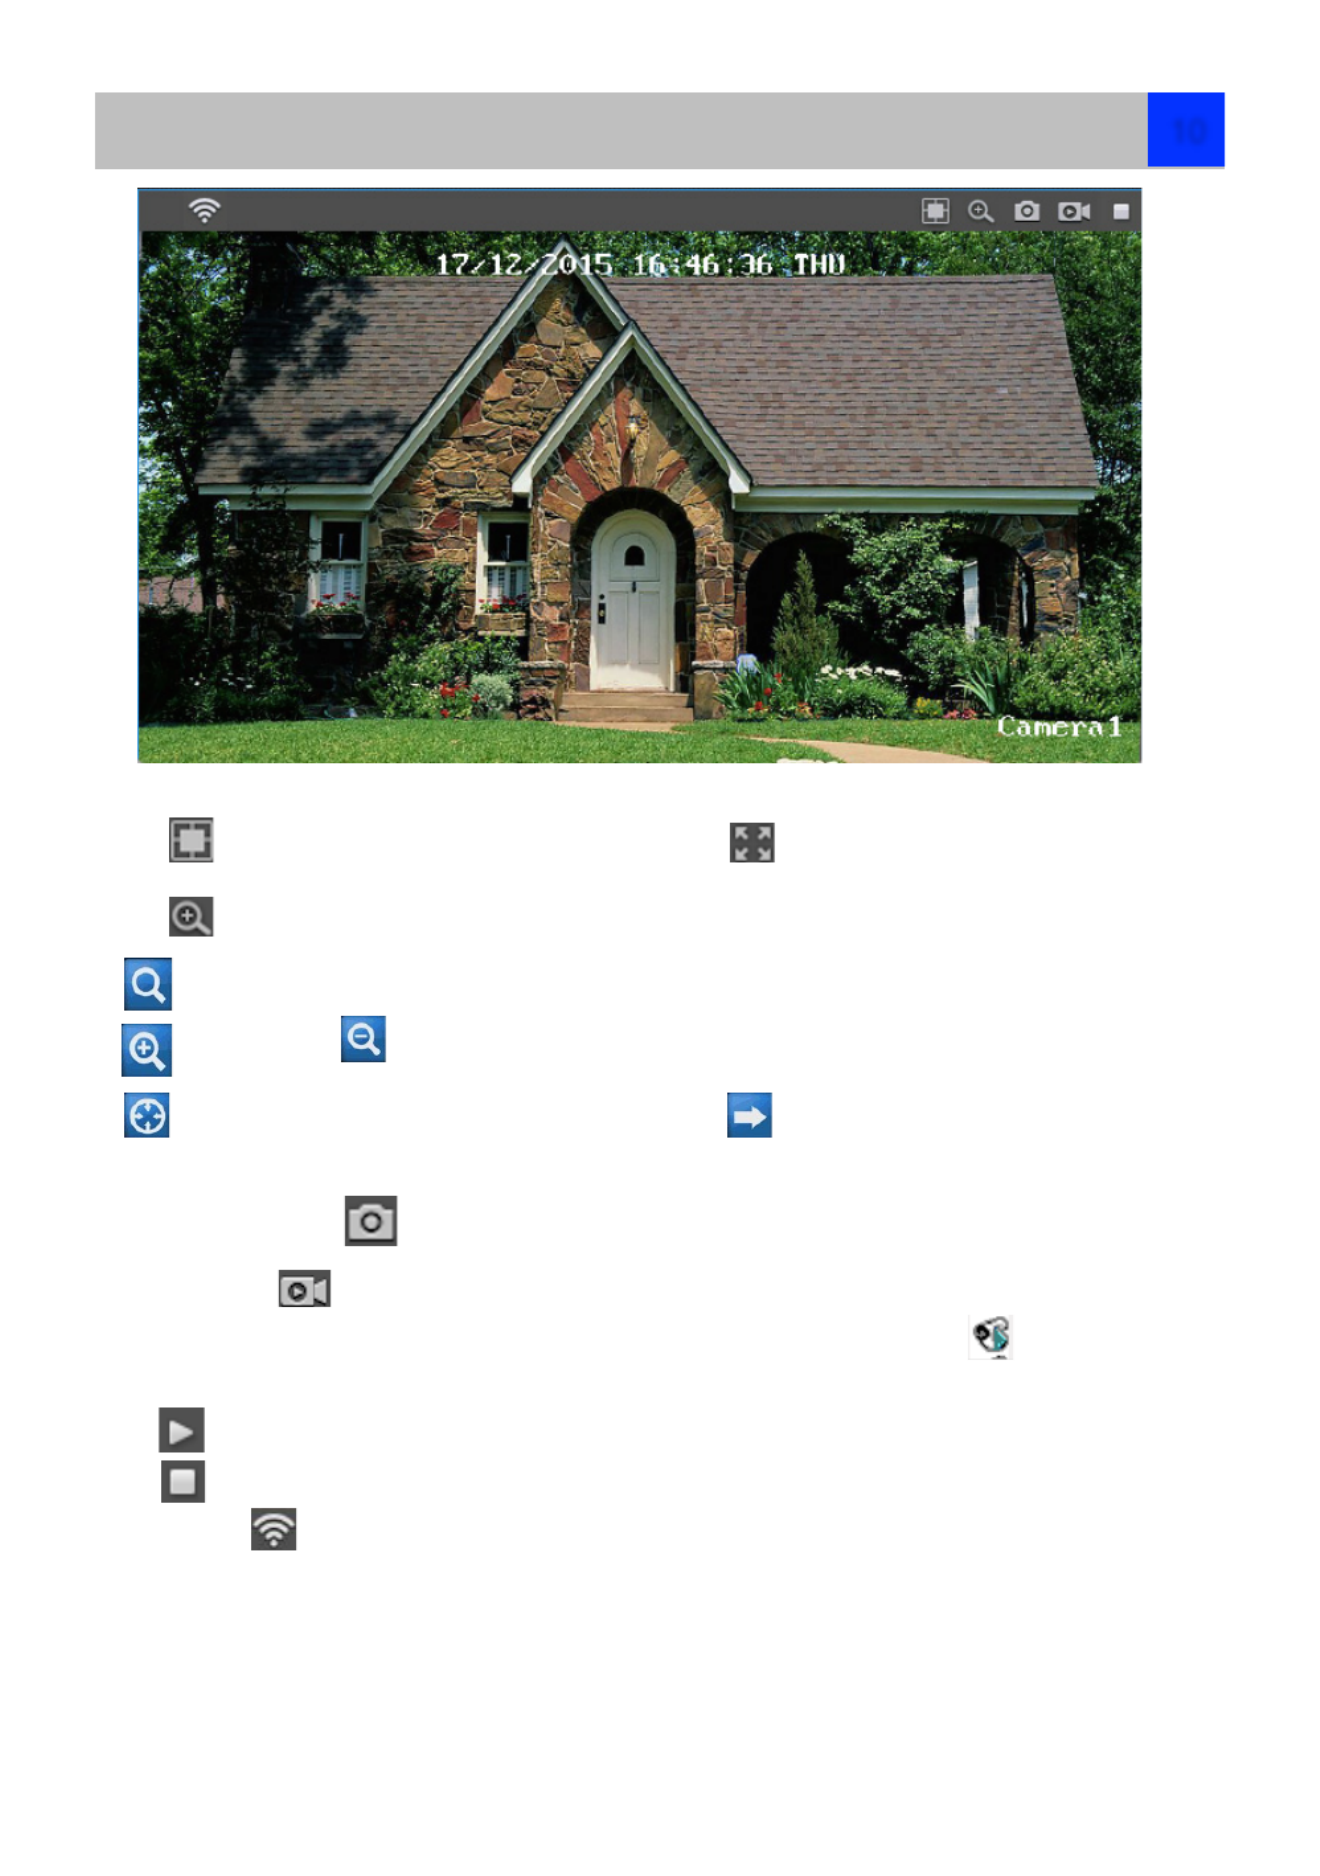
Click to compress the image to centre or click to stretch image to full window.
Click to show the digital zoom page . Here you can click
choose the zoom region
Zoom In Zoom Out
restore zoom back to default setting Exit Digital zoom
Click Capture button to take a snapshot of the image
Record Button Manual start record or stop record of the selected channel. During the
recording, on Device Tree area, status icon next to device name will show record icon on
the device .
Click to start Live View.
Click to Stop Live View.
This Symbol shows your camera with WIFI Functions .
Client Software - Preview
10

Client Software - Local Settings
Click Gear Icon Local Settings button on the upper right of the screen. The local Settings screen is
where you can customise how ReoLink will store and process footage on the local PC when you download
it from the Camera.
Download Path: Where ReoLink will
save footage that you’ve downloaded
from the Camera.
Convert to AVI: When selected, ReoLink
will use your PC to transcode footage
from the Camera’s native format (H.264)
into AVI file .
Capture Path: Where ReoLink will save
still images captured using the snapshot
function.
After finished Setting, click Save, Popup
box will note “Save Succeed”!
Record Path: Where ReoLink will save
recordings if you select Record from
the Preview screen.
You may set the Recording File
duration, folder size, Recording
Schedule, the stream File Type and
choose the record file time length from
this page .
After finished setting, click Save,
Popup box will note ”Save Succeed”!
Double Click the user you want to set, Then you will see the Modify user information window.You can set
the password for the user and set the permission for this user. Click OK , Then click Save to keep the
settings.
Client Software - Local Settings
11
Client Software - Local Settings
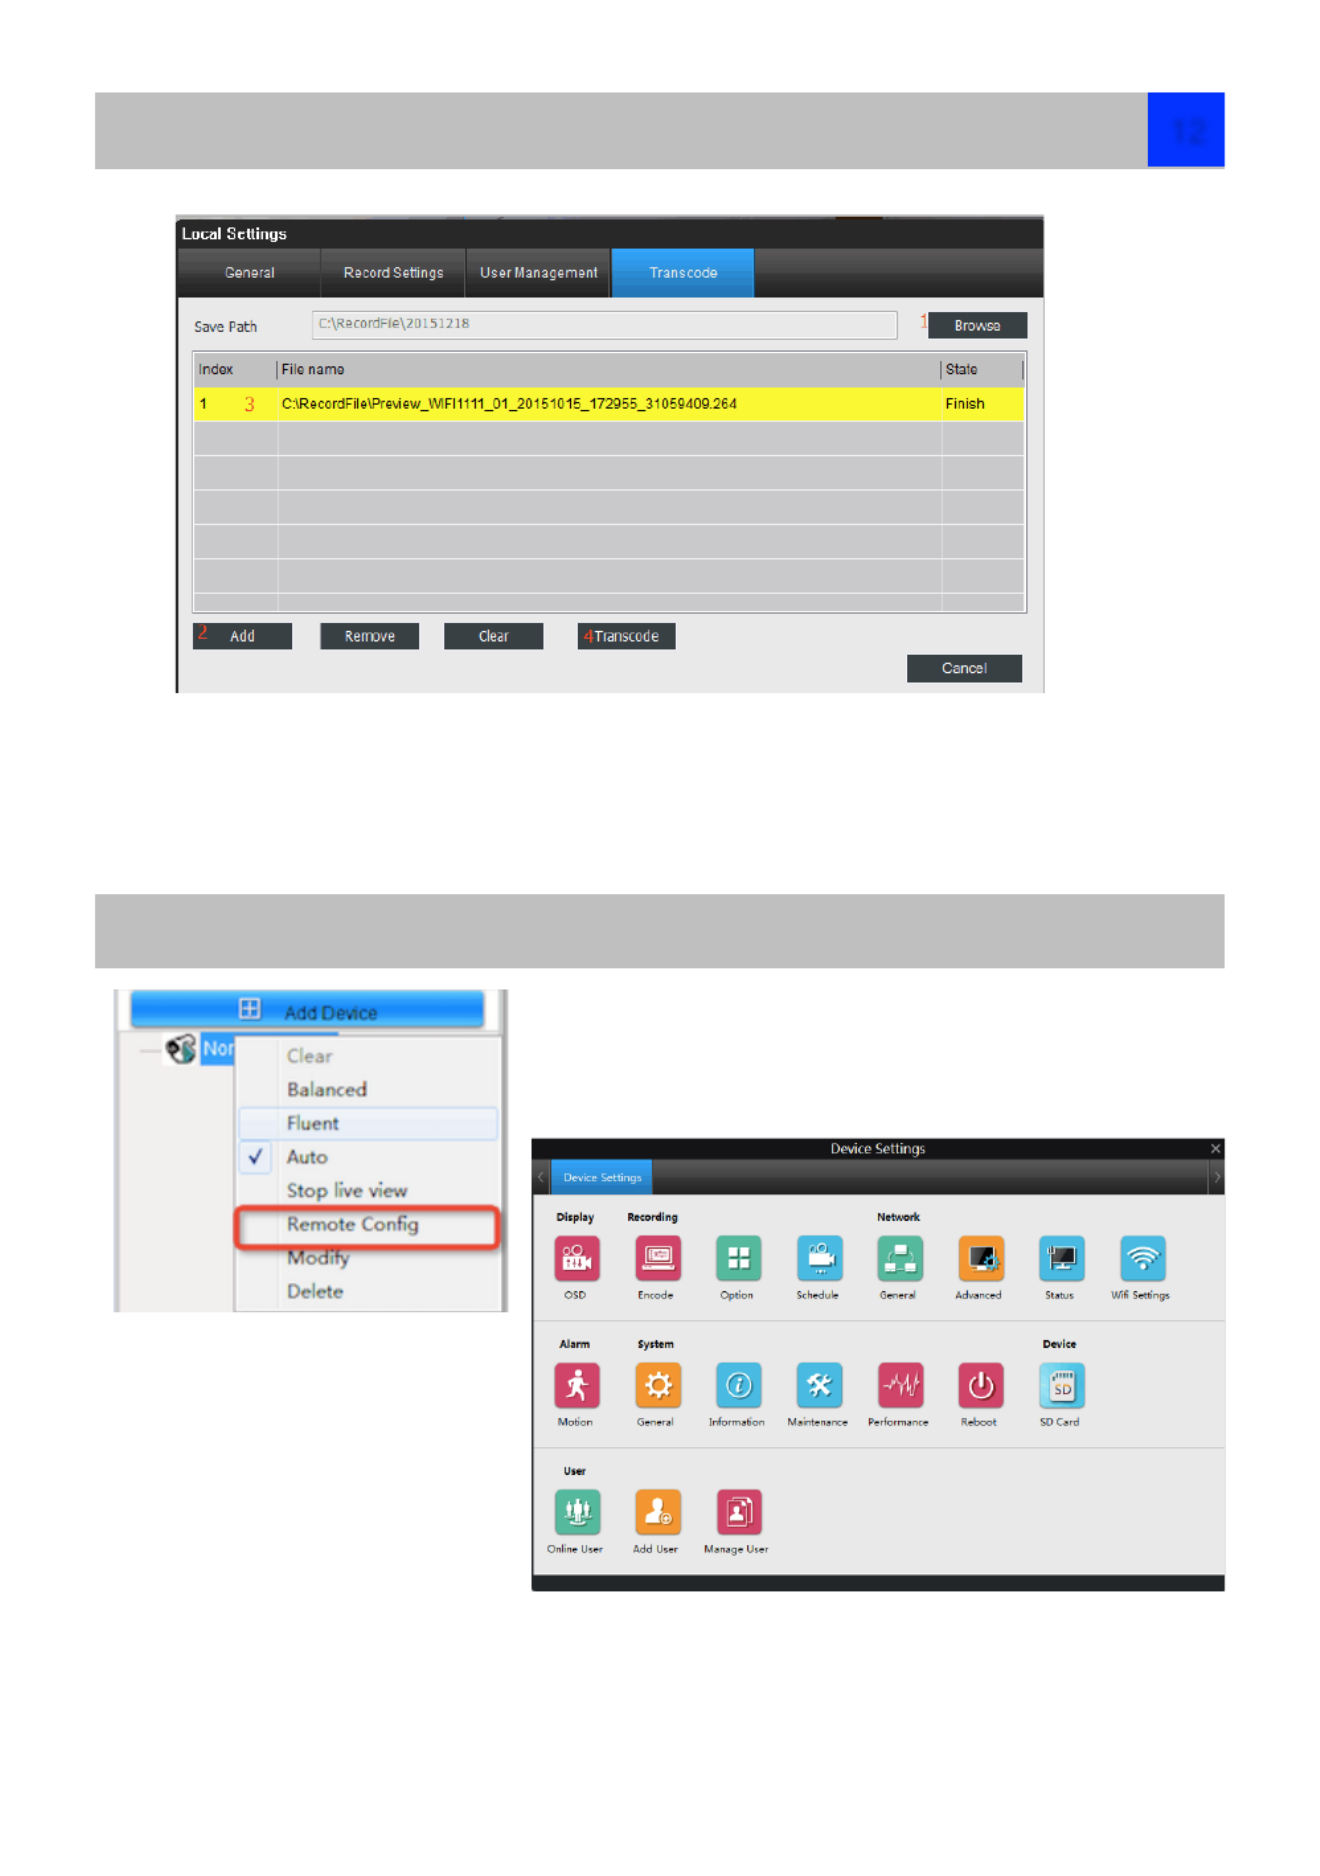
On This page , allows you to transfer the H.264 file to AVI file .
1.Click the Browse to setting the Save Path .
2,Click Add to add the file which you want to transcode to AVI format
3,Choose the file , then click Transcode ,On Status it will show Start and Finish after transcode succeed .
Right Click the Device it will show the setting window, Right ,
click the Remote Config , you will see below window and set the
the related parameters.
Client Software - Device Settings
12
Client Software - Local Settings
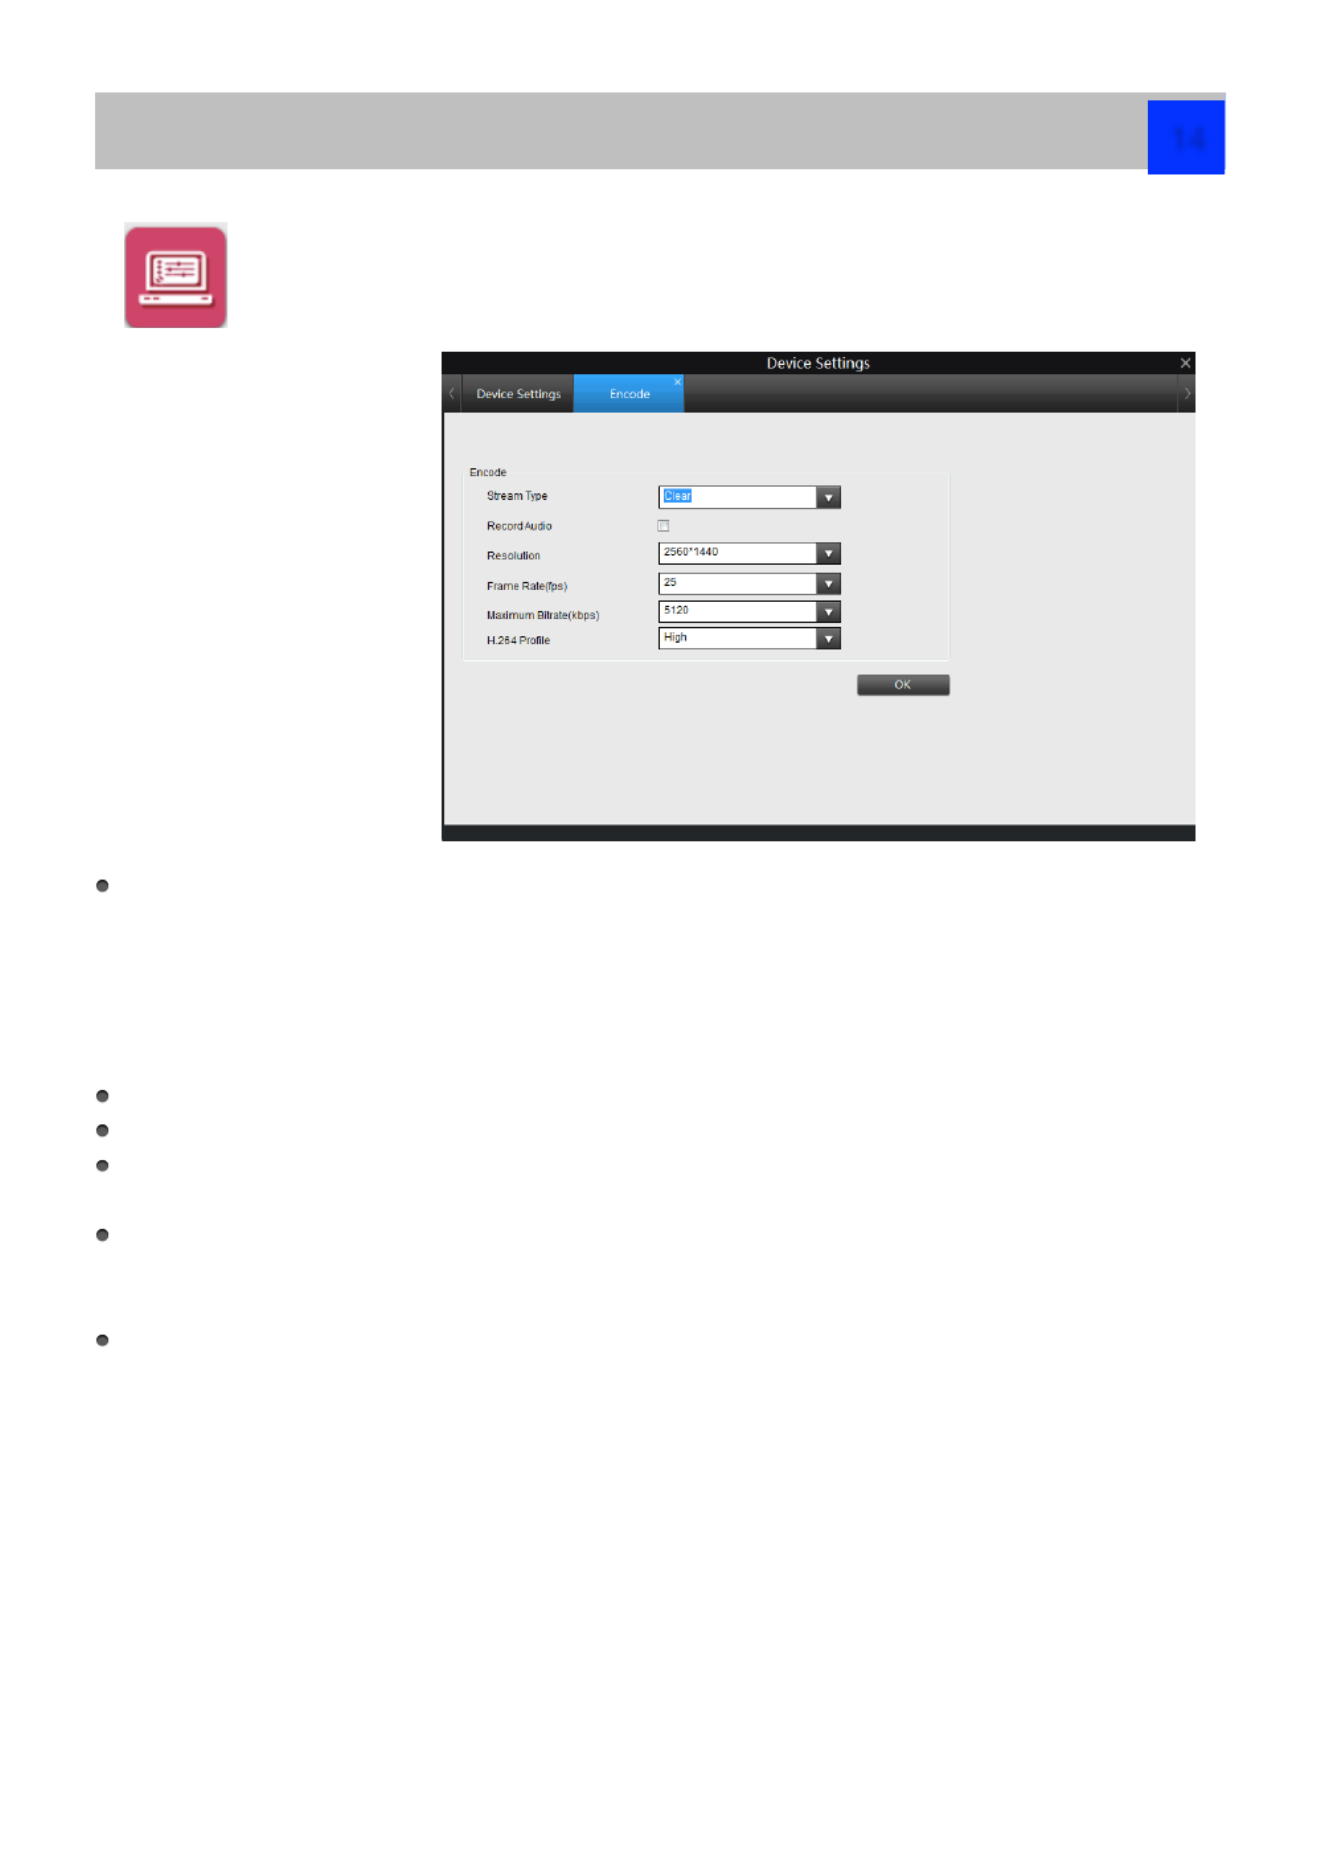
The Recording: Encode menu allows you to alter and customise how the Camera records
footage and “encodes” the files. You can choose and alter:
•the resolution (per channel),
•the frame rate (how many
images per second the
Camera records), and
•the data-rate of each video
stream. The higher the data
rate, the “better” your images
will look.
Stream Type: Whether you’re editing the parameters for the mainstream or the sub-stream.
•Clear(Main-Stream): the video feed that the Camera will record and display. This is the higher-quality
stream.
•Fluent(Sub-Stream): the video stream that the Camera will send to remote devices via a network or
the Internet. It is the lower-quality stream as a reduction in video size makes it easier to send over a
network.
Record Audio: recording with Audio
Resolution: Tells how many “little dots” are going to make up your image.
Frame Rate: Tells the number of frames per second (fps) that the Camera will record. Reducing the
number of fps will save hard drive space but potentially improve the data-rate per frame. not
Max. BitRate(Kbps): The actual amount of data that the Camera will use to record video. The higher the
bitrate, the more space each recording will take up on the hard disk. Generally speaking, recordings
encoded at higher bitrates will be of better quality, especially when recording movements.
H.264 Profile: Reolink can support Baseline/Main/High profile .
•BaseLine :The basic image, short delay and less competitive
•Main: Main Image ,with high encoding
•High: Super image, used for streaming applications.
The main-stream uses a variable bitrate to record video - the more movement occurs in the video, the
higher the bitrate will have to be.
If you set a high bitrate but a low frame rate, the Camera will still use all the data, resulting in potentially
higher quality per frame than at higher frame rates. !
The sub-stream uses a constant bit-rate to makes the video easier to stream over a network or the Internet. !
Note: Both the main-stream and the sub-stream are always operating - in fact, the sub-stream forms part of
the main-stream. The options will affect the output quality of each stream, but won’t change which one is
being used in different circumstances.
Recording ->Encode
14
Client Software - Local Settings
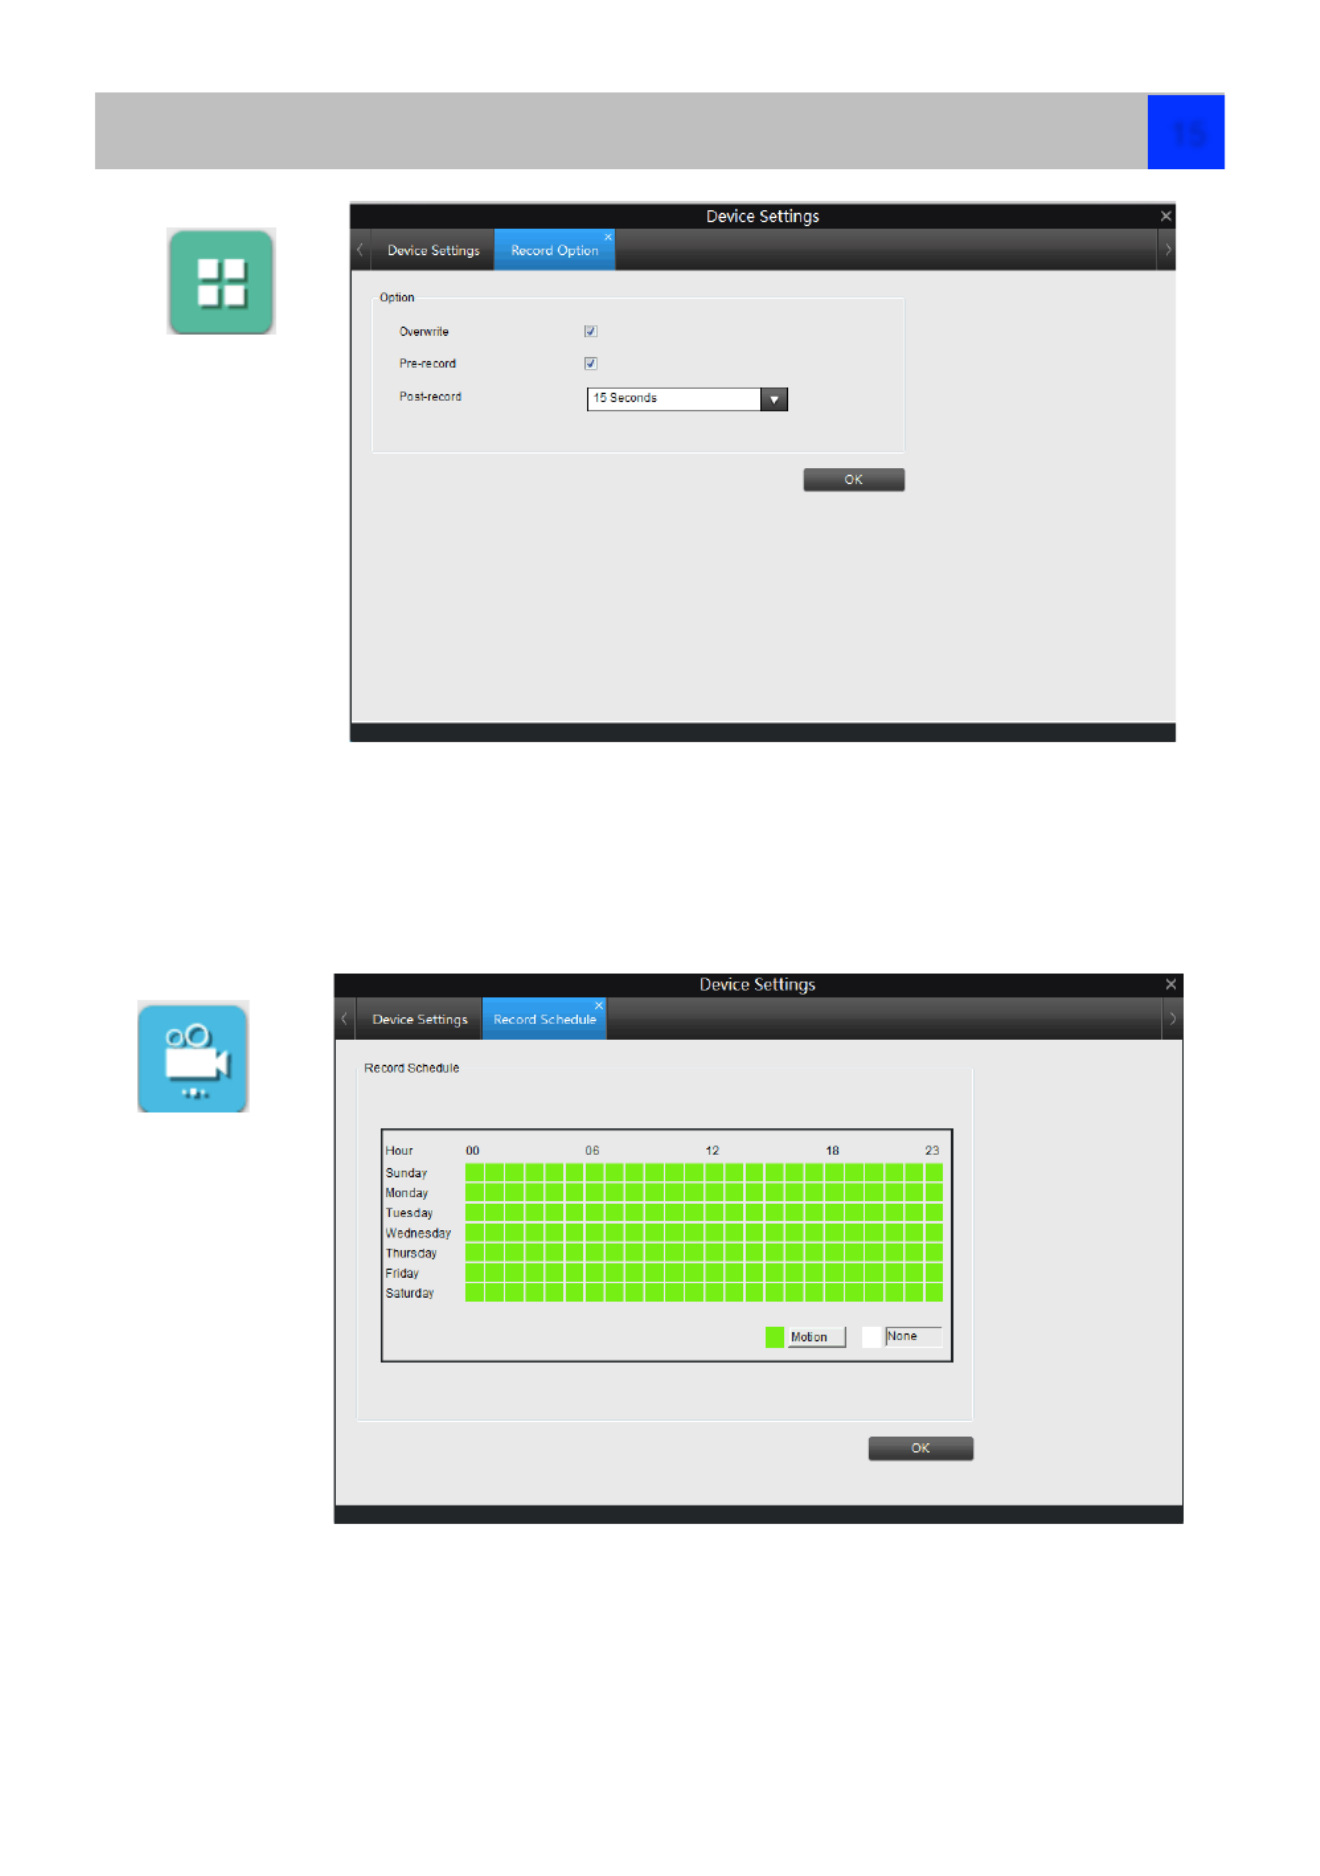
Overwrite When enabled, the SD card will record over the files already stored on the card. The camera will
always record over the oldest files on your SD card first.
Pre-record While Pre-Record is enabled, the camera will record a few seconds an event occurs.before
Post-record How long after an event occurs that the camera will continue to record.
Here you can setting the record schedule for Motion detection on SD Card .
SD card can only storage Motion Detection alarm , it don’t support continuous recording .
The SD card will only record when it detects something moving in front of a camera, and will then only
record footage from the camera(s) that do detect motion.#
Recording - Option (For camera with Built-in SD card only)
15

Network Access: Here you can choose between the three different types of networks that the Camera
can be connected to. The three types of networks are:
•DHCP: DHCP is a system where one device on your network (usually a router) will automatically
assign IP address to device connected to the network.
•STATIC: Static networks require all devices to have their IP addresses manually defined, as there is no
device dedicated to automatically assign IP address.
•PPPoE: An advanced protocol that allows the Camera to be more directly connected via a DSL
modem. This is an option for advanced users only.
IP Address: Just as Home and Office needs to have an address which identifies their location on the
road network, the Camera uses IPv4 addressing, which consists of four groups of numbers between 0
and 255, separated by periods. For example, a typical IP address might be “192.168.1.24” or similar.
Subnet Mask: If the IP address is like a street address, then a subnetwork is like your neighbourhood.
This will be formatted in a similar way to the IP address (ie. four numbers up to 255 separated by periods)
but contain very different numbers. In the above example, the Subnet Mask might be something like:
“255.255.255.0”.
Gateway: This is the address of the “way to the Internet.” To continue the road analogy, this is like your
local access point to the highway. This is an IP address in the same format as the others, and is typically
very similar to the IP address of the Camera. To continue the above example, it might be something such
as: “192.168.1.254”.
Auto DNS / Static DNS: Choose how you would like to define your DNS servers. We recommend leaving
it on Auto configuration.
Auto DNS: The Camera will automatically choose a DNS server. This is the recommended setting.
Static DNS: If you need to manually define a DNS server, then choose Static DNS. This is recommended
for advanced users only.
Preferred DNS Server: “Domain Name System”. Everything on the Internet is located via an IP address -
however, for ease of use, we associate domain names (such as “www.exampledomainname.com”) with
those IP addresses. These index are accessible in many locations online, and we call those locations
“DNS servers”.
Alternate DNS Server: A backup DNS server. This is for redundancy - your Camera will probably work
without one.
MAC Address: The Media Access Control address. This is a unique code which nothing else should
share. You can’t change this one - it’s pre-set when the Camera ships out.
* Many of the following networking settings are not required when using ReoLink P2P for Note:
remote access.
Network-> General
16

DDNS: The place to configure the Camera to automatically update a dynamic DNS service. If you want to remotely
access the Camera via the Internet, you’ll probably need to configure a DDNS account.
NTP: Network Time Protocol. If you’ve got the Camera connected to the Internet, you can have it automatically sync
time with an online server.
Email Settings: You may configure the Camera to work with an email account of your choice. This must be correctly
configured for the Camera’s auto-email feature to work.
FTP: File Transfer Protocol, you can use FTP to transfer files between Camera and computers on a network.
Media Port: Camera will use server port to send information through. Please note that,
You’ll need to enable UPnP on your router so your router can selectively open these ports, allowing the
Camera to communicate via the Internet. If your router doesn’t support UPnP, You may either get a new router
(which support UPNP) or you can manually forward ports from the router to the Camera. Port Forwarding is a
technical process and may require router knowledge.
The default port number is , which is not used by many other devices/programs. However, if you have9000
another Camera or Camera-like device, this port may be used already. If this is the case, change this value to
be unique.
HTTP Port: This is the port through which you will be able to log in to the Camera. it will need to be forwarded properly
in order to ensure smooth, latency-free communication. The default value is “85”, as this port is seldom used by othe
devices. If another device on your network is using this port, please change to other value. This is the port numbe
you’ll need to remember when logging in remotely from a remote PC via the HTTP interface.
What port number(s) should I use?
If the default port numbers are in use (85 and/or 9000) if 85 is already taken, try 86 or 87.
There’s no “right” port number, any port number will work, avoid using port numbers 80, 81, 82, 88 , 90, and 99
as these are often used by other devices.
RTSP Port: Real Time Streaming Protocol”, you may use this port to send the streaming file to Realplayer$ $ $ ,the default
RTSP port is 554
UPNP enable This feature is not required if you are using ReoLink P2P to access the Camera : ( ) UPnP makes
configuring your network easier and faster. To use the UPnP setting on the Camera, you’ll need a router which
supports this feature, with UPnP enabled. Note that many routers which do support UPnP do not come with the feature
enabled by default. You may need to ask your Internet service provider to turn it on.
When UPnP is enabled on your Camera and your router, the Ports that the Camera requires to be open for access to
and from the Internet will automatically be opened and closed as necessary by your router, saving you the trouble o
manually forwarding these ports. If UPnP is not enabled, or your router does not support this feature, you’ll need to
forward the ports the Camera uses from the router to the Camera - since this is a technically challenging process, we
strongly recommend using UPnP if possible.
UID: UThe Camera’s nique IDentifier code for P2P. For convenience, you may have this code sent to your email account
by clicking the button(provided that you’ve already set up your email account).Send UID
Network-> Advanced
17

DDNS Setting
In the same way as your home network can use static or dynamic IP addresses, many Internet providers
don’t issue (or charge more for) a static IP address for users. The easiest way to find out is to contact your
Internet Service Provider. Alternately, you can access the www.whatismyip.com service, make a note of
your IP, then reboot your router/gateway. This should refresh your Internet connection. If your IP address
changes, you have a dynamic IP address. If it stays the same, you may have a static IP - contact your ISP
to confirm.
DDNS Type: Choose the server that you’re using.
Server Domain Name: Enter the host name that you set up in your DDNS service. This is the address
you use to access your network.
Username and Password: Enter the username and password you setup with your DDNS server. These
do not have to match your username/password combination in either your Camera or router. (for the sake
of security, we suggest making them different).
Confirm Password: Retype the password to confirm
If the test is unsuccessful, a message will appear onscreen informing you that the “Update was
Unsuccessful”. This could mean that there’s a problem with your network setup, or there’s a problem with
the DDNS Account Name and Password you’re using.
Network-> Advanced-> DDNS
18

NTP Setup
NTP Server: The server you intend to use to access the current date and time. The default is pool.ntp.org.
NTP Port: The port that the NTP server uses. The default for pool.ntp.org is 123.
Enable Auto-Synchronize: click the checkbox to enable Auto-Sync
Synchronize Every : to set the Sync interval time .
Important: If you have enabled NTP - set this to the time zone where you are. For example, people in Eastern Australia
(Canberra, Sydney and Melbourne) choose GMT+10:00, whilst the Eastern Time zone in the USA and Canada is
GMT-05:00. (GMT stands for Greenwich Mean Time - it’s the baseline that keeps all the different time zones in sync.)
NOTE: Some NTP servers are NOT fully compatible with DST (Daylight Savings Time). This may cause your system to
double-count adding one or removing one more hour than they should, or cancel each other out. You may need to
change your time zone to adjust accordingly or simply not use NTP and DST simultaneously.
Network -> Advanced -> NTP
19

We suggest using as your email client - it’s quite easy to set up an account and use it solely for the Gmail
Camera. Other email servers may not work correctly.For the Auto-Mail function to work correctly, the
Camera will need to be correctly configured with the details of the email servers and addresses you want to
use.#
Enable SSL or TSL: Whether the email server
you’re using requires a secure link. This is by on
default and should be left on if you’re using any
of the preset email servers.
SMTP Server: You may use below mailbox :
Gmail (smtp.gmail.com), Windows Live Mail
(smtp.live.com) and Yahoo Mail
(smtp.mail.yahoo.com).
You’ll need to setup an account with one of these
email providers. All offer free email accounts.
To signup, visit the email provider’s website:
•Gmail (Google): smtp.gmail.com
•Yahoo Mail: smtp.mail.yahoo.com
•Windows Live Mail (Hotmail): smtp.live.com
The Camera will automatically adjust some
settings to make the configuration significantly
easier. If you want to use a different email server,
typically the outgoing email server of their ISP,
then you’ll need to contact your ISP to learn the
correct values.
SMTP Port: The SMTP port used by the email
pro vider of your cho ice . This fiel d will
automatically self-populate if you use one of the
presets.
Sender Address: The address you’re sending
the email . This will be the username you’ve from
set up for the email server you’re using, followed
by “@” and then the email server. For example:
“youraddress@gmail.com” or similar.
Sender Password: The password for the
outgoing email account.
Recipient Address: The email address you
want the Camera to send emails to. Note that the
Camera might send a large number of automatic
emails under certain conditions.
Attachment : You can select to attach picture or
video when send e-mail or receive only
notification.
For motion-based email alerts, this will be an
image of whatever triggered the motion detection.
Interval: The length of time that must elapse
after the Camera sends an email alert before it
will send another.
Short settings are likely to lead to huge Interval
numbers of alerts being sent by the Camera -
perhaps even several emails for one event (if that
one event lasts longer than the interval setting).
On the other hand, a long interval setting might
mean you’ll miss a specific update that you
needed. It will depend on your requirement.!
Network -> Advanced -> E-mail
20

FTP: File Transfer Protocol, you can use FTP to transfer files between Camera and computers on a
network.
FTP Server: Your FTP server address, can be IP address or the FTP link address, then input the FTP
port # .
Anonymous: If your FTP does not need username and password, you can click the Anonymous
checkbox, else you need to input your FTP username and password below.
Upload Directory: You need to input the upload folder name here .
Maximum File Length: You may manage your FTP storage file size, the default setting is 100MB/file .
FTP Schedule: You may set the FTP schedule time from below window, then click OK to save settings.
FTP Test: After finished setting, you may click Testing to verify your FTP settings, it will show FTP Test
Succeed or FTP Test Failed on the bottom of the window. If setting is failed, please check your
configuration again .
Device Setting -> Network -> FTP
21

Here you may find the network information of the camera that you are viewing :
IP Address
Subnet Mask
Gateway
Preferred DNS
Alternate DNS
For more details , you can refer to Device Setting -> Network -> General .
Device Setting -> Network -> Status
22
Specyfikacje produktu
| Marka: | Reolink |
| Kategoria: | Kamera monitorująca |
| Model: | Go |
Potrzebujesz pomocy?
Jeśli potrzebujesz pomocy z Reolink Go, zadaj pytanie poniżej, a inni użytkownicy Ci odpowiedzą
Instrukcje Kamera monitorująca Reolink

30 Grudnia 2025
30 Grudnia 2025
30 Grudnia 2025
30 Grudnia 2025
30 Grudnia 2025
4 Października 2024
4 Października 2024
4 Października 2024
4 Października 2024
4 Października 2024
Instrukcje Kamera monitorująca
- Kamera monitorująca Sony
- Kamera monitorująca Samsung
- Kamera monitorująca Tenda
- Kamera monitorująca Motorola
- Kamera monitorująca Stabo
- Kamera monitorująca Logitech
- Kamera monitorująca Xiaomi
- Kamera monitorująca Braun
- Kamera monitorująca Pioneer
- Kamera monitorująca TP-Link
- Kamera monitorująca Philips
- Kamera monitorująca Bosch
- Kamera monitorująca Gigaset
- Kamera monitorująca Hikvision
- Kamera monitorująca EZVIZ
- Kamera monitorująca Conceptronic
- Kamera monitorująca Panasonic
- Kamera monitorująca Canon
- Kamera monitorująca Crestron
- Kamera monitorująca Withings
- Kamera monitorująca Asus
- Kamera monitorująca Nedis
- Kamera monitorująca AG Neovo
- Kamera monitorująca Boss
- Kamera monitorująca TRENDnet
- Kamera monitorująca Marquant
- Kamera monitorująca Toshiba
- Kamera monitorująca D-Link
- Kamera monitorująca August
- Kamera monitorująca Niceboy
- Kamera monitorująca Ring
- Kamera monitorująca Garmin
- Kamera monitorująca Imou
- Kamera monitorująca Blaupunkt
- Kamera monitorująca Grundig
- Kamera monitorująca APC
- Kamera monitorująca Honeywell
- Kamera monitorująca BLOW
- Kamera monitorująca Manhattan
- Kamera monitorująca Strong
- Kamera monitorująca Swann
- Kamera monitorująca Kwikset
- Kamera monitorująca Kodak
- Kamera monitorująca Cisco
- Kamera monitorująca ORNO
- Kamera monitorująca Broan
- Kamera monitorująca Moxa
- Kamera monitorująca Synology
- Kamera monitorująca Gembird
- Kamera monitorująca ZTE
- Kamera monitorująca Turing
- Kamera monitorująca Lindy
- Kamera monitorująca Minox
- Kamera monitorująca Zebra
- Kamera monitorująca DSC
- Kamera monitorująca JVC
- Kamera monitorująca ZyXEL
- Kamera monitorująca Trust
- Kamera monitorująca LogiLink
- Kamera monitorująca Furrion
- Kamera monitorująca Linksys
- Kamera monitorująca Google
- Kamera monitorująca Digitus
- Kamera monitorująca Vimar
- Kamera monitorująca V-TAC
- Kamera monitorująca Dahua Technology
- Kamera monitorująca Schneider
- Kamera monitorująca Eufy
- Kamera monitorująca Ricoh
- Kamera monitorująca Emos
- Kamera monitorująca AVMATRIX
- Kamera monitorująca Renkforce
- Kamera monitorująca Rollei
- Kamera monitorująca Marshall
- Kamera monitorująca Perel
- Kamera monitorująca Somfy
- Kamera monitorująca Uniden
- Kamera monitorująca Netgear
- Kamera monitorująca Thomson
- Kamera monitorująca DiO
- Kamera monitorująca Velleman
- Kamera monitorująca Ferguson
- Kamera monitorująca DataVideo
- Kamera monitorująca Delta Dore
- Kamera monitorująca Pyle
- Kamera monitorująca Intellinet
- Kamera monitorująca CRUX
- Kamera monitorująca Setti+
- Kamera monitorująca Waeco
- Kamera monitorująca Vivotek
- Kamera monitorująca Vtech
- Kamera monitorująca Speco Technologies
- Kamera monitorująca EtiamPro
- Kamera monitorująca Edimax
- Kamera monitorująca Petcube
- Kamera monitorująca ION
- Kamera monitorująca First Alert
- Kamera monitorująca AirLive
- Kamera monitorująca Maginon
- Kamera monitorująca EnGenius
- Kamera monitorująca SPC
- Kamera monitorująca Planet
- Kamera monitorująca Brilliant
- Kamera monitorująca Genie
- Kamera monitorująca LevelOne
- Kamera monitorująca Axis
- Kamera monitorująca Sanyo
- Kamera monitorująca Lorex
- Kamera monitorująca Control4
- Kamera monitorująca Milesight
- Kamera monitorująca Aluratek
- Kamera monitorująca Abus
- Kamera monitorująca Elro
- Kamera monitorująca Olympia
- Kamera monitorująca Hama
- Kamera monitorująca Marmitek
- Kamera monitorująca Ubiquiti Networks
- Kamera monitorująca Western Digital
- Kamera monitorująca Netatmo
- Kamera monitorująca Schwaiger
- Kamera monitorująca Promise Technology
- Kamera monitorująca GVI Security
- Kamera monitorująca AVer
- Kamera monitorująca ZKTeco
- Kamera monitorująca Netis
- Kamera monitorująca Extech
- Kamera monitorująca Denver
- Kamera monitorująca Anker
- Kamera monitorująca Allnet
- Kamera monitorująca Marshall Electronics
- Kamera monitorująca Orion
- Kamera monitorująca Yale
- Kamera monitorująca SereneLife
- Kamera monitorująca Ernitec
- Kamera monitorująca AVerMedia
- Kamera monitorująca MEE Audio
- Kamera monitorująca Genius
- Kamera monitorująca Trevi
- Kamera monitorująca Technaxx
- Kamera monitorująca Atlona
- Kamera monitorująca Hanwha
- Kamera monitorująca Overmax
- Kamera monitorująca Quantum
- Kamera monitorująca Y-cam
- Kamera monitorująca Grandstream
- Kamera monitorująca Raymarine
- Kamera monitorująca Powerfix
- Kamera monitorująca Avanti
- Kamera monitorująca Ikan
- Kamera monitorująca Alecto
- Kamera monitorująca Avidsen
- Kamera monitorująca JUNG
- Kamera monitorująca Burg Wächter
- Kamera monitorująca Foscam
- Kamera monitorująca Lumens
- Kamera monitorująca Monacor
- Kamera monitorująca Dörr
- Kamera monitorująca M-e
- Kamera monitorująca EVE
- Kamera monitorująca Smartwares
- Kamera monitorująca Adj
- Kamera monitorująca Qian
- Kamera monitorująca Arenti
- Kamera monitorująca Elmo
- Kamera monitorująca Vitek
- Kamera monitorująca Alfatron
- Kamera monitorująca UniView
- Kamera monitorująca Clas Ohlson
- Kamera monitorująca Laserliner
- Kamera monitorująca Megasat
- Kamera monitorująca REVO
- Kamera monitorująca BZBGear
- Kamera monitorująca BirdDog
- Kamera monitorująca KJB Security Products
- Kamera monitorująca HiLook
- Kamera monitorująca Profile
- Kamera monitorująca Aldi
- Kamera monitorująca Aritech
- Kamera monitorująca Acti
- Kamera monitorująca ACME
- Kamera monitorująca Flamingo
- Kamera monitorująca Caliber
- Kamera monitorująca Eminent
- Kamera monitorująca Sitecom
- Kamera monitorująca Exibel
- Kamera monitorująca Fortinet
- Kamera monitorująca KlikaanKlikuit
- Kamera monitorująca Trebs
- Kamera monitorująca Ednet
- Kamera monitorująca Steren
- Kamera monitorująca Flir
- Kamera monitorująca Buffalo
- Kamera monitorująca Arlo
- Kamera monitorująca Nest
- Kamera monitorująca Siedle
- Kamera monitorująca Hive
- Kamera monitorująca Switel
- Kamera monitorująca Chacon
- Kamera monitorująca InFocus
- Kamera monitorująca Hombli
- Kamera monitorująca Naxa
- Kamera monitorująca Konig
- Kamera monitorująca Valueline
- Kamera monitorująca BRK
- Kamera monitorująca QSC
- Kamera monitorująca Xavax
- Kamera monitorująca Vaddio
- Kamera monitorująca Gira
- Kamera monitorująca Interlogix
- Kamera monitorująca Boyo
- Kamera monitorująca IC Intracom
- Kamera monitorująca Iget
- Kamera monitorująca EverFocus
- Kamera monitorująca Adesso
- Kamera monitorująca Satel
- Kamera monitorująca POSline
- Kamera monitorująca Notifier
- Kamera monitorująca Hawking Technologies
- Kamera monitorująca Friedland
- Kamera monitorująca Nexxt
- Kamera monitorująca Monoprice
- Kamera monitorująca Watec
- Kamera monitorująca Beafon
- Kamera monitorująca Chuango
- Kamera monitorująca ETiger
- Kamera monitorująca Videcon
- Kamera monitorująca INSTAR
- Kamera monitorująca Provision ISR
- Kamera monitorująca Aqara
- Kamera monitorująca Advantech
- Kamera monitorująca Digital Watchdog
- Kamera monitorująca Ganz
- Kamera monitorująca AViPAS
- Kamera monitorująca ClearOne
- Kamera monitorująca Ebode
- Kamera monitorująca Oplink
- Kamera monitorująca Sonic Alert
- Kamera monitorująca Linear PRO Access
- Kamera monitorująca Summer Infant
- Kamera monitorująca SMC
- Kamera monitorująca Topica
- Kamera monitorująca Kogan
- Kamera monitorująca Iiquu
- Kamera monitorująca Verint
- Kamera monitorująca Brinno
- Kamera monitorująca Rostra
- Kamera monitorująca Caddx
- Kamera monitorująca Spyclops
- Kamera monitorująca EKO
- Kamera monitorująca Kguard
- Kamera monitorująca Woonveilig
- Kamera monitorująca Mobi
- Kamera monitorująca Surveon
- Kamera monitorująca Hollyland
- Kamera monitorująca Epcom
- Kamera monitorująca Indexa
- Kamera monitorująca Lutec
- Kamera monitorująca Whistler
- Kamera monitorująca ClearView
- Kamera monitorująca VideoComm
- Kamera monitorująca IMILAB
- Kamera monitorująca 3xLOGIC
- Kamera monitorująca Pelco
- Kamera monitorująca Leviton
- Kamera monitorująca Inkovideo
- Kamera monitorująca Pentatech
- Kamera monitorująca Weldex
- Kamera monitorująca SecurityMan
- Kamera monitorująca Canyon
- Kamera monitorująca CNB Technology
- Kamera monitorująca Tapo
- Kamera monitorująca Aigis
- Kamera monitorująca Exacq
- Kamera monitorująca Brickcom
- Kamera monitorująca Laxihub
- Kamera monitorująca Securetech
- Kamera monitorująca EFB Elektronik
- Kamera monitorująca NetMedia
- Kamera monitorująca Videotec
- Kamera monitorująca Illustra
- Kamera monitorująca Nivian
- Kamera monitorująca E-bench
- Kamera monitorująca Syscom
- Kamera monitorująca Tecno
- Kamera monitorująca Night Owl
- Kamera monitorująca Guardzilla
- Kamera monitorująca Astak
- Kamera monitorująca Blink
- Kamera monitorująca Milestone Systems
- Kamera monitorująca Zavio
- Kamera monitorująca Campark
- Kamera monitorująca IPX
- Kamera monitorująca Dedicated Micros
- Kamera monitorująca Hamlet
- Kamera monitorująca Annke
- Kamera monitorująca AVTech
- Kamera monitorująca Qoltec
- Kamera monitorująca Approx
- Kamera monitorująca Digimerge
- Kamera monitorująca Wisenet
- Kamera monitorująca Infortrend
- Kamera monitorująca Epiphan
- Kamera monitorująca Mach Power
- Kamera monitorująca Compro
- Kamera monitorująca Aida
- Kamera monitorująca Ikegami
- Kamera monitorująca Accsoon
- Kamera monitorująca Vimtag
- Kamera monitorująca Gewiss
- Kamera monitorująca Alula
- Kamera monitorująca Insteon
- Kamera monitorująca Costar
- Kamera monitorująca ALC
- Kamera monitorująca Security Labs
- Kamera monitorująca Comtrend
- Kamera monitorująca Seneca
- Kamera monitorująca Avigilon
- Kamera monitorująca American Dynamics
- Kamera monitorująca Vosker
- Kamera monitorująca Sentry360
- Kamera monitorująca Bea-fon
- Kamera monitorująca Owltron
- Kamera monitorująca Enabot
- Kamera monitorująca Luis Energy
- Kamera monitorująca Sir Gawain
- Kamera monitorująca VisorTech
- Kamera monitorująca Atlantis Land
- Kamera monitorująca B & S Technology
- Kamera monitorująca I3International
- Kamera monitorująca IDIS
- Kamera monitorująca Ecobee
- Kamera monitorująca Conbrov
- Kamera monitorująca HuddleCamHD
- Kamera monitorująca Mobotix
- Kamera monitorująca IOIO
- Kamera monitorująca BIRDFY
- Kamera monitorująca I-PRO
- Kamera monitorująca DVDO
- Kamera monitorująca TCP
- Kamera monitorująca Bolin Technology
- Kamera monitorująca Nextech
Najnowsze instrukcje dla Kamera monitorująca
28 Stycznia 2025
25 Stycznia 2025
17 Stycznia 2025
17 Stycznia 2025
15 Stycznia 2025

13 Stycznia 2025

13 Stycznia 2025
13 Stycznia 2025

12 Stycznia 2025
12 Stycznia 2025