Instrukcja obsługi Pantech Element
Przeczytaj poniżej 📖 instrukcję obsługi w języku polskim dla Pantech Element (76 stron) w kategorii smartfon. Ta instrukcja była pomocna dla 14 osób i została oceniona przez 2 użytkowników na średnio 4.5 gwiazdek
Strona 1/76

User Guide for Android 3.2 (Honeycomb)
Thank you for choosing the Pantech Element, our latest tablet. The
Pantech Element has many features designed to enhance your mobile
experience. With its unique and stylish design, you will enjoy the entire
Element experience.
This user guide contains important and useful information that will
maximize your familiarity with all that the Pantech Element has to offer.

2
Table of contents
Important Safety Information ...................................... 4
Safety information .................................................................................5
Safety precautions .................................................................................5
Basic instructions ...................................................................................6
Getting Started .................................................................7
Inside the package .................................................................................8
Checking the SIM/USIM card.................................................................8
Installing the microSD™ card ...............................................................9
Charging battery ....................................................................................9
Turning the Element on/off ................................................................10
Unlocking/locking screen ...................................................................10
Using touch screen ............................................................................... 11
Product overview ................................................................................... 11
Activating the Element ........................................................................ 13
Adjusting the volume ........................................................................... 14
Entering text .......................................................................................... 14
Understanding home screen .............................................................. 14
Customizing home screen .................................................................. 17
Connectivity ....................................................................19
Using a Wi-Fi network ......................................................................... 20
Connecting to a mobile network ....................................................... 21
Legal Disclaimer ................................................................................... 21
Communication ............................................................. 22
Contacts .................................................................................................23
Email .......................................................................................................24
Gmail .......................................................................................................25
Google Talk ............................................................................................26
Latitude ..................................................................................................27
NotePad ..................................................................................................29
Sketch Pad ............................................................................................. 31
Voice Recorder ......................................................................................33
Entertainment ............................................................... 35
Camera ...................................................................................................36
Video .......................................................................................................38
Music ......................................................................................................40
Photo Frame .......................................................................................... 41
Google Books ........................................................................................42
Net Media .............................................................................................. 44
YouTube ..................................................................................................45
Web ........................................................................................................ 46

3
Table of contents
Tools .................................................................................49
Calculator.............................................................................................. 50
Calendar ................................................................................................ 50
Clock ....................................................................................................... 51
Clock Tools ............................................................................................. 51
Market .....................................................................................................52
Maps ........................................................................................................53
Navigation ..............................................................................................54
Places ......................................................................................................55
Search .....................................................................................................55
Settings ........................................................................... 57
Wireless & networks .............................................................................58
Sound ......................................................................................................58
Screen .....................................................................................................59
Location & security ..............................................................................59
Applications........................................................................................... 61
Accounts & sync.................................................................................... 61
Privacy ....................................................................................................62
Storage ...................................................................................................62
Language & input .................................................................................63
Accessibility ..........................................................................................63
Date & time ........................................................................................... 64
About tablet .......................................................................................... 64
AT&T software update .........................................................................65
Appendix .........................................................................66
PC Suite ..................................................................................................67
Troubleshooting checklist ..................................................................67
Specifications ...................................................................................... 68
Cautions on waterproof and dustproof functions ........................ 68
FCC Regulatory Compliance ............................................................. 70
Warranty ................................................................................................. 71
Legal notice ...........................................................................................74
Index........................................................................................................75

Safety information
Safety precautions
Basic instructions
Important Safety
Information

5
Safety information
The following list shows how to maintain your tablet, together with
precautions to take.
xKeep your tablet and its accessories out of the reach of pets.
xMaintain your tablet in dry conditions and keep it within normal
operating temperatures. Temperatures higher than 55°C (131°F) or
lower than -20°C (-4°F) may damage your tablet.
xDo not try to dry your tablet in a microwave oven. If you do, sparks can
occur and cause an explosion or fire.
xDo not use or store your tablet in dusty, dirty areas.
xDo not attempt to disassemble your tablet.
xDo not drop or cause severe impact to your tablet.
xDo not use chemical products, cleaning solvents or detergents to
clean your tablet.
xIf your tablet does not work properly, contact your dealer
immediately.
xUse only authorized batteries, battery chargers and accessories. Any
malfunction or damage caused by the use of unauthorized batteries,
battery chargers and accessories will void the limited product
warranty.
xEnsure that the battery charger does not come in contact with
conductive objects.
Safety precautions
Using a tablet while driving may be prohibited.
Please check local laws and regulations with regard to the prohibition of
tablet use while driving, and comply with them.
Use of your tablet while driving may disturb your concentration and so
cause an accident. Always switch your tablet off to drive safely.
Switch off in restricted areas
Always switch your tablet off in areas where tablet use is restricted.
Switch off in explosive or dangerous areas
Always switch your tablet off in areas with explosive or dangerous
materials (such as fuels, fuel stations or areas containing chemical
goods) and obey any instructions or signs.
Switch off in aircraft
Always switch your tablet off or select (select > Airplane mode Settings
Wireless & networks Airplane mode > ) when you are in an aircraft. The
electromagnetic waves emitted by your tablet may affect the electronic
navigation equipment in the aircraft.
Switch off in hospitals and near medical equipment
Always switch your tablet off in hospitals, and obey the regulations or
rules of the hospital.
Switch your tablet off when using medical equipment for private
purposes, if possible. Always consult with the medical equipment’s
manufacturer or an expert regarding tablet use near the medical
equipment.
Important Safety Information

6
Important Safety Information
Installing a hands free device in your vehicle
Install vehicle hands free devices away from the steering wheel and
airbag expansion area. Otherwise, injury may result.
Tablets and other electronic devices
Tablets emit electromagnetic waves that may affect nearby electronic
devices. When it is switched on, do not place your tablet close to delicate
electronic equipment.
Basic instructions
Useful tips
To understand information contained in this user guide, please keep in
mind the following:
xWords in bold type refer to the relevant action on the screen. For
example, “Tap ” means that you have to tap below the Maps Maps
Maps icon . Words might be placed below or next to an icon or
included in the text.
xThe symbol “>” refers to the next action. For example, “Tap Settings
> ” means that you should tap Settings first and Language & input
Language & input next.
xApplications menu refers to the screen where all applications of the
Element appear.
xHome screen refers to the screen that appears first in the idle mode.
xIdle mode refers to the status where you stay on the home screen
ready to run an application.
xChannels through which you can share items (e.g. contacts and
pictures) increase as you subscribe to a service. For example, if you
sign up for Facebook or Twitter, you can also share information with
others through Facebook or Twitter.
Google accounts
It is recommended that you have a Google account registered to use
some applications provided by Google, e.g. Calendar, Latitude, Market,
Talk, and Gmail of the Element. For more information on setting up the
Google account, refer to Activating the Element on page 13.
Pop-up windows
Pop-up windows can appear on the screen in the following cases and the
running application(s) can stop operating:
xWhen the remaining battery capacity is insufficient;
xWhen the remaining memory space is insufficient.
In the above cases, charge the battery or secure enough memory space
and take the relevant steps.
Please note that Instructions of this user guide are written based on the
default settings of the tablet. Therefore, captured images or functions
may differ according to the updated Android Operating System. For
more details, please contact the nearest dealer.
Default file name
When a file is automatically saved in the Element, the file name follows
the file name policy of the Android Operating System: imgMM [month]
DD [day]YY [year]_hh [hour] mm [minute]ss[second].
For example, when an image is saved automatically in the Sketch Pad, its
file name should be designated as follows: image010611_220328.jpg.

Inside the package
Checking the SIM/USIM card
Installing the microSD™ card
Charging battery
Turning the Element on/off
Unlocking/locking screen
Using touch screen
Product overview
Activating the Element
Adjusting the volume
Entering text
Understanding home screen
Customizing home screen
Getting Started

8
Getting Started
Follow the steps below before using the Element.
Inside the package
The package should contain the following items:
xTablet (The battery is integrated into the device.)
xCharger (Travel Adapter)
xUSB Cable
xQuick Start Guide
xAccessories for your tablet are sold at att.com/WirelessAccessories
or visit your local AT&T store.
Checking the SIM/USIM card
The SIM/USIM card is already pre-installed in the Element. Should you
need to replace the SIM card, please follow the steps below:
1. Open the protective cover on the down side of the Element. Note that
the left one of the two covers is dedicated to the SIM/USIM card and
the microSD™ card. Check the correct location of the slot on page 12.
2. Push the SIM/USIM card and withdraw it from the slot.
3. Insert another SIM/USIM card.
4. Close the protective cover.
About the SIM/USIM card
When you subscribe to the network operator, you receive the Subscriber
Identity Module (SIM) card or the Universal Subscriber Identity Module
(USIM) card that contains your registration information, PIN code, and
others. Please keep it secure and handle carefully. Do not bend, scratch
or expose it to moisture. Avoid static electricity.

9
Getting Started
Installing the microSD™ card
1. Open the protective cover on the down side of the Element and insert
the microSD™ card into the slot. Note that the left one of the two
covers is dedicated to the SIM card and the microSD™ card. Check
the correct location of the slot on page 12. Ensure that the logo of the
microSD™ card is facing upward.
2. Close the protective cover.
About the microSD™ card
A microSD™ card is a removable flash memory card where you can save
data. Save pictures and contacts, and download applications to the SD
card. A memory space of 16GB is embedded in the Element: you can
expand memory by up to 32GB using the external microSD™ card. It is
recommended that you format the microSD™ card before using the
Element. For more information on formatting the microSD™ card, refer
to page 62.
Charging battery
Power might not turn on if the battery voltage is too low or battery is
discharged. In that case, charge the battery with the included charger for
more than ten minutes. It is recommended that you charge the battery
fully before you use the Element.
Note Red light blinks once when you press power button in the case of not
enough battery to turn on. Then, charge the battery for at least ten minutes
before you turn on power.
1. Open the protective cover on the down side of the Element and
connect the USB connector to the Element. Note that the right
one of the two covers is dedicated to the USB connector and HDMI
port. Make sure to align the connector as indicated in the image.
Otherwise, the charging connector will be damaged and the battery
will not be charged.
Correct Incorrect
2. Connect the other end of the USB data cable to the USB charger.
3. Plug in the USB charger to an electrical outlet. The battery starts to be
charged.
4. Disconnect the USB charger from the Element when the battery is
fully charged.

10
Getting Started
About battery
The Element uses a Lithium Ion (Li-Ion) battery. Please use the included
charger and USB cable for the optimal Pantech Element™ charging
performance with higher output current rating. Maximum hours to
use the Element might vary depending on applications that you use,
temperatures and serviced types that the service provider offers. For
more details, contact your nearest dealer.
Cautions
xPlease use the included charger and USB cable for the optimal Pantech
Element™ charging performance with higher output current rating.
Turning the Element on/off
To turn on the Element,
1. Press and hold the LOCK/PWR key for a few seconds.
2. Unlock the screen with your finger.
To turn off the Element,
1. Press and hold the LOCK/PWR key.
2. Tap . The screen will turn off in a few seconds.OK
Unlocking/locking screen
The screen is locked by default when you turn on power. To unlock the
screen,
1. Press the LOCK/PWR key.
2. Drag the inner ring to the edge of the circle to unlock the screen. Draw
a pattern if the screen is protected by pattern lock. Enter a PIN or a
password if the screen is locked by a PIN or a password.
➠
Locking screen
To lock the screen, press the LOCK/PWR key. It is recommended to
lock the screen to protect information in the Element and reduce
battery usage. You can have the Element locked automatically in a
predetermined time; refer to page 59 for screen timeout.
11
Getting Started
Using touch screen
All of the functions of the Element, except for power and volume, are
performed on the touch screen. Therefore, it is essential to know how to
use the touch screen.
The following finger actions might help you easily understand how to use
the touch screen.
xTap: Touch an item (e.g. application or widget) once that appears on
the screen with your finger to run it or access a menu or an option
xDouble tap: Tap an item twice with your finger
xDrag: Tap and hold your finger on an item and move it without losing
contact with the screen
xFlick: Place a finger on an empty space of the screen and move the
screen up or down, or left or right
xPinch: Place two fingers on the screen and move them apart to zoom
in a picture, a document or a web page, or move them together to
zoom out
xSelect and tap: Tap an item in the list of options available
xPress and hold: Press a key, button or any item for a few seconds until
a list of options appears
Cautions
xDo not use sharp tools that can scratch the touch screen.
xDo not allow the touch screen to come in contact with chemicals.
The screen may malfunction in chemicals.
xDo not sit on the Element: the touch screen can be damaged.
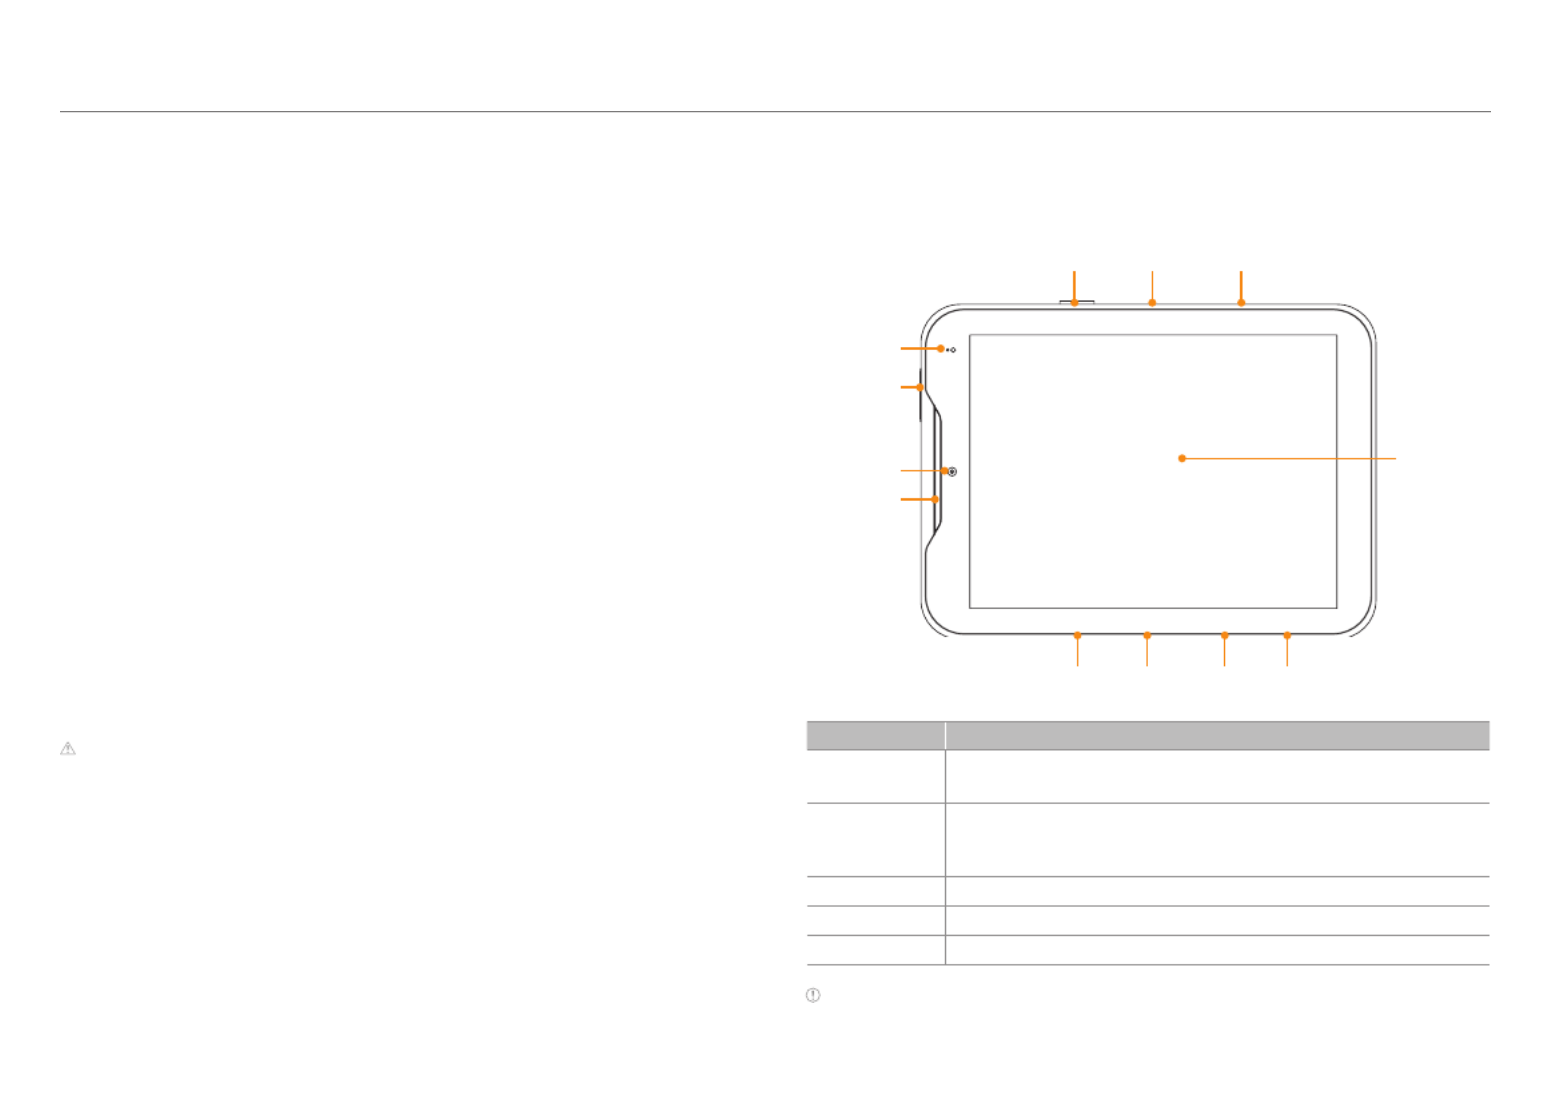
Product overview
Front view
Power/lock
Front
camera
Volume Mic
Speaker
Sensor/
LED
Touch
screen
Ear jack
SIM/USIM
card slot
microSD™
card slot
Micro
USB slot
Micro-HDMI port
Items Description
Ambient light
sensor
Adjusts screen brightness according to the surrounding
brightness
LED
Emits light when the battery is being charged while the Element
is turned on: in green when more than 97% of the battery is
charged; in red when less than 97% of the battery is charged
Ear jack Provides sound via earphone
Front camera Takes photos
Speaker Provides sound
Note Make sure not to cover the sensor with the LCD protection film. If the
sensor is covered, the Element might not detect the surrounding brightness.
12
Getting Started
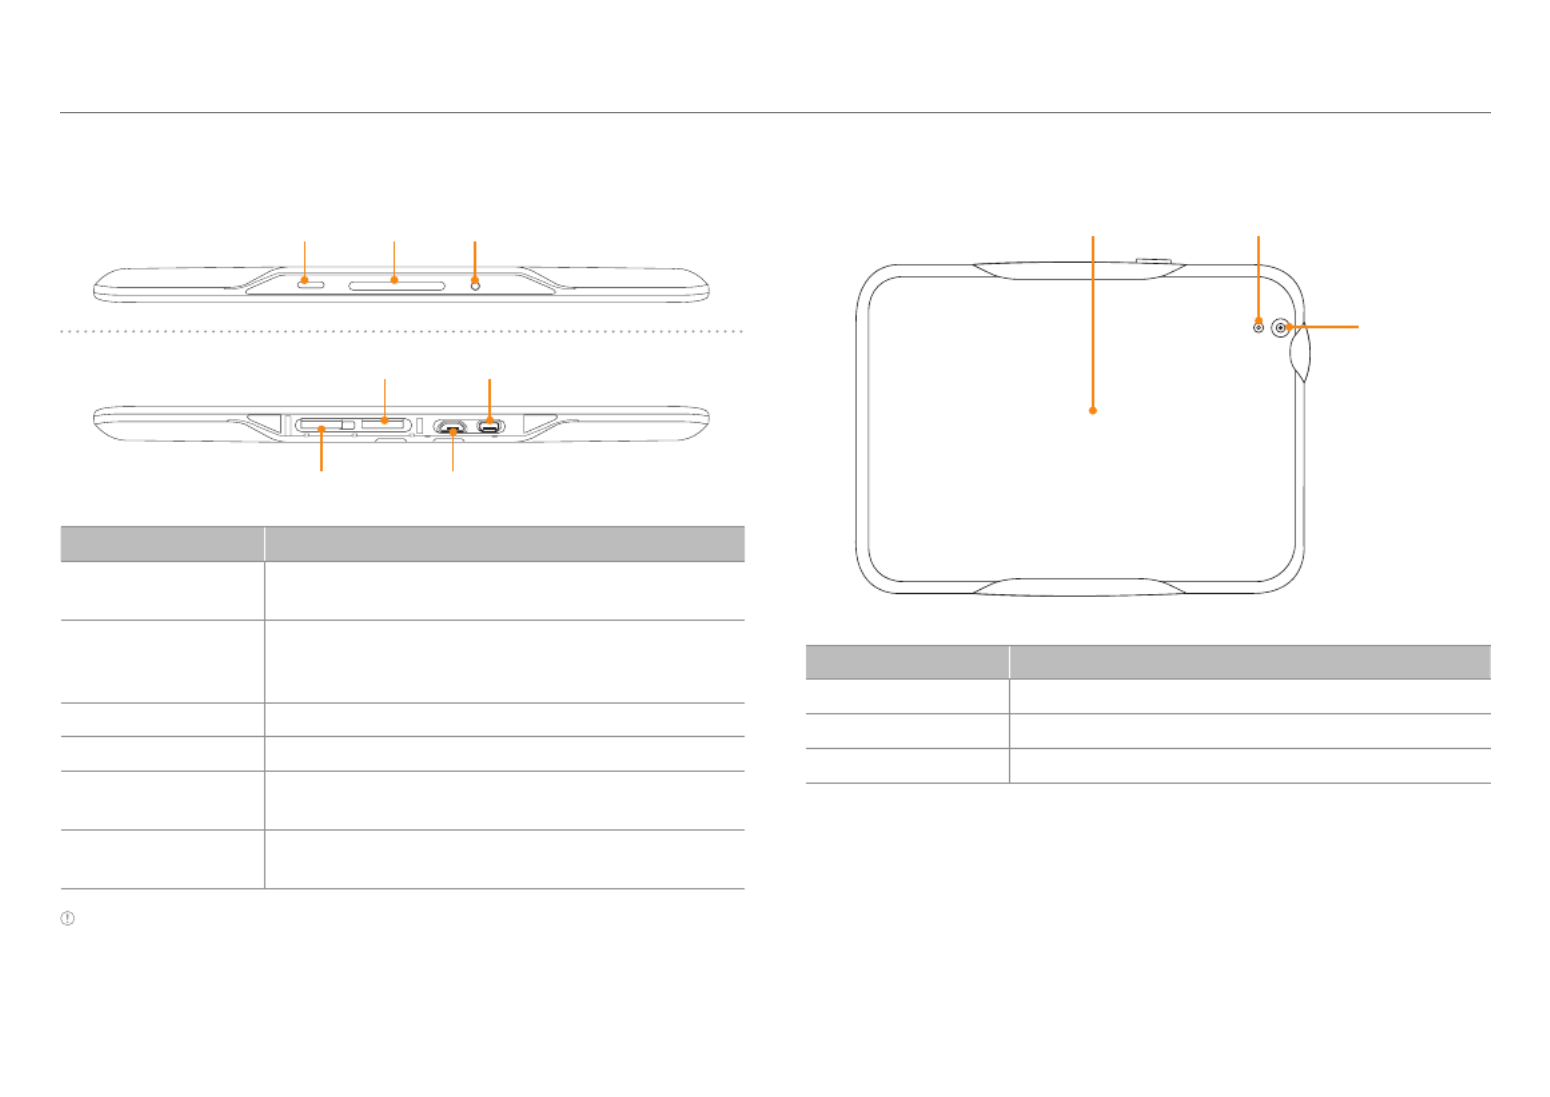
Rear view
Battery cover Camera flash
Rear
camera
Item Description
Rear camera Takes photos
Camera flash Provides light for pictures
Battery cover Protects the battery
Side views
Power/lock MicVolume
microSD™ card slot
SIM/USIM card slot Micro USB port
Micro HDMI port
Item Description
Mic Receives sound; Note that you should not insert a thin
clip into the hole
Volume
Adjusts all sound volumes; reboots the Element if you
press and hold the two volume keys at the same time
for a few seconds
Power/lock Locks the screen; turns on/off the Element
microSD™ card slot Inserts the microSD™ card
Micro USB port Connects the Element and your PC via the USB cable;
Receives power via the USB charger
Micro HDMI port Connects the Element and digital devices via the HDMI
cable
Note The Power/lock key comes with a rubber grommet. You can take it off from
the Element.

13
Getting Started
Activating the Element
Go through the following steps when you turn on the Element for the first
time or after you have reset it.
Learning how to use the Element
1. Press and hold the Power/Lock key to turn on the Element.
2. Tap . If you want to change the language other than English, tap Start
English, select and tap the language for the Element.
3. Tap Next for Use Google’s location service. Deselect the
checkbox(es) next to the option about the Wi-Fi mobile network and
location if you do not want to allow the services.
4. Adjust the date and time for the Element and tap Next. If you want to
use the network-provided time, tap Use network-provided time on
the top right side of the screen and tap .Next
5. Tap Next for Sign in with your Google Account. Tap if you want to Skip
set up the Google account later.
6. Tap Create account if you want to create a new Google account. If
you have a Google account, enter your email address and password
for the account and tap . It takes a few minutes to complete Sign-in
the sign-in process. If the process does not proceed due to the
network problems, tap Connect to Wi-Fi and take the necessary
steps.
7. Select and tap a Wi-Fi network available, enter the password, and tap
Connect. If you want the password to be displayed, tap the checkbox
in front of and tap .Show password Connect
8. Tap in the screen where networks appear.Next
9. Enter the password again for the Google account and tap .Sign-in
Creating a Google account
After finishing learning how to use the Element, create a Google account
following the next steps. You can skip them if you have already your own
Google account.
1. Tap > > > Apps Settings Accounts & sync + Add account.
2. Tap .Google Accounts
3. Tap Create account.
4. Enter the user name for the Google account, your first name and last
name, and . The user name should be 6–30 characters long. You Next
can select an alternative.
5. Take the necessary steps in the following cases:
xTap Connect to Wi-Fi if you have not connected the Element to
the Wi-Fi network, and follow the instructions. Tap in the Next
Create a new Google Account screen.
xEnter another preferred username if it is not available, and tap
Next. You can select the alternative.
6. Enter a password and enter it again to confirm. You should enter at
least 8 characters.
7. Tap .Next
8. Select and tap a security question and enter an answer. You can enter
the recovery address if you want.
9. Tap for the Google Terms of Service.I agree, Next
10. Type the characters that appear on screen and tap Next.
11. Tap the checkbox(es) for sync. Sync options for Books, Calendar,
Contacts, and Gmail are selected by default.
12. Tap .Done
14
Getting Started
Adjusting the volume
In the idle mode, press the right volume key of the Element if you want to
increase the volume. Press the left volume key if you want to decrease
the volume. Refer to page 58 for setting volumes.
Customizing notification tones
1. Tap > > .Apps Settings Sound
2. Tap .Notification ringtone
3. Select the tone and tap .OK
Setting to the silent mode
1. Tap > > > Apps Settings Sound Volume.
2. Tap . All volumes except the alarm are silenced if you select this
option. You can also tap other icons for the same purpose. Tap
again to activate all functions.
3. Tap if you finish setting to the silent mode.OK
Entering text
Enter text for a message for SNS or type a keyword to search for in the
Internet. The Element provides useful text-editing functions.
Typing in words
1. Tap on the empty space in the search box. A keyboard appears on the
bottom of the screen.
2. Enter a keyword that you want to search for in the Internet. As you
keep typing a word, suggested or related words appear below: tap
one that you find appropriate. You can see the results right away.
3. Press and hold on the word: cursors might appear below. You can also
see options available on the top of the screen.
4. Edit text with options available by moving cursors and tap .Done
xSelect all: Selects the whole phrase
xCut: Cuts the selected phrase from a sentence
xCopy: Copies the selected phrase
xPaste: Adds the copied phrase from the previous text. If you
want to paste, place the cursor where you want to add the copied
phrase, and tap .Paste
Creating a message using Swype
1. Tap on the keyboard before you start entering text for a message.
Ensure that Swype is the default keyboard setting for the Element.
Refer to page 63.
2. Drag your finger on the keyboard for the word that you want to enter.
Understanding home screen
Home screen is the starting point to use applications of the Element.
Navigate home screen and use basic functions of the Element. Tap if
you want to move to home screen any time.
Home screen overview
The Element has five home screens, and each home screen features
applications for designated purpose as follows: AT&T, Social, Home,
Media, and Navigation.

15
Getting Started
Google
search
Voice
search Locator Applications Add
BACK
key
HOME key TimeRecent applications Battery
indicator
Icon Name Function
Google search Searches for information in the
text form
Voice search Searches information with voice
Locator Indicates the location of the
screen
Icon Name Function
Applications Opens the applications menu
Add Adds a widget, shortcut or
wallpaper to home screen
Battery indicator Displays the battery status
Time Displays the current time
Recent
applications
Displays all the applications that
are currently working
HOME key Moves to home screen
BACK key Returns to the previous menu
Status Icons
Icons below indicate the current status of the Element. Check them and
take necessary steps.
Icon Description
Connected to a Wi-Fi network
The Element is set to the Airplane mode
The GPS is acquiring information
The GPS is on
Sync in progress

16
Getting Started
Icon Description
There is an error with sync
The USB debugging is connected
The USB is connected to the Element
Bluetooth is connected
Bluetooth is active but not connected to other device
A file is ready to be delivered from other device
A file is being uploaded
A file is being downloaded
There is no memory card
Strength of battery
The battery is charging
Music is being played
Notification icons
Icons below indicate specific notifications. Check them and take
necessary steps.
Icon Description
There is an upcoming event
The alarm is set
There is an incoming message from Talk
A new message has arrived from Gmail
A new message has arrived from Email
There is an error
There are more notifications
17
Getting Started
Customizing home screen
Make your own home screen by adding widgets, shortcuts or changing
wallpapers. Note that you have to secure enough space on home screen.
Changing the view mode
The view of the Element is set to the landscape view by default. If you
want to use the Element in the portrait view, turn it to the left or right: the
view changes automatically by the embedded sensor.
Selecting language
1. Tap > > Apps Settings Language & input Select language > .
2. Select and tap a language that you want to use for the Element.
Note It is recommended to set the language option first before using other
functions.
Adding a widget
1. In the idle mode, tap on the right side of the top of home screen, or
press and hold on the empty space of home screen.
2. Tap Widgets.
3. Press and hold a widget and release it to the screen where you want
to place.
4. Tap if you finish adding widgets to home screen. Or you can just tap
the screen that you want to access right away.
Note You can also make a shortcut of an application.
Deleting a widget from home screen
1. In the idle mode, press and hold a widget that you want to delete.
2. Drag it to on the right side of the screen and release it.Remove
Note You can also delete a shortcut of an application.
Creating wallpaper for home screen
1. In the idle mode, tap on the right side of the top of home screen, or
press and hold on the empty space of home screen
2. Tap Wallpapers Gallery Live Wallpapers Wallpapers, and tap , , or :
xIf you have tapped Wallpapers, tap one.
xIf you have tapped , select and tap a photo, adjust the Gallery
frame for the portrait view and landscape view, and tap .OK
xIf you have tapped Live Wallpapers, select and tap wallpaper and
tap .Set wallpaper
3. Tap if you finish adding widgets to home screen.
Note Live wallpapers consume the battery relatively quickly. Even if you select
live wallpaper, it is recommended that you save the battery consumption by
tapping Force Stop Apps Settings Applications Manage applications ( > > > ).
Relocating applications
1. Tap in the idle mode.Apps
2. Tap or . All My apps My apps indicates applications that you have
downloaded on the Element. All indicates applications that are
installed by default on the Element plus applications of .My apps
3. Tap on the top right side of the screen.
4. Tap . Now you can rearrange applications as you prefer.
5. Drag an application that you want to rearrange and move it to the
place where you want.
6. Tap if you finish relocating applications on the screen.Exit

18
Getting Started
Applications menu overview
My applications Search applications
Market
View change
All
applications
Item Function
All Displays all applications
My apps Displays applications that you have downloaded
Search Searches for applications
Shop Accesses the Google Market
Changes the applications view
Deleting My applications
1. Tap in the idle mode.Apps
2. Tap .My apps
3. Press and hold the application to remove form the Element, and drag
and drop it to on the right top of the screen.Uninstall
Changing applications menu view
1. Tap in the idle mode.Apps
2. Tap .All
3. Tap .
4. Tap . You can see applications by an alphabetic order.
Tap if you want to see applications as you prefer.
Searching for applications
1. Tap in the idle mode.Apps
2. Tap or .All My apps
3. Tap .
4. Tap and enter the name of the application to search.$
5. Tap an application if you want to run it.
6. Tap or if you want to finish searching for applications.X

Using a Wi-Fi network
Connecting to a mobile network
Legal Disclaimer
Connectivity

21
Connectivity
Connecting to a mobile network
If your AT&T service was activated at the time of purchase, you will
automatically connect to the mobile network.
If you need to activate the service, tap on the AT&T Activate
Communication Manager widget.
Icon Description
Data is being transferred through the UMTS network
Data is being transferred through the 4G LTE network
Data is being transferred through the EDGE network
Note When data is transmitted over the network, sound interferences may occur
near electronic products like audio players or telephones.
Legal Disclaimer
4G speeds delivered by LTE, or HSPA+ with enhanced backhaul, where
available. Limited 4G LTE availability in select markets. Deployment
ongoing. Compatible data plan required. LTE is a trademark of ETSI.
Learn more at att.com/network.
Your 4G LTE wireless device will display one of the following network
indicators to let you know which of AT&T's wireless networks you are
connected to. A network indicator does not necessarily mean that you
will experience any particular upload or download data speeds. Actual
speeds depend upon a variety of factors, including the device, network
utilization, file characteristics, terrain, etc.
Learn more at: wireless.att.com/learn/articles-resources/wireless-terms.
jsp, your AT&T Wireless Customer Agreement, Section 3.2 Where and
How Does AT&T Service Work?
x4G LTE: Connected to AT&T's 4G LTE network.
x4G: Connected to AT&T's HSPA+ network. AT&T's HSPA+ network
is capable of delivering 4G speeds when combined with enhanced
backhaul. Your wireless device cannot distinguish between HSPA+ cell
sites combined with enhanced backhaul and those without enhanced
backhaul. Enhanced backhaul is available in limited areas. However,
availability is increasing with ongoing backhaul deployment. Learn
more at att.com/network.
xE: Connected to AT&T's EDGE/2G network.

28
Communication
4. Tap if you want to see your location in the map.
Adding friends from contacts
1. Tap > .Apps Latitude
2. Tap and tap .!Add friends
3. Tap .Select from Contacts
4. Select and tap the contact you want to add as your friend.
5. Tap Yes if you want to send sharing requests.
Adding friends from email addresses
1. Tap > .Apps Latitude
2. Tap and tap .!Add friends
3. Tap .Add via email address
4. Enter the email address of your friend and tap .Add friends
5. Tap Yes if you want to send sharing requests.
Accepting invitation from friends
1. Tap > .Apps Latitude
2. Tap on the top of the screen.1 new sharing request
3. Tap . You can see the location of your friend Accept and share back
shortly below.
Managing friends
1. Tap > .Apps Latitude
2. Tap one of the friends in the screen.
3. Tap , and select and tap the time interval for Real-time updating
refreshing locations.
4. Tap , and select and tap an option.Sharing options
5. Tap and tap if you want to remove the friend Remove this friend OK
from Latitude.
Checking personal settings
1. Tap > .Apps Latitude
2. Tap your name on the top of the screen. You can see your name,
Gmail account and your current location.
3. Tap , tap either Change your photo Take a picture Pick from or
gallery, and change your photo.
Adjusting privacy settings
1. Tap > .Apps Latitude
2. Tap and tap !Latitude.
3. Tap and tap !Location reporting Detect your location, and tap ,
Set your location Do not update your location or . Detect your
location is selected by default.
4. Tap if you want to store your locations in the Enable location history
past and visualize them on the Latitude website.
5. Tap Sign out of Latitude if you do not want to use Latitude. If you
want to join Latitude again, tap and tap !Join Latitude.
Note For more information on the map, refer to page 52.

31
Communication
Adding the NotePad widget
1. In the idle mode, press and hold on the empty space of home screen.
2. Tap .Widgets
3. Flick the screen to the left or right and drag the NotePad widget to the
screen where you want to place.
Viewing memos via the NotePad widget
1. Create the NotePad widget on the home screen. Memos appear on
the screen. Types of memos might vary depending on settings.
2. Flick a memo up or down if you want to see the next or previous memo.
xTap if you want to create a memo.
xTap if you want to see the list of memos.
xTap if you want to change view options: tap or All List View
Default Folder. You can add a folder that you have created.
Sketch Pad
Draw and sketch on your picture and image using the big screen of the
Element. Note that only the landscape view is available for Sketch Pad.
Drawing a Sketch memo
1. Tap > .Apps Sketch Pad
2. Draw a memo with your finger. If there are saved memos, tap on
the top right side of the screen.
3. Tap if you finish drawing a memo.#
4. Enter the name of the memo. The file name should not contain any of
the following characters: / : * ? “ < > |.
5. Tap .OK
Note The message, “Memory Full” appears on the screen if the memory card is
full of contents. Secure enough space if you want to save the sketch memo.
Sketchpad overview
Drawn memo
Drawing
tools
Save List
Note You can just load an image or picture: you cannot edit on it.
Specyfikacje produktu
| Marka: | Pantech |
| Kategoria: | smartfon |
| Model: | Element |
Potrzebujesz pomocy?
Jeśli potrzebujesz pomocy z Pantech Element, zadaj pytanie poniżej, a inni użytkownicy Ci odpowiedzą
Instrukcje smartfon Pantech

11 Października 2024
10 Września 2024
8 Września 2024
6 Września 2024
4 Września 2024
2 Września 2024
1 Września 2024
1 Września 2024
31 Sierpnia 2024
30 Sierpnia 2024
Instrukcje smartfon
- smartfon Sony
- smartfon Samsung
- smartfon AEG
- smartfon LG
- smartfon Motorola
- smartfon Xiaomi
- smartfon MyPhone
- smartfon Sharp
- smartfon Huawei
- smartfon TCL
- smartfon Lenovo
- smartfon TP-Link
- smartfon Philips
- smartfon SilverCrest
- smartfon Gigabyte
- smartfon Acer
- smartfon Realme
- smartfon Gigaset
- smartfon Geemarc
- smartfon Nokia
- smartfon Hisense
- smartfon Infiniton
- smartfon Panasonic
- smartfon Mio
- smartfon Asus
- smartfon Nedis
- smartfon Medion
- smartfon OK
- smartfon Audioline
- smartfon Toshiba
- smartfon Tesla
- smartfon Alcatel-Lucent
- smartfon Majestic
- smartfon Bluebird
- smartfon Garmin
- smartfon Blaupunkt
- smartfon Profoon
- smartfon Vivax
- smartfon Evolveo
- smartfon Alcatel
- smartfon Haier
- smartfon HP
- smartfon Hyundai
- smartfon Honeywell
- smartfon Honor
- smartfon Kodak
- smartfon ZTE
- smartfon MaxCom
- smartfon Dell
- smartfon Google
- smartfon Intex
- smartfon Oppo
- smartfon Kyocera
- smartfon Krüger&Matz
- smartfon Qilive
- smartfon Thomson
- smartfon Manta
- smartfon Apple
- smartfon NGS
- smartfon CRUX
- smartfon Emporia
- smartfon Nevir
- smartfon Mitsubishi
- smartfon Razer
- smartfon GoClever
- smartfon SPC
- smartfon Intermec
- smartfon NEC
- smartfon Polaroid
- smartfon Prestigio
- smartfon Aiwa
- smartfon Sanyo
- smartfon Telefunken
- smartfon OnePlus
- smartfon Amazon
- smartfon Olympia
- smartfon Microsoft
- smartfon Bush
- smartfon HTC
- smartfon CAT
- smartfon Denver
- smartfon Saiet
- smartfon Albrecht
- smartfon RCA
- smartfon Media-Tech
- smartfon BenQ
- smartfon Trevi
- smartfon Lexibook
- smartfon Overmax
- smartfon Micromax
- smartfon Sencor
- smartfon NUU Mobile
- smartfon Alecto
- smartfon Binatone
- smartfon Hammer
- smartfon Allview
- smartfon Oukitel
- smartfon Best Buy
- smartfon Cyrus
- smartfon Kazam
- smartfon Tecdesk
- smartfon KPN
- smartfon Swissvoice
- smartfon I.safe Mobile
- smartfon TrekStor
- smartfon Brondi
- smartfon Fysic
- smartfon Wiko
- smartfon Yarvik
- smartfon Aligator
- smartfon Amplicomms
- smartfon AQISTON
- smartfon Amplicom
- smartfon Archos
- smartfon Androidtech
- smartfon Crosscall
- smartfon Ecom
- smartfon Sony Ericsson
- smartfon Vestel
- smartfon Sonim
- smartfon Energy Sistem
- smartfon Doro
- smartfon Sagem
- smartfon Lava
- smartfon Blu
- smartfon Easypix
- smartfon Konrow
- smartfon Brigmton
- smartfon Sunstech
- smartfon Aspera
- smartfon Sunny
- smartfon Nordmende
- smartfon Blackberry
- smartfon Vivo
- smartfon Wolder
- smartfon NGM
- smartfon Vodafone
- smartfon Switel
- smartfon InFocus
- smartfon GreatCall
- smartfon XD
- smartfon Alba
- smartfon RugGear
- smartfon Umidigi
- smartfon AT&T
- smartfon Mpman
- smartfon Bury
- smartfon Logicom
- smartfon Karbonn
- smartfon Palm
- smartfon Hannspree
- smartfon Phicomm
- smartfon Plum
- smartfon Lumigon
- smartfon Infinix
- smartfon Keneksi
- smartfon Klipad
- smartfon Iget
- smartfon T-Mobile
- smartfon JCB
- smartfon Casper
- smartfon Unnecto
- smartfon Wileyfox
- smartfon ITT
- smartfon Yota
- smartfon Avus
- smartfon Spice
- smartfon Wolfgang
- smartfon BQ
- smartfon ORA
- smartfon Danew
- smartfon Echo
- smartfon Primux
- smartfon Tiptel
- smartfon UTStarcom
- smartfon Zipy
- smartfon Mediacom
- smartfon Beafon
- smartfon BGH
- smartfon Billow
- smartfon Telstra
- smartfon Ulefone
- smartfon CSL
- smartfon ToughGear
- smartfon Benefon
- smartfon Komu
- smartfon Doogee
- smartfon Energizer
- smartfon Tremay
- smartfon Kurio
- smartfon Piranha
- smartfon Coolpad
- smartfon Syco
- smartfon TAG Heuer
- smartfon Mobistel
- smartfon Itel
- smartfon Garmin-Asus
- smartfon Handheld
- smartfon Fero
- smartfon AT Telecom
- smartfon Xtreamer
- smartfon Verykool
- smartfon O2
- smartfon General Mobile
- smartfon Mustang
- smartfon Kogan
- smartfon Pharos
- smartfon Storex
- smartfon Fairphone
- smartfon Freeman
- smartfon HomTom
- smartfon Leotec
- smartfon Auro
- smartfon Maxx
- smartfon ITTM
- smartfon Posh Mobile
- smartfon THL
- smartfon NGM-Mobile
- smartfon POCO
- smartfon Nothing
- smartfon Lark
- smartfon Senifone
- smartfon Tecno
- smartfon Telme
- smartfon UMi
- smartfon Olitech
- smartfon Mobiola
- smartfon Meizu
- smartfon Neffos
- smartfon Gionee
- smartfon TIM
- smartfon Cubot
- smartfon Leagoo
- smartfon NTech
- smartfon Nubia
- smartfon LeEco
- smartfon GSmart
- smartfon Bea-fon
- smartfon Opticon
- smartfon EStar
- smartfon Facom
- smartfon Jitterbug
- smartfon Custom
- smartfon Aplic
- smartfon HMD
- smartfon Opis
- smartfon Volla
- smartfon Nothing Tech
- smartfon Maxwest
- smartfon Kalley
Najnowsze instrukcje dla smartfon
2 Kwietnia 2025

30 Marca 2025
10 Marca 2025
7 Marca 2025
5 Marca 2025
5 Marca 2025
3 Marca 2025

2 Marca 2025

26 Lutego 2025
26 Lutego 2025