Instrukcja obsługi Panasonic Viera TX-L32G20B
Przeczytaj poniżej 📖 instrukcję obsługi w języku polskim dla Panasonic Viera TX-L32G20B (108 stron) w kategorii telewizor. Ta instrukcja była pomocna dla 17 osób i została oceniona przez 2 użytkowników na średnio 4.5 gwiazdek
Strona 1/108

Model No.
TX-L32G20B
TX-L37G20B
Operating Instructions
LCD Television
English
Thank you for purchasing this Panasonic product.
Please read these instructions carefully before operating this product and retain them for future reference.
The images shown in this manual are for illustrative purposes only.
“B” model no. suffix denotes UK model.
U.K. Standard

2
Features
freesat HD tuner built-in
Receives freesat - free digital satellite broadcasts in the UK
This TV has a built-in freesat HD tuner.
freesat is a free digital TV service which broadcasts via satellite so you can receive TV, radio, interactive TV, and HD TV with
crystal clear reception.
You can enjoy sharp pictures, vivid colours, multi-channel sound, and various services with the interactive content.
DVB-T / DVB-T2 tuner built-in
Receives DVB (Digital Video Broadcasting) digital terrestrial broadcasts
DVB-T2 is an advanced digital terrestrial system for more efficient transmission.
Available DVB-T2 broadcasts will be tuned automatically when you perform DVB Auto Setup.
GUIDE Plus+ (p. 20)
This TV supports Gemstar-TV Guide sent from the GUIDE Plus+ system.
HD TV 1080p
This TV supports high definition TV signals.
Sharp pictures and clear sound with HDMI connection (p. 97)
Enjoy high definition digital picture and high quality sound by using an HDMI cable.
This TV incorporates HDMI (Version 1.4 with Content Type, Audio Return Channel) and HDMI (Version 1.3a with
Deep Colour) technology.
Using USB devices
Enjoy recording and playback the digital TV programmes to the USB HDD. (p. 62 and p. 71)
Enjoy the photo, video and music in the USB Flash Memory on Media Player. (p. 66)
Wireless LAN Adaptor for the network connection. (p. 6 and p. 13)
Entering characters with the USB Keyboard in VIERA CAST. (p. 83)
Timer Programming (p. 22 and p. 52)
Timer Programming enables you to use functions such as programme reminder and programme recording to the external
recorder / registered USB HDD.
Dolby Digital Plus decoder
It is possible to decode Dolby Digital Plus audio track (multi-channel sound) and output as a Dolby Digital multi-channel
sound signal from the DIGITAL AUDIO OUT terminal.
VIERA IMAGE VIEWER - SD Card viewer in Media Player (p. 66 - 73)
Enjoy your photos or videos recorded on an SD Card on the TV screen.
SDXC Card
This TV supports SDXC Card. SDXC is the latest standard of SD Card and a higher storage capacity card.
AVCHD
It is possible to play moving pictures recorded on an SD Card or a USB Flash Memory in AVCHD format.
AVCHD is a high definition video recording format. (p. 70)
DivX
Offers good compatibility when going from PC to TV, etc. for easy enjoyment of moving pictures. DivX is a video codec that
was developed by DivX, Inc. (p. 95)
DLNA
DLNA is a standard that makes digital electronics easier and more convenient to use on a home network. For example, you
can enjoy watching photos and videos stored in the PC connected to your home network by accessing from the TV. (p. 80)
VIERA CAST - Enjoy great web entertainment (p. 83)
Enjoy the internet contents on the TV such as photos, videos, weather, video communication (ex. Skype™), etc. through an
easy-to-use web interface that is built into the TV.
Link up and control the connected equipment with “Q-Link” and “VIERA Link” (p. 84 - 91)
Q-Link and VIERA Link provide easy recording and playback, creation of a home theatre without complicated settings, etc.
VIERA TOOLS - Display special feature icons for easy accessibility (p. 30)
Special features (such as VIERA Link, Media Player and DLNA operations) can be accessed easily by using the VIERA
TOOLS button.
Owner ID (p. 56)
Owner ID is an anti-theft function. Entering the PIN number and owner’s personal information will help the Police to
determine the owner in the case of theft.
Supports Audio Description signal (p. 17 and p. 33)
Audio Description (when broadcast) adds an additional soundtrack to describe events on screen (narration) and aids
understanding and enjoyment, particularly for visually-impaired viewers. You can switch Audio Description service Auto or
Off, and adjust the volume of the description soundtrack independently of the main volume.
Digital Switchover for Terrestrial broadcasts
Starting in late 2007 and ending in 2012, TV services in the UK will go completely digital, TV region by TV region.
If you have any questions, please call Digital UK on or visit 08456 50 50 50 www.digitaluk.co.uk
Digital Switchover will cover a period of several weeks. When it starts you will lose all Analogue TV channels and
some Digital TV channels will be missing.
You will need to retune your TV each time this happens to recover your digital channels. Analogue channels are
permanently turned off, it will not be possible to recover them.
To retune your TV
“Auto Setup” in “DVB Tuning Menu”-DVB mode (p. 41)
Users of cable or satellite boxes should still retune the TV to continue to receive Freeview channels via their
aerial. (Your Analogue channel for viewing Cable or Satellite services will change to a new position.)
Due to the digital reception technologies involved, quality of the digital signals may be relatively low in some
cases, despite good reception of analogue channels.

3
Contents
Be Sure to Read
Safety Precautions (Warning / Caution)
················· 4
Quick Start Guide
Accessories / Options
·······························6
Identifying Controls
···································8
Basic Connection
···································· 10
Auto Setup
··············································12
Quick Start
Guide
Enjoy your TV!
Basic Features
Watching TV
························································· 16
Using TV Guide
···················································· 20
Viewing Teletext
···················································· 25
Watching External inputs
······································ 28
How to Use VIERA TOOLS
·································· 30
How to Use Menu Functions
································ 31
Basic
Advanced Features
Retuning from Setup Menu
·································· 40
Tuning and Editing Channels
······························· 42
Shipping Condition
··············································· 51
Timer Programming
·············································· 52
Child Lock
····························································· 54
Input Labels
·························································· 55
Owner ID
······························································ 56
Using Common Interface
······································ 57
Updating the TV Software
···································· 58
Displaying PC Screen on TV
································ 59
Advanced Picture Settings
··································· 60
USB HDD Recording
············································ 62
Using Media Player
·············································· 66
Using Network Services
······································· 74
(DLNA / VIERA CAST / freesat)
Link Functions
····················································· 84
(Q-Link / VIERA Link)
External Equipment
·············································· 92
Advanced
FAQs, etc.
Technical Information
··········································· 94
FAQs
···································································· 99
On screen messages
········································· 102
Maintenance
······················································· 104
Glossary
····························································· 104
Licence
······························································· 105
Index
··································································· 106
Specifications
····················································· 107
FAQs, etc.
FULL HD
This TV uses a high definition panel to produce
high definition pictures close to their original
resolution.
Wide Viewing Angle
This LCD panel offers 178-degree viewing angle.
This delivers beautiful images regardless of the
viewing angle.
IPS panel
This TV uses IPS (In Plane Switching)
panel.
Eco Mode
Adjusts picture settings automatically dependent
on ambient lighting conditions.
Provides suitable images for playing games
Selecting “Game” in Viewing Mode provides fast
resp
onse to the input signal and you can enjoy
pla
ying games.
(p. 32)
V-Audio Surround
Utilises Panasonic’s advanced digital
amplification technology. (p. 33)
24p Smooth Film
This item is displayed instead of “Intelligent
Frame Creation” when 24p signal input, and
produces smoother playback of 24p source
movies.
digital tick
The digital tick logo indicates that a digital
tuner is built-in.
Freeview HD
Freeview HD is the way to enjoy high
definition digital TV for free.
4
Safety Precautions
Warning
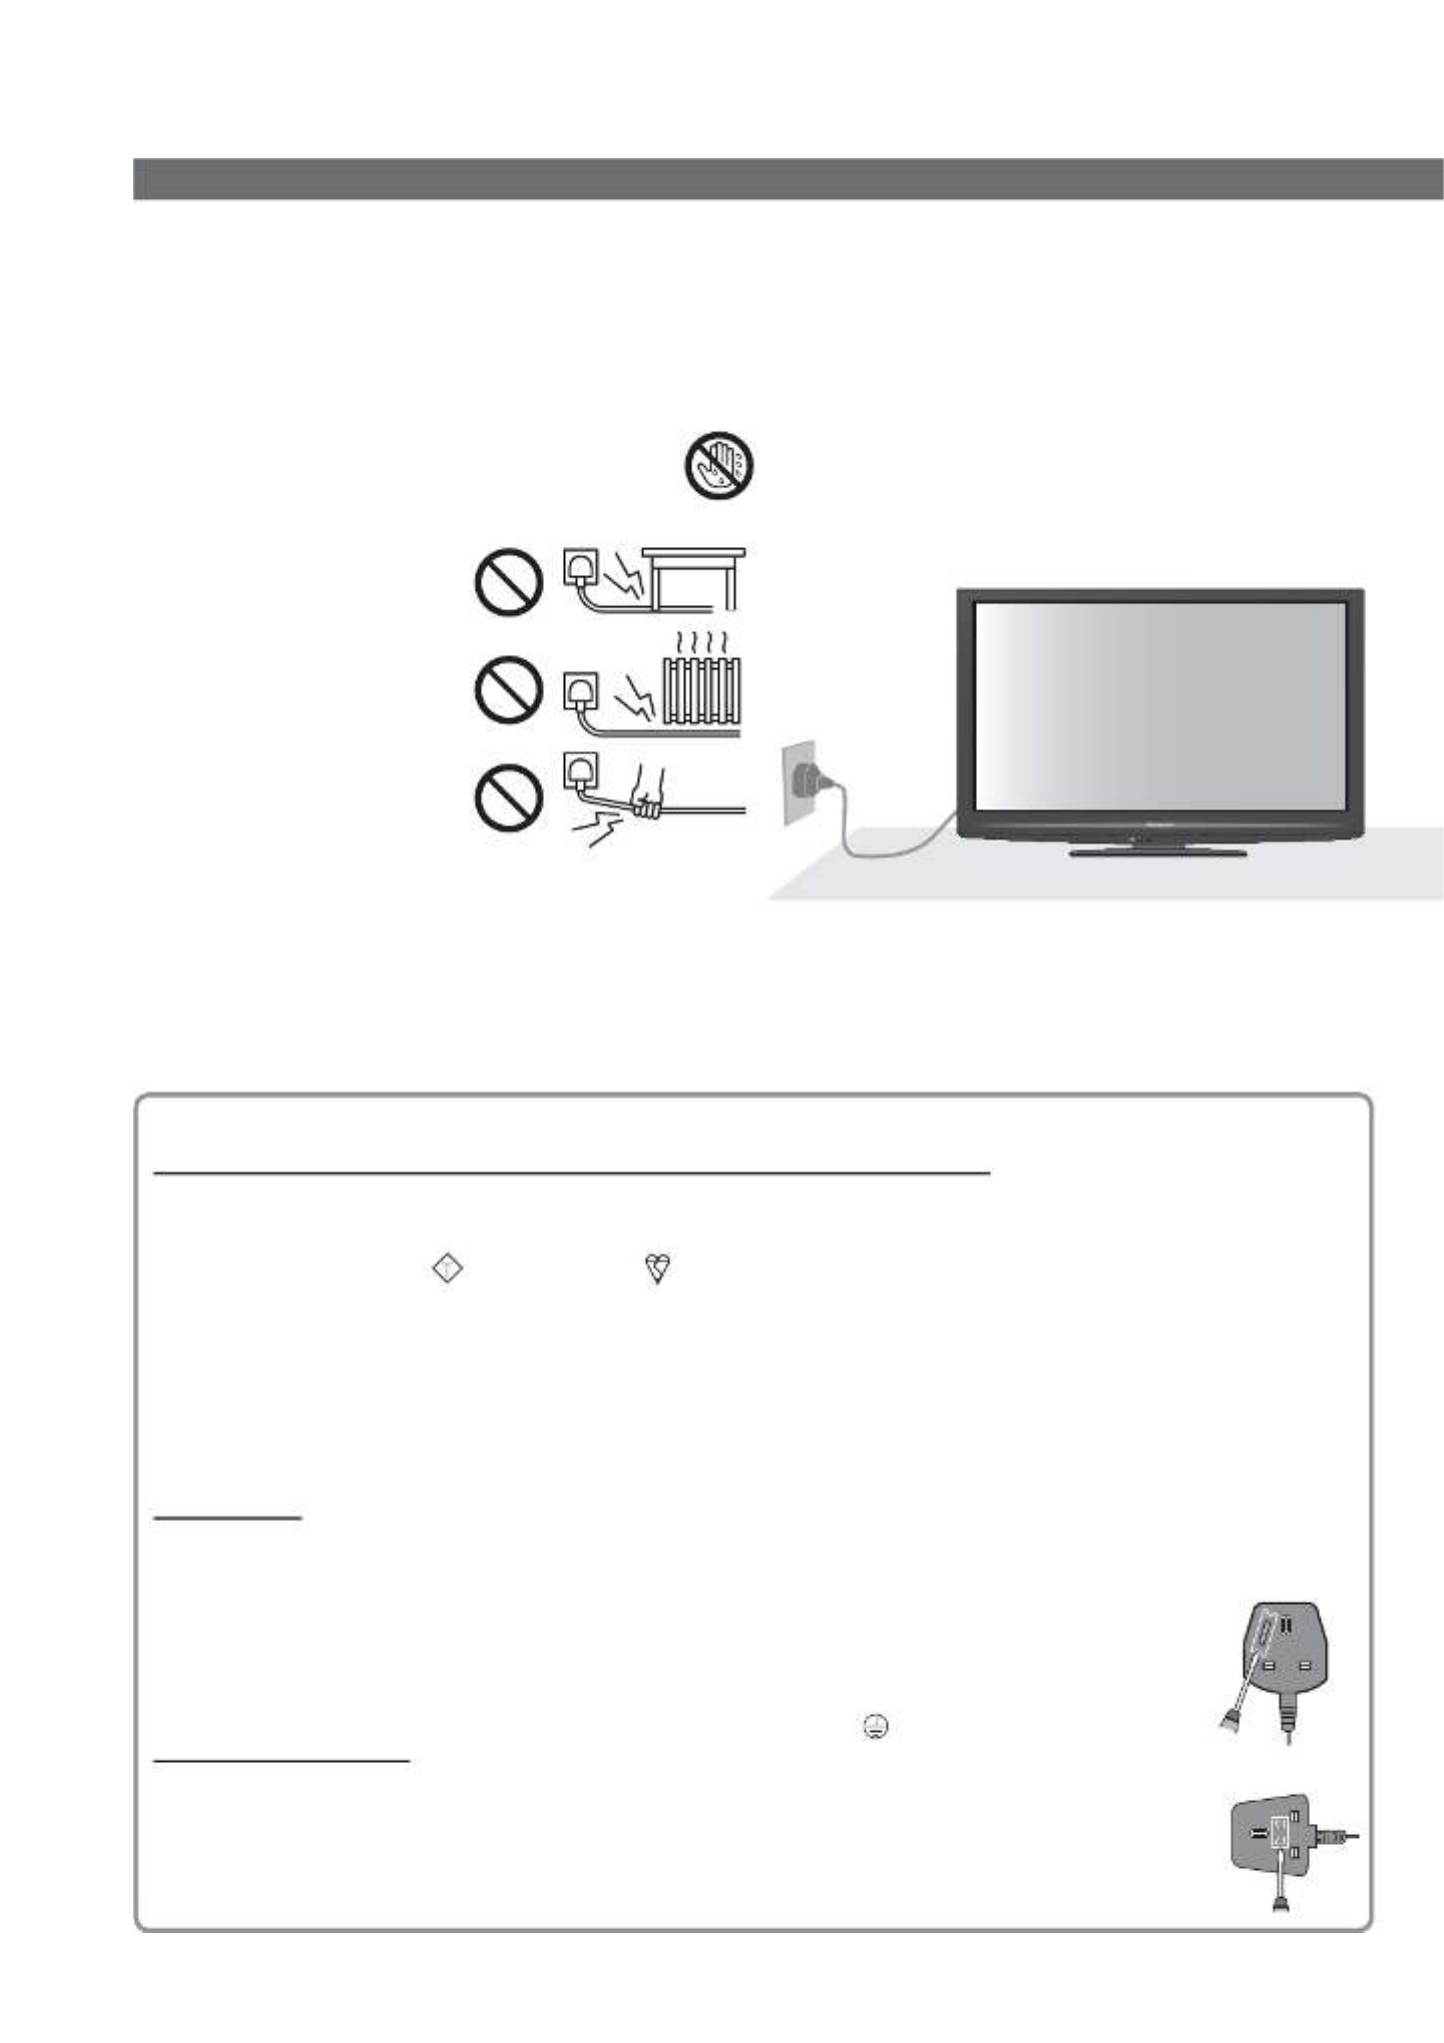
Mains plug and lead
To help avoid risk of electrical shock, fire, damage or injury, please follow the warnings below:
This TV is designed to operate on AC 220-240 V,
50 Hz.
Insert the mains plug fully into the socket outlet.
Ensure that the mains plug is easily accessible.
Remove the mains plug when cleaning the TV.
Do not touch the mains plug with a wet hand.
Do not damage the mains lead.
Do not place a heavy •
object on the lead.
Do not place the lead •
near a high temperature
object.
Do not pull on the lead. •
Hold onto the mains plug
body when disconnecting
the plug.
Do not move the TV with the lead plugged into a •
socket outlet.
Do not twist the lead, bend it excessively or •
stretch it.
Do not use a damaged mains plug or socket outlet.•
Ensure the TV does not crush the mains lead.•
AC 220-240 V
50 Hz
IMPORTANT: THE MOULDED MAINS PLUG
FOR YOUR SAFETY, PLEASE READ THE FOLLOWING TEXT CAREFULLY.
This TV is supplied with a moulded three pin mains plug for your safety and convenience. A 5 amp fuse is fitted
in this mains plug. Shall the fuse need to be replaced, please ensure that the replacement fuse has a rating of 5
amps and that it is approved by ASTA or BSI to BS1362.
Check for the ASTA mark
ASA
or the BSI mark on the body of the fuse.
If the mains plug contains a removable fuse cover, you must ensure that it is refitted when the fuse is replaced.
If you lose the fuse cover the mains plug must not be used until a replacement cover is obtained.
A replacement fuse cover may be purchased from your local dealer.
If the fitted moulded mains plug is unsuitable for the socket outlet in your home, then the fuse shall be
removed and the mains plug cut off and disposed of safety. There is a danger of severe electrical shock
if the cut off mains plug is inserted into any 13 amp socket.
If a new mains plug is to be fitted, please observe the wiring code as shown below.
If in any doubt, please consult a qualified electrician.
IMPORTANT: – The wires in this mains lead are coloured in accordance with the following code: –
Blue: Neutral Brown: Live
As the colours of the wire in the mains lead of this appliance may not correspond with
the coloured markings identifying the terminals in your mains plug, proceed as follows.
The wire which is coloured BLUE must be connected to the terminal in the mains plug
which is marked with the letter N or coloured BLACK.
The wire which is coloured BROWN must be connected to the terminal in the mains plug which
is marked with the letter L or coloured RED.
Under no circumstances should either of these wires be connected to the Earth terminal of the
three pin mains plug, marked with the letter E or the earth symbol .
How to replace the fuse
For plug type shown in example 1:
Lift out the removable fuse compartment with a screwdriver and replace the fuse, then refit
securely into the mains plug (see example 1).
For plug type shown in example 2:
Lift open the fuse compartment, in the mains plug, with a screwdriver, and replace the fuse,
then press the fuse cover down securely (see example 2).
Example 1
Example 2
If you detect anything unusual,
immediately switch off the mains supply
switch and remove the mains plug.
5
Warning
Take care
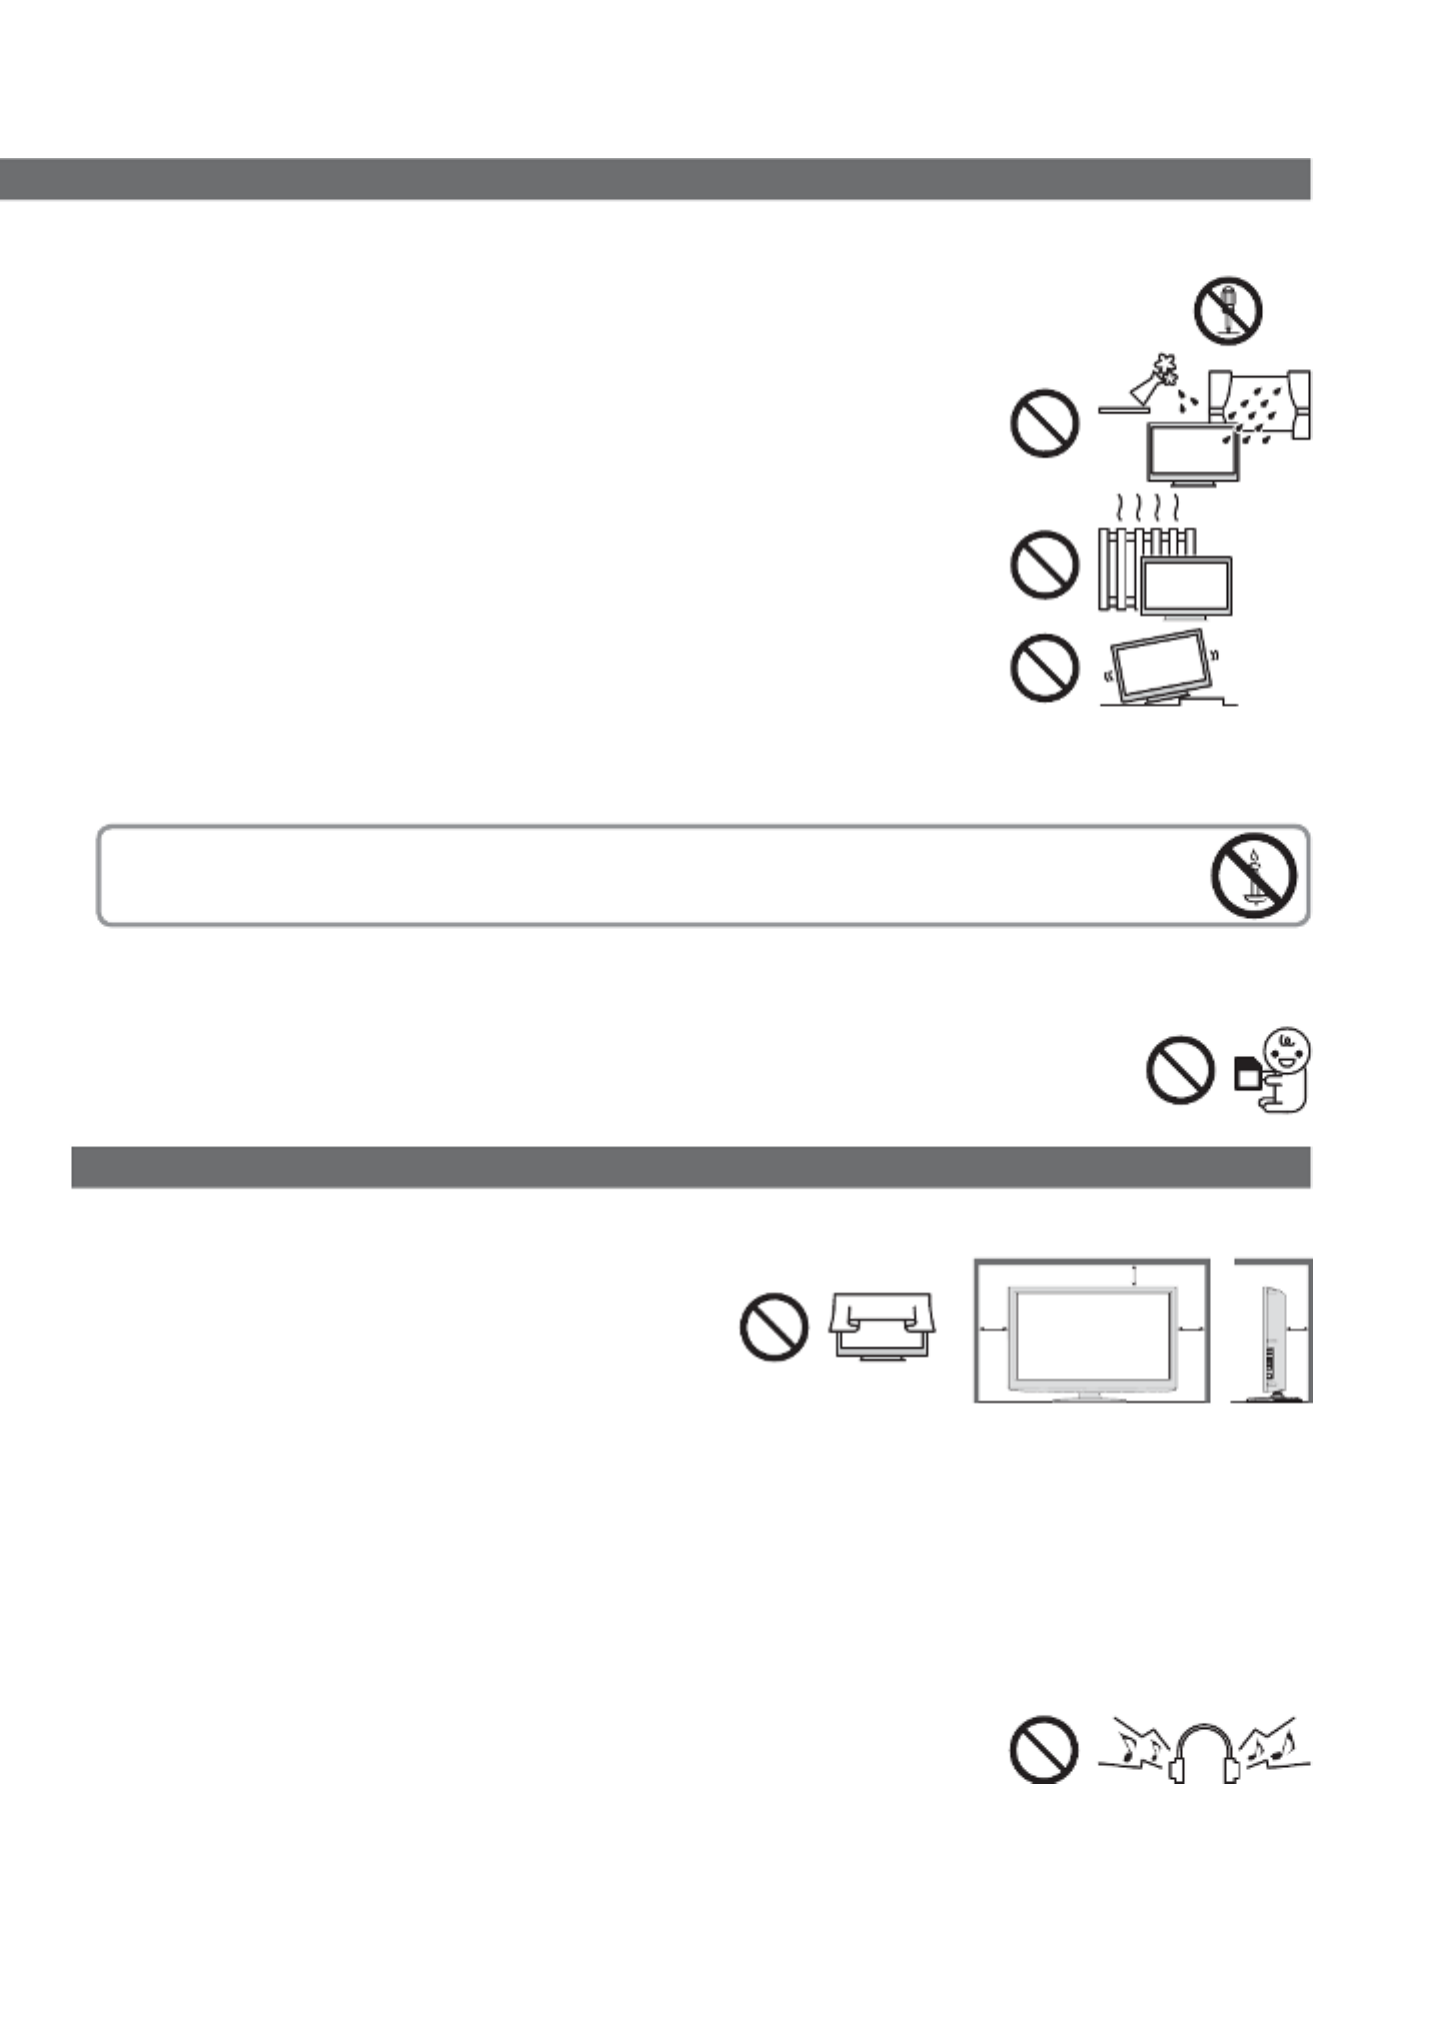
To help avoid risk of electrical shock, fire, damage or injury, please follow the warnings below:
Do not remove covers and never modify the TV yourself as live parts are accessible when they are
removed. There are no user serviceable parts inside.
Do not expose the TV to rain or excessive moisture. This TV must not be exposed
to dripping or splashing water and objects filled with liquid, such as vases, must
not be placed on top of or above the TV.
Do not expose the TV to direct sunlight and other sources of heat. To prevent fire
never place any type of candle or naked flame on top or near the TV.
Do not place the TV on sloped or unstable surfaces.
Do not insert foreign objects into the TV through the air vents.
Do not use an unapproved pedestal / mounting equipment. Be sure to ask your local Panasonic dealer to
perform the setup or installation of approved wall-hanging brackets.
Do not apply strong force or impact to the display panel.
To prevent the spread of fire, keep candles or other open
flames away from this product at all times
Small object
This product contains possibly dangerous parts that can be breathed in or swallowed by young
children accidentally.
Keep the dangerous parts out of reach of young children.
Do not allow children to handle SD Card. As with any small object, the SD Card could be
swallowed by young children. Please remove SD Card immediately after use and store out of
reach of young children.
Caution
Ventilation
Allow sufficient space around the TV in order to help prevent excessive
heat, which could lead to early failure of some electronic components.
Ventilation should not be impeded by covering the
ventilation openings with items such as newspapers,
tablecloths and curtains.
Whether you are using the pedestal or not, always ensure the vents in the
bottom of the TV are not blocked and there is sufficient space to enable
adequate ventilation.
Minimum distance
10
10
10
10
(cm)
Moving the TV
Before moving the TV, disconnect all cables.
Transport only in upright position.
When not in use for a long time
This TV will still consume some power even in the Off mode, as long as the mains plug is still
connected to a live socket outlet.
Remove the mains plug from the wall socket when the TV is not in use for a prolonged period of time.
Excessive volume
Do not expose your ears to excessive volume from the headphones.
Irreversible damage can be caused.

6
Accessories / Options
Standard accessories Check that you have the accessories and items shown
Remote Control N2QAYB000490
Batteries for the Remote Control (2)
R6 (UM3)
p. 8
Clamper TMM8E18048
p. 10
Operating Instructions
Product Registration
Leaflet
Pedestal
TBL0E0110
TBL0E0125
TBL0E0111
TBL0E0123
p. 7
Assembly screw
for Pedestal (4)
XYN4+F12FJK
Optional accessories Please contact your nearest Panasonic dealer to purchase the recommended
optional accessories. For additional details, please refer to the manual of the
optional accessories.
Wireless LAN Adaptor
DY-WL10E-K
Caution
To use the Wireless LAN Adaptor, an access point needs to be obtained.
It is recommended to use the Wireless LAN Adaptor with the extension cable.To avoid malfunctions caused by radio wave interface, keep the TV away from
the devices such as other wireless LAN devices, microwaves and the devices
that use 2.4 GHz and 5 GHz signals when using the Wireless LAN Adaptor.
Depending on the area, this optional accessory may not be available.
Additional information for Wireless LAN Adaptor and access point may be on the following web site. (English only)
http://panasonic.jp/support/global/cs/tv/
Communication Camera TY-CC10W
Caution
This camera can be used on VIERA CAST (p. 83).
Please also read the manual of the camera.
Depending on the area, this optional accessory may not be available.
For details, consult your local Panasonic dealer.
Wall-hanging bracket
(View from the side)
Rear of the TV
Holes for wall-hanging
bracket installation
200 mm Depth of screw:
minimum 9 mm, maximum 12 mm
200 mm
Screw for fixing the TV onto the wall-hanging
bracket
(not supplied with the TV)
Diameter: M6
TY-WK3L2RW
Warning
Using other wall-hanging brackets, or installing a wall-hanging bracket by yourself has the risk of personal
injury and product damage. In order to maintain the unit’s performance and safety, be sure to ask your dealer
or a licenced contractor to secure the wall-hanging brackets. Any damage caused by installing without a
qualified installer will void your warranty.
Carefully read the instructions accompanying optional accessories, and be sure to take steps to prevent the TV
from falling off.
Handle the TV carefully during installation since subjecting it to impact or other forces may cause product
damage which will void your warranty.
Do not mount the unit directly below ceiling lights (such as spotlights or halogen lights) which typically give off
high heat. Doing so may warp or damage plastic cabinet parts.
Take care when fixing wall brackets to the wall. Wall mounted equipment must not be grounded by metal within
the wall. Always ensure that there are no electrical cables or pipes in the wall before hanging bracket.
To prevent fall and injury, remove the TV from its fixed wall position when it is no longer in use for an extended
period of time.
TX-L32G20B
TX-L37G20B

Accessories / Options
Quick Start
Guide
7
Attaching the pedestal
To help avoid risk of damage or injury by the TV tipping or falling, please follow the warnings and
cautions below:
Warning
Do not disassemble or modify the pedestal.
Caution
Do not use with any other TVs or displays.
Do not use the pedestal if it becomes warped or physically damaged. If this occurs, contact your nearest
Panasonic dealer immediately.
During setup, make sure that all screws are securely tightened.
Ensure that the TV does not suffer any impact during installation of the pedestal.
Ensure that children do not climb onto the pedestal.
Install or remove the TV from the pedestal with at least two people.
Assembly screw (4)
XSS4+16FNK
Assembly screw (4)
XYN4+F12FJK
Bracket (1)
TUX0EA004
(TX-L32G20B)
TUX0E198
(TX-L37G20B)
Base (1)
TBL0E0110
(TX-L32G20B)
TBL0E0111
(TX-L37G20B)
Assembling the pedestal
Use the four assembly screws to fasten the bracket
to the base securely.
Forcing the assembly screws the wrong way will strip
the threads.
Make sure that the screws are securely tightened.
A
C
D
Front
Securing the TV
Use only the supplied assembly screws to fasten
the pedestal securely to the TV.
Make sure that the screws are securely tightened.
Carry out the work on a horizontal and level surface.
BB
Foam mat or thick soft cloth
Adjust the panel to your desired angle
Ensure that the pedestal does not hang over the edge of the base even if the TV swivels to the full rotation range.
Do not place any objects or hands within the full rotation range.
15°
a
b
15°
(View from the top)
TX-L32G20B
a: 358 mm / b: 230 mm
TX-L37G20B
a: 399 mm / b: 296 mm
Set the mark at the centre as illustrated, to
ensure full degree rotation in either direction.
Note
Visible part of the pedestal will remain parallel to the TV even when rotated.
EXIT
OPTION
TEXT
REC
PROGRAMME
STTL
INDEX HOLD
BACK/
RETURN
ASPECT
INPUT
LAST VIEW
TV
G
U
I
D
E
V
I
E
R
A
T
O
O
L
S
V
I
E
R
A
L
i
n
k
DVD/VCR
TV
AVTV
abc def
jkl
ghi
mno
tuvpqrs
wxyz
DIRECT TV REC
MENU
SD CARD
8
Identifying Controls
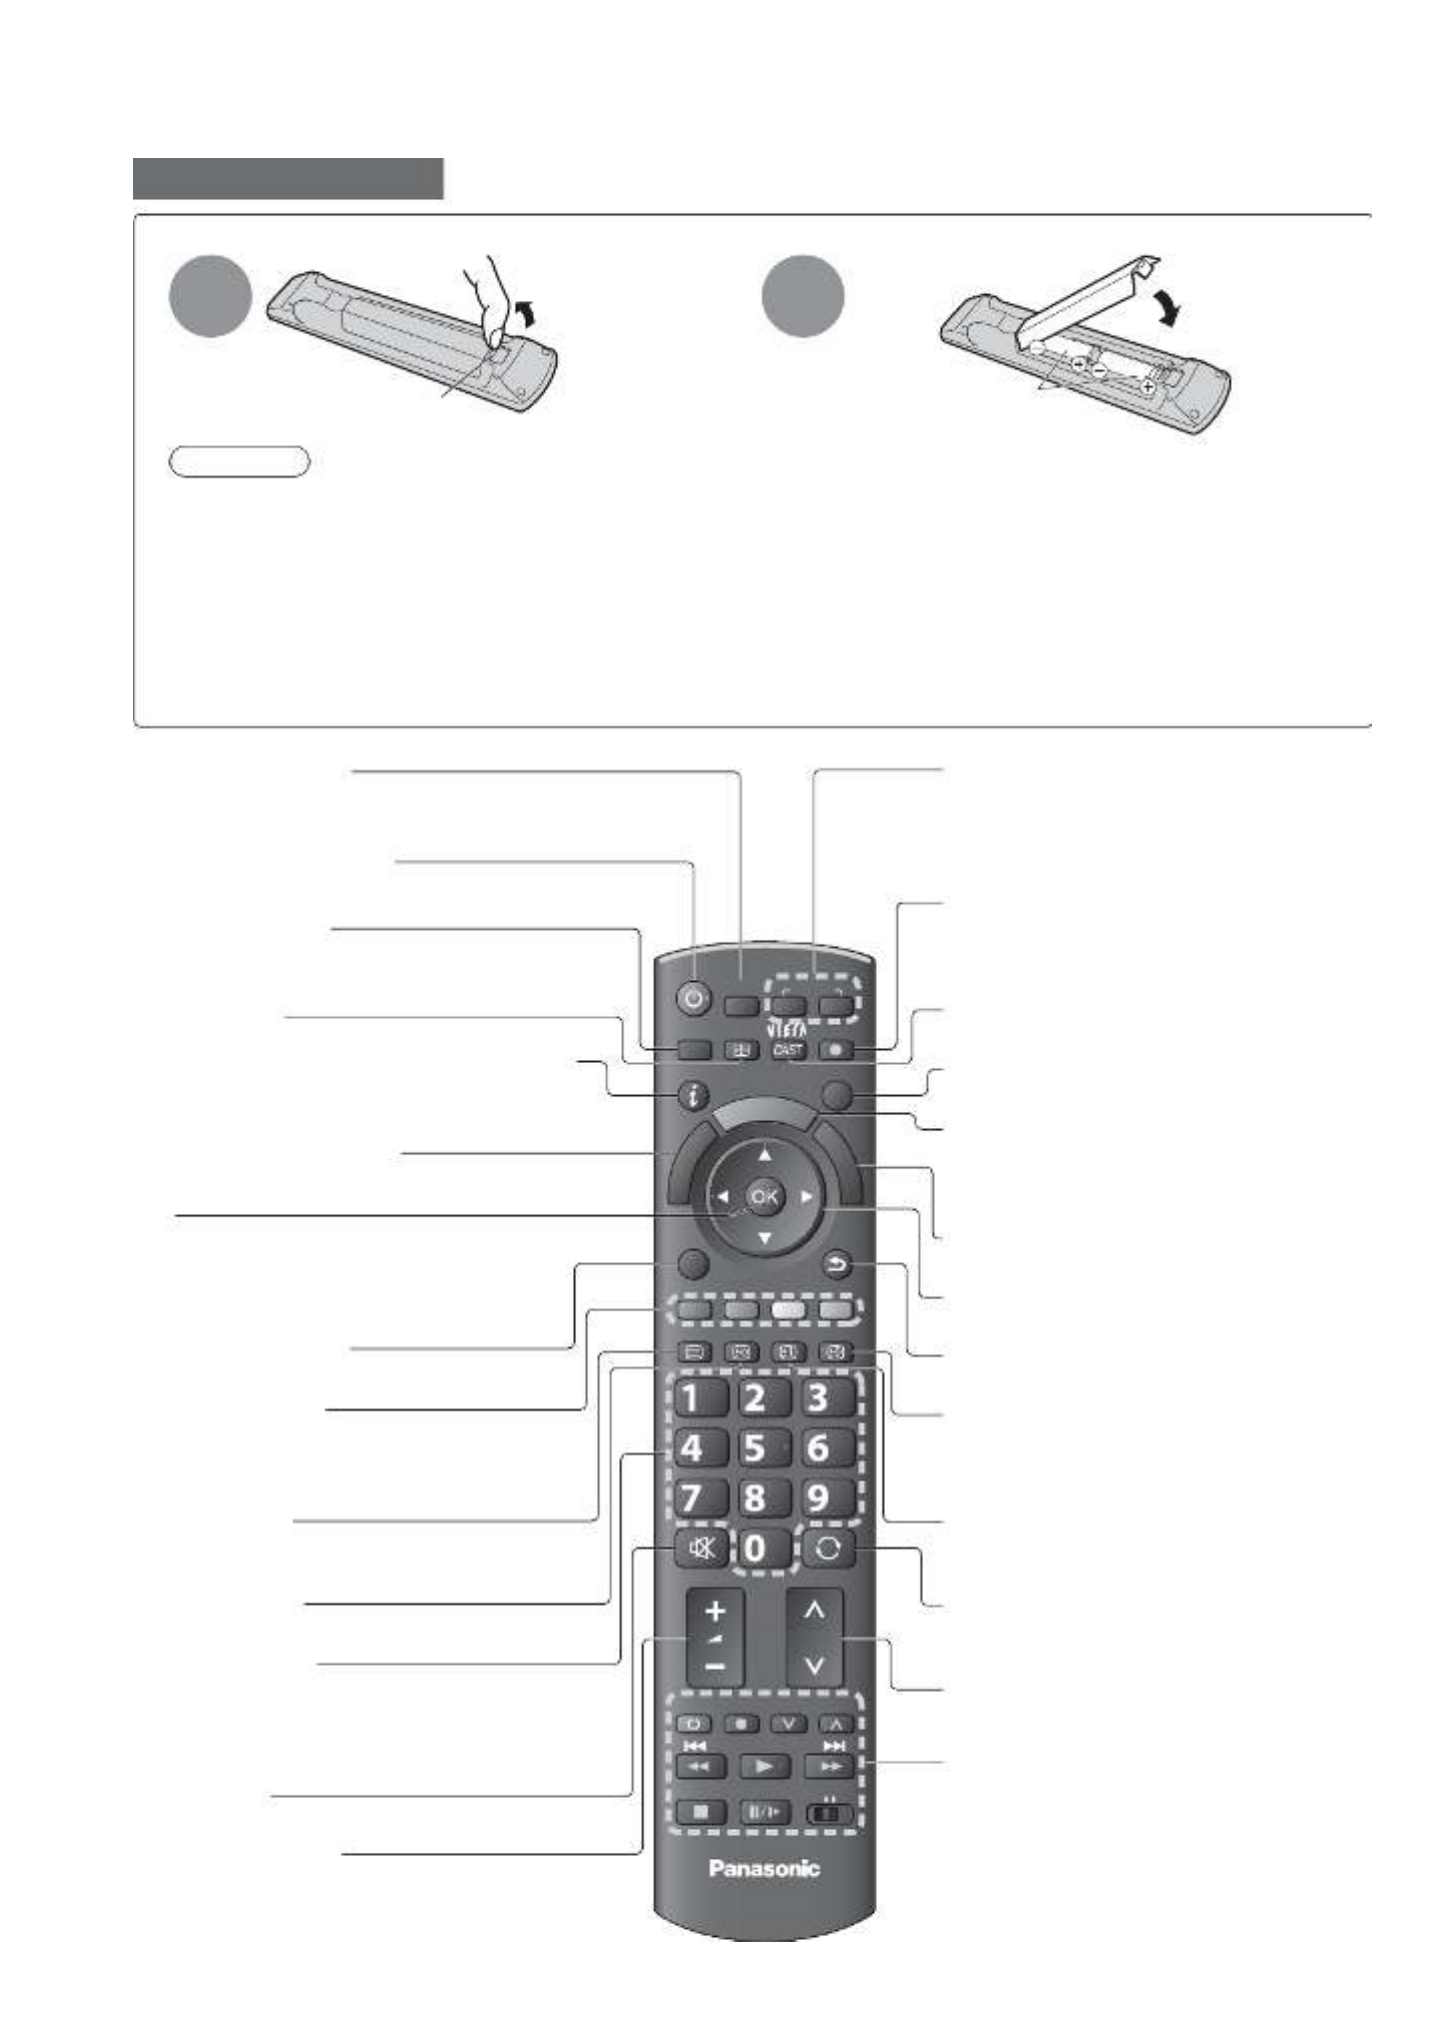
Installing / removing remote’s batteries
1Pull
open
Hook
2
Note the correct
polarity (+ or -)
Close
Caution
Incorrect installation may cause battery leakage and corrosion, resulting in damage to the remote control.
Do not mix old and new batteries.
R
eplace only with same or equivalent type. Do not mix different battery types (such as alkaline and manganese batteries).
Do not use rechargeable (Ni-Cd) batteries.
Do not burn or break up batteries.
Batteries must not be exposed to excessive heat such as sunshine, fire, etc.
Make sure you dispose of batteries correctly.
Ensure batteries are replaced correctly, there is danger of explosion and fire if battery is reversed.
Do not disassemble or modify the remote control.
Remote Control
Cursor buttons
Makes selections and adjustments
Standby On / Off switch
Switches TV On or Off standby
Sound Mute
Switches sound mute On or Off
Aspect (p. 18)
Channel Up / Down
Selects channel in sequence
Connected equipment operations
(p. 29, 64 and p. 90)
Teletext (p. 25)
Switches to teletext mode / interactive
services
OK
Confirms selections and choices
Press after entering channel position by
using numeric buttons to change a channel
quickly
Volume Up / Down
Channel / Programme Information (p. 17)
Displays channel and programme
information
Index (p. 27)
Returns to the teletext index page
(teletext mode)
Coloured buttons
(red-green-yellow-blue)
Used for the selection, navigation and
operation of various functions
Exit
Returns to the normal viewing screen
Numeric buttons
Changes channel and teletext pages
Sets characters
When in Standby mode, switches TV On
(Press for about 1 second)
VIERA Link Menu (p. 88)
Accesses VIERA Link Menu
TV Guide (p. 20)
Displays TV Guide
Option Menu (p. 19)
Easy optional setting for viewing, sound, etc.
Main Menu (p. 31)
Press to access the Picture, Sound and
Setup Menus
Subtitles (p. 18)
Displays subtitles
Input mode selection
TV - switches freesat / DVB / Analogue /
Other Sat. mode (p. 16)
AV - switches to AV input mode from Input
Selection list (p. 28)
Media Player (p. 66)
Switches to SD Card and USB device
viewing / listening mode
Return
Returns to the previous menu / page
Hold
Freeze / unfreeze picture (p. 17)
Holds the current teletext page (teletext
mode) (p. 26)
VIERA CAST (p. 83)
Displays VIERA CAST home screen
Direct TV Recording (p. 86 and p. 88)
Records programme immediately in
DVD Recorder / VCR with Q-Link or
VIERA Link connection
Last view (p. 19)
Switches to previously viewed channel or
input mode
VIERA TOOLS (p. 30)
Easily accesses special features such
as VIERA Link, Media Player and DLNA
operations

Identifying Controls
Quick Start
Guide
9
Using the On Screen Displays
Many features available on this TV can be accessed via the On Screen Display menu.
How to use remote control
MENU
Open the main menu
EXIT
Exit the menu system and return to the
normal viewing screen
Move the cursor / select the menu item Move the cursor / adjust levels / select from
a range of options
Access the menu / store settings after
adjustments have been made or options
have been set
BACK/
RETURN
Return to the previous menu
ON SCREEN HELP Instructions box - Operation guide
Example (Owner ID):
EXIT
RETURN
PIN entry
0 9
Please enter new PIN
PIN
Owner ID
* * * *
Operation guide will help you.
Changes the input mode
TV
C.A.T.S. (Contrast Automatic Tracking System) sensor
• Senses brightness to adjust picture quality when “C.A.T.S.” in the Picture Menu is set
to “On” (p. 32).
Mains power On / Off switch
• Use to switch mains power On / Off.
If TV was switched off whilst in Standby mode, using the
Mains Power On / Off switch, then it will be in Standby mode
when switched back on using the same switch.
For changing TV channel up or down. When a function
is selected by the ‘F’ button, press to increase or
decrease the setting of the selected function. When in
Standby mode, press either button for about 1 second to
switch the TV On.
Function select
Volume / Contrast / Brightness / Colour / Sharpness /
Tint (NTSC signal) / Bass (“Music” or “Speech” mode in the
Sound Menu) / Treble (“Music” or “Speech” mode in the
Sound Menu) / Balance / Auto Setup (p. 40 and p. 41)
Power and Timer LED
Red
: Standby
Green: On
Orange: Timer Programming On
Orange (flash)
: Recording of Timer Programming, Direct TV Recording or
One Touch Recording is in progress
Red with
orange flash: Standby with Timer Programming On, Direct TV Recording or
One Touch Recording
The LED blinks when the TV receives a command from the remote control.
Remote control signal receiver
Do not place any objects between the TV remote control signal receiver
and remote control.
Auto power standby function The TV will automatically go to Standby mode in the following conditions:
no signal is received and no operation is performed for 30 minutes in Analogue TV mode•
“Off Timer” is active in the Setup Menu (p. 19)•
no operation is performed for the period selected in “Auto Standby” (p. 36)•
This function does not affect the recording of Timer Programming, Direct TV Recording and
One Touch Recording.
AV3
R
L
V
HDMI 4
2
Headphones
jack (p. 93)
CI Slot
(p. 57)
HDMI4 terminal
(p. 93)
SD Card slot
(p. 66)
AV3 terminals
(p. 93)
USB 2 port
(p. 13, 62, 66
and p. 75)

( )ARC
COMPONENT
AUDIO
IN
AUDIO
OUT
Y
P
B
P
R
L
R
L
R
21
HDMI
3
DIGITAL
AUDIO
OUT
PC
( )HDD
USB1
10
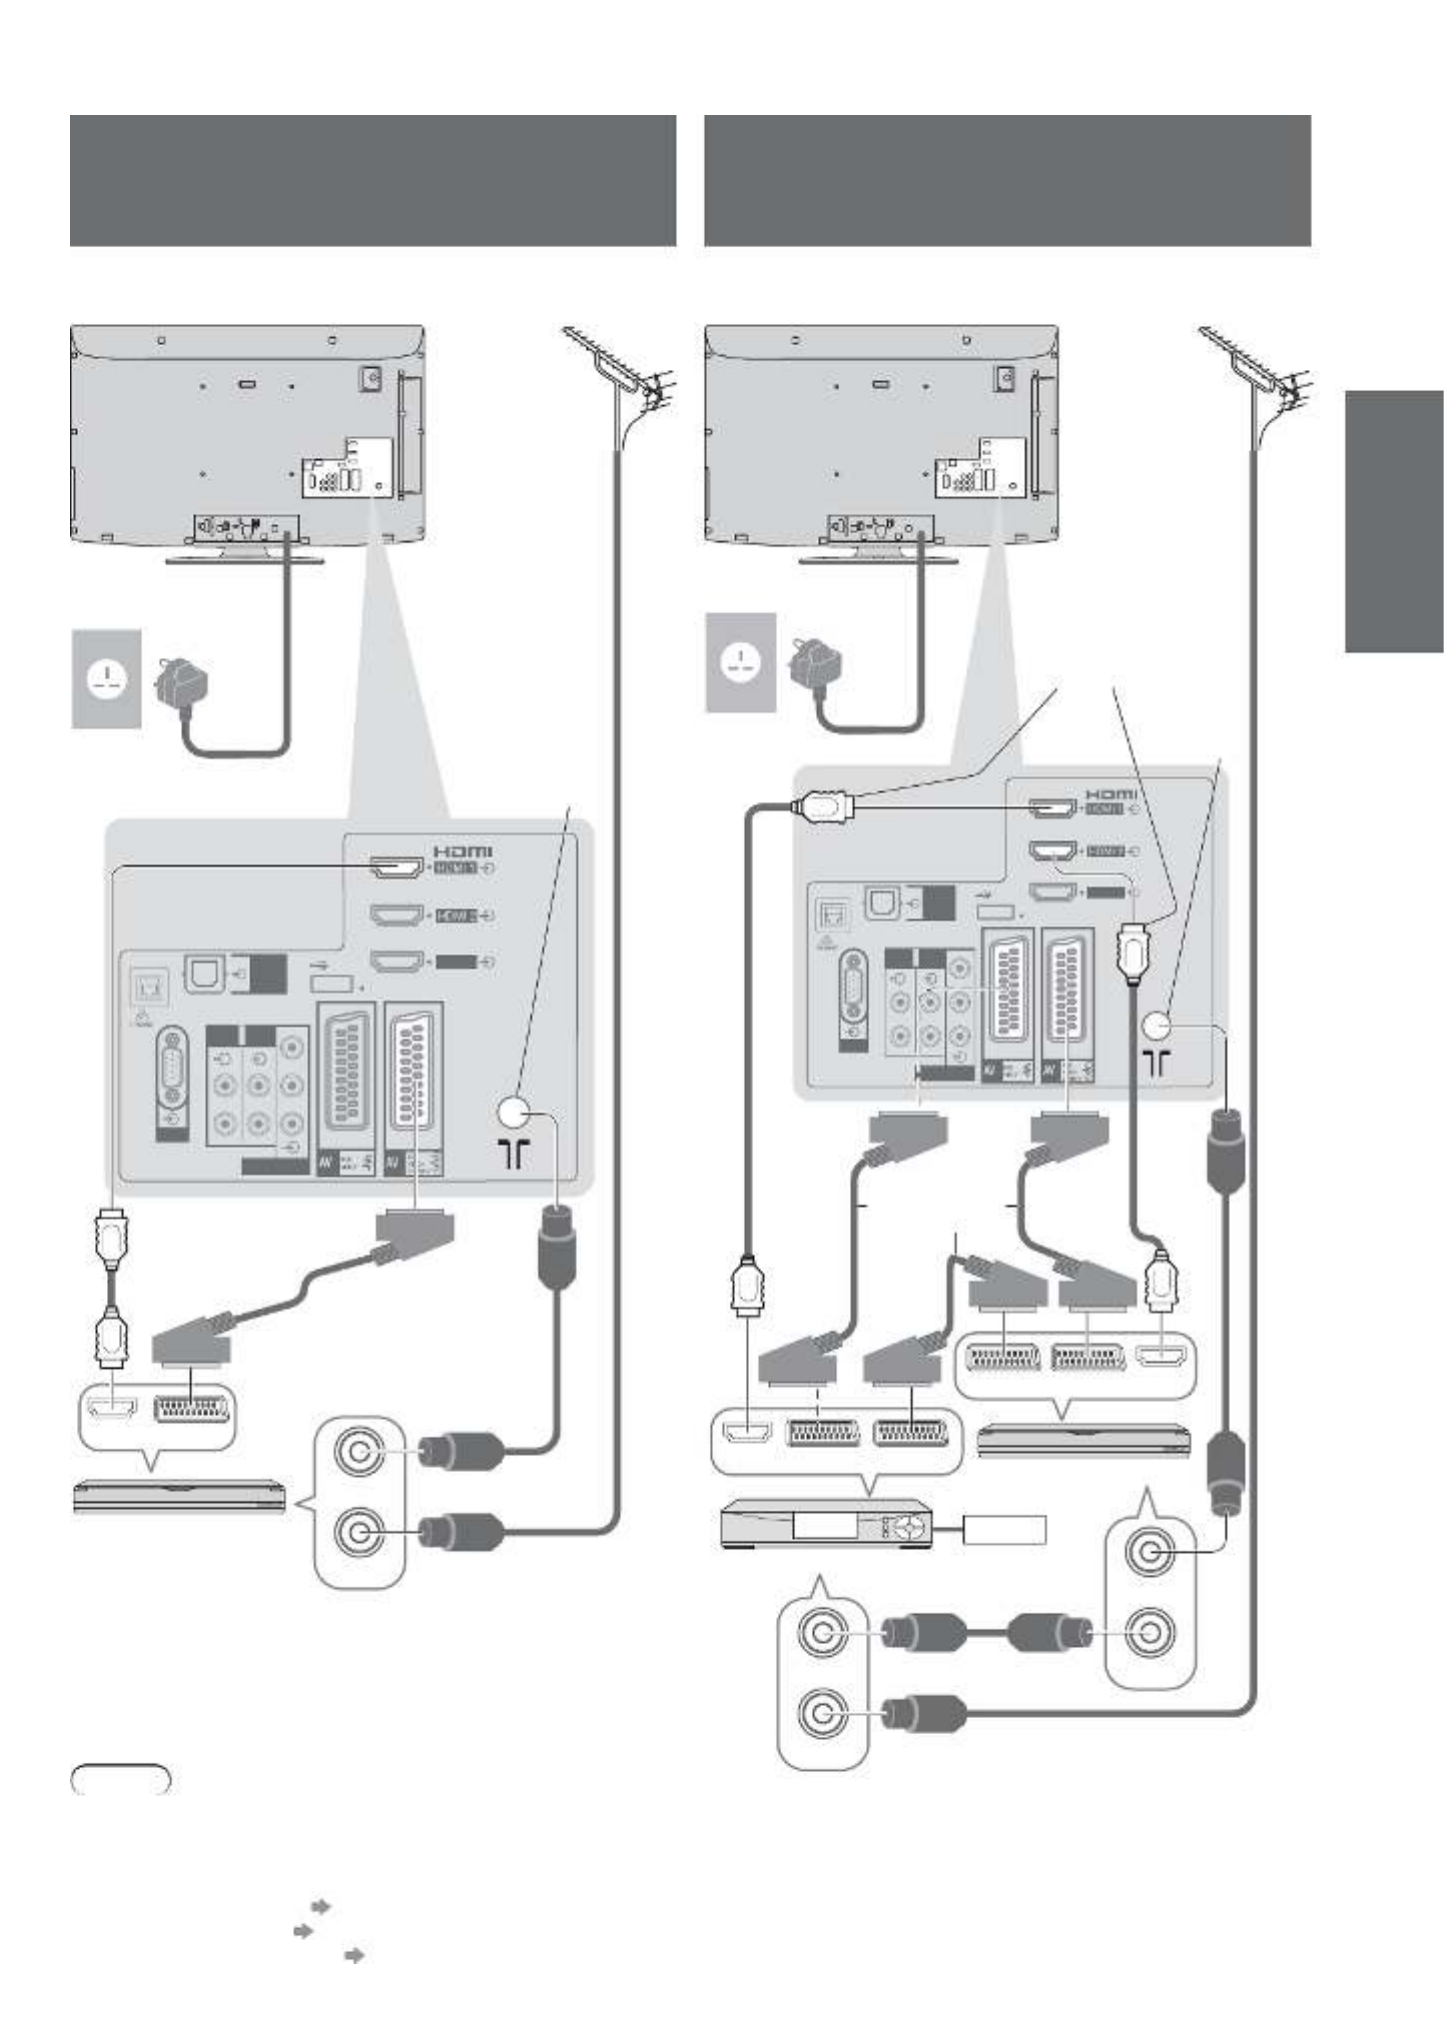
Basic Connection
Mains lead
RF cable
Terrestrial
aerial
Rear of the TV
AC 220-240 V
50 Hz
Clamper
Do not bundle the Satellite cable, RF cable and
mains lead together (could cause distorted image).
Fix cables with clampers as necessary.
When using the optional accessory, follow the
option’s assembly manual to fix cables.
The freesat channel uses Astra 2 at 28.2° East, and Eurobird 1
at 28.5° East satellites. To ensure your satellite dish is correctly
installed please consult your freesat registered dealer.
For digital terrestrial and
analogue broadcasts
Satellite
dish
Satellite cable
For freesat or other
satellite broadcasts
Aerial input terminal
Basic Connection
External equipment and cables shown are not supplied with this TV.
Please ensure that the unit is disconnected from the mains socket before attaching or disconnecting any leads.
Example 1
Connecting dish or aerial
TV only
To tighten:
Keep the
knob pressed
To loosen:
Basic Connection
Quick Start
Guide
( )ARC
COMPONENT
AUDIO
IN
AUDIO
OUT
Y
P
B
P
R
L
R
L
R
21
HDMI
3
DIGITAL
AUDIO
OUT
PC
( )HDD
USB1
RF OUT
RF IN
HDMI AV
(
ARC
)
COMPONENT
AUDIO
IN
AUDIO
OUT
Y
P
B
P
R
L
R
L
R
21
HDMI
3
DIGITAL
AUDIO
OUT
PC
( )HDD
USB1
AV 2 AV 1 HDMI
TV/AV
Recorder/AV
HDMI
RF OUT
RF IN
RF OUT
RF IN
11
Cable
Mains lead
Mains lead
Fully wired
SCART cable
Fully wired HDMI
compliant cable
DVD Recorder or VCR
Terrestrial
aerial
Terrestrial
aerial
Rear of the TV
RF cable
AC 220-240 V
50 Hz
AC 220-240 V
50 Hz
RF cable
Rear of the TV
Example 2
Connecting DVD Recorder / VCR
TV, DVD Recorder or VCR
Example 3
Connecting DVD Recorder / VCR
and Cable TV box
TV, DVD Recorder / VCR and Cable
Note
Connect to the TV’s AV2 for a DVD Recorder / VCR supporting Q-Link (p. 86).
Connect to the TV’s AV1 for a Cable TV box.For HDMI-compatible equipment, it is possible to connect to HDMI terminals (HDMI1 / HDMI2 / HDMI3 / HDMI4) by using HDMI cable (p. 92 and p. 93).
Network connection
p. 13 and p. 75
Q-Link connection
p. 84
VIERA Link connection
p. 84 and p. 85
Please also read the manual of the equipment being connected.
Aerial input
terminal
DVD Recorder or VCR
Cable TV box
Fully wired
SCART cable
RF cable
RF
cable
RF cable
Aerial input
terminal
Fully wired HDMI
compliant cable
Specyfikacje produktu
| Marka: | Panasonic |
| Kategoria: | telewizor |
| Model: | Viera TX-L32G20B |
Potrzebujesz pomocy?
Jeśli potrzebujesz pomocy z Panasonic Viera TX-L32G20B, zadaj pytanie poniżej, a inni użytkownicy Ci odpowiedzą
Instrukcje telewizor Panasonic

21 Września 2024
21 Września 2024
21 Września 2024
21 Września 2024
21 Września 2024
21 Września 2024
21 Września 2024
21 Września 2024
21 Września 2024
21 Września 2024
Instrukcje telewizor
- telewizor Sony
- telewizor Samsung
- telewizor LG
- telewizor Sharp
- telewizor TCL
- telewizor Pioneer
- telewizor Lenovo
- telewizor Philips
- telewizor SilverCrest
- telewizor Fujitsu
- telewizor Nokia
- telewizor Hisense
- telewizor Infiniton
- telewizor Viewsonic
- telewizor AG Neovo
- telewizor Medion
- telewizor OK
- telewizor Lenco
- telewizor Toshiba
- telewizor Tesla
- telewizor Westinghouse
- telewizor Majestic
- telewizor Jensen
- telewizor Blaupunkt
- telewizor Brandt
- telewizor Vivax
- telewizor Salora
- telewizor Teac
- telewizor Grundig
- telewizor Haier
- telewizor Soundmaster
- telewizor Hyundai
- telewizor Strong
- telewizor ECG
- telewizor Matsui
- telewizor Oyster
- telewizor Bang & Olufsen
- telewizor JVC
- telewizor Furrion
- telewizor Funai
- telewizor Oppo
- telewizor TechniSat
- telewizor Krüger&Matz
- telewizor Philco
- telewizor CHiQ
- telewizor Uniden
- telewizor Thomson
- telewizor Velleman
- telewizor Ferguson
- telewizor Manta
- telewizor Pyle
- telewizor AOC
- telewizor Peerless-AV
- telewizor Nevir
- telewizor OKI
- telewizor Mitsubishi
- telewizor Arçelik
- telewizor Continental Edison
- telewizor GoGen
- telewizor NEC
- telewizor Polaroid
- telewizor Aiwa
- telewizor AKAI
- telewizor Sanyo
- telewizor Telefunken
- telewizor Jay-Tech
- telewizor Bush
- telewizor Loewe
- telewizor VOX
- telewizor Insignia
- telewizor AYA
- telewizor Element
- telewizor Denver
- telewizor Hitachi
- telewizor Technika
- telewizor Emerson
- telewizor Seiki
- telewizor Sencor
- telewizor Odys
- telewizor Daewoo
- telewizor Metz
- telewizor Kunft
- telewizor Grunkel
- telewizor Alphatronics
- telewizor XD Enjoy
- telewizor RevolutionHD
- telewizor FFalcon
- telewizor QBell Technology
- telewizor Planar
- telewizor Dyon
- telewizor Reflexion
- telewizor Megasat
- telewizor Sogo
- telewizor Proline
- telewizor Schaub Lorenz
- telewizor Newstar
- telewizor Finlux
- telewizor Palsonic
- telewizor Logik
- telewizor Luxor
- telewizor Mitchell & Brown
- telewizor Aconatic
- telewizor Voxicon
- telewizor Orava
- telewizor SYLVOX
- telewizor Doffler
- telewizor Kogan
- telewizor SunBriteTV
Najnowsze instrukcje dla telewizor

25 Października 2024
25 Października 2024

25 Października 2024
25 Października 2024
25 Października 2024

23 Października 2024
23 Października 2024
23 Października 2024
23 Października 2024

20 Października 2024