Instrukcja obsługi Netgear ReadyNAS RRX443E
Przeczytaj poniżej 📖 instrukcję obsługi w języku polskim dla Netgear ReadyNAS RRX443E (110 stron) w kategorii w. Ta instrukcja była pomocna dla 6 osób i została oceniona przez 2 użytkowników na średnio 4.5 gwiazdek
Strona 1/110

350 East Plumeria Drive
San Jose, CA 95134
USA
November 2013
202-10629-07
ReadyNAS for Business
RAIDiator 4.2.17
Soft ware Manual
x86 Models:
1500
2100
3100
3200
4200
Pro 2
Pro 4
Pro 6
NVX
Pro Business

2
ReadyNAS for Business RAIDiator 4.2.17
© 2011 NETGEAR, Inc. All rights reserved.
No part of this publication may be reproduced, transmitted, transcribed, stored in a retrieval system, or translated
into any language in any form or by any means without the written permission of NETGEAR, Inc.
Technical Support
Thank you for choosing NETGEAR. To register your product, get the latest product updates, or get support online,
visit us at http://support.netgear.com.
Phone (US & Canada only): 1-888-NETGEAR
Phone (Other Countries): See Support information card.
Trademarks
NETGEAR, the NETGEAR logo, and Connect with Innovation are trademarks and/or registered trademarks of
NETGEAR, Inc. and/or its subsidiaries in the United States and/or other countries. Information is subject to change
without notice. © 2011 NETGEAR, Inc. All rights reserved.
Statement of Conditions
To improve internal design, operational function, and/or reliability, NETGEAR reserves the right to make changes
to the products described in this document without notice. NETGEAR does not assume any liability that may occur
due to the use, or application of, the product(s) or circuit layout(s) described herein.

5
ReadyNAS for Business RAIDiator 4.2.17
Resizing Snapshot Space. . . . . . . . . . . . . . . . . . . . . . . . . . . . . . . . . . .101
ReadyNAS Vault Service . . . . . . . . . . . . . . . . . . . . . . . . . . . . . . . . . . . . .102
Enabling Rsync and Specifying Rsync Rights . . . . . . . . . . . . . . . . . . . . .103
Chapter 6 Optimization and Maintenance
Performance . . . . . . . . . . . . . . . . . . . . . . . . . . . . . . . . . . . . . . . . . . . . . . .106
Adding a UPS . . . . . . . . . . . . . . . . . . . . . . . . . . . . . . . . . . . . . . . . . . . . . .107
Power Management . . . . . . . . . . . . . . . . . . . . . . . . . . . . . . . . . . . . . . . . .108
Disk Spin-Down Option. . . . . . . . . . . . . . . . . . . . . . . . . . . . . . . . . . . . .109
Power Timer . . . . . . . . . . . . . . . . . . . . . . . . . . . . . . . . . . . . . . . . . . . . .110
Configuring UPS. . . . . . . . . . . . . . . . . . . . . . . . . . . . . . . . . . . . . . . . . .111
APC . . . . . . . . . . . . . . . . . . . . . . . . . . . . . . . . . . . . . . . . . . . . . . . . . . .111
Wake-on-LAN . . . . . . . . . . . . . . . . . . . . . . . . . . . . . . . . . . . . . . . . . . . .112
Viewing System Status. . . . . . . . . . . . . . . . . . . . . . . . . . . . . . . . . . . . . . . 113
Health . . . . . . . . . . . . . . . . . . . . . . . . . . . . . . . . . . . . . . . . . . . . . . . . . .113
Logs . . . . . . . . . . . . . . . . . . . . . . . . . . . . . . . . . . . . . . . . . . . . . . . . . . .114
System Shutdown and File System Check. . . . . . . . . . . . . . . . . . . . . . . .115
Volume Maintenance . . . . . . . . . . . . . . . . . . . . . . . . . . . . . . . . . . . . . . . .116
Updating ReadyNAS Firmware . . . . . . . . . . . . . . . . . . . . . . . . . . . . . . . .117
Updating Direct from the NETGEAR Web Site. . . . . . . . . . . . . . . . . . .117
Updating from a Local Drive . . . . . . . . . . . . . . . . . . . . . . . . . . . . . . . . .118
Settings. . . . . . . . . . . . . . . . . . . . . . . . . . . . . . . . . . . . . . . . . . . . . . . . .119
Restoring the Factory Default Settings. . . . . . . . . . . . . . . . . . . . . . . . .120
Appendix A Understanding RAID
Understanding RAID. . . . . . . . . . . . . . . . . . . . . . . . . . . . . . . . . . . . . . . . .122
RAID Basics . . . . . . . . . . . . . . . . . . . . . . . . . . . . . . . . . . . . . . . . . . . . .122
RAID Levels . . . . . . . . . . . . . . . . . . . . . . . . . . . . . . . . . . . . . . . . . . . . .122
The Benefits of X-RAID2 . . . . . . . . . . . . . . . . . . . . . . . . . . . . . . . . . . . . . 124
X-RAID2 Is Auto-expandable RAID . . . . . . . . . . . . . . . . . . . . . . . . . . . 124
Simplified Redundancy. . . . . . . . . . . . . . . . . . . . . . . . . . . . . . . . . . . . .124
Easy Volume Expansion. . . . . . . . . . . . . . . . . . . . . . . . . . . . . . . . . . . .125
Flex-RAID . . . . . . . . . . . . . . . . . . . . . . . . . . . . . . . . . . . . . . . . . . . . . . . . .126
Appendix B Notification of Compliance
Index

6
1
1. Getting Acquainted
ReadyNAS for Business RAIDiator 4.2.17
This NETGEAR® ReadyNAS® for Business RAIDiator 4.2.17 software manual describes how to
configure and manage a system. ReadyNAS
This chapter contains the following sections:
• What is the NETGEAR ReadyNAS?
• Initial Setup and Default Login
• Initial Setup and Default Login
• RAIDar Utility
• FrontView Management Console
Note: This manual documents common software features installed on
most ReadyNAS business product models and is based on firmware
v4.2.17. Variations per model are noted, as necessary.

Getting Acquainted
8
ReadyNAS for Business RAIDiator 4.2.17
Initial Setup and Default Login
Follow the instructions on the ReadyNAS Installation Guide that came with your unit to install
your ReadyNAS system. An electronic copy of the installation guide is located on the product
CD. You can also find it on the NETGEAR website, and on the ReadyNAS Community
support page at http://readynas.com/documentation.
If you have a diskless ReadyNAS unit, you must first install and format at least one disk
before you can use the RAIDar setup utility or FrontView Management Console. For more
information, see the appropriate hardware manual for your unit:
• ReadyNAS Ultra, Ultra Plus, and Pro Series Hardware Manual
• ReadyNAS Rack-Mount Hardware Manual
These manuals are available on the ReadyNAS Community support page at
http://readynas.com/documentation.
For a list of supported disks, see . http://readynas.com/hcl
RAIDar Utility
RAIDar is a discovery tool that recognizes ReadyNAS devices on your network and enables
easy setup and management of all your ReadyNAS units. Install it on a computer that is
connected to the same local area network (LAN) as your ReadyNAS unit. The RAIDar utility
is included on the Resource CD that came with your unit. It includes versions for Windows,
Mac, and Linux operating systems. It is also available at http://readynas.com/start.
Launch the RAIDar utility. It automatically finds the device or devices on the network without
needing their IP addresses, and makes it easy to see the status of your units. You should see
your ReadyNAS device or devices listed.
The default IP configuration is set to DHCP; if the unit does not get an IP address, it defaults
to 192.168.168.168.

Getting Acquainted
12
ReadyNAS for Business RAIDiator 4.2.17
FrontView Management Console
After RAIDar discovers your ReadyNAS unit, highlight the unit and click the button to Setup
launch the FrontView Management Console. FrontView operates in two modes:
• Setup Wizard mode
• Advanced Control mode
Setup Wizard Mode
When the unit is installed for the first time, or is in its factory default state, FrontView opens in
Setup Wizard mode. The Setup Wizard guides you step-by-step through the configuration
process, assisting you in quickly integrating the ReadyNAS unit into your network.
Note: For the initial setup, NETGEAR recommends using the Setup
Wizard to ensure that all the necessary settings are configured.
FrontView will automatically switch to the Advanced Control mode
once the Setup Wizard has finished.
The screen provides detailed information about your unit. Home
Click here to switch between the
Smart Wizard and the Advanced Control modes

Managing Your ReadyNAS System
18
ReadyNAS for Business RAIDiator 4.2.17
Ethernet Interfaces
To configure Ethernet interfaces, select . The default screen is the Network > Interfaces
Ethernet 1 screen. Use this screen to specify network interface-specific settings.
Standard Settings
Use this area to specify the IP address, network mask, speed/duplex mode, and MTU
settings.
IP Assignment
You can choose to use IPv4, IPv6, or both.

Managing Your ReadyNAS System
19
ReadyNAS for Business RAIDiator 4.2.17
From the drop-down menu, select server or IPv4 Use values from a DHCP Use values
below:
• Use values from a DHCP server
In most networks where a DHCP server is enabled, you can specify the Use values
from a DHCP server option to automatically set the IP address and network mask. If
you elect to assign the IP address using Use values from a DHCP server, NETGEAR
advises that you set the lease time on the DHCP server or router to a value of at least
1 day. Otherwise, you might notice that the IP address of the unit changes even when
it has been turned off for only a few minutes. Most DHCP servers allow you to map a
static IP address to a MAC address. If you have this option, this ensures that your
ReadyNAS maintains the same IP address, even in DHCP mode.
• Use values below
If you assign a static IP address by selecting Use values below, be aware that the
browser will lose connection to the ReadyNAS device after the IP address has been
changed. To reconnect after assigning a static IP address, open the RAIDar utility,
click to locate the device, and then reconnect.Rescan
Also note that you must take care to correctly enter the IP address. If you enter an
incorrect IP address, you cannot connect to your ReadyNAS system. To recover from
an incorrectly entered IP address, you must perform an OS reinstall reboot. For more
information, see the appropriate hardware manual for your system:
• ReadyNAS Ultra, Ultra Plus and Pro Series Hardware Manual
• ReadyNAS Rack-Mount Hardware Manual
These manuals are available at . http://readynas.com/documentation
From the drop-down menu, select server or IPv6 Use values from a DHCP Use values
below:
• Configure Automatically
In most networks where a DHCP server is enabled, you can specify the Configure
Automatically option to automatically set the IP address and network mask. If you
elect to assign the IP address automatically, values are obtained from a DHCP server.
In this case, NETGEAR advises that you set the lease time on the DHCP server or
router to a value of at least 1 day. Otherwise, you might notice that the IP address of
the unit changes even when it has been turned off for only a few minutes. Most DHCP
servers allow you to map a static IP address to a MAC address. If you have this
option, this ensures that your ReadyNAS maintains the same IP address, even in
DHCP mode.
• Use values below
If you assign a static IP address by selecting Use values below, be aware that the
browser will lose connection to the ReadyNAS device after the IP address has been
changed. To reconnect after assigning a static IP address, open the RAIDar utility,
click to locate the device, and then reconnect.Rescan

Managing Your ReadyNAS System
20
ReadyNAS for Business RAIDiator 4.2.17
Speed/Duplex Mode
NETGEAR advises that you keep the setting in an Auto-negotiation mode; however, if you
have a managed switch that works best when the devices are forced to a particular speed or
mode, you can select either the full-duplex or half-duplex setting as needed.
MTU
NETGEAR advises that you leave the default setting; however, in some network
environments, changing the default MTU value can fix throughput problems.
Teaming/Failover
You can use this area to combine two or more Ethernet interfaces into one. This allows your
ReadyNAS to pool the bandwidth provided by multiple Ethernet interfaces for use with one IP
address, potentially improving performance. This feature is called teaming. To use teaming,
your Ethernet cables must be connected to the same network switch and your network switch
must support teaming.
Another benefit of combining two or more Ethernet interfaces is that failover is supported.
With failover, if one Ethernet interface fails, traffic is automatically directed to the other
Ethernet interfaces.
Managing Your ReadyNAS System
25
ReadyNAS for Business RAIDiator 4.2.17
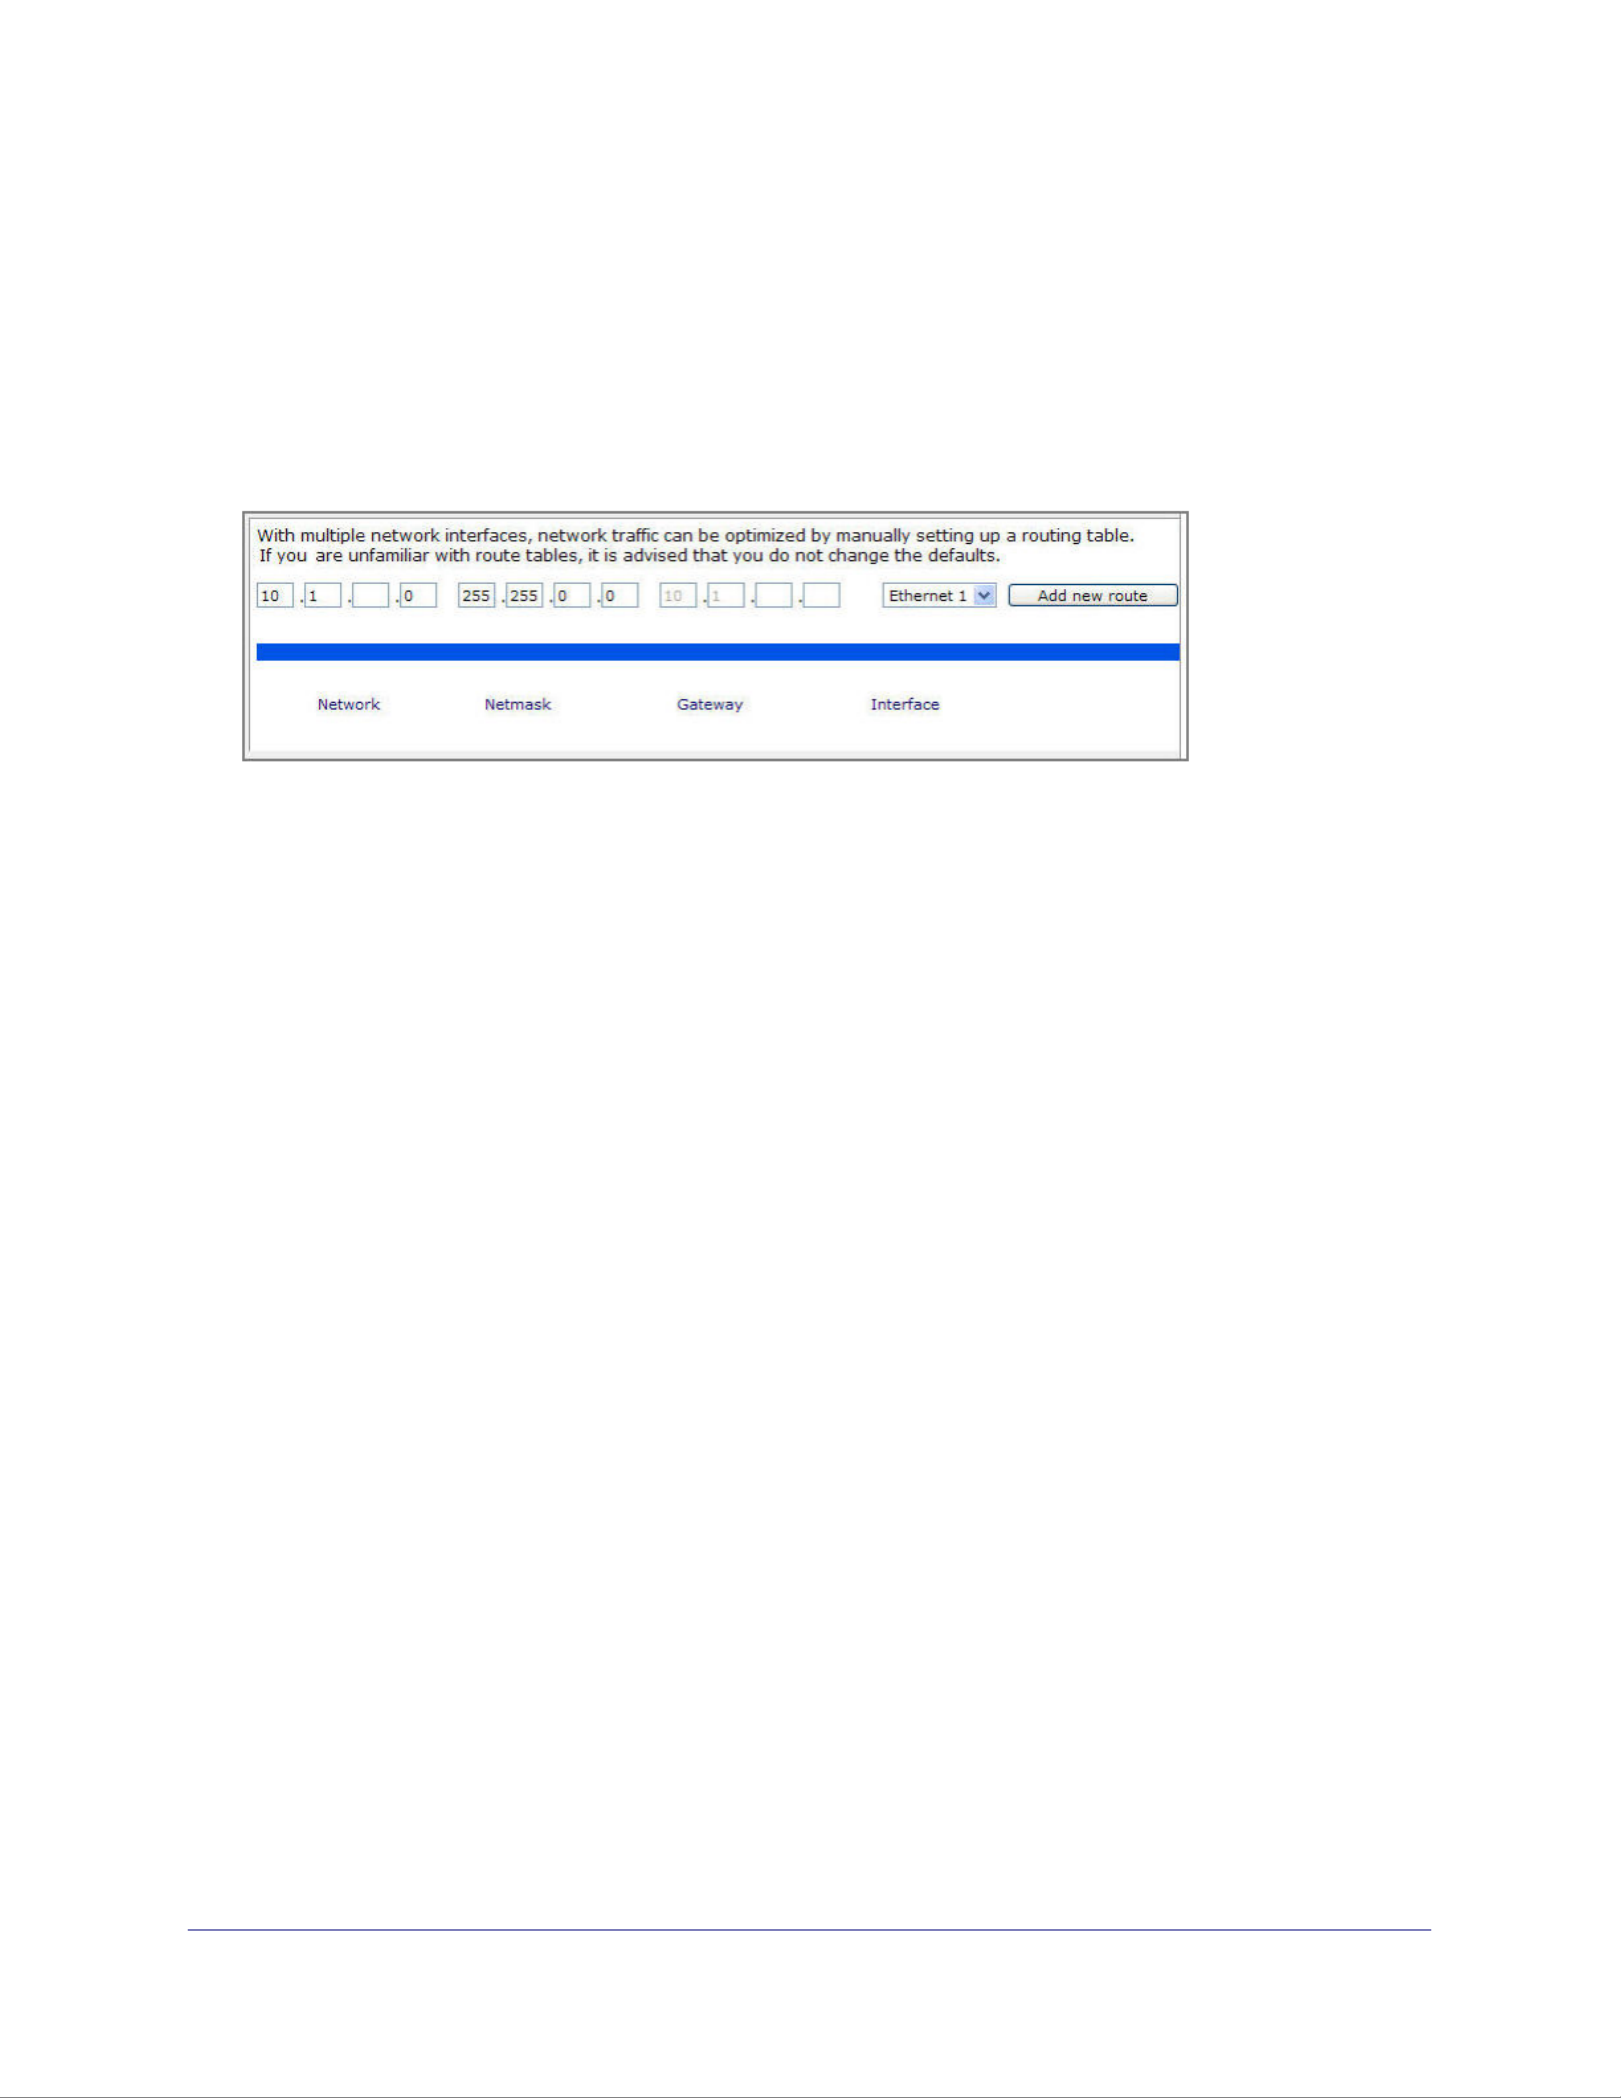
Route
Use the screen to specify a manual routing table for each Ethernet interface and to Route
optimize performance.
For example, you could congure a manual routing table to assure that these Ethernet
interfaces are directly routed over a ber backbone and assure the unit does not experience
the trac congestion that can build up on a gigabit segment.

Managing Your ReadyNAS System
26
ReadyNAS for Business RAIDiator 4.2.17
Setting Up Security
Use the screen to set the administrator password, administer security, and set up Security
the password recovery feature on the ReadyNAS.
Access ReadyNAS Security functionality from these tabs:
• Updating the Admin Password on page 26.
• Security Access Modes on page 27.
• Accounts on page 27.
Updating the Admin Password
The Admin Password screen allows you to change the administrator user password. The
administrator user is the only user who can access the FrontView Management Console, and
has administrative privileges when accessing shares.
Note: Be sure to set a password dierent from the default password and
keep it in a safe place. Anyone who obtains this password can
change settings or erase data stored on the ReadyNAS.
Note: In User Domain or security mode, you can use the admin account to
log in to a Windows share, and perform maintenance on any le or
folder in that share. The admin user also has permission to access
all shares to perform backups.

Managing Your ReadyNAS System
27
ReadyNAS for Business RAIDiator 4.2.17
As a safeguard, you are requested to enter a password recovery question, the expected
answer, and an email address. If, in the future, you forget the password, go to
https://<readynas ip_address>/password_recovery. Successfully answering the
questions resets the admin password, which is then sent to the email address you enter on
this screen.
Password Recovery
To recover a forgotten password:
There are two options for recovering or resetting a lost or compromised password:
1. In a Web browser, enter https://<readynas ip_address>/password_recovery. You will
be prompted for the email address and security question entered when you rst set up
the system. A new password will be sent to you at that email.
2. Optionally, you can reinstall the firmware, which does not remove data from the system, but
resets the admin username and password to the factory defaults admin and netgear1.
In a Web browser, enter:
http://readynas.com/forum/faq.php#How_do_I_re-install_the_rmware%3F
Security Access Modes
See Setting Security Access Modes on page 54.
Accounts
See Setting Up User and Group Accounts on page 58.

Managing Your ReadyNAS System
29
ReadyNAS for Business RAIDiator 4.2.17
CIFS (Common Internet File Service)
Sometimes referred to as SMB, CIFS is used mainly by Microsoft Windows clients, and
sometimes by Mac OS X clients. Under Windows, My Network Places and Network
Neighborhood uses CIFS. This service is enabled by default.
NFS (Network File Service)
NFS is used by Linux and Unix clients. Mac OS 9/X users can access NFS shares through
console shell access. ReadyNAS supports NFS v3 over UDP and TCP.
AFP (Apple File Protocol)
Mac OS 9 and OS X work best using this protocol because it handles an extensive character
set. However, in a mixed PC and Mac environment, NETGEAR recommends CIFS/SMB over
AFP, unless enhanced character set support is necessary for the Mac. ReadyNAS supports
AFP 3.2.
FTP/FTPS (File Transfer Protocol and FTP with SSL encryption)
Widely used in public le upload and download sites. ReadyNAS supports anonymous or
user access for FTP clients, regardless of the security mode selected. You can elect to set up
port forwarding to nonstandard ports for better security when you access les over the
Internet. Alternately, use an FTPS client for secure and encrypted login and data transfers.
HTTP (Hypertext Transfer Protocol)
ReadyNAS supports HTTP le manager, allowing read/write access to shares using the
browser. This service can be disabled in lieu of HTTPS to allow for a more secure
transmission of passwords and data. With the redirect option, access to http://readynas_ip
can be automatically redirected to a share. This is useful if you do not want to expose your
default share listing to outsiders. To redirect to a share, create an index le, such as
index.htm or index.html, in your target share. You can also enable or disable login
authentication to this share.
HTTPS (HTTP with SSL encryption)
This service is enabled by default and cannot be disabled. Access to FrontView is strictly
through HTTPS. If you want remote Web access to FrontView or your HTTPS shares, specify
a nonstandard port (the default is 443) that you can forward on your router for better security.
You can also regenerate the SSL key based on the hostname or IP address that users use to
address ReadyNAS. This allows you to bypass the default dummy certicate warnings
whenever users access the ReadyNAS over HTTPS.
Rsync
Rsync is an extremely popular and ecient form of incremental backup made popular on the
Linux platform, but is now available for various other Unix systems, as well as Windows and
Mac. Enabling Rsync service on the ReadyNAS allows clients to use Rsync to initiate
backups to and from the ReadyNAS.

Managing Your ReadyNAS System
30
ReadyNAS for Business RAIDiator 4.2.17
Discovery Services
Bonjour UPnP and discovery services are included with the ReadyNAS. You can download
and install additional services from the Add-ons page at .http://readynas.com
• Bonjour
Bonjour service lets you discover various services on the ReadyNAS and provides a
way to connect to FrontView, IPP printing, and AFP services. OS X has built-in
Bonjour support, and you can download Bonjour for Windows from Apple’s Web site.
• UPnP
UPnP (Universal Plug-n-Play) provides a means for UPnP-enabled clients to discover
the ReadyNAS on your LAN.

Managing Your ReadyNAS System
32
ReadyNAS for Business RAIDiator 4.2.17
On Windows, you can map a ReadyNAS share to a drive letter, and access the share just as
you would any typical local drive on your PC.
To use ReadyNAS Remote, you need to enable the functionality and install a small client on
your Mac or PC. For more information, see on page 83 or go to Remote Access
http://readynas.com/remote
To enable ReadyNAS Remote:
1. Select the ReadyNAS Remote Save check box and click .
2. Click the Manage ReadyNAS Remote button to allow remote access to the ReadyNAS.
Available
To view and install add-ons that are available through NETGEAR, select Add-ons >
Available. A screen displays showing all add-ons available through NETGEAR.
To install an add-on, click the button. A download progress bar displays and you are Install
notied when the installation process is complete. The new add-on appears on the Installed
screen.
Add New
To install add-ons that you previously downloaded to your computer on your ReadyNAS unit,
select Add-ons > Add New. Browse to the add-on you want to upload and click the Upload
and verify image button.

Managing Your ReadyNAS System
34
ReadyNAS for Business RAIDiator 4.2.17
Alerts
If you have specied email address in the contact list, you receive an email alert when a
system event that requires attention occurs. For example, a device or enclosure failure, a
quota violation, or low disk space warning will generate an email alert.
To access the Alerts screen select System > Alerts from the main menu. This contains three
additional conguration areas, described in the following sections:
• Contacts on page 34.
• Settings on page 35.
• SNMP on page 37.
Contacts
Use the screen to specify up to three email addresses where system alerts will be Contacts
sent. The ReadyNAS device has a robust system monitoring feature and sends email alerts
anytime something appears to be wrong, or when a device has failed. Make sure to enter a
primary address and a backup address, if possible.
Use an email address tied to a mobile phone to monitor the device when you are away from
your desk.
To set up an email contact:
1. Select an option from a list of popular email providers.
2. Add the user name and password needed to authenticate with the SMTP server.
In cases where the provider is not listed, click the button to customize the SMTP
setting for your provider.
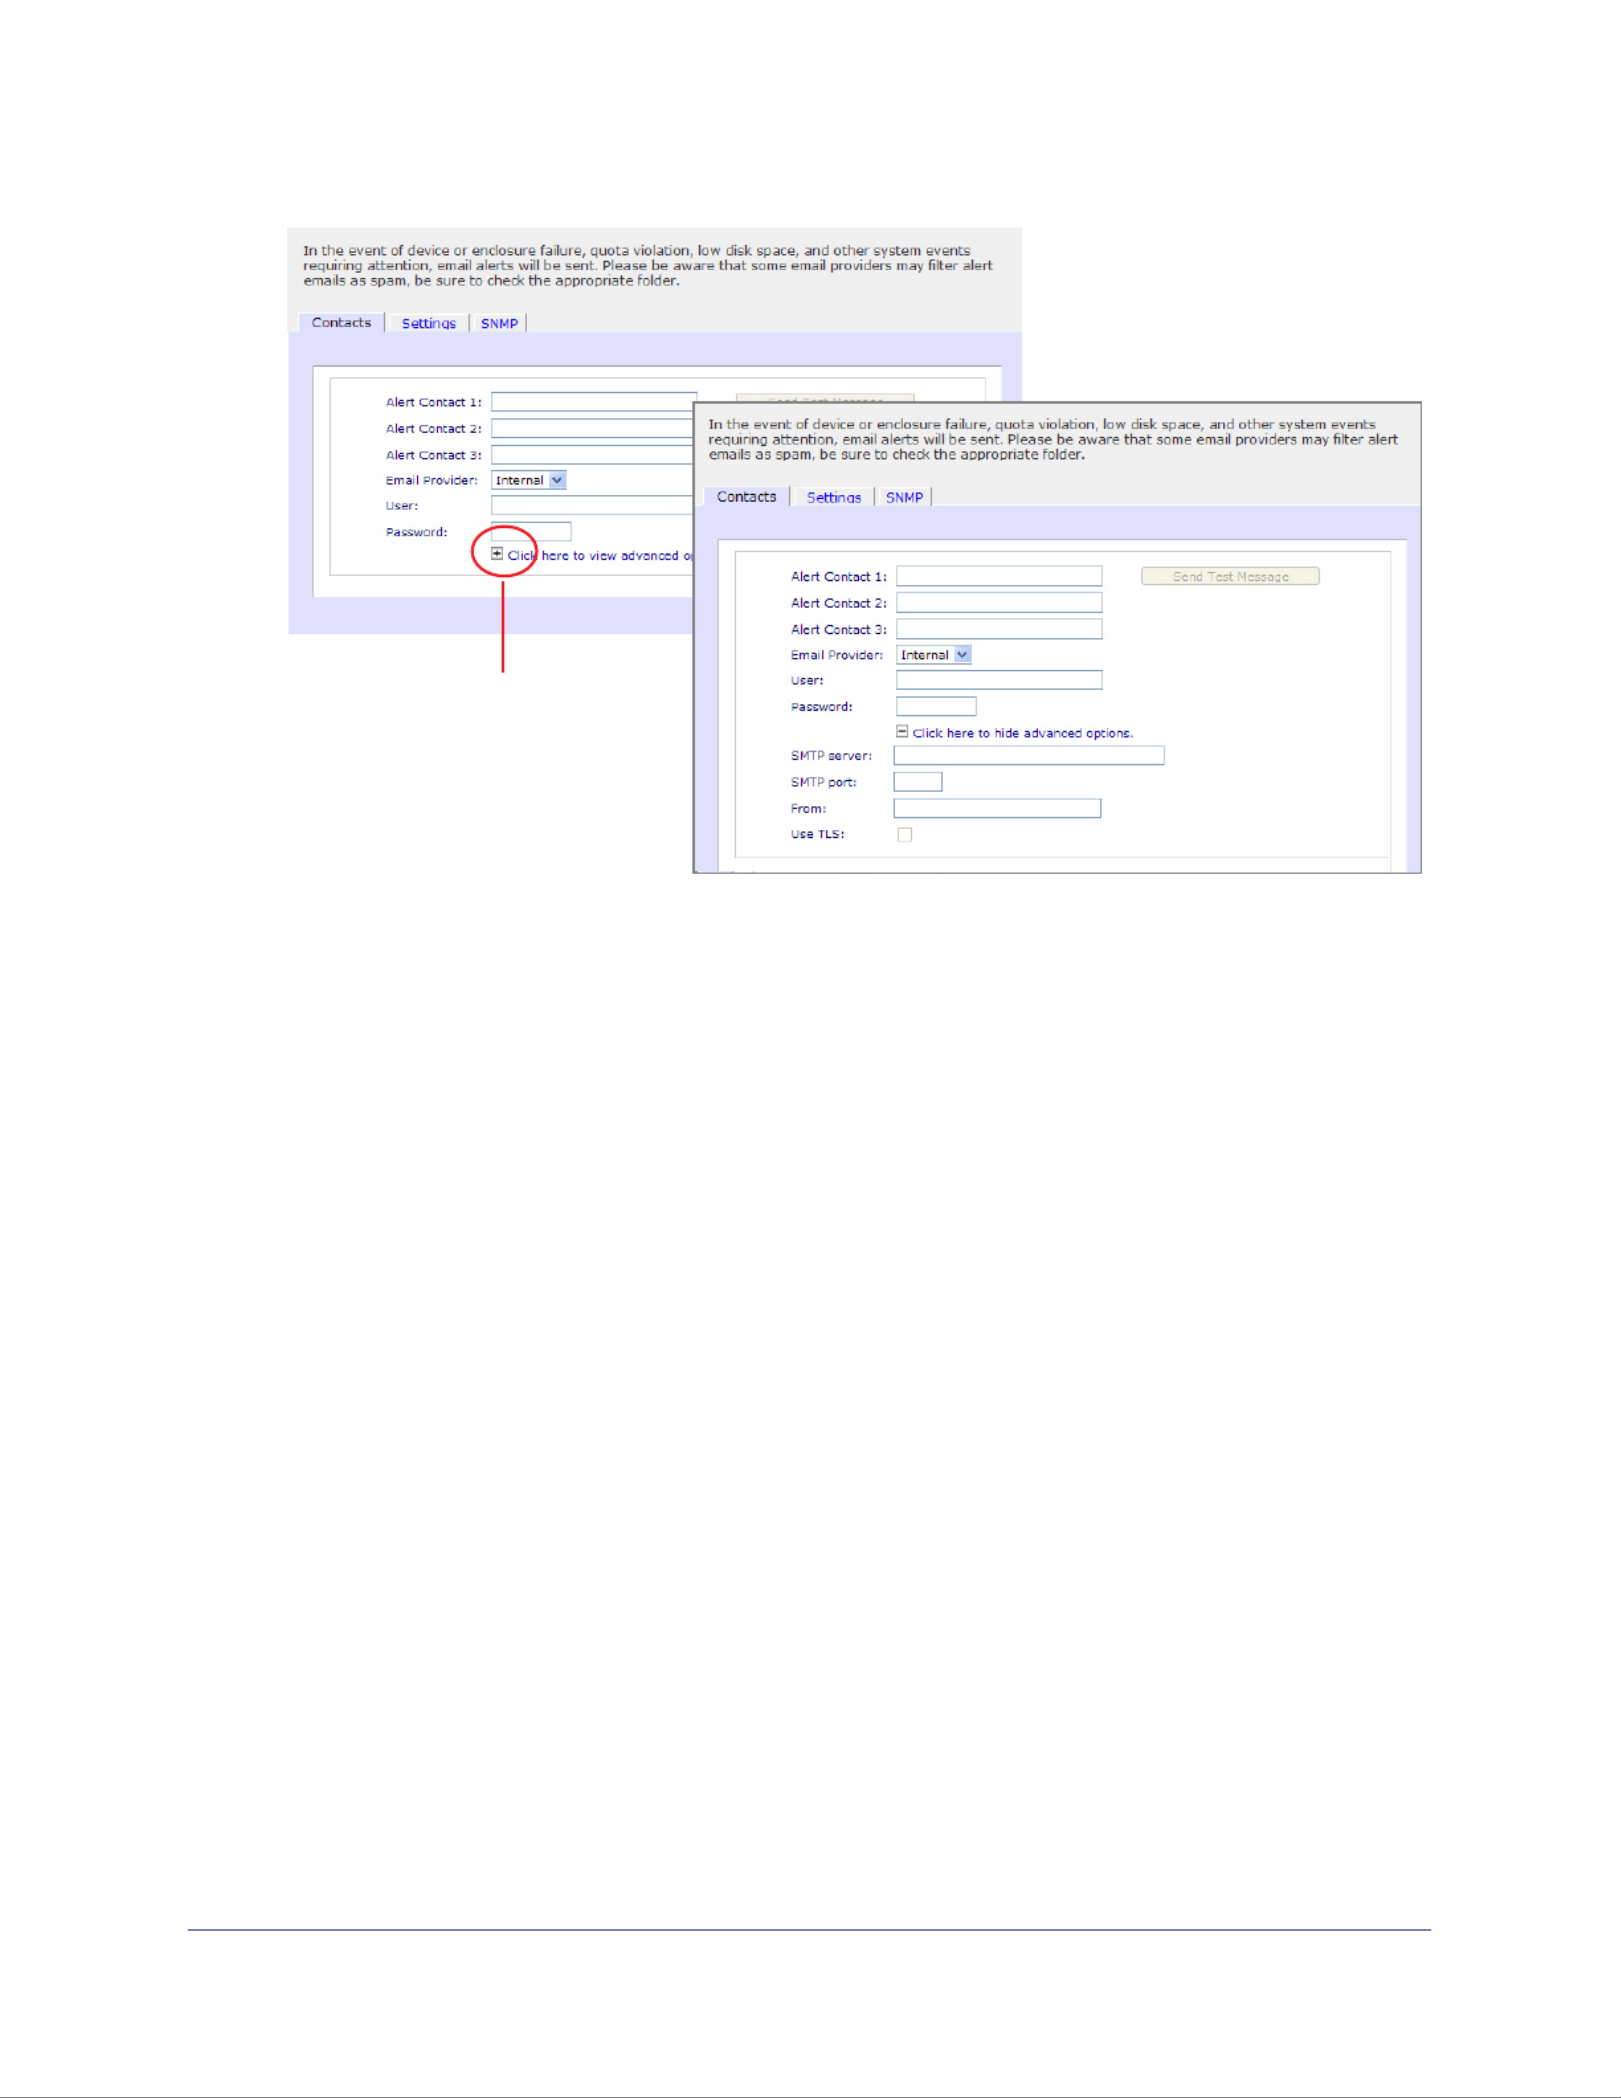
Access additional
SMTP options
Managing Your ReadyNAS System
35
ReadyNAS for Business RAIDiator 4.2.17
Settings
ReadyNAS devices are precongured with mandatory and optional alerts for various system
warnings and failures. Use the screen to control the settings for optional alerts. Settings
NETGEAR recommends that you keep all alerts enabled; however, you might choose to
disable an alert if you are aware of a problem and want to temporarily disable it.

Managing Your ReadyNAS System
36
ReadyNAS for Business RAIDiator 4.2.17
At the bottom of the screen in the Other Alert Settings section, there are additional options.
• Select the option to Power-off NAS when a disk fails or no longer responds
gracefully power off the disk failure or disk remove event is detected.ReadyNAS if a
• Select the to gracefully Power-off NAS when disk temperature exceeds safe level
power off the when the disk temperature exceeds the nominal range.ReadyNAS
Specyfikacje produktu
| Marka: | Netgear |
| Kategoria: | w |
| Model: | ReadyNAS RRX443E |
Potrzebujesz pomocy?
Jeśli potrzebujesz pomocy z Netgear ReadyNAS RRX443E, zadaj pytanie poniżej, a inni użytkownicy Ci odpowiedzą
Instrukcje w Netgear

10 Października 2024
27 Września 2024
13 Września 2024
10 Września 2024
8 Września 2024
8 Września 2024
8 Września 2024
6 Września 2024
5 Września 2024
5 Września 2024
Instrukcje w
- w Samsung
- w LG
- w Supermicro
- w Lenovo
- w Medion
- w Toshiba
- w D-Link
- w HP
- w Synology
- w ZyXEL
- w Sandisk
- w Dell
- w Abus
- w Western Digital
- w Promise Technology
- w QNAP
- w Allnet
- w Veritas
- w Sitecom
- w Maxdata
- w Buffalo
- w LaCie
- w Asustor
- w Freecom
- w Seagate
- w Terra
- w CRU
- w Mustang
- w Raidsonic
- w Approx
- w Infortrend
- w Origin Storage
Najnowsze instrukcje dla w

2 Kwietnia 2025
3 Lutego 2025

13 Stycznia 2025
28 Grudnia 2024
10 Października 2024
10 Października 2024
10 Października 2024
9 Października 2024
6 Października 2024
4 Października 2024