Instrukcja obsługi Netgear ProSafe GS716T
Netgear
przełącznik
ProSafe GS716T
Przeczytaj poniżej 📖 instrukcję obsługi w języku polskim dla Netgear ProSafe GS716T (2 stron) w kategorii przełącznik. Ta instrukcja była pomocna dla 4 osób i została oceniona przez 2 użytkowników na średnio 4.5 gwiazdek
Strona 1/2

Installation Guide
NETGEAR ProSAFE Smart Switch™ GS716Tv3
NETGEAR ProSAFE Smart Switch™ GS724Tv4
NETGEAR ProSAFE Smart Switch™ GS748Tv5
Package Contents
•NETGEAR ProSAFE Smart Switch
•Rubber footpads for tabletop installation
•AC power cord
•Rack-mount kit for rack installation
•Installation guide
•Smart Switch resource CD that includes the Smart Control Center Utility
and hardware installation guide. (A link to the online software administration
manual is on the resource CD.)
Configure the Switch
Install the Smart Control Center Utility and use it to configure the switch.
Install the Smart Control Center Utility on a Computer
1. Insert the resource CD into your CD drive.
2. Run the Setup program to install the Smart Control Center Utility.
The Installation Wizard guides you through the installation.
Connect Your Smart Switch
If you have a DHCP server in you network, see Connect the Switch to Your
Network.
If you are using static IP addresses in you network, first see Configure the
Switch with a Static IP Address Connect the Switch to Your , and then see
Network.
Configure the Switch with a Static IP Address
If you are using a static IP address in you network, configure the switch IP
address before connecting the switch to your network. The default IP address of
the switch is 192.168.0.239.
Note: If you are using a DHCP server in your network, this procedure does not
apply to you; instead, go directly to Connect the Switch to Your Network.
1. Set up the computer with a static IP address in the 192.168.0.x subnet.
2. Connect the computer to the switch.
3. Configure the IP address of the switch to match your network
configuration.
Connect the Switch to Your Network
1. Connect each computer to an RJ-45 network port on the switch front
panel.
Use Category 5 (Cat 5) or better Ethernet cable terminated with an RJ-45
connector to make these connections.
2. Connect the switch to your network.
3. Power on the switch.
4. Verify that the computer with the Smart Control Center Utility is on the same
subnet as the switch.
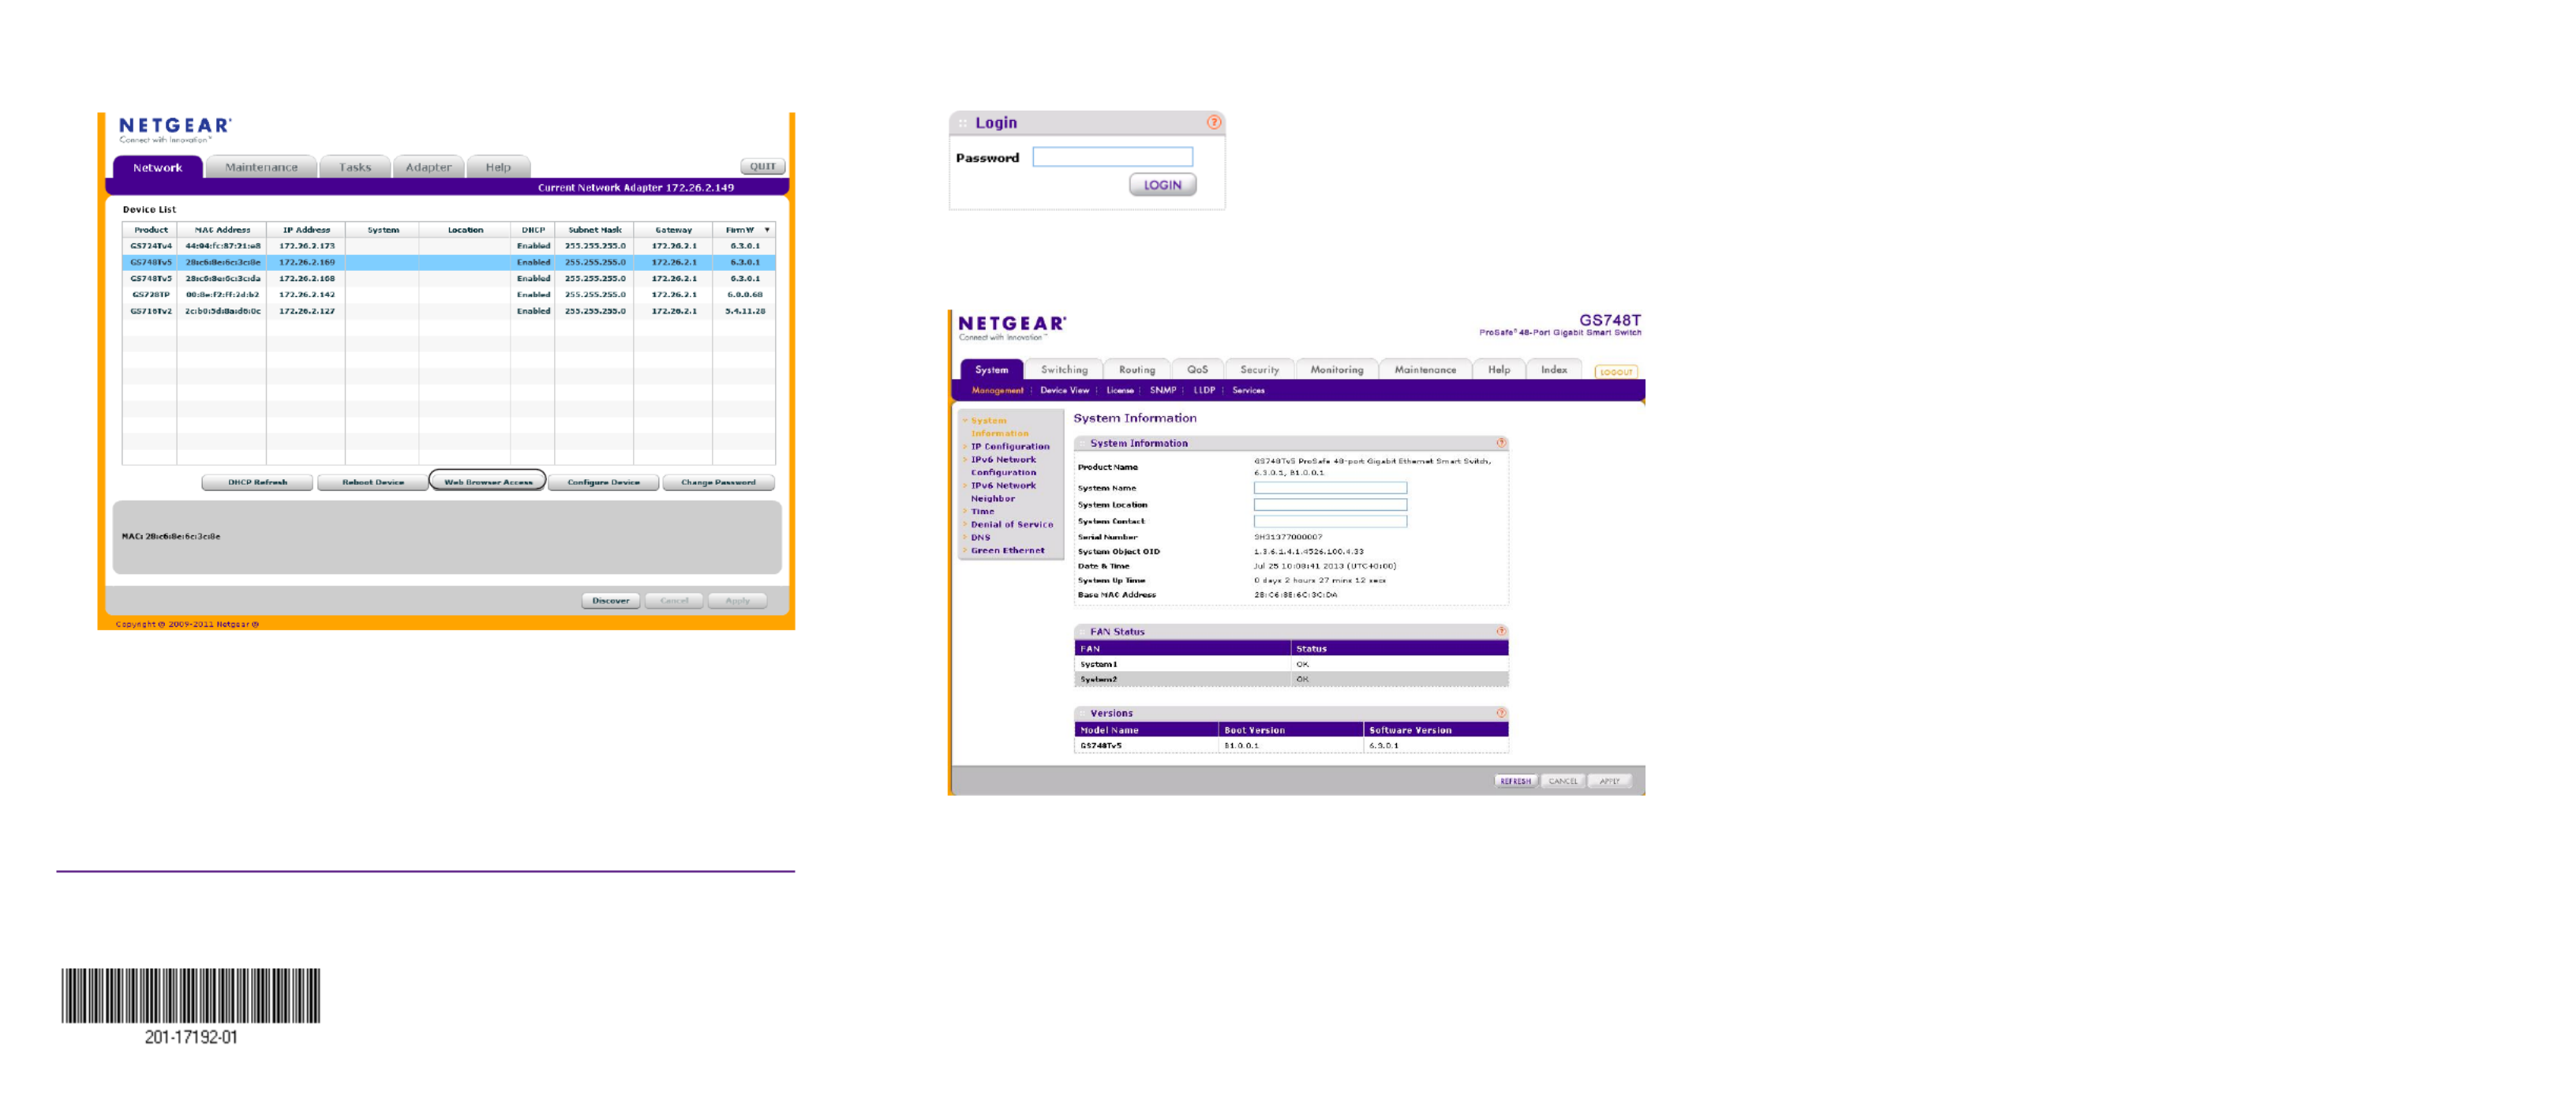
Configure the Switch with the Smart Control Center
Utility
1. Double-click the Smart Control Center Utility icon on your desktop or
click the icon in the Windows Start menu to run the utility and view this
screen.
2. Click the Discover button.
August 2013
NETGEAR, the NETGEAR logo, and Connect with Innovation are trademarks and/or registered trademarks
of NETGEAR, Inc. and/or its subsidiaries in the United States and/or other countries. Information is subject
to change without notice. © NETGEAR, Inc. All rights reserved.
NETGEAR, Inc.
350 East Plumeria Drive
San Jose, CA 95134 USA
The Smart Control Center Utility finds the switch and displays its MAC
address, IP address, and model number.
If the utility does not discover your switch, verify that the cable connections
are secure and that the IP address configuration of the computer is in the
same subnet as the switch, and click the button.Discover
3. Click the row for the switch that you want to configure.
4. Click the Web Browser Access button to view the switch Login screen.
5. Enter the default password of password in lower-case letters and click the
Login button.
The System Information screen displays
6. Configure the switch for your network.
For more information, see the software administration manual.
Troubleshooting Tips
Here are some tips for correcting simple problems you might have.
•Be sure to power on your computer and switch in the following sequence:
1. Turn on the switch and wait about two minutes.
2. Turn on the computer and connect to the switch.
•Make sure the Ethernet cables are plugged in.
For each powered-on computer connected to the switch, the corresponding
switch LAN port status LED is lit.
•Make sure the network settings of the computer are correct.
In most cases, computers should be configured to obtain an IP address
through DHCP. If your network uses static IP addresses, be sure that the
switch and computer are configured with valid IP addresses. For more
information, see the software administration manual.
Support
Thank you for selecting NETGEAR products.
After installing your device, locate the serial number on the label of your product
and use it to register your product at https://my.netgear.com.
You must register your product before you can use NETGEAR telephone support.
NETGEAR recommends registering your product through the NETGEAR website.
For product updates and web support, visit http://support.netgear.com.
NETGEAR recommends that you use only the official NETGEAR support
resources.
For the current EU Declaration of Conformity, visit
http://support.netgear.com/app/answers/detail/a_id/11621/.
Specyfikacje produktu
| Marka: | Netgear |
| Kategoria: | przełącznik |
| Model: | ProSafe GS716T |
Potrzebujesz pomocy?
Jeśli potrzebujesz pomocy z Netgear ProSafe GS716T, zadaj pytanie poniżej, a inni użytkownicy Ci odpowiedzą
Instrukcje przełącznik Netgear

3 Stycznia 2025
15 Października 2024
23 Września 2024
15 Września 2024
13 Września 2024
11 Września 2024
10 Września 2024
7 Września 2024
7 Września 2024
5 Września 2024
Instrukcje przełącznik
- przełącznik Yamaha
- przełącznik Ikea
- przełącznik Tenda
- przełącznik Worx
- przełącznik Huawei
- przełącznik TP-Link
- przełącznik Philips
- przełącznik Plantronics
- przełącznik SilverCrest
- przełącznik Bosch
- przełącznik Hikvision
- przełącznik IPGARD
- przełącznik Toolcraft
- przełącznik Panasonic
- przełącznik StarTech.com
- przełącznik Theben
- przełącznik Crestron
- przełącznik Behringer
- przełącznik Asus
- przełącznik Nedis
- przełącznik Nexa
- przełącznik Boss
- przełącznik TRENDnet
- przełącznik Tesla
- przełącznik D-Link
- przełącznik ATen
- przełącznik Metra
- przełącznik APC
- przełącznik Alcatel
- przełącznik Eberle
- przełącznik HP
- przełącznik Honeywell
- przełącznik Manhattan
- przełącznik Tripp Lite
- przełącznik Mikrotik
- przełącznik Mercury
- przełącznik Shimano
- przełącznik Audac
- przełącznik Cisco
- przełącznik ORNO
- przełącznik Alpine
- przełącznik Chamberlain
- przełącznik Paladin
- przełącznik Lindy
- przełącznik ZyXEL
- przełącznik LogiLink
- przełącznik IFM
- przełącznik Linksys
- przełącznik Digitus
- przełącznik Vimar
- przełącznik Dahua Technology
- przełącznik Schneider
- przełącznik Renkforce
- przełącznik BaseTech
- przełącznik Perel
- przełącznik Trotec
- przełącznik Adder
- przełącznik Ansmann
- przełącznik Velleman
- przełącznik Homematic IP
- przełącznik DataVideo
- przełącznik One For All
- przełącznik Totolink
- przełącznik Intertechno
- przełącznik Black Box
- przełącznik Victron Energy
- przełącznik Delta Dore
- przełącznik Pyle
- przełącznik Lancom
- przełącznik Adviti
- przełącznik Iogear
- przełącznik Intellinet
- przełącznik Setti+
- przełącznik Jabra
- przełącznik Vivotek
- przełącznik PreSonus
- przełącznik Mercusys
- przełącznik Shelly
- przełącznik Edimax
- przełącznik AirLive
- przełącznik EnGenius
- przełącznik SPC
- przełącznik Planet
- przełącznik Brilliant
- przełącznik Blustream
- przełącznik LevelOne
- przełącznik Vivolink
- przełącznik Suevia
- przełącznik Abus
- przełącznik Omnitronic
- przełącznik Elro
- przełącznik Hama
- przełącznik Marmitek
- przełącznik Ubiquiti Networks
- przełącznik Smart-AVI
- przełącznik Goobay
- przełącznik Kaiser
- przełącznik Equip
- przełącznik Kemo
- przełącznik Juniper
- przełącznik Cudy
- przełącznik QNAP
- przełącznik Micro Connect
- przełącznik Hager
- przełącznik Extech
- przełącznik Elation
- przełącznik Rex
- przełącznik Emerson
- przełącznik Ernitec
- przełącznik Vemer
- przełącznik CyberPower
- przełącznik Electro Harmonix
- przełącznik Atlona
- przełącznik Elektrobock
- przełącznik Fibaro
- przełącznik Gefen
- przełącznik SEADA
- przełącznik Vivanco
- przełącznik Grandstream
- przełącznik Powerfix
- przełącznik Alecto
- przełącznik Vacmaster
- przełącznik Kathrein
- przełącznik JUNG
- przełącznik Eaton
- przełącznik Monacor
- przełącznik H-Tronic
- przełącznik EVE
- przełącznik Smartwares
- przełącznik Sygonix
- przełącznik Cotech
- przełącznik Dormakaba
- przełącznik Alfatron
- przełącznik Clas Ohlson
- przełącznik Kopp
- przełącznik Speaka
- przełącznik Belkin
- przełącznik Generac
- przełącznik Kramer
- przełącznik KanexPro
- przełącznik BZBGear
- przełącznik RGBlink
- przełącznik Raritan
- przełącznik AMX
- przełącznik Sonance
- przełącznik Profile
- przełącznik Intermatic
- przełącznik Flamingo
- przełącznik Brennenstuhl
- przełącznik Eminent
- przełącznik KlikaanKlikuit
- przełącznik Ei Electronics
- przełącznik Sylvania
- przełącznik Tork
- przełącznik Techly
- przełącznik Matrox
- przełącznik Steren
- przełącznik AV:link
- przełącznik Buffalo
- przełącznik Audiovox
- przełącznik Merten
- przełącznik Chacon
- przełącznik Konig
- przełącznik UPM
- przełącznik Finder
- przełącznik Fantini Cosmi
- przełącznik DoorBird
- przełącznik Grasslin
- przełącznik Gira
- przełącznik WHALE
- przełącznik PAC
- przełącznik Wentronic
- przełącznik Wago
- przełącznik Lanberg
- przełącznik Monoprice
- przełącznik Nous
- przełącznik Tiptel
- przełącznik OSD Audio
- przełącznik Unify
- przełącznik Berker
- przełącznik Aeon Labs
- przełącznik Provision ISR
- przełącznik CSL
- przełącznik PCE
- przełącznik SIIG
- przełącznik Advantech
- przełącznik Merlin Gerin
- przełącznik Intelix
- przełącznik Extron
- przełącznik Avocent
- przełącznik Heitronic
- przełącznik Ebode
- przełącznik Robbe
- przełącznik ICasa
- przełącznik B-tech
- przełącznik GAO
- przełącznik Legrand
- przełącznik Kraus & Naimer
- przełącznik Noble
- przełącznik Ecler
- przełącznik Inverto
- przełącznik Triax
- przełącznik Rule
- przełącznik CYP
- przełącznik Phoenix Contact
- przełącznik Seuthe
- przełącznik Maclean Energy
- przełącznik SmartAVI
- przełącznik Leviton
- przełącznik DEHN
- przełącznik SEC24
- przełącznik Cooking Performance Group
- przełącznik Flic
- przełącznik HELGI
- przełącznik IB Connect
- przełącznik Liberty
- przełącznik PureTools
- przełącznik SunBriteTV
- przełącznik Hamlet
- przełącznik Noark
- przełącznik Cambium Networks
- przełącznik 2USB
- przełącznik Roline
- przełącznik KVM-TEC
- przełącznik STI
- przełącznik Epiphan
- przełącznik Ebara
- przełącznik Mach Power
- przełącznik Axing
- przełącznik ConnectPro
- przełącznik Atlantis Land
- przełącznik GEV
- przełącznik Pizzato Elettrica
- przełącznik Baco
- przełącznik Doepke
- przełącznik Comet
- przełącznik PureLink
- przełącznik INOGENI
- przełącznik Luxul
Najnowsze instrukcje dla przełącznik

2 Kwietnia 2025
1 Kwietnia 2025
1 Kwietnia 2025
1 Kwietnia 2025
1 Kwietnia 2025
1 Kwietnia 2025
1 Kwietnia 2025
1 Kwietnia 2025
1 Kwietnia 2025
31 Marca 2025