Instrukcja obsługi Motorola Moto 4G Plus - 2016
Przeczytaj poniżej 📖 instrukcję obsługi w języku polskim dla Motorola Moto 4G Plus - 2016 (152 stron) w kategorii smartfon. Ta instrukcja była pomocna dla 8 osób i została oceniona przez 2 użytkowników na średnio 4.5 gwiazdek
Strona 1/152

Canon
FMPHONE,*B6O
BUBBLE-JET
FACSIMILE
Instruction
Book
I7IGilrJ!'

Canron
FAXPHONE'"B60
BUBBLE-JET
FACSIMILE
Instruction
Book
Copyright
copyrightolgg2bycanon, lnc. All rightsreserved.
Nopartof
thispublicauonmaybe
reproduced,
transmitted,
transcribed,
stored
in a retrieval
system,
or translated
into
any
language
or computer
language
in any form
or by any
means, el€ctronic,
mechanicar
magnetic,
optical,
chemical,
manual,
or otherwise,
without
the
prior
written
permrssron
oi
Canon,
Inc.

tiris
facsimile
combines the
functions
of
a facsimile
and
quality
printer.
lts
compact,
vertical
design
means
less
wasted
space
in
your
work
area.
The
bubUe_jet
printer
uses
cut-sheet
plain
paper
to deliver
sharp
reproductions
of your
fax
documents
and copies.
you
no longer
have
to bother
with
specially
treated
rolls
of
recording
paper
that
cud after
coming
out of the
fax.

Users
in the U.S.A.
PRE-INSTALLATION
REOUIREMENTS
FOR
CANON
FACSIMILE
EQUIPMENT
A. Location
Supply
a surtable tatJle, cabinet,
or desk. See brochure
for
unit's
dimensions
and weigfrt.
B. Order
lnformation
1. Only
a single
telephone
line
touch{one
or rotary
is
to be
used.
2. Order
an
RJ11-C modular
wall
jack
(USOC
code),
which
should
oe
installed
by the phone
company. lf the
RJ 1 1
-C
wall
jack
is not present,
telephone/fax
operation is not possible.
3. Order
a normal business
line from
your
telephone
company's
business
representative The
line should
be a regular
voice grade
line
or
the equivalent. Use
one line
per unit.
DDD (Direct
Distance
Dial) line
-or-
IDDD
(lnternational
Direct
Distance
Dial) line if
you communicate
overseas
C.
Power Requirements
The
FAXPHONE
870 should
be connected to a standard 120
volt AC,
three-wire
grounded
outlet
only. Do not connect this
unit to an outlet
or
power
line shared with other
appliances
that cause electrical
noise. Air
conditioners,
electric typewriters,
copiers,
and machines
of this sort
generate
electrical
noise which often
interferes with
communications
equipment
and the sending and
receiving
of documents.
Note:
Canon recommends
an individual
line following industry
standards, e.g.
the 25OO
(Touch Tone) or 5OO
(Rotary/Puise
Dial)
telephones. A dedicated
extension off a PBX unit without'Call
Waiting" can be used with your FAX unit. Key telephone systems are
not recommended
because they send non-standard signals to
individual
telephones for ringing
and speclal codes, which may cause
a FAX error.
CONNECTION
OF THE EQUIPMENT
This equipment
complies with
Part 68 of the FCC rules.
On the rear
panel
of this equipment is a label that contains,
among other
information,
the
FCC Registration
Number and Ringer
Equivalence Number
(REN)
for this
equipment.
lf requested,
this information
must
be
given
to the telephone
company. This equipment
may not be used on coin
service
provided
by
the
telephone
company. Connection
to party
lrnes is subject
to state
tariffs.
IN CASE
OF EQUIPMENT
MALFUNCTION
Should
any
malfunclion
occur which
cannol
be corrected by
the
procedures
described in this instruction book,
disconnect
the equipment
lrom the
telephone line and unplug the
power
cord. The telephone
should
not
be reconnected
or
the
switch
turned on unlil the
problem
is
completely
resolved. Users
should contact their
local
authorized Canon Facsrmile
Service
Dealer
for servicing of equipment.
RIGHTS OF
THE TELEPHONE
COMPANY
Should lhe
equipment cause harm to the telephone network, the telephone
company
may temporarily
disconnect
service. The
lelephone
company
also retains
the right to make changes in facililies and services which
may
affect
the operation of this equipment. When such changes are necessary,
the telephone
company is required to give
adequate
prior
notice to the user.
WARNING
Do not make any changes
or modifications
to the equipment unless
otherwise specified in the manual. lf such changes or modiiications
should
be made,
you could be required
to stop operation of the equipment.
Note:
This equipment has been tested
and found to comply with the limits.
for a Class
B digital device,
pursuant
to Part 15 of the FCC Rules.
These
limits are
designed
to provide
reasonable
protection
against
harmful
interference
in a residential
installation. This equipment
generates,
uses
and can radiate radio frequency
energy and, if not installed
and used in
accordance with the instructions, mav cause harmful interference
to radio
communications.
However, there is no guarantee
that
interference will not occur
in a
parlicular
installation. lf
this equipment does cause
harmful intefference
to
radio
or television reception,
which can be determined
by turning the
equipment
off and on, the user
is encouraged to try
to correct the
interference by one of the following measures:
- Re-orient or relocate the receiving antenna.
- Increase
the separation
between the equipmenl or receiver.
- Connect
the equipment
into an outlet
on a circuit different
from that to
which the receiver is connected.
- Consult the dealer or an experienced
radioffV technician
for help.
IMPORTANT
SAFETY
INSTRUCTIONS
1. Read
all
of
these instructions.
2. Save
lhese
Instructions for
later use.
3. Follow
all warnings and
instructions
marked
on the
product.
4. Unplug
this
product
from
the
wall
before
cleaning
or maintenance.
Do
not
use
liquid cleaners
or aerosol
cleaners.
use a damo
cloth
for
cleaning.
5. Do
not use this
product
near
waler.
6. Do not place
this product
on an unstable
cart,
stand, or table. The
product
may fall,
causing
serious
damage
to the product.
7. slots and openings in
the
cabinet
and
the back or bonom are
provided
for ventilation
to ensure
reliable
operation
of the product
and
to protect
it
from overheating.
These
openings
must not be blocked
or covereo.
The openings
should never be blocked
by placing
the product
on a
bed,
sofa, rug, or other
similar surface.
This
product
should
never
be
placed
near or over
a radiator
or heat
register.
This
product
should
not
be placed
in a built-in
installation
unless
proper
ventilation
is provided.
B. This
product
should be operated
from
the
type of power
source
indicated
on the marking
label. lf
you are
not sure of the type
of power
available,
consult
your dealer or local
power
company.
9. This
product
is equipped
with
a polarized
alternating-currenl
line
plug (a
plug
with
one blade
wider than
the other). This
plug
will fit into
the
power
outlet
only one way.
This
is a safety feature.
lf
you are
unable
to
insert
the plug
fully into
the outlet,
try reversing
the plug. lf the plug
fails
to fit, contact your electrician
to replace your obsolete
outlet. Do not
defeat
the safety
purpose
of the polarized
plug.
10. Do not allow
anything
to rest on the power
cord. Do not locate
this
product
where
persons
will
walk
on the cord.
11. lf an extension
cord is used with
this
product,
make sure that
the total
of
lhe ampere
ratings on the products
plugged
into
the extension
cord
does not exceed the enension
cord ampere
rating.
Also, make sure
that
the total
current of all
products
plugged
into
the wall outlet
does not
exceed
15 amperes
12.
Never
push objects
of any kind into
this product
through cabinet
slots
as
they may
touch dangerous
voltage points
or short
out parts
that
could
result in a risk
of fire or electric
shock. Never spill liquid
of
any
kind on
the
product.
13.
Do not attempt
to service
this product
yourself,
as opening
or removing
certain
covers may expose
you to dangerous
voltage
points
or other
risks.
Refer all servicing
to service
personnel.
.14.
Unplug
this product
from the
wall outlet
and refer
servicing
to qualified
service
personnel
under
the following
conditions:
A. When
the
power
cord
or plug
is
damaged
or frayed.
B lf
liquid
has been spilled
into
the
product.
C. lf
the
product
has been
exposed
to rain
or water.

D. lf the producl
does nol operate
normally
when lhe operating
instructions
are
followed.
Adlust only
those controls
lhal are
covered
by the
operating
instructions
since improper
adjustment of
other conlrols
may resull in damage
and
will
often
require enensive
work by a qualified
lechnician
to restore
the product
to normal
ooeration.
E. lf the product
has been
dropped
or the cabinet
has been
damaged.
F. lf
the product
exhibits
a distinct
change
in performance,
indicating
a
need for service.

Users
in Canada
PRE-INSTALLATION
REOUIREMENTS
FOR
CANON
FACSIMILE
EAUIPMENT
A. Locatlon
Supply
a suitable
taOte,
caOine,,
o,.
Ourf,.
See
brochure
for
unil,s
otmonsions
and
weight.
B.
Order
Informatlon
1.
Provide
only
a single
line
or
touch{one
or
rotary
telephone
set
termrnated
with
a
standard
4_pin
modular
phone
plug. ffouch_rone
is
recommended
if
available
in
your area.)
2 Order
an RJ
r 1-c modurar
wat jack (usoc code),
which
shourd
be
installed
by the
phone
company. lf
the RF1
1_C
wall
jack
is n, prur"n,,
telephone/fax
operation
is not possible.
3. Order
a normal
business
line
from
your
telephone
company,s
business
representative.
The
rine
shourd
be a regurar
voice
grade
rine
or tne equivalent.
Use one line per unlt.
DDD (Direct
Distance
Diat)
tine
-or-
IDDD
(rnternationar
Direct
Distance
diar)
rine
if
you communicate
overseas
Note:
canon recommends
an individuar
rine
foilowing
industry
standards
luch as the 25OO
(t"u!l tone) or 5OO (rotary/putse
dial)
tetephones. A
dedicated e>rlension
off a pBX without camp on srgnats
is arso permitted
with a FAX unit. Key
telephone
systems are not recommended because
tney
send non-
standard
signals
to individuar
terephones
for ringing,
or
send
special
codes
which
may cause
a FAX
error.
C. Power
Requirements
The
power
outret
shourd
be a three-prong
grounded
receptacre
(singre
or
duplex) lt shourd
be independent
from iopi"r", heaters,
air
conditioners
or any
electricar
equipment
that
is
thermostaticaily
controiled.
The
rated
value
is t 15
vorts
and 15
amperes.
The
RJ
1
'1
-c modurar
jack
shourd
be
relatively
close
to the power
outlet
to facilitate
installation.
NOTICE
The
canadian Department
of communications
raber
identifies
certified
equipment.
This
certification
means
that
the
equipment
meets
certain
telecommunications
networks
protective,
operational
and
safety
requirements.
The
Department
does not guarantee
the equipment
wirl
operate
to the user's
satisfaction
Before
instailing
this
equipment,
users
shourd
ensure
that
it is permitted
to
be
connected
to
the
facilities
of
the
local
telecommunications
company.
The
equipment
must
also
be installed
using
an acceptabte
method
of
connectron.
In
some
cases,
the
company's
inside
wiring
associated
wilh
a
single-line
indrviduar
servrce
may
be
enended
by
means
of
a certified
connector
assembry
(terephone
erlension
cord). The
custorner
shourd
be
aware
that
compliance
with
the
above
conditions
may not prevent
detefloratton
of
service
in
some
situations.
I lto Load Nurnbor
(LN)
assignc.d
to each
ternlnal
device
denotes
the
porcontage
of
the
total load
to tle
connected
lo a telephone
loop
which is
usocl
by lhe devico,
to pievent
ovorloading.
Ttre terrnination
on a loop may
oonsrst
of ar,y
cornbinalion
of devices
sub,ect
only to the requirentent
that
the
lotal
of the
Load Nurnbers
of all the
devices
does not exceed
100
Repairs
to cerlified
equiprnent
should be rnade by an authorized Canadian
maintenance
facility designated
by the
supplier. Any repairs or alterations
made by the
user to this equiprnent,
or equipment malfunctions,
may give
the
telecomrnunications
cotrpanv cause
lo roeuest
the user to disconnect
the equipment.
Users should
ensure for
their
own protection
that the electrical
ground
connections
of
the power
utility, telephone
lines and internal
metallic water
pipe system,
if present,
are connecled together This precaution
may be
particularly
important
in rural
areas
CAUTION
Users should not attempt
to make such connections themselves, but
should contact
the appropriate
electric inspection
authority, or electrician,
as appropriate.
This digital apparatus
does not exceed the Class B limits for radio noise
emissions
from digital
apparatuses set out in the Radio Interference
Regulations
of the Canadian Department of Communications.

Table
of Contents
How
to use
this
instruction
book
894 1:
GETT|NG
SET
UT
Check list:
Do you have
everything?
A Quick Look at the Fax
Front
View 4
4
Rear
View
Left
View
The
Handset
Right
View .5
.5
.5
6
Control
panel
summary
Setting Up the Fax
Finding
the right
location
Power
requirements
Operating
and
storing
environment
Fastening
the
handset
cradle
Connecting
the
handset
cord
Turning
the
facsimile
on/off
The
standby
mode
How
to remove
a document
What's
standby?
Tone/pulse
setting
Connecting
an extension
phone
or answering
machine
Connecting
the
telephone
line
I
I
I
9
12
12
12
1?
13
t.+
<A
ta
1A
ta
lq
Setting
up the printer
Installing
an ink
cartridqe
Loading
paper
in
the printer
Cleaning
the
print
head
. .16
Cartridge
handlin
g precaLrtions
Recommended
paper
specifications 18
20
21
23

PaTt
2: BEFoRE
YoU USE
THETAX
*
Registering your number and
before you
registgr...
Registering
the
date
and
time
Registering
your
telephone
number
Registering
your
name
When
you are
finished
registering
..
name (TTt) . .25
26
26
28
30
32
PaTt
3: GETTING
STARTM
Using
the telephone
Using
regular
dialing
with
numeric
keys
Redialing
33
34
35
35
48
48
48
49
Answering
the
phone
Specialdiating . .36
Switching
tone/pulse
dialing
Dialing
through
a switchboard
(pBX) 36
37
38
38
39
40
Before
sending
documents
Paper
size
What
the receiving
fax
doesn,t
s€e
Preparing
documents
before
sending
Setting
document
densiW
Sening
reproduction
quulity
Inserting
a document
Sending
a document
Dialing
a number
and sending
a document
. Manual
Dialing
to send a document
. Automatic
dialing
to send
a document
Redialing
a facsimile
number
. Automatic
redialino
. Manual
redialing
Clearing
document
feed iams
4'l
42
43
. .44
.45
.45
.47

Part
4:
ADVANCED
FEATURES
One-touch
dialing
Registeiing
numbers
and
Adjusting
the
pause
time names
for
One{ouch
dialing 75
76
B1
Using
One-touch
dialing
. One-touch
dialing
the
telephone
. One-louch
sendinq
a
documenl
. Printing
a list
of relistered
numbers
a2
82
B3
t1r+
Coded speed
dialing
Registering
names
and numbers
for
Coded speed
dialing
Using
Coded
speed
dialing . .
'J..
. !o!ed speed
diating
rhe
tetephone
. Coded speed
dialing
to send a document
. Printing
a list
of numbers
registered
for Coded
speed
dialing
Using
delayed
transmission
Sening
up
delayed
transmission
Canceling
delayed
transmission
. .92
...92
.94
85
B5
90
90
91
91
95
96
97
98
Using
polling
Registering
your
polling
lD
Sending
a document
in response
to polling
Manually
polling
another
fax
to receive
Vour
documenl
Setting the printer data
Entering
the printer
setting
mode (BJ
DATA)
Sening
slower
speed
for printing
grapnics .
99
99
Setting
for halftone
printing
Printing
reports
Printing
activity
reports
Printing
activity
management
reporls
. Printing
a report
manuallv
. Printing
a report
after
20 iransactions
. Printing
a report
every
day
at
the
same
time
. Printing
send/receive
transactions
separately
. Printing
error
transmission
reoorts
Summary
of
user
settings
Printing
a list
of user
settings
Changing
the
user
setttngs
.'to0
.101
102
.103
.10s
.105
.106
.107
.108
.110
. .112
. ...112
114
. ttJ
iv

Troubleshooting
Troubleshooting
summary
table
Displ.ay,nteso€lg{?s
and errror
codes
Before
calling
for
service...
Maintenance
Cleaning
the
fax
. Cleaning
the
fax
e),iterior
. Cleaning
the document
scanning
glass
. Cleaning
the printer
area
..116
.
.116
.
l18
114
. .120
. .120
. . .120
. . .120
Specifications
't21
122
123
Glossary
FAXPHONE@
860
Power ON/OFF Brryltch
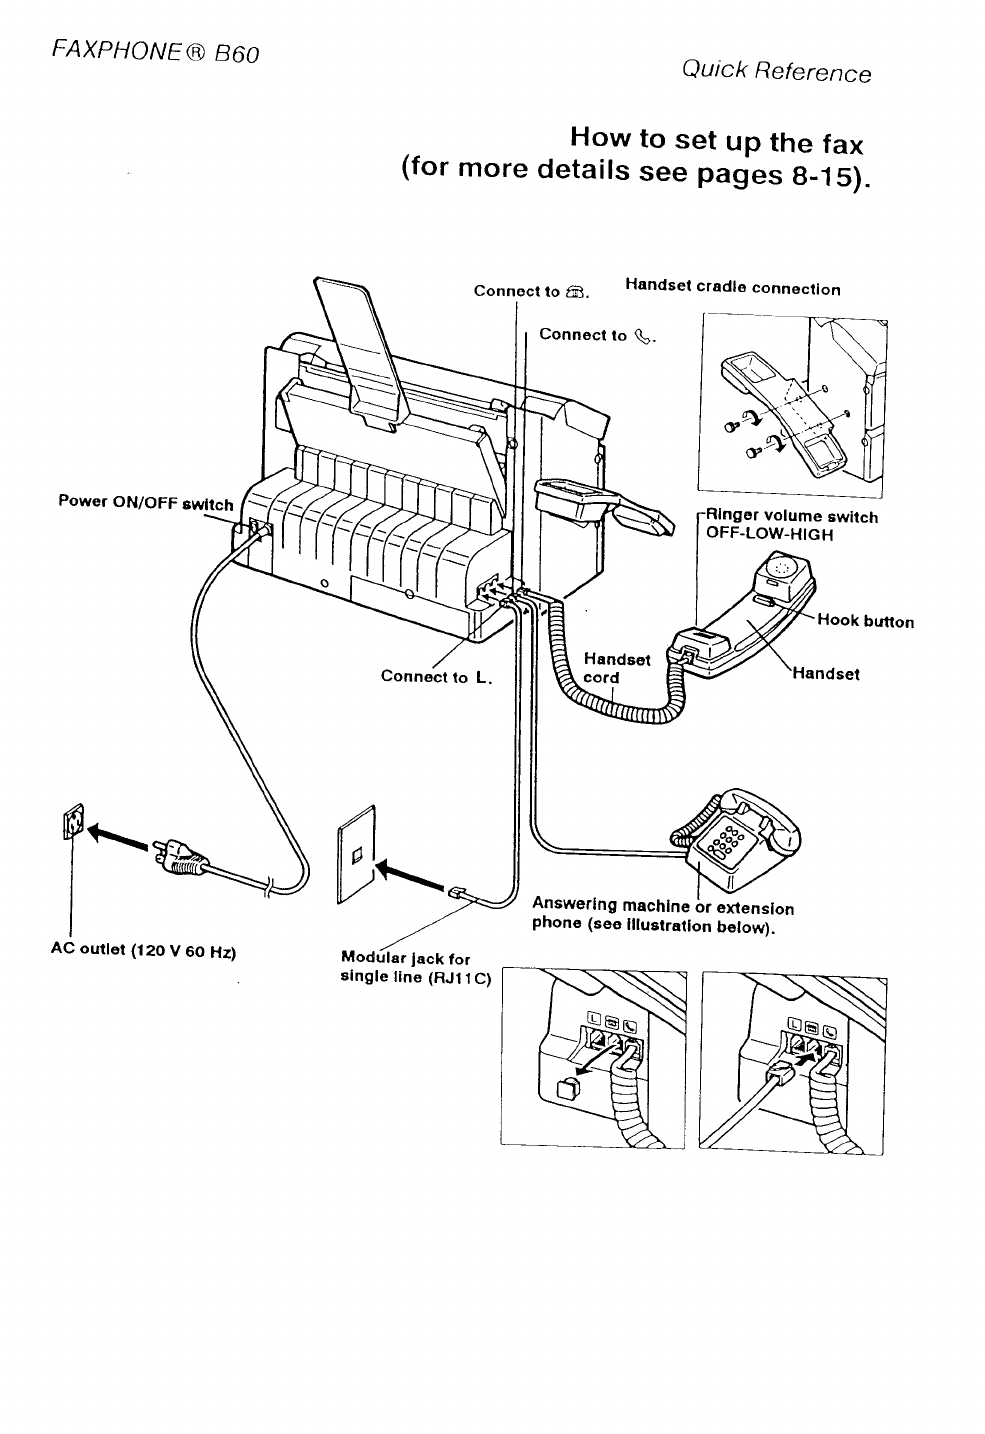
Quick Reference
How to set up the fax
(for
more
details
see pages
g_15).
Connect
to 6. Handsel
cradls connecllon
volume swllch
OFF-LOW-HIGH
Hook button
Handsel
6--
@r-.
lq
I
AC outlet (t20 Modular
lack for
single line (RJlt C)
Answerlng
machlne
6r erctenslon
phono
(seo
lllustratlon
below).
V 60 Hz)

FAXPHONE
@ A60 Quick Reference
1. Open
the
printer
cover.
4. Remove
the
protective
tape
7. Press
the
cartridge
release
lever
down.
2. Pullthe
cartridge
release
lever
up. 3. Remove
the print
head
cap.
5. Hold
the cartridoe. 6. Insert
the
cartridge.
B. Close
the printer
cover.
sv
@

FAXPHONF
@
A60 Quick Referenc,
Loading
letter-size
paper
o^"o
)^vo
o
o
o
1. Insert
the paper
support
tray.
4. Tap
the
stack
to
even
the
edge.
2. Press
down
on
the
paper
feeder
plate
5. Slide
the
paper
into
the
tray.
3. Pick
up
a
small
stack
of paper
and
fan
the paper.
6. Slide
the guide
against
the
paper
7. Press
down
on the
tab.
-\-
$"o
S-"""""tt""-==\
9"":s

FAXPHONEG)
A60 Quick Referent
clearing paper jams with
the paper
nait
retease
rever
(For
details,
see
page
61)
1. Open
the
paper
bail
release
cover
on the bottom left
corner
on the
front
of the fax.
2, Press
the paper
bail
release
lever
down to release
the
paper.
43
into
the document
feeder
1. Adjust
the paper
guides
to the
width
of
the
document.
2. Tap
the
stack
to even
the
edge. lnsert
the documents
face-down
into
the
fax
The
display
changes:
o ooo --
o OOO l:o
;; ^oooodc
- OLro ooo w
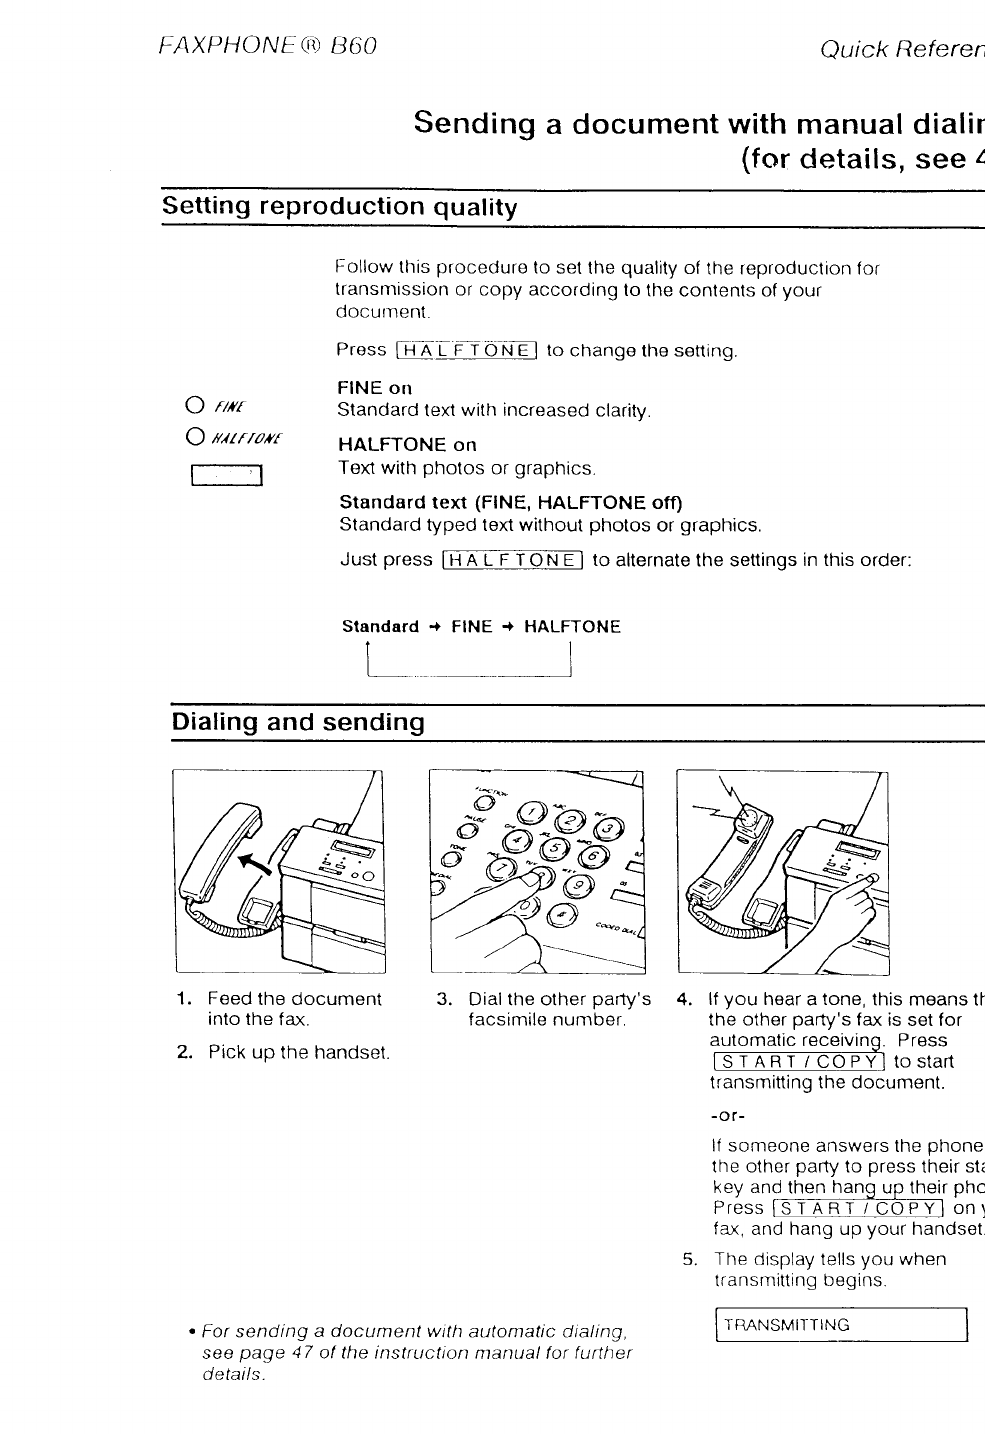
FAXPHONE() iJ60 Quick Referer,
Sending
a document
with manual
dialir
(for
details, see
I
Setting reproduction quality
O ntr
O utrrotr
l----'l
Follow
this
procedure
to
set the
quality
of
the reproduction for
transnrission
or copy according
to
the contents of
your
docurnent.
Press
ft-i
A L r i O
ruE to change
the
sening.
FINE on
Standard
text
with increased
clarity.
HALFTONE on
Text with
photos
or graphics.
Standard
text (FINE,
HALFTONE off)
Standard
typed text without
photos
or graphics.
Just
press
t
Hn tf-f- N E
I to alternate the settings
in this order:
+ FINE ONE
Standard
L+ HALFT
I
Dialing
and sending W
Feed
the document 3. Dial
the
other
pafty's
facsimile number.
into the fax.
2. Pick
up the handset.
. For sending a document wittt
automatic dialing,
see page 47 of the instruction
ntanual for f
ufther
details.
4. lf
you hear a
tone,
this means tf
the other
party's
fax is set for
automatic receivino. Press
fs-rrnITnT-TTOFYltostart
transmitting the document.
-or-
It someone
answers the
phone
the other
party
to press
their
sti
key and
then
hang
up their
phc
P ress on\
fax,
and hang up your
handset
5 Thp r^lrsnlav tells vOu when
transmitting
begins.
TRANSMITTING

How lo usa lhis instruction book
document
fax
IFNNETTOI_I
fo
(+ 1o)
A few simple
notations
are used
to help you read
faster
and find
the information
you need. Beiore
you use this
instruction
book,
glance
over
this
list
of
soecial
notations
and be
sure you understand
what
they
mean.
A document
is
the
sheet
of paper
you send
or receive
with
the
facsimile,
or
copy.
The
facsimile
unit,
including
the
handset,
The name
of the key
is enclosed
in
a box.
Numbers
are the number
keys
on the numeric
key pad
on the control panel.
Numbers
preceded
by an arrow
and enclosed
in
parentheses
are references
to page
numbers
that
contain
more
information
about
the
topic of the
previous
sentence.
. Text
in italics
describes
hetpfut
hints,
restrictions,
or how
to avoid
difficulties.
CAUTION!
Failure
to pay attention
to CAIITIONs
may
resuft
In damage
to the egulpment.
A complete glossary
of terms
is included
at the end of
this
instruction
book.

How to u.so
fhi.s instruc(iorr book
This
manual
is
designed
to help you get
set up and
start
using
your
fax in as short
a time as possible.
y<
will find
this instruction
book easier
to use
if
you reac
through
it in
the
order the
material
is
presented.
GETTING
SET
UP
Shows
you how
to set
up
your
new facsimile
and
get
ready
for operation.
This
section
starts from
openinl
the box and guides
you step by step to get you read
to use the
telephone,
fax,
and copier.
BEFORE
YOU
USE THE
FAX...
Follow
these instructions
to register
your own name
and telephone
number
in
your
fax. your personal
or
company
name
and telephone
number
that you
register
are printed
automatically
on the documents
that
you send. This
information
is used
bv the other
party
to identify
you as the sender.
GETTING
STARTED
WITH
THE BASICS
Basics
are
what you need to know on the first
day yc
have
your
fax set
up. This
section
describes
how
to
use the
telephone,
send
and receive
a document,
make
copies,
and print
an activity
management
repc
so you can start keeping a record of your fax
transactions
from
the first
day. This
section
also
describes
how
to connect
and use an extension
oho
or answering
machine
with
the fax.
ADVANCED
FEATURES
Introduces
the
time-saving
features
such
as One-tou
speed
dialing
and Coded speed
dialing
of registered
fax numbers.
This
section
also
shows
you how to se
up your fax
to receive
and send when Vou
are not in
the office.
MAINTENANCE
AND
TROUBLESHOOTING
Shows
you how
to keep
the fax
and printer
in good
working
condition
and
what
to do if
a problem
occur

A Quick Look at tlto Fax
fake a few minutes
to look over
your new
fax
so you
know how it should
look
when it is
set
uD.
r Front
View
Pap6r
aupport
lr
Prlnior papor foodor
Handsst
Automallc documenl
loodor (ADF)
lammso paper
Printer
cover
Covers the
print
well and
opens
for
installation
of
bubble-iet
cartridgs.
Paper outlel
Paper
bail
release
cover
Opens
for
operation
ol the
paper
bail
release
lever.
r Rear
View
Power
cord
Power (on/off) swilch
i2_g;:-
4'-'.:"o'
.;>y
T/P Oone/Pulse) switch
r/F wtutu
GISTRATION switch
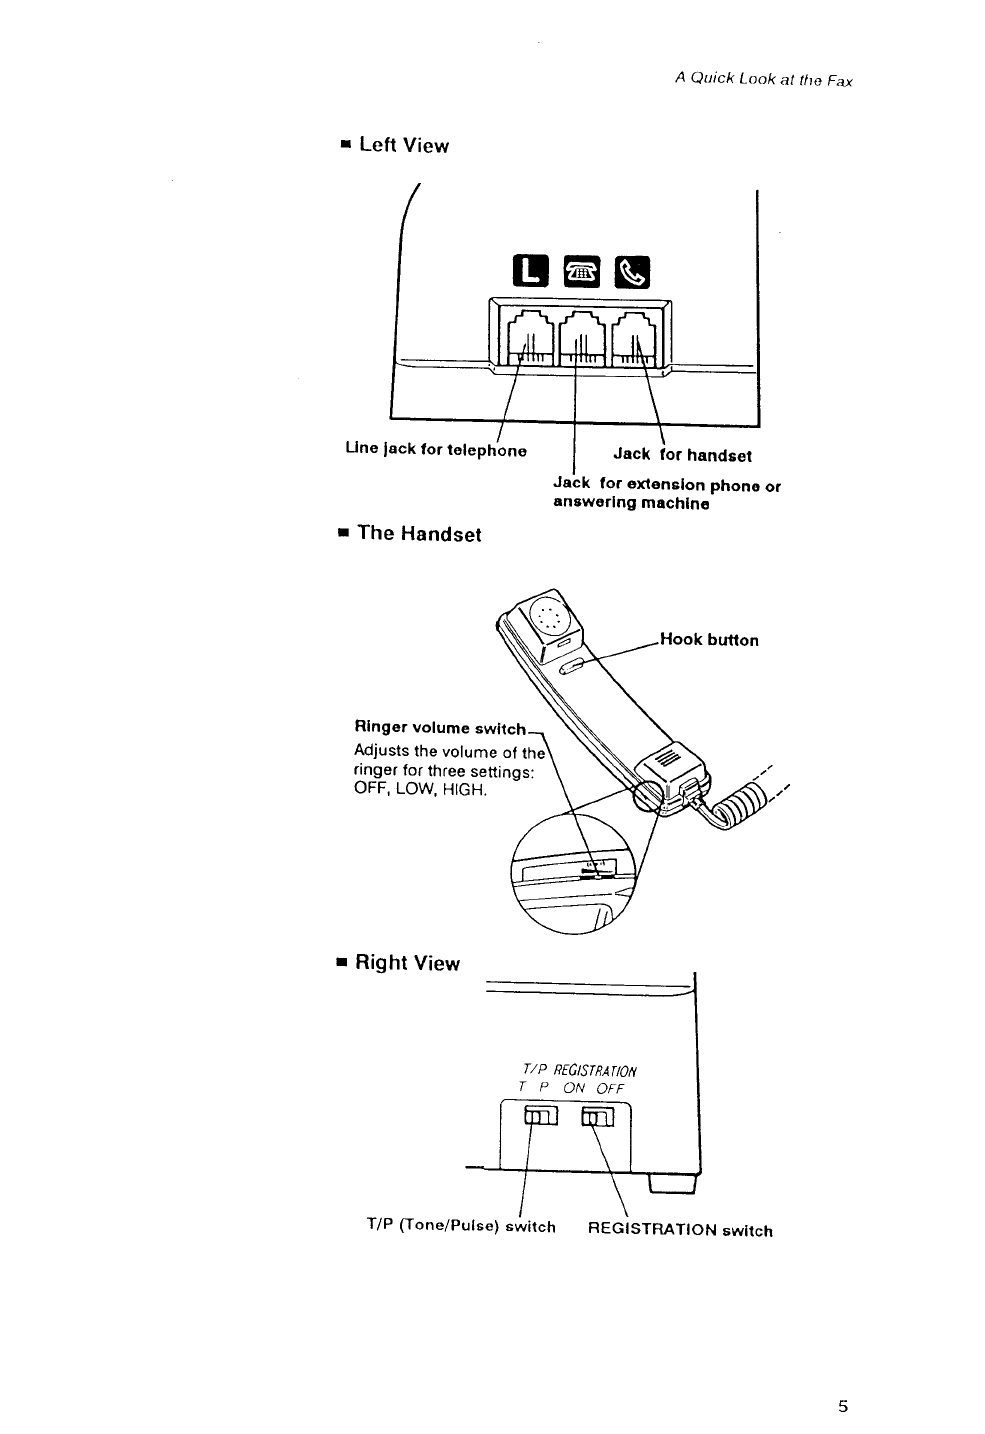
A Quick Look at tlto Fax
r Left View
r The Handset
Rlnger
volume swltch
Jack for extenslon phone
aneworlng machlns
Hook
button
Adjusts
the
volume
of the
ringer
for
three
settinas:
OFF,
LOW.
HIGH.
r Right
View
T/P REG6TRAilOIT
TPONOFF
T/P flone/Pulse) switch REGISTRATION
switch

Ctsrilrol
pancl surnntary
FINE
lamp
Increases
the clarity o{ docu-
ments
sent.
HALFTONE
lamp
Increases
the
quality
of docu-
ments with photographs
and
graphics.
AUTO
lamp
Fax receives
documents automatically
when you are not in the office.
ANS
HOOK
UP
lamp
Sets the lax to be used with an answerino
machine
conn€cted.
Before
you register
user data
or use
the facsimile,
take
a few minutes
to familiarize
yourself
with
the keys
and
indlcators
on the
control
oanel.
FUNCTION
koy
Used with other
koys to por-
form special operations
like
registering
information
in
your
fax.
PAUSE
key
Press
to enter
a pause
in a
telephone
number
when
registering
or dialing.
lN USE lamp
Ughts when
your
fax uses the
telephone line.
rrn | | ,qa
PAI,.SE.
FINE
HALF ANS HOOK UP
,,IEIIORY
STOP key
Press to stop an
operation
and
return
to standby
REDIAL
key
STARr/COPY
START/COPY
key
Press
to start
an
operatton
or to
start copying.
FINE/HALFTONE
key
Press to light FINE
or
HALFTONE
lamp. When both
lamps are
off, this
is the stand-
ard setting
for typed
text. MEMORY
lamp
Lights
when recording
the
document into
memory,
receiving
and printing
the
document
out of
memory
Flashes
when
documenls
are
received
in memory
AUTO/ANS
HOOK
UP
key
Press
to tight
AUTO or ANS HOOK Up
lamp. When both lamps are ofl, you can
recerve
normal phone calls
and receive
oocuments manuallv.
TONE key
Set for tone
dialing
when you
dial
a num-
ber
if
your
fax is
nor-
mally
set
for rotary
pulse
dialing.
Press
to redial
telephone or fac-
simile numbers.
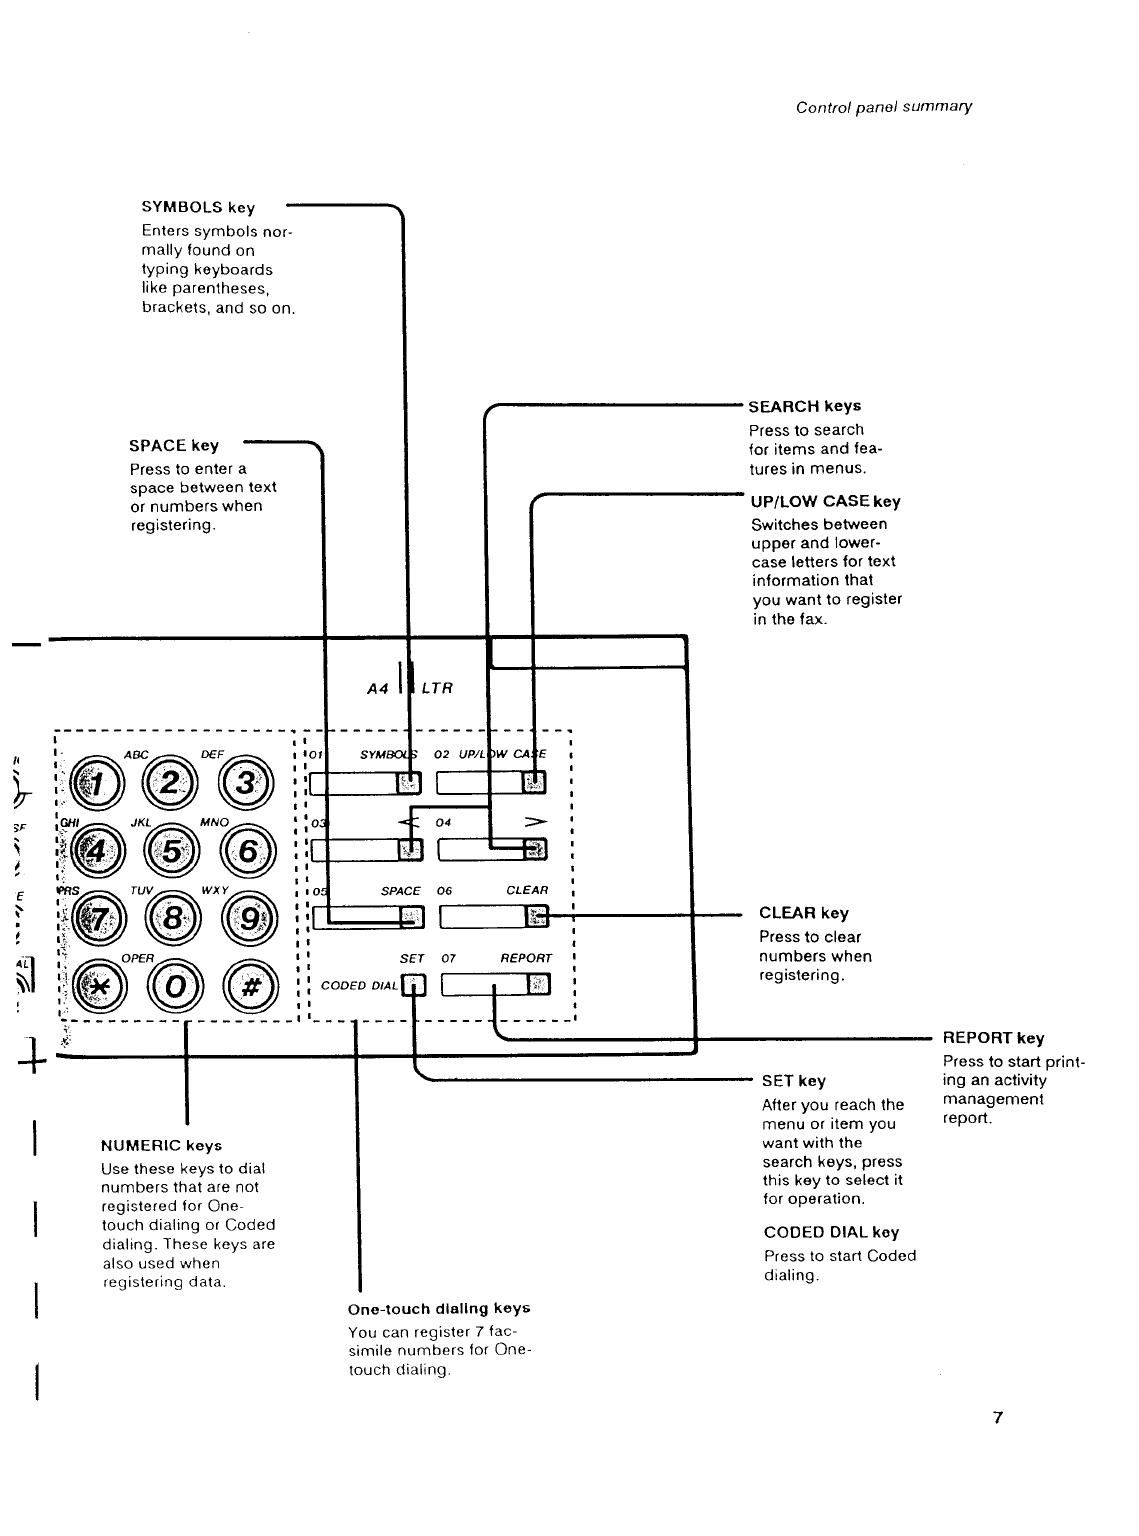
Control
panol summary
SYMBOLS
key
Enlers
symbols
nor-
mally found
on
typing
keyboards
like
parentheses,
brackets,
and so on
,l
\I
r
iF
\
I
E
t
;n
\l
l\l
:
I
I
'$'
SPACE
key
Press
to enter a
space
between text
or
numbers
when
registering.
NUMERIC keys
Use these keys to dial
numbers that are
not
registered for One-
touch dialing
or Coded
dialing.
These
keys
are
also used when
registering
data.
SPACE 06 CLEAR
s6r 07 REPORf
COOED DIAL
On€-touch dlallng koYs
You can register 7 {ac-
simile
numbers {or
One-
touch clialing.
SEARCH keYs
Press
to search
lor items
and fea-
tures
in menus.
UP/LOW CASE keY
Switches
between
upper
and lower-
case letters
for text
inlormation
that
you want to register
in the fax.
CLEAR key
Press
to clear
numbers when
registering.
SET
key
After
you reach the
menu
or rtem
you
want with the
search
keys,
press
this koy
to select it
{or operation.
CODED
DIAL key
Press to start
Coded
dialing.
REPORT
key
Press
to start
print-
ing an activity
management
report.

Setling Up ttro Fax
Finding
the right location
. Find
a place
that
is out of direct
sunlight.
. The fax requires
a telephone
line,
so place
it near
an
existing telephone
outlet. This
may
save
you the
expense
of having
the phone
company installa
new
line
or buying
an enra extension
cord.
Power
requirements
. Plug
the fax into
a 120 volt
AC 60 Hz three-wire,
grounded
outlet
only.
. Do not plug
the fax into
a power
outlet
shared with
an air
conditioner,
electric
typewriter,
copier, or other
equipment
that
can generate
electrical noise
or radio
frequency
waves
that
can interfere with
fax
transmission.
. Once the power is turned off, wait at least
5 seconds
before
turning it on again.
Sellingy Up llte F;tx
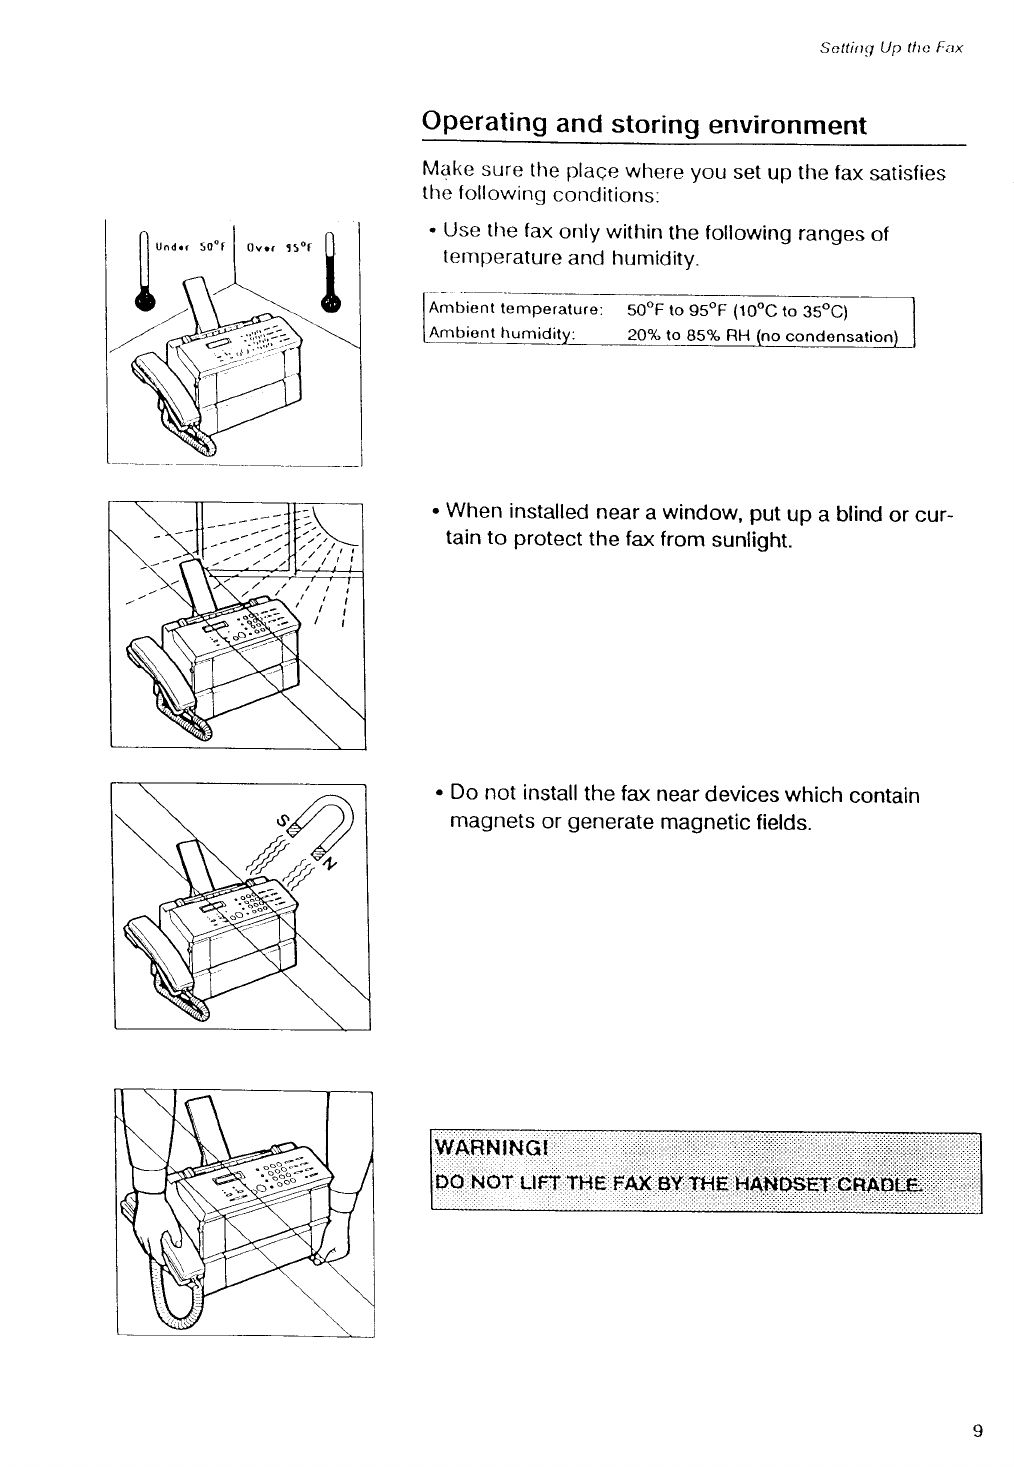
Operating
and
storing
environment
Make
sure
tlre plage
where
you set
up the fax
satisfies
tlrc lollowing
conditions:
. Use tlre
fax
only within
the following
ranges
of
temperature
and humidity.
. When
installed
near
a window, put
up a blind
or cur-
tain to protect
the fax
from
sunlight.
. Do not install
the fax
near
devices
which
contain
magnets
or generate
magnetic
fields.
50"F to 95"F (10"C
to 35oC)
20% to 85% RH (no
condonsation

Settrng Up tho Fax
. Do not subject
the
fax
to strong physical
shock
or
vibration.
. Place
the fax on a level
surface.
. Keep
the
fax
clean.
Dust
accumulation
can
prevent
the
fax
from
operating
properly.
. Never
remove
the bubble-jet
cartridge
from
the
printer
until
it has
to be replaced. lf
the
cartridge
print
head
is removed
and left
unprotected,
it
willdry
out and you may
not be
able
to use
it
10

)otting Up tha Fax
Here are some other general precautions when Vou are
using the fax or workinq around it.
CAUTION!
. Avold lnstalling
your f
ax in places exposed to dlrect
sunllght,
dust, vlbratlon,
hlgh temperature
or humldlty,
or on unstable
surfaces.
. fo assure proper electrlcal
contact, make sure the fax
Is flrmly plugged ln.
. Never pull on the cord to unplug the fax. pull on the
plug ftsetf.
11

Seltlng Up tlta Fax
The standby mode
When
you see
the
date
and time
in
the one_line
display,
the fax
is in the standby
mode.
L2/3I/92 09:4
lf
a document
is
already
in
the
document
feeder
when
you turn
the fax
on,
an alarm will
sound
and the display
will
show:
CHECK DOCUI.{ENT
1
2
3
4
Remove
the
document
from
the
fax
as fohows.
r How
to remove
a document
Press
rcTo-F].
Place you
fingers
under
the
control panel
where
it is marked
[FTsn and
gentiy
pull
out
the
control panel
towards
you
until
if
opens.
Pull
the
document
out from
the
top
or bottom.
Gently push
the
control panel
closed
until
it
clicks
shut.
. As soon as the document is removed, the fax
will return to
standby.
r What's standby?
When
the
fax
is
in
standby,
it
displays
the
current
date
and time.
This
tells
you
the
fax
is
ready
and waiting
to
respond
to your
ne).t
operation
or
to an incoming
call.
Do
not
worry
if
the
date
and
time
are not
correct.
We'll
show you
how
to set
them
on page
26.
rs5'.;_s
: "^
""
3gi
ds
{1dT:o
14
Sottirrg
up tho
printer
Befcre
you can receive
documents
or rnake copies,
you must
have
the paper
loaded
and a cartridge
installed
in the fax
printer.
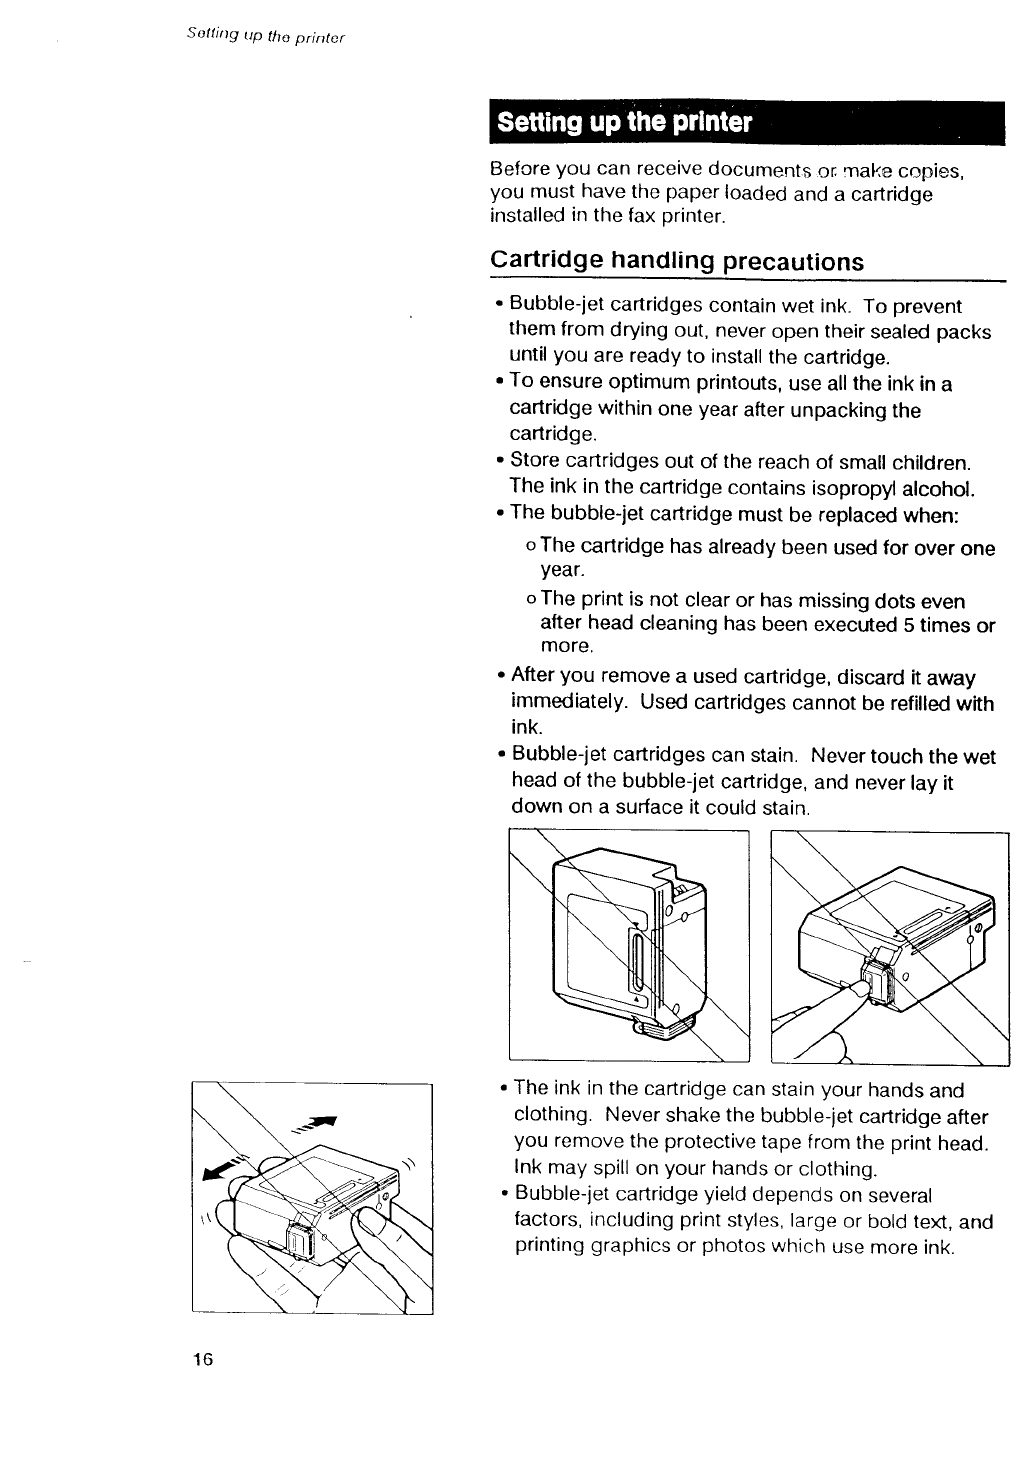
Cartridge handling precautions
. Bubble-iet
cartridges
contain
wet
ink. To
prevent
them
from
drying
out, never
open
their
sealed
packs
until
you
are ready
to install
the
cartridge.
. To
ensure
optimum
printouts,
use allthe ink
in
a
cartridge
within
one
year
after
unpacking the
cartridge.
. Store
cartridges
out
of
the
reach
of small
children.
The ink
in
the
cartridge
contains
isopropyl
alcohol.
. The
bubble-jet
cartridge
must
be
replaced
when:
o
The
cartridge
has
already
been
used for over one
year.
o
The print
is
not
clear
or has
missing
dots even
after head
cleaning has
been
executed
5 times
or
more.
. After
you remove
a used
cartridge,
discard
it away
immediately.
Used
cartridges
cannot
be
refilled
with
ink.
. Bubble-jet
cartridges
can stain. Never
touch
the
wet
head
of the
bubble-jet
cartridge,
and
never
lay it
down
on a surface it
could
stain.
. The
ink
in the
cartridge
can
stain
your
hands
and
clothing. Never
shake
the bubble-let
cartridge
after
you remove
the protective
tape
from
the print
head.
Ink
may
spill
on
your
hands
or clothing.
. Bubble-jet
cartridge
yield
depends
on
several
factors,
including
print
styles, large
or
bold text,
and
printing
graphics
or photos
which
use
more
ink.
16

)attirtg up tlto printor
Hold the label
side
of the
cartridge toward
you so you can read
it, then turn it up side
down.
10
lnsert
the cartridge
into
the machine
so that
the
yellow
plastic
guide
is visible
through
the
cartridge
slot.
Press
the
cartridge
release
lever
down
until it
locks
in
place
and
aligns
the
cartridge.
Close
the
printer
cover.
. The
cartridge print head starts
cleaning
automaticaily.
After
installation,
follow
the procedure
to load
paper
(.+
21).
h
€"o @;r-:
.t9
Soltlrtg up llro printor
Recommended
paper
specifications
This section
explains
the recommended
paper
specifications. To ensure
the
best
print quality
and
efficient
printer
operation,
use only paper
that meets
the specifications
described
below.
Paper
that does
not meet
these
specifications
may be used
in the
printer,
but the results
cannot
be guaranteed.
Quality Use only
plain
bond, typewritor
quality
papsr
without
curls, lolds, or damagod
odqes.
Woight s2glmz to
9o
g/m2 (14
tbs
to 24 lbs) in
uppor
loadinq.
Thicknoss Under 0.2 mm
Storage 64oF
to TsoF
(1BoC
to 24oC)
40% to 60% relativo humiditv
Although
the
printer
can
print
on plain,
bond
paper,
you
should test it to make
sure the results
are
satisfactory
because most
paper
is
sensitive to
temperature
and
humidity. Printer
operation may
alsc
be adversely
affected by extreme temperature
or
humidity.
. Do not load and try to use
punched or colored
paper. Us
only white papor.
. If you do not use the recommended paper, the printing
may be blurred, or the paper not feed correctly into the fi
. The amount of time for the ink to dry and fix depends on
paper quality.
20

Registering your numbor and namo (TTI)
Before
you
register...
Before
you register
data
on the fax,
move
the
REGISTRATION
switch
to the
ON position.
1 The REGtsrRAloN
switch is on the right rear
corner
of the unit.
2 Move
the necrsrRATtoN
switch
to or{.
TURN REG SW OFF
. When you are finished registering settrngs, you will have
to move tho switch back to OFF.
.lf you try to register anything with the REG/SIRAI/ON
switch in the OFF position, the following message is
displayed.
Follow
this procedure
to register
the current
date and
time
to be displayed
in
the oneline display
on standbr
mode
and to print
the current
date
and time
at the top
of documents
you send
to other facsimile
machines.
Press fFnrc-T-Ibrt.
TURN REG SW ON
Registering
the date
and time
I.DIAI SET UP
2 Press
€t.
2.USER DATA
3 Press
ts-T-].
I.ENTER YOUR TEL
4 Press
O.
4. SET TII-{E
Press
tsE-].
. The
current seffings
are displayed.
L2/3I/92 10:10
Use the numeric
keys
to enter
the
new
date
and time
over
the
old
display.
r/p trG6IE/rAfl
TPONOFF
REGISTRATION
switch ON/OFF
26

Rogistoring
your
number
and name
QTI)
.lf there is a previously registered
date and
tima, simply
enter the new date and time over the old one.
. Ehtar
the month, the day, and the /ast fwo digits
of the
year. .lf tho day or month ls a single-digit, pracede it with a
zero (0). For example, Aprit
would Oe:-01.
. Sef the time using the 24-hour
system. lf the
hour or
minute
.is a single digit, precede it with a zero (0). For
example,
5 minutes
aftor
g would be: Og:OS.
.lf you make a mlstake when antering
the
date or time,
press fhe search keys to move the cursor under the
number you want to change. Enter the correct number.
7 Press
rc-rTt
to register
the
new
date
and
time. The
clock
starts the
moment you press
ffi
lJtr |
l.
DATE ENTRY OK
5. MID PAUSE
8 Press
[sToF-l
to return
to standby.
27
Specyfikacje produktu
| Marka: | Motorola |
| Kategoria: | smartfon |
| Model: | Moto 4G Plus - 2016 |
Potrzebujesz pomocy?
Jeśli potrzebujesz pomocy z Motorola Moto 4G Plus - 2016, zadaj pytanie poniżej, a inni użytkownicy Ci odpowiedzą
Instrukcje smartfon Motorola

25 Lutego 2025
16 Stycznia 2025
15 Stycznia 2025
10 Stycznia 2025
19 Grudnia 2024
13 Października 2024
12 Października 2024
7 Października 2024
16 Września 2024
15 Września 2024
Instrukcje smartfon
- smartfon Sony
- smartfon Samsung
- smartfon AEG
- smartfon LG
- smartfon Xiaomi
- smartfon MyPhone
- smartfon Sharp
- smartfon Huawei
- smartfon TCL
- smartfon Lenovo
- smartfon TP-Link
- smartfon Philips
- smartfon SilverCrest
- smartfon Gigabyte
- smartfon Acer
- smartfon Realme
- smartfon Gigaset
- smartfon Geemarc
- smartfon Nokia
- smartfon Hisense
- smartfon Infiniton
- smartfon Panasonic
- smartfon Mio
- smartfon Asus
- smartfon Nedis
- smartfon Medion
- smartfon OK
- smartfon Audioline
- smartfon Toshiba
- smartfon Tesla
- smartfon Alcatel-Lucent
- smartfon Majestic
- smartfon Bluebird
- smartfon Garmin
- smartfon Blaupunkt
- smartfon Profoon
- smartfon Vivax
- smartfon Evolveo
- smartfon Alcatel
- smartfon Haier
- smartfon HP
- smartfon Hyundai
- smartfon Honeywell
- smartfon Honor
- smartfon Kodak
- smartfon ZTE
- smartfon MaxCom
- smartfon Dell
- smartfon Google
- smartfon Intex
- smartfon Oppo
- smartfon Kyocera
- smartfon Krüger&Matz
- smartfon Qilive
- smartfon Thomson
- smartfon Manta
- smartfon Apple
- smartfon NGS
- smartfon CRUX
- smartfon Emporia
- smartfon Nevir
- smartfon Mitsubishi
- smartfon Razer
- smartfon GoClever
- smartfon SPC
- smartfon Intermec
- smartfon NEC
- smartfon Polaroid
- smartfon Prestigio
- smartfon Aiwa
- smartfon Sanyo
- smartfon Telefunken
- smartfon OnePlus
- smartfon Amazon
- smartfon Olympia
- smartfon Microsoft
- smartfon Bush
- smartfon HTC
- smartfon CAT
- smartfon Denver
- smartfon Saiet
- smartfon Albrecht
- smartfon RCA
- smartfon Media-Tech
- smartfon BenQ
- smartfon Trevi
- smartfon Lexibook
- smartfon Overmax
- smartfon Micromax
- smartfon Sencor
- smartfon NUU Mobile
- smartfon Alecto
- smartfon Binatone
- smartfon Hammer
- smartfon Allview
- smartfon Oukitel
- smartfon Best Buy
- smartfon Cyrus
- smartfon Kazam
- smartfon Tecdesk
- smartfon KPN
- smartfon Swissvoice
- smartfon I.safe Mobile
- smartfon TrekStor
- smartfon Brondi
- smartfon Fysic
- smartfon Wiko
- smartfon Yarvik
- smartfon Aligator
- smartfon Amplicomms
- smartfon AQISTON
- smartfon Amplicom
- smartfon Archos
- smartfon Androidtech
- smartfon Crosscall
- smartfon Ecom
- smartfon Sony Ericsson
- smartfon Vestel
- smartfon Sonim
- smartfon Energy Sistem
- smartfon Doro
- smartfon Sagem
- smartfon Lava
- smartfon Blu
- smartfon Easypix
- smartfon Konrow
- smartfon Brigmton
- smartfon Sunstech
- smartfon Aspera
- smartfon Sunny
- smartfon Nordmende
- smartfon Blackberry
- smartfon Vivo
- smartfon Wolder
- smartfon NGM
- smartfon Vodafone
- smartfon Switel
- smartfon InFocus
- smartfon GreatCall
- smartfon XD
- smartfon Pantech
- smartfon Alba
- smartfon RugGear
- smartfon Umidigi
- smartfon AT&T
- smartfon Mpman
- smartfon Bury
- smartfon Logicom
- smartfon Karbonn
- smartfon Palm
- smartfon Hannspree
- smartfon Phicomm
- smartfon Plum
- smartfon Lumigon
- smartfon Infinix
- smartfon Keneksi
- smartfon Klipad
- smartfon Iget
- smartfon T-Mobile
- smartfon JCB
- smartfon Casper
- smartfon Unnecto
- smartfon Wileyfox
- smartfon ITT
- smartfon Yota
- smartfon Avus
- smartfon Spice
- smartfon Wolfgang
- smartfon BQ
- smartfon ORA
- smartfon Danew
- smartfon Echo
- smartfon Primux
- smartfon Tiptel
- smartfon UTStarcom
- smartfon Zipy
- smartfon Mediacom
- smartfon Beafon
- smartfon BGH
- smartfon Billow
- smartfon Telstra
- smartfon Ulefone
- smartfon CSL
- smartfon ToughGear
- smartfon Benefon
- smartfon Komu
- smartfon Doogee
- smartfon Energizer
- smartfon Tremay
- smartfon Kurio
- smartfon Piranha
- smartfon Coolpad
- smartfon Syco
- smartfon TAG Heuer
- smartfon Mobistel
- smartfon Itel
- smartfon Garmin-Asus
- smartfon Handheld
- smartfon Fero
- smartfon AT Telecom
- smartfon Xtreamer
- smartfon Verykool
- smartfon O2
- smartfon General Mobile
- smartfon Mustang
- smartfon Kogan
- smartfon Pharos
- smartfon Storex
- smartfon Fairphone
- smartfon Freeman
- smartfon HomTom
- smartfon Leotec
- smartfon Auro
- smartfon Maxx
- smartfon ITTM
- smartfon Posh Mobile
- smartfon THL
- smartfon NGM-Mobile
- smartfon POCO
- smartfon Nothing
- smartfon Lark
- smartfon Senifone
- smartfon Tecno
- smartfon Telme
- smartfon UMi
- smartfon Olitech
- smartfon Mobiola
- smartfon Meizu
- smartfon Neffos
- smartfon Gionee
- smartfon TIM
- smartfon Cubot
- smartfon Leagoo
- smartfon NTech
- smartfon Nubia
- smartfon LeEco
- smartfon GSmart
- smartfon Bea-fon
- smartfon Opticon
- smartfon EStar
- smartfon Facom
- smartfon Jitterbug
- smartfon Custom
- smartfon Aplic
- smartfon HMD
- smartfon Opis
- smartfon Volla
- smartfon Nothing Tech
- smartfon Maxwest
- smartfon Kalley
Najnowsze instrukcje dla smartfon

2 Kwietnia 2025

30 Marca 2025
10 Marca 2025
7 Marca 2025
5 Marca 2025
5 Marca 2025
3 Marca 2025

2 Marca 2025

26 Lutego 2025
26 Lutego 2025