Instrukcja obsługi Motorola Droid
Przeczytaj poniżej 📖 instrukcję obsługi w języku polskim dla Motorola Droid (58 stron) w kategorii smartfon. Ta instrukcja była pomocna dla 6 osób i została oceniona przez 2 użytkowników na średnio 4.5 gwiazdek
Strona 1/58
User Guide

1Congratulations
Congratulations
DROID by Motorola
DROID by Motorola gives you a premium browsing
and messaging experience with the very latest from
Google™, all in a thin touch QWERTY slider.
• Browsing. Get more from the Web, with a huge
screen and full HTML. Search, browse, everything
you want to do, all made easier.
•Maps, entertainment, and more. The latest
technology and apps. Google Maps™ to find your
way. YouTube™ to stay entertained. Easy access to
Google and thousands of Android applications to
expand your world.
Caution: Before assembling, charging or using your
phone for the first time, please read the important
legal and safety information packaged with your
phone. Once your phone is up and running, touch
Menu > Settings > About phone > Safety
information to read the full information.
More information
On your computer—Go to
http://www.motorola.com/support/droid.
So, whether you want to read, watch, or play, we can
help.

2Congratulations
Your phone
the important keys & connectors
Phone
Messaging Market
Contacts Browser Maps
Press to put
the display to
sleep, or hold
to turn on or off.
3.5mm Headset Jack
Home Key
Back Key
Microphone
Menu Key
To u chscreen
Camera Key
Power Key
Volume Keys
Touch to open
menu options.
Touch to return
to the home
screen.
Touch to go
back.
Search Key
Touch for text
search.
Micro USB
Connector
Charge or
connect
to PC.
When you open or turn your phone,
the screen adjusts for you.
Scroll &
Return
SpaceAlternate
Shift
Press for
text search.
Select
Delete
Search
Menu
3Contents
Contents
Your phone . . . . . . . . . . . . . . . . . . . . . . . . . . . . . . . . 2
Contents . . . . . . . . . . . . . . . . . . . . . . . . . . . . . . . . . . 3
Let’s go . . . . . . . . . . . . . . . . . . . . . . . . . . . . . . . . . . . 3
Touchscreen & keys . . . . . . . . . . . . . . . . . . . . . . . . . 4
Home screen . . . . . . . . . . . . . . . . . . . . . . . . . . . . . . 7
Calls . . . . . . . . . . . . . . . . . . . . . . . . . . . . . . . . . . . . . 9
Web . . . . . . . . . . . . . . . . . . . . . . . . . . . . . . . . . . . . . 12
Google Maps™. . . . . . . . . . . . . . . . . . . . . . . . . . . . . 13
Latitude. . . . . . . . . . . . . . . . . . . . . . . . . . . . . . . . . . . 15
YouTube™ . . . . . . . . . . . . . . . . . . . . . . . . . . . . . . . . . 16
Apps for all . . . . . . . . . . . . . . . . . . . . . . . . . . . . . . . . 18
Manage your life . . . . . . . . . . . . . . . . . . . . . . . . . . . . 19
Contacts . . . . . . . . . . . . . . . . . . . . . . . . . . . . . . . . . 22
Messaging . . . . . . . . . . . . . . . . . . . . . . . . . . . . . . . 24
Text entry . . . . . . . . . . . . . . . . . . . . . . . . . . . . . . . . 26
Tips & tricks . . . . . . . . . . . . . . . . . . . . . . . . . . . . . . 27
Personalize . . . . . . . . . . . . . . . . . . . . . . . . . . . . . . . 28
Photos & videos . . . . . . . . . . . . . . . . . . . . . . . . . . . 30
Music . . . . . . . . . . . . . . . . . . . . . . . . . . . . . . . . . . . 34
Bluetooth™ wireless . . . . . . . . . . . . . . . . . . . . . . . 38
Wi-Fi . . . . . . . . . . . . . . . . . . . . . . . . . . . . . . . . . . . . 39
USB & memory card. . . . . . . . . . . . . . . . . . . . . . . . 40
Tools . . . . . . . . . . . . . . . . . . . . . . . . . . . . . . . . . . . . 41
Management . . . . . . . . . . . . . . . . . . . . . . . . . . . . . 42
Security. . . . . . . . . . . . . . . . . . . . . . . . . . . . . . . . . . 42
Troubleshooting . . . . . . . . . . . . . . . . . . . . . . . . . . . 43
Safety, Regulatory & Legal . . . . . . . . . . . . . . . . . . . 44
Let’s go
let’s get you up and running
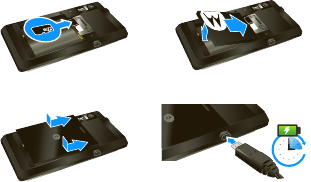
Assemble & charge
Note: Your device is always on when being charged.
Caution: Please read “Battery Use & Safety” on
page 44.
Set up & go
The first time you turn on your phone, a setup wizard
guides you through signing in to your existing
Google™ account. If you don’t have a Google account,
you can create one using the wizard.
1MicroSD in (may
already be inserted)
2Battery in
3Cover on 4Charge up
3H

4Touchscreen & keys
Tip: Remember to write down your user name and
password, and keep them in a safe place.
Turn it on & off
To turn on your phone, press and
hold Power (on top of the
phone).
To turn off your phone, press and
hold Power , then touch Power
off on the screen.
Wi-Fi connect
If you want to use a Wi-Fi computer network for even
faster Internet access, touch Menu > Settings
>Wireless & networks > Wi-Fi settings.
Cool content & more
Browse and download thousands of the coolest apps
on the planet from Android Market™.
Your phone comes with a microSD memory card
installed—you can load it up with photos, videos, and
music from your computer using “USB drag & drop”
on page 40.
Touchscreen & keys
a few essentials
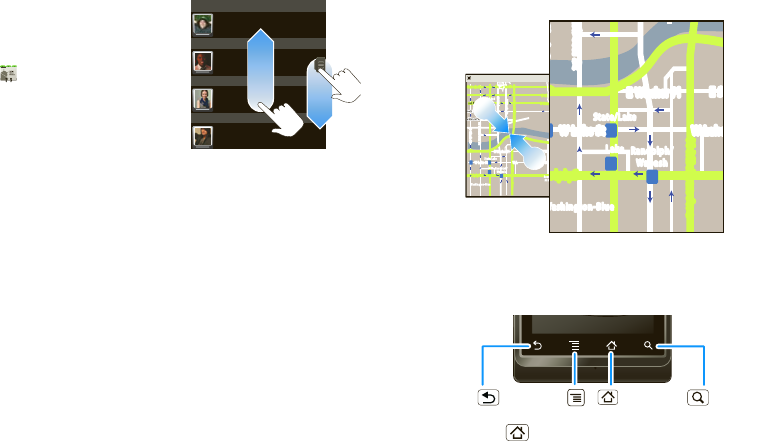
Touch tips
Here are some tips on how to navigate around your
phone.
Touch
To choose an
icon or option,
touch it.
Touch & hold
To open special options,
touch and hold an icon or
other item. Try it: In the home
screen, touch Contacts,
then touch and hold a contact
to open options.
Phone Contacts Browser Maps
Alex Pico
Dan Smith
Kate Shunney
Keith Zang
Luke Carmody
A
L
M
L
5Touchscreen & keys
Drag
To scroll through a list or
move slowly, drag across
the touchscreen. Try it: In
the home screen, touch
Contacts, then drag
your Contacts list up or
down.
Tip: When you drag or
flick a list, a scroll bar
appears on the right. Drag the scroll bar to move the
list to a letter A - Z.
Flick
To scroll through a list or move quickly, flick across the
touchscreen (drag quickly and release).
Tip: When you flick a long list, touch the screen to stop
it from scrolling.
Zoom
Get a closer look at maps or web pages. To zoom in,
double-touch the screen. To zoom out, double touch
the screen again.
Alex Pico
Dan Smith
Kate Shunney
Keith Zang
A
D
K
You can also zoom in or out by pinching your fingers
together or moving them apart on the screen.
Key tips
Menu, home, & back
Touch Home to close any menu or app and return
to the home screen. In the home screen, touch and
Messaging Market
N Clark St
Wacker Dr
M
E Ohio St
N Rush St
N Park St
N New St
N Wabash Ave
N Dearborn St
E Grand Ave
E Randolph St
N Micigan Ave
N Micigan Ave
rD submuloC N
W Lake St W Lake St
E Wacker Pl
State/Lake
Grand Red
Lake
Randolph
St Metra
Randolph/
Wabash
Washington-Blue
E S WaterSt
M
M
M
M
E Randolph St
Ontario St E Ontario St
p
p
h
h
r
r
a
d
o
e
e
d
o
p
h
h
k
E
MM
E
E
E
E
R
R
R
a
a
n
n
d
d
d
o
o
o
l
l
l
p
h
h
h
ph
S
S
t
t
t
Messaging
a
cker Dr
M
a
rborn St
N Micigan Ave
W Lake St W Lak
e
E Wacker Pl
State/Lake
Lake Randolph/
Wabash
W
ashington-Blue
E S
M
M
M
R
andolph St
Pinch to zoom.
Home Key
Back Key Menu Key Search Key
6Touchscreen & keys
hold Home to show the last few apps you used,
then touch an app to open it.
Touch Search for text search, or touch and hold for
voice search.
Touch Menu to open menu options, or touch
Back to go back.
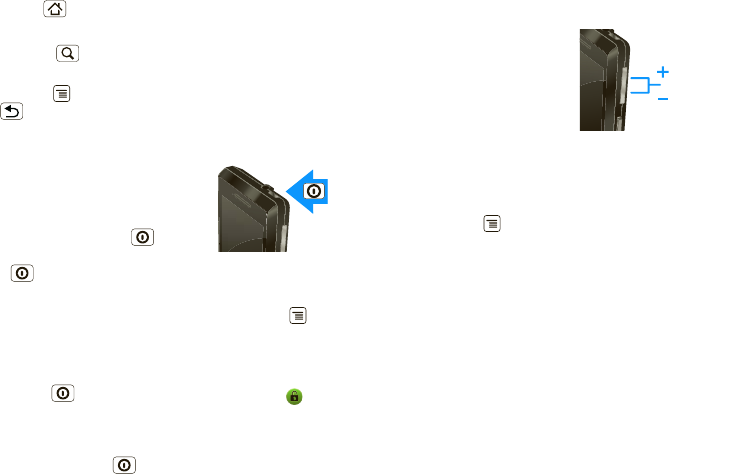
Sleep & wake up
To save your battery, prevent
accidental touches, or when you
want to wipe smudges off your
touchscreen, put the touchscreen to
sleep by pressing Power . To
wake up the touchscreen, just press
Power again, or open the phone.
To change how long your phone waits before the
screen goes to sleep automatically, touch Menu
>Settings > Sound & display > Screen timeout.
Tip: To make the screen lock when it goes to sleep,
use “Screen lock” on page 42. To unlock the screen,
press Power or open the phone. Then, drag to
the right.
Power key menu
Press and hold Power to open the power key
menu, where you can turn off the phone (Power off),
or turn Airplane mode or Silent mode on or off.
Adjust volume
Press the volume keys to
change the ring volume (in
the home screen), or the
earpiece volume (during a
call).
Rotate the screen
When you rotate the phone 90 degrees
counterclockwise, the touchscreen can rotate to stay
right-side up:
Find it: Menu > Settings > Sound & display
>Orientation
Volume Keys

7Home screen
Home screen
quick access to the things you need most
Quick start: Home screen
The home screen gives you all your latest information
in one place. It’s what you see when you turn on the
phone or touch Home from a menu. It’s basically
like this:
Note: Your home screen might look a little different.
Phone
Messaging Market
Contacts Browser Maps
Status Bar
Touch & drag this bar down
to check notifications.
Status Indicators
Shortcuts
Touch to open.
Applications Tab
Drag up to see
all your apps.
The home screen extends beyond what you see on
the screen to give you more room for adding
shortcuts, widgets, and more. Flick the home screen
left and right to see more panels or to add widgets or
shortcuts.
Widgets
Add a widget, such as a clock, music player, or a
calendar that shows upcoming appointments.
To open a widget, touch it. To add widgets, touch
Menu > Add > Widgets. If your home screen is full,
you won’t see the add option. You’ll have to delete
widgets or shortcuts to make room.
Note: If you install apps from Android Market that
have widgets, touch and hold the home screen, then
select a widget to add to the home screen.
Phone
Messaging Market
Contacts Browser Maps

9Calls
Icons on the right tell you about phone status:
Tip: To see today’s date, touch and hold the status bar
at the top of the screen.
Bluetooth™ active network (full signal)
GPS active network (roaming)
Wi-Fi active downloading
volume voicemail message
vibrate 3G (fastest data)
silent flight mode
mute call battery (charging)
battery (full charge) speakerphone active
alarm set
Calls
it’s good to talk
Quick start: Calls
Dialing options
Find it: Phone
Call log FavoritesContactsPhone
123
456
789
0
ABC DEF
GHI JKL MNO
TUVPQRS WXYZ
Contacts
Touch to open, then touch
an entry to call.
Recent Calls
Touch to open, then touch
an entry to call.
Call
Enter a phone number &
touch here to call it.

10 Calls
In-call options
During a call:
•To use a Bluetooth™
device, touch
Bluetooth. (The
device must be
turned on and
previously
paired—see “Connect new devices” on page 38.)
•To mute a call, touch Mute.
•To use the speakerphone, touch Speaker.
Note: Using a mobile device or accessory while
driving may cause distraction and may be illegal.
Always obey the laws and drive safely.
Tip: You can touch Home or Back to leave the
active call display. To reopen it, touch Home
>Phone > Return to call in progress.
Make & answer calls
To make a call, touch Phone, enter a number, then
touch .
Tip: If the screen is locked, drag to the right.
To answer a call, drag to the right.
To end a call, touch End.
To ignore a call, drag to the left.
Speaker
Add Call
Bluetooth Mute
End Dialpad
Speaker
Enter numbers during a call
To enter numbers during a call, touch Dialpad.
Recent calls
Find it: Phone > Call log
•To call a number, touch it.
•To send a text message, create a contact, view a
contact, or other options, touch and hold an entry.
•To clear the list, touch Menu > Clear call log
Frequent calls
Find it: Phone > Favorites
•To call a number, touch it.
•To send a text message, view a contact, or other
options, touch and hold an entry.
Add callAdd call
BluetoothBluetooth MuteMute
End DialpadDialpad
SpeakerSpeaker
Add call
Bluetooth Mute
Dialpad
Speaker

11Calls
Conference calls
To start a conference call, call the first number. After
they answer, touch Add call and call the next number.
When the next number answers, touch Merge call.
Tip: Before merging, you can switch back and forth
between the two calls by touching .
Your phone number
Find it: Menu > Settings > About phone > Status
>My phone number
Emergency calls
Note: Your service provider programs one or more
emergency phone numbers (such as 911 or 112) that
you can call under any circumstances, even when your
phone is locked. Emergency numbers vary by country.
Your pre-programmed emergency number(s) may not
work in all locations, and sometimes an emergency
call cannot be placed due to network, environmental,
or interference issues.
1Touch Phone (if your phone is locked, touch
Emergency Call).
2Enter the emergency number.
3Touch to call the emergency number.
Note: Your mobile device can use AGPS satellite
signals to help emergency services find you (“GPS &
AGPS” on page 46).
12 Web
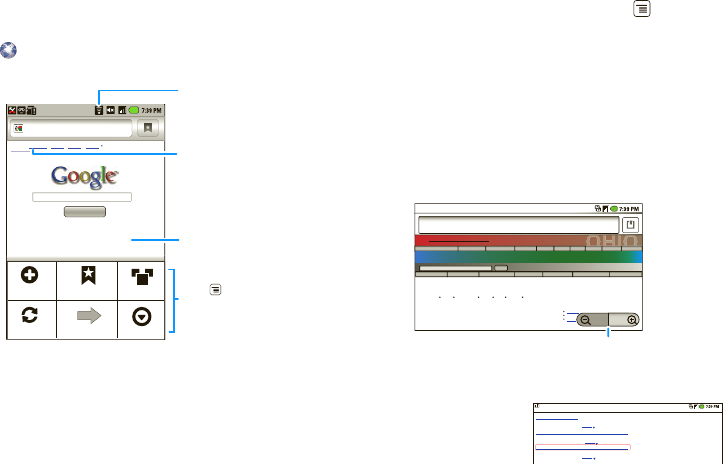
Web
you don’t need a PC, surf the web with your phone
Quick start: Browser
Find it: Browser
Note: If you can’t connect, contact your service
provider.
Connect
Your phone uses the mobile phone network (over the
air) to connect to the Web automatically.
http://www.google.co...
Web Images Local News more
iGoogle Settings Help
View Google in: Mobile
©2009 Google
Classic
Privacy
Sign in
Google Search
New window
Refresh
Bookmarks
Forward
Windows
More
Connection
Over the air
or Wi-Fi.
Links
Touch to open.
Drag or flick
to scroll.
Touch to
display
options.
Note: Your service provider may charge to surf the
Web or download data.
To use a wireless network, touch Menu > Settings
>Wireless & networks. Touch Wi-Fi to turn it on and
touch Wi-Fi settings to search for nearby wireless
networks. Touch a network to connect.
Web touch tips
Zoom & magnify
In Web pages, when you scroll (drag or flick), zoom
icons appear at the bottom of your screen.
Select links
When you touch a
link, your phone
outlines it and goes to
that page. If you touch
Darwin Wings Baseball Team
Home History Organizaons Darwin Wings Baseball Team
The Darwin Wings was a minor league baseball club in Darwin, Ohio, beginning in
the 1939 season.
The Wings played in the Middle Atlanc League and were affiliates of the Chicago
Panthers. They were renamed the Ducks before the 1941 season. The Ducks
moniker was a reference to Ducky Heinz, the team’s manager and club owner.
Related Entries
Baseball
Darwin, Ohio
Wings
OHIO HISTORY CENRAL
An Online Encyclopedia of Ohio History
About Ohio History Central
Browse DHC Index Category Topic Multimedia Time Period
Choose your text size A
A
A
A
Region
Ohio Quick Facts Ohio Across Time Useful Links Subscribe Sponsors Register Members Scrapbooks
n, Ohio
Search
Zoom In/Out
Baseball Dayton Team - NJ.com
Dayton Flyers Baseball rosters, game schedules, photos, arcles ...
Get the latest Baseball Dayton high school Baseball news, rankings, schedules, stats, scaores, results & athletes. . .
highschoolsports.nj.com/school/... - Opons
Dayton Flyers Baseball are ranked #2306 on Fanbase. Find arcles, photos, videos, rosters, and results for seasons...
www.fanbase.com/Dayton-Flyers-B... - Opons
Dayton Wings Baseball Team - Ohio History Central - A product of ...
Get the latest Baseball Dayton high school Baseball news, rankings, schedules, stats, scaores, results & athletes. . .
www.ohiohistorycentral.org/entr... - Opons
Searches related to: da
y
ton baseball

13Google Maps™
and hold the link, your phone shows options, like Open
in new window or Bookmark link.
Browser options
Touch Menu to see browser options:
options
Open Open a new browser window.
Bookmarks See your bookmarks.
Windows View the browser windows that
are currently open.
Refresh Reloads the current page.
Back/Forward Navigate to previously viewed
pages.
More Shows additional browser
options.
Google Maps™
where you are, where you’re going
Note: This feature is not available in all areas. Check
with your service provider.
Quick start: Google Maps
Where am I? Where do I want to go? Don’t worry—let
Google Maps™ find out for you.
Find it: Maps
Messaging Market
N Clark St
Wacker Dr
M
44 West Street
A
E Ohio St
N Rush St
N Park St
N New St
N Wabash Ave
N Dearborn St
E Grand Ave
E Randolph St
N Micigan Ave
N Micigan Ave
rD submuloC N
W Lake St W Lake St
E Wacker Pl
State/Lake
Grand Red
Lake
Randolph
St Metra
Randolph/
Wabash
Washington-Blue
E S WaterSt
M
M
M
M
E Randolph St
Ontario St E Ontario St
Search Directions Layers
My Location Join Latitude More
Touch to
show options.
Map View
Drag or flick
to scroll.
Touch to show
zoom.

14 Google Maps™
Google Maps™ opens by default in “Map mode”. To
learn more about the different map modes, go to
“Select map mode” on page 14.
Set your location sources
Set your phone to determine your location using GPS
satellite signals (highly accurate, but uses battery
power) or using the mobile network (less accurate, but
conserves battery power).
To set your location, touch Menu > Settings
>Location & security > Use GPS satellites and/or Use
wireless networks.
Find your location
Note: Don’t forget to set your location sources.
From the main Map screen, touch Menu > My
Location. Your location is shown on the map as .
The bigger the circle, the less accurate the location.
Find any location
1Touch Menu > Search.
2Enter text in the search box, like an address,
business, or city, then touch .
Tip: If it’s an address you have visited before, select
from the list shown.
3Touch the search box to view all the results, then
touch the one you want.
Get directions
1Touch Menu > Directions.
2Enter a starting point address or touch and select
My current location, Contacts, or Points on map.
3Enter an end point address or touch and select
Contacts or Points on map.
4Select your mode of transport (car, public transport
or walk), then touch Go. Your directions are shown
as a list. To view your directions on a map, touch
Show on map.
5When you have finished, touch Menu > More
>Clear map.
Select map mode
Touch Menu > Layers to select from Traffic,
Satellite, Latitude or recent searches, viewed
positions or directions.
Touch Menu > Layers > More layers to select from
My Maps, Wikipedia, or Transit Lines.
Touch Clear Map to clear your selections.

15Latitude
Map view
Shows a map, complete with names of streets, rivers,
lakes, mountains, and borders. This is the default view.
Satellite view
Shows map on top of aerial photo.
Traffic view
If available in your area, real-time traffic conditions are
shown on the roads as color-coded lines.
Latitude
where are your friends & family?
Note: This feature is not available in all areas. Check
with your service provider.
Join Latitude
See where your friends and family are on Google
Maps™. Plan to meet up, check that your parents got
home safely, or just stay in touch.
Don’t worry, your location is not shared unless you
agree to it. You need to join Latitude, and then invite
your friends to view your location or accept their
invitations. When using Google Maps, touch Menu
>Join Latitude. Read the privacy policy and if you
agree with it, touch Agree & share.
Add & remove friends
Find it: Maps >Menu >Latitude
To add friends:
1Touch Menu > Add friends.
2Touch Select from Contacts or Add via email
address, then touch a contact > Add friends.
If your friends already use Latitude, they’ll receive an
email request and a notification. If they have not yet
joined Latitude, they’ll receive an email request that

16 YouTube™
invites them to sign in to Latitude with their Google
account.
To remove friends:
1Touch Menu > Latitude to show your friend’s
list, then touch a friend in your list.
2Touch Remove.
Share location
When you receive a request to share location details
you can choose to:
•Accept and share back—see your friend’s location,
and your friend can see yours.
•Accept, but hide my location—see your friend's
location, but they can't see yours.
•Don't accept—location information is not shared
between you and your friend.
Hide your location
Touch Menu > Latitude to show your friend’s list.
Touch your contact name, then touch Menu
>Privacy > Hide your location.
Turn off Latitude
Touch Menu > Latitude to show your friend’s list.
Touch Menu > Privacy > Turn off Latitude.
Yo u Tu b e ™
go and create your own classic
Quick start: YouTube
Post that great video you’ve taken and see how many
hits you get.
Find it: > YouTube
Most Viewed
Lady Gaga On Saturda...
1 day ago 857,862 views
Lady Gaga appeared together...
02:58
00:51
05:23
gol de cabeza de paler...
13 hours ago 268,275 views
Golazo de Martin Palermo dura...
okailove1004
View all Most viewed
1 day ago 250,567 views
okailove
YouTube
Search Upload
SettingsCategoriesMy account
TM
Categories
Touch a video to play.
Touch to show
options.

17YouTube™
YouTube user-generated content web site lets you
share videos with YouTube users everywhere. You
don’t need a YouTube account to browse and view
videos.
Note: If you don’t have a YouTube account, visit
http://www.youtube.com to find out more. To create
an account or sign in, go to “Your account” on
page 17.
Watch videos
See popular video categories, like Most viewed, Most
discussed and Most recent. Touch a category, then
touch the video to start playing it. To see more video
categories, touch Menu > Categories. To see a
video in high quality, touch Menu > High quality.
Search for videos
Find it: Menu > Search
Enter text, then touch .To clear your search history,
touch Menu > Settings > Clear search history.
Share videos
Send someone a link to a video that you are watching.
1Touch Menu > Share.
2Address and complete your email, then touch Send.
Your account
Log in or create account
Find it: Menu > My account
1To create your YouTube account, touch the “Don’t
have a YouTube account? Click here to create one”
link.
If you already have a YouTube account, enter your
user name and password, and touch Sign in.
2For a new account, enter a user name, complete the
fields, then touch I accept.
Upload videos
Find it: Menu > Upload
1Touch the video you want to upload. You can change
the video title, description, set the access, and add
tags.
2Touch Upload.

18 Apps for all
Apps for all
get the app you want
Android Market™
Note: You must set up a Gmail account (see “Gmail”
on page 19) in order to buy and download apps from
the Android Market.
Find it: Market
Get all the fun games and cool apps you want! Market
provides you with access to software developers
everywhere, so you can find the app you want. If you
need help or have questions about Android Market,
touch Menu > Help.
Browse & install apps
Scroll to and touch the app you want to install. Then,
touch Install (if app is free) or Buy.
Warning: If an app you are downloading requires
access to your data or control of functions on your
phone, you’ll be asked to give your permission. After
selecting Install, the app will download. After
selecting Buy, you may be asked to sign in to an
additional Google™ account. Sign in and select
Purchase now to proceed. Follow the on-screen
instructions. To see the download progress, open the
notifications window.
After you download an app, the icon for that app
appears on the app menu (see “Apps” on page 8).
Manage & restore apps
To manage your apps, from your phone’s home screen
touch Menu > Settings > Applications > Manage
applications.
Touch the app to open the details screen—from here
you can review, uninstall, and more.
To reinstall any downloaded items, touch Market,
then touch Menu > Download. All previously
installed apps are listed and available for download.
Important customer information
Please be advised that many services and applications
offered through this unique device are provided by
Google™ and various application developers. If you
use, link to, or download a Google service, or an
application such as a non-Verizon Wireless
location-based GPS type service, chat room,
marketplace, or social network, from this device, you
should carefully review the terms of such service or
application. If you use any of these non-Verizon
Wireless services or applications, personal information
you submit may be read, collected, or used by the
service or application provider and/or other users of
those forums.

19Manage your life
Motorola, Inc., and Verizon Wireless are not
responsible for your use of those applications or
information you choose to submit or share with others.
Specific terms and conditions, terms of use, and
privacy policies apply to those applications and
services. Please review carefully any and all terms and
conditions applicable to those applications and
services including those related to any location-based
services for any particular privacy policies, risks, or
waivers.
Your Verizon Wireless customer agreement terms and
conditions and certain other specifically identified
terms govern your use of any Verizon Wireless
products and services.
Manage your life
stay on top of things
What can you manage?
Email, contacts, and calendar on your phone give you
access to the same personal information that you add,
view, and edit on your computer with the use of
Microsoft™ Outlook™.
You can:
•View Google™, Facebook, and Exchange contacts in
one list.
•Schedule and respond to meeting requests.
Gmail
Create a new email
Find it: > Gmail > Menu > Compose
Enter the recipient email address and message, then
touch Send.
Tip: Touch Menu for options, like Attach or Add
Cc/Bcc.
Tips
•To search in Gmail for messages, touch Menu
>Search.

20 Manage your life
•To set new email notifications, such as having a
special sound play when you receive a message,
touch Menu > Settings > Email notifications,
then select the ringtone and vibrate options.
•To label an email thread, touch and hold a message,
then touch Change labels.
Shortcuts
To refresh list, touch Menu + U.
To compose new, touch Menu + C.
To open conversation, press Enter.
To archive conversation, touch Menu + Y.
To jump to top of list, press Alternate + up.
To jump to end of list, press Alternate +
down.
To page up, press Shift + spacebar.
To page down, press spacebar.
Email
Set up an account
Find it: > Email
The email setup wizard will guide you through setting
up your email account.
Tip: To get your Microsoft Outlook mail on your mobile
phone, see “Synchronize with Microsoft™ Office
Outlook™” on page 21.
Create a new email
Find it: > Email > Menu > Compose
Enter the recipient email address and message, then
touch Send.
Tip: Touch Menu for options, like Attach or Add
Cc/Bcc.

21Manage your life
Calendar
Find it: >
Calendar
You can manage your
personal life on the
Google calendar and
your business affairs
on the Corporate
calendar. View a
calendar in different
ways: Touch Menu
>Agenda, Day, or
Week. When you
highlight an event in
the day and week
views, more details
appear.
Add calendar events
From any calendar
view, touch Menu > New event. Enter event details
and touch Done.
Manage calendar events
To edit an event, touch and hold the event, then touch
Edit event. Edit event details, then when you’re done,
touch Done.
September 2009
Sun
30 31 12345
67 8910 11 12
13 14 15 16 17 18 19
20 21 22 23 24 25 26
27 28 29 30
45678910
123
Mon Tue Wed Thu Fri Sat
Google data synchronization
Find it: Menu > Settings > Accounts & sync
The Google apps on your phone give you access to the
same personal information (emails, events, and
contacts) that you have on a computer using Gmail,
Calendar, and Contacts. It’s easy to synchronize the
Google apps information you want to keep up to date.
Select apps to synchronize
1Touch Background data.
Tip: To save battery power do not touch Background
data.
2Touch Add account to add the apps you want to
synchronize, like Google, Facebook, or Corporate.
Synchronize with Microsoft™ Office
Outlook™
If you use Microsoft™ Office Outlook™ on your work
computer, your phone can synchronize emails, and
events with your Microsoft™ Exchange server.
Find it: Menu > Settings > Accounts & sync > Add
account > Corporate
1Enter your user name (username@company.com),
password, email address, and server details
including domain name and security type (server

22 Contacts
address is the same URL you use to access your
company’s email using the Web on your computer).
Note: Contact your business IT department for
server details.
2Touch Next.
3Set up your sync options: select email, contacts, or
calendar.
4Touch Save & sync.
Corporate calendar
Find it: > Corporate Calendar
Corporate calendar appointments are shown in a
separate calendar from Gmail calendar appointments.
Once you have configured your corporate account, you
can start the Corporate calendar app to view, add, and
manage your corporate calendar appointments.
Corporate directory
Find it: > Corporate Directory
After you configure your corporate account, you can
start the Corporate Directory app to search corporate
directory details by specifying a user’s name or email
address. You can then easily call, text, or email the
user.
Contacts
contacts like you’ve never had before
Quick start: Contacts
Find it: Contacts
Tip: To search the list, just open your phone and type a
name, or simply touch Search and type using the
touchscreen keypad. When you flick or drag this list, a
scroll bar appears on the right. Drag the scroll bar to
move the list faster.
ContactsPhone Call log Favorites
A
D
L
K
Alex Pico
Displaying 5 contacts
Dan Smith
Kate Shunney
Keith Zang
Luke Carmody
Contacts List
Touch to view
contact information.
Touch & hold to edit,
delete, & more.
Menu Options
Touch Menu to
edit sync groups or
to add/import new
contacts.

23Contacts
Sync with Facebook friends
When you first log onto Facebook from your phone,
you will be prompted to sync your phone’s contacts
with your Facebook friends’ profiles, including profile
pictures. You can sync with just people in your phone’s
contacts, with your entire Facebook list, or you can
choose not to sync.
Call, text, or email contacts
Find it: Contacts
For View contact, Call contact, Text contact, Add to
favorites, or other options, touch and hold the contact.
Edit or delete contacts
Find it: Contacts
Touch the contact, then touch Menu > Edit contact
or Delete contact.
Create contacts
Find it: Contacts > Menu > New contact
Select the account to save the contact to, then type
the contact name and details.
When you’re finished, touch Done.
Groups
Find it: Contacts > Menu > Display options
You can put your Contacts into groups that you create
(like “friends”, “family”, or “work”). Then, you can find
contacts faster by showing one group at a time.
Phone
Given name
Family name
Phone
Home
Home Email
Email
Google
Edit contact
mxy000@gmail.com
Done Revert
Touch + to add another
entry.
Touch - to remove this entry.
To see more details, flick up.
Specyfikacje produktu
| Marka: | Motorola |
| Kategoria: | smartfon |
| Model: | Droid |
Potrzebujesz pomocy?
Jeśli potrzebujesz pomocy z Motorola Droid, zadaj pytanie poniżej, a inni użytkownicy Ci odpowiedzą
Instrukcje smartfon Motorola

25 Lutego 2025
16 Stycznia 2025
15 Stycznia 2025
10 Stycznia 2025
19 Grudnia 2024
13 Października 2024
12 Października 2024
7 Października 2024
16 Września 2024
15 Września 2024
Instrukcje smartfon
- smartfon Sony
- smartfon Samsung
- smartfon AEG
- smartfon LG
- smartfon Xiaomi
- smartfon MyPhone
- smartfon Sharp
- smartfon Huawei
- smartfon TCL
- smartfon Lenovo
- smartfon TP-Link
- smartfon Philips
- smartfon SilverCrest
- smartfon Gigabyte
- smartfon Acer
- smartfon Realme
- smartfon Gigaset
- smartfon Geemarc
- smartfon Nokia
- smartfon Hisense
- smartfon Infiniton
- smartfon Panasonic
- smartfon Mio
- smartfon Asus
- smartfon Nedis
- smartfon Medion
- smartfon OK
- smartfon Audioline
- smartfon Toshiba
- smartfon Tesla
- smartfon Alcatel-Lucent
- smartfon Majestic
- smartfon Bluebird
- smartfon Garmin
- smartfon Blaupunkt
- smartfon Profoon
- smartfon Vivax
- smartfon Evolveo
- smartfon Alcatel
- smartfon Haier
- smartfon HP
- smartfon Hyundai
- smartfon Honeywell
- smartfon Honor
- smartfon Kodak
- smartfon ZTE
- smartfon MaxCom
- smartfon Dell
- smartfon Google
- smartfon Intex
- smartfon Oppo
- smartfon Kyocera
- smartfon Krüger&Matz
- smartfon Qilive
- smartfon Thomson
- smartfon Manta
- smartfon Apple
- smartfon NGS
- smartfon CRUX
- smartfon Emporia
- smartfon Nevir
- smartfon Mitsubishi
- smartfon Razer
- smartfon GoClever
- smartfon SPC
- smartfon Intermec
- smartfon NEC
- smartfon Polaroid
- smartfon Prestigio
- smartfon Aiwa
- smartfon Sanyo
- smartfon Telefunken
- smartfon OnePlus
- smartfon Amazon
- smartfon Olympia
- smartfon Microsoft
- smartfon Bush
- smartfon HTC
- smartfon CAT
- smartfon Denver
- smartfon Saiet
- smartfon Albrecht
- smartfon RCA
- smartfon Media-Tech
- smartfon BenQ
- smartfon Trevi
- smartfon Lexibook
- smartfon Overmax
- smartfon Micromax
- smartfon Sencor
- smartfon NUU Mobile
- smartfon Alecto
- smartfon Binatone
- smartfon Hammer
- smartfon Allview
- smartfon Oukitel
- smartfon Best Buy
- smartfon Cyrus
- smartfon Kazam
- smartfon Tecdesk
- smartfon KPN
- smartfon Swissvoice
- smartfon I.safe Mobile
- smartfon TrekStor
- smartfon Brondi
- smartfon Fysic
- smartfon Wiko
- smartfon Yarvik
- smartfon Aligator
- smartfon Amplicomms
- smartfon AQISTON
- smartfon Amplicom
- smartfon Archos
- smartfon Androidtech
- smartfon Crosscall
- smartfon Ecom
- smartfon Sony Ericsson
- smartfon Vestel
- smartfon Sonim
- smartfon Energy Sistem
- smartfon Doro
- smartfon Sagem
- smartfon Lava
- smartfon Blu
- smartfon Easypix
- smartfon Konrow
- smartfon Brigmton
- smartfon Sunstech
- smartfon Aspera
- smartfon Sunny
- smartfon Nordmende
- smartfon Blackberry
- smartfon Vivo
- smartfon Wolder
- smartfon NGM
- smartfon Vodafone
- smartfon Switel
- smartfon InFocus
- smartfon GreatCall
- smartfon XD
- smartfon Pantech
- smartfon Alba
- smartfon RugGear
- smartfon Umidigi
- smartfon AT&T
- smartfon Mpman
- smartfon Bury
- smartfon Logicom
- smartfon Karbonn
- smartfon Palm
- smartfon Hannspree
- smartfon Phicomm
- smartfon Plum
- smartfon Lumigon
- smartfon Infinix
- smartfon Keneksi
- smartfon Klipad
- smartfon Iget
- smartfon T-Mobile
- smartfon JCB
- smartfon Casper
- smartfon Unnecto
- smartfon Wileyfox
- smartfon ITT
- smartfon Yota
- smartfon Avus
- smartfon Spice
- smartfon Wolfgang
- smartfon BQ
- smartfon ORA
- smartfon Danew
- smartfon Echo
- smartfon Primux
- smartfon Tiptel
- smartfon UTStarcom
- smartfon Zipy
- smartfon Mediacom
- smartfon Beafon
- smartfon BGH
- smartfon Billow
- smartfon Telstra
- smartfon Ulefone
- smartfon CSL
- smartfon ToughGear
- smartfon Benefon
- smartfon Komu
- smartfon Doogee
- smartfon Energizer
- smartfon Tremay
- smartfon Kurio
- smartfon Piranha
- smartfon Coolpad
- smartfon Syco
- smartfon TAG Heuer
- smartfon Mobistel
- smartfon Itel
- smartfon Garmin-Asus
- smartfon Handheld
- smartfon Fero
- smartfon AT Telecom
- smartfon Xtreamer
- smartfon Verykool
- smartfon O2
- smartfon General Mobile
- smartfon Mustang
- smartfon Kogan
- smartfon Pharos
- smartfon Storex
- smartfon Fairphone
- smartfon Freeman
- smartfon HomTom
- smartfon Leotec
- smartfon Auro
- smartfon Maxx
- smartfon ITTM
- smartfon Posh Mobile
- smartfon THL
- smartfon NGM-Mobile
- smartfon POCO
- smartfon Nothing
- smartfon Lark
- smartfon Senifone
- smartfon Tecno
- smartfon Telme
- smartfon UMi
- smartfon Olitech
- smartfon Mobiola
- smartfon Meizu
- smartfon Neffos
- smartfon Gionee
- smartfon TIM
- smartfon Cubot
- smartfon Leagoo
- smartfon NTech
- smartfon Nubia
- smartfon LeEco
- smartfon GSmart
- smartfon Bea-fon
- smartfon Opticon
- smartfon EStar
- smartfon Facom
- smartfon Jitterbug
- smartfon Custom
- smartfon Aplic
- smartfon HMD
- smartfon Opis
- smartfon Volla
- smartfon Nothing Tech
- smartfon Maxwest
- smartfon Kalley
Najnowsze instrukcje dla smartfon

2 Kwietnia 2025

30 Marca 2025
10 Marca 2025
7 Marca 2025
5 Marca 2025
5 Marca 2025
3 Marca 2025

2 Marca 2025

26 Lutego 2025
26 Lutego 2025