Instrukcja obsługi Melitta Caffeo Passione Varianza CS
Melitta
ekspres do kawy
Caffeo Passione Varianza CS
Przeczytaj poniżej 📖 instrukcję obsługi w języku polskim dla Melitta Caffeo Passione Varianza CS (260 stron) w kategorii ekspres do kawy. Ta instrukcja była pomocna dla 7 osób i została oceniona przez 2 użytkowników na średnio 4.5 gwiazdek
Strona 1/260

Bedienungsanleitung
Operating Instructions
DEUTSCHENGLISHITALIANO NEDERLANDS FRANÇAIS


3
DEUTSCH
Inhaltsverzeichnis
Inhaltsverzeichnis
1 Zu Ihrer Sicherheit .............................................................................................................. 5
1.1 Verwendete Symbole ............................................................................................. 5
1.2 Bestimmungsgemäße Verwendung ................................................................. 6
1.3 Gefahr durch elektrischen Strom ....................................................................... 6
1.4 Verbrennungs- und Verbrühungsgefahr ......................................................... 7
1.5 Allgemeine Sicherheit ............................................................................................ 7
2 Geräteübersicht ................................................................................................................... 8
2.1 Geräte im Überblick ................................................................................................ 8
2.2 Bedienfeld im Überblick ...................................................................................... 10
2.3 Der Cappuccinatore im Überblick ...................................................................12
3 Erste Schritte .......................................................................................................................13
3.1 Gerät auspacken .....................................................................................................13
3.2 Lieferumfang prüfen .............................................................................................13
3.3 Gerät aufstellen ......................................................................................................14
3.4 Gerät anschließen .................................................................................................. 14
3.5 Gerät erstmalig einschalten und entlüften ..................................................14
4 Grundlegende Bedienung ............................................................................................ 16
4.1 Gerät ein- und ausschalten ................................................................................16
4.2 Bedienfeld handhaben ........................................................................................17
4.3 Kaeebohnen in den Bohnenbehälter einfüllen ........................................17
4.4 Wasser einfüllen .....................................................................................................19
4.5 Auslauf für Kaeegetränke einstellen ............................................................20
4.6 Cappuccinatore anschließen ............................................................................. 20
4.7 Milch verwenden ...................................................................................................21
4.8 Tropfschale und Kaeesatzbehälter entleeren ...........................................21
5 My Bean Select®-Funktion verwenden ....................................................................22
5.1 Kaeebohnen für die My Bean Select®-Funktion einfüllen .................... 23
6 Getränke zubereiten........................................................................................................24
6.1 Kaeestärke einstellen ......................................................................................... 25
6.2 Kaeegetränke zubereiten ................................................................................ 25
6.3 Kaeemenge einstellen .......................................................................................25
6.4 Zwei Kaeegetränke gleichzeitig zubereiten .............................................. 26
6.5 Kaeezubereitung abbrechen ..........................................................................27
6.6 Milchschaum oder warme Milch zubereiten ...............................................27
6.7 Heißwasser zubereiten ........................................................................................28

Zu Ihrer Sicherheit
5
DEUTSCH
Liebe Kundin, lieber Kunde,
vielen Dank, dass Sie sich für den Kaeevollautomaten Caeo®Varianza® CS
oder Caeo® Passione® entschieden haben.
Die Bedienungsanleitung hilft Ihnen, die vielfältigen Möglichkeiten des
Geräts kennenzulernen und höchsten Kaeegenuss zu erleben.
Lesen Sie diese Bedienungsanleitung aufmerksam durch. So vermeiden
Sie Personen- und Sachschäden. Bewahren Sie die Bedienungsanleitung
sorgfältig auf. Falls Sie das Gerät weitergeben, geben Sie auch diese Bedie-
nungsanleitung mit.
Für Schäden durch Nichtbeachtung der Bedienungsanleitung übernimmt
Melitta keine Haftung.
Wenn Sie weitere Informationen benötigen oder Fragen zum Gerät haben,
wenden Sie sich an Melitta oder besuchen Sie uns im Internet unter:
www.melitta.de
Wir wünschen Ihnen viel Freude mit Ihrem Gerät.
1 Zu Ihrer Sicherheit
Das Gerät entspricht den folgenden Europäischen Richtlinien:
ū 2006 / 95 / EG (Niederspannung),
ū 2004 / 108 / EG (Elektromagnetische Ver träglichkeit),
ū 2011 / 65 / EU (RoHS),
ū 2009 / 125 / EG (Ökodesign / ErP).
Das Gerät ist nach dem neuesten Stand der Technik gebaut. Dennoch gibt
es Restgefahren.
Um Gefahren zu vermeiden, müssen Sie die Sicherheitshinweise beachten.
Für Schäden durch Nichtbeachtung von Sicherheitshinweisen übernimmt
Melitta keine Haftung.
1.1 Verwendete Symbole
Die folgenden Symbole weisen Sie auf besondere Gefahren im Umgang mit
dem Gerät hin oder geben Ihnen nützliche Hinweise.
VORSICHT
Das Signalwort VORSICHT weist Sie auf mögliche Verletzungen hin.

Geräteübersicht
8
DEUTSCH
2 Geräteübersicht
2.1 Geräte im Überblick
1
23
4
5
6
7
8
9
10
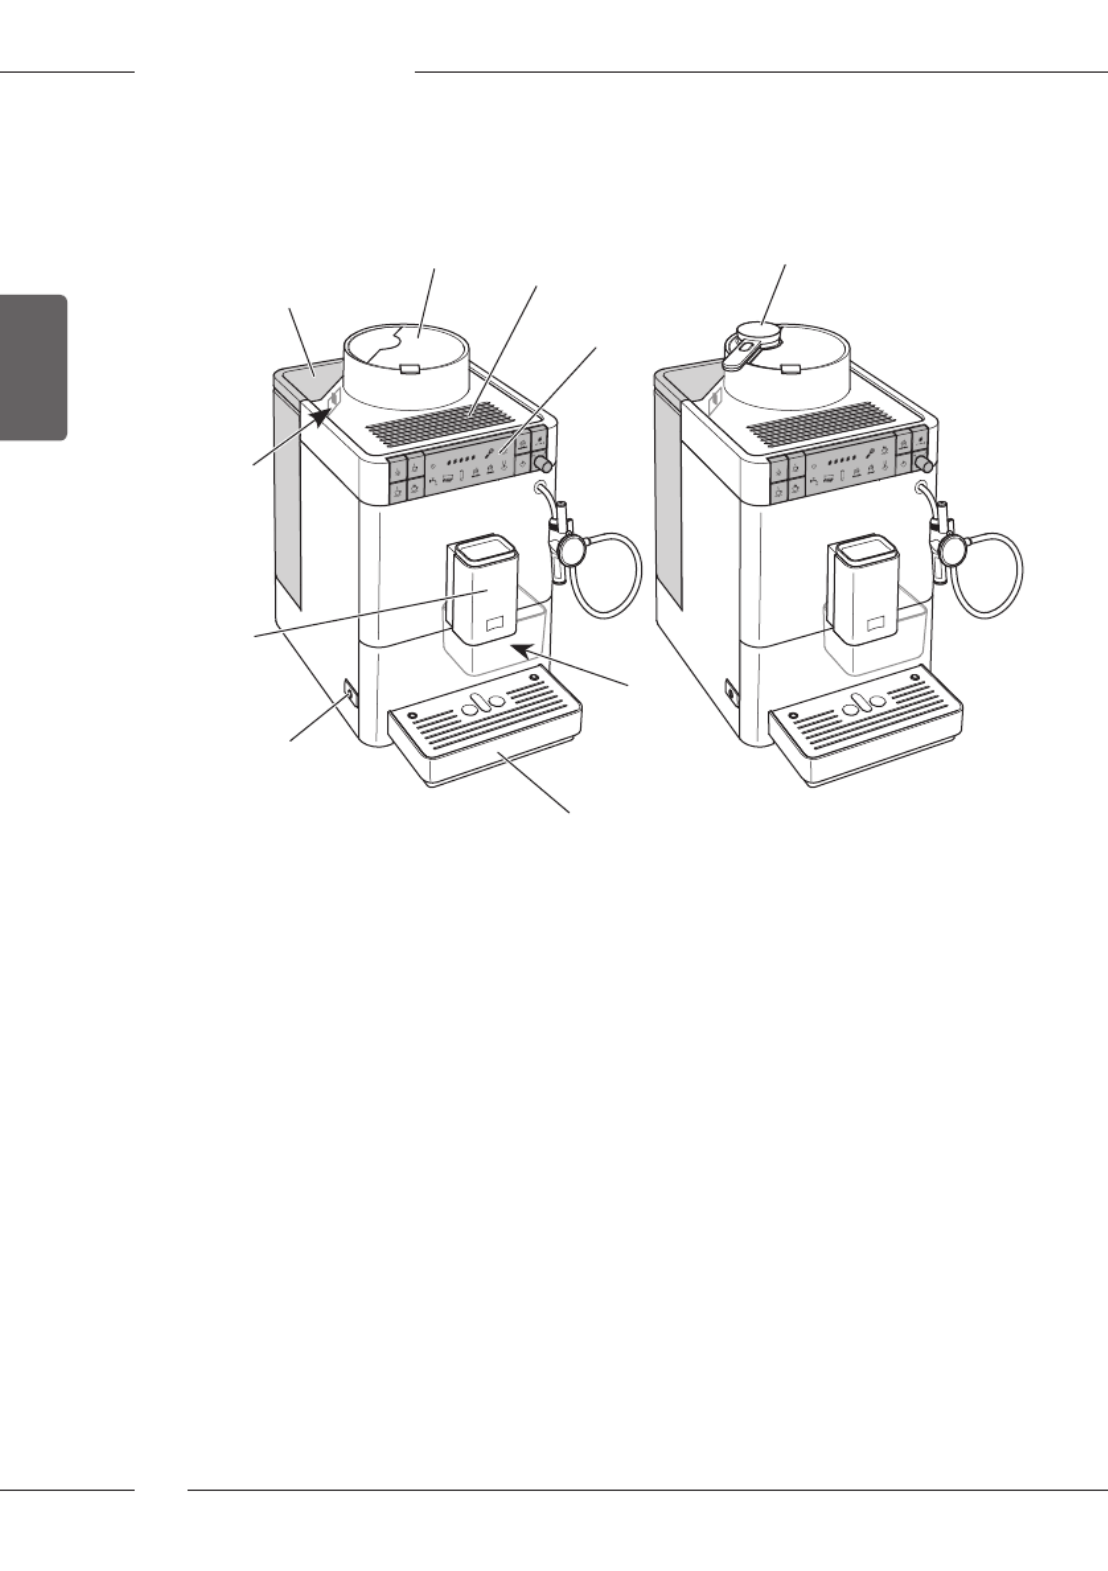
Abb. 1: Caeo® Passione® und Caeo® Varianza® CS von links vorne
1 Wassertank mit Deckel 6 Tropfschale
2 Bohnenbehälter mit Deckel 7 „Ein/Aus“-Taste
3 Tassenabstelläche 8 Höhenverstellbarer Auslauf für
Kaeegetränke mit 2 Kaeedüsen
4 Bedienfeld 9 Hebel „Mahlgradverstellung“ (innen)
5 Kaeesatzbehälter (innen) 10 Dosierlöel* für die
My Bean Select®-Funktion
*Nur bei Caeo® Varianza® CS vorhanden

Geräteübersicht
9
DEUTSCH
12
13
14
11
15
16
Abb. 2: Caeo® Passione® und Caeo® Varianza® CS von rechts vorne
11 Abdeckung 14 Cappuccinatore
12 Brühgruppe (innen) 15 Tassenblech
13 Dampfrohr 16 Schwimmer

Geräteübersicht
10
DEUTSCH
2.2 Bedienfeld im Überblick
191817
Abb. 3: Bedienfeld
17 Bezugstasten
18 Anzeigen
19 Bedientasten und Drehregler
Taste/Regler Bezeichnung Funktion
kleine Tasse Kleine Portion Kaee zubereiten
mittlere Tasse Mittlere Portion Kaee zubereiten
große Tasse Große Portion Kaee zubereiten
zwei Tassen Zweitassenbezug einstellen
Service Servicemodus aufrufen
Kaeestärke Kaeestärke einstellen
Dampfbezug Gerät für Dampfbezug aufheizen
Drehregler Ein- und Ausschalten von Heißwasser oder Dampf

Geräteübersicht
11
DEUTSCH
Anzeige Bedeutung
leuchtet Gerät ist betriebsbereit
blinkt Gerät heizt auf oder bereitet ein Kaeegetränk zu
blinkt schnell Programm zur Kaeemengeneinstellung läuft
leuchtet Anzahl der Kaeebohnen:
Aktuell eingestellte Kaeestärke
blinkt Bohnenbehälter füllen oder
Kaeebezug ist abgebrochen
leuchtet* My Bean Select®-Funktion ist bereit
blinkt* Bohnenschacht füllen
leuchtet Zweitassenbezug ist bereit
leuchtet Wassertank auüllen
blinkt Wassertank einsetzen
leuchtet Tropfschale und Kaeesatzbehälter leeren
blinkt Tropfschale und Kaeesatzbehälter einsetzen
leuchtet Filter wechseln
blinkt Filterwechselprogramm läuft
leuchtet Gerät entkalken
blinkt Entkalkungsprogramm läuft
leuchtet Gerät reinigen
blinkt Reinigungsprogramm läuft
leuchtet Dampfbezug ist bereit
blinkt Gerät heizt für den Dampfbezug auf
*Nur bei Caeo® Varianza® CS vorhanden

Geräteübersicht
12
DEUTSCH
2.3 Der Cappuccinatore im Überblick
20
21
22
23
24
25
Abb. 4: Cappuccinatore
20 Luftansaugrohr
21 Halterung für den Milchschlauch
22 Anschluss des Milchschlauchs
23 Milchschlauch
24 Auslauf für Heißwasser, Milch oder Milchschaum
25 Wahlschalter
Symbol am
Wahlschalter Funktion
Einstellung für
warme Milch
Einstellung für
Heißwasser
Einstellung für
Milchschaum

Erste Schritte
13
DEUTSCH
3 Erste Schritte
In diesem Kapitel ist beschrieben, wie Sie Ihr Gerät für die Verwendung
vorbereiten.
3.1 Gerät auspacken
Neben dem Gerät bendet sich weiteres Zubehör in der Verpackung, wie
zum Beispiel Reinigungshilfen und -mittel.
VORSICHT
Der Kontakt mit Reinigungsmitteln kann zu Reizungen der Augen und
der Haut führen.
Bewahren Sie die mitgelieferten Reinigungsmittel außerhalb der Reich-
weite von Kindern auf.
Packen Sie das Gerät aus. Entfernen Sie das Verpackungsmaterial, die
Klebestreifen und die Schutzfolien vom Gerät.
Bewahren Sie das Verpackungsmaterial für Transporte und eventuelle
Rücksendungen auf.
Information
Im Gerät können sich Kaee- und Wasserspuren benden. Das Gerät wurde
im Werk auf seine einwandfreie Funktion geprüft.
3.2 Lieferumfang prüfen
Überprüfen Sie anhand der nachfolgenden Liste die Vollständigkeit der
Lieferung. Falls Teile fehlen, wenden Sie sich an Ihren Händler.
ū Cappuccinatore,
ū Milchschlauch,
ū Reinigungsbürste,
ū Kaeevollautomaten-Reiniger,
ū Milchsystem-Reiniger,
ū Kaeevollautomaten-Entkalker,
ū Wasserlter,
ū Einschraubhilfe für den Wasserlter,
ū Teststreifen zur Bestimmung der Wasserhärte.

Erste Schritte
14
DEUTSCH
3.3 Gerät aufstellen
Beachten Sie die folgenden Hinweise:
ū Stellen Sie das Gerät nicht in feuchten Räumen auf.
ū Stellen Sie das Gerät auf eine stabile, ebene und trockene Fläche.
ū Stellen Sie das Gerät nicht in der Nähe von Spülbecken oder Ähnlichem
auf.
ū Stellen Sie das Gerät nicht auf heiße Flächen.
ū Halten Sie einen ausreichenden Abstand von etwa 10cm zur Wand und
zu anderen Gegenständen ein. Der Abstand nach oben sollte mindes-
tens 20cm betragen.
ū Verlegen Sie das Netzkabel so, dass es nicht durch Kanten oder heiße
Flächen beschädigt werden kann.
3.4 Gerät anschließen
Beachten Sie folgende Hinweise:
ū Stellen Sie sicher, dass die Netzspannung mit der Betriebsspannung
übereinstimmt, die in den Technischen Daten angegeben ist (siehe
Tabelle Technische Daten auf Seite50).
ū Schließen Sie das Gerät nur an eine vorschriftsmäßig installierte Schutz-
kontaktsteckdose an. Wenden Sie sich im Zweifelsfall an eine Elektro-
fachkraft.
ū Die Schutzkontaktsteckdose muss mindestens über eine 10-A-Siche-
rung abgesichert sein.
3.5 Gerät erstmalig einschalten und entlüften
Sobald Sie das Gerät erstmalig einschalten, führt das Gerät eine automati-
sche Spülung durch. Heißes Wasser ießt zunächst aus dem Cappuccina-
tore, dann aus dem Auslauf. Dabei wird das Gerät entlüftet.
VORSICHT
Ausströmendes Heißwasser und heißes Dampfrohr
Das Dampfrohr während und unmittelbar nach der Benutzung nicht
berühren.
Warten, bis das Dampfrohr abgekühlt ist.
Information
ū Wir empfehlen, die ersten beiden Tassen Kaee nach der ersten Inbe-
triebnahme wegzugießen.
ū Falls Sie einen Wasserlter verwenden möchten, sollten Sie diesen erst
nach der ersten Inbetriebnahme einsetzen.

Erste Schritte
15
DEUTSCH
7
Abb. 5: „Ein/Aus“-Taste
Voraussetzung: Das Gerät ist aufgestellt und angeschlossen.
1. Stellen Sie ein Gefäß unter den Cappuccinatore.
2. Drücken Sie die „Ein/Aus“-Taste .(7)
» Das Gerät zeigt an, dass der Wassertank gefüllt werden muss.
3. Entnehmen Sie den Wassertank. Spülen Sie den Wassertank mit klarem
Wasser aus. Füllen Sie den Wassertank mit frischem Wasser und setzen
Sie ihn ein.
» Das Gerät zeigt an, dass der Dampfbezug bereit ist.
4. Drehen Sie den Drehregler im Bedienfeld bis zum Anschlag im Uhrzei-
gersinn.
» Heißes Wasser ießt aus dem Cappuccinatore.
5. Sobald kein Wasser mehr aus dem Cappuccinatore ießt, drehen Sie
den Drehregler bis zum Anschlag gegen den Uhrzeigersinn.
» Heißes Wasser ießt aus dem Auslauf.
» Das Gerät ist entlüftet.
6. Füllen Sie Kaeebohnen in den Bohnenbehälter (siehe Kapitel4.3 Kaf-
feebohnen in den Bohnenbehälter einfüllen )auf Seite17 .
7. Bei Bedarf können Sie jetzt entweder
a) die Wasserhärte einstellen (siehe Kapitel7 Grundeinstellungen
ändern auf Seite29) oder
b) einen Wasserlter verwenden (siehe Kapitel 8.6 Wasserlter verwen-
den auf Seite44).

Grundlegende Bedienung
16
DEUTSCH
4 Grundlegende Bedienung
In diesem Kapitel sind grundlegende Bedienschritte beim täglichen
Umgang mit dem Gerät beschrieben.
4.1 Gerät ein- und ausschalten
Vor dem Einschalten bei der ersten Inbetriebnahme des Geräts lesen Sie das
Kapitel3.5 auf Seite14.Gerät erstmalig einschalten und entlüften
Information
ū Beim Ein- und Ausschalten führt das Gerät eine automatische Spülung
durch.
ū Bei der Spülung wird Spülwasser auch in die Tropfschale geleitet.
Gerät einschalten
1. Stellen Sie ein Gefäß unter den Auslauf.
2. Drücken Sie die „Ein/Aus“-Taste .(7)
3. Das Gerät heizt sich auf und führt eine automatische Spülung durch.
» Das Gerät zeigt die zuletzt eingestellte Kaeestärke an.
Information
Falls das Gerät nur kurzzeitig ausgeschaltet war, erfolgt nach dem Einschal-
ten keine automatische Spülung.
Gerät ausschalten
1. Stellen Sie ein Gefäß unter den Auslauf.
2. Drücken Sie die „Ein/Aus“-Taste .(7)
» Das Gerät führt eine automatische Spülung durch.
» Das Gerät schaltet sich aus.
Information
ū Das Gerät schaltet sich automatisch aus, wenn es längere Zeit nicht
bedient wird. Auch in diesem Fall erfolgt eine automatische Spülung.
ū Die Ausschaltzeit können Sie im Servicemodus einstellen (siehe Kapi-
tel7.3 auf Seite30).Automatisches Ausschalten einstellen
ū Wenn seit dem Einschalten kein Getränk zubereitet wurde oder der
Wassertank leer ist, erfolgt keine Spülung.

Grundlegende Bedienung
17
DEUTSCH
4.2 Bedienfeld handhaben
Die wesentlichen Programme sind über das Bedienfeld erreichbar.
Drücken Sie auf die gewünschte Taste. Verwenden Sie die folgenden Aktio-
nen zur Bedienung der Tasten:
Kurz drücken
Drücken Sie eine Taste kurz, um ein Programm auszuwäh-
len.
2s Lang drücken
Drücken Sie eine Taste länger als 2 Sekunden, um ein gege-
benenfalls vorhandenes zweites Programm auszuwählen.
4.3 Kaeebohnen in den Bohnenbehälter einfüllen
Geröstete Kaeebohnen verlieren ihr Aroma. Füllen Sie nur so viel Kaee-
bohnen in den Bohnenbehälter, wie Sie in den nächsten 3 bis 4Tagen
verbrauchen werden.
ACHTUNG
Die Verwendung nicht geeigneter Kaeesorten kann zum Verkleben des
Mahlwerks führen.
Verwenden Sie keine gefriergetrockneten oder karamellisierten Kaee-
bohnen.
Verwenden Sie kein Kaeepulver oder Instantprodukte.
Information
Bei einem Wechsel der Bohnensorte können sich je nach Modell noch Reste
der alten Bohnensorte im Mahlwerk benden.
Caeo® Passione®:
Auch wenn der Vorratsbehälter leer läuft und daraufhin eine neue
Bohnensorte eingefüllt wird, verbleibt immer noch eine Restmenge
der alten Bohnensorte im Mahlwerk. Daher können die ersten beiden
Kaeebezüge noch Restmengen der alten Bohnensorte enthalten.
Caeo® Varianza® CS:
Damit beim Wechsel der Bohnensorte (oder beim Benutzen der
MyBeanSelect®-Funktion) die Kaeebohnen nicht vermischt werden,
wird das Mahlwerk nach jedem Mahlvorgang leergemahlen. Dennoch
kann es zu einer minimalen Durchmischung der Kaeesorten kommen.
Das Leermahlen erzeugt ein verändertes Geräusch und ist normal.

Grundlegende Bedienung
18
DEUTSCH
26
2
Abb. 6: Deckel des Bohnenbehälters önen (Caeo® Varianza® CS)
1. Önen Sie den Deckel des Bohnenbehälters . (26) (2)
2. Füllen Sie Kaeebohnen in den Bohnenbehälter.
3. Schließen Sie den Deckel des Bohnenbehälters.
Information
Die blinkende Anzeige fordert Sie dazu auf, Kaeebohnen nachzufüllen.
Beim nächsten Kaeebezug blinkt die Anzeige nicht mehr.

Grundlegende Bedienung
19
DEUTSCH
4.4 Wasser einfüllen
Für einen optimalen Kaeegenuss verwenden Sie nur frisches, kaltes Wasser
ohne Kohlensäure. Wechseln Sie das Wasser täglich.
Information
Die Qualität des Wassers bestimmt sehr stark den Geschmack des Kaees.
Verwenden Sie deshalb einen Wasserlter (siehe Kapitel7.4 Wasserhärte ein-
stellen Wasserlter verwenden auf Seite31 und Kapitel8.6 auf Seite44).
1
27
Abb. 7: Wassertank (Caeo® Varianza® CS)
1. Önen Sie den Deckel des Wassertanks und ziehen Sie den Wasser-(27),
tank am Gri nach oben aus dem Gerät.(1)
2. Füllen Sie den Wassertank mit Wasser.
3. Setzen Sie den Wassertank von oben in das Gerät ein und schließen Sie
den Deckel.

Grundlegende Bedienung
20
DEUTSCH
4.5 Auslauf für Kaeegetränke einstellen
Der Auslauf für Kaeegetränke ist höhenverstellbar. Stellen Sie einen (8)
möglichst geringen Abstand zwischen Auslauf und Gefäß ein. Schieben Sie
den Auslauf je nach Gefäß nach oben oder nach unten.
8
Abb. 8: Auslauf für Kaeegetränke einstellen (Caeo® Varianza® CS)
4.6 Cappuccinatore anschließen
Mit dem Cappuccinatore können Sie Heißwasser, warme Milch oder Milch-
schaum zubereiten. Am Wahlschalter des Cappuccinatore können Sie (25)
das gewünschte Getränk auswählen.
13
21
23
25
28
Abb. 9: Cappuccinatore anschließen

My Bean Select®-Funktion verwenden
23
DEUTSCH
5.1 Kaeebohnen für die My Bean Select®-Funktion
einfüllen
ACHTUNG
Die Verwendung nicht geeigneter Kaeesorten kann zum Verkleben des
Mahlwerks führen.
Verwenden Sie keine gefriergetrockneten oder karamellisierten Kaee-
bohnen.
Verwenden Sie kein Kaeepulver oder Instantprodukte.
Information
Bei einem Wechsel der Bohnensorte können sich je nach Modell noch Reste
der alten Bohnensorte im Mahlwerk benden.
Caeo® Varianza® CS:
Damit beim Wechsel der Bohnensorte (oder beim Benutzen der
MyBeanSelect®-Funktion) die Kaeebohnen nicht vermischt werden,
wird das Mahlwerk nach jedem Mahlvorgang leergemahlen. Dennoch
kann es zu einer minimalen Durchmischung der Kaeesorten kommen.
Das Leermahlen erzeugt ein verändertes Geräusch und ist normal.
10
30
Abb. 12: Dosierlöel entnehmen (Caeo® Varianza® CS)

Getränke zubereiten
26
DEUTSCH
Die voreingestellten Kaeemengen können Sie ändern, von 25ml
bis220ml:
Voraussetzung: Das Gerät ist betriebsbereit.
1. Drücken Sie die gewünschte Bezugstaste länger als 2 Sekunden.
» Die schnell blinkende Anzeige zeigt, dass das Programm zur Einstel-
lung der Kaeemenge läuft.
» Der Mahlvorgang und die Getränkezubereitung starten.
2. Drücken Sie, sobald die gewünschte Kaeemenge erreicht ist, die
gewählte Bezugstaste erneut.
» Die Getränkeausgabe stoppt.
» Das Gerät speichert die neue Kaeemenge.
» Das Gerät ist betriebsbereit.
Information
Die Kaeemenge können Sie wieder auf Werkseinstellungen zurücksetzen
(siehe Kapitel7.6 Gerät auf Werkseinstellungen zurücksetzen auf Seite33).
6.4 Zwei Kaeegetränke gleichzeitig zubereiten
Mit der Bedientaste „zwei Tassen“ bereiten Sie gleichzeitig zwei Kaeege-
tränke zu.
31
8
Abb. 13: Zweitassenbezug (Caeo® Varianza® CS)
1. Stellen Sie zwei Gefäße unter den Auslauf . (8)
2. Drücken Sie die Bedientaste „zwei Tassen“ . (31)

Getränke zubereiten
27
DEUTSCH
3. Drücken Sie die Bezugstaste „kleine Tasse“, „mittlere Tasse“ oder „große
Tasse“.
» Der Mahlvorgang und die Getränkeausgabe starten.
» Die Getränkeausgabe endet automatisch.
4. Entnehmen Sie die beiden Gefäße.
Information
ū Die Einstellung gilt nur für eine einzelne Getränkezubereitung.
ū Wenn Sie innerhalb von 1 Minute kein Kaeegetränk zubereiten, wech-
selt das Gerät zum Eintassenbezug.
6.5 Kaeezubereitung abbrechen
Falls Sie die Zubereitung eines Kaeegetränks vorzeitig abbrechen wollen,
drücken Sie die gewählte Bezugstaste erneut.
6.6 Milchschaum oder warme Milch zubereiten
Milchschaum und warme Milch bereiten Sie am Cappuccinatore zu.
Die Zubereitung von Milchschaum und warmer Milch ist ähnlich. Für die
Zubereitung ist Wasserdampf erforderlich.
VORSICHT
Ausströmendes Heißwasser und heißes Dampfrohr
Nicht in den ausströmenden Wasserdampf fassen.
Das Dampfrohr während und unmittelbar nach der Benutzung nicht
berühren. Warten, bis das Dampfrohr abgekühlt ist.
Voraussetzungen: Das Gerät ist betriebsbereit. Der Cappuccinatore ist am
Gerät angeschlossen und Milch ist angeschlossen.
1. Stellen Sie ein Gefäß unter den Cappuccinatore.
2. Drücken Sie die Bedientaste „Dampfbezug“.
» Die blinkende Anzeige zeigt, dass das Gerät für den Dampfbezug
aufheizt.
» Danach zeigt die leuchtende Anzeige, dass der Dampfbezug bereit
ist.
3. Drehen Sie den Wahlschalter des Cappuccinatore, bis die gewünschte
Einstellung für Milchschaum oder warme Milch nach oben zeigt.
4. Drehen Sie den Drehregler im Bedienfeld bis zum Anschlag im Uhrzei-
gersinn.
» Die Getränkeausgabe startet.

Getränke zubereiten
28
DEUTSCH
5. Drehen Sie den Drehregler bis zum Anschlag gegen den Uhrzeigersinn.
» Die Getränkeausgabe stoppt.
6. Entnehmen Sie das Gefäß.
7. Sie können weitere Getränke zubereiten oder den Cappuccinatore
spülen:
a) Bereiten Sie weitere Getränke zu und spülen Sie den Cappuccina-
tore später.
b) Spülen Sie den Cappuccinatore, wie im Folgenden beschrieben.
Cappuccinatore spülen
1. Füllen Sie ein Gefäß mit klarem Wasser.
2. Tauchen Sie den Milchschlauch in das gefüllte Gefäß.
3. Stellen Sie ein leeres Gefäß unter den Cappuccinatore.
4. Drehen Sie den Wahlschalter des Cappuccinatore, bis die Einstellung für
Milchschaum nach oben zeigt.
5. Drehen Sie den Drehregler bis zum Anschlag im Uhrzeigersinn.
6. Drehen Sie den Drehregler bis zum Anschlag gegen den Uhrzeigersinn,
sobald ein sauberes Wasser-/Dampfgemisch in das leere Gefäß ießt.
» Der Cappuccinatore ist gespült.
Information
Wir empfehlen, den Cappuccinatore nicht nur zu spülen, sondern in regel-
mäßigen Abständen zu zerlegen und reinigen (siehe Kapitel8.3 Cappucci-
natore reinigen auf Seite37).
6.7 Heißwasser zubereiten
Heißwasser bereiten Sie am Cappuccinatore zu.
VORSICHT
Ausströmendes Heißwasser und heißes Dampfrohr
Das Dampfrohr während und unmittelbar nach der Benutzung nicht
berühren.
Warten, bis das Dampfrohr abgekühlt ist.
Voraussetzungen: Das Gerät ist betriebsbereit. Der Cappuccinatore ist
angeschlossen.
1. Stellen Sie ein Gefäß unter den Cappuccinatore.
2. Drehen Sie den Wahlschalter des Cappuccinatore, bis die Einstellung für
Heißwasser nach oben zeigt.
3. Drehen Sie den Drehregler im Uhrzeigersinn.
» Die Getränkeausgabe startet.

Grundeinstellungen ändern
29
DEUTSCH
4. Drehen Sie den Drehregler bis zum Anschlag gegen den Uhrzeigersinn.
» Die Getränkeausgabe stoppt.
5. Entnehmen Sie das Gefäß.
7 Grundeinstellungen ändern
Im folgenden Kapitel ist beschrieben, wie Sie die Grundeinstellungen des
Geräts ändern können.
7.1 Servicemodus aufrufen
Einige der Grundeinstellungen können Sie nur im Servicemodus des
Geräts ändern.
Voraussetzung: Das Gerät ist betriebsbereit.
1. Drücken Sie die Bedientaste „Service“ länger als 2 Sekunden, um den
Servicemodus aufzurufen.
» Das Gerät zeigt an, dass es sich in einem der im Folgenden beschriebe-
nen Servicemodi bendet.
Jedem Servicemodus ist eine Anzeige zugeordnet.
Anzeige Bedeutung im Servicemodus
Energiesparprogramm
Automatisches Ausschalten
Wasserhärte
Brühtemperatur
Information
Alle vier Grundeinstellungen im Servicemodus können Sie wieder auf die
Werkseinstellungen zurücksetzen (siehe Kapitel7.6 Gerät auf Werkseinstel-
lungen zurücksetzen auf Seite33).
7.2 Energiesparprogramm einstellen
Leuchtet im Servicemodus die nebenstehende Anzeige, können Sie das
Energiesparprogramm einstellen.
Das Energiesparprogramm bewirkt ein Absenken der Heiztemperatur.
Zudem leuchtet die Anzeige im Bedienfeld schwächer.

Grundeinstellungen ändern
31
DEUTSCH
Voraussetzung: Der Servicemodus ist aufgerufen.
1. Drücken Sie die Bedientaste „Service“ so oft, bis die Anzeige für den
Servicemodus Automatisches Ausschalten erscheint.
2. Drücken Sie die Bedientaste „Kaeestärke“ so oft, bis die gewünschte
Zeit eingestellt ist.
3. Sie können die nächste Grundeinstellung im Servicemodus aufrufen
oder den Servicemodus verlassen:
a) Drücken Sie die Bedientaste „Service“ kurz, um zur nächsten Grund-
einstellung zu navigieren.
b) Drücken Sie die Bedientaste „Service“ länger als 2 Sekunden, um
den Servicemodus zu verlassen.
» Die neue Zeit für das automatische Ausschalten ist gespeichert.
7.4 Wasserhärte einstellen
Leuchtet im Servicemodus die nebenstehende Anzeige, können Sie die
Wasserhärte einstellen.
Mit der Einstellung der Wasserhärte wird reguliert, wie häug das Gerät Sie
auordert, es zu entkalken. Je härter das Wasser ist, desto häuger muss das
Gerät entkalkt werden.
Information
Wenn Sie einen Wasserlter verwenden, können Sie keine Wasserhärte
einstellen (siehe Kapitel8.6 Wasserlter verwenden auf Seite44). Mit ein-
gesetztem Wasserlter ist die Wasserhärte auf weich eingestellt.
Bestimmen Sie die Wasserhärte mit dem beiliegenden Teststreifen. Beach-
ten Sie die Anweisungen auf der Verpackung des Teststreifens und die
Tabelle auf Seite50.Wasserhärtebereich
Die Einstellung folgender Wasserhärten ist möglich:
Anzeige Wasserhärte
weich, Entkalken nach 150 Liter
mittel, Entkalken nach 100 Liter
hart, Entkalken nach 60 Liter
sehr hart, Entkalken nach 35 Liter

Grundeinstellungen ändern
32
DEUTSCH
Voraussetzung: Der Servicemodus ist aufgerufen.
1. Drücken Sie die Bedientaste „Service“ so oft, bis die Anzeige für den
Servicemodus Wasserhärte erscheint.
2. Drücken Sie die Bedientaste „Kaeestärke“ so oft, bis die gewünschte
Wasserhärte eingestellt ist.
3. Sie können die nächste Grundeinstellung im Servicemodus aufrufen
oder den Servicemodus verlassen:
a) Drücken Sie die Bedientaste „Service“ kurz, um zur nächsten Grund-
einstellung zu navigieren.
b) Drücken Sie die Bedientaste „Service“ länger als 2 Sekunden, um
den Servicemodus zu verlassen.
» Die neue Einstellung für die Wasserhärte ist gespeichert.
7.5 Brühtemperatur einstellen
Leuchtet im Servicemodus die nebenstehende Anzeige, können Sie die
Brühtemperatur einstellen.
Die Brühtemperatur beeinusst den Geschmack des Kaeegetränks. Sie
können die Brühtemperatur nach Ihren Ansprüchen wie folgt einstellen:
Anzeige Brühtemperatur
niedrig
mittel
hoch
Voraussetzung: Der Servicemodus ist aufgerufen.
1. Drücken Sie die Bedientaste „Service“ so oft, bis die Anzeige für den
Servicemodus Brühtemperatur erscheint.
2. Drücken Sie die Bedientaste „Kaeestärke“ so oft, bis die gewünschte
Brühtemperatur eingestellt ist.
3. Sie können die nächste Grundeinstellung im Servicemodus aufrufen
oder den Servicemodus verlassen:
a) Drücken Sie die Bedientaste „Service“ kurz, um zur nächsten Grund-
einstellung zu navigieren.
b) Drücken Sie die Bedientaste „Service“ länger als 2 Sekunden, um
den Servicemodus zu verlassen.
» Die neue Brühtemperatur ist gespeichert.

Grundeinstellungen ändern
33
DEUTSCH
7.6 Gerät auf Werkseinstellungen zurücksetzen
Sie können das Gerät auf die Werkseinstellungen zurücksetzen.
Information
Wenn Sie das Gerät auf die Werkseinstellungen zurücksetzen, gehen alle
persönlichen Grundeinstellungen im Servicemodus verloren (siehe Kapi-
tel 7.1 auf Seite29).Servicemodus aufrufen
Voraussetzung: Das Gerät ist betriebsbereit.
4. Drücken Sie die Bedientaste „Service“ und zusätzlich die Bezugstaste
„mittlere Tasse“.
» Die blinkende Anzeige zeigt, dass die Funktion aktiviert wurde.
» Das Gerät ist auf die Werkseinstellungen zurückgesetzt (siehe Tabelle
Werkseinstellungen auf Seite50).
7.7 Mahlgrad einstellen
Der Mahlgrad des Kaeepulvers hat Einuss auf den Geschmack des
Kaees. Der Mahlgrad wurde vor der Auslieferung optimal eingestellt. Wir
empfehlen, den Mahlgrad frühestens nach etwa 1 000 Kaeebezügen (nach
etwa1Jahr) zu justieren.
9
Abb. 14: Hebel für die Einstellung des Mahlgrads (Caeo® Varianza® CS)

Pege und Wartung
34
DEUTSCH
1. Entnehmen Sie den Wassertank.
» Am Gehäuse wird der Hebel "Mahlgradverstellung" sichtbar.(9)
2. Stellen Sie den Hebel nach links oder nach rechts, wie auf Abb. 14
abgebildet.
ū Nach links = Mahlgrad feiner
ū Nach rechts = Mahlgrad gröber
3. Setzen Sie den Wassertank wieder ein.
Information
ū Wenn Sie den Mahlgrad feiner einstellen, wird der Kaeegeschmack
stärker.
ū Der Mahlgrad ist optimal eingestellt, wenn der Kaee gleichmäßig aus
dem Auslauf ießt und eine feine, dichte Crema entsteht.
8 Pege und Wartung
Durch regelmäßige Pege und Wartung des Geräts stellen Sie eine gleich-
bleibend hohe Qualität Ihrer Getränke sicher.
8.1 Allgemeine Reinigung
Reinigen Sie das Gerät regelmäßig. Entfernen Sie äußerliche Verunreinigun-
gen von Milch und Kaee sofort.
ACHTUNG
Bei Verwendung nicht geeigneter Reinigungsmittel kann die Oberäche
verkratzen.
Verwenden Sie keine scheuernden Tücher, Schwämme und Reinigungs-
mittel.
Voraussetzung: Das Gerät ist ausgeschaltet.
Reinigen Sie das Gerät von außen mit einem weichen, feuchten Tuch
und einem handelsüblichen Geschirrspülmittel.
Spülen Sie die Tropfschale und den Kaeesatzbehälter ab. Verwenden
Sie hierbei ein weiches, feuchtes Tuch und ein handelsübliches Geschirr-
spülmittel.
Reinigen Sie den Bohnenbehälter mit einem weichen, trockenen Tuch.
Der Kaeesatzbehälter und das Tassenblech sind spülmaschi-(5) (15)
nengeeignet.

Pege und Wartung
35
DEUTSCH
8.2 Brühgruppe reinigen
Zur Vermeidung von Schäden am Gerät empfehlen wir, die Brühgruppe
einmal pro Woche zu reinigen.
Im Zuge der Reinigung können Sie die Kaeereste hinter der Abdeckung
auf den Geräteächen mit einem trockenem weichem Tuch entfernen.
VORSICHT
Stromschlag beim Reinigen des geöneten Geräts
Schalten Sie das Gerät aus, bevor Sie hinter der Abdeckung die Geräte-
ächen reinigen.
32
11
12
Abb. 15: Brühgruppe entnehmen (Caeo® Varianza® CS)
1. Önen Sie die Abdeckung . Fassen Sie dafür in die Mulde an der (11)
rechten Seite des Geräts und schieben Sie die Abdeckung nach hinten.
Nehmen Sie die Abdeckung ab.
2. Drücken und halten Sie den roten Hebel am Gri der Brüh-(32)
gruppe und drehen Sie den Gri im Uhrzeigersinn, bis er am (12)
Anschlag einrastet.
3. Ziehen Sie die Brühgruppe am Gri aus dem Gerät heraus.

Pege und Wartung
36
DEUTSCH
33
Abb. 16: Brühgruppe reinigen
4. Spülen Sie die Brühgruppe unter ießendem Wasser gründlich von allen
Seiten ab.
» Die Brühgruppe und das Sieb sind frei von Kaeeresten.(33)
5. Lassen Sie die Brühgruppe abtropfen.
6. Setzen Sie die Brühgruppe in das Gerät ein. Drücken und halten Sie den
roten Hebel am Gri der Brühgruppe, und drehen Sie den Gri gegen
den Uhrzeigersinn, bis er am Anschlag einrastet.
7. Schließen Sie die Abdeckung. Setzen Sie dazu die Abdeckung ein, und
schieben Sie die Abdeckung nach vorn, bis sie ein rastet.

Pege und Wartung
37
DEUTSCH
8.3 Cappuccinatore reinigen
Zusätzlich empfehlen wir, den Cappuccinatore und den Milchschlauch
regelmäßig zu reinigen.
13
20
24
23
Abb. 17: Cappuccinatore zerlegen
Zum Zerlegen des Cappuccinatore gehen Sie wie folgt vor:
1. Ziehen Sie den Cappuccinatore vom Dampfrohr(13) ab.
2. Ziehen Sie vom Cappuccinatore die folgenden Einzelteile ab:
ū Milchschlauch ,(23)
ū Luftansaugrohr ,(20)
ū Auslauf .(24)
3. Reinigen Sie den Cappuccinatore und die Einzelteile mit warmem
Wasser. Verwenden Sie die mitgelieferte Reinigungsbürste, ein weiches,
feuchtes Tuch und handelsübliches Geschirrspülmittel.
4. Fügen Sie den Cappuccinatore wieder zusammen.
5. Schließen Sie den Cappuccinatore an das Gerät an (siehe Kapitel 4.6
Cappuccinatore anschließen auf Seite20).

Pege und Wartung
39
DEUTSCH
Tasten Anzeigen Handlungsschritte
3. Setzen Sie die Tropfschale und den
Kaeesatzbehälter ein.
» Das Gerät zeigt an, dass die zweite
Programmstufe erreicht ist.
» Das Gerät spült zweimal.
» Die blinkende Anzeige fordert Sie
auf, die Brühgruppe zu entneh-
men und eine Reinigungstablette
einzulegen.
Abb. 18: Reinigungstablette in die Brühgruppe legen.
Tasten Anzeigen Handlungsschritte
4. Entnehmen Sie die Brühgruppe und
reinigen Sie die Brühgruppe, wie in
Kapitel8.2 auf Brühgruppe reinigen
Seite35 beschrieben. Schalten Sie
das Gerät dabei nicht aus.
5. Legen Sie eine Reinigungstablette in
die Brühgruppe (siehe Abb. 18). Setzen
Sie die Brühgruppe in das Gerät ein,
wie in Kapitel8.2 Brühgruppe reinigen
auf Seite35 beschrieben.
» Das Gerät zeigt an, dass die dritte
Programmstufe erreicht ist.
» Der Reinigungsprozess startet.

Pege und Wartung
40
DEUTSCH
Tasten Anzeigen Handlungsschritte
» Nach mehreren Minuten zeigt das
Gerät an, dass
ū die vierte Programmstufe
erreicht ist,
ū die Tropfschale und der Kaee-
satzbehälter geleert werden
müssen.
6. Entleeren Sie die Tropfschale und den
Kaeesatzbehälter.
7. Setzen Sie die Tropfschale und den
Kaeesatzbehälter ein.
» Das Gerät zeigt an, dass die letzte
Programmstufe erreicht ist.
» Der Reinigungsprozess wird fort-
gesetzt.
» Danach zeigt das Gerät an, dass die
Tropfschale und der Kaeesatzbe-
hälter geleert werden müssen.
8. Entleeren Sie die Tropfschale und den
Kaeesatzbehälter.
» Das Gerät ist betriebsbereit.
8.5 Entkalkungsprogramm durchführen
Mit dem Entkalkungsprogramm werden Kalkablagerungen im Innern des
Geräts mit Kaeevollautomaten-Entkalker entfernt.
Zur Vermeidung von Schäden am Gerät empfehlen wir, das Programm
„Entkalkung“ alle 3 Monate – oder wenn das Gerät Sie dazu auordert –
durchzuführen.
Das Programm Entkalkung dauert ungefähr 25 Minuten und sollte nicht
unterbrochen werden.
VORSICHT
Der Kontakt mit Kaeevollautomaten-Entkalker kann zu Reizungen der
Augen und der Haut führen.
Beachten Sie die Verarbeitungshinweise auf der Verpackung des
Kaeevollautomaten-Ent kalkers.

Pege und Wartung
41
DEUTSCH
VORSICHT
Ausströmendes Heißwasser und heißes Dampfrohr
Das Dampfrohr während und unmittelbar nach der Benutzung nicht
berühren.
Warten, bis das Dampfrohr abgekühlt ist.
ACHTUNG
Die Verwendung nicht geeigneter Entkalker kann zu Schäden am Gerät
führen.
Verwenden Sie ausschließlich den Flüssigentkalker Melitta® ANTI CALC
Espresso Machines Flüssigentkalker.
ACHTUNG
Ein eingeschraubter Wasserlter kann während des Entkalkungspro-
gramms beschädigt werden.
Entfernen Sie den Wasserlter, wenn das Gerät Sie dazu auordert.
Legen Sie den Wasserlter während des Entkalkungsprogramms in ein
Gefäß mit Leitungswasser.
Nach Beendigung des Entkalkungsprogramms können Sie den Wasser-
lter wieder einsetzen und weiter verwenden.
Voraussetzungen: Das Gerät ist betriebsbereit. 0,5 Liter Entkalkerlösung
wurde angesetzt und steht bereit.
Symbol am
Wahlschalter
oder Tasten
Anzeigen Handlungsschritte
1. Drücken Sie die Bedientaste „Ser-
vice“ und zusätzlich die Bedientaste
„Dampfbezug“ länger als 2Sekunden.
» Das Gerät zeigt an, dass
ū das Entkalkungsprogramm
läuft,
ū die erste Programmstufe
erreicht ist,
ū die Tropfschale und der Kaee-
satzbehälter geleert werden
müssen.
2. Entleeren Sie die Tropfschale und den
Kaeesatzbehälter (siehe Kapitel 4.8
Tropfschale und Kaeesatzbehälter
entleeren auf Seite21).

Pege und Wartung
42
DEUTSCH
Symbol am
Wahlschalter
oder Tasten
Anzeigen Handlungsschritte
3. Drehen Sie den Wahlschalter, bis die
Einstellung für Heißwasser nach oben
zeigt.
4. Setzen Sie die Tropfschale ohne den
Kaeesatzbehälter ein.
» Das Gerät zeigt an, dass
ū die zweite Programmstufe
erreicht ist,
ū der Wassertank gefüllt werden
muss.
ū Entkalkerüssigkeit in den Was-
sertank gefüllt werden muss.
5. Stellen Sie den Kaeesatzbehälter
unter den Cappuccinatore.
6. Önen Sie den Deckel des Wasser-
tanks und ziehen Sie den Wasser-,
tank am Gri nach oben aus dem
Gerät.
7. Füllen Sie 0,5 Liter Entkalkerlösung in
den Wassertank. Beachten Sie dabei
die entsprechende Gebrauchsan-
leitung des Kaeevollautomaten-
Entkalkers.
8. Setzen Sie den Wassertank wieder ein.
» Der Entkalkungsprozess startet.
» Nach mehreren Minuten zeigt das
Gerät an, dass
ū die dritte Programmstufe
erreicht ist,
ū der Dampfbezug bereit ist.
9. Drehen Sie den Drehregler bis zum
Anschlag im Uhrzeigersinn.
» Der Entkalkungsprozess wird
fortgesetzt.
» Nach mehreren Minuten zeigt das
Gerät an, dass die Tropfschale und
der Kaeesatzbehälter geleert
werden müssen.
10. Entleeren Sie die Tropfschale und den
Kaeesatzbehälter.

Pege und Wartung
43
DEUTSCH
Symbol am
Wahlschalter
oder Tasten
Anzeigen Handlungsschritte
11. Setzen Sie die Tropfschale ohne den
Kaeesatzbehälter ein.
» Das Gerät zeigt an, dass
ū die vierte Programmstufe
erreicht ist,
ū der Wassertank gefüllt werden
muss.
12. Stellen Sie den Kaeesatzbehälter
unter den Cappuccinatore.
13. Önen Sie den Deckel des Wasser-
tanks und ziehen Sie den Wasser-,
tank am Gri nach oben aus dem
Gerät.
14. Entleeren und reinigen Sie den Was-
sertank.
15. Füllen Sie den Wassertank mit fri-
schem Wasser und setzen ihn wieder
ein.
» Heißes Wasser ießt in den Kaee-
satzbehälter.
16. Sobald kein heißes Wasser mehr ießt,
drehen Sie den Drehregler bis zum
Anschlag gegen den Uhrzeigersinn.
» Das Gerät zeigt an, dass die letzte
Programmstufe erreicht ist.
» Heißes Wasser ießt in die Tropf-
schale.
» Nach mehreren Minuten zeigt das
Gerät an, dass Tropfschale und
Kaeesatzbehälter geleert werden
müssen.
17. Entleeren Sie die Tropfschale und den
Kaeesatzbehälter.
18. Setzen Sie die Tropfschale und den
Kaeesatzbehälter ein.
» Das Gerät ist betriebsbereit.

Pege und Wartung
44
DEUTSCH
8.6 Wasserlter verwenden
Die Verwendung eines Wasserlters verlängert die Lebensdauer des Geräts
und Sie müssen das Gerät seltener entkalken. Der im Lieferumfang enthal-
tene Wasserlter ltert Kalk und andere Schadstoe aus dem Wasser.
1
34
35
36
Abb. 19: Wasserlter ein- oder ausschrauben
Der Wasserlter(35) wird mit der Einschraubhilfe in das Gewinde(34) (36)
am Boden des Wassertanks eingeschraubt oder ausgeschraubt.(1)
Wasserlter einsetzen
Information
Wenn Sie einen Wasserlter verwenden, können Sie keine Wasserhärte
einstellen. Die Wasserhärte ist automatisch auf weich eingestellt (siehe
Kapitel7.4 auf Seite31).Wasserhärte einstellen

Pege und Wartung
45
DEUTSCH
Voraussetzungen: Das Gerät ist betriebsbereit. Der neue Wasserlter liegt
bereit.
1. Drücken Sie die Bedientaste „Service“ und zusätzlich die Bedientaste
„zwei Tassen“ länger als 2Sekunden.
» Das Gerät zeigt an, dass
ū das Filterprogramm läuft,
ū die Tropfschale und der Kaeesatzbehälter geleert werden müs-
sen.
2. Entleeren Sie die Tropfschale und den Kaeesatzbehälter.
3. Setzen Sie die Tropfschale ohne den Kaeesatzbehälter ein.
» Das Gerät zeigt an, dass der Wassertank gefüllt werden muss.
4. Stellen Sie den Kaeesatzbehälter unter den Cappuccinatore.
5. Önen Sie den Deckel des Wassertanks und ziehen Sie den Wasser-,
tank am Gri nach oben aus dem Gerät.
6. Entleeren Sie den Wassertank.
7. Setzen Sie einen neuen Filter in den Wassertank ein (siehe Abb. 19).
8. Füllen Sie den Wassertank.
9. Setzen Sie den Wassertank wieder ein.
» Das Gerät zeigt an, dass der Dampfbezug bereit ist.
10. Drehen Sie den Drehregler bis zum Anschlag im Uhrzeigersinn.
» Der Filter wird mit Wasser gespült.
» Wasser ießt in das Gefäß unter dem Cappuccinatore.
Information
Falls während dieses Vorgangs das Gerät anzeigt, dass der Wassertank
gefüllt werden muss, drehen Sie den Drehregler zunächst bis zum Anschlag
gegen den Uhrzeigersinn. Füllen Sie den Wassertank. Sobald Sie den gefüll-
ten Wassertank eingesetzt haben, drehen Sie den Drehregler wieder bis
zum Anschlag im Uhrzeigersinn.
11. Falls kein Wasser mehr in das Gefäß ießt und das Gerät nicht anzeigt,
dass der Wassertank gefüllt werden muss, drehen Sie den Drehregler bis
zum Anschlag gegen den Uhrzeigersinn.
12. Setzen Sie den Kaeesatzbehälter wieder in die Tropfschale ein.
» Der neue Filter ist eingesetzt und das Gerät betriebsbereit.

Störungen
46
DEUTSCH
Wasserlter wechseln
Der Wasserlter sollte nicht über einen längeren Zeitraum trockenstehen.
Wir empfehlen, den Wasserlter bei längerem Nichtgebrauch in einem
Gefäß mit Leitungswasser im Kühlschrank aufzubewahren.
Voraussetzung: Das Gerät ist betriebsbereit.
1. Entnehmen Sie den Wassertank.
2. Entfernen Sie den Wasserlter (siehe Abb. 19).
3. Setzen Sie einen neuen Wasserlter ein (siehe Kapitel Wasserlter einset-
zen auf Seite44).
Wasserlter dauerhaft abmelden
Wenn Sie einen eingesetzten Wasserlter entfernt haben und das Gerät
ohne Wasserlter weiterbetreiben wollen melden Sie den Wasserlter am
Gerät ab:
1. Entnehmen Sie den Wassertank.
2. Entfernen Sie den Wasserlter (siehe Abb. 19).
3. Füllen Sie den Wassertank.
4. Drücken Sie die Bedientaste „Service“ und zusätzlich die Bezugstaste
„große Tasse“ länger als 2Sekunden.
» Der Wasserlter ist abgemeldet.
» Die Wasserhärte ist auf den Härtegrad zurückgestellt, die das Gerät
vor dem Einsetzen eines Wasserlters gespeichert hatte.
5. Stellen Sie gegebenenfalls die Wasserhärte ein (siehe Kapitel 7.4 Was-
serhärte einstellen ). auf Seite31
9 Störungen
Wenn die unten genannten Maßnahmen die Störungen nicht beheben
oder andere, hier nicht aufgeführte Störungen auftreten, wenden Sie sich
an unsere Hotline (Ortstarif).
Deutschland: +49 (0)571/ 861 900
Österreich: +43 (0)810/ 100 500
Schweiz: +41 (0)62/ 388 98 48
Luxemburg: +32 (0)9/ 331 52 30

Störungen
47
DEUTSCH
Störung Ursache Maßnahme
Kaee läuft nur
tropfenweise aus dem
Auslauf.
Mahlgrad ist zu fein. Mahlgrad gröber einstel-
len (siehe Kapitel7.7 auf
Seite33).
Gerät ist verschmutzt. Brühgruppe reinigen (siehe
Kapitel8.2 auf Seite35).
Reinigungsprogramm durch-
führen (siehe Kapitel8.4 auf
Seite38).
Gerät ist verkalkt. Entkalkungsprogramm durch-
führen (siehe Kapitel8.5 auf
Seite40).
Kaee läuft nicht. Wassertank ist nicht
gefüllt oder nicht
richtig eingesetzt.
Wassertank füllen und auf
richtigen Sitz achten (siehe
Kapitel4.4 auf Seite19).
Brühgruppe ist ver-
stopft.
Brühgruppe reinigen (siehe
Kapitel8.2 auf Seite35).
Beim Aufschäumen
von Milch entsteht zu
wenig Milchschaum.
Wahlschalter ist
nicht in der richtigen
Position.
Wahlschalter in richtige Posi-
tion drehen (siehe Kapitel6.6
auf Seite27).
Cappuccinatore ist
verschmutzt.
Cappuccinatore reinigen (siehe
Kapitel8.3 auf Seite37).
Obwohl der Bohnenbe-
hälter gefüllt ist, zeigt
das Gerät an, dass Kaf-
feebohnen eingefüllt
werden müssen.
Kaeebohnen fallen
nicht ins Mahlwerk.
Eine Bezugstaste drücken.
Leicht an den Bohnenbehälter
klopfen.
Bohnenbehälter reinigen.
Kaeebohnen sind zu ölig.
Andere Kaeebohnen ver-
wenden.
Lautes Geräusch des
Mahlwerks.
Fremdkörper sind im
Mahlwerk.
Hotline kontaktieren.
Bei der My Bean Select®-
Funktion erlischt die
Anzeige, wenn der
Dosierlöel wieder
aufgelegt wird.
Im Bohnenschacht
benden sich weniger
als 8 g Kaeebohnen.
Kaeebohnen nachfül-
len (siehe Kapitel5.1 auf
Seite23).
Brühgruppe lässt sich
nach Entnahme nicht
einsetzen.
Gri für die Verriege-
lung der Brühgruppe
ist nicht in der richti-
gen Position.
Prüfen, ob der Gri für die
Verriegelung korrekt einge-
rastet ist (siehe Kapitel8.2 auf
Seite35).
Antrieb ist nicht in der
richtigen Position.
Bedientaste drücken und
gedrückt halten. Zusätzlich die
„Ein/Aus“-Taste drücken. Das
Gerät führt eine Initialisierung
durch. Tasten wieder loslassen.
Schnelles Wechselblin-
ken der Anzeigen:
Softwarestörung Gerät aus- und wieder ein-
schalten (siehe Kapitel4.1 auf
Seite16).
Hotline kontaktieren.

Transport, Lagerung und Entsorgung
49
DEUTSCH
5. Sobald kein Wasser und kein Dampf mehr entweichen, drehen Sie den
Drehregler bis zum Anschlag gegen den Uhrzeigersinn.
» Das Gerät ist ausgedampft und schaltet sich automatisch aus.
Information
Wenn Sie das Gerät erneut in Betrieb nehmen, wird nach dem Einschalten
eine automatische Spülung durchgeführt und das Gerät entlüftet (siehe
Kapitel3.5 auf Seite14).Gerät erstmalig einschalten und entlüften
10.2 Gerät transportieren
ACHTUNG
Gefrierendes Restwasser kann zu Schäden am Gerät führen.
Vermeiden Sie, dass das Gerät Temperaturen unter 0°C ausgesetzt wird.
Information
Transportieren Sie das Gerät in der Originalverpackung. Damit vermeiden
Sie Transportschäden.
Bevor Sie das Gerät transportieren, führen Sie folgende Tätigkeiten aus:
1. Dampfen Sie das Gerät aus (siehe Kapitel10.1 auf Gerät ausdampfen
Seite48).
2. Entleeren Sie die Tropfschale und den Kaeesatzbehälter.
3. Entleeren Sie den Wassertank.
4. Entleeren Sie den Bohnenbehälter.
5. Reinigen Sie das Gerät (siehe Kapitel8.1 auf Allgemeine Reinigung
Seite34).
6. Befestigen Sie lose Teile (Tassenblech usw.) mit geeignetem Klebe band.
7. Verpacken Sie das Gerät.
10.3 Gerät entsorgen
Die mit diesem Symbol gekennzeichneten Geräte unterliegen der Europä-
ischen Richtlinie 2002 / 96 / EG für WEEE (Waste Electrical and Electronic
Equipment).
Elektrogeräte gehören nicht in den Hausmüll.
Entsorgen Sie das Gerät umweltgerecht über geeignete Sammel-
systeme.

Technische Daten
51
DEUTSCH

Technische Daten
52
DEUTSCH

53
ENGLISH
Table of contents
Table of contents
1 For your safety ...................................................................................................................55
1.1 Symbols used ..........................................................................................................55
1.2 Proper use ................................................................................................................. 56
1.3 Danger from electric current .............................................................................56
1.4 Risk of burns and scalds.......................................................................................57
1.5 General safety..........................................................................................................57
2 Overview of the appliance ............................................................................................58
2.1 The appliances at a glance .................................................................................58
2.2 Overview of the control panel ..........................................................................60
2.3 Tthe Cappuccinatore at a glance .....................................................................62
3 First steps .............................................................................................................................63
3.1 Unpacking the appliance ....................................................................................63
3.2 Checking the delivery contents ........................................................................ 63
3.3 Installing the appliance .......................................................................................64
3.4 Connecting the appliance ..................................................................................64
3.5 Switching on and venting the appliance for the rst time ..................... 64
4 Basic operation ..................................................................................................................66
4.1 Switching the appliance on and o ................................................................66
4.2 Using the control panel .......................................................................................67
4.3 Filling coee beans into the bean container ...............................................67
4.4 Filling with water ....................................................................................................68
4.5 Adjusting the outlet for coee beverages .................................................... 70
4.6 Connecting the Cappuccinatore ...................................................................... 70
4.7 Using milk ................................................................................................................. 71
4.8 Emptying the drip tray and coee grounds container .............................72
5 Using the My Bean Select® function ......................................................................... 73
5.1 Filling coee beans for the My Bean Select® function..............................73
6 Preparing beverages ....................................................................................................... 75
6.1 Setting the coee strength ................................................................................75
6.2 Preparing coee beverages ..............................................................................76
6.3 Setting the coee quantity ................................................................................76
6.4 Preparing two coee beverages simultaneously ....................................... 77
6.5 Stopping coee preparation .............................................................................77
6.6 Preparing milk foam or warm milk .................................................................. 78
6.7 Preparing hot water ..............................................................................................79

54
ENGLISH
Table of contents
7 Changing basic settings .................................................................................................79
7.1 Calling up service mode ...................................................................................... 79
7.2 Setting the energy save programme .............................................................. 80
7.3 Setting Auto OFF ....................................................................................................81
7.4 Setting the water hardness ................................................................................81
7.5 Setting the brewing temperature ....................................................................82
7.6 Resetting the appliance to the factory settings..........................................83
7.7 Setting the grinding neness ............................................................................ 84
8 Care and maintenance ....................................................................................................85
8.1 General cleaning ....................................................................................................85
8.2 Cleaning the brewing unit ..................................................................................85
8.3 Cleaning the Cappuccinatore ............................................................................87
8.4 Running the cleaning programme ..................................................................88
8.5 Running the descaling programme ................................................................90
8.6 Using a water lter .................................................................................................94
9 Problems ...............................................................................................................................96
10 Transport, storage and disposal .................................................................................98
10.1 Venting the appliance .......................................................................................... 98
10.2 Transporting the appliance ................................................................................ 99
10.3 Disposing of the appliance .................................................................................99
11 Technical data ....................................................................................................................99

For your safety
55
ENGLISH
Dear Customer,
Thank you for purchasing the Caeo®Varianza® CS or Caeo® Passione® fully
automatic coee maker.
The operating instructions will help you discover the diverse options
oered by the appliance and enjoy your coee to the full.
Read through the operating instructions carefully. This helps avoid personal
injury and material damage. Store the operating instructions carefully. If
you pass on the appliance, include the operating instructions with it.
Melitta accepts no liability for damage caused by failure to observe the
operating instructions.
If you require further information or have any questions on the appliance,
contact Melitta or visit our website at:
www.melitta.de
We hope you enjoy using your appliance.
1 For your safety
The appliance conforms to the following European directives:
ū 2006 / 95 / EC (low voltage),
ū 2004 / 108 / EC (electromagnetic compatibility),
ū 2011 / 65 / EU (RoHS),
ū 2009 / 125 / EC (eco-design / ErP).
The appliance has been built using the latest technology. Nevertheless,
some residual dangers remain.
Observe the safety instructions to avoid dangers. Melitta accepts no liability
for damage caused by failure to observe the safety instructions.
1.1 Symbols used
The following symbols indicate particular risks in using the appliance or
provide useful tips.
CAUTION
The signal word CAUTION indicates possible injuries.

For your safety
56
ENGLISH
ATTENTION
The signal word ATTENTION indicates possible damage to the appliance.
Information
The signal word "Information" indicates additional notes and tips on using
the appliance.
1.2 Proper use
The appliance is used to prepare beverages made from
coee beans, and to heat milk and water.
The appliance is intended for use in private households.
Any other use is regarded as improper and may lead to
personal injury and material damage. Melitta accepts no
liability for damage that arises due to improper use of
the appliance.
1.3 Danger from electric current
If the appliance or the power cable is damaged, there is a
risk of fatal electric shock.
Observe the following safety instructions to avoid dan-
ger from electric current:
ū Do not use a damaged power cable.
ū A damaged power cable may only be replaced by the
manufacturer or its customer service or service part-
ner.
ū Do not open any covers rmly screwed onto the appli-
ance housing.
ū Only use the appliance when it is in a technically aw-
less condition.
ū A defective appliance may only be repaired by an
authorised workshop. Do not repair the appliance
yourself.
ū Do not make any changes to the appliance, its compo-
nents or its accessories.
ū Do not immerse the appliance in water.

For your safety
57
ENGLISH
1.4 Risk of burns and scalds
Escaping uids and steam may be very hot. Parts of the
appliance can also become very hot.
Observe the following safety instructions to avoid scalds
and burns:
ū Avoid escaping uids and steam coming into contact
with the skin.
ū When dispensing a beverage, do not touch the noz-
zles at the outlet or the steam pipe. Wait until the
components have cooled down.
1.5 General safety
Observe the following safety instructions to avoid per-
sonal injury and material damage:
ū Do not reach into the interior of the appliance during
operation.
ū Keep the appliance and its power cable out of the
reach of children under 8years of age.
ū This appliance may be used by children over 8 years of
age and by persons with reduced physical, sensory or
mental capabilities or a lack of experience and knowl-
edge if they are supervised or have been instructed in
using the appliance safely and understand the result-
ing risks.
ū Children must not play with the appliance. Cleaning
and maintenance must not be undertaken by children
younger than 8 years of age. Children over 8 years of
age must be supervised during cleaning and mainte-
nance.
ū Disconnect the appliance from the power supply
when left unsupervised for a long time.
Overview of the appliance
58
ENGLISH
2 Overview of the appliance
2.1 The appliances at a glance
1
23
4
5
6
7
8
9
10
Fig. 1: Caeo® Passione® and Caeo® Varianza® CS from front left
1 Water tank with lid 6 Drip tray
2 Bean container with lid 7 ON/OFF button
3 Cup rest 8 Height-adjustable outlet for
coee beverages with 2 coee noz-
zles
4 Control panel 9 "Grinding neness adjustment" lever
(inner)
5 Coee grounds container (inner) 10 Measuring spoon* for the
My Bean Select® function
*Only present in Caeo® Varianza® CS

Overview of the appliance
59
ENGLISH
12
13
14
11
15
16
Fig. 2: Caeo® Passione® and Caeo® Varianza® CS from front right
11 14 CappuccinatoreCover
12 Brewing unit (inner) 15 Cup plate
13 Steam pipe 16 Float

Overview of the appliance
60
ENGLISH
2.2 Overview of the control panel
191817
Fig. 3: Control panel
17 Direct keys
18 Displays
19 Control buttons and rotary regulator
Button/
Regulator
Designation Function
Small cup Prepare small portion of coee
Medium cup Prepare medium portion of coee
Large cup Prepare large portion of coee
Two cups Set two-cup dispensing
Service Call up service mode
Coee
strength
Setting the coee strength
Steam dispens-
ing
Appliance for steam dispensing heating
Rotary regula-
tor
Switching hot water or steam on and o

First steps
63
ENGLISH
3 First steps
This chapter describes how to prepare your appliance for use.
3.1 Unpacking the appliance
In addition to the appliance, there are further accessories in the packaging
such as cleaning aids and agents.
CAUTION
Contact with cleaning agents can lead to eye and skin irritation.
Keep the supplied cleaning agents out of the reach of children.
Unpack the appliance. Remove the packaging material, the adhesive
strips and the protective lms from the appliance.
Keep the packaging material for transport and possible return ship-
ments.
Information
The appliance may contain traces of coee and water. The appliance has
been tested in the factory to ensure that it functions perfectly.
3.2 Checking the delivery contents
Check the completeness of delivery using the following list. If parts are
missing, contact your retailer.
ū Cappuccinatore
ū Milk hose
ū Cleaning brush
ū Fully automatic coee makers cleaner
ū Milk system cleaning agent
ū Fully automatic coee makers descaling agent
ū Water lter
ū Screw-in aid for the water lter
ū Test strip for determining the water hardness.

First steps
64
ENGLISH
3.3 Installing the appliance
Observe the following instructions:
ū Do not install the appliance in damp rooms.
ū Install the appliance on a stable, at and dry surface.
ū Do not install the appliance in the vicinity of sinks or the like.
ū Do not install the appliance on hot surfaces.
ū Install the appliance at a sucient distance (approx. 10cm) from the
wall and other objects. The space above the appliance should be at least
20cm.
ū Route the power cable so it cannot be damaged by edges or hot sur-
faces.
3.4 Connecting the appliance
Observe the following instructions:
ū Make sure that the supply voltage matches the operating voltage speci-
ed in the technical data (see the Technical data on page99 table).
ū Only connect the appliance to a properly installed earthing contact
socket. If in doubt, consult a specialist electrician.
ū The earthing contact socket must have a fuse of at least 10 A.
3.5 Switching on and venting the appliance for the rst
time
Once you switch on the appliance for the rst time, the appliance performs
automatic rinsing. Hot water rst ows out of the Cappuccinatore, then out
of the outlet. The appliance is vented.
CAUTION
Hot water and hot steam owing out of the pipe
Do not touch the steam pipe during and immediately after use.
Wait until the steam pipe has cooled down.
Information
ū We recommend pouring away the rst two cups of coee after initial
start-up.
ū If you want to use a water lter, only insert this after starting up for the
rst time.

First steps
65
ENGLISH
7
Fig. 5: ON/OFF button
Requirement: The appliance has been installed and connected.
1. Place a vessel beneath the Cappuccinatore.
2. Press the ON/OFF button .(7)
» The appliance indicates that the water tank needs to be lled.
3. Remove the water tank. Rinse out the water tank with clean water. Fill
the water tank with fresh water and insert it.
» The appliance indicates that the steam dispensing is ready.
4. Turn the rotary regulator on the control panel clockwise up to the stop.
» Hot water ows out of the Cappuccinatore.
5. When water no longer ows out of the Cappuccinatore, turn the rotary
regulator anti-clockwise to the stop.
» Hot water ows out of the outlet.
» The appliance is vented.
6. Fill coee beans into the bean container (see section4.3 Filling coee
beans into the bean container ) on page67 .
7. As required, you can now either
a) set the water hardness (see section7 on Changing basic settings
page79) or
b) use a water lter (see section 8.6 on page94).Using a water lter

Basic operation
66
ENGLISH
4 Basic operation
This chapter describes basic operating steps for using the appliance on a
daily basis.
4.1 Switching the appliance on and o
Before switching on after starting up the appliance for the rst time, read
chapter 3.5 Switching on and venting the appliance for the rst time on
page64.
Information
ū When switched on and o, the appliance performs automatic rinsing.
ū During rinsing, rinsing water is also conducted into the drip tray.
Switching on the appliance
1. Place a vessel beneath the outlet.
2. Press the ON/OFF button .(7)
3. The appliance heats up and performs automatic rinsing.
» The appliance indicates the last set coee strength.
Information
If the appliance was only switched o briey, there is no automatic rinsing
after switching on.
Switching o the appliance
1. Place a vessel beneath the outlet.
2. Press the ON/OFF button .(7)
» The appliance performs automatic rinsing.
» The appliance switches o.
Information
ū The appliance switches o automatically when it is not operated for a
long time. Automatic rinsing is also carried out in this case.
ū The o time can be set in the service mode (see section7.3 Setting Auto
OFF on page81).
ū If no beverage has been prepared since switching on or if the water tank
is empty, no rinsing takes place.

Basic operation
67
ENGLISH
4.2 Using the control panel
The essential programmes can be accessed using the control panel.
Press the required button. Use the following actions to operate the buttons:
Brief press
Briey press a button to select a programme.
2s Long press
Press a button for longer than 2 seconds to select a second
programme that may be available.
4.3 Filling coee beans into the bean container
Roasted coee beans lose their aroma. Only ll the bean container with as
many coee beans as you will consume over the next 3 to 4days.
AT TENTION
The use of unsuitable types of coee can lead to clogging of the grinder.
Do not use freeze-dried or caramelised coee beans.
Do not use any coee powder or instant products.
Information
Depending on the model, when changing the type of beans, remains of the
old type of beans can still be in the grinder.
Caeo® Passione®:
Even if the supply tank runs empty and is then lled with a new type of
bean, there are always remaining quantities of the old type of bean in
the grinder. For this reason, the rst two coees dispensed can contain
remains of the old type of bean.
Caeo® Varianza® CS:
In order that the coee beans are not mixed when changing the type
of bean (or when using the MyBeanSelect® function), the grinder is
emptied after each grinding process. Nevertheless, minimal coee type
mixing may occur. Grinding when empty causes a dierent type of noise
and is normal.

Basic operation
68
ENGLISH
26
2
Fig. 6: Open the lid of the bean container (Caeo® Varianza® CS)
1. Open the lid of the bean container . (26) (2)
2. Fill coee beans into the bean container.
3. Close the lid of the bean container.
Information
The ashing display requests you to rell coee beans. The next time a cof-
fee is dispensed, the display no longer ashes.
4.4 Filling with water
Only use fresh, cold water without carbon dioxide for optimum coee
enjoyment. Change the water daily.
Information
The quality of the water largely determines the avour of the coee.
Therefore, use a water lter (see chapter 7.4 on Setting the water hardness
page81 and chapter 8.6 Using a water lter on page94).

Basic operation
69
ENGLISH
1
27
Fig. 7: Water tank (Caeo® Varianza® CS)
1. Open the lid of the water tank and pull the water tank upwards (27) (1)
out of the appliance by the handle.
2. Fill the water tank with water.
3. Insert the water tank into the appliance from above and close the lid.

Basic operation
70
ENGLISH
4.5 Adjusting the outlet for coee beverages
The outlet for coee beverages is height-adjustable. Set the greatest (8)
possible distance between the outlet and the vessel. Depending on the ves-
sel, push the outlet up or down.
8
Fig. 8: Setting the outlet for coee beverages (Caeo® Varianza® CS)
4.6 Connecting the Cappuccinatore
You can prepare hot water, warm milk or milk foam with the Cappuc-
cinatore. Use the selector switch of the Cappuccinatore to select the (25)
desired beverage.
13
21
23
25
28
Fig. 9: Connecting the Cappuccinatore

Basic operation
71
ENGLISH
1. Connect the Cappuccinatoreto the steam pipe Slide the connec-(13).
tion of the Cappuccinatore to the stop of the steam pipe.(28)
2. Connect the milk hose to the Cappuccinatore.(23)
3. If you do not want to use milk, clamp the milk hose in the holder .(21)
4.7 Using milk
Use cooled milk for optimum coee enjoyment.
29
23
Fig. 10: Conventional milk pack (Caeo® Varianza® CS)
1. Remove the milk hose from the holder .(23) (21)
2. Insert the milk hose into a conventional milk pack or into a vessel (29)
lled with milk.

Basic operation
72
ENGLISH
4.8 Emptying the drip tray and coee grounds container
After several beverage dispensing processes, the drip tray and the coee (6)
grounds container can become full and must be emptied. The projecting (5)
oat indicates the current lling level of the drip tray.(16)
After a specied number of beverage have been dispensed, the appliance
also shows that the drip tray and coee grounds container are full.
Always empty the drip tray and coee grounds container.
5
16 6
Fig. 11: Emptying the drip tray and coee grounds container (Caeo® Vari-
anza® CS)
1. Pull the drip tray forwards out of the appliance.(6)
2. Remove the coee grounds container and empty it.(5)
3. Empty the drip tray.
4. Insert the coee grounds container.
5. Push the drip tray into the appliance up to the stop.
Information
If you empty the drip tray and the coee grounds container while the appli-
ance is switched o, the appliance does not register this process. Therefore,
it is possible that you are requested to empty the containers although the
drip tray and the coee grounds container are not yet full.

Using the My Bean Select® function
73
ENGLISH
5 Using the My Bean Select® function
The function for preparing single portions is only present in the
Caeo®Varianza® CS.
With the My Bean Select® function, a single coee beverage can be
prepared from a dierent type of coee. Separately ll a single portion of
coee beans to prepare the coee.
While the bean container is full with lightly roasted coee beans, for exam-
ple, the My Bean Select® function can be used to prepare a coee beverage
from a single portion of darkly roasted coee beans.
5.1 Filling coee beans for the My Bean Select® function
ATTENTION
The use of unsuitable types of coee can lead to clogging of the grinder.
Do not use freeze-dried or caramelised coee beans.
Do not use any coee powder or instant products.
Information
Depending on the model, when changing the type of beans, remains of the
old type of beans can still be in the grinder.
Caeo® Varianza® CS:
So that the coee beans are not mixed when changing the type of bean
(or when using the MyBeanSelect® function), the grinder is emptied
after each grinding process. Nevertheless, minimal coee type mixing
may occur. Grinding when empty causes a dierent type of noise and is
normal.

Using the My Bean Select® function
74
ENGLISH
10
30
Fig. 12: Removing the measuring spoon (Caeo® Varianza® CS)
Requirement: The appliance is ready for operation.
1. Remove the measuring spoon from the bean chute . (10) (30)
» The ashing display requests you to ll the bean chute.
2. Use the measuring spoon to ll a single portion of coee beans into the
bean chute .(30)
3. Place the measuring spoon back onto the bean chute.
» The lighting display indicates that the My Bean Select® function is
ready.
4. Prepare any coee beverage.
Information
The measuring spoon is intended to help in lling the correct amount of
coee beans into the bean chute.
ū A full measuring spoon contains approx. 10 to 11 g of coee beans.
Depending on the desired coee strength, fewer coee beans can also
be lled.
ū If there are less than approx. 8g coee beans in the bean chute, the
My Bean Select® function is not activated. As soon as you hang up the
measuring spoon again, the display goes out. The next time a coee is
dispensed, the coee beans from the bean chute are mixed with the cof-
fee beans from the bean container.

Preparing beverages
75
ENGLISH
6 Preparing beverages
There are two options for preparing beverages:
ū Preparing coee beverages at the outlet for coee beverages or
ū preparing hot water, warm milk and milk foam on the Cappuccinatore.
Note:
ū There should always be sucient water in the water tank. If the lling
level is too low, the appliance requests you to rell it.
ū There should always also be sucient coee beans in the bean con-
tainer. If there are no longer any coee beans present, the appliance
stops the preparation of a coee beverage.
ū The appliance does not indicate a lack of milk.
ū The vessels for the beverages should be suciently large (see table Fac-
tory settings on page100).
6.1 Setting the coee strength
As soon as the appliance is ready for operation, it displays the current set-
ting of the coee strength. The following settings for the coee strength are
possible:
Display Coee strength
Very mild (without pre-brewing)
Mild
Normal
Strong
Very strong
Requirement: The appliance is ready for operation.
1. Press the "Coee strength" button several times to set the desired coee
strength.
» The appliance indicates the selected coee strength.
Information
When switching o the appliance, the last set coee strength is stored.

Preparing beverages
76
ENGLISH
6.2 Preparing coee beverages
Requirement: The appliance is ready for operation.
1. Place a vessel beneath the outlet.
2. Press the "Small cup", "Medium cup" or "Large cup" direct key.
» The grinding process and beverage dispensing start.
» Beverage dispensing ends automatically.
3. Remove the vessel.
6.3 Setting the coee quantity
The coee quantity can be specied by selecting a direct key.
Direct key Coee quantity (factory setting)
40 ml
120 ml
200 ml
The preset coee quantity can be changed from 25ml to220ml:
Requirement: The appliance is ready for operation.
1. Press the desired direct key for longer than 2 seconds.
» The quickly ashing display indicates that the programme for setting
the coee quantity is running.
» The grinding process and beverage preparation start.
2. Press the selected direct key again as soon as the desired coee quantity
is reached.
» Beverage dispensing stops.
» The appliance saves the new coee quantity.
» The appliance is ready for operation.
Information
The coee quantity can be reset to the factory settings (see section7.6
Resetting the appliance to the factory settings on page83).

Preparing beverages
77
ENGLISH
6.4 Preparing two coee beverages simultaneously
The "Two cups" button is used to prepare two coee beverages simultane-
ously.
31
8
Fig. 13: Two-cup dispensing (Caeo® Varianza® CS)
1. Place two vessels beneath the outlet . (8)
2. Press the "Two cups" button . (31)
3. Press the "Small cup", "Medium cup" or "Large cup" direct key.
» The grinding process and beverage dispensing start.
» Beverage dispensing ends automatically.
4. Remove both vessels.
Information
ū The setting only applies to the single beverage that is prepared.
ū If a coee beverage is not prepared within 1 minute, the appliance
switches to single-cup dispensing.
6.5 Stopping coee preparation
To stop coee beverage preparation prematurely, press the selected direct
key again.

Preparing beverages
78
ENGLISH
6.6 Preparing milk foam or warm milk
Prepare milk foam and warm milk on the Cappuccinatore.
The preparation of milk foam and warm milk is similar. Steam is required for
the preparation.
CAUTION
Hot water and hot steam owing out of the pipe
Do not reach into the steam that is owing out.
Do not touch the steam pipe during and immediately after use. Wait
until the steam pipe has cooled down.
Requirement: The appliance is ready for operation. The Cappuccinatore is
connected to the appliance and milk is connected.
1. Place a vessel beneath the Cappuccinatore.
2. Press the "Steam dispensing" button.
» The ashing display indicates that the appliance is heating up for
steam dispensing.
» The lit-up display than indicates that steam dispensing is ready.
3. Turn the selector switch of the Cappuccinatore until the desired setting
for milk foam or warm milk points upwards.
4. Turn the rotary regulator on the control panel clockwise up to the stop.
» Beverage dispensing starts.
5. Turn the rotary regulator anti-clockwise up to the stop.
» Beverage dispensing stops.
6. Remove the vessel.
7. Prepare further beverages or rinse the Cappuccinatore:
a) Prepare further beverages and rinse the Cappuccinatore later.
b) Rinse the Cappuccinatore as described below.
Rinsing the Cappuccinatore
1. Fill a vessel with clear water.
2. Immerse the milk hose in the lled vessel.
3. Place an empty vessel beneath the Cappuccinatore.
4. Turn the selector switch of the Cappuccinatore until the setting for milk
foam points upwards.
5. Turn the rotary regulator clockwise up to the stop.
6. Turn the rotary regulator anti-clockwise up to the stop as soon as a clean
water/steam mixture ows into the empty vessel.
» The Cappuccinatore is rinsed.

Changing basic settings
79
ENGLISH
Information
We recommend not only rinsing the Cappuccinatore, but dismantling and
cleaning it at regular intervals (see section8.3 Cleaning the Cappuccinatore
on page87).
6.7 Preparing hot water
Prepare hot water on the Cappuccinatore.
CAUTION
Hot water and hot steam owing out of the pipe
Do not touch the steam pipe during and immediately after use.
Wait until the steam pipe has cooled down.
Requirement: The appliance is ready for operation. The Cappuccinatore is
connected.
1. Place a vessel beneath the Cappuccinatore.
2. Turn the selector switch of the Cappuccinatore until the setting for hot
water points upwards.
3. Turn the rotary regulator clockwise.
» Beverage dispensing starts.
4. Turn the rotary regulator anti-clockwise up to the stop.
» Beverage dispensing stops.
5. Remove the vessel.
7 Changing basic settings
The following chapter describes how to change the appliance's basic set-
tings.
7.1 Calling up service mode
Some of the basic settings can only be changed in the service mode of the
appliance.
Requirement: The appliance is ready for operation.
1. Press the "Service" button for longer than 2 seconds to call up the service
mode.
» The appliance indicates that it is in one of the service modes described
below.

Changing basic settings
81
ENGLISH
3. Call up the next basic setting in the service mode or exit the service
mode:
a) Briey press the "Service" button to navigate to the next basic setting.
b) Press the "Service" button for longer than 2 seconds to exit the ser-
vice mode.
» The new time for switching on the energy save mode is stored.
7.3 Setting Auto OFF
If the adjacent display lights up in service mode, the Auto OFF can be set.
If the appliance is not operated for a long time, it switches o automatically
after a specied time. The following times can be set:
Display Time
9 min
30 min
60 min
240 min
480 min
Requirement: The service mode is called up.
1. Press the "Service" button repeatedly until the display for the Auto OFF
service mode appears.
2. Press the "Coee strength" button repeatedly until the desired time is
set.
3. Call up the next basic setting in the service mode or exit the service
mode:
a) Briey press the "Service" button to navigate to the next basic setting.
b) Press the "Service" button for longer than 2 seconds to exit the ser-
vice mode.
» The new time for Auto OFF is stored.
7.4 Setting the water hardness
If the adjacent display lights up in the service mode, the water hardness can
be set.
Setting the water hardness regulates how frequently you are requested to
descale the appliance. The harder the water, the more frequently the appli-
ance has to be descaled.

Changing basic settings
82
ENGLISH
Information
The water hardness cannot be set if you use a water lter (see section8.6
Using a water lter on page94). If a water lter is used, the water hardness
is set to soft.
Determine the water hardness with the enclosed test strip. Observe the
instructions on the test strip packaging and in Table Water hardness on
page82.
Setting of the following water hardnesses is possible:
Display Water hardness
Soft, descaling after 150 litres
Medium, descaling after 100 litres
Hard, descaling after 60 litres
Very hard, descaling after 35 litres
Requirement: The service mode is called up.
1. Press the "Service" button repeatedly until the display for the water
hardness service mode appears.
2. Press the "Coee strength" button repeatedly until the desired water
hardness is set.
3. Call up the next basic setting in the service mode or exit the service
mode:
a) Briey press the "Service" button to navigate to the next basic setting.
b) Press the "Service" button for longer than 2 seconds to exit the ser-
vice mode.
» The new setting for the water hardness is stored.
7.5 Setting the brewing temperature
If the adjacent display lights up in the service mode, the brewing tempera-
ture can be set.
The brewing temperature inuences the avour of the coee beverage. The
brewing temperature can be set to your requirements as follows:
Display Brewing temperature
Low
Medium
High

Changing basic settings
83
ENGLISH
Requirement: The service mode is called up.
1. Press the "Service" button repeatedly until the display for the brewing
temperature service mode appears.
2. Press the "Coee strength" button repeatedly until the desired brewing
temperature is set.
3. Call up the next basic setting in the service mode or exit the service
mode:
a) Briey press the "Service" button to navigate to the next basic setting.
b) Press the "Service" button for longer than 2 seconds to exit the ser-
vice mode.
» The new brewing temperature is stored.
7.6 Resetting the appliance to the factory settings
The appliance can be reset to the factory settings.
Information
If the appliance is reset to the factory settings, all personal basic set-
tings in service mode are lost (see section 7.1 on Calling up service mode
page79).
Requirement: The appliance is ready for operation.
1. Press the "Service" button and also the "Medium cup" direct key.
» The ashing display indicates that the function has been activated.
» The appliance is reset to the factory settings (see Table Factory settings
on page100).

Changing basic settings
84
ENGLISH
7.7 Setting the grinding neness
The grinding neness of the coee powder inuences the avour of the
coee. The grinding neness has been optimally set prior to delivery. We
recommend adjusting the grinding neness after around 1, 000 beverages
have been dispensed (after around 1 year) at the earliest.
9
Fig. 14: Lever for setting the grinding neness (Caeo® Varianza® CS)
1. Remove the water tank.
» The "Grinding neness adjustment" lever is visible on the housing.(9)
2. Move the lever to the left or right, as shown on Fig. 14.
ū To the left = grinding neness ner
ū To the right = grinding neness coarser
3. Insert the water tank again.
Information
ū If the grinding neness is set ner, the coee avour is stronger.
ū The grinding neness is optimally set when the coee ows evenly out
of the outlet and a ne, dense crema appears.

Care and maintenance
85
ENGLISH
8 Care and maintenance
Regular care and maintenance of the appliance ensure the consistent high
quality of your beverages.
8.1 General cleaning
Clean the appliance regularly. Immediately remove external soiling caused
by milk and coee.
ATTENTION
The use of unsuitable cleaning agents may lead to scratched surfaces.
Do not use any abrasive cloths, sponges or cleaning agents.
Requirement: The appliance is switched o.
Clean the outside of the appliance with a soft, damp cloth and normal
washing-up liquid.
Rinse o the drip tray and the coee grounds container. Use a soft, damp
cloth and normal washing up liquid for this.
Clean the bean container with a soft, dry cloth.
The coee grounds container and the cup plate can be washed (5) (15)
in a dishwasher.
8.2 Cleaning the brewing unit
To avoid damage to the appliance, we recommend cleaning the brewing
unit once a week.
In the course of the cleaning operations, the coee residues behind the
cover on the appliance surfaces can be removed with a soft, dry cloth.
CAUTION
Electric shock when cleaning the open appliance
Switch o the appliance before cleaning the appliance surfaces behind
the cover.

Care and maintenance
87
ENGLISH
8.3 Cleaning the Cappuccinatore
In addition, we recommend cleaning the Cappuccinatore and the milk hose
regularly.
13
20
24
23
Fig. 17: Dismantling the Cappuccinatore
Proceed as follows to dismantle the Cappuccinatore:
1. Detach the Cappuccinatore from the steam pipe .(13)
2. Detach the following individual parts from the Cappuccinatore:
ū Milk hose(23)
ū Air suction pipe(20)
ū Outlet(24)
3. Clean the Cappuccinatore and the individual parts with warm water. Use
the enclosed cleaning brush, a soft, damp cloth and normal washing up
liquid.
4. Re-assemble the Cappuccinatore.
5. Connect the Cappuccinatore to the appliance (see section 4.6 Connect-
ing the Cappuccinatore on page70).

Care and maintenance
88
ENGLISH
8.4 Running the cleaning programme
This cleaning programme is used to remove residues and coee oil residues
with the aid of fully automatic coee maker cleaning agents.
To avoid damage to the appliance, we recommend running the cleaning
programme every 2 months or as requested by the appliance.
The cleaning programme takes approximately 3 minutes and should not be
interrupted.
CAUTION
Contact with fully automatic coee maker cleaning agent may lead to
eye and skin irritation.
Observe the processing instructions on the packaging of the fully auto-
matic coee maker cleaning agent.
ATTENTION
The use of unsuitable fully automatic coee maker cleaning agent can
damage the appliance.
Only use the Melitta® PERFECT CLEAN Espresso Machines cleaning
tablets.
Requirement: The appliance is ready for operation. The water tank is full.
Buttons Displays Steps
1. Press the "Service" bu also the tton and
"Coffee strength" button for longer
than 2 seconds.
» The appliance indicates that:
ū the cleaning programme is
running
ū the rst programme stage is
reached
ū the drip tray and the coee
grounds container must be
emptied.
2. Empty the drip tray and the coee
grounds container (see section 4.8
Emptying the drip tray and coee
grounds container on page72).

Care and maintenance
89
ENGLISH
Buttons Displays Steps
3. Insert the drip tray and the coee
grounds container.
» The appliance indicates that the
second program stage is reached.
» The appliance rinses twice.
» The ashing display requests you
to remove the brewing unit and
insert a cleaning tablet.
Fig. 18: Placing a cleaning tablet in the brewing unit.
Buttons Displays Steps
4. Remove the brewing unit and clean
it as described in section8.2 Cleaning
the brewing unit on page85. Do not
switch o the appliance.
5. Place a cleaning table in the brewing
unit (see Fig. 18). Insert the brewing
unit into the appliance as described in
section8.2 Cleaning the brewing unit
on page85.
» The appliance indicates that the
third programme stage is reached.
» The cleaning process starts.

Care and maintenance
90
ENGLISH
Buttons Displays Steps
» After several minutes, the appli-
ance indicates that:
ū the fourth programme stage is
reached
ū the drip tray and the coee
grounds container must be
emptied.
6. Empty the drip tray and the coee
grounds container.
7. Insert the drip tray and the coee
grounds container.
» The appliance indicates that the
last program stage is reached.
» The cleaning process is continued.
» The appliance then indicates
that the drip tray and the cof-
fee grounds container must be
emptied.
8. Empty the drip tray and the coee
grounds container.
» The appliance is ready for operation.
8.5 Running the descaling programme
The descaling programme is used to remove limescale deposits in the inte-
rior of the appliance with fully automatic coee maker descaling agents.
To avoid damage to the appliance, we recommend running the "Descaling"
programme every 3 months or as requested by the appliance.
The descaling programme takes approximately 25 minutes and should not
be interrupted.
CAUTION
Contact with fully automatic coee maker descaling agent may lead to
eye and skin irritation.
Observe the processing instructions on the packaging of the fully auto-
matic coee maker descaling agent.

Care and maintenance
91
ENGLISH
CAUTION
Hot water and hot steam owing out of the pipe
Do not touch the steam pipe during and immediately after use.
Wait until the steam pipe has cooled down.
ATTENTION
Use of unsuitable descaling agent may damage the appliance.
Only use the Melitta® ANTI CALC Espresso Machines liquid descaling
agent.
ATTENTION
A water lter may be damaged if it is screwed in during the descaling
programme.
Remove the water lter when the appliance requests you to do so.
Place the water lter into a vessel lled with tap water during the descal-
ing programme.
The water lter can be reinserted and reused on completion of the des-
caling programme.
Requirement: The appliance is ready for operation. 0.5 litres of descaling
solution has been prepared and is ready for use.
Symbol on the
selector switch
or buttons
Displays Steps
1. Press the "Service" bu also the tton and
"Steam dispensing" button for longer
than 2seconds.
» The appliance indicates that:
ū the descaling program is run-
ning
ū the rst programme stage is
reached
ū the drip tray and the coee
grounds container must be
emptied.
2. Empty the drip tray and the coee
grounds container (see section 4.8
Emptying the drip tray and coee
grounds container on page72).

Care and maintenance
92
ENGLISH
Symbol on the
selector switch
or buttons
Displays Steps
3. Turn the selector switch until the set-
ting for hot water points upward.
4. Insert the drip tray without the coee
grounds container.
» The appliance indicates that:
ū the second programme stage is
reached
ū the water tank must be lled.
ū Descaling uid must be lled
into the water tank.
5. Place the coee grounds container
beneath the Cappuccinatore.
6. Open the lid of the water tank and
pull the water tank upwards out of the
appliance by the handle.
7. Fill 0.5 litres of descaling uid into the
water tank. Observe the correspond-
ing instructions for use of the fully
automatic coee maker descaling
agent.
8. Insert the water tank again.
» The descaling process starts.
» After several minutes, the appli-
ance indicates that:
ū the third programme stage is
reached
ū the steam dispensing is ready.
9. Turn the rotary regulator clockwise up
to the stop.
» The descaling process is continued.
» After several minutes, the appli-
ance indicates that the drip tray
and the coee grounds container
must be emptied.
10. Empty the drip tray and the coee
grounds container.

Care and maintenance
93
ENGLISH
Symbol on the
selector switch
or buttons
Displays Steps
11. Insert the drip tray without the coee
grounds container.
» The appliance indicates that:
ū the fourth programme stage is
reached
ū the water tank must be lled.
12. Place the coee grounds container
beneath the Cappuccinatore.
13. Open the lid of the water tank and
pull the water tank upwards out of the
appliance by the handle.
14. Empty and clean the water tank.
15. Fill the water tank with fresh water
and re-insert it.
» Hot water ows into the coee
grounds container.
16. As soon as hot water no longer ows,
turn the rotary regulator anti-clock-
wise to the stop.
» The appliance indicates that the
last program stage is reached.
» Hot water ows into the drip tray.
» After several minutes, the appli-
ance indicates that the drip tray
and the coee grounds container
must be emptied.
17. Empty the drip tray and the coee
grounds container.
18. Insert the drip tray and the coee
grounds container.
» The appliance is ready for operation.

Care and maintenance
94
ENGLISH
8.6 Using a water lter
The use of a water lter extends the service life of the appliance and the
appliance has to be descaled less frequently. The water lter contained in
the scope of delivery lters calcium and other pollutants out of the water.
1
34
35
36
Fig. 19: Screwing/Unscrewing the water lter
The water lter is screwed in and unscrewed from the thread on (35) (36)
the base of the water tank using the screwing aid .(1) (34)
Inserting the water lter
Information
The water hardness cannot be set if you use a water lter. The water hard-
ness is automatically set to soft (see section7.4 Setting the water hardness
on page81).

Care and maintenance
95
ENGLISH
Requirement: The appliance is ready for operation. The new water lter is
at hand.
1. Press the "Service" button and also the "Two cups" button for longer
than 2 seconds.
» The appliance indicates that:
ū the lter programme is running
ū the drip tray and the coee grounds container must be emptied.
2. Empty the drip tray and the coee grounds container.
3. Insert the drip tray without the coee grounds container.
» The appliance indicates that the water tank needs to be lled.
4. Place the coee grounds container beneath the Cappuccinatore.
5. Open the lid of the water tank and pull the water tank upwards out of
the appliance by the handle.
6. Empty the water tank.
7. Insert a new lter in the water tank (see Fig. 19 .)
8. Fill the water tank.
9. Insert the water tank again.
» The appliance indicates that the steam dispensing is ready.
10. Turn the rotary regulator clockwise up to the stop.
» The lter is rinsed with water.
» Water ows into the vessel beneath the Cappuccinatore.
Information
If the appliance indicates that the water tank must be lled during this pro-
cess, rst turn the rotary regulator anticlockwise to the stop. Fill the water
tank. As soon as you have inserted the lled water tank, turn the rotary
regulator clockwise back to the stop.
11. If water no longer ows into the vessel and the appliance does not
indicate that the water tank must be lled, turn the rotary regulator anti-
clockwise to the stop.
12. Insert the coee grounds container in the drip tray again.
» The new lter is inserted and the appliance is ready for operation.
Changing the water lter
The water lter should not be left standing dry for a long period of time.
When it is not used for a long time, we recommend storing the water lter
in a vessel lled with tap water in the refrigerator.

Problems
96
ENGLISH
Requirement: The appliance is ready for operation.
1. Remove the water tank.
2. Remove the water lter (see Fig. 19).
3. Insert a new water lter (see section on Inserting the water lter
page94).
Permanently de-registering the water lter
If you have removed an inserted water lter and want to continue operat-
ing the appliance without a water lter, de-register the water lter from the
appliance:
1. Remove the water tank.
2. Remove the water lter (see Fig. 19).
3. Fill the water tank.
4. Press the "Service" button and also the "Large cup" direct key for longer
than 2 seconds.
» The water lter is de-registered.
» The water hardness is reset to the water hardness that the appliance
had stored prior to inserting a water lter.
5. Adjust the water hardness if necessary (see section 7.4 Setting the water
hardness ). on page81
9 Problems
If the actions listed below fail to rectify the problems or other problems not
listed here occur, contact our hotline (local rate).
Germany: +49 571/ 861 900
Austria: +43 810/ 100 500
Switzerland: +41 62/ 388 98 48
Luxemburg: +32 9/ 331 52 30
Problem Cause Action
Coee only emerges as
drips from the outlet. Grinding neness is
too ne. Set a coarser grinding ne-
ness (see section 7.7 one
page84).
Appliance is soiled. Clean the brewing unit (see
section 8.2 one page85).
Run the cleaning pro-
gramme (see section 8.4 one
page88).
Appliance is covered
inside with limescale. Run the descaling pro-
gram (see section8.5 one
page90).

Problems
97
ENGLISH
Problem Cause Action
Coee does not ow. Water tank is not lled
or is not correctly
inserted.
Fill the water tank and ensure
it is positioned correctly (see
chapter 4.4 one page68).
Brewing unit is
clogged. Clean the brewing unit (see
chapter 8.2 one page85).
When foaming milk,
there is not enough
milk foam.
Selector switch is not in
the correct position. Turn the selector switch to
the correct position (see sec-
tion6.6 one page78).
Cappuccinatore is
soiled. Clean the Cappuccinatore (see
section8.3 one page87).
Although the bean
container is full, the
appliance indicates
that coee beans must
be lled.
Coee beans do not
drop into the grinder. Press a direct key.
Tap lightly on the bean con-
tainer.
Clean the bean container.
Coee beans are too oily. Use
dierent coee beans.
Loud grinder noise. Foreign objects in the
grinder. Contact the hotline.
With the My Bean
Select® function, the
display goes o when
the measuring spoon is
put back on.
There are less than 8 g
of coee beans in the
bean chute.
Top up coee beans (see sec-
tion5.1 one page73).
Brewing unit cannot be
inserted after remov-
ing.
Handle for the locking
mechanism of the
brewing unit is not in
the correct position.
Check that the handle for the
locking mechanism is correctly
engaged (see section8.2 one
page85).
Drive is not in the cor-
rect position. Press and hold button. Also
press the ON/OFF button. The
appliance initialises. Release
buttons again.
Rapid alternate ash-
ing of the displays:
Software problem. Switch the appliance o and
on again (see chapter 4.1 one
page66).
Contact the hotline.
Rapid alternate ash-
ing of the displays:
Brewing unit is not
inserted. Insert brewing unit.
The display lights up
without having been
activated:
Appliance is not fully
vented. Vent the appliance, turn the
rotary regulator clockwise to
the stop for this. As soon as
water ows out of the Cap-
puccinatore, turn the rotary
regulator anti-clockwise to
the stop.
Clean the brewing unit (see
section 8.2 one page85).

Transport, storage and disposal
98
ENGLISH
10 Transport, storage and disposal
10.1 Venting the appliance
We recommend venting the appliance when it is not used for a long period,
prior to transport and when there is a risk of frost.
During venting, residual water is removed from the appliance.
CAUTION
Hot water and hot steam owing out of the pipe
Do not reach into the steam that is owing out.
Do not touch the steam pipe during and immediately after use. Wait
until the steam pipe has cooled down.
Requirement: The appliance is ready for operation.
1. Place a vessel beneath the Cappuccinatore.
2. Press the "Service" button and also the "Small cup" direct key for longer
than 2 seconds.
» The display ashes for the duration of the venting.
» The lighting display indicates that the water tank must be removed.
3. Remove the water tank.
» The lighted display indicates that the rotary regulator must be actu-
ated.
4. Turn the rotary regulator clockwise up to the stop.
» Water and steam escape from the Cappuccinatore.
» The display ashes.
5. As soon as water and steam no longer escape, turn the rotary regulator
anti-clockwise to the stop.
» The appliance is vented and switches o automatically.
Information
If you put the appliance back into operation, automatic rinsing is carried
out after switching on and the appliance vented (see section3.5 Switching
on and venting the appliance for the rst time on page64).

Technical data
99
ENGLISH
10.2 Transporting the appliance
ATTENTION
Freezing residual water can damage the appliance.
Prevent the appliance from being exposed to temperatures below 0°C.
Information
Transport the appliance in the original packaging. This avoids damage in
transit.
Before transporting the appliance, carry out the following activities:
1. Vent the appliance (see chapter 10.1 Venting the appliance on
page98).
2. Empty the drip tray and the coee grounds container.
3. Empty the water tank.
4. Empty the bean container.
5. Clean the appliance (see chapter 8.1 on page85).General cleaning
6. Secure loose parts (cup plate, etc.) with suitable adhesive tape.
7. Package the appliance.
10.3 Disposing of the appliance
Appliances marked with this symbol are subject to European Directive
2002 / 96 / EC for WEEE (Waste Electrical and Electronic Equipment).
Electrical appliances do not belong in domestic waste.
Dispose of the appliance in an environmentally friendly manner via suit-
able collection systems.
11 Technical data
Technical data
Operating voltage 220 V to 240 V, 50 Hz
Power consumption Maximum 1450 W
Pump pressure Static, max. 15 bar
Dimensions
Width
Depth
Height
– Caeo® Varianza® CS
– Caeo® Passione®
253 mm
380 mm
405 mm
390 mm

Technical data
100
ENGLISH
Technical data
Capacity
Bean container
Measuring spoon
Water tank
125 g
10 g to 11 g (depending on coee type)
1.2 l
Capacity limits per dispens-
ing process
Continuous steam dis-
pensing
Dispensing hot water
180 s
440 ml
Weight (empty)
– Caeo® Varianza® CS
– Caeo® Passione®
11.2 kg
11,0 kg
Ambient conditions
Temperature
Relative humidity
10 °C to 32 °C
30 % to 80 % (non-condensing)
Water hardness range °d °e °f
Soft 0 to 10 0 to 13 0 to 18
Medium 10 to 15 13 to 19 18 to 27
Hard 15 to 20 19 to 25 27 to 36
Very hard <20 >25 >36
Factory settings
Small cup 40 mlBeverage amount
Coee strength Normal
Brewing temperature Normal
Medium cup 120 mlBeverage amount
Coee strength Normal
Brewing temperature Normal
Large cup 200 mlBeverage amount
Coee strength Normal
Brewing temperature Normal
Milk Foam amount 180 ml
Milk amount 180 ml

Technical data
101
ENGLISH

Technical data
102
ENGLISH

103
Sommaire
FRANÇAIS
Sommaire
1 Pour votre sécurité .........................................................................................................105
1.1 Symboles utilisés ..................................................................................................106
1.2 Utilisation réglementaire ..................................................................................106
1.3 Danger dû au courant électrique ...................................................................106
1.4 Risque de brûlure et d'éclaboussures ...........................................................107
1.5 Sécurité d'ordre général ....................................................................................107
2 Vue d'ensemble de l'appareil ....................................................................................108
2.1 Vue d'ensemble de l'appareil ..........................................................................108
2.2 Vue d'ensemble du panneau de commande .............................................110
2.3 Vue d'ensemble du Cappuccinatore .............................................................112
3 Premiers pas ......................................................................................................................113
3.1 Déballage de l'appareil ......................................................................................113
3.2 Contrôle de l'étendue de la fourniture .........................................................113
3.3 Installation de l'appareil ....................................................................................114
3.4 Branchement de l'appareil ...............................................................................114
3.5 Première mise en marche et première purge de l'appareil ..................114
4 Commande fondamentale ..........................................................................................116
4.1 Mise en marche et arrêt de l'appareil ...........................................................116
4.2 Comment utiliser le panneau de commande ............................................117
4.3 Remplissage du réservoir de café en grains ...............................................117
4.4 Remplissage du réservoir d'eau ......................................................................118
4.5 Réglage du bec verseur pour les boissons au café ..................................120
4.6 Raccordement du Cappuccinatore ................................................................120
4.7 Utilisation de lait ..................................................................................................121
4.8 Comment vider le bac collecteur et le bac de
récupération du marc .........................................................................................122
5 Utilisation de la fonction My Bean Select® ..........................................................123
5.1 Remplissage de grains de café pour la fonction
My Bean Select® ....................................................................................................123
6 Préparation de boissons ..............................................................................................125
6.1 Réglage de l'intensité du café .........................................................................125
6.2 Préparation de boissons au café ....................................................................126
6.3 Réglage de la quantité de café ........................................................................126
6.4 Préparation de deux boissons au café à la fois ..........................................127
6.5 Interruption de la préparation du café .........................................................127
6.6 Préparation de mousse de lait ou de lait chaud .......................................128
6.7 Préparation d'eau chaude .................................................................................129

104
Sommaire
FRANÇAIS
7 Modication des réglages de base..........................................................................130
7.1 Appel du mode service ......................................................................................130
7.2 Réglage du programme d'économie d'énergie ........................................130
7.3 Réglage de l'arrêt automatique ......................................................................131
7.4 Réglage de la dureté de l'eau ..........................................................................132
7.5 Réglage de la température d'extraction ......................................................133
7.6 Réinitialisation de l'appareil aux réglages par défaut .............................134
7.7 Réglage de la nesse de mouture..................................................................134
8 Entretien et maintenance ............................................................................................135
8.1 Nettoyage d'ordre général ...............................................................................135
8.2 Nettoyage de la chambre d'extraction ........................................................136
8.3 Nettoyage du Cappuccinatore ........................................................................138
8.4 Exécution du programme de nettoyage .....................................................139
8.5 Exécution du programme de détartrage ....................................................142
8.6 Utilisation d'un ltre à eau ................................................................................146
9 Dérangements .................................................................................................................149
10 Transport, stockage et élimination .........................................................................150
10.1 Purge de l'appareil ...............................................................................................150
10.2 Transport de l'appareil .......................................................................................151
10.3 Élimination de l'appareil ....................................................................................152
11 Caractéristiques techniques ......................................................................................152

Pour votre sécurité
105
FRANÇAIS
Cher cliente, cher client,
Nous vous remercions d'avoir fait le choix d'une machine à café automa-
tique Caeo®Varianza® CS ou Caeo®Passione®.
Le mode d'emploi vous aidera à faire la connaissance des nombreuses pos-
sibilités que vous orent l'appareil et à savourer votre café.
Veuillez lire attentivement ce mode d'emploi. Cela vous permettra d'éviter
tout dommage corporel et matériel. Conservez soigneusement ce mode
d'emploi. Si vous vous séparez de l'appareil, donnez le mode d'emploi avec
lui.
Melitta n'est pas responsable en cas de non respect du mode d'emploi
normal de l'appareil.
Si vous désirez de plus amples informations ou poser des questions rela-
tives à l'appareil, veuillez vous adresser à Melitta ou rendez-nous visite sur
notre site Internet: www.melitta.fr
Nous vous souhaitons de jouir pleinement de votre appareil.
1 Pour votre sécurité
L'appareil satisfait aux directives européennes suivantes:
ū 2006 / 95 / CE (basse tension),
ū 2004 / 108 / CE (compatibilité électromagnétique),
ū 2011 / 65 / EU (RoHS),
ū 2009 / 125 / CE (Écodesign/ ErP).
L'appareil a été construit selon le niveau technologique le plus actuel. Il
existe cependant des risques résiduels.
Respecter les consignes de sécurité pour éviter tout danger. Melitta n'est
pas responsable en cas de non respect du mode d'emploi normal de l'appa-
reil.

Pour votre sécurité
106
FRANÇAIS
1.1 Symboles utilisés
Les symboles suivants signalent des dangers particuliers relatifs à la mani-
pulation de l'appareil ou donnent des informations utiles.
ATTENTION
Le mot associé ATTENTION signale des blessures possibles.
NOTE
Le mot associé NOTE signale des dommages possibles de l'appareil.
Information
Le mot associé Information signale des consignes et conseils supplémen-
taires relatifs à la manipulation de l'appareil.
1.2 Utilisation réglementaire
L'appareil sert à préparer des boissons à partir de grains
de café et à réchauer du lait et de l'eau.
L'appareil est uniquement destiné à un usage domes-
tique.
Toute autre utilisation est considérée comme non régle-
mentaire et peut provoquer des dommages corporels et
matériels. Melitta ne répond pas de dommages consécu-
tifs à une utilisation non réglementaire.
1.3 Danger dû au courant électrique
Il y a danger de mort par choc électrique en cas d'en-
dommagement de l'appareil ou du cordon d'alimenta-
tion.
Respecter les consignes de sécurité suivantes pour éviter
tout danger dû au courant électrique:
ū Ne pas utiliser de cordon d'alimentation endommagé.
ū Un cordon d'alimentation endommagé ne doit être
remplacé que par le fabricant, son service après vente
ou son distributeur.
ū Ne pas ouvrir de caches xés par des vis sur le corps
de l'appareil.
ū N'utiliser l'appareil que quand il est en parfait état
technique.

Pour votre sécurité
107
FRANÇAIS
ū Un appareil défectueux ne doit être réparé que par un
atelier agréé. Ne pas réparer l'appareil soi-même.
ū Ne pas procéder soi-même à des modications sur
l'appareil, ses éléments et ses accessoires.
ū Ne pas plonger l'appareil dans l'eau.
1.4 Risque de brûlure et d'éclaboussures
Les liquides et les vapeurs qui s'échappent peuvent
être brûlants. Des pièces de l'appareil deviennent aussi
brûlantes.
Respecter les consignes de sécurité suivantes pour éviter
toute éclaboussure et toute brûlure:
ū Éviter que les liquides et les vapeurs qui s'échappent
entrent en contact avec la peau.
ū Ne toucher ni les buses sur le bec d'écoulement ni le
tube vapeur pendant la préparation d'une boisson.
Attendre que les pièces se soient refroidies.
1.5 Sécurité d'ordre général
Respecter les consignes de sécurité suivantes pour éviter
tout dommage corporel et matériel:
ū Ne pas passer les mains à l'intérieur de l'appareil pen-
dant son fonctionnement.
ū Tenir les enfants de moins de 8ans à distance de l'ap-
pareil et de son cordon d'alimentation.
ū Cet appareil peut être utilisé par des enfants de plus
de 8ans et des personnes aux capacités physiques,
sensorielles ou mentales réduites ou ne possédant
que peu d'expérience et de connaissances s'ils sont
surveillés ou qu'ils ont été instruits de l'utilisation sûre
de l'appareil et comprennent les dangers en résultant.
ū Les enfants ne doivent pas jouer avec l'appareil. Les
enfants de moins de 8ans ne doivent pas réaliser le
nettoyage et la maintenance. Les enfants de plus de
8ans doivent être surveillés pendant le nettoyage et
la maintenance.
ū Débrancher l'appareil quand il reste non surveillé
pendant un temps prolongé.

Vue d'ensemble de l'appareil
108
FRANÇAIS
2 Vue d'ensemble de l'appareil
2.1 Vue d'ensemble de l'appareil
1
23
4
5
6
7
8
9
10
Fig. 1: Caeo® Passione® et Caeo® Varianza® CS, avant gauche
1 Réservoir d'eau avec couvercle 6 Bac collecteur
2 Réservoir de café en grains avec
couvercle
7 Touche «Marche/Arrêt»
3 Chaue-tasse 8 Bec verseur réglable en hauteur pour
boisson au café avec 2buses
4 Panneau de commande 9 Levier «Réglage de la mouture»
(intérieur)
5 Bac de récupération du marc
(intérieur)
10 Cuillère de dosage* pour la
fonction My Bean Select®
*N'existe que sur la Caeo® Varianza® CS

Vue d'ensemble de l'appareil
110
FRANÇAIS
2.2 Vue d'ensemble du panneau de commande
191817
Fig. 3: Panneau de commande
17 Touches
18 Achages
19 Touches de commande et bouton tournant
Touche/
bouton de
réglage
Désignation Fonction
Petite tasse Préparation d'une petite portion de café
Tasse moyenne Préparation d'une moyenne portion de café
Grande tasse Préparation d'une grosse portion de café
Deux tasses Réglage de la préparation pour deux tasses
Service Appel du mode service
Intensité du
café
Réglage de l'intensité du café
Vapeur Chauage de l'appareil pour la vapeur
Bouton tour-
nant
Allumage/extinction de l'eau chaude ou de la
vapeur

Vue d'ensemble de l'appareil
111
FRANÇAIS
Achage Signication
allumé L'appareil est opérationnel
clignote L'appareil chaue ou prépare une boisson au café
clignote rapi-
dement
Programme de réglage de la quantité de café en
cours
allumé Nombre de grains de café:
intensité actuellement réglée
clignote Remplir le réservoir de café en grains ou
préparation d'un café interrompue
allumé* La fonction My Bean Select® est prête
clignote* Remplir le bac à grains
allumé Préparation pour deux tasses prête
allumé Remplir le réservoir d'eau
clignote Mettre le réservoir d'eau en place
allumé Vider le bac collecteur et le bac de récupération
du marc
clignote Mettre le bac collecteur et le bac de récupération
du marc en place
allumé Changer le ltre
clignote Programme de changement de ltre en cours
allumé Détartrer l'appareil
clignote Programme de détartrage en cours
allumé Nettoyer l'appareil
clignote Programme de nettoyage en cours
allumé La vapeur est prête
clignote L'appareil chaue pour obtenir de la vapeur
*N'existe que sur la Caeo® Varianza® CS

Vue d'ensemble de l'appareil
112
FRANÇAIS
2.3 Vue d'ensemble du Cappuccinatore
20
21
22
23
24
25
Fig. 4: Cappuccinatore
20 Tube d'aspiration d'air
21 Fixation du tuyau à lait
22 Raccordement du tuyau à lait
23 Tuyau à lait
24 Bec verseur pour l'eau chaude, le lait ou la mousse de lait
25 Sélecteur
Symbole sur
le sélecteur
Fonction
Réglage pour
le lait chaud
Réglage pour
l'eau chaude
Réglage pour
la mousse de lait

Entretien et maintenance
138
FRANÇAIS
8.3 Nettoyage du Cappuccinatore
Nous recommandons en outre de nettoyer régulièrement le Cappuccina-
tore et le tuyau à lait.
13
20
24
23
Fig. 17: Désassemblage du Cappuccinatore
Procéder comme suit pour désassembler le Cappuccinatore:
1. Débrancher le tube vapeur(13) du Cappuccinatore.
2. Retirer les pièces détachées suivantes du Cappuccinatore:
ū tuyau à lait(23)
ū tube d'aspiration d'air(20)
ū bec verseur(24).
3. Nettoyer le Cappuccinatore et les pièces détachées à l'eau chaude.
Utiliser la brosse de nettoyage fournie, un chion doux humide et du
produit à vaisselle usuel.
4. Assembler de nouveau le Cappuccinatore.
5. Brancher le Cappuccinatore à l'appareil (voir chapitre4.6 Raccordement
du Cappuccinatore à la page120).

Entretien et maintenance
139
FRANÇAIS
8.4 Exécution du programme de nettoyage
Ce programme de nettoyage permet d'éliminer les dépôts et restes de café
à l'aide d'un nettoyant pour machines à café automatiques.
Nous recommandons d'exécuter le programme de nettoyage tous les
2mois ou si l'appareil invite à le faire pour éviter tout dommage de ce
dernier.
Le programme de nettoyage dure environ 10minutes et ne doit pas être
interrompu.
ATTENTION
Le contact avec le nettoyant pour machines à café automatiques peut
provoquer des irritations des yeux et de la peau.
Respecter les consignes d'utilisation données sur l'emballage du net-
toyant pour machines à café automatiques.
NOTE
L'appareil peut être endommagé en cas d'utilisation d'un nettoyant non
appropriés pour les machines à café automatiques.
N'utiliser que les pastilles de nettoyage Melitta® PERFECT CLEAN pour
machines à expresso.

Entretien et maintenance
141
FRANÇAIS
Touches Indicateurs Étapes
4. Retirer la chambre d'extraction et la
nettoyer comme décrit au chapitre8.2
Nettoyage de la chambre d'extrac-
tion à la page136. Ne pas éteindre
l'appareil.
5. Poser une pastille de nettoyage dans
la chambre d'extraction (voir Fig. 18).
Mettre la chambre d'extraction en
place dans l'appareil comme décrit au
chapitre8.2 Nettoyage de la chambre
d'extraction à la page136.
» L'appareil indique que la troisième
étape du programme est atteinte.
» Le processus de nettoyage
démarre.
» Au bout de plusieurs minutes,
l'appareil indique
ū que la quatrième étape du pro-
gramme est atteinte
ū que le bac collecteur et celui de
récupération du marc doivent
être vidés.
6. Vider le bac collecteur et le bac de
récupération du marc.
7. Mettre le bac collecteur et celui de
récupération du marc en place.
» L'appareil indique que la dernière
étape du programme est atteinte.
» Le processus de nettoyage est
poursuivi.
» L'appareil indique ensuite que le
bac collecteur et celui de récupéra-
tion du marc doivent être vidés.
8. Vider le bac collecteur et le bac de
récupération du marc.
» L'appareil est opérationnel.

Entretien et maintenance
142
FRANÇAIS
8.5 Exécution du programme de détartrage
Le programme de détartrage permet d'éliminer les dépôts de tartre à l'inté-
rieur de l'appareil avec du détartrant pour machines à café automatiques.
Nous recommandons d'exécuter le programme «Détartrage» tous les
3mois ou si l'appareil invite à le faire pour éviter tout dommage de ce
dernier.
Le programme de détartrage dure environ 25minutes et ne doit pas être
interrompu.
ATTENTION
Le contact avec le détartrant pour machines à café automatiques peut
provoquer des irritations des yeux et de la peau.
Respecter les consignes d'utilisation données sur l'emballage du
détartrant pour machines à café automatiques.
ATTENTION
Eau chaude qui s'écoule et tube vapeur très chaud
Ne pas toucher le tube vapeur pendant et directement après utilisation.
Attendre que le tube vapeur ait refroidi.
NOTE
L'appareil peut être endommagé en cas d'utilisation de détartrant non
approprié.
N'utiliser que le détartrant liquide Melitta® ANTI CALC pour machines à
expresso.
NOTE
Un ltre à eau en place (vissé) peut être endommagé pendant le
détartrage.
Retirer le ltre à eau quand l'appareil y invite.
Poser le ltre à eau dans un récipient rempli d'eau du robinet pendant le
déroulement du programme de détartrage.
Une fois le programme de détartrage terminé, le ltre à eau peut être de
nouveau mis en place et utilisé.

Entretien et maintenance
143
FRANÇAIS
Condition préalable: l'appareil est opérationnel. Une solution de
détartrage de 0,5litre a été préparée et est disponible.
Symbole sur le
sélecteur ou les
touches
Achages Étapes
1. Appuyer sur la touche «Service» et
la touche «Vapeur» pendant plus de
2secondes.
» L'appareil indique
ū que le programme de
détartrage est en cours
ū que la première étape du pro-
gramme est atteinte
ū que le bac collecteur et celui de
récupération du marc doivent
être vidés.
2. Vider le bac collecteur et celui de récu-
pération du marc (voir chapitre4.8
Comment vider le bac collecteur et le
bac de
récupération du marc à la page122).
3. Tourner le sélecteur jusqu'à ce que le
réglage de l'eau chaude indique vers
le haut.
4. Mettre le bac collecteur sans bac de
récupération du marc en place.
» L'appareil indique
ū que la deuxième étape du pro-
gramme est atteinte
ū que le réservoir d'eau doit être
rempli
ū que le liquide de détartrage
doit être versé dans le réservoir
d'eau.
5. Placer le bac de récupération de marc
sous le Cappuccinatore.
6. Ouvrir le couvercle du réservoir d'eau
et extraire ce dernier de l'appareil par
le haut en le tirant par la poignée.

Entretien et maintenance
144
FRANÇAIS
Symbole sur le
sélecteur ou les
touches
Achages Étapes
7. Verser 0,5litre de solution de
détartrage dans le réservoir d'eau.
Respecter le mode d'emploi du
détartrant pour machines à café auto-
matiques.
8. Remettre le réservoir d'eau en place.
» Le processus de détartrage
démarre.
» Au bout de plusieurs minutes,
l'appareil indique
ū que la troisième étape du pro-
gramme est atteinte
ū que la vapeur est prête.
9. Tourner le bouton tournant dans
le sens des aiguilles d'une montre
jusqu'en butée.
» Le processus de détartrage se
poursuit.
» Au bout de plusieurs minutes, l'ap-
pareil indique que le bac collecteur
et celui de récupération du marc
doivent être vidés.
10. Vider le bac collecteur et le bac de
récupération du marc.
11. Mettre le bac collecteur sans bac de
récupération du marc en place.
» L'appareil indique
ū que la quatrième étape du
programme est atteinte
ū que le réservoir d'eau doit être
rempli
12. Placer le bac de récupération de marc
sous le Cappuccinatore.
13. Ouvrir le couvercle du réservoir d'eau
et extraire ce dernier de l'appareil par
le haut en le tirant par la poignée.
14. Vider et nettoyer le réservoir d'eau.

Overzicht
161
NEDERLANDS
12
13
14
11
15
16
Afb. 2: Caeo® Passione® en Caeo® Varianza® CS vooraan rechts
11 Afdekpaneel 14 Cappuccinatore
12 Zetgroep (intern) 15 Kopjesplateau
13 Stoombuis 16 Vlotter
Specyfikacje produktu
| Marka: | Melitta |
| Kategoria: | ekspres do kawy |
| Model: | Caffeo Passione Varianza CS |
Potrzebujesz pomocy?
Jeśli potrzebujesz pomocy z Melitta Caffeo Passione Varianza CS, zadaj pytanie poniżej, a inni użytkownicy Ci odpowiedzą
Instrukcje ekspres do kawy Melitta

3 Kwietnia 2025
4 Marca 2025
6 Lutego 2025
13 Stycznia 2025
28 Grudnia 2024
11 Października 2024
10 Października 2024
8 Października 2024
3 Października 2024
1 Października 2024
Instrukcje ekspres do kawy
- ekspres do kawy Bauknecht
- ekspres do kawy Ikea
- ekspres do kawy Bertazzoni
- ekspres do kawy Electrolux
- ekspres do kawy DeLonghi
- ekspres do kawy AEG
- ekspres do kawy Beko
- ekspres do kawy Teka
- ekspres do kawy Küppersbusch
- ekspres do kawy Smeg
- ekspres do kawy Götze & Jensen
- ekspres do kawy Hario
- ekspres do kawy Caso
- ekspres do kawy Amica
- ekspres do kawy Gorenje
- ekspres do kawy Etna
- ekspres do kawy Sharp
- ekspres do kawy Gaggia
- ekspres do kawy Braun
- ekspres do kawy Russell Hobbs
- ekspres do kawy Sage
- ekspres do kawy Tefal
- ekspres do kawy Philips
- ekspres do kawy Livoo
- ekspres do kawy SilverCrest
- ekspres do kawy Bosch
- ekspres do kawy Whirlpool
- ekspres do kawy Miele
- ekspres do kawy La Pavoni
- ekspres do kawy Brentwood
- ekspres do kawy Kärcher
- ekspres do kawy Lamona
- ekspres do kawy Severin
- ekspres do kawy Panasonic
- ekspres do kawy Muse
- ekspres do kawy Nedis
- ekspres do kawy Jura
- ekspres do kawy Medion
- ekspres do kawy Baumatic
- ekspres do kawy Black & Decker
- ekspres do kawy OK
- ekspres do kawy Adler
- ekspres do kawy Marquant
- ekspres do kawy Westinghouse
- ekspres do kawy Hendi
- ekspres do kawy Quigg
- ekspres do kawy Domo
- ekspres do kawy Conair
- ekspres do kawy GE
- ekspres do kawy Taurus
- ekspres do kawy Orbegozo
- ekspres do kawy Blaupunkt
- ekspres do kawy Brandt
- ekspres do kawy Vivax
- ekspres do kawy Siemens
- ekspres do kawy Ambiano
- ekspres do kawy Grundig
- ekspres do kawy Prixton
- ekspres do kawy Blomberg
- ekspres do kawy Rowenta
- ekspres do kawy Mesko
- ekspres do kawy Fisher & Paykel
- ekspres do kawy ECG
- ekspres do kawy Indesit
- ekspres do kawy Schaerer
- ekspres do kawy Makita
- ekspres do kawy Ilve
- ekspres do kawy Unold
- ekspres do kawy Hotpoint
- ekspres do kawy Kenwood
- ekspres do kawy V-Zug
- ekspres do kawy Trisa
- ekspres do kawy Ariston Thermo
- ekspres do kawy Zelmer
- ekspres do kawy Mestic
- ekspres do kawy Ninja
- ekspres do kawy Cuisinart
- ekspres do kawy Wilfa
- ekspres do kawy Krups
- ekspres do kawy Bialetti
- ekspres do kawy Bomann
- ekspres do kawy Moulinex
- ekspres do kawy Teesa
- ekspres do kawy Ursus Trotter
- ekspres do kawy PowerXL
- ekspres do kawy Emerio
- ekspres do kawy Create
- ekspres do kawy H.Koenig
- ekspres do kawy Arzum
- ekspres do kawy Melissa
- ekspres do kawy Schneider
- ekspres do kawy Beper
- ekspres do kawy Alaska
- ekspres do kawy MPM
- ekspres do kawy OneConcept
- ekspres do kawy CDA
- ekspres do kawy Philco
- ekspres do kawy Neff
- ekspres do kawy Renkforce
- ekspres do kawy Morphy Richards
- ekspres do kawy Zanussi
- ekspres do kawy Bourgini
- ekspres do kawy Instant
- ekspres do kawy Fagor
- ekspres do kawy Redmond
- ekspres do kawy Koenic
- ekspres do kawy ECM
- ekspres do kawy Izzy
- ekspres do kawy WMF
- ekspres do kawy ProfiCook
- ekspres do kawy Klarstein
- ekspres do kawy BEEM
- ekspres do kawy Polti
- ekspres do kawy Ascaso
- ekspres do kawy Arendo
- ekspres do kawy Witt
- ekspres do kawy NGS
- ekspres do kawy CRUX
- ekspres do kawy Cecotec
- ekspres do kawy KitchenAid
- ekspres do kawy AFK
- ekspres do kawy Waeco
- ekspres do kawy Eta
- ekspres do kawy Camry
- ekspres do kawy Steba
- ekspres do kawy Keurig
- ekspres do kawy La Cimbali
- ekspres do kawy Scarlett
- ekspres do kawy GUTFELS
- ekspres do kawy Nevir
- ekspres do kawy TriStar
- ekspres do kawy Cremesso
- ekspres do kawy Exquisit
- ekspres do kawy Bartscher
- ekspres do kawy First Austria
- ekspres do kawy Gastroback
- ekspres do kawy Privileg
- ekspres do kawy Nespresso
- ekspres do kawy Arçelik
- ekspres do kawy Hanseatic
- ekspres do kawy Continental Edison
- ekspres do kawy Bifinett
- ekspres do kawy Atag
- ekspres do kawy Franke
- ekspres do kawy Faema
- ekspres do kawy DCG
- ekspres do kawy Beautiful
- ekspres do kawy G3 Ferrari
- ekspres do kawy Sanyo
- ekspres do kawy Rancilio
- ekspres do kawy Hamilton Beach
- ekspres do kawy Bugatti
- ekspres do kawy Gourmetmaxx
- ekspres do kawy Clatronic
- ekspres do kawy Healthy Choice
- ekspres do kawy Telefunken
- ekspres do kawy Calor
- ekspres do kawy Inventum
- ekspres do kawy Ariete
- ekspres do kawy TurboTronic
- ekspres do kawy Graef
- ekspres do kawy Princess
- ekspres do kawy Innoliving
- ekspres do kawy Sunbeam
- ekspres do kawy Solac
- ekspres do kawy Olympia
- ekspres do kawy Hama
- ekspres do kawy Waring Commercial
- ekspres do kawy Caple
- ekspres do kawy AEG-Electrolux
- ekspres do kawy Ritter
- ekspres do kawy Nivona
- ekspres do kawy Kenmore
- ekspres do kawy Kaiser
- ekspres do kawy Breville
- ekspres do kawy AYA
- ekspres do kawy Pelgrim
- ekspres do kawy Chefman
- ekspres do kawy Tower
- ekspres do kawy Elta
- ekspres do kawy Solis
- ekspres do kawy Salton
- ekspres do kawy JennAir
- ekspres do kawy Frigidaire
- ekspres do kawy Galanz
- ekspres do kawy Barazza
- ekspres do kawy Genius
- ekspres do kawy Foster
- ekspres do kawy Electra
- ekspres do kawy Rommelsbacher
- ekspres do kawy Fulgor Milano
- ekspres do kawy Electroline
- ekspres do kawy Gaggenau
- ekspres do kawy Sencor
- ekspres do kawy Tesco
- ekspres do kawy Asko
- ekspres do kawy Kalorik
- ekspres do kawy Suntec
- ekspres do kawy Signature
- ekspres do kawy Kunft
- ekspres do kawy Grunkel
- ekspres do kawy Becken
- ekspres do kawy Haeger
- ekspres do kawy Lelit
- ekspres do kawy Lavazza
- ekspres do kawy The Little Guy
- ekspres do kawy Gastronoma
- ekspres do kawy Aroma
- ekspres do kawy Dualit
- ekspres do kawy Comelec
- ekspres do kawy De Dietrich
- ekspres do kawy Vitek
- ekspres do kawy Magic Chef
- ekspres do kawy Maestro
- ekspres do kawy Clas Ohlson
- ekspres do kawy Sogo
- ekspres do kawy Cloer
- ekspres do kawy Nutrichef
- ekspres do kawy Proline
- ekspres do kawy Flama
- ekspres do kawy Espressione
- ekspres do kawy OBH Nordica
- ekspres do kawy Bestron
- ekspres do kawy Optimum
- ekspres do kawy Rotel
- ekspres do kawy Capresso
- ekspres do kawy Swan
- ekspres do kawy Quintezz
- ekspres do kawy Kluge
- ekspres do kawy Alpina
- ekspres do kawy Animo
- ekspres do kawy Aerobie
- ekspres do kawy Nuova Simonelli
- ekspres do kawy SV Italia SAB
- ekspres do kawy Techwood
- ekspres do kawy Bezzera
- ekspres do kawy Korona
- ekspres do kawy Saturn
- ekspres do kawy Tiger
- ekspres do kawy Tomado
- ekspres do kawy Caffitaly
- ekspres do kawy Bellini
- ekspres do kawy Oster
- ekspres do kawy Sinbo
- ekspres do kawy Curtis
- ekspres do kawy Jata
- ekspres do kawy Profitec
- ekspres do kawy Fritel
- ekspres do kawy Logik
- ekspres do kawy Profilo
- ekspres do kawy Ernesto
- ekspres do kawy Mellerware
- ekspres do kawy Douwe Egberts
- ekspres do kawy Heinner
- ekspres do kawy Lakeland
- ekspres do kawy Termozeta
- ekspres do kawy Bella
- ekspres do kawy Eldom
- ekspres do kawy Premium
- ekspres do kawy Illy
- ekspres do kawy Blokker
- ekspres do kawy Jacob Jensen
- ekspres do kawy Trebs
- ekspres do kawy Boretti
- ekspres do kawy Café Bar
- ekspres do kawy Elba
- ekspres do kawy King
- ekspres do kawy Maxwell
- ekspres do kawy Malmbergs
- ekspres do kawy Champion
- ekspres do kawy Buffalo
- ekspres do kawy Farberware
- ekspres do kawy Ufesa
- ekspres do kawy Presto
- ekspres do kawy Bunn
- ekspres do kawy Cilio
- ekspres do kawy Isomac
- ekspres do kawy Habitat
- ekspres do kawy Nova
- ekspres do kawy Proctor Silex
- ekspres do kawy Primo
- ekspres do kawy Gerlach
- ekspres do kawy Saro
- ekspres do kawy Hema
- ekspres do kawy Konig
- ekspres do kawy Ices
- ekspres do kawy Nescafe
- ekspres do kawy Saeco
- ekspres do kawy Harper
- ekspres do kawy Petra
- ekspres do kawy Team
- ekspres do kawy Xavax
- ekspres do kawy Relags
- ekspres do kawy CaterChef
- ekspres do kawy Bravilor Bonamat
- ekspres do kawy Magimix
- ekspres do kawy Efbe-schott
- ekspres do kawy Lifetec
- ekspres do kawy Wolf
- ekspres do kawy Varo
- ekspres do kawy Stelton
- ekspres do kawy Bodum
- ekspres do kawy Superior
- ekspres do kawy Magimix Nespresso
- ekspres do kawy Daalderop
- ekspres do kawy Grimac
- ekspres do kawy Expobar
- ekspres do kawy Koenig
- ekspres do kawy Turmix
- ekspres do kawy Demoka
- ekspres do kawy Fakir
- ekspres do kawy Nescafe Dolce Gusto
- ekspres do kawy Arno
- ekspres do kawy Magefesa
- ekspres do kawy Carimali
- ekspres do kawy Handpresso
- ekspres do kawy OXO
- ekspres do kawy Kuechenprofi
- ekspres do kawy YooDigital
- ekspres do kawy C3
- ekspres do kawy EMSA
- ekspres do kawy Nesco
- ekspres do kawy Waves
- ekspres do kawy Philips-Saeco
- ekspres do kawy Coline
- ekspres do kawy N8WERK
- ekspres do kawy Technivorm
- ekspres do kawy Home Electric
- ekspres do kawy Butler
- ekspres do kawy Café
- ekspres do kawy La San Marco
- ekspres do kawy Bravilor
- ekspres do kawy Ideeo
- ekspres do kawy AdHoc
- ekspres do kawy Tchibo
- ekspres do kawy Rombouts
- ekspres do kawy Zepter
- ekspres do kawy Fischer
- ekspres do kawy Durabase
- ekspres do kawy Sanremo
- ekspres do kawy Wittenborg
- ekspres do kawy Micromaxx
- ekspres do kawy Weasy
- ekspres do kawy T-fal
- ekspres do kawy Heyner
- ekspres do kawy Prima Donna
- ekspres do kawy Mia
- ekspres do kawy Orava
- ekspres do kawy Amici
- ekspres do kawy Spidem
- ekspres do kawy Azkoyen
- ekspres do kawy Riviera And Bar
- ekspres do kawy SAB
- ekspres do kawy Italico
- ekspres do kawy Frieling
- ekspres do kawy Puc
- ekspres do kawy Micro Matic
- ekspres do kawy Barista Mate
- ekspres do kawy Egro
- ekspres do kawy NutriBullet
- ekspres do kawy Walco
- ekspres do kawy L'or
- ekspres do kawy UNIC
- ekspres do kawy Fine Dine
- ekspres do kawy Venga
- ekspres do kawy Kees Van Der Westen
- ekspres do kawy Rival
- ekspres do kawy Thomas
- ekspres do kawy Exido
- ekspres do kawy Rosseto
- ekspres do kawy Innova
- ekspres do kawy Francis Francis
- ekspres do kawy Moccamaster
- ekspres do kawy K-fee
- ekspres do kawy Grindmaster
- ekspres do kawy Viceversa
- ekspres do kawy Wilbur Curtis
- ekspres do kawy Fetco
- ekspres do kawy Avantco
- ekspres do kawy Kogan
- ekspres do kawy Grandioso
- ekspres do kawy La Marzocco
- ekspres do kawy Cecilware
- ekspres do kawy Estella Caffe
- ekspres do kawy QuickMill
- ekspres do kawy PowerTec Kitchen
- ekspres do kawy Leopold Vienna
- ekspres do kawy Emeril Lagasse
- ekspres do kawy Autobar
- ekspres do kawy Didiesse
- ekspres do kawy Wacaco
- ekspres do kawy BCC
- ekspres do kawy Ideen Welt
- ekspres do kawy Kitchen Originals
- ekspres do kawy Nostalgia
- ekspres do kawy Espressions
- ekspres do kawy Minimoka
- ekspres do kawy Barista
- ekspres do kawy Nemox
- ekspres do kawy Veromatic
- ekspres do kawy Toddy
- ekspres do kawy KING Hoff
- ekspres do kawy WestBend
- ekspres do kawy Mr Coffee
- ekspres do kawy Newco
- ekspres do kawy Elektra
- ekspres do kawy Vibiemme
- ekspres do kawy Focus Electrics
- ekspres do kawy Petra Electric
- ekspres do kawy Wega
- ekspres do kawy Casadio
- ekspres do kawy Bellarom
- ekspres do kawy Bloomfield
- ekspres do kawy Francisfrancis
- ekspres do kawy Giesen Coffee Roasters
- ekspres do kawy BellaBarista
- ekspres do kawy Bifinet
- ekspres do kawy Ceado
- ekspres do kawy Casselin
- ekspres do kawy Victoria Arduino
- ekspres do kawy Girmi
- ekspres do kawy Conti
- ekspres do kawy Koolatron
- ekspres do kawy Bellman
- ekspres do kawy Astoria
- ekspres do kawy Inalsa
- ekspres do kawy HeyCafe
- ekspres do kawy Espressotoria
- ekspres do kawy Delizio
- ekspres do kawy Bonavita
- ekspres do kawy Mio Star
- ekspres do kawy Caffe Borbone
- ekspres do kawy Heru
- ekspres do kawy ATRIUM
- ekspres do kawy Rhea
- ekspres do kawy Catler
- ekspres do kawy Royal Catering
- ekspres do kawy Szarvasi
- ekspres do kawy Auspure
- ekspres do kawy Avoury
- ekspres do kawy Imarflex
- ekspres do kawy Mystery
- ekspres do kawy HomeCraft
- ekspres do kawy Flytek
- ekspres do kawy Pyrex
- ekspres do kawy Total Chef
- ekspres do kawy La Nuova Era
- ekspres do kawy Veromatic International
- ekspres do kawy Espresso Gear
- ekspres do kawy Coffeemaxx
- ekspres do kawy Sielaff
- ekspres do kawy Caffe2go
- ekspres do kawy La Spaziale
Najnowsze instrukcje dla ekspres do kawy
9 Kwietnia 2025
Veromatic International Melange d Or Vista Espresso Instrukcja
9 Kwietnia 2025
9 Kwietnia 2025
9 Kwietnia 2025
8 Kwietnia 2025
8 Kwietnia 2025
7 Kwietnia 2025
7 Kwietnia 2025
6 Kwietnia 2025
5 Kwietnia 2025