Instrukcja obsługi MeldaProduction MMultiAnalyzer
MeldaProduction
Oprogramowanie dźwiękowe
MMultiAnalyzer
Przeczytaj poniżej 📖 instrukcję obsługi w języku polskim dla MeldaProduction MMultiAnalyzer (30 stron) w kategorii Oprogramowanie dźwiękowe. Ta instrukcja była pomocna dla 11 osób i została oceniona przez 2 użytkowników na średnio 4.5 gwiazdek
Strona 1/30
MMultiAnalyzer
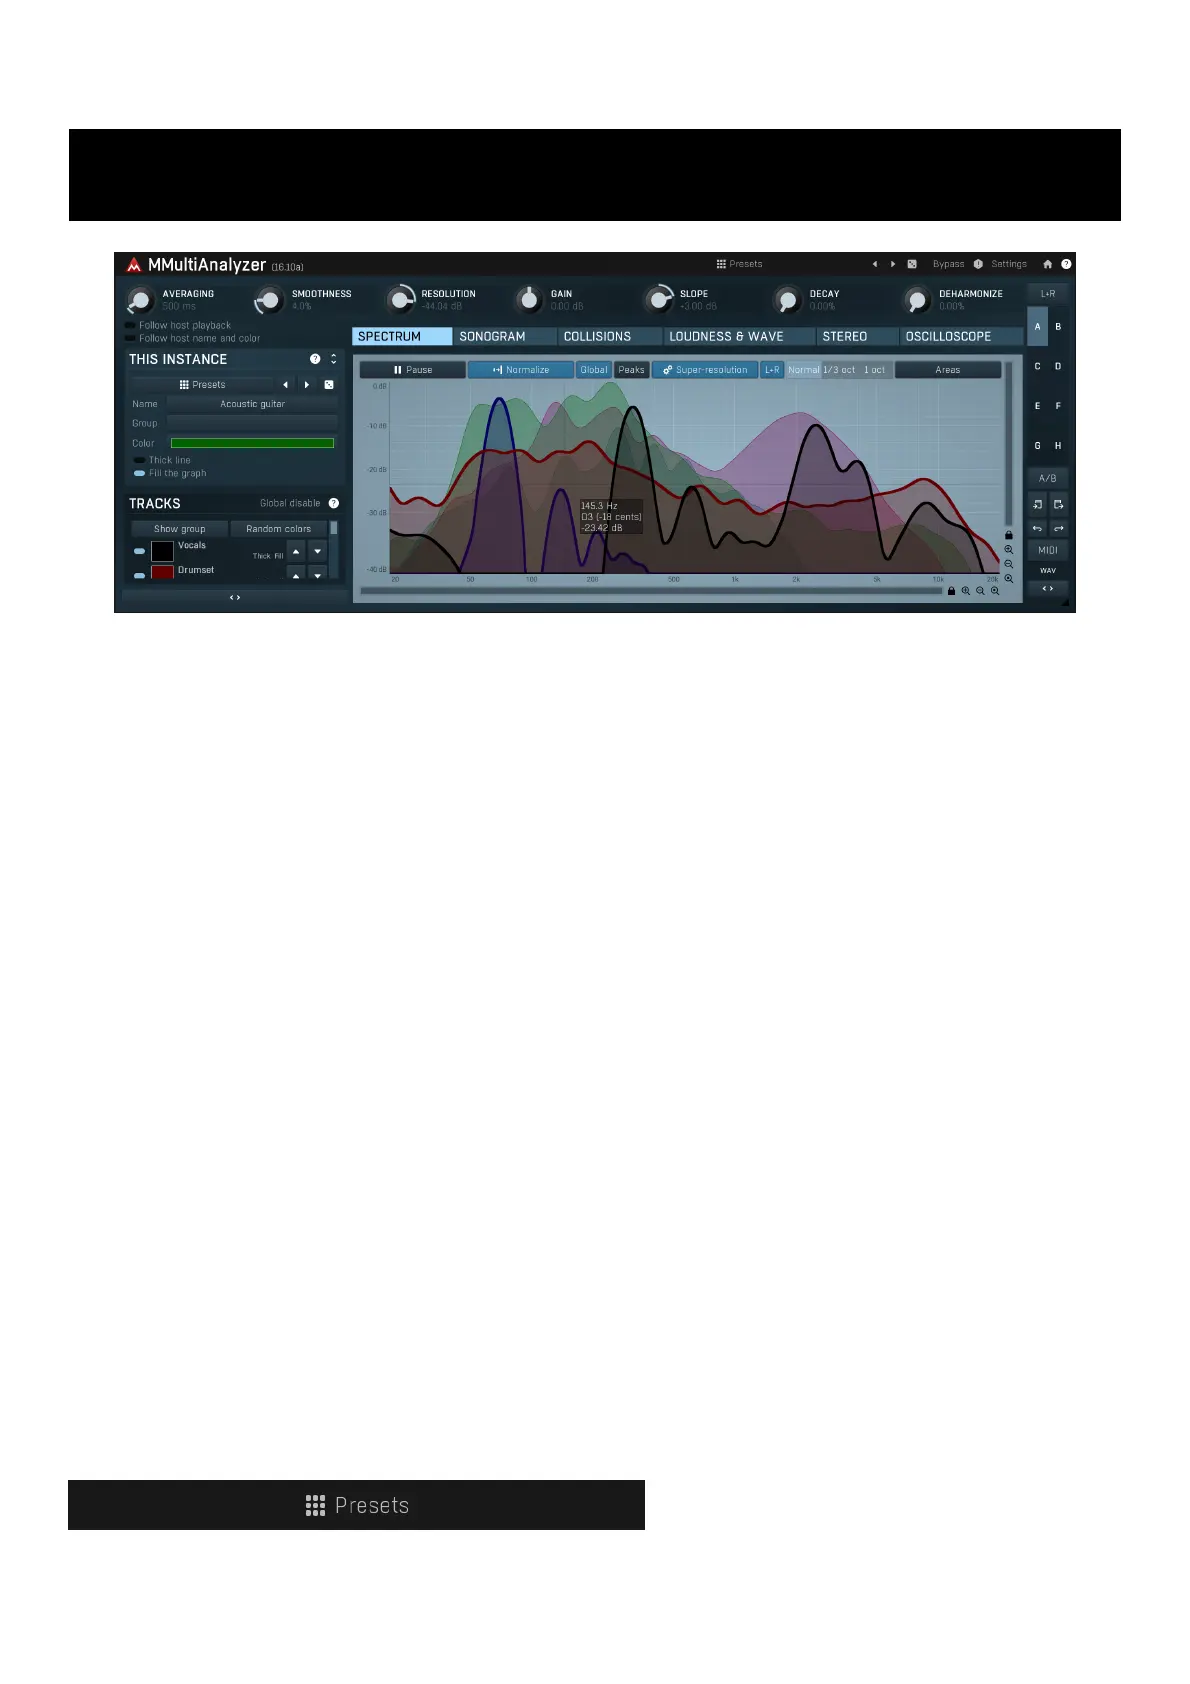
MMultiAnalyzer is an advanced multitrack analyzer, designed to be extremely easy-to-use yet versatile. It is an indispensable tool for mixing.
MMultiAnalyzer doesn't require any kind of special routing, either in your DAW host or within the plugin. All you need to do is place the
plugin on each track that you want to analyze in your project and the instances will "find each other". Each instance of the plugin can then
be used to show any kind of analysis (Frequency spectrum, Sonogram, Stereo field etc.) , it doesn't matter which is which, you can monitor
drum tracks in the plugin instance placed on the guitar track for example.
The main window is divided into 3 parts - on the top you can see analysis parameters. Most of them are specific to current instance (e.g.
you can analyze the same set of tracks using different parameters), a few are global and when you change them, they will be changed in
other instances as well.
On the left side of the plugin window you can see settings for the particular instance, This instance. You can specify the name and visual
parameters here. Often you will need only to use presets, which contain all of these settings and will speed up your workflow. You can add,
load, save and manage your presets too. Below this panel is the list of tracks being analyzed (that is, those tracks on which the plugin has
been placed). You can enable/disable whether each track is displayed in this instance and control visual parameters - these are shared, so
when you change color of a track for example, it will take effect in all other instances as well.
The rest of the window contains the actual analysis. You can choose from several views:
Spectrum view displays the spectrum analysis graphs.
Sonogram view provides the spectrum sonogram view - an analysis where the depth of color indicates level of each frequency and the
vertical axis represents time. Having too many tracks displayed in this mode may make the view hard to read, so it is often recommended to
keep at most 4 tracks a time.
Collisions view displays a 1-dimensional sonogram (essentially the sonogram without time axis) for each track and also the collision
sonogram, which highlights frequencies overlapping in any 2 tracks. This is often used during mixing to reveal, which parts of the spectrum
are over-occupied. You may then use an equalizer to remove the collision frequencies from one of the problematic tracks.
Each track is shown in the collision view starting from top. At the bottom there is an additional red graph showing the collisions. Anything
present in the collision graph is present in at least 2 tracks. The fact that something is colliding doesn't always mean you should fix it, but it
can help you understand, why a mix is cluttered and muddy and in which frequencies.
Loudness & waveform view contains EBU R128 and ITU-R BS 1770-3 compliant loudness meters and waveform display for each track.
Here you can see the actual waveforms of the tracks along with their approximate Momentary, Short-term and Integrated loudness graphs.
Stereo view displays the stereo analysis of each track. Unlike XY goniometers, which could be hard to read, this graph shows the percentual
distribution stereo placement - in other words, how much of the signal is located in the center, on the left & right and anywhere in between.
It is usually very easy to judge the width and stereo placement this way.
Oscilloscope view runs a pitch detector on each track and displays a single period image of each track. It can be useful when analysing
waveshapers, dynamic processors, synthesizers etc.
Presets
Presets button shows a window with all available presets. A preset can be loaded from the preset window by double-clicking on it, selecting
via the buttons or by using your keyboard. You can also manage the directory structure, store new presets, replace existing ones etc.
Presets are global, so a preset saved from one project, can easily be used in another. The arrow buttons next to the preset button can be
used to switch between presets easily.
Holding while pressing the button loads a random preset. There must be some presets for this feature to work of course. Ctrl
Presets can be backed up by 3 different methods:
A) Using "Backup" and "Restore" buttons in each preset window, which produces a single archive of all presets on the computer.
B) Using "Export/Import" buttons, which export a single folder of presets for one plugin.
C) By saving the actual preset files, which are found in the following directories (not recommended):
Windows: C:\Users\{username}\AppData\Roaming\MeldaProduction
Mac OS X: /Library/Application support/MeldaProduction
Files are named based on the name of the plugin like this: "{pluginname}.presets", so for example MAutopan.presets or MDynamics.presets.
If the directory cannot be found on your computer for some reason, you can just search for the particular file.
Please note that prior to version 16 a different format was used and the naming was "{pluginname}presets.xml".
The plugin also supports
an online preset exchange. If the computer is connected to the internet, the plugin connects to our server once a week, submits your
presets and downloads new ones if available. This feature is manually maintained in order to remove generally unusable presets, so it may
take some time before any submitted presets become available. This feature relies on each user so we strongly advise that any submitted
presets be named and organised in the same way as the factory presets, otherwise they will be removed.
Left arrow
Left arrow button loads the previous preset.
Right arrow
Right arrow button loads the next preset.
Randomize
Randomize button loads a random preset.
Panic
Panic button resets the plugin state. You can use it to force the plugin to report latency to the host again and to avoid any audio problems.
For example, some plugins, having a look-ahead feature, report the size of the look-ahead delay as latency, but it is inconvenient to do that
every time the look-ahead changes as it usually causes the playback to stop. After you tweak the latency to the correct value, just click this
button to sync the track in time with the others, minimizing phasing artifacts caused by the look-ahead delay mixing with undelayed audio
signals in your host. It may also be necessary to restart playback in your host.
Another example is if some malfunctioning plugin generates extremely high values for the input of this plugin. A potential filter may start
generating very high values as well and as a result the playback will stop. You can just click this button to reset the plugin and the playback
will start again.
Settings
Settings button shows a menu with additional settings of the plugin. Here is a brief description of the separate items.
Licence manager lets you activate/deactivate the plugins and manage subscriptions. While you can simply drag & drop a licence file onto
the plugin, in some cases there may be a faster way. For instance, you can enter your user account name and password and the plugin will
do all the activating for you.
There are 4 groups of settings, each section has its own detailed help information: enables you to pick the GUI style for theGUI & Style
plugin and the main colours used for the background, the title bars of the windows and panels, the text and graphs area and the highlighting
(used for enabled buttons, sliders, knobs etc).
Advanced settings configures several processing options for the plugin.
Global system settings contains some settings for all MeldaProduction plugins. Once you change any of them, restart your DAW if
needed, and it will affect all MeldaProduction plugins.
Dry/Wet affects determines, for Multiband plugins, which multiband parameters are affected by the Global dry/wet control.
Smart interpolation adjusts the interpolation algorithm used when changing parameter values; the higher the setting the higher the audio
quality and the lower the chance of zippering noise, but more CPU will be used.
WWW
WWW button shows a menu with additional information about the plugin. You can check for updates, get easy access to support,
MeldaProduction web page, video tutorials, Facebook/Twitter/YouTube channels and more.
Plugin toolbar
Plugin toolbar provides some global features, A-H presets and more.
Channel mode
Channel mode button shows the current processing channel mode, e.g. indicates the processing of left and rightLeft+Right (L+R)
channels. This is the default mode for mono and stereo audio material and effectively processes the incoming signal as expected.
However the plugin also provides additional modes, of which you may take advantage as described below. Mastering this feature will
give you unbelievable options for controlling the stereo field.
Note that this is not relevant for mono audio tracks, because the host supplies only one input and output channel.
Left (L) mode and Right (R) mode allow the plugin to process just one channel, only the left or only the right. This feature has a
number of simple uses. Equalizing only one channel allows you to fix spectral inconsistencies, when mids are lower in one channel for
example. A kind of stereo expander can be produced by equalizing each side differently. Stereo expansion could also be produced by
using a modulation effect, such as a vibrato or flanger, on one of these channels. Note however that the results would not be fully
mono compatible.
Left and right channels can be processed separately with different settings, by creating two instances of the plugin in series, one set to
'L' mode and the other to 'R' mode. The instance in 'L' mode will not touch the right channel and vice versa. This approach is perfectly
safe and is even advantageous, as both sides can be configured completely independently with both settings visible next to each other.
Mid (M) mode allows the plugin to process the so-called mid (or mono) signal. Any stereo signal can be transformed from left and
right, to mid and side, and back again, with minimal CPU usage and no loss of audio quality. The mid channel contains the mono sum
(or centre), which is the signal present in both left and right channels (in phase). The side channel contains the difference between the
left and right channels, which is the "stereo" part. In 'M mode' the plugin performs the conversion into mid and side channels, processes
mid, leaves side intact and converts the results back into the left and right channels expected by the host.
To understand what a mid signal is, consider using a simple gain feature, available in many plugins. Setting the plugin to M mode and
decreasing gain, will actually lower or attenuate the mono content and the signal will appear "wider". There must be some stereo
content present, this will not work for monophonic audio material placed in stereo tracks of course. Similarly amplifying the mono
content by increasing the gain, will make the mono content dominant and the stereo image will become "narrower".
As well as a simple gain control there are various creative uses for this channel mode.
Using a on the mid channel can widen the stereo image, because in louder parts the mid part gets attenuated and thecompressor
Specyfikacje produktu
Marka: | MeldaProduction |
Kategoria: | Oprogramowanie dźwiękowe |
Model: | MMultiAnalyzer |
Potrzebujesz pomocy?
Jeśli potrzebujesz pomocy z MeldaProduction MMultiAnalyzer, zadaj pytanie poniżej, a inni użytkownicy Ci odpowiedzą
Instrukcje Oprogramowanie dźwiękowe MeldaProduction
7 Października 2024
3 Października 2024
3 Października 2024
3 Października 2024
3 Października 2024
3 Października 2024
3 Października 2024
3 Października 2024
3 Października 2024
3 Października 2024
Instrukcje Oprogramowanie dźwiękowe
- Oprogramowanie dźwiękowe PSP Audioware
- Oprogramowanie dźwiękowe MIA Laboratories
- Oprogramowanie dźwiękowe IZotope
- Oprogramowanie dźwiękowe Kuassa
- Oprogramowanie dźwiękowe Cherry Audio
- Oprogramowanie dźwiękowe Antares
- Oprogramowanie dźwiękowe Eventide
- Oprogramowanie dźwiękowe SONORIS
- Oprogramowanie dźwiękowe Slate Digital
- Oprogramowanie dźwiękowe Steinberg
- Oprogramowanie dźwiękowe Atomix
- Oprogramowanie dźwiękowe Sonible
- Oprogramowanie dźwiękowe Nomad
- Oprogramowanie dźwiękowe Air
- Oprogramowanie dźwiękowe Waves
- Oprogramowanie dźwiękowe Magix
- Oprogramowanie dźwiękowe Avid
- Oprogramowanie dźwiękowe Best Service
- Oprogramowanie dźwiękowe Xils Lab
- Oprogramowanie dźwiękowe MixVibes
- Oprogramowanie dźwiękowe Audified
- Oprogramowanie dźwiękowe Blue Cat Audio
- Oprogramowanie dźwiękowe Overloud
- Oprogramowanie dźwiękowe FabFilter
- Oprogramowanie dźwiękowe Metric Halo
- Oprogramowanie dźwiękowe Audiomodern
- Oprogramowanie dźwiękowe Chocolate Audio
- Oprogramowanie dźwiękowe Nugen Audio
- Oprogramowanie dźwiękowe TAL Software
Najnowsze instrukcje dla Oprogramowanie dźwiękowe
8 Października 2024
8 Października 2024
8 Października 2024
8 Października 2024
8 Października 2024
8 Października 2024
8 Października 2024
8 Października 2024
8 Października 2024
8 Października 2024