Instrukcja obsługi LG 65UM3DG
Przeczytaj poniżej 📖 instrukcję obsługi w języku polskim dla LG 65UM3DG (40 stron) w kategorii monitor. Ta instrukcja była pomocna dla 7 osób i została oceniona przez 2 użytkowników na średnio 4.5 gwiazdek
Strona 1/40

OWNER’S MANUAL
LG Digital Signage
(MONITOR SIGNAGE)
www.lg.com
Copyright © 2020 LG Electronics Inc. All Rights Reserved.
Please read this manual carefully before operating your set and retain it for future
reference.
43UM3DG
49UM3DG
55UM3DG
65UM3DG

2
ENGLISH
TABLE OF CONTENTS
SAFETY PRECAUTIONS 3 ................
- Precautions for the AC Adapter and Power 4 ......
- Precautions for Moving the Product 6 ......................
- Precautions for Installing the Product 7 ..................
- Precautions for Cleaning the Product 9 ...................
- Precautions for Using the Product.......................10
- Precautions for Using the Remote control 12 ......
- Precautions for Experiencing
Image Retention 13 .............................................................
- Product Disposal 13 ............................................................
ASSEMBLY AND
PREPARATION 14 ............................
- Optional Accessories 15 ....................................................
- Parts and Buttons 16 .........................................................
- Connecting the Stand 17 .................................................
- Connecting the IR Sensor 18 .........................................
- Portrait Layout 21 ................................................................
- Assembling the Memory Cover..............................22
- Installing on a Wall 23 ........................................................
REMOTE CONTROL 25 ....................
MAKING CONNECTIONS 27 ...........
- Connecting to a PC.......................................................27
- External Device Connection 27 .....................................
- Using the Input List 28 ......................................................
- Connecting Multiple Monitors 29 ................................
TROUBLESHOOTING 30 ..................
PRODUCT SPECIFICATIONS 34 ......
LICENSES 39 ....................................
3
ENGLISH
WARNING - This equipment is compliant with Class A of CISPR 32. In a residential environment this equipment may
cause radio interference.
SAFETY PRECAUTIONS
The safety precautions are intended to prevent unexpected danger or harm by helping the user to use the product
safely and for its intended purpose.
WARNING
If you ignore the warning message, you may be seriously injured or there is a possibility of accident or death.
CAUTION
If you ignore the caution message, you may be slightly injured or the product may be damaged.
WARNING
•Indoor Use Only.

4
ENGLISH
Precautions for the AC Adapter and Power
WARNING
•Use only the power cord or AC adapter provided or approved by LG Electronics, Inc. If you use another power cord,
make sure that it is certified by the national standards. If the power cable is faulty in any way, please contact the
manufacturer or the nearest authorized service center for a replacement.
•Operate the display only from a power source(i.e. voltage) indicated in the product specification.
- Otherwise the product can be damaged, fire can occur or you may be electrocuted. If you are not sure what type of
power supply you have, consult a certified installation company.
•Make sure the power cord connect to a properly grounded outlet.
- If you do not you may be electrocuted or injured or the product can be damaged.
•Insert the power plug or AC adapter firmly so it cannot come loose.
- Poor connection may cause a fire or electric shock.
•In the presence of thunder and lightning, never touch the power cord and signal cable because it can be very
dangerous.
- It can cause electric shock.
•Be careful not to step or place heavy objects (electronic appliances, clothing, etc.) on the power cord or AC adapter.
Additionally, do not bend or pull out the power cord or AC adapter with excessive force.
- Damaged power cords may cause a fire or electric shock.
•Do not connect power cord or AC adapter damaged with sharp objects to power outlet.
- You may be electrocuted.
•Do not insert a conductor (like a metal chopstick) into one end of the power cord while the other end is connected to
the input terminal on the wall. Additionally, do not touch the power cord right after it is unplugged.
- You may be electrocuted.
•Do not use with a multi-outlet connected by many electrical product and heating devices. Use an exclusive multi-
outlet with a grounding terminal.
- A fire can break out due to overheating.

5
ENGLISH
•If water or any foreign substance goes inside the product, disconnect the power cord immediately and contact the
service center.
- Otherwise, this may cause a fire or electric shock due to damage to the product.
•Keep the power cord or AC adapter away from any heating devices.
- The cord coating may melt and cause fire or electric shock.
•Never disassemble, repair or modify the power cord or AC adapter.
- This may cause a fire or electric shock.
•The main cutoff device is the power cord. Please make sure the product is installed near the wall outlet and that it is
easily accessible.
•As long as this unit is connected to the AC wall outlet, it is not disconnected from the AC power source even if the
unit is turned off.
•Power consumption will be ‘0’ only when the power plug is unplugged.
•Use the appliance coupler as the disconnect device.
CAUTION
•If the outlet pins of the power plug or AC adapter is covered with dust, be sure to wipe them and keep them clean.
- Overheating due to layers of dust may cause a fire or electric shock.
•If the outlet pins of the power plug or AC adapter is covered with water be sure to wipe them and keep them clean.
Additionally, Do not touch the power plug or AC adapter with wet hands.
- This may cause an electric shock.
•Do not turn the product on or off by plugging in or unplugging the power plug from the power outlet. Do not use the
power socket as a switch.
- This may cause an electric shock or product malfunction.
•Do not unplug the power cord while the product is in use.
- Electrical shock can damage the product.

6
ENGLISH
Precautions for Moving the Product
WARNING
•Contact the service center before moving the product.
- It may cause electric shock and damage the product.
•Make sure the product is turned off, unplugged, and all cables have been removed before the product is moved.
- You may be electrocuted or the product can be damaged.
•When moving the product, do not shock or cause an impact on the front panel.
- You may be electrocuted or the product can be damaged.
•Use the correct number of people according to the weight of the product. (Under 25Kg per person use lifting
equipment when exceeding 100 Kg)
- If use the damaged product again, contact the service center because it can cause electric shock or fire.
•Do not hold it upside down while holding only the stand. (It is for stand supported models only.)
- This may cause stand warping, panel damage and other types of product damage.
CAUTION
•Do not dispose of the product-packing box. Use it when moving by putting the product in the box to carry it.

7
ENGLISH
Precautions for Installing the Product
WARNING
•Contact the service center before installing the product.
- It can cause electric shock and damage the product.
•Do not drop an object on or impact on the product. Keep out of reach of children and do not place toys or objects
near the product to prevent throwing things on the product screen.
- It can cause injury to human, problem to product and damage the display.
•Do not put heavy objects on, or hang from, the product.
- If the product collapses or is dropped, you may be injured.
•Do not touch the surface of the product if it overheats.
- It can cause injury to human.
•Install the product firmly fixed on a floor, wall, etc. to prepare against external impact such as wind and earthquake.
- You must refer to the manual provided.
•Prevent Children from climbing or hanging on the product.
- If the product collapses or is dropped, you may be injured.
•Do not install it where there are heating devices such as electrical heaters or lighting equipment.
- Fire, electrical shock, malfunction may occur.
•Do not install this product by yourself as you may injure yourself or cause damage to the product. Please contact
service engineer authorized by service center.
•Do not install this product on a wall if it could be exposed to oil or oil mist.
- This may damage the product and cause it to fall.
•Do not leave the power or signal cable, etc. on the pathway.
- This could cause a trip or fall, which could cause an electrical shock, fire, product breakdown, or injury.
•Do not let the product drop when connecting it to an external device connected with a short cable.
- This may cause injury and damage to the product.
•If you dropped the product or the case is broken, turn off the product and unplug the power cord and contact the
service center.
- If you continue to use without taking proper measures, electrical shock or fire can occur.
•Install the product in a dry place where it is not near dust and water. Avoid high temperatures and humidity.
- This may cause electrical shock, fire or product damage.
•Safely install the product in a place that can hold the weight of the product.
- A lack of strength may cause the product to fall.
•Take a comfortable and natural position to relax the muscles when working with a product.

8
ENGLISH
CAUTION
•Install the product where no Electromagnetic Interference occurs.
•If you install the product in a place that does not meet the recommended conditions, this may cause serious damage
to the product’s picture quality, life cycle, and appearance. Please check with service engineer before installing. Please
do not install the product in places such as where there is an abundance of fine dust or oil mist, chemical substances
are used, exposed to direct sunlight, the temperature is very high or low, the humidity is very high.
•Make sure the product is well ventilated by Installing at a distance (100mm or more) from the wall.
- If you install the product too close to the wall, it may be deformed or fire can break out due to internal heat buildup.
•Do not cover the product with a tablecloth or a curtain or other materials (e.g. plastic) while plugged in. Do not block
the ventilation hole of the product.
- The product can be deformed or fire can break out due to overheating inside the product.
•Do not install the product in an area with poor ventilation (e.g. on a bookshelf, in a closet) or outside and avoid placing
on cushions or carpets.
- The product could catch fire due to overheating inside the product.
•Install the product on a flat and stable place that is large enough to support the product.
- If the product is dropped, you may be injured or the product may be broken.
•When installing the product on a shelf or cabinet, make sure that the bottom end of the product is not protruding
forward.
- The product may fall due to unbalanced center of gravity, which may cause personal injury or damage to the
product. Be sure to use cabinets or shelves that fit your product.

9
ENGLISH
Precautions for Cleaning the Product
WARNING
•Keep the product clean at all times.
- If you don’t clean the unit for a long time and it becomes covered in dust, it can cause fire or product damage.
•When you need to clean the inside of the product, you must contact the service center.
- Otherwise, cleaning without support may cause a fire, electric shock, or damage to the product.
•When cleaning the product, unplug the power cord and wipe gently with a soft cloth to prevent scratching.
- An electric shock may occur or damage to the screen if its scratched.
•When you want to clean the front frame, spray water onto a soft cloth 2 to 4 times and wipe in one direction only.
- Too much moisture may cause staining.
CAUTION
•When cleaning the product or the screen, unplug the power cord and wipe it gently with a soft cloth. Do not spray
water or other liquids directly on the product. Especially, do not clean your product with chemicals including glass
cleaner, any type of air freshener, insecticide, lubricants, wax (car, industrial), abrasive, thinner, benzene, alcohol, etc.,
which can damage the product or its panel.
- This may result in fire, electric shock or product damage (deformation, corrosion or breakage).

10
ENGLISH
Precautions for Using the Product
WARNING
•Do not use the product in any environment with excessively high temperatures or humidity.
•If you use the product for a long period of time, take a rest from time to time to protect your vision.
- Extended viewing could result in impaired vision.
•Listening at high volume or using for a long time can cause damage to your hearing.
•In the event that liquid or a foreign object falls into the product, please switch it off and unplug it from the wall outlet
and contact the service center.
- Otherwise, the product may cause fire or electric shock.
•In the event that no image appears on the screen or no sound is heard, stop using the product. Switch it off
immediately, unplug it from the power outlet and contact the service center.
- Otherwise, the product may cause fire or electric shock.
•Do not drop an object or impact on the product or screen.
- It can cause injury to human, problem to product and damage the screen.
•If you can smell smoke or other odors or hear a strange sound, unplug the power cord and contact the service center.
- If you continue to use the product without taking proper measures, it may cause electrical shock or fire.
•Do not attempt to disassemble, repair or modify the product yourself. Please contact service center if you need to
repair it.
- Fire or electric shock can occur.
•Do not place objects filled with liquids such as vases, cups etc. on or over the product to prevent liquid from entering
the product.
- Failure to do so may result in fire, electric shock, malfunction or deformation.
•Do not push hard on or scratch the product’s surface with your hands or sharp objects, such as nails, pencils or pens.
Do not shock or scratch the front and sides of the screen with metallic objects.
- This may damage the products and cause it to malfunction.
•Do not touch the product if it has been exposed to sunlight or an intense light because it could be hot.

12
ENGLISH
Precautions for Using the Remote control
WARNING
•Avoid places with high humidity.
- It may cause electrical shock or damage the product.
•Do not expose batteries to excessive heat, such as direct sunlight, open fireplace, and electric heaters.
- It may cause fire and you may be injured.
•Make sure that children do not swallow the remote control batteries when you replace them. Keep batteries out of
reach of children.
- If a child swallows a battery, consult a doctor immediately.
•Do not dispose of batteries in a fire.
- Please dispose batteries at a local recycling center or a retail store that handles batteries.
•Used batteries, which include rechargeable batteries, should be recycled separately from waste.
- Please dispose used batteries and rechargeable batteries at a local recycling center or a retail store that handles
batteries.
CAUTION
•Do not short circuit and disassemble of batteries.
- It may cause electrical shock or fire.
•The remote control may not function properly in sunlight or under a strong lamp. Move the product if it is being used
in these conditions.
•Check if there is any obstacle between the product and the remote control.
•Do not mix new batteries with old batteries.
- Overheating or leaking batteries may cause fire or electric shock.
•Only use the specified type of battery. Do not insert batteries that are not rechargeable into the charger.
- Overheating or leaking batteries may cause fire or electric shock.

13
ENGLISH
Precautions for Experiencing Image Retention
•Displaying a still image for a prolonged period of time may cause damage to the screen, resulting in image retention.
Most third-party products have the same issue. The resulting damage is not covered by the product warranty.
- Use a screen saver when using the monitor for a prolonged period of time.
Product Disposal
•Do not dispose of this product with general household waste.
•Disposal of this product must be carried out in accordance to the regulations of your local authority.

14
ENGLISH
ASSEMBLY AND PREPARATION
CAUTION
•Always use genuine components to ensure safety and product performance.
•The product warranty will not cover damage or injury caused by the use of counterfeit components.
NOTE
•The accessories provided with your product may vary depending on the model or region.
•Product specifications or contents in this manual may be changed without prior notice due to upgrade of product
functions.
•SuperSign Software & Manual
- Downloading from the LG Electronics website.
- Visit the LG Electronics website (http://partner.lge.com) and download the latest software for your model.
•The warranty will not cover any damage caused by using the product in an excessively dusty environment.

15
ENGLISH
Optional Accessories
Without prior notice, optional accessories are subject to change to improve the performance of the product, and new
accessories may be added. The illustrations in this manual may differ from the actual product and accessories.
Stand kit
ST-653T Screws
Diameter4.0mm xPitch0.7mm xLength12.0mm
Media Player kit
Media Player
MP500/ MP700
Screws
Diameter3.0mm xPitch0.5mm
xLength6.0mm
CD (Owner's Manual)/ Cards
NOTE
•Cable holder/cable tie may not be available in some areas or for some models.
•Optional accessories are available for some models. If necessary, please purchase them separately.
•Before you attach the OPS kit or Media Player, connect the cable to the port.

16
ENGLISH
Parts and Buttons
The image may be different according to the model.
Power On (Press)
Quick Menu (Press 1)
Menu Selection (Press 2)
Power Off 3 (Press and Hold)
Volume Control
Menu Control 2Menu Control 2
1 When the monitor is turned on, press the button one time.
2 You can use the function when you control menu.
3 All running apps will close.
Quick Menu
Turns the power off. Accesses the main menu.
Changes the input source. Close the quick menu.

17
ENGLISH
Connecting the Stand
- For certain models only.
- The image may be different according to the model.
1
2

18
ENGLISH
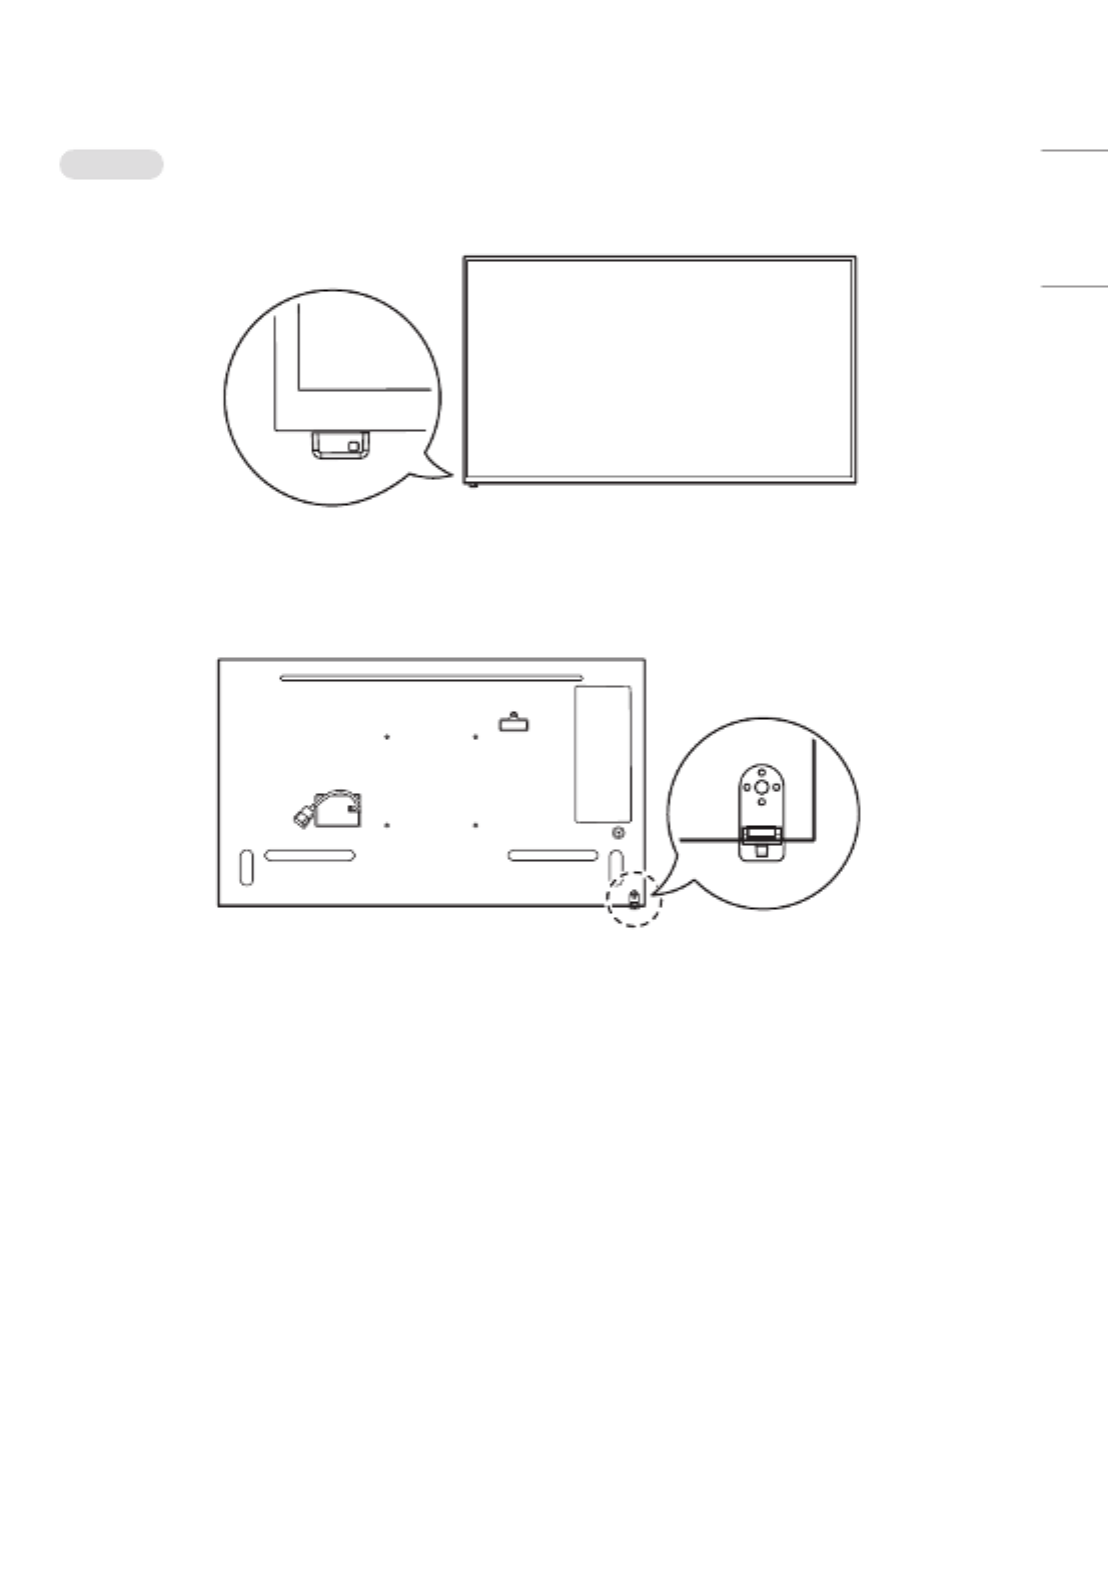
Connecting the IR Sensor
When you connect the cable to the product, the feature for receiving remote control signals is activated. Rotate the IR
sensor according to the screen orientation (Landscape/Portrait).
- The image may be different according to the model.
Basic installation
[Front]
[Rear]
19
ENGLISH
Landscape
[Front]
[Rear]
20
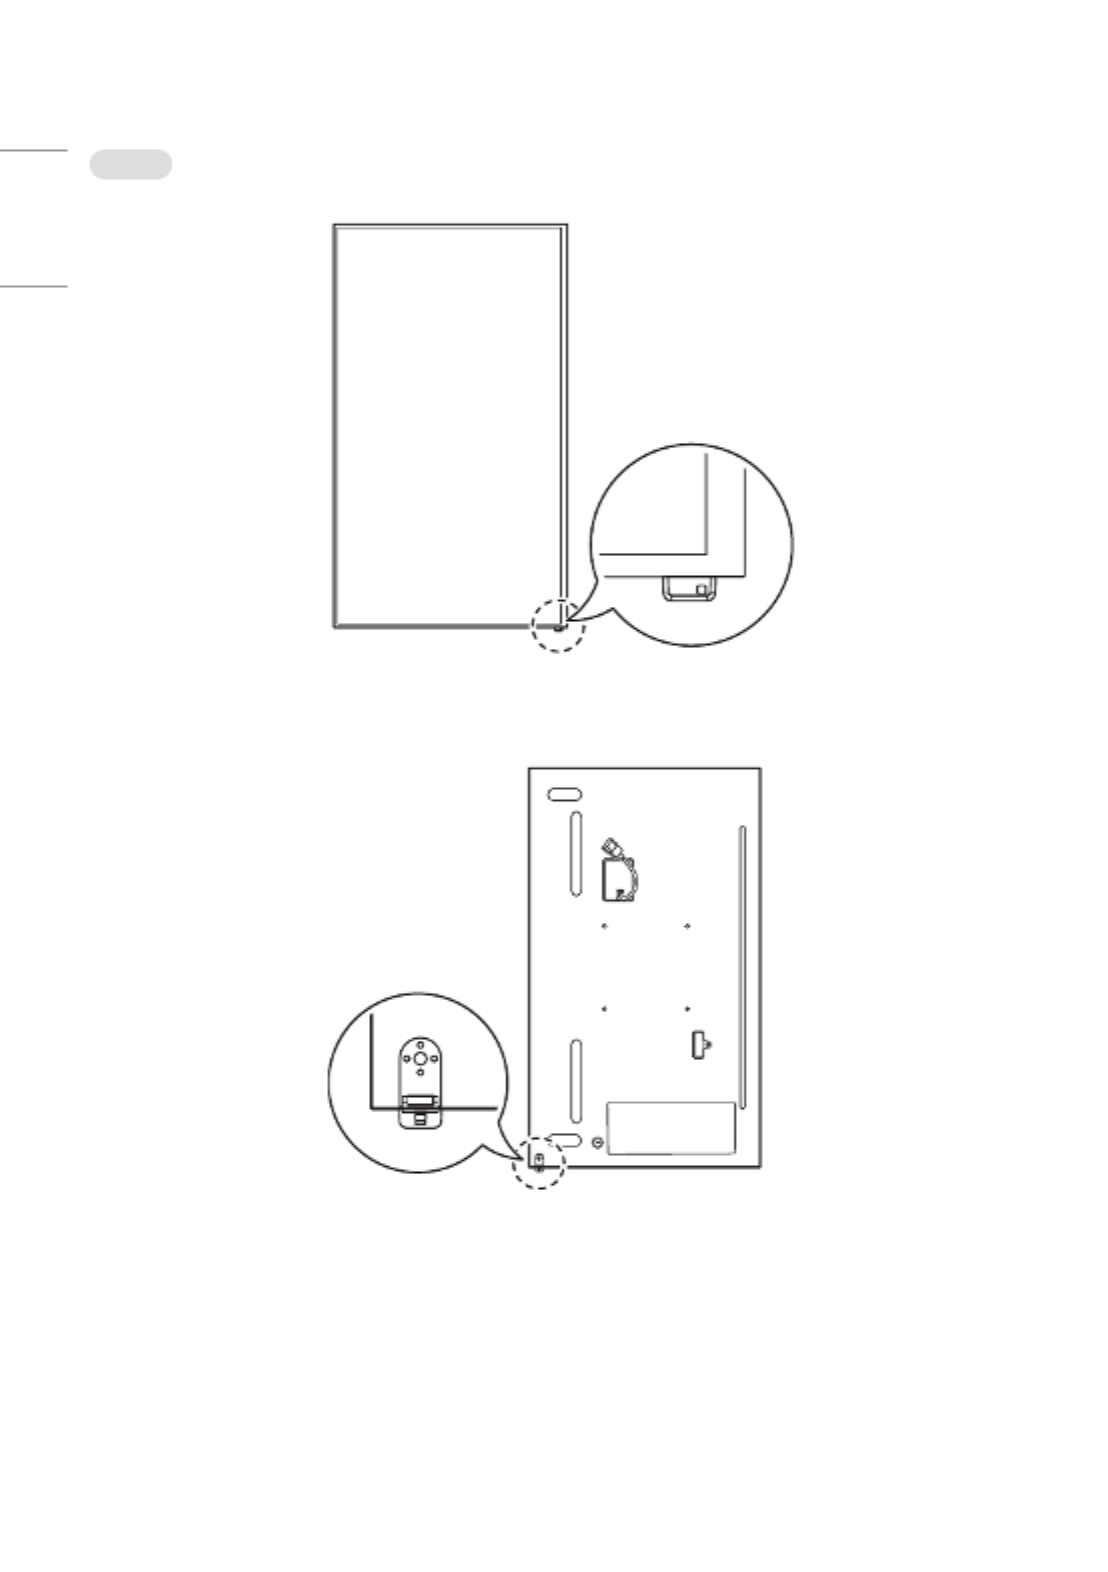
ENGLISH
Portrait
[Front]
[Rear]

21
ENGLISH
Portrait Layout
When installing in a portrait layout, rotate the monitor counterclockwise 90 degrees (when facing the screen).
Using Kensington Lock
(This is not available for all models.)
The Kensington security system connector is located at the back of the monitor. For more information on installation
and use of this system, refer to the manual provided with the Kensington security system or visithttp://www.
kensington.com.
Connect the Kensington security system cable between the monitor and a table.
NOTE
•The Kensington security system is optional. You can obtain additional accessories from most electronics retail stores.
•The illustration shows a general example of installation and may look different from the actual product.

22
ENGLISH
Assembling the Memory Cover
Assemble the cover with a screw as illustrated to prevent the USB memory from theft.
1

23
ENGLISH
Installing on a Wall
For proper ventilation, allow a clearance of 100mm on each side and from the wall. Detailed installation instructions
are available from your dealer, see the optional Tilt Wall Mounting Bracket Installation and Setup Guide.
100mm
100mm
100mm
100mm 100mm
To install your monitor on a wall, attach a wall mounting bracket (optional part) to the back of the monitor.
Make sure that the wall mounting bracket is securely fixed to the monitor and to the wall.
1 Use only screws and wall mounting brackets that conform to VESA standards.
2 Screws which are longer than standard length may damage the inside of the monitor.
3 A non-VESA standard screw may damage the product and cause the monitor to fall. LG Electronics is not liable for
any accidents related to the use of non-standard screws.
4 Please use VESA standard as below.
•785mm and above
* Fixing screws: Diameter6.0mm xPitch1.0mm xLength12mm
785mm

24
ENGLISH
CAUTION
•Disconnect the power cord before moving or installing the monitor to avoid risk of electric shock.
•If you install the monitor on a ceiling or slanted wall, it may fall and result in injury. Use an authorized LG wall mount
and contact your local dealer or qualified personnel to assist with the installation.
•Do not over tighten the screws as this may damage the monitor and void your warranty.
•Use only screws and wall mounting brackets that meet the VESA standard. Any damage or injuries caused by misuse
or use of improper accessories are not covered by the warranty.
NOTE
•The wall mount kit includes the installation guide and all necessary parts.
•The wall mounting bracket is optional. You can obtain additional accessories from your local dealer.
•The length of screws required may differ depending on the wall mount. Be sure to use the correct length.
•For more information, please refer to the guide provided with the wall mount.
•Tilt installation of up to30degrees facedown is supported. (in conditions within30°Ctemperature,50%humidity)

25
ENGLISH
REMOTE CONTROL
The descriptions in this manual are based on the buttons on the remote control. Please read this manual carefully to
use the monitor correctly. To install batteries, open the battery cover, place batteries (1.5VAAA) matching and
terminals to the labels inside the compartment, and close the battery cover. To remove the batteries, perform the
installation actions in reverse. The illustrations may differ from the actual accessories.
CAUTION
•Do not mix old and new batteries, as this may damage the remote control.
•Be sure to point the remote control toward the remote control sensor on the monitor.
•Some features of the remote control may not be supported in certain models.
•The product’s internal and external batteries should not be exposed to excessive heat such as direct sunlight, fire, or
the like.
Turns the monitor on or off.(POWER)
Turns the monitor on.
Turns the monitor off.
Adjusts the brightness of the picture to reduce
energy consumption.
(INPUT) Selects the input mode.
This function is not supported.
Number and Alphabet buttons Enters numerical or alphabetical
characters depending upon the setting.
Toggles between numerical and alphabetical.
Deletes the entered numerical or alphabetical character.
(Volume Up/Down Button) Adjusts the volume.
Selects the Aspect Ratio mode.
Automatically adjusts picture position and minimizes image
instability (available for RGB input only).
(MUTE) Mutes all sounds.
Adjusts the brightness of the display.
function is not supported in this model.

26
ENGLISH
Selects the Picture Mode.
(HOME) Activates the Launcher.
Enters the White Balance menu.
(SETTINGS) Accesses the main menus or saves your input and exit
menus.
This function is not supported.
(Navigation Buttons) Scrolls through menus or options.
Selects menus or options and confirms your input.
(BACK) Allows you to move back one step in the user interaction
function.
Quit all OSD tasks and applications.
Allows you to control various multimedia devices to enjoy
multimedia simply by using the remote control through the SimpLink
menu.
Selects the Mode.
When the Picture ID number matches the Set ID
number, you can control whichever monitor you want in multi-display
format.
USB Menu Control Buttons Controls media playback.

27
ENGLISH
MAKING CONNECTIONS
You can connect various external devices to your monitor. Change the input mode and select the external device you
want to connect. For more information about external device connections, see the user manual provided with each
device.
Connecting to a PC
Some of the cables are not provided. This monitor supports the * feature.
* : a feature that enables a PC to recognize devices attached by the user without device configuration or
user intervention when powering up.
External Device Connection
Some of the cables are not provided. Connect a HD receiver, DVD, or VCR player to the monitor and select an
appropriate input mode.
For the best picture and sound quality, connecting external devices to your monitor using HDMI cables is recommended.

28
ENGLISH
NOTE
•For the best image quality, using the monitor with HDMI connection is recommended.
•To comply with the specifications of the product, use a shielded interface cable with ferrite core, such as a DVI-D/
HDMI cable.
•If you turn the monitor on when the set is cold, the screen may flicker. This is normal.
•Sometimes red, green, or blue spots may appear on the screen. This is normal.
•Use a High Speed HDMI®/™ cable (shorter than3meters).
•Use a certified cable with the HDMI logo attached. If you do not use a certified HDMI cable, the screen may not
display or a connection error may occur.
•Recommended HDMI Cable Types
- High Speed HDMI®/™ Cable
- High Speed HDMI®/™ Cable with Ethernet
•If you cannot hear any sound in HDMI mode please check your PC settings. Some PCs require you to manually change
the default audio output to HDMI.
•If you want to use HDMI-PC mode, you must set your PC/DTV to PC mode.
•You may experience compatibility issues if you use HDMI-PC mode.
•Make sure the power cable is disconnected.
•If you connect a gaming device to the monitor, use the cable provided with the gaming device.
CAUTION
•Connect the signal input cable and tighten it by turning the screws clockwise.
•Do not press the screen with your finger for a prolonged period as this may result in temporary distortion on the
screen.
•Avoid displaying static images on the screen for a long period of time to prevent retention. Use a screensaver if
possible.
•A wireless communication device near your monitor can affect the image.
Using the Input List
(HOME)
•

29
ENGLISH
Connecting Multiple Monitors
To use multiple monitors connected to each other, connect the end of the signal input cable to the connection in
one monitor and connect the other end to the connection of the other monitor.
RS-232C
IN
RS-232C
OUT
RS-232C
IN
RS-232C
OUT
RS-232C
IN
RS-232C
OUT
NOTE
•If the signal cable connecting the product to your PC is too long, make sure to use a booster or optical cable.

30
ENGLISH
TROUBLESHOOTING
ŮEach model may have different points to check.
ŮFor information on your PC settings, refer to the Windows Help.
Issues Related to Use
•The power won’t turn on.
- Check if the power cord is correctly plugged into the power outlet.
- Try turning the power on after disconnecting the AC adapter and cleaning the contacting port.
•The ‘Unknown Product’ message appears when the product is connected.
- Check if the driver of PC(graphics card) has been installed.
- Check if the plug and play function is supported by the PC(graphics card) user manual.
Issues Related to Screen (Video)
•A message saying ‘No signal’ or ‘Invalid Format’ appears.
- The signal cable is not connected between the PC and the product, or the cable connection status is unstable.
Check the signal cable.
- Access the input menu to check the input signal.
- The signal from the PC (Graphics card) is out of the vertical or horizontal frequency range of the product. Adjust
the frequency range by referring to the specifications in this manual.
•The position of the screen is incorrect.
- Check if the graphics card resolution and frequency are supported by the product. If the frequency exceeds the
supported range, use PC settings to set the resolution to the recommended value.
- D-Sub analog signal - Press the button in the remote control to automatically select the optimal screen
status that fits into the current mode. If the adjustment is not satisfactory, adjust the display settings manually in
the OSD menu.
•The screen is displayed abnormally.
- Connect the signal cable that matches with the source input signal.

31
ENGLISH
•Images are flickering or fluttering on the screen.
- If you turn the monitor on when it is cold, the screen may flicker. This is normal.
- Make sure that the current resolution and frequency settings of the graphics card are supported by the monitor.
•Stripes appear in the background.
- D-Sub analog signal - Press the button in the remote control to automatically select the optimal screen
status that fits into the current mode. If the adjustment is not satisfactory, adjust the display settings manually in
the OSD menu.
•Horizontal noise appears or the characters look blurred.
- D-Sub analog signal - Press the button in the remote control to automatically select the optimal screen
status that fits into the current mode. If the adjustment is not satisfactory, adjust the display settings manually in
the OSD menu.
Issues Related to Screen (Colour)
•Screen has poor colour resolution (16colours).
- Use PC settings to set the colour to24bits (True Colour) or above.
•Screen colour is unstable or mono-coloured.
- Check the connection status of the signal cable. Or, re-insert the PC graphics card.
•Black spots or bright spots appear on the screen.
- Some pixels (red, green, blue, black) are visible on the screen due to the unique characteristics of the display panel.
This is not a malfunction of the product.
•The screen’s brightness seems dark.
- Adjust brightness and contrast again.
- Backlight may need repair.
Issues Related to Sound
•There is no sound output.
- See if the audio cable is connected properly.
- Adjust the volume of the product or external device.
- See if the sound is set properly.
•Sound is too dull.
- Select the appropriate equalizer sound.
•Sound is too low.
- Adjust the volume of the product or external device.
•For some models, you will need to purchase external speakers separately since they do not have speakers built-in.
Specyfikacje produktu
| Marka: | LG |
| Kategoria: | monitor |
| Model: | 65UM3DG |
Potrzebujesz pomocy?
Jeśli potrzebujesz pomocy z LG 65UM3DG, zadaj pytanie poniżej, a inni użytkownicy Ci odpowiedzą
Instrukcje monitor LG

28 Marca 2025
12 Marca 2025
25 Lutego 2025
25 Lutego 2025
25 Lutego 2025
25 Lutego 2025
20 Lutego 2025
19 Lutego 2025
4 Lutego 2025
30 Stycznia 2025
Instrukcje monitor
- monitor Sony
- monitor Yamaha
- monitor Samsung
- monitor PeakTech
- monitor UPERFECT
- monitor Xiaomi
- monitor Joy-It
- monitor Sharp
- monitor Huawei
- monitor TCL
- monitor Pioneer
- monitor Lenovo
- monitor Philips
- monitor Plantronics
- monitor SilverCrest
- monitor Gigabyte
- monitor Acer
- monitor Bosch
- monitor Epson
- monitor JBL
- monitor Hikvision
- monitor Fujitsu
- monitor HyperX
- monitor LC-Power
- monitor Hisense
- monitor Panasonic
- monitor Promethean
- monitor Canon
- monitor Crestron
- monitor Viewsonic
- monitor Behringer
- monitor Asus
- monitor AG Neovo
- monitor Allen & Heath
- monitor IK Multimedia
- monitor Medion
- monitor Boss
- monitor Marquant
- monitor MSI
- monitor Toshiba
- monitor Tesla
- monitor Westinghouse
- monitor Jensen
- monitor Yealink
- monitor Ring
- monitor Garmin
- monitor Blaupunkt
- monitor Salora
- monitor Iiyama
- monitor Citizen
- monitor APC
- monitor Haier
- monitor HP
- monitor Hyundai
- monitor Honeywell
- monitor Chauvet
- monitor Tripp Lite
- monitor Shure
- monitor Cisco
- monitor Xerox
- monitor Smart
- monitor Cooler Master
- monitor Alpine
- monitor Godox
- monitor Dynaudio
- monitor Deltaco
- monitor JVC
- monitor V7
- monitor Dell
- monitor IFM
- monitor Corsair
- monitor Alesis
- monitor Vimar
- monitor Dahua Technology
- monitor Schneider
- monitor Eurolite
- monitor Ricoh
- monitor SMART Technologies
- monitor NZXT
- monitor Emos
- monitor Renkforce
- monitor Marshall
- monitor Viessmann
- monitor Omron
- monitor Thomson
- monitor Velleman
- monitor Neumann
- monitor DataVideo
- monitor Danfoss
- monitor Pyle
- monitor Apple
- monitor Newline
- monitor Waeco
- monitor AOC
- monitor Peerless-AV
- monitor Speco Technologies
- monitor Samson
- monitor PreSonus
- monitor ARRI
- monitor Kindermann
- monitor Olympus
- monitor Mitsubishi
- monitor Fluid
- monitor Razer
- monitor ART
- monitor Continental Edison
- monitor RCF
- monitor NEC
- monitor Brandson
- monitor Prestigio
- monitor OSEE
- monitor Sanyo
- monitor Elvid
- monitor Optoma
- monitor Focal
- monitor Asrock
- monitor Monkey Banana
- monitor Abus
- monitor AMCV
- monitor Jay-Tech
- monitor Mackie
- monitor Palmer
- monitor Barco
- monitor Insignia
- monitor AVer
- monitor Akuvox
- monitor 3M
- monitor Element
- monitor Denver
- monitor Marshall Electronics
- monitor Orion
- monitor Hitachi
- monitor Postium
- monitor Kali Audio
- monitor IStarUSA
- monitor Seiki
- monitor Ernitec
- monitor Wohler
- monitor SmallHD
- monitor AJA
- monitor KRK
- monitor BenQ
- monitor Atlona
- monitor Thermaltake
- monitor Simrad
- monitor Hanwha
- monitor Odys
- monitor Elo
- monitor Ikan
- monitor BOOX
- monitor JUNG
- monitor Burg Wächter
- monitor Eizo
- monitor Monacor
- monitor Aputure
- monitor Daewoo
- monitor Tannoy
- monitor GVision
- monitor Positivo
- monitor Adj
- monitor Freedom Scientific
- monitor SPL
- monitor Qian
- monitor I3-Technologies
- monitor Stairville
- monitor Vitek
- monitor Planar
- monitor Mobile Pixels
- monitor REVO
- monitor Atomos
- monitor Newstar
- monitor SWIT
- monitor Kramer
- monitor RGBlink
- monitor AMX
- monitor Midas
- monitor Alienware
- monitor Archos
- monitor Acti
- monitor Emachines
- monitor Caliber
- monitor Maxdata
- monitor Sunstech
- monitor GlobalTronics
- monitor Sunny
- monitor BlueBuilt
- monitor Da-Lite
- monitor ProXtend
- monitor Kubo
- monitor GeoVision
- monitor LaCie
- monitor InFocus
- monitor Festo
- monitor Konig
- monitor Swissonic
- monitor IHealth
- monitor Peaq
- monitor QSC
- monitor Hannspree
- monitor ESI
- monitor Avocor
- monitor Vivitek
- monitor Genelec
- monitor Interlogix
- monitor Vorago
- monitor EverFocus
- monitor POSline
- monitor Peerless
- monitor M-Audio
- monitor Mad Catz
- monitor Krom
- monitor Monoprice
- monitor Eve Audio
- monitor Yorkville
- monitor HoverCam
- monitor Voxicon
- monitor Sonifex
- monitor TV One
- monitor Fostex
- monitor Prowise
- monitor Terra
- monitor Neets
- monitor Soundstream
- monitor Xoro
- monitor HKC
- monitor CTOUCH
- monitor Ozone
- monitor Ibm
- monitor Maxell
- monitor Packard Bell
- monitor Provision ISR
- monitor Mybeo
- monitor CSL
- monitor Bearware
- monitor Drawmer
- monitor Blue Sky
- monitor Zalman
- monitor Iadea
- monitor Advantech
- monitor Hercules
- monitor Avantone Pro
- monitor Ganz
- monitor TVLogic
- monitor Gamber-Johnson
- monitor Extron
- monitor Neat
- monitor Legamaster
- monitor Belinea
- monitor Adam
- monitor Triton
- monitor ITek
- monitor Kogan
- monitor Posiflex
- monitor Antelope Audio
- monitor MicroTouch
- monitor X-Rite
- monitor EKO
- monitor ONYX
- monitor IBoardTouch
- monitor Mirai
- monitor Elite Screens
- monitor Hollyland
- monitor Mitsai
- monitor Christie
- monitor Skytronic
- monitor Enttec
- monitor Feelworld
- monitor Phoenix Contact
- monitor COMMBOX
- monitor Yiynova
- monitor Alogic
- monitor Pelco
- monitor Lilliput
- monitor LightZone
- monitor AOpen
- monitor Planet Audio
- monitor EC Line
- monitor Datacolor
- monitor HELGI
- monitor Desview
- monitor Syscom
- monitor Allsee
- monitor Night Owl
- monitor ProDVX
- monitor Varad
- monitor PureTools
- monitor DoubleSight
- monitor CTL
- monitor Game Factor
- monitor Nixeus
- monitor Chimei
- monitor Blue Sea
- monitor Faytech
- monitor Hamlet
- monitor Wyse - Dell
- monitor Approx
- monitor Bauhn
- monitor GeChic
- monitor Oecolux
- monitor ADS-TEC
- monitor Satco
- monitor Casalux
- monitor Jupiter
- monitor Transvideo
- monitor Innocn
- monitor KeepOut
- monitor Shimbol
- monitor Raysgem
- monitor Motrona
- monitor Ikegami
- monitor AORUS
- monitor Portkeys
- monitor Mimo Monitors
- monitor American Dynamics
- monitor AIS
- monitor Wortmann AG
- monitor Viotek
- monitor Vidi-Touch
- monitor KTC
- monitor CoolerMaster
- monitor Atlantis Land
- monitor HEDD
- monitor Colormetrics
- monitor IOIO
- monitor DTEN
- monitor Cocopar
- monitor Titan Army
- monitor Xenarc
- monitor Delvcam
- monitor Wimaxit
- monitor BookIT
- monitor SideTrak
- monitor TRIUMPH BOARD
- monitor Japannext
Najnowsze instrukcje dla monitor

8 Kwietnia 2025

8 Kwietnia 2025

8 Kwietnia 2025
7 Kwietnia 2025

5 Kwietnia 2025

4 Kwietnia 2025

4 Kwietnia 2025
3 Kwietnia 2025
2 Kwietnia 2025

2 Kwietnia 2025