Instrukcja obsługi LG 43SQ700S
Przeczytaj poniżej 📖 instrukcję obsługi w języku polskim dla LG 43SQ700S (31 stron) w kategorii monitor. Ta instrukcja była pomocna dla 18 osób i została oceniona przez 2 użytkowników na średnio 4.5 gwiazdek
Strona 1/31

ENGLISH_index
OWNER’S MANUAL
www.lg.com
Copyright © 2023 LG Electronics Inc.
All Rights Reserved.
The model and serial number of the product are located on the
back and on one side of the product. Record them below in case
you ever need service.
Model
Serial No.
LG SMART Display
Please read this manual carefully before
operating your set and retain it for future
reference.
43SQ700S
Supplier's Declaration of Conformity
Trade Name LG
Responsible
Party
LG Electronics USA,
Inc.
Address 111 Sylvan Avenue,
North Building,
Englewood Cliffs,
NJ07632
E-mail lg.environmental@
lge.com

2
Before reading this manual
•Read this manual thoroughly before operating your Monitor, and keep it for future reference.
•On the website you can download the manual including installation, using, troubleshooting, specifications, license etc and view its contents on your PC or
mobile device.
•User Guide : For more information about this Monitor, read the USER GUIDE embedded in the product.
-To open the USER GUIDE [Support] [User Guide] → → →
Separate Purchase
•Separate purchase items can be changed or modified for quality improvement without any notification. Contact your dealer to buy these items. These
devices only work with certain models.
•The model name or design may be changed depending on the upgrade of product functions, manufacturer’s circumstances or policies.
•Magic Remote Control : (MR22GA model can be used in common with some TV products and this LG Smart Display)MR22GA
Check whether your model supports Bluetooth in the Wireless Module Specification to verify whether it can be used with the Magic Remote.
•A cable to connect external devices must be purchased separately.
Note
•Product specifications or contents of this manual may be changed without prior notice due to upgrade of product functions.
•The items supplied with your product may vary depending on the model.
•Image shown may differ from your Monitor.
Important Precautions
Please read these safety precautions carefully before using the product. All precautions and safety information applies to LCD models.
•Failure to follow those warnings may result in death, serious injury or damage to the product or other property.
Precautions to the AC Adapter and Electrical Power
•If water or any foreign substance goes inside the product (Monitor, power cord, or AC adapter), disconnect the power cord immediately and contact the
service center.
-Otherwise, this may cause a fire or electric shock due to damage to the product.
•Do not touch the power plug or AC adapter with wet hands. If the pins of the plug are wet or dusty, wipe and dry them before use.
-Otherwise, this may cause a fire or electric shock.
•Make sure to completely insert the power cord into the AC adapter.
-If loosely connected, the poor connection may cause a fire or electric shock.
•Be sure to use power cords and AC adapters provided or approved by LG Electronics, Inc.
-The use of non-approved products may cause a fire or electric shock.
•When unplugging the power cord, always pull it by the plug. Do not bend the power cord with excessive force.
-The power line can be damaged, which may cause electric shock or fire.
•Be careful not to step or place heavy objects (electronic appliances, clothing, etc.) on the power cord or AC adapter. Be careful not to damage the power cord
or AC adapter with sharp objects.
-Damaged power cords may cause a fire or electric shock.

3
•Never disassemble, repair or modify the power cord or AC adapter.
-This may cause a fire or electric shock.
•Use only the power cord supplied with the unit or another manufacturer's authorized cord.
-Failure to do so may result in fire or electrical shock or damage to the product.
•Use only a properly grounded plug and receptacle.
-If you do not you may be electrocuted or injured. Or the product might be damaged.
•Do not use a damaged or loose plug.
-This may cause electrical shock or fire.
•Operate the display only from a power source(i.e. voltage) indicated in the product specification.
-Otherwise the product can be damaged, fire can occur or you may be electrocuted. If you are not sure what type of power supply you have, consult a
certified electrician.
•In the presence of thunder and lightning, never touch the power cord and signal cable because it can be very dangerous.
-It can cause electric shock.
•Do not connect several extension cords, electrical appliances or electrical heaters to a single outlet. Use a power bar with a grounding terminal designed for
exclusive use with the computer.
-A fire can break out due to overheating.
•Do not touch the power plug with wet hands. Additionally, if the cord pin is wet or covered with dust, dry the power plug completely or wipe dust off before
plugging in the cord.
-You may be electrocuted due to excess moisture.
•If you don’t intend to use the product for a long time, unplug the power cable from the product.
-Covering dust can cause a fire, or insulation deterioration can cause electric leakage, electric shock or fire.
•Insert the power plug firm so it cannot come loose.
-A loose connection can cause fire.
•Do not insert metal or other conductive materials into the product openings. Additionally, do not touch the power cable right after plugging into the wall
input terminal.
-You may be electrocuted.
•The AC Plug is the disconnecting device. It should be easily accessible in case of emergency.
•Please make sure the device is installed near the wall outlet to which it is connected and that the outlet is easily accessible.
•Be sure to keep the outlet, AC adapter, and pins of the power plug clean from dust and etc.
-This may cause a fire.
•Do not unplug the power cord while the product is in use.
-Electrical shock can damage the product.
•As long as this unit is connected to the AC wall outlet, it is not disconnected from the AC power source even if the unit is turned off.
Precautions in installing the Product
•Keep away from heat sources like heaters or open flames.
-Electrical shock, fire, malfunction or deformation may occur.
•Keep the packing anti-moisture material or vinyl packing out of the reach of children.
-Anti-moisture material is harmful if swallowed. If swallowed by mistake, force the patient to vomit and visit the nearest hospital. Additionally, vinyl
packing can cause suffocation. Keep it out of the reach of children.
•Do not put heavy objects on the product on sit upon it.
-If the product collapses or is dropped, you may be injured. Children must pay particular attention.
•Do not leave the power or signal cable where someone can trip over it.
-The passerby can falter, which can cause electrical shock, fire, product breakdown or injury.
•Install the product in a neat and dry place. Do not use near water.
-Dust or moisture can cause electrical shock, fire or product damage.
•Do not add accessories that have not been designed for this display.

4
•If you smell smoke or other odors or hear a strange sound from the product unplug the power cord and contact LG Customer Service.
-If you continue to use without taking proper measures, electrical shock or fire can occur.
•If you dropped the product or the case is broken, turn off the product and unplug the power cord.
-If you continue to use without taking proper measures, electrical shock or fire can occur. Contact LG Customer Service.
•Do not drop an object on or apply impact to the product. Do not throw any toys or objects at the product.
-It can cause injury to humans, problems to the product and damage the display.
•Keep out of reach of children and do not place toys near the product.
•Make sure the product ventilation hole is not blocked. Install the product more than 10cm (3.9inches) from the wall.
-If you install the product too close to the wall, it may be deformed or fire can break out due to internal heat build-up.
•Do not cover the product with cloth or other material (eg. plastic) while plugged in.
-The product can be deformed or fire can break out due to internal overheating.
•Place the product on a flat and stable surface that is large enough to support the product.
-If the product is dropped, you may be injured or the product may be broken.
•Install the product where no Electromagnetic Interference occurs.
•Keep the product away from direct sunlight.
-The product can be damaged.
•Do not place the product on the floor.
-Small Children and others may trip over it.
•Do not install this product on a wall if it could be exposed to oil or oil mist.
-This may damage the product and cause it to fall.
•For displays with glossy bezels the user should consider the placement of the display as the bezel may cause disturbing reflections from surrounding light
and bright surfaces.
Precautions in Moving the Product
•Make sure to turn off the product.
-You may be electrocuted or the product can be damaged.
•Make sure to remove all cables before moving the product.
-You may be electrocuted or the product can be damaged.
•When lifting or moving the product, do not hold it upside down while holding only the stand.
-This may cause the product to fall resulting in damage or injury.
•Do not shock the product when moving it.
-You may be electrocuted or the product can be damaged.
•Make sure the panel faces forward and hold it with both hands to move.
-If you drop the product, the damaged product can cause electric shock or fire.
•Do not place the product face down.
-This may damage the TFT-LCD screen.
5
Precautions in Using/Cleaning the Product
•Do not attempt to disassemble, repair or modify the product yourself.
-Fire or electric shock can occur.
-Contact LG Customer Service for repair.
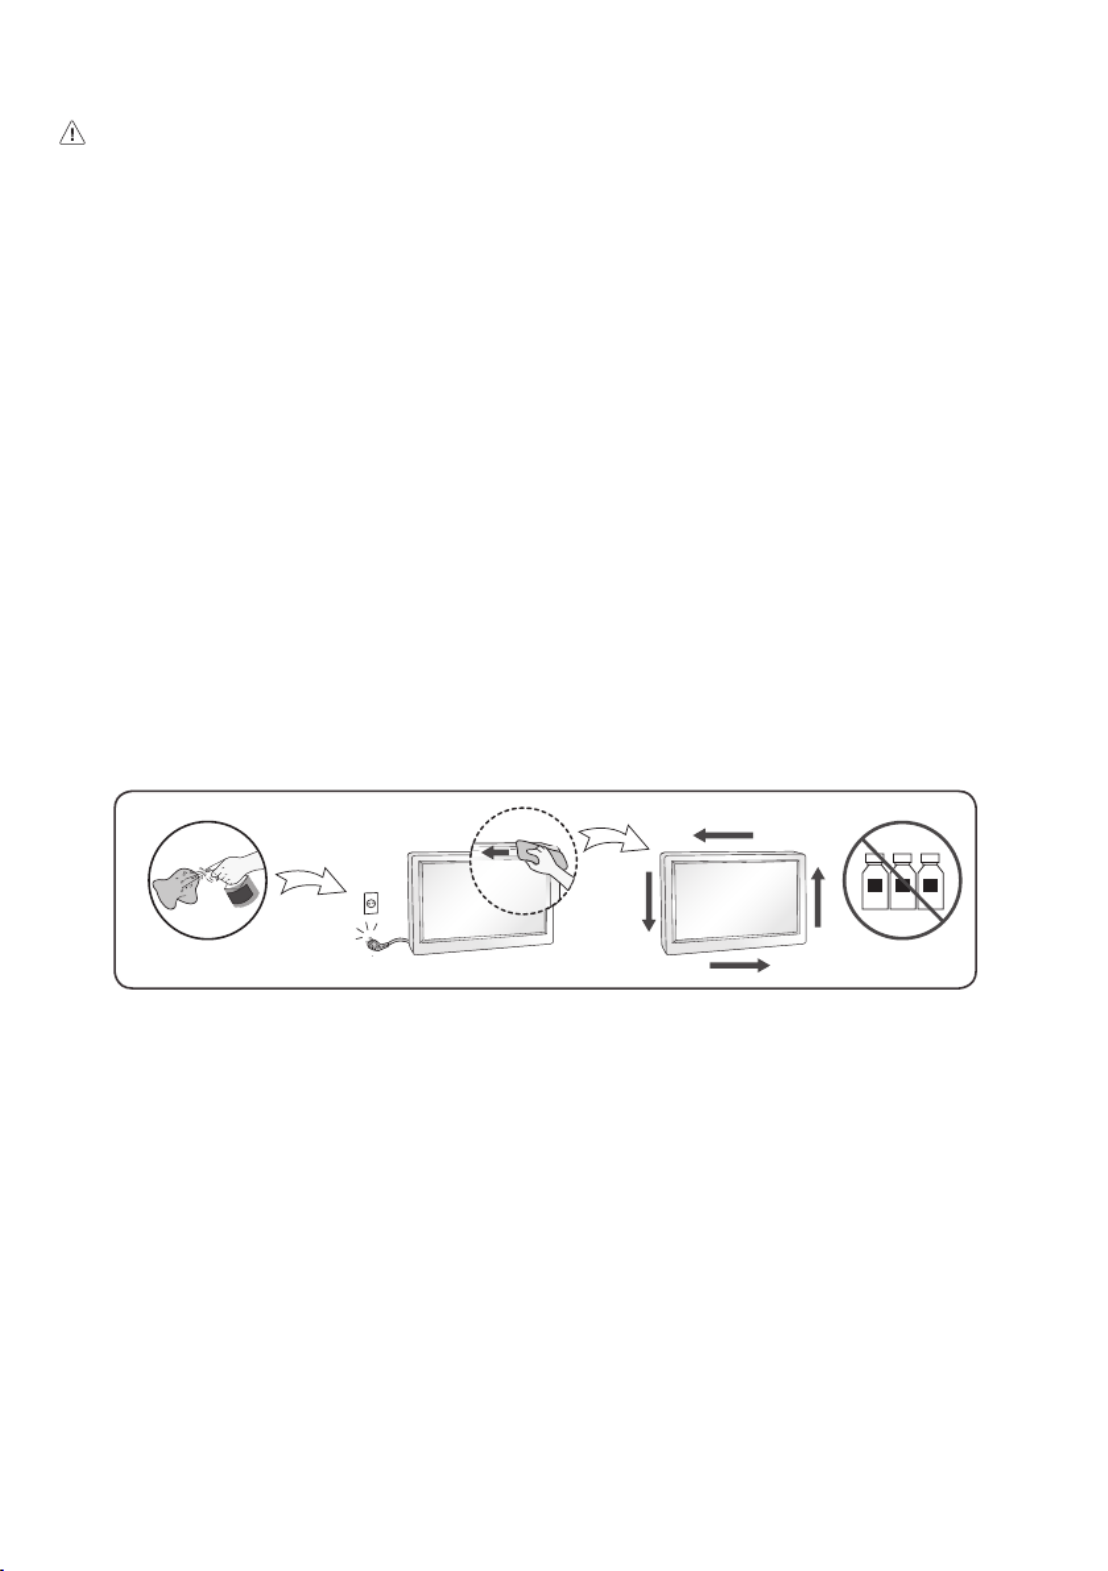
•When cleaning the product, unplug the power cord and scrub gently with a soft cloth to prevent scratching. Do not clean with a wet cloth or spray water or
other liquids directly onto the product. An electric shock may occur. (Do not use chemicals such as benzene, paint thinners or alcohol)
•Keep the product away from water.
-Fire or electric shock accident can occur.
•Avoid high temperatures and humidity.
•Do not put or store flammable substances near the product.
-There is a danger of explosion or fire.
•Keep the product clean at all times.
•Take a comfortable and natural position when working with the product.
•Take a regular break when working with the product for a long time.
•Do not press on the panel with a hand or sharp object such as nail, pencil or pen, or make a scratch on it.
•Keep proper distance from the product and rest from time-to-time.
-Your vision may be impaired if you look at the product too closely or for too long.
•Set the appropriate resolution by referring to the User’s Guide.
•Keep small accessories out of the reach of children.
•Displaying a still image for long time on the monitor may leave persistent image or stain on the monitor screen. To avoid this problem, use a screen saver
and power off when this product is not used. Persistent image or stain caused by long time usage are not covered by the warranty on this product.
•Do not use products using high voltage around the Monitor. (ex. Electrical Swatter)
-Monitor may have malfunction as its electrical shock.
•Spray water onto a soft cloth 2 to 4 times, and use it to clean the front frame;wipe in one direction only. Too much moisture may cause staining.
WATER CHEMICALS
7
Leveling the Screen
If the screen appears crooked to one side after the product has been placed in position, straighten the angle horizontally as follows.
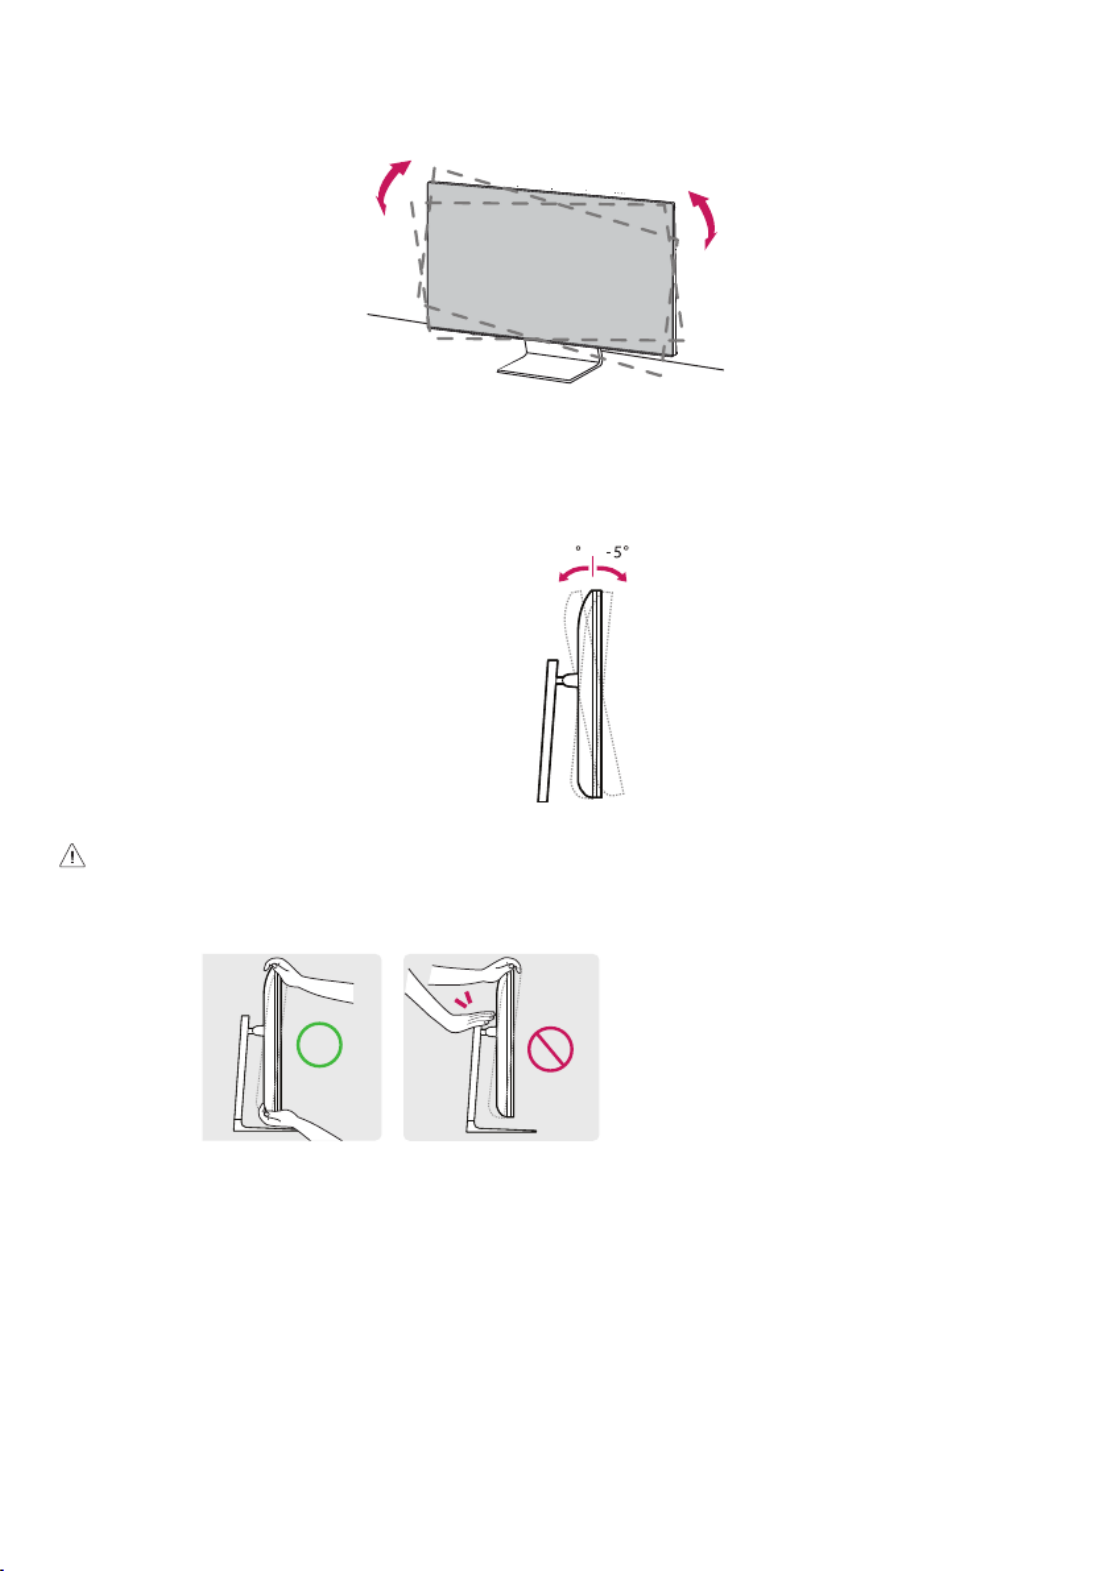
Adjusting the Angle
Adjust the angle of the screen.
The angle of the screen can be adjusted forward or backward from -5°
to 10° for a comfortable viewing experience.
10
•To avoid injury to the fingers when adjusting the screen, do not hold the lower part of the monitor’s frame as illustrated below.
•Be careful not to touch or press the screen area when adjusting the angle of the monitor.

8
Using the Kensington Lock
For more information on installation and usage, refer to the Kensington lock owner’s manual or visit the website at http://www.kensington.com.
Connect the monitor to a table using the Kensington security system cable.
Note
•The Kensington security system is optional. You can obtain optional accessories from most electronics stores.

9
Connecting the Camera to the Monitor
Insert the webcam according to the direction in which you wish the camera to shoot, and use it after connecting it to the monitor.
Note
•The webcam is an optional feature and is not supplied as an accessory. This part can be purchased from LG Electronics Service Center.
-Part Number : EBP64154901
•The USB-C port on the bottom of the monitor and the USB-C port on the PC must be connected with a USB-C cable in order for the webcam to function.
•The USB-C ports on the top of the monitor are exclusively for the webcam.
Monitor
(Bottom)
Monitor
(Top)
Webcam (only)
PC
•By connecting a camera to the monitor, you can use it for video conferencing, etc.
-Connect the camera to the upper USB-C port. Connect the PC to the lower USB-C port.
-Select a device to use the connected camera. Go to [Settings] [General] [Devices] [External Devices] [Camera] [Select Device], choose → → → → →
Monitor or PC.
-Run Home Dashboard by pressing the input button on the remote control.
-Select Camera.
10
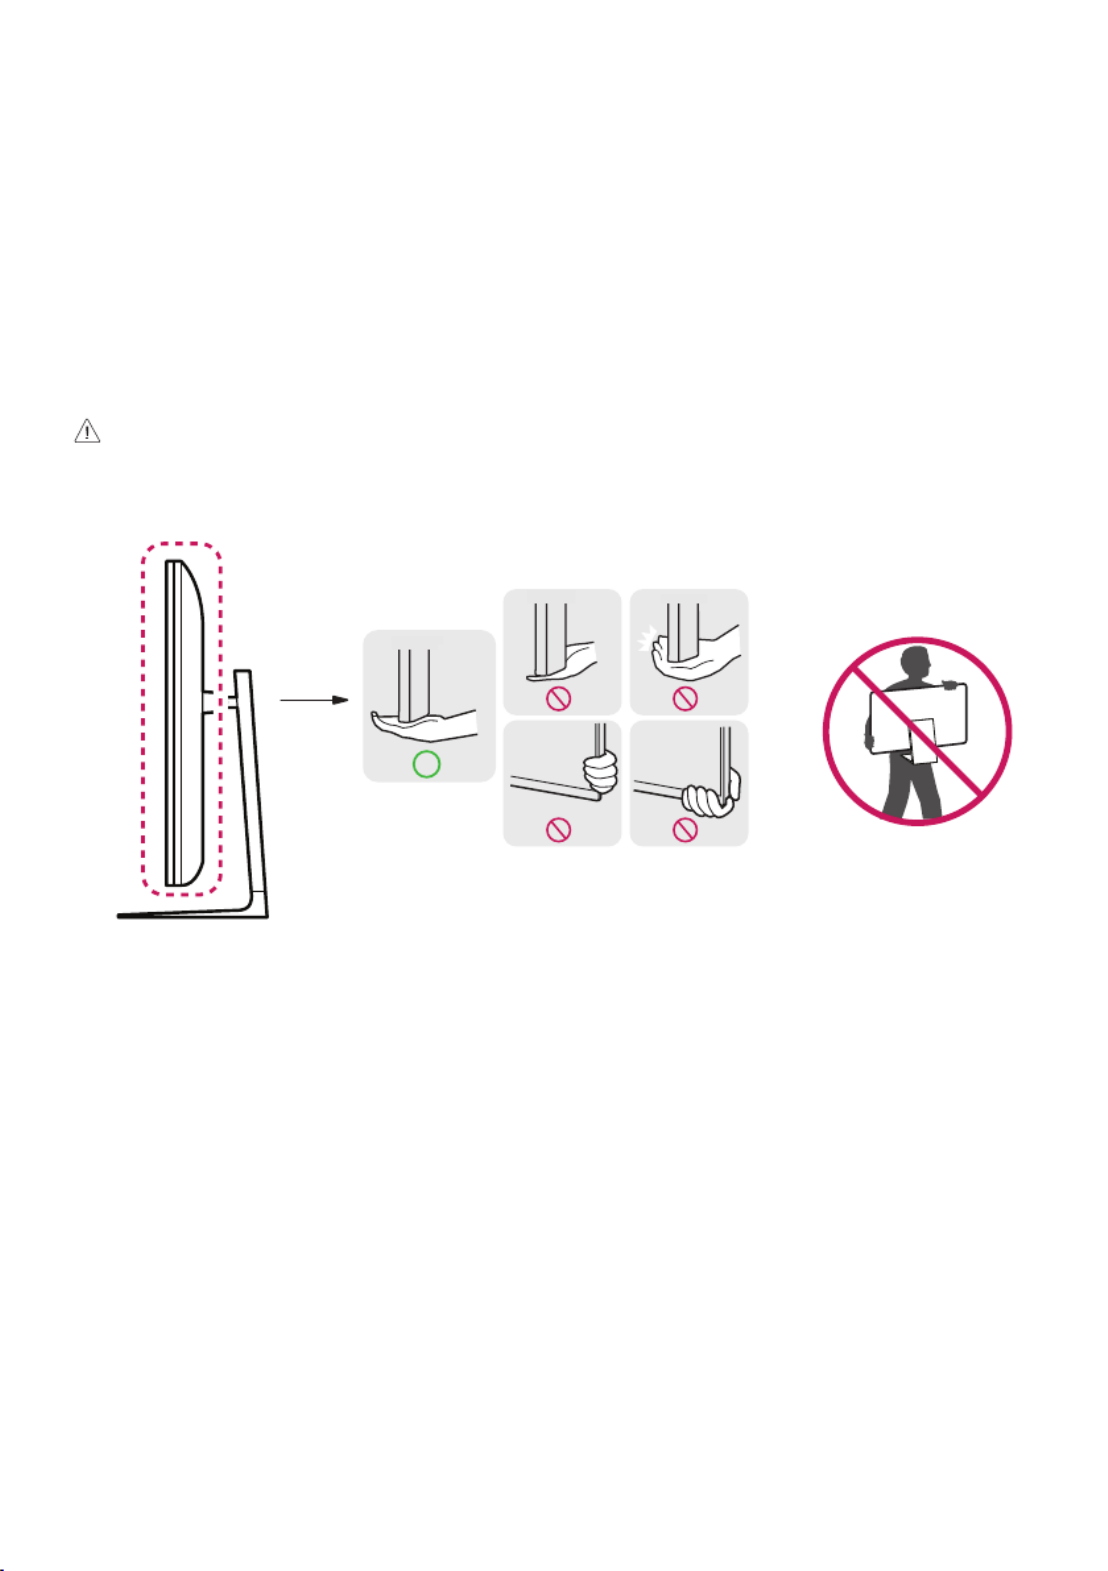
Moving and Lifting the Monitor
When moving or lifting the monitor, follow these instructions to prevent the monitor from being scratched or damaged and to ensure safe transportation,
regardless of its shape or size.
•Place the monitor in the original box or packing material before attempting to move it.
•Before moving or lifting the monitor, disconnect the power cord and all other cables.
•When holding the Monitor, the screen should face away from you to avoid damage.
•Hold the bottom and side of the monitor frame firmly. Do not hold the panel itself.
•When transporting the monitor, do not expose the monitor to shock or excessive vibration.
•When moving the monitor, keep it upright and never turn the monitor on its side or tilt it sideways.
•Disassemble and reposition the head and stand separately when moving the monitor.
•Do not apply excessive pressure to cause flexing / bending of frame chassis as it may damage screen.
•When handling the Monitor, be careful not to damage the protruding buttons.
•Avoid touching the screen at all times, as this may result in damage to the screen.
•When attaching the stand to the Monitor set, place the screen facing down on a cushioned table or flat surface to protect the screen from scratches.

11
Connections
You can connect various external devices to your monitor. Change the input mode and select the external device you want to connect. For more information
about external device connections, see the user manual provided with each device.
Connecting to a PC
Some of the cables are not provided. This monitor supports the * feature.
* : a feature that enables a PC to recognize devices attached by the user without device configuration or user intervention when powering up.
HDMI Connection
•When connecting the HDMI cable, the product and external devices should be turned off and unplugged.
•Supported HDMI Audio format:
Dolby Digital / Dolby Digital Plus (32 kHz / 44.1 kHz / 48 kHz),
PCM (32 kHz / 44.1 kHz / 48 kHz / 96 kHz / 192 kHz)
•For the best image quality, using the monitor with HDMI connection is recommended.
•To comply with the specifications of the product, use a shielded interface cable with ferrite core, such as a HDMI cable.
•If you turn the monitor on when the set is cold, the screen may flicker. This is normal.
•Sometimes red, green, or blue spots may appear on the screen. This is normal.
•Use a High Speed HDMI®
/™ cable (shorter than 3m (9.84feet)).
•Use a certified cable with the HDMI logo attached. If you do not use a certified HDMI cable, the screen may not display or a connection error may occur.
•Recommended HDMI Cable Types
-High Speed HDMI®/™ Cable
-High Speed HDMI®/™ Cable with Ethernet
•If you cannot hear any sound in HDMI mode please check your PC settings. Some PCs require you to manually change the default audio output to HDMI.
•If you want to use HDMI-PC mode, you must set your PC/DTV to PC mode.
•You may experience compatibility issues if you use HDMI-PC mode.
•Make sure the power cable is disconnected.
•If you connect a gaming device to the monitor, use the cable provided with the gaming device.

12
•Do not press the screen with your finger for a prolonged period as this may result in temporary distortion on the screen.
•Avoid displaying static images on the screen for a long period of time to prevent retention. Use a screensaver if possible.
•A wireless communication device near your monitor can affect the image.
•For an optimal connection, HDMI cables and USB devices should have bezels less than 10mm (0.39inches) thick and 18mm (0.7inches) width. Use an
extension cable that supports if the USB cable or USB memory stick does not fit into your Monitor’s USB port. (Depending upon model)
* A
<
=
10mm (0.39inches)
* B
<
=
18mm (0.7inches)
Note
•If the device connected to Input Port also supports HDMI/USB-C Deep Color, your picture may be clearer. However, if the device doesn’t support it, it may not
work properly. In that case, change the Monitor’s [HDMI/USB-C Deep Color] setting to off.
• [General] [Devices] [Input Settings] [HDMI/USB-C Deep Color]→ → → → →
USB-C connection
Transmits digital video and audio signals from your PC to the monitor.
Some USB Hubs may not work. If a USB device connected using a USB Hub is not detected, connect it to the USB port on the Monitor directly.
Note
•USB-C does not support fast charging. Gender converters for fast charging is also not supported.
•Use a certified USB-C cable (1.5m (4.92feet) or less). If you do not do so, the screen may not be displayed or a connection error may occur.
•USB C is not support to DPM. (Except for US & CA)
•PD(Power Delivery) and DP Alternate Mode(DP over USB-C) are supported via USB-C Port.
•Features may not work properly depending on the connected device’s specifications and the environment.
•USB-C port is not for the monitor power source but for a PC power source. Connect adapter to supply power to the monitor.

13
External Device Connection
Some of the cables are not provided. Connect a HD receiver, DVD, or VCR player to the monitor and select an appropriate input mode.
For the best picture and sound quality, connecting external devices to your monitor using HDMI cables is recommended.
USB Device connection
The USB port on the product functions as a USB hub.
Note
•It is recommended you install all Windows Updates to keep your Windows up-to-date before connecting to the product for use.
•Peripheral devices are sold separately.
•A keyboard, mouse, or USB device can be connected to the USB port.
•The charging speed may vary depending on the device.
•To use USB Downstream port of monitor, user must connect Upstream port of monitor to Host PC using USB C-C or USB C-A cable.
•When the USB C-C cable is connected between Upstream port of monitor and Host PC, the Downstream port of monitor support USB 2.0 device.
•When the USB C-A cable is connected between Upstream port of monitor and Host PC, the Downstream port of monitor support USB 2.0 device. However,
Host PC must support USB 2.0 function.
•Cautions when using a USB device.
-A USB device with an automatic recognition program installed, or that uses its own driver, may not be recognized.
-Some USB devices may not be supported or may not work properly.
-It is recommended to use a USB hub or hard disk drive with power supplied. (If the power supply is not adequate, the USB device may not be recognized
properly.)

14
Starting Display
Parts and Buttons
The image may be different according to the model.
Power On (Press)
Power Off1) (Press and Hold)
Menu Control (Press2))
Menu Selection (Press and Hold3))
1) All running apps will close.
2) You can access and adjust the menu by pressing the button.
3) You can use the function when you access menu control.
Adjusting the menu
Power Off Inputs Volume Up Volume Down Channel Up Channel Down
Turns the power off. Adjusts the volume level.
Changes the input source. Scrolls through the saved channels.

15
Specications
Environment Condition
Operating Temperature 0°C to 40°C (32°F to 104°F)
Operating Humidity Less than 80%
Storage Temperature -20°C to 60°C (-4°F to 140°F)
Storage Humidity Less than 85%
Product Information
Wireless module(LGSBWAC03)Specifications
Wireless LAN (IEEE 802.11a/b/g/n/ac)
Frequency range Output Power (Max.)
2,400 to 2,483.5MHz 20 dBm
5,150 to 5,725MHz 18.5 dBm
5,725 to 5,850MHz 8 dBm
Bluetooth
Frequency range Output Power (Max.)
2,400 to 2,483.5MHz 9dBm
As band channels can vary per country, the user cannot change or adjust the operating frequency. This product is configured for the regional frequency table.
For consideration of the user, this device should be installed and operated with a minimum distance of 20cm (7.8inches) between the device and the body.
FCC ID: BEJLGSBWAC03 / IC: 2703H-LGSBWAC03
Specifications are subject to change without notice.
The symbol means alternating current, and the symbol means direct current.
Dimensions: Monitor Size (Width x Depth x Height)
•With Stand : 967mm x 272.9mm x 647.5mm (38inches x 10.7inches x 25.4inches)
•Without Stand : 967mm x 71.8mm x 564mm (38inches x 2.8inches x 22.2inches)
Weight (Without Packaging)
•With Stand : 14.6kg (32.1lbs)
•Without Stand : 10.9kg (24.0lbs)
Power Sources
•Power Rating: 100-240V~ 50/60Hz 2.1A
•Power Consumption
-Operating Mode: 68W (Typical)*
-Standby Mode: ≤ 0.5W (Based on HDMI port)**
* The Operating Mode of Power Consumption is measured with LGE test standard. (Full white pattern, Maximum resolution, Outgoing condition)
* The Power Consumption level can be different by operating condition and monitor setting.
** When not in use, the monitor goes to the sleep mode in a couple of minutes. (Max. 5 minutes)
Specyfikacje produktu
| Marka: | LG |
| Kategoria: | monitor |
| Model: | 43SQ700S |
Potrzebujesz pomocy?
Jeśli potrzebujesz pomocy z LG 43SQ700S, zadaj pytanie poniżej, a inni użytkownicy Ci odpowiedzą
Instrukcje monitor LG

28 Marca 2025
12 Marca 2025
25 Lutego 2025
25 Lutego 2025
25 Lutego 2025
25 Lutego 2025
20 Lutego 2025
19 Lutego 2025
4 Lutego 2025
30 Stycznia 2025
Instrukcje monitor
- monitor Sony
- monitor Yamaha
- monitor Samsung
- monitor PeakTech
- monitor UPERFECT
- monitor Xiaomi
- monitor Joy-It
- monitor Sharp
- monitor Huawei
- monitor TCL
- monitor Pioneer
- monitor Lenovo
- monitor Philips
- monitor Plantronics
- monitor SilverCrest
- monitor Gigabyte
- monitor Acer
- monitor Bosch
- monitor Epson
- monitor JBL
- monitor Hikvision
- monitor Fujitsu
- monitor HyperX
- monitor LC-Power
- monitor Hisense
- monitor Panasonic
- monitor Promethean
- monitor Canon
- monitor Crestron
- monitor Viewsonic
- monitor Behringer
- monitor Asus
- monitor AG Neovo
- monitor Allen & Heath
- monitor IK Multimedia
- monitor Medion
- monitor Boss
- monitor Marquant
- monitor MSI
- monitor Toshiba
- monitor Tesla
- monitor Westinghouse
- monitor Jensen
- monitor Yealink
- monitor Ring
- monitor Garmin
- monitor Blaupunkt
- monitor Salora
- monitor Iiyama
- monitor Citizen
- monitor APC
- monitor Haier
- monitor HP
- monitor Hyundai
- monitor Honeywell
- monitor Chauvet
- monitor Tripp Lite
- monitor Shure
- monitor Cisco
- monitor Xerox
- monitor Smart
- monitor Cooler Master
- monitor Alpine
- monitor Godox
- monitor Dynaudio
- monitor Deltaco
- monitor JVC
- monitor V7
- monitor Dell
- monitor IFM
- monitor Corsair
- monitor Alesis
- monitor Vimar
- monitor Dahua Technology
- monitor Schneider
- monitor Eurolite
- monitor Ricoh
- monitor SMART Technologies
- monitor NZXT
- monitor Emos
- monitor Renkforce
- monitor Marshall
- monitor Viessmann
- monitor Omron
- monitor Thomson
- monitor Velleman
- monitor Neumann
- monitor DataVideo
- monitor Danfoss
- monitor Pyle
- monitor Apple
- monitor Newline
- monitor Waeco
- monitor AOC
- monitor Peerless-AV
- monitor Speco Technologies
- monitor Samson
- monitor PreSonus
- monitor ARRI
- monitor Kindermann
- monitor Olympus
- monitor Mitsubishi
- monitor Fluid
- monitor Razer
- monitor ART
- monitor Continental Edison
- monitor RCF
- monitor NEC
- monitor Brandson
- monitor Prestigio
- monitor OSEE
- monitor Sanyo
- monitor Elvid
- monitor Optoma
- monitor Focal
- monitor Asrock
- monitor Monkey Banana
- monitor Abus
- monitor AMCV
- monitor Jay-Tech
- monitor Mackie
- monitor Palmer
- monitor Barco
- monitor Insignia
- monitor AVer
- monitor Akuvox
- monitor 3M
- monitor Element
- monitor Denver
- monitor Marshall Electronics
- monitor Orion
- monitor Hitachi
- monitor Postium
- monitor Kali Audio
- monitor IStarUSA
- monitor Seiki
- monitor Ernitec
- monitor Wohler
- monitor SmallHD
- monitor AJA
- monitor KRK
- monitor BenQ
- monitor Atlona
- monitor Thermaltake
- monitor Simrad
- monitor Hanwha
- monitor Odys
- monitor Elo
- monitor Ikan
- monitor BOOX
- monitor JUNG
- monitor Burg Wächter
- monitor Eizo
- monitor Monacor
- monitor Aputure
- monitor Daewoo
- monitor Tannoy
- monitor GVision
- monitor Positivo
- monitor Adj
- monitor Freedom Scientific
- monitor SPL
- monitor Qian
- monitor I3-Technologies
- monitor Stairville
- monitor Vitek
- monitor Planar
- monitor Mobile Pixels
- monitor REVO
- monitor Atomos
- monitor Newstar
- monitor SWIT
- monitor Kramer
- monitor RGBlink
- monitor AMX
- monitor Midas
- monitor Alienware
- monitor Archos
- monitor Acti
- monitor Emachines
- monitor Caliber
- monitor Maxdata
- monitor Sunstech
- monitor GlobalTronics
- monitor Sunny
- monitor BlueBuilt
- monitor Da-Lite
- monitor ProXtend
- monitor Kubo
- monitor GeoVision
- monitor LaCie
- monitor InFocus
- monitor Festo
- monitor Konig
- monitor Swissonic
- monitor IHealth
- monitor Peaq
- monitor QSC
- monitor Hannspree
- monitor ESI
- monitor Avocor
- monitor Vivitek
- monitor Genelec
- monitor Interlogix
- monitor Vorago
- monitor EverFocus
- monitor POSline
- monitor Peerless
- monitor M-Audio
- monitor Mad Catz
- monitor Krom
- monitor Monoprice
- monitor Eve Audio
- monitor Yorkville
- monitor HoverCam
- monitor Voxicon
- monitor Sonifex
- monitor TV One
- monitor Fostex
- monitor Prowise
- monitor Terra
- monitor Neets
- monitor Soundstream
- monitor Xoro
- monitor HKC
- monitor CTOUCH
- monitor Ozone
- monitor Ibm
- monitor Maxell
- monitor Packard Bell
- monitor Provision ISR
- monitor Mybeo
- monitor CSL
- monitor Bearware
- monitor Drawmer
- monitor Blue Sky
- monitor Zalman
- monitor Iadea
- monitor Advantech
- monitor Hercules
- monitor Avantone Pro
- monitor Ganz
- monitor TVLogic
- monitor Gamber-Johnson
- monitor Extron
- monitor Neat
- monitor Legamaster
- monitor Belinea
- monitor Adam
- monitor Triton
- monitor ITek
- monitor Kogan
- monitor Posiflex
- monitor Antelope Audio
- monitor MicroTouch
- monitor X-Rite
- monitor EKO
- monitor ONYX
- monitor IBoardTouch
- monitor Mirai
- monitor Elite Screens
- monitor Hollyland
- monitor Mitsai
- monitor Christie
- monitor Skytronic
- monitor Enttec
- monitor Feelworld
- monitor Phoenix Contact
- monitor COMMBOX
- monitor Yiynova
- monitor Alogic
- monitor Pelco
- monitor Lilliput
- monitor LightZone
- monitor AOpen
- monitor Planet Audio
- monitor EC Line
- monitor Datacolor
- monitor HELGI
- monitor Desview
- monitor Syscom
- monitor Allsee
- monitor Night Owl
- monitor ProDVX
- monitor Varad
- monitor PureTools
- monitor DoubleSight
- monitor CTL
- monitor Game Factor
- monitor Nixeus
- monitor Chimei
- monitor Blue Sea
- monitor Faytech
- monitor Hamlet
- monitor Wyse - Dell
- monitor Approx
- monitor Bauhn
- monitor GeChic
- monitor Oecolux
- monitor ADS-TEC
- monitor Satco
- monitor Casalux
- monitor Jupiter
- monitor Transvideo
- monitor Innocn
- monitor KeepOut
- monitor Shimbol
- monitor Raysgem
- monitor Motrona
- monitor Ikegami
- monitor AORUS
- monitor Portkeys
- monitor Mimo Monitors
- monitor American Dynamics
- monitor AIS
- monitor Wortmann AG
- monitor Viotek
- monitor Vidi-Touch
- monitor KTC
- monitor CoolerMaster
- monitor Atlantis Land
- monitor HEDD
- monitor Colormetrics
- monitor IOIO
- monitor DTEN
- monitor Cocopar
- monitor Titan Army
- monitor Xenarc
- monitor Delvcam
- monitor Wimaxit
- monitor BookIT
- monitor SideTrak
- monitor TRIUMPH BOARD
- monitor Japannext
Najnowsze instrukcje dla monitor

8 Kwietnia 2025

8 Kwietnia 2025

8 Kwietnia 2025
7 Kwietnia 2025

5 Kwietnia 2025

4 Kwietnia 2025

4 Kwietnia 2025
3 Kwietnia 2025
2 Kwietnia 2025

2 Kwietnia 2025