Instrukcja obsługi LG 27GN60R
Przeczytaj poniżej 📖 instrukcję obsługi w języku polskim dla LG 27GN60R (44 stron) w kategorii monitor. Ta instrukcja była pomocna dla 6 osób i została oceniona przez 2 użytkowników na średnio 4.5 gwiazdek
Strona 1/44

LED Monitor*
Owner’s Manual
* LG LED Monitor applies LCD screen with LED backlights.
Please read this manual carefully before operating your set and retain it for future reference.
24GN60R
27GN60R
32GN50R www.lg.com
Copyright © 2022 LG Electronics Inc. All Rights Reserved.

2
ENGLISH
2
TABLE OF CONTENTS
LICENSE 3 .......................................
ASSEMBLING AND PREPARING 4
- Supported Drivers and Software 4 .........................
- Product and Button Description........................... 5
How to Use the Joystick Button
- Moving and Lifting the Monitor............................6
Installing on a Table
Adjusting the Angle
Tidying up Cables (27GN60R, 32GN50R)
Using the Kensington Lock
Installing the Wall Mount Plate
Installing on the Wall
USING THE MONITOR .............. 13
- Connecting to a PC...................................................13
HDMI Connection
DisplayPort Connection
- Connecting AV Devices 14 ...........................................
HDMI Connection
- Connecting Peripherals...........................................15
Connecting Headphones
USER SETTINGS 16 .......................
- Activating the Main Menu 16 ....................................
Main Menu Features
- User Settings 18 ...............................................................
Menu Settings
TROUBLESHOOTING 29 ................
PRODUCT SPECIFICATION 32 ......
- Factory Support Mode............................................38
- 40HDMI Timing (Video) ................................................
- Power LED 40 .....................................................................
- Beep Guide 41 ...................................................................

3
ENGLISH
LICENSE
Each model has different licenses. Visit www.lg.com for more information on the license.
The terms HDMI and HDMI High-Definition Multimedia Interface, and the HDMI Logo are trademarks or registered trademarks of
HDMI Licensing Administrator, Inc.
4
ENGLISH
ASSEMBLING AND PREPARING
CAUTION
•Always use genuine LG components to ensure safety and product performance.
•The product warranty will not cover damage or injury caused by the use of
unauthorized components.
•It is recommended that use the supplied components.
•If you use generic cables not certified by LG, the screen may not display or there
may be image noises.
•Illustrations in this document represent typical procedures, so they may look
different from the actual product.
•Do not apply foreign substances (oils, lubricants, etc.) to the screw parts when
assembling the product. (Doing so may damage the product.)
•Applying excessive force when tightening screws may cause damage to the
monitor. Damage caused in this way will not be covered by the product warranty.
•Do not carry the monitor upside down by just holding the base. This may cause the
monitor to fall off the stand and could result in personal injury.
•When lifting or moving the monitor, do not touch the monitor screen. The force
applied to the monitor screen may cause damage to it.
•For wave pattern on appearance, unlike the general method of coating, it’s applied
to added glittering material in raw material.With no peeled-off appearance, it has
good durability. Please use it with confidence because there is no problem in using
the product at all.
NOTE
•The components may look different from those illustrated here.
•Without prior notice, all product information and specifications contained in this
manual are subject to change to improve the performance of the product.
•To purchase optional accessories, visit an electronics store or an online shopping
site, or contact the retailer from which you purchased the product.
•The power cord provided may differ depending upon the region.
Supported Drivers and Software
You can download and install the latest version from the LGE website (www.lg.com).
Drivers and Software Installation Priority
Monitor Driver Recommended
OnScreen Control Recommended

5
ENGLISH
Product and Button Description
Joystick Button
How to Use the Joystick Button
You can easily control the functions of the monitor by pressing the joystick button or
moving it left/right with your finger.
Basic Functions
Power on Press the joystick button once with
your finger to turn on the monitor.
Power off
Press and hold the joystick button
once with your finger to turn off the
monitor.
/ Volume
control
You can control the volume by moving
the joystick button left/right.
NOTE
•The joystick button is located at the bottom of the monitor.

6
ENGLISH
Moving and Lifting the Monitor
When moving or lifting the monitor, follow these instructions to prevent the monitor
from being scratched or damaged and to ensure safe transportation, regardless of
its shape or size.
•Place the monitor in the original box or packing material before attempting to
move it.
•Before moving or lifting the monitor, disconnect the power cord and all other
cables.
•Hold the bottom and side of the monitor frame firmly. Do not hold the panel itself. •When holding the monitor, the screen should face away from you to prevent it
from being scratched.
•When transporting the monitor, do not expose the monitor to shock or excessive
vibration.
•When moving the monitor, keep it upright and never turn the monitor on its side or
tilt it sideways.
CAUTION
•Avoid touching the monitor screen as much as possible.
- This may result in damage to the screen or some of the pixels used to create
images.

7
ENGLISH
Installing on a Table
•Lift the monitor and place it on the table in an upright position. Place the monitor
at least 100mm (3.94 inches) away from the wall to ensure sufficient ventilation.
100mm
(3.94 inches)
100mm
(3.94 inches) 100mm
(3.94 inches)
100mm
(3.94 inches)
•If you use the monitor panel without the stand base, its joystick button may cause
the monitor to become unstable and fall, resulting in damage to the monitor or
human injury. In addition, this may cause the joystick button to malfunction.

9
ENGLISH
WARNING
•To avoid injury to the fingers when adjusting the screen, do not hold the lower part
of the monitor’s frame as illustrated below.
•Be careful not to touch or press the screen area when adjusting the angle of the
monitor.
Tidying up Cables (27GN60R, 32GN50R)
Arrange the cables using the cable holder as shown in the illustration.

10
ENGLISH
Using the Kensington Lock
The connector for the Kensington security system is located at the bottom of the
monitor.
For more information on installation and usage, refer to the Kensington lock owner’s
manual or visit the website at http://www.kensington.com.
Connect the monitor to a table using the Kensington security system cable.
NOTE
•The Kensington security system is optional. You can obtain optional accessories
from most electronics stores.
Installing the Wall Mount Plate
This monitor meets the specifications for the wall mount plate or other compatible
devices.
1 Place the screen face down. To protect the monitor panel (screen), cover the
surface with a soft cloth or the monitor protection pad included in the product
package.
2 Remove the four screws tightened on the back of the monitor.
3 Place the wall mount plate onto the monitor and align it with the screw holes.
4 Tighten the four screws using a screwdriver to fix the plate to the monitor.
NOTE
•The wall mount plate is sold separately.
•For more information on installation, refer to the wall mount plate’s installation
guide.
•Be careful not to apply too much force while mounting the wall mount plate as it
may cause damage to the screen.

11
ENGLISH
Installing on the Wall
Install the monitor at least 100mm (3.94 inches) away from the wall and leave
about 100mm (3.94 inches) of space at each side of the monitor to ensure
sufficient ventilation. Detailed installation instructions can be obtained from your
local retail store. Alternatively, please refer to the manual for how to install and set
up a tilting wall mounting bracket.
100 mm
( )3.94 inches
100 mm
( )3.94 inches
100 mm
( )3.94 inches 100 mm
(3.94 inches)
To install the monitor to a wall, attach a wall mounting bracket (optional) to the back
of the monitor.
Make sure that the wall mounting bracket is securely fixed to the monitor and to the
wall.
1 If you use screws longer than the standard length, it may damage the inside of
the product.
2 A non-VESA standard screw may damage the product and cause the monitor
to fall. LG Electronics is not liable for any accidents relating to the use of non-
standard screws.
Wall Mount (mm) 100 x 100
Standard screw M4 x L10
Number of screws 4
Wall Mount Plate (Optional) LSW 149

12
ENGLISH
NOTE
•Use the screws specified by VESA standards.
•The wall mount kit includes the installation guide and all necessary parts.
•The wall mounting bracket is optional. You can obtain optional accessories from
your local dealer.
•The length of the screw may differ for each wall mounting bracket. Be sure to use
the proper length.
•For more information, please refer to the user manual for the wall mounting
bracket.
CAUTION
•Unplug the power cord before moving or installing the monitor to avoid electric
shock.
•Installing the monitor on the ceiling or on a slanted wall may result in the monitor
falling off, which could lead to injury. Use an authorized LG wall mount and contact
the local dealer or qualified personnel.
•Applying excessive force when tightening screws may cause damage to the
monitor. Damage caused in this way will not be covered by the product warranty.
•Use the wall mounting bracket and screws that conform to VESA standards.
Damage caused by the use or misuse of inappropriate components will not be
covered by the product warranty.
•When measured from the back of the monitor, the length of each installed screw
must be 8 mm (0.3 inches) or less.
Wall Mount Plate
Back of the Monitor
Screw
Dimensions
: M4 x L10
Wall Mount Plate
Back of the
Monitor
Max. 8 mm (0.3 inches)

13
ENGLISH
USING THE MONITOR
•Illustrations in this manual may differ from the actual product.
Press the joystick button, go to , and then select the input option.Menu →Input
CAUTION
•Do not press the screen for a prolonged time. This may cause image distortion.
•Do not display a still image on the screen for a prolonged time. This may cause
image retention. Use a screensaver if possible.
NOTE
•When connecting the power cord to the outlet, use a grounded (3-hole) power
strip or a grounded power outlet.
•The monitor may flicker when turned on in an area where the temperature is low.
This is normal.
•Sometimes red, green, or blue spots may appear on the screen. This is normal.
Connecting to a PC
•This monitor supports the *Plug and Play feature.
* Plug and Play: A feature that allows you to add a device to your computer without
having to reconfigure anything or install any manual drivers.
HDMI Connection
Transmits digital video and audio signals from your PC to the monitor.
CAUTION
•Using a DVI to HDMI / DP (DisplayPort) to HDMI cable may cause compatibility
issues.
•Use a certified cable with the HDMI logo attached. If you do not use a certified
HDMI cable, the screen may not display or a connection error may occur.
•Recommended HDMI cable types
- High-Speed HDMI®
/TM cable
- High-Speed HDMI®
/TM cable with Ethernet

14
ENGLISH
DisplayPort Connection
Transmits digital video and audio signals from your PC to the monitor.
NOTE
•There may be no video or audio output depending on the DP (DisplayPort) version
of the PC.
•If you are using a Mini DisplayPort output graphics card, use a Mini DP to DP (Mini
DisplayPort to DisplayPort) cable or gender that supports DisplayPort1.4. (sold
separately)
Connecting AV Devices
HDMI Connection
HDMI transmits digital video and audio signals from your AV device to the monitor.
NOTE
•Using a DVI to HDMI / DP (DisplayPort) to HDMI cable may cause compatibility
issues.
•Use a certified cable with the HDMI logo attached. If you do not use a certified
HDMI cable, the screen may not display or a connection error may occur.
•Recommended HDMI cable types
- High-Speed HDMI®/TM cable
- High-Speed HDMI®/TM cable with Ethernet
17
ENGLISH
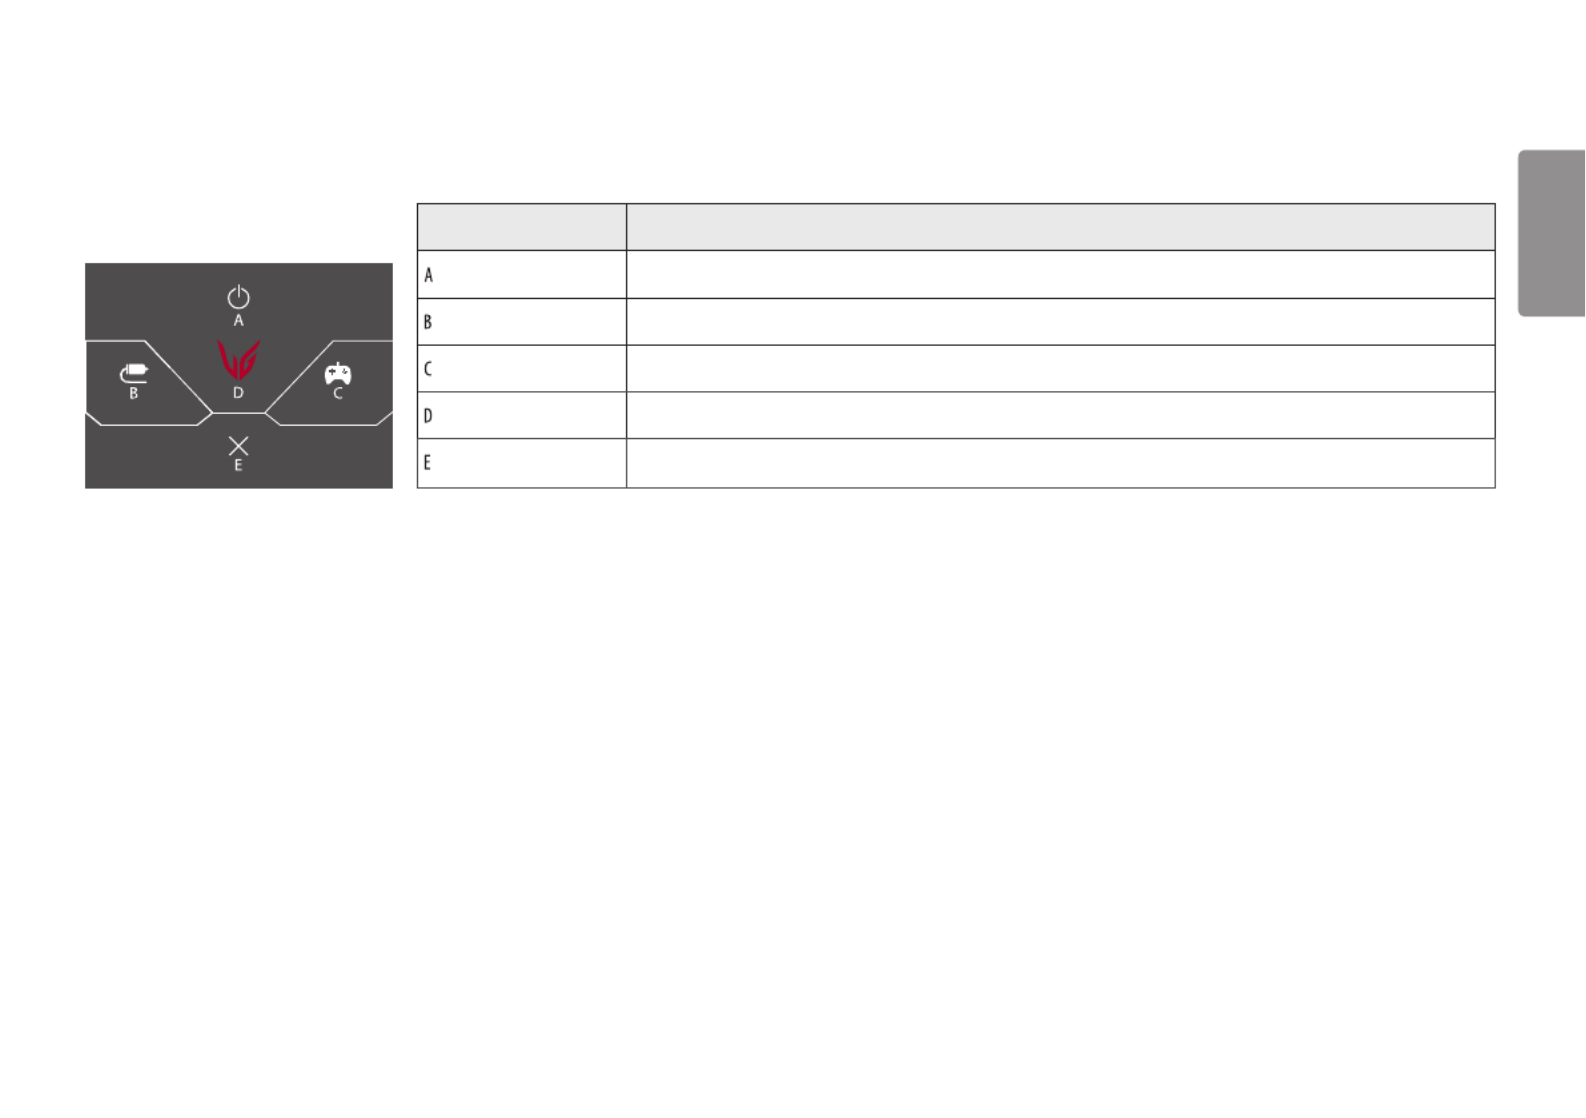
Main Menu Features
Main Menu Description
: Power Off Turns off the monitor.
: Sets input mode.Input
: Sets the game mode for gaming.Game Mode
: Configures the screen settings.Menu
:
Exit Exits the main menu.

18
ENGLISH
User Settings
Menu Settings
1 To view the OSD menu, press the joystick button at the bottom of the monitor and then enter the .Menu
2 Move the joystick up/down and left/right to set the options.
3 To return to the upper menu or set other menu items, move the joystick to or pressing ( ) it.
4 If you want to exit the OSD menu, move the joystick to until you exit.
Game Mode Game Adjust Picture Adjust Input General

19
ENGLISH
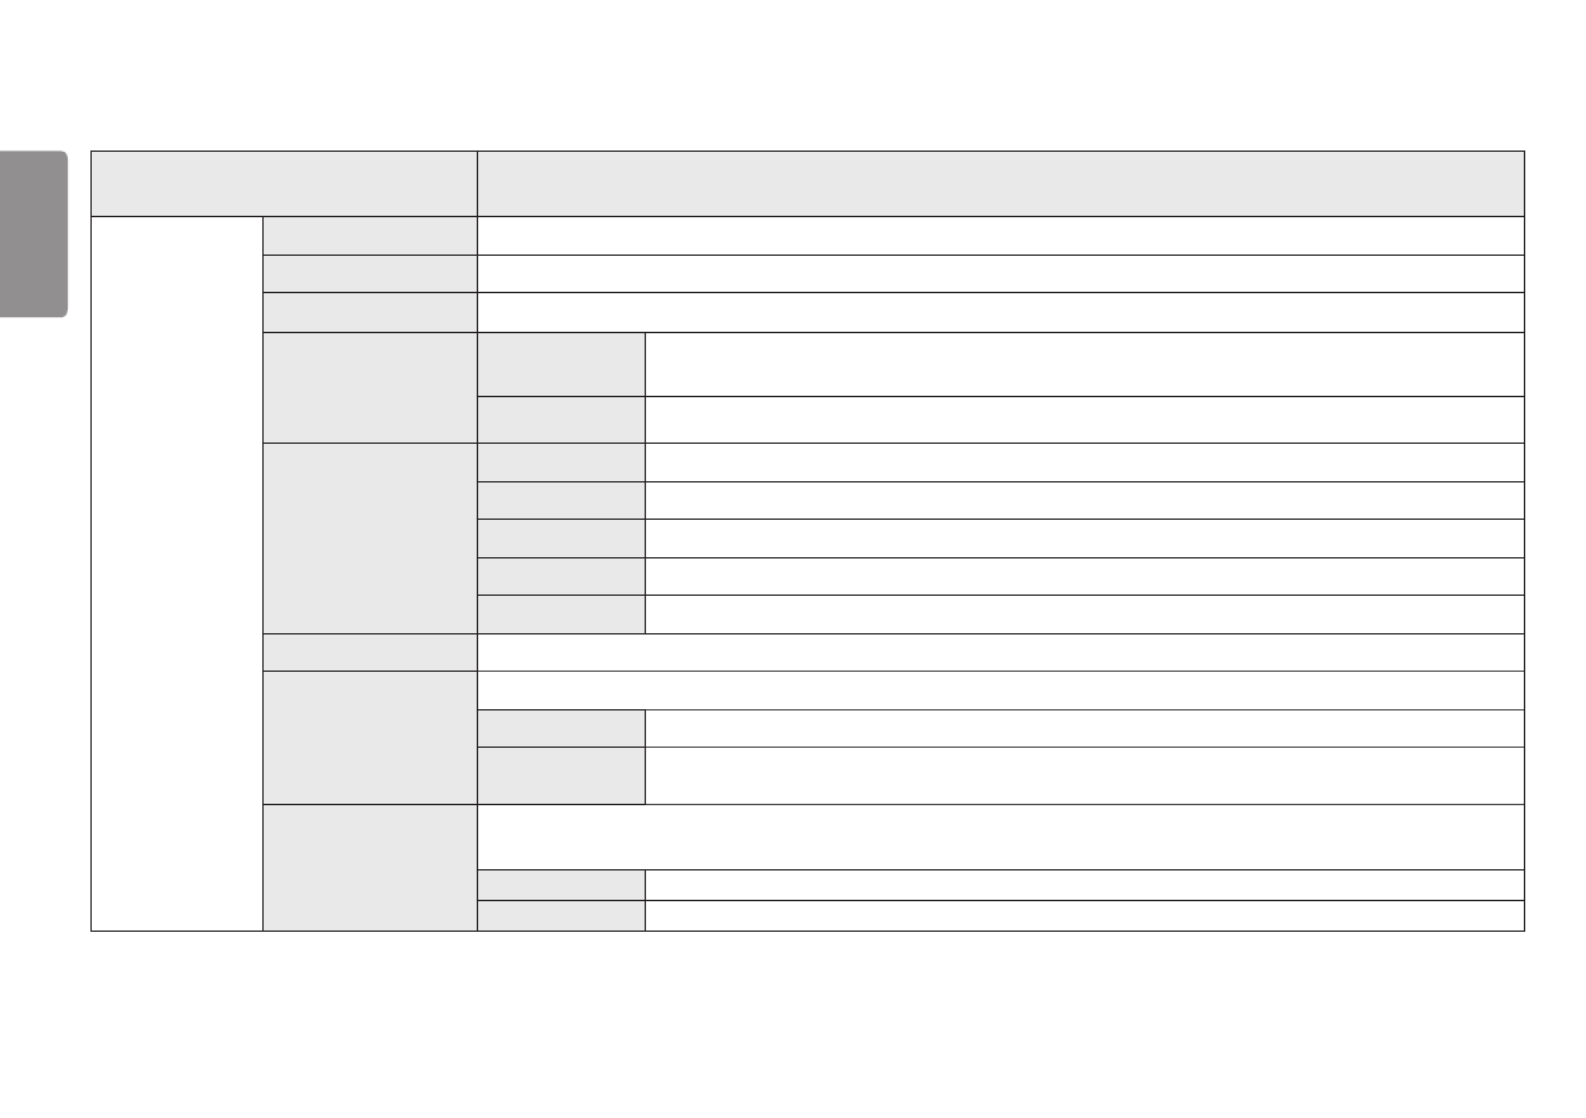
Game Mode on SDR(Non-HDR)signal.
Menu > Game Mode Description
Game Mode
Gamer 1 In this mode, users can customize elements including game-related options.
Gamer 1 Gamer 2 and picture modes allow you to save two sets of customized display settings, including game-related setup
options.
Gamer 2
FPS This mode is optimized for FPS games.
RTS This mode is optimized for RTS Game.
Vivid Optimized the screen for vivid colors.
Reader Optimizes the screen for viewing documents. You can brighten the screen in the OSD menu.
HDR Effect Optimizes the screen for high dynamic range.

21
ENGLISH
Menu > Game Adjust Description
Game Adjust FreeSync Premium /
Adaptive-Sync
Provides seamless and natural images by synchronizing the vertical frequency of the input signal with that of the output
signal.
CAUTION
•Supported Interface: DisplayPort (Adaptive-Sync), HDMI (FreeSync Premium)
•Supported Graphic Card : A graphic card that supports AMD’s FreeSync is necessary.
•Supported Version : Make sure to update the graphic card to the latest driver.
•For more information and requirement, refer to AMD website at http://www.amd.com/FreeSync
•FreeSync Premium / Adaptive-Sync Motion Blur Reduction and cannot be enabled simultaneously.
Extended
FreeSync Premium / Adaptive-Sync function
on
. (Enable wider frequency range of FreeSync function than
basic mode.)
Basic
FreeSync Premium / Adaptive-Sync function
on
. (Enable basic frequency range of FreeSync function.)
Off
FreeSync Premium / Adaptive-Sync function off.

22
ENGLISH
Game Adjust
Motion Blur Reduction
On
This mode minimizes motion blur in fast-moving videos. To take full advantage of this function, select 1920 x
1080 @ 120Hz/144Hz before enabling Motion Blur Reduction.
This function is available for the following vertical frequency. (120Hz/144Hz)
Off
Turns Mode off.Motion Blur Reduction
NOTE
•To reduce motion blur, brightness is reduced with backlight control.
•Motion Blur Reduction FreeSync and feature can not used at the same time.
•This function is game-optimized.
•It is recommended to turn off when you are not using the gaming function.
•Flicker may occur during Motion Blur Reduction operation.
Black Stabilizer You can control the black contrast to have better visibility in dark scenes.
You can easily distinguish objects on dark game screens.

23
ENGLISH
Game Adjust
Response Time
Sets a response time for displayed pictures based on the speed of the screen.
For a normal environment, it is recommended that you use Fast.
For a fast-moving picture, it is recommended that you use Faster.
Once Faster Mode Motion Blur is selected, may occur depending on the content.
Faster Sets the response time to Faster.
Fast Sets the response time to Fast.
Normal Sets the response time to Normal.
Off Does not use the response time improvement feature.
Crosshair
Crosshair provides a mark on the center of the screen for First Person Shooter (FPS) games. Users can select the Crosshair that fits
their gaming environment among four different Crosshairs.
•When the monitor is off or enters energy saving mode, the Crosshair feature is automatically turned off.
FPS Counter
On The indicator is displayed on the upper left of the screen. It will reflect the actual frame rate that is received at the
input.
Off Does not use the FPS Counter feature.
NOTE
•FPS Counter Crosshair and feature can not be used at the same time.
Game Reset
Do you want to reset your Game settings?
No Cancel the select.
Yes Returns to the default settings.
24
ENGLISH
Menu > Picture Adjust Description
Picture Adjust
Brightness Adjusts the brightness of the screen.
Contrast Adjusts the contrast of the screen.
Sharpness Adjusts the sharpness of the screen.
Gamma
Mode 1, Mode 2,
Mode 3
The higher the gamma value, the darker the image becomes. Likewise, the lower the gamma value, the
lighter the image becomes.
Mode 4
If you do not need to adjust the gamma settings, select Mode 4.
Color Temp
Custom The user can adjust it to red, green, or blue by customization.
Warm Sets the screen color to a reddish tone.
Medium Sets the screen color to between a red and blue tone.
Cool Sets the screen color to a bluish tone.
Manual The user can fine - tune the color temperature.
R/G/B You can customize the picture color using , , and colors.Red Green Blue
Six Color
Meets the user requirements for colors by adjusting the hue and saturation of the six colors and then saving the settings.
Hue Adjusts the tone of the screen colors.
Saturation Adjusts the saturation of the screen colors. The lower the value, the less saturated and brighter the colors
become. The higher the value, the more saturated and darker the colors become.
Black Level
Sets the offset level (for HDMI only).
yOffset as a reference for a video signal, this is the darkest color the monitor can display.:
High Keeps the current contrast ratio of the screen.
Low Lowers the black levels and raises the white levels from the current contrast ratio of the screen.

25
ENGLISH
Picture Adjust
DFC On Adjusts the brightness automatically according to the screen.
Off DFCDisables the feature.
Picture Reset
Do you want to reset your picture settings?
No Cancel the select.
Yes Returns to the default settings.
Specyfikacje produktu
| Marka: | LG |
| Kategoria: | monitor |
| Model: | 27GN60R |
Potrzebujesz pomocy?
Jeśli potrzebujesz pomocy z LG 27GN60R, zadaj pytanie poniżej, a inni użytkownicy Ci odpowiedzą
Instrukcje monitor LG

28 Marca 2025
12 Marca 2025
25 Lutego 2025
25 Lutego 2025
25 Lutego 2025
25 Lutego 2025
20 Lutego 2025
19 Lutego 2025
4 Lutego 2025
30 Stycznia 2025
Instrukcje monitor
- monitor Sony
- monitor Yamaha
- monitor Samsung
- monitor PeakTech
- monitor UPERFECT
- monitor Xiaomi
- monitor Joy-It
- monitor Sharp
- monitor Huawei
- monitor TCL
- monitor Pioneer
- monitor Lenovo
- monitor Philips
- monitor Plantronics
- monitor SilverCrest
- monitor Gigabyte
- monitor Acer
- monitor Bosch
- monitor Epson
- monitor JBL
- monitor Hikvision
- monitor Fujitsu
- monitor HyperX
- monitor LC-Power
- monitor Hisense
- monitor Panasonic
- monitor Promethean
- monitor Canon
- monitor Crestron
- monitor Viewsonic
- monitor Behringer
- monitor Asus
- monitor AG Neovo
- monitor Allen & Heath
- monitor IK Multimedia
- monitor Medion
- monitor Boss
- monitor Marquant
- monitor MSI
- monitor Toshiba
- monitor Tesla
- monitor Westinghouse
- monitor Jensen
- monitor Yealink
- monitor Ring
- monitor Garmin
- monitor Blaupunkt
- monitor Salora
- monitor Iiyama
- monitor Citizen
- monitor APC
- monitor Haier
- monitor HP
- monitor Hyundai
- monitor Honeywell
- monitor Chauvet
- monitor Tripp Lite
- monitor Shure
- monitor Cisco
- monitor Xerox
- monitor Smart
- monitor Cooler Master
- monitor Alpine
- monitor Godox
- monitor Dynaudio
- monitor Deltaco
- monitor JVC
- monitor V7
- monitor Dell
- monitor IFM
- monitor Corsair
- monitor Alesis
- monitor Vimar
- monitor Dahua Technology
- monitor Schneider
- monitor Eurolite
- monitor Ricoh
- monitor SMART Technologies
- monitor NZXT
- monitor Emos
- monitor Renkforce
- monitor Marshall
- monitor Viessmann
- monitor Omron
- monitor Thomson
- monitor Velleman
- monitor Neumann
- monitor DataVideo
- monitor Danfoss
- monitor Pyle
- monitor Apple
- monitor Newline
- monitor Waeco
- monitor AOC
- monitor Peerless-AV
- monitor Speco Technologies
- monitor Samson
- monitor PreSonus
- monitor ARRI
- monitor Kindermann
- monitor Olympus
- monitor Mitsubishi
- monitor Fluid
- monitor Razer
- monitor ART
- monitor Continental Edison
- monitor RCF
- monitor NEC
- monitor Brandson
- monitor Prestigio
- monitor OSEE
- monitor Sanyo
- monitor Elvid
- monitor Optoma
- monitor Focal
- monitor Asrock
- monitor Monkey Banana
- monitor Abus
- monitor AMCV
- monitor Jay-Tech
- monitor Mackie
- monitor Palmer
- monitor Barco
- monitor Insignia
- monitor AVer
- monitor Akuvox
- monitor 3M
- monitor Element
- monitor Denver
- monitor Marshall Electronics
- monitor Orion
- monitor Hitachi
- monitor Postium
- monitor Kali Audio
- monitor IStarUSA
- monitor Seiki
- monitor Ernitec
- monitor Wohler
- monitor SmallHD
- monitor AJA
- monitor KRK
- monitor BenQ
- monitor Atlona
- monitor Thermaltake
- monitor Simrad
- monitor Hanwha
- monitor Odys
- monitor Elo
- monitor Ikan
- monitor BOOX
- monitor JUNG
- monitor Burg Wächter
- monitor Eizo
- monitor Monacor
- monitor Aputure
- monitor Daewoo
- monitor Tannoy
- monitor GVision
- monitor Positivo
- monitor Adj
- monitor Freedom Scientific
- monitor SPL
- monitor Qian
- monitor I3-Technologies
- monitor Stairville
- monitor Vitek
- monitor Planar
- monitor Mobile Pixels
- monitor REVO
- monitor Atomos
- monitor Newstar
- monitor SWIT
- monitor Kramer
- monitor RGBlink
- monitor AMX
- monitor Midas
- monitor Alienware
- monitor Archos
- monitor Acti
- monitor Emachines
- monitor Caliber
- monitor Maxdata
- monitor Sunstech
- monitor GlobalTronics
- monitor Sunny
- monitor BlueBuilt
- monitor Da-Lite
- monitor ProXtend
- monitor Kubo
- monitor GeoVision
- monitor LaCie
- monitor InFocus
- monitor Festo
- monitor Konig
- monitor Swissonic
- monitor IHealth
- monitor Peaq
- monitor QSC
- monitor Hannspree
- monitor ESI
- monitor Avocor
- monitor Vivitek
- monitor Genelec
- monitor Interlogix
- monitor Vorago
- monitor EverFocus
- monitor POSline
- monitor Peerless
- monitor M-Audio
- monitor Mad Catz
- monitor Krom
- monitor Monoprice
- monitor Eve Audio
- monitor Yorkville
- monitor HoverCam
- monitor Voxicon
- monitor Sonifex
- monitor TV One
- monitor Fostex
- monitor Prowise
- monitor Terra
- monitor Neets
- monitor Soundstream
- monitor Xoro
- monitor HKC
- monitor CTOUCH
- monitor Ozone
- monitor Ibm
- monitor Maxell
- monitor Packard Bell
- monitor Provision ISR
- monitor Mybeo
- monitor CSL
- monitor Bearware
- monitor Drawmer
- monitor Blue Sky
- monitor Zalman
- monitor Iadea
- monitor Advantech
- monitor Hercules
- monitor Avantone Pro
- monitor Ganz
- monitor TVLogic
- monitor Gamber-Johnson
- monitor Extron
- monitor Neat
- monitor Legamaster
- monitor Belinea
- monitor Adam
- monitor Triton
- monitor ITek
- monitor Kogan
- monitor Posiflex
- monitor Antelope Audio
- monitor MicroTouch
- monitor X-Rite
- monitor EKO
- monitor ONYX
- monitor IBoardTouch
- monitor Mirai
- monitor Elite Screens
- monitor Hollyland
- monitor Mitsai
- monitor Christie
- monitor Skytronic
- monitor Enttec
- monitor Feelworld
- monitor Phoenix Contact
- monitor COMMBOX
- monitor Yiynova
- monitor Alogic
- monitor Pelco
- monitor Lilliput
- monitor LightZone
- monitor AOpen
- monitor Planet Audio
- monitor EC Line
- monitor Datacolor
- monitor HELGI
- monitor Desview
- monitor Syscom
- monitor Allsee
- monitor Night Owl
- monitor ProDVX
- monitor Varad
- monitor PureTools
- monitor DoubleSight
- monitor CTL
- monitor Game Factor
- monitor Nixeus
- monitor Chimei
- monitor Blue Sea
- monitor Faytech
- monitor Hamlet
- monitor Wyse - Dell
- monitor Approx
- monitor Bauhn
- monitor GeChic
- monitor Oecolux
- monitor ADS-TEC
- monitor Satco
- monitor Casalux
- monitor Jupiter
- monitor Transvideo
- monitor Innocn
- monitor KeepOut
- monitor Shimbol
- monitor Raysgem
- monitor Motrona
- monitor Ikegami
- monitor AORUS
- monitor Portkeys
- monitor Mimo Monitors
- monitor American Dynamics
- monitor AIS
- monitor Wortmann AG
- monitor Viotek
- monitor Vidi-Touch
- monitor KTC
- monitor CoolerMaster
- monitor Atlantis Land
- monitor HEDD
- monitor Colormetrics
- monitor IOIO
- monitor DTEN
- monitor Cocopar
- monitor Titan Army
- monitor Xenarc
- monitor Delvcam
- monitor Wimaxit
- monitor BookIT
- monitor SideTrak
- monitor TRIUMPH BOARD
- monitor Japannext
Najnowsze instrukcje dla monitor

8 Kwietnia 2025

8 Kwietnia 2025

8 Kwietnia 2025
7 Kwietnia 2025

5 Kwietnia 2025

4 Kwietnia 2025

4 Kwietnia 2025
3 Kwietnia 2025
2 Kwietnia 2025

2 Kwietnia 2025