Instrukcja obsługi Lenovo ThinkVision T24v
Przeczytaj poniżej 📖 instrukcję obsługi w języku polskim dla Lenovo ThinkVision T24v (41 stron) w kategorii monitor. Ta instrukcja była pomocna dla 21 osób i została oceniona przez 2 użytkowników na średnio 4.5 gwiazdek
Strona 1/41

T2 v4-10 Flat anel P Monitor
User’s Guide
Machine Type:61BC

Product Number
61BC-MAR6-WW
First Edition (07 ) 2017
© Copyright Lenovo 2017
All rights reserved.
LENOVO products, data, computer software, and services have been developed exclusively at private expense and are sold to
governmental entities as commercial items as defined by 47 C.F.R. 2.101 with limited and restricted rights to use, reproduction and
disclosure.
LIMITED AND RESTRICTED RIGHTS NOTICE: IF products, data, computer software, or services are delivered pursuant a
General Services Administration "GSA" contract, use, reproduction, or disclosure is subject to restrictions set forth in
Contract No. - - GS 35F 05925.
© Copyright Lenovo 2017 i

Contents
Product Number ................................................................................................................................................................................................................... i
Contents ................................................................................................................................................................................................................................ ii
Safety information…………………………………………………………………………………………………………………………………………………………………………………..iii
Safety and Maintenance Guidelines………………………………………………………………………………………………………………………………………………………….iv
Chapter 1 Getting started ................................................................................................................................................................................................. 1-1
Shipping contents ........................................................................................................................................................................................................... 1-1
Notice for use .................................................................................................................................................................................................................. 1-1
Product overview ........................................................................................................................................................................................................... 1-2
Types of adjustments ..................................................................................................................................................................................................... 1-2
User controls ................................................................................................................................................................................................................... 1-3
Cable lock slot ................................................................................................................................................................................................................. 1-3
IR-Camera ........................................................................................................................................................................................................................ 1-4
Speaker ............................................................................................................................................................................................................................ 1-5
Setting up your monitor ................................................................................................................................................................................................ 1-6
Connecting and turning on your monitor ................................................................................................................................................................... 1-6
Windows Hello setup (Windows 10 Only) .................................................................................................................................................................. 1-8
Registering your option .............................................................................................................................................................................................. 1-10
Chapter 2 Adjusting and using your monitor ................................................................................................................................................................. 2-1
Comfort and accessibility .............................................................................................................................................................................................. 2-1
Arranging your work area.............................................................................................................................................................................................. 2-1
Health Administration.................................................................................................................................................................................................... 2-2
Accessibility information ............................................................................................................................................................................................... 2-5
Adjusting your monitor image ...................................................................................................................................................................................... 2-6
Using the direct access controls.................................................................................................................................................................................... 2-6
Using the On-Screen Display (OSD) controls ............................................................................................................................................................... 2-6
Selecting a supported display mode ............................................................................................................................................................................ 2-9
Image rotation ................................................................................................................................................................................................................ 2-9
Audio description ........................................................................................................................................................................................................ 2-10
Understanding power management ........................................................................................................................................................................ 2-10
Caring for your monitor .............................................................................................................................................................................................. 2-10
Detaching the monitor stand ..................................................................................................................................................................................... 2-11
Wall Mounting (Optional) .......................................................................................................................................................................................... 2-11
Chapter 3 Reference information .................................................................................................................................................................................... 3-1
Monitor specifications ................................................................................................................................................................................................... 3-1
Troubleshooting.............................................................................................................................................................................................................. 3-3
Manual image setup ...................................................................................................................................................................................................... 3-5
Manually installing the monitor driver ........................................................................................................................................................................ 3-5
Manually installing the IR camera driver in Windows 10 .......................................................................................................................................... 3-7
Service information ........................................................................................................................................................................................................ 3-8
Appendix A. Service and Support.................................................................................................................................................................................. A-1
Registering your option ................................................................................................................................................................................................ A-1
Online technical support .............................................................................................................................................................................................. A-1
Telephone technical support ....................................................................................................................................................................................... A-1
Worldwide telephone list ............................................................................................................................................................................................. A-1
Appendix B. Notices ........................................................................................................................................................................................................ B-1
Recycling information ....................................................................................................................................................................................................B-2
Collecting and recycling a disused Lenovo computer or monitor ............................................................................................................................B-2
Disposing of Lenovo computer components B-2.............................................................................................................................................................
Trademarks .....................................................................................................................................................................................................................B-3
Turkish statement of compliance .................................................................................................................................................................................B-4
Ukraine RoHS ..................................................................................................................................................................................................................B-4
India RoHS .......................................................................................................................................................................................................................B-4
ii © Copyright Lenovo 2017

Safety information
General Safety guidelines
For tips to help you use your computer safety, go to:
http://www.lenovo.com/safety
Before installing this product, read the Safety Information.
© Copyright Lenovo 2017 iii
Safety and Maintenance Guidelines
Important Safety Information
The power cord is designed for use with your monitor. To use a different cord, use only a power source and
co tnnec ion compatible with this monitor.
WARNING: Always connect your monitor, the computer, and other equipment to a grounded (earthed) power
outlet. To reduce the risk of electric shock or damage to your equipment, do not disable the power cord grounding
feature. The grounding plug is an important safety feature.
WARNING: For your safety, be sure that the grounded power outlet you plug the power cord into is easily
accessible to the operator and located as close to the equipment as possible. To disconnect power from the
equipment, unplug the power cord from the power outlet by grasping the plug firmly. Never pull on the cord.
CAUTION: To protect your monitor, as well as your computer, connect all power cords for your computer
and its peripheral devices (such as a monitor, printer, or scanner) to a surge protection device such as a power
strip with surge protection or unin ). terruptible power supply (UPS Not all power strips provide surge
protection; the power strips must be specifically labelled as having this ability. Use a power strip whose
manufacturer offers a damage replacement policy, so you can replace your equipment if surge protection fails.
CAUTION: A certified power supply cord has to be used with this equipment. The relevant national installation
and/or equipment regulations shall be considered. A certified power supply cord not lighter than ordinary polyvinyl
chloride flexible cord according to IEC 60227 (designation H05VV-F 3G 0.75mm² -or H05VVH2 F2 3G 0.75mm²) shall
be used. An alternative flexible cord is synthetic rubber.
Safety Precautions
■Use only a power source and connection compatible with this monitor, as indicated on the label/back plate
of the monitor.
■Be sure the total ampere rating of the products connected to the outlet does not exceed the current rating of the
electrical outlet, and the total ampere rating of the products connected to the power cord does not exceed the
rating of the power cord. Look on the power label to determine the ampere rating (Amps or A) for each device.
■ Install your monitor near a power outlet that you can easily reach. Disconnect the monitor by grasping the plug
firmly and pulling it from the outlet. Never disconnect the monitor by pulling the cord.
■ Do not allow anything to rest on the power cord. Do not walk on the cord.
■ While using VESA mount application, the AC Inlet must face to down side. Do not face any other position.
Maintenance Guidelines
To enhance the performance and extend the life of your monitor:
■ Do not open your monitor cabinet or attempt to service this product yourself. If your monitor is not operating
properly or has been dropped or damaged, contact your authorized dealer, reseller, or serviceLenovo provider.
■ Adjust only those controls that are described in the operating instructions.
■ Turn your monitor off when not in use. You can substantially increase the life expectancy of the monitor by using a
screen saver program and turning off the monitor when not in use.
■ Keep your monitor in a well-ventilated area, away from excessive light, heat, or moisture.
■ Slots and openings in the cabinet are provided for ventilation. These openings must not be blocked or covered.
Never push objects of any kind into cabinet slots or other openings.
■ Unplug the monitor from the power outlet before cleaning. Do not use liquid cleaners or aerosol cleaners.
■ Do not drop the monitor or place it on an unstable surface.
■ When removing the monitor base, you must lay the monitor face down on a soft area to prevent it from getting
scratched, defaced, or broken.
Cleaning the Monitor
The monitor is a high quality optical device that requires special care when cleaning. To clean the monitor, follow-
these steps:
1. Turn off the computer and the monitor.
2. Unplug your monitor from the power outlet before cleaning.
CAUTION: Do not use benzene, thinner, ammonia, or any volatile substance to clean the monitor screen or cabinet.
These chemicals may damage the monitor. Do not use liquid or aerosol cleaners. Never use water to clean an LCD
screen.
3. Wipe the screen with a dry, soft, clean cloth. If the screen requires additional cleaning, use an antistatic screen
cleaner.
4. Dust the monitor hou ing. Use a damp cloth to cs lean the cabinet. If the cabinet requires additional cleaning, use a
clean cloth dampened with isopropyl alcohol.
5. Plug in the monitor.
6. Turn on the monitor and the computer.
iv © Copyright Lenovo 2017

Chapter 1 Getting started
This ser’s uide contains etailed information he U G d on t ThinkVision® T24v-10 Flat anel nitor. or uick P Mo F a q
overview, please see the Setup oster hat as shipped with our onitor. P t w y m
Shipping contents
The product package should include the following items:
● Information Flyer
● Flat Panel Monitor
● Monitor stand
● Monitor base
● DP cable
● Power Cord
● Analog signal Cable
● USB 3.0 Cable
● HDMI Cable
Notice for use
To setup your monitor, please see the illustrations below.
Note: Do not touch the monitor within the screen area. The screen area is glass and can be damaged by
rough handling or excessive pressure.
1. Place your monitor with the screen face down on a soft flat surface.
2. Align the stand assembly bracket to the monitor.
3. Insert the the stand until it locks in place.base towards
Note: To attach a VESA mount, please see “Detaching the monitor stand” on page 2-11.
Chapter 1. Getting started 1-1

Product overview
This section will provide information on adjustin monitor positions, setting userg controls, and using the cable lock
slot.
Types of adjustments
Tilt
Please see the illustration below for an example of the tilt range.
Swivel
With the built-in pedestal, you can tilt and swivel the monitor for the most comfortable viewing angle.
Height Adjustment
After pressing the top of the monitor, you can adjust the height of the monitor.
1-2 -1 ’sT24v 0 Flat anel onitor User P M Guide

Monitor Pivot
- Adjust the monitor before rotating the monitor screen. (Make sure that the monitor height
screen ascent to its highest point and it inclines backward at 30°)
- Then rotate clockwise or anticlockwise until the monitor stops at 90°.
User controls
Your monitor has controls on the front which are used to adjust the display.
For information on how controls, see to use these please “ ” 2-6. Adjusting your monitor image on page
Cable lock slot
Your monitor is equipped with a cable lock slot located on the rear of your monitor. Please follow
the instructions that came with the cable lock to attach it.
Chapter 1. Getting started 1-3

IR- Camera
Your monitor has embedded integrated IR Camera Module; it can be used as a normal web- camera
and also a way to login your Window 10 operating system using the function of face- recognition after
setting up the “ ” . Windows hello application
Note:
1. To set , please see “ ”up windows hello “Windows Hello setup (Windows 10 Only) on page ” 1-8.
2. To install the Camera driver, please see “Manually installing the IR camera driver in Windows 10”
o 3-7.n page
Slide the camera shutter to enableopen or close /disable the camera.
a. Slide to open. b. Slide to close.
1-4 -1 ’sT24v 0 Flat anel onitor User P M Guide

Setting up your monitor
This section provides information to help you set up your monitor.
Connecting and turning on your monitor
Note: Be sure to read the Safety Information located in the before carrying out this procedure.Flyer
1. Power off your computer and all attached devices, and unplug the computer power cord.
2. Connect the analog signal cable to the D-SUB connector of the monitor and the other end
on the back of the computer.
3. Connect one end of the DP cable to the DP connector on the back of the computer, and the
other end to the DP connector on the monitor. Lenovo recommends that customers who
require to use the DisplayPort input on their monitor purchase the "Lenovo DisplayPort to
DisplayPort cable 0A36537".
For more information, go to the following:
www.lenovo.com/support/monitoraccessories
1-6 -1 ’sT24v 0 Flat anel onitor User P M Guide
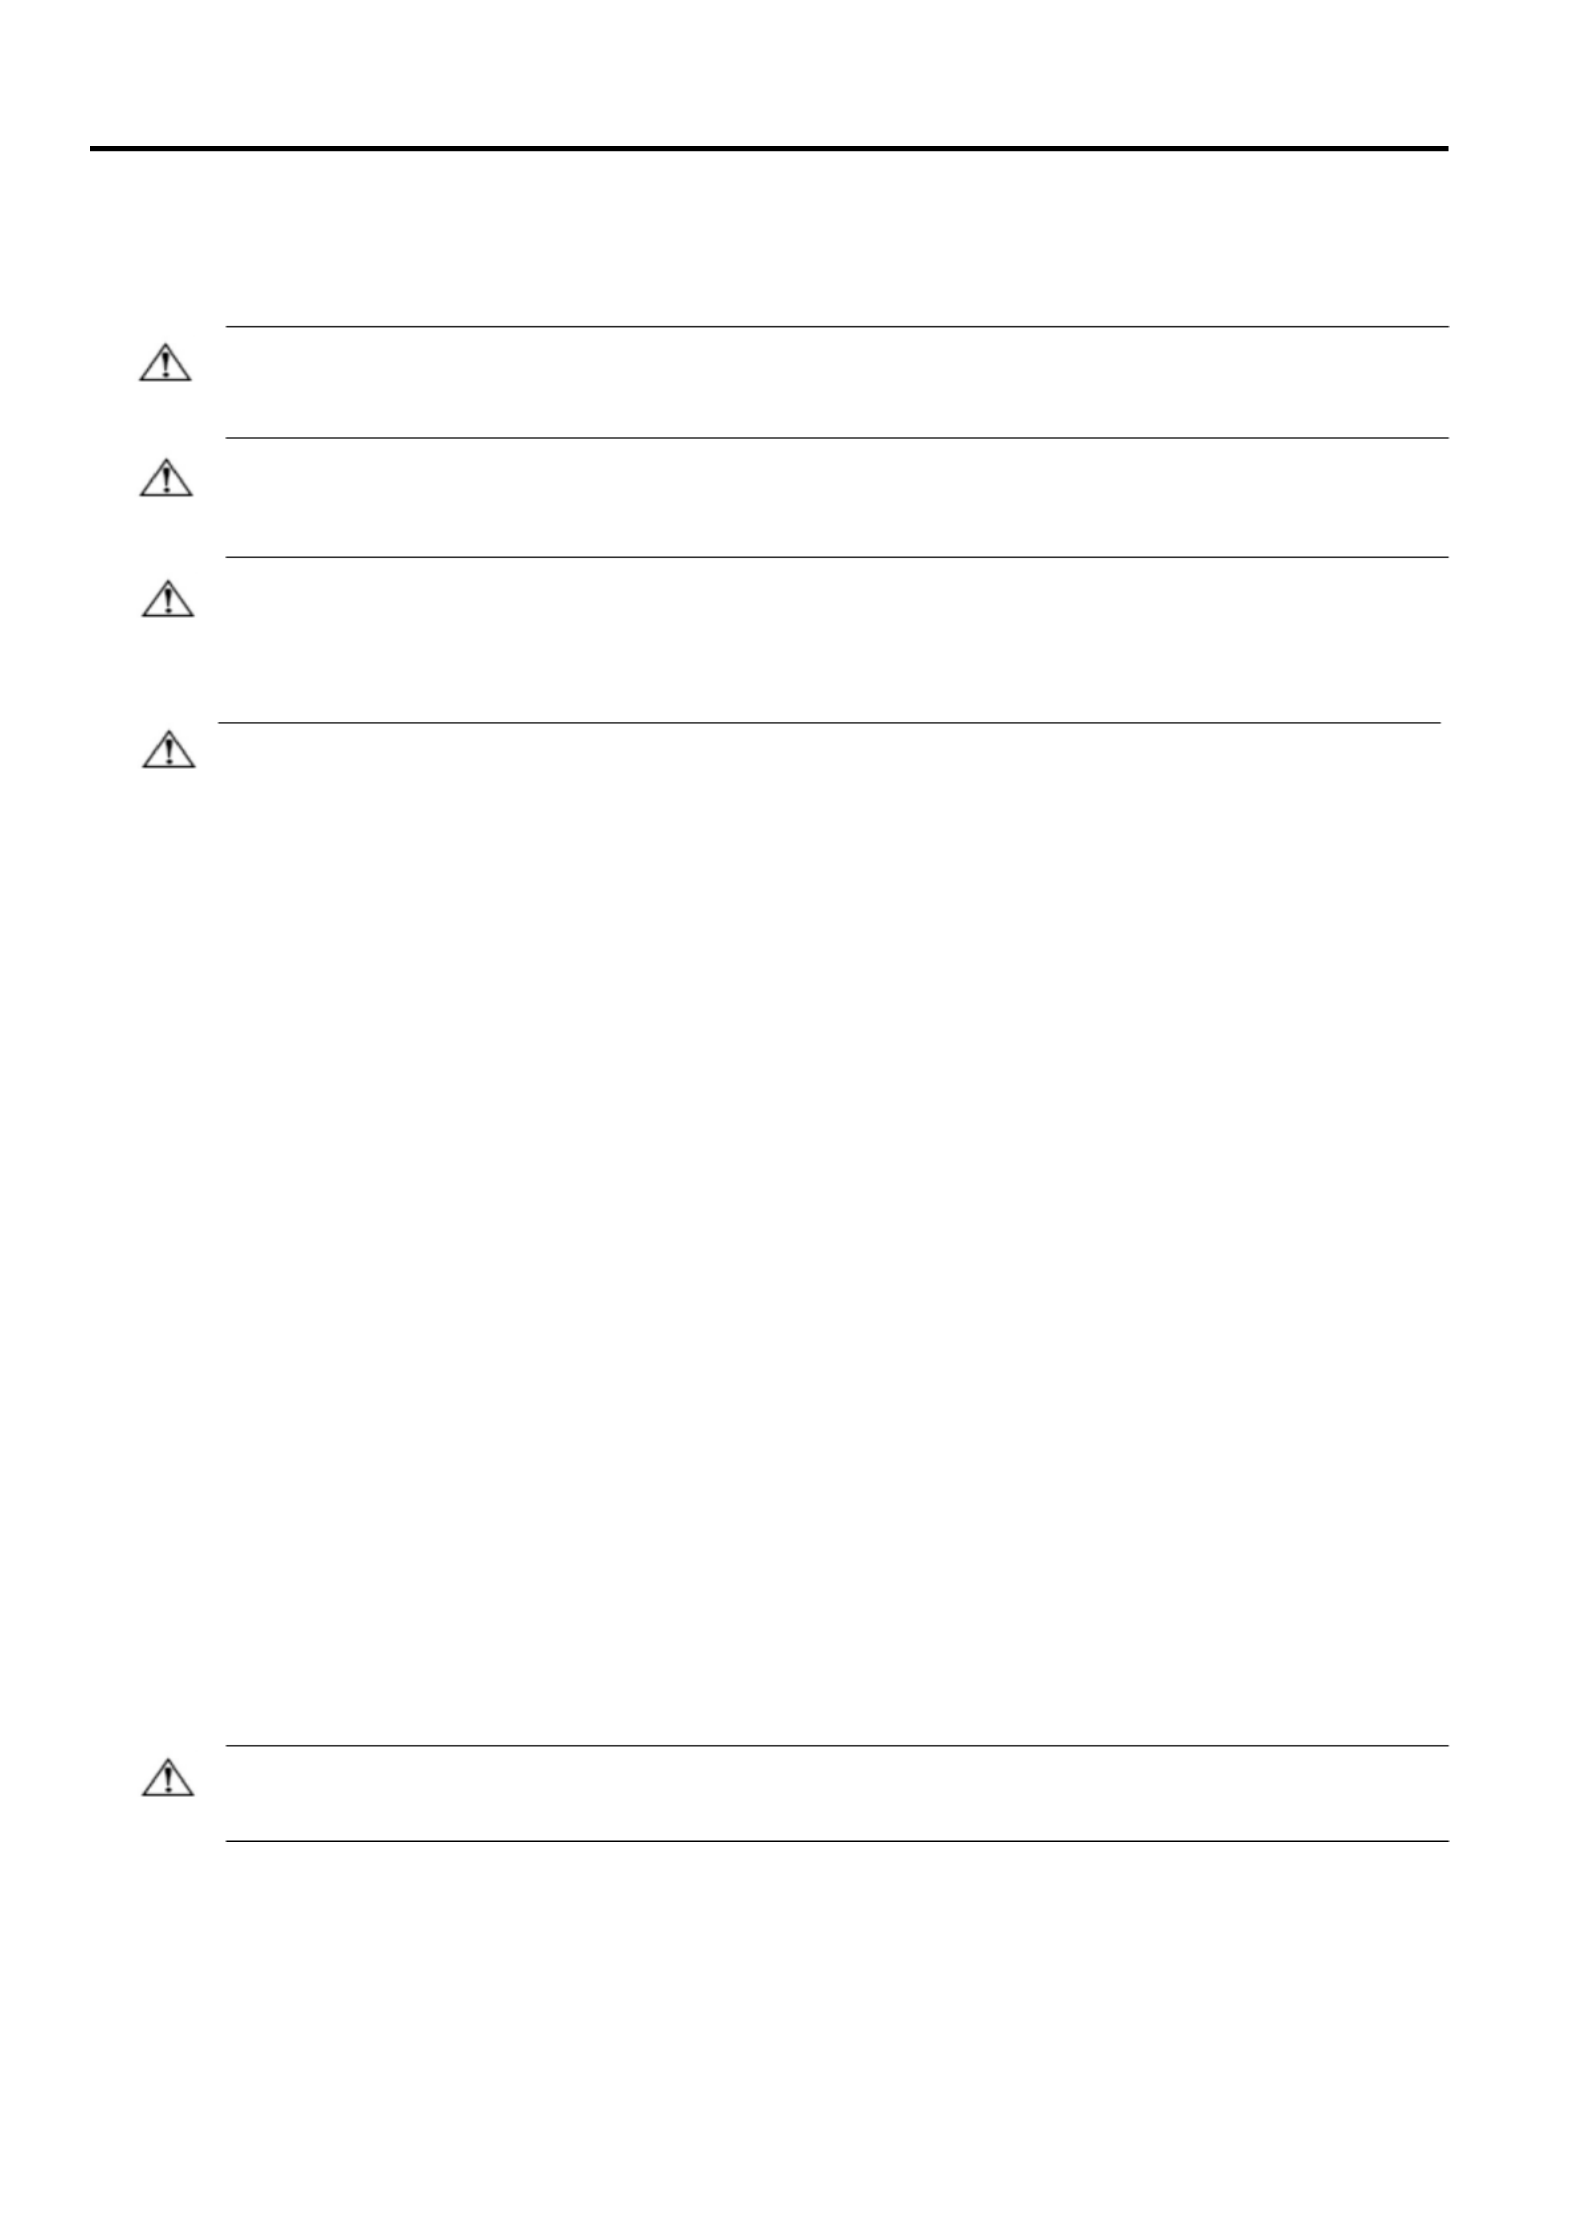
4 . Connect one end of the USB cable to the USB connector on the back of the 3.0 computer,
and the other end to the upstream USB connector on the monitor.
5. Connect one end of the HDMI cable to the HDMI connector on the back of the computer,
and the other end to the HDMI connector on the monitor. Lenovo recommends that
customers who require to use the HDMI input on their monitor purchase the “Lenovo
HDMI to HDMI cableOB47070”.
For more information, go to the following:
www.lenovo.com/support/monitoraccessories
6 . Plug the monitor power cord and the computer cord into grounded electrical outlets.
Note: A certified power supply cord has to be used with this equipment. The relevant national
installation and/or equipment regulations shall be considered. A certified power supply cord not
lighter than ordinary polyvinyl chloride flexible cord according to IEC 60227 (designation
H05VV- - F 3G 0.75mm² or H05VVH2 F2 3G 0.75mm²) shall be used. Alternative a flexible cord be
of synthetic rubber according - to IEC 60245 (designation H05RR F 3G 0.75mm²) shall be used.
Chapter 1. Getting started 1-7
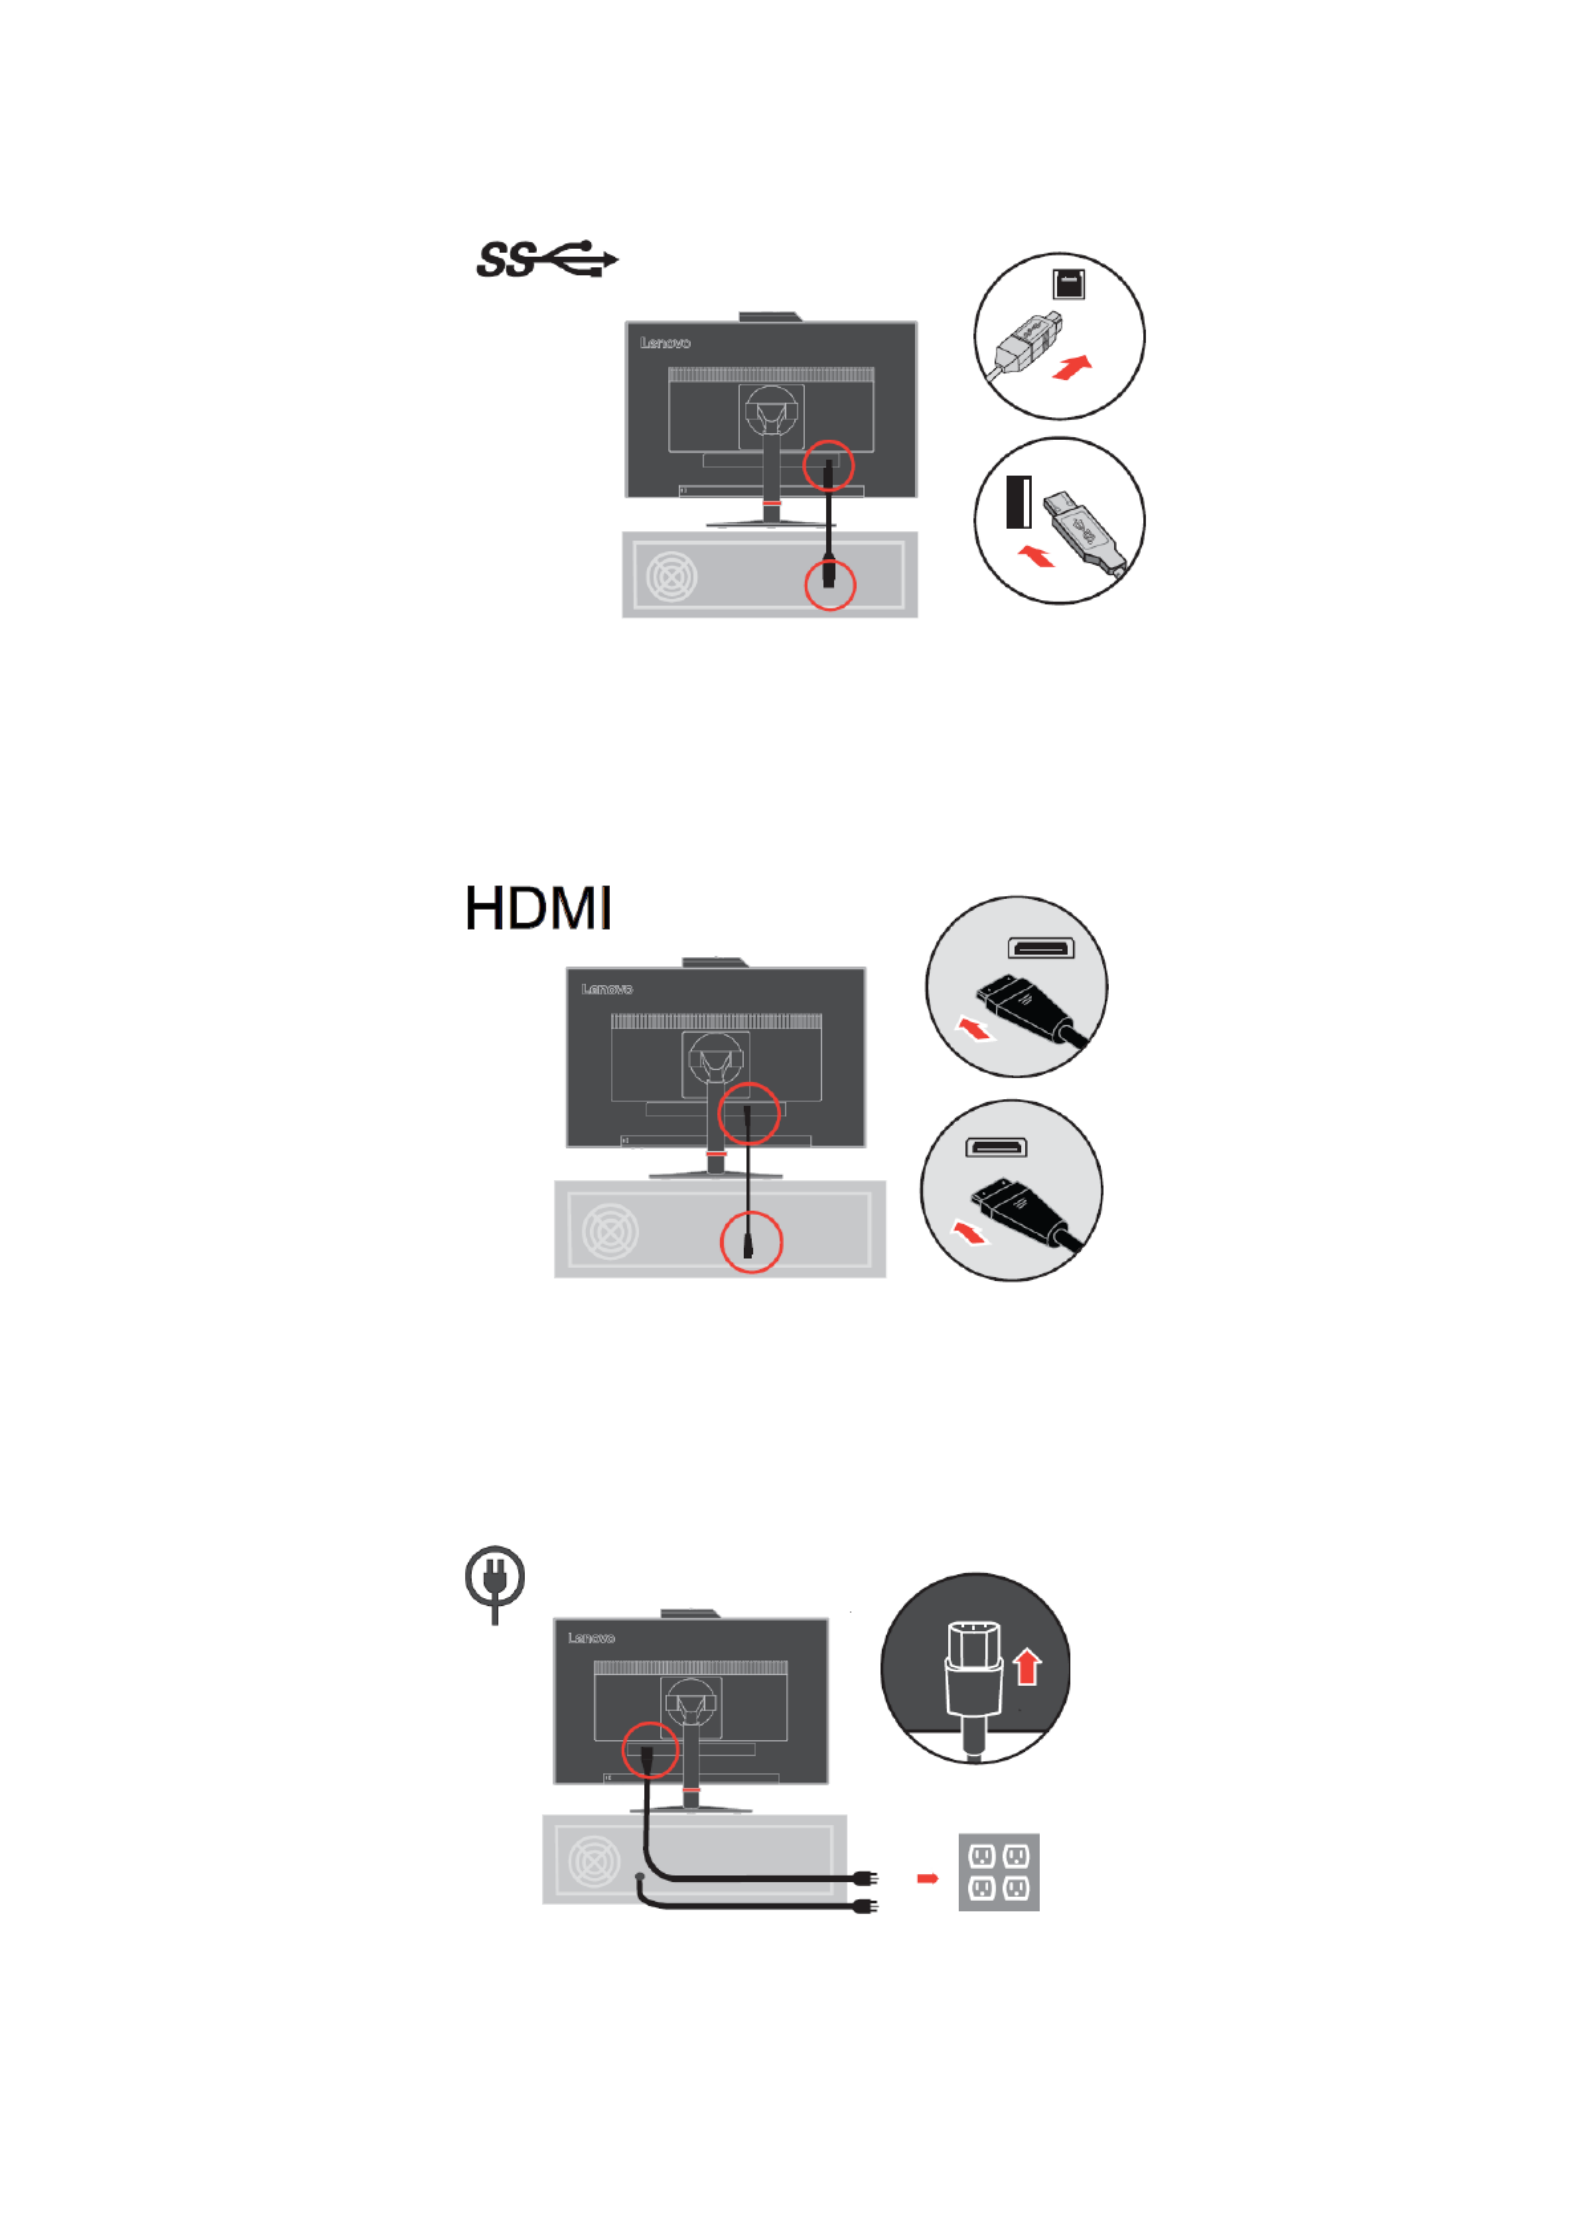
7. Assembled Line Cleaner as shown below.
8. Power on the monitor and the computer.
9. To nstall he onitor driver, i t m you ust ownload t rom enovo website m d i f L ,
(http://support.lenovo.com/docs/T24v_10) nd ollow he nstructions n page a f t i o
3-5.
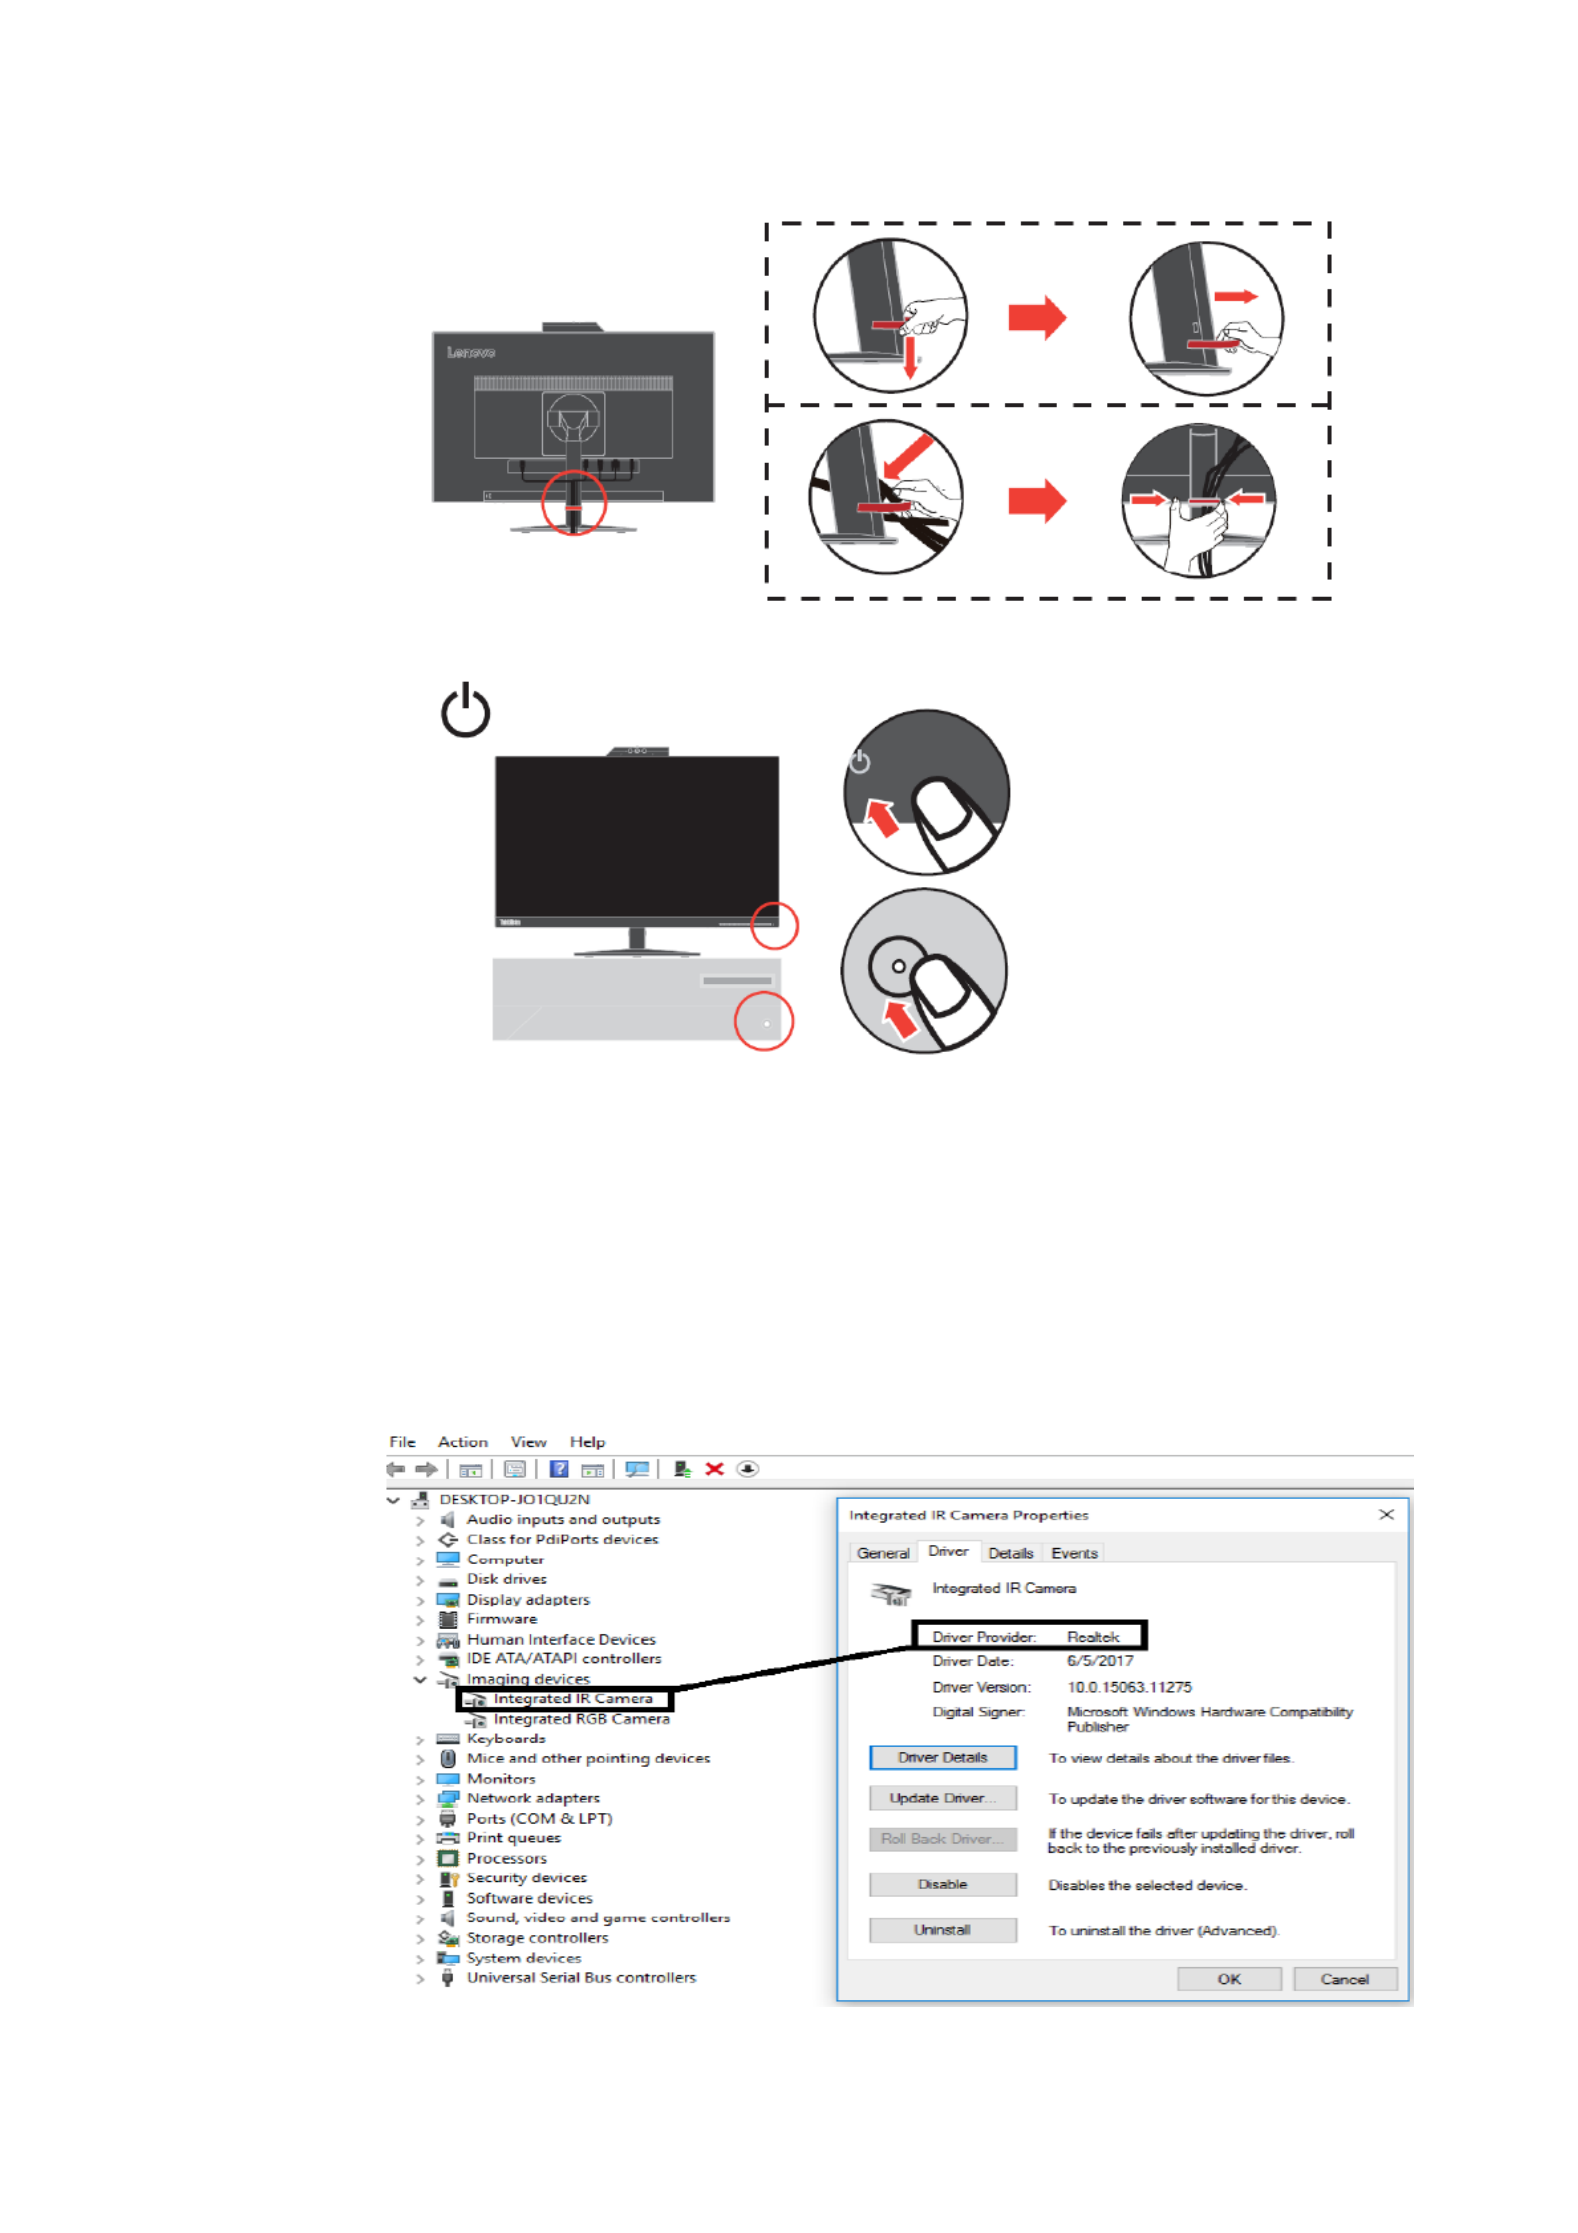
Windows Hello setup (Windows 10 Only)
Note: “To set up Windows Hello”, do the following:
1. Install the IR camera driver.
Note: To install the Camera driver, please see “Manually installing the IR camera driver in
Windows 10” o 3-7. n page
2. Confirm the driver has been installed correctly. (See the device manager and confirm the
Integrated IR Camera’s driver vender is “Realtek”. see as bellow.)
1-8 -1 ’sT24v 0 Flat anel onitor User P M Guide

Registering your option
Thank you for purchasing this Lenovo® product. Please take a few moments to register your
product and provide us with information that will help Lenovo to better serve you in the future.
Your feedback is valuable to us in developing products and services that are important to you, as
well as in developing better ways to communicate with you. Register your option on the
following Web site:
http://www.lenovo.com/register
Lenovo will send you information and updates on your registered product unless you indicate
on the Web site questionnaire that you do not want to receive further information.
1-1 -1 ’s0 T24v 0 Flat anel Monitor User P Guide

Chapter 2 jAd usting and using your monitor
This section will give you information on adjusting and using your monitor.
Comfort and accessibility
Good ergonomic practice is important to get the most from your personal computer
and to avoid discomfort. Arrange your workplace and the equipment you use to suit
your individual needs and the kind of work that you perform. In addition, use
healthy work habits to maximize your performance and comfort while using your
computer.
Arranging your work area
Use a work surface of appropriate height and available working area to allow you to
work in comfort.
Organize you work area to match the way you use materials and equipment. Keep
your work area clean and clear for the materials that you typically use and place the
items that you use most frequently, such as the computer mouse or telephone, within
the easiest reach.
Equipment layout and setup play a large role in your working posture. The
following topics describe how to optimize equipment setup to achieve and maintain
good working posture.
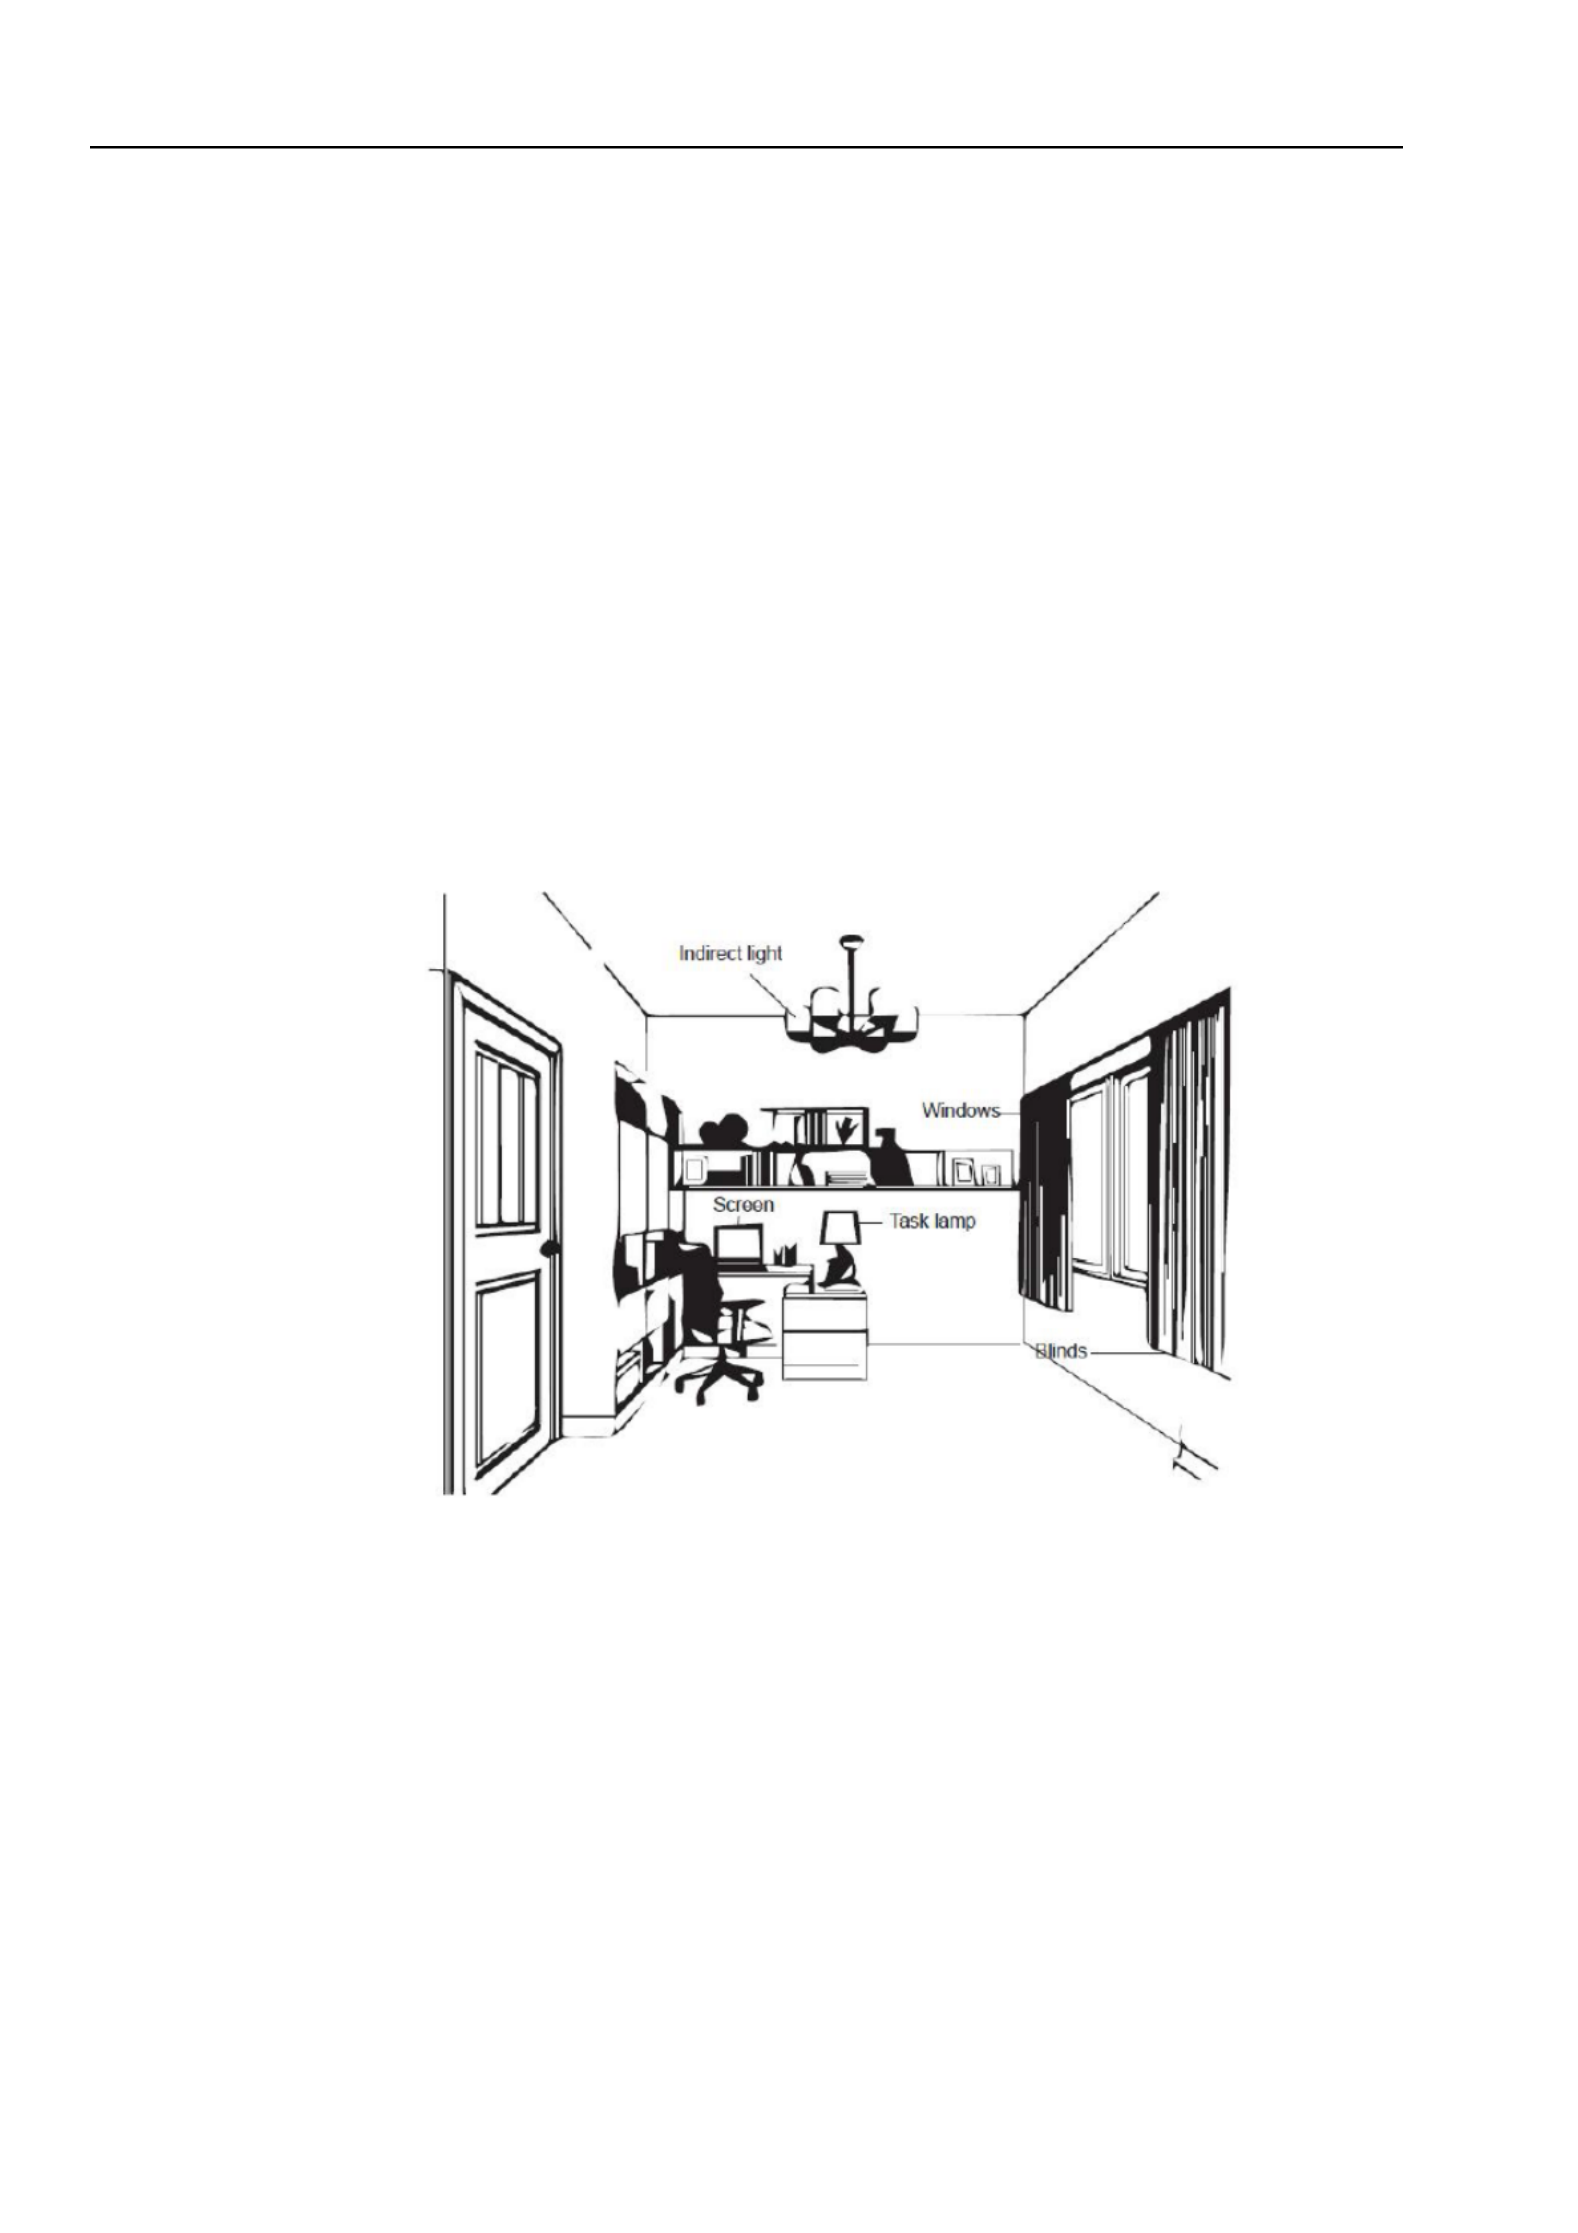
Positioning and viewing your monitor
Position and adjust your computer monitor for comfortable viewing by considering
the following items:
● Viewing distance: Optimal viewing distances for monitors range from
approximately 510mm to 760mm (20 in to 30 in) and can vary depending on ambient
light and time of day. You can achieve different viewing distances by repositioning
your monitor or by modifying your posture or chair position. Use a viewing distance
that is most comfortable for you.
● Monitor height: Position the monitor so your head and neck are in a comfortable
and neutral (vertical, or upright) position. If your monitor does not have height
adjustments, you might have to place books or other sturdy objects under the base of
the monitor to achieve the desired height. A general guideline is to position the
monitor such that the top of the screen is at or slightly below your eye -height when
you are comfortably seated. However, be sure to optimize your monitor height so
the line of site between your eyes and the centre of the monitor suits your
preferences for visual distance and comfortable viewing when your eye muscles are
in a relaxed stated.
● Tilt : Adjust the tilt of your monitor to optimize the appearance of the screen
content and to accommodate your preferred head and neck posture.
● General location: Position your monitor to avoid glare or reflections on the
screen from overhead lighting or nearby windows.
The following are some other tips for comfortable viewing of your monitor:
● Use adequate lighting for the type of work you are performing.
● Use the monitor brightness, contrast, and image adjustment controls, if equipped,
to optimize the image on your screen to meet your visual preferences.
● Keep your monitor screen clean so you can focus on the screen’s contents.
Any concentrated and sustained visual activity can be tiring for your eyes. Be sure to
periodically look away from your monitor screen and focus on a far object to allow
your eye muscles to relax. If you have questions on eye fatigue or visual discomfort,
consult a vision care specialist for advice.
2-1 T24v-1 ’s0 Flat anel Monitor User P Guide
Health Administration
Prolong exposure to computer screens may cause temporary visual fatigue. Factors
including working environment, working habit and posture, screen flicker and blue light
contribute to this condition. To minimize visual fatigue certain adjustments can be made on
the work stations or using suitable computer screens with features that alleviate eye strain.
Environment
Visual fatigue is affected by the working environment. Glare reductions and appropriate
lighting situations help minimize this condition.
● Glare reduction
Glare can be reduced by
a) Changing position of any light source that is causing the glare.
b) Fitting the light sources with appropriate diffusers or lampshade.
c) Using curtains or blind on windows to minimize glare from direct sunlight.
d) Adjusting monitor position to be perpendicular to the source of light or windows.
e) Using an anti-glare screen - ThinkVision monitors have anti-glare surface treatment that
scatters light for a reflection- free work usage.
● Lighting
Adequate lighting is necessary to avoid glare and eye fatigue. Excessive or insufficient
lighting makes the display on screen harder to see. Generally, lighting level should not
exceed 750 lux and levels ranging from 300 to 500 lux are most appropriate for computer
desk work. Recommended lighting arrangement includes positioning work stations away
from direct sunlight or using overhead lighting with baffles or louvers that reduces glare.
Working Habits
Long exposures to computer screens may cause eye strain. Symptoms include headache,
burning eyes, blurred vision and discomfort. To minimize eye strain, computer users can
adjust working habits to let their eyes relax and recover.
● Break Times
Computer users should take some time away from the screen especially if working for
prolong hours. Generally, it is recommended to take short breaks (5 – 15 mins) after 1 –2
hours of continuous computer works. Taking short and frequent breaks is more advised
than longer breaks.
● Looking at Distant Objects
Users often blink less when in front of monitor screen. To minimize eye strain and dryness,
users should rest the eye periodically by focusing on objects that are far away.
● Eye and Neck Exercises
Certain exercise reduces eye strain and prevent early onset of musculo-skeletal disorders. It
is recommended to repeat these exercises often. However, should symptoms persists it is
recommended to consult a physician.
Chapter 2. Adjusting and Using your monitor 2-2

Exercises for the eye:
1. Alternate looking up and looking down while keeping the body and head upright.
2. Slowly roll your eyes to look to the left and right.
3. Roll eyes to look at objects on the upper right corner and then on lower right. Do same
thing to look at objects on the upper left and lower left.
Exercises for the neck:
1. Relax arm at the side. Bend head forward to slightly stretch the neck. Hold for 5 seconds.
2. Relax arm at the side. Turn thead to the right. Hold for 5 seconds. Then turn head to the
left.
3. Relax arm at the side. Swing head to the left. Hold for 5 seconds. Then swing head to the
right.
Working Posture
Appropriate working position helps minimize eye discomfort. Seating position and ideal
placement of monitor are essential for a comfortable working experience.
●Seating Position
Placing the monitor too far or too close may lead to eye strain. Far viewing distance causes
users to lean forward to see small texts, which strain the eyes and torso. Close viewing
distance, on the other hand, strains the eye resulting from exerting more effort to focus and
also causes the user to sit in awkward body posture (i.e. tilting the head, typing with
outstretched arms, etc.)
Recommended viewing distance between the eye and the monitor screen is 1.5 x the diagonal
of the screen. Solutions in meeting this required distance in cramped office situations include
pulling desk away from wall or divider to make room for monitor, using flat panel or compact
displays placing the monitor in the desk corner, or placing the keyboard in an adjustable
drawer to create a deeper working surface.
ThinkVision monitors are design to maximize work space (e.g. having thin profiles,
compatible for ThinkCentre Tiny back mount, practical cable management, etc).
2-3 T24v-1 ’s0 Flat anel Monitor User P Guide
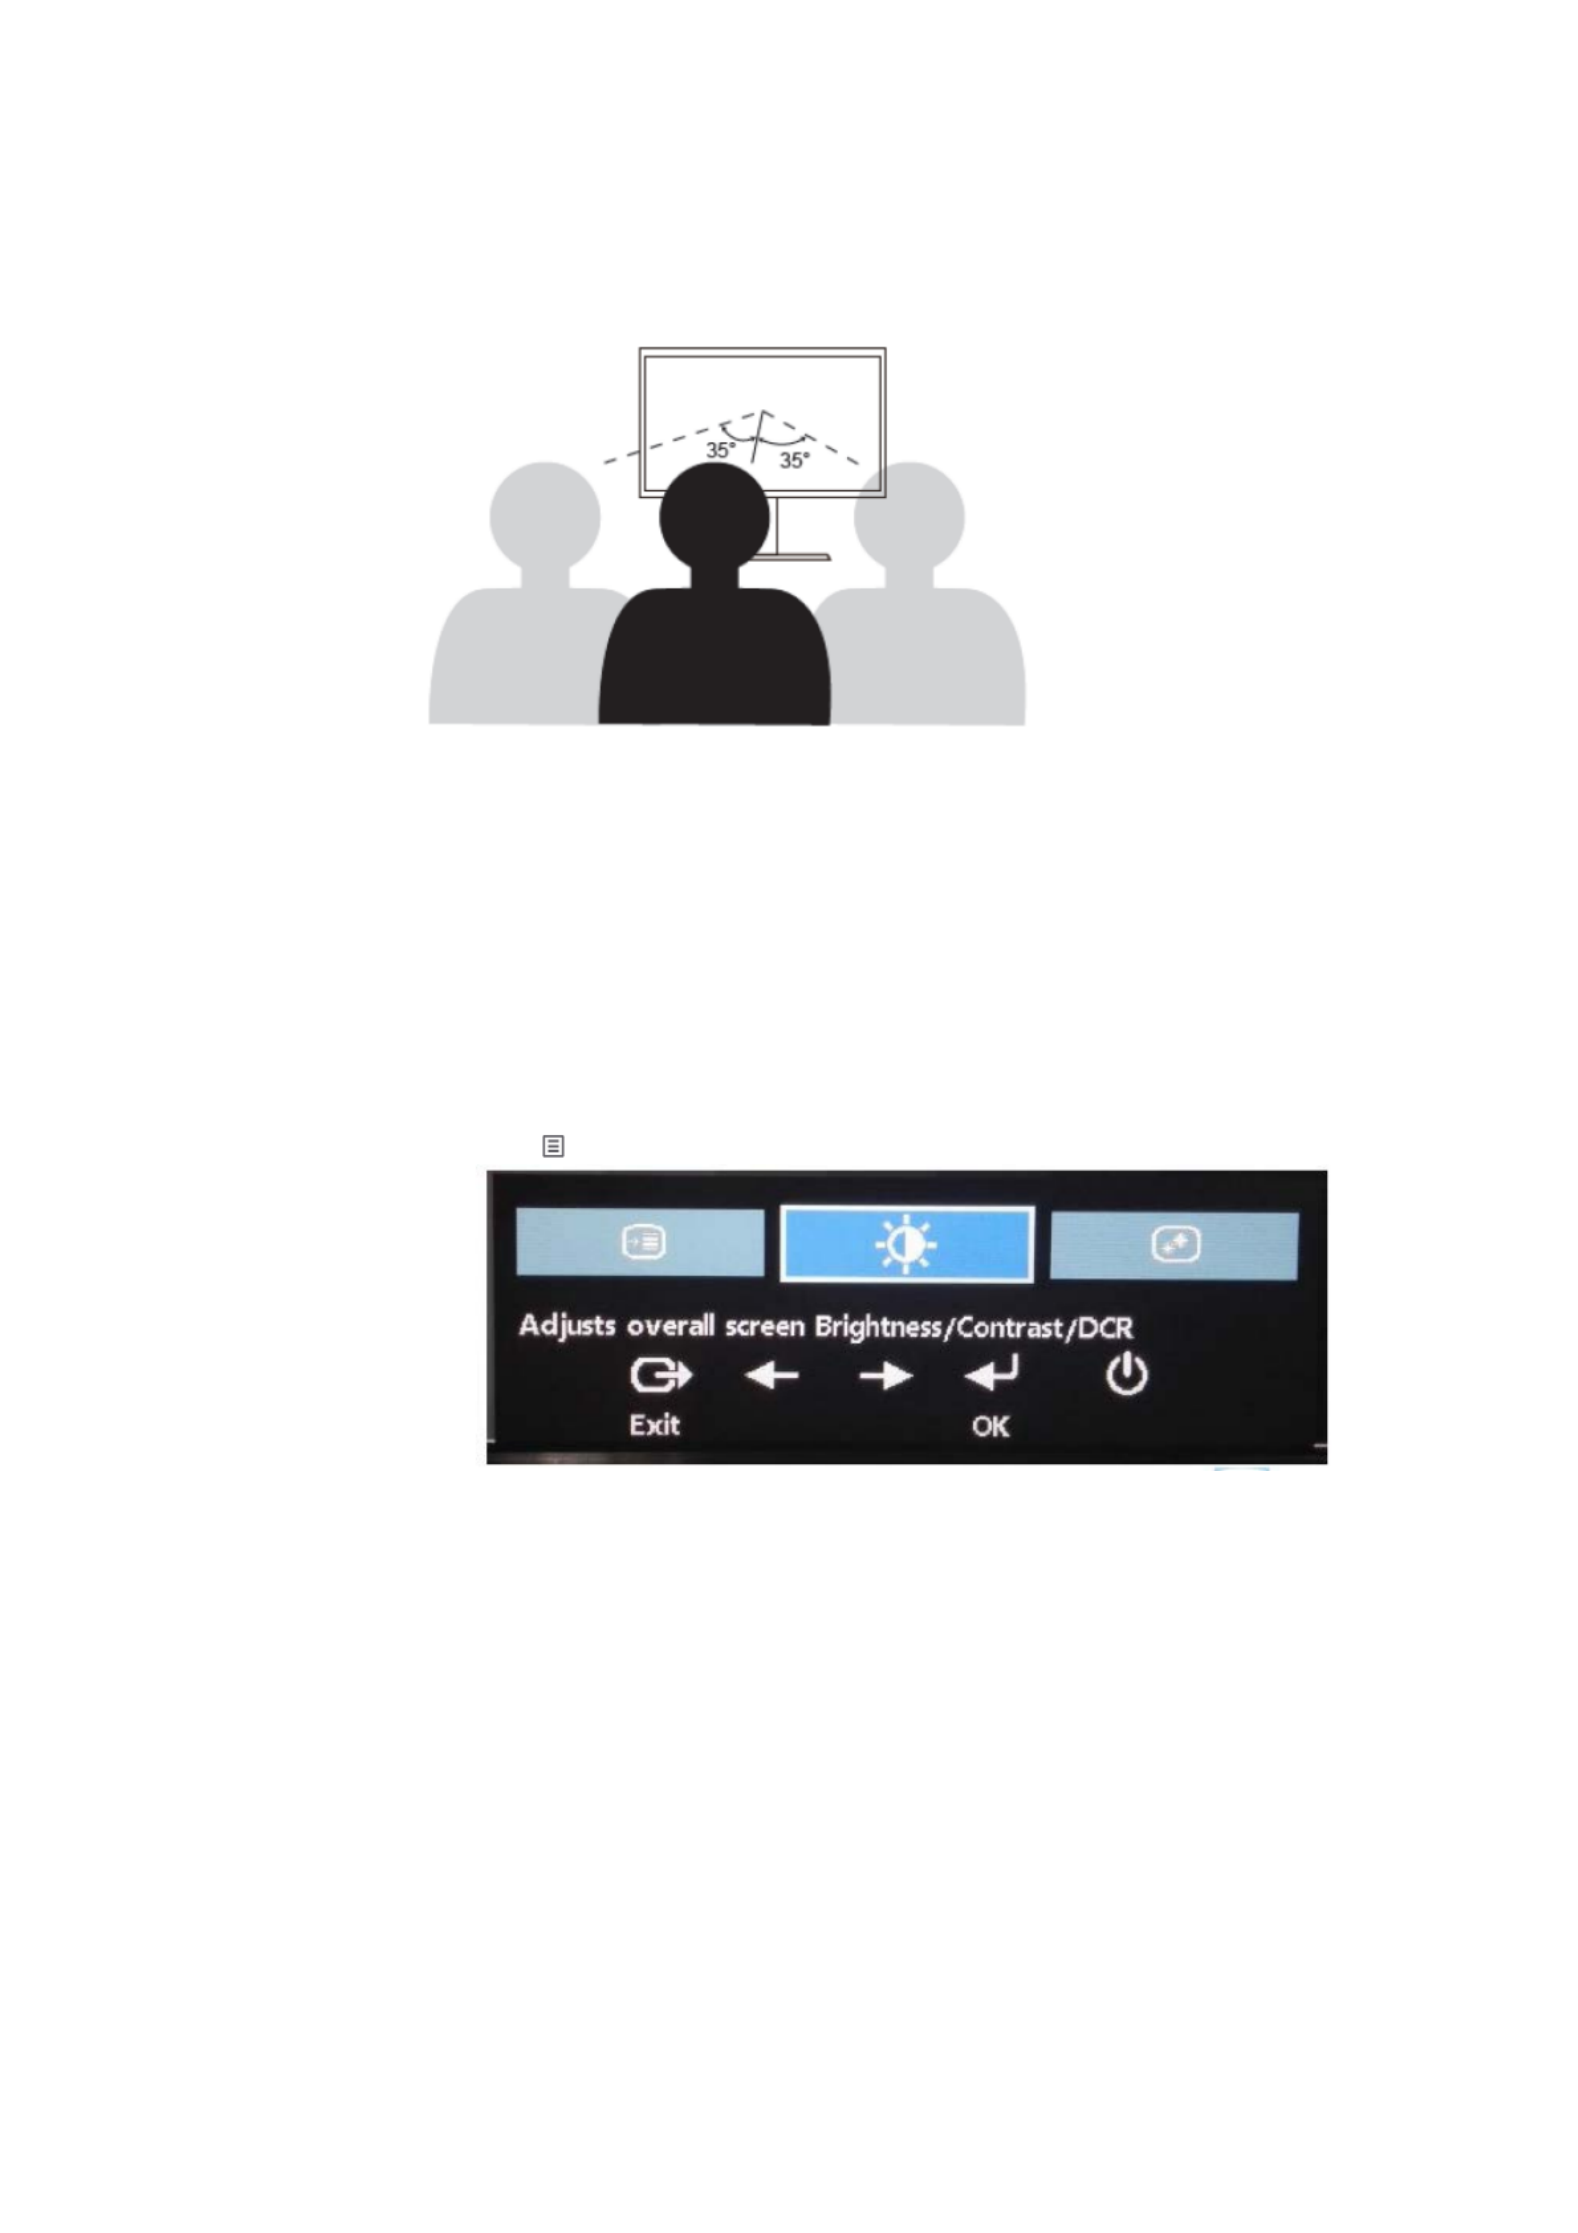
● Viewing Angle
Neck fatigue and pain may result from prolong turning of the head to see objects on the monitor
screen. To minimize this, position the monitor directly in front so the head, neck and torso face
forward to the screen. It is recommended that monitor should not be more than 35 degrees to the
right or left of the head.
Monitors should also not be placed too high or too low as this contributes to awkward posture which
results to muscle fatigue.
Reduce Flicker
Monitor flickers refer to repeated changes in monitor light intensity. It is caused by several factors
including but not limited to voltage fluctuations. Reducing flicker minimizes eye strain and
headaches. ThinkVision monitors allow users to use high frequency display modes that can
effectively reduce flicker.
Low Blue Light
Concerns on blue light affecting eye health have risen over the years. Blue light have
wavelength between 300 nm to 500 nm. The monitors have a factory setting that reduces blue
light emissions. Users can enable low blue light mode on these monitors from the OSD
settings.
1. Press to open the main OSD menu.
Chapter 2. Adjusting and Using your monitor 2-4
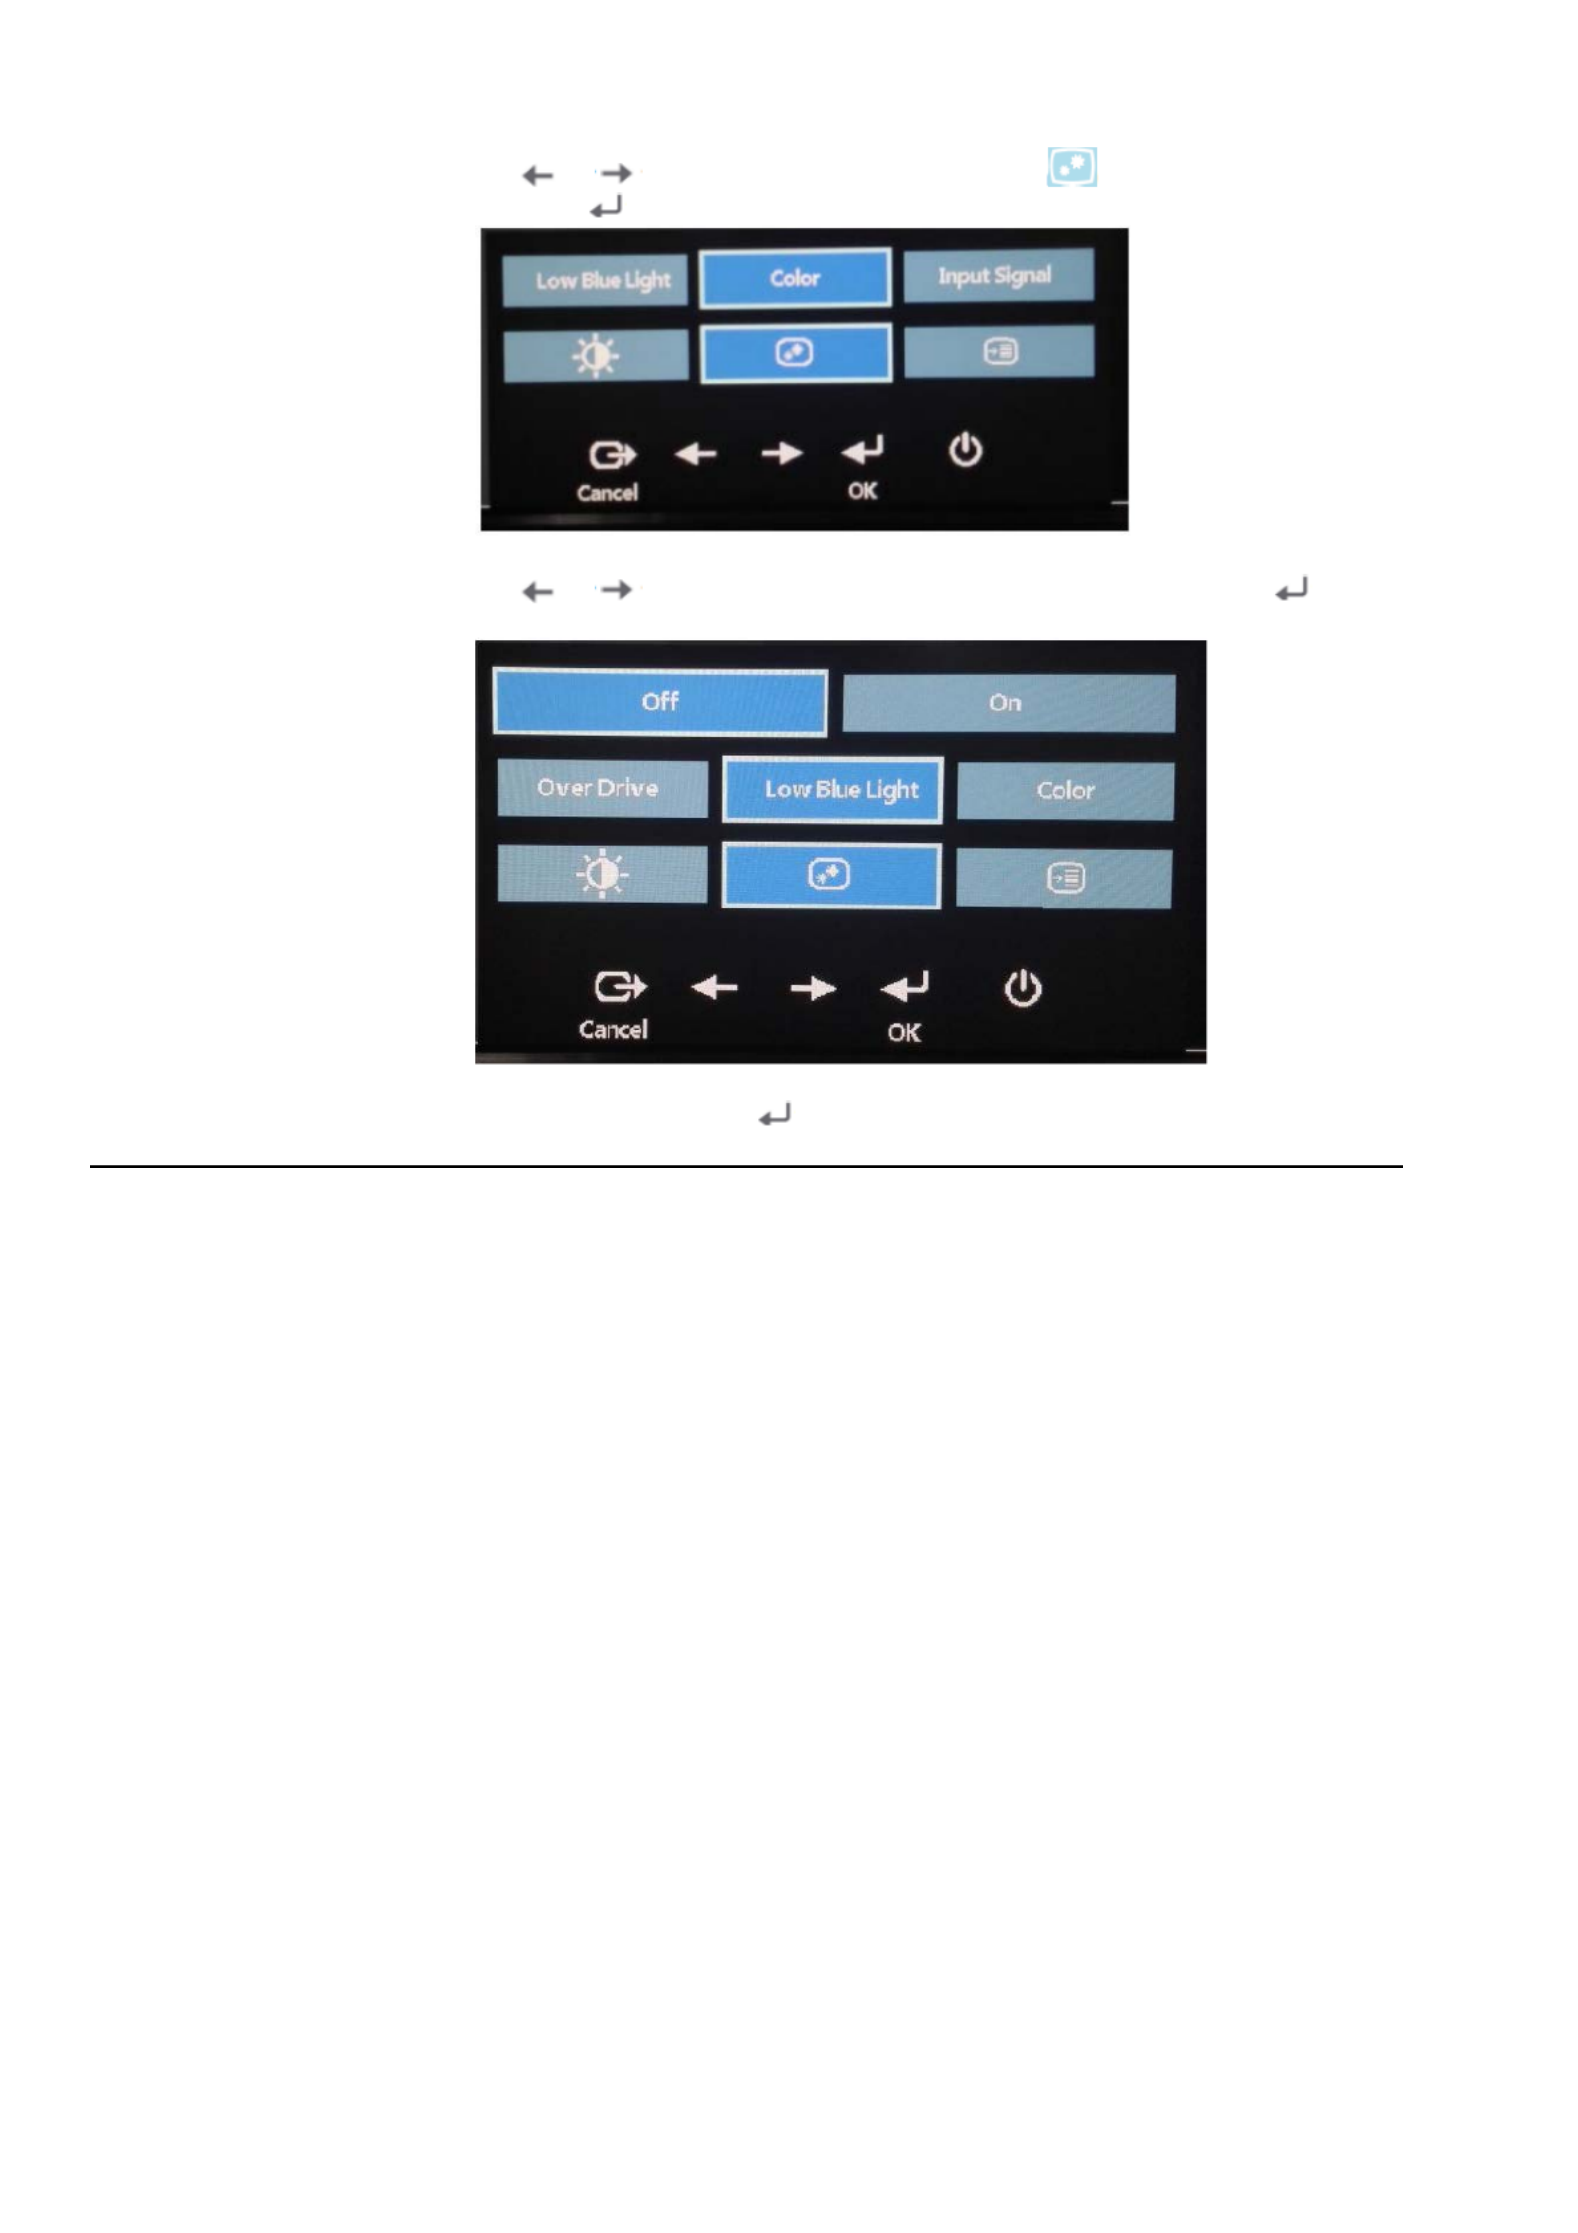
2. Use or to move among the icons. Select icon (Adjusts image properties)
and press to acces this function.
3. Use or move among the items. Select Low Blue Light and press to
acces s this function.
4. Select Off or On and press to enable Low blue Light or disable Low Blue Light.
Accessibility information
Lenovo greater information technology is committed to providing access to and to
people with disabilities. With assistive technologies, users can access information in
the to their these way most appropriate disability. Some of technologies are already
provided others in your operating system; can be purchased through vendors or
accessed at:
https://lenovo.ssbbartgroup.com/lenovo/request_vpat.php
2-5 T24v-1 ’s0 Flat anel Monitor User P Guide

Adjusting your monitor image
This section describes control features monitor the user used to adjust your image.
Using the direct access controls
The controls On Screen not direct access can be used when the Display (OSD) is displayed.
Table 2-1 Direct access controls
Icon Control Description
Microphone Mute
Use the Microphone Mute button to mute
microphone.
Mute Use the Mute button to mute audio.
Input change Switches the video input source.
Main menu Open main OSD menu
Using the On- Screen Display (OSD) controls
The controls viewed On settings adjustable with the user are through the - Screen Display (OSD),
as shown below.
To controls: use the
1. Press to open the main OSD menu.
2. an Use icons. or to move among the Select icon and press to access that
function. there If is a - , sub menu, you can move between options using or
then to that to press select function. Use or make adjustments. Press
to save.
3. backwards Press to move - from through the sub menus and exit the OSD.
4. Press lock accidental for and hold 10 seconds to the OSD. This will prevent
adjustments to the to the for OSD. Press and hold 10 seconds unlock OSD
and allow adjustments to the OSD.
5. Enables DDC/CI by default. Use OSD Exit Key, press and hold the buttons for 10
seconds to disable/enable DDC/CI function. The words " DDC/CI
Disable/DDC/CI/Enable" shows on the screen.
Chapter 2. Adjusting and Using your monitor 2-6
Table. 2-2 OSD functions
Controls and
OSD Icon on Main Menu Submenu Description
Adjustments
Brightness C/ ontrast Brightness Adjusts overall brightness
Brightness Contrast/ Contrast
Adjusts difference between
light and dark areas.
On
Brightness Contrast/
DCR Enable dynamic contrast ratio. Off
Image Position
Horizontal Position
Vertical Position
Moves the image left or right.
Moves the image up or D own.
Automatic Automatically optimizes the
image.
Image Setup
Manual
Manually optimizes the image.
See “Manual image setup” on
page 3-3
●Clock
●Phase
Analog Analog Select Signal
Image
Properties
Input Signal D ISPLAYPORT
HDMI
Select DP Signal
Select HDMI Signal
Adjusts intensity of red, green,
and blue.
Preset mode
●Neutral
●sRGB
●Reddish
●Bluish
Custom
●Red: Increases or decreases
Color the saturation of ‘red’ in the
Image Properties image.
●Green: Increases or
decreases the saturation of
‘green’ in the image.
●Blue: Increases or
decreases the saturation of
‘blue’ in the image.
●Save: Saves the
custom colo r choices.u
Image Properties
Scaling ●
●
Full Screen
Original AR
Image Properties
Over Drive
Response time enhancement
●Normal
●Extreme
●Off
Image Properties
Low Blue Light ●
●
On
Off
2-7 T24v-1 ’s0 Flat anel Monitor User P Guide

Table 2-2 OSD functions
OSD Icon on Main
Menu Submenu Description
Options
Information
Shows resolution, refresh rate, and product details.
Note: This screen does not allow any changes to the settings.
This section lists the languages supported by your monitor.
Options
Language Note: The language chosen only affects the language of the OSD. It has
no effect on any software running on the computer.
Options
Menu Position
Default
Custom
Menu position adjusts menu location on the screen.
Returns the menu position to the default settings.
● Horizontal: Changes the horizontal position of the OSD
● Vertical: Changes the vertical position of the OSD.
Options Factory Default
● Cancel
● Reset
Resets monitor to the original factory settings.
Controls button and menu settings for accessibility preferences.
Options
Accessibility
Button repeat rate:
Select or to change.
● Off
● Default
● Slow
Menu time out: Sets the length of time the OSD will remain active after
the last time a button is pressed.
Options
DP Select
Select DP1.1 or DP1.2:
● DP1.1
● DP1.2
Controls button and menu settings for DP transmit speed.
*Low Blue Light Mode is reducing the blue light content.
*The use of Extreme Mode (response time) may result in reduced display quality when fast moving video
graphics are displayed.
Users should check Extreme Mode (response time) to verify if it is compatible with any applications they would
like to use it with.
Chapter 2. Adjusting and Using your monitor 2-8

Audio description
If your Operation System(OS) is XP, for the XP limitation, 2 phenomena will be happened:
A) The USB audio is recognized as a speaker phone by PC, Speaker volume control icon will
be disappeared when you plug in the USB cable.
B) Because PC doesn't set the USB audio as the prior audio output automatically when you
first lug he SB cable, and the onitor w not udio p in t U m ill a output.
You ust etup t anually nce, lease refer o below step: m s i m o p t
1> en our control anel” from he start. Op y “ p t
2> hen en th “sounds nd udio devices” T op e a a .
3> elect he “ThinkVision ide Monitor or SB S t T24v W f U -Audio” s efault udio utput. a d a o
4> Apply t. i
Understanding management power
Power recognizes you not management is invoked when the computer that have using your
mouse user a or keyboard for - definable period. There are several states as described in the table
below.
For optimal performance, working off switch your monitor at the end of each day, or whenever you
expect for to leave it unused long periods during the day.
Table2 4.Power- indicator
State Power
Indicator
Screen Restoring Operation Compliance
On Steady green Normal
Standby/
Suspend
Steady amber Blank
Press a key or move the
mouse.
There may be a slight
delay reappears.
Note: Standby also occurs
if there is no image output to
the monitor.
ENERGY
STAR
Off Off Off Press power key to switch on
There may be a slight delay
before the image reappears.
ENERGY
STAR
Caring for your monitor
Be off sure to turn the power before you perform any maintenance on the monitor.
Do not:
●Apply .water or liquid directly to your monitor
●Use solvents or abrasives.
●Use flammable cleaning materials eto clean your monitor or any other electrical quipment.
●Touch the screen area of your monitor with sharp or abrasive items. This type of contact may
cause permanent damage to your screen.
●Use any cleaner which contains - an anti static solution or similar additives. This may harm the
coating the of screen area.
Do:
●Lightly a soft dampen cloth with water and use this to gently wipe the covers and the screen.
●Remove a a grease or finger marks with damp cloth and little mild detergent.
Chapter 2. Adjusting and Using your monitor 2-10
Specyfikacje produktu
| Marka: | Lenovo |
| Kategoria: | monitor |
| Model: | ThinkVision T24v |
Potrzebujesz pomocy?
Jeśli potrzebujesz pomocy z Lenovo ThinkVision T24v, zadaj pytanie poniżej, a inni użytkownicy Ci odpowiedzą
Instrukcje monitor Lenovo

19 Grudnia 2024
18 Grudnia 2024
7 Grudnia 2024
9 Października 2024
8 Października 2024
8 Października 2024
8 Października 2024
8 Października 2024
8 Października 2024
8 Października 2024
Instrukcje monitor
- monitor Sony
- monitor Yamaha
- monitor Samsung
- monitor PeakTech
- monitor UPERFECT
- monitor LG
- monitor Xiaomi
- monitor Joy-It
- monitor Sharp
- monitor Huawei
- monitor TCL
- monitor Pioneer
- monitor Philips
- monitor Plantronics
- monitor SilverCrest
- monitor Gigabyte
- monitor Acer
- monitor Bosch
- monitor Epson
- monitor JBL
- monitor Hikvision
- monitor Fujitsu
- monitor HyperX
- monitor LC-Power
- monitor Hisense
- monitor Panasonic
- monitor Promethean
- monitor Canon
- monitor Crestron
- monitor Viewsonic
- monitor Behringer
- monitor Asus
- monitor AG Neovo
- monitor Allen & Heath
- monitor IK Multimedia
- monitor Medion
- monitor Boss
- monitor Marquant
- monitor MSI
- monitor Toshiba
- monitor Tesla
- monitor Westinghouse
- monitor Jensen
- monitor Yealink
- monitor Ring
- monitor Garmin
- monitor Blaupunkt
- monitor Salora
- monitor Iiyama
- monitor Citizen
- monitor APC
- monitor Haier
- monitor HP
- monitor Hyundai
- monitor Honeywell
- monitor Chauvet
- monitor Tripp Lite
- monitor Shure
- monitor Cisco
- monitor Xerox
- monitor Smart
- monitor Cooler Master
- monitor Alpine
- monitor Godox
- monitor Dynaudio
- monitor Deltaco
- monitor JVC
- monitor V7
- monitor Dell
- monitor IFM
- monitor Corsair
- monitor Alesis
- monitor Vimar
- monitor Dahua Technology
- monitor Schneider
- monitor Eurolite
- monitor Ricoh
- monitor SMART Technologies
- monitor NZXT
- monitor Emos
- monitor Renkforce
- monitor Marshall
- monitor Viessmann
- monitor Omron
- monitor Thomson
- monitor Velleman
- monitor Neumann
- monitor DataVideo
- monitor Danfoss
- monitor Pyle
- monitor Apple
- monitor Newline
- monitor Waeco
- monitor AOC
- monitor Peerless-AV
- monitor Speco Technologies
- monitor Samson
- monitor PreSonus
- monitor ARRI
- monitor Kindermann
- monitor Olympus
- monitor Mitsubishi
- monitor Fluid
- monitor Razer
- monitor ART
- monitor Continental Edison
- monitor RCF
- monitor NEC
- monitor Brandson
- monitor Prestigio
- monitor OSEE
- monitor Sanyo
- monitor Elvid
- monitor Optoma
- monitor Focal
- monitor Asrock
- monitor Monkey Banana
- monitor Abus
- monitor AMCV
- monitor Jay-Tech
- monitor Mackie
- monitor Palmer
- monitor Barco
- monitor Insignia
- monitor AVer
- monitor Akuvox
- monitor 3M
- monitor Element
- monitor Denver
- monitor Marshall Electronics
- monitor Orion
- monitor Hitachi
- monitor Postium
- monitor Kali Audio
- monitor IStarUSA
- monitor Seiki
- monitor Ernitec
- monitor Wohler
- monitor SmallHD
- monitor AJA
- monitor KRK
- monitor BenQ
- monitor Atlona
- monitor Thermaltake
- monitor Simrad
- monitor Hanwha
- monitor Odys
- monitor Elo
- monitor Ikan
- monitor BOOX
- monitor JUNG
- monitor Burg Wächter
- monitor Eizo
- monitor Monacor
- monitor Aputure
- monitor Daewoo
- monitor Tannoy
- monitor GVision
- monitor Positivo
- monitor Adj
- monitor Freedom Scientific
- monitor SPL
- monitor Qian
- monitor I3-Technologies
- monitor Stairville
- monitor Vitek
- monitor Planar
- monitor Mobile Pixels
- monitor REVO
- monitor Atomos
- monitor Newstar
- monitor SWIT
- monitor Kramer
- monitor RGBlink
- monitor AMX
- monitor Midas
- monitor Alienware
- monitor Archos
- monitor Acti
- monitor Emachines
- monitor Caliber
- monitor Maxdata
- monitor Sunstech
- monitor GlobalTronics
- monitor Sunny
- monitor BlueBuilt
- monitor Da-Lite
- monitor ProXtend
- monitor Kubo
- monitor GeoVision
- monitor LaCie
- monitor InFocus
- monitor Festo
- monitor Konig
- monitor Swissonic
- monitor IHealth
- monitor Peaq
- monitor QSC
- monitor Hannspree
- monitor ESI
- monitor Avocor
- monitor Vivitek
- monitor Genelec
- monitor Interlogix
- monitor Vorago
- monitor EverFocus
- monitor POSline
- monitor Peerless
- monitor M-Audio
- monitor Mad Catz
- monitor Krom
- monitor Monoprice
- monitor Eve Audio
- monitor Yorkville
- monitor HoverCam
- monitor Voxicon
- monitor Sonifex
- monitor TV One
- monitor Fostex
- monitor Prowise
- monitor Terra
- monitor Neets
- monitor Soundstream
- monitor Xoro
- monitor HKC
- monitor CTOUCH
- monitor Ozone
- monitor Ibm
- monitor Maxell
- monitor Packard Bell
- monitor Provision ISR
- monitor Mybeo
- monitor CSL
- monitor Bearware
- monitor Drawmer
- monitor Blue Sky
- monitor Zalman
- monitor Iadea
- monitor Advantech
- monitor Hercules
- monitor Avantone Pro
- monitor Ganz
- monitor TVLogic
- monitor Gamber-Johnson
- monitor Extron
- monitor Neat
- monitor Legamaster
- monitor Belinea
- monitor Adam
- monitor Triton
- monitor ITek
- monitor Kogan
- monitor Posiflex
- monitor Antelope Audio
- monitor MicroTouch
- monitor X-Rite
- monitor EKO
- monitor ONYX
- monitor IBoardTouch
- monitor Mirai
- monitor Elite Screens
- monitor Hollyland
- monitor Mitsai
- monitor Christie
- monitor Skytronic
- monitor Enttec
- monitor Feelworld
- monitor Phoenix Contact
- monitor COMMBOX
- monitor Yiynova
- monitor Alogic
- monitor Pelco
- monitor Lilliput
- monitor LightZone
- monitor AOpen
- monitor Planet Audio
- monitor EC Line
- monitor Datacolor
- monitor HELGI
- monitor Desview
- monitor Syscom
- monitor Allsee
- monitor Night Owl
- monitor ProDVX
- monitor Varad
- monitor PureTools
- monitor DoubleSight
- monitor CTL
- monitor Game Factor
- monitor Nixeus
- monitor Chimei
- monitor Blue Sea
- monitor Faytech
- monitor Hamlet
- monitor Wyse - Dell
- monitor Approx
- monitor Bauhn
- monitor GeChic
- monitor Oecolux
- monitor ADS-TEC
- monitor Satco
- monitor Casalux
- monitor Jupiter
- monitor Transvideo
- monitor Innocn
- monitor KeepOut
- monitor Shimbol
- monitor Raysgem
- monitor Motrona
- monitor Ikegami
- monitor AORUS
- monitor Portkeys
- monitor Mimo Monitors
- monitor American Dynamics
- monitor AIS
- monitor Wortmann AG
- monitor Viotek
- monitor Vidi-Touch
- monitor KTC
- monitor CoolerMaster
- monitor Atlantis Land
- monitor HEDD
- monitor Colormetrics
- monitor IOIO
- monitor DTEN
- monitor Cocopar
- monitor Titan Army
- monitor Xenarc
- monitor Delvcam
- monitor Wimaxit
- monitor BookIT
- monitor SideTrak
- monitor TRIUMPH BOARD
- monitor Japannext
Najnowsze instrukcje dla monitor

8 Kwietnia 2025

8 Kwietnia 2025

8 Kwietnia 2025
7 Kwietnia 2025

5 Kwietnia 2025

4 Kwietnia 2025

4 Kwietnia 2025
3 Kwietnia 2025
2 Kwietnia 2025

2 Kwietnia 2025