Instrukcja obsługi Lenovo ThinkPad S431
Przeczytaj poniżej 📖 instrukcję obsługi w języku polskim dla Lenovo ThinkPad S431 (152 stron) w kategorii laptop. Ta instrukcja była pomocna dla 4 osób i została oceniona przez 2 użytkowników na średnio 4.5 gwiazdek
Strona 1/152

UserGuide
ThinkPadS431

Notes:Beforeusingthisinformationandtheproductitsupports,besuretoreadandunderstandthe
following:
•Safety,Warranty,andSetupGuide
•RegulatoryNotice
•“Importantsafetyinformation”onpagevi
•AppendixD“Notices”onpage131
TheSafety,Warranty,andSetupGuideandtheRegulatoryNoticehavebeenuploadedtotheWebsite.To
refertothem,gotohttp://www.lenovo.com/ThinkPadUserGuidesandfollowtheinstructionsonthescreen.
FirstEdition(May2013)
©CopyrightLenovo2013.
LIMITEDANDRESTRICTEDRIGHTSNOTICE:IfdataorsoftwareisdeliveredpursuantaGeneralServicesAdministration
“GSA”contract,use,reproduction,ordisclosureissubjecttorestrictionssetforthinContractNo.GS-35F-05925.

Contents
Readthisrst..............v
Importantsafetyinformation..........vi
Conditionsthatrequireimmediateaction..vii
Safetyguidelines............vii
Chapter1.Productoverview......1
Locatingcomputercontrols,connectors,and
indicators..................1
Frontview................1
Right-sideview..............3
Left-sideview..............4
Bottomview...............6
Statusindicators.............7
Locatingimportantproductinformation......8
Machinetypeandmodellabel........8
FCCIDandICCerticationnumberlabel...8
CerticateofAuthenticitylabel.......9
Features.................10
Specications...............11
Operatingenvironment...........11
Lenovoprograms.............12
AccessingLenovoprogramsontheWindows
7operatingsystem...........12
AccessingLenovoprogramsontheWindows
8operatingsystem...........14
Lenovoprogramsoverview........14
Chapter2.Usingyourcomputer...17
Registeringyourcomputer..........17
Frequentlyaskedquestions.........17
Usingthemulti-touchscreen.........19
Specialkeys...............21
UsingtheThinkPadpointingdevice......23
Powermanagement............25
Checkingthebatterystatus........25
Usingtheacpoweradapter........25
Chargingthebattery..........26
Maximizingthebatterylife........26
Managingthebatterypower.......27
Power-savingmodes..........27
Connectingtothenetwork..........29
Ethernetconnections..........29
Wirelessconnections..........29
Attachinganexternalmonitor.........32
Changingdisplaysettings........34
UsingtheExtenddesktopfunction.......34
Settingupapresentation..........35
UsingtheAMDSwitchableGraphicsfeature...35
Usingaudiofeatures............35
Usingtheintegratedcamera.........36
Usingamediacard.............36
Insertingamediacard..........37
Removingamediacard.........37
Chapter3.Youandyourcomputer..39
Accessibilityandcomfort..........39
Ergonomicinformation..........39
Comfort...............40
Accessibilityinformation.........40
T ravelingwithyourcomputer.........41
T raveltips...............41
T ravelaccessories...........42
Chapter4.Security..........43
Attachingamechanicallock.........43
Usingpasswords..............43
Passwordsandsleepmode........43
T ypingpasswords...........43
Power-onpassword...........44
Harddiskpasswords..........44
Supervisorpassword..........46
Harddisksecurity.............48
Settingthesecuritychip...........49
Usingthengerprintreader..........50
Noticeondeletingdatafromyourharddiskdrive
orsolid-statedrive.............52
Usingrewalls...............52
Protectingdataagainstviruses........52
Chapter5.Recoveryoverview....55
RecoveryoverviewfortheWindows7operating
system..................55
Creatingandusingarecoverymedia....55
Performingbackupandrecoveryoperations.56
UsingtheRescueandRecoveryworkspace.57
Creatingandusingarescuemedium....58
Reinstallingpreinstalledapplicationsand
devicedrivers.............59
Solvingrecoveryproblems........59
RecoveryoverviewfortheWindows8operating
system..................60
Refreshingyourcomputer........60
Resettingyourcomputertothefactorydefault
settings................60
Advancedstartupoptions........60
©CopyrightLenovo2013 i

Chapter6.Replacingdevices.....63
Staticelectricityprevention..........63
Disablingthebuilt-inbattery.........63
Replacingthebasecoverassembly......64
Replacingtheharddiskdriveorsolid-statedrive.65
Replacingamemorymodule.........67
ReplacingaMiniPCIExpressCardforwireless
LANconnection..............68
Replacingthebackupbattery.........70
Chapter7.Advancedconguration..73
Installinganewoperatingsystem.......73
Beforeyoubegin............73
InstallingtheWindows7operatingsystem..74
InstallingtheWindows8operatingsystem..75
Installingdevicedrivers...........75
Installingthedriverforthe4-in-1mediacard
reader................75
InstallingthedriverforUSB3.0(forWindows
7).................
InstallingtheThinkPadmonitorlefor
Windows2000/XP/Vista/7/8(forWindows
7).................
Installingotherdriversandsoftware(for
Windows7)..............76
ThinkPadSetup..............76
Mainmenu..............77
Congmenu..............77
Date/Timemenu............81
Securitymenu.............82
Startupmenu.............85
Restartmenu.............87
UpdatingyoursystemUEFIBIOS.....88
Usingsystemmanagement..........88
Systemmanagement..........88
Settingmanagementfeatures.......89
Chapter8.Preventingproblems...91
Generaltipsforpreventingproblems......91
Makingsuredevicedriversarecurrent.....92
Takingcareofyourcomputer.........93
Cleaningthecoverofyourcomputer....94
Chapter9.Troubleshootingcomputer
problems...............97
Diagnosingproblems............97
Troubleshooting..............97
Computerstopsresponding.......97
Spillsonthekeyboard..........98
Errormessages............98
Errorswithoutmessages.........100
Beeperrors..............101
Memorymoduleproblems........102
Networkingproblems..........102
Problemswiththekeyboardandotherpointing
devices................104
Problemswiththedisplayandmultimedia
devices................104
Fingerprintreaderproblems........109
Batteryandpowerproblems.......110
Problemswithdrivesandotherstorage
devices................112
Asoftwareproblem...........113
Problemswithportsandconnectors....113
Chapter10.Gettingsupport....115
BeforeyoucontactLenovo..........115
Gettinghelpandservice...........116
Usingdiagnosticprograms........116
LenovoSupportWebsite.........116
CallingLenovo.............116
FindingThinkPadoptions........117
Purchasingadditionalservices........118
AppendixA.Regulatory
information.............119
Wirelessrelatedinformation.........119
LocationoftheUltraConnectwireless
antennas...............120
Locatingwirelessregulatorynotices....121
Exportclassicationnotice..........121
Electronicemissionnotices..........121
FederalCommunicationsCommission
DeclarationofConformity........121
IndustryCanadaClassBemissioncompliance
statement...............121
EuropeanUnion-Compliancetothe
ElectromagneticCompatibilityDirective...122
GermanClassBcompliancestatement...122
KoreaClassBcompliancestatement....123
JapanVCCIClassBcompliancestatement..123
Japancompliancestatementforproducts
whichconnecttothepowermainswith
ratedcurrentlessthanorequalto20Aper
phase................123
Lenovoproductserviceinformationfor
Taiwan................123
Eurasiancompliancemark..........123
AppendixB.WEEEandrecycling
statements.............125
ImportantWEEEinformation.........125
Japanrecyclingstatements.........125
RecyclinginformationforBrazil........126
iiUserGuide

BatteryrecyclinginformationfortheEuropean
Union..................126
BatteryrecyclinginformationforTaiwan.....127
BatteryrecyclinginformationfortheUnitedStates
andCanada................127
RecyclinginformationforChina........127
AppendixC.ENERGYSTARmodel
information.............129
AppendixD.Notices.........131
Trademarks................132
AppendixE.RestrictionofHazardous
SubstancesDirective(RoHS)....133
EuropeanUnionRoHS...........133
ChinaRoHS................133
TurkishRoHS...............133
UkraineRoHS...............134
IndiaRoHS................134
©CopyrightLenovo2013 iii

ivUserGuide

Readthisrst
Besuretofollowtheimportanttipsgivenheretogetthemostuseandenjoymentoutofyourcomputer.
Failuretodosomightleadtodiscomfortorinjury,orcauseyourcomputertofail.
Protectyourselffromtheheatthatyourcomputergenerates.
Whenyourcomputeristurnedonorthebatteryischarging,thebase,thepalm
rest,andsomeotherpartsmaybecomehot.Thetemperaturetheyreach
dependsontheamountofsystemactivityandthelevelofchargeinthebattery.
Extendedcontactwithyourbody,eventhroughclothing,couldcause
discomfortorevenaskinburn.
•Avoidkeepingyourhands,yourlap,oranyotherpartofyourbodyin
contactwithahotsectionofthecomputerforanyextendedtime.
•Periodicallytakehandsfromusingthekeyboardbyliftingyourhandsfrom
thepalmrest.
Protectyourselffromtheheatgeneratedbytheacpoweradapter.
Whentheacpoweradapterisconnectedtoanelectricaloutletandyour
computer,itgeneratesheat.
Extendedcontactwithyourbody,eventhroughclothing,maycauseaskin
burn.
•Donotplacetheacpoweradapterincontactwithanypartofyourbody
whileitisinuse.
•Neveruseittowarmyourbody.
Preventyourcomputerfromgettingwet.
Toavoidspillsandthedangerofelectricalshock,keepliquidsawayfromyour
computer.
Protectthecablesfrombeingdamaged.
Applyingstrongforcetocablesmaydamageorbreakthem.
Routecommunicationlines,orthecablesofanacpoweradapter,amouse,a
keyboard,aprinter,oranyotherelectronicdevice,sothattheycannotbewalked
on,trippedover,pinchedbyyourcomputerorotherobjects,orinanyway
subjectedtotreatmentthatcouldinterferewiththeoperationofyourcomputer.
©CopyrightLenovo2013 v

Protectyourcomputeranddatawhenmovingit.
Beforemovingacomputerequippedwithaharddiskdrive,dooneofthe
following,andensurethatthepowerbuttonisofforisblinking:
•T urnitoff.
•Putitinsleepmode.
•Putitinhibernationmode.
Thiswillhelptopreventdamagetothecomputer,andpossiblelossofdata.
Handleyourcomputergently.
Donotdrop,bump,scratch,twist,hit,vibrate,push,orplaceheavyobjectson
yourcomputer,display,orexternaldevices.
Carryyourcomputercarefully.
•Useaqualitycarryingcasethatprovidesadequatecushioningandprotection.
•Donotpackyourcomputerinatightlypackedsuitcaseorbag.
•Beforeputtingyourcomputerinacarryingcase,ensurethatitisoff,insleep
mode,orinhibernationmode.Donotputacomputerinacarryingcasewhileit
isturnedon.
Importantsafetyinformation
Note:Readtheimportantsafetyinformationrst.
Thisinformationcanhelpyousafelyuseyournotebookcomputer.Followandretainallinformationincluded
withyourcomputer.Theinformationinthisdocumentdoesnotalterthetermsofyourpurchaseagreement
ortheLenovo ®LimitedWarranty.Formoreinformation,see“WarrantyInformation”intheSafety,Warranty,
andSetupGuidethatcomeswithyourcomputer.
Customersafetyisimportant.Ourproductsaredevelopedtobesafeandeffective.However,personal
computersareelectronicdevices.Powercords,poweradapters,andotherfeaturescancreatepotential
safetyrisksthatcanresultinphysicalinjuryorpropertydamage,especiallyifmisused.Toreducethese
risks,followtheinstructionsincludedwithyourproduct,observeallwarningsontheproductandinthe
operatinginstructions,andreviewtheinformationincludedinthisdocumentcarefully.Bycarefullyfollowing
theinformationcontainedinthisdocumentandprovidedwithyourproduct,youcanhelpprotectyourself
fromhazardsandcreateasafercomputerworkenvironment.
Note:Thisinformationincludesreferencestopoweradaptersandbatteries.Inadditiontonotebook
computers,someproducts(suchasspeakersandmonitors)shipwithexternalpoweradapters.Ifyouhave
suchaproduct,thisinformationappliestoyourproduct.Inaddition,computerproductscontainacoin-sized
internalbatterythatprovidespowertothesystemclockevenwhenthecomputerisunplugged,sothe
batterysafetyinformationappliestoallcomputerproducts.
viUserGuide

Conditionsthatrequireimmediateaction
Productscanbecomedamagedduetomisuseorneglect.Someproductdamageisseriousenough
thattheproductshouldnotbeusedagainuntilithasbeeninspectedand,ifnecessary,repairedby
anauthorizedservicer.
Aswithanyelectronicdevice,paycloseattentiontotheproductwhenitisturnedon.Onveryrare
occasions,youmightnoticeanodororseeapuffofsmokeorsparksventfromyourproduct.Oryou
mighthearsoundslikepopping,crackingorhissing.Theseconditionsmightmerelymeanthatan
internalelectroniccomponenthasfailedinasafeandcontrolledmanner.Or,theymightindicate
apotentialsafetyissue.However,donottakerisksorattempttodiagnosethesituationyourself.
ContacttheCustomerSupportCenterforfurtherguidance.ForalistofServiceandSupportphone
numbers,seethefollowingWebsite:
http://www.lenovo.com/support/phone
Frequentlyinspectyourcomputeranditscomponentsfordamageorwearorsignsofdanger.Ifyou
haveanyquestionabouttheconditionofacomponent,donotusetheproduct.ContacttheCustomer
SupportCenterortheproductmanufacturerforinstructionsonhowtoinspecttheproductand
haveitrepaired,ifnecessary.
Intheunlikelyeventthatyounoticeanyofthefollowingconditions,orifyouhaveanysafetyconcerns
withyourproduct,stopusingtheproductandunplugitfromthepowersourceandtelecommunication
linesuntilyoucanspeaktotheCustomerSupportCenterforfurtherguidance.
•Powercords,plugs,poweradapters,extensioncords,surgeprotectors,orpowersuppliesthatare
cracked,broken,ordamaged.
•Signsofoverheating,smoke,sparks,orre.
•Damagetoabattery(suchascracks,dents,orcreases),dischargefromabattery,orabuildupofforeign
substancesonthebattery.
•Acracking,hissingorpoppingsound,orstrongodorthatcomesfromtheproduct.
•Signsthatliquidhasbeenspilledoranobjecthasfallenontothecomputerproduct,thepowercordor
poweradapter.
•Thecomputerproduct,powercord,orpoweradapterhasbeenexposedtowater.
•Theproducthasbeendroppedordamagedinanyway.
•Theproductdoesnotoperatenormallywhenyoufollowtheoperatinginstructions.
Note:Ifyounoticetheseconditionswithaproduct(suchasanextensioncord)thatisnotmanufacturedfor
orbyLenovo,stopusingthatproductuntilyoucancontacttheproductmanufacturerforfurtherinstructions,
oruntilyougetasuitablereplacement.
Safetyguidelines
Alwaysobservethefollowingprecautionstoreducetheriskofinjuryandpropertydamage.
Serviceandupgrades
DonotattempttoserviceaproductyourselfunlessinstructedtodosobytheCustomerSupportCenteror
yourdocumentation.OnlyuseaServiceProviderwhoisapprovedtorepairyourparticularproduct.
Note:Somecomputerpartscanbeupgradedorreplacedbythecustomer.Upgradestypicallyare
referredtoasoptions.ReplacementpartsapprovedforcustomerinstallationarereferredtoasCustomer
ReplaceableUnits,orCRUs.Lenovoprovidesdocumentationwithinstructionswhenitisappropriatefor
customerstoinstalloptionsorreplaceCRUs.Y oumustcloselyfollowallinstructionswheninstallingor
replacingparts.TheOffstateofapowerindicatordoesnotnecessarilymeanthatvoltagelevelsinsidea
productarezero.Beforeyouremovethecoversfromaproductequippedwithapowercord,alwaysensure
©CopyrightLenovo2013 vii

thatthepoweristurnedoffandthattheproductisunpluggedfromanypowersource.Ifyouhaveany
questionsorconcerns,contacttheCustomerSupportCenter.
Althoughtherearenomovingpartsinyourcomputerafterthepowercordhasbeendisconnected,the
followingwarningsarerequiredforyoursafety.
CAUTION:
Hazardousmovingparts.Keepngersandotherbodypartsaway.
CAUTION:
BeforereplacinganyCRUs,turnoffthecomputerandwaitthreetoveminutestoletthecomputer
coolbeforeopeningthecover.
Powercordsandpoweradapters
DANGER
Useonlythepowercordsandpoweradapterssuppliedbytheproductmanufacturer.
Thepowercordsshallbesafetyapproved.ForGermany,itshallbeH05VV-F ,3G,0.75mm 2,or
better.Forothercountries,thesuitabletypesshallbeusedaccordingly.
Neverwrapapowercordaroundapoweradapterorotherobject.Doingsocanstressthecordin
waysthatcancausethecordtofray,crack,orcrimp.Thiscanpresentasafetyhazard.
Alwaysroutepowercordssothattheywillnotbewalkedon,trippedover,orpinchedbyobjects.
Protectpowercordsandpoweradaptersfromliquids.Forinstance,donotleaveyourpowercord
orpoweradapternearsinks,tubs,toilets,oronoorsthatarecleanedwithliquidcleansers.
Liquidscancauseashortcircuit,particularlyifthepowercordorpoweradapterhasbeenstressed
bymisuse.Liquidsalsocancausegradualcorrosionofpowercordterminalsand/ortheconnector
terminalsonapoweradapter,whichcaneventuallyresultinoverheating.
Alwaysconnectpowercordsandsignalcablesinthecorrectorderandensurethatallpowercord
connectorsaresecurelyandcompletelypluggedintoreceptacles.
Donotuseanypoweradapterthatshowscorrosionattheacinputpinsorshowssignsof
overheating(suchasdeformedplastic)attheacinputpinsoranywhereonthepoweradapter.
Donotuseanypowercordswheretheelectricalcontactsoneitherendshowsignsofcorrosionor
overheatingorwherethepowercordappearstohavebeendamagedinanyway.
viiiUserGuide

Topreventpossibleoverheating,donotcoverthepoweradapterwithclothingorotherobjects
whenthepoweradapterispluggedintoanelectricaloutlet.
Extensioncordsandrelateddevices
Ensurethatextensioncords,surgeprotectors,uninterruptiblepowersupplies,andpowerstripsthatyouuse
areratedtohandletheelectricalrequirementsoftheproduct.Neveroverloadthesedevices.Ifpowerstrips
areused,theloadshouldnotexceedthepowerstripinputrating.Consultanelectricianformoreinformation
ifyouhavequestionsaboutpowerloads,powerrequirements,andinputratings.
Plugsandoutlets
DANGER
Ifareceptacle(poweroutlet)thatyouintendtousewithyourcomputerequipmentappearstobe
damagedorcorroded,donotusetheoutletuntilitisreplacedbyaqualiedelectrician.
Donotbendormodifytheplug.Iftheplugisdamaged,contactthemanufacturertoobtain
areplacement.
Donotshareanelectricaloutletwithotherhomeorcommercialappliancesthatdrawlargeamounts
ofelectricity;otherwise,unstablevoltagemightdamageyourcomputer,data,orattacheddevices.
Someproductsareequippedwithathree-prongedplug.Thisplugtsonlyintoagrounded
electricaloutlet.Thisisasafetyfeature.Donotdefeatthissafetyfeaturebytryingtoinsertitinto
anon-groundedoutlet.Ifyoucannotinserttheplugintotheoutlet,contactanelectricianforan
approvedoutletadapterortoreplacetheoutletwithonethatenablesthissafetyfeature.Never
overloadanelectricaloutlet.Theoverallsystemloadshouldnotexceed80percentofthebranch
circuitrating.Consultanelectricianformoreinformationifyouhavequestionsaboutpowerloads
andbranchcircuitratings.
Besurethatthepoweroutletyouareusingisproperlywired,easilyaccessible,andlocatedclose
totheequipment.Donotfullyextendpowercordsinawaythatwillstressthecords.
Besurethatthepoweroutletprovidesthecorrectvoltageandcurrentfortheproductyouare
installing.
Carefullyconnectanddisconnecttheequipmentfromtheelectricaloutlet.
Powersupplystatement
DANGER
Neverremovethecoveronapowersupplyoranypartthathasthefollowinglabelattached.
©CopyrightLenovo2013 ix
Hazardousvoltage,current,andenergylevelsarepresentinsideanycomponentthathasthislabel
attached.Therearenoserviceablepartsinsidethesecomponents.Ifyoususpectaproblemwith
oneoftheseparts,contactaservicetechnician.
Externaldevices
CAUTION:
DonotconnectordisconnectanyexternaldevicecablesotherthanUSBcablewhilethecomputer
powerison;otherwise,youmightdamageyourcomputer.Toavoidpossibledamagetoattached
devices,waitatleastvesecondsafterthecomputerisshutdowntodisconnectexternaldevices.
Generalbatterynotice
DANGER
PersonalcomputersmanufacturedbyLenovocontainacoincellbatterytoprovidepowerto
thesystemclock.Inaddition,manymobileproducts,suchasnotebookcomputers,utilizea
rechargeablebatterypacktoprovidesystempowerwheninportablemode.Batteriessuppliedby
Lenovoforusewithyourproducthavebeentestedforcompatibilityandshouldonlybereplaced
withapprovedparts.
Neverattempttoopenorserviceanybattery.Donotcrush,puncture,orincineratebatteriesor
shortcircuitthemetalcontacts.Donotexposethebatterytowaterorotherliquids.Onlyrecharge
thebatterypackstrictlyaccordingtoinstructionsincludedintheproductdocumentation.
Batteryabuseormishandlingcancausethebatterytooverheat,whichcancausegassesorame
to“vent”fromthebatterypackorcoincell.Ifyounoticeanysignsofbulging,leakageorcorrosion
ontheexterioroftheproduct,thismaybetheresultofaninternalbatteryfault.Ifthisoccurs,stop
usingtheproductimmediatelyandpleasecontacttheLenovoSupportteamforfurtherinstructions.
Factoryreplacementofthebatteriesmayberequired.
Batteriescandegradewhentheyareleftunusedforlongperiodsoftime.Forsomerechargeable
batteries(particularlyLithiumIonbatteries),leavingabatteryunusedinadischargedstatecould
increasetheriskofabatteryshortcircuit,whichcouldshortenthelifeofthebatteryandcanalso
poseasafetyhazard.DonotletrechargeableLithium-Ionbatteriescompletelydischargeorstore
thesebatteriesinadischargedstate.
Built-inrechargeablebatterynotice
DANGER
Donotattempttoreplacetheinternalrechargeablelithiumionbatteries.ContactLenovoSupport
forfactoryreplacement.
xUserGuide

Lithiumcoincellbatterynotice
DANGER
Dangerofexplosionifbatteryisincorrectlyreplaced.
Whenreplacingthelithiumcoincellbattery,useonlythesameoranequivalenttypethatis
recommendedbythemanufacturer.Thebatterycontainslithiumandcanexplodeifnotproperly
used,handled,ordisposedof.
Donot:
•Throworimmerseintowater
•Heattomorethan100°C(212°F)
•Repairordisassemble
Disposeofthebatteryasrequiredbylocalordinancesorregulations.
ThefollowingstatementappliestousersinthestateofCalifornia,U.S.A.
CaliforniaPerchlorateInformation:
Productscontainingmanganesedioxidelithiumcoincellbatteriesmaycontainperchlorate.
PerchlorateMaterial-specialhandlingmayapply,See
www.dtsc.ca.gov/hazardouswaste/perchlorate
Heatandproductventilation
DANGER
Computers,acpoweradapters,andmanyaccessoriescangenerateheatwhenturnedonandwhen
batteriesarecharging.Notebookcomputerscangenerateasignicantamountofheatduetotheir
compactsize.Alwaysfollowthesebasicprecautions:
•Whenyourcomputeristurnedonorthebatteryischarging,thebase,thepalmrest,andsome
otherpartsmaybecomehot.Avoidkeepingyourhands,yourlap,oranyotherpartofyour
bodyincontactwithahotsectionofthecomputerforanyextendedlengthoftime.Whenyou
usethekeyboard,avoidkeepingyourpalmsonthepalmrestforaprolongedperiodoftime.
Yourcomputergeneratessomeheatduringnormaloperation.Theamountofheatdependson
theamountofsystemactivityandthebatterychargelevel.Extendedcontactwithyourbody,
eventhroughclothing,couldcausediscomfortorevenaskinburn.Periodicallytakebreaks
fromusingthekeyboardbyliftingyourhandsfromthepalmrest;andbecarefulnottouse
thekeyboardforanyextendedlengthoftime.
•Donotoperateyourcomputerorchargethebatterynearammablematerialsorinexplosive
environments.
•Ventilationslots,fansand/orheatsinksareprovidedwiththeproductforsafety,comfort,and
reliableoperation.Thesefeaturesmightinadvertentlybecomeblockedbyplacingtheproducton
abed,sofa,carpet,orotherexiblesurface.Neverblock,cover,ordisablethesefeatures.
•Whentheacpoweradapterisconnectedtoanelectricaloutletandyourcomputer,itgenerates
heat.Donotplacetheadapterincontactwithanypartofyourbodywhileusingit.Neverusethe
acpoweradaptertowarmyourbody.Extendedcontactwithyourbody,eventhroughclothing,
maycauseaskinburn.
©CopyrightLenovo2013 xi

Foryoursafety,alwaysfollowthesebasicprecautionswithyourcomputer:
•Keepthecoverclosedwheneverthecomputerispluggedin.
•Regularlyinspecttheoutsideofthecomputerfordustaccumulation.
•Removedustfromventsandanyperforationsinthebezel.Morefrequentcleaningsmightbe
requiredforcomputersindustyorhigh-trafcareas.
•Donotrestrictorblockanyventilationopenings.
•Donotoperateyourcomputerinsidefurniture,asthismightincreasetheriskofoverheating.
•Airowtemperaturesintothecomputershouldnotexceed35°C(95°F).
Electricalcurrentsafetyinformation
DANGER
Electriccurrentfrompower,telephone,andcommunicationcablesishazardous.
Toavoidashockhazard:
•Donotuseyourcomputerduringalightningstorm.
•Donotconnectordisconnectanycablesorperforminstallation,maintenance,orreconguration
ofthisproductduringanelectricalstorm.
•Connectallpowercordstoaproperlywiredandgroundedelectricaloutlet.
•Connecttoproperlywiredoutletsanyequipmentthatwillbeattachedtothisproduct.
•Wheneverpossible,useonehandonlytoconnectordisconnectsignalcables.
•Neverturnonanyequipmentwhenthereisevidenceofre,water,orstructuraldamage.
•Disconnectallattachedcablesanddisablebatteriesbeforeopeninganyaccessibledevice
coversunlessinstructedotherwiseintheinstallationandcongurationprocedures.
•Donotuseyourcomputeruntilallinternalpartsenclosuresarefastenedintoplace.Neveruse
thecomputerwheninternalpartsandcircuitsareexposed.
DANGER
Connectanddisconnectcablesasdescribedinthefollowingprocedureswheninstalling,moving,
oropeningcoversonthisproductorattacheddevices.
Toconnect:
1.TurneverythingOFF.
2.First,attachallcablestodevices.
3.Attachsignalcablestoconnectors.
4.Attachpowercordstooutlets.
5.TurndevicesON.
Todisconnect:
1.TurneverythingOFF.
2.First,removepowercordsfromoutlets.
3.Removesignalcablesfromconnectors.
4.Removeallcablesfromdevices.
Thepowercordmustbedisconnectedfromthewalloutletorreceptaclebeforeinstallingallother
electricalcablesconnectedtothecomputer.
Thepowercordmaybereconnectedtothewalloutletorreceptacleonlyafterallotherelectrical
cableshavebeenconnectedtothecomputer.
xiiUserGuide

Liquidcrystaldisplay(LCD)notice
CAUTION:
Theliquidcrystaldisplay(LCD)ismadeofglass,androughhandlingordroppingthecomputercan
causetheLCDtobreak.IftheLCDbreaksandtheinternaluidgetsintoyoureyesoronyour
hands,immediatelywashtheaffectedareaswithwaterforatleast15minutes;ifanysymptomsare
presentafterwashing,getmedicalcare.
Note:Forproductswithmercury-containinguorescentlamps(forexample,non-LED),theuorescentlamp
intheliquidcrystaldisplay(LCD)containsmercury;disposeofaccordingtolocal,state,orfederallaws.
Usingheadphonesorearphones
CAUTION:
Excessivesoundpressurefromearphonesandheadphonescancausehearingloss.Adjustmentof
theequalizertomaximumincreasestheearphoneandheadphoneoutputvoltageandthesound
pressurelevel.Therefore,toprotectyourhearing,adjusttheequalizertoanappropriatelevel.
Excessiveuseofheadphonesorearphonesforalongperiodoftimeathighvolumecanbedangerousifthe
outputoftheheadphoneorearphoneconnectorsdonotcomplywithspecicationsofEN50332-2.The
headphoneoutputconnectorofyourcomputercomplieswithEN50332-2Subclause7.Thisspecication
limitsthecomputer’smaximumwidebandtrueRMSoutputvoltageto150mV.Tohelpprotectagainst
hearingloss,ensurethattheheadphonesorearphonesyouusealsocomplywithEN50332-2(Clause7
limits)forawidebandcharacteristicvoltageof75mV.UsingheadphonesthatdonotcomplywithEN
50332-2canbedangerousduetoexcessivesoundpressurelevels.
IfyourLenovocomputercamewithheadphonesorearphonesinthepackage,asaset,thecombinationof
theheadphonesorearphonesandthecomputeralreadycomplieswiththespecicationsofEN50332-1.
Ifdifferentheadphonesorearphonesareused,ensurethattheycomplywithEN50332-1(Clause6.5
LimitationValues).UsingheadphonesthatdonotcomplywithEN50332-1canbedangerousdueto
excessivesoundpressurelevels.
Additionalsafetyinformation
DANGER
Plasticbagscanbedangerous.Keepplasticbagsawayfrombabiesandchildrentoavoiddanger
ofsuffocation.
Noticefortabletpersonalcomputerusers
SafetynoticeforusersinAustralia
DANGER
Donotconnectphonelinewhileusingtabletmode.
NoticeforusersintheU.S.A.
Manypersonalcomputerproductsandaccessoriescontaincords,cablesorwires,suchaspowercordsor
cordstoconnecttheaccessorytoapersonalcomputer.Ifthisproducthassuchacord,cableorwire,then
thefollowingwarningapplies:
WARNING:Handlingthecordonthisproductorcordsassociatedwithaccessoriessoldwiththisproduct
willexposeyoutolead,achemicalknowntotheStateofCaliforniatocausecancer,andbirthdefectsor
otherreproductiveharm.Washhandsafterhandling.
©CopyrightLenovo2013 xiii

Savetheseinstructions.
xivUserGuide
Chapter1.Productoverview
Thischapterprovidesinformationaboutthelocationsofconnectors,locationsofimportantproductlabels,
computerfeatures,specications,operatingenvironment,andpreinstalledprograms.
Thischaptercontainsthefollowingtopics:
•“Locatingcomputercontrols,connectors,andindicators”onpage1
•“Locatingimportantproductinformation”onpage8
•“Features”onpage10
•“Specications”onpage11
•“Operatingenvironment”onpage11
•“Lenovoprograms”onpage12
Locatingcomputercontrols,connectors,andindicators
Thissectionintroducesthecomputerhardwarefeaturestogiveyouthebasicinformationyouwillneed
tostartusingthecomputer.
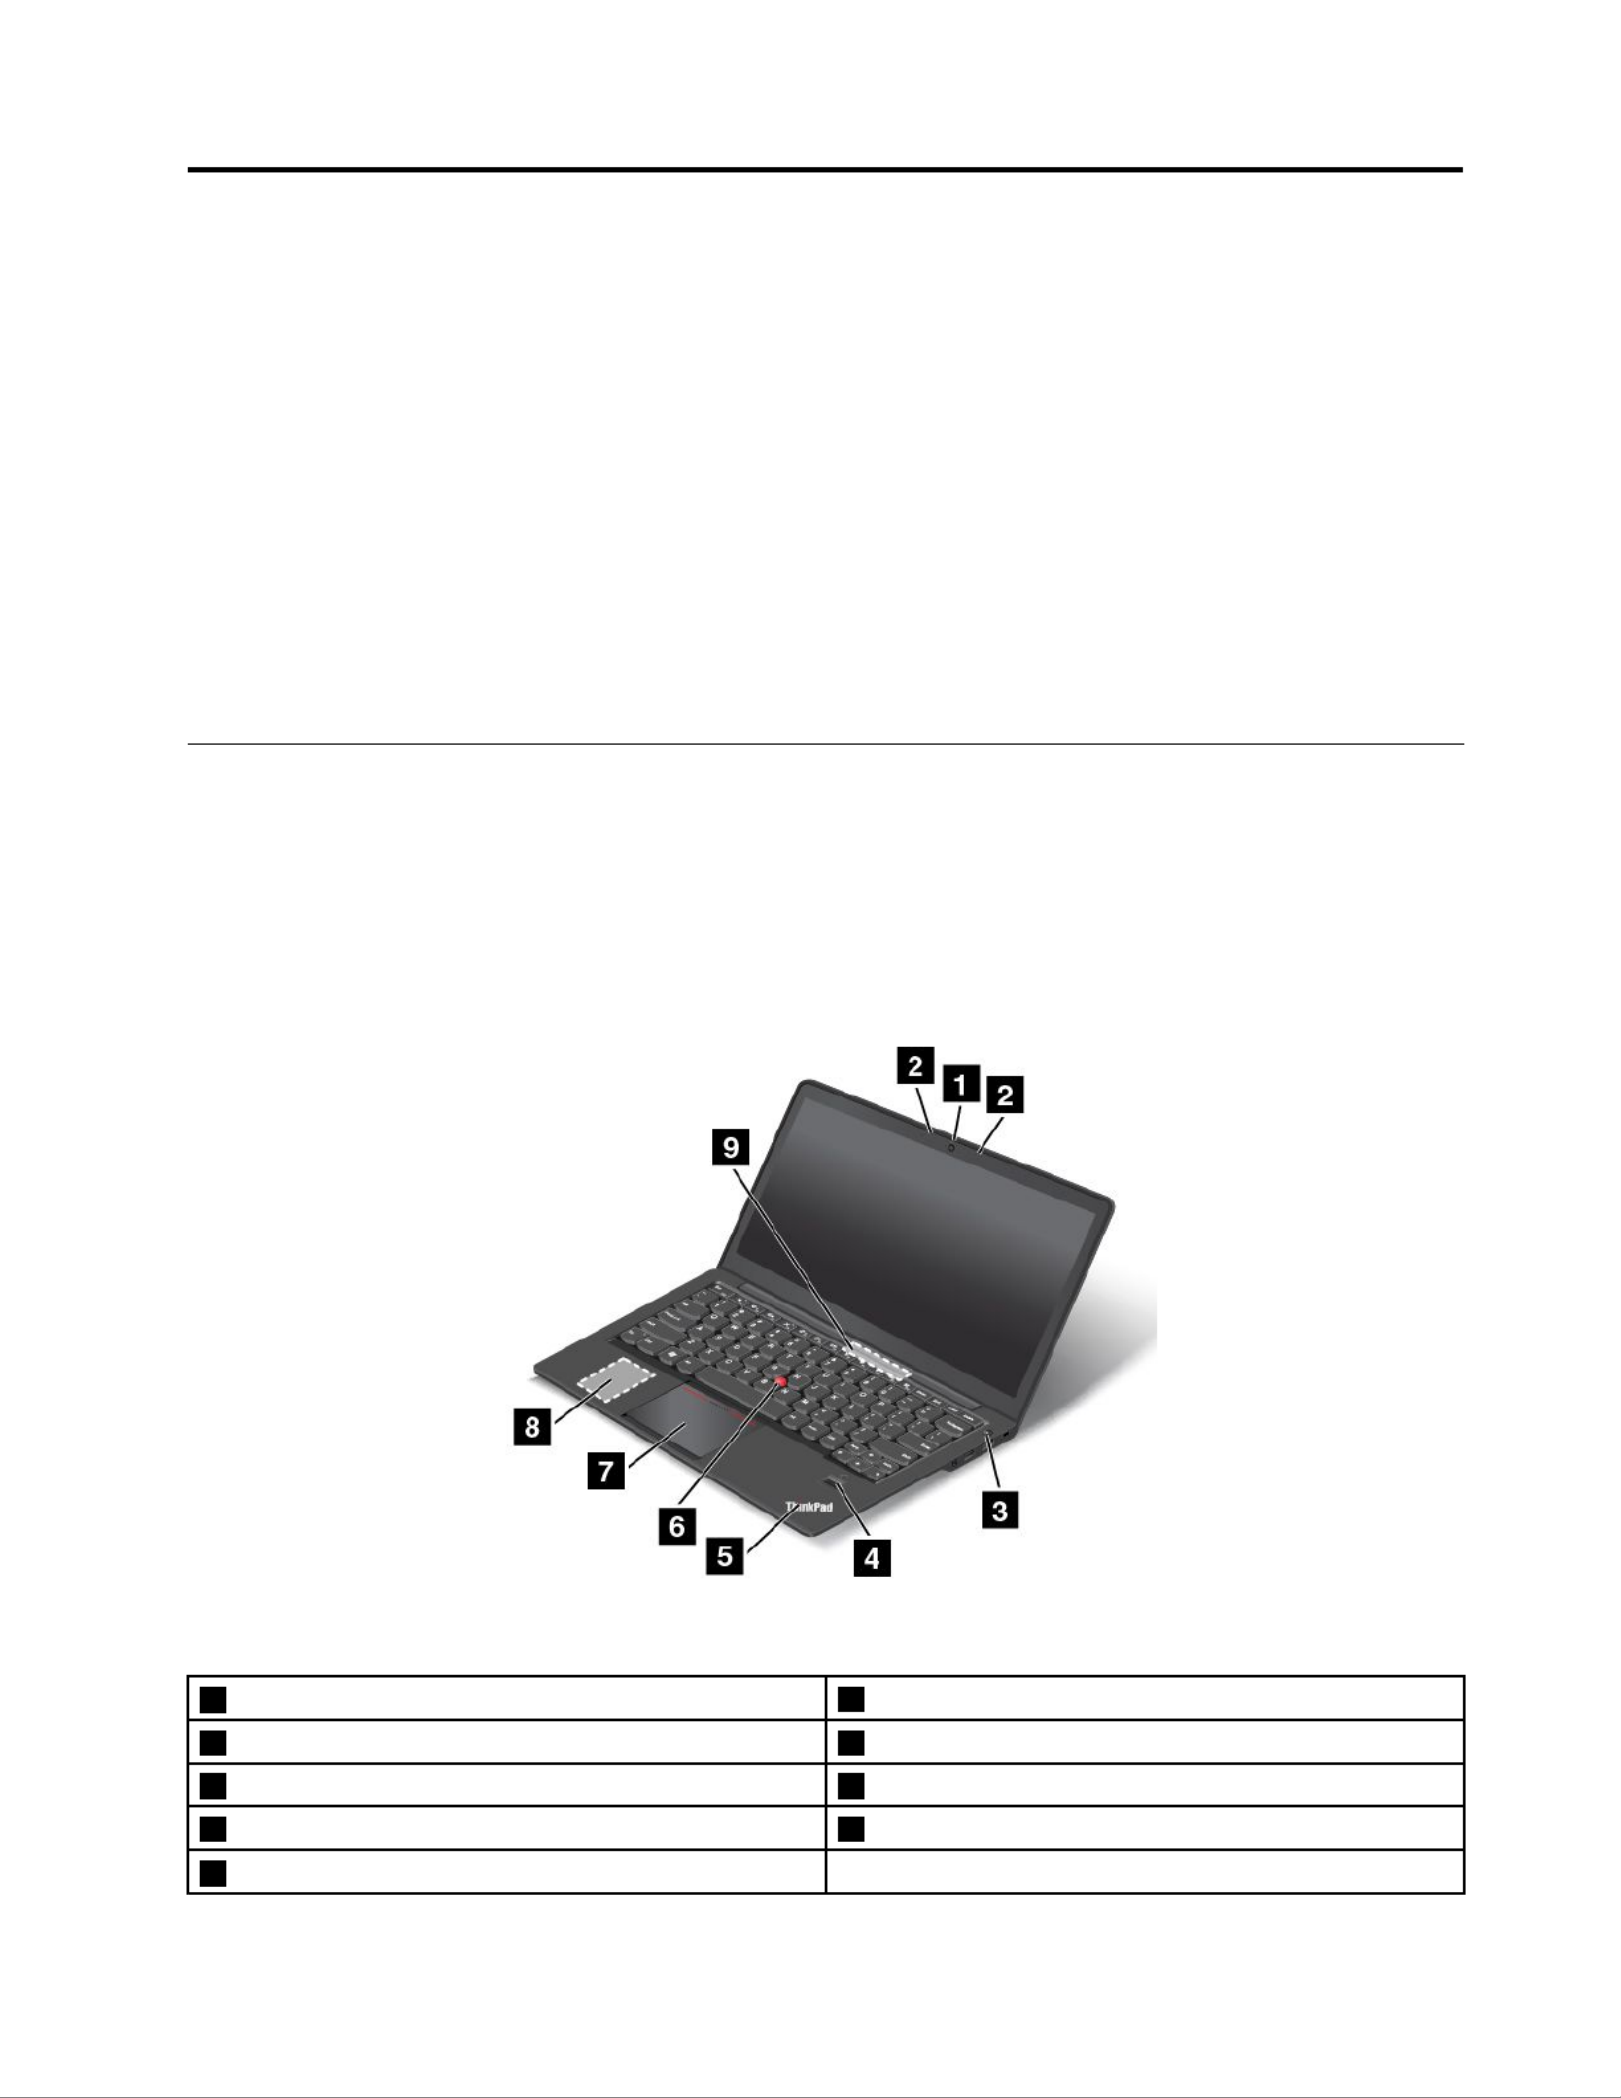
Frontview
Figure1.Frontview
1Camera 6T rackPoint ®pointingstick
2Microphones
3Powerbuttonedrive
4Fingerprintreaderouvers
5Systemstatusindicator(illuminatedThinkPad ®logo)
©CopyrightLenovo2013 1

1Camera
Usethecameratotakepicturesorholdavideoconference.Fordetails,see“Usingtheintegratedcamera”
onpage36.
2Microphones
Themicrophonescapturesoundandvoicewhenusedwithanapplicationprogramcapableofhandling
audio.
3Powerbutton
Usethepowerbuttontoturnonthecomputer.
Toturnoffthecomputer,usetheStartmenushutdownoptionontheMicrosoft ®Windows®7operating
system.FortheMicrosoftWindows8operatingsystem,movethepointertothebottomrightcornerofthe
screentobringupthecharms.ThenclickSettings➙Power➙Shutdown.
Ifyourcomputerstopsrespondingandyoucannotturnitoff,pressandholdthepowerbuttonforfour
secondsormore.Ifthecomputerstillisnotresponding,removetheacpoweradapterandresetthe
computerbyinsertinganeedleorastraightenedpaperclipintotheemergencyresetholetoturnoffthe
computer.Tolocatetheemergencyresethole,see“Bottomview”onpage6 .
Youalsocanprogramthepowerbuttonsothatbypressingthepowerbuttonyoucanshutdownthe
computerorputitintosleeporhibernationmode.Toachievethis,youneedtochangeyourpowerplan
settings.Toaccesspowerplansettings,dothefollowing:
•ForMicrosoftWindows7:StartthePowerManagerprogramandthenclickthePowerPlantab.For
instructionsonhowtostartthePowerManagerprogram,see“AccessingLenovoprogramsonthe
Windows7operatingsystem”onpage12 .
•ForWindows8:Right-clickthebatterystatusiconfromtheWindowsnoticationareaandclickMore
poweroptions➙Choosewhatthepowerbuttonsdo.
4Fingerprintreader
Somemodelshaveangerprintreader.Fingerprintauthenticationtechnologyprovidesasimpleandsecure
useraccessbyassociatingyourngerprintwithapassword.Fordetails,see“Usingthengerprintreader”
onpage50 .
5Systemstatusindicator(illuminatedThinkPadlogo)
TheilluminatedThinkPadlogoonthepalmrestfunctionsasasystemstatusindicator.Yourcomputerhas
severalstatusindicators.Forinformationaboutthelocationandmeaningofeachindicator,see“Status
indicators”onpage7 .
ThinkPadpointingdevice
6TrackPointpointingstick
7Touchpad
ThekeyboardcontainstheThinkPadpointingdevice.Pointing,selecting,anddraggingareallpartofasingle
processthatyoucanperformwithoutmovingyourngersfromatypingposition.Formoreinformation,see
“UsingtheThinkPadpointingdevice”onpage23.
8M.2solid-statedrive
Forsomemodels,anM.2solid-statedriveisinstalledonyourcomputer.
2UserGuide
9Fanlouvers
Thelouversandinternalfanenableairtocirculateinthecomputertoensurepropercooling,especiallythe
coolingofthemicroprocessor.
Note:Thefanlouversarelocatedbehindthehinge.
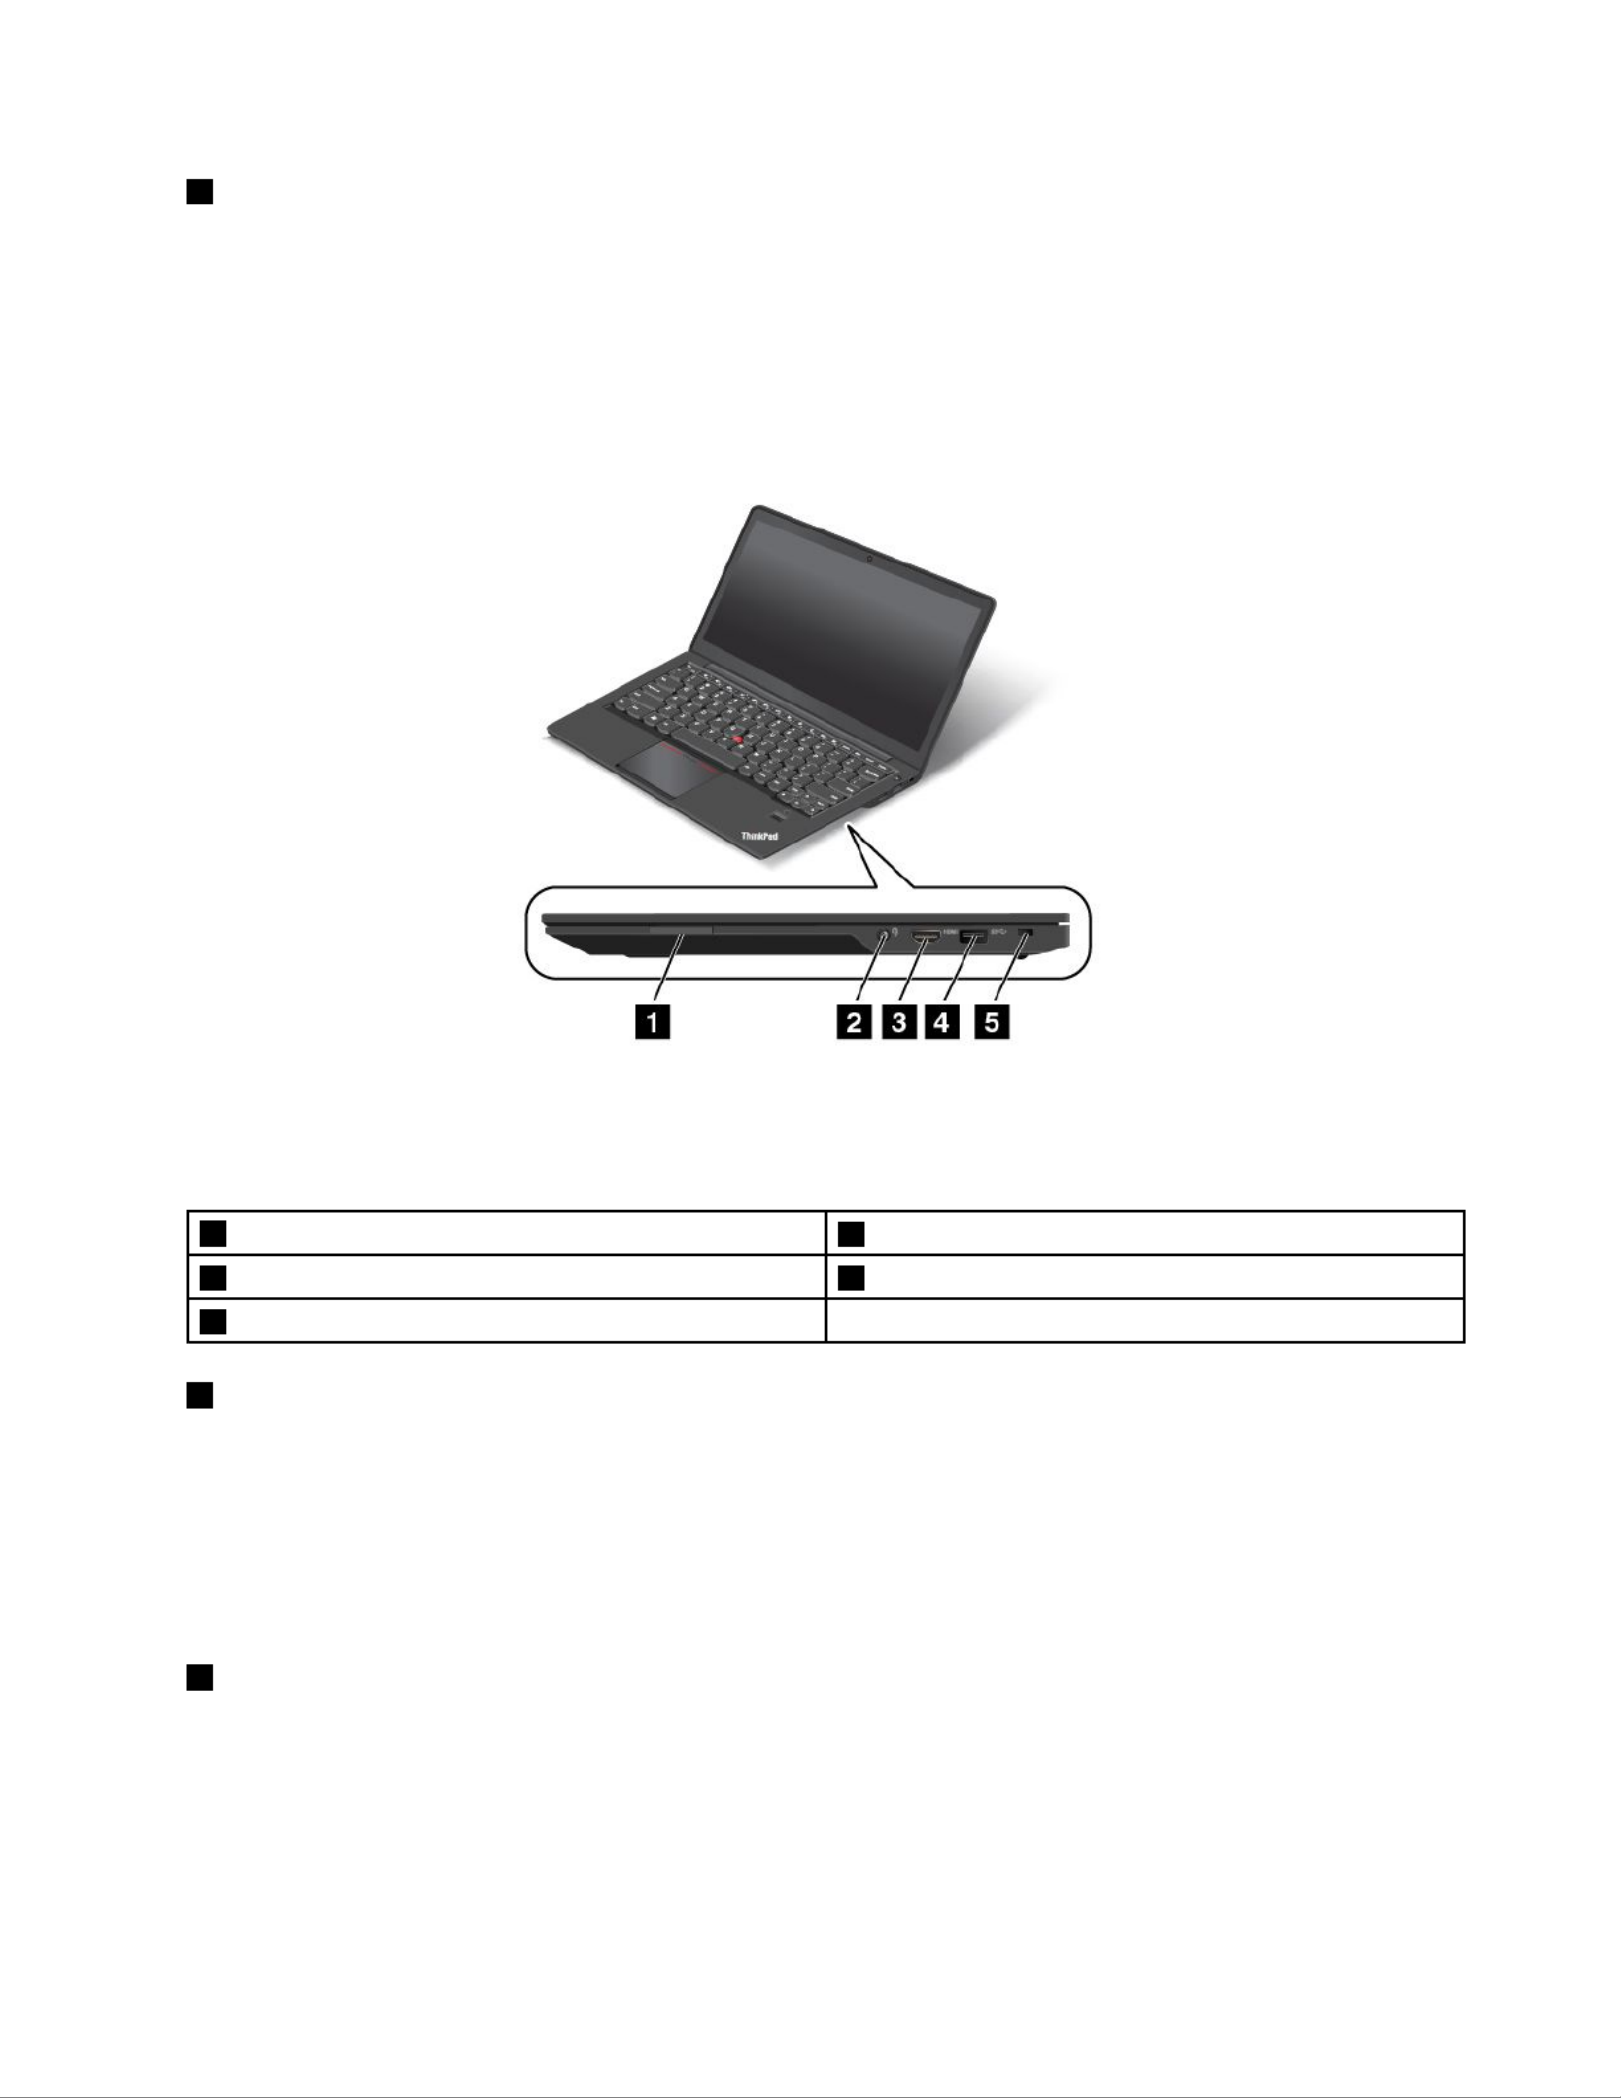
Right-sideview
Figure2.Right-sideview
Note:Yourcomputermightlookslightlydifferentfromtheillustrationabove.
1Mediacardreaderslot 4USB3.0connector
2Comboaudiojackurity-lockslot
3HighDenitionMultimediaInterface(HDMI)port
1Mediacardreaderslot
Themediacardreaderslotsupportsthefollowingcards:
•SecureDigital(SD)card
•SecureDigitalHigh-Capacity(SDHC)card
•SecureDigitaleXtended-Capacity(SDXC)card
•MultiMediaCard(MMC)
2Comboaudiojack
Tolistentothesoundfromyourcomputer,connectheadphonesoraheadsetthathasa3.5mm4-pole
plugtothecomboaudiojack.
Notes:
Chapter1.Productoverview3

•Ifyouareusingaheadsetwithafunctionswitch,forexample,aheadsetforamobiledigitaldevice,do
notpressthisswitchwhileusingtheheadset.Ifyoupressit,theheadsetmicrophonewillbedisabled,
andtheintegratedmicrophonesonthecomputerwillbeenabledinstead.
•Thecomboaudiojackdoesnotsupportaconventionalmicrophone.Formoreinformation,see“Using
audiofeatures”onpage35.
3HighDenitionMultimediaInterface(HDMI)port
Adigitalaudioandvideointerfacethatcanconnectacompatibledigitalaudiodeviceorvideomonitor,
suchasaDVDplayeroradigitaltelevision(DTV).
4USB3.0connector
TheUniversalSerialBus(USB)3.0connectorisusedforconnectingdevicescompatiblewithaUSB
interface,suchasaUSBprinteroradigitalcamera.
Attention:WhenyouattachaUSBcabletoconnector,ensurethattheUSBmarkisfacingupward.
Otherwisetheconnectormightbedamaged.
5Security-lockslot
Toprotectyourcomputerfromtheft,purchaseasecuritycablelock,usuallyaKensington-stylecablelock,
thattsthissecurity-lockslottolockyourcomputertoastationaryobject.
Left-sideview
Figure3.Left-sideview
Note:Yourcomputermightlookslightlydifferentfromtheillustrationabove.
1acpowerconnector 3Ethernetconnector
2LenovoOneLinkconnector4AlwaysOnUSBconnector(USB3.0)
4UserGuide

1acpowerconnector
2LenovoOneLinkconnector
Whentheacpoweradapterisconnectedtotheacpowerconnector,itprovidesacpowertothecomputer
andchargesthebattery.WhenasupportedThinkPadOneLinkDockisconnectedtotheLenovoOneLink
connector,itcannotonlyextendthecomputercapabilitiesbutalsoprovideacpowertothecomputer
andchargethebattery.
2Ethernetconnector
ConnectyourcomputertoaLANwiththeEthernetconnector.
DANGER
Toavoidtheriskofelectricalshock,donotconnectthetelephonecabletotheEthernetconnector.
YoucanonlyconnectanEthernetcabletothisconnector.
Therearetwoindicatorstoshowthestatusofthenetworkconnection,onelocatedtotheupperrightof
theconnectorandtheothertotheupperleft.WhenyourcomputerconnectstoaLANandasessionwith
thenetworkisavailable,theupperleftindicatorissolidgreen.Whiledataisbeingtransmitted,theupper
rightindicatorblinksyellow.
3AlwaysOnUSBconnector(USB3.0)
Bydefault,theAlwaysOnUSBconnectorenablesyoutochargesomemobiledigitaldevicesand
smartphoneswhenyourcomputerisinsleeporhibernationmode.
Ifyouwanttochargethesedeviceswhenyourcomputeristurnedoff,dothefollowing:
1.Connectthecomputertoanacpoweradapter.
2.GotoThinkPadSetupandenableAlwaysOnUSBChargeinoffmode.Formoreinformation,see
“Congmenu”onpage77.
3.Dooneofthefollowing:
•ForWindows7:OpenthePowerManagerprogramandclickGlobalPowerSettingsorclick
Advanced➙GlobalPowerSettings.ThenselectEnableAlwaysOnUSBandclickOK.
•ForWindows8:PresstheWindowskeytogototheStartscreen.ClickLenovoSettings➙Power.
ThenselectEnablewhenthecomputerisoffunderAlwaysOnUSB.
Note:WhenyouattachaUSBcabletotheconnector,ensurethattheUSBmarkisfacingupward.
Otherwisetheconnectormightbedamaged.
Chapter1.Productoverview5
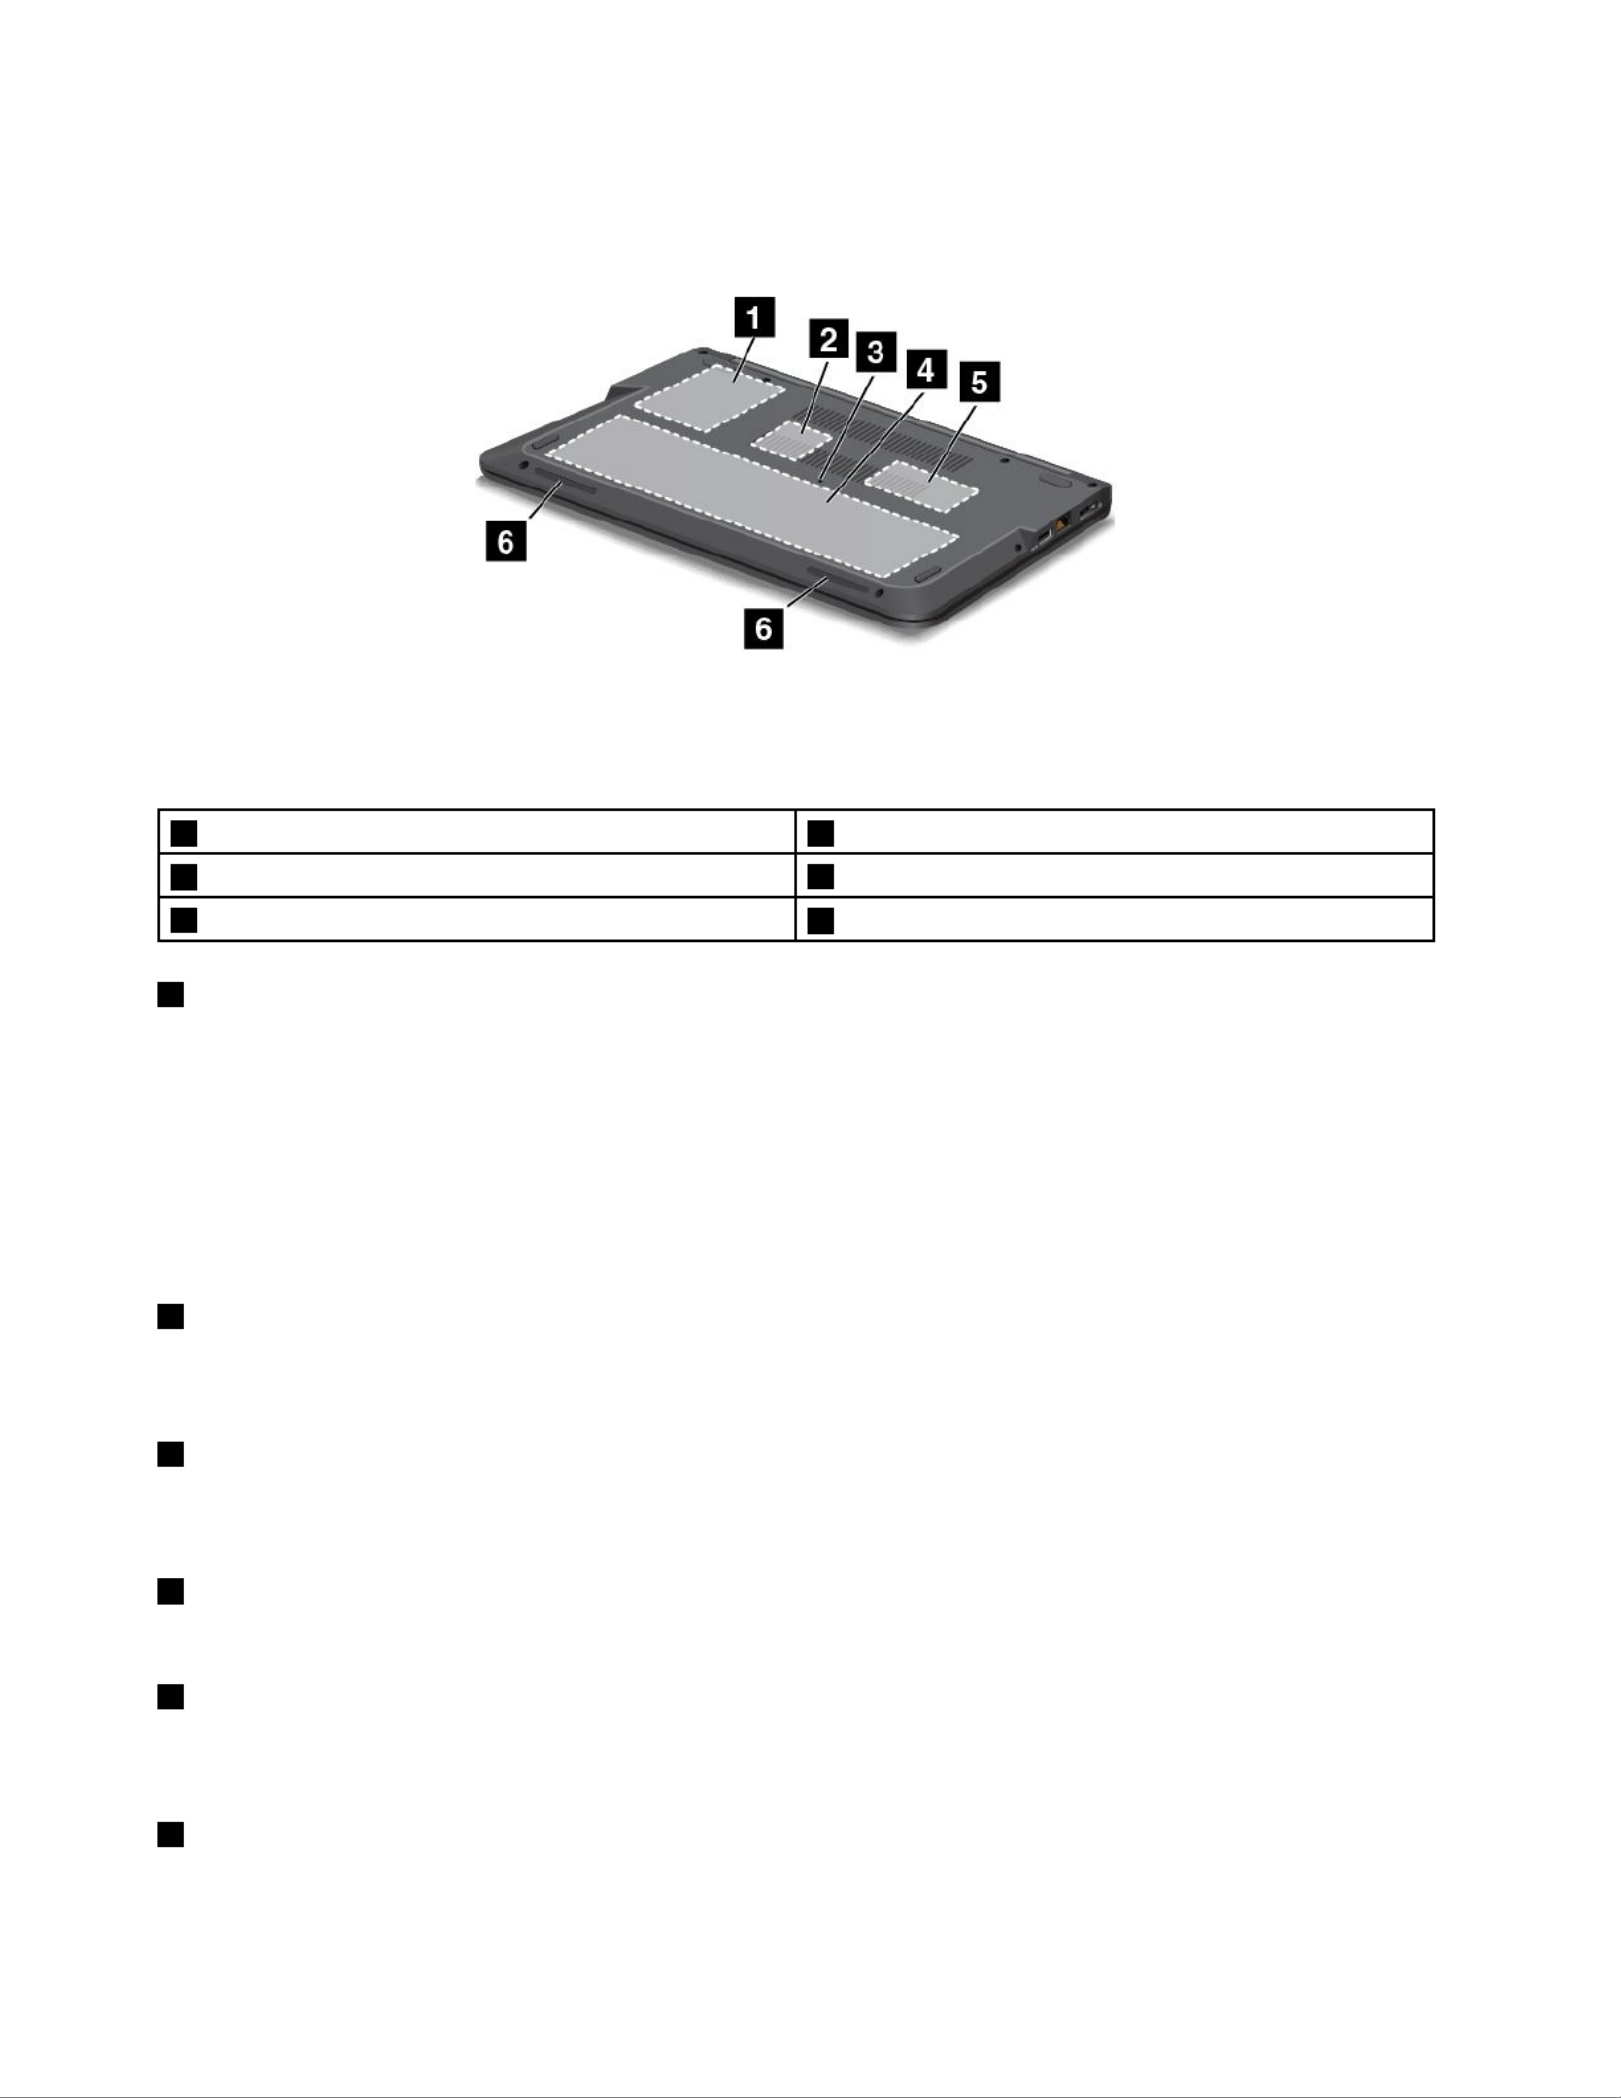
Bottomview
Figure4.Bottomview
Note:Yourcomputerbottomviewmightlookslightlydifferentfromtheillustrationabove.
1Harddiskdriveorsolid-statedrive4Integratedbattery
2MiniPCIExpressCardslotforwirelessLANcard 5Memory-upgradeslot
3Emergencyresethole 6Stereospeakers
1Harddiskdriveorsolid-statedrive
Dependingonthemodel,yourcomputermighthavealarge-capacity,customer-upgradableharddisk
drivethatcanmeetavarietyofstoragedemands.
Somemodelsareequippedwithasolid-statedrivefordatastorage,makingyourcomputerlighterandfaster.
Note:Thehiddenservicepartitionisthereasonwhythereislessfreespacethanexpectedonyourhard
diskdriveorsolid-statedrive.Thisreductionismorenoticeableonthesolid-statedrivebecauseofits
smallercapacity.
2MiniPCIExpressCardslotforwirelessLANcard
Yourcomputermightincludeawirelesslocalareanetwork(LAN)cardintheMiniPCIExpressCardslotfor
youtoestablishwirelessLANconnections.
3Emergencyresethole
Ifthecomputerdoesnotrespond,removetheacpoweradapterandresetthecomputerbyinsertinga
straightenedpaperclipintotheemergencyresetholetoturnoffthecomputer.
4Integratedbattery
Useyourcomputerwiththebatterypowerwheneveracpowerisunavailable.
5Memory-upgradeslot
Youcanincreasetheamountofmemoryinyourcomputerbyinstallingamemorymoduleinthe
memory-upgradeslot.MemorymodulesareavailableasoptionsfromLenovo.
6Stereospeakers
Fordetails,see“Specialkeys”onpage21.
6UserGuide

Statusindicators
Yourcomputerhasseveralstatusindicatorsthatshowthestatusofyourcomputer.
Note:Yourcomputermightlookslightlydifferentfromthefollowingillustration.
1FnLockindicator
TheFnLockindicatorshowsthestatusoftheFnLockfunction.Formoreinformation,see“Specialkeys”
onpage21.
2Speakermuteindicator
Whenthespeakermuteindicatorison,thespeakersaremuted.
3Microphonemuteindicator
Whenthemicrophonemuteindicatorison,themicrophonesaremuted.
4Camerastatusindicator
WhentheCamerastatusindicatorison,thecameraisinuse.
56Systemstatusindicators
Chapter1.Productoverview7

TheilluminateddotsintheThinkPadlogoontheouterlidofyourcomputerandonthepalmrestshowthe
systemstatusofyourcomputer:
•Blinksthreetimes:Thecomputerisinitiallyconnectedtothepower.
•On:Thecomputerisinuse.
•Off:Thecomputerisofforinhibernationmode.
•Slowblinking:Thecomputerisenteringsleepmode.
•Fastblinking:Thecomputerisenteringhibernationmode.
Locatingimportantproductinformation
Thissectionprovidesinformationtohelpyoulocateyourmachinetypeandmodellabel,FCCIDandIC
Certicationlabel,andtheWindowsCerticateofAuthenticity(COA)label.
Machinetypeandmodellabel
Themachinetypeandmodellabelidentiesyourcomputer.WhenyoucontactLenovoforhelp,themachine
typeandmodelinformationhelpssupporttechnicianstoidentifyyourcomputerandprovidefasterservice.
Thefollowinggureshowsthelocationofthemachinetypeandmodelofyourcomputer:
FCCIDandICCerticationnumberlabel
ThereisnoFCCIDorICCerticationnumberforthePCIExpressMiniCard1shownontheenclosure
ofthecomputer.TheFCCIDandICCerticationnumberlabelisafxedonthecardinstalledinthePCI
ExpressMiniCardslotofthecomputer.
8UserGuide

Onsomemodels,LenovoprovidesyoutheinformationaboutthelocationoftheFCCIDandICCertication
numberlabelonthecomputerbackcoverassembly.Thefollowinggureshowswhereyoucanndthe
informationaboutthelocationoftheFCCIDandICCerticationnumberlabelofthecomputer.
ThefollowinggureshowsthelocationoftheFCCIDandICCerticationnumberlabelofyourcomputer:
ToremovetheWirelessLANcardforrepairorreplacement,see“ReplacingaMiniPCIExpressCardfor
wirelessLANconnection”onpage68.
Note:LenovoauthorizedwirelessLANcardsareallowedtobeusedinthecomputer.Ifyouinstallan
unauthorizedPCIExpressMiniCardthatisnotapprovedforuseinyourcomputer,anerrormessageis
displayedandthecomputerbeepswhenyouturnonthecomputer.
CerticateofAuthenticitylabel
TheCerticateofAuthenticitylabelforthepreinstalledoperatingsystemisattached.Printedonthislabelare
theproductIDandtheproductkeyinformationforyourcomputer.Recordthisinformationandkeepitina
safeplace.Youmightneedthesenumberstostartyourcomputerorreinstalltheoperatingsystem.
TheCerticateofAuthenticitylabelappliesonlytocomputerspreinstalledwiththeWindows7operating
system.
Chapter1.Productoverview9

TheCerticateofAuthenticitylabelofyourcomputerisshownasbelow:
Features
Thistopicliststhefeaturesofyourcomputer.
Processor
Toviewthesystempropertiesofyourcomputer,dothefollowing:
•ForWindows7:ClickStart,right-clickComputer.ThenclickProperties.
•ForWindows8:Movethecursortothebottomrightcornerofthescreentobringupthecharms.Then
clickSettings➙PCinfo.
Memory
Doubledatarate3low-voltagesynchronousdynamicrandomaccessmemorymodules(DDR3LSDRAM)
Storagedevice
•7.5mm(2.5-inchheight)harddiskdrive
•7.5mm(2.5-inchheight)solid-statedrive
•2.75mm(0.1-inchheight)M.2solid-statedriveforcacheonly(onsomemodels)
Display
ThecolordisplayusestheThinFilmTransistor(TFT)technology.
•Size:355.60mm(14inches)
•Resolution:
–LCD:1366x768or1600x900,dependingonthemodel
–Externalmonitor:upto1920x1200
•Brightnesscontrol
•Built-inmicrophones
•Integratedcamera
Keyboard
•6-rowkeyboard
•Fnkey
•ThinkPadpointingdevice(TrackPointpointingdeviceandmulti-touchtouchpad)
Interface
10UserGuide

•4-in-1mediacardreader
•Comboaudiojack
•HDMIport
•RJ45Ethernetconnector
•OneUSB3.0connector
•OneAlwaysOnUSBconnector
Wirelessfeatures
•IntegratedwirelessLAN
•IntegratedBluetooth
Securityfeatures
Fingerprintreader
Specications
Thissectionliststhephysicalspecicationsforyourcomputer.
Size
•Width:333mm(13.11inches)
•Depth:225mm(8.86inches)
•Height:21mmto23mm(0.83to0.91inches)
Heatoutput
45W(154Btu/hr)maximumor65W(222Btu/hr)maximum,dependingonthemodel
Powersource(acpoweradapter)
•Sine-waveinputat50to60Hz
•Inputratingoftheacpoweradapter:100to240Vac,50to60Hz
Batterypack
Integratedlithium-ion(Li-Ion)batterypack
Batterystatus
Tocheckthebatterystatus,dothefollowing:
•ForWindows7:OpenthePowerManagerprogram.ClicktheBatterytab.Forinstructionsonhowto
starttheAccessConnections™program,see“AccessingLenovoprogramsontheWindows7operating
system”onpage12 .
•ForWindows8:PresstheWindowskeytogototheStartscreen.ClickLenovoSettings➙Power.
Operatingenvironment
Thissectionprovidesinformationaboutyourcomputeroperatingenvironment.
Environment:
Chapter1.Productoverview11

•Maximumaltitudewithoutpressurization:3048m(10000ft)
•Temperature
–Ataltitudesupto2438m(8000ft)
–Operating:5.0°Cto35.0°C(41°Fto95°F)
–Storage:5.0°Cto43.0°C(41°Fto109°F)
–Ataltitudesabove2438m(8000ft)
–Maximumtemperaturewhenoperatingundertheunpressurizedcondition:31.3°C(88°F)
Note:Whenyouchargethebatterypack,itstemperaturemustbeatleast10°C(50°F).
•Relativehumidity:
–Operating:8%to80%
–Storage:5%to95%
Ifpossible,placeyourcomputerinawell-ventilatedanddryareawithoutdirectexposuretosunshine.
Keepelectricalappliancessuchasanelectricfan,radio,airconditioner,andmicrowaveovenawayfrom
yourcomputerbecausethestrongmagneticeldsgeneratedbytheseappliancescandamagethemonitor
anddataontheharddiskdrive.
Donotplaceanybeveragesontopoforbesidethecomputerorotherattacheddevices.Ifliquidisspilledon
orinthecomputeroranattacheddevice,ashortcircuitorotherdamagemightoccur.
Donoteatorsmokeoveryourkeyboard.Particlesthatfallintoyourkeyboardcancausedamage.
Lenovoprograms
YourcomputercomeswithLenovoprogramstohelpyouworkmoreeasilyandsecurely.Dependingon
theWindowsoperatingsystempreinstalled,theprogramsmightvary.
TolearnmoreabouttheprogramsandothercomputingsolutionsofferedbyLenovo,goto:
http://www.lenovo.com/support
AccessingLenovoprogramsontheWindows7operatingsystem
OntheWindows7operatingsystem,youcanaccessLenovoprogramsfromeithertheLenovo
ThinkVantage®ToolsprogramorfromControlPanel.
AccessingLenovoprogramsfromtheLenovoThinkVantageToolsprogram
ToaccessLenovoprogramsfromtheLenovoThinkVantageToolsprogram,clickStart➙AllPrograms➙
LenovoThinkVantageTools.Thendouble-clickaprogramicontoaccesstheprogram.
Note:IfaprogramiconintheLenovoThinkVantageToolsprogramnavigationwindowisdimmed,it
indicatesthatyouneedtoinstalltheprogrammanually.Toinstalltheprogrammanually,double-clickthe
programicon.Then,followtheinstructionsonthescreen.Whentheinstallationprocesscompletes,the
programiconwillbeactivated.
Note:Dependingonyourcomputermodel,someoftheprogramsmightnotbeavailable.
12UserGuide

Table1.ProgramsintheLenovoThinkVantageToolsprogram
Program
AccessConnectionsnternetConnection
ActiveProtectionSystem™AirbagProtection
ClientSecuritySolutionEnhancedSecurity
CommunicationsUtilityWebConferencing
FingerprintSoftware FingerprintReader
LenovoSolutionCenterSystemHealthandDiagnostics
PasswordManagersswordVault
PowerManager PowerControls
RecoveryMediacoveryDisks
RescueandRecovery ®EnhancedBackupandRestore
SimpleTap
SystemUpdate UpdateandDrivers
AccessingLenovoprogramsfromControlPanel
ToaccessLenovoprogramsfromControlPanel,clickStart➙ControlPanel.Thendependingonthe
programyouwanttoaccess,clickthecorrespondingsectionandthenclickthecorrespondinggreentext.
Note:IfyoudonotndtheprogramyouneedinControlPanel,opentheLenovoThinkVantageTools
programnavigationwindowanddouble-clickthedimmedicontoinstalltheprogramyouneed.Then,
followtheinstructionsonthescreen.Whentheinstallationprocesscompletes,theprogramiconwillbe
activated,andyoucanndtheprograminControlPanel.
TheprogramsandthecorrespondingsectionsandgreentextsinControlPanelarelistedinthefollowing
table.
Note:Dependingonyourcomputermodel,someoftheprogramsmightnotbeavailable.
Table2.ProgramsinControlPanel
Program ControlPanelsectionGreentextinControlPanel
AccessConnections NetworkandInternet Lenovo-InternetConnection
ActiveProtectionSystemSystemandSecurity
HardwareandSound
Lenovo-AirbagProtection
ClientSecuritySolutionSystemandSecurityLenovo-EnhancedSecurity
CommunicationsUtilityHardwareandSoundLenovo-WebConferencing
FingerprintSoftwareSystemandSecurity
HardwareandSound
Lenovo-FingerprintReader
or
Lenovo-NotebookFingerprint
Reader
LenovoSolutionCenterSystemandSecurityLenovo-SystemHealthand
Diagnostics
MessageCenterPlus Programs MessagesfromLenovo
Chapter1.Productoverview13

Table2.ProgramsinControlPanel(continued)
Program ControlPanelsectionGreentextinControlPanel
PasswordManager SystemandSecurity
UserAccountsandFamilySafety
Lenovo-PasswordVault
PowerManager HardwareandSound
SystemandSecurity
Lenovo-PowerControls
RecoveryMedia SystemandSecurity Lenovo-FactoryRecoveryDisks
SimpleTap Programs Lenovo-SimpleTap
SystemUpdateSystemandSecurity Lenovo-UpdateandDrivers
RescueandRecovery SystemandSecurity Lenovo-EnhancedBackupand
Restore
AccessingLenovoprogramsontheWindows8operatingsystem
IfyourcomputerispreinstalledwiththeWindows8operatingsystem,youcanaccessLenovoprogramsby
doingeitherofthefollowing:
•ClicktheLenovoQuickLaunchiconfromthetaskbar.Alistofprogramsisdisplayed.Double-clicka
Lenovoprogramtolaunchit.Ifadesiredprogramisnotinthelist,clicktheplusicon+.
•PresstheWindowskeytogototheStartscreen.ClickaLenovoprogramtolaunchit.Ifyoucannotnd
theprogramyouneed,movethecursortothebottomrightcornerofthescreentobringupthecharms.
ThenclicktheSearchcharmtosearchthedesiredprogram.
YourcomputersupportsthefollowingLenovoprograms:
•ActiveProtectionSystem
•FingerprintSoftware
•LenovoCompanion
•LenovoQuickSnip
•LenovoSettings
•LenovoSolutionCenter
•LenovoQuickLaunch
•LenovoSupport
•LenovoThinkVantageTools
•PasswordManager
•SystemUpdate
Foranintroductiontotheseprograms,see“Lenovoprogramsoverview”onpage14 .
Lenovoprogramsoverview
ThistopicprovidesinformationaboutsomeLenovoprograms.
Note:Dependingonyourcomputermodel,someoftheprogramsmightnotbeavailable.
•AccessConnections
14UserGuide

TheAccessConnectionsprogramisaconnectivityassistantprogramforcreatingandmanaginglocation
proles.EachlocationprolestoresallthenetworkandInternetcongurationsettingsneededfor
connectingtoanetworkinfrastructurefromaspeciclocationsuchasahomeoranofce.
Byswitchingbetweenlocationprolesasyoumoveyourcomputerfromplacetoplace,youcanquickly
andeasilyconnecttoanetworkwithnoneedtorecongureyoursettingsmanuallyandrestartthe
computereachtime.
•ActiveProtectionSystem
TheActiveProtectionSystemprogramprotectsyourharddiskdrivewhentheshocksensorinsideyour
computerdetectsaconditionthatcoulddamagethedrive,suchassystemtilt,excessivevibration,or
shock.Theharddiskdriveislessvulnerabletodamagewhenitisnotoperating.Thisisbecausewhen
theharddiskdriveisnotoperating,thesystemstopsitfromspinning,andmightalsomovetheread
andwriteheadsofthedrivetoareasthatdonotcontaindata.Assoonastheshocksensorsenses
thattheenvironmentisstableagain(minimalchangeinsystemtilt,vibration,orshock),itturnsthe
harddiskdriveon.
•ClientSecuritySolution
TheClientSecuritySolutionprogramprotectsyourcomputerbysecuringclientdataanddeecting
securitybreachattempts.Italsocanhelpmanageyourpasswords,recoveraforgottenpassword,
monitorsecuritysettingsonyourcomputer,andsuggesthowtoenhanceyourcomputersecurity.
•CommunicationsUtility
UsetheCommunicationsUtilityprogramtoconguresettingsfortheintegratedcameraandaudiodevices.
•FingerprintSoftware
Ifyoursystemcomeswithangerprintreader,theFingerprintSoftwareprogramenablesyoutoenroll
yourngerprintandassociateitwithyourWindowspassword.Asaresult,thengerprintauthentication
canreplaceyourpasswordandenablesimpleandsecureuseraccess.
•LenovoCompanion
ThroughtheLenovoCompanionprogram,youcangettheinformationabouttheaccessoriesforyour
computer,viewbolgsandarticlesaboutyourcomputer,andcheckforotherrecommendedprograms.
•LenovoMobileAccess
TheLenovoMobileAccessprogramenablesyoutomanageyourmobilebroadbandconnection.You
cancreateanaccount,addmoneytotheaccount,andpurchasemobilebroadbandsessionsusing
youraccount.
•LenovoQuickSnip
TheLenovoQuickSnipprogramprovidesyouwithaquickandeasywaytocaptureandshareyour
experience.Itenablesyoutograbascreenshot,snipandsavethescreenshot,anduseitinother
applications.
•LenovoSettings
UsetheLenovoSettingsprogramtoenhanceyourcomputingexperiencebyturningyourcomputerinto
aportablehotspot,conguringcameraandmicrophonesettings,optimizingyourpowersettings,and
creatingandmanagingmultiplenetworkproles.
•LenovoSolution
TheLenovoSolutionprogramenablesyoutotroubleshootandresolvecomputerproblems.Itcombines
diagnostictests,systeminformationcollection,securitystatus,andsupportinformation,alongwith
hintsandtipsformaximumsystemperformance.
•LenovoQuickLaunch
TheLenovoQuickLaunchprogramprovidesyouwithquickaccesstoprogramsinstalledonyour
computer,includingLenovoprograms,Microsoft ®programs,andotherthirdpartyprograms.
•LenovoSupport
Chapter1.Productoverview15

TheLenovoSupportprogramenablesyoutoregisteryourcomputerwithLenovo,checkthecomputer
healthconditionandbatterystatus,downloadandviewusermanualsforyourcomputer,getthewarranty
informationofyourcomputer,andexplorehelpandsupportinformation.
•LenovoThinkVantageTools
TheLenovoThinkVantageToolsprogramhelpsyouworkmoreeasilyandsecurelybyprovidingeasy
accesstovarioustechnologies,suchasFingerprintSoftware,LenovoSolutionCenter,andsoon.
•MessageCenterPlus
TheMessageCenterPlusprogramautomaticallydisplaysmessagestoinformyouaboutimportantnotices
fromLenovo,suchasalertsonsystemupdatesandalertsonconditionsthatrequireyourattention.
•PasswordManager
ThePasswordManagerprogramautomaticallycapturesandllsinauthenticationinformationfor
WindowsprogramsandWebsites.
•PowerManager
ThePowerManagerprogramprovidesconvenient,exible,andcompletepowermanagementforyour
computer.Itenablesyoutoadjustyourcomputerpowersettingstoachievethebestbalancebetween
performanceandpowersaving.
•RecoveryMedia
TheRecoveryMediaprogramenablesyoutorestorethecontentsoftheharddiskdrivetothefactory
defaultsettings.
•RescueandRecovery
TheRescueandRecoveryprogramisaone-buttonrecoveryandrestoresolutionthatincludesasetof
self-recoverytoolstohelpyoudiagnosecomputerproblems,gethelp,andrecoverfromsystemcrashes,
evenifyoucannotstarttheWindowsoperatingsystem.
•SimpleTap
TheSimpleT approgramprovidesyouwithaquickwaytocustomizesomebasiccomputersettingssuch
asmutingthespeakers,adjustingthevolume,lockingthecomputeroperatingsystem,launchinga
program,openingaWebpage,openingale,andsoon.YoualsocanusetheSimpleT approgramto
accesstheLenovoAppShop,fromwhichyoucandownloadvariousprogramsandcomputersoftware.
TostarttheSimpleT apprograminaquickway,doanyofthefollowing:
–ClicktheredSimpleT aplaunchpointonthedesktop.Theredlaunchpointisavailableonthedesktop
afteryouhavelaunchedtheSimpleT approgramforthersttime.
–Presstheblackbuttononthekeyboard(nexttothevolumecontrolbuttons).
Note:TheSimpleT approgramisonlyavailableoncertainmodelspreinstalledwiththeWindows7
operatingsystem.IfyourWindows7modelisnotpreinstalledwiththeSimpleT approgram,youcan
downloaditfromhttp://www.lenovo.com/support.
•SystemUpdate
TheSystemUpdateprogramhelpsyoukeepthesoftwareonyourcomputerup-to-datebydownloading
andinstallingsoftwareupdatepackages(Lenovoprograms,devicedrivers,UEFIBIOSupdates,and
otherthirdpartyprograms).
16UserGuide

Chapter2.Usingyourcomputer
Thischapterprovidesinformationonusingsomeofthecomputercomponents.
Thischaptercontainsthefollowingtopics:
•“Registeringyourcomputer”onpage17
•“Frequentlyaskedquestions”onpage17
•“Specialkeys”onpage21
•“UsingtheThinkPadpointingdevice”onpage23
•“Powermanagement”onpage25
•“Connectingtothenetwork”onpage29
•“Attachinganexternalmonitor”onpage32
•“UsingtheExtenddesktopfunction”onpage34
•“Settingupapresentation”onpage35
•“UsingtheAMDSwitchableGraphicsfeature”onpage35
•“Usingaudiofeatures”onpage35
•“Usingtheintegratedcamera”onpage36
•“Usingamediacard”onpage36
Registeringyourcomputer
Whenyouregisteryourcomputer,informationisenteredintoadatabase,whichenablesLenovotocontact
youincaseofarecallorothersevereproblem.AfteryouregisteredyourcomputerwithLenovo,youwill
alsoreceivequickerservicewhenyoucallLenovoforhelp.Inaddition,somelocationsofferextended
privilegesandservicestoregisteredusers.
ToregisteryourcomputerwithLenovo,dooneofthefollowing:
•Gotohttp://www.lenovo.com/registerandfollowtheinstructionsonthescreentoregisteryourcomputer.
•ConnectyourcomputertotheInternetandregisteryourcomputerthroughapreinstalledregistration
program:
–ForWindows7:ThepreinstalledLenovoProductRegistrationprogramlaunchesautomaticallyafteryou
haveusedyourcomputerforatime.Followtheinstructionsonthescreentoregisteryourcomputer.
–ForWindows8:LaunchtheLenovoSupportprogram.ThenclickRegistrationandfollowthe
instructionsonthescreentoregisteryourcomputer.
Frequentlyaskedquestions
Thefollowingareafewtipsthatwillhelpyouoptimizetheuseofyourcomputer.
Toensurethatyoureceivethebestperformancefromyourcomputer,gotothefollowingWebpage
tondinformationsuchasaidsfortroubleshootingandanswerstofrequentlyaskedquestions:
http://www.lenovo.com/support/faq
CanIgetmyuserguideinanotherlanguage?
©CopyrightLenovo2013 17

•Todownloadtheuserguideinanotherlanguage,goto:http://www.lenovo.com/support.Thenfollow
theinstructionsonthescreen.
Howtousethebatterypowermoreeffectively?
•Toconservepower,ortosuspendoperationwithoutexitingapplicationsorsavingles,see“Power-saving
modes”onpage27.
•Toachievethebestbalancebetweenperformanceandpowersaving,createandapplypowerplans.
See“Managingthebatterypower”onpage27 .
•Ifyourcomputerwillbeturnedoffforanextendedperiodoftime,youcanpreventbatterypower
fromdrainingbyremovingthebattery.Lookformoreinformationaboutusingthebatteryin“Power
management”onpage25.
Concernedaboutsecurityorneedtosecurelydisposeofdatastoredonyourharddiskdriveor
solid-statedrive?
•StudyChapter4“Security”onpage43tondouthowyoucanprotectyourcomputerfromtheftand
unauthorizeduse.
•UsethePasswordManagerprogramtoprotectthedatastoredonyourcomputer.Fordetails,seethe
helpinformationsystemoftheprogram.
•Beforeyoudisposeofthedataontheharddiskdriveorsolid-statedrive,besuretoread“Noticeon
deletingdatafromyourharddiskdriveorsolid-statedrive”onpage52 .
Isgettingconnectedindifferentlocationsachallenge?
•Totroubleshootawirelessnetworkingissue,goto:
http://www.lenovo.com/support/faq
•TakeadvantageofthenetworkingfeaturesbyuseoftheAccessConnectionsprogram(ontheWindows7
operatingsystem)orLocationAwarenessprogram(ontheWindows8operatingsystem).
•Tolearnmoreaboutusingthewirelessfeaturesofyourcomputer,referto“Wirelessconnections”on
page29.
•Totravelmorecondently,besuretocheckthetipsin“Travelingwithyourcomputer”onpage41 .
•PressF8toenableordisablethewirelessfeatures.
Needtogivepresentationsorattachanexternalmonitoroften?
•Ensurethatyoufollowtheprocedurefor“Attachinganexternalmonitor”onpage32.
•WiththeExtenddesktopfunction,youcandisplayoutputonboththecomputerdisplayandanexternal
monitor.
Needtoattachorreplaceadevice?
•SeeChapter6“Replacingdevices”onpage63formoreinformationaboutreplacingthedevicesof
yourcomputer.
Youhavebeenusingyourcomputerforsometimealready,anditisgettingslower?
•Followthe“Generaltipsforpreventingproblems”onpage91 .
•Youcandiagnoseproblemsyourselfbyusingthepreinstalleddiagnosticsoftware.
•CheckforrecoverysolutionsinChapter5“Recoveryoverview”onpage55 .
Printthefollowingsectionsandkeepthemwithyourcomputerincaseyouareunabletoaccessthisonline
userguidewhennecessary.
•“Installinganewoperatingsystem”onpage73
18UserGuide

•“Computerstopsresponding”onpage97
•“Powerproblems”onpage110
Usingthemulti-touchscreen
Thistopicprovidesinstructionsonhowtousethemulti-touchscreenthatisavailableonsomemodels.
Tap
Taponthescreenwithyourngertiptolaunchanapplication,selectanitem,oropenamenu.
Pressandhold
Pressandholdanitemorablankareaonthescreenforafewsecondsuntilanactionoccurs.
Drag
Tapandholdyourngeronanitem,suchasanimageoranicononthescreen,thenpullitalongwithyour
ngertothedesiredlocation.
Swipeorslide
MoveyourngerhorizontallyonthescreentoscrollthroughWebpages,lists,picturethumbnails,andsoon.
Zoominorzoomout
Movetwongersclosertogetheronthescreentozoomout,ormovetwongersapartonthescreen
tozoomin.
Rotate
Puttwoormorengersonanitem,andthenrotateyourngers.Thisoperationenablesyoutorotatethe
selecteditemsinadirectionyoumoveyourngers.
Doubletap
Forsomeapplications,quicklytaptwiceonthescreentozoomin.Double-tapagaintozoomout.
Windows8touchgesturesandmouseactions
ThefollowingtableliststhetouchgesturesandmouseactionssupportedbytheWindow8operatingsystem.
Tasks Touchgestures(touchmodelsonly) Mouseactions
Todisplaythecharmsthatcontain
systemcommands,suchasStart,
Settings,Search,Share,and
Devices
Swipeinfromtherightedge. Movethepointertothelower-rightor
upper-rightcornerofyourscreen.
Todisplaytheopenapplicationsand
switchapplications
Swipeinfromtheleftedge. Movethepointertotheupper-left
cornerofyourscreen,andthenclick.
Chapter2.Usingyourcomputer19

Tasks Touchgestures(touchmodelsonly) Mouseactions
Toviewtherecentlyusedapplications
orselectanapplicationfromthelist
Swipeinandoutontheleftedge. Movethepointertotheupper-left
cornerofyourscreen,andthenmove
itdownward.
Toviewallapplicationsonthe
Startscreenorviewtheapplication
commandsonanopenapplication,
suchasCopy,Save,andDelete,
dependingontheapplications
Swipeinfromthetoporbottomedge. Right-clickablankareaonthe
Startscreenorright-clickanopen
application.
Toclosethecurrentapplication Swipeinfromthetopedgetothe
bottom.
Clickthetopoftheapplication,and
thendragittothebottomofyour
screen.
Toenlargeorreducethesizeofan
icon,removeaniconfromtheStart
screen,orremoveanapplication
Movethedesiredicondownward
untilatickicon( )isdisplayed,then
releaseyournger.
Right-clickthedesiredicon.
ToopenanapplicationontheStart
screenorperformanactiononan
openapplication,suchasCopy,
Save,andDelete,dependingonthe
application
Tap. Click.
20UserGuide

Tasks Touchgestures(touchmodelsonly) Mouseactions
Toscrollthroughitems,suchaslists,
pages,andphotos
Slide.Scrollthemousewheel,movethe
scrollbar,orclickthescrollarrow.
TomoveanobjectDraganitemtothedesiredlocation. Click,hold,anddraganitem.
Tozoomout Movetwongersclosertogether. PresstheCtrlkeywhilescrollingthe
mousewheelbackward.
Tozoomin Movetwongersfartherapart. PresstheCtrlkeywhilescrollingthe
mousewheelforward.
Torotateanitem Puttwoormorengersonan
item,andthenrotateyourngers
(supportedonlyonsomemodels).
Iftheapplicationsupportsrotation,
clicktherotationicon.
Specialkeys
Yourcomputerhasseveralspecialkeys1and2tohelpyouworkmoreeasilyandeffectively.Thefollowing
gureshowsthelocationsofthespecialkeys.
Chapter2.Usingyourcomputer21

1Functionkeys
•+:PressFn+EsctoenableordisabletheFnLockfunction.
WhentheFnLockfunctionisdisabled:TheFnLockindicatorisoff(defaultmode).T oinitiatethe
specialfunctionofeachkey,pressthefunctionkeysdirectly.ToinputF1–F12,youneedtopresstheFn
keyandthecorrespondingfunctionkey .
WhentheFnLockfunctionisenabled:TheFnLockindicatorturnson.ToinputF1–F12,pressthe
functionkeysdirectly.Toinitiatethespecialfunctionofeachkey,youneedtopresstheFnkeyandthe
correspondingfunctionkey.
• :Mutesorunmutesthespeakers.Whenthespeakersaremuted,thespeakermuteindicatorturnson.
Ifyoumutethesoundandturnoffyourcomputer,thesoundwillremainmutedwhenyouturnonyour
computeragain.Toturnonthesound,pressF1,F2,orF3.
•:Decreasesthespeakervolume.
•:Increasesthespeakervolume.
•:Mutesorunmutesthemicrophones.Whenthemicrophonesaremuted,themicrophonemute
indicatorturnson.
Ifyoumutethemicrophonesandturnoffyourcomputer,themicrophoneswillremainmutedwhenyou
turnonyourcomputeragain.T ounmutethemicrophones,pressF4.
• :Darkensthedisplay.
•:Brightensthedisplay.
Youcantemporarilychangethecomputerdisplaybrightnessbypressingthetwokeys.Tochangethe
defaultbrightnesslevel,right-clickthebatterystatusiconintheWindowsnoticationarea.Thenclick
Adjustscreenbrightnessandmakechangesasdesired.
•:Switchesthedisplayoutputlocationbetweenthecomputerdisplayandanexternalmonitor.For
moreinformation,referto“Attachinganexternalmonitor”onpage32 .
Note:Toswitchbetweenthecomputerdisplayandanexternalmonitor,theWindows+Pkeycombination
alsoisavailable.
•:Enablesordisablesthebuilt-inwirelessnetworkingfeatures.Formoreinformationonthewireless
features,referto“Wirelessconnections”onpage29 .
22UserGuide

•:
ForWindows8:OpenstheSettingscharm.
ForWindows7:OpensControlPanel.
•:
ForWindows8:OpenstheSearchcharm.
ForWindows7:OpensWindowsSearch.
•:Viewstheprogramsthatyouhaveopened.
• :
ForWindows8:Viewsalltheprograms.
ForWindows7:OpensComputer.
•+olsthekeyboardbacklight
Therearethreemodesforthekeyboardbacklight:Off,Low,andHigh.PressFn+Spacebartochange
themodesofthekeyboardbacklight.
•Fn+B:HasthesamefunctionastheBreakkey.
•Fn+P:HasthesamefunctionasthePausekey.
•Fn+S:HasthesamefunctionastheSysRqkey.
•Fn+K:HasthesamefunctionastheScrLKkey.
2Windowskey
OntheWindows7operatingsystem,presstheWindowskeytoopentheStartmenu.OntheWindows8
operatingsystem,presstheWindowskeytoswitchbetweenthecurrentworkspaceandtheStartscreen.
ForinformationaboutusingtheWindowskeywithotherkeys,refertothehelpinformationsystemofthe
Windowsoperatingsystem.
UsingtheThinkPadpointingdevice
TheThinkPadpointingdeviceconsistsoftheTrackPointpointingstick1andthetouchpad2.Thewhole
touchpadisanactiveareasensitivetongermovement.Theleftclickzones3andrightclickzones5
workastheleftandrightmousebuttonsonaconventionalmouse.Thescrollzone4enablesyouto
scrollWebpagesordocumentsinanydirection.
Chapter2.Usingyourcomputer23

Note:Yourcomputerkeyboardmightlookslightlydifferentfromthefollowingillustration.
UsingtheTrackPointpointingstick
TousetheTrackPointpointingstick,applypressuretothenonslipcaponthepointingstickinanydirection
paralleltothekeyboard.Thenyoucanmovethecursor.Butthepointingstickitselfdoesnotmove.The
speedatwhichthecursormovesdependsonthepressureyouapplytothepointingstick.
Usingthemulti-touchtouchpad
Thetouchpadofyourcomputersupportsmulti-touchwithwhichyoucanzoomin,zoomout,scroll,or
rotateonthescreenwhilebrowsingtheInternetorreadingoreditingadocument.
CustomizingtheThinkPadpointingdevice
YoucancustomizetheThinkPadpointingdevicetoachievetheextendedfunctionsoftheThinkPad
pointingdevice.
TocustomizetheThinkPadpointingdevice,dothefollowing:
1.GotoControlPanel.
2.ClickHardwareandSound➙Mouse➙ThinkPad.
3.Followtheinstructionsonthescreen.
Replacingthecap
Thecap1ontheendoftheTrackPointpointingstickisremovable.Afteryouusethecapforaperiod
oftime,youcanreplacethecapwithanewone.
24UserGuide

Note:TheTrackPointcapusedinyourcomputerhasgrooves2asshowninthefollowingillustration.
EnsurethatyoureplacetheTrackPointcapwithacorrectonethathassuchgrooves.
Powermanagement
Whenyouneedtouseyourcomputerawayfromelectricaloutlets,youdependonbatterypowertokeep
yourcomputerrunning.Differentcomputercomponentsconsumepoweratdifferentrates.Themoreyou
usethepower-intensivecomponents,thefasteryouconsumebatterypower.Mobilityhasrevolutionized
businessbyallowingyoutotakeyourworkwhereveryougo.WithThinkPadbatteries,youwillbeableto
worklongerwithoutbeingtiedtoanelectricaloutlet.
Checkingthebatterystatus
ThebatteryiconintheWindowsnoticationareadisplaysthepercentageofbatterypowerremaining.
Therateatwhichyouusebatterypowerwilldeterminehowlongyoucanusethebatteryofyourcomputer
betweencharges.Becauseeachcomputeruserhasdifferenthabitsandneeds,itisdifculttopredicthow
longabatterychargewilllast.Therearetwomainfactors:
•Howmuchenergyisstoredinthebatterywhenyoubegintowork.
•Thewayyouuseyourcomputer.Forexample:
–Howoftenyouaccesstheharddiskdrive.
–Howbrightyoumakethecomputerdisplay.
–Howoftenyouusethewirelessfeatures.
Tocheckfordetailedbatterystatusinformation,dothefollowing:
•FortheWindows7operatingsystem:OpenthePowerManagerprogramandclicktheBatterytab.
•FortheWindows8operatingsystem:
–OpentheLenovoSettingsprogramandclickPower.
–OpentheLenovoSupportprogramandclickBatteryHealth.
Usingtheacpoweradapter
Thepowertorunyourcomputercancomeeitherfromthelithium-ion(Li-ion)batterypackprovidedwithit,
orfromacpowerthroughtheacpoweradapter.Whileyouuseacpower,thebatterychargesautomatically.
Chapter2.Usingyourcomputer25

Theacpoweradapterthatcomeswithyourcomputerhastwobasiccomponents:
•Thetransformerpackthatconvertsacpowerforusewiththecomputer.
•Thepowercordthatplugsintotheacoutletandintothetransformerpack.
Attention:Usinganimproperpowercordcouldcauseseveredamagetoyourcomputer.
Connectingtheacpoweradapter
Tousetheacpoweradapter,dothefollowing.Besuretotakethesestepsintheorderinwhichtheyare
givenhere.
1.Plugtheacpoweradapterintoanacoutlet.
2.Connectthepowercordtothetransformerpack.
3.Insertthepowerjackintothecomputer.
Tipsonusingtheacpoweradapter
Youcancheckthestatusofyourbatteryatanytimebylookingatthebatterymeteratthebottomofyour
display.
•Whentheacpoweradapterisnotinuse,disconnectitfromtheelectricaloutlet.
•Donotbindthepowercordtightlyaroundtheacpoweradaptertransformerpackwhenitisconnectedto
thetransformer.
•Beforeyouchargethebattery,ensurethatitstemperatureisatleast10°C(50°F).
•Youcanchargethebatterywhentheacpoweradapterisconnectedtothecomputerandthebatteryis
installed.Youneedtochargeitinanyofthefollowingconditions:
–Whenyoupurchaseanewbattery.
–Thepercentageofpowerremainingislow.
–Thebatteryhasnotbeenusedforalongtime.
Chargingthebattery
Whenyoucheckbatterystatusandndthatthepercentageofpowerremainingisloworwhenthepower
alarmalertsyouthattheremainingpowerislow,youneedtochargeyourbattery.
Ifanacoutletisconvenient,plugtheacpoweradapterintoit,andtheninsertthejackintothecomputer.
Thebatterywillbefullychargedinabout3to6hours.Thisisaffectedbythebatterysizeandthephysical
environment.
Note:Toincreasethelifeofthebattery,thecomputerdoesnotstartrechargingthebatteryiftheremaining
powerisgreaterthan95%.
Maximizingthebatterylife
Toachievethebestbalancebetweenperformanceandpowersaving,adjustyourpowerplansettings.
Toaccesspowerplansettings,dothefollowing:
•Usethebatteryuntilthechargeiscompletelydepleted.
•Rechargethebatterycompletelybeforeusingit.Youcanseewhetherthebatteryisfullychargedfromthe
batterystatusiconintheWindowsnoticationarea.
•Alwaysusepowermanagementfeaturessuchaspowermodes,screenblank,sleep,andhibernation.
26UserGuide

Managingthebatterypower
Toachievethebestbalancebetweenperformanceandpowersaving,adjustyourpowerplansettings.
Toaccesspowerplansettings,dothefollowing:
•ForWindows7:StartthePowerManagerprogramandthenclickthePowerPlantab.Forinstructionson
howtostartthePowerManagerprogram,see“AccessingLenovoprogramsontheWindows7operating
system”onpage12.
•ForWindows8:Right-clickthebatterystatusiconfromtheWindowsnoticationareaandclickPower
Options.ThenclickChangeplansettingsthatisnexttoyourpowerplan.
Formoreinformation,refertothehelpinformationsystem.
Power-savingmodes
Thereareseveralmodesthatyoucanuseatanytimetoconservepower.Thissectionintroduceseach
modeandgivestipsontheeffectiveuseofthebatterypower.
Understandingthepower-savingmodes
•Screenblank(fortheWindows7operatingsystemonly):
Thecomputerdisplayrequiresconsiderablebatterypower.Toturnoffpowertothedisplay,dothe
following:
1.Right-clickthePowerManagerbatterygaugeonthetaskbar.
2.SelectPoweroffdisplay.
•Sleep:
Insleepmode,yourworkissavedtomemory,andthenthesolid-statedriveortheharddiskdriveandthe
computerdisplayareturnedoff.Whenyourcomputerwakesup,yourworkisrestoredwithinseconds.
–ForWindows7:
1.ClickStart.
2.ClickthetrianglemarkontherightsideoftheShutdownicon;thenselectSleep.
–ForWindows8:
1.Movethecursortothebottomrightcornerofthescreentobringupthecharm.
2.ClickSettings➙Power➙Sleep.
Dependingonthecomputermodel,yourcomputermightsupportthe30DayStandbyfunction.Whenthis
functionisenabled,thecomputerconsumesevenlesspowerinsleepmodeandtakesonlyseconds
toresumenormaloperationwhenyoupressthepowerbutton.Toenablethe30DayStandbyfunction,
dothefollowing:
–ForWindows7:
1.OpenthePowerManagerprogram.
2.ClickGlobalPowerSettingsorclickAdvanced➙GlobalPowerSettings.
3.SelectEnable30DayStandby;thenclickOK.
–ForWindows8:
1.OpentheLenovoSettingsprogram.
2.ClickPower.
3.Under30DayStandby,movetheslidertotheright.
•Hibernation:
Chapter2.Usingyourcomputer27

Byusingthismode,youcanturnoffyourcomputercompletelywithoutsavinglesorexitingfromany
programsthatarerunning.Whenthecomputerentershibernation,allopenprograms,folders,andles
aresavedtotheharddisk,andthenthecomputerturnsoff.
Toputthecomputerintohibernationmode,changeyourpowerplansettings.Toaccesspowerplan
settings,dothefollowing:
–ForWindows7:StartthePowerManagerprogramandthenclickthePowerPlantab.Forinstructions
onhowtostartthePowerManagerprogram,see“AccessingLenovoprogramsontheWindows7
operatingsystem”onpage12 .
–ForWindows8:Right-clickthebatterystatusiconfromtheWindowsnoticationareaandclickPower
Options.ThenclickChangeplansettingsthatisnexttoyourpowerplan.
•AlwaysOnUSBfunctionoff
TheAlwaysOnUSBdrainsyourbatterypower.Youcandisableitwhenyoudonotneedit.Todisable
theAlwaysOnUSBfunction,dothefollowing:
–ForWindows7:
1.OpenthePowerManagerprogram.
2.ClickGlobalPowerSettingsorclickAdvanced➙GlobalPowerSettings.
3.UnselectEnableAlwaysOnUSB;thenclickOK.
–ForWindows8:
1.OpentheLenovoSettingsprogram.
2.ClickPower.
3.UnderAlwaysOnUSB,movetheslidertotheleft.
•Wirelessoff
Whenyouarenotusingthewirelessfeatures,suchasBluetoothorwirelessLAN,turnthemoff.This
willhelpconservepower.Toturnoffthewirelessfeatures,pressF8.
Enablingthewakeupfunction
Ifyouputyourcomputerintohibernationmode,andthewakeupfunctionisdisabled(thisisthedefault
setting),thecomputerdoesnotconsumeanypower.Ifthewakeupfunctionisenabled,itconsumesa
smallamountofpower.
Toenablethefunction,dothefollowing:
1.GotoControlPanel.SystemandSecurity.
2.ClickAdministrativeT ools.
3.Double-clickTaskScheduler.Ifyouarepromptedforanadministratorpasswordorconrmation,type
thepasswordorprovideconrmation.
4.Fromtheleftpane,selectthetaskfolderforwhichyouwanttoenablethewakeupfunction.The
scheduledtasksaredisplayed.
5.Clickascheduledtask,andthenclicktheConditionstab.
6.UnderPower,selectthecheckboxforWakethecomputertorunthistask.
EnablingthebatteryalarmontheWindows7operatingsystem
FortheWindows7operatingsystem,youcanprogramyourcomputersothatwhenthebatterypowerfalls
belowacertainlevel,threeeventsoccur:thealarmgoesoff,amessageisdisplayed,andtheLCDis
turnedoff.
Toenablethebatteryalarm,dothefollowing:
1.StartPowerManager.
28UserGuide

2.ClicktheGlobalPowerSettingstab.
3.ForLowbatteryalarmorCriticallylowbatteryalarm,setthepercentageofthepowerlevelandset
theaction.
Note:Ifyourcomputerenterssleeporhibernationmodewhenthebatteryislow,butthealarmmessage
hasnotyetbeendisplayed,themessagewillbedisplayedwhenthecomputerresumes.Toresumenormal
operation,clickOK.
Connectingtothenetwork
YourcomputerhasoneormorenetworkcardsforconnectingtotheInternetandtoyourcompany'swired
LANorwirelessLANnetwork.
Ethernetconnections
YoucanconnecttoalocalnetworkorabroadbandconnectionbyuseoftheEthernetfeaturebuiltintoyour
computer.
ToconnecttoanetworkthroughEthernet,dothefollowing:
•ForWindows7:UsetheAccessConnectionsprogram.ForinstructionsonhowtostarttheAccess
Connectionsprogram,see“AccessingLenovoprogramsontheWindows7operatingsystem”onpage12.
•ForWindows8:OpentheLenovoSettingsprogramandclickLocationAwareness.Thenfollowthe
instructionsonthescreen.
DANGER
YourcomputerhasanEthernetconnector.Toavoidtheriskofelectricalshock,donotconnect
thetelephonecabletotheEthernetconnector.
Wirelessconnections
Wirelesscommunicationisthetransferofdatawithouttheuseofcablesbutbymeansofradiowavesonly.
Dependingonthewirelessdeviceusedinyourcomputer,youmightbeabletoconnecttothefollowing
categoriesofwirelessnetworks.
WirelessLAN
AwirelessLANcoversarelativelysmallgeographicarea,suchasanofcebuildingorahouse.Devices
basedonthe802.11standardscanconnecttothisnetwork.
Yourcomputercomeswithabuilt-inwirelessnetworkcardandacongurationutilitytohelpyoumake
wirelessconnectionsandmonitorthestatusofyourconnection,sothatyoucanstayconnectedtoyour
networkwhileyouareintheofce,inameetingroom,orathome,withnoneedforawiredconnection.
TipsforusingthewirelessLANfeature
Toachievethebestconnection,usethefollowingguidelines:
•PlaceyourcomputersothatthereareasfewobstaclesaspossiblebetweenthewirelessLANaccess
pointandthecomputer.
•Openyourcomputerdisplaytoanangleofslightlymorethan90degrees.
Chapter2.Usingyourcomputer29

•Ifyouusethewirelessfeature(the802.11standard)ofyourcomputersimultaneouslywithaBluetooth
option,thedatatransmissionspeedcanbedelayedandtheperformanceofthewirelessfeaturecanbe
degraded.
Bluetooth
Bluetoothisoneofanumberoftechnologiesusedtocreateawirelesspersonalareanetwork.Bluetooth
canconnectdevicesashortdistancefromoneanother,andiscommonlyusedforconnectingperipheral
devicestoacomputer,transferringdatabetweenhand-helddevicesandapersonalcomputer,orremotely
controllingandcommunicatingwithdevicessuchasmobilephones.
Establishingawirelessconnection
Toestablishawirelessconnection,dothefollowing:
1.PressF8toturnonthewirelessfeature.
2.ClickthewirelessnetworkconnectionstatusiconintheWindowsnoticationarea.Alistofavailable
wirelessnetworksisdisplayed.
3.Double-clickanetworktoconnecttoit.Providerequiredinformationifneeded.
Ifyouneedtoconnecttodifferentwirelessnetworksindifferentlocations,usethefollowingsoftwareto
managemultiplenetworkprolessothatthecomputerconnectstoanavailablenetworkautomaticallywhen
thelocationchanges:
•ForWindows7:UsetheAccessConnectionsprogram.ForinstructionsonhowtostarttheAccess
Connectionsprogram,see“AccessingLenovoprogramsontheWindows7operatingsystem”onpage12 .
•ForWindows8:OpentheLenovoSettingsprogramandclickLocationAwareness.See“Accessing
LenovoprogramsontheWindows8operatingsystem”onpage14 .
Attention:
•Ifyouwanttousethewirelessfeaturesonanairplane,checkthewirelessserviceswiththeairlinebefore
boardingtheairplane.
•Iftherearerestrictionsontheuseofcomputerwirelessfeaturesonanairplane,youneedtodisableyour
computerwirelessfeaturesbeforeboarding.Todisablethewirelessfeatures,see“Enablingordisabling
thewirelessfeatures”onpage32.
UsingBluetooth
SomemodelsareequippedwithaBluetoothcardthatiscompliantwithBluetoothSpecication4.0.
ToenabletheBluetoothfeatureontheWindows7operatingsystem,pressF8toopenthewirelessradio
switchboard.ThenturnontheBluetoothradio.FortheWindows8operatingsystem,theBluetoothfeature
isonbydefault.
TocongureaBluetoothdeviceormanageconnectionsettings,useBluetoothDevicesinControlPanel.
1.OpenControlPanel.
2.ClickHardwareandSound.
3.ClickDevicesandPrinters.
TosenddatatoaBluetooth-enableddevice,dothefollowing:
1.Right-clickthedatathatyouwanttosend.
2.SelectSendTo➙BluetoothDevices.
30UserGuide

Note:Ifyouusethewirelessfeature(the802.11standard)ofyourcomputersimultaneouslywithaBluetooth
option,thedatatransmissionspeedcanbedelayedandtheperformanceofthewirelessfeaturecanbe
degraded.
FormoreinformationaboutusingtheBluetoothfeature,refertotheWindowshelpinformationsystemand
theBluetoothhelpinformationsystem.
Checkingthewirelessnetworkconnectionstatus
Youcancheckyourcomputerwirelessnetworkconnectionstatusandwirelesssignalstrengththroughthe
wirelessnetworkconnectionstatusiconintheWindowsnoticationarea.Themorebarsencompassed,the
betterthesignal.
FortheWindows7operatingsystem,youalsocanchecktheAccessConnectionsgauge,theAccess
Connectionsstatusicon,ortheAccessConnectionswirelessnetworkconnectionstatusiconinthe
Windowsnoticationarea.
AccessConnectionsgauge
OntheWindows7operatingsystem,theAccessConnectionsgaugeintheWindowsnoticationarea
displaysthestatusandsignalstrengthofyourwirelessconnection.
Youcanndmoredetailedinformationaboutthestatusandsignalstrengthofyourwirelessconnection
byopeningtheAccessConnectionsprogramorbyright-clickingtheAccessConnectionsgaugeinthe
WindowsnoticationareaandselectingViewStatusofWirelessConnection.
•AccessConnectionsgaugestates:wirelessLAN
–Powertothewirelessradioisoffornosignal.
–Powertothewirelessradioison.Thesignalstrengthofthewirelessconnectionispoor.To
improvethesignalstrength,moveyourcomputerclosertothewirelessaccesspoint.
–Powertothewirelessradioison.Thesignalstrengthofthewirelessconnection
ismarginal.
–Powertothewirelessradioison.Thesignalstrengthofthewirelessconnectionis
excellent.
AccessConnectionsstatusicon
TheAccessConnectionsstatusicondisplaysgeneralconnectionstatus.
•AccessConnectionsstatusiconstates
– Nolocationproleisactiveornoneexists.
– Currentlocationproleisdisconnected.
– Currentlocationproleisconnected.
AccessConnectionswirelessstatusicon
TheAccessConnectionswirelessstatusicondisplaysthestatusandsignalstrengthofyourwireless
connection.
Youcanndmoredetailedinformationaboutthestatusandsignalstrengthofyourwirelessconnection
eitherbyopeningtheAccessConnectionsprogramorbydouble-clickingtheAccessConnectionswireless
statusiconintheWindowsnoticationarea.
•Wirelessstatusiconstates:wirelessLAN
Chapter2.Usingyourcomputer31

–Powertothewirelessradioisoff.
– Powertothewirelessradioison.Noassociation.
–Powertothewirelessradioison.Nosignal.
–Powertothewirelessradioison.Thesignalstrengthofthewirelessconnectionisexcellent.
– Powertothewirelessradioison.Thesignalstrengthofthewirelessconnectionismarginal.
–Powertothewirelessradioison.Thesignalstrengthofthewirelessconnectionispoor.Toimprove
thesignalstrength,moveyourcomputerclosertothewirelessaccesspoint.
Note:Ifyouhavetroubleinmakingaconnection,trymovingyourcomputerclosertoyourwirelessaccess
point.
Enablingordisablingthewirelessfeatures
Toenableordisablethewirelessfeatures,dooneofthefollowing:
•ForWindows7:PressF8toopenthewirelessradioswitchboard.T urnonorturnoffthewirelessfeature
asdesired.
•ForWindows8:PressF8toenableordisabletheAirplanemode.WhentheAirplanemodeisenabled,all
ofyourwirelessdevicesareturnedoff.
Youalsocanusethewirelessradioswitchtoturnonorturnoffthewirelessradiosofallthewirelessdevices
onyourcomputer.
Attachinganexternalmonitor
Youcanattachanexternalmonitortoyourcomputertoexpandyourcomputercapabilities.
Note:Ifyouattachanexternalmonitor,avideointerfacecablewithaferritecoreinstalledonthecable
isrequired.
Yourcomputersupportsamaximumvideoresolutionofupto1920x1200,providedthattheexternal
monitoralsosupportsthatresolution.Formoredetails,refertothemanualsprovidedwithyourmonitor.
Youcansetanyresolutionforeitherthecomputerdisplayortheexternalmonitor.Whenyouusebothatthe
sametime,theresolutionofbothisthesame.Ifyousetahigherresolutionforthecomputerdisplay,you
canseeonlypartofthescreenatatime.YoucanseeotherpartsbymovingtheimagewiththeT rackPoint
pointingdeviceoranotherpointingdevice.
Youcanmovethedisplayoutputtothecomputerdisplay,theexternalmonitor,orbothbyconguring
settingsintheDisplaySettingswindow.
Connectinganexternalmonitor
Ifyourcomputercannotdetecttheexternalmonitor,right-clickonthedesktop,thenselectScreen
resolution.ClicktheDetectbutton.
Toattachanexternalmonitor,dothefollowing:
1.ConnecttheexternalmonitortotheHDMIport;thenconnectthemonitortoanelectricaloutlet.
2.T urnontheexternalmonitor.
3.ChangethedisplayoutputlocationbypressingF7.Thisenablesyoutoswitchbetweenviewingoutput
ontheexternalmonitor,thecomputermonitor,andbothmonitors.
32UserGuide

Note:IfthemonitorconnectorisnotcompatiblewiththeHDMIportonyourcomputer,youcanusea
convertcabletoestablishtheconnection.ConvertcablesareavailableasoptionsfromLenovoat:
http://www.lenovo.com/accessories/services/index.html
Settingthemonitortype
Tosetyourmonitortype,dothefollowing:
1.Connecttheexternalmonitortothemonitorconnector,andthenconnectthemonitortoanelectrical
outlet.
2.Turnontheexternalmonitor.
3.Right-clickonthedesktop,andclickScreenresolution.
Note:Ifyourcomputercannotdetecttheexternalmonitor,clicktheDetectbutton.
4.Clicktheiconforthedesiredmonitor(theMonitor-2iconisfortheexternalmonitor).
5.SetResolution.
6.ClickAdvancedSettings.
7.ClicktheMonitortab.Checkthemonitorinformationwindowtoensurethatthemonitortypeiscorrect.
Ifitis,clickOKtoclosethewindow;otherwiseproceedwiththefollowingsteps.
8.Ifmorethantwomonitortypesaredisplayed,selectGenericPnPMonitororGenericNon-PnP
Monitor.
9.ClickProperties.Ifyouarepromptedforanadministratorpasswordorconrmation,typethepassword
orprovideconrmation.
10.ClicktheDrivertab.
11.ClickUpdateDriver.
12.ClickBrowsemycomputerfordriversoftware,andthenclickLetmepickfromalistofdevice
driversonmycomputer.
13.CleartheShowcompatiblehardwarecheckbox.
14.SelectManufacturerandModelforyourmonitor.Ifyoucannotndyourmonitoronthelist,stopthe
installationofthisdriverandusethedrivershippedwithyourmonitor.
15.Afterupdatingthedriver,clickClose.
16.FortheWindows7operatingsystem,tochangethecolorsettings,right-clickonthedesktop,andclick
Screenresolution.ClickAdvancedSettings,selecttheMonitortab,thensetColors.
17.ClickOK.
Note:Tochangethecolorsettings,right-clickonthedesktop,andclickScreenresolution.ClickAdvanced
Settings,selecttheMonitortab,thensetColors.
Considerationsforattachinganexternalmonitor
•Wheninstallinganoperatingsystem,youmustinstallthedisplaydriverforyourmonitorthatissupplied
withthecomputer,andthemonitorINFlethatissuppliedwiththeexternalmonitor.
•Ifyousetaresolutionhigherthantheresolutionyouareusingonthecomputermonitor,andusean
externalmonitorthatdoesnotsupportthatresolution,takeadvantageofthevirtualscreenfunction,
whichenablesyoutodisplayonlyapartofthehigh-resolutionscreenimageyourcomputerproduces.
YoucanseeotherpartsoftheimagebymovingthescreenwiththeTrackPointpointingdeviceoranother
pointingdevice.
•Iftheexternalmonitoryouareusingisoutdated,theresolutionandtherefreshratemightbelimited.
Chapter2.Usingyourcomputer33

Changingdisplaysettings
Youcanchangethedisplaysettings,suchasthedisplayresolution,fontsize,andsoon.
Tochangethedisplaysettings,dothefollowing:
1.OpenControlPanelandclickAppearanceandPersonalization.
2.ClickDisplayforfurtherconguration.
UsingtheExtenddesktopfunction
YourcomputersupportsafunctionnamedtheExtenddesktop.WiththeExtenddesktopfunction,you
candisplayoutputonboththecomputerdisplayandanexternalmonitor.Youalsocandisplaydifferent
desktopimagesoneachmonitor.
YoucanusetheExtenddesktopfunctionwithoutchanginganysettings.Ifthefunctiondoesnotwork,refer
to“EnablingtheExtenddesktopfunction”onpage34toenableit.
ConsiderationsforusingtheExtenddesktopfunction
•IfyouwanttoshowDOSfull-screenwhileintheExtenddesktopmode,onlytheprimarydisplayshows
DOS;theotherdisplayisblackedout.
•IfyourcomputerhastheIntel ®graphicscard,youcandesignatetheotherdisplayastheprimarydisplay
bydoingthefollowing:
1.PressCtrl+Alt+Fn+F12.TheIntelGraphicsandMediaControlPanelwindowopens.
2.SelectAdvanceModeandclickOK.
3.ClickMultipleDisplay.
4.Selectthedesireddisplayastheprimarydisplay.
•WhenanapplicationusingDirectDraworDirect3Displayedinfull-screenmode,itisshownonlyonthe
primarydisplay.
•YoucannotusethedisplayswitchingfunctionwhenyouareintheExtenddesktopmode.
EnablingtheExtenddesktopfunction
ToenabletheExtenddesktopfunction,dothefollowing:
1.ConnecttheexternalmonitortotheHDMIport;thenconnectthemonitortoanelectricaloutlet.
2.Turnontheexternalmonitor.
3.PressF7,thenselectExtend.
Note:IfthemonitorconnectorisnotcompatiblewiththeHDMIportonyourcomputer,youcanusea
convertcabletoestablishtheconnection.ConvertcablesareavailableasoptionsfromLenovoat:
http://www.lenovo.com/accessories/services/index.html
Tochangetheresolutionforeachmonitor,dothefollowing:
1.Right-clickonthedesktop,andclickScreenresolution.
2.ClicktheMonitor-1icon(fortheprimarydisplay,thecomputerdisplay).
3.Settheresolutionfortheprimarydisplay.
4.ClicktheMonitor-2icon(forthesecondarydisplay,theexternaldisplay).
5.Settheresolutionforthesecondarydisplay.
6.ClickOKtoapplythechanges.
34UserGuide

Note:Tochangethecolorsettings,right-clickonthedesktop,andclickScreenresolution.ClickAdvanced
Settings,selecttheMonitortab,thensetColors.
Settingupapresentation
Tomakepresentations,youcanattachaprojectortoyourcomputerthroughtheHDMIportonyourcomputer.
Note:IftheprojectorconnectorisnotcompatibletotheHDMIportonyourcomputer,youcanpurchasea
convertercableonhttp://www.lenovo.com/accessories/services/index.html.
Itmighttakeseveralsecondsbeforetheprojectordisplaystheimage.Ifyoudonotseeyourdesktop
displayedafter60seconds,pressF7toswitchbetweendifferentdisplayoutputlocations.
Yourprojectormighthaveoneormoreaudio-inputconnectors.Toprojectsound,youwillneedtoattachthe
comboaudiojackonyourcomputertotheseconnectors,usinganaudiocable(commerciallyavailable).
UsingtheAMDSwitchableGraphicsfeature
SomeThinkPadnotebookcomputerssupporttheAMDSwitchableGraphicsfeature.
Toachievethebestbalancebetweenthecomputerperformanceandalongbatterylife,dependingonthe
graphicsqualitydemandoftherunningprogramandthesettingsofthepowerplanthatyouuse,theAMD
SwitchableGraphicsfeatureautomaticallyswitchesbetweenHighPerformanceGraphicsandEnergySaving
Graphics,withnoneedtorestartyourcomputer,closeprograms,orintervenemanually.
Usingaudiofeatures
Yourcomputerisequippedwiththefollowing:
•Comboaudiojack,1/8inch(3.5mm)indiameter
•Built-instereospeakers
•Built-indigitalmicrophone
Yourcomputeralsohasanaudiochipthatenablesyoutoenjoyvariousmultimediaaudiofeatures:
•CompliantwithIntelHighDenitionAudio
•RecordingandplaybackofPCMandWAVlesin16-bitor24-bitformat
•PlaybackofaWAVleatasamplerateof44.1KHzto192KHz
•PlaybackofMIDIlesthroughaWavetablesynthesizerunderMicrosoftWindowsoperatingsystems
•PlaybackofMP3lesthroughtheWindowsMediaPlayerorasoftwareMP3player
•Recordingfromvarioussoundsources
Note:Thecomboaudiojackdoesnotsupportaconventionalmicrophone.
Thefollowingtableshowswhichfunctionsoftheaudiodevicesattachedtothejacksonyourcomputerare
supported.
T able3.Audiofeaturelist
Jackdsetwitha3.5mm
4-poleplug
Conventional
headphone
Conventional
microphone
Comboaudiojack Headphoneand
microphonefunctions
supported
Headphonefunction
supported
Notsupported
Chapter2.Usingyourcomputer35

Conguringforsoundrecording
Tocongurethemicrophoneforoptimizedsoundrecording,opentheRealtekHDAudioManagerwindow
bydoingthefollowing:
OpenControlPanel.ThenclickHardwareandSound➙RealtekHDAudioManager.TheRealtekHD
AudioManagerwindowopens.
Usingtheintegratedcamera
Ifyourcomputerhasanintegratedcamera,youcanusethecameratopreviewyourvideoimageand
takeasnapshotofyourcurrentimage.
Tostartthecamera,dothefollowing:
•ForWindows7:PressF9toopenControlPanel.ClickLenovo-WebConferencing.
•ForWindows8:ClickCamerafromtheStartscreen.
Whenthecameraisstarted,thegreencamera-in-useindicatorturnson.
Youalsocanusetheintegratedcamerawithotherprogramsthatprovidefeaturessuchasphotographing,
videocapturing,andvideoconferencing.Tousetheintegratedcamerawithotherprograms,openoneofthe
programsandstartthephotographing,videocapturing,orvideoconferencingfunction.Then,thecamera
willstartautomaticallyandthegreencamera-in-useindicatorwillturnon.Formoreinformationaboutusing
thecamerawithaprogram,refertothedocumentationthatcamewiththeprogram.
Conguringcamerasettings
Youcancongurethecamerasettingstomeetyourneeds,suchasadjustingthequalityofthevideooutput.
Tocongurethecamerasettings,dothefollowing:
•ForWindows7:PressF9toopenControlPanel.ClickLenovo-WebConferencingandcongurethe
camerasettingsasdesired.
•ForWindows8,dooneofthefollowing:
–Congurethecamerasettingsdirectlyfromtheprogramthatisusingthecamera.Formoreinformation,
seethehelpinformationsystemoftheprogram.
–PressF9tostarttheLenovoSettingsprogram.ThenclickCamera.Followtheinstructionsonthe
screentocongurethecamerasettingsasdesired.
Usingamediacard
Yourcomputerhasonemediacardreaderslot.Themediacardreaderslotsupportsthefollowingfour
typesofcards:
•SecureDigital(SD)card
•SecureDigitalHigh-Capacity(SDHC)card
•SecureDigitaleXtended-Capacity(SDXC)card
•MultiMediaCard(MMC)
Note:Whiletransferringdatatoorfromamediacard,suchasanSDcard,donotputyourcomputerinto
sleeporhibernationmodebeforethedatatransferiscomplete;otherwise,yourdatacouldbecomedamaged.
Formoreinformationonmediacards,refertoanyofthefollowingtopics:
36UserGuide

Insertingamediacard
Attention:Beforeyoustartinstallinganyofthefollowingcards,touchametaltableoragroundedmetal
object.Thisactionreducesanystaticelectricityfromyourbody.Thestaticelectricitycoulddamagethecard.
Toinsertamediacardintothe4-in-1mediacardreaderslot,dothefollowing:
1.Ensurethatthecardiscorrectlyoriented.
2.Insertthecardrmlyintothe4-in-1mediacardreaderslot.Pressthecardrmlyintotheslot.
Ifthemediacardisnotplugandplay,dothefollowing:
1.GotoControlPanel.ClickHardwareandSound➙DeviceManager.Ifyouarepromptedforan
administratorpasswordorconrmation,typethepasswordorprovideconrmation.
2.FromtheActionmenu,selectAddlegacyhardware.TheAddHardwareWizardstarts.
3.Followtheinstructionsonthescreen.
Removingamediacard
Attention:
•Beforeremovingthecard,stopthecardrst.Otherwise,dataonthecardmightbecorruptedorlost.
•Donotremovethecardwhilethecomputerisinsleepmodeorhibernationmode.Otherwise,thesystem
mightnotrespondwhenyoutrytoresumeoperation.
Toremoveamediacard,dothefollowing:
1.ClickthetriangulariconintheWindowsnoticationareatoshowhiddenicons.Then,right-clickthe
SafelyRemoveHardwareandEjectMediaicon.
2.SelectthecorrespondingitemtoejectthecardfromtheWindowsoperatingsystem.
3.Pressthecardtoejectitfromyourcomputer.
4.Removethecardfromyourcomputerandstoreitsafelyforfutureuse.
Note:IfyoudonotremovethecardfromyourcomputerafteryouejectthecardfromtheWindows
operatingsystem,thecardcannolongerbeaccessed.Toaccessthecard,youmustremoveitonce,
theninsertitagain.
Chapter2.Usingyourcomputer37

38UserGuide

Chapter3.Youandyourcomputer
Thischapterprovidesinformationaboutaccessibility,comfort,andtravellingwithyourcomputer.
•“Accessibilityandcomfort”onpage39
•“Travelingwithyourcomputer”onpage41
Accessibilityandcomfort
Goodergonomicpracticeisimportanttogetthemostfromyourpersonalcomputerandtoavoiddiscomfort.
Arrangeyourworkplaceandtheequipmentyouusetosuityourindividualneedsandthekindofwork
thatyouperform.Inaddition,usehealthyworkhabitstomaximizeyourperformanceandcomfortwhile
usingyourcomputer.
Thefollowingtopicsprovideinformationaboutarrangingyourworkarea,settingupyourcomputer
equipment,andestablishinghealthyworkhabits.
Lenovoiscommittedtoprovidingthelatestinformationandtechnologytoourcustomerswithdisabilities.
Refertoouraccessibilityinformationwhichoutlinesoureffortsinthisarea.
Ergonomicinformation
Workinginthevirtualofcemightmeanadaptingtofrequentchangesinyourenvironment.Followingsome
simpleruleswillmakethingseasierandbringyouthemaximumbenetsofyourcomputer.Keepinginmind
suchbasicsasgoodlightingandproperseating,forexample,canhelpyouimproveyourperformance
andachievegreatercomfort.
Thisexampleshowssomeoneinaconventionalsetting.Evenwhennotinsuchasetting,youcanfollow
manyofthesetips.Developgoodhabits,andtheywillserveyouwell.
Generalposture:Makeminormodicationsinyourworkingposturetodetertheonsetofdiscomfortcaused
bylongperiodsofworkinginthesameposition.Frequentshortbreaksfromyourworkalsohelptoprevent
minordiscomfortassociatedwithyourworkingposture.
©CopyrightLenovo2013 39

Display:Positionthedisplaytomaintainacomfortableviewingdistanceof20-30inches(510-760mm).
Avoidglareorreectionsonthedisplayfromoverheadlightingoroutsidesourcesoflight.Keepthedisplay
screencleanandsetthebrightnesstolevelsthatenableyoutoseethescreenclearly.PressF5orF6
toadjustdisplaybrightness.
Headposition:Keepyourheadandneckinacomfortableandneutral(vertical,orupright)position.
Chair:Useachairthatgivesyougoodbacksupportandseatheightadjustment.Usechairadjustmentsto
bestsuityourdesiredposture.
Armandhandposition:Ifavailable,usechairarmrestsoranareaonyourworkingsurfacetoprovide
weightsupportforyourarms.Keepyourforearms,wrists,andhandsinarelaxedandneutral(horizontal)
position.Typewithasofttouchwithoutpoundingthekeys.
Legposition:Keepyourthighsparalleltotheoorandyourfeetatontheoororonafootrest.
Whatifyouaretraveling?
Itmightnotbepossibletoobservethebestergonomicpracticeswhenyouareusingyourcomputer
whileonthemoveorinacasualsetting.Regardlessofthesetting,trytoobserveasmanyofthetipsas
possible.Sittingproperlyandusingadequatelighting,forexample,willhelpyoumaintaindesirablelevels
ofcomfortandperformance.
Questionsaboutvision?
ThevisualdisplayscreensofThinkPadnotebookcomputersaredesignedtomeetthehigheststandards
andtoprovideyouwithclear,crispimagesandlarge,brightdisplaysthatareeasytosee,yeteasyonthe
eyes.Ofcourse,anyconcentratedandsustainedvisualactivitycanbetiring.Ifyouhavequestionsoneye
fatigueorvisualdiscomfort,consultavisioncarespecialistforadvice.
Comfort
Observethefollowingguidelinestoachievegreatercomfortandimproveperformance.
Activesittingandrestbreaks:Thelongeryousitandworkwithyourcomputer,themoreimportantitisto
observeyourworkingposture.Follow“Ergonomicinformation”onpage39andpractice“activesitting”to
avoiddiscomfortassociatedwithyourworkingpostures.Makingminorvoluntaryposturalchangesand
takingshortfrequentworkbreaksarethekeyingredientsforhealthycomputing.Y ourcomputerislightand
mobile;youcaneasilyrepositionyourworkingsurfacetoaccommodatemanyposturemodications.
Workareasetupoptions:Familiarizeyourselfwithallofyourofcefurnituresothatyouknowhowto
adjustyourworksurface,seat,andotherworktoolstoaccommodateyourpreferencesforcomfort.
Ifyourworkareaisnotinanofcesetting,besuretotakespecialnoteofemployingactivesitting
andtakingworkbreaks.ManyThinkPadproductsolutionsareavailabletohelpyoumodifyandexpand
yourcomputertobestsuityourneeds.AccessthefollowingWebsitetoviewsomeoftheseoptions:
http://www.lenovo.com/accessories/services/index.html.Exploreyouroptionsfordockingsolutionsand
externalproductsthatprovidetheadjustabilityandfeaturesthatyouwant.
Accessibilityinformation
Lenovoiscommittedtoprovidingpeoplewithdisabilitiesgreateraccesstoinformationandtechnology.
Asaresult,thefollowinginformationprovideswaystohelpusersthathavehearing,vision,andmobility
limitationsgetthemostoutoftheircomputerexperience.
40UserGuide

•Whentakingoff,remembertoturnoffyourcomputerorputitintohibernationmode.
Travelaccessories
Thefollowingisachecklistofitemstoconsiderpackingwhenyouaregoingtotravel:
•ThinkPadacpoweradapter
•ThinkPadAC/DCcomboadapter
•Externalmouse(ifyouareaccustomedtousingone)
•Ethernetcable
•Aqualitycarryingcasethatprovidesadequatecushionandprotection
•Externalstoragedevice
•HDMIcable
•ConvertercableforHDMIport
Ifyouaretravelingtoanothercountry,youmightneedtoconsideranacpoweradapterforthecountryto
whichyouaretravelling.
Topurchasetravelaccessories,gotohttp://www.lenovo.com/accessories.
42UserGuide

Chapter4.Security
Thischapterprovidesinformationabouthowtoprotectyourcomputerfromtheftandunauthorizeduse.
•“Attachingamechanicallock”onpage43
•“Usingpasswords”onpage43
•“Harddisksecurity”onpage48
•“Settingthesecuritychip”onpage49
•“Usingthengerprintreader”onpage50
•“Noticeondeletingdatafromyourharddiskdriveorsolid-statedrive”onpage52
•“Usingrewalls”onpage52
•“Protectingdataagainstviruses”onpage52
Attachingamechanicallock
Youcanattachamechanicallocktoyourcomputertohelppreventitfrombeingremovedwithoutyour
permission.
Attachamechanicallocktothesecurity-lockslotofthecomputer;thensecurethechainonthelocktoa
stationaryobject.Refertotheinstructionsshippedwiththemechanicallock.
Note:Youareresponsibleforevaluating,selecting,andimplementingthelockingdevicesandsecurity
features.Lenovomakesnocomments,judgments,orwarrantiesaboutthefunction,quality,orperformance
oflockingdevicesandsecurityfeatures.
Usingpasswords
Byusingpasswords,youcanhelppreventyourcomputerfrombeingusedbyothers.Onceyouseta
password,apromptisdisplayedonthescreeneachtimeyouturnonthecomputer.Enteryourpasswordat
theprompt.Youcannotusethecomputerunlessyoutypethecorrectpassword.
Passwordsandsleepmode
Ifyouhavesetpasswordsandyouputyourcomputerintosleepmode,theprocedureforresuming
operationisasfollows:
•Youarenotpromptedtotypethepasswordwhenresumingoperation.
•Ifanyharddiskdriveorsolid-statedrivehasapassword,itisunlockedautomaticallywhenyouresume
operation.
Note:IfaWindowspasswordhasbeenset,youwillbepromptedtoenterit.
Typingpasswords
Ifthisiconisdisplayed,typeapower-onpasswordorasupervisorpassword.
Ifthisiconisdisplayed,typeauserharddiskpassword.Ifyouwanttotypeamasterharddisk
password,dothefollowing:
©CopyrightLenovo2013 43

1.PressF1.Theiconchangestothis:
2.Typethemasterharddiskpassword.
Note:Toreturntotheicon,pressF1again.
Note:PresstheBackspacekeyifyouenterawrongpasswordwhileyouaretypingyourpassword.
Power-onpassword
Youcansetapower-onpasswordtohelpprotectyourcomputeragainstaccessbyunauthorizedusers.
Ifyousetapower-onpassword,thepasswordpromptisdisplayedonthescreenwheneveryouturnonthe
computer.Youmustenterthecorrectpasswordtostartusingthecomputer.
Settingapower-onpassword
1.Printtheseinstructions.
2.Saveallopenles,andexitallapplications.
3.Turnyourcomputeroffandthenturnitonagain.
4.Whenthelogoscreenisdisplayed,pressF1.TheThinkPadSetupprogrammainmenuopens.
5.SelectSecurity,usingthecursordirectionalkeystomovedownthemenu.
6.SelectPassword.
7.SelectPower-onPassword.
8.IntheEnterNewPasswordeld,typeadesiredpassword,andpressEnter.
9.IntheConrmNewPasswordeld,retypethepasswordandpressEnter.
Note:Youmightwanttorecordyourpasswordandstoreitinasafeplace.Otherwise,ifyouforgetit,
youhavetotakeyourcomputertoaLenovoreselleroramarketingrepresentativetohavethepassword
canceled.
10.IntheSetupNoticewindowthatisdisplayed,pressEntertocontinue.
11.PressF10.TheSetupConrmationwindowopens.SelectYestosavecongurationchangesandexit.
Changingorremovingthepower-onpassword
Tochangethepower-onpassword,followsteps1through7.Enteryourcurrentpassword.WhentheEnter
NewPasswordeldisdisplayed,typeanewpasswordintheeldandthenretypeittoverify.Toremove
thepassword,followsteps1through7.Typeyourcurrentpassword.WhentheEnterNewPasswordeld
isdisplayed,leaveitblankandpressEntertwice.
Harddiskpasswords
Twotypesofharddiskpasswordshelpprotecttheinformationstoredontheharddiskdrive:
•Userharddiskpassword
•Masterharddiskpassword,whichrequiresauserharddiskpassword
Ifauserharddiskpasswordhasbeenset,butnomasterharddiskpasswordhasbeen,theusermustenter
theuserharddiskpasswordinordertogainaccesstolesandapplicationsontheharddiskdrive.
Themasterpasswordcanbesetandusedonlybyasystemadministrator.Likeamasterkey,itenablesthe
administratortogetaccesstoanyharddiskdriveinasystem.Theadministratorsetsthemasterpassword;
nooneelseknowsit.Thentheadministratorsetsauserpasswordforeachcomputerinthenetwork,and
44UserGuide

tellseachuserthepasswordforhisorhercomputer.Theusercanthenchangetheuserpasswordas
desired,buttheadministratorstillcangetaccessbyusingthemasterpassword.
Note:Whenamasterharddiskpasswordisset,onlytheadministratorcanremovetheuserharddisk
password.
Settingaharddiskpassword
1.Printtheseinstructions.
2.Saveallopenles,andexitallapplications.
3.Turnyourcomputeroffandthenonagain.
4.Whenthelogoscreenisdisplayed,pressF1.TheThinkPadSetupprogrammainmenuopens.
5.SelectSecurity,usingthecursordirectionalkeystomovedownthemenu.
6.SelectPassword.
7.SelectHardDisk1PasswordorHardDisk2Password.
8.Apasswordwindowopens.Y ouarepromptedtoselectUserorUser+Master.SelectUserifyouwant
tosetonlyoneharddiskpassword.Ifyouareanadministratororsupervisor,youcanselectUser+
Mastertosettwopasswords.(Theusercanchangetheuserpasswordlater.)
•IfyouselectUser+Master,dothefollowing:
a.Whenawindowfortypingthenewuserharddiskpasswordopens,typeyournewpasswordin
theEnterNewPasswordeld.PressEnter.
b.IntheConrmNewPasswordeld,retypethepasswordyoujustenteredtoverifyit.PressEnter.
c.Amessagewindowopensandpromptsyoutosetthemasterharddiskpassword.PressEnterto
continue.
d.Awindowfortypingthenewmasterharddiskpasswordopens.Typeyournewpasswordin
theEnterNewPasswordeld.PressEnter.
e.IntheConrmNewPasswordeld,retypethepasswordyoujustenteredtoverifyit.PressEnter.
•IfyouselectUseronly,dothefollowing:
a.Whenawindowfortypingthenewpasswordopens,typeyournewpasswordintheEnterNew
Passwordeld.PressEnter.
Notes:
–YoucansettheminimumlengthofaharddiskpasswordthroughtheSecuritymenu.
–Ifyousetaharddiskpasswordofoversevencharacters,theharddiskdrivecanbeusedonly
withacomputerthatcanrecognizeaharddiskpasswordofoversevencharacters.Ifyouthen
installtheharddiskdriveinacomputerthatcannotrecognizeaharddiskpasswordthat
containsmorethansevencharacters,youcannotgetaccesstothedrive.
b.IntheConrmNewPasswordeld,retypethepasswordyoujustenteredtoverifyit.PressEnter.
Attention:Youmightwanttonotedownyourpasswordsandkeeptheminasafeplace.Otherwise,if
youforgettheuserpassword,orbothuserandmasterpasswords,Lenovocannotresetyourpasswords
orrecoverdatafromtheharddiskdrive.YoumusttakeyourcomputertoaLenovoresellerora
marketingrepresentativetohavetheharddiskdrivereplaced.Proofofpurchaseisrequired,andafee
willbechargedforpartsandservice.
9.IntheSetupNoticewindowthatisdisplayed,pressEntertocontinue.
10.PressF10.TheSetupConrmationwindowopens.SelectYestosavecongurationchangesandexit.
Thenexttimeyouturnonyourcomputer,youwillhavetotypetheuserormasterharddiskpasswordin
ordertostartyourcomputerandgetaccesstoyouroperatingsystem.
Chapter4.Security45

Changingorremovingaharddiskpassword
Followsteps1through7in“Settingaharddiskpassword”onpage45,typingyourpasswordtogetaccess
totheThinkPadSetupprogram.
Tochangeorremovetheuserharddiskpassword,dothefollowing:
•Tochangetheharddiskpassword,typethecurrentpasswordintheEnterCurrentPasswordeld.Then
typethenewpasswordintheEnterNewPasswordeld,andretypethepasswordyoujustenteredto
verifyitintheConrmNewPasswordeld.PressEnter,andaSetupNoticewindowisdisplayed.Press
EntertoexitfromtheSetupNoticewindow.Theuserharddiskpasswordwillbechanged.
•Toremovetheharddiskpassword,typethecurrentpasswordintheEnterCurrentPasswordeld.Then
leavetheEnterNewPasswordandConrmNewPasswordeldsblank,andpressEnter.ASetup
Noticewindowisdisplayed.PressEntertoexitfromtheSetupNoticewindow.Theuserharddisk
passwordwillberemoved.
TochangeorremovetheUser+Masterharddiskpasswords,selectUserHDPorMasterHDP.
IfyouchooseUserHDP,dothefollowing:
•Tochangetheuserharddiskpassword,typethecurrentuserharddiskpasswordorthecurrentmaster
harddiskpasswordintheEnterCurrentPasswordeld.Thentypethenewuserharddiskpasswordin
theEnterNewPasswordeld,andretypethepasswordyoujustenteredtoverifyitintheConrmNew
Passwordeld.PressEnter,andaSetupNoticewindowisdisplayed.PressEntertoexitfromtheSetup
Noticewindow.Theuserharddiskpasswordischanged.
•Toremovetheuserharddiskpassword,typethecurrentmasterharddiskpasswordintheEnterCurrent
Passwordeld.ThenleavetheEnterNewPasswordandConrmNewPasswordeldsblank,and
pressEnter.ASetupNoticewindowisdisplayed.PressEntertoexitfromtheSetupNoticewindow.
Theuserharddiskpasswordwillberemoved.
IfyouchooseMasterHDP,dothefollowing:
•Tochangethemasterharddiskpassword,typethecurrentmasterharddiskpasswordintheEnter
CurrentPasswordeld.ThentypethenewmasterharddiskpasswordintheEnterNewPassword
eld,andretypethepasswordyoujustenteredtoverifyitintheConrmNewPasswordeld.Press
Enter,andaSetupNoticewindowisdisplayed.PressEntertoexitfromtheSetupNoticewindow.The
masterharddiskpasswordischanged.
•Toremovethemasterharddiskpassword,typethecurrentmasterharddiskpasswordintheEnter
CurrentPasswordeld.ThenleavetheEnterNewPasswordandConrmNewPasswordeldsblank,
andpressEnter.ASetupNoticewindowisdisplayed.PressEntertoexitfromtheSetupNoticewindow.
Boththeuserandmasterharddiskpasswordswillberemoved.
Supervisorpassword
ThesupervisorpasswordprotectsthesysteminformationstoredinThinkPadSetup.Withoutit,noonecan
changethecongurationofthecomputer.Itprovidesthefollowingsecurityfeatures:
•Ifasupervisorpasswordisset,apasswordpromptisdisplayedwhenyoutrytostarttheThinkPadSetup
program.Unauthorizeduserscannotgetaccesstocongurationdata.
•Thesystemadministratorcanusethesupervisorpasswordtogetaccesstoacomputereveniftheuserof
thatcomputerhassetapower-onpassword.Thesupervisorpasswordoverridesthepower-onpassword.
•Ifbothasupervisorpasswordandapower-onpasswordareset,youcandothefollowingonlyifyou
havethesupervisorpassword:
–Deletingthepower-onpassword
–Changingordeletingthesupervisorpassword
46UserGuide

–EnablingordisablingtheWakeonLANfeature
–EnablingordisablingtheInternalNetworkOptionROMfeature
–Changingdateandtime
–EnablingordisablingtheLockUEFIBIOSSettingsfeature
–EnablingordisablingthePasswordatunattendedbootfeature
–Specifyingtheminimumlengthforpower-onpasswordsandharddiskpasswords
–Changingthesettingforthesecuritychip
–EnablingordisablingtheBootDeviceListF12Optionfeature
–EnablingordisablingtheBootOrderLockfeature
–EnablingordisablingtheFlashBIOSUpdatingbyEnd-Usersfeature
–Enablingordisablingtheinternalnetworkdevice
–Enablingordisablingtheinternalwirelessdevice
–EnablingordisablingtheinternalBluetoothdevice
–EnablingordisablingtheSecuritymode
Notes:
•ThesystemadministratorcansetthesamesupervisorpasswordonmanyThinkPadnotebookcomputers
tomakeadministrationeasier.
•ByenablingtheLockUEFIBIOSSettingsfeatureonthePasswordmenuwhenyousetthesupervisor
password,youmakeitimpossibleforanyonebutyoutomakechanges.
Setting,changing,orremovingasupervisorpassword
Onlyasystemadministratorcanset,change,orremoveasupervisorpassword.
Toset,change,orremoveasupervisorpassword,dothefollowing:
1.Printtheseinstructions.
2.Saveallopenles,andexitallapplications.
3.Turnyourcomputeroffandthenturnitonagain.
4.Whenthelogoscreenisdisplayed,pressF1.TheThinkPadSetupprogrammainmenuopens.
5.SelectSecurity,usingthecursordirectionalkeystomovedownthemenu.
6.SelectPassword.
7.SelectSupervisorPassword.
8.Awindowopens,promptingyoutoenteranewpassword.Dependingonyourneeds,dooneofthe
following:
•Tosetapassword,dothefollowing:
a.IntheEnterNewPasswordeld,typeadesiredpasswordandpressEnter.
b.IntheConrmNewPasswordeld,retypethepasswordandpressEnter.
•Tochangeapassword,dothefollowing:
a.IntheEnterCurrentPasswordeld,typethecurrentsupervisorpasswordandpressEnter.
b.IntheEnterNewPasswordeld,typethenewsupervisorpassword;thenretypethepassword
youjustenteredtoverifyitintheConrmNewPasswordeld.PressEnter.
•Toremoveapassword,dothefollowing:
a.IntheEnterCurrentPasswordeld,typethecurrentsupervisorpasswordandpressEnter.
Chapter4.Security47

b.LeavetheEnterNewPasswordandConrmNewPasswordeldsblank.PressEnter.
Attention:Youmightwanttonotedownyourpasswordandkeepitinasafeplace.Ifyouforgetyour
supervisorpassword,Lenovocannotresetyourpassword.YoumusttakeyourcomputertoaLenovo
reselleroraLenovomarketingrepresentativetohavethesystemboardreplaced.Proofofpurchaseis
required,andafeewillbechargedforpartsandservice.
9.IntheSetupNoticewindowthatisdisplayed,pressEntertocontinue.
10.PressF10.TheSetupConrmationwindowopens.SelectYestosavecongurationchangesandexit.
ThenexttimeyouopentheThinkPadSetupprogram,youwillbepromptedtotypeyourpasswordtoproceed.
Harddisksecurity
Toprotectpasswordsfromunauthorizedsecurityattacks,severalofthelatesttechnologiesandalgorithms
areintegratedintoUEFIBIOSandhardwaredesignofThinkPadnotebookcomputers.
Tomaximizesecurity,dothefollowing:
•Setapower-onpasswordaswellasaharddiskpasswordforyourinternalsolid-statedriveorharddisk
drive.Refertotheproceduresin“Power-onpassword”onpage44 and“Harddiskpasswords”onpage
44.Forsecurity,alongerpasswordisrecommended.
•ToprovidereliablesecurityforUEFIBIOS,usethesecuritychipandasecurityapplicationwithaTrusted
PlatformModule(TPM)managementfeature.Referto“Settingthesecuritychip”onpage49.
Note:TheWindows7andWindows8operatingsystemsupportstheTPMmanagementfeature.
•Ifaharddiskdriveorsolid-statedrivewithencryptiontechnologyisinstalledinyourcomputer,besure
toprotectthecontentsofyourcomputermemoryfromunauthorizedaccessbyuseofdriveencryption
software,suchasMicrosoftWindowsBitLocker ®DriveEncryption,whichissupportedintheUltimateand
EnterpriseeditionsoftheWindows7operatingsystemandProfessionalandEnterpriseeditionsofthe
Windows8operatingsystem.See“UsingWindowsBitLockerDriveEncryption”onpage48 .
•Beforeyoudisposeof,sell,orhandoveryourcomputer,besuretodeletedatastoredonit.Referto
“Noticeondeletingdatafromyourharddiskdriveorsolid-statedrive”onpage52 .
Note:TheharddiskdrivebuiltintoyourcomputercanbeprotectedbyUEFIBIOS.
UsingWindowsBitLockerDriveEncryption
Tohelpprotectyourcomputeragainstunauthorizedaccess,besuretousedriveencryptionsoftware,such
asWindowsBitLockerDriveEncryption.
WindowsBitLockerDriveEncryptionisanintegralsecurityfeatureoftheWindows7andWindows8
operatingsystems.ItissupportedintheUltimateandEnterpriseeditionsoftheWindows7andProfessional
andEnterpriseeditionsoftheWindows8operatingsystem.
BitLockerusesaTrustedPlatformModuletoprovideenhancedprotectionforyourdataandtoensureearly
bootcomponentintegrity.AcompatibleTPMisdenedasaV1.2TPM.
TochecktheBitLockerstatus,gotoControlPanel,andclickSystemandSecurity➙BitLockerDrive
Encryption.
FordetailsaboutWindowsBitLockerDriveEncryption,seetheWindowsHelpandSupport,orsearchfor
“MicrosoftWindowsBitLockerDriveEncryptionStep-by-StepGuide”ontheMicrosoftWebsite.
48UserGuide

DiskEncryptionharddiskdriveandEncryptionsolid-statedrive
SomemodelscontaintheDiskEncryptionharddiskdriveorEncryptionsolid-statedrive.Thisfeature
helpstoprotectyourcomputeragainstsecurityattacksonmedia,NANDashordevicecontrollersbyuse
ofahardwareencryptionchip.Fortheefcientuseoftheencryptionfeature,besuretosetaharddisk
passwordfortheinternalstoragedevice.
Settingthesecuritychip
Strictsecurityrequirementsareimposedonnetworkclientcomputersthattransfercondentialinformation
electronically.Dependingontheoptionsyouordered,yourcomputermighthaveanembeddedsecurity
chip,acryptographicmicroprocessor.Withthesecuritychip,youcandothefollowing:
•Protectyourdataandsystem
•Strengthenaccesscontrols
•Securecommunications
Settingthesecuritychip
ThechoicesofferedontheSecurityChipsubmenuundertheSecuritymenuofThinkPadSetupareas
follows:
•SecurityChip:activate,inactivate,ordisablethesecuritychip.
•SecurityReportingOptions:enableordisableeachsecurityreportingoption.
•ClearSecurityChip:cleartheencryptionkey.
Notes:
1.EnsurethatthesupervisorpasswordhasbeensetinThinkPadSetup.Otherwiseanyonecanchange
thesettingsforthesecuritychip.
2.IfyouareusingClientSecuritySolution,handlethesecuritychipbydoingthefollowing:
•Donotclearthesecuritychip.Ifyoudo,thefunctionsassignedtothekeyswillbeerased.
•Donotdisablethesecuritychip.Ifyoudo,ClientSecuritySolutionwillnotwork.
3.Ifthesecuritychipisremovedorreplaced,oranewonehasbeenadded,thecomputerwillnotstart.
Youwillhearfourcyclesoffourbeepseach.
4.Ifthesecuritychipisinactiveordisabled,theClearSecurityChipoptionwillnotbedisplayed.
5.Whenyouclearthesecuritychip,besuretoturnyourcomputeroffandthenturnitonagainafteryou
setthesecuritychiptoActive.Otherwise,theClearSecurityChipoptionisnotdisplayed.
TosetanitemontheSecurityChipsubmenu,dothefollowing:
1.Printtheseinstructions.
2.Saveallopenles,andexitallapplications.
3.Turnyourcomputeroffandthenturnitonagain.
4.Whenthelogoscreenisdisplayed,pressF1.TheThinkPadSetupprogrammainmenuopens.
5.Usingthecursorkeys,movetoSecurity.TheSecuritymenuopens.
6.Usingthecursorkeys,movetoSecurityChip,andpressEnter.TheSecurityChipsubmenuopens.
7.Usingthecursorkeys,movetoanitemyouwanttoset.Whentheitemishighlighted,pressEnter.
8.Setotheritemsthatyouwanttoset.
9.PressF10tosavechangesandexit.
10.PressEnterintheSetupConrmationwindowtoconrmtheexit.
Chapter4.Security49

Usingthengerprintreader
Yourcomputerhasanintegratedngerprintreader.Fingerprintauthenticationcanreplacepasswordsand
enablesimpleandsecureuseraccess.ByenrollingyourngerprintandassociatingitwithaWindows
passwordyoucanlogontothecomputerbyswipingyourngeroverthereader,withouttypingpasswords.
Enrollingyourngerprint
Tousetheintegratedngerprintreader,beginbyenrollingyourngerprintasfollows:
1.Turnonyourcomputer.
2.Doeitherofthefollowing:
•IfyoursystemisinstalledwiththeWindows7operatingsystem,tostarttheLenovoFingerprint
software,referto“AccessingLenovoprogramsontheWindows7operatingsystem”onpage12.
•IfyoursystemisinstalledwiththeWindows8operatingsystem,tostarttheLenovoFingerprint
software,referto“AccessingLenovoprogramsontheWindows8operatingsystem”onpage14 .
3.Followtheinstructionsonthescreentoenrollyourngerprint.Fordetails,refertothehelpinformation
systemfortheprogram.
Swipingyourngeroverthereader
Toswipeyourngeroverthereader,dothefollowing:
1.Placetheballofyournger(thecentralpartofthengerprint)onthesmallcircleabovethereader.
Ensurethattheentiretopjointofthengerisonthereader.
Note:Yourcomputerkeyboardmightlookdifferentfromtheillustrationabove.
50UserGuide

2.Applylightpressureandswipeyourngeracrossthereaderinonesmoothmotion.
Note:Yourcomputerkeyboardmightlookdifferentfromtheillustrationabove.
Maintainingthengerprintreader
Thefollowingactionscoulddamagethengerprintreaderorcauseitnottoworkproperly:
•Scratchingthesurfaceofthereaderwithahard,pointedobject.
•Scrapingthesurfaceofthereaderwithyourngernailoranythinghard.
•Usingortouchingthereaderwithadirtynger.
Ifyounoticeanyofthefollowingconditions,gentlycleanthesurfaceofthereaderwithadry,soft,lint-free
cloth:
•Thesurfaceofthereaderisdirtyorstained.
•Thesurfaceofthereaderiswet.
•Thereaderoftenfailstoenrollorauthenticateyourngerprint.
Ifyourngerhasanyofthefollowingconditions,youmightnotbeabletoregisterorauthenticateit:
•Yourngeriswrinkled.
•Yourngerisrough,dry,orinjured.
•Yourngerisstainedwithdirt,mud,oroil.
•Thesurfaceofyourngerisverydifferentfromwhenyouenrolledyourngerprint.
•Yourngeriswet.
•Angerthathasnotbeenenrolledisused.
Toimprovethesituation,trythefollowing:
•Cleanorwipeyourhandstoremoveanyexcessdirtormoisturefromthengers.
•Enrollanduseadifferentngerforauthentication.
•Ifyourhandsaretoodry,applylotiontothem.
Chapter4.Security51

Noticeondeletingdatafromyourharddiskdriveorsolid-statedrive
Ascomputersspreadintoeverycorneroflife,theyprocessmoreandmoreinformation.Thedataonyour
computer,someofwhichmightbesensitive,isstoredonaharddiskdriveorsolid-statedrive.Beforeyou
disposeof,sell,orhandoveryourcomputer,besuretodeletedatastoredonit.
Handingyourcomputerovertosomeoneelsewithoutdeletingtheloadedsoftware,suchasoperating
systemsandapplicationsoftware,mightevenviolatelicenseagreements.Youareadvisedtocheckthe
termsandconditionsofthoselicenseagreements.
Therearemethodsthatseemtodeletethedata:
•Movethedatatotherecyclebin,andthenclickEmptyrecyclebin.
•UsetheDeleteoption.
•Formatyourharddiskdriveorsolid-statedrive,usingthesoftwareforinitializingit.
•Usingtherecoveryprogram,bringtheharddiskdriveorsolid-statedrivebacktothefactorydefault
settings.
Theseoperations,however,onlychangetheleallocationofthedata;theydonotdeletethedataitself.In
otherwords,thedataretrievalprocessingisdisabledunderanoperatingsystemsuchasWindows.The
dataisstillthere,eventhoughitseemstobelost.Thus,itissometimespossibletoreadthedatabyuseof
specialsoftwarefordatarecovery.Thereisariskthatpeopleofbadfaithmightreadandmisusethecritical
dataonharddiskdrivesorsolid-statedrivesforunexpectedpurposes.
Topreventleakageofdata,itbecomesveryimportantthatyoutakeresponsibilityfordeletingallthedata
fromtheharddiskdriveorsolid-statedrivewhenyoudisposeof,sell,orhandoveryourcomputer.Y ou
candestroythedataphysicallybysmashingtheharddiskdriveorsolid-statedrivewithahammer,or
magneticallybymeansofstrongmagneticpower,thusmakingthedataunreadable.Butwerecommend
thatyoumakeuseofthesoftware(payware)orservice(payservice)specicallydevelopedforthepurpose.
Fordisposingofdataontheharddiskdriveorsolid-statedrive,LenovoprovidestheSecureDataDisposal
tool.Todownloadtheapplication,goto:
http://www.lenovo.com/support
Note:Runningeitherapplicationwilltakeacoupleofhours.
Usingrewalls
Ifyoursystemispreinstalledwitharewallprogram,itprotectsagainstcomputerInternetsecuritythreats,
unauthorizedaccesses,intrusions,andInternetattacks.Italsoprotectsyourprivacy.
Formoreinformationabouthowtousetherewallprogram,refertothehelpinformationsystemthat
comeswiththeprogram.
Protectingdataagainstviruses
Yourcomputerispreinstalledwithanantivirusprogramsoyoucandetectandeliminateviruses.The
antivirusprogramisdesignedtohelpyoudetectandeliminateviruses.
Lenovoprovidesafullversionofantivirussoftwareonyourcomputerwithafree30-daysubscription.After
30days,youmustrenewthelicensetocontinuereceivingtheantivirussoftwareupdates.
52UserGuide

Formoreinformationabouthowtouseyourantivirussoftware,refertothehelpinformationsystemof
yourantivirussoftware.
Chapter4.Security53

54UserGuide

Chapter5.Recoveryoverview
ThischapterprovidesinformationabouttherecoverysolutionsprovidedbyLenovo.
•“RecoveryoverviewfortheWindows7operatingsystem”onpage55
•“RecoveryoverviewfortheWindows8operatingsystem”onpage60
RecoveryoverviewfortheWindows7operatingsystem
ThissectionprovidesinformationabouttherecoverysolutionsprovidedbyLenovoontheWindows7
operatingsystem.
Notes:
•Thereareavarietyofmethodstochoosefromwhenconsideringhowtorecoverintheeventofasoftware-
orhardware-relatedproblem.Somemethodsvarydependingonthetypeofyouroperatingsystem.
•Theproductontherecoverymediamightbeusedonlyforthefollowingpurposes:
–Restoretheproductpreinstalledonyourcomputer
–Reinstalltheproduct
–ModifytheproductusingtheAdditionalFiles
Notes:T opreventpotentialperformancerisksorunexpectedbehaviorthatmightbecausedbythenew
harddiskdrivetechnology,itisrecommendedthatyouuseoneofthefollowingback-upsoftwareprograms:
•ThinkVantageRescueandRecoveryversion4.3orlater
•SymantecNortonGhostversion15orlater
Notes:Tousethisprogram,dothefollowing:
1.ClickStart➙Run.TheRunwindowopens.
2.T ypecmdintheeld.ThenclickOK.
3.T ypeghost-align=1mbandpressEnter.
•AcronisTrueImage2010orlater
•ParagonBackup&Recovery10Suitorlater,ParagonBackup&Recovery10Homeorlater
Creatingandusingarecoverymedia
Youcanuserecoverymediatorestoretheharddiskdrivetothefactorydefaultsettings.Recoverymedia
areusefulifyoutransferthecomputertoanotherarea,sellthecomputer,recyclethecomputer,orputthe
computerinanoperationalstateafterallothermethodsofrecoveryhavefailed.Asaprecautionarymeasure,
itisimportanttocreaterecoverymediaasearlyaspossible.
Note:Therecoveryoperationsyoucanperformusingrecoverymediavarydependingontheoperating
systemfromwhichtherecoverymediawerecreated.Therecoverymediamightcontainabootmedium
andadatamedium.YourMicrosoftWindowslicensepermitsyoutocreateonlyonedatamedium,soitis
importantthatyoustoretherecoverymediainasafeplaceafteryouhavemadethem.
Creatingrecoverymedia
Thissectionprovidesinstructionsonhowtocreaterecoverymedia.
Note:YoucancreaterecoverymediausingdiscsorexternalUSBstoragedevices.
©CopyrightLenovo2013 55

Performingarecoveryoperation
ThissectionprovidesinstructionsonhowtoperformarecoveryoperationusingtheRescueandRecovery
program.
1.FromtheWindowsdesktop,clickStart➙AllPrograms➙LenovoThinkVantageT ools➙Enhanced
BackupandRestore.TheRescueandRecoveryprogramopens.
2.IntheRescueandRecoveryprogrammainwindow,clicktheLaunchadvancedRescueandRecovery
arrow.
3.ClicktheRestoreyoursystemfromabackupicon.
4.Followtheinstructionsonthescreentocompletetherecoveryoperation.
FormoreinformationaboutperformingarecoveryoperationfromtheRescueandRecoveryworkspace,see
“UsingtheRescueandRecoveryworkspace”onpage57.
UsingtheRescueandRecoveryworkspace
TheRescueandRecoveryworkspaceresidesinaprotected,hiddenareaofyourharddiskdrivethat
operatesindependentlyfromtheWindowsoperatingsystem.Thisenablesyoutoperformrecovery
operationsevenifyoucannotstarttheWindowsoperatingsystem.Y oucanperformthefollowingrecovery
operationsfromtheRescueandRecoveryworkspace:
•Rescuelesfromyourharddiskdriveorfromabackup
TheRescueandRecoveryworkspaceenablesyoutolocatelesonyourharddiskdriveandtransfer
themtoanetworkdriveorotherrecordablemedia,suchasaUSBdeviceoradisc.Thissolutionis
availableevenifyoudidnotbackupyourlesorifchangesweremadetothelessinceyourlastbackup
operation.Y oualsocanrescueindividuallesfromaRescueandRecoverybackuplocatedonyourlocal
harddiskdrive,aUSBdevice,oranetworkdrive.
•RestoreyourharddiskdrivefromaRescueandRecoverybackup
IfyouhavebackedupyourharddiskdriveusingtheRescueandRecoveryprogram,youcanrestorethe
harddiskdrivefromaRescueandRecoverybackup,evenifyoucannotstarttheWindowsoperating
system.
•Restoreyourharddiskdrivetothefactorydefaultsettings
TheRescueandRecoveryworkspaceenablesyoutorestorethecompletecontentsofyourharddiskdrive
tothefactorydefaultsettings.Ifyouhavemultiplepartitionsonyourharddiskdrive,youhavetheoption
torestorethefactorydefaultsettingstotheC:partitionandleavetheotherpartitionsintact.Becausethe
RescueandRecoveryworkspaceoperatesindependentlyfromtheWindowsoperatingsystem,youcan
restorethefactorydefaultsettingsevenifyoucannotstarttheWindowsoperatingsystem.
Attention:IfyourestoretheharddiskdrivefromaRescueandRecoverybackuporrestoretheharddisk
drivetothefactorydefaultsettings,alllesontheprimaryharddiskdrivepartition(usuallydriveC:)willbe
deletedintherecoveryprocess.Ifpossible,makecopiesofimportantles.Ifyouareunabletostartthe
Windowsoperatingsystem,youcanusetherescuelesfeatureoftheRescueandRecoveryworkspaceto
copylesfromyourharddiskdrivetoothermedia.
T ostarttheRescueandRecoveryworkspace,dothefollowing:
1.Ensurethatthecomputeristurnedoff.
2.RepeatedlypressandreleasetheF11keywhenturningonthecomputer.Whenyouhearbeepsor
seealogoscreen,releasetheF11key.
3.IfyouhavesetaRescueandRecoverypassword,typeyourpasswordwhenprompted.TheRescue
andRecoveryworkspaceopensafterashortdelay.
Note:IftheRescueandRecoveryworkspacefailstoopen,see“Solvingrecoveryproblems”onpage59 .
Chapter5.Recoveryoverview57

4.Dooneofthefollowing:
•Torescuelesfromyourharddiskdriveorfromabackup,clickRescuelesandfollowthe
instructionsonthescreen.
•TorestoreyourharddiskdrivefromaRescueandRecoverybackuportorestoreyourharddiskdrive
tothefactorydefaultsettings,clickRestoreyoursystemandfollowtheinstructionsonthescreen.
FormoreinformationaboutthefeaturesoftheRescueandRecoveryworkspace,clickHelp.
Notes:
1.Afterrestoringyourharddiskdrivetothefactorydefaultsettings,youmighthavetoreinstalldevice
driversforsomedevices.See“Reinstallingpreinstalledapplicationsanddevicedrivers”onpage59.
2.SomecomputerscomewithMicrosoftOfceorMicrosoftWorkspreinstalled.Ifyouneedtorecover
orreinstallyourMicrosoftOfceorMicrosoftWorksapplications,youmustusetheMicrosoftOfce
CDorMicrosoftWorksCD.ThesediscsareprovidedonlywithcomputerspreinstalledwithMicrosoft
OfceorMicrosoftWorks.
Creatingandusingarescuemedium
Witharescuemedium,suchasadiscoraUSBharddiskdrive,youcanrecoverthecomputerfromfailures
thatpreventyoufromgainingaccesstotheRescueandRecoveryworkspaceonyourharddiskdrive.
Notes:
1.Therecoveryoperationsyoucanperformusingarescuemediumvarydependingontheoperating
system.
2.Therescuedisccanbestartedinalltypesofopticaldrives.
Creatingarescuemedium
Thissectionprovidesinstructionsonhowtocreatearescuemedium.
1.FromtheWindowsdesktop,clickStart➙AllPrograms➙LenovoThinkVantageTools➙Enhanced
BackupandRestore.TheRescueandRecoveryprogramopens.
2.IntheRescueandRecoverymainwindow,clicktheLaunchadvancedRescueandRecoveryarrow.
3.ClicktheCreateRescueMediaicon.TheCreateRescueandRecoveryMediawindowopens.
4.IntheRescueMediaarea,selectthetypeoftherescuemediumyouwanttocreate.Youcancreatea
rescuemediumusingadisc,aUSBharddiskdrive,orasecondaryinternalharddiskdrive.
5.ClickOKandfollowtheinstructionsonthescreentocreatearescuemedium.
Usingarescuemedium
Thissectionprovidesinstructionsonhowtousetherescuemediumyouhavecreated.
•Ifyouhavecreatedarescuemediumusingadisc,usethefollowinginstructionstousetherescuemedium:
1.Turnoffyourcomputer.
2.RepeatedlypressandreleasetheF12keywhenturningonthecomputer.WhentheBootMenu
windowopens,releasetheF12key.
3.IntheBootMenuwindow,selectthedesiredopticaldriveastherstbootdevice.Then,insertthe
rescuediscintotheopticaldriveandpressEnter.Therescuemediumstarts.
•IfyouhavecreatedarescuemediumusingaUSBharddiskdrive,usethefollowinginstructionsto
usetherescuemedium:
1.AttachtheUSBharddiskdrivetooneoftheUSBconnectorsonyourcomputer.
2.RepeatedlypressandreleasetheF12keywhenturningonthecomputer.WhentheBootMenu
windowopens,releasetheF12key.
58UserGuide

3.IntheBootMenuwindow,selecttheUSBharddiskdriveastherstbootdeviceandpressEnter.
Therescuemediumstarts.
Whentherescuemediumstarts,theRescueandRecoveryworkspaceopens.Thehelpinformationfor
eachfeatureisavailablefromtheRescueandRecoveryworkspace.Followtheinstructionstocomplete
therecoveryprocess.
Reinstallingpreinstalledapplicationsanddevicedrivers
Yourcomputerhasprovisionsthatenableyoutoreinstallselectedfactory-installedapplicationsanddevice
drivers.
Reinstallingpreinstalledapplications
Toreinstallselectedapplicationprograms,dothefollowing:
1.Turnonyourcomputer.
2.GototheC:\SWTOOL Sdirectory.
3.OpentheAPPSfolder.Initareseveralsubfoldersnamedforthevariouspreinstalledapplications.
4.Openthesubfolderfortheapplicationyouarereinstalling.
5.Double-clickSetup,andthenfollowtheon-screenstepstoreinstalltheprogram.
Reinstallingpreinstalleddevicedrivers
Attention:Whenyoureinstalldevicedrivers,youarechangingthecurrentcongurationofyourcomputer.
Reinstalldevicedriversonlywhenitisnecessarytocorrectaproblemwithyourcomputer.
Toreinstalladevicedriverforafactory-installeddevice,dothefollowing:
1.Turnonyourcomputer.
2.GototheC:\SWTOOL Sdirectory.
3.OpentheDRIVERSfolder.WithintheDRIVERSfolderareseveralsubfoldersnamedforthevarious
devicesinstalledinyourcomputer(forexample,AUDIOandVIDEO).
4.Openthesubfolderforthedevice.
5.Reinstallthedevicedriverbyoneofthefollowingmethods:
•Inthesubfolderforthedevice,lookforatextle(alewiththeextension.txt).Thetextlecontains
informationonhowtoreinstallthatdevicedriver.
•Ifthesubfolderforthedevicecontainsaleofsetupinformation(alewiththeextension.inf),you
canusetheAddNewHardwareprogram(intheWindowsControlPanel)toreinstallthedevicedriver.
Notalldevicedriverscanbereinstalledbyuseofthisprogram.IntheAddNewHardwareprogram,
whenpromptedforthedevicedriveryouwanttoinstall,clickHaveDiskandBrowse.Thenselect
thedevicedriverlefromthedevicesubfolder.
•Inthesubfolderforthedevice,lookfortheexecutablele(alewiththeextension.exe).Double-click
thele,andfollowtheinstructionsonthescreen.
Attention:Ifyouneedupdateddevicedrivers,donotdownloadthemfromtheWindowsUpdateWebsite.
ObtainthemfromLenovo.Formoreinformation,see“Makingsuredevicedriversarecurrent”onpage92.
Solvingrecoveryproblems
IfyouareunabletoaccesstheRescueandRecoveryworkspaceortheWindowsenvironment,doone
ofthefollowing:
•UsearescuemediumtostarttheRescueandRecoveryworkspace.See“Creatingandusingarescue
medium”onpage58.
Chapter5.Recoveryoverview59

•Userecoverymediaifallothermethodsofrecoveryhavefailedandyouneedtorestoretheharddisk
drivetothefactorydefaultsettings.See“Creatingandusingarecoverymedia”onpage55.
Note:IfyouareunabletoaccesstheRescueandRecoveryworkspaceortheWindowsenvironmentfroma
rescuemediumorrecoverymedia,youmightnothavetherescuedevice(aninternalharddiskdrive,adisc,
aUSBharddiskdrive,orotherexternaldevices)setastherstbootdeviceinthestartupdevicesequence.
Youmustrstensurethatyourrescuedeviceissetastherstbootdeviceinthestartupdevicesequencein
theThinkPadSetupprogram.See“Startupmenu”onpage85 fordetailedinformationabouttemporarilyor
permanentlychangingthestartupdevicesequence.
Itisimportanttocreatearescuemediumandasetofrecoverymediaasearlyaspossibleandstorethem
inasafeplaceforfutureuse.
RecoveryoverviewfortheWindows8operatingsystem
ThissectionprovidesinformationabouttherecoverysolutionsprovidedbyWindows8operatingsystem.
Refreshingyourcomputer
Ifyourcomputerdoesnotperformwellandtheproblemmightbecausedbyarecentlyinstalledprogram,
youcanrefreshyourcomputerwithoutlosingyourpersonallesorchangingyoursettings.
Attention:Ifyourefreshyourcomputer,theprogramsthatcamewithyourcomputerandtheprogramsthat
youinstalledfromWindowsStorewillbereinstalled,butallotherprogramswillberemoved.
Torefreshyourcomputer,dothefollowing:
1.Swipeinfromtherightedgeofthescreentodisplaythecharms.
2.TaptheSettingscharm.
3.TapChangePCsettings.
4.TapGeneral.
5.IntheRefreshyourPCwithoutaffectingyourlessection,clickGetstarted.
Resettingyourcomputertothefactorydefaultsettings
Youcanresetyourcomputertothefactorydefaultsettings.Resettingthecomputerwillreinstallthe
operatingsystem,andreinstallalltheprogramsandsettingsthatcamewithyourcomputer.
Attention:Ifyouresetyourcomputer,allyourpersonallesandsettingswillbedeleted.Toavoiddataloss,
makeabackupcopyofallthedatathatyouwanttokeep.
Toresetyourcomputer,dothefollowing:
1.Moveyourcursortothebottomrightcornerofthescreentobringupthecharms.ClickSettings
➙ChangePCsettings➙General.
2.IntheRemoveeverythingandreinstallWindowssection,clickGetstarted.
Advancedstartupoptions
AdvancedstartupoptionsenableyoutochangethestartupsettingsofyourWindowsoperatingsystem,
startthecomputerfromanexternaldevice,orrestoretheWindowsoperatingsystemfromasystemimage.
Tousetheadvancedstartupoptions,dothefollowing:
1.Moveyourcursortothebottomrightcornerofthescreentobringupthecharms.ClickSettings
➙ChangePCsettings➙General.
60UserGuide

2.IntheAdvancedstartupsection,clickRestartnow➙Troubleshoot➙Advancedoptions.
3.Restartyourcomputerfollowingtheinstructionsonthescreen.
FormoredetailsabouttherecoverysolutionsprovidedoncomputerspreinstalledwiththeWindows8
operatingsystem,refertothehelpinformationsystemoftheWindows8operatingsystem.
Chapter5.Recoveryoverview61

62UserGuide

Chapter6.Replacingdevices
Thischapterprovidesinstructionsonhowtoreplacedevicesforyourcomputer.
Thischaptercontainsthefollowingitems:
•“Staticelectricityprevention”onpage63
•“Disablingthebuilt-inbattery”onpage63
•“Replacingtheharddiskdriveorsolid-statedrive”onpage65
•“Replacingamemorymodule”onpage67
•“ReplacingaMiniPCIExpressCardforwirelessLANconnection”onpage68
•“Replacingthebackupbattery”onpage70
Staticelectricityprevention
Staticelectricity,althoughharmlesstoyou,canseriouslydamagecomputercomponentsandoptions.
Improperhandlingofstatic-sensitivepartscancausedamagetothepart.Whenyouunpackanoptionor
aCRU,donotopenthestatic-protectivepackagecontainingthepartuntiltheinstructionsdirectyou
toinstallthepart.
WhenyouhandleoptionsorCRUs,orperformanyworkinsidethecomputer,takethefollowingprecautions
toavoidstatic-electricitydamage:
•Limityourmovement.Movementcancausestaticelectricitytobuilduparoundyou.
•Alwayshandlecomponentscarefully.Handleadapters,memorymodules,andothercircuitboardsbythe
edges.Nevertouchexposedcircuitry.
•Preventothersfromtouchingcomponents.
•Whenyouinstallastatic-sensitiveoptionorCRU,touchthestatic-protectivepackagecontainingthe
parttoametalexpansion-slotcoverorotherunpaintedmetalsurfaceonthecomputerforatleasttwo
seconds.Thisreducesstaticelectricityinthepackageandyourbody.
•Whenpossible,removethestatic-sensitivepartfromthestatic-protectivepackageandinstallthepart
withoutsettingitdown.Whenthisisnotpossible,placethestatic-protectivepackageonasmooth,
levelsurfaceandplacethepartonthepackage.
•Donotplacethepartonthecomputercoverorothermetalsurface.
Disablingthebuilt-inbattery
BeforereplacinganyCRU,ensurethatyouhavedisabledthebuilt-inbatterybydoingthefollowing:
1.Turnoffyourcomputeranddisconnecttheacpoweradapterandallcablesfromthecomputer.
2.Turnonyourcomputer.PressF1toenterThinkPadSetupwhentheThinkPadlogoappears.
3.SelectCong➙Power.ThePowersubmenuisdisplayed.
4.SelectDisableBuilt-inBattery.
5.ClickYesintheSetupWarningwindow.Thenthecomputerwillautomaticallyturnedoff.Waitthreeto
veminutestoletthecomputercool.
©CopyrightLenovo2013 63
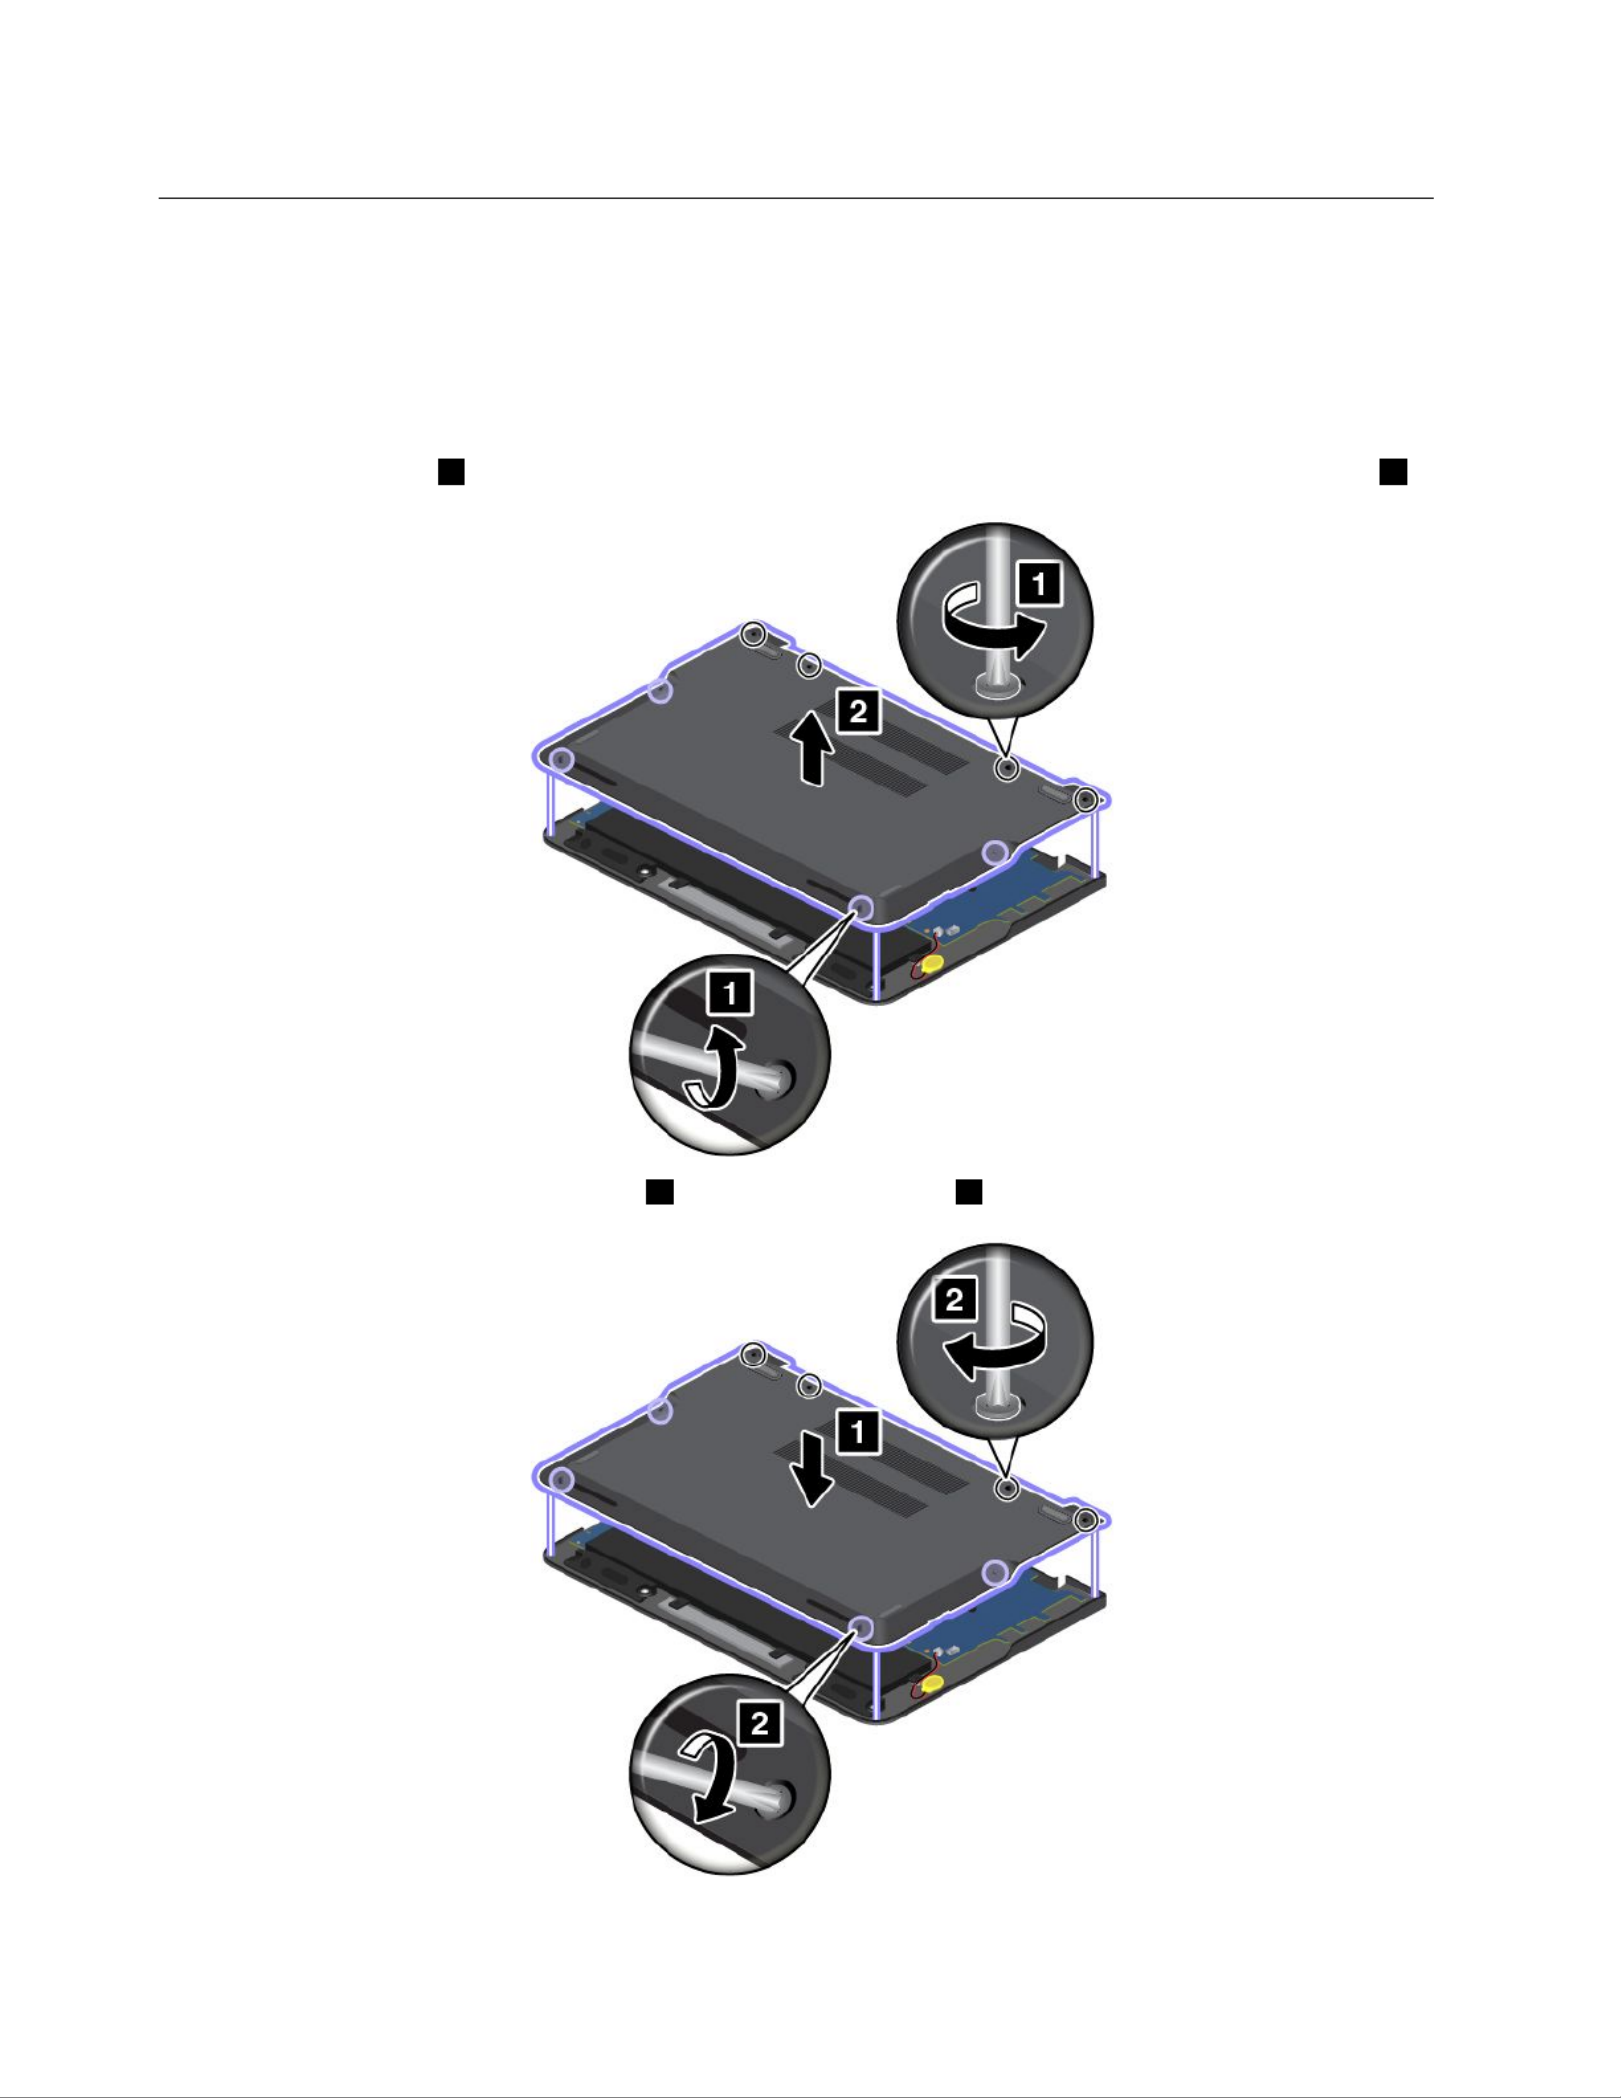
Replacingthebasecoverassembly
Beforeyoustart,printtheseinstructions.
Toreplacethebasecoverassembly,dothefollowing:
1.Disablethebuilt-inbattery.See“Disablingthebuilt-inbattery”onpage63.
2.Closethecomputerdisplay,andturnthecomputerover.
3.Loosenthescrews1thatsecurethebasecoverassembly.Thenremovethebasecoverassembly2.
4.Installthenewbasecoverassembly1andtightenthescrews2.
5.Turnthecomputeroveragain.Connecttheacpoweradapterandallcables.
64UserGuide
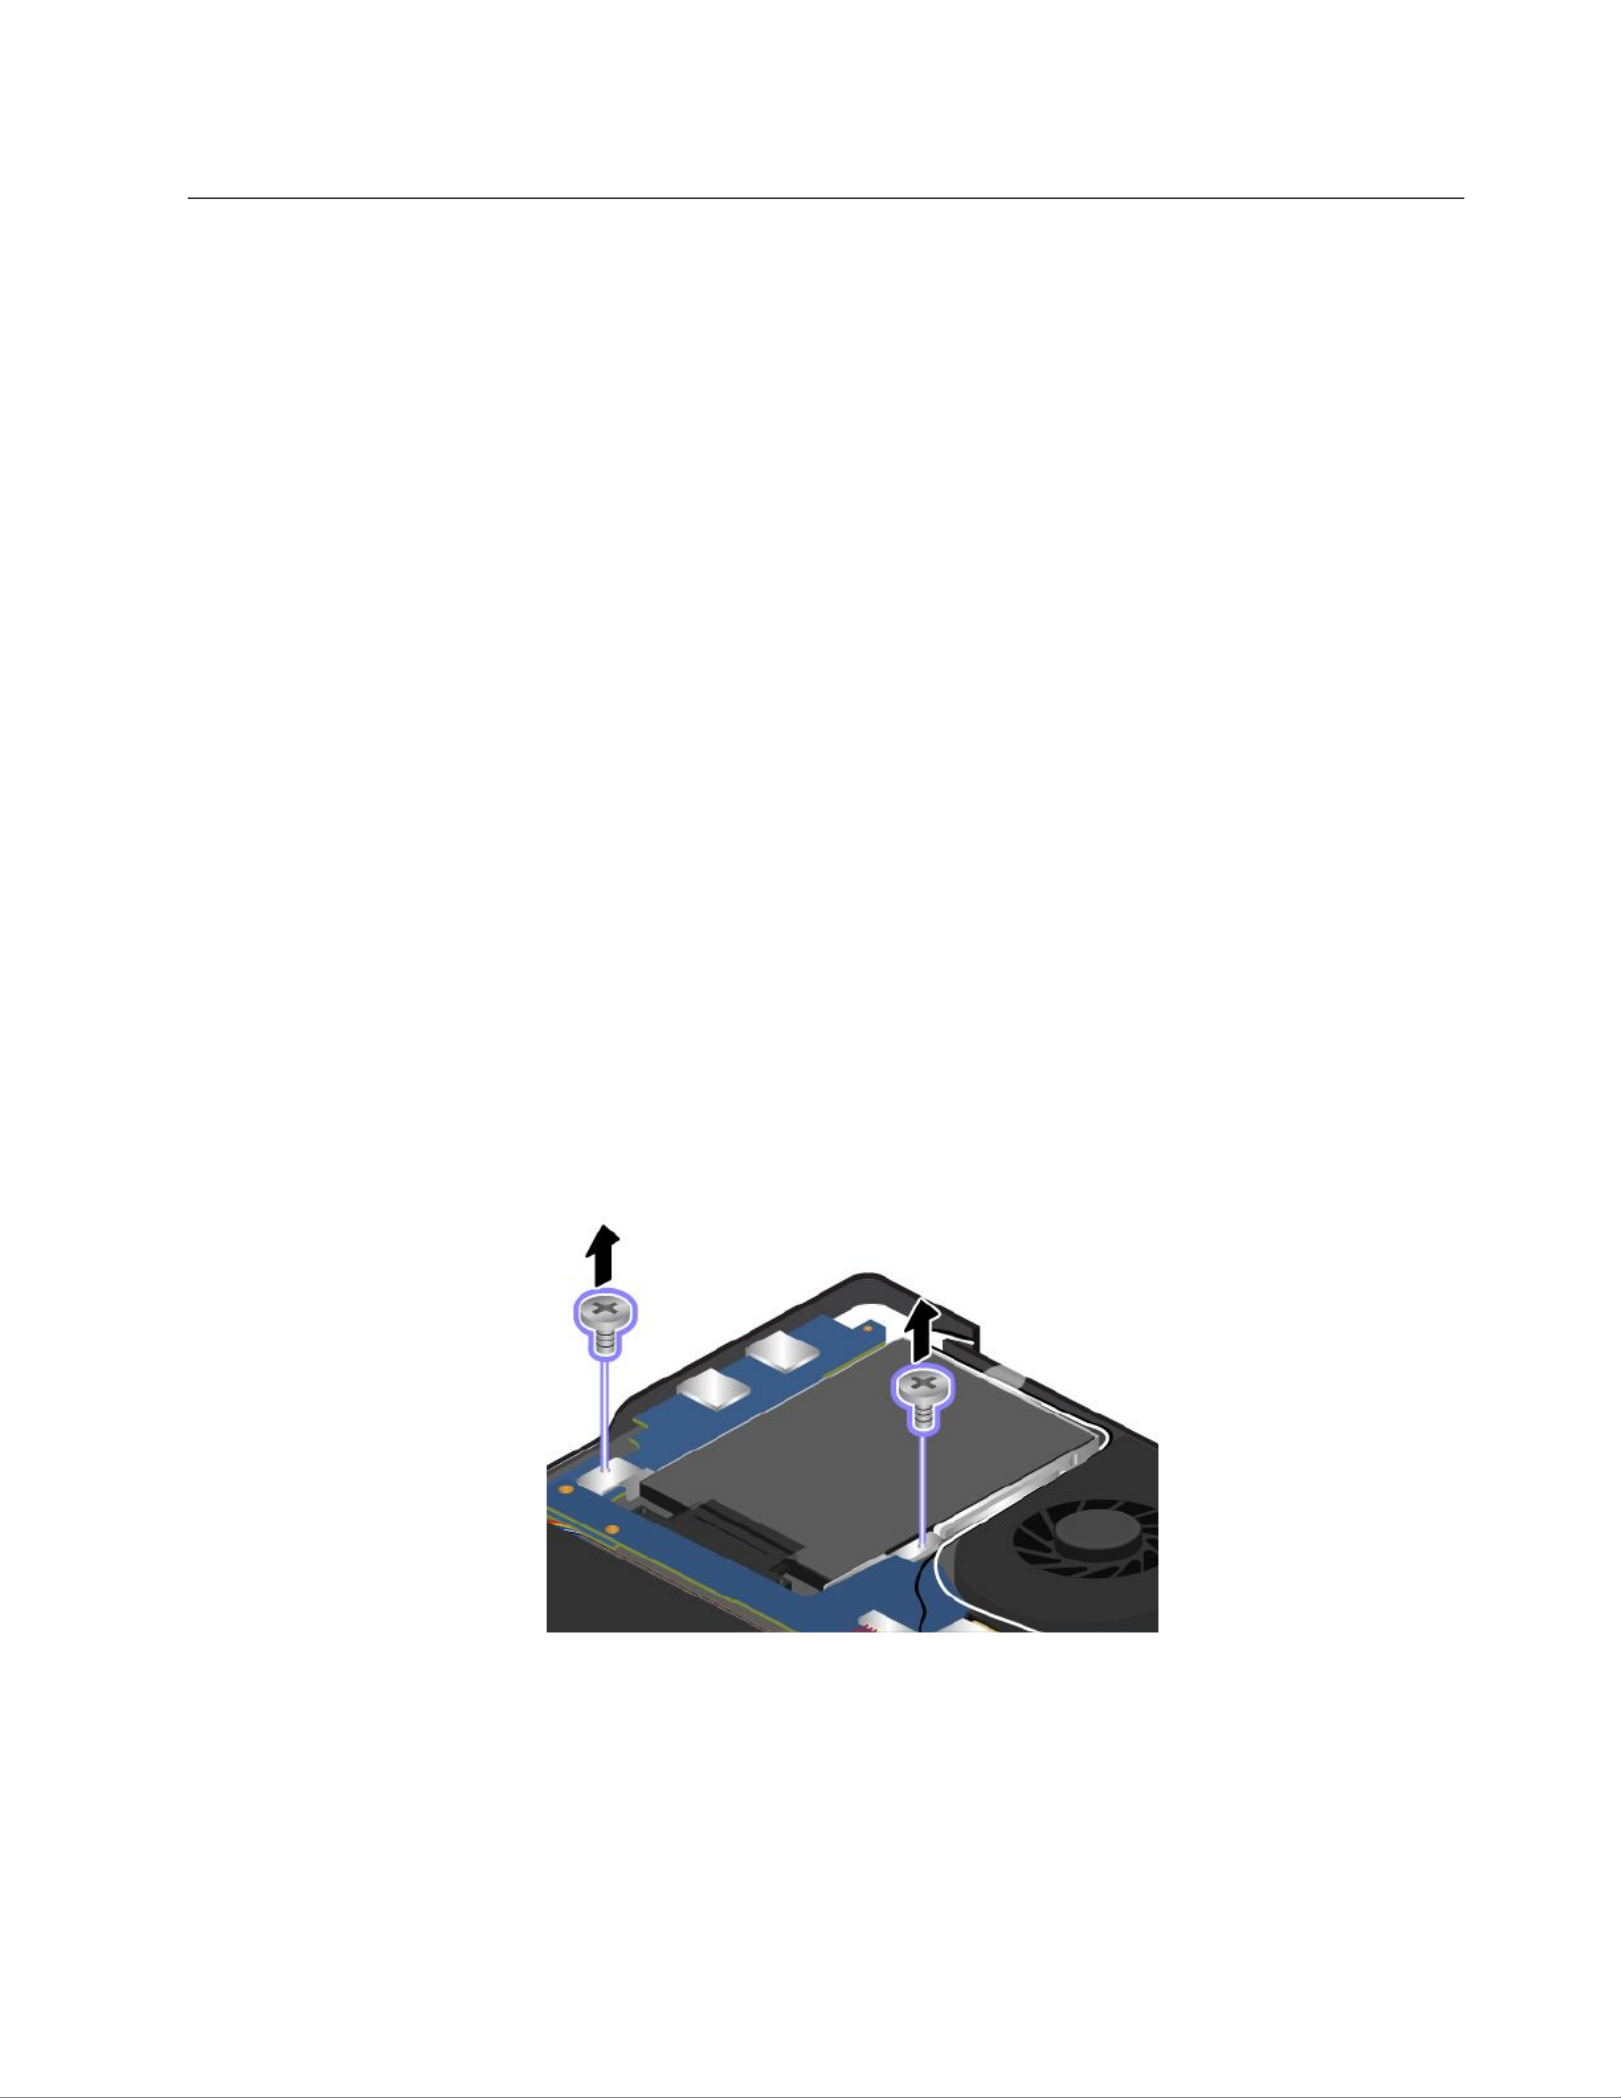
Replacingtheharddiskdriveorsolid-statedrive
Beforeyoustart,printtheseinstructions.
Attention:Theharddiskdriveisverysensitive.Incorrecthandlingcancausedamageandpermanentloss
ofdata.Observethefollowingguidelines:
•Replacetheharddiskdriveorsolid-statedriveonlyifyouupgradeitorhaveitrepaired.Theconnectors
andslotoftheharddiskdriveorsolid-statedrivearenotdesignedforfrequentchanges,ordrive
swapping.
•Donotdroptheharddiskorsolid-statedriveorsubjectittophysicalshocks.Puttheharddiskdriveor
solid-statedriveonamaterial,suchassoftcloth,thatabsorbsanyphysicalshocks.
•Donotapplypressuretothecoveroftheharddiskdriveorsolid-statedrive.
•Donottouchtheconnectors.
•Beforeremovingtheharddiskdriveorsolid-statedrive,makeabackupcopyofalltheinformation
onit,andthenturnthecomputeroff.
•Neverremovetheharddiskdriveorsolid-statedrivewhilethecomputerisoperating,insleepmode,
orinhibernationmode.
Toreplacetheharddiskdriveorsolid-statedrive,dothefollowing:
1.Disablethebuilt-inbattery.See“Disablingthebuilt-inbattery”onpage63.
2.Closethecomputerdisplay,andturnthecomputerover.
3.Removethebasecoverassembly.See“Replacingthebasecoverassembly”onpage64.
4.Removethescrewsthatsecuretheharddiskdriveorsolid-statedriveasshowntoreleaseitfromthe
connector.
Note:Dependingonthemodel,yourharddiskdriveorsolid-statedrivemightlookdifferentfrom
theillustrationsinthistopic.
Chapter6.Replacingdevices65
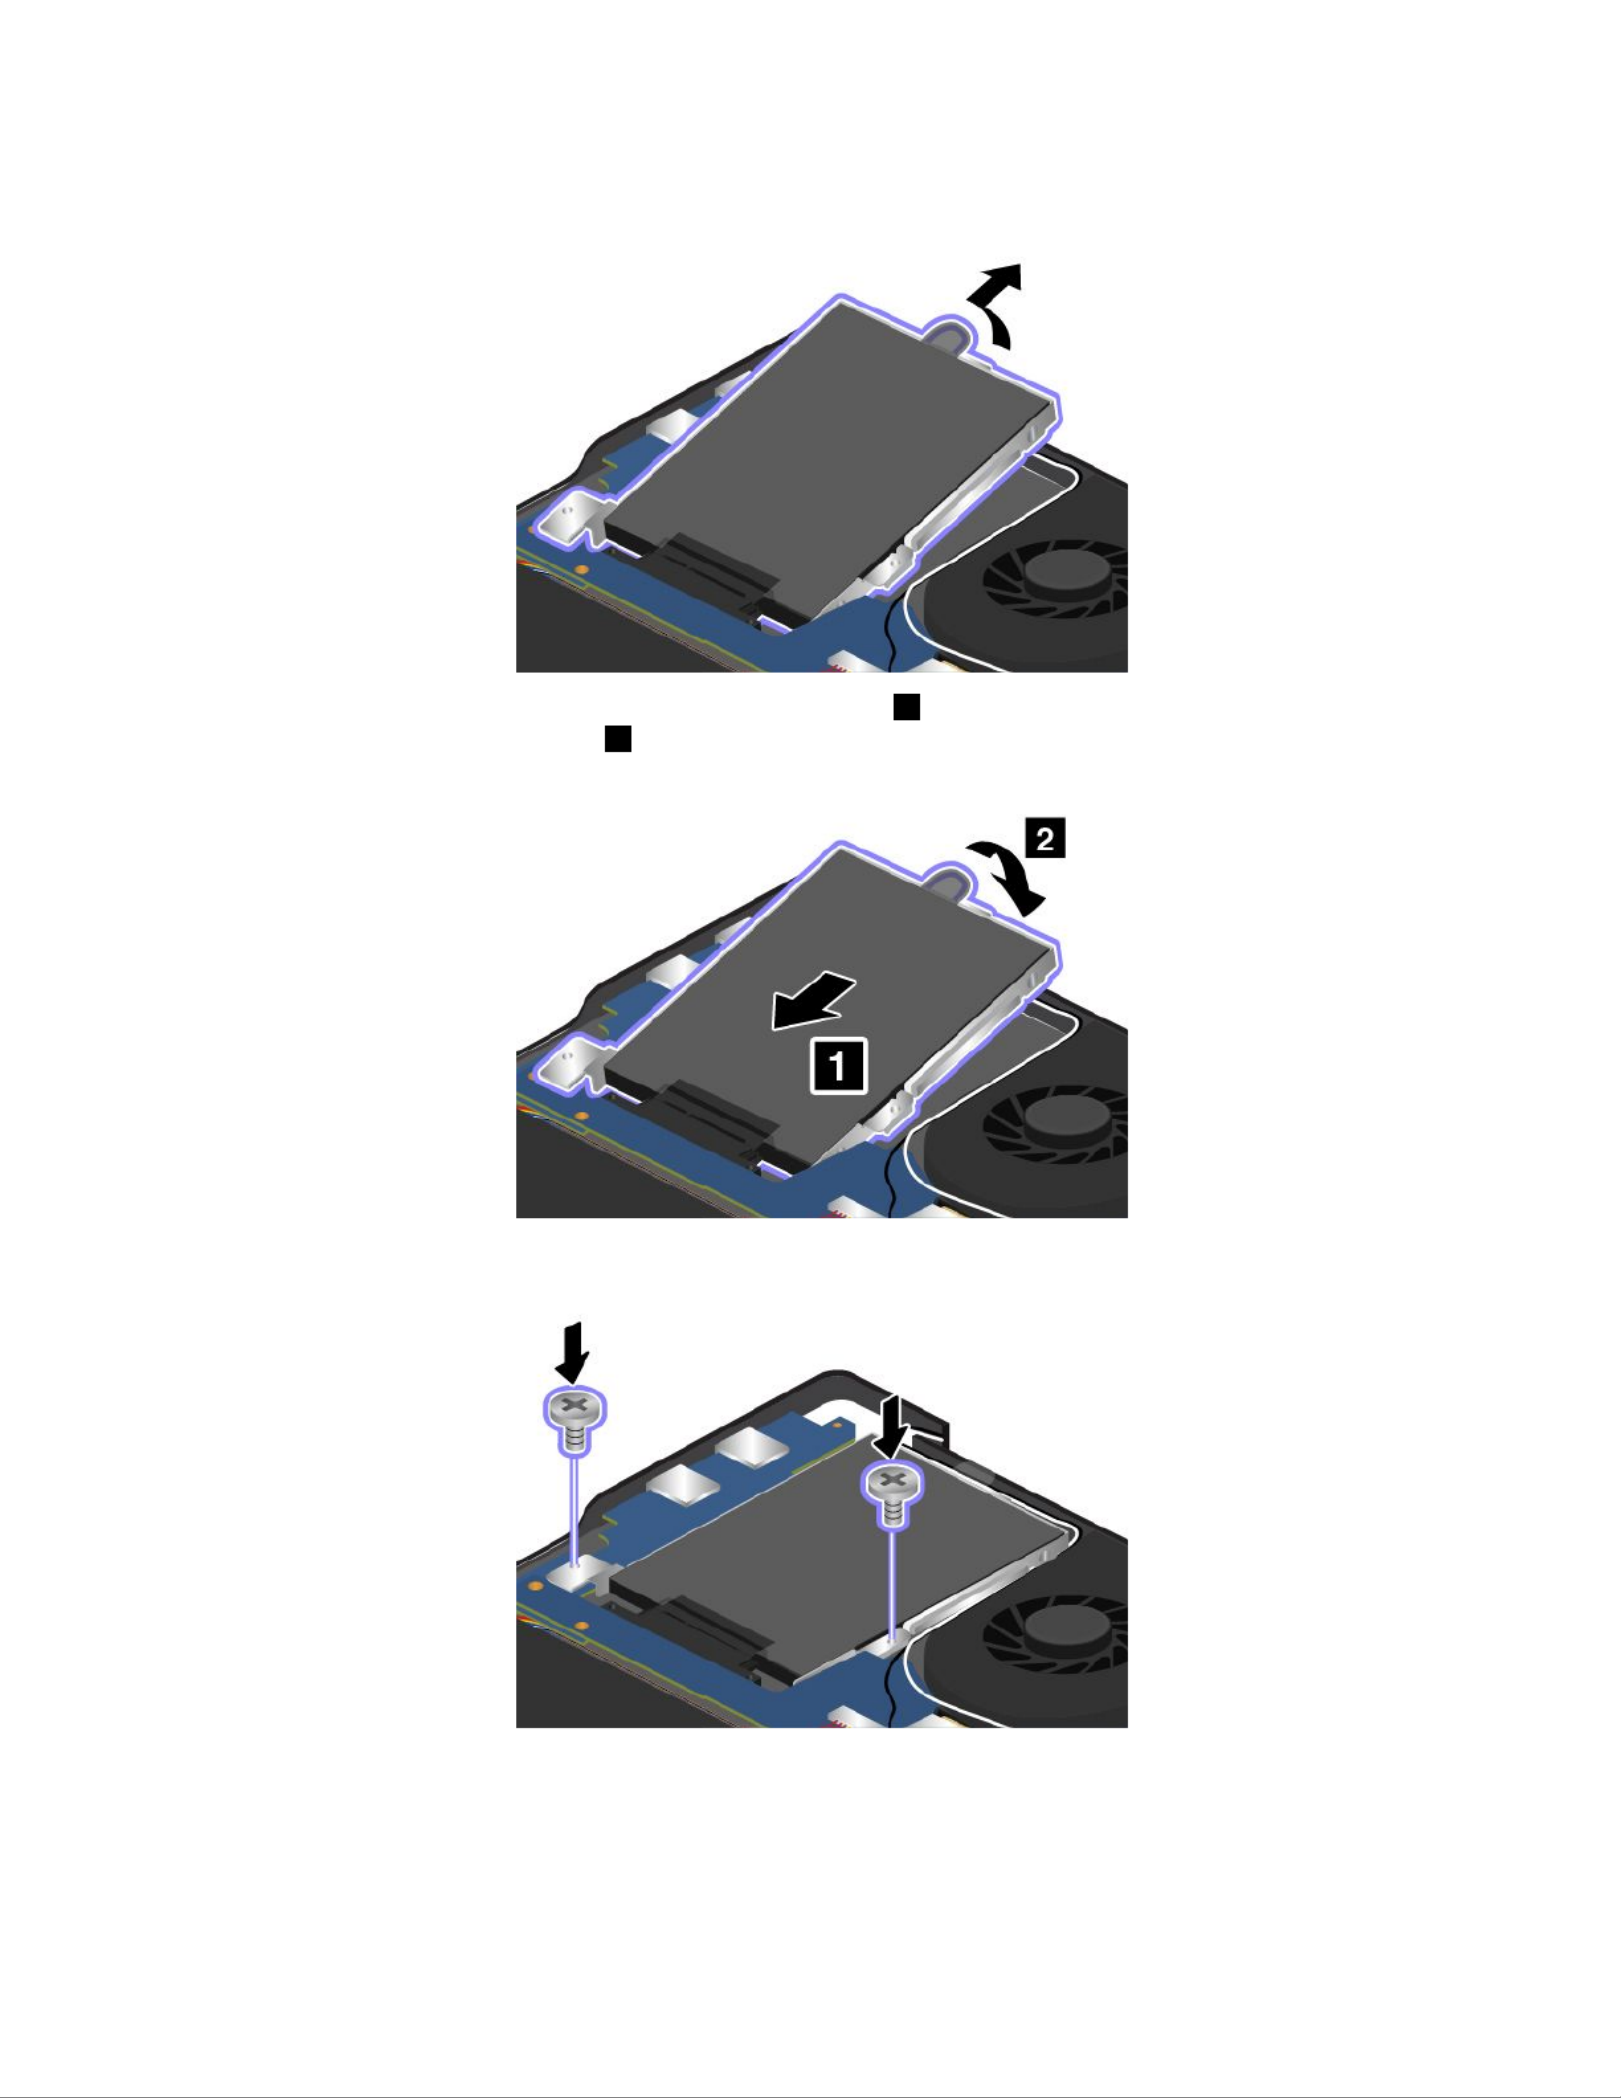
5.Liftthetabtoremovetheharddiskdriveorsolid-statedriveoutofthecomputer.
6.Inserttheharddiskdriveorsolid-statedriveintotheslot1andpositiontheharddiskdriveor
solid-statedrivermlyintoplace2.
7.Installthescrewstosecuretheharddiskdriveorsolid-statedrive.
8.Reinstallthebasecoverassembly.See“Replacingthebasecoverassembly”onpage64.
9.Turnthecomputeroveragain.Connecttheacpoweradapterandallcables.
66UserGuide

Replacingamemorymodule
Beforeyoustart,printtheseinstructions.
Increasingmemorycapacityisaneffectivewaytomakeprogramsrunfaster.T oreplaceoraddamemory
module,readthefollowingprerequisites,andthentheinstructions.
Whenreplacingamemorymodule,besuretofollowtheprecautions.
Note:Theoperatingspeedofthememorymodulehasdependencyonthesystemconguration.Insome
conditions,thememorymoduleinyourcomputermightnotbeabletooperateatthemaximumspeed.
Attention:Beforeyoustartinstallingamemorymodule,touchametaltableoragroundedmetalobject.This
actionreducesanystaticelectricityfromyourbody.Thestaticelectricitycoulddamagethememorymodule.
T oreplaceamemorymodule,dothefollowing:
1.Disablethebuilt-inbattery.See“Disablingthebuilt-inbattery”onpage63.
2.Closethecomputerdisplay,andturnitover.
3.Removethebasecoverassembly.See“Replacingthebasecoverassembly”onpage64.
4.Ifthememorymodulealreadyisinthememoryslot,pressoutonthelatchesonbothedgesofthe
socketatthesametime1,andthenremovethememorymodule2.Savetheremovedmemory
moduleforfutureuse.
5.Findthenotchonthecontactedgesideofthememorymoduleyouareinstalling.
Attention:T oavoiddamagingthememorymodule,donottouchitscontactedge.
Chapter6.Replacingdevices67

6.Withthenotchedendofthememorymoduletowardthecontactedgesideofthesocket,insertthe
memorymodule1intothesocketatanangleofabout20degrees;thenpressitinrmly2.
7.Reinstallthebasecoverassembly.See“Replacingthebasecoverassembly”onpage64.
8.Turnthecomputeroveragain.Connecttheacpoweradapterandallcables.
ReplacingaMiniPCIExpressCardforwirelessLANconnection
Beforeyoustart,printtheseinstructions.
DANGER
Duringelectricalstorms,donotconnectthecabletoordisconnectitfromthetelephoneoutlet
onthewall.
DANGER
Electriccurrentfrompower ,telephone,andcommunicationcablesishazardous.Toavoidshock
hazard,disconnectthecablesbeforeopeningthecoverofthisslot.
Attention:BeforeyoustartinstallingaMiniPCIExpressCard,touchametaltableoragroundedmetal
object.Thisactionreducesanystaticelectricityfromyourbody.Thestaticelectricitycoulddamagethecard.
ToreplacethewirelessLANcard,dothefollowing:
1.Disablethebuilt-inbattery.See“Disablingthebuilt-inbattery”onpage63.
2.Closethecomputerdisplay,andturnthecomputerover.
3.Removethebasecoverassembly.See“Replacingthebasecoverassembly”onpage64.
68UserGuide

4.Ifatoolforremovingconnectorsisincludedinthepackagewiththenewcard,usethetooltodisconnect
thecablesfromthecard.Ifnosuchtoolisincluded,disconnectthecablesbypickinguptheconnectors
withyourngersandgentlyunpluggingthem.
5.Removethescrew1.Thecardpopsup2.Removethecard.
6.AlignthecontactedgeofthenewPCIExpressMiniCardwiththecorrespondingsocket1.Pivotthe
carddownwarduntilitsnapsintoplace.Securethecardwiththescrew2.
Chapter6.Replacingdevices69

7.Connecttheantennacablestothenewcardasshowninthedrawing.
8.Reinstallthebasecoverassembly.See“Replacingthebasecoverassembly”onpage64.
9.Turnthecomputeroveragain.Connecttheacpoweradapterandallcables.
Replacingthebackupbattery
Beforeyoustart,printtheseinstructions.
DANGER
Ifthebackupbatteryisincorrectlyreplaced,thereisdangerofanexplosion.Thebackupbattery
containsasmallamountofharmfulsubstances.Toavoidpossibleinjury:
•ReplaceonlywithabatteryofthetyperecommendedbyLenovo.
•Keepthebatterypackawayfromre.
•Donotexposeittoexcessiveheat.
•Donotexposeittowaterorrain.
•Donotshort-circuitit.
•Donotdrop,crush,puncture,orsubjecttostrongforces.Batteryabuseormishandlingcan
causethebatterytooverheat,whichcancausegassesorameto“vent”fromthebattery
packorcoincell.
Toreplacethebackupbattery,dothefollowing:
1.Disablethebuilt-inbattery.See“Disablingthebuilt-inbattery”onpage63.
2.Closethecomputerdisplay,andturnthecomputerover.
3.Removethebasecoverassembly.See“Replacingthebasecoverassembly”onpage64.
70UserGuide

72UserGuide

–Aftertheoperatingsysteminstallation,youshouldnotchangetheinitialUEFI/LegacyBootsetting
inThinkPadSetup.TheUEFI/LegacyBootsettingmustbethesameasitwaswhentheWindows
operatingsystemimagewasinstalled.Otherwise,theoperatingsystemwillnotbootproperly.
Forthecountryorregioncoderequiredintheinstallation,useoneofthefollowing:
Countryorregion:Code
China:SC
Denmark:DK
Finland:FI
France:FR
Germany:GR
Italy:IT
Japan:JP
Netherlands:NL
Norway:NO
Spain:SP
Sweden:SV
TaiwanandHongKong:TC
UnitedStates:US
InstallingtheWindows7operatingsystem
Beforeyoustart,printtheseinstructions.
ToinstalltheWindows7operatingsystemanditsrelatedsoftwareonyourcomputer,dothefollowing:
1.StartThinkPadSetup.
2.SelectStartup.
3.SelectUEFI/LegacyBoot.
4.Dooneofthefollowing:
•IfyouwanttoinstalltheWindows7(32–bit)operatingsystem,selectLegacyOnlyorBoth.
•IfyouwanttoinstalltheWindows7(64–bit)operatingsysteminLegacymode,selectLegacyOnly.
•IfyouwanttoinstalltheWindows7(64–bit)operatingsysteminUEFImode,selectUEFIOnly.
5.PressF10.
6.InserttheWindows7operatingsysteminstallationDVDintotheDVDdrive,andrestartthecomputer.
7.RestoreC:\SWTOOLSfromthebackupcopyyoumadebeforestartingtheinstallation.
8.InstalltheIntelChipsetSupportforWindows2000/XP/Vista/7/8.Todothis,runtheSetup.exeleinthe
C:\SWTOOLS\DRIVERS\INTELINF\innst_autoldirectory.
9.Installdevicedrivers.See“Installingotherdriversandsoftware(forWindows7)”onpage76.
InstallingtheregistrypatchesforWindows7
Gotohttp://www.lenovo.com/supportandinstallthefollowingregistrypatches:
•RegistrypatchenablingWakeUponLANfromStandbyforEnergyStar
•FixforIssueofHDDwithHDDetection
InstallingtheWindows7xmodules
TheWindows7xmodulesareinthefollowingdirectory:
C:\SWTOOLS\OSFIXES\
74UserGuide

Thenameofeachsubfolderisthenumberofaxmodule.Forinformationabouteachxmodule,goto
theMicrosoftKnowledgeBasehomepageathttp://support.microsoft.com,typethenumberofthex
moduleyouneedinthesearcheld,andclickSearch.
Toinstallaxmodule,runtheEXEleinasubfolderandfollowtheinstructionsonthescreen.
Note:Ifyouremovetheharddiskdrivefromthecomputerwithasingle-coreprocessorandinstallitona
computerwithadual-coreprocessor,youcangetaccesstotheharddiskdrive.Theopposite,however,is
nottrue:Ifyouremovetheharddiskdrivefromacomputerwithadual-coreprocessorandinstallitona
computerwithasingle-coreprocessor,youcannotgetaccesstotheharddiskdrive.
InstallingtheWindows8operatingsystem
Beforeyoustart,printtheseinstructions.
ToinstalltheWindows8operatingsystemanditsrelatedsoftwareonyourcomputer,dothefollowing:
1.StartThinkPadSetup.
2.SelectStartup➙Boot.
3.ChangethebootpriorityordertobootyourcomputerfromthedrivethatcontainstheWindows
8operatingsysteminstaller.
4.PressF10.
5.ConnectthedrivethatcontainstheWindows8operatingsysteminstallertoyourcomputer,and
restartthecomputer.
6.InstalltheIntelChipsetSupportforWindows832/864.
7.Installdevicedrivers.See“Installingdevicedrivers”onpage75.
InstallingtheWindows8xmodules
TodownloadandinstallaWindows8xmodules,gototheMicrosoftKnowledgeBasehomepageat
http://support.microsoft.com/,typethenumberofthexmoduleyouneedinthesearcheld,andclick
Search.
Installingdevicedrivers
Thedevicedriversareavailableathttp://www.lenovo.com/Drivers.Clickyourcomputerproductname
toviewallthedevicedriversforyourcomputer.
Attention:Alwaysgotohttp://www.lenovo.com/Driversforthelatestdevicedrivers.Donotdownload
themfromtheWindowsUpdateWebsite.
Installingthedriverforthe4-in-1mediacardreader
Tousethe4-in-1mediacardreader,youneedtodownloadandinstalltheRealtekCardReaderDriverfrom
theLenovoSupportWebsiteat:
http://www.lenovo.com/support
InstallingthedriverforUSB3.0(forWindows7)
IfyourcomputersupportsUSB3.0,andyouhavereinstalledtheoperatingsystem,youneedtodownload
andinstalltheUSB3.0drivertousetheUSB3.0bydoingthefollowing:
1.Gotohttp://www.lenovo.com/support.Findyourmodelanddisplaythedriverlinks.
2.SelecttheUSB3.0driverforthe32-bitor64-bitoperatingsystemandextractittoyourlocalhard
diskdrive.
Chapter7.Advancedconguration75

3.Double-clicktheSetup.exeleintheC:\DRIVERS\WIN\USB3.0\directory.
4.ClickNext.Ifthedevicedriverisalreadyinstalled,clickCancel.Followtheinstructionsonthescreen
untiltheinstallationisnished.
InstallingtheThinkPadmonitorleforWindows2000/XP/Vista/7/8(for
Windows7)
TheThinkPadmonitorleforWindows2000/XP/Vista/7/8isinthefollowingdirectory:
C:\SWTOOL S\DRIVERS\MONITOR
Note:Ifyoucannotndthisdirectoryonyourharddiskdriveorsolid-statedrive,downloadtheThinkPad
monitorleforWindows2000/XP/Vista/7/8fromtheThinkPadWebsiteat:
http://www.lenovo.com/Drivers
Note:Beforeyouinstallthisle,ensurethatthecorrectvideodriverhasbeeninstalled.
1.Right-clickonthedesktop,andclickPersonalize.
2.ClickDisplayattheleft.
3.ClickChangedisplaysettings.
4.ClickAdvancedSettings.
5.ClicktheMonitortab.
6.ClickProperties.
7.ClicktheDrivertab.
8.ClickUpdateDriver.
9.SelectBrowsemycomputerfordriversoftware,andthenclickLetmepickfromalistofdevice
driversonmycomputer.
10.ClickHaveDisk.
11.SpecifypathC:\SWTOOL S\DRIVERS\MONITORtothismonitorINFle.Then,clickOpen.
12.ClickOK.
13.Conrmthecorrectdisplaytype,thenclickNext.
14.Wheninstallationcompletes,clickClose.
15.ClickClosetoclosetheDisplayPropertieswindow.
16.ClickOKontheMonitortab.
17.ClickOKandclosetheDisplaySettingswindow.
Installingotherdriversandsoftware(forWindows7)
ThedevicedriversareprovidedintheC:\SWTOOLS\DRIVERSdirectoryonyourharddiskdrive.Youwillalso
needtoinstallapplicationsoftware,whichisprovidedintheC:\SWT OOLS\APPSdirectoryonyourharddisk
drive.Todothis,refertotheinstructionsin“Reinstallingpreinstalledapplicationsanddevicedrivers”
onpage59 .
Note:IfyoucannotndtheSupplementles,devicedrivers,andapplicationsoftwareyouneedon
yourharddiskdrive,orifyouwanttoreceiveupdatesandthelatestinformationaboutthem,goto
http://www.lenovo.com/Drivers.
ThinkPadSetup
YourcomputercomeswiththeThinkPadSetupprogramtoenableyoutoselectvarioussetupparameters.
TostartThinkPadSetup,dothefollowing:
76UserGuide

1.Turnonthecomputer.Whenthelogoscreenisdisplayed,presstheF1key.theThinkPadSetup
programmainmenuopens.
Ifyouhavesetasupervisorpassword,theThinkPadSetupprogrammainmenuwillbedisplayed
afteryouenterthepassword.YoucanstartThinkPadSetupbypressingEnterinsteadofenteringthe
supervisorpassword.However,youcannotchangetheparametersthatareprotectedbythesupervisor
password.Formoreinformation,referto“Usingpasswords”onpage43.
2.Usethecursorkeystomovetoanitemthatyouwanttochange.Whentheitemishighlighted,press
Enter.Asubmenuisdisplayed.
3.Changetheitemsyouwanttochange.Tochangethevalueofanitem,pressthe+or–key.Iftheitem
hasasubmenu,youcandisplayitbypressingEnter.
4.PressEsctoexitfromthesubmenu.
5.Ifyouareonanestedsubmenu,pressEscrepeatedlyuntilyoureachtheThinkPadSetupprogram
mainmenu.
Note:Ifyouneedtorestorethesettingstotheoriginalstateasofthetimeofpurchase,pressF9to
loadthedefaultsettings.YoualsocanselectanoptionontheRestartsubmenutoloadthedefault
settingsordiscardthechanges.
6.SelectRestart.Movethecursortotheoptionyouwanttorestartyourcomputer;thenpressEnter.
Yourcomputerrestarts.
Note:Dependingontheoperatingsystemyouareusing,somemenuitemslistedinthischaptermightnot
beavailableonyourcomputer,andsomemenuitemsmightbeslightlydifferentfromtheactualmenuitems
displayedonyourcomputer.
Mainmenu
TheMainmenuistherstinterfaceyouseeafteryouenterThinkPadSetup.Itdisplaysthefollowing
congurationofyourcomputer:
•UEFIBIOSVersion
•UEFIBIOSDate(Year-Month-Day)
•EmbeddedControllerVersion
•MachineTypeModel
•System-unitserialnumber
•Systemboardserialnumber
•AssetT ag
•CPUType
•CPUSpeed
•Installedmemory
•UUID
•MACaddress(InternalLAN)
•PreinstalledOSLicense
•UEFISecureBoot
Congmenu
Ifyouneedtochangethecongurationofyourcomputer,selectCongfromtheThinkPadSetupmenu.
Notes:
Chapter7.Advancedconguration77

•Defaultvaluesareinboldface.Thedefaultsettingsarealreadyoptimizedforyou.Ifyouconsider
changingthecomputerconguration,proceedwithextremecaution.Settingthecongurationincorrectly
mightcauseunexpectedresults.
•Oneachsubmenu,pressEntertoshowselectableoptionsandselectadesiredoption,ortypedesired
valuesfromthekeyboarddirectly.
•Someitemsaredisplayedonthemenuonlyifthecomputersupportsthecorrespondingfeatures.
ThefollowingtableliststheCongmenuitems.
Table4.Congmenuitems
Menuitem SubmenuitemSelectionComments
WakeOnLAN •Disabled
•ACOnly
•ACandBattery
EnablethesystemtoPoweron
whentheEthernetcontroller
receivesamagicpacket(a
specialnetworkmessage).
IfyouselectACOnly,theWake
onLANfunctionisenabledonly
whentheacpoweradapteris
attached.
IfyouselectACandBattery,
theWakeonLANfunctionis
enabledwithanypowersources.
Notes:
•ThemagicpackettypeWake
onLANrequiresacpower.
•TheWakeonLANfunction
doesnotworkwhenahard
diskpasswordisset.
EthernetLANOptionROM
(forLegacyOnlyboot
modeorBothwithLegacy
rst)
•Disabled
•Enabled
LoadtheEthernetLANOption
ROMtoenablestartupfroman
integratednetworkdevice.
UEFIIPv4NetworkStack
(forLegacyOnlyboot
modeorBothwithLegacy
rst)
•Disabled
•Enabled
EnableorDisableUEFIIPv4
NetworkStackforUEFI
environment
UEFIIPv6NetworkStack
(forUEFIOnlybootmode
orBothwithUEFIrst)
•Disabled
•Enabled
EnableorDisableUEFIIPv6
NetworkStackforUEFI
environment
UEFIPXEBootPriority
(forUEFIOnlybootmode
orBothwithUEFIrst)
•IPv6First
•IPv4First
SelectNetworkStackPriorityfor
UEFIPXEBoot.
Network
WirelessLANRadio •On
•Off
IfyouselectOn,theinternal
wirelessradioisturnedon.Ifyou
selectOff,theinternalwireless
radioisturnedoff.
78UserGuide

Table4.Congmenuitems(continued)
Menuitem SubmenuitemSelectionComments
IntheRestartpage,whenthe
OSOptimizedDefaultsisset
toEnabled,theWirelessLAN
RadiomenuisOnandcannot
bechanged.
USBUEFIBIOSSupport •Disabled
•Enabled
Enableordisablebootsupport
fromUSBstoragedevices.
AlwaysOnUSB •Disabled
•Enabled
IfyouselectEnableandthe
systemisconnectedwiththe
acpoweradapter,theUSBport
canchargetheexternaldevice
whenthesystemisinstandby
mode,hibernatemode,orturn
off.Whenthesystemisusinga
batteryandisnotconnecttothe
acpoweradapter,theUSBport
canchargetheexternaldevice
instandbymode.
IfyouselectDisable,theUSB
portisdisabledwhenthesystem
isinstandbymode,hibernate
mode,andpower-offmode.
AlwaysOnUSBChargein
offmode
•Disabled
•Enabled
IfyouselectEnable,itenables
youtochargeexternaldevice
whenthesystemisinhibernation
modeorthesystemisturnedoff.
USB
USB3.0Mode •Disabled
•Enabled
•Auto
SettheUSB3.0controllermode
fortheportssharedbetween
USB2.0andUSB3.0controller.
IfyouselectAuto,itenablesyou
toconnectandrouteappropriate
USB3.0orUSB2.0connectors.
IfyouselectEnabled,itenables
theUSB3.0modeandallows
theUSB3.0tobesupported
intheWindows7operating
system.
IfyouselectDisabled,itdisables
andhidestheUSB3.0controller,
andtheUSB3.0connectorswill
workasUSB2.0connectors.
Keyboard/MouseFnandCtrlKeyswap •Disabled
•Enabled
IfyouselectEnabled,theFnkey
worksastheCtrlkey,andthe
CtrlkeyworksastheFnkey.
Note:EvenwhenEnabledis
selected,youneedtopressthe
Fnkeytoresumethecomputer
fromsleepmodetonormal
operation.
Chapter7.Advancedconguration79

Table4.Congmenuitems(continued)
Menuitem SubmenuitemSelectionComments
BootDisplayDevice •ThinkPadLCD
•HDMI
•Displayondock
Selectthedisplaydevicetobe
activatedatboottime.This
selectioniseffectiveforboot
time,passwordprompt,and
ThinkPadSetup.
GraphicsDevice•IntegratedGraphics
•Switchable
Graphics
TheIntegratedGraphicsmode
provideslongerbatterylife.The
SwitchableGraphicsmoderuns
asIntegratedGraphicsmode
andDiscreteGraphicsisenabled
ondemand.
Note:SwitchableGraphics
modeshouldonlybeselected
ifyouareusingtheWindows7
operatingsystem.
Display
OSDetectionfor
SwitchableGraphics
•Disabled
•Enabled
IfyouselectEnabled,the
systemUEFIBIOSautomatically
switchestheGraphicsDevice
settingtoAMDswitchable
modeiftheoperatingsystem
supportsthisfeature,andto
IntegratedGraphicsmodeif
theoperatingsystemdoesnot
supportthisfeature.
Intel(R)SpeedStep ®
technology
•Disabled
•Enabled
SelectthemodeofIntel
SpeedSteptechnologyat
runtime.
•MaximumPerformance:
Alwayshighestspeed
•BatteryOptimized:Always
lowestspeed
•Disabled:Noruntime
support,lowestspeed
CPUPowerManagement •Disabled
•Enabled
Enableordisablethepower
savingfeaturethatstops
themicroprocessorclock
automaticallywhenthereareno
systemactivities.
Intel(R)RapidStart
Technology
•Disabled
•Enabled
Enterafter:
•Immediately
•1minute
•2minutes
•5minutes
•10minutes
•15minutes
•30minutes
•1hour
Tousethisfeature,aspecial
partitiononthesolid-statedrive
isrequired.
Whenenabled,youcanenable
the30DayStandbyfunction
throughthePowerManager
program.Thefunctionenables
thecomputertoenteralower
powerstateafterthespecied
timeinsleepstate.Alsoittakes
onlysecondstoresumenormal
operation.
Power
80UserGuide

Table4.Congmenuitems(continued)
Menuitem SubmenuitemSelectionComments
•2hours
•3hours
DisableBuilt-inBattery Usethisfeaturetotemporarily
disablethebuilt-inbattery.The
systemwillbeautomatically
poweredoffafteryouselect
thisitem.Thenthecomputeris
readytobeserviced.
Note:Theacpoweradapter
mustbedisconnectedtoperform
thisoperation.Thebuilt-in
batterywillbeautomatically
enabledwhentheacpower
adapterisreconnected.
PasswordBeep•Disabled
•Enabled
Enablethisoptiontohavea
beepsoundwhenthesystem
iswaitingforapower-on,hard
disk,orsupervisorpassword.
Differentbeepswillbesounded
whentheenteredpassword
matchesordoesnotmatchthe
conguredpassword.
BeepandAlarm
KeyboardBeep•Disabled
•Enabled
Enableordisablethekeyboard
beepwhenunmanageablekey
combinationsarepressed.
SerialATA(SATA)SATAControllerMode
Option
•Compatibility
•AHCI
SelectSATAcontroller
operationmode.Ifyou
selectCompatibility,the
SATAcontrolleroperatesin
compatibilitymode.
CoreMulti-Processing •Disabled
•Enabled
Enableordisableadditional
executioncoreunitswithina
CPU.
Note:Ifyouareusinga
computerwithasingle-core
processor,thisitemisnot
available.
CPU
IntelHyper-Threading
Technology
•Disabled
•Enabled
Enableordisableadditional
logicalprocessorswithina
processorcore.
Date/Timemenu
Ifyouneedtosetthecurrentdateandtimeofyourcomputer,selectDate/TimefromtheThinkPadSetup
programmainmenu.Thefollowingsubmenuisdisplayed:
•SystemDate
•SystemTime
Tochangethedateandtime,dothefollowing:
1.Usingtheupanddownarrowkeystoselecttheitemtochangethedateortime.
Chapter7.Advancedconguration81

2.PressTab,Shift+Tab,orEntertoselectaeld.
3.Typethedateortime.
Note:Anotherwaytoadjustthedateandtimeisbypressing+or–.
4.PressF10tosavethechangesandrestartthesystem.
Securitymenu
Ifyouneedtosetthesecurityfeaturesofyourcomputer,selectSecurityfromtheThinkPadSetupmenu.
Notes:
•Defaultvaluesareinboldface.Thedefaultsettingsarealreadyoptimizedforyou.Ifyouconsider
changingthecomputerconguration,proceedwithextremecaution.Settingthecongurationincorrectly
mightcauseunexpectedresults.
•Oneachsubmenu,pressEntertoshowselectableoptionsandselectadesiredoption,ortypedesired
valuesfromthekeyboarddirectly.
•Someitemsaredisplayedonthemenuonlyifthecomputersupportsthecorrespondingfeatures.
ThefollowingtableliststheSecuritymenuitems.
Table5.Securitymenuitems
Menuitem SubmenuitemSelectionComments
SupervisorPassword •Disabled
•Enabled
Referto“Supervisorpassword”on
page46.
LockUEFIBIOSSettings •Disabled
•Enabled
Enableordisablethefunctionthat
protectsitemsintheThinkPad
Setupprogramfrombeingchanged
byunauthorizedusers.Bydefault,
thisissettoDisabled.Ifyouset
thesupervisorpasswordandenable
thisfunction,noonebutyoucan
changetheitemsintheThinkPad
Setupprogram.
Passwordatunattended
boot
•Disabled
•Enabled
IfyouselectandenablePassword
atunattendedboot,apassword
promptisdisplayedwhenthe
computeristurnedon,fromeither
apower-offorhibernationstate.If
youselectDisabled,nopassword
promptisdisplayed;thecomputer
goesaheadandloadstheoperating
system.T opreventunauthorized
access,youcansettheuser
authenticationontheoperating
system.
Passwordatrestart•Disabled
•Enabled
IfyouselectandenablePassword
atrestart,apasswordpromptis
displayedwhenyourestartthe
computer.IfyouselectDisabled,
nopasswordpromptisdisplayed;
thecomputergoesaheadandloads
theoperatingsystem.Toprevent
unauthorizedaccess,youcanset
Password
82UserGuide

Table5.Securitymenuitems(continued)
Menuitem SubmenuitemSelectionComments
theuserauthenticationonthe
operatingsystem.
SetMinimumLength •Disabled
•xcharacters
(4≤x≤12)
Specifyaminimumlengthfor
power-onpasswordandharddisk
passwords.Ifyousetthesupervisor
passwordandspecifyaminimum
lengthforpasswords,noonebut
youcanchangethelength.
Power-OnPassword •Disabled
•Enabled
Referto“Power-onpassword”on
page44 .
HardDisk1Password•Disabled
•Enabled
Referto“Harddiskpasswords”on
page44 .
HardDisk2Password•Disabled
•Enabled
Referto“Harddiskpasswords”on
page44 .
SecurityChip •Active
•Inactive
•Disabled
IfyouselectActive,thesecurity
chipisfunctional.Ifyouselect
Inactive,theSecurityChipoption
isvisible,butthesecuritychip
isnotfunctional.Ifyouselect
Disabled,theSecurityChipoption
ishiddenandthesecuritychipis
notfunctional.
SecurityReporting
Options
Enableordisablethefollowing
SecurityReportingOptions:
•BIOSROMStringsReporting:
BIOStextstring
•CMOSReporting:CMOSdata
•NVRAMReporting:Security
datastoredintheAssetID
•SMBIOSReporting:SMBIOS
data
ClearSecurityChip Enter Cleartheencryptionkey.
Note:Thisitemisdisplayedonly
ifyouhaveselectedActiveforthe
SecurityChipoption.
PhysicalPresencefor
Provisioning
•Disabled
•Enabled
Thisoptionenablesordisablesthe
conrmationmessagewhenyou
changethesettingsofthesecurity
chip.
SecurityChip
PhysicalPresencefor
Clear
•Disabled
•Enabled
Thisoptionenablesordisablesthe
conrmationmessagewhenyou
clearthesecuritychip.
Chapter7.Advancedconguration83

Table5.Securitymenuitems(continued)
Menuitem SubmenuitemSelectionComments
IntelATModuleActivation•Disabled
•Enabled
•Permanently
Disabled
EnableordisabletheUEFIBIOS
interfacetoactivatetheIntelAT
module,whichisanoptional
anti-theftservicefromIntel.
Note:IfyousettheIntelAT
moduleactivationtoPermanently
Disabled,youwillbeunableto
enablethissettingagain.
Anti-Theft
Computrace •Disabled
•Enabled
•Permanently
Disabled
EnableordisabletheUEFIBIOS
interfacetoactivatethecomputrace
module.Computraceisanoptional
monitoringservicefromAbsolute
Software.
Note:Ifyousetthecomputrace
moduleactivationtoPermanently
Disabled,youwillbeunableto
enablethissettingagain.
SecureBoot •Disabled
•Enabled
EnableordisabletheUEFISecure
Bootfeature.SelectEnableto
preventunauthorizedoperating
systemsfromrunningatboot
time.SelectDisabledtoallowany
operatingsystemstorunatboot
time.
PlatformMode UserMode
SecureBootModeStandardMode
ResettoSetupMode •EnterThisoptionisusedtoclearthe
currentplatformkeyandputthe
systemintosetupmode.You
caninstallyourownplatformkey
andcustomizetheSecureBoot
signaturedatabasesinsetupmode.
SecureBootmodewillbesetto
custommode.
SecureBoot
RestoreFactorykeys•EnterThisoptionisusedtorestoreall
keysandcerticatesinSecureBoot
databasestofactorydefaults.Any
customizedSecureBootsettings
willbeerased,andthedefault
platformkeywillbere-established
alongwiththeoriginalsignature
databasesincludingcerticatefor
Windows8operatingsystem.
Startupmenu
Tochangethecomputerstartupsettings,selectStartupfromtheThinkPadSetupmainmenu.
Attention:
Chapter7.Advancedconguration85
Specyfikacje produktu
| Marka: | Lenovo |
| Kategoria: | laptop |
| Model: | ThinkPad S431 |
| Kolor produktu: | Czarny |
| Typ produktu: | Laptop |
| Wysokość produktu: | 20.32 mm |
| Szerokość produktu: | 333 mm |
| Głębokość produktu: | 224.8 mm |
| Waga produktu: | 1780 g |
| Bluetooth: | Tak |
| Wersja Bluetooth: | 4.0 |
| Wtyk słuchawek: | 3,5 mm |
| Typ HD: | HD+ |
| Technologia baterii: | Litowo-polimerowy (LiPo) |
| Długość przekątnej ekranu: | 14 " |
| Obsługiwane typy kart pamięci: | MMC, SD, SDHC, SDXC |
| Prędkość transferu danych przez Ethernet LAN: | 10,100,1000 Mbit/s |
| Ilość portów Ethernet LAN (RJ-45): | 1 |
| Układ: | Muszla |
| Rozdzielczość: | 1600 x 900 px |
| Natywne proporcje obrazu: | 16:9 |
| Technologia dotyku: | Multi-touch |
| Ekran dotykowy: | Tak |
| Taktowanie procesora: | 2.1 GHz |
| Typ procesora: | Intel® Core™ i7 |
| Model procesora: | i7-3687U |
| Wi-Fi: | Tak |
| Standardy Wi- Fi: | 802.11a, 802.11b, 802.11g |
| Czytnik linii papilarnych: | Tak |
| Przewodowa sieć LAN: | Tak |
| Zintegrowany czytnik kart: | Tak |
| Typ portu ładowania: | DC-in jack |
| Producent procesora: | Intel |
| Liczba rdzeni procesora: | 2 |
| Typ pamięci wewnętrznej: | DDR3-SDRAM |
| Pamięć wewnętrzna: | 8 GB |
| Ilość portów USB 3.2 Gen 1 (3.1 Gen 1) Typu-A: | 2 |
| Zainstalowany system operacyjny: | Windows 8 Pro |
| Maksymalna pojemność pamięci: | 8 GB |
| Gniazdo procesora: | BGA 1023 |
| Ilość portów HDMI: | 1 |
| Port wyjścia S/PDIF: | Nie |
| Mikrofon: | Nie |
| Klawiatura numeryczna: | Nie |
| Kensington Lock: | Nie |
| Nośniki: | HDD+SSD |
| Ilość wbudowanych glosników: | 2 |
| System dźwięku: | Dolby Home Theater |
| Kamera przednia: | Tak |
| Port DVI: | Nie |
| Czas pracy na zasilaniu akumulatorowym: | 6 h |
| Wbudowany mikrofon: | Tak |
| Podświetlenie LED: | Tak |
| Klawisze Windows: | Tak |
| Pełnowymiarowa klawiatura: | Tak |
| Gniazda pamięci: | 1x SO-DIMM |
| Gniazdo smartcard: | Nie |
| Pojemność HDD: | 500 GB |
| Całkowita pojemność przechowywania: | 500 GB |
| Procesor ARK ID: | 71258 |
| Technologia Intel® Hyper Threading (Intel® HT Technology): | Tak |
| Technologia Intel® Turbo Boost: | 2.0 |
| Technologia Intel® Quick Sync Video: | Tak |
| Technologia Intel® InTru™ 3D: | Tak |
| Technologia Intel® Clear Video HD (Intel® CVT HD): | Tak |
| Nowe instrukcje AES (Intel® AES-NI): | Tak |
| Technologia Udoskonalona Intel SpeedStep: | Tak |
| Technologia Intel® Trusted Execution: | Tak |
| Maksymalna konfiguracja CPU: | 1 |
| Intel® Enhanced Halt State: | Tak |
| Intel® Clear Video Technology dla MID (Intel® CVT for MID): | Nie |
| Intel® VT-x with Extended Page Tables (EPT): | Tak |
| Intel® Secure Key: | Tak |
| Intel® 64: | Tak |
| Technologia Wirtualizacji Intel® (Directed I/O) (VT-d): | Tak |
| Technologia Intel® Clear Video: | Nie |
| Wersja technologii Intel® Secure Key: | 1.00 |
| Technologia virtualizacji Intel® (VT-x): | Tak |
| Typ pamięci procesora: | Smart Cache |
| Cache procesora: | 4 MB |
| Wskaźnik magistrali systemowej: | 5 GT/s |
| Maksymalne taktowanie procesora: | 3.3 GHz |
| Litografia procesora: | 22 nm |
| Liczba wątków: | 4 |
| Tryb pracy procesora: | 64-bit |
| Nazwa kodowa procesora: | Ivy Bridge |
| Pamięć ECC wspierana przez procesor: | Nie |
| Maksymalna liczba linii PCI Express: | 16 |
| Konfiguracje PCI Express: | 1x8, 1x16, 2x4, 2x8 |
| Termiczny układ zasilania (TDP): | 17 W |
| Bezkonfliktowy procesor: | Tak |
| Stepping: | L1 |
| Instrukcje obsługiwania: | AVX |
| Kod procesora: | SR0XH |
| Technologia Execute Disable Bit (EDB): | Tak |
| Stan spoczynku: | Tak |
| Technologie Thermal Monitoring: | Tak |
| Wbudowane opcje dostępne: | Nie |
| Typ magistrali: | DMI |
| Wielkość opakowania procesora: | 31.0 x 24.0 (BGA1023) mm |
| Układ pamięci: | 1 x 8 GB |
| Prędkość zegara pamięci: | 1600 MHz |
| Karta graficzna on-board: | Tak |
| Model karty graficznej on-board: | Intel® HD Graphics 4000 |
| Wersja gniazd typu Slot (PCI Express): | 2.0 |
| Parytet FSB: | Nie |
| Rozgałęźnik T: | 105 °C |
| Magistrala systemowa: | - MHz |
| Seria procesora: | Intel Core i7-3600 Mobile series |
| Generowanie procesora: | Intel® Core™ i7 trzeciej generacji |
| Wbudowana bazowa częstotliwość procesora: | 350 MHz |
| Dynamiczne taktowanie wbudowanej karty graficznej (max): | 1200 MHz |
| Model dedykowanej karty graficznej: | Niedostępny |
| ID wbudowanego urządzenia graficznego: | 0x166 |
| Typ zintegrowanej karty graficznej: | Intel® HD Graphics |
| Intel® Wireless Display (Intel® WiDi): | Tak |
| Technologia Intel® My WiFi (Intel® MWT): | Tak |
| Technologia Intel® Identity Protection (Intel® IPT): | Tak |
| Technologia Intel® Anti-Theft (Intel® AT): | Tak |
| Intel® Insider™: | Tak |
| Technologia Intel® FDI: | Tak |
| Intel® Flex Memory Access: | Tak |
| Intel® Fast Memory Access: | Tak |
| Intel® Smart Cache: | Tak |
| Intel® Demand Based Switching: | Nie |
| Układ graficzny i litografia IMC: | 22 nm |
| Technologia Intel® Dual Display Capable: | Tak |
| Intel® Rapid Storage Technology: | Nie |
| Wersja technologii Intel® Identity Protection: | 1.00 |
| Napędy optyczne: | Nie |
| Architektura systemu operacyjnego: | 64-bit |
| Pojemność pamięci SSD: | 24 GB |
| Liczba zainstalowanych dysków SSD: | 1 |
| Port dla zestaw słuchawka/mikrofon: | Tak |
| Dedykowana karta graficzna: | Nie |
| Technologia LightScribe: | Nie |
| Złącze dokowania: | Nie |
| Obsluga ExpressCard: | Nie |
| Typ gniazda cardbus pcmcia: | Nie |
| Funkcja USB Sleep-and-Charge: | Tak |
| Porty USB Sleep-and-Charge: | 1 |
| Ilość komór baterii: | 4 |
| Współczynnik Magistrala/Rdzeń: | 21 |
| Liczba zainstalowanych HDD: | 1 |
| Zintegrowany 4G WiMAX: | Tak |
| Klawiatura odporna na ciecz: | Tak |
| Klawiatura z podświetleniem: | Tak |
Potrzebujesz pomocy?
Jeśli potrzebujesz pomocy z Lenovo ThinkPad S431, zadaj pytanie poniżej, a inni użytkownicy Ci odpowiedzą
Instrukcje laptop Lenovo

28 Marca 2025
26 Marca 2025
23 Lutego 2025
7 Lutego 2025
7 Lutego 2025
31 Stycznia 2025
7 Grudnia 2024
12 Października 2024
8 Października 2024
8 Października 2024
Instrukcje laptop
- laptop Sony
- laptop Samsung
- laptop Fellowes
- laptop LG
- laptop Xiaomi
- laptop Huawei
- laptop Gigabyte
- laptop Acer
- laptop Fujitsu
- laptop Panasonic
- laptop Viewsonic
- laptop Asus
- laptop Medion
- laptop MSI
- laptop Toshiba
- laptop Haier
- laptop HP
- laptop Prixton
- laptop Hyundai
- laptop Honor
- laptop Tripp Lite
- laptop Zebra
- laptop Dell
- laptop Schneider
- laptop Thomson
- laptop Pyle
- laptop Apple
- laptop Razer
- laptop ADATA
- laptop GoClever
- laptop SPC
- laptop NEC
- laptop Oregon Scientific
- laptop Jay-Tech
- laptop Microsoft
- laptop ECS
- laptop XPG
- laptop Denver
- laptop Lexibook
- laptop Micromax
- laptop Odys
- laptop TechBite
- laptop TrekStor
- laptop Alienware
- laptop Airis
- laptop Emachines
- laptop Hähnel
- laptop Sylvania
- laptop Coby
- laptop Evga
- laptop Naxa
- laptop Ricatech
- laptop Mpman
- laptop Vizio
- laptop Targa
- laptop Peaq
- laptop Ematic
- laptop Hannspree
- laptop Inovia
- laptop Ergotron
- laptop Ibm
- laptop Atdec
- laptop Packard Bell
- laptop Compaq
- laptop SIIG
- laptop Hercules
- laptop Kogan
- laptop Getac
- laptop Vulcan
- laptop System76
- laptop General Dynamics Itronix
- laptop CTL
- laptop Everex
- laptop Olidata
- laptop Dynabook
- laptop Hamilton Buhl
- laptop AORUS
- laptop Humanscale
- laptop Aplic
- laptop Schenker
Najnowsze instrukcje dla laptop

3 Kwietnia 2025

2 Kwietnia 2025

28 Marca 2025
13 Marca 2025
7 Marca 2025

4 Marca 2025
1 Marca 2025
26 Lutego 2025
23 Lutego 2025
22 Lutego 2025