Instrukcja obsługi Lenovo ThinkCentre M910x
Przeczytaj poniżej 📖 instrukcję obsługi w języku polskim dla Lenovo ThinkCentre M910x (58 stron) w kategorii Pulpit. Ta instrukcja była pomocna dla 6 osób i została oceniona przez 2 użytkowników na średnio 4.5 gwiazdek
Strona 1/58

M910x
User Guide and
Hardware Maintenance Manual
Machine Type (MT):
10MY, 10N0, 10N1, 10N2, 10QQ
Energy Star MT:
10MY, 10N0, 10N1, 10N2, 10QQ
Overview
Locations of indicators,
connectors, and
controls provided on
your computer
Replaceable parts
Locations of the
replaceable parts on
your computer
Specications
Specications of your
computer
Replacing FRUs
Replacing instructions
for eld-replaceable
units (FRUs) (for
technicians only)
Computer locks
Locking devices for
your computer
Replacing CRUs
Replacing instructions
for customer-
replaceable units
(CRUs)

2
Overview 3 .........................................
Front view 3 .......................................................................
Rear view 4 ........................................................................
System board 6 ................................................................
Machine type and model label 7 ...................................
I/O box ............................................8
Overview 8 .........................................................................
Using the I/O box 9 ..........................................................
Computer locks ............................10
Attaching a Kensington-style cable lock ...............10
Specications ...............................11
Replacing hardware 12 ......................
Before replacing hardware 12 .......................................
Handling static-sensitive devices ...........................12
Knowing replaceable parts 13 .......................................
Customer-Replaceable Units (CRUs) .......................... 13
Field-Replaceable Units (FRUs) .................................... 13
CRUs and FRUs locations 14 ..............................................
Replacing CRUs 17 ............................
Before replacing CRUs 17 ..............................................
Replacing the keyboard or wireless keyboard 19 ......
Replacing the keyboard 19 ..................................................
Replacing the wireless keyboard 19 ..................................
Replacing the mouse or wireless mouse 20 ..............
Replacing the mouse 20 ......................................................
Replacing the wireless mouse 20 ......................................
Replacing the power adapter 22 ...................................
Replacing the vertical stand 23 .....................................
Replacing the VESA mount bracket 24 ........................
Replacing the external optical drive 25 ........................
Replacing the external I/O box 26 ................................
Replacing the power adapter bracket 27 ....................
Removing the computer cover 28 ................................
Replacing the storage drive 29 ......................................
Replacing the internal speaker 30 ................................
Replacing the system fan 31 .........................................
Replacing the PCI Express card and PCI Express
card adapter 32 ................................................................
Replacing the Wi-Fi card ...........................................34
Replacing the bottom cover 37 .....................................
Replacing the memory module 38 ...............................
Replacing the M.2 storage drive 39 ..............................
Completing the parts replacement 40 .........................
Replacing FRUs 41 ............................
Before replacing FRUs 41 ...............................................
Replacing the illuminated red dot cable 43 ................
Replacing the advanced speaker 44 ............................
Replacing the Wi-Fi antennas ..................................45
Replacing the front Wi-Fi antenna ...............................45
Replacing the rear Wi-Fi antenna .................................46
Replacing the storage drive cable 48 ...........................
Replacing the heat sink 49 .............................................
Replacing the microprocessor .................................50
Replacing the coin-cell battery ................................52
Replacing the antenna bracket 54 ................................
Replacing the system board and chassis 55 .............
Notices & Trademarks ..................57
Notices..........................................................................57
Trademarks 58 .................................................................
Contents
Overview 3
Overview
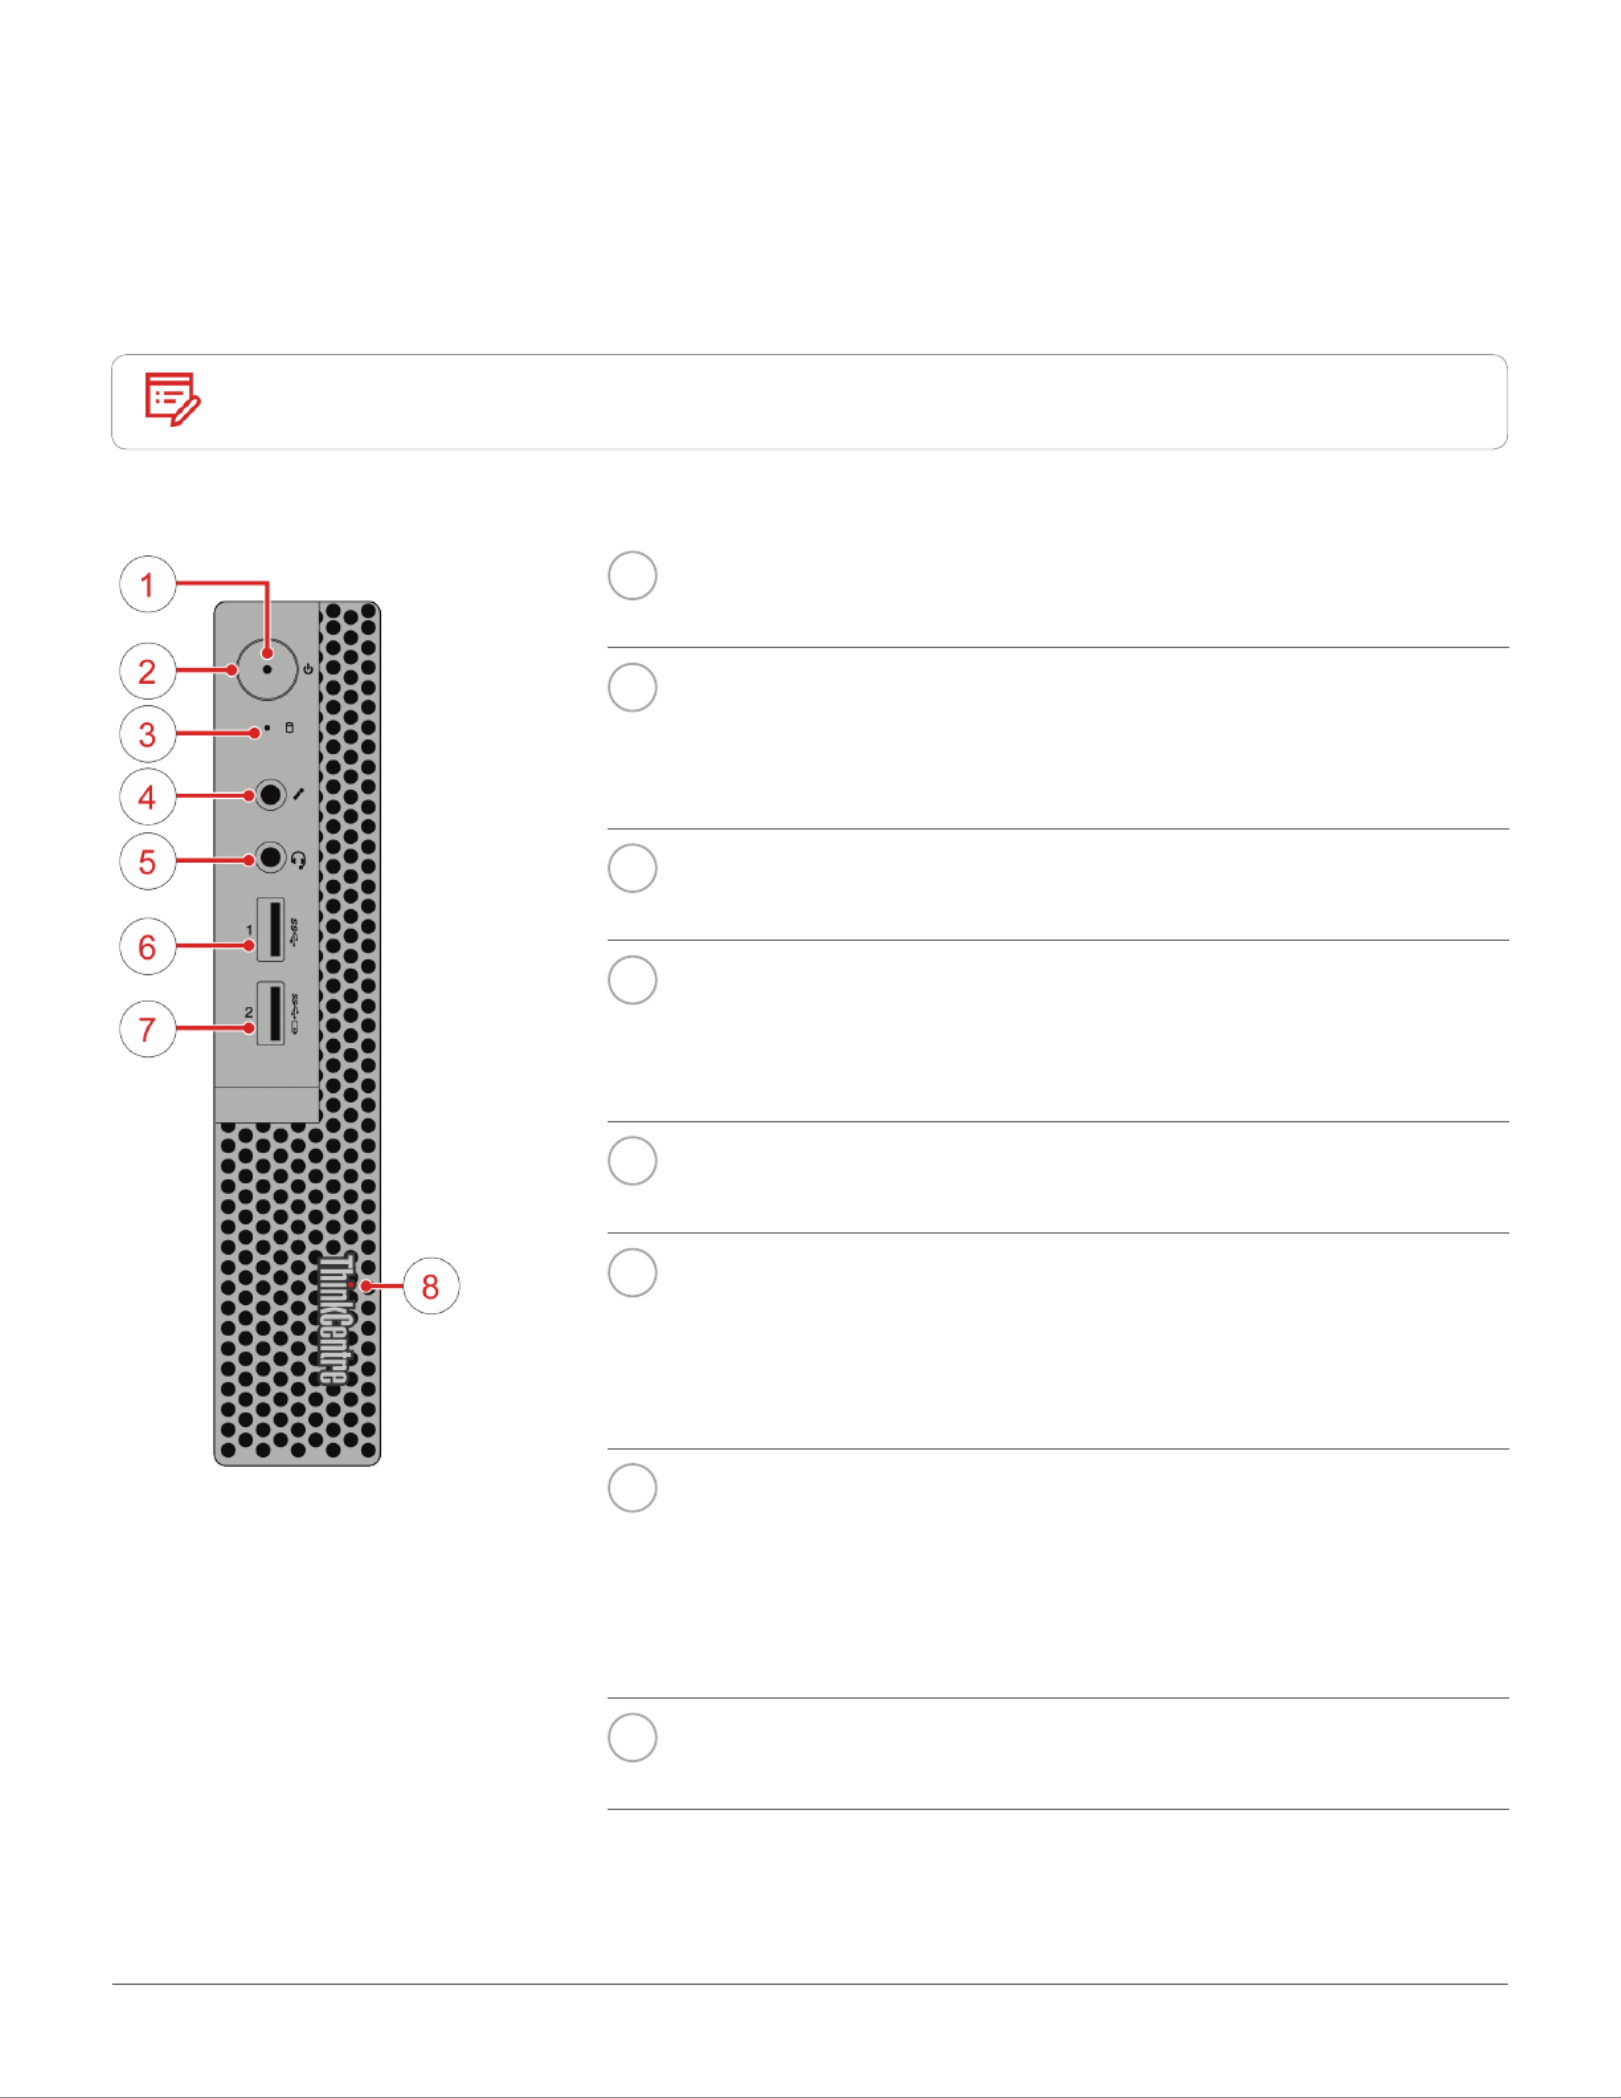
Front view
Note Your computer model might look slightly different from the illustration.
1Power indicator
This indicator is on when the computer is on.
2Power button
Used to turn on your computer. When you cannot shut down the
computer from the operating system, press and hold the power
button for four or more seconds to turn off the computer.
3Storage drive status indicator
This indicator is on when the storage drive is in use.
4Microphone connector
Used to connect a microphone to your computer. You can use the
microphone to record sounds or interact with the computer using
speech-recognition software.
5Headset connector
Used to connect a headset or headphones to your computer.
6USB 3.0 connector
Used to connect a USB-compatible device, such as a USB
keyboard, mouse, scanner, printer, or personal digital assistant
(PDA). For optimal data transfer, connect a USB 3.0 device to a
USB 3.0 connector instead of a USB 2.0 connector.
7Always On USB 3.0 connector
Used to connect a device that requires a USB 2.0 or USB 3.0
connection, such as a keyboard, a mouse, a scanner, a printer,
or a personal digital assistant (PDA). With the power adapter
connected, you can charge the automatically detected device
even when the computer is in hibernation mode or turned off.
8Illuminated red dot
This indicator is on when the computer is powered on.
Specyfikacje produktu
| Marka: | Lenovo |
| Kategoria: | Pulpit |
| Model: | ThinkCentre M910x |
Potrzebujesz pomocy?
Jeśli potrzebujesz pomocy z Lenovo ThinkCentre M910x, zadaj pytanie poniżej, a inni użytkownicy Ci odpowiedzą
Instrukcje Pulpit Lenovo

10 Października 2024
2 Października 2024
30 Września 2024
24 Września 2024
14 Września 2024
14 Września 2024
14 Września 2024
13 Września 2024
11 Września 2024
11 Września 2024
Instrukcje Pulpit
- Pulpit Sony
- Pulpit Samsung
- Pulpit LG
- Pulpit Sharp
- Pulpit Supermicro
- Pulpit Gigabyte
- Pulpit Acer
- Pulpit Fujitsu
- Pulpit LC-Power
- Pulpit Promethean
- Pulpit Mio
- Pulpit Viewsonic
- Pulpit Asus
- Pulpit Medion
- Pulpit MSI
- Pulpit Toshiba
- Pulpit Haier
- Pulpit HP
- Pulpit Tripp Lite
- Pulpit Moxa
- Pulpit ZTE
- Pulpit Dell
- Pulpit JYSK
- Pulpit Apple
- Pulpit AOC
- Pulpit Vtech
- Pulpit Razer
- Pulpit Kobo
- Pulpit NEC
- Pulpit Axis
- Pulpit Optoma
- Pulpit Asrock
- Pulpit Microsoft
- Pulpit Sharkoon
- Pulpit ECS
- Pulpit BenQ
- Pulpit BDI
- Pulpit Zotac
- Pulpit Alienware
- Pulpit Emachines
- Pulpit Parisot
- Pulpit Maxdata
- Pulpit Woood
- Pulpit Wehkamp
- Pulpit InFocus
- Pulpit Intel
- Pulpit Targa
- Pulpit Peaq
- Pulpit Seagate
- Pulpit Shuttle
- Pulpit Vorago
- Pulpit VXL
- Pulpit Foxconn
- Pulpit Ibm
- Pulpit Packard Bell
- Pulpit Advantech
- Pulpit Kogan
- Pulpit MP
- Pulpit Elitegroup
- Pulpit Smart Things
- Pulpit ONYX
- Pulpit System76
- Pulpit Zoostorm
- Pulpit Bestar
- Pulpit Pelco
- Pulpit Altra
- Pulpit Dell Wyse
- Pulpit AOpen
- Pulpit NComputing
- Pulpit MvixUSA
- Pulpit Faytech
- Pulpit AIS
- Pulpit Wyse
Najnowsze instrukcje dla Pulpit

15 Października 2024
15 Października 2024

14 Października 2024

12 Października 2024
9 Października 2024
9 Października 2024

9 Października 2024
8 Października 2024
8 Października 2024
8 Października 2024