Instrukcja obsługi Lenovo Essential G580H
Przeczytaj poniżej 📖 instrukcję obsługi w języku polskim dla Lenovo Essential G580H (59 stron) w kategorii laptop. Ta instrukcja była pomocna dla 15 osób i została oceniona przez 2 użytkowników na średnio 4.5 gwiazdek
Strona 1/59

Lenovo G480/G485/
G580/G585/G780
Read the safety notices and important tips in the
included manuals before using your computer.
User Guide
User Guide
User Guide
User Guide
User Guide
V1.0
V1.0
V1.0
V1.0
V1.0

First Edition (December 2011)
© Copyright Lenovo 2011.
Before using the product, be sure to read Lenovo Safety and General
Information Guide first.
The features described in this guide are common to most models.
Some features may not be available on your computer and/or your
computer may include features that are not described in this user
guide.
Some instructions in this guide may assume that you are using
Windows® 7. If you are using other Windows operating system, some
operations may be slightly different. If you are using other operating
systems, some operations may not apply to you.
LIMITED AND RESTRICTED RIGHTS NOTICE: If data or software is delivered pursuant a General
Services Administration “GSA” contract, use, reproduction, or disclosure is subject to restrictions set
forth in Contract No. GS-35F-05925.
Note
•
•
•
To learn more about Lenovo Applications, go to: http://www.lenovo.com.
•
The illustrations in this manual may differ from the actual product.
Please refer to the actual product.
The illustrations used in this manual are for Lenovo G580 unless
otherwise stated.
•
•
i
Top view.......................................................................................................................1
Left-side view ..............................................................................................................5
Right-side view............................................................................................................7
Front view ....................................................................................................................9
Bottom view ...............................................................................................................10
First use.......................................................................................................................16
Using AC adapter and battery ................................................................................18
Using the touchpad...................................................................................................20
Using the keyboard...................................................................................................21
Connecting external devices....................................................................................24
Special keys and buttons..........................................................................................26
System status indicators...........................................................................................27
Securing your computer...........................................................................................29
About NVIDIA® OptimusTM (on select models) .................................................30
Wired connection ......................................................................................................31
Wireless connection ..................................................................................................32
OneKey Rescue system ............................................................................................33
Replacing the battery................................................................................................35
Replacing the hard disk drive .................................................................................37
Replacing memory....................................................................................................44
Replacing the wireless LAN card ...........................................................................48
Removing the optical drive .....................................................................................50


1
1
2
3
5
4
7
8

2
1
2
3
5
4
7
8

3
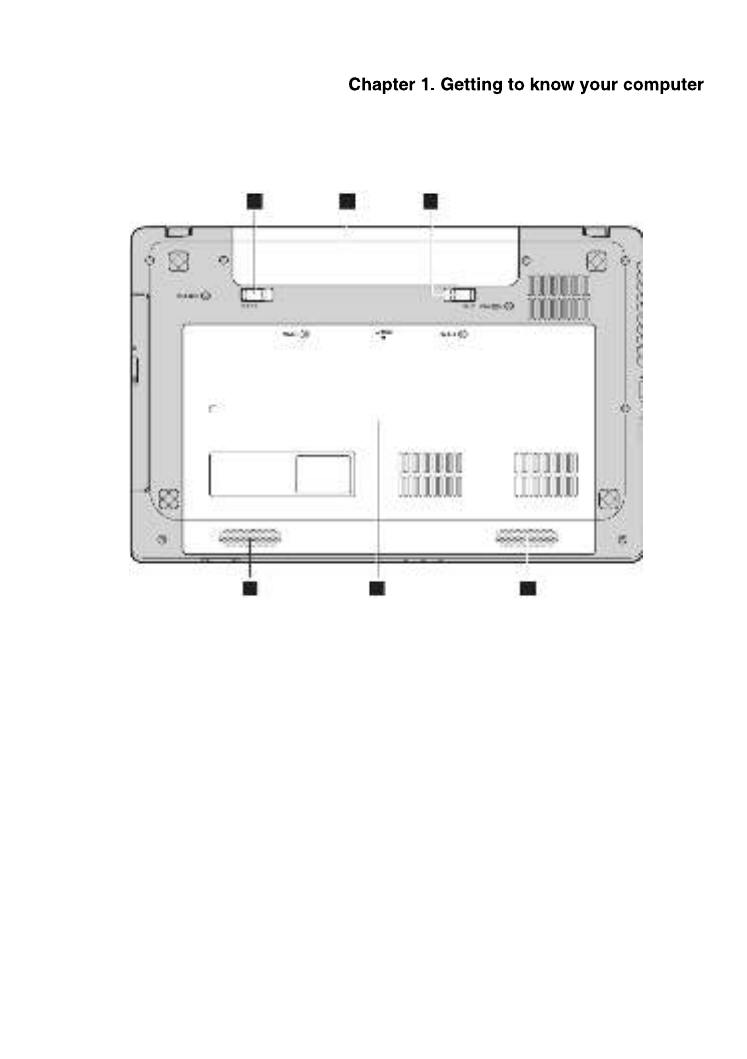
The dashed part is invisible.
Do NOT open the display panel beyond 130 degrees. When closing the display panel, be
careful NOT to leave pens or any other objects in between the display panel and the
keyboard. Otherwise, the display panel may be damaged.
1
2
3
6
5
4
7
8
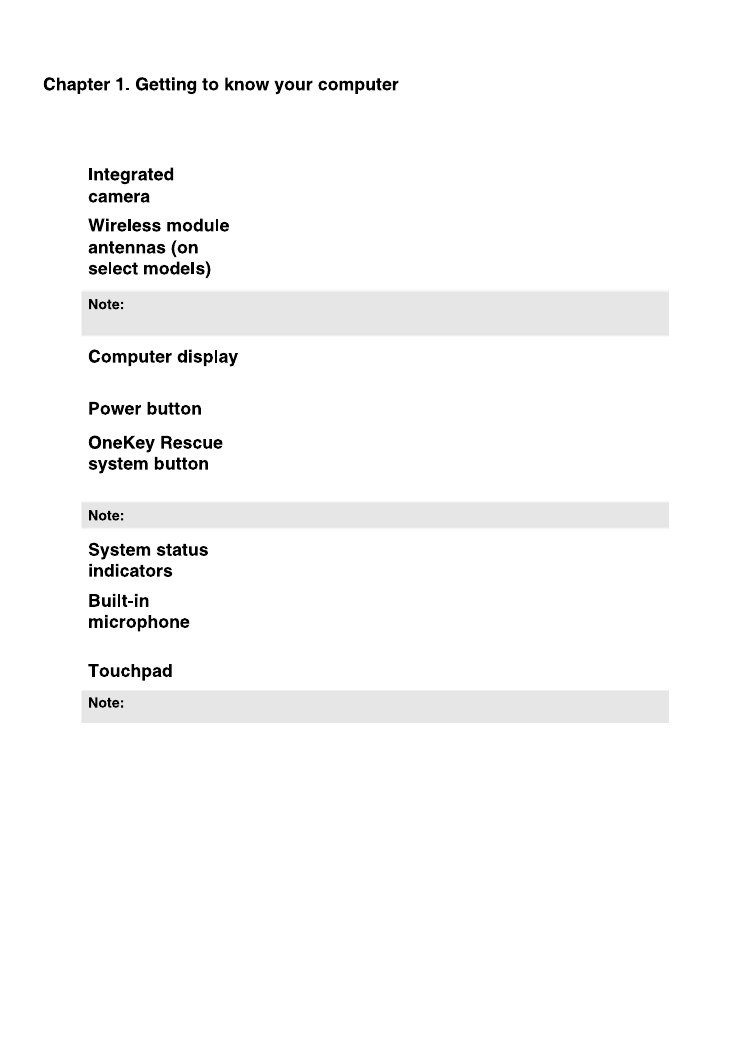
4
Use the camera for video communication.
The built-in antennas ensure optimal reception of wireless
radio.
Wireless module antennas may be placed in different positions (2a/2b) depending on
different configurations.
The LCD display with LED backlight provides brilliant
visual output.
Press this button to turn on the computer.
Press this button to open OneKey Rescue system (If
OneKey Rescue system has been preinstalled) when the
computer is powered off.
For details, see “OneKey Rescue system” on page 33.
For details, see “System status indicators” on page 27.
The built-in microphone (with noise reduction) can be
used for video conferencing, voice narration, or simple
audio recordings.
The touchpad functions as a conventional mouse.
For details, see “Using the touchpad” on page 20.
a
b
c
d
e
f
g
h

6
This port connects the computer to an Ethernet network.
For details, see “Wired connection” on page 31.
Connects to devices with HDMI input such as a TV or a
display.
Connect to USB devices.
The blue ports are USB 3.0 ports. The black ports are USB 2.0 ports.
For details, see “Connecting a universal serial bus (USB) device” on page 25.
d
e
f

7
Connects to external headphones.
Connects to external microphones.
Reads/Burns optical discs.
6 3 4 5
1 2 3 4 5
a
b
c

8
Connects to USB devices.
The blue ports are USB 3.0 ports. The black ports are USB 2.0 ports.
For details, see “Connecting a universal serial bus (USB) device” on page 25.
Connect the AC adapter here.
For details, see “Using AC adapter and battery” on page 18.
d
e
f

9
Insert memory cards (not supplied) here.
For details, see “Using memory cards (not supplied)” on page 24.
For details, see “System status indicators” on page 27.
1
2
1
2
a
b
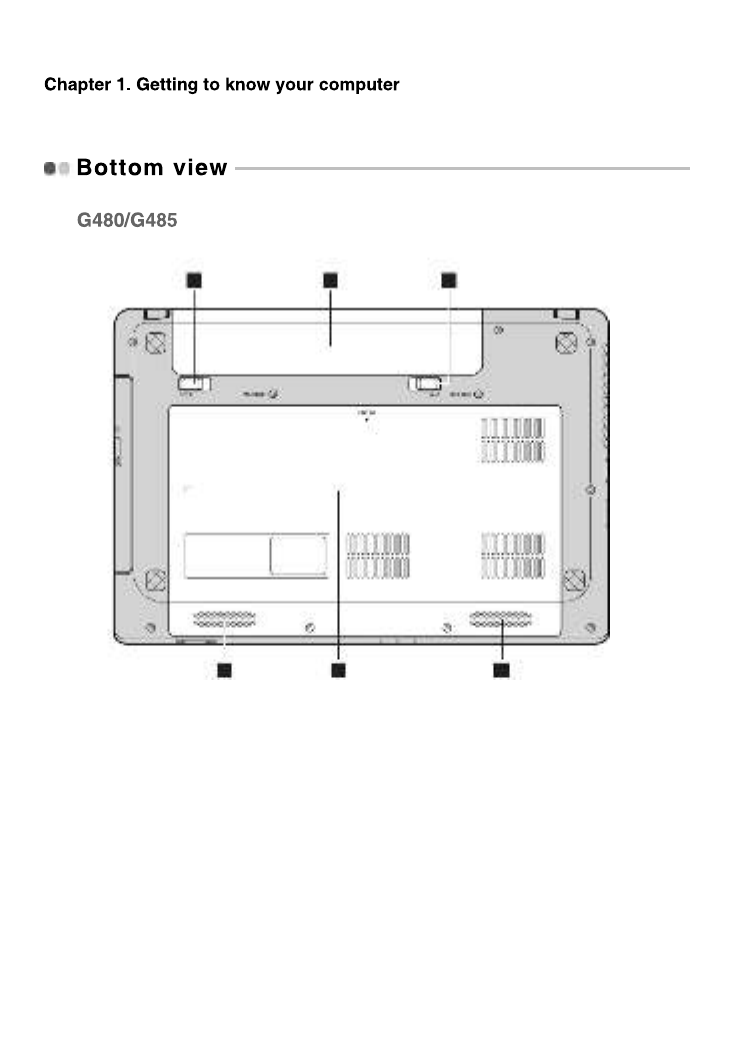
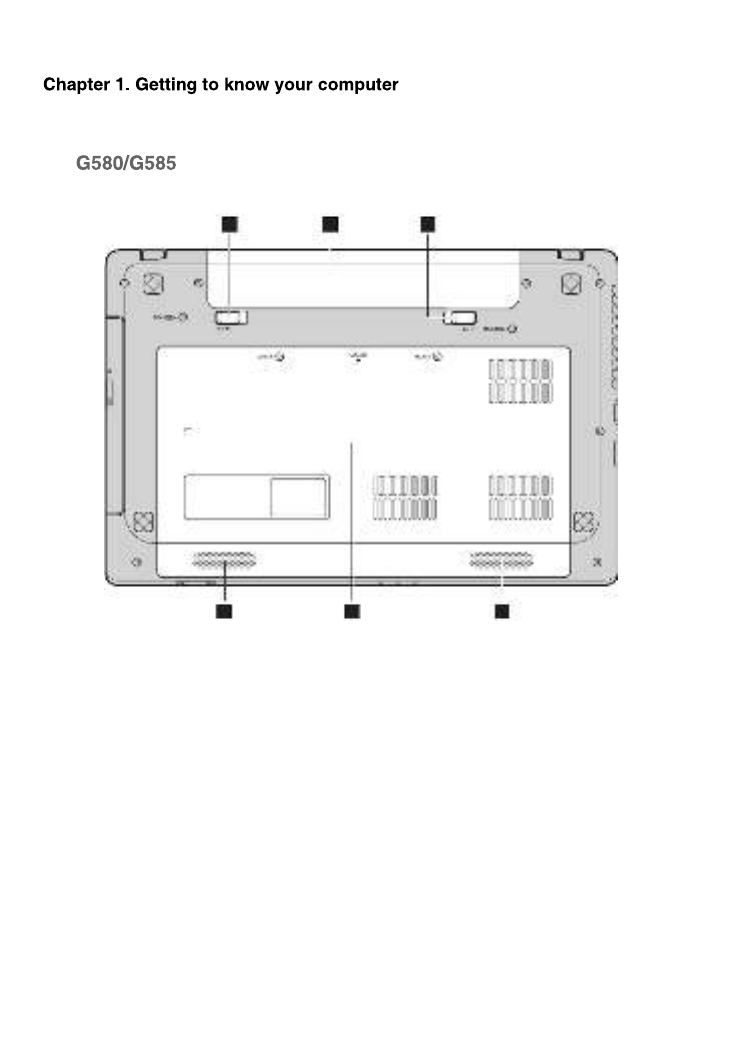
10
1 2 3
4 55
12
1 2 3
4 55
13
1 2 3
4 55

14
1 2 3
45 5

15
The manual battery latch is used to keep the battery pack
secured in place.
For details, see “Using AC adapter and battery” on page
18.
The spring-loaded battery latch keeps the battery pack
secured in place.
The stereo speakers provide rich and powerful sound.
For sound effects and speaker locations specific to your model, refer to the actual
product.
a
b
c
d
e

16
Read the supplied manuals before using your computer.
The supplied battery pack is not fully charged at purchase.
To charge the battery and begin using your computer, insert the battery pack
and connect the computer to an electrical outlet. The battery is automatically
charged while the computer is running on AC power.
Refer to the supplied Setup Poster to install the battery pack.
1
Connect the power cord to the AC adapter.
2
Connect the AC adapter to the AC power adapter jack of the computer
firmly.
3
Plug the power cord into an electrical outlet.
Press the power button to turn on the computer.
You may need to configure the operating system when it is first used. The
configuration process may include the procedures below.
• Accepting the end user license agreement
• Configuring the Internet connection
• Registering the operating system
• Creating a user account

17
When you finish working with your computer, you can put it into sleep state
or shut it down.
If you will be away from your computer for only a short time, put the
computer into sleep state.
When the computer is in sleep state, you can quickly wake it to resume use,
and bypass the startup process.
To put the computer into sleep state, do one of the following.
• Click and select Sleep from the Start menu.
• Press Fn + F1.
To wake the computer, do one of the following.
• Press the power button.
• Press any key on the keyboard.
If you are not going to use your computer for a day or two, shut it down.
To shut down your computer, click and select Shut down from the Start
menu.
Wait until the power indicator light starts blinking (indicating that the computer is in
sleep state) before you move your computer. Moving your computer while the hard
disk is spinning can damage the hard disk, causing loss of data.

18
You can determine the percentage of battery power remaining by checking
the battery icon in the notification area.
When you find that the battery power is low, you need to charge the battery
or replace it with a fully charged one.
You need to charge the battery in any of the following situations:
• When you purchase a new battery
• If the battery status indicator starts blinking
• If the battery has not been used for a long time
As each computer user has different habits and needs, it is difficult to predict how
long a battery charge will last. There are two main factors:
• The amount of energy stored in the battery when you commence work.
• The way you use your computer: for example, how often you access the hard
disk drive and how bright you make the computer display.
• You are advised to insert the battery pack when using your computer to prevent small
particles from entering the inside of your computer.
• To increase the life of the battery pack, the computer does not start recharging the
battery immediately after it drops from fully charged.
• Charge the battery at a temperature between 50 °F and 86 °F (10 °C-30 °C).
• Full charge or discharge is not required.

19
If you are not going to use the computer for an extended period of time, or if
you need to send your computer to Lenovo for service, etc. remove the
battery pack from the computer. Before removing the battery pack, make
sure the computer has been shut down.
If the rechargeable battery pack is replaced with an incorrect type, there may
be danger of an explosion. The battery pack contains a small amount of
harmful substances. To avoid possible injury and detriment to the
environment, pay attention to the following points:
• Replace only with a battery of the type recommended by Lenovo.
• Keep the battery pack away from fire.
• Do not expose the battery pack to water or rain.
• Do not attempt to disassemble the battery pack.
• Do not short-circuit the battery pack.
• Keep the battery pack away from children.
• Do not put the battery pack in trash that is disposed of in landfills. When
disposing of the battery, comply with local ordinances or regulations and
your company’s safety standards.

20
To move the cursor on the screen, slide your
fingertip over the pad in the direction in which
you want the cursor to move.
The function corresponds to that of the left
mouse button on a conventional mouse.
The function corresponds to that of the right
mouse button on a conventional mouse.
You can enable/disable the touchpad using Fn+F6.
1
2 3
a
b
c
21
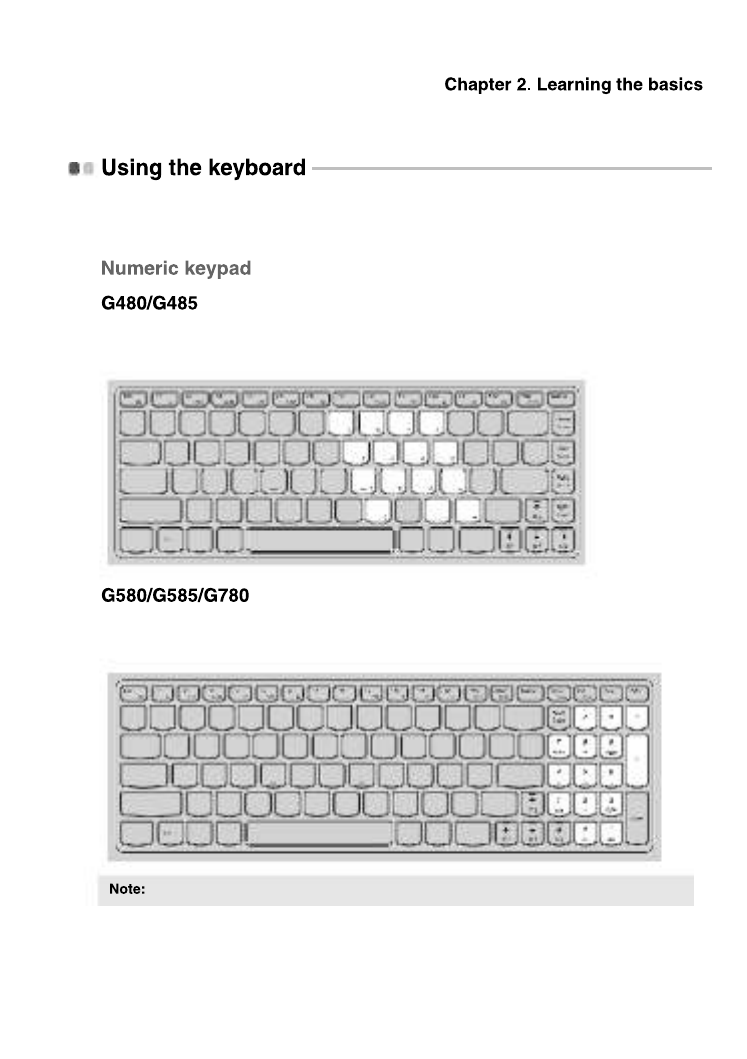
Your computer has a numeric keypad and function keys incorporated in its
standard keyboard.
The keyboard has keys that, when enabled, work as a 10-key numeric
keypad. To enable or disable the numeric keypad, press Fn+F8 .
The keyboard has a separate numeric keypad. To enable or disable the
numeric keypad, press the Num Lock key.
The Num lock indicator will light on if the numeric keypad is enabled (G780).
22
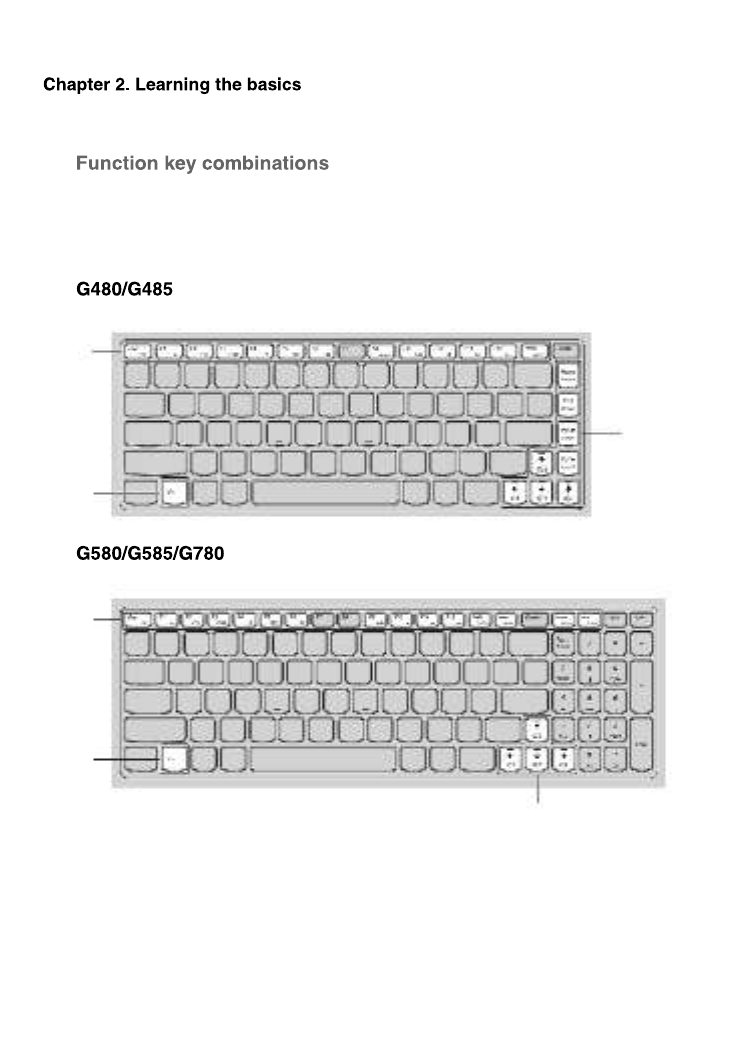
Through the use of the function keys, you can change operational features
instantly. To use this function, press and hold Fn ; then press one of the
function keys .
a
b
b
a
b
a
b
b

23
The following describes the features of each function key.
Turn on/off the integrated camera.
Enter sleep mode.
Turn on/off the backlight of the LCD screen.
Open the interface for the display device switch
to select this notebook or an external display.
Open the interface for display resolution
settings.
Open the interface for integrated wireless
devices settings (on/off).
Enable/Disable the touchpad.
Enable/Disable the numeric keypad.
Start/Pause playback of Windows Media Player.
Stop playback of Windows Media Player.
Skip to the previous track.
Skip to the next track.
Enable/Disable the scroll lock.
Activate the system request.
Activate the pause function.
Activate the break function.
Activate the insert function.
↑ / ↓Increase/Decrease display brightness.
→ / ←Increase/Decrease sound volume.

24
Your computer has a wide range of built-in features and connection
capabilities.
Your computer supports the following types of memory cards:
• Secure Digital (SD) card
• MultiMediaCard (MMC)
1
Push the dummy card until you hear a click. Gently pull the dummy card
out of the memory card slot.
2
Slide the memory card in until it clicks into place.
1
Push the memory card until you hear a click.
2
Gently pull the memory card out of the memory card slot.
• Insert ONLY one card in the slot at a time.
• This card reader does not support SDIO devices (e.g., SDIO Bluetooth, etc.).
The dummy card is used for preventing dust and small particles from entering the
inside of your computer when the memory card slot is not in use. Retain the dummy
card for future use.
Before removing the memory card, disable it via Windows safely remove hardware
and eject media utility to avoid data corruption.

25
Your computer comes with three or four USB ports compatible with USB
devices.
If your computer has an integrated Bluetooth adapter card, it can connect to
and transfer data wirelessly to other Bluetooth enabled devices, such as
notebook computers, PDAs and cell phones. You can transfer data between
these devices without cables and up to 10 meters range in open space.
Press Fn + F5 to make configuration.
When using a high power consumption USB device such as USB ODD, use the
external device’s power adapter. Otherwise, the device may not be recognized, and
system shut down may result.
The actual maximum range may vary due to interference and transmission barriers.
To get the best possible connection speed, place the device as near your computer as
possible.
• When you do not need to use the Bluetooth function, turn it off to save battery power.
• You need to pair the Bluetooth enabled device with your computer before you can transfer
data between them. Read the documentation supplied with the Bluetooth enabled device
for details on how to pair the device with your computer.

26
• When the computer is powered-off, press this button to start the OneKey
Rescue system if Lenovo OneKey Rescue system has been preinstalled.
• In Windows operating system, press this button to start Lenovo OneKey
Recovery.
For details, see “OneKey Rescue system” on page 33.
1
a

27
These indicators inform you of the computer status.
3 4 1
3
1
4 5 6
2

28
a
b
c
d
e
f

29
This section provides information about how to help protect your computer
from theft and unauthorized use.
You can attach a security lock to your computer to help prevent it from being
removed without your permission. For details on installing the security lock,
please refer to the instructions shipped with the security lock that you have
purchased.
Refer to the “Left-side view” on page 5 for the location of the Kensington
slot.
VeriFace is a face recognition software which takes a digital snapshot,
extracts key features of your face, and creates a digital map that becomes the
system’s “password”.
If you want to activate VeriFace for the first time, click the VeriFace icon on
the desktop to register your facial image.
For more details on VeriFace, see the software help.
• Before purchasing any security product, verify that it is compatible with this type of
security keyhole.
• You are responsible for evaluating, selecting, and implementing the locking devices and
security features. Lenovo offers no comment judgement or warranty regarding the
function, quality or performance of locking devices and security features.
• The face registration and verification works best in an environment with steady and even
light.
• You can determine whether to use this function when you log on the system.

30
Using passwords helps prevent your computer from being used by others.
Once you set a password and enable it, a prompt appears on the screen each
time you power on the computer. Enter your password at the prompt. The
computer cannot be used unless you enter the correct password.
For details about how to set the password, see the Help to the right of the
screen in the BIOS setup utility.
Optimus is a GPU switching mechanism which automatically switches the
active GPU to perform image-rendering tasks. If no graphics-intensive
programs are running, the integrated GPU will be selected as the active GPU
to preserve battery life; if you start high-definition movie playback or a 3D
game, the image-rendering task is automatically switched by Optimus to the
discrete GPU to produce high graphics performance.
When Optimus is enabled, switching between integrated and discrete GPUs
is performed automatically without user intervention.
This password can be from one to seven alphanumeric characters in any combination.
To enter BIOS setup utility, press F2 when the Lenovo logo appears on the screen while
the computer is starting up.

32
Wireless connections provide mobile access to the Internet, allowing you to
stay online anywhere the wireless signal covers.
Divided by the signal scales, wireless connection to the Internet can be built
based on the following standards.
To enable wireless communications, press Fn + F5 to make configuration.
Consult your Internet Service Provider (ISP) and search Windows Help and
Support Center for details on how to configure your computer.
Wi-Fi networks cover a small physical area, like a home,
office, or small group of buildings. An access point is
necessary for the connection.
WiMAX networks connect several Wireless LAN
systems to cover a metropolitan area, providing high-
speed broadband access without the need for cables.
The Mobile Broadband network provides Internet access
to computers, cell phones and other devices over a large
geographic area. Mobile networks are used for data
transmission, and access is usually provided by a mobile
network operator. A Mobile Broadband SIM card is
necessary for the connection.
Your computer may not support all wireless connection methods.
Access point *
Wi-Fi/WiMAX network
* Not supplied

33
The Lenovo OneKey Rescue system is an easy-to-use application that can be
used to back up the data on your system partition (C drive) for easy restore
when required. You can run Lenovo OneKey Recovery under the Windows
operating system, and the OneKey Rescue system without starting the
Windows operating system.
In order to utilize the features of the OneKey Rescue system, your hard disk
already includes a hidden partition by default to store the system image file
and OneKey Rescue system program files. This default partition is hidden
for security reasons and is the reason the available disk space is less than it
claims. The exact available hard disk space depends on the file size of the
mirror image file (based on the size of operating system and preinstalled
software).
In Windows operating system, double click the OneKey Recovery system
Icon on the desktop to launch Lenovo OneKey Recovery.
Within the program, you can back up the system partition on the hard disk
drive, other storage devices, or by creating recovery discs.
• The backup process and creation of recovery discs may take some time, connect the AC
adapter and battery pack to your computer.
• After the recovery discs are burned, please number them so that you can use them in the
correct order.
• Computers without an integrated optical drive support the creation of recovery discs;
however an appropriate external optical drive is needed to physically create the recovery
discs.

34
In the event that the operating system cannot be loaded, follow the steps
below to access OneKey Rescue system.
• Shut down your computer.
• Press the key to launch OneKey Rescue system.
Within the program, you can choose to restore your system partition to the
original factory status, or to a previously generated backup.
The recovery process is irreversible. Make sure to back up any critical data before
using the recovery feature.
35
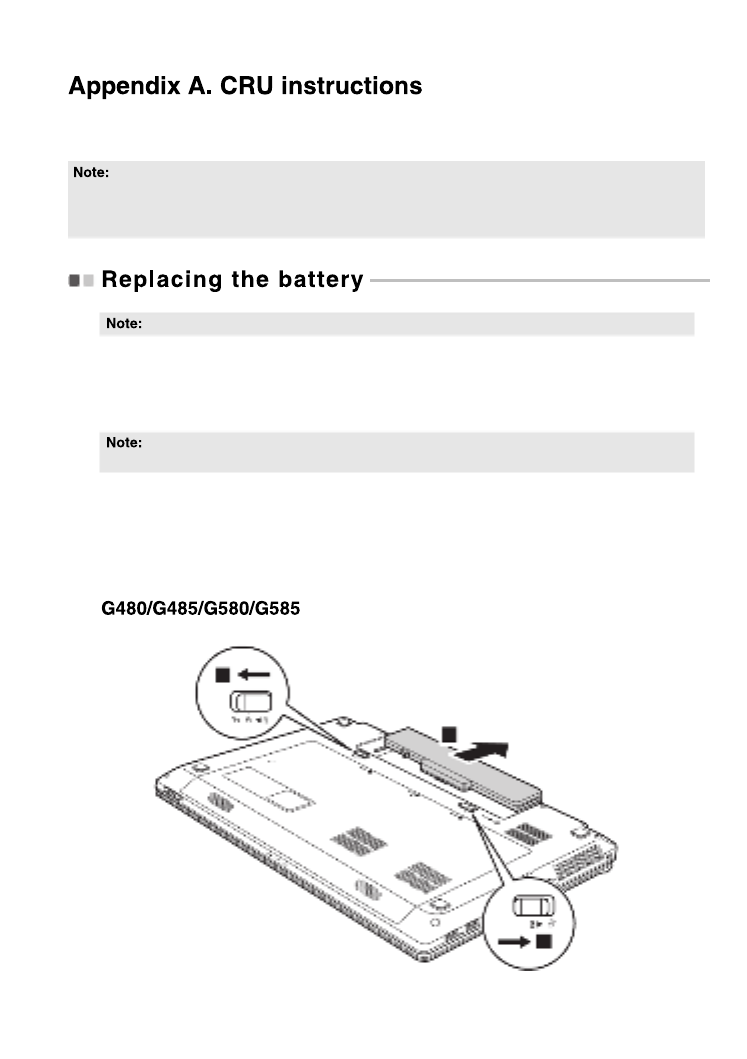
To replace the battery, do the following:
1
Turn off the computer, or enter hibernation mode. Disconnect the AC
adapter and all cables from the computer.
2
Close the computer display, and turn the computer over.
3
Unlock the manual battery latch . Holding the spring-loaded battery
latch in the unlocked position , remove the battery pack in the direc-
tion shown by the arrow .
• The illustrations used in this chapter are of the Lenovo G580, unless otherwise stated.
• The following procedures about removing and replacing devices are the same for the Lenovo
G480/G485/G580/G585/G780.
Use only the battery provided by Lenovo. Any other battery could ignite or explode.
If you are using an ExpressCard device, the computer might not be able to enter
hibernation mode. If this happens, turn off the computer.
a
b
c
1
2
3

36
4
Install a fully charged battery.
5
Slide the manual battery latch to the locked position.
6
Turn the computer over again. Connect the AC adapter and the cables to
the computer again.
3
1
2

37
You can increase the storage capacity of your computer by replacing the hard
disk drive with one of greater capacity. You can purchase a new hard disk
drive from your reseller or Lenovo marketing representative.
The drive is very sensitive. Incorrect handling can cause damage and perma-
nent loss of data on the hard disk. Before removing the hard disk drive, make
a backup copy of all the information on the hard disk, and then turn the com-
puter off. Never remove the drive while the system is operating, in sleep
mode, or in hibernation mode.
• Replace the hard disk drive only if you upgrade it or have it repaired. The connectors and
bay of the hard disk drive were not designed for frequent changes, or drive swapping.
• The preinstalled softwares are not included on an optional hard disk drive.
Do not drop the drive or subject it to physical shocks. Put the drive on a material,
such as soft cloth, that absorbs the physical shock.
Do not apply pressure to the cover of the drive.
Do not touch the connector.
Specyfikacje produktu
| Marka: | Lenovo |
| Kategoria: | laptop |
| Model: | Essential G580H |
| Kolor produktu: | Black, Brown |
| Typ produktu: | Laptop |
| Wysokość produktu: | 34.3 mm |
| Szerokość produktu: | 376 mm |
| Głębokość produktu: | 245 mm |
| Waga produktu: | 2600 g |
| Podręcznik użytkownika: | Tak |
| Certyfikat środowiskowy (zrównoważonego rozwoju): | RoHS, EPEAT Gold, ENERGY STAR |
| Bluetooth: | Tak |
| Zasilacz sieciowy: | Tak |
| Technologia baterii: | Litowo-jonowa (Li-Ion) |
| Długość przekątnej ekranu: | 15.6 " |
| Obsługiwane typy kart pamięci: | MMC, SD |
| Prędkość transferu danych przez Ethernet LAN: | 10, 100 Mbit/s |
| Ilość portów Ethernet LAN (RJ-45): | 1 |
| Układ: | Muszla |
| Rozdzielczość: | 1366 x 768 px |
| Natywne proporcje obrazu: | 16:9 |
| Ekran dotykowy: | Nie |
| Taktowanie procesora: | 2.4 GHz |
| Typ procesora: | Intel® Pentium® |
| Model procesora: | 2020M |
| Rozdzielczość kamery przedniej: | 0.3 MP |
| Wi-Fi: | Tak |
| Standardy Wi- Fi: | 802.11b, 802.11g, Wi-Fi 4 (802.11n) |
| Liczba portów USB 2.0: | 1 |
| Przewodowa sieć LAN: | Tak |
| Zintegrowany czytnik kart: | Tak |
| Typ portu ładowania: | DC-in jack |
| Producent procesora: | Intel |
| Liczba rdzeni procesora: | 2 |
| Typ pamięci wewnętrznej: | DDR3-SDRAM |
| Pamięć wewnętrzna: | 4 GB |
| Ilość portów USB 3.2 Gen 1 (3.1 Gen 1) Typu-A: | 2 |
| Zainstalowany system operacyjny: | Nie |
| Maksymalna pojemność pamięci: | 16 GB |
| Gniazdo procesora: | PGA988 |
| Układ płyty głównej: | Intel HM76 Express |
| Ilość portów HDMI: | 1 |
| Port wyjścia S/PDIF: | Nie |
| Mikrofon: | Nie |
| Przewód zasilający dołączony: | Tak |
| Klawiatura numeryczna: | Tak |
| Urządzenie wskazujące: | Panel dotykowy |
| Kensington Lock: | Tak |
| Typ gniazda zamka kabla: | Kensington |
| Liczba portów VGA (D-Sub): | 1 |
| Nośniki: | HDD |
| Ilość wbudowanych glosników: | 2 |
| System dźwięku: | Dolby Advanced Audio 2 |
| Kamera przednia: | Tak |
| Port DVI: | Nie |
| Powierzchnia wyświetlacza: | Połysk |
| Czas pracy na zasilaniu akumulatorowym: | 5 h |
| Wbudowany mikrofon: | Tak |
| Podświetlenie LED: | Tak |
| Częstotliwość adaptera AC: | 50 - 60 Hz |
| Napięcie wejściowe adaptera AC: | 100 - 240 V |
| Klawisze Windows: | Tak |
| Pełnowymiarowa klawiatura: | Tak |
| Gniazda pamięci: | 2x SO-DIMM |
| Gniazdo smartcard: | Nie |
| Pojemność HDD: | 1000 GB |
| Rozmiar HDD: | 2.5 " |
| Całkowita pojemność przechowywania: | 1000 GB |
| Ochrona hasłem: | Tak |
| Procesor ARK ID: | 71142 |
| Technologia Intel® Hyper Threading (Intel® HT Technology): | Nie |
| Technologia Intel® Turbo Boost: | Nie |
| Technologia Intel® Quick Sync Video: | Nie |
| Technologia Intel® InTru™ 3D: | Nie |
| Technologia Intel® Clear Video HD (Intel® CVT HD): | Nie |
| Nowe instrukcje AES (Intel® AES-NI): | Nie |
| Technologia Udoskonalona Intel SpeedStep: | Tak |
| Technologia Intel® Trusted Execution: | Nie |
| Maksymalna konfiguracja CPU: | 1 |
| Intel® Enhanced Halt State: | Tak |
| Intel® Clear Video Technology dla MID (Intel® CVT for MID): | Nie |
| Intel® VT-x with Extended Page Tables (EPT): | Tak |
| Intel® 64: | Tak |
| Technologia Wirtualizacji Intel® (Directed I/O) (VT-d): | Nie |
| Technologia Intel® Clear Video: | Nie |
| Technologia virtualizacji Intel® (VT-x): | Tak |
| Interfejs HDD: | SATA |
| Typ pamięci procesora: | Smart Cache |
| Cache procesora: | 2 MB |
| Wskaźnik magistrali systemowej: | 5 GT/s |
| Litografia procesora: | 22 nm |
| Liczba wątków: | 2 |
| Tryb pracy procesora: | 64-bit |
| Nazwa kodowa procesora: | Ivy Bridge |
| Pamięć ECC wspierana przez procesor: | Nie |
| Maksymalna liczba linii PCI Express: | 16 |
| Konfiguracje PCI Express: | 1x16, 2x8, 1x8+2x4 |
| Termiczny układ zasilania (TDP): | 35 W |
| Bezkonfliktowy procesor: | Tak |
| Stepping: | L1 |
| Instrukcje obsługiwania: | SSE4.1, SSE4.2 |
| Kod procesora: | SR0U1 |
| Technologia Execute Disable Bit (EDB): | Tak |
| Stan spoczynku: | Tak |
| Technologie Thermal Monitoring: | Tak |
| Wbudowane opcje dostępne: | Nie |
| Typ magistrali: | DMI |
| Wielkość opakowania procesora: | 37.5 x 37.5 (rPGA988B) mm |
| Prędkość zegara pamięci: | 1600 MHz |
| Karta graficzna on-board: | Tak |
| Model karty graficznej on-board: | Intel® HD Graphics |
| Wersja gniazd typu Slot (PCI Express): | 2.0 |
| Rozdzielczość przedniej kamery: | 1280 x 720 px |
| Parytet FSB: | Nie |
| Rozgałęźnik T: | 90 °C |
| Magistrala systemowa: | - MHz |
| Seria procesora: | Intel Pentium 2000 series for Mobile |
| Wbudowana bazowa częstotliwość procesora: | 650 MHz |
| Dynamiczne taktowanie wbudowanej karty graficznej (max): | 1100 MHz |
| Model dedykowanej karty graficznej: | Niedostępny |
| Typ zintegrowanej karty graficznej: | Intel® HD Graphics |
| Intel® Small Business Advantage (Intel® SBA): | Nie |
| Intel® Wireless Display (Intel® WiDi): | Nie |
| Technologia Intel® My WiFi (Intel® MWT): | Tak |
| Technologia Intel® Identity Protection (Intel® IPT): | Nie |
| Technologia Intel® Anti-Theft (Intel® AT): | Nie |
| Intel® Insider™: | Nie |
| Technologia Intel® FDI: | Tak |
| Intel® Flex Memory Access: | Tak |
| Intel® Fast Memory Access: | Tak |
| Intel® Smart Cache: | Tak |
| Intel® Demand Based Switching: | Nie |
| Układ graficzny i litografia IMC: | 22 nm |
| Technologia Intel® Dual Display Capable: | Tak |
| Intel® Rapid Storage Technology: | Nie |
| Napędy optyczne: | DVD Super Multi |
| Port dla zestaw słuchawka/mikrofon: | Tak |
| Rodzaj pamięci: | SO-DIMM |
| Dedykowana karta graficzna: | Nie |
| Złącze dokowania: | Nie |
| Obsluga ExpressCard: | Nie |
| Typ gniazda cardbus pcmcia: | Nie |
| Technologia Intel® Smart Connect: | Nie |
| Technologia Intel® Rapid Start: | Nie |
| Technologia Intel® Smart Response: | Nie |
| Intel® Matrix Storage Technology (Intel® MST): | Nie |
| Intel HD Audio Technology: | Nie |
| Intel® Active Management Technology (Intel® AMT): | Nie |
| Ilość komór baterii: | 6 |
| Współczynnik Magistrala/Rdzeń: | 24 |
| Maksymalna pamięć wewnętrzna (64-bit): | 16 GB |
| Liczba zainstalowanych HDD: | 1 |
| Moc głośnika: | 1.5 W |
| Zintegrowany 4G WiMAX: | Nie |
Potrzebujesz pomocy?
Jeśli potrzebujesz pomocy z Lenovo Essential G580H, zadaj pytanie poniżej, a inni użytkownicy Ci odpowiedzą
Instrukcje laptop Lenovo

28 Marca 2025
26 Marca 2025
23 Lutego 2025
7 Lutego 2025
7 Lutego 2025
31 Stycznia 2025
7 Grudnia 2024
12 Października 2024
8 Października 2024
8 Października 2024
Instrukcje laptop
- laptop Sony
- laptop Samsung
- laptop Fellowes
- laptop LG
- laptop Xiaomi
- laptop Huawei
- laptop Gigabyte
- laptop Acer
- laptop Fujitsu
- laptop Panasonic
- laptop Viewsonic
- laptop Asus
- laptop Medion
- laptop MSI
- laptop Toshiba
- laptop Haier
- laptop HP
- laptop Prixton
- laptop Hyundai
- laptop Honor
- laptop Tripp Lite
- laptop Zebra
- laptop Dell
- laptop Schneider
- laptop Thomson
- laptop Pyle
- laptop Apple
- laptop Razer
- laptop ADATA
- laptop GoClever
- laptop SPC
- laptop NEC
- laptop Oregon Scientific
- laptop Jay-Tech
- laptop Microsoft
- laptop ECS
- laptop XPG
- laptop Denver
- laptop Lexibook
- laptop Micromax
- laptop Odys
- laptop TechBite
- laptop TrekStor
- laptop Alienware
- laptop Airis
- laptop Emachines
- laptop Hähnel
- laptop Sylvania
- laptop Coby
- laptop Evga
- laptop Naxa
- laptop Ricatech
- laptop Mpman
- laptop Vizio
- laptop Targa
- laptop Peaq
- laptop Ematic
- laptop Hannspree
- laptop Inovia
- laptop Ergotron
- laptop Ibm
- laptop Atdec
- laptop Packard Bell
- laptop Compaq
- laptop SIIG
- laptop Hercules
- laptop Kogan
- laptop Getac
- laptop Vulcan
- laptop System76
- laptop General Dynamics Itronix
- laptop CTL
- laptop Everex
- laptop Olidata
- laptop Dynabook
- laptop Hamilton Buhl
- laptop AORUS
- laptop Humanscale
- laptop Aplic
- laptop Schenker
Najnowsze instrukcje dla laptop

3 Kwietnia 2025

2 Kwietnia 2025

28 Marca 2025
13 Marca 2025
7 Marca 2025

4 Marca 2025
1 Marca 2025
26 Lutego 2025
23 Lutego 2025
22 Lutego 2025