Instrukcja obsługi Lenovo Chromebook 100e G2
Przeczytaj poniżej 📖 instrukcję obsługi w języku polskim dla Lenovo Chromebook 100e G2 (66 stron) w kategorii laptop. Ta instrukcja była pomocna dla 6 osób i została oceniona przez 2 użytkowników na średnio 4.5 gwiazdek
Strona 1/66

Lenovo 100e/300e 2nd Gen
User Guide

Read this first
Before using this documentation and the product it supports, ensure that you read and understand the
following:
• Appendix A “Important safety information” on page 31
• Safety and Warranty Guide
• Setup Guide
Second Edition (May 2021)
© Copyright Lenovo 2020, 2021.
LIMITED AND RESTRICTED RIGHTS NOTICE: If data or software is delivered pursuant to a General Services
Administration “GSA” contract, use, reproduction, or disclosure is subject to restrictions set forth in Contract No. GS-
35F-05925.

Contents
About this documentation . . . . . . . . iii
Chapter 1. Meet your computer . . . . . 1
Front . . . . . . . . . . . . . . . . . . . . 1
Base . . . . . . . . . . . . . . . . . . . . 2
Left . . . . . . . . . . . . . . . . . . . . 3
Right . . . . . . . . . . . . . . . . . . . . 5
Bottom . . . . . . . . . . . . . . . . . . . 6
Features and specifications . . . . . . . . . . . 7
Statement on USB transfer rate . . . . . . . . 8
Chapter 2. Get started with your
computer . . . . . . . . . . . . . . . . . 9
Connect to Wi-Fi networks . . . . . . . . . . . 9
Interact with your computer . . . . . . . . . . . 9
Use Hotkeys . . . . . . . . . . . . . . . 9
Use the multi-touch screen (for Lenovo 300e
2nd Gen only) . . . . . . . . . . . . . . 11
Connect to an external display . . . . . . . 12
Operating modes . . . . . . . . . . . . 14
Lenovo Integrated Pen (for selected models of
Lenovo 300e 2nd Gen) . . . . . . . . . . 15
Chapter 3. Explore your computer . . 17
Lock the computer . . . . . . . . . . . . . 17
Use the Vantage app . . . . . . . . . . . . . 17
Manage power . . . . . . . . . . . . . . . 18
Check the battery status . . . . . . . . . 18
Charge the battery . . . . . . . . . . . . 18
Change the power settings . . . . . . . . 18
Transfer data . . . . . . . . . . . . . . . . 19
Set up a Bluetooth connection . . . . . . . 19
Use a microSD card . . . . . . . . . . . 19
Chapter 4. Configure advanced
settings. . . . . . . . . . . . . . . . . 21
UEFI BIOS setup utility . . . . . . . . . . . . 21
Enter the UEFI BIOS setup utility . . . . . . 21
Change the startup sequence . . . . . . . 21
Change the hotkey mode . . . . . . . . . 21
Enable or disable the Always On USB
function . . . . . . . . . . . . . . . . 21
Use passwords . . . . . . . . . . . . . . . 21
Password types . . . . . . . . . . . . . 21
Set an administrator password . . . . . . . 22
Change or remove the administrator
password . . . . . . . . . . . . . . . 22
Set a user password . . . . . . . . . . . 22
Change or remove the user password . . . . 23
Enable the power on password . . . . . . . 23
Set a hard disk password . . . . . . . . . 23
Change or remove the hard disk password . . 24
Use firewalls and antivirus programs. . . . . . . 24
Chapter 5. Help and support . . . . . 25
Frequently asked questions . . . . . . . . . . 25
Self-help resources . . . . . . . . . . . . . 26
Windows label . . . . . . . . . . . . . . . 27
What are CRUs . . . . . . . . . . . . . . . 27
Call Lenovo . . . . . . . . . . . . . . . . 28
Before you contact Lenovo . . . . . . . . 28
Lenovo Customer Support Center . . . . . . 29
Appendix A. Important safety
information . . . . . . . . . . . . . . . 31
Appendix B. Accessibility and
ergonomic information . . . . . . . . 45
Appendix C. Compliance
information . . . . . . . . . . . . . . . 47
Appendix D. Notices and
trademarks. . . . . . . . . . . . . . . 59
© Copyright Lenovo 2020, 2021 i

ii Lenovo 100e/300e 2nd Gen User Guide

About this documentation
• Illustrations in this documentation might look different from your product. Please refer to the actual
product.
• Depending on the model, some optional accessories, features, and software programs might not be
available on your computer.
• Depending on the version of operating systems and programs, some user interface instructions might not
be applicable to your computer.
• Documentation content is subject to change without notice. Lenovo makes constant improvements on the
documentation of your computer, including this User Guide. To get the latest documentation, go to
https://
support.lenovo.com.
• Microsoft® makes periodic feature changes to the Windows
® operating system through Windows Update.
As a result, some information in this documentation might become outdated. Refer to Microsoft resources
for the latest information.
© Copyright Lenovo 2020, 2021 iii

iv Lenovo 100e/300e 2nd Gen User Guide
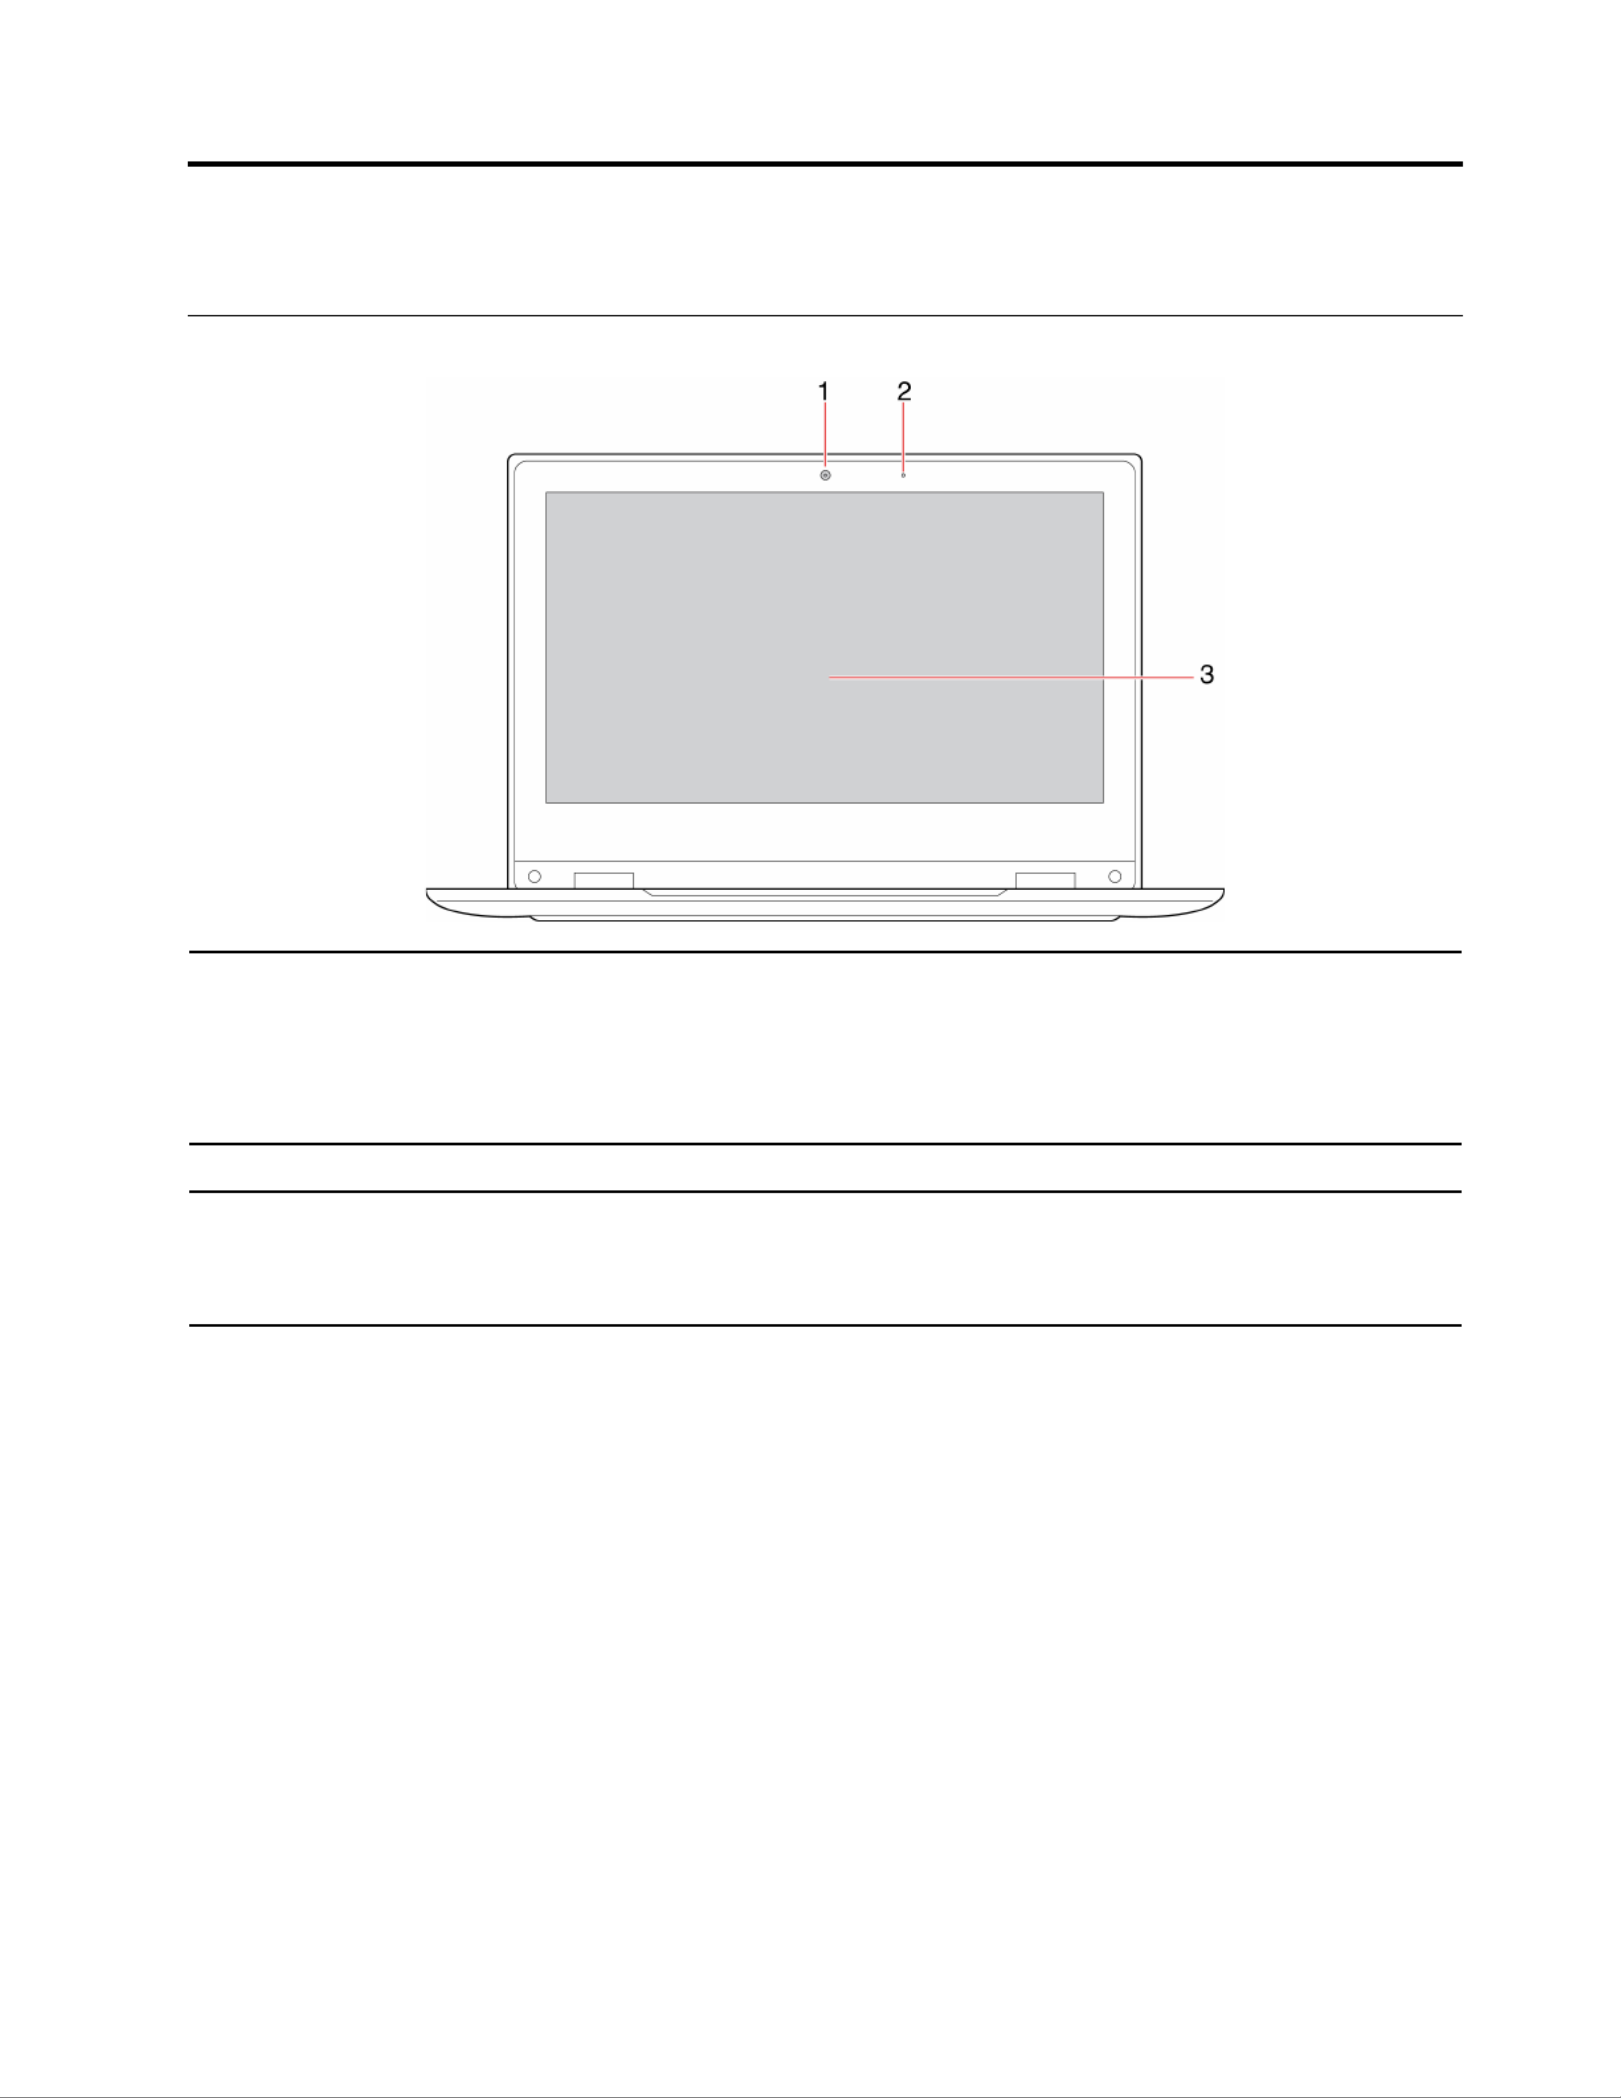
Chapter 1. Meet your computer
Front
1. Front camera
Take pictures or record videos by clicking Camera from the Start menu. The
indicator next to the camera is on when the camera is in use.
If you use other apps that support photographing, video chatting, and video
conference, the camera starts automatically when you enable the camera-
required feature from the app.
2. Microphone Captures or records sound and voice.
3. Screen
Displays text, graphics, and videos.
Select models support multi-touch function. See “Use the multi-touch screen (for
Lenovo 300e 2nd Gen only)” on page 11.
© Copyright Lenovo 2020, 2021 1
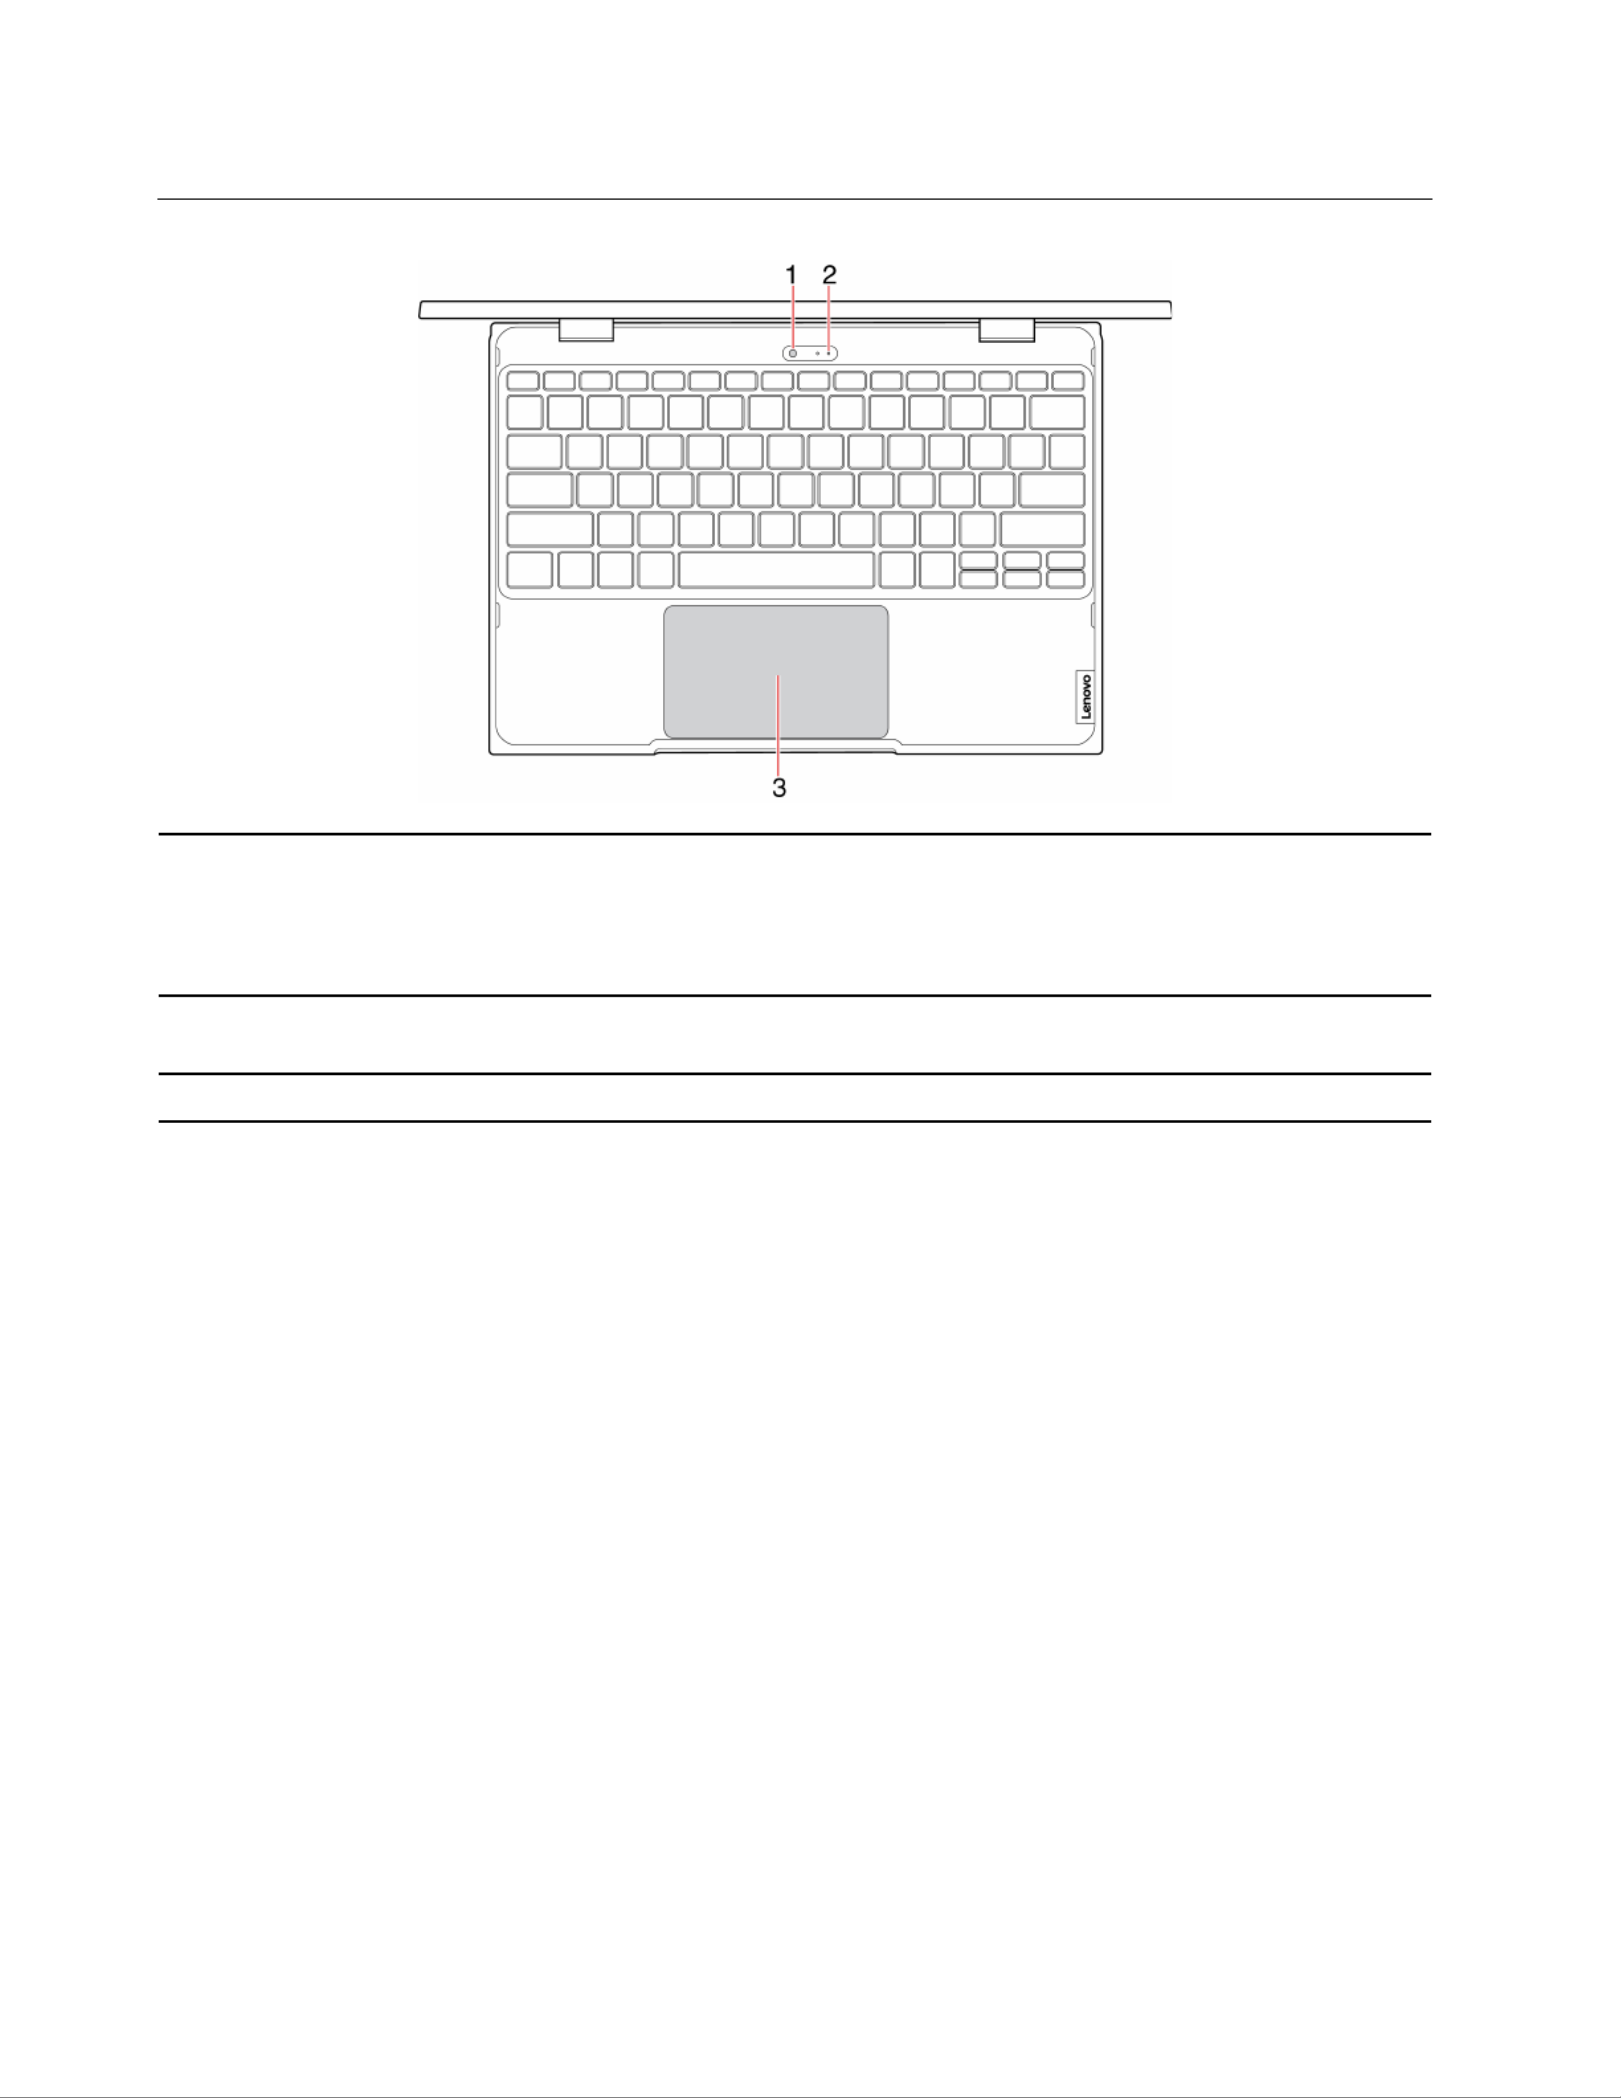
Base
1. World-Facing camera*
Take pictures or record videos.
If you use other apps that support photographing, video chatting, and video
conference, the camera starts automatically when you enable the camera-
required feature from the app.
2. Microphone* Captures or records sound and voice.
Note: This microphone is only available when the World-Facing camera is in use.
3. Touchpad Performs finger touch and all the functions of a traditional mouse.
* for selected models of Lenovo 300e 2nd Gen
2Lenovo 100e/300e 2nd Gen User Guide
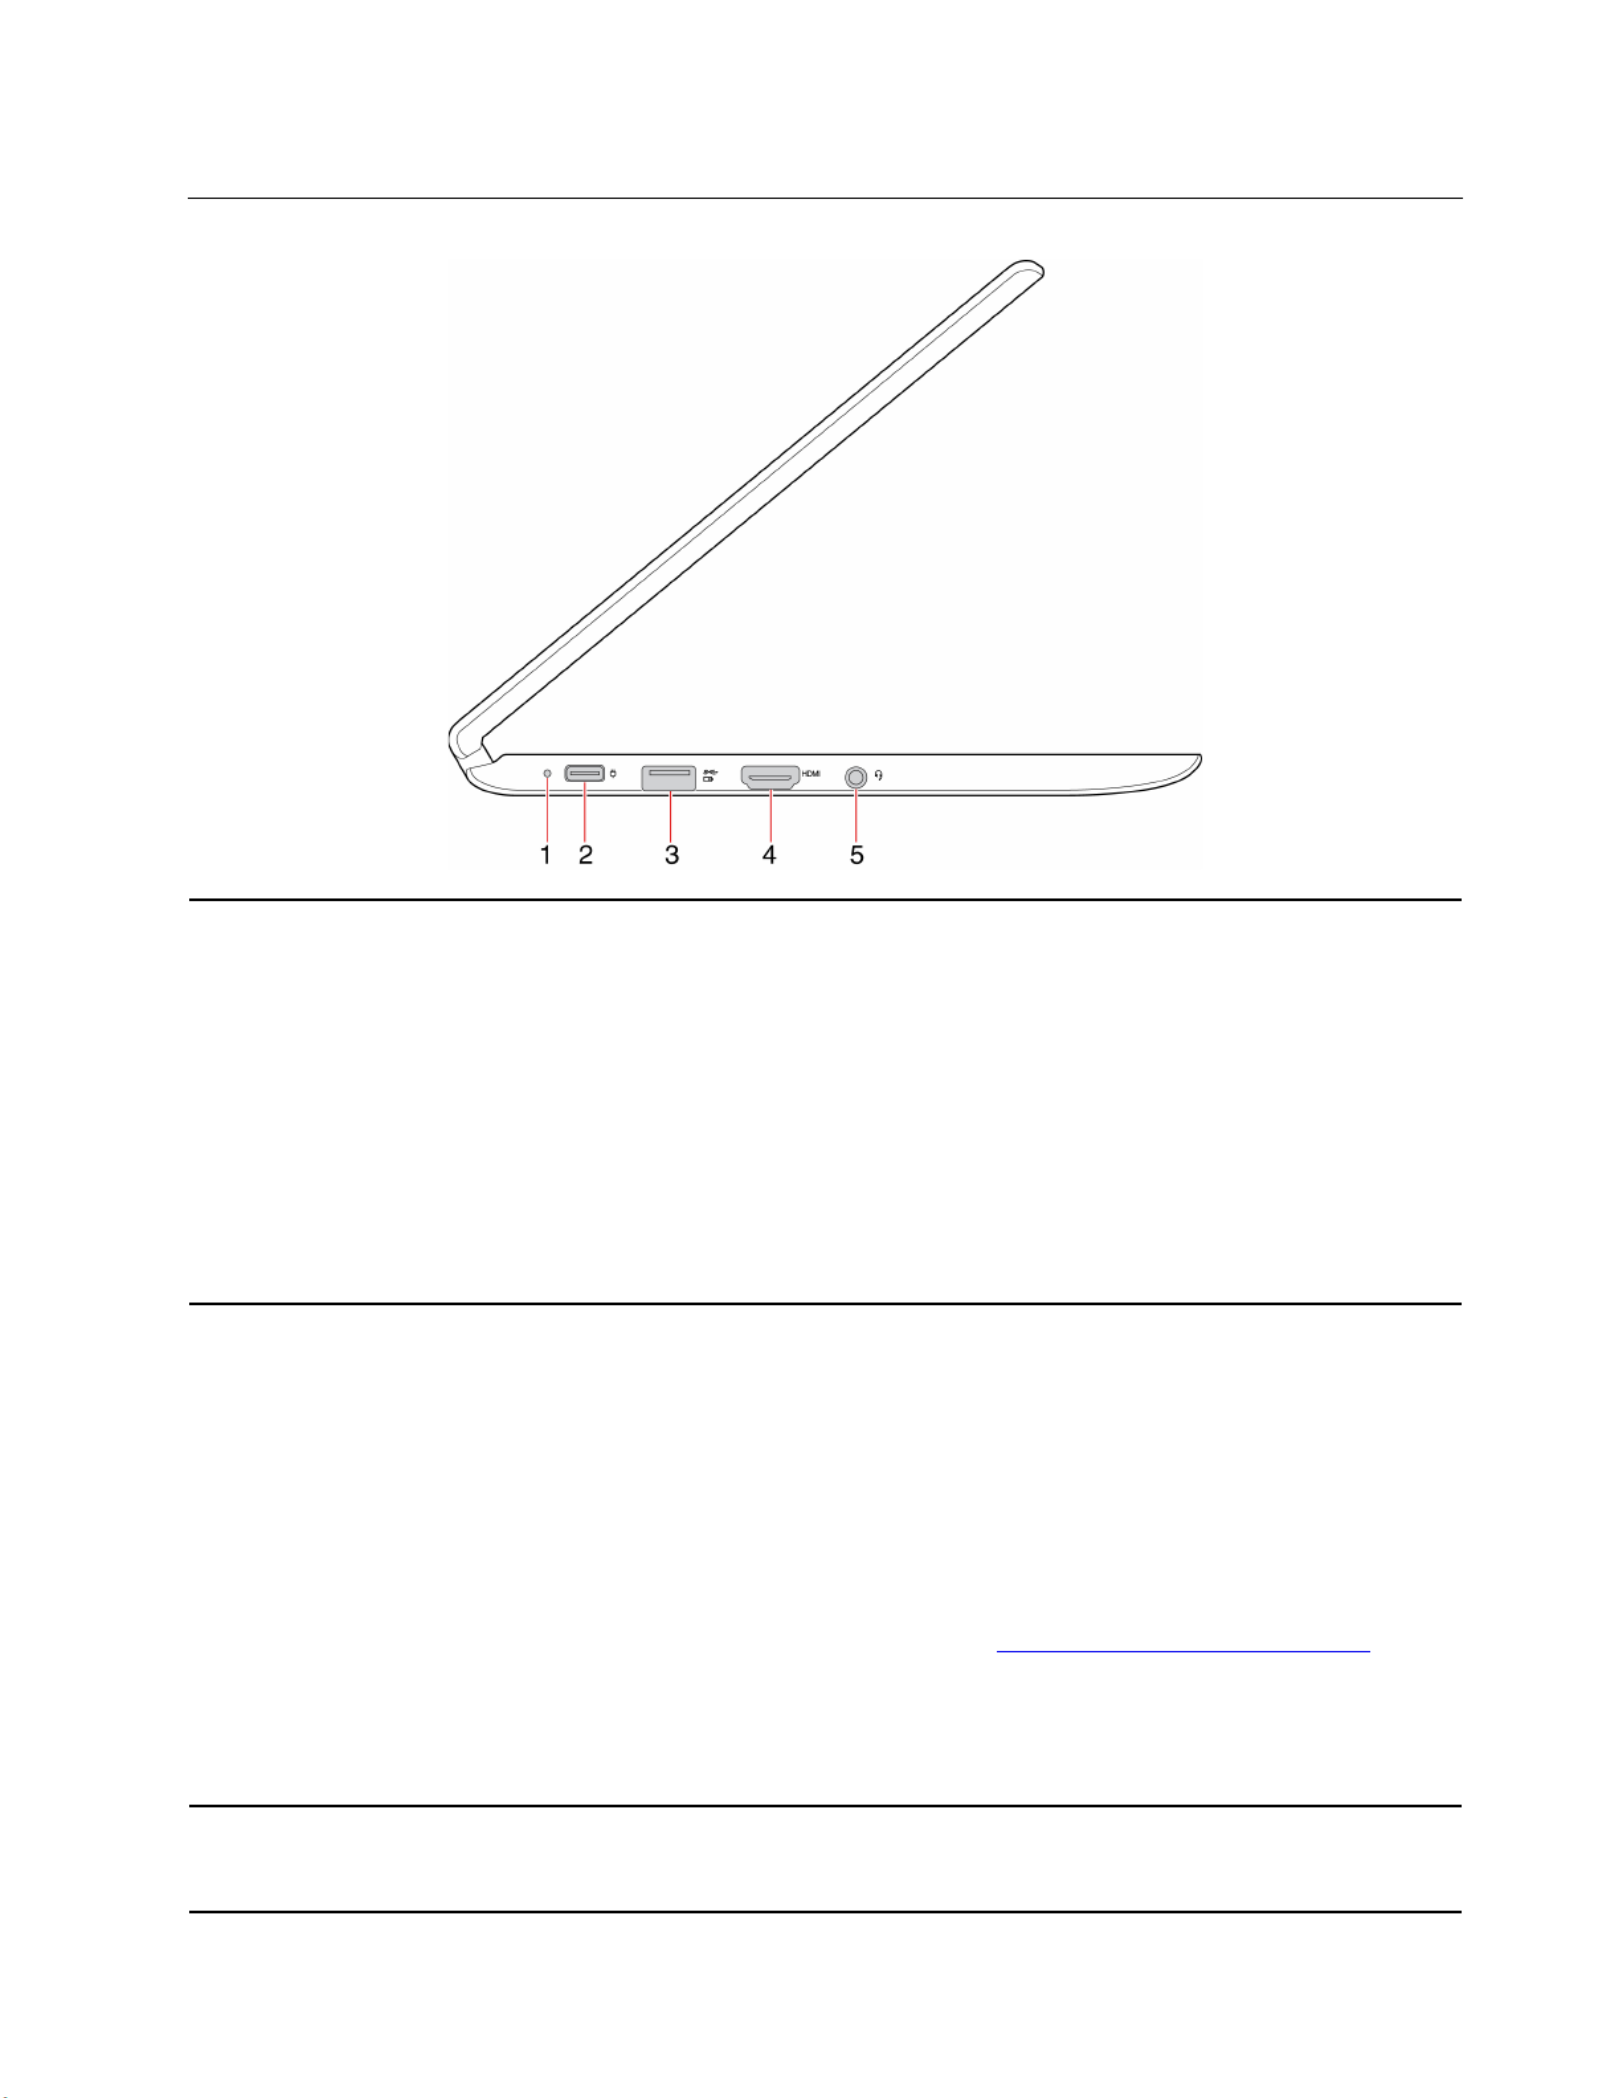
Left
1. Battery/Charging status
indicator
This indicator shows whether the ac power is connected to the computer and the
battery power status of the computer.
• Connected to ac power:
– Solid white (battery power 80%–100%)
– Slow blinking white (battery power 20%–80%)
– Slow blinking amber (battery power 1%–20%)
• Not connected to ac power:
– Off (battery power 20%–100%)
– Solid amber (battery power 5%–20%)
– Fast blinking amber (battery power 1%–5%)
2. USB-C connector / Power ™
connector
• Charges your computer.
• Charges USB-C compatible devices with the output voltage and current of 5 V
and 3 A.
• Transfers data at USB 3.1 speed, up to 5 Gbps.
• Connects to an external display.
– USB-C to VGA: 1900 × 1200 pixels, 60 Hz
– USB-C to DP: 3840 × 2160 pixels, 60 Hz
• Connects to USB-C accessories to expand computer functionality. To
purchase USB-C accessories, go to https://www.lenovo.com/accessories
Note: When the battery power is below 10%, the connected USB-C
accessories might not work correctly.
This connector also works as the power connector. Connect the computer to ac
power with the shipped USB-C power adapter and power cord.
3. Always On USB 3.1 connector
Gen 1
To charge the USB-compatible devices when your computer is off, in sleep mode,
or in hibernation mode, enable the Always On USB feature on your computer. See
“Enable or disable the Always On USB function” on page 21.
Chapter 1 Meet your computer.3

4. HDMI connector ™ Connect to a compatible digital audio device or video monitor, such as an HDTV.
5. Audio connector
Connect headphones or a headset with a 3.5-mm (0.14-inch) and 4-pole plug to
listen to the sound from the computer.
Note: The audio connector does not support conventional microphones.
4Lenovo 100e/300e 2nd Gen User Guide

Right
1. Pen slot* For Lenovo 300e 2nd Gen, selected models are equipped with Lenovo Integrated
Pen (an electronic pen). Use the pen slot to store Lenovo Integrated Pen.
2. Volume up/down button* Increase/decrease the volume level.
3. Power button
Press to turn on the computer or put the computer to sleep mode.
To turn off the computer, open the Start menu, click Power, and then click
Shut down.
The indicator on the power button shows the system status of your computer.
• : The computer is on.On
• : The computer is off or in hibernation mode.Off
• : The computer is in sleep mode.Blinking
4. USB 3.1 connector Gen 1 Connect to USB-compatible devices, such as a USB keyboard, USB mouse, USB
storage device, or USB printer.
5. MicroSD card slot Insert a microSD card for data access or storage.
6. Mini security-lock slot Lock your computer to a desk, table, or other fixtures through a compatible
security cable lock.
* for Lenovo 300e 2nd Gen only
Chapter 1 Meet your computer.5
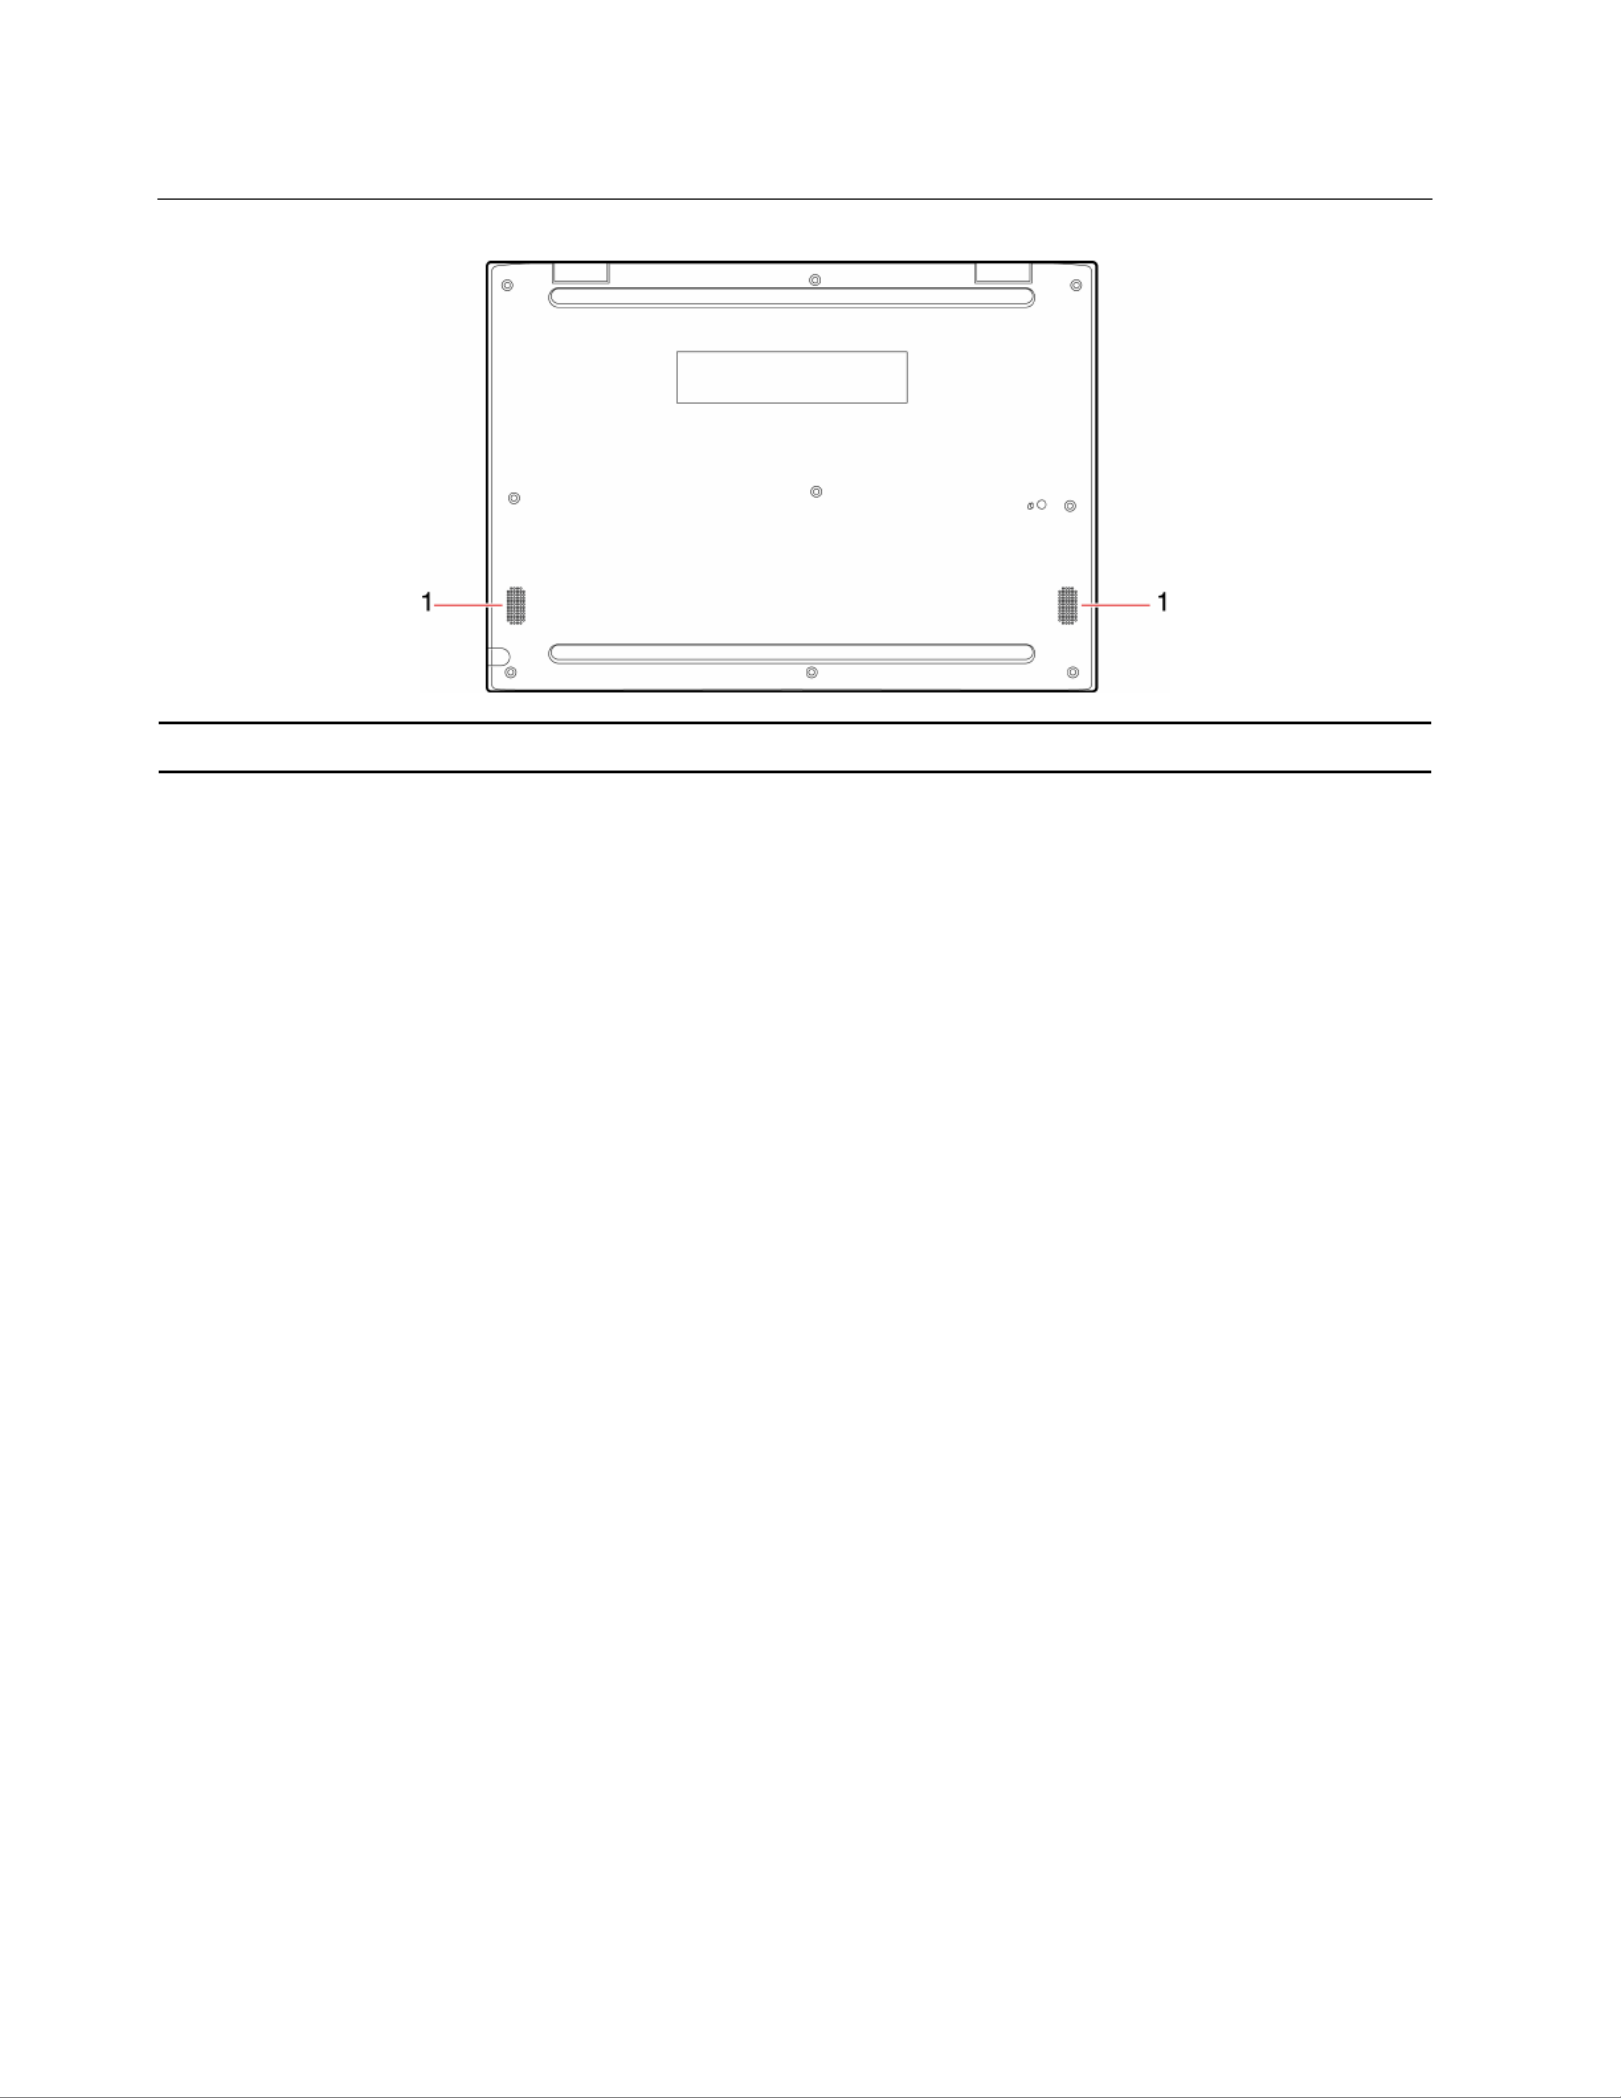
Bottom
1. Speakers Produce sound.
6Lenovo 100e/300e 2nd Gen User Guide

Features and specifications
Dimensions
• Length: 290 mm (11.4 inches)
• Width: 204 mm (8.1 inches)
• Thickness:
– Lenovo 100e 2nd Gen: 19.9 mm (0.78 inches)
– Lenovo 300e 2nd Gen: 20.85 mm (0.82 inches)
Power source (ac power
adapter)
• Sine-wave input at 50 Hz to 60 Hz
• Input rating of the ac power adapter: 100 V to 240 V ac, 50 Hz to 60 Hz
Battery • 42 Wh
• 3 cells
Memory Low Power Double data rate (LPDDR) 4, on-board memory
Storage device M.2 solid-state drive or on-board eMMC
Display
• Display size: 294.6 mm (11.6 inches)
• Display resolution: 1366 x 768 pixels
• Multi-touch technology (for Lenovo 300e 2nd Gen only)
Keyboard • Function keys
• Six-row keyboard
Connectors and slots
• USB-C connector/Power connector
• Two USB 3.1 connectors Gen 1 (including one Always On USB 3.1 connector
Gen 1)
• Audio connector
• HDMI connector
• MicroSD card slot
• Mini security-lock slot
• Pen slot (for selected models of Lenovo 300e 2nd Gen)
Security features
• Password
• Mini security-lock slot
• Trusted Platform Module (TPM)
Wireless features • Bluetooth
• Wireless LAN
Others
• Front camera
• World-Facing camera (for selected models of Lenovo 300e 2nd Gen)
• Microphones
• Speakers
Chapter 1 Meet your computer.7

Note: The battery capacity is the typical or average capacity as measured in a specific test environment.
Capacities measured in other environments may differ but are no lower than the rated capacity (see product
label).
Statement on USB transfer rate
Depending on many factors such as the processing capability of the host and peripheral devices, file
attributes, and other factors related to system configuration and operating environments, the actual transfer
rate using the various USB connectors on this device will vary and will be slower than the data rate listed
below for each corresponding device.
USB device Data rate (Gbit/s)
3.2 Gen 1 / 3.1 Gen 1 5
3.2 Gen 2 / 3.1 Gen 2 10
3.2 Gen 2 × 2 20
Thunderbolt 3 40
Thunderbolt 4 40
8Lenovo 100e/300e 2nd Gen User Guide
Chapter 2. Get started with your computer
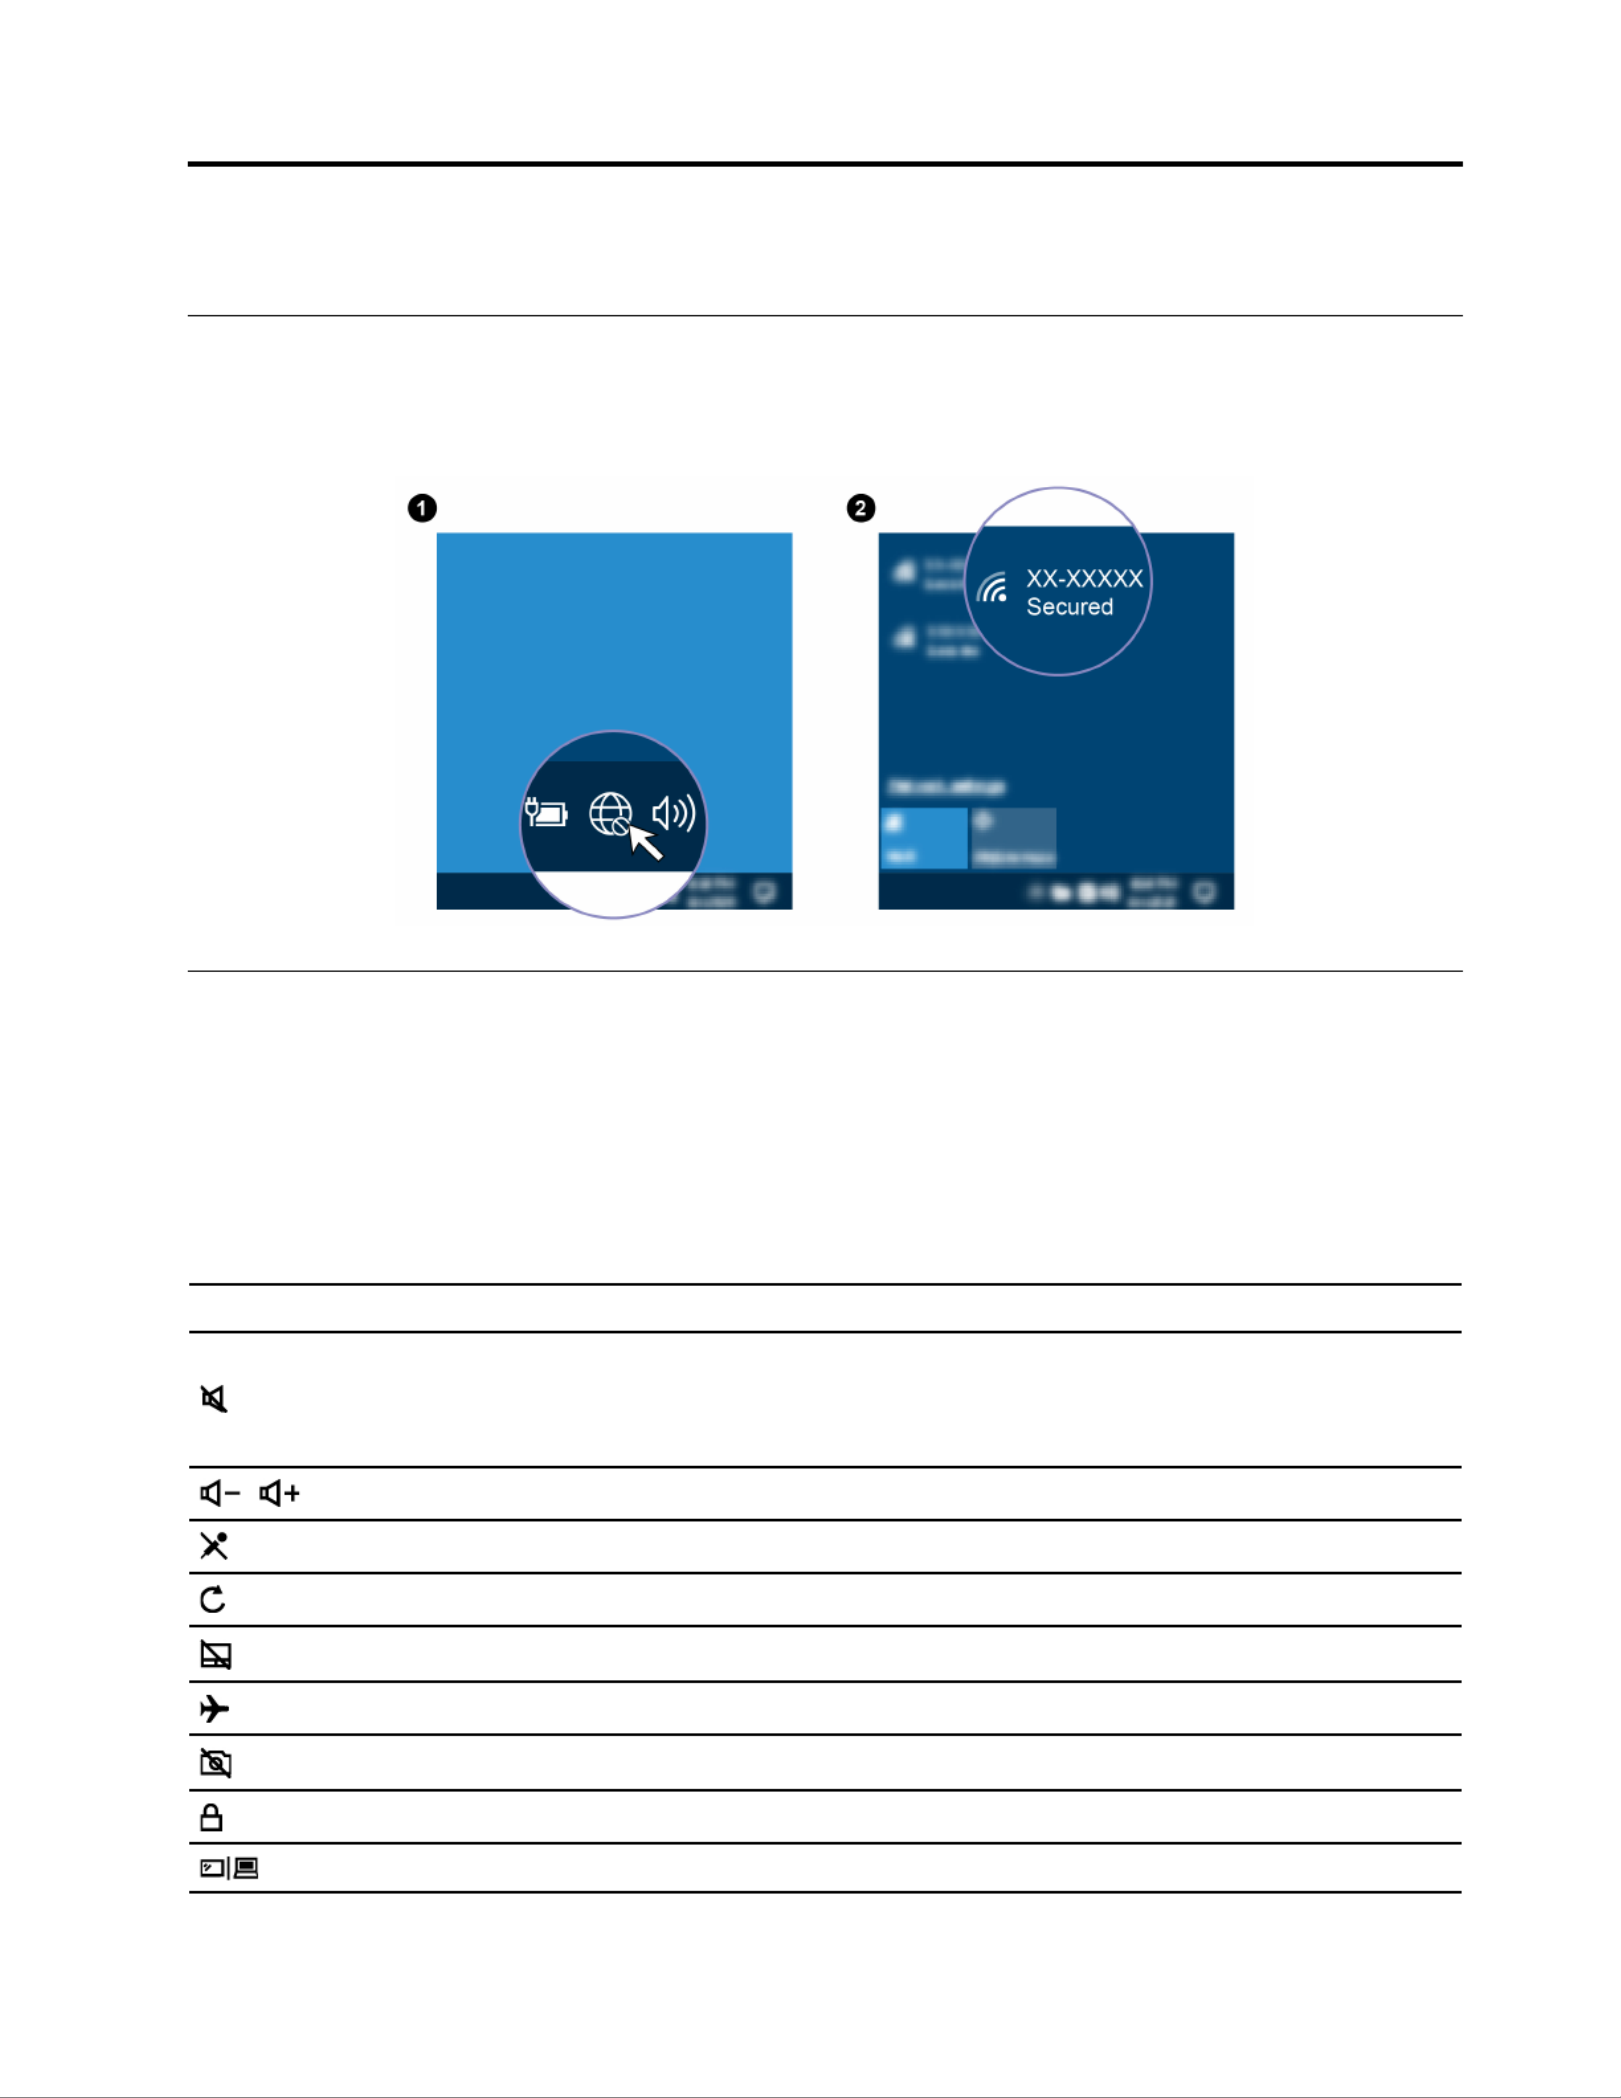
Connect to Wi-Fi networks
Click the network icon in the Windows
® notification area, and then select a network for connection. Provide
required information, if needed.
Interact with your computer
Your computer provides you various ways to navigate the screen.
Use Hotkeys
Some keys on the keyboard are printed with icons. These keys are called hotkeys and can be pressed alone
or in combination with the Fn key to access certain functions or settings quickly. The functions of hotkeys are
symbolized by the icons printed on them.
Hotkey Function
Mute / unmute the speakers.
If you mute the speakers and turn off your computer, the speakers remain muted when
you turn on your computer.
/ Decrease / increase the volume.
Mute / unmute the microphones.
Refresh the current window.
Enable / disable the touchpad.
Turn on / turn off the airplane mode.
Enable / disable the camera.
Lock the current user account.
Manage external displays.
© Copyright Lenovo 2020, 2021 9

/ Decrease / increase display brightness.
Fn + Equal the Home key.
Use the hotkey mode
Some hotkeys share keys with functions keys (F1 to F12). The hotkey mode is a UEFI BIOS setting that
changes how hotkeys (or function keys) are used.
• When the hotkey mode is enabled, press Fn together with the hotkey to use the hotkey.
• When the hotkey mode is disabled, press the hotkey directly.
10 Lenovo 100e/300e 2nd Gen User Guide
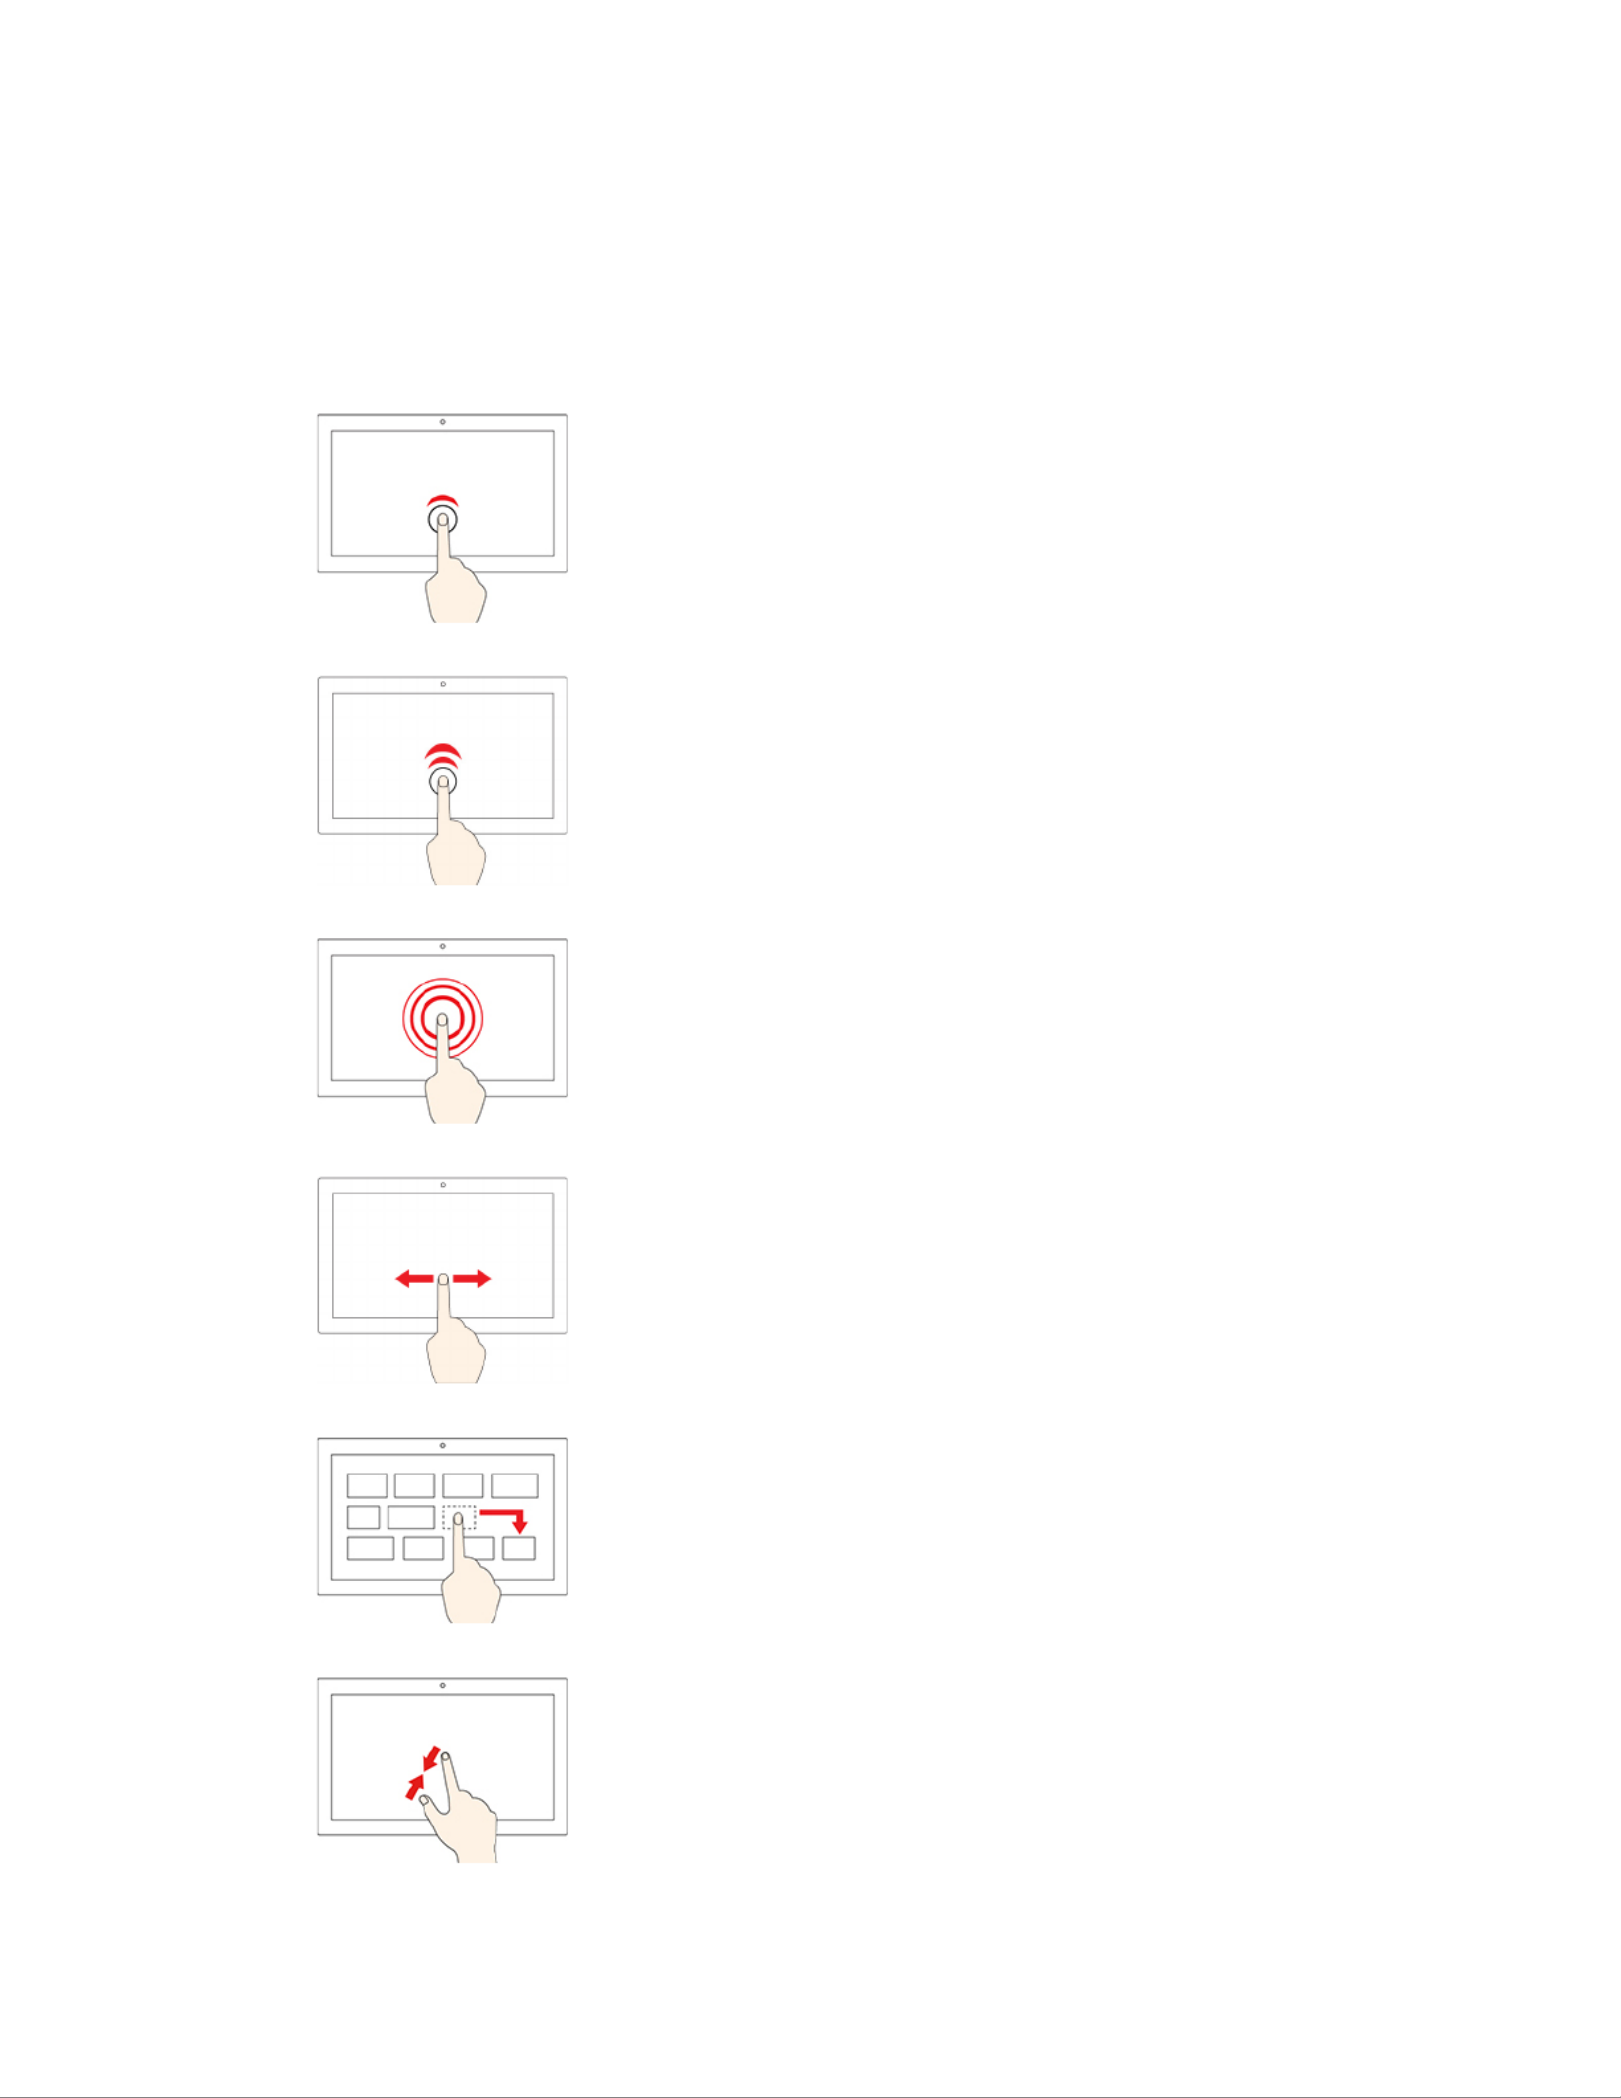
Use the multi-touch screen (for Lenovo 300e 2nd Gen only)
The display of Lenovo 300e 2nd Gen supports the multi-touch function. You can navigate the screen with
simple touch gestures.
Note: Some gestures might not be available depending on the app you use.
Tap once
• From the Start menu: Open an app or item.
• From the desktop: Select an app or item.
• In an open app: Perform an action such as Copy, Save, and
Delete, depending on the app.
Tap twice quickly
Open an app or item from the desktop.
Tap and hold
Open a shortcut menu.
Slide
Scroll through items, such as lists, pages, and photos.
Drag an item to the location you want
Move an object.
Move two fingers closer together
Zoom out.
Chapter 2 Get started with your computer.11

Move two fingers farther apart
Zoom in.
Swipe in from the right edge
Open the action center to see your notifications and quick actions.
Swipe in from the left edge
View all your open windows in task view.
• Swipe downwards shortly from the top edge (for full-screened
app or when your computer is in the tablet mode)
Show a hidden title bar.
• Swipe in from the top edge to the bottom edge (when your
computer is in the tablet mode)
Close the current app.
Tips
• Turn off the computer before cleaning the multi-touch screen.
• Use a dry, soft, and lint-free cloth or a piece of absorbent cotton to remove fingerprints or dust from the
multi-touch screen. Do not apply solvents to the cloth.
• The multi-touch screen is a glass panel covered with a plastic film. Do not apply pressure or place any
metallic object on the screen, which might damage the touch panel or cause it to malfunction.
• Do not use fingernails, gloved fingers, or inanimate objects for input on the screen.
• Regularly calibrate the accuracy of the finger input to avoid a discrepancy.
Connect to an external display
Connect your computer to a projector or a monitor to give presentations or expand your workspace.
Connect to a wired display
If your computer cannot detect the external display, right-click a blank area on the desktop and select
display settings. Then follow the on-screen instructions to detect the external display.
12 Lenovo 100e/300e 2nd Gen User Guide

Supported resolution
The following table lists the supported maximum resolution of the external display.
Connect the external display to Supported resolution
USB-C connector Up to 3840 x 2160 pixels / 60 Hz
HDMI connector Up to 3840 x 2160 pixels / 30 Hz
Connect to a wireless display
To use a wireless display, ensure that both your computer and the external display support the Miracast
®
feature.
Press + and then select a wireless display to connect with.
Set the display mode
Press or and then select a display mode of your preference.
Change display settings
1. Right-click a blank area on the desktop and select display settings.
2. Select the display that you want to configure and change display settings of your preference.
You can change the settings for both the computer display and the external display. For example, you can
define which one is the main display and which one is the secondary display. You also can change the
resolution and orientation.
Chapter 2 Get started with your computer.13

Operating modes
You computer features the following operating modes. You can switch among different modes according to
your preference.
Attention: Do not rotate the computer display with too much force, or apply too much force to the upper-
right or upper-left corner of the computer display. Otherwise the display or hinges might get damaged.
Note: The keyboard, the mouse and the touch pad are automatically disabled in the stand mode, tent mode,
and tablet mode. Use the touch screen to control your computer instead.
Notebook mode (for Lenovo 100e and 300e 2nd Gen) Stand mode (for Lenovo 300e 2nd Gen only)
Tent mode (for Lenovo 300e 2nd Gen only) Tablet mode (for Lenovo 300e 2nd Gen only)
Warning: The bottom in the notebook mode and the keyboard in the tablet mode may become hot with any
external device connected. Avoid keeping your hands, lap, or any part of the body in contact with the bottom
or the keyboard for over one minute.
14 Lenovo 100e/300e 2nd Gen User Guide

Lenovo Integrated Pen (for selected models of Lenovo 300e 2nd Gen)
For Lenovo 300e 2nd Gen, the Lenovo Integrated Pen might be shipped with some computer models.
Lenovo Integrated Pen is an electronic pen stored in the pen slot. To use the pen, slide it out of the slot.
Notes:
• Lenovo Integrated Pen is not waterproof. Keep the pen away from water and excessive moisture.
• To purchase Lenovo Integrated Pen, go to https://www.lenovo.com/accessories.
• Select models support Pencil with a conductive tip. The tip diameter should be more than 2 mm. Also, the
diameter of the contact area between the tip and screen should be more than 1.5 mm.
Use Lenovo Integrated Pen
1 Eraser button (default function)
2 Click button (default function)
Note: Default button functions might vary depending on the app you use.
You can perform the following operations with the Lenovo Integrated Pen:
• To click or make a selection, tap the display once.
• To double-click, tap twice without pausing.
• To right-click, tap the display and hold the pen there for one second. Alternatively, you can press and hold
the click button 2 and tap the display.
• To erase ink, press and hold the eraser button 1, tap the display, and drag the pen across the ink you
want to erase.
Charge Lenovo Integrated Pen
1. Ensure that your computer is on or in sleep mode.
2. Insert the pen back into the pen slot. The pen is 80% charged in about 15 seconds and 100% charged
in about five minutes.
Chapter 2 Get started with your computer.15

16 Lenovo 100e/300e 2nd Gen User Guide

Chapter 3. Explore your computer
Lock the computer
Lock your computer to a desk, table, or other fixtures through a compatible security cable lock.
Note: The slot supports cable locks that conform to the Kensington MiniSaver
® lock standards using
Cleat™ locking technology. Do not attempt to use other types of cable locks that use a rotating T-bar™
locking mechanism. You are responsible for evaluating, selecting, and implementing the locking device and
security feature. Lenovo makes no comments, judgments, or warranties about the function, quality, or
performance of the locking device and security feature. Cable locks for your product are available from
Lenovo at https://www.lenovoquickpick.com/.
Use the Vantage app
The preinstalled Vantage app is a customized one-stop solution to help you maintain your computer with
automated updates and fixes, configure hardware settings, and get personalized support.
To access the Vantage app, type Vantage in the Windows search box.
Key features
The Vantage app enables you to:
• Know the device status easily and customize device settings.
• Download and install UEFI BIOS, firmware, and driver updates to keep your computer up-to-date.
• Monitor your computer health, and secure your computer against outside threats.
• Scan your computer hardware and diagnose hardware problems.
• Look up warranty status (online).
• Access User Guide and helpful articles.
Notes:
© Copyright Lenovo 2020, 2021 17

• The available features vary depending on the computer model.
• The Vantage app makes periodic updates of the features to keep improving your experience with your
computer. The description of features might be different from that on your actual user interface.
Manage power
Use the information in this section to achieve the best balance between performance and power efficiency.
Check the battery status
Click the battery icon in the Windows notification area to check the battery status, view the current power
plan, change the power mode, and access battery settings quickly. For more details about your battery, refer
to the Vantage app.
Charge the battery
When the battery power is low, charge your battery by connecting your computer to ac power.
The battery is fully charged in about four to eight hours. The actual charging time depends on the battery
size, the physical environment, and whether you are using the computer. If the power adapter shipped with
your computer supports the rapid charge function, the battery is 100% charged in about 2 hours when the
computer is turned off.
Battery charging is also affected by its temperature. The recommended battery temperature range for
charging the battery is between 10°C (50°F) and 35°C (95°F).
Note: To maximize the life of the battery, use the battery until the charge is depleted and recharge the
battery completely before using it. Once the battery is fully charged, it must discharge to 94% or lower
before it will be allowed to recharge again.
Change the power settings
For ENERGY STAR® compliant computers, the following power plan takes effect when your computer has
been idle for a specified duration:
• Turn off the display: After 10 minutes
• Put the computer to sleep: After 30 minutes
To reset the power plan:
1. Right-click the battery status icon and select Power Options.
2. Choose or customize a power plan of your preference.
To reset the power button function:
1. Right-click the battery status icon and select Power Options ➙ Change what the power buttons do.
18 Lenovo 100e/300e 2nd Gen User Guide

2. Change the settings as you prefer.
Transfer data
Quickly share your files using the built-in Bluetooth technology among devices with the same features. You
also can insert a microSD card or smart card to transfer data.
Set up a Bluetooth connection
You can connect all types of Bluetooth-enabled devices to your computer, such as a keyboard, a mouse, a
smartphone, or speakers. To ensure successful connection, place the devices at most 10 meters (33 feet)
from the computer.
1. Type Bluetooth in the Windows search box and then press Enter.
2. Turn on Bluetooth, if it is off.
3. Select a Bluetooth device, and then follow the on-screen instructions.
Use a microSD card
You can insert a microSD card to transfer data.
Install or remove a card
Attention: Before removing the card:
1. Click the triangular icon in the Windows notification area to show hidden icons. Right-click the icon
prompting you to safely remove hardware and eject media.
2. Select the corresponding item to eject the card from the Windows operating system.
3. Press the card and remove it from your computer. Store the card safely for future use.
Chapter 3 Explore your computer.19

20 Lenovo 100e/300e 2nd Gen User Guide

Chapter 4. Configure advanced settings
UEFI BIOS setup utility
UEFI BIOS setup utility is the first program that the computer runs. When the computer turns on, UEFI BIOS
setup utility performs a self test to make sure that various devices in the computer are functioning.
Enter the UEFI BIOS setup utility
Restart the computer. When the logo screen is displayed, press F2 or Fn + F2 to enter the UEFI BIOS setup
utility.
Change the startup sequence
You might need to change the startup sequence to allow the computer to start from another device or a
network location.
1. Enter the setup utility.
2. Navigate to the Boot menu.
3. Follow the on-screen instructions to change the order of devices under Boot Priority Order.
Note: You can also change the startup sequence temporarily without opening the setup utility. To do so,
start the computer. When the logo screen is displayed, press Fn + F12.
Change the hotkey mode
1. Open the setup utility.
2. Select Configuration ➙ Hotkey Mode and press Enter.
3. Change the setting to Disabled or Enabled.
4. Select Exit ➙ Exit Saving Changes.
Enable or disable the Always On USB function
For computer models with the Always On USB connector, the always-on function can be enabled or disabled
in the setup utility.
1. Open the setup utility.
2. Select Configuration ➙ Always On USB and press Enter.
3. Change the setting to Disabled or Enabled.
4. Select Exit ➙ Exit Saving Changes.
Use passwords
This section introduces the types of passwords that you can set in the setup utility.
Password types
You can set various types of passwords in the UEFI BIOS setup utility.
Notes:
• All passwords set in the setup utility consist of alphanumeric characters only.
© Copyright Lenovo 2020, 2021 21

• If you start the setup utility using the user password, you can only change a few settings.
Password type Pre-requisite Usage
Administrator password No Use the administrator password to
enter the setup utility.
User password The administrator password must be
set.
Use the user password to enter the
setup utility.
Master hard disk password No
Use master hard disk password to
enter the setup utility or operating
system.
User hard disk password The master hard disk password must
be set.
Use the user hard disk password to
enter the setup utility or operating
system.
Set an administrator password
You can set the administrator password to prevent unauthorized access to the setup utility.
Attention: If you forget the administrator password, a Lenovo authorized service personnel cannot reset
your password. You must take your computer to a Lenovo authorized service personnel to have the system
board replaced. Proof of purchase is required and a fee will be charged for parts and service.
1. Enter the setup utility.
2. Select Security ➙ Set Administrator Password and press Enter.
3. Enter a password string that contains only letters and numbers and then press Enter.
4. Enter the password again and press Enter.
5. Select Exit ➙ Exit Saving Changes.
Next time you turn on the computer, you should enter the administrator password to enter the setup utility.
Change or remove the administrator password
Only the administrator can change or remove the administrator password.
1. Enter the setup utility.
2. Select Security ➙ Set Administrator Password and press Enter.
3. Enter the current password.
4. In the Enter New Password field, enter the new password.
5. In the Confirm New Password field, enter the new password again.
Note: If you want to remove the password, leave both fields blank, and press Enter twice.
6. Select Exit ➙ Exit Saving Changes.
If you remove the administrator password, the user password is also removed.
Set a user password
You must set the administrator password before you can set the user password. The system administrator
might need to set a user password so that other users can access the computer.
1. Enter the setup utility.
2. Select Security ➙ Set User Password and press Enter.
3. Enter a password string that contains only letters and numbers and then press Enter.
22 Lenovo 100e/300e 2nd Gen User Guide

Note: The user password should be different from the administrator password.
4. Enter the password again and press Enter.
5. Select Exit ➙ Exit Saving Changes.
Change or remove the user password
1. Enter the setup utility.
2. Select Security ➙ Set User Password and press Enter.
3. Enter the current password.
4. In the Enter New Password field, enter the new password.
5. In the Confirm New Password field, enter the new password again.
Note: If you want to remove the password, leave both fields blank, and press Enter twice.
6. Select Exit ➙ Exit Saving Changes.
Enable the power on password
If the administrator password has been set, you can enable the power on password to enforce stronger
security.
1. Enter the setup utility.
2. Select Security ➙ Power on Password and press Enter.
Note: The administrator password must be set in advance.
3. Change the setting to Enabled.
4. Select Exit ➙ Exit Saving Changes.
If the power on password is enabled, you must enter the administrator password or user password every
time you enter the setup utility.
Set a hard disk password
You can set a hard disk password in the setup utility to prevent unauthorized access to your data.
Attention: Be extremely careful when setting a hard disk password. If you forget the master hard disk
password, a Lenovo authorized service personnel cannot reset your password or recover data from the hard
disk. You must take your computer to a Lenovo authorized service personnel to have the hard disk drive
replaced. Proof of purchase is required and a fee will be charged for parts and service.
Notes:
• If you start the setup utility using the user password, you cannot set the hard disk password.
• The master hard disk password and user hard disk password must be set at the same time.
1. Enter the setup utility.
2. Select Security ➙ Set Hard Disk Password and press Enter.
3. Follow the on-screen instructions to set both the master hard disk password and user hard disk
password.
4. Select Exit ➙ Exit Saving Changes.
If the hard disk password is set, you must enter the password to enter the setup utility or the operating
system.
Chapter 4 Configure advanced settings.23

Change or remove the hard disk password
1. Enter the setup utility.
2. Select .Security
3. To change or remove the hard disk password, do one of the following:
• To change or remove the master hard disk password, select Change Master Password and press
Enter.
Notes:
– If you remove the master hard disk password, the user hard disk password is also removed.
– The user hard disk password cannot be removed separately.
• To change the user hard disk password, select Change User Password and press Enter.
4. Select Exit ➙ Exit Saving Changes.
Use firewalls and antivirus programs
Your computer might be preinstalled with a firewall program. The firewall protects against computer Internet
security threats, unauthorized access, intrusions, and Internet attacks. It also protects your privacy.
A full version of the antivirus program is provided with a free 30-day subscription. After 30 days, you must
renew the license to continue receiving the antivirus program updates.
For more information, see the help system of the program.
24 Lenovo 100e/300e 2nd Gen User Guide

Chapter 5. Help and support
Frequently asked questions
How do I open the Control Panel? Type Control Panel in the Windows search box and then press Enter.
How should I turn off my
computer? Open the Start menu and select Power ➙ Shut down.
How do I partition my storage
drive? Refer to https://support.lenovo.com/solutions/ht503851.
What should I do if my computer
stops responding?
Press and hold the power button until the computer turns off. Then restart the
computer.
What should I do if I spill liquid on
the computer?
1. Carefully unplug the ac power adapter and turn off the computer immediately.
The more quickly you stop the current from passing through the computer the
more likely you will reduce damage from short circuits.
Attention: Although you might lose some data or work by turning off the
computer immediately, leaving the computer on might make your computer
unusable.
2. Wait until you are certain that all the liquid is dry before turning on your
computer.
CAUTION:
Do not try to drain out the liquid by turning over the computer. If your
computer has keyboard drainage holes on the bottom, the liquid will be
drained out through the holes.
Where can I get the latest device
drivers and UEFI BIOS?
• The Vantage app
• Lenovo Support Web site at https://support.lenovo.com
How do I disinfect my computer?
1. Squeeze out excess liquid from wipe or disinfecting cloth before using.
Recommended wipes are hydrogen peroxide wipes and alcohol based wipes.
Do not use wipes containing sodium hypochlorite (bleach).
2. Gently wipe the computer thoroughly, being careful to ensure no liquid drips
into the computer. Do not wipe on connector pins.
3. After disinfecting, follow the cleaning procedure from the wipe supplier to
minimize chemical buildup of disinfectant residue.
4. Always allow the computer to completely dry prior to any use.
© Copyright Lenovo 2020, 2021 25

Self-help resources
Use the following self-help resources to learn more about the computer and troubleshoot problems.
Resources How to access?
Troubleshooting and FAQ • https://www.lenovo.com/tips
• https://forums.lenovo.com
Accessibility information https://www.lenovo.com/accessibility
Reset or restore Windows
• Use Lenovo recovery options.
1. Go to https://support.lenovo.com/
HowToCreateLenovoRecovery.
2. Follow the on-screen instructions.
• Use Windows recovery options.
1. Go to https://pcsupport.lenovo.com.
2. Detect your computer or manually select your
computer model.
3. Click Diagnostics ➙ Operating System
Diagnostics and then follow the on-screen
instructions.
Use the Vantage app to:
• Configure device settings.
• Download and install UEFI BIOS, drivers, and firmware
updates.
• Secure your computer from outside threats.
• Diagnose hardware problems.
• Check the computer warranty status.
• Access User Guide and helpful articles.
Type Vantage in the Windows search box and then press
Enter.
Product documentation:
• Safety and Warranty Guide
• Generic Safety and Compliance Notices
• Setup Guide
• This User Guide
• Regulatory Notice
Go to https://pcsupport.lenovo.com. Then, follow the on-
screen instructions to filter out the documentation you
want.
26 Lenovo 100e/300e 2nd Gen User Guide

Resources How to access?
Lenovo Support Web site with the latest support
information of the following:
• Drivers and software
• Diagnostic solutions
• Product and service warranty
• Product and parts details
• Knowledge base and frequently asked questions
https://pcsupport.lenovo.com
Windows help information
• Open the Start menu and click Get Help or Tips.
• Use Windows Search or the Cortana® personal
assistant.
• Microsoft support Web site: https://
support.microsoft.com
Windows label
Your computer might have a Windows Genuine Microsoft label affixed to its cover depending on the
following factors:
• Your geographic location
• Edition of Windows that is preinstalled
Go to https://www.microsoft.com/en-us/howtotell/Hardware.aspx for illustrations of the various types of
Genuine Microsoft labels.
• In the People’s Republic of China, the Genuine Microsoft label is required on all computer models
preinstalled with any edition of the Windows operating system.
• In other countries and regions, the Genuine Microsoft label is required only on computer models licensed
for Windows Pro editions.
The absence of a Genuine Microsoft label does not indicate that the preinstalled Windows version is not
genuine. For details on how to tell whether your preinstalled Windows product is genuine, refer to the
information provided by Microsoft at https://www.microsoft.com/en-us/howtotell/default.aspx.
There are no external, visual indicators of the Product ID or Windows version for which the computer is
licensed. Instead, the Product ID is recorded in the computer firmware. Whenever a Windows product is
installed, the installation program checks the computer firmware for a valid, matching Product ID to complete
the activation.
In some cases, an earlier Windows version might be preinstalled under the terms of the Windows Pro edition
license downgrade rights.
What are CRUs
Customer Replaceable Units (CRUs) are parts that can be upgraded or replaced by the customer. The
computers contain the following types of CRUs:
• Self-service CRUs: Refer to parts that can be installed or replaced easily by customer themselves or by
trained service technicians at an additional cost.
Chapter 5 Help and support.27

• Optional-service CRUs: Refer to parts that can be installed or replaced by customers with a greater skill
level. Trained service technicians can also provide service to install or replace the parts under the type of
warranty designated for the customer’s machine.
If you intend on installing a CRU, Lenovo will ship the CRU to you. CRU information and replacement
instructions are shipped with your product and are available from Lenovo at any time upon request. You
might be required to return the defective part that is replaced by the CRU. When return is required: (1) return
instructions, a prepaid shipping label, and a container will be included with the replacement CRU; and (2) you
might be charged for the replacement CRU if Lenovo does not receive the defective CRU within thirty (30)
days of your receipt of the replacement CRU. For full details, see the Lenovo Limited Warranty
documentation at https://www.lenovo.com/warranty/llw_02.
Refer to the following CRU list for your computer.
Self-service CRUs
• ac power adapter
• Lenovo Integrated Pen*
• Power cord
* for selected models
Note: Replacement of any parts not listed above, including the built-in rechargeable battery, must be done
by a Lenovo-authorized repair facility or technician. Go to https://support.lenovo.com/partnerlocation for more
information.
Call Lenovo
If you have tried to correct the problem yourself and still need help, you can call Lenovo Customer Support
Center.
Before you contact Lenovo
Prepare the following before you contact Lenovo:
1. Record the problem symptoms and details:
• What is the problem? Is it continuous or intermittent?
• Any error message or error code?
• What operating system are you using? Which version?
• Which software applications were running at the time of the problem?
• Can the problem be reproduced? If so, how?
2. Record the system information:
• Product name
• Machine type and serial number
28 Lenovo 100e/300e 2nd Gen User Guide

The following illustration shows where to find the machine type and serial number of your computer.
Lenovo Customer Support Center
During the warranty period, you can call Lenovo Customer Support Center for help.
Telephone numbers
For a list of the Lenovo Support phone numbers for your country or region, go to
https://
pcsupport.lenovo.com/supportphonelist for the latest phone numbers.
Note: Phone numbers are subject to change without notice. If the number for your country or region is not
provided, contact your Lenovo reseller or Lenovo marketing representative.
Services available during the warranty period
• Problem determination - Trained personnel are available to assist you with determining if you have a
hardware problem and deciding what action is necessary to fix the problem.
• Lenovo hardware repair - If the problem is determined to be caused by Lenovo hardware under warranty,
trained service personnel are available to provide the applicable level of service.
• Engineering change management - Occasionally, there might be changes that are required after a product
has been sold. Lenovo or your reseller, if authorized by Lenovo, will make selected Engineering Changes
(ECs) that apply to your hardware available.
Services not covered
• Replacement or use of parts not manufactured for or by Lenovo or nonwarranted parts
• Identification of software problem sources
• Configuration of UEFI BIOS as part of an installation or upgrade
• Changes, modifications, or upgrades to device drivers
• Installation and maintenance of network operating systems (NOS)
• Installation and maintenance of programs
For the terms and conditions of the Lenovo Limited Warranty that apply to your Lenovo hardware product,
go to:
• https://www.lenovo.com/warranty/llw_02
• https://pcsupport.lenovo.com/warrantylookup
Chapter 5 Help and support.29

30 Lenovo 100e/300e 2nd Gen User Guide
Appendix A. Important safety information
Safety notices
This information can help you safely use your computer. Follow and retain all information included with your
computer. The information in this document does not alter the terms of your purchase agreement or the
Limited Warranty. For more information, see Safety and Warranty Guide that comes with your computer.
Customer safety is important. Our products are developed to be safe and effective. However, personal
computers are electronic devices. Power cords, power adapters, and other features can create potential
safety risks that can result in physical injury or property damage, especially if misused. To reduce these risks,
follow the instructions included with your product, observe all warnings on the product and in the operating
instructions, and review the information included in this document carefully. By carefully following the
information contained in this document and provided with your product, you can help protect yourself from
hazards and create a safer computer work environment.
Note: This information includes references to power adapters and batteries. In addition, some products
(such as speakers and monitors) ship with external power adapters. If you have such a product, this
information applies to your product. In addition, computer products contain a coin-sized internal battery that
provides power to the system clock even when the computer is unplugged, so the battery safety information
applies to all computer products.
Important information about using your computer
Ensure that you follow the important tips given here to get the most use and enjoyment out of your computer.
Failure to do so might lead to discomfort or injury, or cause the computer to fail.
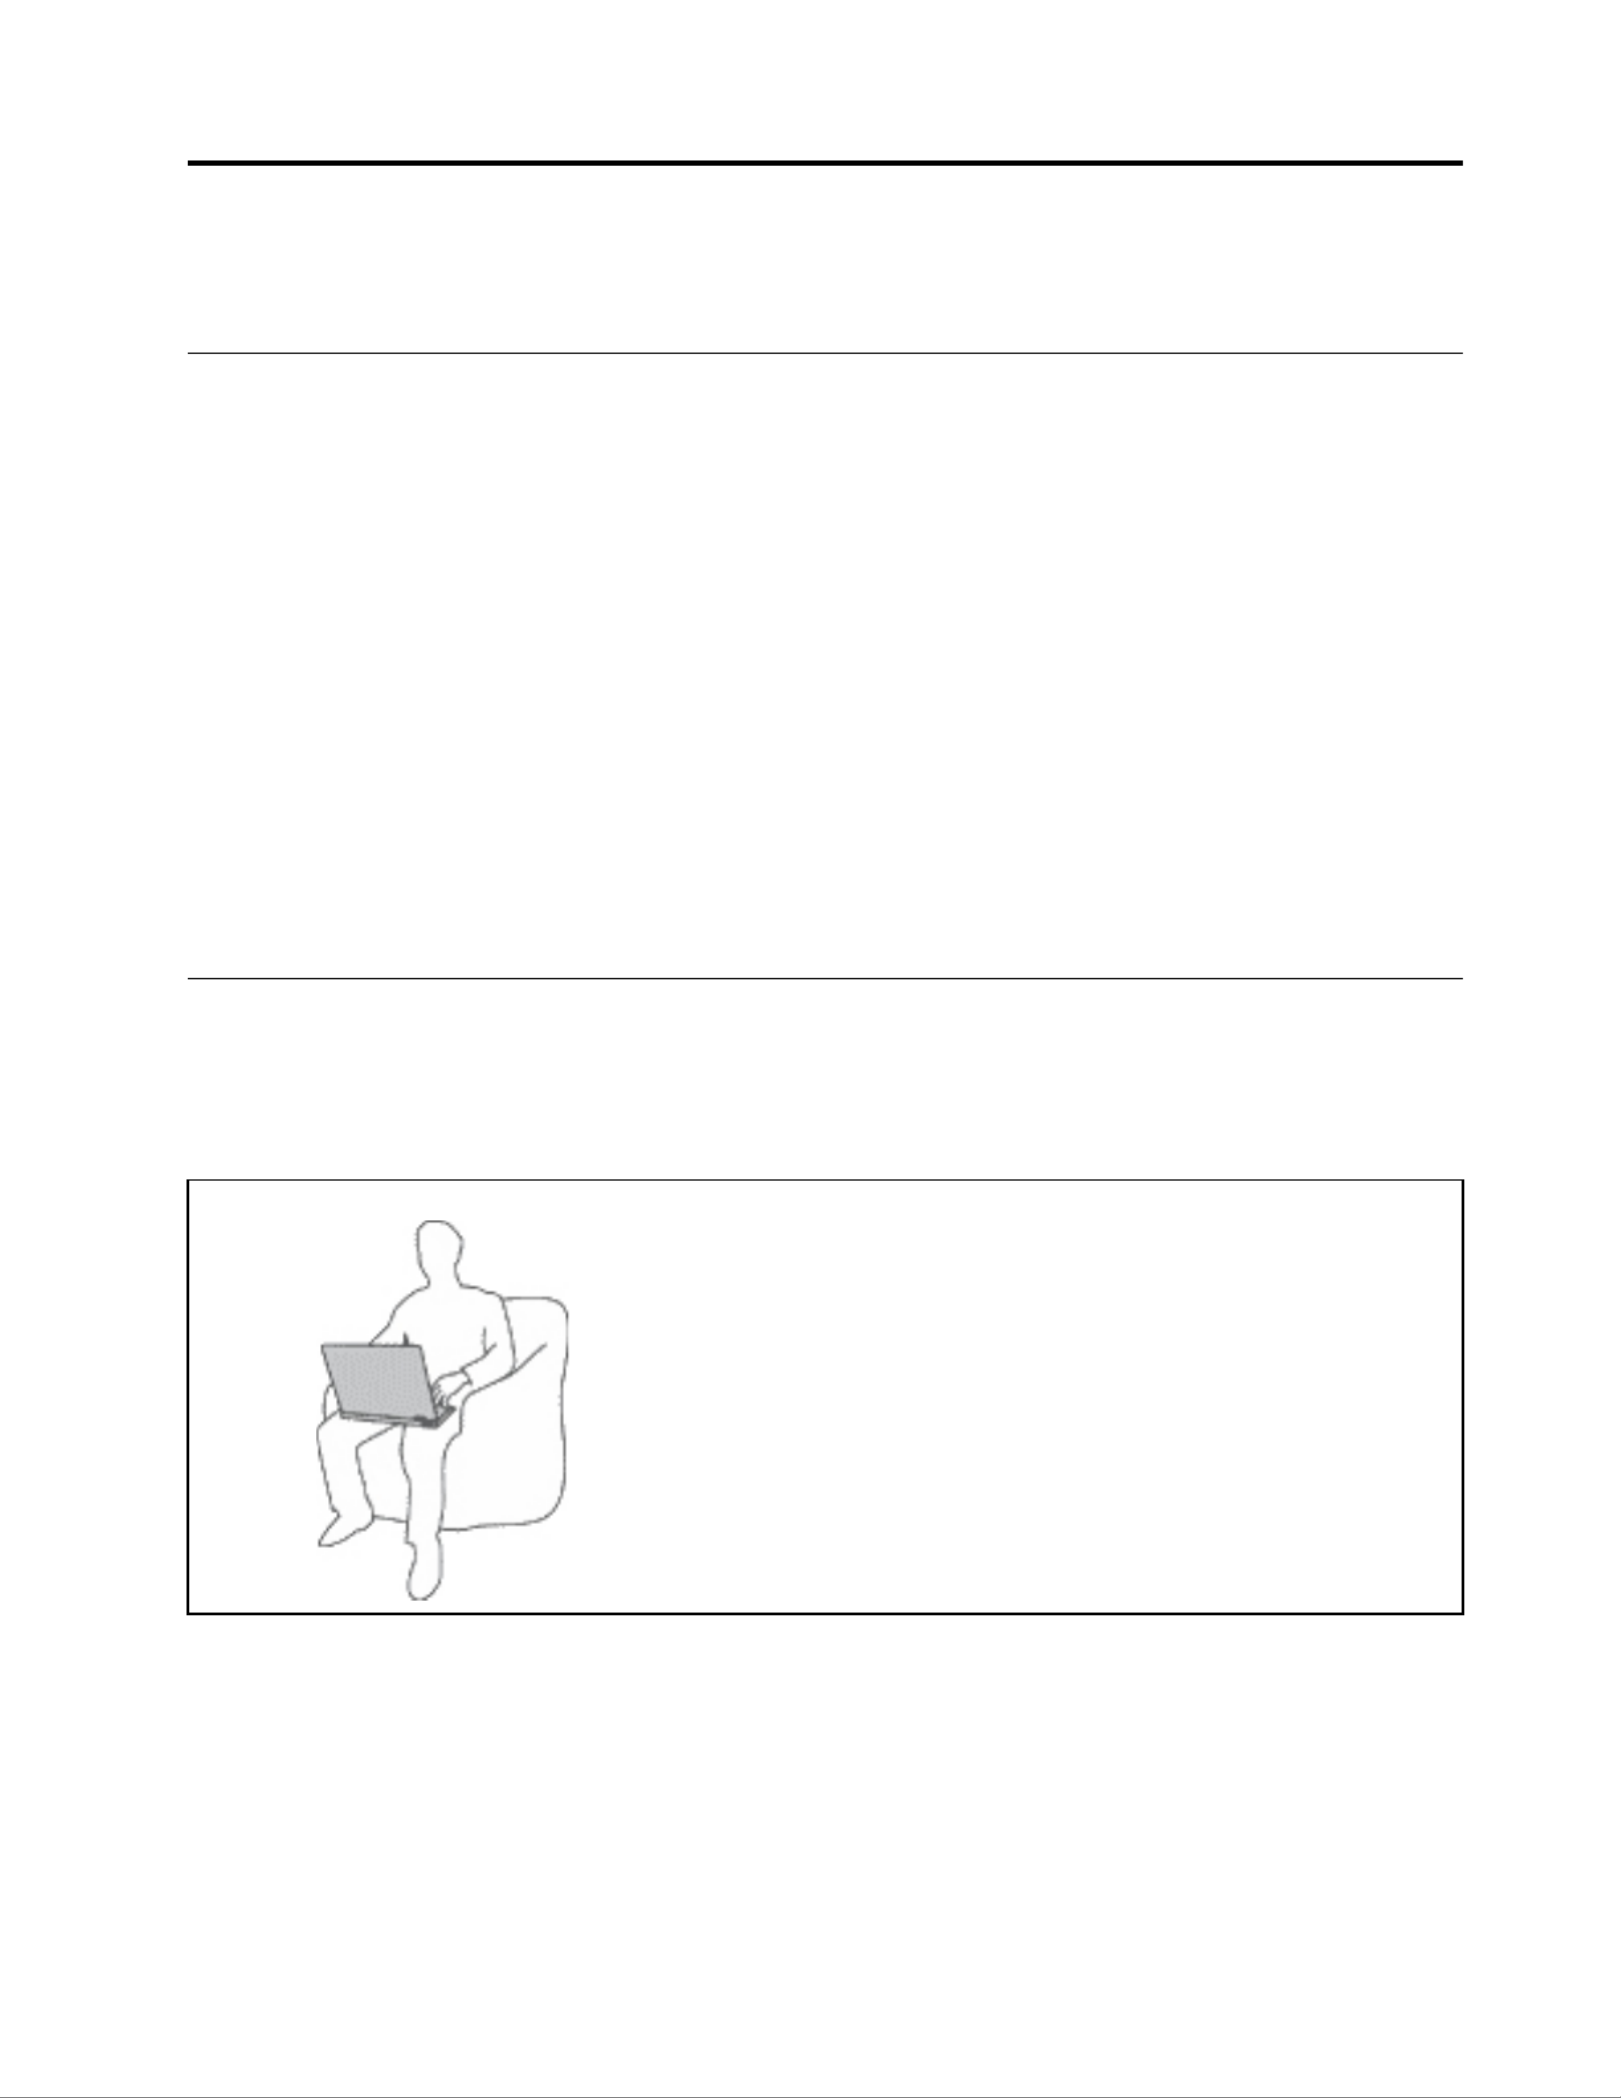
Protect yourself from the heat that your computer generates.
When your computer is turned on or the battery is charging, the base,
the palm rest, and some other parts may become hot. The
temperature they reach depends on the amount of system activity and
the level of charge in the battery.
Extended contact with your body, even through clothing, could cause
discomfort or even a skin burn.
• Avoid keeping your hands, your lap, or any other part of your body
in contact with a hot section of the computer for any extended
time.
• Periodically take your hands away from the keyboard by lifting your
hands from the palm rest.
© Copyright Lenovo 2020, 2021 31
Specyfikacje produktu
| Marka: | Lenovo |
| Kategoria: | laptop |
| Model: | Chromebook 100e G2 |
Potrzebujesz pomocy?
Jeśli potrzebujesz pomocy z Lenovo Chromebook 100e G2, zadaj pytanie poniżej, a inni użytkownicy Ci odpowiedzą
Instrukcje laptop Lenovo

28 Marca 2025
26 Marca 2025
23 Lutego 2025
7 Lutego 2025
7 Lutego 2025
31 Stycznia 2025
7 Grudnia 2024
12 Października 2024
8 Października 2024
8 Października 2024
Instrukcje laptop
- laptop Sony
- laptop Samsung
- laptop Fellowes
- laptop LG
- laptop Xiaomi
- laptop Huawei
- laptop Gigabyte
- laptop Acer
- laptop Fujitsu
- laptop Panasonic
- laptop Viewsonic
- laptop Asus
- laptop Medion
- laptop MSI
- laptop Toshiba
- laptop Haier
- laptop HP
- laptop Prixton
- laptop Hyundai
- laptop Honor
- laptop Tripp Lite
- laptop Zebra
- laptop Dell
- laptop Schneider
- laptop Thomson
- laptop Pyle
- laptop Apple
- laptop Razer
- laptop ADATA
- laptop GoClever
- laptop SPC
- laptop NEC
- laptop Oregon Scientific
- laptop Jay-Tech
- laptop Microsoft
- laptop ECS
- laptop XPG
- laptop Denver
- laptop Lexibook
- laptop Micromax
- laptop Odys
- laptop TechBite
- laptop TrekStor
- laptop Alienware
- laptop Airis
- laptop Emachines
- laptop Hähnel
- laptop Sylvania
- laptop Coby
- laptop Evga
- laptop Naxa
- laptop Ricatech
- laptop Mpman
- laptop Vizio
- laptop Targa
- laptop Peaq
- laptop Ematic
- laptop Hannspree
- laptop Inovia
- laptop Ergotron
- laptop Ibm
- laptop Atdec
- laptop Packard Bell
- laptop Compaq
- laptop SIIG
- laptop Hercules
- laptop Kogan
- laptop Getac
- laptop Vulcan
- laptop System76
- laptop General Dynamics Itronix
- laptop CTL
- laptop Everex
- laptop Olidata
- laptop Dynabook
- laptop Hamilton Buhl
- laptop AORUS
- laptop Humanscale
- laptop Aplic
- laptop Schenker
Najnowsze instrukcje dla laptop

3 Kwietnia 2025

2 Kwietnia 2025

28 Marca 2025
13 Marca 2025
7 Marca 2025

4 Marca 2025
1 Marca 2025
26 Lutego 2025
23 Lutego 2025
22 Lutego 2025